#sewists of tumblr
Text
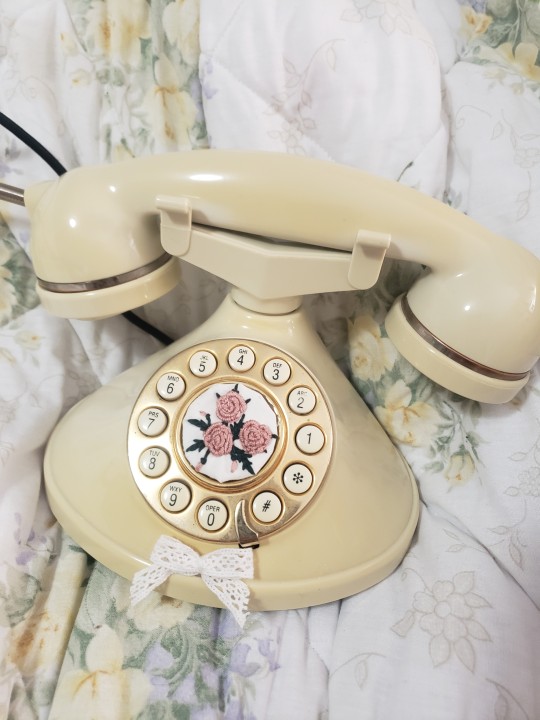

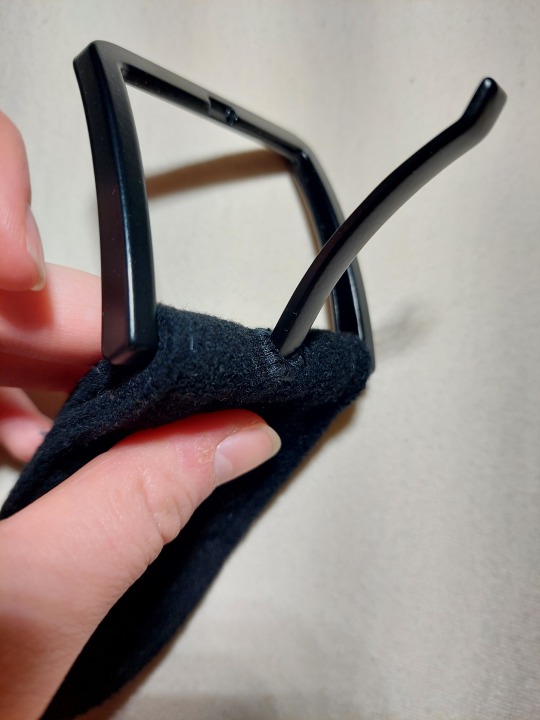
Small project. Embroidered a patch to cover the missing logo plate on this old phone.
#crafts#cottagecore#crafting#handmade#artists on tumblr#cottagecore aesthetic#sewing#sewists of tumblr#hand embroidery#embroidery#hand embroidered#embroidered#sewing crafts#sewing project#conair#conairphone#vintage#upcycling#coquette#springtime#roses#bullion roses#flowers#vintage phone
313 notes
·
View notes
Text
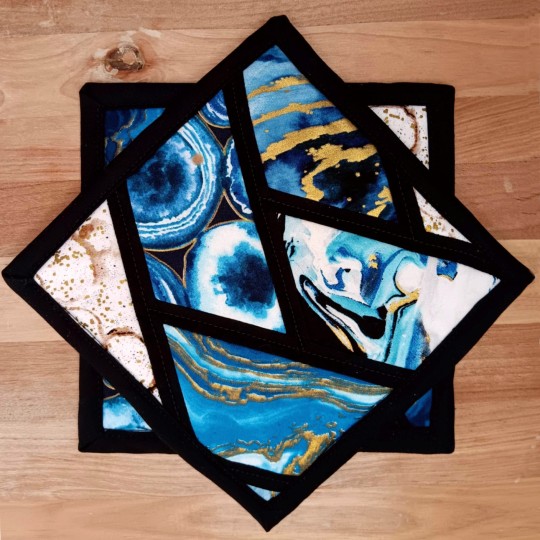
[ID. Two quilted potholders laid one on top of the other. The potholders are made with a "braided" half-hexagon pattern, each panel a different blue, gold, black, and white print with a swirled of geode-like appearance. Black sashing runs between the panels and the potholders are bound with black as well. End ID.]
On sale now! These quilted potholders are both stylish and functional. 100 percent cotton fabrics make the top and back sturdy, while an insulated batting layer keeps your hands cool even if the kitchen gets hot!
🔗in the next reblog.
#small business#for sale#quilt#quilting#quilted craft#potholder#cooking#baking#quilters of tumblr#sewing#sewists of tumblr
129 notes
·
View notes
Text
This graffiti-style Batman fabric is one of my favorites, so of course, it’s a fast seller! If you’d like to get one, check out my Etsy store NerdyCreationsStudio!
#batman#batman pillow#the joker#joker#the joker pillow#joker pillow#dc comics#dc comics pillow#dc#dc pillow#etsy#etsy seller#etsy shop#artists of tumblr#artists support artists#artists supporting artists#sewing#sewists of tumblr#sewingblr#sewist#support small business#support etsy sellers#support etsy shops#pillow#fandom pillow#decorative pillow#nerdy creations studio#batfam#batjokes
29 notes
·
View notes
Text

bird patch test/experiment w my sewing machine. made w fabric scraps left over from a quilting project
#artists on tumblr#my art#cute art#crafting#crafts#my crafts#sewing#sewists of tumblr#crafters of tumblr#handsewn#embroidery#diy#diy fashion#solarpunk
28 notes
·
View notes
Text
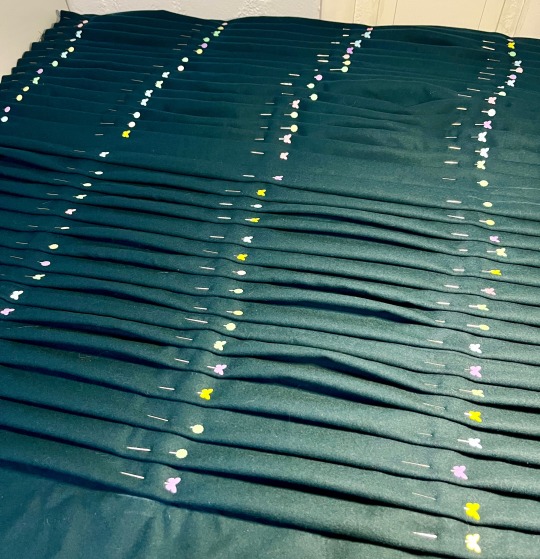
Thought I would try to get through some sewing block issues by doing a simple project and decided to make a long pleated wool skirt. I wouldn’t even need a pattern! And I even had this great spruce green wool twill fabric I got for $20 at a thrift store!
Of course when I started I did not realize that I should hand baste all 31 pleats… 😭 It is a simple project but NOT a fast one.
#sewists of tumblr#sewing wip#sewing#sewing project#homemade clothes#homemade fashion#diy sewing#sewist#sewblr
20 notes
·
View notes
Text


I have so many vintage patterns I can’t remember where I got this one. My cousin gave me a ton, but I’ve also been collecting them over the years. It’s a 1940s mail order one sent out by Hoard’s Dairyman. Other mail order vendors included Anne Adams and Marian Martin.
I was hoping the pattern would be one of the tops or the slip set, but it turns out…
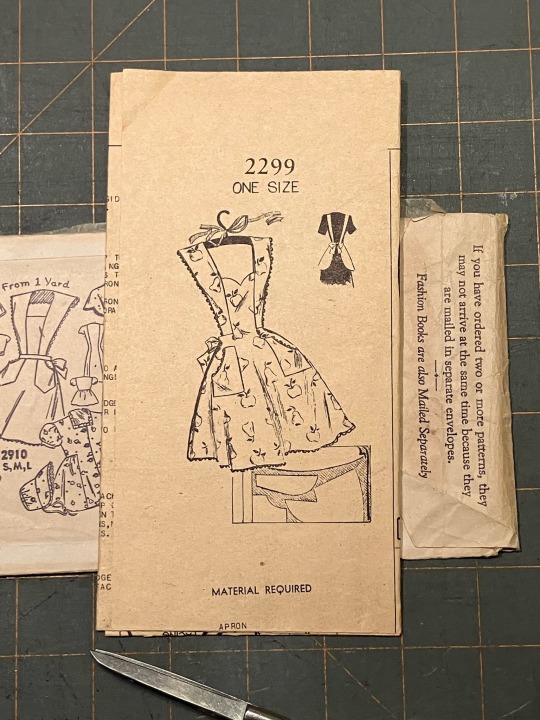
…it’s a really cute apron. that’s not even on the back. I’ve been trying to do some surface pattern designing, and I thought it would be neat to make a “cut and sew” design. But what do I put on it? Apples and pears like the drawing? Cowgirls to match my kitchen? Flowers with a matching tea towel? This is the hardest part of surface design - besides the actual drawing, arranging stuff, and making repeats that don’t make weird patterns themselves.
#vintage sewing#vintage pattern#inspiration#sewing#sewists of tumblr#sewing patterns#sewblr#surface pattern design#apron#mail order patterns#did i add enough tags?#i don’t actually have a cowgirl themed kitchen#it’s more aspirationally cowgirl-themed
9 notes
·
View notes
Text
Does anyone have any favorite newbie-friendly quilting websites or YouTube channels?
This is me right now trying to get my corners to match.

6 notes
·
View notes
Text
Question to all the knitters and maybe the sewists
I'm knitting a circle skirt right now and I'm not sure about the hem and the waist band yet
It's in stockinette stitch so it will curl. I thought about doing some surface crochet to embellish it, but I don't know if that will actually help with the curling. Someone having any experience with it?
Or I will do some seed stitch rows for the hem?
For the waist band: the skirt is gonna have an elastic band and since I don't want the thickness of a fold over I'm gonna just sew the elastic to the knit. And then maybe sew some stretchy fabric on to cover it? I'm not sure about that though
Has anyone any ideas or can give me some tips?
#knitting#handknit#skirt#sewing#knitters of tumblr#knitters#knittlr#handcrafts#knit skirt#help#sewists#sewists of tumblr#help me#please
7 notes
·
View notes
Text
I'm working on practicing french seams and this feels SO WRONG.

2 notes
·
View notes
Text
First sewing project ✅
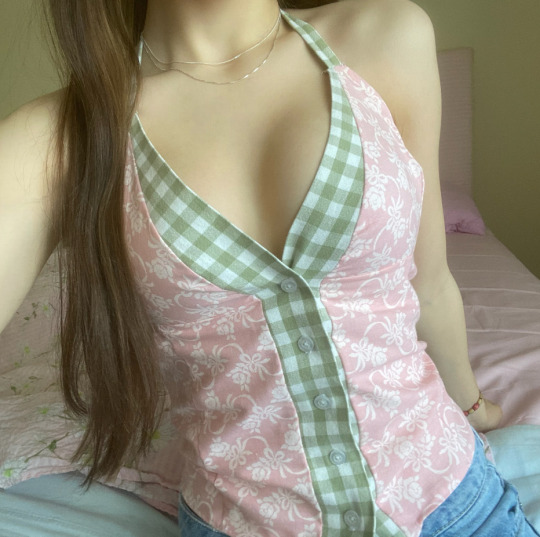
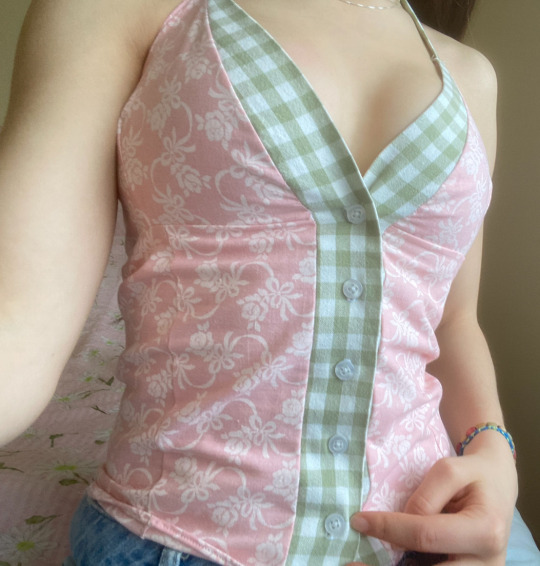

It’s a top!!! Pretty cute right? No!😡
The problem with it is that it’s not made out of clothing fabrics so it doesn’t fit very well and it turned out veryy revealing sadly. I made the halter neck too long. Oh well I’ve gotten a lot of experience from this and it’s a good first try for not having a pattern to follow. 🪡 🎀 🧵 🪡
(Also look at me doing the little coquette clothing haul scrunch on the sides of the top lmao😭)


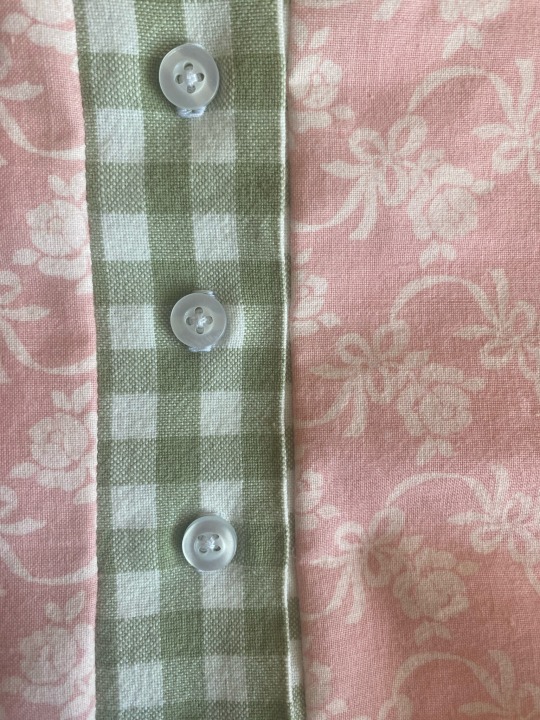
During this project I’ve learned how to sew buttonholes!!!!!! lol I always misread that word. When you sew buttonholes you use a special presserfoot. The picture in the middle are practice buttonholes. 🪡💕
That’s all!!! I’m hoping to actually find some sewing patterns soon as this was a bit of a struggle but other than that I did alright!!!😊
Also ignore how deathly pale I am!!!! Geez lol😅
I LOVE YOU💕
#sew#sewblr#sewing clothes#recycling#coquette#coquette aesthetic#girly girl#cute clothes#cute top#sewing#sewist#clothing haul#girlblogging#girly blog#becoming the best version of yourself#becoming that girl#pink coquette#pinkcore#y2k aesthetic#y2kcore#art#artists on tumblr#dream girl#girlblog#girly fashion#fashion#girly stuff#kawaii#diy sewing#pale girl
128 notes
·
View notes
Text
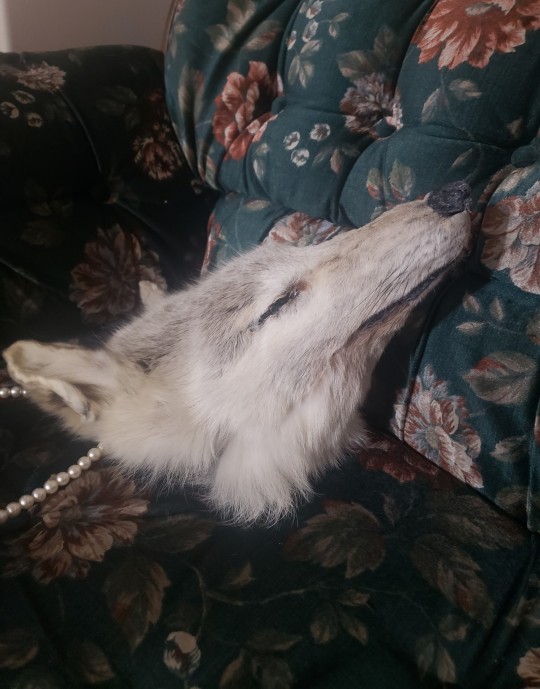

White wolf taxidermy purse.
The head is mounted but hollow, with a closure of fabric on the back of the head. I didn't know what I was going to do with this wolf head pelt for a while, but this is perfect because I will get to take this wolf with me when I go out. The strap is borrowed from another purse of mine -- I will make or acquire a more suitable one eventually.
#taxidermy wolf#taxidermy art#taxidermy#taxidermist#taxidermy canine#taxidermy mount#wolf#white wolf#silver wolf#vulture culture art#vulture culture#crafts#crafting#handmade#artists on tumblr#sewing#sewists of tumblr#sewing project#purse#fashion#oddities and curiosities#oddities#dark academia#dark cottagecore#forestcore#naturecore#taxidermists
250 notes
·
View notes
Text
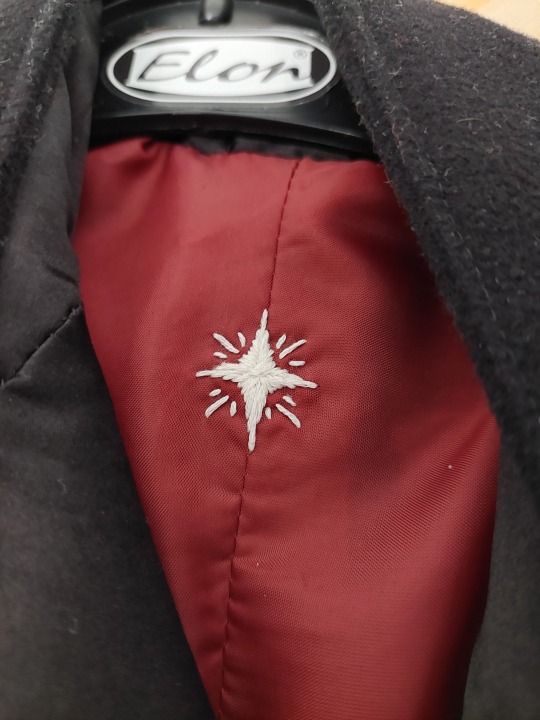
Bit late to share my Nanny Astoreth cosplay, but here we go! More info under the cut.
To all the folks who attended the Talent show and/or submitted: loved seing your creations! Can't wait for a next year!❤
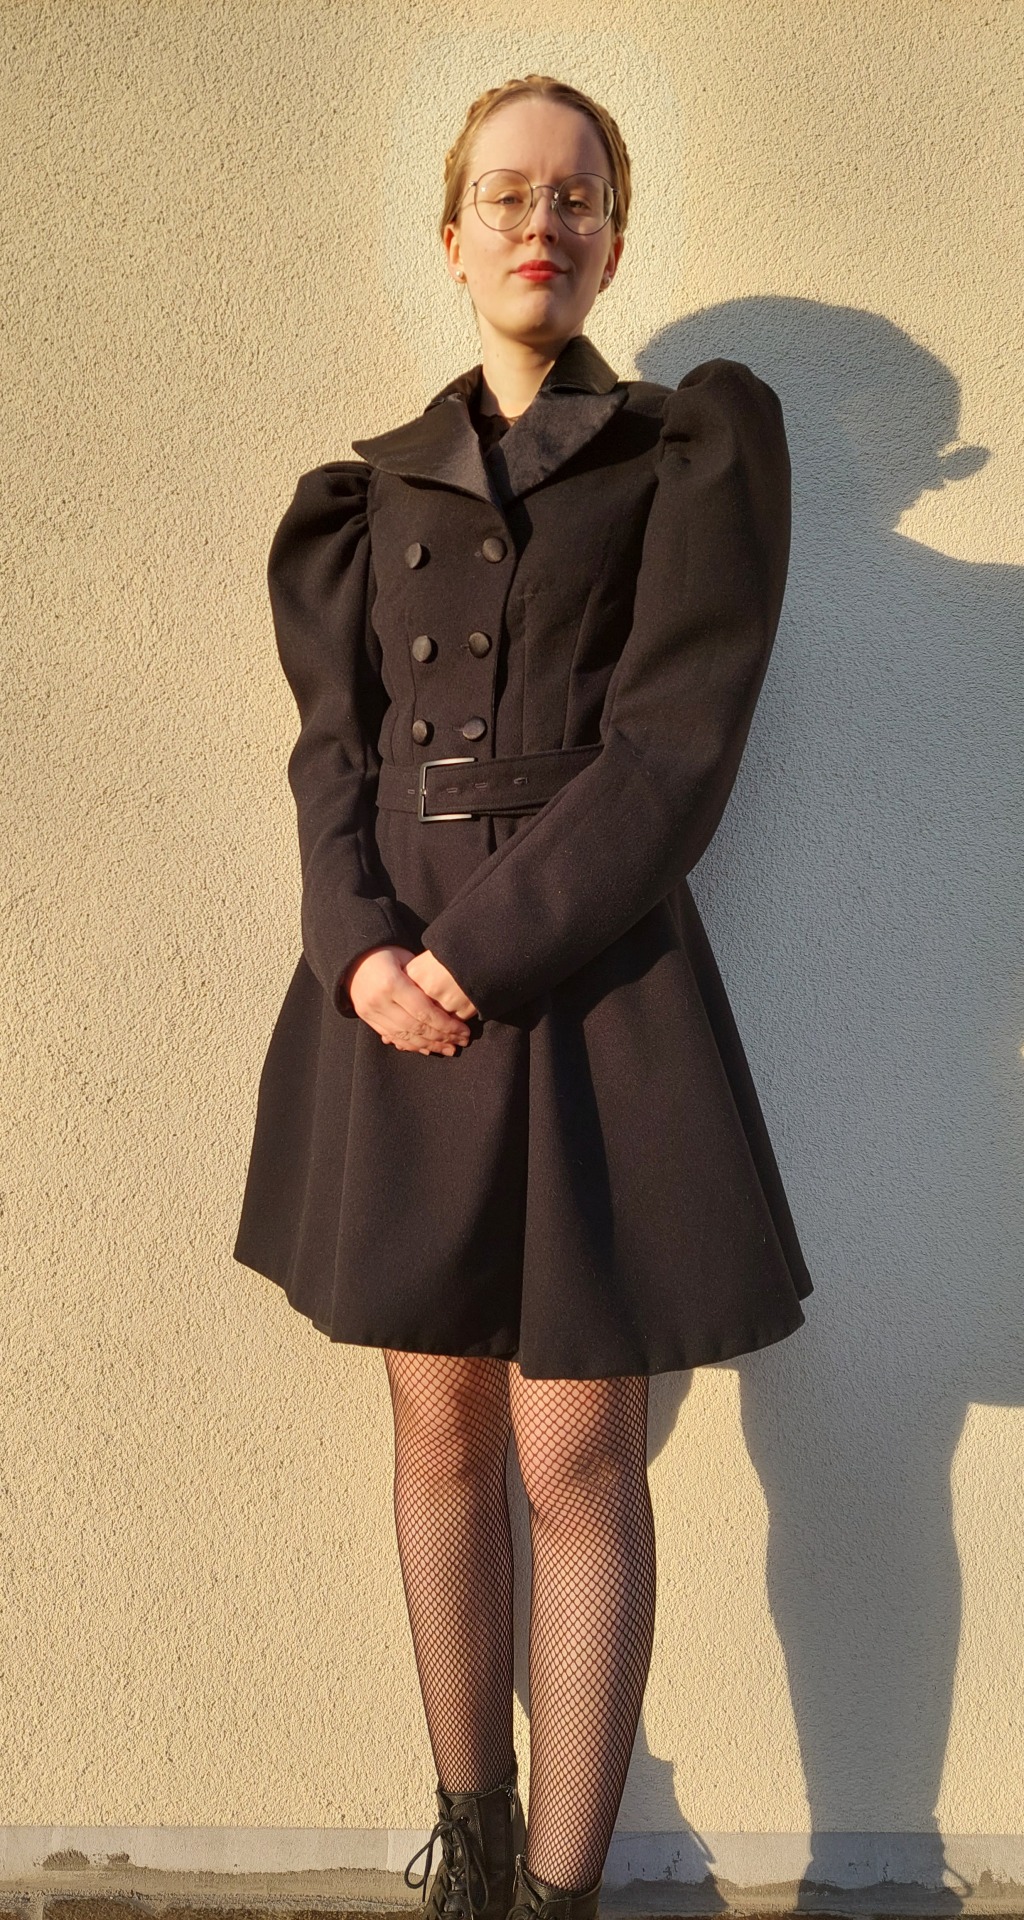


The main part of the cosplay- the coat, was made by me. From black wool, satin and burgundy nylon lining. I sewed by machine and by hand. The pattern is roughly 1890s. I wanted to make a coat that is also wearable for a normal day, not only a cosplay. (It will have it's premiere in about a week when I go to see very good production of Hamlet in the theatre.)
I always wanted to have a coat like this, so I added a little Nanny Astoreth magic to the mix and made one of my dreams come true.
Edit: I was asked about some sewing info, so there you go! Warning: I'm not a seamstress, I start and complete my sewing projects only by the inaffable audacity I posses, usually by the method of trial and error. So if you're a seamstress, please don't execute me or burn me at the stake for this, please.
The pattern is from Black Snail Patterns, it's their Victorain 1890s coat. I made few alterations: I combined the two patterns you get (with the skirt or peplum). I picked sleeves from the peplum variation but kept the skirt. (More about the skirt later.)
I made no mock up. That's it, you can crucify me. I just went for it and hoped for the best. Probably don't do that.
This was my "first" in many ways: first time using pattern with included seam allowance, first time working with interfacing, first time doing an overcoat. There were some easy part and some hard ones. I won't go over the whole process, just share a few tips I found helpfull.
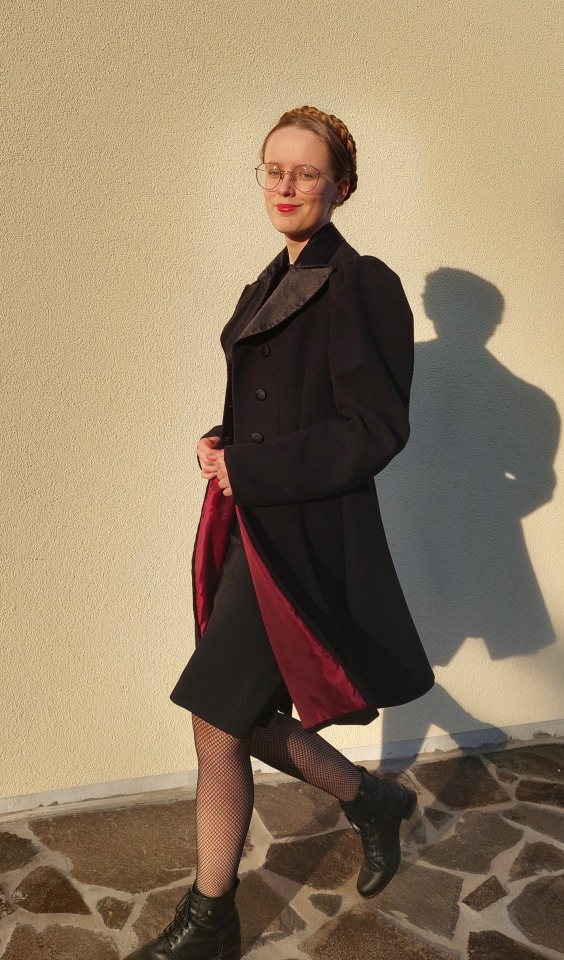
Here's the whole coat with the inside. (Colours are a bit brighter then in real life, I had quite a different lighting. It also isn't so shiny.)

Before I even started sewing, I ironed in interfacing. This makes the coat stiff and strong. (I sadly have no pictures.) The pattern will tell, where to do that. I used baking sheet, so it wouldn't stick to the iron.
To ensure I have the bodice pieces all lined up, I marked the waist-line by thread. Chalupa wouldn't hold and thread made it so easy to work with the pieces. Over all, sewing the bodice together wasn't a problem, but here comes the hard part...
The satin lapels. I had a breakdown over these. I'm not kidding. First, I just sewed them in, and to make them all nice and smooth I ironed them to the ineterfacing on the wool outer layer. That turned out to be a disaster. The seams were showing on the corners because there was more fabric. I had to carefully rip it apart and think of another solution.
I decided to iron in new Layer of interfacing, sticking just to the satin. This was achieved but putting baking sheet between the two fabrics, so it doesn't stick together. There are some photos of the interfacing pinned and not ironed and then when I ironed it. (It was honestly going back and forth, trying not to overheat and melt the fabric whilst making it stick. It took forewer.)
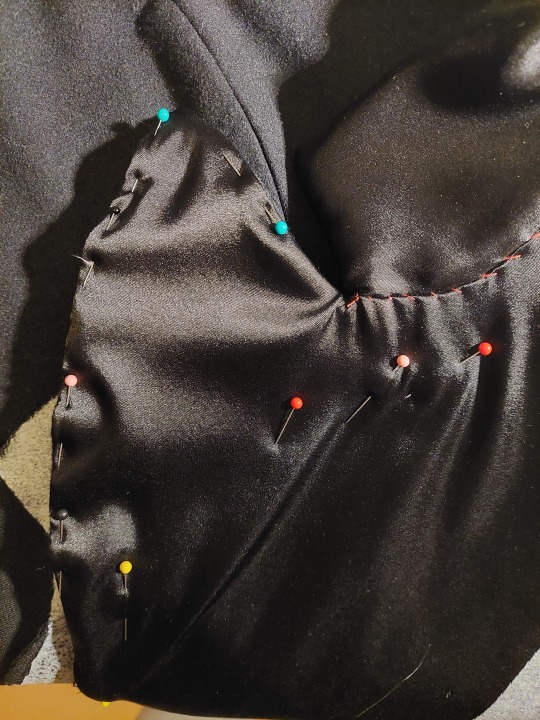

(As you can see, the collar is stitched on with red thread. That was just to hold it in place, I later handstitched it with black one. I used the same "two interfacings" method for the collar as on the lapels. You can also see a tiny bit of the interfacing in the upper left corner of the second photo.)
Sewing and sewing in the lining wasn't much of a trouble. The sleeves took a while to figure out, but it was mainly my thread ripping while I gathered them.
The skirt was the easy part. I pinned it on and tried it, saw the waist was too low and made my proportions weird. I just moved it up and trimmed the rest of the fabric. Here you can see how the inner seam is done. It was pretty easy.
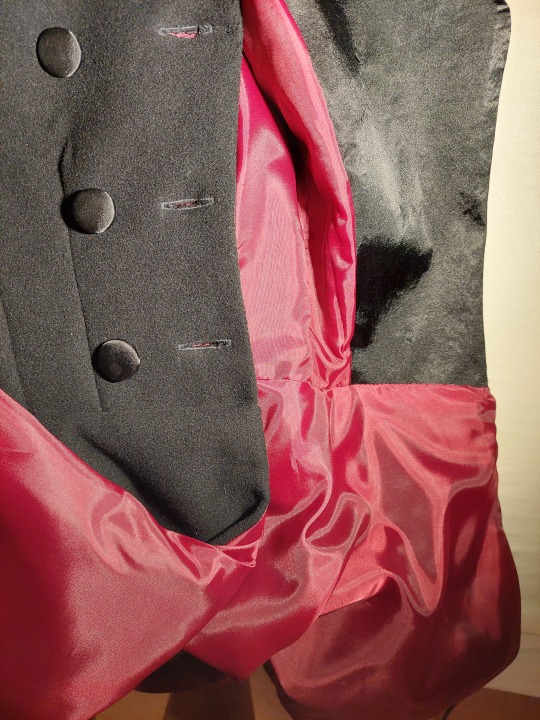
About the additional stuff - buttons, buttonholes and the buckle and belt. Buttons were made by me. I wanted them to match, so I bought a little box for making custom fabric buttons. Easy and fun! Buttonholes were supposed to be easy. First two were. The third was a disaster. What can I say? Check your foot and settings. You don't want to be undoing that. I bought the buckle in the shop, sewed the belt. The wholes for the buckle were done by sewing tiny buttonholes. I did the same for the prog of the buckle. Worked surpridingly well.
That's probably all the tios I have.
Last but not least, I have a tiny fun detail. I embroidered a little star for the starmaker! And I love it dearly!
#good omens 2#good omens#crowley#neil gaiman#ineffable husbands#nanny ashtoreth#cosplay#my sewing#sewing#go cosplay#talent show#aziraphale#aziracrow#david tennant#michael sheen#good omens season 2#seamstress#artist on tumblr#sewist#sewblr
75 notes
·
View notes
Text
You gotta go fast if you want to buy this pillow! I have this Sonic pillow available on my Etsy store, NerdyCreationsStudio, if you’d like to order it, along with other custom pillows!
#Sonic#Sonic pillow#sonic the hedgehog#Sonic the hedgehog pillow#amy rose#shadow the hedgehog#knuckles the echidna#tails the fox#miles prower#cream the rabbit#silver the hedgehog#blaze the cat#rouge the bat#dr eggman#dr robotnik#ivo robotnik#etsy#etsy seller#etsy shop#artists of tumblr#artists support artists#artists supporting artists#sewing#sewists of tumblr#sewingblr#sewist#support etsy shops#support etsy sellers#support small business#pillow
34 notes
·
View notes
Text

my most recent embroidery project - thornfield hall!
#eva embroiders#jane eyre#thornfield hall#thornfield#classic literature#classic lit#english lit#english literature#charlotte bronte#charlotte brontë#embroidery#freehand embroidery#freehand#seamstress#art#artist#artists on tumblr#sewist#sewing#brontë sisters#bronte sisters#the brontë sisters#victorian era#eyreposting
22 notes
·
View notes
Text

Another English paper pieced quilt block for the Pile!
I’m by no means an expert, but I’m wondering… should I post a little video on how I’m putting these together? Maybe I’ll go work on it now 😅
#quilting#quilting project#english paper piecing#eep quilting#eep quilt block#fiber arts#hand quilting#handsewn quilt#hexagon quilt block#hexagon quilt#sewing#quilt block#handmade quilt#quilters of tumblr#quilt making#quiltblr#quilt art#hand sewing project#sewists of tumblr
8 notes
·
View notes
Text
I went to my first Oktoberfest last September (buuut it’s Oktob….?) and came home determined to make myself a dirndl.
Burdastyle is a German pattern company and I knew they had patterns. And then I saw this lovely gothy one!
But where to find fabric? I designed some! But I’m not quite ready to post about it…

#sewing#sewing patterns#burda#burdastyle#dirndl#oktoberfest#sewblr#sewers of tumblr doesn’t sound quite right#sewists of tumblr
1 note
·
View note
Last Seen Blogs

variedfanart
Varied-Fanart
ortodelmondo
rabdomanzie
amaleyart
To Create is To Breathe
gay-male-hungrybellygrowllover
gay chubby male hungrybellygrowl lover

nextpawn
Next Pawn