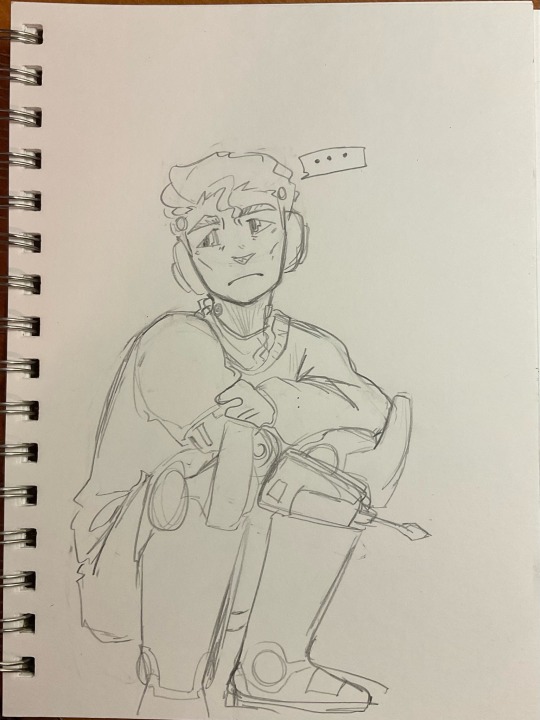
#Echos prosthetic
Text
Echo deserves a proper prosthetic.
So I gave him one✨✨
#star wars#star wars fanart#tcw#artwork#clone wars#clone wars fanart#clone wars drawings#the clone wars#the bad batch#art#tbb#echo tbb#Echos prosthetic#arc trooper echo
899 notes
·
View notes
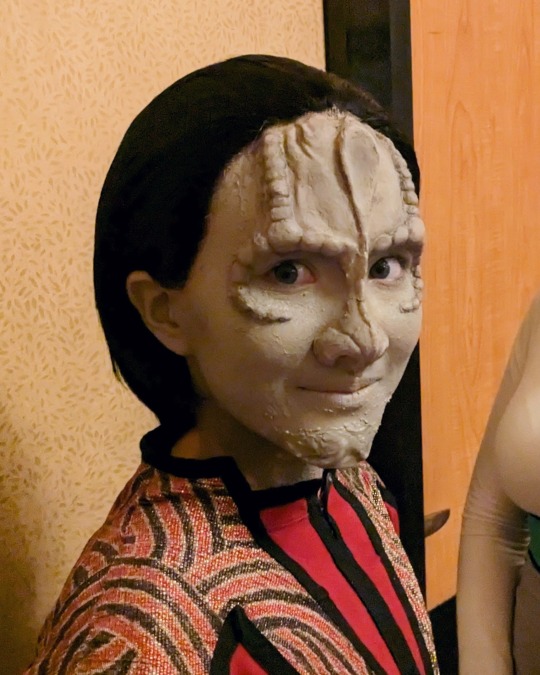
Text
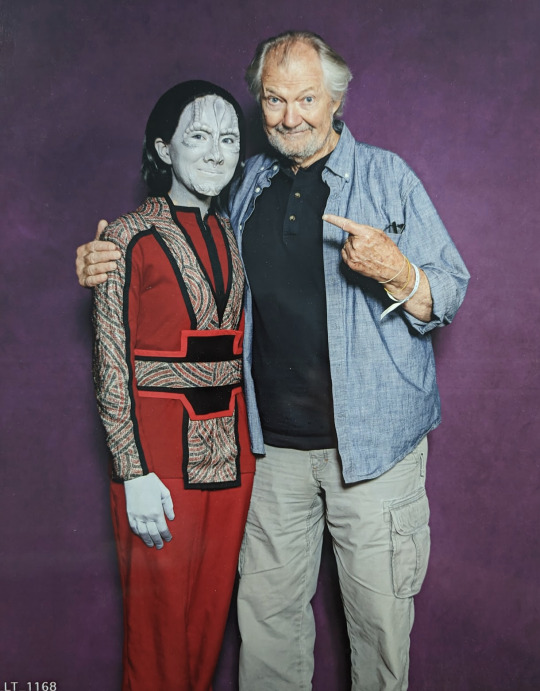
garak at stsf :))
#gotta remake the prosthetics if I wear him again I think. these r getting crusty... I still have the plaster molds it'll be easy#everyone loves him though. hehe#if I had a nickel for every time cirroc lofton walked past me in a star trek con hallway and complimented my cosplay. I'd have 2 nickels :))#definitely a lot more chill than the vegas con. I'm having fun hehe#chin piece was coming off too much and I forgot to bring spirit gum so. just took it off and painted over it lmao#narcissus's echoes#narcissus plays dress up#ds9#elim garak#star trek#cardassians#star trek cosplay
951 notes
·
View notes
Photo

finally finished echo !! i didnt rlly plan for him to come out looking like an 80s anime protag but i dig the look tbh
#this took way too long but at least now i can draw a prosthetic leg from scratch#a win is a win ig#my art#star wars#tcw#tbb#clone wars#bad batch#echo#tbb echo#clone fashion#hunter next... mark your calendars ladies
1K notes
·
View notes
Text
In my heart I just know Echo has used the "I'll take my leg off and beat you with it" threat at least 3 times.
#star wars#the bad batch#tbb echo#tech wont sleep?#knock him out with a leg#no one is listening?#takes leg off and shakes it threatenly#one of my co workers has a prosthetic leg#he has threatened many other co workers#in spanish#with leg beatings
456 notes
·
View notes
Note
Will the merc be able to play with Echo's cats? 🥺👉👈
yeah, when you go to echo's apartment sometime you'll meet them!!
#asks#c: mc#c: echo#thinking back to how much i changed abt echo but the cats remained#always#one only has three legs and is called junior#for reasons#reasons being echo only has one leg thats not a prosthetic and junior comes after them
56 notes
·
View notes
Text
in-universe "logistics" aside, i think it's good that echo has the permanent scomp arm instead of a hand for like. real-world representation reasons.
in star wars sure they have fully articulated replacement prosthetics but we very much don't have that in real life, and i feel like echo with the scomp is good rep for that. he's one of the most competent characters and i think it's good to show that he can do All That as he is, especially with how irl people with only one hand usually are very capable, even more if they've been living with it for a long time, and very rarely do we see that in media.
like, mark hamill once said he talked to a kid for a make a wish thing who was about to have his arm amputated, and the kid said that he wasn't worried because luke did it too. i think that's important
#tbb#echo#.txt#the bad batch#arc trooper echo#SORRY MUTUALS this has been on my mind since i saw some people being really weird/Actually Ableist about it on twitter back in january and#that post going around just reminded me of it#NOT THAT OP WAS SAYING ANYTHING PARTICULARLY BAD bc like yeah utilitarially a multitool type arm could probably be useful#just imo its nice to have real world rep#also im still taking psychic damage from some of the twitter shit it was like how echo would ''have relief at having a proper hand'' or sth#like um. thats not very ummmm.... thats not really a good thing to say--#with regards to like. a lot of people with limb differences dont feel any particular desire to have a standard limb and a replacement#isnt necessarily the best for everyone or what everyone wants#and acting like all people who dont have standard are all suffering and sad about it is demeaning and patronizing#twitter users when theyve never read about people with limb differences from those people's perspectives#twitter users when theyve never heard of the Lucky Fin Project#sorry for going off agh prosthetics are what i plan on studying & specializing in so i read a lot about this stuff
216 notes
·
View notes
Text

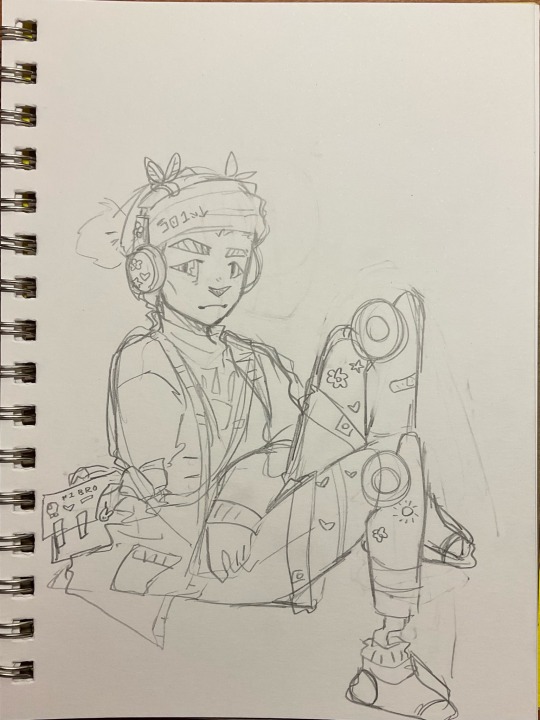
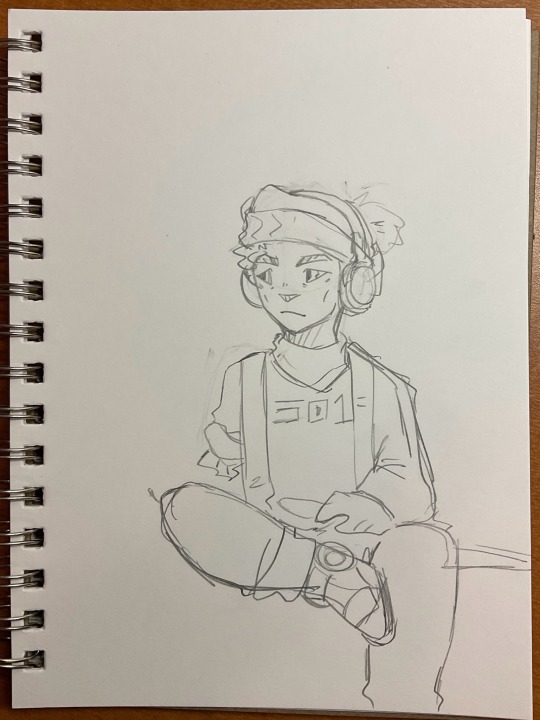
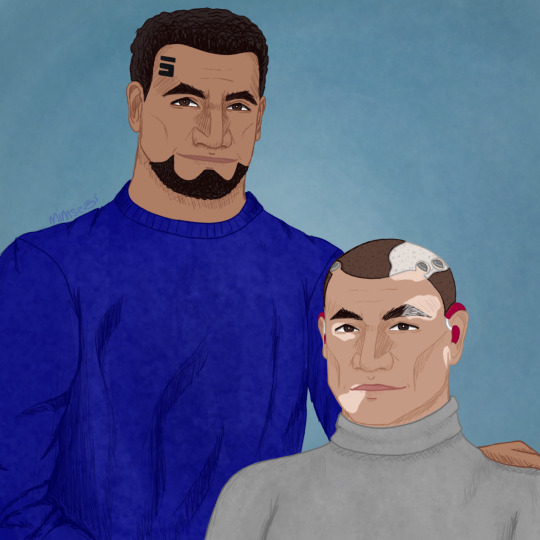
(2/5) pieces for my bad batch modern au HEHEH ITS ECHO TIME HEHEHHEEEEE
I actually went through a few iterations before I settled on this one…the previous ones were just too plain for me lol BUT LOOK HOW CUTE HE TURNED OUT HEHEHE YAAAHHHH
#the bad batch#star wars the bad batch#star wars#tbb echo#bad batch echo#arc trooper echo#echo bad batch#the bad batch echo#ct 1409#tbb modern au#where the echo girlies at?#come get your mans#actually maybe don’t because I like having him all to myself#anyway he’s so handsome#omega definitely put stickers on his prosthetics#she likes to make sure echo knows we love him#prosthetics and all
37 notes
·
View notes
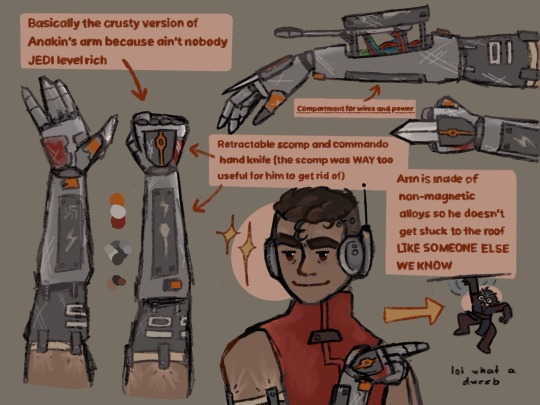
Text
Has anyone thought about how Anakin could've given Echo a spare arm? With all the stunts he pulls, I'm sure he has plenty.
#star wars#bad batch#the bad batch#arc trooper echo#tbb echo#anakin skywalker#clone force 99#the clone wars#the clones#star wars anakin#anakin skywalker's prosthetic arm#clone wars anakin#anakin and the clones#the 501st
22 notes
·
View notes
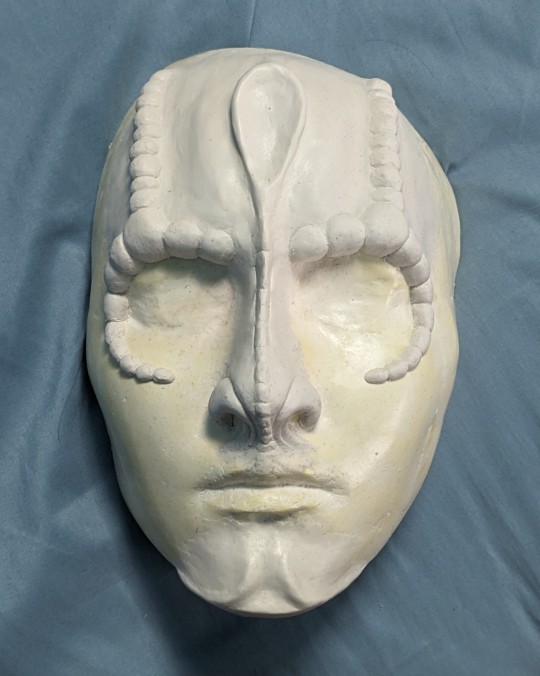
Note
how did you make those holy shit!!!
jfjskdk okay I'll take any excuse I get to talk abt this more
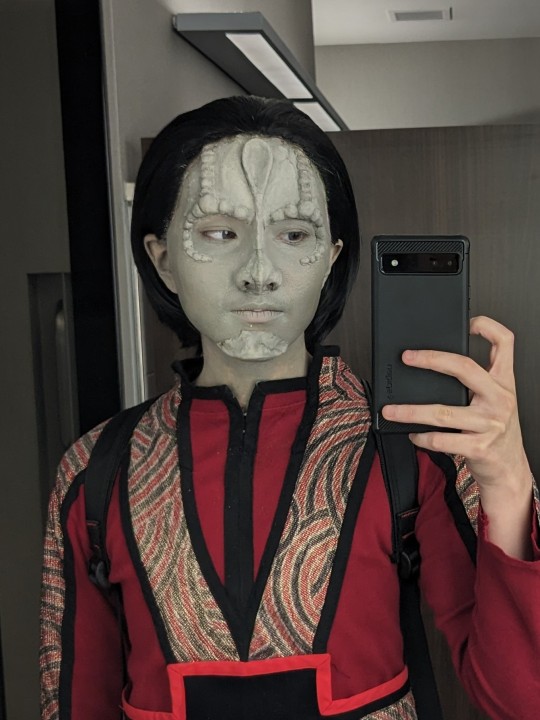
How I made my Cardassian prosthetics
Disclaimer: I'm no expert, it's my first time doing this!! All the resources I used can be found online. In fact, here's a playlist of all the youtube videos I followed, in case you don't want to read the whole post. You can pretty much make any facial prosthetics following these steps, not just Cardassian ones.
What you'll need:

Plaster bandages, plaster of Paris (a lot more than is pictured here), modeling clay, and liquid latex. You'll also need some things you probably already have around the house, like vaseline (or cooking oil), plastic wrap, wood glue, rubbing alcohol, q-tips, cotton balls, and setting powder (or baby powder).
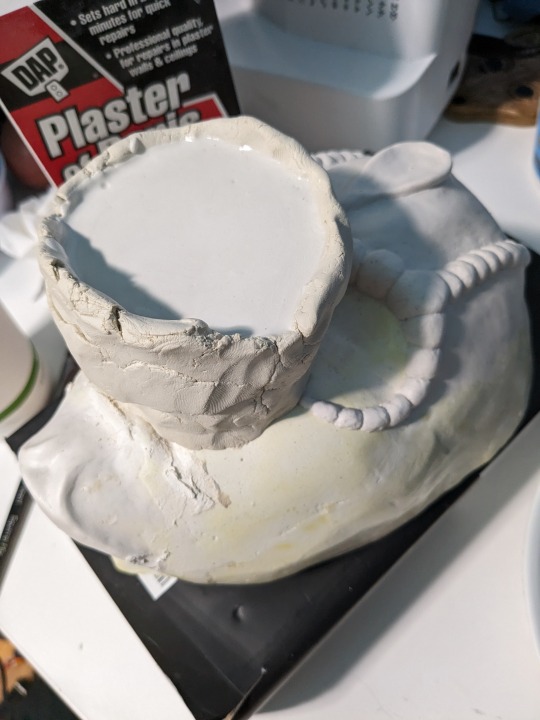
Step 1: Face cast
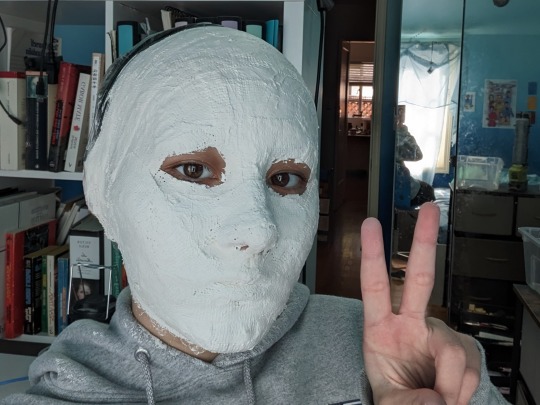
The goal here is to make a plaster copy of your face that you can sculpt your prosthetics on, by covering your face with plaster bandages and then casting that in plaster of Paris. This is the video tutorial I followed for this step. There are many methods, and you'll find tutorials for all of them on youtube, but this is the easiest way if you're doing it by yourself, and it results in a perfectly useable face cast for our purposes. And, if you're cosplaying Garak like me, it's a great way to get into character by experiencing claustrophobia for the first time in your life!! (Jk it's not actually that bad. I lived.)
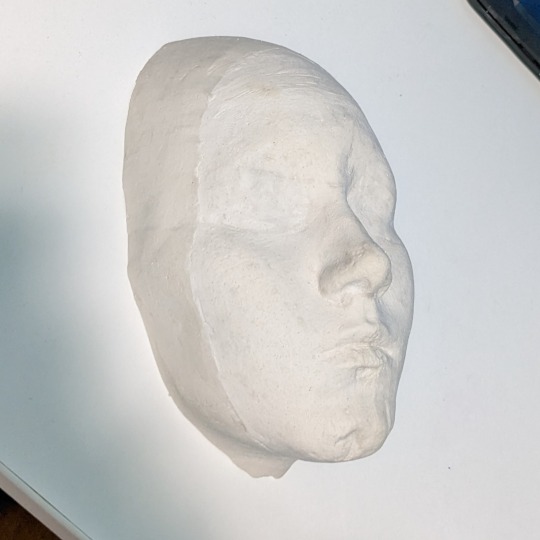
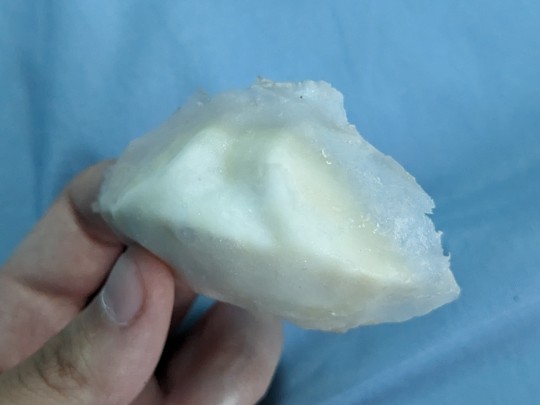
The video explains the process better than I could, but here's some tips I learned from doing it! Wear a shirt that you don't mind ruining. Go a bit closer to your eyes than I did here. When you're propping up your mask in a bowl, make sure you're not squishing any parts of it or tilting it! I ended up with a dent in the chin of my face cast because I accidentally dented the mask while I was casting it. And make sure you have enough plaster of Paris! I probably used 2-3 pounds for this part. Here's what I ended up with, before sanding or sealing it with wood glue:
Step 2: Sculpting
This is pretty self explanatory, but also probably the hardest part. Just use lots and lots of reference photos. I've got a pretty good stash for Garak, if anyone's interested hdjkfhk. I found that gifs made better references than still photos, since they give you a better sense of the 3D shape. You want to make sure you're using modeling clay that doesn't dry. You don't need any fancy sculpting tools! I used my trusty palette knife to get the small details, but you could probably accomplish the same thing with, like, a spoon and a toothpick. It depends on what kind of clay you're using, but you can dip your finger in a solvent to smooth out the surface of the clay and blend the edges into the face cast. I used rubbing alcohol, but I also heard people recommend acetone. Once you're happy with your sculpt, you can move onto the next step!
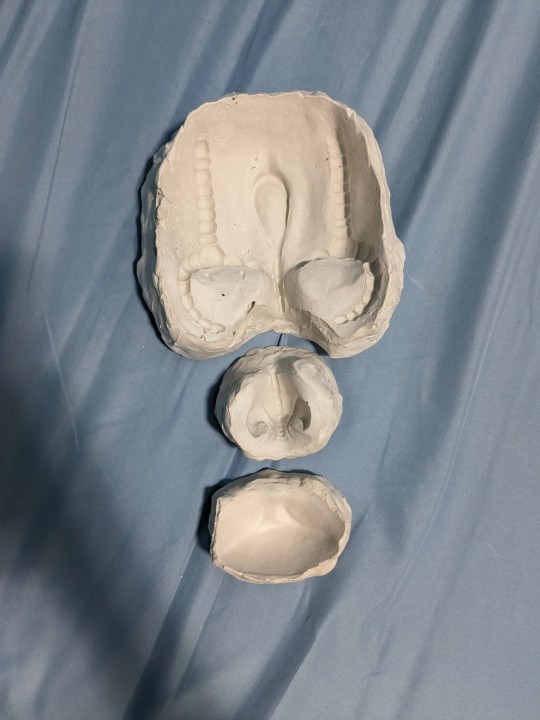
Step 3: Casting negatives
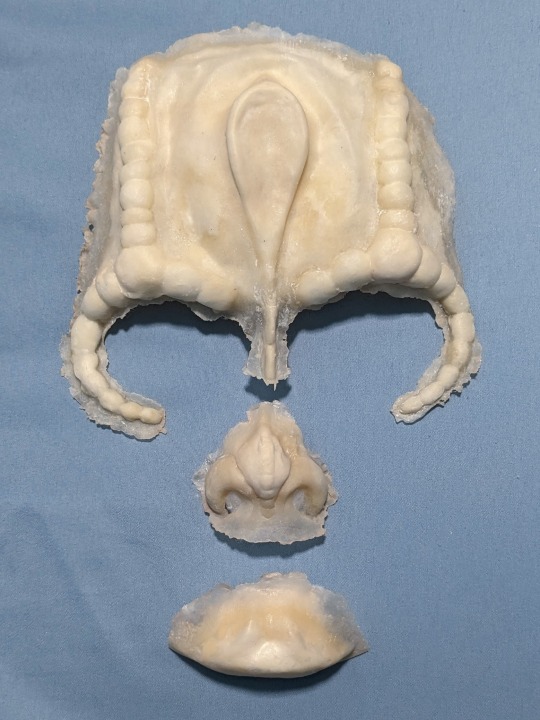
This step is technically optional. The video I followed also outlines an easier way that skips this step, by simply building your prosthetics directly on the sculpt. But casting negatives allows you to get a lot more fine detail, and a smoother finish on the final prosthetics, so that's what I chose to do. Basically, you pour plaster of Paris over your sculpt, and it hardens into a mold you can use to build your prosthetics on.
Again, the video explains it better, but some tips! If it's possible with your sculpt, do it in small pieces instead of the whole face at once. I did the chin, nose, and forehead separately. If you try to do the whole face, there's a greater chance of it getting stuck or breaking. Of course, if you were doing, say, Odo, then it might not be possible to do it in multiple pieces. Another thing to watch out for:

If your underlying face cast has any "undercuts," or places where it's, like, concave, then if plaster gets into those areas and hardens, your face cast and your negatives will lock together, and you won't be able to use either of them. For me I was worried about the sides of my nose and under my bottom lip. As long as those parts are filled in with clay, then you should be fine. It's okay if your clay sculpt has undercuts! You can see in the (shamelessly stolen) diagram that their sculpt has a lot of undercuts, but that's okay because the clay is soft and won't lock with the plaster, it'll just come off. The video I got the diagram from was also pretty helpful, even if it's meant for casting with different materials than I used. Here are the completed negatives:
Step 4: Making the prosthetics!
Now you have negatives! Your sculpt may or may not be intact, but if your negatives turned out okay then that's fine. This step is also covered in the video for step 3. Using a stippling sponge, foam brush, or q-tip, stipple thin layers of liquid latex onto your negatives. I found that a q-tip worked best, even if it took longer to cover larger areas. Make sure the edges are very thin, so you can blend them into your skin when you apply the prosthetics. Wait for a layer to dry before adding more latex on top of it, or you'll end up with fucked up results like I had:
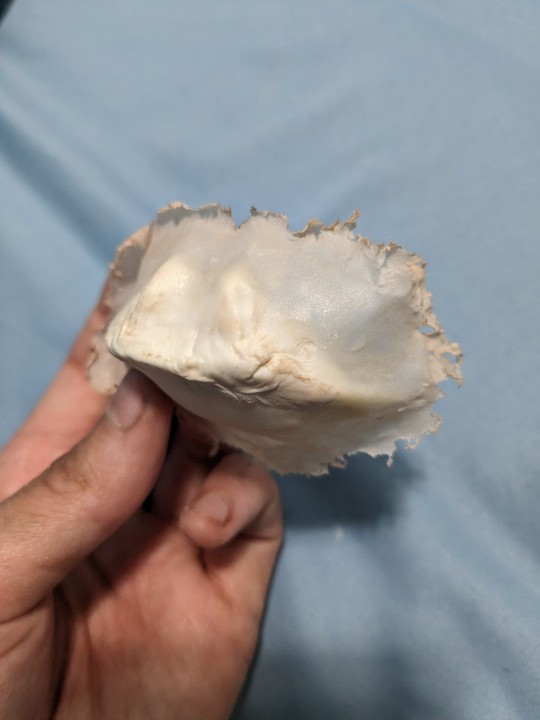
(Left: first draft, where I didn't let it dry enough before layering more. Right: second draft. Much better!)
Build up bulky areas with pieces of cotton balls, then cover the cotton with a thin layer of latex. Emphasis on thin! It'll take forever to dry if you saturate your cotton with too much latex. This step mostly involves a LOT of waiting. When the latex is fully dry, brush everything with a liberal amount of setting powder or baby powder to prevent the latex from sticking to itself as you peel it out of the mold.
And now you have your prosthetics! You can tear away some of the excess latex at the edges to make it fit your face better. I ended up tearing away almost all of the edges around the eye ridges, so it would blend better and I wouldn't have to get adhesive so close to my eyes. Tear, don't cut! It'll result in a more natural edge that's easier to blend. This video shows how to apply prosthetics. Use whatever prosthetic adhesive you want! I used spirit gum because it's what I had on hand.
Now you can go forth and live out your lizard alien dreams!!
#IDs in alt text#garak prosthetics tutorial is finally here :))#u guys better not let this flop. this is more effort than I put into my entire high school career (which is a low bar tbh)#sorry to my friend I cropped out of the first pic 😭😭 I rly didn't get any good solo shots jdlkjhf#narcissus's echoes#narcissus plays dress up#ds9#elim garak#star trek#garashir#andy robinson#cardassians#star trek ds9#star trek cosplay#deep space nine#star trek deep space 9#garak cosplay
332 notes
·
View notes
Text
domino twins
#part of that same au i did for dogma and tup#yea. so. fives has trauma bc he watched his twin 'die' then he watched tup lose control and then everything was different#his whole life purpose was gone in a flash and he was the cause of it--nobody to blame but himself#and tup is struggling due to the aftermath of the faulty chip and dogma isn't himself and. and echo was gone but now he's back.#and nothing is okay but everything is okay and he doesn't know what to do so he just. he throws everything at helping echo get better.#because what else is is he going to do? tup is focused on dogma. and echo... echo really needs the help.#sure maybe deep down its about getting fives out of his head but it really really is important he help echo#bc you don't just... come away from freezing in techno union's hands--with less than half of your human body--and jump back to normal#those legs and scomp had parts fused to him. parts of him never healed from the explosion. and parts of him got eaten by the frost.#and he's massively underweight because feeding a repurposed mechanised POW wasn't high on priorities#and then the cold fucked up his metabolism so he's trying to gain back weight that he can't...#and overall...#it's not going so great. but echo is home and--while he's healed completely (as far as he can be healed anyway)--he gets a night or two#per week in a bacta tank to deal with the chronic pain. and he's getting used to the prosthetics and the tubes and bags#going into where his stomach used to be. and everything can be so goddamn triggering sometimes but.#he's alive. with fives.#and if he just is alive for fives... then fives will be okay. right? fives will be okay if he's okay... so he needs to be okay...#ANYWAY YEA i got a lot of things to say xoxo#saleucami au#arc trooper fives#arc trooper echo#fives and echo#star wars: the clone wars#star wars#the clone wars#my art
44 notes
·
View notes
Photo

ok theres a lot going on here but i think i captured his essence well enough
#echos next :)#i just. i just gotta. figure out those prosthetics#god help me#my art#star wars#tbb#bad batch#crosshair#tbb crosshair#clone fashion
974 notes
·
View notes
Text
The way that if when Tech comes back, I fully think he’s just gonna look the exact same :/
My man had a broken femur and went riot racing the next week. He got his chip taken out and his hair regrew within the next episode. Hunter fell from a pretty comparable height and walked it off.
As much as I realistically think Tech would have multiple injuries and probably permanent problems, maybe even prosthetics, I just have no faith in the writers for them to not just heal Tech up like nothing happened bskhsjsjsjk
Or idk, maybe they’ll just make him bald and the color of rice paper like usual lol
#like i know echo got prosthetics and everything but we like saw him get blown up#and he came back after years and needed to be completely different mostly for the story#and i just can’t see them bothering with tech? which sucks? please prove me wrong lol#sw tbb spoilers#tbb spoilers#the bad batch spoilers#tbb tech
22 notes
·
View notes
Text
echo wireplay sweep btw. if you even care
13 notes
·
View notes
Text
Seen, Known, Loved (Changed)
Rated T, CNTW, 983w, Rex/Echo ft. Tech, post-66, soft, mutual pining, cyborg body dysphoria, kisses
Rex had recognized him by his brain.
Because clones were so visually similar, they learned to tell one another apart primarily by non-physical markers. Intonation, attitude, humor… strategic thought patterns, apparently.
To be known was to be loved, and Echo didn’t know if he could bear the buildup of years wherein absence had made the heart grow fonder. The change hurt, like every other modification to his flesh.
With the additional processors, he had too much capacity to think, these days. How had Rex recognized him when he could hardly recognize himself?
read on AO3 🔒 https://archiveofourown.org/works/47404771
#star wars tcw#the bad batch#fanfiction#my fic link#rated t#clones#cloneshipping#captain rex#arc trooper echo#rex/echo#rexho#prosthetics
9 notes
·
View notes
Text
The aforementioned dead patient was something I had been wondering about for a while, the three kinds of death you run into at the hospital as a cardiac sonographer are -
They did not call to cancel the echo order, the nurse is not there to tell you not to go into the patient's room, and the patient is lying in their bed but they are actually just straight up dead and not hooked up to anything and it takes you a minute or two to go, "hold on a fucking second... this person is DEAD" and then you float around the entrance of the room until the nurse shows up to be like "don't go in there!! patient expired!!" and you get to be like "m-hm YEAH I KNOW. Cancel the order." And you are disgruntled at the team for a. wasting your time and b. interrupting the final sleep of some poor person where you were very nearly lightly disrespectful to a corpse (by trying to shake them gently awake and putting stickers on them, as you do to asleep patients)
They called you because there is literally a Code Blue crisis situation happening and there's twenty people in the room, possibly doing CPR or giving meds or giving blood, like a well-oiled machine where you are a massive interloper with your giant ass ultrasound machine being in the way and asking "when do you want pictures? what do you want to see?", and you either get to scan before, during, or after lifesaving procedures, and if you (not the patient, not the family, for this will be a tragedy) are very, very lucky you may get pictures after the patient's heart has stopped moving but before they call the end of the code (and declare the patient officially dead) which means you are there, in the room, not-so-gently (because those pictures are hard to get after CPR) smashing on someone's chest with a piece of plastic as they die and you get to see the heart stop and the blood clot up almost immediately, and it's funny to see something that moves so much not doing much of anything at all.
This patient is already considered braindead and literally being kept alive with machines and they need pictures for organ donation ASAP I hope you know how to burn a CD
And by wondering about I mean, wanted to experience, because I'm a morbid fucker who works in a hospital and wonders about death in a hospital and how it works and what it's like, because that's a crisis situation not many people get to experience in their lives and good news! These are all things I have actually experienced as a cardiac imaging tech in the hospital. Writing it down is funny because I did not expect the trajectory of my life to go in that direction even at all.
#death#the dragoon diaries#the fourth option is that the life saving measures WORK and you get to scan a somewhat unstable but still alive and very in pain patient#healthcare#medicine#I also get to see human cadavers for like education reasons#which like not to be morbid but damn I love human cadavers#I am eternally thankful to the people who donate their bodies to science because it's SO enriching to see post surgical stuff INSIDE a body#like I don't get to see the sutures from a CABG on echo but you can clearly see them in a cadaver and it's cool!!#there's a world of difference between a prosthetic heart valve on ultrasound vs seeing one in person surrounded by red meat tissue#and you never get to see unless the patient is dead and gracious enough to donate their body#ironically surgery gives me the jeebs and I can't look inside ALIVE people#only dead
7 notes
·
View notes
Last Seen Blogs

i-misk
خديجَه ོ.

the-hadal-zone-sys
The Hadal Zone

dynamic-jun-blog
제목 없음

scienceandpuzzles
when I decided to wage holy war...

125-sraboni-khatun
Untitled