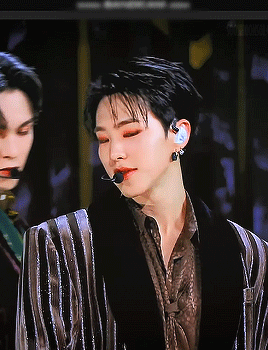
#i downloaded this video to make cc of this scene in specific
Text
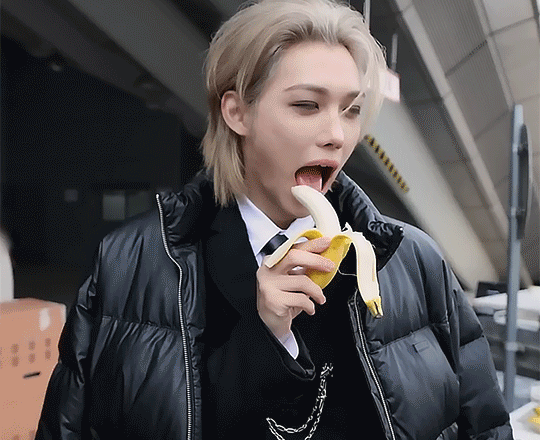

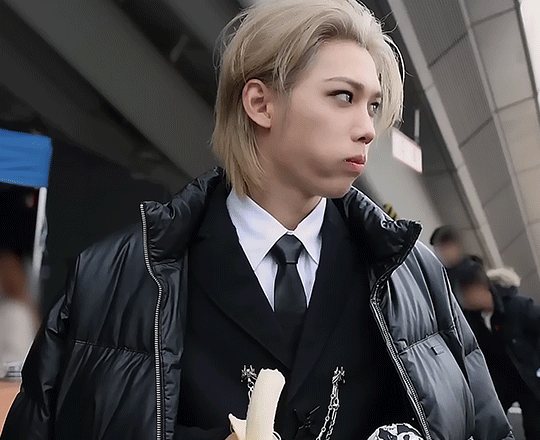
hey hey brownie banana boy
#kpopdols#lee felix#lee yongbok#lee yong bok#felix#stray kids#skz#5 star#createskz#staysource#bystay#mine.#i downloaded this video to make cc of this scene in specific#brownie boy
166 notes
·
View notes
Text
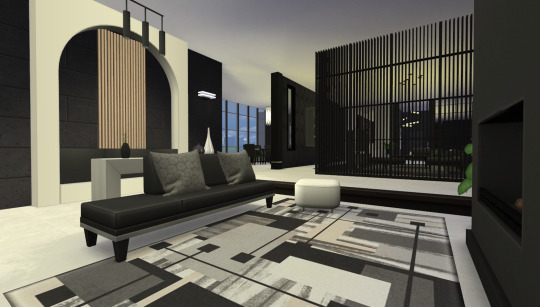
Satoru's apartment (Part 1)
Continuing with my whole thing of trying to make the characters' apartments from my fic in The Sims, let's finally get into Satoru's apartment! ....Or part of it, because his apartment is fairly big lol. Here's the layout:
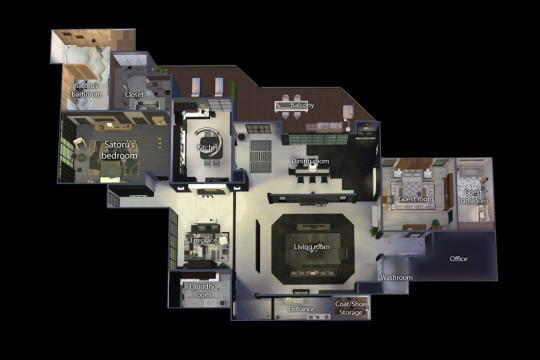
*The office and washroom are blurred because I haven't actually gotten around to them yet lol
Satoru's place is pretty big, but not the biggest he could have afforded because he is just one guy... so a fairly "modest" apartment will do.
("modest" my ass lmao)
His apartment is pretty neat, which tends to surprise people that expect someone like him to make a mess of things, lol. But Satoru had a pretty strict childhood so some things just stuck with him, and along with the way his family never allowed him to decorate his room in the Gojo Estate with trinkets and stuff, most of his apartment ended up the same--almost void of personality. The things he actually cherishes are kept away from prying eyes, even if this is his own apartment.
Honestly, I had a few very vivid images of what I thought his apartment looked like in my head (or parts of it), and it was kinda tough trying to put them all together into a definite layout lmao. If I made some weird architectural choices, well.... good thing I'm not an actual architect! I just really wanted to make it look like how I pictured it in my head.
In this post we'll take a look at the living room/fireplace/dining area and the kitchen after the cut!

The entrance is pretty spacious, and right behind the camera here there's a door leading to a whole ass closet for shoes and coats and stuff.
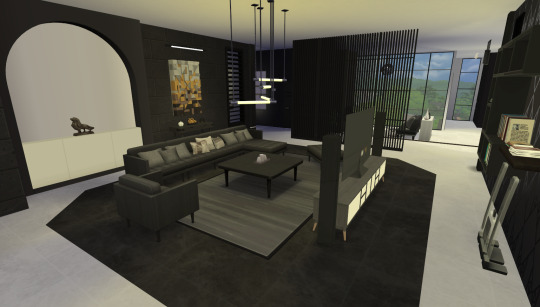
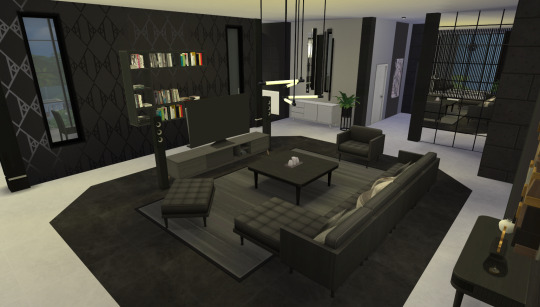
This here is the living room, where Satoru spends a lot of his free time watching movies (especially when he has people over. And by people I mean Yura and Shoko, mostly). He has a bunch of DVDs and Blu rays there on the shelf behind the TV, and he also has a couple of video game consoles that he doesn't use a lot.
Yes, this is where the Movie Night oneshot took place (͡° ͜ʖ ͡°)... among other scenes.
(That corridor in the second pic with the white door leads to the guest bedroom, the office, and the washroom. That white door is the guest room, specifically.)

This is the fireplace area! Satoru doesn't actually use the fireplace a lot since he has central heating in the entire apartment, but in the opening chapter of Deeper in the Dark, this is where Satoru made a little pillow nest on the floor for him and Yura to snuggle... and yes, other things.
It's got a pretty good view! (...just pretend it's Tokyo back there)
(That corridor in the first pic leads to his bedroom.)

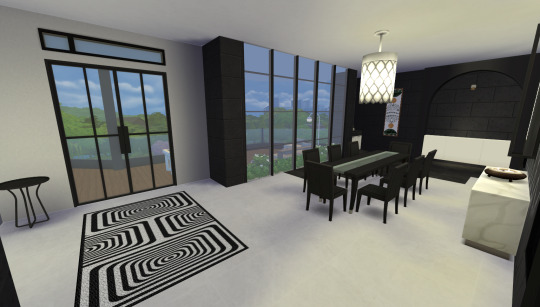
Here is the dining room that Satoru only uses when he has people over, otherwise it's just easier to eat in the kitchen or outside in the balcony (more on the balcony in another post... cause I still need to make it prettier lmao)
Also I might make some changes to this dining area at some point because I'm not 100% sure on the decor yet....
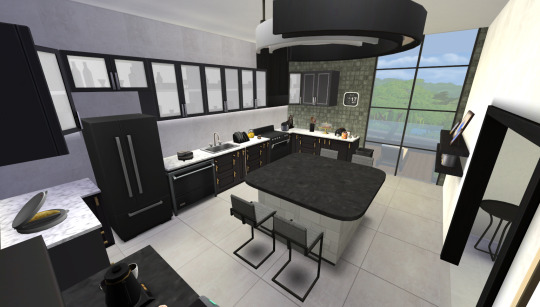
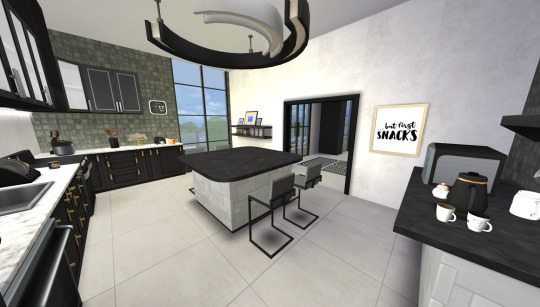
And here's the kitchen! This is the one place that has the most trinkets on display, a lot of novelty items that were mostly gifted to him by Yura over the years (and that he actually makes a point to use). Funny mugs, cookie jars, silly sugar bowls--since Satoru is filthy rich, it's very hard to give him gifts, so Yura eventually found out that he actually likes being given 'stupid stuff', in her words.
I had a very vivid image of the kitchen entrance in my head from that chapter where Yura was sleeping in the guest bedroom after coming back from NYC, and she sleepily stumbles into a shirtless Satoru with his back to her by the counter... cue her brain short circuiting for a moment lmao.
Anyway, next up should be the bedrooms! It's been a struggle making this apartment because I had to download so much CC and mods to be able to make things look the way I wanted to, and I'm still constantly changing things lol. If I do decide to change something, we'll just call it Satoru renovating his apartment at some point throughout the years lmao
#gojo satoru#jjk#jjk fic#the sims 4#you guys have no idea how much CC i downloaded just to make this#it took so long and I'm still not done lol#but I'm actually having fun so you cant stop me now!!#satoyura
20 notes
·
View notes
Text
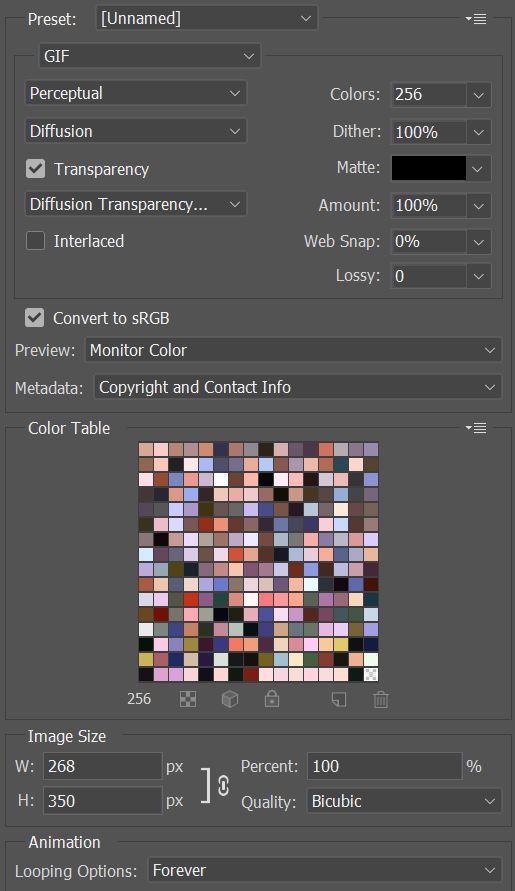
GIF Tutorial
Someone asked me how I made my gifs so HD so I decided to write a full step-by-step uuuh babyyy 🎶 tutorial + useful tips on every part of the process.
It is explained in detail, so people with 0% experience can try it for the first time, and the more experienced gif makers can focus on the parts they are interested in 👍 (click on the images to see them bigger)
Disclaimers: I am not a professional, I have learned by trial and error and by watching other amazing creators. I use photoshop CC 2019 in Spanish so some of the names may vary but I tried to use the more accurate English names and used colors as references so even in other languages you can still follow this tutorial.
GIF TUTORIAL STEP BY STEP:
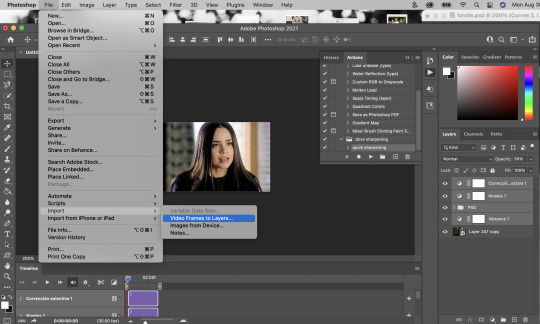
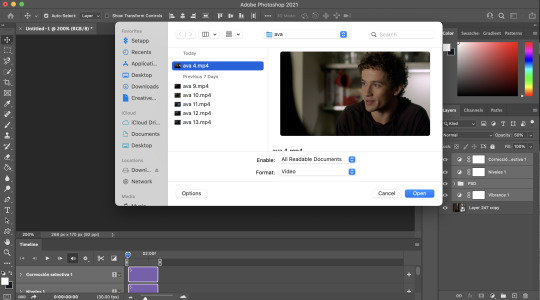
1.- Open photoshop and create a new project. Then go to “files” 🠲 “import” 🠲 “convert video to frames” 🠲 this will send you to your video folder, and from there select the one you want. TIP 1: try always to download it in the best quality possible (1080p or 720p) so you will end up with “cleaner” HD gifs.

2.- When you select your video, then you will have to choose the specific moment or scene you want (you do this by selecting and moving the arrows at the bottom of the image) TIP 2: I usually limit every 2 frames, but if your scene is too short (less than 20 - 25 frames) then I suggest not clicking the limit and leaving it at 0, likewise if your scene has too many frames (over 70) then limit every 3 frames 👍 to make it smaller.

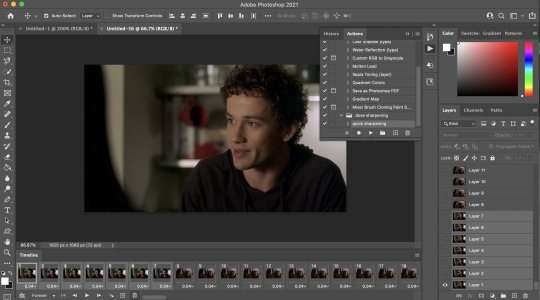
3.- Sometimes when you select your scene, a few extra frames will show up in your timeline, it’s ok, you can delete them by selecting the frames and clicking the trashcan icon at the bottom. Next, don’t forget to change the speed, you do this by selecting all the frames (click the first one then press SHIFT and click the last one, this will select everything), and then click one of the numbers below the image and select “Other”. TIP 3: Usually I use between 0,07 - 0,08 (my fav) - 0,09 from faster to slower. The speed will depend on the gif you are making. TIP 4: If you have PSDs colorings, now it’s time to add them, just click and drag your PSD on top of the image, and remember to make sure it is on top of all the frames and layers ( the ones on the side). Personally, I do it now, because when I do it later in the process there is always a few frames that won't color.

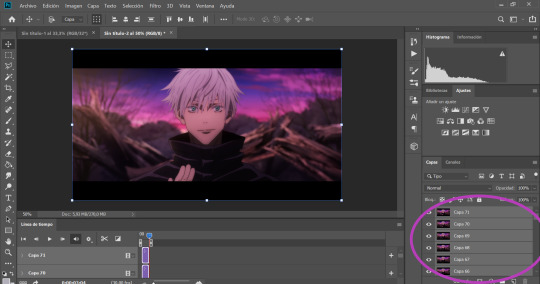
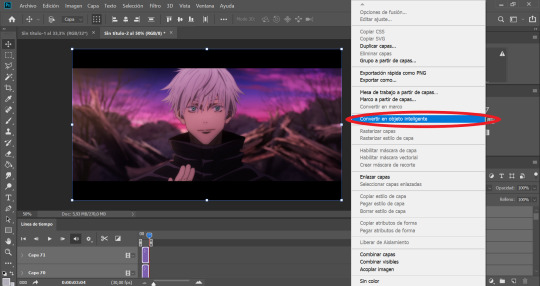
4.- Now that we have our desired frames, speed, and PSD coloring (optional), we need to make it easier to keep editing. So we need to click on the little icon with stripes at the top right corner on top of the timeline (the orange square) 🠲 “Convert timeline into video” 🠲 and now you should have one long frame instead of many single ones.

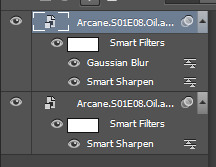
Now let’s do the same with the layers that are on the right (purple circle), once again click the first layer then shift-click on the last one to select everything 🠲 right click on one of the layers 🠲 “convert into a smart object” 🠲 and now all the layers also become one.
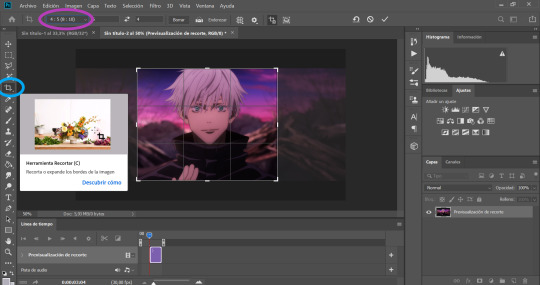
5.- What I like to do next is to cut and then resize (you can do it the other way around if you’d like) select the cutting tool on the left side (light blue circle) and then it is up to you to choose which shape do you want (in the purple circle) there are some basic proportions but you can also make your own.
6.- Now is where all the fun begins. Let’s resize our image so we won’t end up with a giant gif. to do this go to the “Image” tab on top of the screen 🠲 “image size”
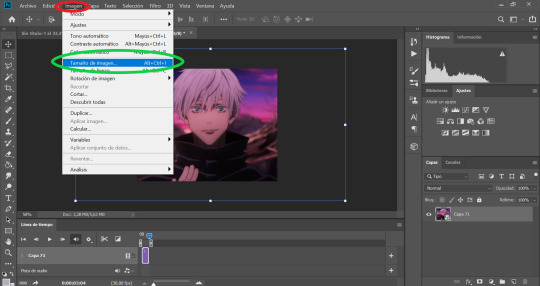
TIP 5: To choose a good size, please keep in mind the standard sizes on Tumblr or other social media. If you are using one gif per row then the size should range between 540px - 560px - or 580px / If you are using 2 gifs per row then the size should be around 268px / and if you have 3 per row then the size should be around 177px. Once you select the appropriate size… this is where it gets tricky. Depending on the gif you are making you will have to select a different option ex: if your gif is too blurry or has lots of movement or grains if they are too dark or too light if the colors are too different, all these factors will determine what you need to use. TIP 6: I usually use only 3: bilineal - bicubic reduction or keep details 2.0 (the names may change in English but look for something along those lines or in the same place as the ones in the image with the green ticks)

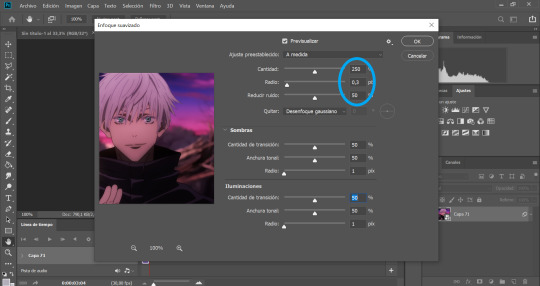
7.- SHARPENING TIME!: go to “Filter” 🠲 “sharpen” 🠲 “smart sharpen”

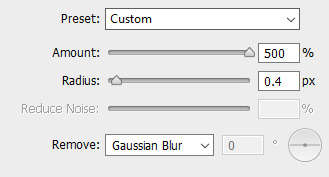
As I have mentioned before, the amount will depend on the gif you are making, there is no perfect formula for all the gifs, so you need to play around a bit to find the perfect setting for your specific gif. TIP 7: This is what I normally use: amount: between 250 and 300 / Radius: 0,3px - 0,4px or 0,5 (but never over 0,5) / noise: anything between 0 and 50, now if you have a very blurry scene you can go up to 100 👍 and finally select the option “Grussian blur”.
Tbh I never change the “shadows” and “lighting” settings (they are always 50 -50 -1) If you know how to use them or want to play around, then go for it…. I have no idea how to 🤣 oops.
8.- BLUR: sometimes the gifs look TOO sharp so we need to add a blur filter. so go to “filter” 🠲 “blur” 🠲 “surface blur”

then once again, depending on your needs, you can play around with the settings. TIP 8: I normally use 10-6 / 9-4 / 7-4 or 3 / etc. but I never go over 10.
Also if you are noticing that your gif is still looking a bit blurry or with imperfections, due to the quality of the video, the scene is too complicated, etc. then I recommend adding noise on purpose 🤣 hey! if you can’t fight against the noise then put it on purpose and make the gif with a bit of texture and colors, it will look nice too 👍 go to “filter” 🠲 “noise” and then add the amount you want.

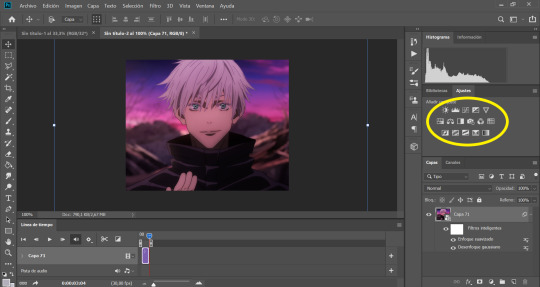
9.- Now we are almost done, you can leave it like that if you want or you can add some extra steps and play around with the brightness, exposure, color balance, gradients, filters, etc. you can find everything on your right (the yellow circle). Here is up to you to explore and experiment, I never use the same, it changes every gifset I make.
10.- You can add your watermark, images, texts, paint with the brushes, or do anything else with your gif. but this time I will skip these steps, but if you need extra information about something, please feel free to ask, and I will gladly help you 😊.
TIP 9: Before you save your gif, please make sure all the things you added are in line with your gif “video frame” 🠲 move the little arrow so it will end perfectly with your gif, if the others are longer, it doesn’t matter, you can move them or you can leave them there, the important thing is that the line is perfectly in line with your gif.

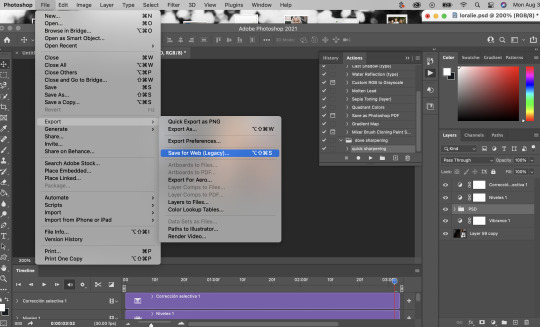
11.- Now there is nothing left to do, it’s finally time to save it for the web. Go to “files” 🠲 “export” 🠲 “save for the web”
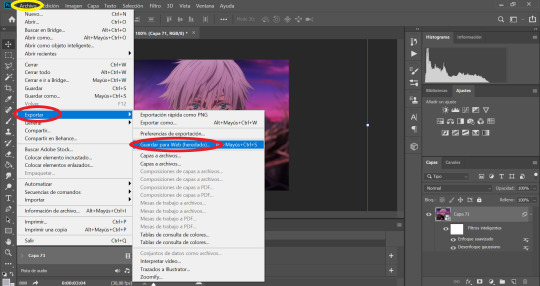
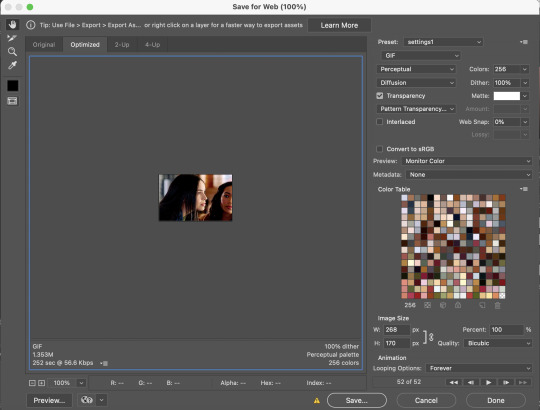
TIP 10: Now you have two options: you can view your gif in the “optimized version” tab where it will show you one option that you can edit. If you select this option then these are the settings I always use, the only option that changes is: using pattern (the gif will have a small invisible “net” that will make the gifs look more uniform, use this especially when the lights or shadows and colors look grainy) or you can use Diffusion (to make it smoother and move flowy) you can try both and see which one suits your gif best 👍

and then the easier second option is to click the “4 copies” tab on top of the gif, and it will show you 4 different options, then you just select the one you like the best and it’s ready!

12 .- THE LAST STEP!!! TIP 11: make sure your final gif is smaller than 10MB (Tumblr's limit) and hit SAVE! and you are ready!! ヾ(≧▽≦*)o
This is our final result: A sexy Gojo 💙
Thank you for reading, I hope this helped you, and I can wait to see all of your creations! ✨
Feel free to tag me in your gifsets or to ask me any other question in case you need extra information or need me to explain something better 💖
Also, if you are an expert and would like to comment, change or suggest better steps and/or settings, please let me know! so we can all learn and grow 👍
#gif tutorial#tutorial#mygiftutorial#i apoloogize in advanced for any mistake or bad explanation#I really hope this help you to learn how to make gifs or to learn new steps or settings 💖#allresources#completeresources#rresources#please let me know if im doing something wrong#or if you would like to recommend me better settings or steps#i would gladly accept them! 🥰🥰🥰
161 notes
·
View notes
Text
Get to know you- Sims Style
I was tagged by @simbury
What’s your favorite Sims death?
-- I find it incredibly entertaining that sims can spontaneously combust if they get too warm.
Alpha CC or Maxis Match?
-- mix, but ig it leans towards realism nowadays.
Do you cheat your sims weight?
-- not that I can think of. sometimes if I am shooting a specific scene and they weren't that shape at the time. but not during gameplay.
Do you move objects?
-- absolutely. I'm incapable of decorating without moveobjects on honestly.
Favorite Mod?
-- uhm... I guess the 3t2 traits project or ACR/Romantic Standards.
First Expansion/Game Pack/Stuff Pack?
-- I have been playing ts2 since it literally came out, so my first ep was whichever one came out first. I think that was Uni? but in spirit of the question, for sims 4 I only bothered downloading the game when they came out with cottage living lol.
Do you pronounce live mode like aLIVE or LIVing?
-- aLIVE. my brain always said essentially like a movie set "and we're live!" so.
Who’s your favorite sim that you’ve made?
-- Evren Thorne (who you're more likely to see in @luverofralts or @nappe-plays-the-sims game than mine) because he's not story relevant yet, or (much to everyone's chagrin) Callum
Have you made a simself?
-- at some point far in the past, yes. I do not have that sim anymore, and I probably wouldn't do it again, but yk. I was also 11 when I started playing this game, so of course I made a digital barbie of myself. (not to say it's childish to do in and of itself, but that it's definitely something that every child tends to do)
Which is your favorite EA hair color?
-- since ts2 only has 4, I'm going to assume this was more ts4 centric. in which case I like the neutral blonde/light blonde colors (the two that are less yellow)
Favorite EA hair?
-- eh. for ts2 I wouldn't use any of them. for ts4... the mullet thing from werewolves? ig.
Favorite life stage?
-- teens or young adults. (I think I may be the only person I know how actively likes Uni for ts2 the most lmao)
Are you a builder or are you in it for the gameplay?
-- oh. both. depends on my mood.
Are you a CC creator?
-- yeeeup. recreationally though. (read: with no real consistency.)
Do you have any Simblr friends or a Sim Squad?
-- I feel like I do lmao. I at least hope they feel the same LOL.
Do you have any sims merch?
-- I now have a gameplay guide for the original Sims game lol. but I think that's all I own.
Do you have a YouTube for sims?
-- nope. I uh... don't like watching gameplay videos, and sims machinema is way too time consuming to make so I do not.
How has your “Sims style” changed throughout your years of playing?
-- oh gosh. I was one of those edgy emo kids so it was a lot of grunge and dyed hair and bright makeup. I've honestly been leaning a bit more towards that style again though so....
Who’s your favorite CC creator?
-- depends on what I'm looking for. tbh a LOT of the CC I have now is older stuff that I just still like. but anyone who isn't exclusively making 4t2 stuff is probably someone I've downloaded from.
How long have you had Simblr?
-- technically this blog since January 1st 2020. that being said, I moved from LJ to simblr in like.... idk, 2012? whenever that great migration happened.
How do you edit your pictures?
-- a lot of photoshop. color correction, a slight film grain at the very least. most times I also do aesthetic edits to hide clipping, and add painted hair strands nowadays. if I can't get an emotion right for a screenshot, I edit those too.
What expansion/ gamepack is your favorite?
-- for ts2 I really don't think I could pick one. the problem is I use like 90% of them for SOMETHING gameplay wise, even if I don't use the main function. ie: I love the chemistry/attraction from nightlife, even though the whole downtown thing is frankly annoying sometimes (do YOU WANT TO GO DOWNTOWN? no, random townie I do not. ) But, seeing as I listed it earlier, I guess university.
Tagging uhm.... @rebouks, @pralinesims, @luverofralts, and @nappe-plays-the-sims
14 notes
·
View notes
Note
Hello,
I absolutely love your gifs, it's what keeps me going till the next episode airs. It doesn't help when all you can think about is that while working but hah what's normal life, I love these dorks too much to care.
I wanted to ask you about gifs, specifically 33, 34 and 39 from your list.
Thank you
whaa- really? that’s so sweet; thank you 😭💖 talk about relatable- I’m not saying the brain rot’s been advanced enough that I’ve worked on edits at work, but that’s exactly what I’m saying.
33. give us a quick explanation of how you make a graphic / gif?
brevity’s not my strong suit (I usually respond to friend’s PS questions with screen-recorded voiceover videos 🤓) but I’ll do my damndest:
1. get my source video (I have a 2-page GDoc just with those resources).
2. open my source video in PS as-is (unless it’s a full-length movie or something). I rarely clip because my PC & the PS version I use (2020) can handle it.
3. change the video speed to 89%.
4. run an action to crop, resize & turn the video into a Smart Object, or do it manually w/ a bunch of keyboard shortcuts. it depends on what I’m doing.
5. run my sharpening action; tweak if needed for the scene I’m working with.
6. create my coloring or drag & drop previous colorings I’ve made; tweak as needed.
7. create subtitle GIF text if needed. I use the site SaveSubs for YT; otherwise, I type it out manually.
8. watermark it all ‘cause I enjoy making thieves look bad.
9. export & upload!
34. Gif makers, how many frames do you import? (And why!)
that’s an easy one: I have no clue. 99% of my sets are made in Timeline at 89% speed, so I rarely mess with individual frames.
I know some GIF makers who still use older versions of PS that don’t have Timeline, so it still has its place. Timeline’s just way easier to use IMO and has more advantages.
39. What software do you use to make graphics / gifs?
I use Photoshop CC because it allows me to GIF basically anywhere I am…the only other thing I need is Google Drive or my external hard drive.
to be really specific, I use PS 2020 because it exports GIFs way faster that 2021 or 2022, at least in my experience (Adobe support actually recommended the older version, too).
other must-haves: 4K Video Downloader, VLC and OBS with settings optimized for 1080p screenrecording.
ask me GIF questions
4 notes
·
View notes
Text
Adobe character animator tutorial

ADOBE CHARACTER ANIMATOR TUTORIAL HOW TO
ADOBE CHARACTER ANIMATOR TUTORIAL PDF
ADOBE CHARACTER ANIMATOR TUTORIAL UPDATE
ADOBE CHARACTER ANIMATOR TUTORIAL SOFTWARE
ADOBE CHARACTER ANIMATOR TUTORIAL TRIAL
Once you are positioned, click Set Rest Pose found right below the preview window.Ensure you are positioned in the center of the preview window.You will want to ensure that you are at eye level with the camera you are using. Setting the Rest Pose is a simple process, as outlined below. It allows you to look straight at the camera in a comfortable position, and the character will follow your movements. The Rest Pose is important to ensure that your puppet is not leaning off to one side. Now that your puppet is selected, and your camera and microphone are configured, you're ready to start animating! The first thing you will want to do with your new puppet is to set the Rest Pose.
ADOBE CHARACTER ANIMATOR TUTORIAL SOFTWARE
Once you decide on your example puppet, simply double-click your selection, and the software will open and insert the puppet into a Scene. If you select an alternate character, keep in mind that the triggers, draggers, and motion capabilities of your selected character may be different. From creative personal projects to producing professional content, this article will take you through the basics and help get your project started. For the character to work well in Adobe Character Animator the artwork should follow a specific structure and naming convention.
ADOBE CHARACTER ANIMATOR TUTORIAL TRIAL
Download the latest version or a free > trial of. Check out some of our top rated Adobe Character Animator professionals below FREE DOWNLOAD: Feel free to use and edit these however you want - no credit needed I watched all the videos (thanks Okay Samuri) for all the tutorials After Effects is the industry-standard software for motion-graphics pros, web designers and. Chill lofi Animation Tutorial in After Effects, Part 2 - 2D Fire. Selecting a region changes the language and/or content on this article, Stardust the unicorn will be used. Adobe Character Animator uses your camera and microphone to sync your movements and voice to a layered 2D character created in Photoshop or Illustrator. The puppet opens automatically in Photoshop or Illustrator and your work is directly synchronized with Adobe Character Animator It can be used for web development as well as animation To see new Character Animator > tutorials, visit the Ch tutorial home page Learn more about Adobe. Compare Adobe After Effects VS Flame and find out whats different, what people are. If you want to use the puppet in a composited scene, import a background from Adobe Stock or from a shared Creative Cloud Library.
ADOBE CHARACTER ANIMATOR TUTORIAL HOW TO
You'll learn how to build your puppet, use layers to make animation easier, add advanced movements and then record. Select the first PNG file in the exported PNG sequence. In Fundamentals of Adobe Character Animator CC Instructor Tony Harmer takes you through the basic process of creating, rigging and animating a puppet in Adobe Character Animator, to produce a performance character animation. 109 web, 31213 Animation Presets 3D text, 131 Adobe-supplied, 8081. Animate expressive characters using real-time performance capture with Character Animator. included on this book's DVD: Pre-Roll User Interface.mov Lesson 3 Effects. Take a tour of the different modes (Rig, Record, and Stream) in Character Animator. Gain an understanding of the basic naming, organizing, and tagging structure for characters. Now launch After Effects and choose File > Scripts > New Comp from Character Animator Recording.jsx. Start with characters created in Photoshop or Illustrator. This exports the video as a PNG sequence and the audio as a WAV file to use in After Effects.
Export an image sequence: Choose File > Export > PNG Sequence and WAV and specify a name and location.
Animate in real time with Character Animator, or use Animate to create interactive vector animations. Adobe offers animation apps that work with all your ideas.
ADOBE CHARACTER ANIMATOR TUTORIAL UPDATE
When you use Dynamic Link, any changes you make to the puppet in Character Animator will automatically update in After Effects. Essential apps for motion graphics and animation. Drag the scene from the Project panel in Character Animator to the Project panel in After Effects and then right-click it and select New Comp from Selection.
ADOBE CHARACTER ANIMATOR TUTORIAL PDF
• Use Dynamic Link: Launch After Effects. Added new faster navigation Free cliparts that you can download to you computer and use in your designs A very basic character can only have a front view for the head and the body Download a blank puppet template for Adobe Illustrator Glitter Font On Canva Patterns are Adobe PDF files Adobe Character > Animator Tutorial: How to create your own. This video will help you get started in Adobe Character Animator, learn the basics about Adobe Character Animator.
You now have two options for bringing your character into Adobe After Effects: Create intros, transitions, and more with After Effects. Adobe offers animation apps that work with all your ideas and each other. When you’re finished animating, select the scene in the Project panel and adjust the scene’s duration in the Properties panel. Essential apps for motion graphics and animation.
0 notes
Note
(☁️)
HIIII it's 3 am and i'm trying to sleep but brain went brr with ideas n shit and oh well- thing is ; i was wondering if i could make my first request? (smth simple if u want to, no need to be very long or anything + pls don't rush nd take ur time AND don't feel pressured to actually do my request :] ! ) maybe smth ab faceless art streamer! y/n [they/them]?? (if u could add that the reader is like an indie game dev or works for smth like that u'd be sosososososo cool omg) with maybe quackity, tommy, dream, ranboo, niki and/or jack?? idk brain did the storming and its all messy hsdnshhfjsjz (btw! i know it's a lot of CCs so feel free to remove some or do the ones ur only comfy with !!! take care nd stay safe !!! luv ya <3 (/p))
AS SOMEONE WHO LIKES TO GAME DESIGN, CHARACTER, AND PLOT DESIGN YOU BET I CAN MAKE THE READER AND INDIE GAME DEV (and aaaa ty for adding jack!!! I think he's really neat and not enough people acknowledge him :))!!)
Multiple x indie game dev!artist!y/n
pairings: quackity, tommy, dream, ranboo, niki, jack manifold (separate) x indie game dev!artist!y/n
pronouns: they/them
other information on the reader:
. faceless
. knows how to code
. artist
. streams them drawing video game characters
. minor
. makes indie / horror games
form: headcanons
genre: platonic, fluff(??)
warnings: horror games / horror mods, ranboo enderwalk lore in his section
abbreviations: y/n -> your name
quackity
okay let's get the obvious out of the way; definitely going to be the type of person that's like "I'm going to play this game first after you're finished" yk? playfully ofc, n playfully fight with anyone who says the same thing (*cough* Wilbur, tommy, dream *cough*)
he probably wouldn't be on your art streams often – he doesn't really enjoy watching people draw, but he would want to see the finished pics
he would happily be on voice chat with you while you're drawing though!! :D
would be proud to answer any questions you have about character / scene / etc designs!!
"quackity!! so for this character – check your dms for a current picture – would red or purple antenna be better? also, two or four antenna?"
"*gasp* you're asking me?? 🥺" /j
"y'know what, nevermind, chat wh-"
"NO WAIT WAIT"
"so what do you think?"
also, if you do end up sending him the finished pics of the art he will hype you tf up !!!!
would try to get you make joke games – not like actually, it's just an ongoing bit between you two!
if you make a game for him – or give him a sneak peek of a game before anyone else he's going to freak out!! and he won't really know what to say bc putting feelings into words is hard
if y'all ever meet up and you're fine w hugs he's gonna give you a huge hug, hoping that makes up for the lack of words to describe how just,, proud of you he is bc he really really is!!
you're not even in your 20s yet and you can make video games, or help with them?? not to mention how creative you are with the characters and story line??? he's amazed by you
might actually cry /pos if you base a character off of him
like let's say a part of a puzzle is to get a rubber duck and place it into a pond to get the next hint or thing you need – only when he plays it on stream, he doesn't know anything about the game, so you're watching and waiting for him to get there
when he does get there – he finds out the duck has a beanie and has a white ring appear around it that flashes to life before fading out after picking it up, signifying it was the right thing to get
at first he doesn't really notice the ring, "oh! that animation is different than normal" he notes, but mainly focuses on the beanie, comparing it to himself before he glances at chat to see them freaking out over the planet duck reference
then he's just talking about it, shocked of course but flattered, and then you type in chat "you helped me a ton with things I couldn't decide during this game, I couldn't not add you! :)" everyone's just :(((( !!! /pos
overall supportive n proud, maybe a bit loud about games in progress, but just a really nice guy in general :)
tommy
he is ABSOLUTELY loud about your games in progress!! if you don't want something said you have to tell that to him before telling him or else he's going to brag about how cool it is the next time he streams
"chat!! chat, y/n is making this new game and they told me that one of the outfits you can collect for the player is going to be based off me!- right!! that sounds pog!!"
if he ever accidentally let's anything slip on stream that he was supposed to say, everyone who's a fan of you is just like "wow! suddenly! I cannot hear anymore!", sometimes they're like that even if it was okay to say
the just like being surprised :)
as for art streams, he'll try his best to tune in but obviously won't be there all the time! he's usually very active in chat too! likes being on call with you while you do art streams if you let him!
he once convinced you to make a texture pack and a shader (meant for both to be active at the same time), the fans loved it and a lot of them use it more often than the original!!
tommy however, not to much, proud of you bc that must've been a ton of work!! but at some time it slipped his mind that you make indie and horror games; I think we all know he doesn't do well with horror games
so you liking horror and such made the textures look more ominous and just make it look like and area you don't want to be in, and the spook goes up even more with the shader!! it's darker than usual, there's unusual fog, the portals look too dangerous now, so on and so forth yk
so,, tommy didn't use the texture pack for long;;
if you ever raid him after you're done streaming and he has a question, he's literally just gonna ask you on stream
"y/n raid? oh! are they still here?" when you confirm you're in chat, he continues "great! okay I had a question about your new game that's going to be available soon and how to download it-"
fans love how casual you guys are about game information, like you had to teach him how to export a game character he made on the website you usually make yours on (it was for a fun stream) and it was just a simple back and forth but everyone's like omg :((( omg them :((
also if you're the type of person to go insane over tiny details in other games, he will absolutely tease you for it
like you can just be going on and on about how this game had a sentence at the start that had a backhanded meaning by the end and he's just gonna call you a nerd (genuinely thinks is cool how much of the small things you notice in games though)
dream
COMPLAINING ABOUT CODING AND HOW HARD IT IS 🤝🤝
and if you took other coding classes hoping that I'd help with video game coding he'd just listen to you talk about it
"I actually took robotics for a while before because the school didn't have any video game coding classes and I was hoping it'd help either way" "oh?" "it,, it didn't help, it's so hard to code robots and considering how fast I caught onto video game code you think it'd be easier to understand the robot code" "yeah, that sounds reasonable" "NOPE,, WHY R THEY SO DIFFERENT I ALMOST FAILED" "D:"
fanartists like those moments, if one of those talks happen expect a bit of fanart of just dream and you chilling while you talk and he listens, the art always gives off comfy vibes n it's just cute :)
offering him to play a semi-rough draft of the demo so that he could see if it's good or what you needed to do to make it more enticing for the player
power duo fr fr o/
people like comparing y'all to hackers sometimes bc y'all know how to code???
you play into the bit with the fans though and honestly it's so fun !!!
fans: omg,, hackers (affectionate),,,
you next time you stream: hacker voice; I'm in
AND THEY GOT SHOCKED??? LIKE THEY FORGOT YOU CAN SEE THE STUFF THEY POST????
wouldn't be able to watch your art streams for long because he would get side tracked, the streams are just too under stimulating for his brain to focus on, but he'd hang around as long as he could though :)
would be glad to be on call with you while you're doing an art stream – though if he has is game sounds on you may occasionally have to repeat a question that was aimed at him
you're also in his streams when you can :)
also, you like sending donations to communicate rather than chat
one stream dream turned off his donos because you wouldn't stop giving him money 💀
being friends with such a popular creator and being a game creator yourself has it's downs as well
nothing thats too hard to deal with – the most common one is actually kinda funny – some people will slide in your dms acting like they're dream and just got locked out of his account, trying to get you to make them a game
like ??? do they think that dream would mssg you over Twitter or insta?? he has your phone number bro ,😭
also!!! when dream plays through new games you made he complements the small things and complements how hard something must've been to code :)
and I'm ngl, he kinda sucks with every game he plays at first but he's a quick learner so dw :)
would be glad to help if you're having a difficult time choosing between things too! except he'll answer right away without any teasing
"dreammm" "y/nnnn" "for this area should I do like shattered stone walls or mossy stone walls like with vines n stuff?" "depends on the vibe you want, shattered stone would give it a dangerous and uneasy undertone and mossy stone would be more of ominous, if that makes sense?" "oh! okay, thank youuu!!"
ofc if you didn't have a specific vibe or couldn't choose which was better he would just give a straight up answer so you didn't stress out trying to choose one \o/
would absolutely like being a guest in a drawing stream, he isn't the best at art or character design but it's fun to see him try
maybe you both plus some friends do a "drawing Minecraft mobs from memory" stream? ,, with that the thing is; his would mostly be relatively accurate if you could understand wtf he was drawing 😭
dream may or may or have some of your art as his phone homescreen, he loves your style so much :(( /pos
ranboo
first off; he's incredibly impressed!! like!!! you made this game?? this playable game, completely from scratch??? how??
also you may or may not have made a small Minecraft mod for him to tryout on stream,, little gift from you to both chat n ranboo 🤲
its literally all based off his lore,, if you get close to obsidian and crying obsidian fallen down from Undertale starts playing, if you splash water on yourself 1) you get hurt 2) your screen blacks out and when it comes back, your in a different place than before, some things art taken, maybe a few extra things are added
and there's a 50% chance that when you go into your "enderwalk" state (the blackout) you blow something up, so there may or may not be an explosion somewhere nearby, you also have a 20% chance of building something small in you enderwalk state :)
he found it so incredibly cool!!! chat was crying while complementing you while ranboo thanked you and complemented you over n over again
he won't shut up about how cool the mod is for several weeks, maybe even a few months, it's just so cool!!
will absolutely use it as a comeback if you let him; "oh? you got first place? well y/n made me a really really cool mod, so who's the actual winner here?"
will absolutely play every single game you come out with – it doesn't matter if it's his style or not – and he thoroughly enjoys all of the games as well
as for art streams, he will absolutely try to tune in every time he can!! active in chat and donos!!
doesn't really like being in art streams – like in call is fine but actually drawing? not really, he just doesn't love drawing in front of a ton of people
but will join an art stream if you ask
will listen to you rant about whatever, even if he doesn't understand it! like will listen to you go on and on about how well a game set up the atmosphere or maybe talking about how difficult coding is, and he'll converse back with you but won't really understand yk?
"ranboo I just played a really cool game do you wanna hear about it?" "yeah yeah- of course!!" "ok so like, the atmosphere was so well put together- like it was a horror game and I didn't even see the monster but the vibe was so well put together that it was still unnerving!!" "that's awesome! how did the atmosphere get set up the best and when you saw the monster, was it scarier?"
yk what I mean? like engages in convo so you don't feel bad about talking so much, plus shows his interest without the constant "hm?" "cool" etc a lot of people do and even though he does talk more than the acknowledgment sounds many people make he also manages to almost never sidetrack you and when he does it's on accident :)
if your way of learning is teaching then he'll gladly be the person you teach it to if you want! most likely won't use the information therefore his brain won't retain it but that's not on you, and the whole reason is so you can learn, not him, so! ^^
will make sure to take care of yourself, and he has a through way of telling if you have or not bc he's known you for long enough to know that even if you try to hide it a little bit of your tired voice shows so he knows if you've been sleeping like you should
also friends with you on discord, where you have your Spotify attached,, you like listening to music while you work on things that aren't sound related and if it's active later than it should be he's going to confront you
overall wholesome mixed in with a little pain bc both of you are like "ah yes, lore <3" and like to see fans cry /lh
niki
I feel like this is expected but if you need to get extra motivation she would probably be your go-to
she hypes you up but like, in a sweet and quiet kinda way, where as everyone else here would probably be relatively loud ;;
honored to be on an art stream if you invite her :')
and would absolutely watch your art streams when she can :D hypes you up in chat
also compliments, tons of compliments!
might call you a prodigy? bc you're so young but can already make games?? and make income off of them?? and do really good art??? and so much more??? like tell me that's not prodigy energy,
if you make a video game character based off her she might cry,, like in a positive way obviously but like at the same time :(( no don't cry!!
I say might bc it's dependant on how she feels that day yk? like she might just have the almost-cry wobble to her voice or she might actually, if that makes sense?
she genuinely loves your art style!! even if it's pointy and kinda creepy she really likes it!!
yk the "awww (name) :(" /pos she does sometimes? 100% does that with you
there are a few compilations of just "aww y/nnn" on YouTube and all the comments on those videos are just crying over y'all /pos
would be happy to help if you're stuck between some options in a game, but would feel kinda bad bc it's your game, you're supposed to be the one choosing the stuff
assure her that it's okay n stuff n she'll be ok tho !
I can't decide if she would play your games or not
bc on one hand she's a huge supporter of you and your work and would like to experience it first hand
but on the other hand she isn't the best with scry games,,
so maybe she'd do both? maybe she'd react on stream to a playthrough, maybe your playthrough? or maybe she would only play some of your games? I haven't decided so up to you I suppose!
jack manifold
genuinely amazed by your talent and will make it quite clear!!
can and will go on tangents about you on stream if someone brings it up
everyone is so :(( <333 /pos bc of it
will play the games you've made as soon as he can
if there are different games that line up in a story he'll make sure to play them in order :)
people also sometimes compare you two to hackers bc you code a ton and he kinda looks like a hacker
difference here is that both of you play into the bit, it's tons of fun!!
listen, I know he doesn't draw much but I am a firm believer that he will doodle his favorite character(s) from your games after he's done playing them
like after he plays a game of yours then expect a small doodle in your texts :)
you compiled a bunch of these doodles into one picture and made it you phone background and he only found out after y'all met irl and it caught the corner of his eye and he registered "oh hey wait that looks familiar"
he found out while recording the vlog n when editing, the editor was like "hey let's leave this in, it'd be funny if the fans knew right?" ,, the fans were crying for two weeks,, /pos
and speaking of drawings; he would like to be on a drawing stream with you, thinks it's be tons of fun!! :D
and he's usually free to call while your streaming and doesn't mind so if you wanna talk to him while drawing just call :)
and he will watch the streams he can make it to!! he may leave a bit early but he stays for the majority of it
if you make a character based off of him he's going to constantly thank you and brag about how cool you are anywhere he can
"hello manifolders, if you haven't done it already go download (game name)! I'm there!" with a ss of his character from the game and he'll reply to the tweet on his alt to talk more about the game and how much he really liked it :)
another that'll help you were you need it! he'll make it into a joke before anything else, but he'll get to the point
taglist (sorry i forgot to do it on the past two): @cvsmixplant // @l0ver0fj0y // @youngstarfishdinosaur
#asked and answered#request#headcanons#platonic!reader#platonic fanfic#platonic x reader#jack manifold x reader#niki x reader#dream x reader#tommy x reader#quackity x reader#ranboo x reader#streamer!au#mcyt x reader#streamer!reader#streamer!y/n#fanfic#headcanon#☁️ anon#game dev!reader#game dev! reader#artist!reader#artist! reader#platonic ranboo x reader#platonic dream x reader#platonic tommy x reader#platonic quackity x reader#platonic niki x reader#platonic jack manifold x reader#jack x reader
655 notes
·
View notes
Text
🌻 a gif tutorial by: me! 🌻
i know there are so so many WONDERFUL tutorials out there, but i can’t say no to a very kind anon so!!! here we go. hopefully this is helpful for someone out there! if anyone doesn’t do well with picture tutorials and would find it more helpful for me to do a video, i would also be happy to try that too!!
this is definitely not the fastest way to do it, i’m sure, just the way i’ve always done it and i’m bad at learning new things so ldkjfoiw also i’m using photoshop cc 2021 (tho this method should work for any version of photoshop i think) and i use video frames to layers to gif just as an fyi
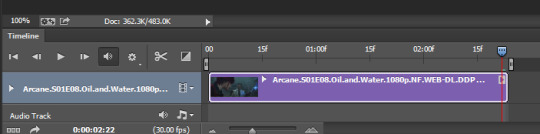
step 1: get whatever media you’re giffing! i use torrents and direct downloads. that’s how i’ve always giffed, i’ve never tried capping so i can’t help with that. sorry!
step 2: make clips of the scenes your fc is in! i have a folder dedicated to the character the fc is playing and keep all my clips in there. when i do movies, i typically only do about 12 clips at a time because it just feels less overwhelming for me. when i do a show, i only clip one episode at a time for the same reason. i use quicktime to clip, but i know some people use VLC and i’m sure there are other options out there to try, too! again, this is just what i’ve always used so i’m comfortable with it and know how it works.
when i clip, i try to start the clip a few seconds before the scene my subject is in and a few seconds after just to make sure i’m getting every single frame.
step 3: import video frames to layers! so once you have photoshop open, go to file > import > import video frames to layers
then go to your folder where you have all your clips saved and choose the one you want. i took this one out of my trash because the rest of the gifs i have to do in this episode are in the dark and that was gonna be too annoying to me lkdjfkslofw so i’m just re-making one i already did a few days ago. i’m giffing sofia carson and you can see that my clip starts on someone else’s face so i can make sure i have every frame of hers!
step 4: select the range for your gif! just like with clipping, i try to get a few frames before and a few frames after of the fc i’m working on so that i don’t miss anything. if you aren’t interested in giffing them in every single second (which is totally fine, i know a lot of people prefer not to!) then you don’t need to be as concerned with it

because i’m using a direct download, i’m not going to limit my frames to every 2. it’ll be really fast and choppy. if you screen recorded, i would suggest limited to every 2 frames and then going through and deleting each duplicate frame (when i giffed via screen recording, i found that every 6 frames or so was a duplicate). this will make sure your gif is smooth and exactly the same as one made from a direct download. it IS time consuming though, so i recommend doing a direct download/torrent if possible! if you ever need help finding downloads or need something torrented and converted for you, please feel free to message me and i’ll be happy to help!!
step 5: delete the frames you don’t need! this is the time to delete any extra frames at the beginning, end, and any duplicates
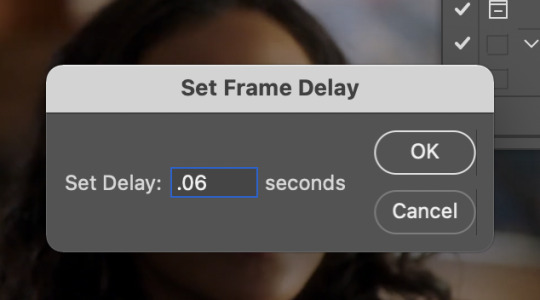
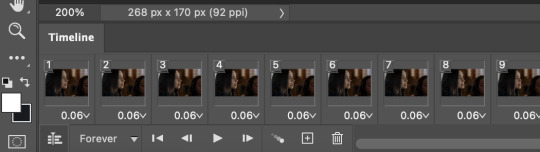
step 6: set your speed! you can do this later if you want, but i like to do it as soon as all my extra frames are deleted. my personal preference is typically .06 seconds for most of my gifs. if they’re on the shorter side (under 35 frames), i’ll do .07-.09. i know some people have very strong feelings on gif speed lskdfjpwe i do not. it’s all about what feels best for you! .06 is where i feel my gifs feel the best, but there are plenty of beautiful gifs that are slower or faster!
step 7: crop it! as you can see above, i set my W x H ratio to 268px x 170px. this is a size i really like, but you can make yours smaller or larger. i do suggest using the W x H ratio setting to set it to your specific pixel measurements because it cuts out having to resize after cropping.
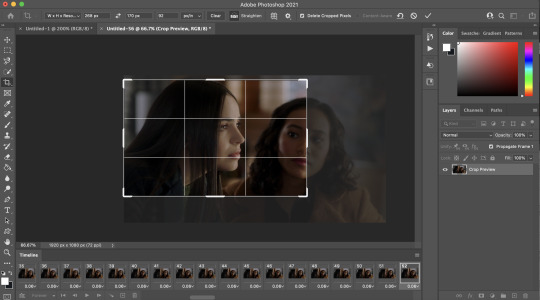
also, i have a few hundred frames in this one particular gif that i’m going to cut down in the next step. however, i know that she remains pretty much in the same place throughout the frames which is why i’m cropping them all at once. if it’s a gif where you get a few hundred frames that you’re going to turn into multiple gifs and the person moves around a lot, definitely only crop one gif at a time!
step 8: delete the frames you aren’t using! everyone has a different way of deciding how many frames their gifs are. for me, if they’re talking, i actually go and watch the segment i’m giffing to see what they’re saying, read their lips as i go through each frame, and crop it there. it’s a little more time consuming i guess but i feel like it gives me the best results. totally optional, though! if the person is NOT talking, then i typically just try to make it between 60-80ish frames and base it on facial expressions or body language. sometimes it’s more, sometimes it’s less! again just comes down to what your preference is.

step 9: convert to timeline! basically just press that lil highlighted button down there next to the “forever” and convert to timeline. pretty self explanatory
step 10: sharpening! this is where i use my sharpening action which is linked right here. i’ve been using it for a while now and i really love it! i’ve tried other sharpening actions since i made it and they just don’t make me as happy as this one lol
hit play on your action:
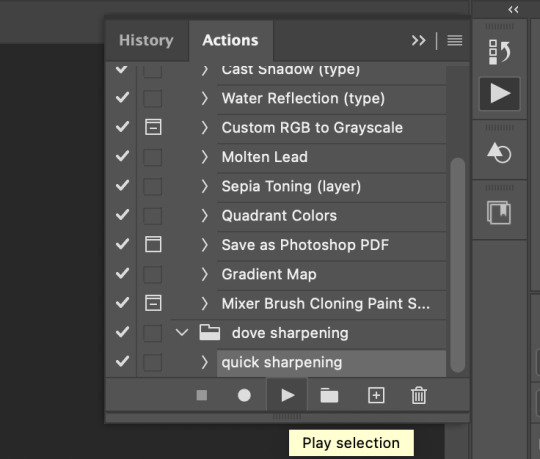
for my action, i get this popup twice and just hit “continue” and it keeps going through the steps with no problem
step 11: COLORING!!! get your psd and slap it on! i have different one base psd that i use for almost everything and will edit it to fit whatever scene/show/movie i’m working on. i’ll also save different versions of it based on the media i’m giffing. for example, the lighting on liv & maddie is SUUUUUPER different from the writing on pll: the perfectionists. so i have a “liv” psd and a “loralie” (name of my char that i use sofia for, idk why i named the first psd after liv and not my char but whatever ldkfjsoi) psd. same base, same layers, just different levels. i also will often combine psds! i’ll put my base down and then add layers from other psds or create new ones to fit whatever scene i have going!
step 12: save your gif! go to file > export > save for web (legacy)...
people use different settings for saving their gifs, too. these are my personal settings. i really like them and feel they work for my gifs. feel free to copy them or play around with your own settings! just make sure it’s always on the 256 colors
step 13 (optional): preview! i like to hit the preview button just to make sure i like my gif before i save it. if i don’t like it (coloring looks off, too fast/too slow, feels like it cuts off in a weird place) i’ll hit cancel and undo everything until i’m back to wherever i need to fix it.
step 14: save your gif, yay!! YOU DID IT!!!! save that beautiful gif and feel so proud of yourself!!

step 15 (optional): if you’re making multiple gifs from the segment you imported, go back and cntrl/cmmnd + z everything until you’re back to having allllll the frames again. delete the frames of the gif you just made (in this case, it would be 52) and start again from step 8!
i hope this made sense and was helpful for anyone! please let me know if there’s anything you need clarification on!!
35 notes
·
View notes
Photo
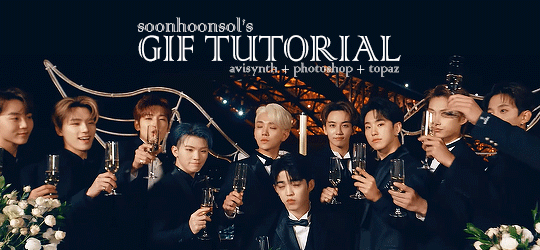
Welcome to soonhoonsol’s gif tutorial!
As a nice anon asked me how I make my gifs, I thought it’d be cool to create an in-depth tutorial :) Perhaps this can help some others enter the gif-ing world too!
What we’ll be using for this tutorial:
Software: Bandicam, Avisynth, Photoshop CC 2018, Topaz Labs
File Format: .mp4
Operating System: Windows
Disclaimer: This is just my method. Every gif maker works differently and has different preferences. What works for me may not work for you, and that’s completely okay!
Let’s get into it!
1. Find the best quality video you can find
This really depends on the content you want to gif. For variety shows, music videos or photoshoots, any video of [1080p] should be sufficient. Try not to use anything below 720p.
For stage performances, fancams tend to have higher resolutions [1440p, 4k]. Use these if your computer can handle it. If not, usually 1080p works fine. The best option would be to download .ts files, which provide clearer and less grainy videos.
For Seventeen, you can get .ts files from The Rosebay on Twitter :)
2. Screen recording
As a Windows user, I don’t have a built-in screen recorder on my laptop. So, I use Bandicam, which is a free screen recording software. The only con to it is that it has a watermark.
To combat the watermark, I always have the boundary box a little bigger than the video itself so that I can crop it out of the gif.
This is what the recording would look like:
Just record the scene(s) that you want to gif so your video file doesn’t end up too large! Your recording should be in .mp4 format.
(You may use pure .ts files in Avisynth but it never worked well for me so I usually screen record the .ts video and move on)
You can find your recorded videos in Documents > Bandicam.
3. Avisynth
I followed THIS tutorial to download Avisynth. This software is really helpful if you want sharp and clear gifs! I recommend to follow the steps in the tutorial as the below method stems from it.
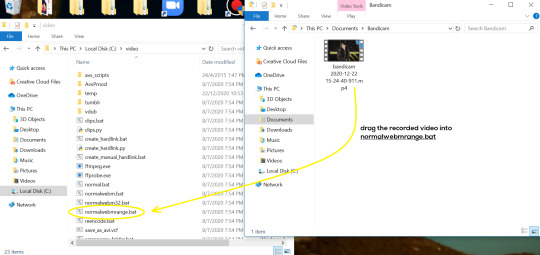
- Once you have downloaded it, open up your recorded video from Step 2 and watch it. Take note of the duration you want to gif. (e.g. from 00:01 to 00:05)
- Drag your video file into normalwebrange.bat. On Windows, you can find this in File Explorer > Local Disk (C:) > video. For other .bat files, you may check out THIS tutorial.
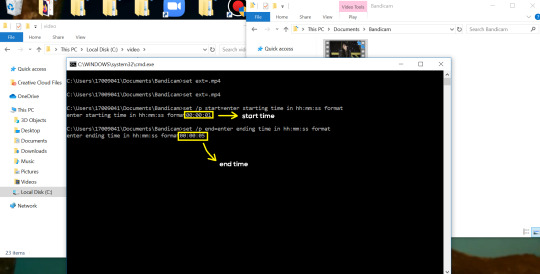
- In the pop-up box, key in the start time for your gif (e.g. 00:00:01). It has to be in hh:mm:ss format. Press “enter”.
- Key in the end timing and press “enter” again. A resizer should pop up in an Internet Browser. I found that Firefox works best for me.
- In the resizer, you may indicate the size of the gif you’d like to make. You can also click and drag the video to resize and frame it to your liking. You may refer to THIS post for Tumblr dashboard sizing.
(These are some common gif sizes for stage performances):
1 gif - 540px by 540px (square)
2 gifs - 268px by 350px
3 gifs - 177/178px by 250px
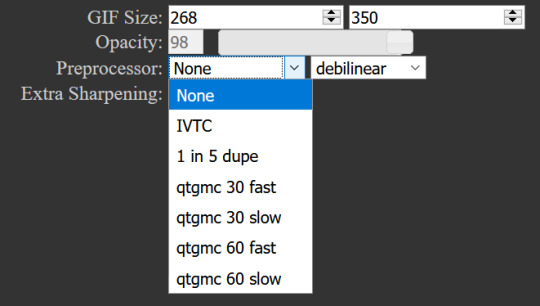
- Under “Preprocessor”, select “debilinear” for the second box. For the first box, you may pick between qtgmc 30 (same frame rate as video) or qtgmc 60 (doubles the frame rate; smoother).
- You will also see “fast” or “slow” options. These are just how long the video will take to render. “Fast” will give you slightly lower quality as compared to “slow”, but usually is good enough.
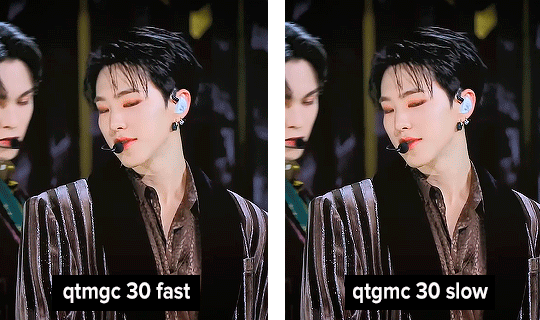
(You can see that his features are sharper and more defined in the “slow” gif as compared to the “fast” one.)
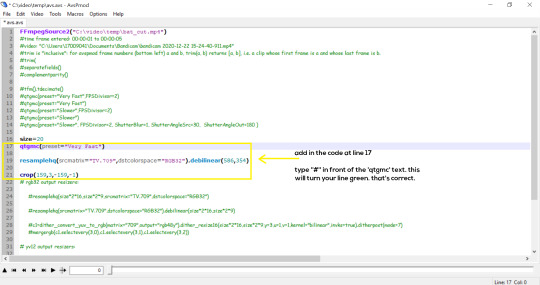
- Copy the code in the white box. Navigate to the scripting window (it should have popped up with the resizer) and paste the code at line 17. Type a “#” before qtgmc on the same line. This will prevent the software from lagging.
- Click on the inverted triangle at the bottom of the screen. Your video will now appear in the scripting window. Drag the slider to the intended starting point of your gif and press the “home” key on your keyboard.
- Drag the slider again to the intended ending point of your gif and press the “end” key on your keyboard. This blue area you see is the duration of your gif.
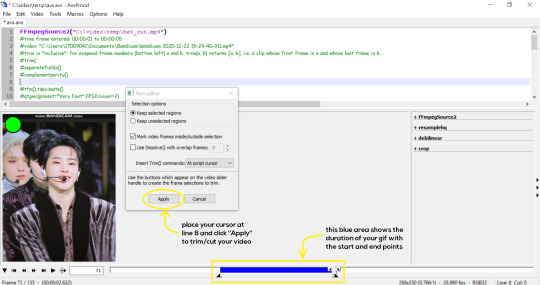
- On an empty line (I usually go to line 8), place your cursor there and click “Apply” in the mini pop-up window. Afterwards, remove the “#” from line 17.
- Go to File > Save or press Ctrl + S to save the code. Close the scripting window. The video renderer will pop up. When it’s done, it will automatically close by itself.
4. Using Photoshop and Topaz
I’m using my school license for Photoshop 2018, but if you don’t have that, there are plenty of cracked versions for free. I don’t have any to recommend though so I’m sorry about that :(
I followed THIS video tutorial to download Topaz plug-ins for free. I use Topaz DeNoise (the most helpful) and Clean, but you may use others if you’d like :)
Alright, let’s dive in to the steps!
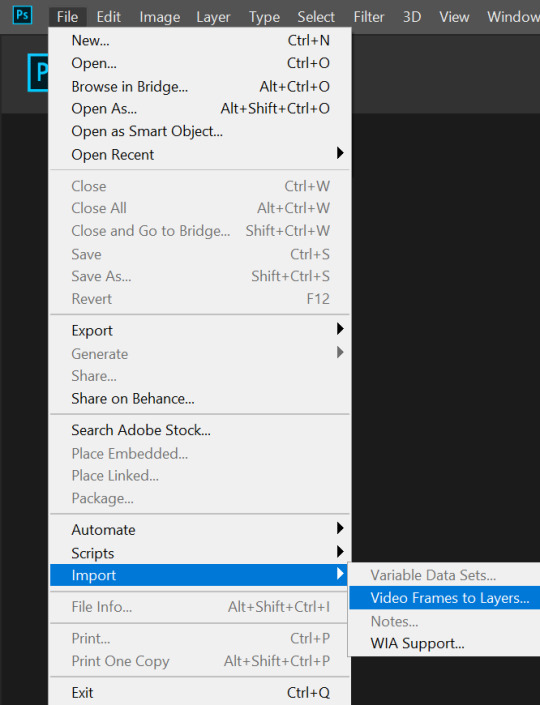
- Open up Photoshop and go to File > Import > Video Frames to Layers.
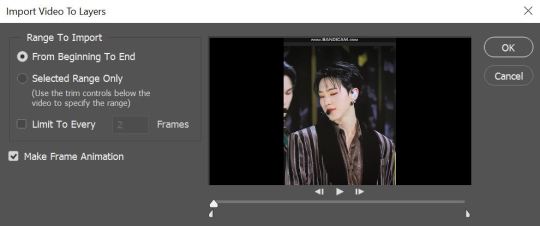
- A pop-up will appear. You can find your deinterlaced Avisynth video in File Explorer > Local Disk (C:) > video > temp > video.avi. Follow the settings in the picture and click “OK”.
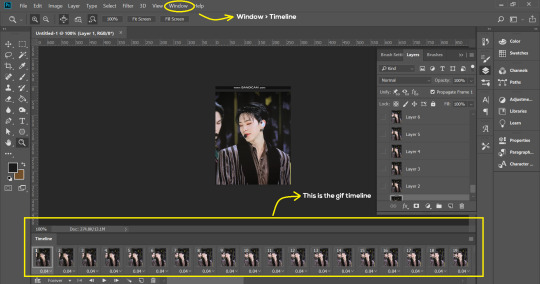
- Go to Window > Timeline to open up the timeline. You should be able to see your gif spread out in frames. If you press the play button, it should play like a video.
- (Quick optional step I learned from THIS tutorial) Go to Image > Canvas and set the Resample option to “Bicubic (smooth gradients)”.)
- Select the first frame of your gif in the timeline. Shift select the last frame. Go to Window > Layers. Shift select these layers as well.
- With everything selected, click the 3 lines at the top right corner of the timeline. Select “Convert to Video Timeline”.
- At the top of the screen, select Filter > Convert for Smart Filters. Your layers will condense into one layer. Don’t worry, your gif is fine.
- Now it’s time to sharpen the gifs. Go to Filter > Sharpen > Smart Sharpen. Play around with the settings to your liking!
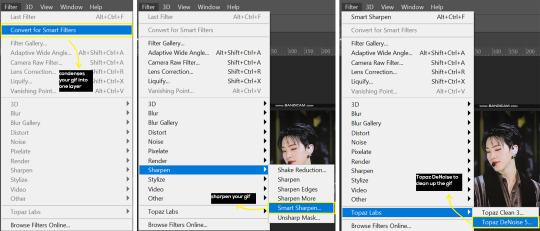
- If you’ve downloaded Topaz correctly, it should appear under Filter > Topaz Labs. If a pop-up asks you for an activation key, you may use THESE to activate it for free.
- Go to Filter > Topaz Labs > DeNoise and/or Clean and play with the settings until you’re satisfied.
5. Blurring
If your gifs have captions/logos that are distracting, you’d want to blur them out. Don’t be like 2018 me that blurred out the logo frame by frame; it’s very tiring. Instead, using this method from @scoupsy‘s tutorial, you’ll save lots of time.
- In the Layers tab (Windows > Layers), select the “New Layer” icon. It should be blank.
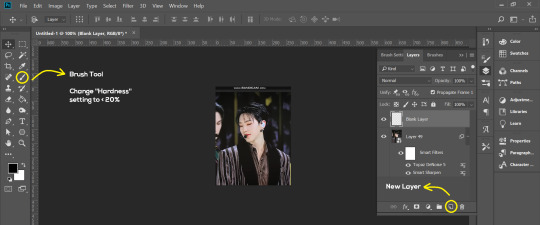
- Select the Brush tool. Make sure the “Hardness” setting is below 20%. This will blend the blurring nicely into the gif.
(For the sake of this tutorial, I will be blurring out the Bandicam logo to show you.)
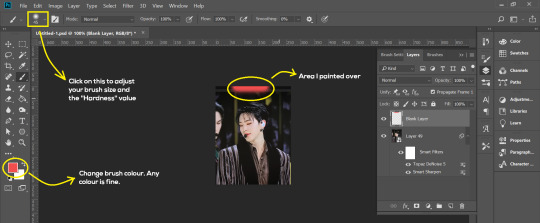
- Paint over the captions/logos. Make sure this is on the blank layer!
- Duplicate (Right Click > Duplicate) the gif layer and drag it so that it’s on top of the blank layer.
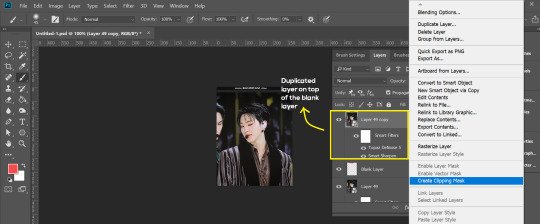
- Right click on the duplicate layer and select “Create Clipping Mask”.
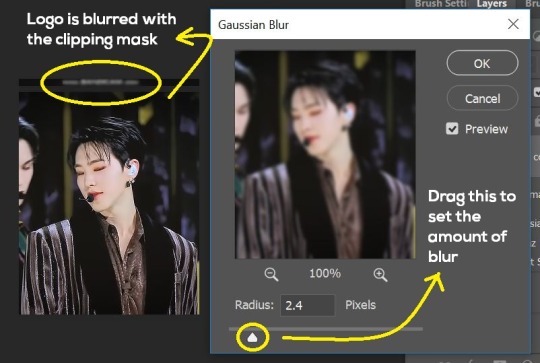
- Go to Filter > Blur > Gaussian Blur and play around with the settings until you’re satisfied with the level of blurring. Click “OK”.
6. Flattening & Colouring
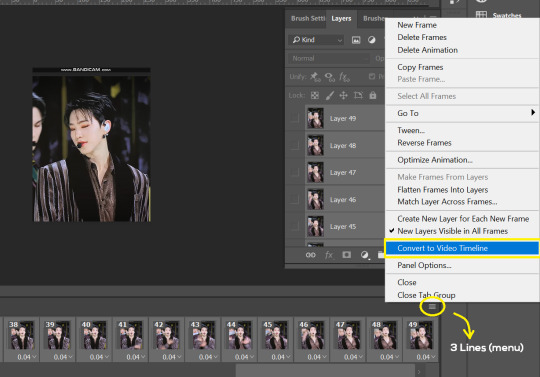
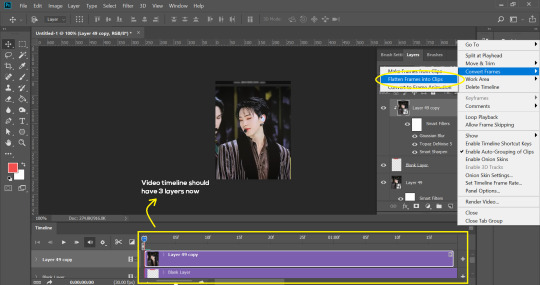
- Once you’re done with sharpening and/or blurring, click on the 3 lines on at the right corner of the video timeline and go to Convert Frames > Flatten Frames Into Clips.
- Topaz layers and blurring will take some time to render so you can just chill for now~
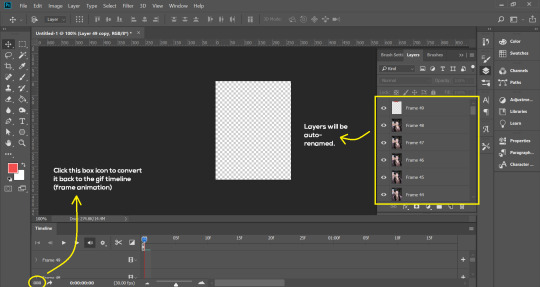
- When it’s done rendering, click again on the 3 lines and go to Convert Frames > Make Frames From Clips.
- Convert it back to the gif timeline by clicking on the 3-box icon at the bottom left of the timeline.
- Select the first frame of your gif. It must be the FIRST.
- Scroll to the top of the layers and select the layer at the top. Any other layers you add should be on top of this layer. VERY IMPORTANT!!
- In the Adjustments Tab (Window > Adjustments), there are many different things to play with. There’s a high chance you won’t use everything, but here’s a few of my favourites.
Levels - Adjust the brightness and contrast of your gif in depth.
Hue/Saturation - Useful for changing colours, or switching it to black and white.
Color Balance - Tweak the colours to your liking.
Colour Lookup - Comes with built-in LUTs that you can use as a preset. Great starting point for colouring. Saves time too. You can even download plug-ins for this. 11/10 tool.
Selective Colour - Adjust the vibrancy of specific colours.
- Colouring is completely up to the gifmaker. Go crazy go stupid :D
7. Exporting
We’re almost to the end!
- Set the timing for your gif.
If you used qtgmc30, the best timing would be 0.04s / 0.05s / 0.06s.
If you used qtgmc60, the best timing would be 0.02s / 0.03s / 0.04s.
- Once you’re satisfied with everything, go to File > Export > Save for Web (Legacy).
- Follow the settings in the picture below:
- Tumblr’s gif limit is 10mb per gif. Check the gif size at the bottom left of the pop-up window. Make sure it’s below 10mb; the smaller the better.
- Click “Save”. Choose where you’d like to save the gif.
- Done!
~~~~~~~~~~~~~~~~
And that’s it! You’ve successfully made a gif! Good job you :D
I hope this tutorial was helpful! Please leave some feedback if it helped, or if you have other methods you’d like to share :)
Lastly, if you have any questions, feel free to send in an ask or DM me!! :)
Good luck and happy gif-ing :’D
#gif tutorial#kpop gifs#avisynth tutorial#topaz tutorial#gifs#chey.resource#kpop#idk what else to tag so...#i finally posted the tutorial yay!!#please spare a reblog if you find this even remotely helpful thank you <3#also to spread it hehe i spent a lot of time on this#if anyone has any questions please feel free to DM me!!#i apologize if there are any spelling errors
221 notes
·
View notes
Note
Hey! Can I ask how you gif? Your gifs are so pretty and I’ve been wanting to learn how to do it. I know I could also probably google it so if you don’t feel like answering I understand
it's a bit of a process so i'll put stuff under the cut! not sure if this will be the best tutorial but i'll try!
things i use: a torrent downloader, kmplayer, photoshop cc
first off! download the episode you want the gifs from! i get mine off piratebay and use utorrent as my downloader. lots of tips on how to do that online so i'll skip over that
open up the episode in kmplayer and hit ctrl+g (or cmd+g if ur on mac i think? the rest of this will be PC specific since thats what i use for gifs) to open up the capture settings. the top bar is where you want the caps to be sent to- make a different folder for each gif u want to make.
these are the settings i use. bitmap format is a lil faster and wrecks ur pc less and its perfectly passable! png is the best quality but it makes my laptop chug like hell so i use jpg (the happy medium)
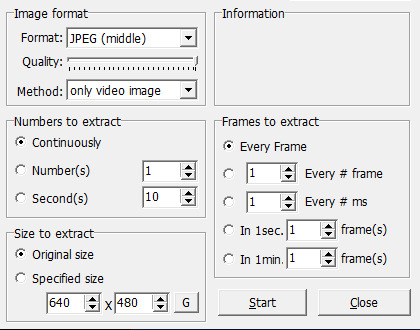
make sure its continuous, original size, and every frame! start the video playback a little before the segment you want and hit start on the capture menu, then hit stop once you're done. there will likely be a few extra frames on either end, so just go and delete those!
next up take those caps and upload them to photoshop! w the version i have i go to files -> scripts -> load files into stack. go into your caps folder, select all of em, and hit ok. it'll take a while for all of them to load in, especially w a larger gif, so just wait a bit before doing anything else or photoshop might crash haha.
once that's up, go to window (in the top bar) and check "timeline". click "create video timeline", and then immediately click the three small squares on the bottom left to convert it to frame animation. now click the three lines on the top right of the timeline window and click "make frames from layers:. they'll come in in reverse, so go to the same menu and click "reverse frames" next! go into the same menu, hit select all frames, and then change the frame duration to 0.05 by clicking the arrow next to the time under a frame, clicking "other," and typing in that value.
i usually crop my gif next. for a gif with one gif per row the width is 540px, for two gifs per row it's 268px, and for three it's 177px except for the middle gif which is 178px (meaning you have to kinda plan the layout in advance). the height can be whatever you like.
next up is sharpening! to sharpen easily, convert your timeline back into video animation by clicking in the same spot you did to convert to frame animation, then select all of your layers on the right, right click, and "convert to smart object". should look like this now:
one single layer. now click filter -> sharpen -> smart sharpen, and use these settings:
duplicate that layer, then hit the duplicated layer with filter -> blur -> gaussian blur with a radius of 0.5 pixels. set that layer to 50% opacity. you layers should look like this now:
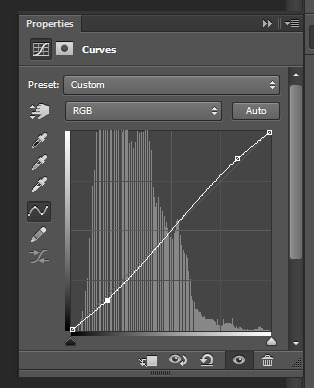
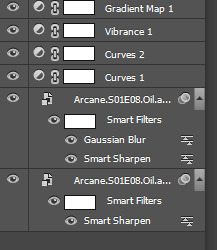
after this is colouring! all of these upcoming layers can be found under layer -> new adjustment layer. the process i tend to follow is a standard curves layer to up the brightness:
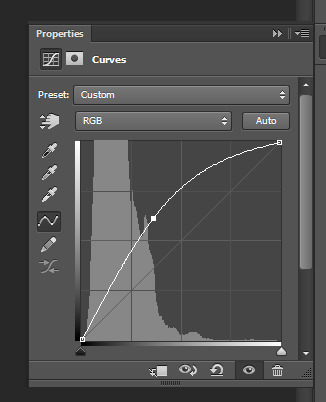
another curves layer to get some contrast going:
and from there on out you can kinda do whatever you want! i use a vibrance layer to get more saturation followed by a gradient map layer set to soft light and 50% opacity to kinda tone it down a bit while increasing contrast, and then selective colour and colour balance layers to mess with the overall colours of the scene, and finally a levels layer if i want a little more contrast! so my layers tend to look like this:
and now your gif is pretty much done! to save, go to file -> save for web. i use these settings:
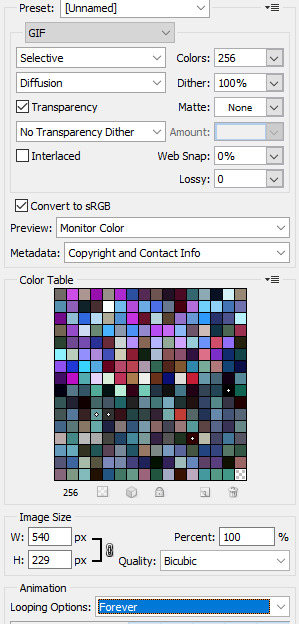
make sure your loop is set to forever! for gif size, im not quite sure what the hard limit is, but i think i remember reading somewhere that the quality starts tanking once it's bigger than 5MB, so i try to keep it under 5. if a gif is too big, start by cutting frames. you can also reduce the amount of colours to lower file size, but it will start affecting the quality!
now for a little tricky thing i learned recently- converting your gif to video timeline actually automatically changes the frame duration to 0.07, which is a little slow. to fix this, just open up your finished gif in photoshop again, which will automatically open it as a frame animation, and change the duration back to 0.05! save as normal, and you're done!
WHEW this got long. honestly it just gets easier with practice once you're not thinking about it as much. if you have any specific qs feel free to reach out, and happy giffing!
9 notes
·
View notes
Text
#showyourprocess
From planning to posting, share your process for making creative content!
To continue supporting content makers, this tag game is meant to show the entire process of making creative content: this can be for any creation.
RULES — When your work is tagged, show the process of its creation from planning to posting, then tag 5 people with a specific link to one of their creative works you’d like to see the process of. Use the tag #showyourprocess so we can find yours!
Tagged by @leonzhng and @yiling-recesses thank you sm for tagging me!!! 🥰 i did the yibo gfx one, sorry mimi i lost all photoshop files for the genshin edit you mentioned, like i literally can;t find them lmao 😅 but the process is pretty much the same as this!
tagging:
@theghostvalley for this set - i love your colouring, your gifs always look so quality!!
@claudiablack for this set - your colouring is always stunningly gorgeous and i'm just blown away how well the colours work together in this set??
@runqings for this set - i love the scene choices and the colouring is beautiful as well!
0. Software
photoshop (cc 2015 when making the yibo edit but currently 2021)
topaz clean + denoise
after effects cc 2020
1. Planning
whenever i do an animation gfx i usually always write a notepad for what i plan to do - ideas, the animations, aesthetic etc

also cos i have no idea about web design i subscribed to some webdesigner websites and checked sites like awwwards for popular/trending website design features + i've gotten quite into the aesthetics and animations of websites now!
after i have a basic plan for what all the panels are gonna include, i find and download all the images i need, so for the yibo website that was all his magazine covers, pics of his albums + drama posters, other pics of him + pics of the cast and their characters for legend of fei
then i trawl through color schemes trying to find one i like, tho with website gfx the predominant colour has to be white otherwise the gifs will end up being too large/super grainy/photoshop will mess with the colours so they aren't the same anymore 😩
2. Creation
i design all the panels in photoshop first which is the longest step in all this cos i'm super indecisive and don't usually have a clear idea in mind for what it should look like 😅
i'll only focus on the actor panel cos otherwise this would be wayyy too long - i resized, coloured, denoised + sharpened the yibo pics so they matched more then added a mask to make the corners more round,
chose a font for the txt and added it to the bottom

then i decided the layout for the rest of the elements + just like the yibo pics, i edited + resized + masked the drama posters, character + actor pics, then added the name txt + a low opacity bg for the txt so it's easier to read

finally i individually save all the elements (either alone if it's gonna move alone or with other elements if they'll move together) as a png with no background so i can load them into after affects ready to animate
after that i import all the pngs to after effects (i lost all the yibo website after effects saves cos of a hard drive reformat 😢 so i'll use my recent zzh website saves to illustrate instead)

the first thing i animated was the circle pics - just a scale animation with overshoot at the end
then the rotating circle txt - first i made the txt layer follow a circle path then i placed it where i wanted it to end up, added a keyframe for all the properties i'm going to animate, backtrack on the timeline however long i want the animation to be, add a new keyframe to all the chosen properties, reduced the scale + changed the position so it was hidden behind the picture, then changed the rotation so it would rotate continually for as long as it would appear
then i made the kinda wobbly circle animation?? on mouse over - the zzh pics are actually larger than shown, they just have a circle shape layer above them which i set as an alpha matte so only what's within that circle is shown

first i increase the scale of the shape layer alpha matte so more of the zzh pic is revealed + change the position slightly so the txt circle isn't completely covered, for these keyframes i also adjust the easing on them to make the speed of the animation slower at the beginning + end and faster in the middle
then i added a wiggle paths + wave warp effect, made a keyframe with the settings i wanted to change on zero then went forward in the timeline for the duration, added a new keyframe and adjusted the settings on the effects till i was happy with how the wobbly animation looked
after that pretty much just copied + reversed the keyframes for the animation to go back to normal then animated the same thing for the next zzh pic
i'll stop there cos i feel like this is already super long 😅 but if anybody is looking into using after effects + wants to know more?? you can just message me if you want, if you have any questions or anything!
when i've finished all the animations i'll check how the whole thing looks and make any final adjustments, then render it to make it a video
final step i import the video into photoshop, check it through there, change any of the frame timings if necessary and save it as a gif
3. Posting
i save the gfx set in drafts first to check how all the panels look together then add the gradient txt caption using jsfiddle
then i add the tags and schedule it to be posted at 10pm the same day
9 notes
·
View notes
Note
Hi, sorry to bother you! I was just wondering how you got started making gifs? I really love your gifs, and I've been kinda wanting to try to make some, too!! I just don't know where to start...
hello! it’s not a bother at all!!! :-) bc this is such a complex sort of question and it’s kinda hard (for me) to describe things I’ll give a rundown of what questions I asked myself in the beginning and I’ll also link you to some resources!
how do I download the videos that I want to gif?
performance
vimeo
vlive (sometimes works for youtube, twitter, vimeo, tiktok, does not work for vlive+ content!)
youtube
what program do I want to use?
photoshop cc 2020 - the program I use and am most familiar w (this is a crack ver and I’m not sure if it still works! I know that there’s a monthly payment option that gives you access to ALL adobe programs including after effects, premiere pro, audition etc. the whole shebang!)
photoscape (2) - I used to use this program about 10 years when the gif limit was 500kb so I’m not too familiar w it now but I do remember that it was really easy to get the hang of and it’s free
how do I want to import video frames to photoshop?
now assuming photoshop is your program of choice you will need to find the method you prefer for importing frames! there are 3 ways I am familiar w! included are links on how to download and use
file > import > import video frames to layers - this combination within photoshop will pop up a window and you will need to use the slider to select the scene(s) you want
avisynth - works w windows
vapoursynth (2) - typically for mac but also works w windows (this is the method I use and unfortunately I don’t have any links for downloading on windows)
how do I want to crop and size my gif(s)?
crop tool then image > image size - first you need to decide what size you want your gifs to be! here are some sizes frequently used: 268 x 350, 300 x 300, 540 x 250 / image > image size... this combination within photoshop will pop up a window where you can choose what size you want your gifs to be you usually just want to change it to the size of your gif because if you don’t you’ll go past the 10mb limit
avisynth - using the resizer plug in (this will crop your gif to your liking and isn’t as limiting as the method above)
vapoursyth - the same process as the video linked above ^w^
how do I want to sharpen my gif(s)?
smart sharpen - within photoshop
topaz labs - video enhancer software that once downloaded can be found under the filter options within photoshop / denoise and clean are the 2 most used / here is where you can download and here are codes that might work (I’m not sure if they do I haven’t actually used this in years sorry ;;) and here is how to sharpen ***note*** topaz is incredibly finicky and must be done and saved in a specific order or else photoshop will crash and you will tragically lose all your hard work my advice would be to save as you go to avoid a heartbreak...
vapoursyth - coolest thing about this program is that it comes w topaz installed! no need to download it! you will just want to come up w settings you feel comfortable w
how do I color?
this question is a bit hard bc... it’s all about experimenting! there’s a lot of awesome ppl that do post their psds and you are always welcome to use them but you can also just play around yourself! some adjustment layers I recommend to use are selective color, color balance, curves, levels, and hue and saturation!
here are blogs dedicated to just posting psds! kpop-colorings, kaypoppsds, kcolourings, jjangpsd
here is a tutorial on how to add psds to gifs
how do I save for web?
here is a really nice in-depth post about all of its settings!
that’s really all I can think about atm I hope this helps some ;; and pls feel free to msg me directly if you ever need help w something or if you have questions about certain things, etc.! I’d be more than happy to help!!! (I’m also always down to make a video tutorial of how I make gifs/address any specific question you have or anything you’re struggling w!) something I always say to anyone who asks me for advice is to make some sets w the intention of not posting them as in just a random set for yourself! play w cropping play w sharpening methods play w adjustment layers just have fun and experiment on your own time bc just practicing can become really really fun! I wish you lots of luck and the best w gif making!!! and thank you so much ;w; 💓
#Anonymous#a#gif qs#sorry this took so long ahhh#long post#tagging it just in case tumblr doesnt want it to be under a read more...
19 notes
·
View notes
Text
✨ basic gif tutorial pt. 2 by vvondergifs !!
ok i’m back at it again with the second installment of the tutorials !! and this time around i’m going to show you how to make a gif from video frames to to layers, i need to make it clear that this method is quicker however i would not suggest you do it for longer shows and movies ( i’d recommend my first tutorial for that ) but it’s great for youtube videos or intagram stories anything on that area !

what you’ll need:
photoshop ( i’ll be using cc but i believe anyone you have would be fine! )
your video/show/movie of choice downloaded into your computer
1. first things first, you have to open photoshop ! once you’re there look for file > import > video frames to layers

then photoshop will ask you to select your video from your files do it and and click ok.
2. then a pop up asking you to select where your gif will begin and end, how you do this is by moving the arrows i circled in blue in the picture bellow, and make sure selected range only is selected like shown in the red.
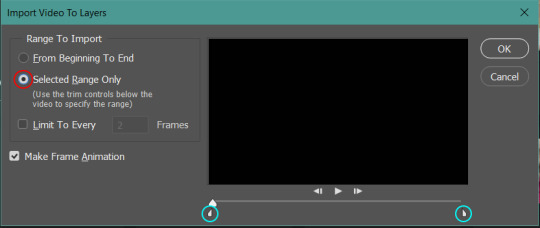
now go through the timeline and look for the scene you wish to gif, once you found it take the arrows and drag it to the beginning and the end of that scene.
tip: i like to give some wiggle room for the gif to make sure i’ll have all the frames i want in the gif, what that mean is that i drag the arrows just a little before and after the scene i want and delete the extra frames later.
also keep in mind that the maximum of frames that photoshop will accept is 500 frames which means if you try to select a range that is bigger than that photoshop will cut it down to 500 frames and you might loose the scene you actually want ( which is why i don’t recommend this method for shows/movies, because it’s too hard to select the right range for a long video and be specific with the scene )

when you decided on and selected the scene click ok and let photoshop load it for you.
3. now that photoshop opened the file with all your layers is time to delete the extra frames by clicking the first and shift clicking on the last one that you don’t need and hitting delete or the trash icon on the bottom of the screen

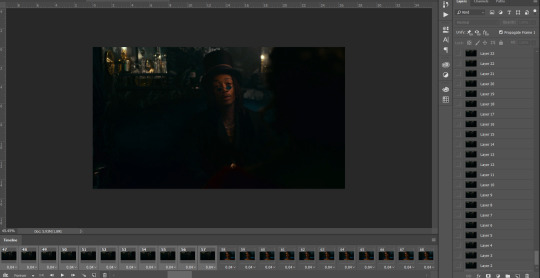
after you delete all the extra layers you will only have the frames to your gif !
( now if you read my first tutorial here is where things will start to repeat themselves, so if you learned from there how to crop, set delay, sharpen and save you are all set, however i’ll make this a full tutorial as well but if you didn’t keep on reading ! )
4. now we are going to crop the gif whichever dimensions you’d like ( here is a good reference for you ) in this case i’ll be making my 268px x 150px. for cropping gifs you’ll want to find the cropping tool that is located in the tools bar on the far left of your screen and it looks like this:

once you click it your top bar will change to cropping settings, which you will change to these settings ( disregard the numbers, put your own dimensions there )
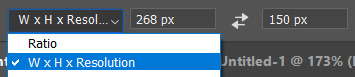
now we have to decide where to crop the gif,
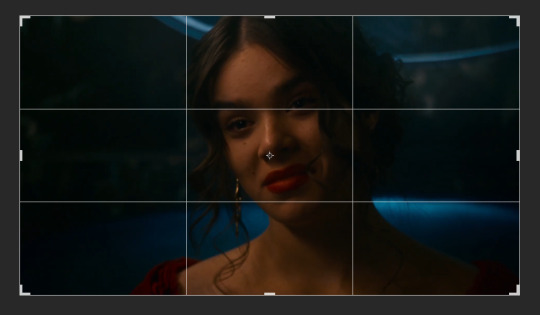
just play around with your grid by dragging and resizing from the corners, until you are satisfied with where you want to crop and hit enter
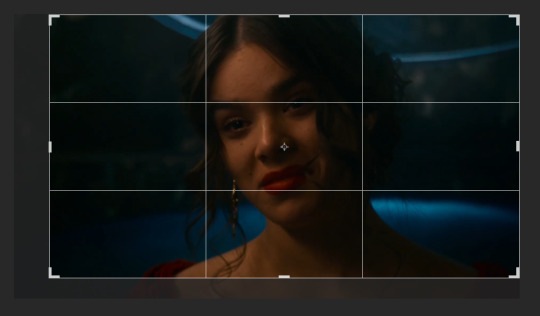
5. next step is to set the delay of the gifs, let’s start by selecting all frames on the little list icon on the top right of your timeline


and now that is all selected on the bottom of your frame preview there’s a “0 sec.” and an arrow

click it and you will get a menu, select other:
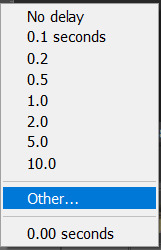
once you do it a pop up window will appear for you, there’s were you set the time your frames will go from one to the next. i find it that the delay 0.07 is the perfect one for a gif, so type that in the box of the pop up and hit ok.
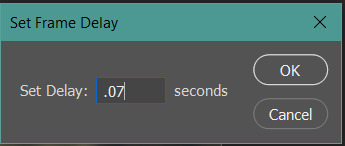
once you hit ok you’re basically done, if you hit play on your timeline you’ll see your gif moving !

( this next part will be totally optional, it makes your gif cleaner but you are free to choose not to do it, just jump ahead on this tutorial to see how to save your gif on step 8 ! )
6. let’s see how to simply sharpen your gif now ! select all your frames once again the same way we did it before and this time make sure you select all your layers too ( click on the first one and shift + click on the last ). now that you have everything selected we are going to the video time line, on the bottom left of the timeline there’s this icon:

click it and now we have this:

now what we want to do it is go to the top bar and look for filter > convert for smart filters, select it and say ok when photoshop asks you if you’re sure.

your workspace should be looking like this now
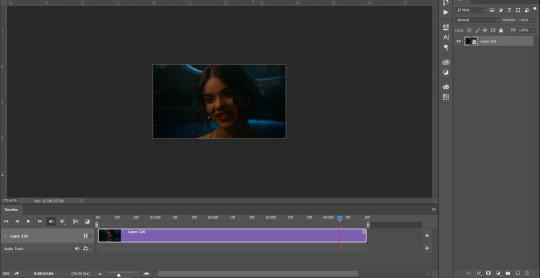
next thing you do is go back to filter > sharpen > smart sharpen
the smart sharpen window will show up to you and here is were you fix your settings, this next picture is how i like to sharpen my gifs and you’re more then welcome to just copy every setting, but if you feel like playing with the settings a little that’s also ok, it’s your gif make it how you like it !
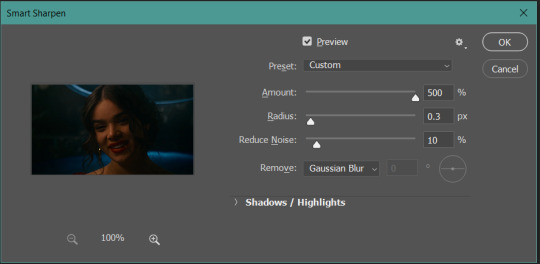
click ok and you have a sharpened gif !
7. now we are done ! if you like to color your gif, this is the step that you would do it ( if you’re familiar with psd and coloring feel free to drop them in now ) but i’ll make a separate tutorial on how i make a base coloring for my gifs soon so i’ll skip this step for now and go directly to saving.
8. to save it is a little different than a picture, you need to go to file > export > save for web
tip: if you’re a windows user you can use the shortcut alt + shift +crtl + s it will make your life so much easier, trust me ! ( i’m not sure what the shortcut is for mac but i’m sure there is one )
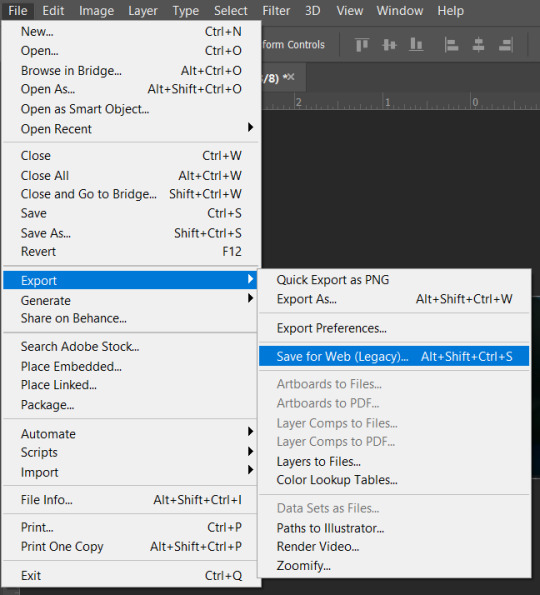
now your final pop up ! you will see the preview of your gif and a bunch of information on the side, the most important one lays on the looping options that if it isn’t set to forever already you have to change to it, if not your gif will only loop once and stop.

now click save and choose the folder destination of your file and CONGRATS you make yourself a gif !!
if you still have any questions about this process my inbox is always open and i’ll gladly help you understand how to do it !
i hope this tutorial was helpful and easy to understand if not just leave me a question !
#gif tutorial#tutorial#itsphotoshop#rph#rpc#*m#*m:tutorial#*tutorial#me says not to use this for shows but does it anyway bc i hate myself and is a sucker for aesthetic#these unedited gifs will be the death of me but i'm leaving them like this for the colouring tutorial
44 notes
·
View notes
Text
Kristine Froseth gifs full tutorial
As requested ever so kindly, I will explain to you both my gif processes for the Kristine Frøseth gif packs I’ve made recently. My process probably doesn’t differ that much (or at all) from other tutorials out there but this is mostly a way to explain the specifics of these particular gif packs and a chance for me to give credit where credit is due as well: to the wonderful @insomniacgifs for their help with sharpening and gif colouring and the equally talented @jojorphs whose gif icon colouring psd I used for the Kristine gif icons.

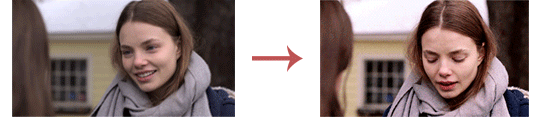
REQUIREMENTS:
- Photoshop CC (other versions probably work as well!)
- My used gifmaking action: here (original here)
- My used gif icon psd: here (original here)
- My used small gifs psd: here (original here)
Downloading the footage: I use torrent sites for this and the program Bitlord to download them with - you’ll have to message me privately if you want me to share the websites themselves because this is, in fact, an illegal way of obtaining footage. Especially the Americans or others who have strict regulations about this in their countries, beware and I advise you to use a VPN.
Tip: Try to find the best high-quality version - I always opt for 1080 or more, especially when making small gifs.
Cutting the footage into pieces: To make my life easier, I cut movies and tv shows and anything longer than 5 minutes basically, into smaller scenes via a program like Windows Movie Maker ( there are probably better options out there but it works for me ). It may seem time-consuming but it saves you a lot of hassle later when selecting and importing scenes into photoshop (3).
Tip: you don’t have to do it all at once, you can easily save it as a draft and get back to it later when you use movie maker. You can recognize a movie maker project by .wlmp as a file extension.
As soon as only my wanted scenes are left in the project, I start saving them one by one by selecting all the scenes (Ctrl+A), clicking on those scenes that I want to save (so that they are unselected) and clicking delete so only those scenes are left. (don’t worry we’re going to get them back after saving the scenes by using the ‘step back’ function (Ctrl+Z))
Tip: Always save them with the highest definition possible.
After saving, you click Ctrl+Z, then delete the scene(s) you just saved and do it all over again until you’ve saved all scenes. (Again, there may be a video editing program out there who can save them all separately at once. I don’t know!)
Importing into Photoshop: I use the import frames to layers option. Click on File > Import (near the bottom) > Video Frames to Layers. You choose the video you want to gif and then select the exact scene with the pop-up window that comes up. Make sure the ‘Make Frame Animation” box is selected!! Then click OK.
Tip: I always select a bit of scene before and after my selected scene if possible - then I can just delete the unnecessary frames and be sure I have the whole scene but again, that’s just extra time-consuming.

This is where the process becomes just a tiny bit different:
Gif icons
(Deleting frames you don’t need): By going into your timeline, you can delete any frames at the start and end that you don’t want.
Tip: Don’t use the delete shortcut on your keyboard! It will delete your layers instead of your frames. Rather select them and drag them to the bin at the right bottom or right-click and delete them.
Cropping: First off, I cropped the gifs by choosing a square ratio (1:1) and selecting as best as I could to make sure Kristine was completely visible in every frame.
(Loading an action:) Open the action window by clicking Window > Actions (or Alt+9). Click the menu-button in the top corner (three horizontal lines) > Load actions > choose the action you’ve downloaded and you won’t really get notified but you’ll see the folder amongst the rest of your action folders. That’s it!
Applying gifmaking action: To make things easier for myself, I put together an action that takes care of everything (mostly based off of @insomniacgifs their action!!) - including resizing. All you need to do is click on it and press play. The process is done when all that’s left is a folder labelled ‘gif’.
You can download it HERE if you haven’t already.
➝ If you’d like to resize by hand, my settings are: bicubic (smooth gradients)
➝ If you’d like to use a different size but still use the action: just click within the action tab, (open the folder and the action labeled “sharpen + blur”), the first step is called Image Size - double click on it and it’ll give you the resize pop-up display, allowing you to change the size to your preference.
NOTE: Make sure you’ve got the first frame selected on your frame-timeline before you click play on the action - otherwise you’ll end up deleting frames and have blank frames when the action’s finished.
Colouring: I used @jojorphs gif icon psd as a base. You can download mine HERE if you haven’t already but it’s basically their psd so please show your support to them!!
➝ The orange layers represent those I added.
➝ The blue layers represent those I toggled depending on the scene.
Tip: For really dark scenes ➝ Add an exposure layer instead at the bottom and adjust the opacity of the brightness layer at the bottom and/or the levels and selective colour layer.
Tip: For scenes that weren’t dark but rather had a lot of natural shadows ➝ adjust the selective colour layer.
Small gifs
Cropping until gifmaking action is the same as explained above. Just the cropping ratio is 268x150 + the action is different which you can find HERE.
Colouring: I used @insomniacgifs gif psd. You can download the different adjustments I made for some scenes HERE if you haven’t already but it’s basically their psd so please show your support to them!!
➝ I mainly changed the blue layers - both brightness/contrast layers
Saving
Click on file > export > save for web or use the shortcut Ctrl+Shift+S
These are my general settings (though you can play around with selective/adaptive and pattern/diffusion in my opinion, depending on the gif):
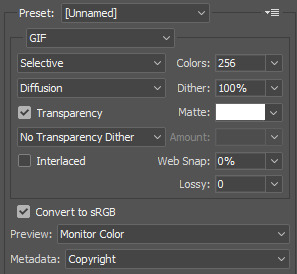
#gif tutorial#req.#tut.#how to#this seems longer than it is I promise (':#I just wanted it to be complete for people who have no idea what they're doing or make it easier for everyone basically#major credit to the original sharpening actions and cpsds though??#I hope this helps??#any tutorial on my specific colourings from now on will be shorter though cause I can refer back to this post for the early steps (':
98 notes
·
View notes
Note
Helloo is it possible you could upload a tutorial of how u make your gifs 🤭❤ also I'm in love with your content(You actually got me to stan got7 haha)
hii!! and thank you omg thats so sweet of you to say 😭 (also what!!!!! i’m honored omg!!!)
so to make my gifs i use photoshop cc and vapoursynth, i don’t know how familiar you are of gif making but my steps are usually
download video
choose which part of the video to gif
import the chosen clip to vapoursynth in order to denoise and sharpen
use photoshop to make the gif/s (import video frames to layers)
coloring
(sharpening)
export and save
there’s a great tutorial here that basically explains how to make gifs in detail i rly recommend following or just reading it to get a basic understanding of how to make gifs using photoshop, vapoursynth, downloading videos and coloring!!
okay so this tutorial really explains It All but i’ll try to explain what i do that might not be in the tutorial so please don’t just follow mine, read through this if u really wanna know it all in detail!!
step 1: downloading videos
to get the the highest quality for your gifs you should download videos with the highest quality you can find. i usually download 1080p videos, but in some cases 720p videos works as well!! for performances .ts-files usually have the highest quality
for performances i download the videos from kpopexciting (bc i don’t have an acc for kpop24hrs 😓). for youtube videos i use 4kdownloader or y2mate mostly, for vlive videos i usually use savieo and sometimes i screen record a part in a video using quicktime player if i’m really lazy
if you wanna find videos for specifically got7 i recommend looking through this archive here (jytrain), they have archived most videos from got7’s debut until lullaby era (i love love love loooveee!!!) and for newer videos p922p on twitter usually uploads ts.files, bless<3
step 2: choosing which part to gif
kinda self-explanatory but u choose which part to gif basically hbvndnf if it’s a mp4-video then i usually trim the video into smaller clips using quicktime player (edit > trim...) and if it’s a ts-file i trim the videos using vlc (playback (i think.. idk mine is in swedish...😩) > record, and then play the video at the time you want it to start recording, and then press playback > record again to stop. there should be a check mark in the second “record” when u want to stop it)
step 3: import clips to vapoursynth
denoise and sharpening time!! they really explain it so well here so i recommend reading how to do this there. you could also skip this step if you don’t want to use vapoursynth, not everyone does! i didn’t use vapoursynth until like january this year
my vapoursynth settings are usually denoise: KNML at around 1.5-1.7 and then i use sharpening: finesharp at 0.7-1
step 4: use photoshop to make the gif/s
time to gif!! and honestly they explain it well here so i’ll just link this again
step 5: coloring
coloring a gif is the most fun for me bc this it the time you can really play around with the colors. i usually go for a vibrant look in my gifs, but this is just a personal preference. it’s totally up to you how you want your gifs to look like! if it’s your first time making a gif and trying to color, i would recommend downloading psds (like pre-made colorings that creators have been nice to share with everyone) to see how each adjustment layer plays a role in coloring. some good resources blogs: itsphotoshop, completeresources, chaoticresources
i did upload a psd pack waaaay back which u can find here but i don’t really use any of them anymore hbnfhdn (the eoy tourgraph one is a personal fave tho...<3) (also disclaimer: the base psd in this pack is actually Not a base psd it kinda only works with that particular scene, i just needed one more to fill out the pack hbdhfnvhbnf)
so to actual tips: when it comes to coloring i firstly just color correct (or try to make the gif a blueish tone bc i like how that looks) using curves layers. there’s an amazing tutorial explaining and showing more how to color correct using curves layers here (100% recommend!!!! its SO easy once you get the hang of it). i use the white point and the black point the most, but sometimes i use the gray point too. when u use the white point, try to find the lightest part in your gif. and when using the black point you should try finding the darkest point in your gif. i like to mess around with the opacity of these layers too
after color correcting i usually mess around with color balance, selective color, vibrance and brightness/contrast
step 6: sharpening
i put this in a bracket bc i never rly sharpen gifs in ps anymore since using vapoursynth, but if you want to you can add even more sharpening here if you would like
step 7. export & save
when you feel satisfied and done, go to export > save for web and save your gif!! dooone!!! 💫
i also uploaded a gif making process video here if you want to check out how i personally do it, but i basically just follow the steps given in the tutorial that i linked several times hbbdfhn
i hope this helped!!! lmk if u have any questions and i’ll try my best to help 🥰
#okay this got long i didnt think i was gonna write this much but uhm yeah .....😩#hope this helps tho!!! lmk if u need any more help i'll gladly try to help as much as i can!!#resources#<- just so i can find it again hbfsdbbsnv#anonymous#answered
3 notes
·
View notes
Note
how do you make gifs??? like how do you download a specific part and stuff im so confused
it depends on the program you’re using. maybe if i knew what you used, i might be more help to you. but i only know how to make gifs on photoshop so i don’t know if i can help much.
i download the entire video (the entirety of reputation tour, miss americana, etc) and depending on the specific program, there are ways to upload on photoshop. if you use photoshop cc, you can upload the whole video and clip out the scene you want. this tutorial can help with that. if you use photoshop cs, you can’t upload videos. you need screencaps to make the gif. this tutorial can help with that.
if you don’t use photoshop, you can check out this tutorial which also explains how to capture a specific part you want!
5 notes
·
View notes
Last Seen Blogs
gatheredfates
PILLAR OF FATE

ohsas18001safety
Untitled
model2watch
Models2Watch
glowwithsophia
Sophia