#avisynth tutorial
Photo
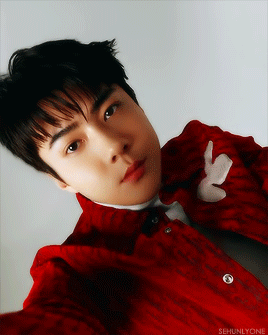
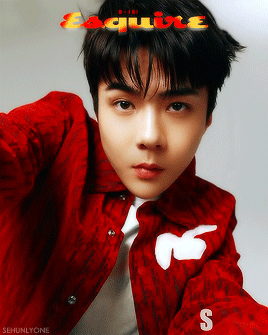
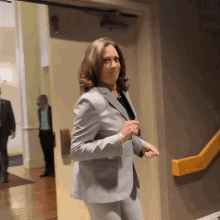
Sehun for Esquire E Issue
"How does he make even the simplest moves charming?
Is his attractive face the answer to all?"
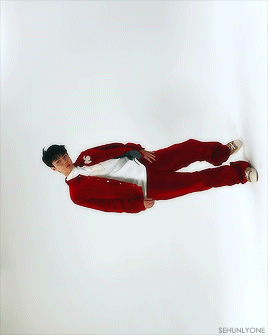
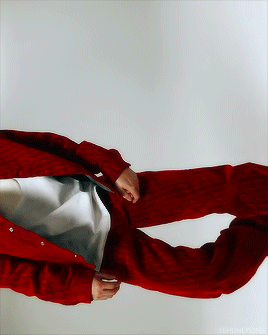
#exo#sehun#oh sehun#exosnet#sehun gif#sehunlygif#esquire#uhm... hello it's been a while#i legit forgot how to gif#avisynth doesn't work anymore (probably i need a new update or smth)#and i'm lucky i had actions saved because if not i had to look up a tutorial for real#i had a sudden urge to gif when i saw the two videos of him#so yes there will be another set#but i'm not back to giffing regularly#*200
397 notes
·
View notes
Text
pov: u finally figure out how to gif a show 6 hours and 5 different ps methods later 💀🤡
#mika rambles#this is abt dangerous romance btw#like honestly. GOD#this is why i love animegiffing the quality is so much better#for dr i literally downloaded the ep from 3 different sites all w the same shit quality....#then spent 3 hrs on avisynth trying to upscale it.....#then another 3 hrs on ps trying to figure the right settings to make it look good.....#finally figured it out thank god#honestly god bless all the gifmakers that upload tutorials on here cuz i cant edit to save my life when it comes to lq content😭💀
3 notes
·
View notes
Text
making progress 😏
#women in stem yuppp!!#i gotta stick to avisynth for gifs#years of giffing kpop will do that to you cause every other tutorial feels unnecessarily long ☠️#i kept going cause i felt like there was an easier way these other tutorials got so many steps omg#save yourself and use avisynth if you just want simple gifs#idk if i can recommend it for the fancier graphic gifs some ppl make
0 notes
Note
your gifs are so nice! would you be willing to share your sharpening? and if it's not too much trouble do a quick rundown of your coloring process?
hi anon! it's no trouble at all, if it helps i'm happy to share <3
first i'd like to say that the size and speed of your gifs is key for the sharpen to look good! an incorrectly sized gif will look wonky on desktop (mobile is not very noticeable but desktop is where your gifs can potentially look bad if you size incorrectly) and same for slow-ish gifs, the slower your gif is the more the imperfections show so a correct speed hides the ugly parts lol
these are the standard tumblr photoset sizes

now with that out of the way i'm going to put everything under the cut bc it's probs going to be very long lol if you have any questions after reading all of this, do not hesitate to come back and i'll try to explain better!
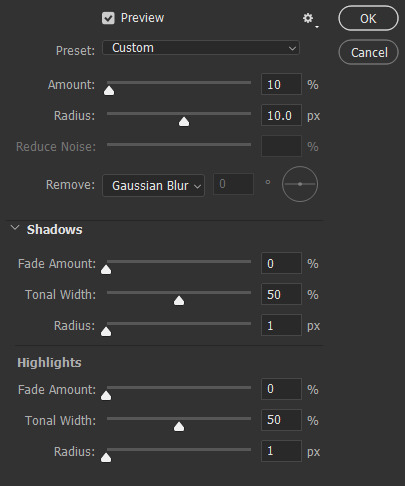
okay! first i’d like to point out that i use an older photoshop, simply bc i like how they work lol i work on photoshop cs6 so to enable the same options i’m going to show you here you’ll have to have enabled the legacy option in the smart sharpen filters.
my sharpen varies depending on my source material tbh here are some examples:
source material: music videos
i actually use mvs downloaded from vimeo but these take longer to be up bc the directors don't usually upload at the same time the video is coming out unlike youtube mv, so if i'm working with something from youtube i like to get the biggest format available, so 4k and if it's not available then 1080p will do
i like to do big gifs for mvs so thats 540px width, these are my crop settings (putting it like that i don’t have to manually resize to 540px after cropping bc it’s going to be already the correct size)

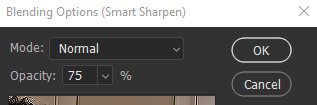
and my sharpen for these is this

and then i lower the opacity of it to 75/80%, double clicking here

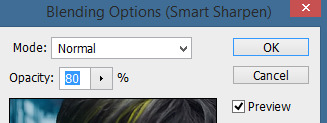
this is the result:


and my gif speed for mvs in particular is this

looks very crispy and ready to color away!
source material: stage videos in .ts format
for stages i like to work with .ts files since they are very high quality recordings of the stages and generally the gifs come out nicer. for stages that are from youtube the next part of this will probs help but this part will be focused on .ts files.
i get my files from kpop24hrs which is invite only right now and invites are a bitch to get a hold of but if you have access it’ll make your life so easy when giffing stages, there’s also twitter to look up files! for stray kids the fastest .ts uploader on twitter is @/STEii_e but if you look up the date + stray kids + .ts the tweets will show! anyway, back to the important thing
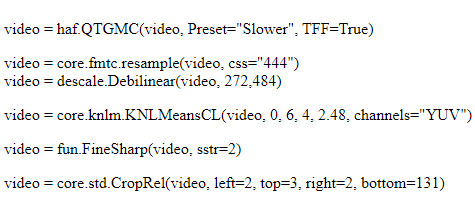
for .ts files i work with AviSynth! my computer hates vapoursynth so i use it’s older sibling lol it does the work just fine for what i use it imo bc i usually end up sharpening on photoshop. if you’d like an avisynth tutorial, this is what i used to learn about it and if you’d like to try vapoursynth there’s tons of tutorials from tumblr if you google, the most complete one is from user realstraykids
i modified my avisynth processor for it to have a denoiser (which is a feature from vapoursynth) to have my gifs look a little more smooth but that effect can also be achieved using topaz tbh

these are the output settings i get on the resizer

like i said i modified some things to have a denoiser so it won’t look like this on a regular avisynth
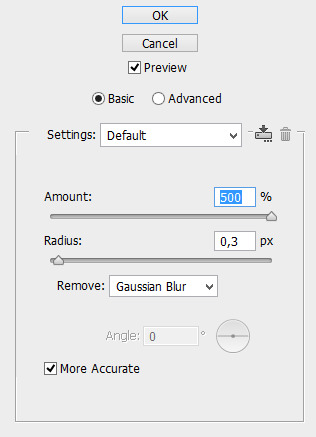
using debilinear usually makes my gif already look a bit sharp, so if i see it’s good i don’t use a sharpen, if i see it need a little push i’ll use a smart sharpen of 500% radius and 0.3px amount, and i’ll use a gaussian blur filter set to 0,3 and i lower it’s opacity to 75/80%


results:

and my gif speed for .ts stages

now it’s all ready to color!
final source material: your regular youtube/twitter/vlive video
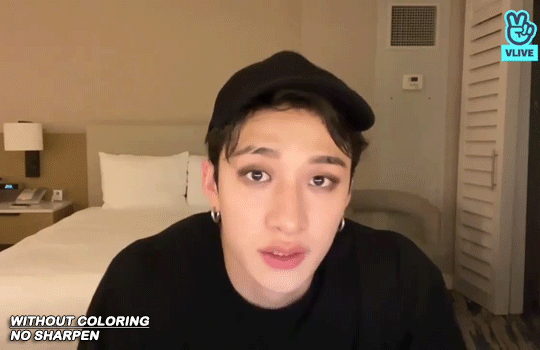
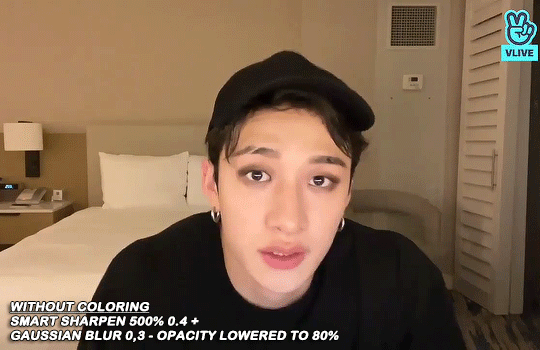
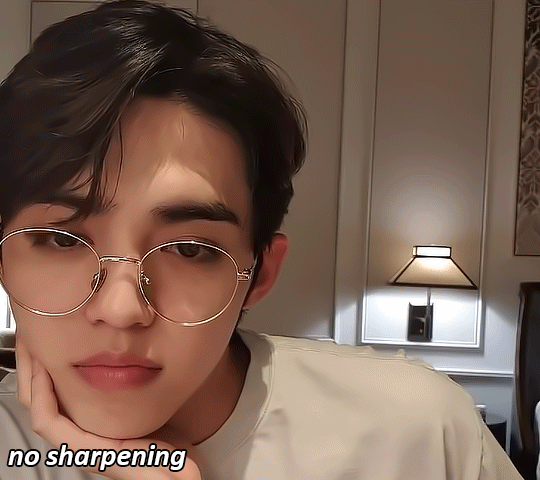
anyone that ever worked with a lq-ish video know how they just look ugly no matter how your try to sharpen, specially vlives and now channie’s rooms on youtube (*shaking fist in the air* damn you 720p videos!!) so i found a way to make them look decent, in this case i oversharpen using a 500% 0.4px smart shapen and then i slap a gaussian blur of 0,3 (lowered to 50% opacity) on top of it to smooth things out, more often than not it works very well but some videos are just plain bad (looking at you twitter) so this will work if you tweak the gaussian blur to your liking. i also recommend to work with small gifs if your video is not 1080p bc they’ll look better, but if you like pain like me and love big gifs this is what i do:


my results:


and my gif speed for these kind of videos

that’s about it for my sharpen tricks!
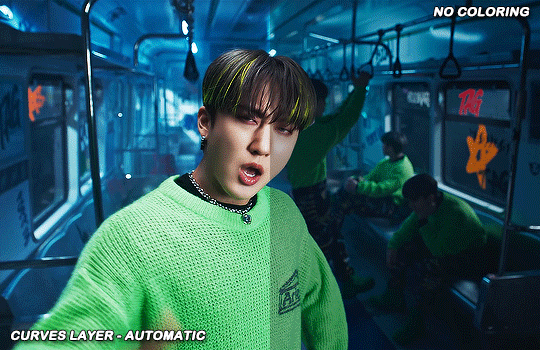
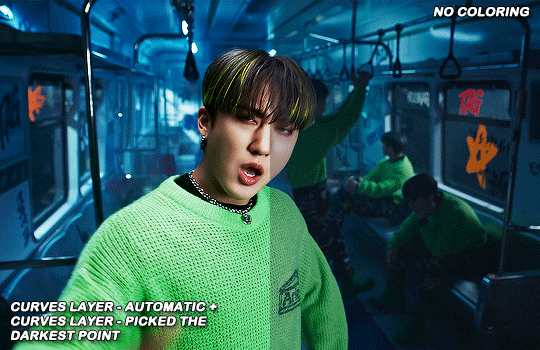
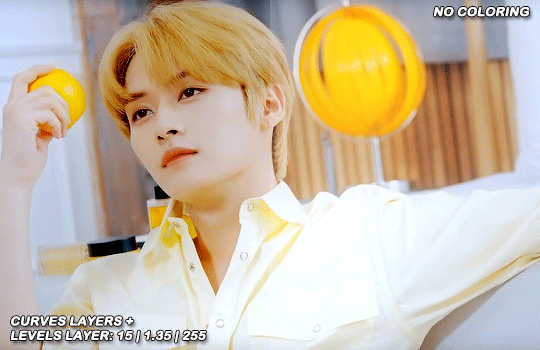
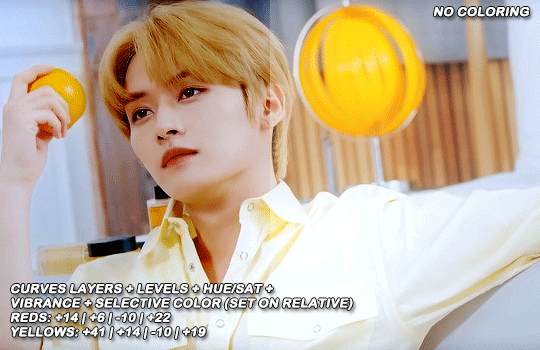
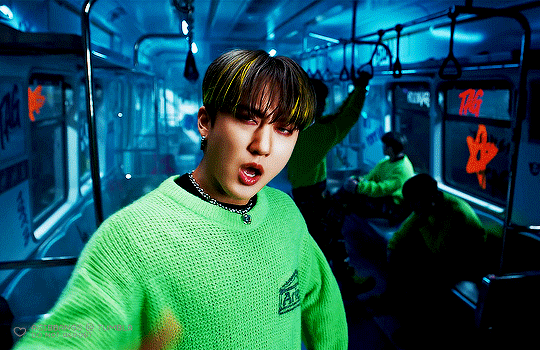
for coloring i like to do vibrant gifs, i adapted my latest method from this and this, and another tutorial that i can’t find rn, but for my base what i do is two curves layers, a levels layer to bring up darks, then i do a hue/sat to fix up colors, then i do vibrance and finally i selective color to fix things up. i’m going to show you on this binnie and minho gifs
first we use a curves layer and we set it on automatic (no worries if it gets too bright, we’ll be fixing as we go)

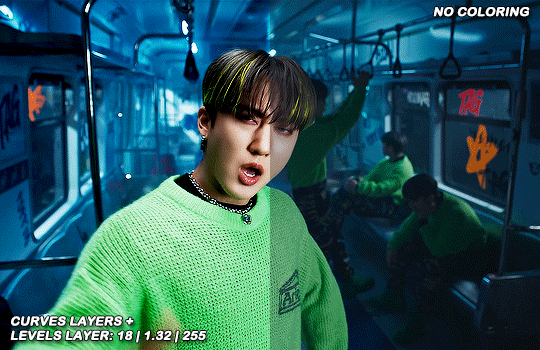
now we do a second curves layer, for this one we’ll use the black color picker from the curves layer and pick the darkest point on our gif

now we fix the darks and we bring some brightness with a levels layer
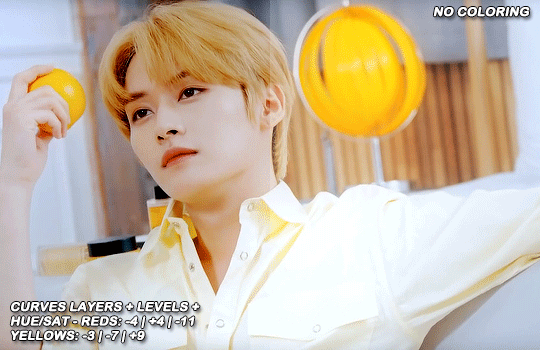
now we do a hue/saturation layer, here i fix up the reds and yellows, sometimes i skip it if the gif already looks good after the first 3 layers if that’s the case i go directly to the next step which is vibrance, in this case i only did minho in this step bc i felt like binnie’s was okay after the first 3 layers
now it’s the vibrance layer, for making the colors pop out more
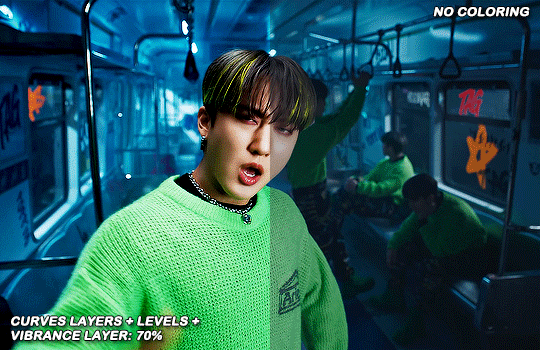

and now the final layer: selective color! here we fix again red and yellows

that was my base coloring! sometimes i put in a gradient map in between the curves layers and the levels but only sometimes. after this if i want to mess around with colors i mostly go with another hue/sat layer or just use selective color, hue/sat is great for color manipulation. anyway, this is the finished result and my saving settings!


that was really long lmao, i hope it helps somehow? like i said if anything isn’t clear pls come back and we’ll go around it again <3
109 notes
·
View notes
Text
VAPOURSYNTH INSTALLATION TUTORIAL (macOS)
— if you’ve always wanted to try vapoursynth but have been intimidated by the installation process, then this tutorial is for you!
— target audience: macOS from High Sierra and later (ie: Catalina, Mojave, Big Sur, Monterey)
About Vapoursynth (VS)
vapoursynth is an application for video manipulation. for gif makers it helps to resize, crop, sharpen, denoise, and clip videos into small gif-able segments with minimal loss to the original file quality. for more information visit the official site here. the application works for both mac and windows (however this tutorial is meant to guide mac users since the installation process can be more confusing on that OS). for users familiar with avisynth, this is a similar program (however unlike the former, it is also compatible with macOS)
This two part video tutorial references this HackMD tutorial by nibreon throughout tutorial. (you will also find how to download on windows there).
To access the tutorial please access the following YouTube links:
part one // part two
103 notes
·
View notes
Note
Hiii, just gotta say, I LOVED your Wendy gifset and I was wondering how you got them to look that pretty?? They looks soft and detailed and like, real? Hehe I hope you can help me out, idk what I've been doing wrong with mine that are looking like shit so, help me out please
henlo anon!
when i first started gif-making, my gifs weren't the bestest either! it's a process and i think you'll get better at it w practice and trying new things !! <3 i'll throw in a bunch of pointers a lot of CCs gave me when i first started giffing and some of my opinions under the cut!
also this is definitely Not a link to download photoshop 2022 for free that i definitely didn't use as an upgrade two weeks ago
what you'll need to know before going through this long long rant of mine:
basic photoshop giffing skills
knowledge of smart filters and blending options
some patience (to hear my nonsense)
interest in maybe picking up new software
disclaimer: image heavy!

1. always use videos in their highest quality!
hq videos = hq gifs! i do not recommend using videos below 720p! also if you use photoshop, the number of colours in the gif is limited 268, meaning that sometimes your gifs can lose quality in export, and that could make lower quality videos look worse! (for eg. the video i sourced the wendy set from was 4k that i downloaded from 4kvideodownloader)
here's links to download:
4kvideodownloader
sophistagram (for vlives)
weverse lives download tutorial
twitter video downloader
a smol opinion: i've seen a lot of users use tumblr mobile, and noticed that gifs on tumblr mobile are always a little blurred out? this kind of makes the gifs look less clear </3 so using higher quality videos always helps!
2. vapoursynth / avisynth / km player!
these are softwares to sharpen and denoise your videos! they're completely optional (i used to gif with photoshop alone for the longest time) but they do make quite a lot of difference!
i highly recommend you to check the tutorials below!
gif-making with vapoursynth tutorial by @wonublr
gif-making with avisynth tutorial by @soonhoonsol
gif-making with km player (and vapoursynth!) tutorial by @woozi
a smol opinion: i've never used km player, so i don't have much to say about it. as for avisynth, it's pretty easy to work with, the only down side is that there are no denoise options. vapoursynth has both and is very user-friendly, but i found the shift from avisynth to vapoursynth slightly confusing!
these are my usual settings for vapoursynth:
3. gif sizes!
a very big (and maybe bullshit) opinion:
now, tumblr recommends you size your gifs this way:
(img src)
but it,, doesn't necessarily have to be that way 👁
i really like to fuck around and use whatever size i want for my 268px and my 177px gifs, and the wendy set was no exception! the size of each gif in the set was 400px X 580px!! this, in my opinion, makes it easier to view them (a lot more clear, you could say) :o
as for my 540px gifs, they remain the same size!

4. sharpening on photoshop!
i would always recommend you to sharpen your gifs again on photoshop. tumblr LOVES reducing gif quality, so i resharpen to give my gifs some 'depth'
this is how i usually sharpen my gifs:
(the gif above was sharpened and denoised on vs w the settings mentioned above!)
step 01:
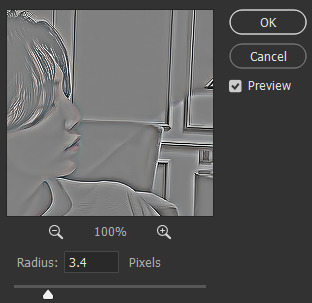
after you're done converting your gif into a smart object on photoshop, we'll add a layer of smart sharpen. these are my settings:

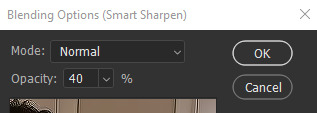
step 02: more... smart sharpen :eye: :
step 03: high pass (optional tbh)
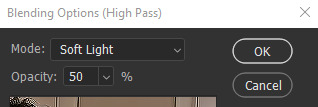
imp: don't forget to change the blending to soft light / overlay (i prefer the former)
now the gif looks like this:
something to note: i like switching up my opacity levels on these settings, and usually only ever change the radius and strength of the sharpening!
here's a few more sharpening tutorials:
sharpening tutorial by @/woozi
tutorial by @/hellboys
tutorial by @yutaslaugh
5. colouring!
colouring plays a huge role in making your gifs look sharper and cleaner! this is your playground, and this is the area you have the most freedom to change, and zuzsh up things the way you like them!
generally, i like to draw the attention to the person i'm giffing, so i make sure to set the contrasts right! i also extremely like making the colours cooler, so that it seems more natural!
the layers i use most are:
curves (on auto)
more cuves (using the eyedroppers to set my black, grey and white points)
selective colour (to change contrasts, to recolour skin)
colour balance (to balance my shadows and highlights)
levels (for brightness, contrast and depth!)
i'm not extremely good at colouring either, so here are some more in depth colouring tutorials (i'm terrible at explaining i'm so sorry sksjkd):
colouring tutorial by @/jihan
south-east asian celeb colouring tutorial by @/blueshelp
and here's some pre-made psd packs!:
psd pack by @/kpopco
psd pack by @shuatonin
psd pack by @coupsnim
psd pack by @/wonublr
closing ments:
if you've made it this far, thank you! i'm not extremely great at explaining things, but i hope you found this 'tutorial' useful! (extremely confused what this is tbh it feels like i'm rambling sgkfjsh)
here's a few more tutorials (kinda unrelated) that i found useful and fun!:
tutorial to fix grainy gifs
tutorial to remove panning from gifs
animated text tutorial
gif + more effects tutorial
112 notes
·
View notes
Text
An anon asked for a tutorial on how I make gifs, so here we go!
I believe that everyone with a decent computer can learn how to make gifs.
The programs I use are
Vapoursynth
Photoshop
Topaz denoise (a lot of people don’t use this)
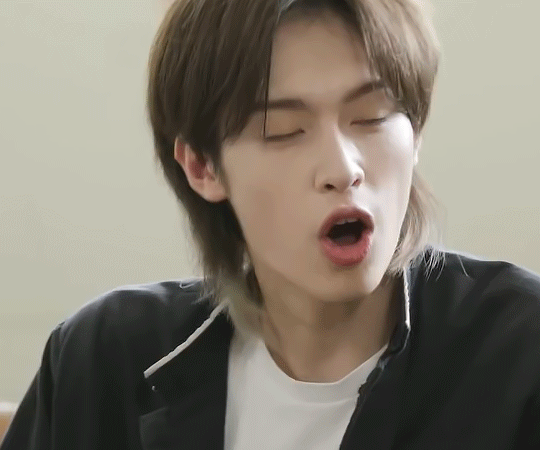
This is the gif I will be making in this tutorial!

Step 1. Find what you want to gif!
Download the video you want to gif in the best quality you can find. This is where ts files are really good! Personally I don’t really mind giffing only 1080p videos, but better the quality, better the gif!
Step 2. Crop it using vapoursynth!
Using vapoursynth is a whole tutorial in itself. You can still make gifs without vapoursynth (or avisynth as some people use). You can just crop the gif in photoshop to the size you want. Vapoursynth is just good at doing so without losing a lot of the quality!
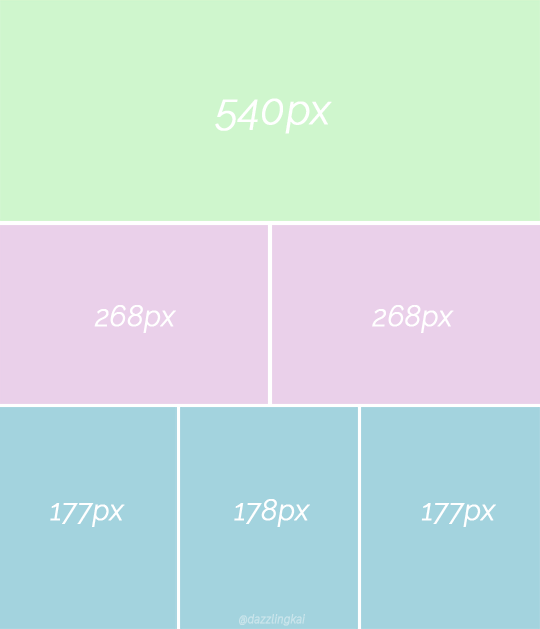
The width for tumblr posts are 540px (one gif), 268px (two gifs) and 177px for the outer gifs and 178px for the middle gif, when making three gifs!
This site has everything you need for vapoursynth!
I don’t really have any set settings. I switch it up a lot, but these are my settings for this gif!
Step 3. Import gif to photoshop!
(My photoshop is in Danish, but it should be the same place in any other language).
You do this by going files > import > video frames to layers
Then you choose the video you got from vapoursynth (if you didn’t use vapoursynth, you just choose the part of your original video you wanted!)
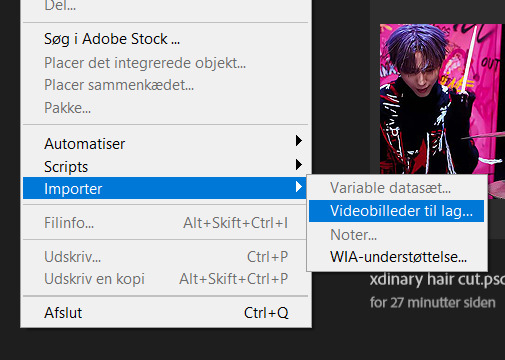
Now we have a basic gif!
Step 4. Colouring!
Now the fun part comes! We colour the gif! This is where your gif truly becomes your gif! Every content creator has their own style of colouring and it really just takes time to find what you really like! Just do whatever you like!
These are the ones you use for colouring! Just play around!
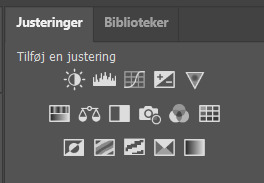
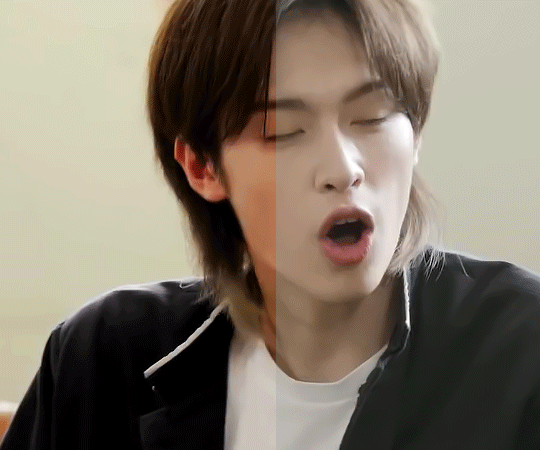
Here we have the gif with colour! I’m not going to do a colouring tutorial, because colouring is really just up to the person making the gif!
These are the adjustments I’ve used on this!
Again, sorry for the Danish!
Here are some of my psds (tho I always make a new one every time I do a gifset)! I feel like there’s a lot to learn through looking at other people’s psds! Just have fun with it!
Step 5. Sharpen (and topaz)
I more or less always sharpen the same way on every gif (depending on how sharp it already is).
To sharpen you have to make sure you’re working as a smart object! You have to make the frame animation into a timeline and the layerss into a smart object!
Timeline:

Smart object: Select all layers > filter > convert to smart
(or select all layers > right click > convert to smart)
It has to look like this

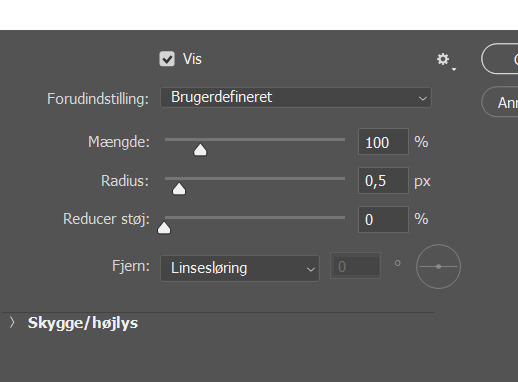
To sharpen you go to filter > sharpen > smart sharpen
These are my settings:
Then I go to topaz denoise! I don’t really have any set settings for this, I just do whatever feels right in the moment. Topaz denoise is also a whole other thing, but it’s easy once you figure it out! I made a video on how to use Topaz here (to help someone who asked)
youtube
Because I don’t like my gifs way too sharp, I always add a blur at 20-30% opasity!
Step 6. Save the gif!
Before saving the gif, make sure everything is as you want it to be! You also have to remember to set the frame delay! I usually go for 0.05 or 0.06!
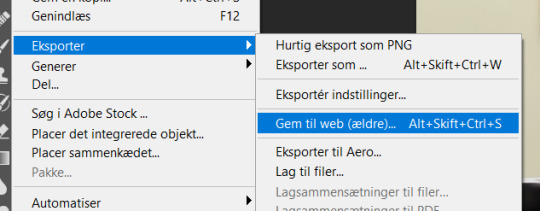
To save go to files > export > save for web
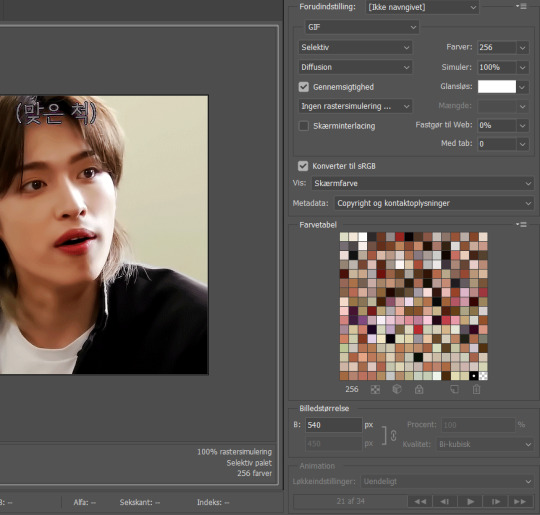
These are my settings!
And there you have it! A finished gif!
If you are more of a visual video learner, here is a video I made of my giffing like over a year ago for a challenge!
youtube
My colouring has changed a lot since then tho! I also didn’t sharpen and use topaz in photoshop (I used a lot in vapoursynth)
I hope this was at least a little helpful! ^8^
#*m.gif#maja talks#ps tutorial#resources#ps resources#photoshop#I am not good with words but here we are
54 notes
·
View notes
Note
How do you make your Gifs so hd? I swear, you have the best quality gifs!
Hi! Thank you! It's a combination of many things;
game graphics settings on ultra quality
otis_inf's camera tool to zoom in the face
avisynth to crop/sharpen gifs before loading the frames in ps
the sharpen action in photoshop
If you would like a better 'tutorial' of sorts, let me know!
6 notes
·
View notes
Note
hi umm so I really love your gifs and i was wondering how you make them so good?? no pressure tho
ahh i'm so flattered you like my gifs but i'm ngl! i've only been making gifs for like, a month and a half now? so i will try my best to answer your question with my limited experience 🙇♀️
there are 3 main programs i use which are 4k video downloader, vapoursynth, and photoshop -- 4k to download yt videos in the best quality, vs to preprocess the video (crop, resize, denoise, and sharpen) and photoshop for recoloring and other edits! ik other people may use different programs like avisynth instead of vapoursynth for their preprocessing, and topaz for sharpening/cleaning but these are the ones i use! in addition you may be able to find ultra hd videos on other sites without going through 4k downloader but yeah this is the one i use specifically for yt. i've found that these programs have really helped improve the quality of my gifs in terms of smoothness and clarity
these are the tutorials i used when i first started learning and they explain how to use those programs in greater depth:
vapoursynth link one, link two
photoshop link one, link two, link three
other tips link one, link two, link three
(also i would exercise caution in regards to any download links you come across in these tutorials!!)
but yeah there are loads of other resources online that go in depth about where to find hd videos, how to use photoshop, etc and the gifmaking community is p friendly so don't hesitate to reach out!! when i first started making gifs (which wasn't even on photoshop LOL) i went through a lot of trial and error and tbh i still haven't really found my style yet! but i kept trying to experiment with different programs and techniques and the process itself became fun and i felt a big sense of accomplishment just learning to do the little things :^)
i hope this was helpful and if you come off anon i can't wait to see the gifs you make!! fighting by bss 😎
#woo boy this got long#tbh feeling v embarrassed but ty annonie for liking my gifs 🫶#nina answers#anonnie
7 notes
·
View notes
Note
how do you make your gifs and touch them up? im curious if its a specific program or just a high quality online converter
i'd say the most important thing is to download the original video in the highest quality possible!
For resizing the video i use avisynth/vapoursynth (has a denoizer too, an alternative would be topaz but i never figured out how it works) but it's not necessary
the rest (sharpening, coloring) is done in photoshop (it's expensive and has one of these awful subscription systems, so if u can't leech from work like me there are very nice tutorials on how to get it for free :) )
11 notes
·
View notes
Note
How do you make your gifs have high quality? Do you use any presets or have any tips? Your edits are amazing, it would be AMAZING if you could share. <3
Ah thank you anon!! 🥰🥰
My tips are basically the same any other creator will give you tbh for good and crispy gifs your source material should be 1080p MINIMUM , I cannot stress that enough. For film search for files between 5-10gb for good results, but if you have space in your drives for even bigger files then go with these, sometimes files under 3-4gb are compressed as fuck and will only give you a headache when you try to color and The Pixels™ will inevitably show themselves. For tv anything under 1gb will be questionable, good streaming services rips are over 1gb for sure.
There is however good files not compressed for film under 3gb sometimes and they are encoded as x265 so if you don't have much space but still want to gif in quality get these downloads, in their name usually they say if they are 264 or 265 so look up for that. So in short:
Under 3gb encoded in 264: shit
Under 3gb encoded in 265: good!
If you need a place for downloads come of anon and I'll link you a trusted place for gifmakers only.
Okay enough on the files 😂 for doing the actual gifs I either screencap or use an external tool to trim an specific scene I want to gif. For screencaps I recommend mpv or mpv.net, both are open source programs and work really well and gifs will look the best imo. For trimming videos I use ffmpeg on my computer's CMD but it's not very user friendly if you don't know how to use ffmpeg well, I know people recommend handbrake though so there's that option and then use video frames to layers.
For sharpening I use 3 different settings depending on my source material:
Animation: I use a smart sharpen with 500 0.3, if it's ghibli or anime I'll lower the opacity of the sharpen around 80-85%
Tv/Film: a good source (files over 3gb) will only need a 500 0.3 sharpen sometimes. If I want it to look a bit more crispy I add another sharpen of 100 1. For not so good sources I apply a 500 0.4 sharpen and I lower its opacity to 80-85%
Youtube videos/music videos: first, YouTube is a bitch on quality so there's that, but if you can't find the thing you want to gif elsewhere (like our lord and savior Vimeo or the ShareMania forum) for YouTube I get my videos using Jdownloader, it will download the biggest file possible and more often than not it's the best quality possible. If the video even being 1080p looks kinda shit I use Topaz to denoise and clean my gif and then I apply a 500 0.4 lowered to 85% smart sharpen (gif making for kpop taught me many things lately 😂) and it looks like it was a video from a good source! There's also avisynth and vapoursynth but I don't use them, if you wanna check that out you can Google and lots of tutorials will show up, mostly from kpop creators.
After that, it's all coloring tbh. Know that shit files won't be able to handle vibrant coloring very well so be careful with that. If it's too bad I try to bring up the darks more to no make it too visible but you will always get pixelated stuff with bad quality source.
My saving settings vary between adaptive/diffusion and adaptive/pattern, if I'm working on animation or too heavily colored sets (like with gradients) I'll go with pattern, if not it's diffusion.
Okie I think that covers everything 🙈 if you ever need more help with gif making you can message me again and I'll gladly help!
You can also join the @pscentral server on discord where there's ton of gif makers (from beginners to well established ones) that will always be there to help and always give good feedback ☺️
33 notes
·
View notes
Note
Hi so I have no idea if you're even still active on here but I figured it'd be worth a shot, I randomly got this error on my avisynth after saving [Avisynth open failure: SeperateFields: YV12 height must be multiple of 4] would you happen to know the fix by any chance? Thank u so so so much for all the help/tutorials you've posted on this blog btw they're an actual lifesaver
oh HELLO, barely managed to see the email notification for this lmao...not active on here but I do still see messages, even if it's a couple days late!
For starters, which files are you using? Honestly been so long that I don't even remember all the differences, but the latest updates I made are here, so if you're not using those files and are able to make the update, I would recommend going for that--since I'm sure past me was smarter than present me and made updates for some specific reasons...
Second, I feel like I MUST have coded in a failsafe for this kind of error but maybe not? Basically, as it says there, it's crying cuz the height value of the input video you are trying to use the filter on is not a multiple of 4. I'm pretty sure I have it coded so that whenever you resize, the output window will round to the nearest multiple of 4 for the height value, so technically it should always be a multiple of 4 UNLESS you're not resizing at all.
Check out this post here for a slightly more thorough explanation to a similar problem and lmk if any of that gives some insight towards a solution. If not you can send over a screenshot of the code in avspmod and the error that displays and we can go from there~
2 notes
·
View notes
Note
Hello! How are you? I'm sorry to disturb you, but I discovered your Tumblr profile not so long ago and I love your gifs, they're so beautiful!
I wanted to ask you how you make them, what programs do you use and how to do them in order to upload them on Tumblr and make them work. I used to upload myself lots of gifs back in the day, but they were so bad and I always had problems with them not moving on the post.
I hope I'm not bothering you with this question. Thank you in advance for your response and I hope you have a great day!
oh, hello! 🥰 i'm doing alright! thank you sooooooo much for appreciating my gifs, it really means a lot to me 🥺 of course i will help you, as much as i can and don't worry you could never bother me!
first things first, i will provide you with some links to tutorials, my own gif making process was built on a bumpy road and by a method of trial and error LOL but don't worry if it happens to you too yeah? we're here to learn. here is my tag where i post or reblog photoshop/gif related stuff (there is not a lot but i will have to reblog all the tutorials i have in my likes, but that for later LOL) personally i use photoshop cc which i downloaded here, but in the tutorials i will leave for you you'll have a lot more of the versions and links to choose from. i use avisynth to resize my gifs without losing quality (download and tutorial) and a software called topaz denoise and clean which is a plug-in for photoshop, for quality control of my gifs, to get rid of ugly noise (download). and here is a tutorial how to use both in order to sharpen gifs properly. here is the first tutorial i would like you to check out, it's most similar to my own process because it includes both things i just mentoned, next two tutorials i recommend are this and this, they are amazing and everything here is basically covered, with exception there is a different process to it than mine because i rarely use screencaps to upload clips into photoshop, but it's a great way as well so definetely give it a try because you might like it more. as to why your gifs did not move after uploading, there might be a lot of reasons, starting from too large file (the limit is now 10mb) or lack of loop on the gif etc., but hopefully these tutorials will help you figure out what went wrong, i'm sure they will answer all your questions! 💞
here is also some additional tutorials for coloring: 1, 2, 3, 4
and something that might help with the issue you mentioned: 1
if you had any more questions in the future i will be always happy to help 🥰 have fun! thank you again and have a wonderful day as well please! ❤❤❤
#earlier today i had a small breakdown over my gifs and here you are complimenting me AND asking for advice!#how could i be sad ever again when people like you exist 🤧🤧#LOL sending you muuuch love!#anonymous#answered
8 notes
·
View notes
Note
how did u get so good at giffing?
hi anon great question! so back in 2012 i used to be a gifmaker during tumblr's "popular" days. the gifs were very low quality but it fit right if u wanted to be a content creator for a specific fandom
not a lot of people know this but i use to make gifs of glee. yes, you heard that right. i was a gleek on tumblr during 2011 to 2013.
my gifmaking skills were very naive during that time. i was using my mom's old windows 7 laptop to make 400 - 800kb gifs. where i had to lock my folder filled with gifs and psd's just in case my mom wanted to use her laptop.
i was also torrenting every 1080p episode of glee with a really bad wifi. i cant imagine how i would make them like that today.
but luckily times have changed. and gifmakers also have changed their methods on making gifs where it went from just photoshop to programs such as avisynth and vapoursynth.
i recently got back to gifing after 7 years in 2020 because of BL and i think bl has made me see how much i had changed from my old gifs to my current one.
i think i got so good at giffing because i was persistent in looking for resources and making sure i had the right amount of style that says alot about what im gifing whereas back them i would just load the clip in photoshop and it would look bad but still gain notes.
so basically i went from this

(this is the only set i can find of my old gifs lol)
to this

because of the psd's, tutorials and other gifmakers that have given me advice on what to do and i based that in to making my own kind of style. also thankful that tumblr made the gif size from less than 1000kb to 10MB so i guess thats what makes this even better.
1 note
·
View note
Note
How do you screen record/make gifs for your posts? I think its really cool and...complicated
hey! I think you also sent an ask to my main blog (soyums) so I'll answer to both here! ^^ (if not pls let me know T.T)
To be honest with you, I kinda ditched making gifs lately, but I did make them with avisynth and photoshop! It's not really that difficult once you get the hang of it. For avisynth, you can refer to this post, it shows how and where to download it, how to cut and crop the gifs, etc. (you can also use vapoursynth, but it never really worked for my old ass laptop) and for photoshop, to be completely honest, I don't know where to download it from, but I'm pretty sure you can find a link/tutorial on youtube.
As for the giffing tutorials, there's a lot of them on tumblr, but this one is the closest to how I made my gifs. FYI, you don't need Topaz plugins, I never added topaz to my anime gifs ever and the quality still comes out pretty good!
And as for resources, I used the default windows screen recording option (windows key+alt+R) (if you looked at the tutorial, I never used bandicam so you can skip that). A lot of the footage is from youtube as well, for better quality downloads, I used 4k downloader; for the newest stuff there are some sites for torrents, but as I haven't been giffing lately, my torrents and all the sites are gone, so you can simply google them. But if you're only starting to gif, I'd say stick with simple youtube footage available for you (I guess you can type character + raw scenes or smthn like that) and it should come up.
Hope this helped at least a bit, I'm not really good at explaining, but if you have any questions, let me know and I'll try to help! And it's really not complicated, after repeatijg the tutorial for 10-20 times you'll get the hang of it, so keep it up if you're trying to learn!
2 notes
·
View notes
Note
Hey, can I ask where you learned to make gifs? Are there any resources or blogs you can recommend?
hi, the exact blog i learned from has been deleted but this resource here has a pretty thorough guide on how to get started on giffing! this tutorial is a slightly more advanced method for using avisynth + topaz for giffing. i use vaporsynth personally and here's a thorough tutorial for using vs to gif! i also have a few resources reblogged on my blog which can be found here! if you are looking for something specific, feel free to send me an ask again <3
4 notes
·
View notes
Last Seen Blogs

guiadeandorraenvideo
Guia de Andorra en Video todos los videos de Andor

terencecheong
Terence Cheong

cupidonna
Summer Bliss

luchtschild
NQ