#ps tutorial
Text
Hello!! A couple years ago I posted this tutorial for making gifs with a moving overlay effect. In the two and a half years since I made that tutorial, I've learned some new tricks for this gif effect but most importantly I've learned how to explain things better.
For that reason, I've created this new and improved tutorial for my overlay gif effect. The basics are the same but it's simpler, I go into more detail, give better explanations, and have more comprehensive instructions.
The easiest way to do this effect with this method is to use smart objects and work in timeline. For this tutorial, I’m assuming you know the basics of giffing like cropping, resizing, colouring, etc. If you need help with this I’d suggest you look at some other tutorials and guides!!
First, we’re going to start off with three things.
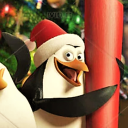
1. A completed gif converted into a smart object that is going to be the base gif. I'm going to call this "gif1". You’ll want this gif to be at least 3 seconds because it needs to last as long as the overlay plus a little bit of extra time in the beginning.
This is the base gif I’ll be using in the example (except I trimmed it so that I could meet the size limit).
2. A second completed gif converted into a smart object that is going to go over the base gif. We’re going to call this "gif2". This gif should be at least 2 seconds but I’ve made it work with shorter. Gif2 needs to be the same dimensions or bigger than gif1.
This is the gif I'll be using in the example (except I trimmed it so that I could meet the size limit).

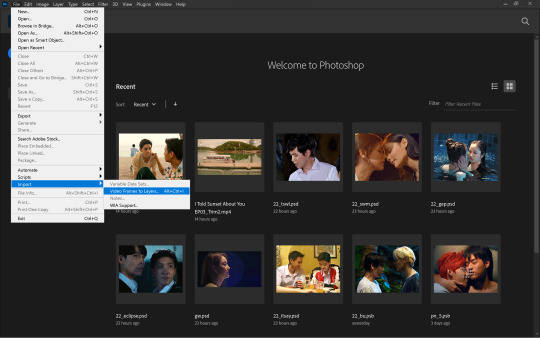
3. An overlay in video form. These can be found on tumblr and youtube by search for overlay or transition packs. For this example, I'll be using an ink drop overlay I found on youtube.
Step 1: Turning the overlay video into an overlay gif
Most overlays aren’t going to instantly fit the gif effect you’re trying to achieve right away. This is the overlay I got from youtube and as you can see it’s too slow and needs a crop/resize to be usable.

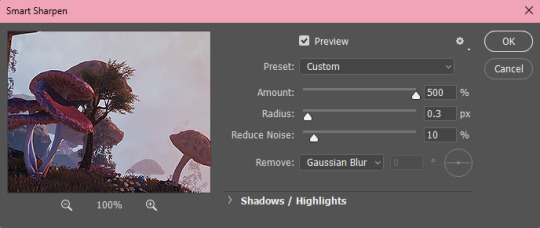
To fix it, I sped the frame rate up, cropped the overlay, and resized the overlay so it fits over my base gif. I also sharpened the overlay (500% amount, 0.3px radius) so that the edges were smooth. This is the new overlay gif and the one I’ll be using for the gif effect.

A tip: I also like to add a brightness/contrast layer to get rid of the grey on the overlay gif. Because we’re working with blending modes to achieve this effect, any parts of the overlay that are grey will be a blended mix of gif1 and gif2. If you think this will look good for your gif effect then don't worry about it!
Another tip: try to get the entire overlay movement to fit into a 2-3 second window. Anything longer than that will likely be cut off when you have to trim your gif to meet the upload size limit and it would suck to only have half of the overlay.
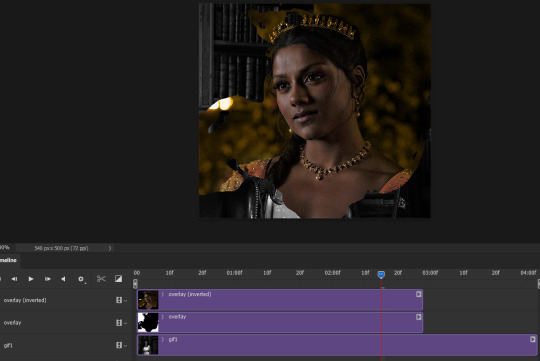
Step 2: Creating the gif effect
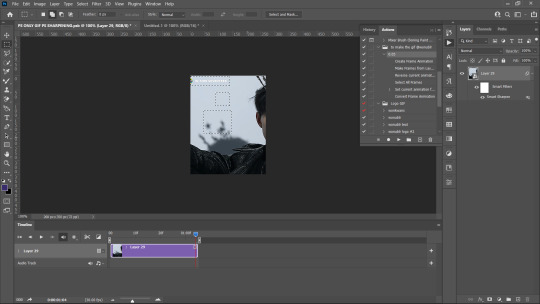
Drag a copy of gif2 and a copy of the overlay gif onto the gif1 canvas. I like to use Ctrl+Shift+V so that the layers are pasted in the same position as they were on the previous canvas. MAKE SURE that both overlay layers are in the same position on the canvas. If one of the overlay layers is higher/lower/etc. than the other then the effect won't work properly.
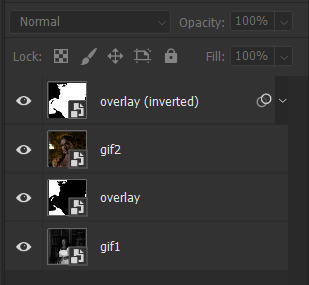
Then, make a second copy of the overlay and invert it (Ctrl+i). These are the layers you should have:

Before you go any further, trim gif2 and both overlay layers so they are all the same length.
Now, we need to rearrange the layers and set blending modes. The top layer should be whichever overlay goes from black to white. This is because when we change the blending modes, the white part of this layer will disappear and look like its being replaced by gif2. In this case, that is the overlay (inverted) layer. Then we want gif2, the other overlay layer, and then gif1.
A tip: this process can be done the other way where the top layer is the overlay that goes from white > black however, you are much more likely to have an error where there is a grey/black line around the overlay effect in your final gif. In order to avoid that, I always use the black > white layer on top.
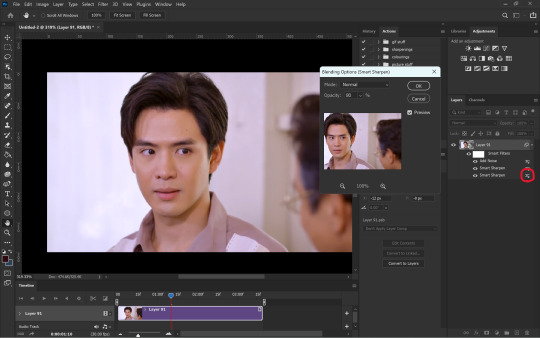
Next, set the top overlay layer to darken. You should only see the black part from the overlay and gif2 should fill in the white part. Here’s how that looks in my example.
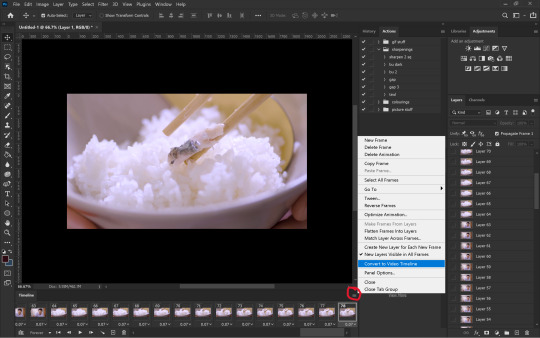
Next, select the top overlay layer and gif2 and convert both layers into one smart object. Your layers tab should look like this now.

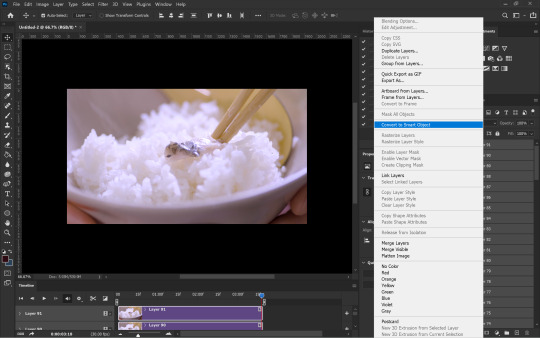
Now, set the new layer’s blending mode to lighten and the overlay layer’s blending mode to darken. Once you do this, you should be able to see gif1 as well as the overlay gif.
Step 3: Timeline and exporting
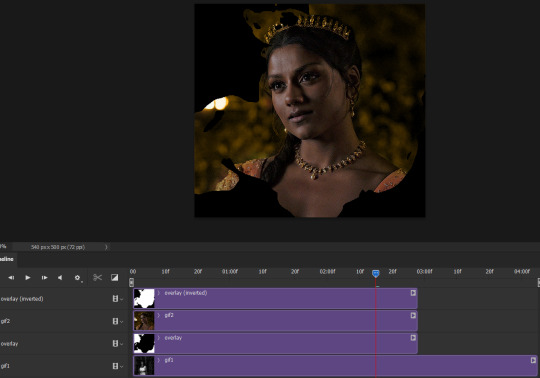
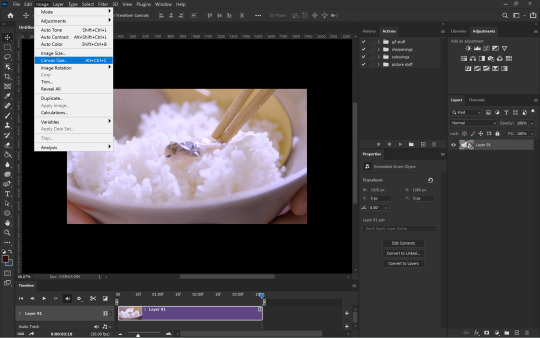
At the moment, gif1 is still significantly longer than the overlay gifs. Since this gif is just over 10 mb (which is pretty small for this effect) I’m going to trim about 1/4 of a second off the end of gif1 and then drag the overlay layers so they all end at the same time.

Now you’re free to export the gif! This is the finished effect for the example gif!

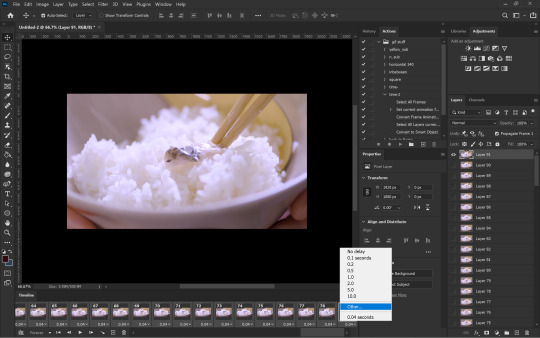
A tip: sometimes, when I convert to from timeline to frames, the gif becomes a little longer and slower. It has to do with different frame rates across the videos and photoshop but I'm not smart enough to understand it. If that happens, just set all the frames with the overlay layers to 0.04 speed instead of 0.05.
And we're finished! I hope that was helpful and made sense. If you have any questions feel free to drop them in my inbox or send me a message!! <3
#gif tutorial#allresources#completeresources#dailyresources#chaoticresources#ps tutorial#photoshop tutorial#usertreena#tuserssam#usernik#tuserabbie#tuserace#userk8#usershreyu#uservalentina#useryoshi#userannalise#userrobin#usersalty#uservivaldi
1K notes
·
View notes
Text
TILE TRANSITION TUTORIAL

a couple of people have asked me for a tutorial on how I did the penultimate gif in this set, so here goes! this is my first tutorial, so please feel free to reach out with further questions if anything's unclear.
note: this tutorial assumes you know the basics of gifmaking, can create the base gifs, and are familiar with timeline mode.
STEP ONE: create the base gifs! I'd recommend staying between 25-40 frames for each gif, since the transitions we'll use later tend to increase gif sizes. these are the ones I'll be using for this tutorial:


STEP TWO: create the guide layouts for both base gifs. for this panel, I chose a 4x4 grid — I would recommend keeping the number of "tiles" low because it can get tedious, but have a minimum of 9 (3x3 grid).


now your canvas should look like this:

STEP THREE: create the tiles. this is where the going gets rough; there might be easier ways to do this that I couldn't think of 😭 if there are any please send me an ask!
essentially, in this step we'll cut up the base gifs into smaller squares so that each tile can be manipulated separately when we put both gifs together. to do this, first create a square using the rectangle tool and the guides. then duplicate the base gif, move it above the square, apply a clipping mask, and then convert the clipped gif and square (selected in the image below) into one smart object.


ALTERNATELY: you could duplicate the original base gif and use layer masks to isolate tiles. create a layer mask for the duplicated gif layer and, with the layer mask selected, drag your mouse over a square (using the guide layout) and press delete. then press ctrl/cmd + i to invert the layer mask so that the gif only shows in the square of your choosing.
now repeat until you've got the entire gif in tiles, and do the same for the other gif!
since the transition effect is achieved by staggering the crossfades for each tile of the final gif, you can cheat by having multiple tiles "flip" at a time, ideally no more than four. this means you need to cut the base gif up into fewer pieces. to do this, simply draw multiple squares instead of one and then merge the shapes, before duplicating and clipping the gif onto them.


if you do this, it's essential to remember that you have to divide both gifs up in the exact same way. each piece of the b/w gif has to correspond to a piece of the purple gif!
this is what the layers look like for each gif once I'm done:


I have them lettered so that it'll be easier to match them up in the next step.
STEP FOUR: this is the complicated bit that took me two days to figure out. I'll do my best to explain but don't hesitate to reach out if something isn't clear!
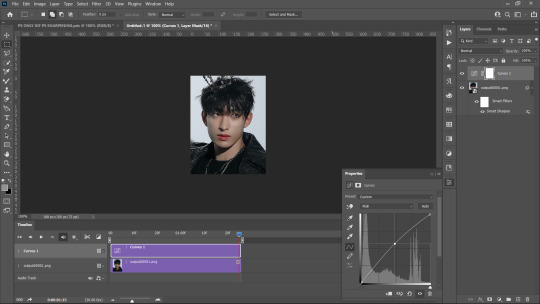
to begin, open up a new psd and import both base gifs into it. (remember to click "create video timeline" and ensure that your gifs are all in order before proceeding.)
now, the trickiest part about this transition is ensuring that all the little tiles sync up so that the larger gif is coherent. so first we'll create some markers (just empty layers) to ensure that everything lines up as it should.
— marker 1: at about halfway through the first gif (b/w in this case)
— marker 2: at about a quarter of the gif length
— marker 3: close to the end of the gifs

at this point we're ready to start bringing in the tiles. I'm going to delete the base gifs from this new psd just to keep things cleaner!
first thing to do is import my b/w tile. move the timeline slider over to marker 1 and split the first gif. (if it helps, rename the split gifs and add (start) and (end) to the two halves.) then, move the (end) half to the beginning of the timeline, and the (start) half to line up with marker 3.
the purple tile is easier to manage. simply import it into the psd and line it up with marker 2.
your timeline should now look like this:

notice the overlap between the gifs at their beginnings and ends — this is where you'll be able to cascade the tiles flipping, so it helps to have a significant amount of overlap.
crop the three gifs for this tile as you see fit! since this is the first tile I want to flip from b/w to purple, I'll crop gif 1a (end) all the way to the current position of the timeline slider (red line with blue tip) and leave the beginning of gif 2a uncropped. for the flip from purple to b/w, I'll crop both gifs a bit.
once that's done, drag all three gifs onto the same level in timeline so they form a video group. your timeline should look something like this:

now you just repeat the process for all the other tiles! as long as you made sure that all the tiles in one gif correspond with tiles in the other gif in step three, this should be a fairly painless process. make sure to crop the starts/ends of the gifs separately so that they don't all flip together.
this is what my layers look once I've done all the tiles:

and the gif!

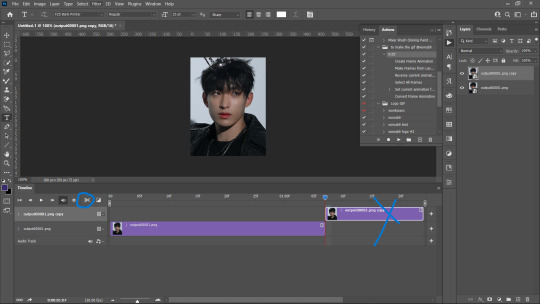
STEP FIVE: transitions! click on the half-white square (top right of the left column in the timeline, beside the scissors) and select the crossfade transition, then drag it between two gifs in a video group. it should create a two-triangle symbol and shorten the overall length of the video group.


apply the transition to all the tile flips, ensuring that the duration of all transitions is constant. this can sometimes be tricky because ps likes to change the duration of each transition, so right click on the transition symbol and manually change all your transition durations to be the same.
your layers should now look something like this:

STEP SIX: draw the grid. bring back the guide layout from step two and using the line tool (I like 2px thickness), trace the grid. adjust opacity as you see fit (50-80% is usually a good idea), so that the canvas looks like this:

STEP SEVEN: export and celebrate! you're done!
I hope this tutorial made sense and was easy to follow, and happy giffing! my inbox is always open for any questions <3
#tutorial#ps help#ps tutorial#userace#alielook#userabs#usercats#userhella#userfaiths#tuserabbie#usershreyu#usertreena#tuserlucie#uservivaldi#usertj#usergiu#userroza
614 notes
·
View notes
Note
hello! just wondering if you know of a tutorial for the lines going through gifs? and getting them all to match up? like in these sets /post/714978685858496512 and /post/733101286452559872 also are they overlays or how did you make them? thank you in advance!
hey! so, i've attempted to show you with a little tutorial on how i made lines like the ones here and here, i've not seen one around myself and decided to try this out one day and it didn't go too badly so, i hope this makes sense and helps.
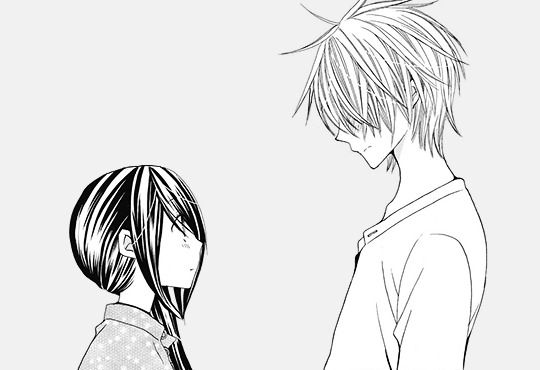
so, i'll be explaining and showing you how i did the lines on these gifs:
now, firstly i'm going to assume you know the basics and can create/colour etc a gif, you'll need your base gif ready to go. in this example i've flattened them to frames, but you can do this in timeline as well.
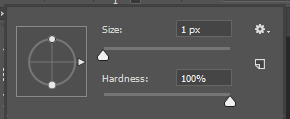
step one: add a new layer on top of the gif/smart object, and set up your brush ready. i personally have used 2px brush, 100px hardness, 100px smoothing and 75% flow;

the flow is the main thing i think that is more down to personal preference, it affects how the line draws/moves and will be down to a little bit of trial and error - i've added below how the lines look at difference levels of flow (no other setting from the above has changed just the flow)

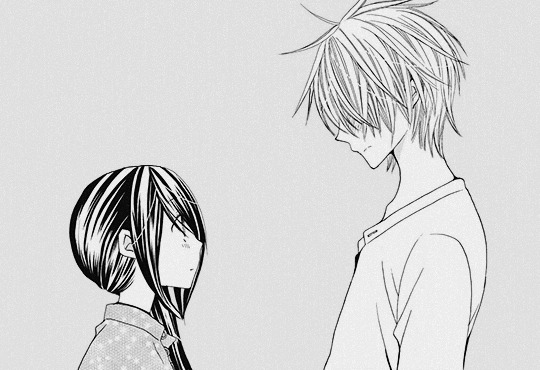
step two: decide where you want your lines to link, i've always done from the centre of the gif but you could want your lines to meet up 100px from the left at the top and exit the gif 100px from the right at the bottom. no matter what, the best thing to do here is to add guides to your gifs. as i'm just going straight from the centre to the centre for every gif i add a guideline at 270px

step three: i recommend testing this all out on a separate canvas first to play around and see how you want your line to look etc, but when you're ready you're good to go. start from when the guideline is and draw your line until where you want it to end, the best way to show you this is on video so i've screen recorded the whole process.
youtube
it's honestly pretty straight forward, so i hope this all makes sense, and just have fun with it, i love messing around and drawing 30 versions of the same line until i'm happy with it!!
ALSO, in case you were wondering about the final gif in the wheel of time set, the moving line, that was simply an overlay from this video that i set to screen so the black background disappeared leaving just the line (i stretched/rotated/moved it around get it to start and end where i wanted it to! i just played around with the line thickness when drawing my lines to match as best i could with the line in the overlay!
#ask#anonymous#ps ask#quirkyresources#usernik#userhella#uservalentina#userrobin#userannalise#userrainbow#usershreyu#alielook#useralison#userives#useryoshi#ps help#ps tutorial#chaoticresources#dailyresources#hisources
217 notes
·
View notes
Photo


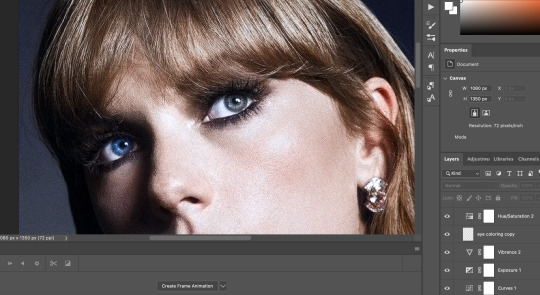
Hi everyone! I just wanted to share my coloring/giffing process for stages because I love making performance sets and I know that giffing kpop stages is a daunting task, not just for new gifmakers, but also more experienced ones. This is in no way saying my way is the best or right way to color, but I hope this will somehow help alleviate some challenges for anyone who is afraid or hesitant to gif stages.
Disclaimer: I am not a professional and although this blog is relatively new, I’ve been giffing for a little bit over 3 years with a lot to learn still. This tutorial is focused on K-Pop stages and doesn’t necessarily apply to other types of gifs. Also, I try my best to explain why I do things the way I do here so this is going to be long (image and word heavy).
With that in mind, let’s get started! I’ll be using our precious Jeonghan in Seventeen’s Super performances for this tutorial :D
BEFORE WE BEGIN
This tutorial is mostly focused on coloring; however, I believe the quality of your video file, sharpening, and timing also factors a lot into whether your gif looks good or not. For reference, I use VapourSynth and Photoshop 2020 cc for making gifs. Vps is not necessary to make good gifs but it does help make my process easier and quicker.
Files: For performance gifs, I only use .ts files because that ensures all of them come out in the highest quality possible. Please refer to this post for more information and where to get them (thank you op <3).
Sharpening: I use Vps for sharpening, denoising, and deinterlacing .ts files. I tend to keep my KNLM settings between 1.2 to 2, depending on how noisy the original video is, and FineSharp between 0.3 to 0.5. Any additional denoising/sharpening is done in PS.
Timing: Because I deinterlace with qtgmc 60 slow, the resulting video import will be 0.2 for the frame delay. Gifs that are too fast or too slow will compromise the quality of your gif. For stages, I like to use 0.3 as the final frame delay for 60 fps files and 0.4 for 30 fps.
Exporting: My export settings are Adaptive Diffusion since I find that to look the best.
BASE LAYER
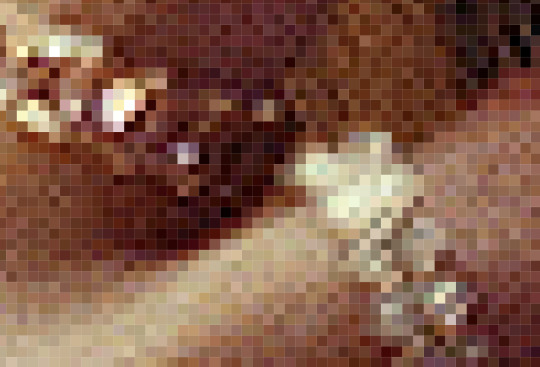
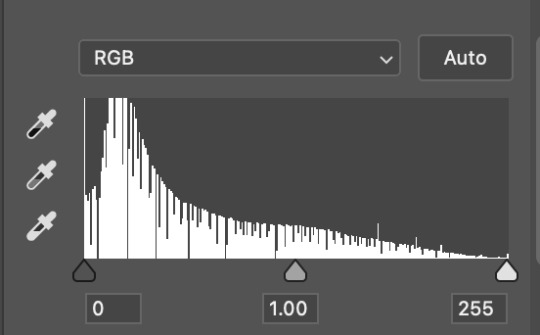
As you can see even without coloring and just based on the file, sharpening, and timing, I already have a nice gif to work with. I like to start by correcting the original lighting and colors so that I have a nice canvas for coloring. I do this with a levels layer and use the eyedropper tools to designate what I want to be white (bottom eyedropper) and black (top eyedropper). Here, I zoomed in on the highlight of his mic for white and chose the darker area of his mic for black. I also adjust the brightness a little.
The gif is now much more vibrant and less faded. I think the lighting here looks okay but, sometimes, a curves layer is needed to even out the lighting. Below, I am trying to lower the saturation of the red as well as make his skin even (aka not shiny) so that I can color later.
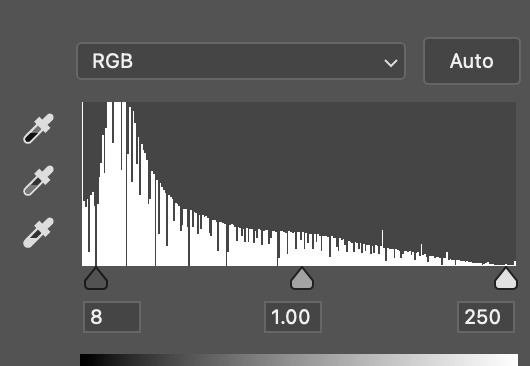
Just an FYI: The curves layer also has the same eyedropper tools found in the levels layer so you can skip the levels step if you prefer to use the curves layer only. I find that using the eyedroppers to designate what is truly white and what is truly black helps significantly in correcting lighting. For example, if your gif’s covered in a purple color and your darkest pixel is a dark purple, when you pick that pixel to be black, PS will correct your gif’s color table and get rid of the purple. The same happens when you designate the brightest pixel to be white.

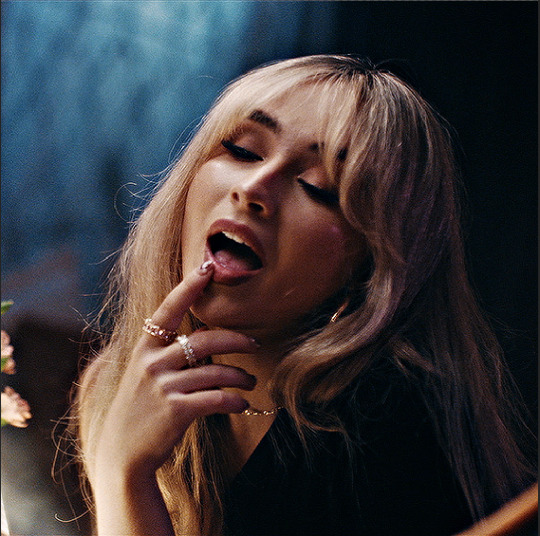
Here is an example. Notice in that in the first gif, it looks faded and is filled with a purple filter and lighting. A single levels adjustment layer using the eyedropper tools to designate a true white (the highlight of his hairpin) and black (his hair) color removed the filter and made the colors of the gif more vivid and saturated.
COLOR LOOKUP/GRADIENT MAP
Next is my favorite layer, the color lookup. This adjustment layer takes your gif’s color table and matches to a selection of presets. I generally use this at a lowered opacity to even out or add color to an idol’s skin while also darkening the background. If your PS doesn’t have this option, I find that gradient maps set to the right colors and opacity have the same effect. Here are two examples of the different color lookup layers I used at different fills.


The Fall Colors adjustment gave his skin some life and warmth while the Crisp Warm adjustment darkened and gave the gif more saturation.
CORRECTING BLUE VS. RED BACKGROUNDS
Generally, Kpop stages have backgrounds consisting of cool (blue, purple, green) and warm (yellow, orange, red) colors. I personally prefer a cooler background because it is much easier to manipulate and will not affect the skin tone of the idols (unless there is blue lighting on their skin). Warm colored backgrounds are harder to manipulate because you run the risk of messing with their skin.
Gifs that have too many colors end up looking pixelated so my goal when fixing backgrounds is to turn cyans/greens/purple into blue and manipulate the blue using the hue/saturation and selective color layers. As for warm colored backgrounds, I darken and desaturate as much as I can without affecting the skin. Any sort of magenta can also be treated in the same way.
I like to make my backgrounds into gray/black or at least very desaturated so that the idol can shine and be the main focus of the gif. Having less colors will help improve the quality of the gif so don’t be afraid to play with the hue/saturation sliders. Here are just a few examples of the adjustment layers that I used for the gifs above.

That will usually work if the lighting doesn’t change. If the lighting changes, then you might want to change your approach. For the following gif, there is a flashing light that fills the entire gif with blue light, including his face. In this case, I can’t darken the blues because it will end up giving him a weird gray color when it flashes. Instead, I go the opposite direction and lighten the blue using the hue/saturation layer.

Make sure to pay attention to every frame to see how the hue/saturation layers affect the rest of the gif. Here are the adjustment layers for this gif.

COLORING SKIN
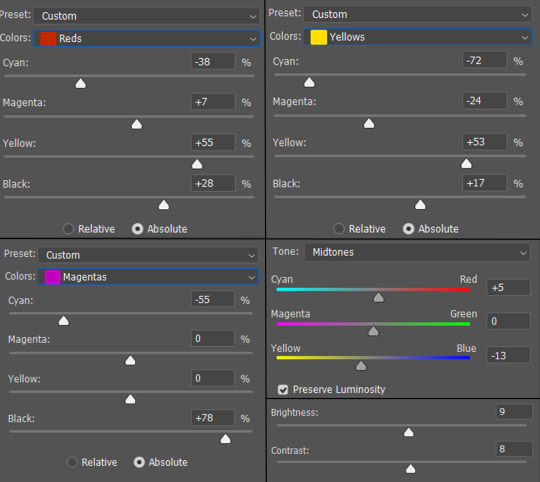
Correcting backgrounds will always end up affecting the color of the idol’s skin so it’s best to minimize the effects as much as you can so that you have an easier time coloring. The layers that I use to color skin are color balance, selective color, and hue/saturation.
I start with color balance, adding in a mixture of yellow, red, and magenta to the midtones. To counteract the warmth, I add cyan and blue to the shadows; I rarely mess with the highlights unless necessary. I use selective color to darken reds and yellows with black. If the yellows/red are too pink, I darken with cyan. If the yellows/reds are too yellow, I darken with magenta and lessen the yellow. If the yellows/reds are too cool, I darken with magenta and yellow.
Above, you can see that he’s kind of pale without any added layers. The color balance layer added warmth in yellows and reds and the selective layer added some depth to the shadows. These were all minor adjustments but they had a great impact on how the gif ended up looking.

For this gif, I noticed that he was just a bit too pale after the color balance and selective color layers so I added a channel mixer layer to add a tiny bit of pink into his skin.
Here is another example. There are a lot of other skin coloring tutorials out there that do a better job of explaining the do’s and don’ts than I can but as a good rule of thumb, try not to make their skin too yellow or pink and you’re good! :D Refer to this tutorial for more information.
FINISHING TOUCHES
The remaining adjustment layers I use are exposure, brightness/contrast, and vibrance. Everyone has a different preference for these layers and that’s what makes creators’ gifs unique from one another. So, adjust these layers as you’d like! For me, I like increase the exposure and balance it with a decreased offset and gamma correction with the exposure layer. I also like to decrease contrast in the brightness/contrast layer and increase both saturation and vibrance.

It’s best to find a good balance between brightness, exposure, and contrast. If you increase exposure, make sure it’s balanced by something else so that your idol won’t end up looking too white. Gifs that are too bright will end up looking pixelated and grainy. If the noise in your gifs is not an artistic choice, then making sure everything is balanced will help reduce noise and make your gifs look crisp and smooth.
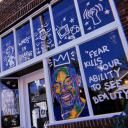
Giffing stages is hard, but it’ll get easier with practice and time/dedication. It takes me a total of 2 to 3.5 hours to make 2x2 performance set from start to finish and 2 days for a 9 pc set like Fear, not to mention that I had to recolor the first Super stage 3 different times. I’ve also had my fair share of bad looking sets. Stages are difficult but they’re doable! If you have any questions, feel free to send me an ask.
Here is the link to the psds I used to make these gifs. Happy giffing~!
#ps tutorial#gif tutorial#coloring tutorial#mymine#flashing tw#eyestrain tw#long post#tagging some mutuals just in case you wanna see it#feel free to ignore <3#isaishi#hanatonin#tuserose#tusersali#userzaynab#userhev#sonafied#emification#shuaria#resources
285 notes
·
View notes
Text
HELLO & WELCOME ♡
to an all inclusive giffing guide, which includes:
- vapousynth installation on windows / mac
- how to source giffable material
- resizing / deinterlacing / denoising / sharpening on VS
- step by step breakdown of how to use VS
- giffing after you've used VS
- giffing using only photoshop
- simple colouring guide
- watermaking and blurring captions
( a better and updated version of the previous one )
GIFFING USING VS + PS
1. VAPOURSYNTH & ITS INSTALLATION
VS is free to download and use. it is truly an amazing tool which allows you to resize, denoise, sharpen your gifs all at once and save the output in gifs, frames , mp4 and mov.
You can install vapoursyth from here. The site has download software and installation guide for both MacOs and Windows. Please watch and read the installation guide thoroughly, it is a very well written one and if you follow along, installation will be done easily.
It is best to use a video with minimum resolution of 1080p but a good 720p would work sometimes. This is how gifs look after sharpening a normal 1080p video:
2. SOURCING GIFABLE MATERIAL
➞ You can start with downloading a 4K Video downloader. It will allow you to download clean and best available resolution videos from youtube.
➞ If you don't want to download a software, you can use screenrecording.
- Windows : windows key + alt +R
- MacOs: shift + cmnd + 5
➞ .TS files
- for seventeen .ts files, you can go to rosebay
3. TUMBLR SIZING
Tumblr has it own resizing rules so that your gifs aren't blurry after you've uploaded them. Keep this in mind when you're using VS resizing tool.
4. USING VAPORSYTNH
After you've installed the VS properly. You'll have a VS script shortcut on which you'll drop your video file for giffing.
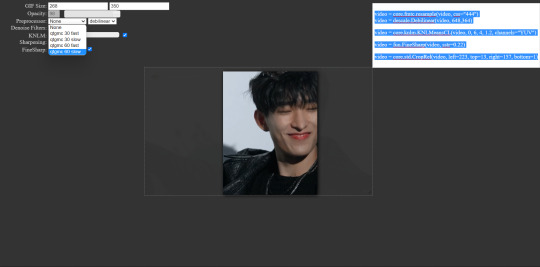
Once you drop your video file on the VS shortcut, a window like this will pop up:

After you've put your timestamps and gif duration, a resizer will open up in chrome ( or your default web) along with a VS Script Window (sometimes it’ll take a min to open).
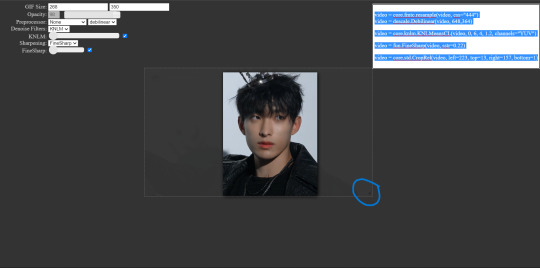
GIF Size: WIDTH (left space) and HEIGHT (right space). Use the bottom left triangle to adjust you clip.
Make sure 'Preprocessor' is set to 'None' and "debilinear'.
Use KNLM for denoising and FineSharp for sharpening by selecting them and ticking the small check box beside them. DONOT mess with the denoise and sharpening cursor on the resizer tab, we'll adjust setting on the VS Script.
There are CCs who use BM3D for denoising but it never worked for me. Always gave me an error. KNLM has worked without an error for years for me.
NOW, there are CCs who like to set frame per second ( qtgmc) on the resizer itself but qtgmc is designed to work with interlaced video. Don’t waste your time with fancams, it won’t do shit.
[ Interlaced content: live performances, variety shows. Typical formats: .ts/.tp/.m2ts
Progressive content: fancams, vlive/instagram videos, some variety shows (basically 1080p/720p/480p/…, anything with a p. Typical formats: .mp4/.avi ]
Copy whatever code that comes on the top right.
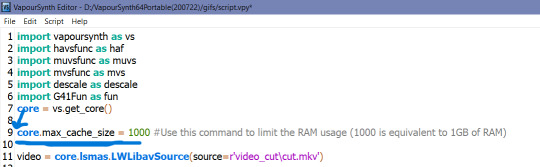
YOUR VS SCRIPT:
First, remove the # on line 9 to increase your cache size so that your VS doesn't slow down or crash. It is already removed in mine, but you'll have to remove the # on the start of line 9.
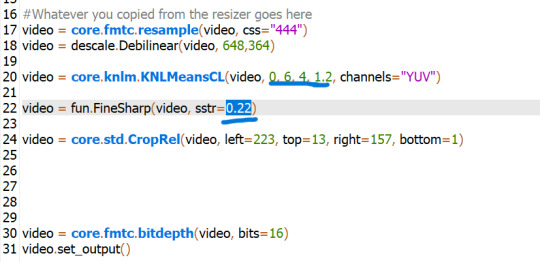
Remove everything from line 17 till before "video = core.fmtc.bitdepth(video, bits =16)" and paste the code you copied from the resizer on line 17.

After you've pasted the code, we put in our denoise and sharpen settings by changing these things.
denoise: 2, 6, 4 , 2
finesharp: 2
Now, Encoding aka Saving the output. Script > Encode Video and another window will pop up which allows you to select in which way you want to save your ouput.
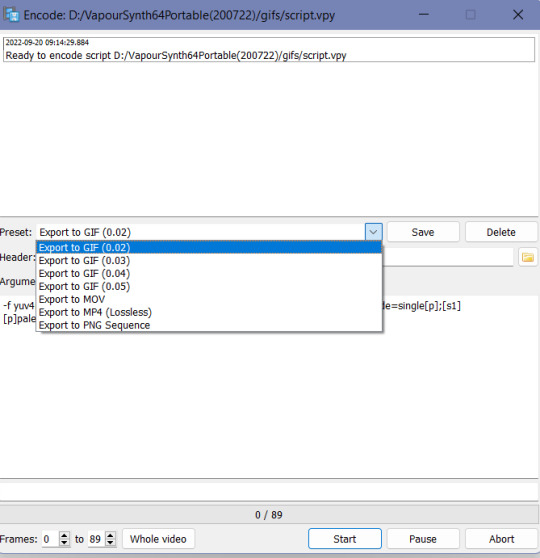
I would highly suggest using the PNG sequence because it is easily editable and is saved in hd from. GIF output can often be dithered.
Ensure that header in in Y4M mode
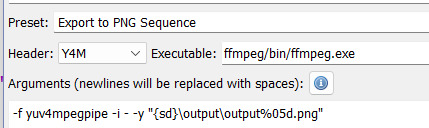
Click on Start to start your encoding process. Don't close any of the window tabs before the encoding is completed.
Your output will be saved under "D:\VapourSynth64Portable(200722)\gifs\output".
Before you start encoding another batch of frames or a gif, please cut and paste the previous output in another folder because each new batch of output gets saved in the same folder with the same name, thus, automatically replacing the files.
after you’re done with accessing your output PNGs, close all the windows and repeat the same for a new set of PNGs for another gif.
TRIMMING GIFS
If your saving as PNG sequence, you can simply trim your gif by removing the unwanted frames!
If you're saving as a GIF output, after loading your gif and converting it into a smart object, you can cut it using the 'scissors' button on the timeline.
Place the cursor thing from where you want to cut the gif from and press the scissors button.
It will split the gif in two. Select the unwanted one and press delete.
REMOVING FLASES FROM GIFS
To remove flashes in gifs in a simple and easy way is to save them as a PNG sequence. With that you can clearly see which frame has a flash and simply delete that before loading in photoshop as stack.

5. LOADING THE GIFS IN PHOTOSHOP
Firstly, turn on your timeline mode. WIndow > Timeline
To LOAD GIF FILE IN PS FOR COLOURING
File > Open > Select GIF > Enter
( a normal gif output will have a 0.02 FPS delay )
(if you want to sharpen or add any effects to the gif then:)
- Click the small button on the left bottom of the timeline to convert into into video timeline.
Select all frames on your right and convert them into a Smart Object (select all > right click > covert to smart object)
Add whatever filters you want.
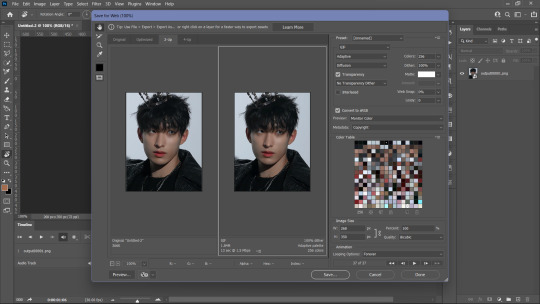
Add your colouring and save.
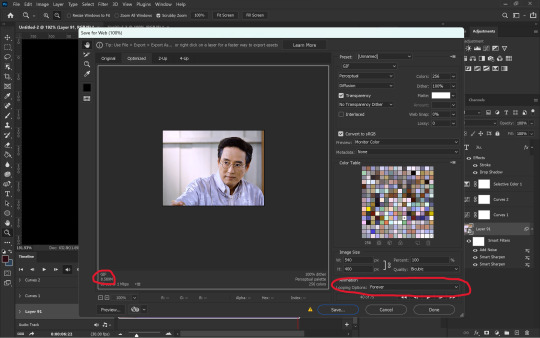
TO SAVE AKA EXPORT GIF
File > Export > Save to WEB
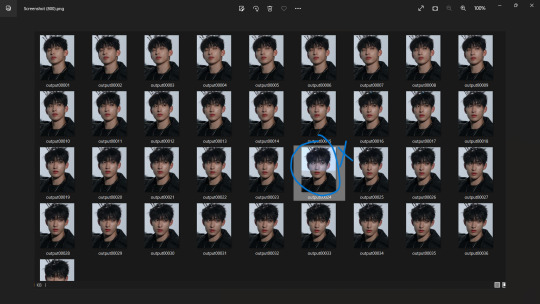
6. LOADING PNG SEQUENCE FRAMES FOR GIFFING
File > Scripts > Load into Stack > Browse
Browse will open your File Manager. Select the frames you want to be loaded as a stack. Let them load and click OK.
After PS is done loading your frames, Follow these steps:
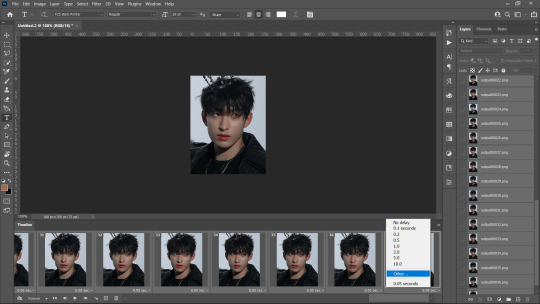
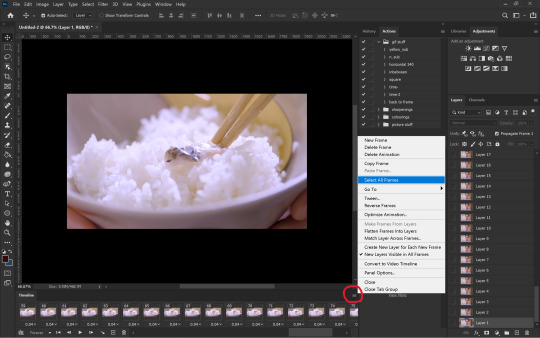
Click create frame animation. It’s show only one frame so you have to click this ≡ symbol on the top right of the timeline.
Then click Create Frames from layers and it’ll make all frames.
Then click ≡ again and click “reverse frames” because ps loads stacked frames in reverse so you have to un-reverse it.
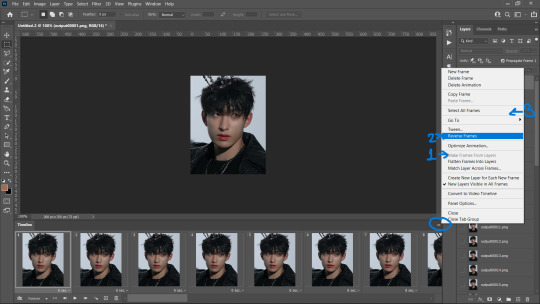
4. Most importantly, we need to set frames per second because we didn't set anything on the resizer. Frames per second can make a huge difference in how fast or slow you want your gif to be.
0.05 FPS is just my preferred setting.
To input your desired FPS settings, select all frame from the timeline, right click on any frame > Other > Input your desired setting.
( anything above 0.08 will make the gif too slow )
5. Click on 'Create Video Timeline' to turn this into a video timeline. (bottom left of timeline)
i made an action that does all steps from 1 to 5. Download it here <3
6. Then select all your layers from the side panel and convert it into a smart object so that you can sharpen it and add other filters.
7. Add your adjustment layers for colouring and save it!! Saving process as same as before. (File > Export > Save to WEB)
GIFFING USING ONLY PHOTOSHOP
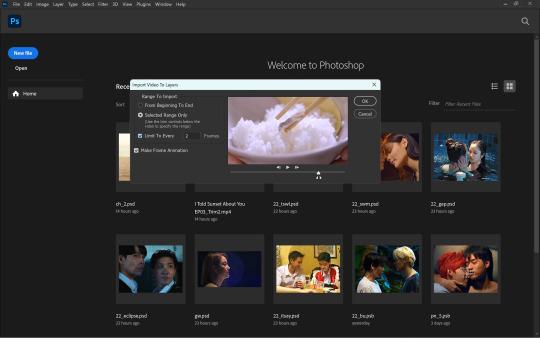
If you don't want to go through hassle of installing and using vapoursynth, you can use this photoshop only method. You can simply cut the video and load them as frames.
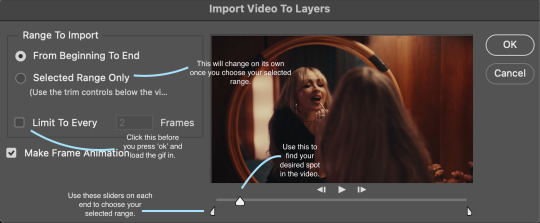
File > Import > Video Frames to Layers
A window like this will pop up:
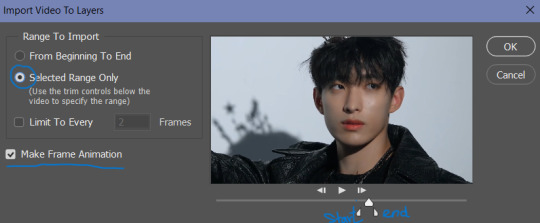
Use the triangle cursors to set the start and end of your clip. Make sure Make frame Animation is check. Press OK.
IMP: After you frames have loaded, you'll see the frames have loaded at a 0.04FPS. You can change it according to your preference but the speed is different (slower) for these gifs even if they're both at 0.05fps, that is because the number of frames is different than number of frames from a VS png sequence for the same clip.
You can adjust the fps the same way mentioned above.
You can see the difference even with the same FPS settings. The frames in the second gif are VS generated whereas the first one is PS generated.

After setting you desired FPS, click on the Make Video frame animation button at the bottom left on the Timeline tab,, Select all frames/ layers on the right and convert them into a SmartObject.
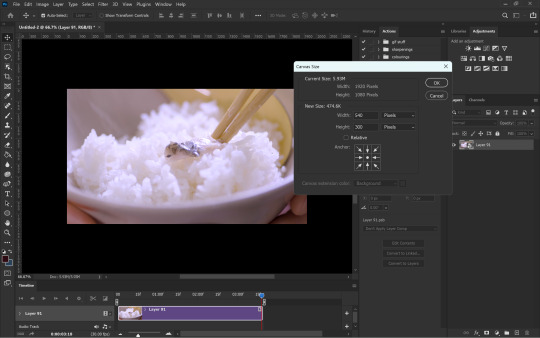
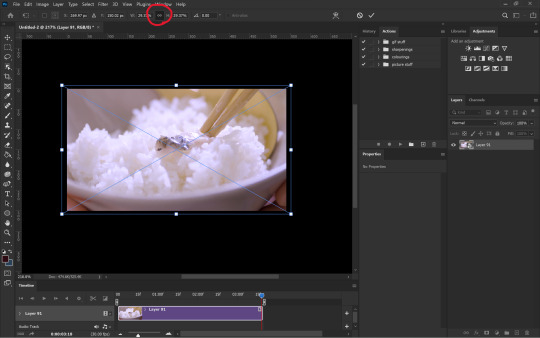
Now comes the main part, Resizing the gif according to tumblr.
For this, Image > Canvas Size. Input your desired dimentions and press OK.
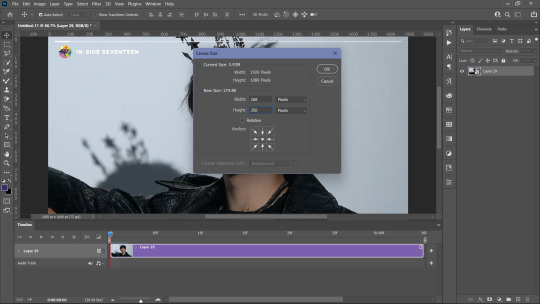
Then, Click of CTRL + T (Free Transform) and adjust the gif along the canvas. like this:

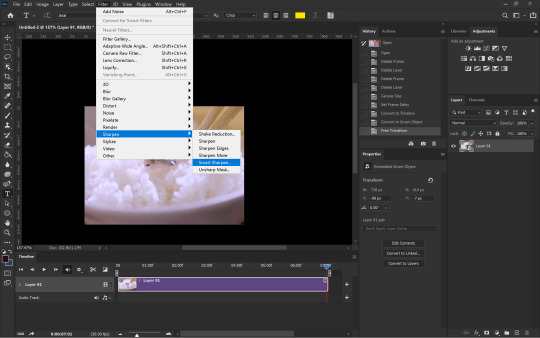
Press Enter. You gif is set. all you need to do is, add your sharpening (filters > smart sharpen).
You can also refer to this amazing tutorial by @jeonwonwoo for photoshop giffing.
BLURRING CAPTIONS IN GIFS
For this you only need a gif in a Smart Object, Marquee Tool and Gaussian Blur.
Marquee Tool is the small dotted rectangle tool. Click on it and then make your selection around the caption by clicking and dragging your cursor.

normal selection
Add to selection (to the normal selection)
( best for multiple captions, it lets you select in multiple places at once) Example:
after selection, go to Filters > Blur > Gaussian Blue > 3.0
IMP: If you want to add Blur using marquee tool on a smart object that already has a smart sharpen filter (or any filter) on then you need to convert that smart object into a smart object again.
after you've added your colouring adjustment layers, save your gif. File > Export > Save for Web
WATERMARK
To make you custom watermark shape, you can follow this wonderful tutorial by @yunaevis
How to set the custom watermark or any watermark, you can follow this tutorial by me. ( bonus: it'll also teach you how to use actions for watermarking)
BASIC COLOURING
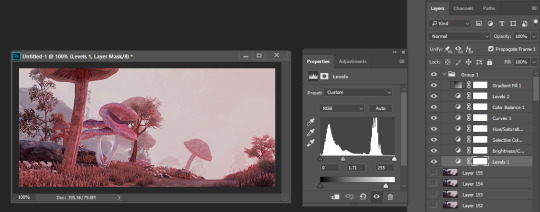
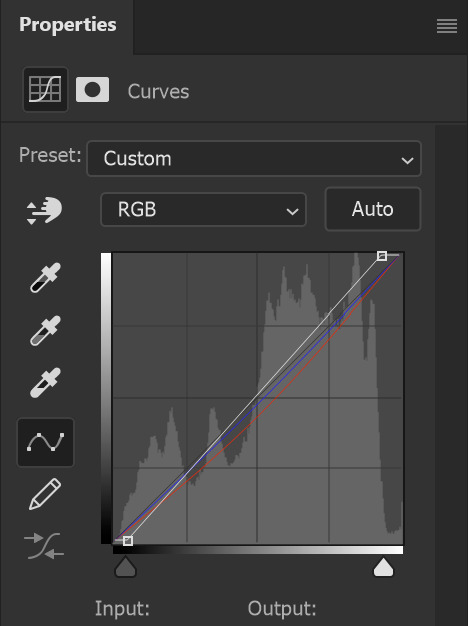
Start off Curves.
Click and drag the curves from the middle to upwards. This will increase the brightness .
For skin, we begin with Selective colours. Messing with Reds and Yellows, give the skin more even saturation. You can accentuate blacks and increase brightness + contrast too.
BEFORE AND AFTER:
for a detailed basic colouring tutorial, you can follow this tutorial!
DONE AND DUSTED,,,, THANKYOU <333
I hope this was somewhat helpful <3 if anyone has a doubt, they can always contact me!
#photoshop tutorial#vapoursynth tutorial#all in one gif guide#gif tutorial#kpopccc#lee.guide#ps tutorial#watermark#giffing#blurring captions#resources#guides#allresources#vs#vapoursynth#photoshop#gif making#300
534 notes
·
View notes
Text
hello and welcome to my little blending + colouring tutorial !! in this tutorial, i will be guiding you through colouring blended gifs and how to blend them. i will be using ps 2023. this tutorial assumes you have prior knowledge of basic colouring and timeline !
please note this is the process that i have received the best results from - it might not work for everyone and it likely doesn’t work for every show. but, with the results i have been having, i feel like it’s something i want to share with others !!
p.s. : i will work this tutorial the best i can to accomodate to the new tumblr gif guidelines and bugs !!
GUIDES:
here’s the initial stuff that guided me with my blending and colouring !
blending tutorial by @ helloinej
colouring tutorial by @ helloinej
blending tutorial by @ disaster-lineage
blending tutorial by @ nelsonnicks
keep in mind each of the above have different styles of blending, each also being different to my own. if your final result isn’t the exact same as any tutorial, don’t beat yourself up over it !
STEP 1 - find your scenes.
this step is more important than you think. certain scenes simply don’t blend well and that’s just reality. here’s my preferences:
similar scenes (eg. similar lighting, colouring, setting) blend well.
one moderately well lit scene (ideally not outdoors) + a moderately dark scene (eg. you can clearly get an outline of a face, you’re not adding curves layer after curves layer) CAN blend well, depending.
scenes on two different ends of the spectrum like one daytime outdoors sunshining type scene + midnight dark, obscured faces scenes do not have potential to blend well.
however, you’ll come to know what works through experience !
also make sure that whatever scenes you pick, ideally, there is little to no movement !! this makes it easier when you actually colour the gif later on.
STEP 2 - organize your two gifs.
to blend your gifs, they need to be the same length. i load them into frames first and then i set the speed and trim them to the same amount of frames and layers and then i will crop. then, go convert to timeline > command + option + a (for mac) to select all on the layers + timeline, then right click on your layers and go ‘convert to smart object’.
do this on both of your gifs and then you can sharpen them (i do, so it gives me a better idea of how my gif is looking) or not, depending on how you like to do things.
STEP 3 - the blend.
with my two seperate gifs now, i will take one gif and duplicate it onto the other.
please note that simply performing ‘duplicate layer’ will not be sufficient if you are working with every frame and layer individually. having two seperate smart objects makes things much easier for me and only really changes one or two things that people would normally do.
now, to blend your gifs, go to the gif you duplicated over and change the blending mode to ‘screen’. some people may choose to use ‘lighten’ - do whatever looks best in your opinion.

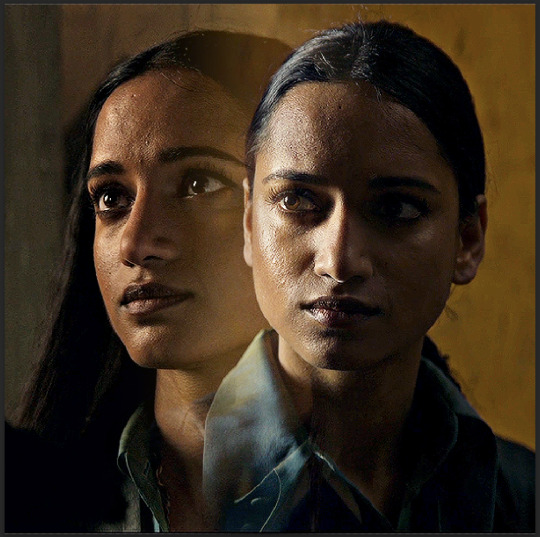
right now, the background of my top gif is washing out my bottom gif of inej. no worries - we’re going to fix that now.
STEP 4 - the blend part ii (the harder half)
first off, i’m going to adjust the positions of my gifs. the top gif covers too much of the focal point of the bottom gif (inej’s face) so i’m going to move the top one a little to the right and then the bottom one a little to the left so i can get the best view.
now it looks like this:

to begin fixing it, add a ‘layer mask’ to both of the gifs. make sure your foreground colour on your layer mask is set to black. you need a layer mask on both of the gifs because different aspects of each have something interrupting the other.
now, select the ‘gradient’ tool and make sure you have the same setup:
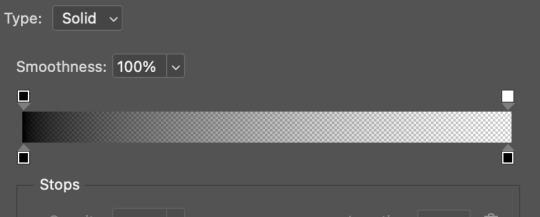
the black colour lets you blend and the transparent end means it does blend. now, using the gradient tool, do this:
and repeat:
(keep in mind i’m not 100% done here !!)
keep using the gradient (or brush) until you’re getting your desired results. do note that when you’re using the gradient tool and, if you have two layer masks (one per gif) that there is a chance that your gradients overlap and the middle point becomes opaque. in that case, i’ll either delete my layer masks and start again, move my gifs or use a brush with a WHITE colour to redo.
play around with your gradient though ! don’t be afraid of messing something up in this process; you can easily go back and fix it. experimenting allows you to learn.
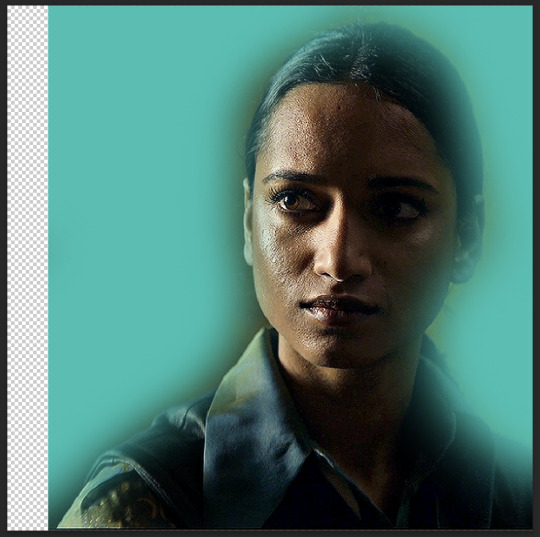
it took me another five minutes to play around and get exactly what i wanted, but what i’m going to do next will actually assist my final result. here’s what it looks like atm:

there’s still a bit of an overlay from that top gif, but when i colour it, it will disappear.
STEP 5 - basic colouring.
this is your curves, levels, colour balance etc. ! there’s not much to say here as everyone does this bit different, but i do advise that whichever gif you work on, you turn off the visibility of the other, and disable the layer mask while you colour. this allows you to achieve the best results.
make sure to use a clipping mask for your colouring layers, and clip them to the corresponding gif.
now i’ve completed the basic colouring and i’m ready to give it some actual colour !!
STEP 6 - colourful colouring !!
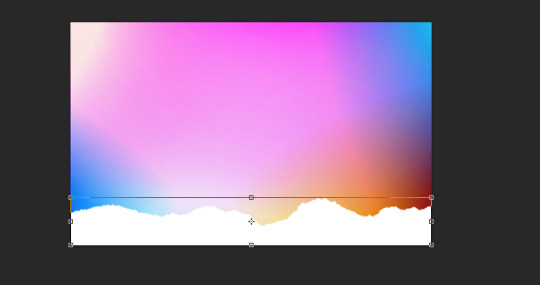
next up - actually making it look cool !! start by adding 2-3 blank layers (make sure they’re clipped to the respective gif). with the first layer, go back to your gradient tool and draw a gradient on the “darker half” of your gif. if there isn’t one, just choose which one will help it blend best. also disable your layer mask while you do the colouring !!
where that little bit of the top gif was overlapping on the bottom one, i’ve added a black gradient to it so it blends better.

rn it looks a bit weird, but once you change the blending mode to ‘soft light’ it evens out a lot.
then with my other blank layer, i’ll change my brush to my desired colour and set the size to 200px. from there, i’ll do one half of her face then i’ll make ANOTHER layer, and do around the other half, as such:
then, set the blending mode to either ‘colour’ or ‘hue’, whichever suits best !
after, make sure to clean up with an eraser so it won’t turn the subjects skin that colour. then, you can repeat the process for the other gif !! feel free to switch your colours up too.
here’s both my gifs, coloured individually:


don’t stress about having the perfect colouring where no skin is obscured by the colouring. it won’t be perfect (eg. there’s a tad bit of cyan on her ear) just as long as it works well with the motion !!
STEP 7 - final clean up and save !
and i’m done ! this process is relatively quick and has been giving consistent and high quality results for me, which has been so good. i’m aware that blending is not a quick thing to learn and wanting to incorporate colour is such a hard thing to start. hopefully this has helped <3
#*tutorial#gif tutorial#ps tutorial#userriel#userraffa#usercim#alielook#userrsun#userv#thingschanged#userzesty#userfaiths
238 notes
·
View notes
Text

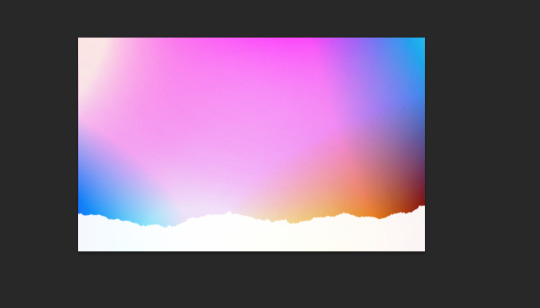
per anon request, this very quick tutorial will go over how to add a ripped paper effect to images
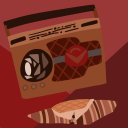
ripped paper resources for this tutorial: (x)
give this tutorial a like/reblog if it helped you out
if questions should arise, feel free to send a message!
more tutorials
Chapters:
There are a few methods but I´ll be quickly going over only two.
easy png method
brush method
What you´ll need:
any version of photoshop (I use CS6, mine is in german because I bought it years ago in germany)
very basic photoshop knowledge
i. png method
Open the image you want to use and choose a ripped paper png, one of the transparent ones, like these ones I made.
Either drag the png over to the other window, or copy and paste it. Adjust it to the width of your image by pressting ctrl + T or strg + T.
Once you´re done hit enter.
If your blog has any other color than white, you´d have to adjust the paper stripe to the color of your blog so it blends seamlessly
ii. brush method
find brushes you like, like these ones.
load the brushes you want to use into photoshop (as always google is your friend if you don´t know how to do it) Choose the color you want to use for the paper effect (preferably the one you use on your blog)
add a new layer to your document, and use the brush as big as you need it so it fits the whole width of your image.
Click once on the new layer as high or low as you want the paper effect to be. And that´s it!
#completeresources#dailyresources#ps tutorial#photshop tutorial#photoshop help#tutorial#my tutorials#mine: tutorials#I hope this helps anon#my resources
65 notes
·
View notes
Photo

I recently received a request to show how I recolor photos from black and white (mainly from the photos featured here and here), so here is a quick summary of how I colorized another photo from TIFF from black and white in Photoshop!
Tutorial including some photos under the cut:
For this set of recoloring I used the newest version of Photoshop as of December 2022, which includes an option for “neural filters” under the filter tab. This opens a variety of options, of which I will select “colorize”.

A couple examples of what auto-colorizing will generate from this include the following:
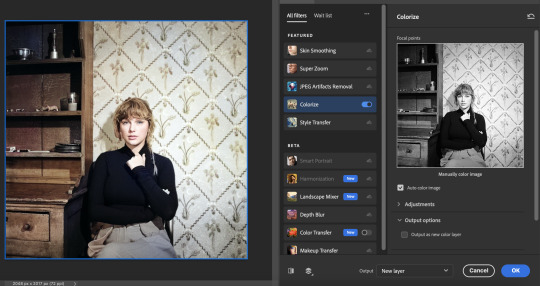

Some resulting photos appear more realistic from this option than others (some parts of the curtain behind her on the second photo are reddish and don’t match, the dress is missing gold and her eyes are missing the blue, etc.), which is why it’s helpful to go in the section on the right and manually add points of color where needed.
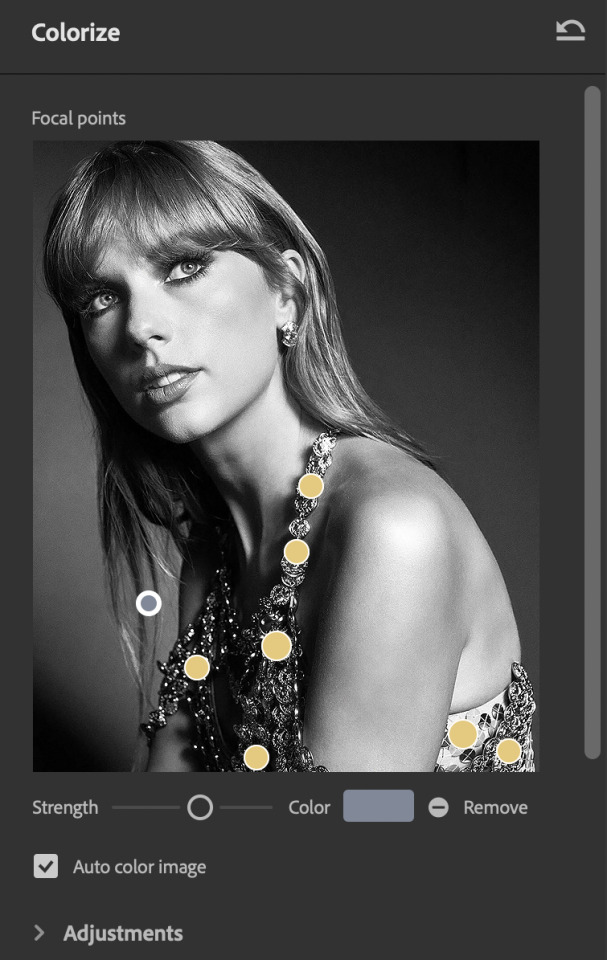
In this case, I added a gray point to the patch underneath her face to make that curtain section consistent with the gray on the rest of the background, and added several points of yellow in varying strengths to realistically add color back to her dress.
Once I finished adding these points, I opened the photo as a new layer and got this as my result:
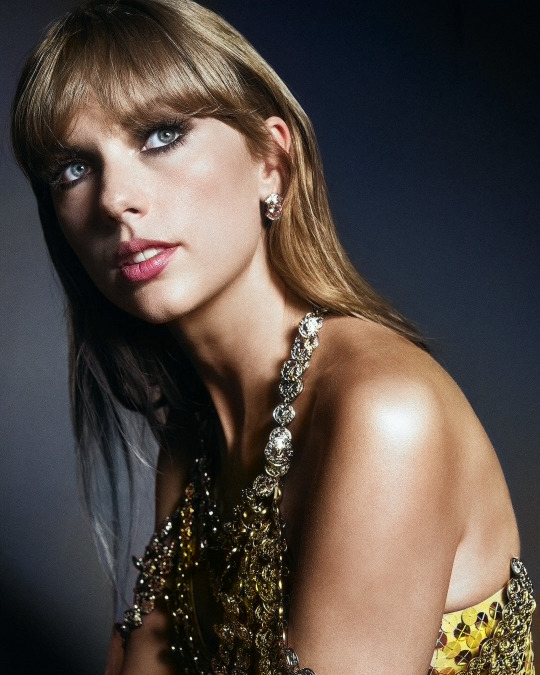
It’s mostly there but I still have some areas that need adjusted to make it fully realistic to other photos of her at this event. Outside of some general edits to add more depth/brightness/color vibrance, I also added some transparent layers and used a brush tool with different colors to add certain colors that didn’t generate beforehand. The photo below shows my addition of blue on her eyes with the brush on the left and how it looked before I added the brush coloring on the right:
Depending on what section I’m working on and how saturated I want that extra color to be, I’ll set the blend mode that the brush layer is on to either “soft light” or “color” (I used soft light for this photo). In other layers, I set a layer mask to concentrate other changes to smaller areas of the image.
Some additional layers for hue & saturation, selective color, and color balance especially helped in getting my coloring lined up to be consistent with other photos from the event she was photographed at, leading to this final result:

The process of colorizing photos from black & white is full of trial and error to get a realistic result, but hopefully this will help give some ideas on how to get a good recolored result!
#ps tutorial#completeresources#allresources#tutorial#chaoticresources#I have no idea how to tag this fhdfhd#but I hope this is a helpful tutorial <3#*
211 notes
·
View notes
Note
Hello!
I am in awe of your edits and gifs !!! :0
I wanted to try making my own, but I have no idea where to start tbh - do you have any pointers or advice for a good tutorial? Or what programs you use?
I am especially interested in making gifs for bg3, aha.

Hi there, first of all thank you so much! I'd be happy to help, so I made a little tutorial that basically depicts my process. Full disclosure, this is the way I make gifs, so it may differ from how other creators make them. :3 I use Photoshop CC 2018, but the process should be similar in different versions as well.

Things to keep in mind:
gif sizes: when making gifs you should make sure their size is no larger than 10 MB (as of currently), since otherwise tumblr will not be able to post them. the best way to lower gif size is to lower the amount of included frames. you can simply delete them in the Timeline window.
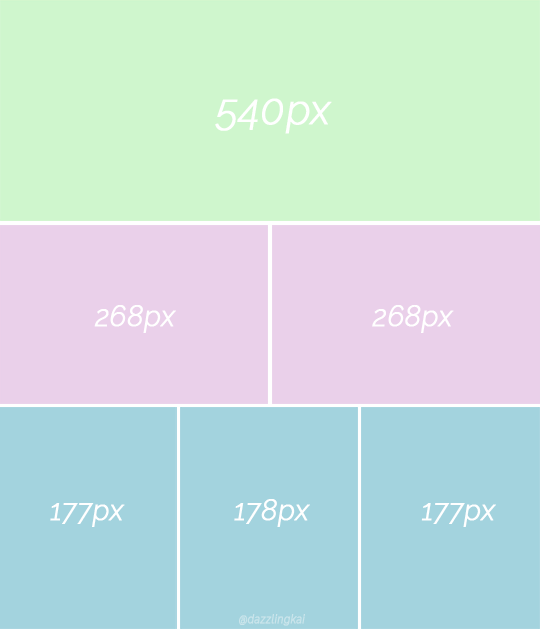
gif dimensions: to avoid tumblr resizing your gifs and turning them into a blurry mess, keep their width 540px when posted one above other, or 268px if you want to post two gifs side by side. the height doesn't matter as long as you keep the width as mentioned above
psds and recolors: I use extensive recoloring on my gifs which includes filters like color balance, selective color, gradient fill, hue/saturation, curves and more. many creators offer their own psds as a free download so you can use them for your gifs but these will usually require some manual adjustments as your giffed scenes could have a different lighting situation going on. this tutorial is focused more on the actual "making" of a gif, but I would be happy to make another one that would be more about the actual coloring I make :3
With that being said, let's go! Read on for the full tutorial.
First, you need to know how to actually make a gif. For recording purposes, I use the GeForce experience app since I have an Nvidia GPU, but there are many other programs online that you can use to record footage of your games. Basically, we want to make a short video that we will then turn into a gif in PS.
Once you have a suitable footage, open up PS and go to File → Import → Video Frames to Layers...

You will see a window like this. It's possible your recorded footage would be longer than the accepted file size of a gif, so you should choose which parts of the video you want to include (you can see them as two little arrows under my video here). Once everything is in order, hit OK.

Now it's time to resize the gif, I usually use 540x250 for my scenery gifsets, but as I said, it's the width that matters. Since I am planning to post this gif on its own, I chose 540.

Now it's editing time for me, but you can choose to do this after you sharpen the gif, which will be depicted later. I love pastel pink colors so I used selective color / color balance here to make it more pink, and several levels / curves layers to up the brightness more and make it look more pastel and "washed out", but this all comes down to personal preference naturally!
Sharpening a gif is optional, but it makes it look much more crisp, so I highly recommend it! First, you want to go to your Timeline (if missing, you can re-enable it through Window → Timeline), click the menu icon, and Select all Frames. Now we need to do the same for our layers (you can do this by selecting the first layer, holding shift down and clicking the very last layer).

After you have both your Layers and Frames selected, go back to Timeline, click the menu button again and choose Conver to Video Timeline.
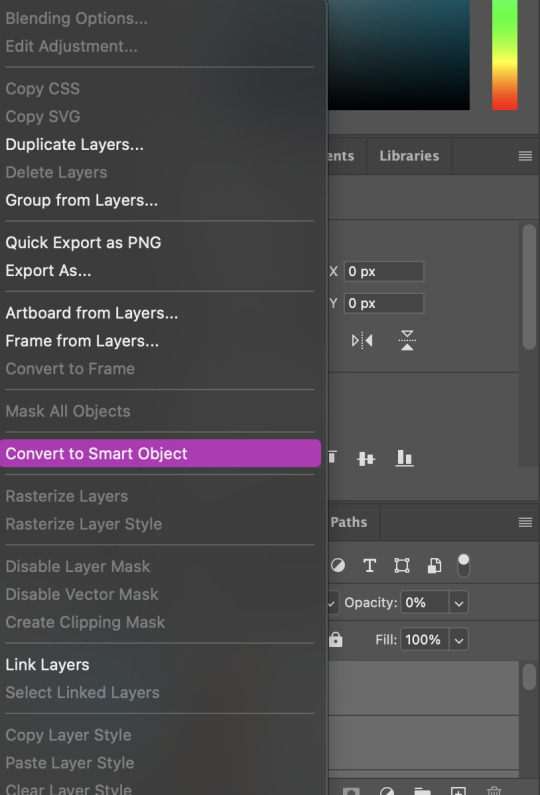
Now go to Filters → Convert to Smart Filters. You can ignore the pop-up message or choose to click the prompt to never display it again. After that go back to Filter → Sharpen → Smart Sharpen.

You can see the settings I use here. Hit OK and ur done!
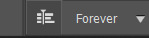
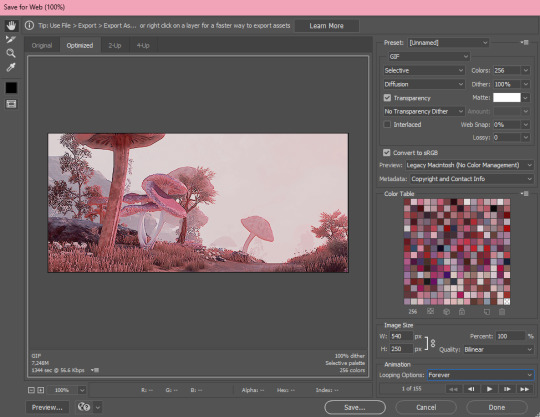
Now we want to save the gif. Go to Export → Save for Web (Legacy). In earlier versions of PS it might be simply listed as Save for Web. It may take the gif a few seconds to load, depending on the size. In the pop-up window, make sure your looping options are set to Forever.
And with that you are done! If you have any questions please don't hesitate to ask me. :3
Unsharpened version:
And sharpened:

#ask#saturnawa#gif tutorial#ps tutorial#ambie's tips#hope this helped! feel free to ask me any more questions uwu and good luck!
46 notes
·
View notes
Note
Hi! I hope you don’t mind me asking but do you use photoshop to get the moodlets on your game photos? I love your style and your sims btw💖
Hiii..thank you so much!! 🤎 I do use photoshop and just copy and paste the dialog box onto a rounded rectangle. My screen resolution is 2560 x 1440 so the moodlets aren't too blurry. Since a few people have asked me, I thought I'd show what I do....
Housekeeping: I have my Gshade set to remove all effects from the UI. I use the FFrestore and FFkeep shaders. Gshade UI box will tell you which one goes before all your effects and which one goes after.
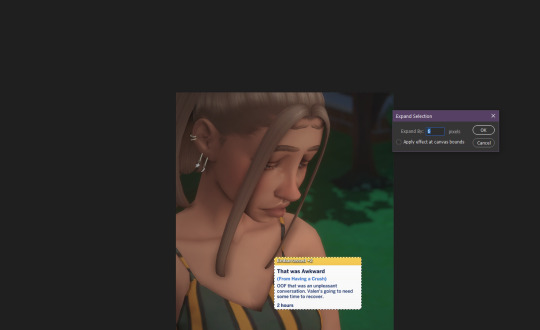
Open the photo with the moodlet/dialog box. Use the rectangle marquee tool to draw a box around it. Ctrl + C to copy the selection.
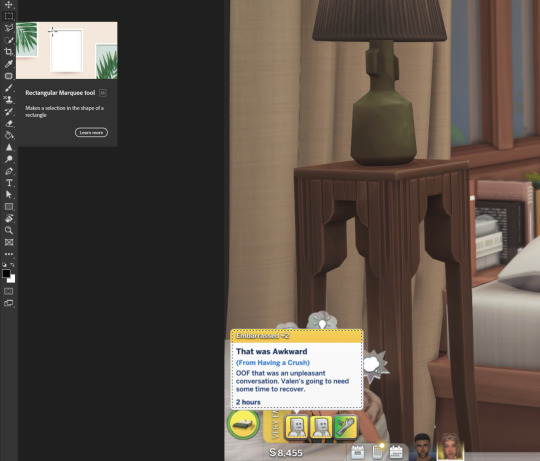
3. Paste the selection onto your photo that's edited and resized and ready to post. If you need to resize the moodlet, right click the layer in the layer panel and convert to a smart object.
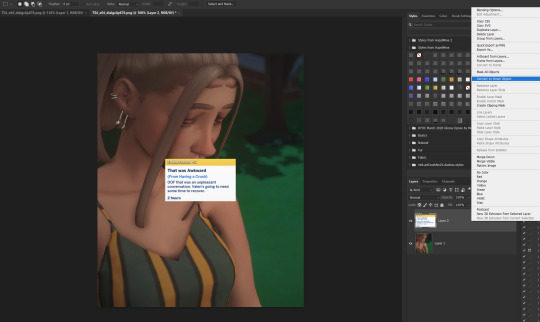
4. After you resize, rasterize the layer by right clicking in the layer panel and choosing the option. Sharpen the moodlet/dialog box with smart sharpen. Filter > Sharpen > Smart Sharpen.
5. Then, select the rectangle tool and change the corner radius to 8px. Draw your rectangle about the size of your moodlet. Place the rectangle under your moodlet box.

6. Rasterize your rectangle. Select your moodlet layer and create a clipping mask by right click on the layer in the layer panel. This will give the moodlet the shape of the round rectangle. Merge down once you have them lined up.
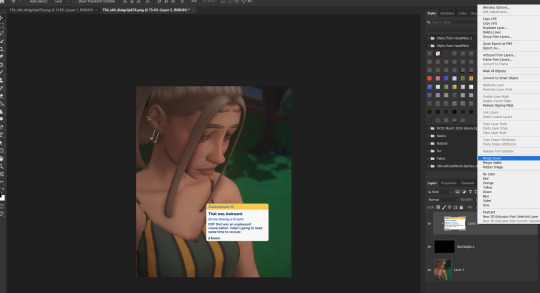
7. Then, I add a new layer. Ctrl + click on your moodlet layer to select the box. Then click back on your empty layer in the layer panel. Go to the menu to Select > Modify > Expand and expand your selection to 6 px.
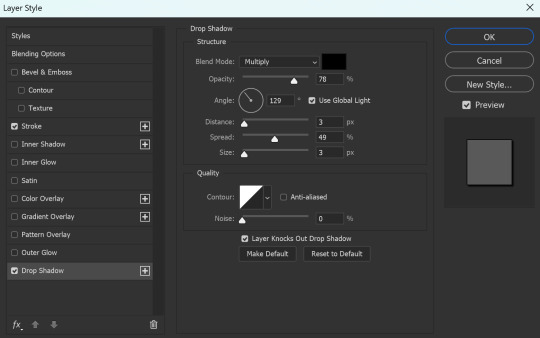
8. Now get your paint bucket tool and fill your selection with a white color. Change the fill layer to 60% opacity. Right click in the layer panel to go to the blending options and add a drop shadow with these settings (or whatever you prefer):
Blend mode: Linear burn | Opacity: 34% | Color: 2C1901 | Angle: 45° | Distance: 10 | Size: 40
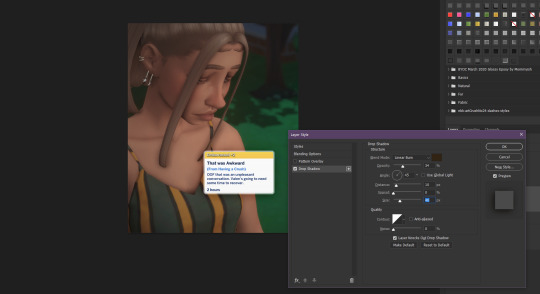
Click okay when you're done. Move your moodlet box wherever you want sand save your photo.

Hope that wasn't too much. It seems like a lot, but it's fairly quick once you do it a few times. 😊
104 notes
·
View notes
Text

A manga caps cleaning tutorial. requested by @noctemys
Program: photoshop cc2019 but could work on any older or newer versions.
i’ve been working on this and a hard time choosing which cap should i work on, i decided to write it using an easy one to work on and writing the tutorial on, but you could work this one even in more challanging caps to clean! i’ll show examples of different difficulty at the end of this tutorial. i’m still a work on a process when it comes to cleaning caps!
*tip: always try to use a high quality files! i personally like to work on the official files if they’re available. they make a huge difference as seen between this old and newcleaned cap!
step.1
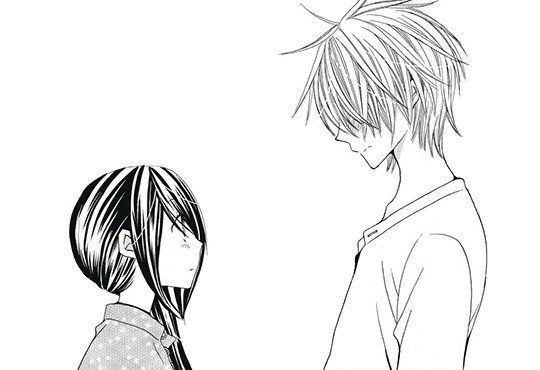
first step is choosing a cap of your choice and crop the panel that you like. mine is from Special A by minami maki.

step.2
zoom in the cap, i usually go with x800! then using the lasso tool i select all the area i would like to erase and clean! this step could take a long time with some caps that have overlaying background effect with the characters. you could also use the pen tool or the magnet tool, whichever feel more comfortable using.
step.3
once you finish selecting the whole area you want to clean, with a white color fill the layer with white color!

step.4
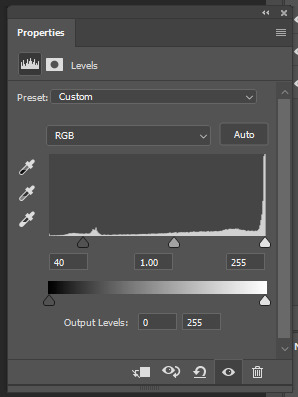
some caps do need to up the contrast in them just like this one, i usually use the levels to increase the blacks and whites by ticking the black point to the left to increase the blackness and the white to the right until i like the result i get. for this one as it leans more to the grey than black i only needed to increase the blackness.
step.5
some caps aren’t truly in black/white so i just add a gradient black and white!
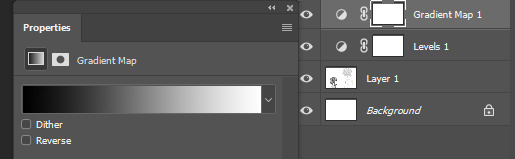
step.6
add a new colorfill layer and fill it with #f1f1f1 and set it to multiply. and delete the mask!!!

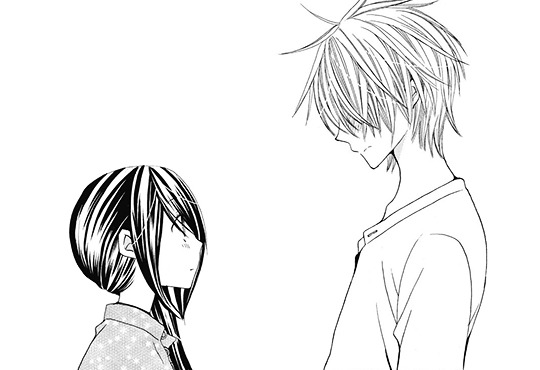
step.7
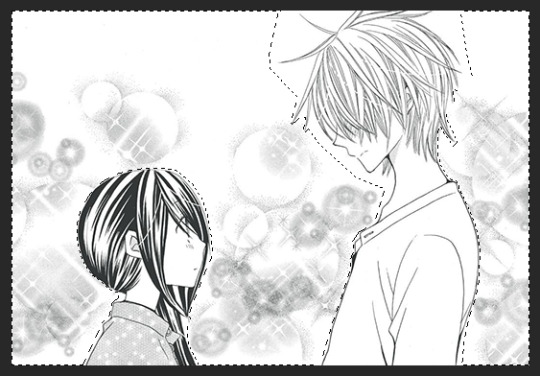
this step could be the last step or will need an extra step to make. and in this case we’ll need the extra step use magic wand tool select the background that i just cleaned you’ll notice the selection will include parts of both hikari’s hair and kei’s face.
step.8
after deselecting, with a round brush with a grey shade color - my choice is shade is #373737 -, i would zoom in the cap again and notice where the gaps that’s causing the selecting mess is. and while in the cap layers i would redraw those tiny parts… sometimes the gaps are big and there’ll be many gaps.. you could either redraw by the mouse directly if the missing parts are small and tiny or use the pen tool to do that!
step.9
using the magic wand again select the area you want and select the colorfill layer click the mask icon from the layers box and you’re all set!
step.9 - optional-
a last step i’ve been adding lately to my manga caps edits is adding this texture at the top of layers and lowering its opacity to 8% for a nice little touch!
the final layer box will look like this.
other cleaned caps before and after:
before→ after | before → after | before→ after| before → after
you could add any background you like at the end for a different ending result
#manga#manga cleaning#manga tutorial#ps tutorial#tutorial#photoshop tutorial#photoshop#ps resources#itsmangacap
19 notes
·
View notes
Note
Hi!! I have a question about gifs. I’ve noticed some users (yourself included) have something on their gifs that I could only describe as sort of a net on top of their gifs. I noticed it, for example, on your Barbie/suicide squad parallels post. It almost seems like some sort of tool like noise where it helps to make a gif appear more hq. I’m wondering what that might be, or if I’m totally off base!
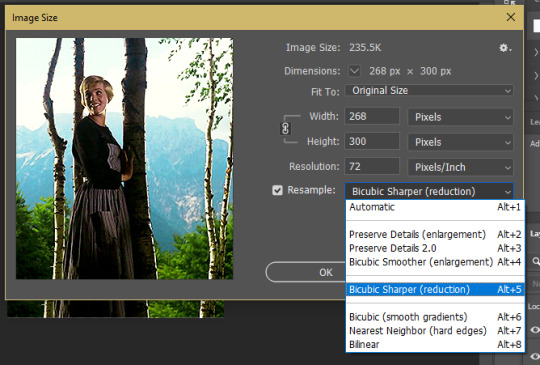
Hey! Unfortunately, I didn't save the PSD for that particular set - the closest one I still have was for this Sound of Music one, but the settings were fairly similar from what I remember.
There isn't really much to it, and the easiest way I can explain what the "net" is, is that it's basically the combo of your resize settings, sharpening/noise you've added to your gif, and finally your export settings. At least that's how it is for me - keeping in mind I usually try to work with the most HD cuts available so the quality is already there. Anything less than 1080p will always require more adjustment.
When figuring out your image size early on, ensure the resample size is set to Bicubic Sharper (reduction) as that'll give your gif a cleaner, more sharpened look to start with and it should make things easier moving forward.
Proceed to make your gif as usual.
I add Smart Filters last, and these gifs didn't require anything more than the simple Sharpen tool applied to the gif once the layer had been converted.
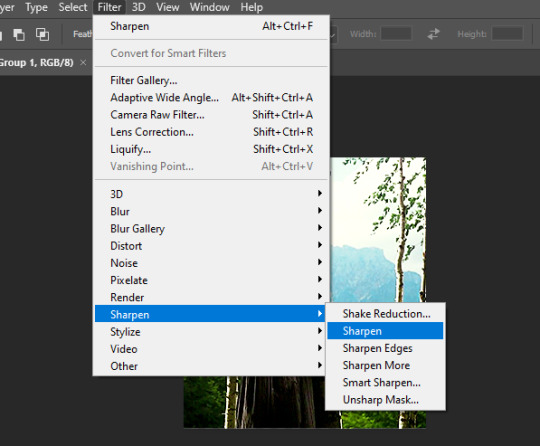
You can mess around with noise or blurring etc. if your gif doesn't quite look the way you want. Before sharpening, I sometimes use Stylize > Diffuse > Anisotropic > ~20% opacity (under blending options) to give the gif a softer look first and remove any graininess. It can look a little funky sometimes.
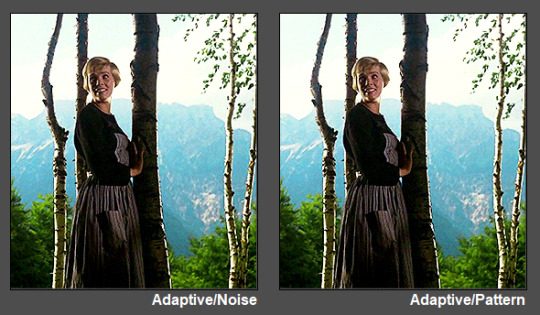
Lastly, when exporting your image, select Adaptive and Pattern as your save settings these can significantly change the final appearance of your gif - especially Pattern. The two in combination are what create the "net" and will retain the quality of your gif in export.

You should be all set with your quality-control "net"! 💜
#tutorial#ps tutorial#gif tutorial#mine*#gif making#I kinda suck at tutorials so let me know if this did/n't help anon and I can maybe offer some more suggestions if necessary :)
43 notes
·
View notes
Note
Hi!
I sent this ask to the UserGif blog and they directed me to you. I was wondering how you created this black widow layout set:
https://www.tumblr.com/usergif/709701351905624064/black-widow-2021-dir-cate-shortland-insp
The layout is so cool and creative, I love it so much.
Thanks in advance!
hey! first off, thank you so much i really appreciate it.
now i will attempt to explain it, but i am never the best at these things so if you have any questions, feel free to ask! (all this is assuming everyone has a basic knowledge of gifmaking etc.) we're going to recreate a gif from my original set here.
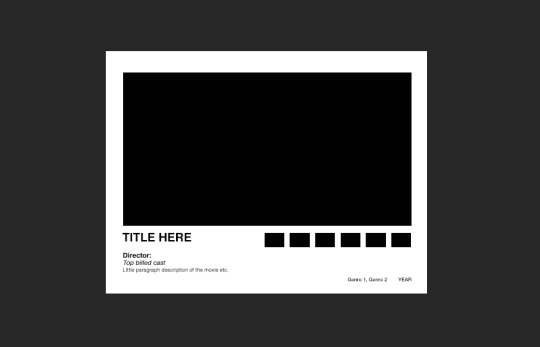
FIRSTLY, you need your basic layout, now i used the rectangle shape tool to create the space for the big gif, and the little palette boxes, and fill them black so you can see them easily and move them around until i'm happy with the layout. and then move onto my text, the posters i was originally inspired by on etsy no longer seem to be there but the font i used which i *think* is what was used on those (as i wanted to get as close to my insp source as possible) is Nimbus Sans L for the title in bold, and Nimbus Sans Rounded for the rest (semi bold for the director and the genre/date and italic for the starring actors) and once i perfected the layout, and added a white layer for the background i saved that as a psd for future use. (make sure you're in timeline mode, and that the frame rate of this canvas is 23.976 fps - as that'll stop any issues when creating the whole gif.)
from here, you're free to gif make your first gif as normal, colouring it and putting it all together in a smart object so then you're ready to just paste it into this canvas, clipping it over the big rectangle, resizing as needed and then sharpening. (if you're unsure about clipping masks - this gifset relies on them - there's a handy tutorial here!)
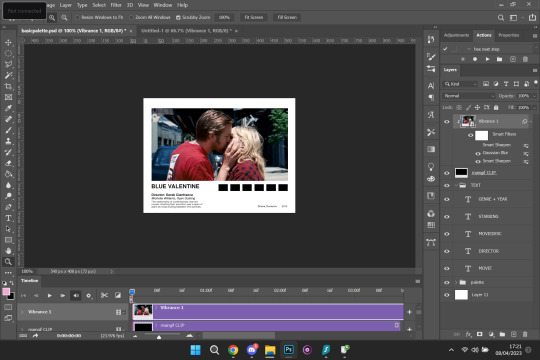
so, here's how it looks with the main gif in place, and i've filled in my movie details for the film i've picked (i try to keep my layers as organised as possible so i recommend labelling things so you know exactly which text layer is which) i put all the text layers in a folder, and make a folder for all the palette rectangle boxes too.
next is the fun bit, or at least it is for me (personally i like to zoom in for this bit) but it's time to colour pick for the palette. before you do this make a new layer for each palette and clip one to each of the palette boxes like below.

like i said, i like to zoom in for this, but select the eyedropper tool, and start picking your colours, i try to do it in a gradient, usually starting with either the brightest or darkest colour etc. for this gif i want to go from browny red to blue. once you pick your first colour, go to the layer clipped to the rectangle you want that colour and fill it with your colour. keep repeating this process until all your colours are picked and you're happy with your palette.

and here is what you're left with. so now, just do what you'd usually do when saving your gifs, i personally put everything back into frames, so i can save with a timing of 0.05. and then repeat for each gif until you've got a beautiful gifset that you love!


i hope this made sense, and is easy enough to follow! sorry if it's a bit rambling and ridiculous, me and explaining things are not compatible.
#ps ask#quirkyresources#usernik#userhella#uservalentina#userrobin#userannalise#userrainbow#usershreyu#alielook#useralison#userives#useryoshi#ask#anonymous#ps help#ps tutorial#chaoticresources#dailyresources#hisources
219 notes
·
View notes
Note
Can I ask what you do to lighten iwtv gifs so well? 🥲 It seems nothing I do lightens it as well as that
First off, I haven’t seen a gifset yet that isn’t miles better than the dismal lighting of the show, lol. So I’m sure you’re underselling your abilities, nonny. But I’m happy to share my approach.
It's all in the curves layer in photoshop. For example, right now I'm working on this scene:
add a curves layer:

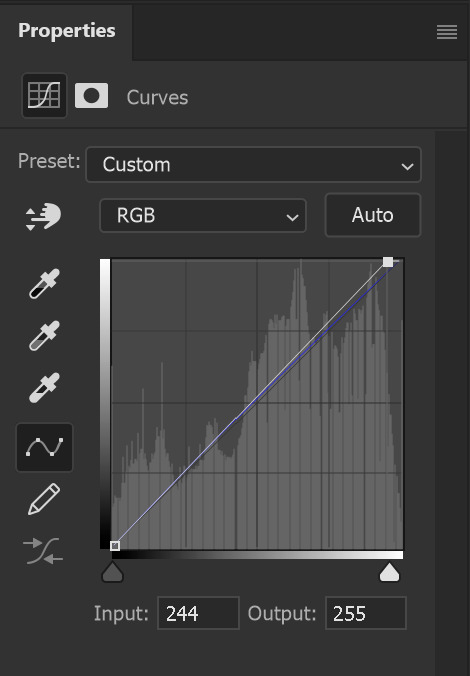
and use the color dropper to set the ‘white’ and ‘black’ points to what you want them to be in the image. So here, I choose the white bit in Louis' collar:

Now it’s a lot lighter, but we’ve introduced some graininess into the background. So to offset that, we set a dark point in his vest:

to get this:

The great part about this method is that the same curves layer will usually work on the whole scene, so you can illuminate shots with less easily discernable ‘white’ and ‘black’ points:

^This uses only a single adjustment layer, the same one we just created.
tl;dr use the curves color dropper as it drastically cuts down on the number of adjustment layers needed to color a scene. Hope this helps!
#interview with the vampire#photoshop#tutorial#anonymous#answered#cj talks#screenrecord + giffing my process felt so meta lmao#gif#photoshop tutorial#ps tutorial
83 notes
·
View notes
Text
GIF MAKING IN PS
i've never done anything like this before so hope it makes some kind of sense.
so before you get into making gifs first thing so will need is some sort of editing software (i use ps 2022) and some raws obviously. most of the shows i gif are on yt so its pretty easy to get them and you can use any kind of yt to mp4 converter.
so once you have all of this i guess we can get started!!! on a daily basis i do not follow all these steps because you can easily turn them into actions on ps, which means that it would take just seconds. so although it may look lengthy its pretty simple
the first step to making gifs is importing the raws. you first want to go to file>import>video frames to layer. this will open up your file explorer from where you can choose your desired file. you may want to make sure your file isn't an mkv one but an mp4 before you do this. also if your raws are large, perhaps a whole episode or longer than 30 minutes, it might help to trim it down beforehand to make it easier to work with.
once you select your file, this window will open up. here, you can move the sliders to select the exact part of the clip you want for your gifs. (when files are larger, it would be more difficult to capture smaller parts of the clip using the sliders) although optional, selecting the limit to every 'x' frames will help reduce the size of your gifs while not making it look too choppy. i do 'every 2 frames' for regular scenes and leave it unchecked for anything in slow-mo. more than 2 usually makes the entire thing look sped up and choppy so i wouldn't recommend it. although it depends on the raws ideally you want something around 80 frames for one gif.
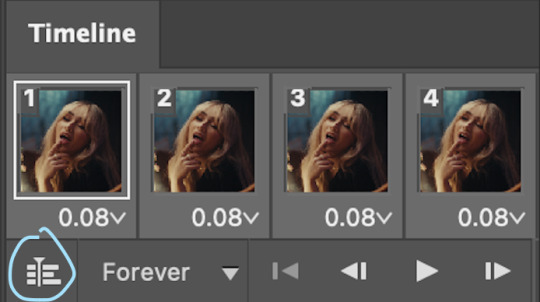
once you press okay on the above step, your workspace will open up and from here we can start making the gif. the first step would be to set the time delay. this is two ensure that the gif doesn't look sped up. for this you want to first select all the frames as shown above.
next, you can click on the downward arrow on any frame to change the time delay. i usually prefer 0.07s which you can set in other...
once you've set the time delay, you have to convert the frames into timeline as shown above.
now that you have your timeline as seen on the left side, all you have to do is convert everything into a smart object. for that you have to first select all the layers using the shortcut Ctrl+Alt+A and then right-click on the layers followed by convert to smart object
now you can see that the many layers have been converted into one layer making it easier to work with. the next step is to resize the gif. the original dimensions would make the gifs too large to fit tumblr's size limit, this can be done by going to image>canvas size
to ensure that tumblr does unnecessarily crop your gifs you want to make sure width is always 540px if there's going to be only one gif in a row. the height can be anything depending how you want your gif to look.
you can adjust the gif onto the new canvas using Ctrl+T to transform the layer. always ensure the height and width are linked to make sure you don't squeeze the image weirdly.
after resizing the gif, i next sharpen the gif (which is my least favourite part). you can sharpen by going to filter>sharpen>smart sharpen while the noise filter is in filter>noise>add noise
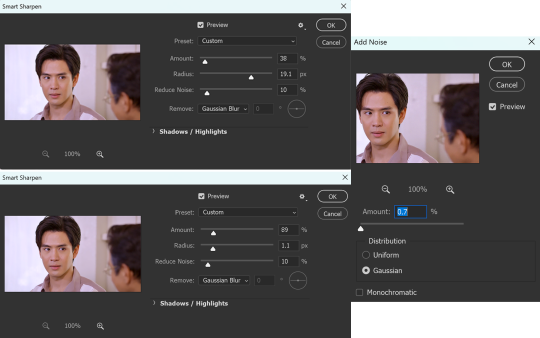
although i don't always stick to the same sharpening, these are the settings i use the most.
once i'm done with the sharpening i like to soften the first smart sharpen filter. for this i change the blending option of the first filter to 80%. this is entirely optional.
once sharpening is done, you can colour and edit however you like using any of the adjustment layers. i mostly prefer curves and selective colour. these are the curves i used for this particular gif to remove the purple/redness it had going on. in RGB mode the white slider adds brightness and the grey one darkness/contrast. then you can individually use the red, green and blue modes to adjust the colours. i only used selective colour here to adjust the skin tones a bit so i haven't added that.
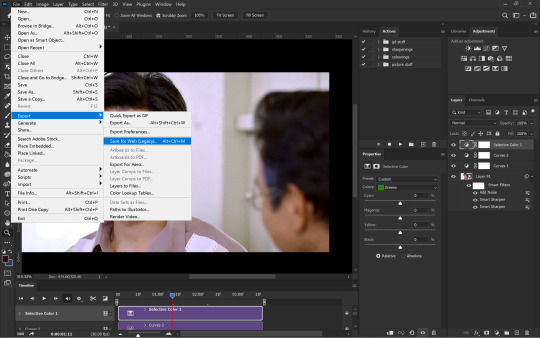
once done with colouring all you have to do is export the gif from file>export>save for web (legacy)
in the last window you have to make sure your looping is forever and that your gif is below 9.5MB. although tumblr says max gif size is 10MB, at least for me nothing over 9.5MB uploads.
and THAT'S IT (i say after a whole one page essay) your gif is ready!!! honestly i don't know if this is the easiest or most convenient method but this is just how i do it. also i use actions for everything other than colouring so it isn't as time consuming as it looks. you can also set shortcuts for importing and exporting to save time. this can be done from edit>keyboard shortcuts
since you made it to the end here is an extra bit on captioning
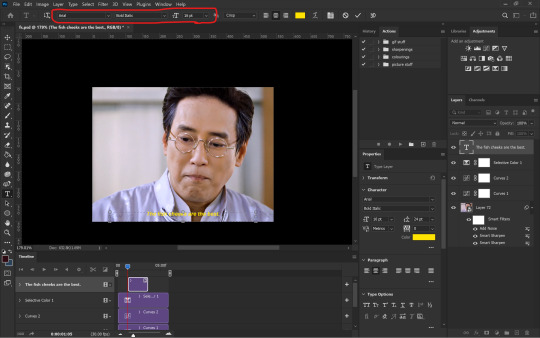
you want to start with a normal text layer and center it at the bottom of the gif. i use arial bold italic in size 16. next to make it look better we can add an outline and shadow to it through the layer style. and you can open up this window either by clicking the fx option at the bottom right or double-clicking the text layer.
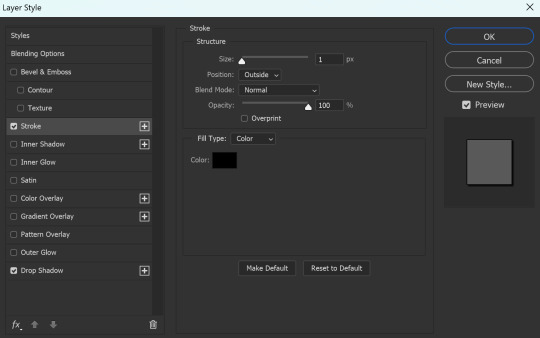
these are the settings i use for the stroke as well as the shadow
now it is ACTUALLY the end!!!
#gif making#ps tutorial#gif making tutorial#photoshop tutorial#hope this makes some sense 😭#i made the important stuff bold so that you don't have to necessarily read through the whole thing#i had to go take a look at my actions cause i had actually forgotten my settings in the first place
86 notes
·
View notes
Note
Hi! Happy 4k celebration 🥰 Can you share how you make your gifs or make a gif tutorial?
hi !! tysm <3 i'm more than happy to give you a little tutorial on how i make my gifs ! of course, my process is not the same to other gifmakers and may not always work for everyone but i hope it helps !
for this tutorial, i'm using the most recent edition of photoshop (2023) on my mac. full explanation under the cut.
full disclaimer: most of what i've learnt about photoshop and the giffing process is through pure trial and error. this won't work for everyone and others may think it's a little weird, but this is just how i make my gifs !!
1.find your scenes.
finding your scenes is sometimes very time consuming but you want to get it right the first time !! for this tutorial, i'm using a music video in mp4 format.
2. loading your scenes.
to load your scenes, you want to go: 'file' > 'import' > 'video frames to layers'. i know that this step varies on the user because some people like to go to timeline first, but i'd advise starting in frames first !
after that, a screen like i've depicted below will pop up. i've also annotated everything for you as well.
so, select your desired range, press 'ok' and then it will all load into ps !
3. setting up your gif.
i'm grouping this all into one step, but it's broken down into a few things.
the first part of this is: cropping. the recommended dimensions i follow are on this guideline here, but for the sake of this tutorial i'm just going to crop my gif 540x540 (as a w x h setting). the crop tool is on the left hand tool bar.
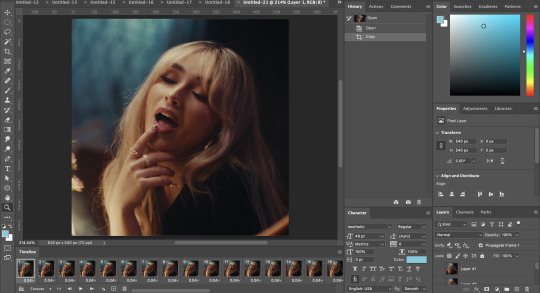
now, my gif looks like this. from here, i'm going to click on the timeline (the space along the bottom that has every frame). from there, click on the three lines to get this menu (i've circled where to go + what you'll click):

from there, go 'select all frames' and then click on any of the frames NUMBERS (where it says 0.04 with an arrow besides it, or whatever yours says) then change the frame rate. with most youtube videos i will use 0.08 as my desired frame rate, but when i'm gifing a show or something, it loads in as 0.02, so i change it to 0.05. 0.05-6 on any normal screen cap should be fine, but obviously you can change it depending on if it looks right or not.
from there, you've basically done the first half of the basics. now, you'll want to click on this button:
and now you'll be taken to the video timeline ! from here, select command + option + a (this is for mac, i think it would be control if you're on another device) then, right click on your layers and go 'convert to smart object'.
from here, i'll sharpen my gif before i colour. for this step i have two alternative sharpening settings first one by anyataylorjoy (rb to download !) and the other by maygrant (please ask !). the first one is tuser maygrant's and the second one is tuser anyataylorjoy's. i typically use morgan's for all my basic gifs but anyataylorjoy's for creative sets. every user has a different preference but just find what's good for you !

4. colouring your gif.
definitely the most tedious, this can be a little bit of a hassle depending on the scene. if the colouring isn't riddled with heavy yellows or cyans, colouring is usually a breeze but if it is, it can be hard.
CURVES

the circle with the arrow dropdown and that's half grey-white is the circle you want to click on to find curves. it'll open a menu and curves will be at the top.
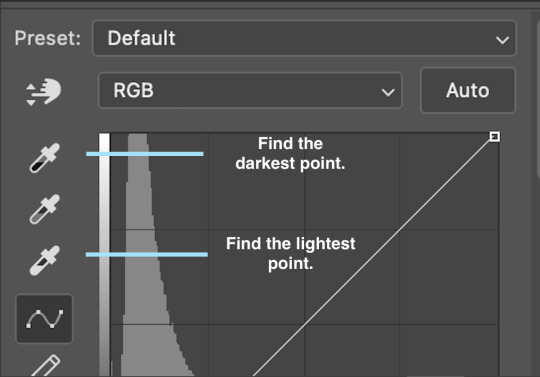
you'll see a little menu like above appear. now, select the dropper i've indicated as being the "light point" and then, using the zoom tool, we're going to zoom in and find the brightest point on the gif. this is typically where the light source is.
in this section here, i can see a couple of bright points. using the dropper, i'll click on the closest to white (note: i find that white rarely changes the colouring of the gif, so if there's like, a really really light yellow, for example, click on that) and then i'll do a similar process with the "dark point" dropper, finding the darkest spot, which is usually in shadows or in the corners. unlike with the light dropper, you want the closest to black, whether that's a dark dark brown or dark dark blue.
now, we can see how the colouring has changed:

optional: you can change the white line on the curves menu, which can make it lighter, or darker in different points of the gif.
LEVELS
levels is an optional step, but i recommend it on very light gifs, or if you want to add a little more depth. probably don't do it on an already very dark gif.
the levels menu looks like this:
the far left slider adds shadows and the far right slider makes it lighter. on this particular gif, i only need a little bit of depth to her face and i only need to contrast that a little bit. by just dragging the slider a little bit:
this is the result:
with levels, it can very quickly alter skin tone/make your gif look bad !! with levels, i don't think you need to go above 1-12 in adding depth.
OPTIONAL: BRIGHTNESS/CONTRAST
brightness/contrast is optional !! only add it if it's necessary :)
COLOUR BALANCE
a colour balance layer is great for fixing the tones for the gif !!

this one's pretty self explanatory. if you want it to be more yellow, slide it towards yellow. if you want it to be more red, slide it more towards red, etc etc. i've attached some gifs showing how i change tone:
but just play with it until it looks right. be very careful with skin tone !! colour balance can very easily whitewash/colour wash and that is not something encouraged, in the slightest.
SELECTIVE COLOUR
a selective colour layer is basically a "final touch" to colouring. where colour balance just kind of does an overall change of the gif, selective colour allows you to alter your specific tones, ie. reds, magentas, blues, etc. for me, i'll do the bulk of getting my desired colouring with colour balance, but if it overcorrects reds, for example, i'll add some cyan to red tones in selective colour, to diffuse that.
currently, in my gif, it's very red/yellow heavy. to balance that out, i want to add cyans. so, on the drop down list of the selective colour menu, i'll select 'red' and then i'll ADD cyans (so move the slider to the right, not the left to decrease) and then repeat that on other tones that i want to correct, with different colours.
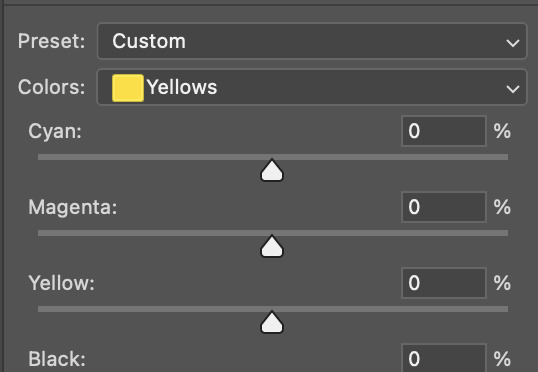
with each of the sliders, just add or decrease how much of that colour is in that tone. once again, be mindful of skin tone and whether it is appropriate or not.
with selective colour, if there are any standout colours (eg. in my gif, there's a big patch of cyan) that don't interrupt their face (eg. reds and yellows are always in faces) and change the way the subjects look, you can change those colours to make it more vibrant. so, in this gif, i'll enhance the cyans and blues and magentas to make the colours pop more.
5. saving your gif
once your happy with the colouring of your gif and done what you need to do with it, save it as a smart object with all your colouring layers, then go to 'file' > 'export' > 'save for web (legacy)...' . play back your gif, and it should be all good !! congrats on making your gifs !
i've included a playback of each layer, which is staggered to show each layer come into effect.
in order: nothing -> curves -> levels-> brightness/contrast -> colour balance -> selective colour.
hope this helped !!
#*tutorial#gif tutorial#ps help#ps tutorial#userriel#userautie#userraffa#usernorah#userrsun#usercats#thingschanged#**l.myeditss
88 notes
·
View notes
Last Seen Blogs
butterscotch-lolly
Feesh!!

balsa-abadan
Untitled
willsmiths-world
Love in Reverse
juice-draws
juicebox!

tripcabinet
Trip Cabinet