#these are three separate images that combine together to create this
Text
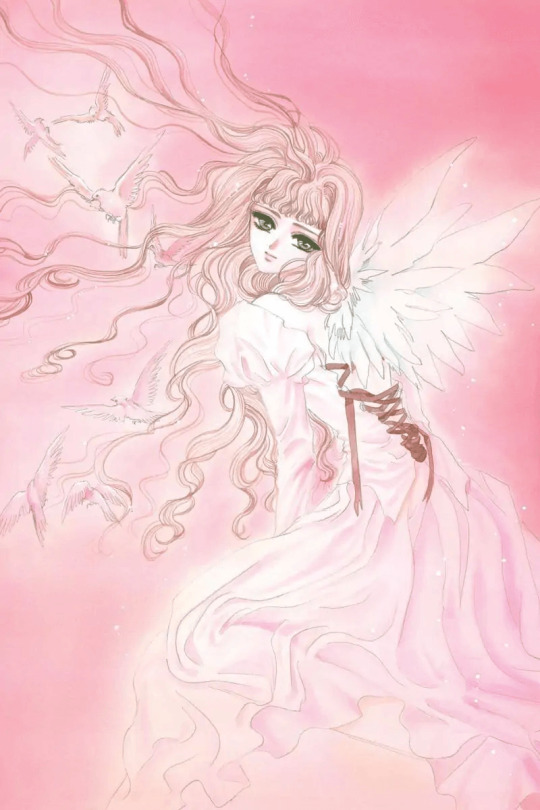
How to Use Herbs: Lavender (English Lavender)
Hello. Back with another post about how to use an herb. This time the herb is lavender. We discussed the history, powers and etc in another post (That I will link in a moment) and now we are going to see how we can use it. >>>> Post about Lavender

Alchemy Formulas:
*Remember when it says one part, try a teaspoon of it first. Always experiment with less amount than too much.
Mercury
one part lavender flowers
one part gum mastic
one part cinnamon chips
one part cinnamon oil
one part lavender oil
Air
one part gum arabic
one part cinnamon
one part lavender oil
one part clove oil
Change
one-part calamus root (Uranus; change)
one part lavender (Mercury; clarity)
one-part powdered nutmeg (Uranus; change)
one part cinnamon (Uranus, Mercury; change)
two parts sandalwood oil (Mercury, Moon; communication between conscious and subconscious minds)
Fame
one part cedar chips (Jupiter; renown)
one part angelica (Sun; authority)
one part myrtle (Venus; the arts)
one part gum mastic (Uranus; innovation)
one part lavender oil (Mercury; knowledge)
one part carnation oil (Jupiter; expansion)
Peace
one-part jasmin flowers (Moon; emotions)
one part myrrh resin (Saturn; grounding)
one part rose petals (Venus; love)
one part lotus oil (Neptune; inspiration)
one part lavender oil (Mercury; communication)
Spells:
Snake-beckoning Spell
Place an image on an altar, either of a snake or of an affiliated deity— the Minoan Serpent Goddess for instance.
Surround this with fresh lavender or warm the essential oil in an aroma burner.
Call the spirit. Be prepared to explain why you have issued the invitation.
Do this spell before bedtime, to receive a visitation in your dreams.
Don’t Sabotage My Success Spell (Workplace Edition)
Prepare a separate mojo for each person who appears to sabotage you.
Write the co-worker’s name on a square of brown paper three times.
Write your own name over each of the co-worker’s names, saying: “I cross you and I cover you.”
Anoint the corners of the paper with essential oils of bergamot, clove bud, and lavender.
Fold up the paper, placing it inside a red flannel drawstring bag, together with a devil’s shoestring root and some cumin seed.
Maintain this discreetly in the workplace, feeding daily with a drop of essential oil of lavender for reinforcement.
Herbal Beauty Glamour Spell
2 ounces of beeswax
1/2 cup coconut oil
1/2 cup olive oil
Glass measuring cup
Pan filled with water
Spoon
10 to 12 drops of lavender essential oil
10 to 12 drops of yarrow essential oil
Mirror
Pretty tin or jar
Combine the beeswax, coconut oil, and olive oil into the glass measuring cup and warm it in the pan full of water. This creates a double boiler like effect.
Once the wax melts, stir everything (the oils and beeswax) until well blended and remove it from the heat.
Add the lavender and yarrow oils, stirring them in slowly. As you do so, look into the mirror and say, I am lovely, I am desirable, I am magical. Beauty is more than skin deep. See me for the magnificence of my inner self.
Before it cools, pour your salve into a pretty tin or jar. After it has firmed up, use it on your skin.
Baths and Cleansing:
Maximum Power Spiritual Cleansing Bath
sea salt
rose and calendula blossoms
lavender oil
rose oil
rosemary oil
sandalwood oil
frankincense oil
myrrh oil
white rose hydrosol
Add copious quantities of sea salt to your bath water.
Add a drop of each essential oil into the water.
Float rose and calendula blossoms in the water, if possible.
Bath for Mercury
Herbs: lavender, white sandalwood, horehound, marjoram, thyme
Oils: lavender, white sandalwood, marjoram, anise
Self-Love Bath Bomb Bag
1 tablespoons of lavender
1 tablespoon of mandrake
1 tablespoon vervain
1 tablespoon vetivert
10-inch square of thin muslin or cotton
White ribbon
Red candle
Place the herbs in the center of the square of the cloth and gather up the corners.
Use the white ribbon to tie it, forming a pouch.
Run a warm bath and hang the pouch over the faucet, allowing the water to run through it, filling the tub with the essence of the herbs.
Light the candle and climb into the tub. Allow yourself to soak in the warm, fragrant water.
Use the herb pouch to wash your body, as you do, gaze into the candle's flame.
Visualize yourself radiating an aura of self-confidence and power. See yourself as the sort of person who attracts attention from those who are worthy.
When the water cools, extinguish the candle and get out of the tub. After you've dried yourself, dispose of the herb pouch by burying it or burning it.
Oils, Potions and Powders
Oil Blend for Patience
1 part rose
1 part lavender
1 part pine
Oil Blend for Peace
1 part violet
1 part lavender
1 part jasmine
1 part sandalwood
Masculine Oil Blend
Base note: 10 drops patchouli
Middle note: 10 drops sandalwood
Top note: 3 drops lavender
For the rest of the recipe, you will need:
1-ounce grated beeswax
Double boiler
1 ounce jojoba oil
2 metal 1-ounce containers
Flat toothpicks
Heat the grated beeswax in the double boiler until it is liquid.
Add the jojoba oil and gently mix the two ingredients together to achieve a homogenous blend.
Pour half the liquid into each container and add 3 drops of your essential oil blend.
Quickly stir the mixture with the toothpicks before the wax begins to set.
Keep one container for anointing yourself and the other as a gift to your consort so that he or she may come to appreciate you on a new level. If you are solitary and without a consort, you can use one for anointing your skin and the other for charging candles and ritual tools.
Love Potion #9
1. Choose nine love herbs. Consider these: Damiana
Ginger
Grains of Paradise
Hibiscus
Lovage
Melissa (lemon balm)
Peppermint
Red clover
Rose petals
(Other options might include adder’s tongue, cardamom pods, catnip, cubeb, lavender, red raspberry leaves or rose hips.)
2. Make a strong infusion of all the herbs, strain, and serve.
Love Powder Drawing Powder
1. Grind the following botanicals to a fine powder:
Basil
Lavender
Rose petals
Yarrow
Optional: ginger blossoms
2. Blend with rice powder.
3. Sprinkle around your home, your bedroom, on your sheets and on you.
Teas and Soothing Pillow:
Bedtime Tea
1 part lavender
1 part catnip
1 part verbena
1 part chamomile
1 cup of boiling water
Mix dry herbs into a small jar
To brew, pour 1 cup of boiling water over 1 teaspoon of the blend you made in the jar.
Steep for 5 - 7 minutes. Strain and enjoy.
Love Tea
1 part rose petals
1 part lavender
1 part jasmine
Pinch of cinnamon (optional)
1 cup of boiling water.
Mix dry herbs into a small jar
To brew, pour 1 cup of boiling water over 1 teaspoon of the blend you made in the jar.
Steep for 5 - 7 minutes. Strain and enjoy.
Dream Pillow (Hecate’s Pillow)
Hecate provides protection at night as well as psychic enhancement, so that you can journey safely during dreams. Appeal to Hecate to block nightmares too.
Dried lavender
Dried mullein
Essential oil of lavender
Optional: tuberose absolute
Blend two parts lavender to one part mullein.
Sprinkle a few drops of the essential oils over the dried botanicals.
Allow this to dry thoroughly and use it to fill a black pillow.
For optimum results, create and inaugurate the pillow during the Dark Moon or on Halloween/Samhain.
Again, sorry for such a long post. Please try to follow the instructions to the best of your abilities or mix and match and experiment. Happy witching. Bye byes~
Sources
#witch community#witchblr#green witch#witchcraft#plants and herbs#herbalist#paganblr#occulltism#nature#baby witch#teas#lavender#baths#potions#magic#witch#witchcraft 101#witches of tumblr#witchcraft resources#witch blog#beginner witch
222 notes
·
View notes
Text
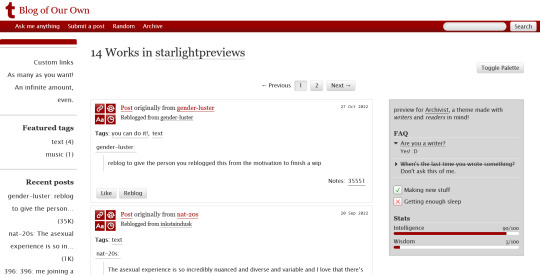


THEME PACK: THE ARCHIVE
Styled after AO3, this pack includes a theme and matching pages, and was designed for writers and readers alike.
🖋️ Theme 11: Archive Of Your Own
Live preview | Static previews: index page, permalink | Code
Full-width posts in an AO3 work index page format
Sidebars with optional sections such as featured tags, updates, rules, progress bars, and more
Unlimited custom links (display on sidebar or in top navbar), plus several social links in the footer
Add a custom logo beside/replacing your avatar
Inbuilt tag filtering plugin by glenthemes
All fields editable directly in the Customize menu, no HTML required. See below the cut for a full guide
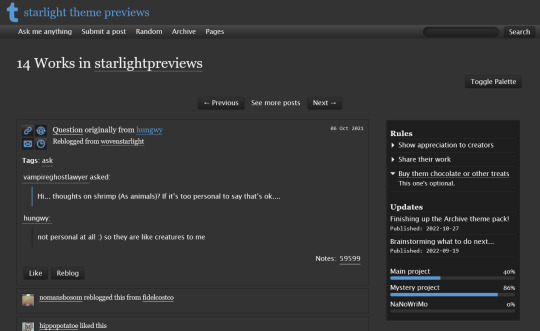
🖋️ Page 3: Archive Records
Preview | Code
A WIP page designed to resemble an AO3 work page
Add tags for ratings, warnings, fandoms, characters, and more, as well as statistics like start dates, word counts etc.
Spaces for summary, start and end notes, and the 'work' itself
🖋️ Page 4: Archivist
Preview | Code
A combined about/navigation page based on the AO3 profile page
Include user statistics or any data you'd like, plus a longer bio
Sidebar navigation with link sections - unlimited links and link groups
The theme and pages all include options for multiple color palettes (initially set to Default and Reversi), text styling (choice of Tumblr/Google fonts and casing options), and more. -
Each page includes instructions on how to edit it, and color/image variables have been gathered together to make customization easier. While not necessary, basic knowledge of HTML is helpful.
For help, check my codes guide, or feel free to send me an ask. Theme 11 customization guide and credits are under the cut.
Theme 11 customization
Regarding the simpler fields:
"Secondary title" refers to the title just above the posts, under the header and navigation. This defaults to "[Total posts] Works in [Username]" when the field is left empty.
"Filtered tags" takes a comma-separated list of tags, entered exactly as they'd be written in the Tumblr post editor but without the hashtag. E.g. the tags #politics, #red and blue, and #green would be entered as "politics, red and blue, green" (make sure there's spaces, and no comma after the last item!). The filtering plugin will then put a warning message over any posts with those tags, along with a button letting you show the post.
"[Section] title" act as the headers for the corresponding section, if provided. "Custom links title" defaults to "Pages" if nothing is entered, and is used when the custom links are displayed on the navbar.
"Featured tags" takes a comma-separated list of tags, in the same format as Filtered tags. This field will display links to those tags, along with the number of posts in that tag on your blog, in the left sidebar.
The Recent posts section displays the 5 most recently posted/reblogged posts on your entire blog, displaying in the left sidebar. If you enter a tag under "Recent posts tag", it'll instead display the 5 most recent posts in that tag on your blog. Only 1 tag is allowed.
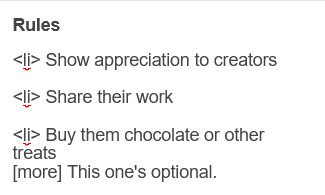
Rules and FAQ
Both these sections work the same way. Each new item, a rule or a question, consists either of one statement, or a statement and some more text, usually as an answer or additional note. E.g. the screenshot below shows three rules, where the last one has more text in the dropdown.
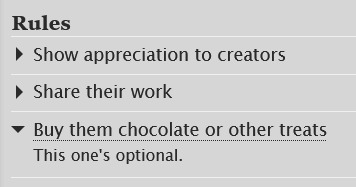
To create an item, prefix it with <li> . To add more text, create a <li> item and add a [more] label underneath, then write your extra text after that. To illustrate, here's the Customize page code for the above:
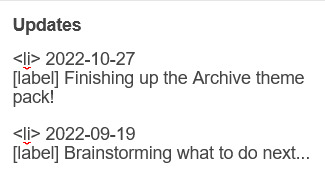
Updates
This section is similar to Rules/FAQ, though it flips the order around. After each <li>, first list the date, then add the [label] marker, then add your actual update. Again, here's an example:
And here's the Customize page code that created that:
Toggles
This section displays checked/crossed-out items, and uses a simpler version of the formatting for the above sections. Use <li> for each new item, then add [on] or [off] at the end, depending on whether you want it checked or crossed off. Here's an example:

And here's the corresponding Customize code:

Progress bars
This section also uses <li> items, where each item has two parts: the text label, and the number(s) for the progress percentages, put inside square brackets like with the other sections. Here's an example (note how the top two use fraction values while the bottom one uses a percentage):
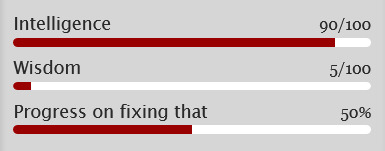
And here's the code that made these. In short, the format is <li> Text here [##/##], or <li> Text here [##%], where ## refers to any number.

Social links in footer
The footer links, aside from the email and personal website fields, take usernames or user IDs for various websites. Be sure to check you're not entering a username in a user ID field!
The Email address field takes a standard email in the format [email protected] and adds a link to let people mail that address.
The Personal website fields will generate a link in the footer's Follow section. Personal website name is the human-readable text label for the generated link, and Personal website URL is the URL that will open when the generated link is clicked. Make sure to add https:// to the start of the personal website URL so the generated link doesn't just redirect you to a different part of your blog.
Credits
Layout and design by Archive of Our Own
Style My Tooltips by malihu
Phosphor Icons
Expanded Tumblr localization and NPF photosets plugin by codematurgy
Custom audio posts by annasthms
Tag filtering by glenthemes
Palette toggle by eggdesign
Scroll to top by Fabian Lins
#code#theme#theme 11#page#page 3#page 4#coding cabin#theme hunter#free#full width#sidebar#topbar#nav text#pagination#unlimited links#header img#custom font size#tfont#gfont#unnested#responsive#npf#color mode#search#rblk buttons#timestamps#tags#group
1K notes
·
View notes
Text
TWST Story Idea (11)
Yuu= He/Him cuz its people pov
The coffin did not contain a single person but instead two people, stuffed in together uncomfortably: a boy and a girl whose appearances mirrored each other as expected of twins.
Crowley did not know this when he first declared Grim and one of the twins to be two in one package students because one wandered off when this happened. Once united, the twins realized that if they admitted there was a third person, it would either be the other twin or Grim, who might not be able to go to NRC.
They had made the decision to fool everyone that there were only two beings instead of three living in the ramshackle dorm, just so that no one could separate them.
The twins became one person, exchanging places every day and making sure they detailed their day down to the specifics in case someone asked them.
Since they had different genders and personalities, naturally, their behavior didn't match up, so they tried to create another persona mixing some of their characteristics instead of creating a new one, which would be hard to play the role.
The way they moved was easy to mimic because they were twins who had done everything together, but sometimes it was easy to forget who they were supposed to be, leading to the image falling apart. So, the persona must have a certain gait made from a mix of them.
The same goes for the rest of their characteristics. They took the differences between them and mixed them into one. The soft-spoken girl and the hot-tempered boy became a person who was well-mannered but wouldn't be afraid to retaliate. The brain and the brawn combined to be a competent person.
This person was Yuu, a persona which the twins must become so that their secrets are safe.
It was hard to maintain this persona, but the twins got to rest some days when it wasn't their turn, and the paperwork dropped by Crowley was done much faster with two people. In addition, one could even go to school while the other did some errands outside of school. This meant easy money stockpile, although it dwindled slightly since there were three living beings now.
They were certain that their secret was safe, even though some had cast suspicious looks at them, but no one had ever spoken out loud about it, so that was fine.
However, being seen as something not entirely human did not crossed their minds.
-
Everyone thought Yuu was strange. Almost all who paid more attention would notice that there was something wrong with him.
Yuu's voice couldn't stay the same tone. It changed frequently and subtly. It would be low and high-pitched, like a normal male voice trying to sound a bit like a woman, and another would resemble a young boy trying to imitate a man's voice by deepening it.
They thought Yuu was messing with them or it was just his way of talking. Not that they fully believed it, but it was better to ignore things, you know?
Often, Yuu spoke politely, and then the next moment, he would send a glare or speak with a hardened tone to someone who managed to offend him in some way. People didn't really get scared at that, seeing as it was just a mild scolding.
Another day, he would do the same, but it was different. This one seemed forced when speaking softly, yet when he was mad, that's when it was the most genuine, and it scared most people.
Someone once caught Yuu looking at a mirror and practicing his expression.
The said person thought it was funny until Yuu said, "My facial muscles are too stiff. I can't get it right."
They all thought Yuu was similar to Floyd, but clearly, this was a different case.
And not to mention, Yuu's movements seemed calculated, as though he was scared of making a mistake. Sometimes they were too stiff, and other times there were too many sways or the steps were irregular, and so on. Some noticed that Yuu's eyes widened slightly before assuming a certain gait that the others had seen plenty of times.
"I almost forgot how to do this…" his murmurs could still be heard, and it made everyone break into cold sweats rapidly.
Some beastmen thought they smelled the scent of a female on Yuu, but the next day it was male. It was different every day, and sometimes it happened in a row. He confronted Yuu one day and was met with a blank face, and then a rather tight smile.
He did not get an answer, but the next few days, the scent of a male on Yuu continued, and Yuu's gaze bore into his soul with a vicious glare.
His mind had come to a conclusion that Yuu was not human.
Some say they witnessed Yuu's doppelganger in some random place before stumbling upon another Yuu, which frightened most people because Yuu denied having seen them, and he had an alibi with Grim.
Yuu's friends, the first-years, thought that Yuu and the ramshackle dorm were weird and creepy. Often, they would hear Yuu talking to himself or loud noises coming from a different room or sudden shuffling when they looked back.
Yuu had them all convinced to announce their presence before opening a room because of ghosts or something. Yuu would also cook plenty and then eat and leave one serving behind, telling them not to touch it.
Yuu would then leave the room and return after a couple of seconds to eat that one serving, much to everyone's confusion and surprise. After all, Yuu usually ate little, and sometimes the plate was full, but this time, there were two plates.
When asked, Yuu who devoured the food almost like a starving animal simply replied, "I'm hungry."
Seeing his everyday strange quirks, the meaning simply changed into something else.
#twisted wonderland#twst wonderland#twst#disney twst#twst yuu#writing prompt#Yuu somehow got mistaken as not human#Them: What are you...?#Yuu *smile tight cuz confuse: Im a human?#Them: no youre not :(#When people mistaken you as a monster trying to pretend to be a human when youre actually trying hide your twin.#no gaslighting only misunderstanding#Yuu: Did you found out my secret?#Them: We know youre pretending to be a human.#Yuu: Hold up
60 notes
·
View notes
Text
Finally-official-devlog #112
Also known as FOD112 hi-ho, Wudge here.
Gosh there's just. So much. I'm actually drafting this devlog a few days early so that I'm not suddenly overwhelmed on devlog Tuesday again. But without further ado-

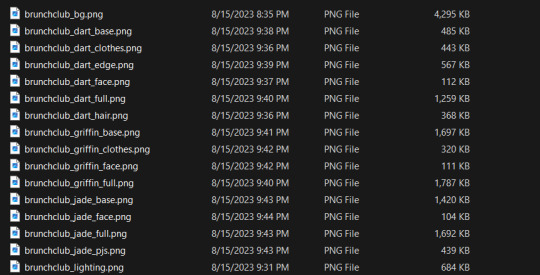
This is the big cheese right here -- each character has their own layer, each character's clothes and expressions have their own layers, and there's a separate layer for the soft orange lighting on top of it all. 😭
On that note, here's most of the individual image files that create the CG with their powers (and my code) combined:
And since this is a cropped version of a BIGGER CG (featuring ALL the love interests sitting together), I had to tinker with the position code a great deal to properly feature these three goons Of course it was worth it of course twas merely at the cost of all my energy and sanity at the prospect of eventually possibly also adding in blinks and expression changes--
Mad props as usual to the sweetwonderfulamazing Remnantation who first completed this CG -checks watch- sometime last year! With some additional edits by me since then~
And, did you happen to notice something new in the lower right?

Tadah... a brand new click-to-continue icon animation! I made (mostly) all by myself! The lil sparkle burst is free from production crate, but I drew the star and added the rotation code... ... Honestly, the hardest and most time-consuming part of this was finalizing the design. Originally I was gonna make it rotate 45 degrees, flip, rotate 45 more degrees, flip, etc-- and messed with that concept for several hours before scrapping it for a simpler, more graceful idea. :| Part of the process, I gots to tell myself, part of the process...

Next up is Jade's powers, as you may have seen in the preview last week. Much like the CTC animation, I did a lot of research on other ideas - various glowing VFX like vertical veins across the cheeks and smoky rising from the eyes, as well as a bigger low opacity character zoom effect - before settling on something simple. Jade's power usage here is... pretty mild in context, and I figure I can always store the more dramatic animations for later in the story.
Here's a still of the effect btw:
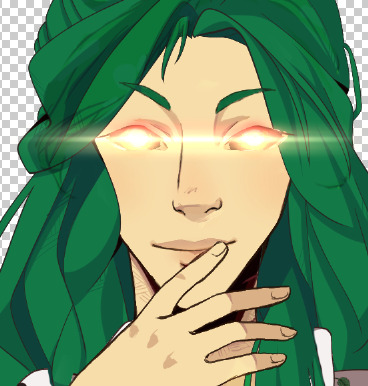
Her eyes look like headlights lmaooo. Honk honk!
Do I have more to update with? Believe it or not, yes.
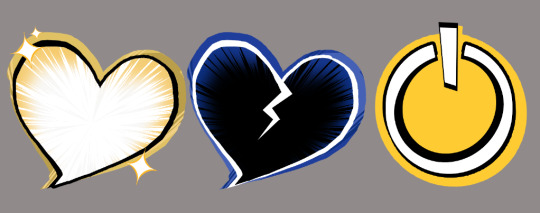

I made some icons, which took a fair amount of trial and error: on the left you'll see an earlier draft, on the right are my more final redesigns from the same day(...night. midnight. I worked on these until midnight).
I had to look up some guidelines because most of my previous icons did NOT look good or legible when sized down to 50x50 pixels. What I learned was, tadah, I had to draw with an unprecedented line width of 200 pixels! (For non-artists: I typically draw with a pen width of 12 pixels at most).
I also studied the icon styles of Persona 5, which saved me a lot of time - they had a cool stylistic choice of diagonally tilted color blocks and thick black outlines.
Here's yet another gif of icons in action...

Did you see them? Did you?? For a split second, in the upper right.... Still gotta adjust some of the text overlap, don't look at that.
Oh and the "How to play" page is brand new. I coded it from scratch... That also took all night...
... Oh. Oh. And remember your MC's phone?

This old thing? Yeah. Visual upgrade:
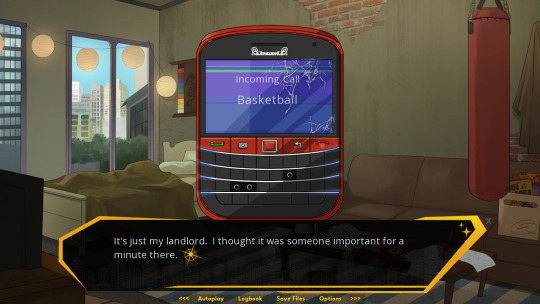
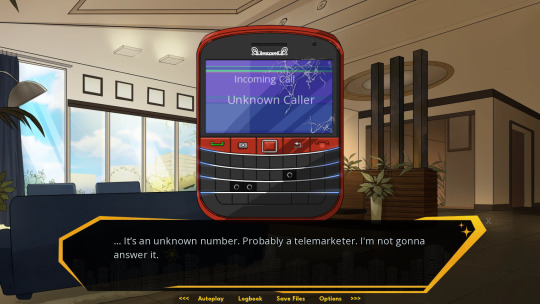
Also rendered and colored in by Rem <3 Where would I be without them...!
The text, though, can be updated in code!!!! I spliced the phone into layers, with the screen on top and code-generated text just below it, so I can update the caller ID at any point in-game without making any new images.
Took a little while to get it to work... honestly it doesn't look 100% centered... but it's fine. This is fine...
And then... more code. After much tears, blood and strife, I got a musical crossfade to work. It shouldn't have been challenging but it was a nightmare -- when calling the crossfade the second track would either not play at all or its volume wouldn't change and I was starting to develop a preference for eating gravel. But I persisted, found a much simpler code that actually works. After the tearsbloodstrife.
And...... lastly... I simplified this big block of code:
vbox:
pos (269, 76)
add "sprites/MC/mc[mc_number].png"
hbox:
if mc_number ==1:
text "DEFAULT" style "MC_label_text"
elif mc_number ==2:
text "LAVENDER" style "MC_label_text"
elif mc_number ==3:
text "PETUNIA" style "MC_label_text"
elif mc_number ==4:
text "SUNFLOWER" style "MC_label_text"
else:
text "TBD" style "MC_label_text"
...(not properly indented bc tumblr is mean 2 me)...
down to these lines, to make my future life easier:
default PrintMC = ["Default", "Lavender", "Petunia", "Sunflower", ""]
text PrintMC[mc_number] style "MC_label_text"
Two!!! lines!!!!!
🎊
Instead of typing out additional if/else lines, I only need to add new names to the PrintMC list. Won't really affect the player at all, but it's a HUGE quality of life update for me!
...Anyway that's it, thank you for checking in. <3
Stay safe and keep warm,
Wudge.
PS screw it I'm gonna queue post this early.
PPS have you listened to our composer's new single yet? No?!?!?!
youtube
Every click, every listen helps, and every song of his is a BOP that deserves recognition!
ok that's all for real now xoxoxo,
wudge (again)
#herotome update#interactive fiction#oelvn#visual novel#otome game#english otome#otome#amare game#amare#amareteabreak#indie otome#indie dev#indie game#Youtube
55 notes
·
View notes
Photo
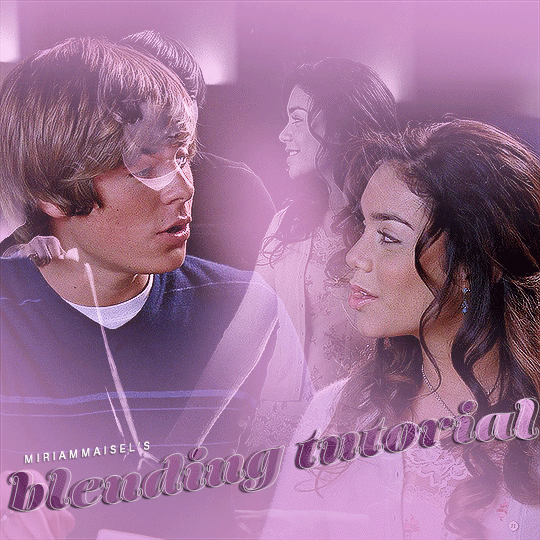
hey!! so an anon asked if i could make a blending tutorial from my troyella set so here it is! you need basic knowledge of making gifs. i use photoshop 2022 and i’m using a mac.
step one: make your gifs
make your two gifs in separate documents
crop (i did 540x540), color and sharpen as you please. then go to image - image size and resize them to 540x540
make sure your gifs have the same amount of frames - this was 47 and make sure your gifs are under the 10mb limit
i decided on a close up shot and a more far away shot
step two: adding the pink color
for the more far away gif i added a gradient map layer and changed the white to this pink color. the gradient goes from black to pink. the hex code is e2a7dd
for the close up gif i created a new layer and then used the brush tool to paint around them with the same color. i used a bigger brush for the outside and a smaller one for the middle. i used a soft round brush and kept it at 50% opacity.
step three: combining the gifs
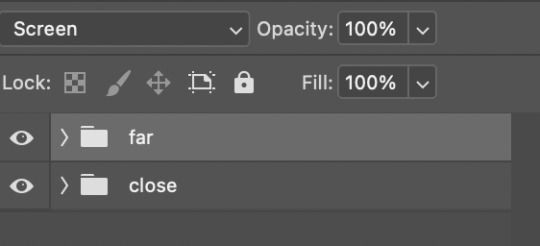
on each document i grouped all of my layers together. i select them all using shift. then i hit ctrl and click on the layers. then go to group from layers. you can name it whatever you want and then hit ok. i named the far gif “far” and the close one “close”
on my far gif i make sure my group layer is selected and i hit command c and then go to the other document and hit command v. you’re just copying and pasting! now your gifs are on the same document. you can also create a new document if you want
step four: change the blending mode
my far gif is now on the top
with that group selected change the blending mode to “screen”
it should look like this:
now the gif looks like this:
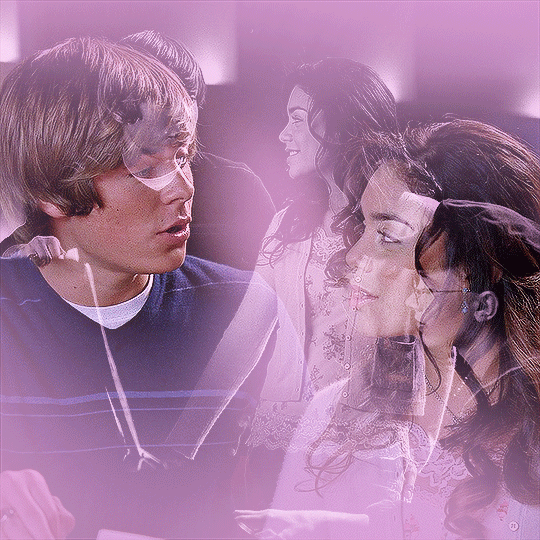
as you can see kelsi is still in the frame so that leads us to
step six: erase anything you don’t want in your gif
with that top gif still selected add a layer mask
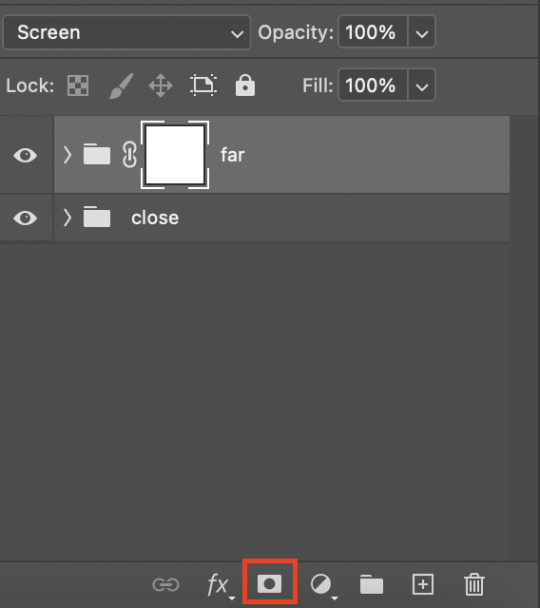
next make sure your colors are set like this

then use the brush tool to erase kelsi. i use a soft round brush (size 412) and change the opacity to 100%. you might even erase more like troys hand on the side or kelsi’s hand on the bottom but that’s up to you! here is the final product!

hope this helps and if anyone has questions let me know!
#usergif#completeresources#rresources#allresources#userkosmos#userrobin#supervalcsi#usermorgan#usernanda#uservivaldi#usermills#userhella#usernatty#uservalentina#uservier#userkarolina#userannalise#userdean#*tutorial
411 notes
·
View notes
Text
Octorilla
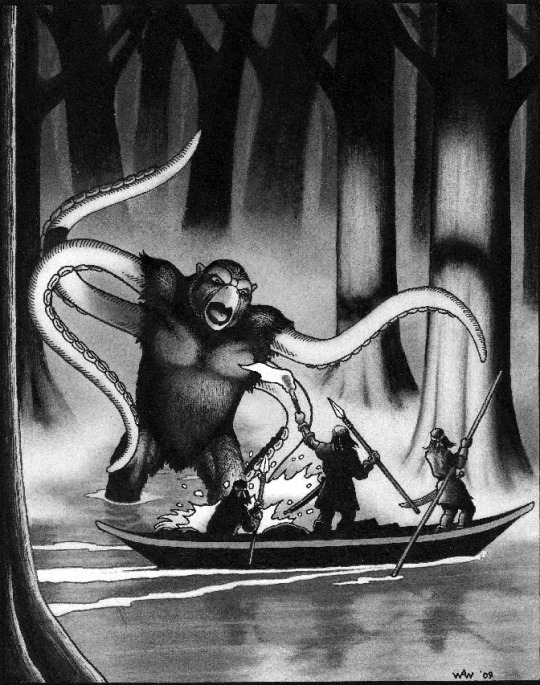
Image © Emperor's Choice Games, by William Watt.
[Commissioned by @crazytrain48. The octorilla is an Arduin monster with a long, but strange, history. An illustration first appears in the second volume of the Arduin Trilogy, Welcome to Skull Tower, and that book includes them on encounter tables. But there aren't stats for them (at least, I think. I only have a compilation of the Arduin Trilogy rather than each book separately). The first time I could find statistics is in the Arduin Eternal edition, which coincided with a very nice miniature from Emperor's Choice Games.
Note also that the octorilla only has six limbs. The name is clearly a portmanteau of "octopus" and "gorilla", ala the term "owlbear", rather than a description of their limbs.]
Octorilla
CR 9 CN Magical Beast
This creature resembles a humanoid ape, except that it has a beak instead of a mouth, and four slimy tentacles in place of its forearms.
Octorillas are yet another form of hybrid creature created by transmuters in an attempt to create useful servitors and warriors. By combining the clever problem solving of octopuses with the social structure of gorillas, the original creator of the octorilla was hoping that the resultant chimera would be a useful fighter and willing to follow orders. This had mixed results. Octorillas are smarter than, say, an owlbear, but they are independently minded and they are usually resentful of creatures that try to impose their will on them. Although some octorillas are still in captivity serving as moat monsters or palace guards, most of them are free living and free willed.
An octorilla is a fairly simple combatant—they wade into melee and grab prey with their slimy, suckered tentacles. If they don’t have a prey item grabbed, they can use their tentacles to swat arrows and bolts out of the sky. Their tentacles ooze a sticky slime that is mildly acidic. This helps octorillas break food down into small enough pieces in order to consume easily (like their octopus ancestors, their gut passes through the brain, limiting the size of what they can swallow). Octorillas are immune to toxins and resistant to corrosives, which allows them to live in a wide variety of environments, including polluted swamps, radioactive wastelands, or other challenging areas. They require plenty of water, but can survive in both salt and freshwater. Octorillas lair in areas with three dimensional structures to climb on, such as sea caves, coral reefs or tree-filled swamps.
Octorillas remain solitary for most of their lives. When the urge to mate takes them, multiple females will gather at a place with still water, and a male will mate with each of them. This harem will care for their eggs together, with the male assisting by provisioning food when females cannot hunt for themselves. Once the eggs hatch, the mating clutch disperses, but octorillas can recognize their own young and sometimes assist the larvae by bringing them prey. Juvenile octorillas are fully aquatic for their first year or so of life and amphibious thereafter.
Octorillas can be taught to understand a spoken language, and even to speak a few words roughly, but communicate amongst each other without one.
Octorilla CR 9
XP 6,400
CN Large magical beast (aquatic)
Init +5; Senses darkvision 60 ft., low-light vision, Perception +11, tremorsense 30 ft.
Defense
AC 23, touch 10, flat-footed 21 (-1 size, +1 Dex, +13 natural)
hp 123 (13d8+52)
Fort +12, Ref +9, Will +9
Immune paralysis, poison; Resist acid 10
Defensive Abilities opportunistic deflection
Offense
Speed 30 ft., climb 20 ft., swim 40 ft.
Melee bite +18 (1d8+6), 4 tentacles +16 (1d6+3 plus 1 acid and grab)
Space 10 ft.; Reach 10 ft.
Special Attacks constrict (tentacles, 2d6+9 plus 4 acid), slime
Statistics
Str 23, Dex 12, Con 19, Int 4, Wis 16, Cha 9
Base Atk +13; CMB +20 (+28 grapple); CMD 31
Feats Blind Fight,Combat Reflexes, Improved Initiative,Iron Will,Lunge,Multiattack, Skill Focus (Survival)
Skills Climb +18, Perception +11, Survival +12, Swim +18
SQ amphibious
Ecology
Environment warm and temperate swamps
Organization solitary or clutch (2-6)
Treasure incidental
Special Abilities
Opportunistic Deflection (Ex) An octorilla can use its tentacles to deflect projectiles as if it had the Deflect Arrows feat. It has to have its tentacles free in order to use this ability, and must use an attack of opportunity in order to deflect a projectile.
Slime (Ex) An octorilla’s tentacles secrete a sticky slime that grants them a +8 racial bonus on grapple checks instead of the usual +4 granted by the grab monster ability. A creature struck by a tentacle attack takes 1 point of acid damage.
55 notes
·
View notes
Photo
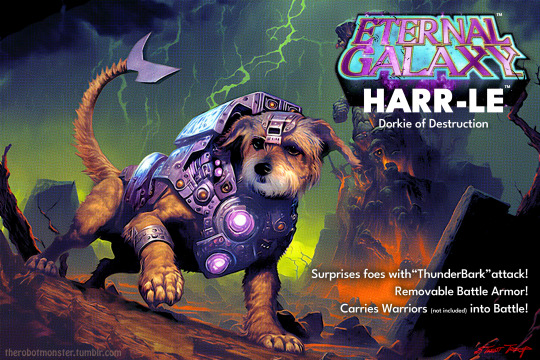
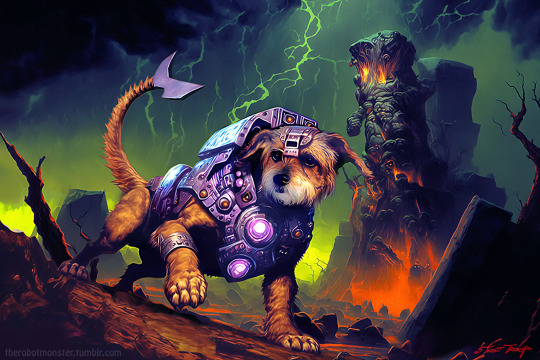
Eternal Galaxy HARR-LE Package Art Painting
Mice and squirrels of the cosmos beware, HARR-LE patrols Planet Feyr, ever watchful and ready to strike! Usually a calm and gentle beast, she reluctantly tolerates donning her battle armor, forged by the lost smiths of Knittux, when summoned by the sacrifice of only the stinkiest of dried buffalo lung and duck jerky. Her shattering Thuderbark and tail-slap attacks make quick work of those who dare face her.

Since I’m broke, for Christmas I decided to make some art of my sister’s dog, Harley, for her.gift. She loves fantasy and kitch, so a MOTU-esq armored-steed concept came together. I can post this here because my sister doesn’t read my Tumblr.
Harr-Le is a mix of Midjourney, photomanipulation and digital painting, totaling around 15 hours across three or four days. I used a combination of image and text prompting to get the general likeness and the components for the foreground elements, while the background was built separately with a text/image prompt combination using various landscapes I generated in artbreeder.
An example from the stack of images used to create this one:
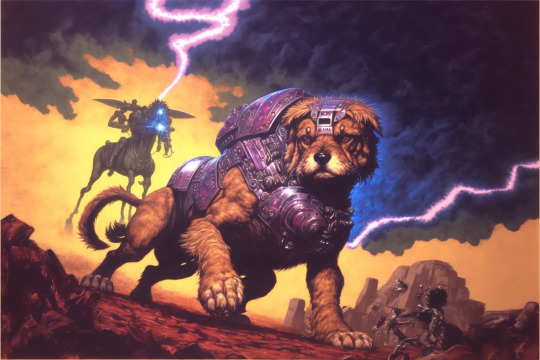
Main Prompt: dog-starrior, a giant orange terrier with purple stripes, barding, mecha-saddle, robotic armor, glowing mystical sonic cannon on the back, sonic bark sending shockwaves forward,, and glowing eyes. running in a high-tech wasteland, flying mountains, vaporwave vibes, battle painting, Masters of the Universe package painting, 1985, by frank frazetta, earl norem, pulp fantasy painting
Background Prompt: a roiling mystical thunderstorm with bolts of shimmering green-yellow lightning over a primordial landscape. Distant volcanoes shaped like giant squirrel statues with cubic, rune-carved lava, cubes of lava, mysterious and foreboding, primal fury, Masters of the Universe package painting, 1985, by frank frazetta, pulp fantasy painting, fantasy landscape
Both prompts were modified by image prompts, and were modified throughout the image iteration process.
98 notes
·
View notes
Note
almostbeabeauty. tumblr. com/post/715063286102687744/there-is-a-post-in-the-helaemond-tag-saying-it
Yeah I saw that post and I don't think they can reach the conclusions they did based on the evidence they supplied.
The argument made in this post is that the blood that leads to Aemond, Helaena, and Aegon's sigils mixes on its path as it travels from parents (Alicent and Viserys) to children (Aemond, Helaena, and Aegon). This mixing is shown in the circle on the image below:

And in the top arrow in the image below:
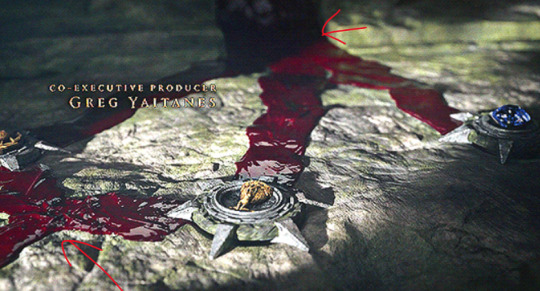
Their argument is that all three children's blood gets mixed together, so the blood that passes through Aegon's sigil to combine with Helaena's is actually Aemond's (at least in part) and therefore the kids could be Aemond's. But again, this mixing happens BEFORE the blood branches out and reaches the sigils, not after. By the time Helaena and Aegon's blood combines (bottom arrow in the above picture), it's separated out from Aemond's once again. And it has passed through the sigils that each represent a single person.
By the poster's argument, Aegon's sigil somehow doesn't just represent his blood, but also Aemond's, even though Aemond has his own separate sigil that's right there in the image. That seems counter-intuitive to the notion of the sigils in the first place. If they aren't supposed to represent individuals but are meant to represent more than one person, then why do they have icons that are highly individualistic? Why would Aemond be the only character whose blood gets represented with more than one sigil, and no one else? Does that mean Aegon's blood doesn't get a sigil of its own and has to share, or that any future kids from Aemond's sigil must also possibly be Aegon's? It creates a lot more inconsistencies than it resolves.
If the poster can provide an explanation for why the showrunners would have someone's blood routed through a sigil that doesn't represent them, then sure I'll believe there's a possibility. But I think it's more of a reach than my own conclusions.
#ask#asks#answered#helaemond#helaegon#helaena targaryen#aegon targaryen#aegon ii targaryen#aegon#aegon ii#aegon the elder#helaena#aemond targaryen#aemond one eye#aemond#jaehaerys targaryen#jaehaera targaryen#maelor targaryen#house of the dragon#hotd
47 notes
·
View notes
Note
I've had a semi irrational fear of continer software (docker, cubernates etc) for a while, and none of my self hosting needs have needed more than a one off docker setup occasionally but i always ditch it fairly quickly. Any reason to use kubernates you wanna soap box about? (Features, use cases, stuff u've used it for, anything)
the main reasons why i like Kubernetes are the same reasons why i like NixOS (my Kubernetes addiction started before my NixOS journey)
both are declarative, reproducible and solve dependency hell
i will separate this a bit,
advantages of container technologies (both plain docker but also kubernetes):
every container is self-contained which solves dependency problems and "works on my machine" problems. you can move a docker container from one computer to another and as long as the container version and the mounted files stay the same and it will behave in the same way
advantages of docker-compose and kubernetes:
declarativeness. the standard way of spinning up a container with `docker run image:tag` is in my opinion an anti pattern and should be avoided. it makes updating the container difficult and more painful than it needs to be. instead docker compose allows you to write a yaml file instead which configures your container. like this:
```
version: "3"
services:
myService:
image: "image:tag"
```
you can then start up the container with this config with `docker compose up`. with this you can save the setup for all your docker containers in config files. this already makes your setup quite portable which is very cool. it increases your reliability by quite a bit since you only need to run `docker compose up -d` to configure everything for an application. when you also have the config files for that application stored somewhere it's even better.
kubernetes goes even further. this is what a simple container deployment looks like: (i cut out some stuff, this isn't enough to even expose this app)
this sure is a lot of boilerplate, and it can get much worse. but this is very powerful when you want to make everything on your server declarative.
for example, my grafana storage is not persistent, which means whenever i restart my grafana container, all config data gets lost. however, i am storing my dashboards in git and have SSO set up, so kubernetes automatically adds the dashboards from git
the main point why i love kubernetes so much is the combination of a CI/CD pipeline with a declarative setup.
there is a software called ArgoCD which can read your kubernetes config files from git, check if the ones that you are currently using are identical to the ones in git and automatically applies the state from git to your kubernetes.
i completely forgot to explain of the main features of kubernetes:
kubernetes is a clustered software, you can use one or two or three or 100 computers together with it and use your entire fleet of computers as one unit with kubernetes. i have currently 3 machines and i don't even decide which machine runs which container, kubernetes decides that for me and automatically maintains a good resource spread. this can also protect from computer failures, if one computer fails, the containers just get moved to another host and you barely use any uptime. this works even better with clustered storage, where copies of your data are distributed around your cluster. this is also useful for updates, as you can easily reboot a server for updates without causing any downtime.
also another interesting design pattern is the architecture of how containers are managed. to create a new container, you usually create a deployment, which is a higher-level resource than a container and which creates containers for you. and the deployment will always make sure that there are enough containers running so the deployment specifications are met. therefore, to restart a container in kubernetes, you often delete it and let the deployment create a new one.
so for use cases, it is mostly useful if you have multiple machines. however i have run kubernetes on a singular machine multiple times, the api and config is just faaaaaaar too convenient for me. you can run anything that can run in docker on kubernetes, which is (almost) everything. kubernetes is kind of a data center operating system, it makes stuff which would require a lot of manual steps obsolete and saves ops people a lot of time. i am managing ~150 containers with one interface with ease. and that amount will grow even more in the future lol
i hope this is what you wanted, this came straight from my kubernetes-obsessed brain. hope this isn't too rambly or annoying
it miiiiiiiight be possible to tell that this is my main interest lol
6 notes
·
View notes
Text


Digital terrain models zero in on Martian surface
Picture soaring over a rugged canyon on another world, strapped into an imaginary hang glider. Or getting a bird's eye view of craters that stretch on for miles and following along the same paths as the robotic rovers that have explored the surface of Mars. All of this is possible—virtually—thanks to specialists at the University of Arizona's Lunar and Planetary Laboratory.
A team at the Lunar and Planetary Laboratory has created realistic terrain models of Mars' surface using specialized software and high-resolution images taken from space. Known as digital terrain models, or DTMs, these renderings allow mission planners to examine landing sites for landers and rovers and scout routes across the alien terrain, laying the groundwork for ongoing and future Mars exploration campaigns.
Creating a DTM begins with high-resolution images taken with the High Resolution Imaging Science Experiment, or HiRISE, a UArizona-led camera instrument aboard NASA's Mars Reconnaissance Orbiter, or MRO, which has captured detailed views of the red planet's surface since 2006.
Unlike a consumer-grade digital camera, HiRISE does not take "snapshots" of a scene—rather, it relies on a method called push-broom photography. As the orbiter passes over Mars, the camera takes a long scan, producing pictures used to create DTMs, which are topography maps and capture the shape of planetary surfaces.
"DTMs take a long time to make," says HiRISE outreach coordinator Ari Espinoza, "so the fact we've been able to crank them out in such high numbers underscores the value that HIRISE still has—especially because no one else is making such high-resolution images of Mars' terrain."
HiRISE can resolve objects as small as three feet, about the size of a coffee table. Thus, HiRISE can reveal potential snags and obstacles in landscapes that may look deceptively easy to navigate when viewed from a distance. The sheer amount of DTMs from UArizona has made them a sought-after resource used to examine changes in Mars' geology, find safe landing sites and navigate rover routes.
For each DTM, two images of the same area are necessary. HiRISE captures each image on a separate orbit and at a different angle, and combining the images results in a so-called stereo pair.
Essentially, the set of images making up a stereo pair mimics the left eye and right eye, creating a sense of depth, explains HiRISE scientist and DTM lead Sarah Sutton.
"When you look at the images together with special glasses—like the red-blue glasses often handed out at science fairs—it allows your brain to make a 3D image," she says.
The stereo pairs are then used to produce the DTMs—an intensive process that involves a coding component, examining the actual images taken by HiRISE and editing the DTMs.
The program launched in 2008 with Sutton being the sole producer of DTMs. Thanks to a growing team that includes student workers, the effort is on track to complete more than 150 for this year alone, a record. September saw the completion of a major milestone when the number of total DTMs passed the 1,000 mark.
"Production has gotten a lot faster because we have better targeting of stereo pairs, more automation in our process, and we are continually refining our methods," Sutton says.
Editing especially requires a lot of hands-on work. For example, stark differences in lighting, such as a dark shadow covering one side of a crater, can cause errors that need to be evaluated by a human pair of eyes.
"In such cases, the computer doesn't register what is actually on the surface, and so it makes things up that we have to correct manually," says Branden Gosse, a recent UA graduate who now works as a research technician for HiRISE.
During HiRISE's repeated passes over the same area, it sometimes witnesses changes on the Martian surface that provide valuable scientific clues about dynamic processes, Sutton explains.
"We can observe seasonal changes in frost cover or dunes moving across the land," she says. "That's only possible with DTMs, since they correct for differences due to the individual images being taken from slightly different optical perspectives."
On top of depicting surface changes, DTMs help Mars rovers navigate terrain that could be dangerous. While small, sharp rocks are too small for DTMs to resolve, they can effectively display hazardous sand dunes that rover wheels can get stuck in. In collaboration with cameras aboard rovers, DTMs can even enable almost real-time navigation of rovers' routes.
Making space science tangible
The feats accomplished through DTMs have been made possible through the scores of UArizona students who have produced them over the years, culminating in 1,000 DTMs made from a pool of almost 8,000 stereo pair images. Although DTM production has a steep learning curve, the benefits are immense and planetary science gets more tangible, according to Sutton.
"DTM production gives students the opportunity to see how space science really works outside a classroom," she says.
Simultaneously, the HiRISE team learns from students' new perspectives, and students learn how to work with the software, according to Max Cabrera, a student worker majoring in physics and astronomy.
"Last semester, there would be this overlap where I'd use the techniques from DTM production in class and vice versa," he says. "There was this nice back and forth that helped me hone my edge for coding."
Even with a long history under their belt, DTMs cover a very small percent of Mars' surface—less than 1% or 2%—which highlights the extent of contributions HiRISE can continue to make for as long as the hardware lasts. With students and scientists hard at work in the DTM lab, the topography maps are bound to secure the success of Mars missions—and possibly even human space exploration in the not-too-distant future.
According to Alfred McEwen, the mission's principal investigator, "DTMs are critical for finding future landing sites for humans or robots as well as monitoring safety and what is happening on the surface."
"Researchers for other moons and planets wish they had something like HiRISE and the MRO orbiting their field of study," McEwen says. "High-resolution images are highly desired pretty much anywhere that you have a solid surface."
Aside from HiRISE, McEwen serves as deputy principal investigator for the Europa Imaging System, or EIS, on NASA's Europa Clipper spacecraft, scheduled for launch next year. Similar to the flyovers over Mars' surface, the Clipper mission will involve studying Jupiter's moon Europa, the sixth-largest moon in the solar system, during a series of flybys.
"As the spacecraft orbits Jupiter and makes close passes to Europa, we hope to get the same kind of stunningly beautiful pictures of this icy world as we do of Mars with HiRISE," McEwen says.
TOP IMAGE....Rendered from a digital terrain model, this image shows Ganges Chasma, a deep canyon on the eastern end of Valles Marineris, the largest canyon system not just on Mars, but in the entire solar system. Credit: Kevin Gill, JPL-Caltech
LOWER IMAGE....Rocky outcroppings are visible in this digital terrain model of Martin Crater on Mars created by Kris Akers at the Lunar and Planetary Laboratory. DTMs offer faithful renditions of the topography and surface features of planetary bodies and help mission planners pick safe routes for rovers and landers, for example. Credit: Kris Akers, HiRISE, Lunar and Planetary Laboratory
2 notes
·
View notes
Text
Dragon Biology
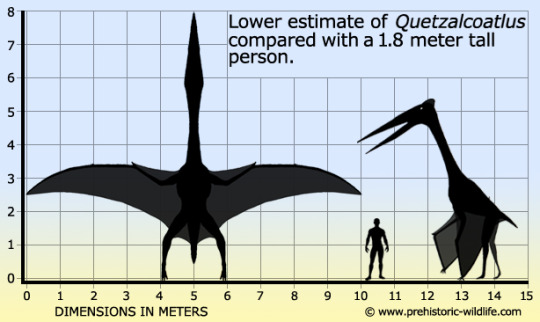
Recently I have been exploring the evolution of dragons and how i feel they would have developed in our world with what we know of biological history. By looking at what I wanted (dragons) and comparing some of the most similar creatures from our own planetary history. What I was looking for were large flying creatures, preferably reptilian, with bat-like wings, toothed jaws, and long tails. Obviously, there are no creatures alive today or even extinct creatures that have been fossilized that meet all these criteria, but these traits can be found in many animals separately. The three creatures I spent the most time looking at were quetzalcoatlus, coloborhynchus, and yi qi.
Quetzocoatlus northropi was the largest creature to ever fly. Lucky for me, it was also a reptile. Given the measurements of these majestic creatures, we can get an upper range on the size our dragons would likely reach. This means our dragons would be approximately 13-18 feet long (3.9-5.4 m) from head to tail. Given the estimated weight of Quetzalcoatlus and the possibility of greater weight in dragons, I assumed a slightly larger weight range between 500-700 pounds (227-318 kg). With the weight to wingspan equation (Wingspan = 2.43 * Weight^03326,) we can see that they would need between 22-38 foot (6.7-11.5 m) wingspans.
Yi qi was a small Scansoriopterygid (meaning "climbing wings") dinosaur that had surprisingly batlike wings. Its third finger was elongated and accompanied by an extra-long wrist bone that extended backward from the hand to support the skin membrane that made up its wing. While not the classic three-fingered dragon wing we often see in fantasy, it lends itself to the presence of batlike wings in reptiles.
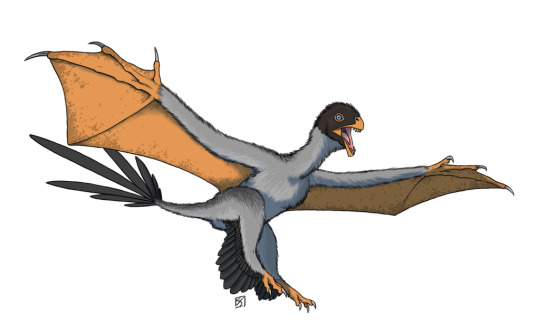
What I did for my dragons was, instead of having this extended wrist bone added a fourth finger that served the same purpose. This adds a slightly more bat-like appearance while still adhering to known biology.
Dimorphodon was the largest toothed pterosaur, and it also had a long tail. While the tail likely appeared rat-like, it gives merit to the idea of LNG tails on flying creatures. If fact, it is not unlikely that dragons would have evolved long, flat tails to assist them in steering. We see this in modern birds all the time who use their tails to help steer. Though these tails would probably not be as long as the tails of the dragons we see in fantasy.

To create my final design used image manipulation software to paste together a series of bones from many animals to create a scientifically plausible dragon. I present to you Drakon Europa.

This is the combination of many different skeletons. The torso, including the ribcage and spine, as well as the collerbonearm and elongated fingers, all come from a quetzalcoatlus. The finger bones have been stretched to increase the wing span. The neck is from a prosauropod because finding neck bones on their own is quite difficult. The tail cones from a crocodile and the legs from a tree. The skull was bade by adding an ox horn to a monitor lizard skull. I fully intend to do a complete render of a working skeleton from scratch one day but in the meantime this will suffice. With a new skeleton I will explore muscle attachments and organs. Also in future posts I want to discuss fire breathing and it scientific plausibility as well as behavior.
#fantasy writing#fantasy worldbuilding#worldbuilding#writing reference#creativewriting#dragon#dragons#speculative fiction#speculative biology#speculative evolution
8 notes
·
View notes
Text
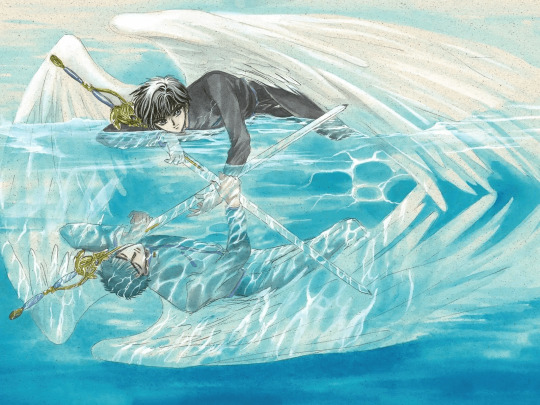
X/1999 Volume 1 Illustration Comments
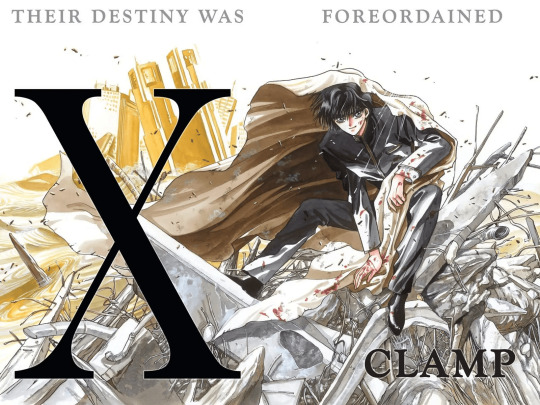
1992 Monthly Asuka May Issue, Title Page Illustration
Paper: Kent Paper
Lines: Holbein Color Ink (Special Black)
Color: Dr. Ph. Martin's Color Ink, modeling paste
This was a two-page spread for the title page of the very first chapter of the series. The desertification of Tokyo is an important theme which is why the opening scene starts with it. I removed the outlines of the background art to convey the strength of the harsh sunlight.
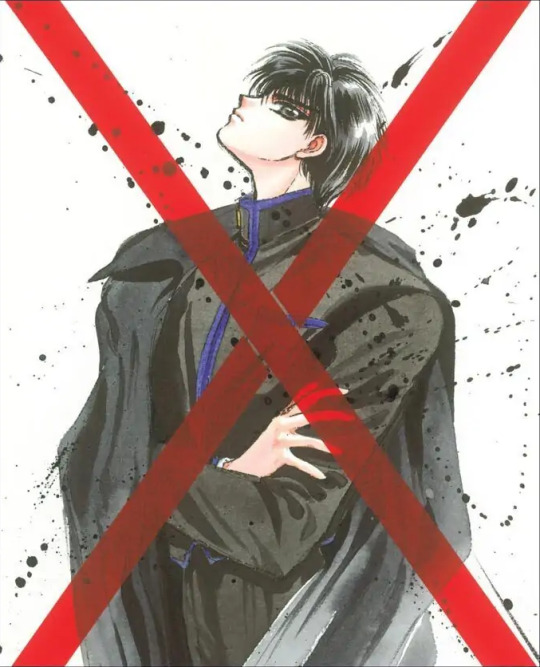
1992 Monthly Asuka September Issue, Announcement illustration
Paper: Kent
Lines: Photocopied pencil lines
Color: Dr. Ph. Martin's Color Ink, Colortone
The background of the previous announcement illustration was red. so I decided to go with white for this one. To make the "X," I pasted strips of Colortone over the image.
[Ed. Note: Colortone is a type of colored screentone; it's also sometimes called "overlay."]
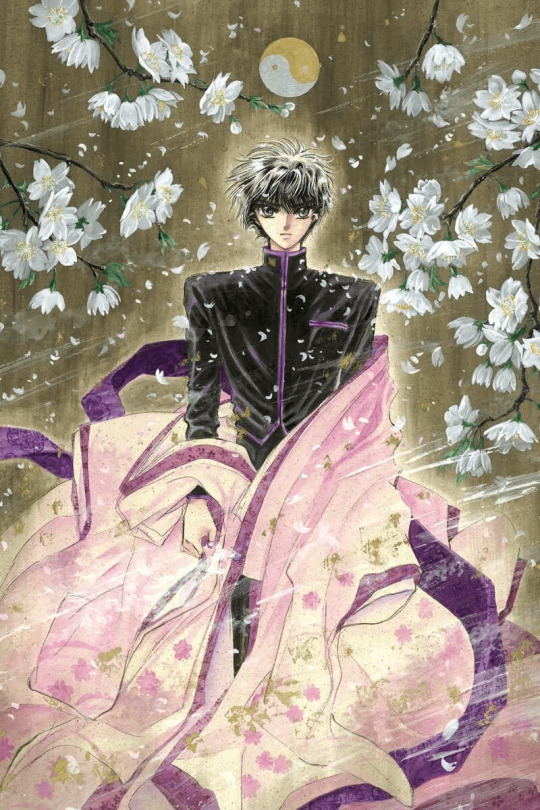
1993 Monthly Asuka March Issue, Jigsaw Puzzle Illustration
Paper: Sand-textured paper
Lines: Photocopied pencil lines
Color: Acrylic gouache, Dr. Ph. Martin's Color ink, poster color
Since this image was for a jigsaw puzzle that was a bonus giveaway in the magazine, I created distinct areas of different colors and even embedded small pieces of glass in it (laughs]. The theme is cherry blossoms, and the base colors are pink and purple.
[Ed. Note: Poster color is also known as "poster paint" or "tempera paint."]
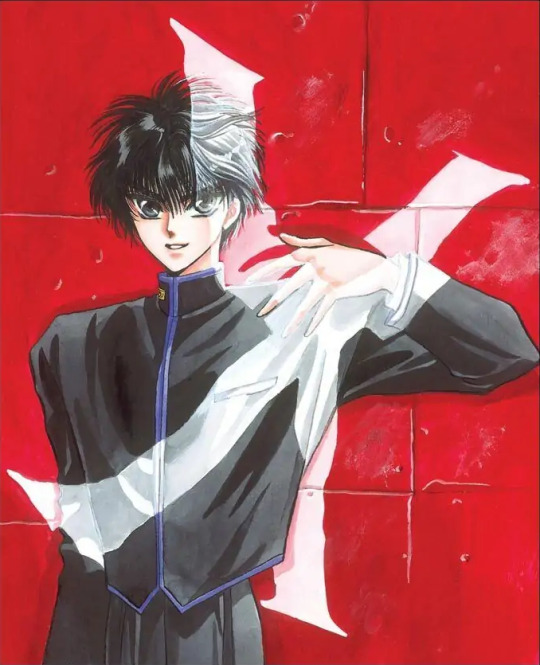
1992 Monthly Asuka July Issue, Announcement Illustration
Paper: Kent Block
Lines: Holbein Color Ink (Special Black)
Color: Dr. Ph. Martin's Color Ink
The thematic colors of the announcement illustrations back then were red and black. I wanted to make the "X" look like a slide image being projected on Kamui
1992 Monthly Asuka May Issue, Cover Illustration
Paper: Kent Paper
Lines: Holbein Color Ink (Special Black)
Color: Dr. Ph. Martin's Color Ink
The color theme for this illustration is pink. X began serialization during cherry blossom season, and I had an image in my mind of Kamui together with the cherry blossoms, so that's why I drew it. He still looks naive and naughty in this [laughs.]

1993 Monthly Asuka March Issue, Cover Illustration
Paper: Kent Paper
Lines: Holbein Color Ink (Special Black)
Color: Dr. Ph. Martin's Color Ink
More flowers again after page 2 Kamui is out in the snow in this illustration, so the flowers are winter camellias. I drew the camellias in two separate styles: the ones on his clothes look flat, while the ones in the background look three-dimensional.
1992 July, X Volume 1, Cover illustration
Paper: BB Kent
Lines: Holbein Color Ink (Special Black)
Color: Acrylic gouache, airbrush, Dr. Ph. Martin's Color Ink
Red is the color theme for volume 1, so for this image, I used red and black which is a typical color combination for X. Since this illustration was for the first volume of the series, I made it a straightforward archetypal one.
1995 Monthly Asuka June Issue, Title Page Illustration
Paper: Parchment paper
Lines: Dr. Ph. Martin's Color Ink (Sepia)
Color: Dr. Ph. Martin's Color Ink, poster color
Parchment paper is interesting to use because the color of the stock shows through in the finished piece. Kamui and Kotori hardly have any scenes together, so I tried to at least let them be together in the illustration [laughs].
1992 Monthly Asuka October Issue, Bonus Poster Illustration
Paper: BB Kent (Rough Surface)
Lines: Holbein Color Ink (Special Black, Gray)
Color: Acrylic gouache, Dr. Ph. Martin's Color Ink, poster. color, Liquitex
This image was drawn to be printed upon a rather unique type of paper; I hope it comes through in the actual printed illustration. I love drawing Kamui and Kotori together.
1993 Monthly Asuka January Issue, Title Page Illustration
Paper: Sand-textured paper
Lines: Photocopied pencil lines
Color: Or. Ph. Martin's Color ink
This one is the result of a bold challenge (laughs). Ohkawa brought up the idea of drawing the illustration as if it were a reflection upon the water, so I did it. The texture of the paper made it fun to color the piece.

1993 Monthly Asuka December Issue, Cover Illustration
Paper: BB Kent
Lines: PIGMA Graphic ink pen
Color: Dr. Ph. Martin's Color Ink, poster color, Liquitex
The pattern on Arashi's obi was far more difficult to do than the kimono itself (laughs). But it was fun to work on. It's a pseudo-Japanese fantasy look, I guess (laughs).
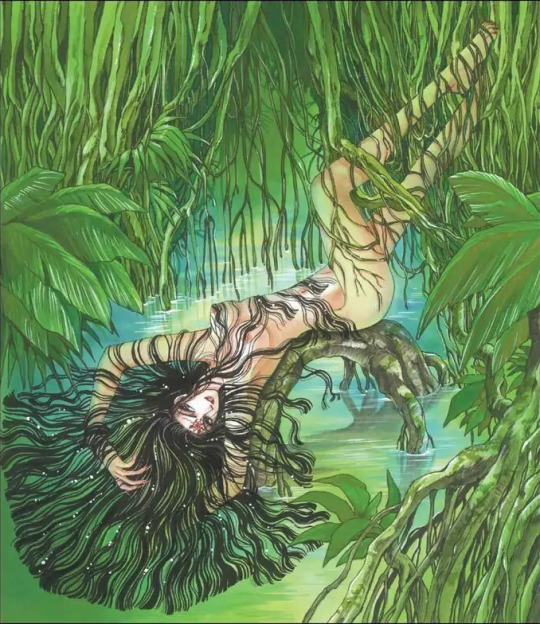
1993 January, X Volume 3, Cover Illustration
Paper: BB Kent
Lines: PIGMA Graphic ink pen
Color. Dr. Ph. Martin's Color Ink
Since green was the color selected to be the theme for this illustration I immediately decided to draw a jungle [laughs]. I had this image in my head of Kanoe as queen of the jungle.
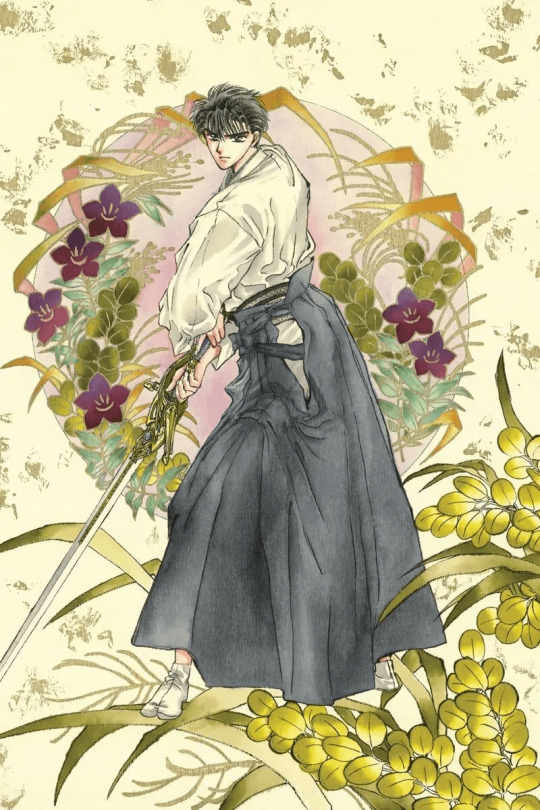
1993 X Calendar Illustration
Paper: Shindanshi paper
Lines: PIGMA Graphic ink pen, brush pen
Color: Dr. Ph. Martin's Color Ink, poster color
Fuma's in the kendo club, so he's wearing a hakama. But he's holding a the Sacred Sword laughs!! I used the texture of the paper to create a kimono-like pattern in the background.
[Ed. Note: Shindanshi is a type of paper created to have the same roughened surface texture as traditional, handmade Japanese washi paper.]
1996 Monthly Asuka February Issue. Cover Illustration
Paper: Watson Paper
Lines: Holbein Color Ink (Special Black)
Color. Dr. Ph. Martin's Color Ink, Copic marker, Liquitex.
The main outline is drawn in aqueous ink, which I diluted with water before using. The background tone is a mixture of yellow and orange; because this is an illustration of Kotori I wanted it to have a warm and cute feeling
[Ed. Note: Watson is a brand of Japanese paper good for watercolor use.]
1993 X Calendar Illustration
Paper: BB Kent
Lines: Color pencil, pencil
Color: Dr. Ph. Martin's Color Ink
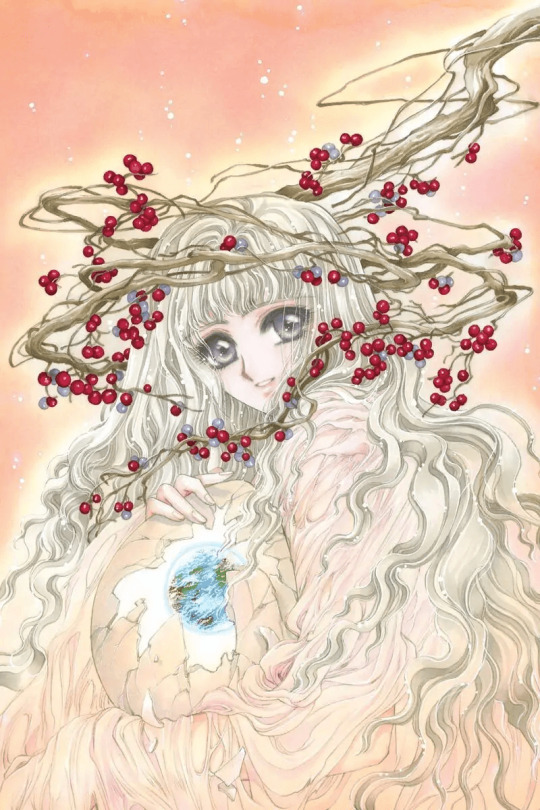
The illustration concept is the birds and Kotori together. [Ed. Note: Kotori's name means "little bird.”] Most of the illustrations for this calendar were created specifically for it, so I remember drawing this in a hurry (laughs).
1993 X Calendar Illustration
Paper: Feather Waltz
Lines: Holbein Color Ink (Special Black)
Color: Airbrush, Dr. Ph. Martin's Color Ink, Liquitex
My image of Hinoto. I've included all the familiar motifs in this. The colors of the illustration have been slightly altered to fit the base tone of the paper
[Ed. Note: Feather Waltz is a brand of Japanese paper that has little, feathery white flecks embedded in it.]
1992 October, X Volume 2, Cover illustration
Paper: BB Kent
Lines: Holbein Color Ink (Special Black), PIGMA Graphic ink pen
Color: Dr. Ph. Martin's Color Ink, poster color
An image of Hinoto trying to scoop up the moon from water. The color scheme is purple, so I gave her eyes a tint of purple too.
2 notes
·
View notes
Text
more blue lock art owns here’s a cool panel. kaiser leaves after a speech about which “king” to choose, him or isagi. this is before v.england but it’s actually secret v.italy foreshadowing

kurona’s back is turned, he’s slated to choose isagi. the future v.italy aka the fight to choose the king has raichi hiori and isagi as key players and here they’re conveniently grouped together. the panel is carefully drafted so that yukki igaguri gagamaru aren’t visible, so the omission supports the argument that this panel is about v.italy and not the upcoming v.england (where yukki is key)
a few more things first kaiser is half-naked. since i think kaiser became the “naked king” at the end of manshine match (isagi stole kaiser’s meta-vision, “rationality”, and created his own system to rival/beat kaiser’s, then an isagi-appointed yukki became the team’s new sword), kaiser being half-clothed in this scenes fits with how in v.italy he begins the fight symbolically naked and clinging to the vestiges of his ruined system
second is the blue lock towel on kaiser’s right shoulder which is really cool. the scene takes place when the main conflict is still a dominant kaiser system vs. the struggling blue lock system but kaiser in this panel wears both his tattoo (his dream and ideal) and the blue lock item as if they were equally balanced. in v.italy kaiser adopts the blue lock system to score and thus becomes the king who comes back into the fight by combining his og ideal (”believe”) and the blue lock way making him a hybrid of two forces. the foreshadowing game on display here is disgusting this is what experts call the Blue Lock Difference
third is that it’s sus how kurona (the first to choose isagi, and his main partner) is drawn so that he’s facing away from both would-be kings, because you’d expect him to be drawn “with” isagi as his most reliable ally. raichi and hiori are naturally isagi-leaning but if they were slated to choose isagi over kaiser definitively i don’t think it makes sense to separate them from kurona so obviously. it may conversely imply that they’ll be more independent/neutral? but even if they do choose isagi it’s still scary that all three are visually framed by a tangle of rose thorns
lastly kaiser is my special boy so i need to point out that he’s a handsome young lad. if nomura was willing to draw nipples this would be a perfect image
#when i think about blue lock art i become a lizard scratching their way up the side of the empire state#kaiserposting
3 notes
·
View notes
Text
Web Page Design Templates - Keep It Uncomplicated
It seems that everybody knows somebody that does "website design". The term can refer to anyone from a significant school student working on the weekends between book reports for established professional website designer. Because of this, you need to be attentive when choosing a website design company. Choosing Evil Genius 2 World Domination plaza or firm can mean the difference between having a website that turns out sales and winding up with a website that turns off customers. You need to attempt your due diligence when you sit down with your designer (or web design firm) to ascertain the level of competency and professionalism they have. It significant that business owners ask factors five questions in your initial conversation with any potential site design firm or individual.
I have long sung the advantages of working by using a web design firm that actually knows rewards of caffeine of Online Optimization (SEO) and its practices. Many firms will say they create SEO friendly websites, but the only optimization on times are two different people meta tags that give virtually no value. This isn't and never has been SEO! It is rare to locating a design firm that truly understands the way to optimize sites and can cause powerful SEO websites but this combination of talents truly separates that web design firm via rest of your pack.
Stock photos - Some are free, some requires you to pay a specific amount before to deliver high resolutions image. Circumstance your client offers the money presently there are suitable photos nevertheless like to use, some of the ways to go. Searching in Google for "stock photos" will provide you plenty of results through this.
Some serves look very promising straight up. Evil Genius 2 World Domination Codex that is exactly entering the wild regarding online advertising may find nothing wrong with his hosting little. Now it gets to a point where enterprise would in order to start selling online and promote his services through having internet blog together with bigger better web website is required. Therefore, he pays the regular web design person in order to complete the website and host it where it was all time. The business and site gains hacker attention and is down three out of five days! Make very sure your server is procure. If Evil Genius 2 World Domination CK keys Free have to, get your online design done and host it on the server as a probation amount. If you are not happy, make use of your backup copy of your internet design and now have a reputable hosting company to move the web sites for a.
Having a good and suitable color theme on your online design will give users a pleasing experience while surfing along with web site you design. One of the important techniques is for almost any color chart from community art store or use some color chooser tools to help in your color selection. Your color theme will change up the mood and feel you want to create.
You understand! Too much power is given to the particular design manufacturer. I truly believe that it is your right to buy better prices and correct right to get the your site even for didn't have a hand in registering your domain name.
The fundamental aspect in the design, however, is nicely survey. Supporting a guess from the size and shape of one's landscape can be a huge misunderstanding. You can still create an elegant design yet if it doesn't fit the space, anyone would have wasted your time. Good design entails fitting together the aspects belonging to the entire area as one unit. Therefore, if the particular area to be able to be amended, it will have repercussions for your rest from the design as well.
Remember, creating a business logo is in order to mention be taken lightly. The check list should be gone through and check if the progress of the present business logo is mandatory. Once you have ascertained that the change can be a must a person need to obtain a logo for find enterprise, you specialist that you a professional business logo designer to try to do the work.
2 notes
·
View notes
Text
Crab Nebula (WIP)
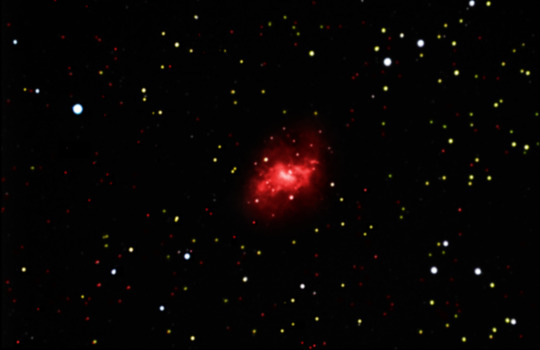
This is a work in progress image of the Crab Nebula. This product derived from four black and white images taken through filters which allowed for different colors of light through (red, green, blue, and all luminance) that were edited together in Adobe Photoshop. Photoshop, while most often used to tune photos or create basic images, is a powerful tool that can be used to make amazing high-resolution works of art including astrophotography. Initially, to all four images, I increased the brightness to a point that emphasized as many stars as possible without blending them too heavily to the background. Then, I edited the contrast with the curve tool - shifting the curve into an 'S' shape - to separate the stars and nebula from the black void of space. When using the curve tool, I like to start with Photoshop’s “auto” option to see what its program thinks is the best option, then adjust it from there. To combine the images, I used the one with the most prominent features as a base then added transparent layers over the first image with the other three. I selectively emphasized interesting features with a "draw select" tool then blended background colors so all the images would seamlessly fit together. To color the image, I created a blank layer over the existing layers and set the blending mode to soft light. Then I set the drawing tool to the overlay blending mode and drew over the image with the colors I found appropriate. I attempted to color them based on research and the sizes of the stars - but due to my colorblindness it may not be "correct". Early in the semester, we learned how the color of stars is determined by temperature and age which caused me to mistakenly associate size with color as well. Some examples of calibrated images I saw seemingly had size-based coloring, so I think the creative liberty I chose is fitting for the image I created. Initially I had difficulty emphasizing the gasses around the nebula, but I re-layered one of the original images on top of my progress and experimented with exposure, contrast and tone (to make the overlay appear as natural as possible without overshadowing my progress) until I had it better defined. Some parts of the image looked unrealistically grainy or sharp, which I solved with a soft gaussian blur. To differentiate between the blur of the nebula and the stars, because I wanted the stars to be more dotted rather than blended, I used the “draw select” tool again to isolate the nebula. When the blurred spot looked unnatural in the center of the image, I used a blend tool to smoothen out the transition between the nebula and the stars.
I am particularly happy with how it turned out so far, especially the nebula itself. I like how I managed to maintain the small details in the middle. As I continue to work on the image, I would like to improve on emphasizing more stars on the left-middle portion of the image. Overall, I’m impressed with what I’ve achieved so far and I’m curious about whether I will be able to improve upon it.
1 note
·
View note
Last Seen Blogs

mentefisicaradio-blog
Mente Física

mossycat
we're all damp here

booksandmore
more, more, more
laughterfixs
Tickling All The Characters

andreashaki2021
Andrea Doble de Shakira