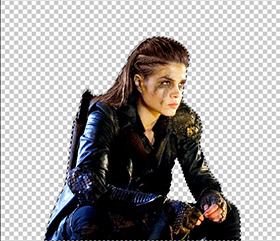
#sorry if this sucks photoshop keeps deleting all my settings :(
Text
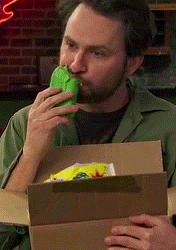


charlie kelly - season 16
#iasip#it's always sunny in philadelphia#charlie kelly#charlie day#my gifs#s16 spoilers#sorry if this sucks photoshop keeps deleting all my settings :(#gonna be real... i know they were prob trying to balance things out bc s15 had a bunch of charlie stuff#but man there werent enough good charlie moments this season :(#(or at least not stuff i really enjoyed)#i have a dee one coming up tomorrow (not even gonna get into how much worse this season was for her)#& then i think after that im taking a sunny gifmaking break for a bit#i love making these (and im planning on coming to them eventually) but theyre a lot of work#and tbh ive been thinking i need to spend less time on tumblr/sunny stuff bc im just not having as much fun as i used to#& i know i'll enjoy it again eventually tho bc my brain likes to cycle thru the same 5 interests year after year (lol)#just have 2 get there again!!! which might take a bit of time#might still be on all the time. might not.#might be a little more multifandom might make gifs or fanart for other stuff (dont wanna scare everyone off tho)#idk at this point but i felt like i needed to get it out there ya kno#kinda gotta figure out some things. like how to have an actual social life & finding time to make art & not feel overwhelmed all the time.#speaking of art maybe i'll start updating my art blog lol#anyway... gonna be fun when i do come back to these to try to find them to add the links
72 notes
·
View notes
Text
GIF Tutorial for Beginners
People keep asking me to teach them how to make gifs and I end up writing them long confusing messages, so I figured maybe it’s time to just write up an actual clean tutorial instead! This is supposed to be for total beginners! (Or people who want to switch to a new process that I’ve curated and streamlined over 8 years of making gifs.) I’ll try to keep this as barebones as possible, and won’t include all the advanced stuff I usually add. I hope it’s easy enough to follow, and I’ll include some links at the end for more stuff. I really do think it’s better to make a few simple gifs before doing more complicated stuff though, just to get used to it!
There will be three sections in this tutorial:
#1 Basics - How to make a gif in PS at all
#2 Sharpen - How to use sharpen/denoise filters in an easy way
#3 Colouring - Just a few very basic adjustment layers
What you need:
A video (most common formats should work, although .mkv doesn’t always)
Photoshop (I use PS CC 2018 - this one because I'm morally opposed to Adobe’s subscription model - but versions aren’t super different from each other)
In the end, you should hopefully be able to make something like this:
This is gonna be so long. Sorry. You can make a gif with just part #1! The rest is just to make it look better.
#1 Basics
If any of the tools/functions aren’t where they should be for you, your best bet is googling it, you might need to change something in your preferences!
Make sure to save your PS file... often. PS has a tendency to crash, especially on laptops.
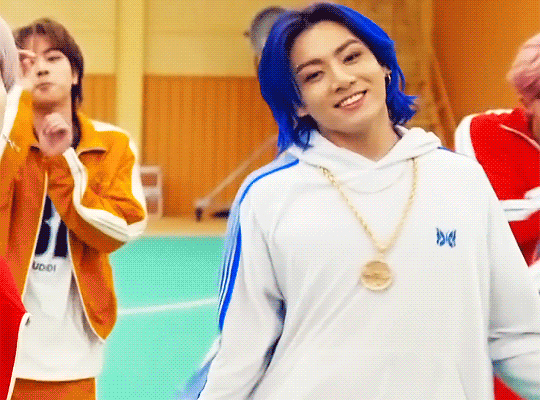
First, you need to get the video file. I recommend a shorter video, a few minutes long, if it’s longer you might want to cut it into shorter parts beforehand. This is just because PS’s video import tool sucks.
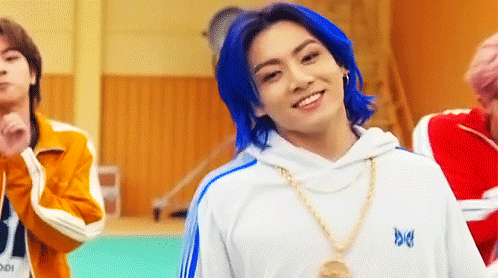
I chose the Butter MV, specifically Jungkook’s body roll at 1:24 because that’s what I want to look at for the duration of this tutorial. No further questions, thanks.
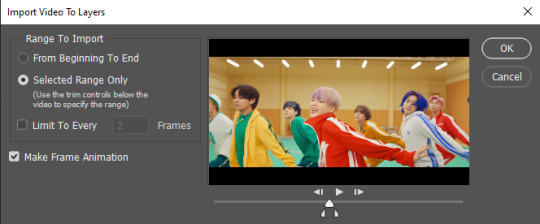
1. Open PS, go to File > Import > Video Frames to Layers

2. In the little pop-up, choose the part of the video that you want to gif. This will import every frame of the video into PS as a layer, so it has to be a relatively short part, or it’ll take ages (and gifs can’t be that big anyway). Now you can also see why it’s almost impossible to select the correct part if the video is too long.
The little controls at the bottom are for trimming, the one in the middle just for the preview. Make sure “Make Frame Animation” is selected! Then click OK.
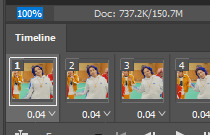
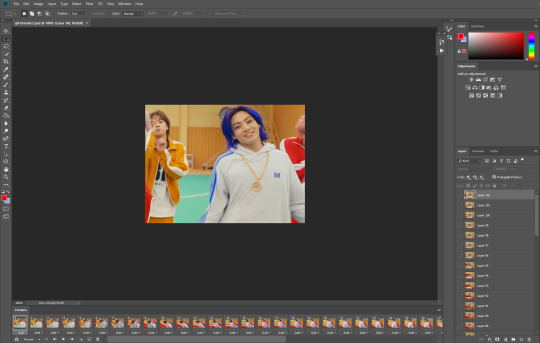
3. Now you have your layers, and you have a frame animation! On the right are your layers, that’s where we’ll apply the colouring etc. later on. On the bottom, that’s your timeline or frame animation - that’s what the gif will be in the end! So if you delete frames, the layers will still be there, but they won’t show up in the gif. If you click on a frame, you can see the little eye checkmark on the layer that’s currently visible.
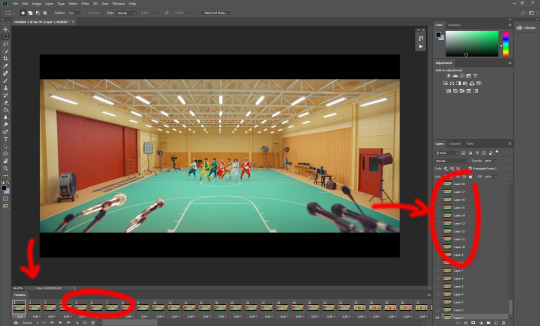
4. The timeline controls at the bottom that are relevant right now: set to “forever” so the gif will loop, you can play the animation with the play button, and you can delete the selected frame(s). The number on each frame is the speed of the gif, depending on the video I usually set it to 0.05 or 0.06 (photoshop lies to you when you play the animation, the only way to test this is to open the finished gif, preferably on tumblr or wherever you want to upload it).
5. As you can see, the animation starts a bit before the actual part that I want, so go ahead and delete all the frames in the animation that you don’t want! You can delete the corresponding layers too if you want, to make the PS file smaller, but it has no influence on the gif. (Hold Shift to select multiple frames as usual)
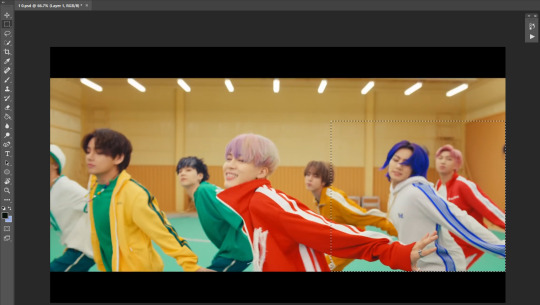
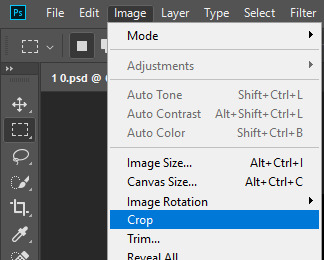
6. Next, we’re gonna crop the gif however we want! You can do this with the crop tool in the left sidebar, but with gifs like this where there’s a lot of moving parts, I sometimes just use the selection tool in the left sidebar, like so:
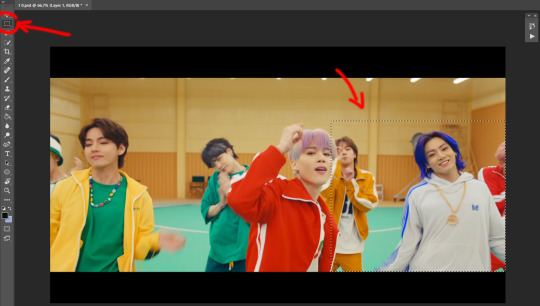
When you click on different frames, the selection stays, and you can check to make sure Jungkook doesn’t suddenly go out of frame if you crop it like that!
At this point, make sure the selection/crop isn’t smaller than you want the gif to be! For tumblr, what matters is the width (in pixels) of gifs. In the end, the width dimensions on tumblr should be 540px (1 gif per row), 268px (2 gifs per row), or 177/178px (3 gifs per row). Anything else will lead to very shitty resizing!
For this gif I’m going full sized, meaning 540px wide, so I made sure my selection isn’t smaller than that.
Then just go to Image > Crop, and it’s done!
7. Check to see if this is what you want, then resize: go to Image > Image Size to resize the picture. Make sure the little “link” between Width and Height is active (to keep the same aspect ratio), then set the width to 540px or whatever you chose. I always set the resample option to Bicubic.
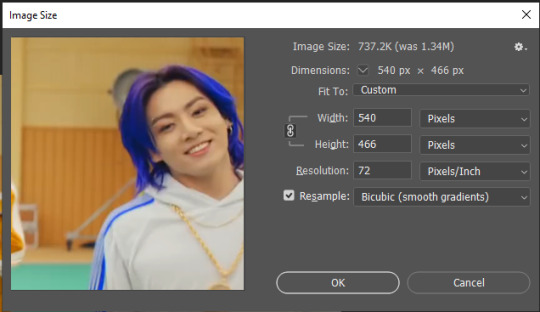
Once that’s done, set the zoom to 100% right above the timeline, to see what it really looks like.
Almost done! A little note about the sizing: width is the important part for tumblr, but if you want to make a whole gif set (especially with more than 1 gif per row!!!) make sure to make all the gifs the same height, otherwise they won’t line up and tumblr will do whatever it wants.
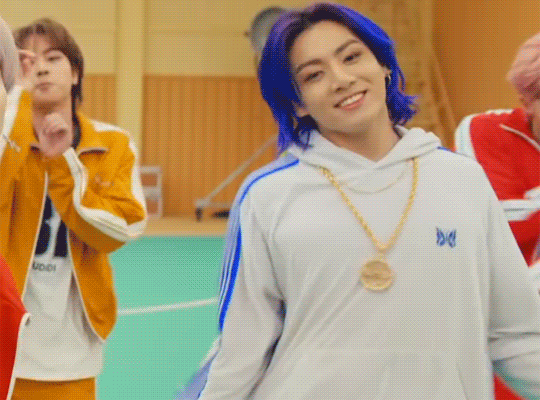
I ended up making mine 540 x 400 and ended up with this:
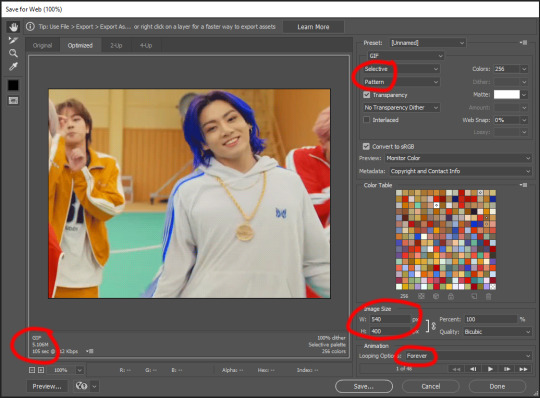
8. Time to save the gif!! Go to File > Export > Save for Web (OR just use the shortcut Ctrl + Shift + Alt + S) (or whatever it is on Mac).
In the pop-up, you can change things about the gif, but most things should already be the way you want it (Image size, Looping option forever). Selective should be the default, just like the rest.
You can choose between Pattern and Diffusion, some gif makers swear on one or the other, I go back and forth.
On the bottom left, you can see the size of your gif. Keep an eye on that! I believe Tumblr allows every single gif to be up to 10mb, but I try to keep mine under 5mb or close to it, because I think tumblr adds compression if it gets closer to 10mb?? Anyway back in my day you couldn’t upload anything over 1mb. You’ll never know our struggles.
Then just save it, and that’s it, you made a gif! Well done!! Here’s the end result:
:)
#2 Sharpen
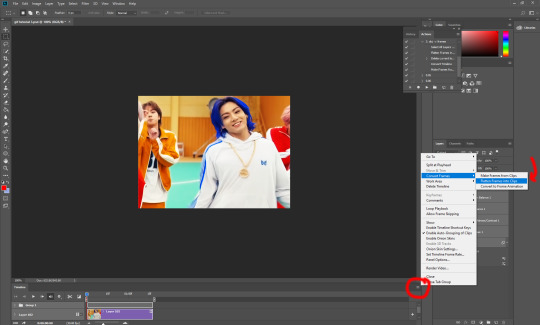
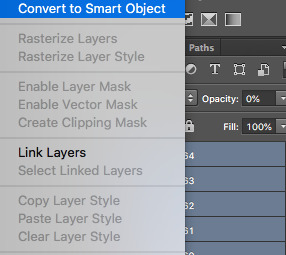
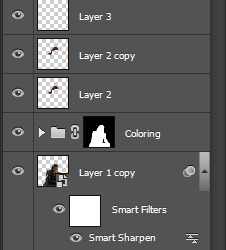
There are countless ways out there to make gifs as smooth and clean as possible! Here I’ll show you the easiest way, but it also provides a good basis for other methods. The main difficulty is that you you need to sharpen the layers, but you don’t want to 100 layers one by one. So what we’re gonna do is convert the layers into a Smart Object, which functions as one layer!
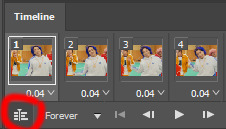
1. Convert the frame animation timeline to a video timeline with the little button right underneath on the left:
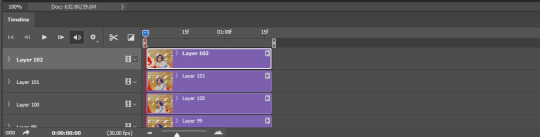
It should look like this, and I’m sorry but I can’t explain this one because I’m not an expert here, but you can just ignore it:
2. Select all layers: Select > All Layers, or just manually.
Then right click on the layers > Convert to Smart Object. Now there’s only one layer left, but don’t worry, the frames are still there!

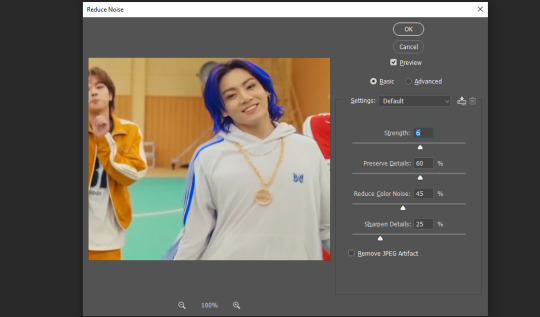
3. De-noise! It reduces noise, takes away some of that grain. More necessary in some videos. It also makes it less sharp, so I do this one first. Filter > Noise > Reduce Noise

My default settings are, Strength: 6, Preserve Details: 60, Reduce Color Noise: 45, Sharpen Details: 25, Remove JPEG Artifact: No. But you can play around, especially with the strength, and see how the little preview looks. Don’t apply too much of it! Or it will look weirdly smooth with no details in the end.
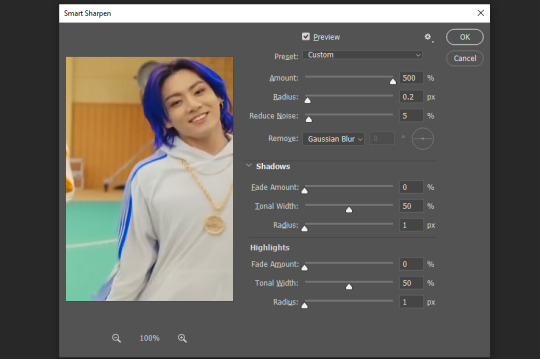
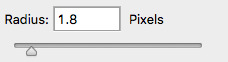
4. File > Sharpen > Smart Sharpen.
Settings: I usually have mine at Amount: 500, Reduce Noise: 5, and Radius at either 0.2 or 0.3, depending on the video. I’ll actually do 0.3 here, because I find it a bit blurry otherwise. If you sharpen more, it can quickly get grainy.
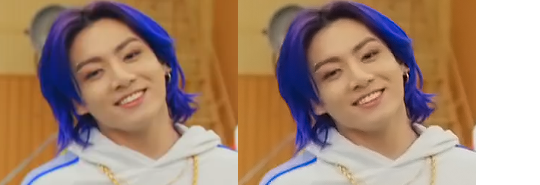
The difference isn’t huge, but here’s a little before and after denoise & sharpen:
5. Technically you can just save it as a gif (save for web) as shown above now, or you can convert it back to a frame animation, which I’d recommend especially if you use certain other sharpening methods (I’ll show you how to convert it back at the end of the colouring part), but for now, let’s go straight to the next part:
#3 Colouring
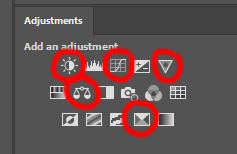
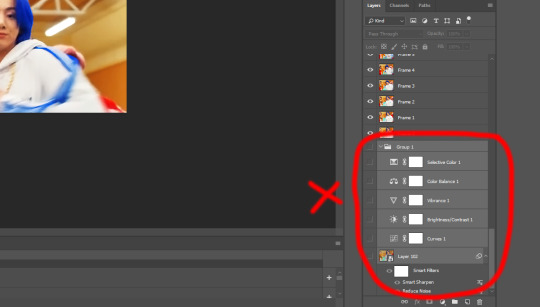
Now, you CAN do this part right after part #1, still in frame animation, without a smart object. I prefer it like this because sometimes PS acts weird, but if you want to skip the smart object stuff: select all frames, and add the adjustment layers at the very top, above all the other layers. (It only affects selected frames; and it only affects the layers under it.)
The adjustment layers should be above the layer tray, and these are the ones we’ll use today: Brightness/Contrast, Curves, Vibrance, Color Balance, Selective Color.
All of these are optional! You can do one, or all, or any combination. This is just the very most basic for me to get a gif to a point that I like. I’d recommend sticking to these for a start, but once you get the hang of it, definitely feel free to play around! It’s fun! Every gif maker has different preferences here, too, so there’s tutorials for everything.
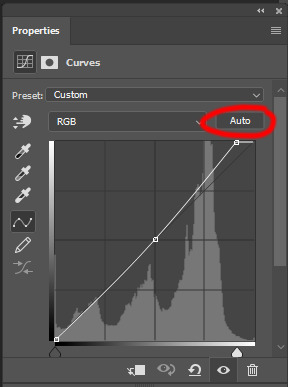
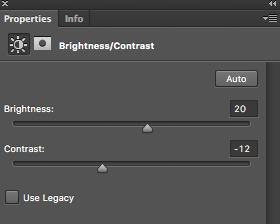
1. Curves: Just click Auto, tbh. You can play around, but Auto works fine for me as a start, just to brighten or darken some parts as a base.
2. Brightness/Contrast: Usually videos are a bit dark, and contrast can help to make it seem sharper AND cut down on gif size, so I usually just up both of them a bit (but not too much! Or it’ll look cheap). Here I put them at B: 19, C: 23

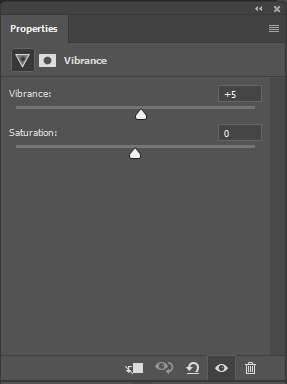
3. Vibrance: I love very vibrant and colourful gifs, so I usually up the vibrance (and sometimes the saturation). This one is already very vibrant, so I only put +5, but if you try to colour, say, a very moody tv show, this can help wonders, especially if you want to work with the colours more later.
If you prefer less vibrant gifs, you can also lower the values here!
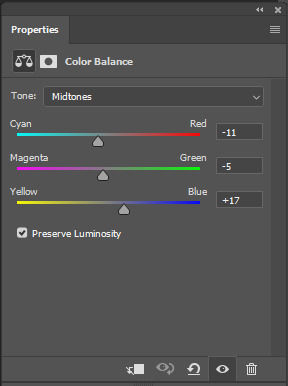
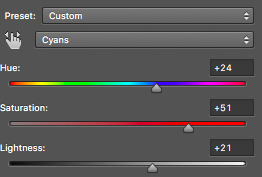
4. Color Balance: getting a bit more complicated now. Often, videos will have a slight yellow or green or blue tint, and this is where you can correct that. This video is a bit yellow, so I added +17 Blue. It was still too warm, so i added -11 Cyan as well. This neutralized the yellow tint, but I wanted some of the reddish tone back, so I added -5 Magenta. I usually do a similar process like that, depending on the tone.
Instead of Midtones, you can also do this for Shadows and Highlights individually.

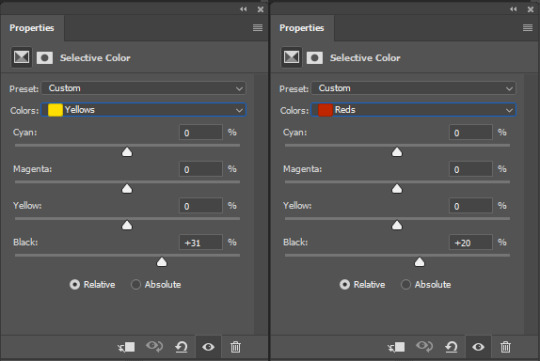
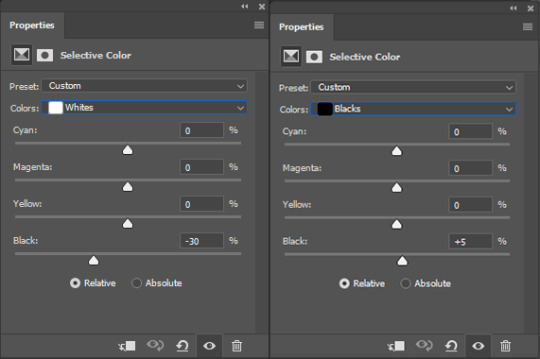
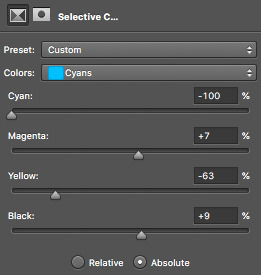
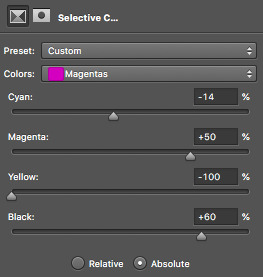
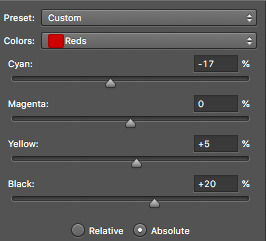
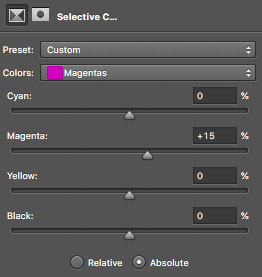
5. Selective Color: now this is the most complicated, but also the most fun to play around in my opinion! Be careful here, if you do something too extreme it’ll look like shit or make the gif super grainy. I some rough goals in mind here: make the blue hair as blue as possible, make their skin tone a bit less pale, and enhance the black and white (which I always do).
You choose a colour at the top, and then add or subtract cyan/magenta/yellow/black values for that colour.
Skin tone: yellow and red. For this gif, I just added black to both, making them darker. Sometimes, if you change one or both those colours for a different part of the gif (for example, if I wanted to make the background less yellow, I’d subtract yellow from the yellows - but then I’d add yellow to the reds, to make the skin tone natural again.)

Blue hair: Just ramp up the cyan for the blues. Be careful with putting anything to +100, but here it’s already so bright that it should be fine. His roots are more purple, so I changed the magentas by adding cyan and black, and subtracting magenta and yellow. It’s not super clean, but fine for our purposes.
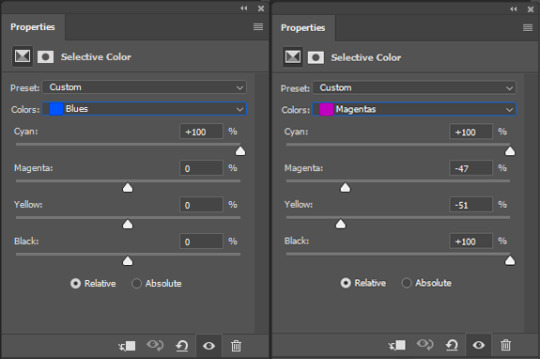
Black/white: depending on the gif, I often either add or subtract black to the whites. Adding makes the highlights less blinding, a bit darker, and flatter (I like to do that if one side of the face is bright white in the sunlight, for example). Subtracting creates contrast, makes it brighter, can wash it out. It can also lessen the gif size, and here it’s mostly just the tracksuit instead of important details, so I subtracted black. For the blacks, I almost always just add a bit of black, to make it more intense. Just like adding contrast, this can make the gif seem sharper and less grainy.

And done!
6. You could just save it as gif now, but as I said, I prefer to convert it back to frame animation timeline first, if only because I like to let it play through before I save it, and it works better for me there than in the video timeline.
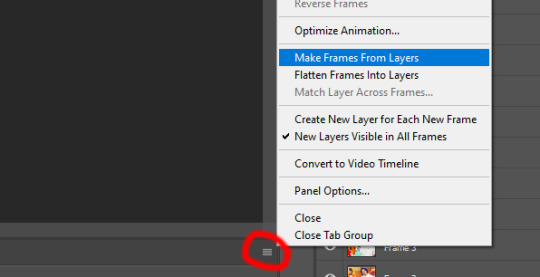
Select all frames, then click the little menu on the top right of the video timeline > Convert Frames > Flatten Frames into Clips
7. When you scroll down to the bottom of the layers now, the old smart object + adjustment layers should be at the bottom, under all the new layers. Delete the old ones, we don’t need them anymore.
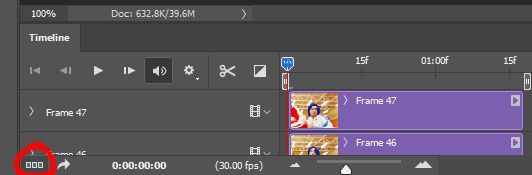
8. Convert the timeline back to frame animation, by clicking the little button at the bottom left of the video timeline:
9. Click on the menu top right of the timeline again > Make Frames from Layers
10. Now, just some potential cleaning left to do. Sometimes, there’s a doubled or empty frame or layer at the beginning or end, just delete those as necessary. The timing of the frames is probably off, too, just select all frames and set the delay time to 0.05 (or whatever).
Now your done! Save as gif, and you should get this:
I included some bonus links and tips after this but tumblr ate that whole part so I guess it’s going into a separate post. (Here is is)
Anyway, I tried to make this as easy to follow as possible for beginners, but feel free to send me an ask for clarification anytime. Hope this helps, now go make gifs and have fun!!
#photoshop#tutorial#gif tutorial#ps tutorial#btsgif#*#*tutorial#this took so much longer than i expected i'm not giffing for at least a week now
225 notes
·
View notes
Note
Hi Lati :) I'm a huge fan of The Rivers! I read in one of your responses to another ask that you record with FRAPS on a low-end laptop, but your videos always come out flawless! Whenever I try to record let's plays like this, I always come out with lag. May I ask for some of your tips for avoiding lag when recording? Thanks for all your amazing work :)
Hiii! I am so sorry I am just seeing this, I havent looked at my tumblr notifications in so long! I hope these tips can still help even though they're so late! But thank you so much 💖💖💖 I really appreciate it!
Tip #1. Keep the downloads folder small: For me, I feel like my game lags less the smaller my downloads folder is, so I make to sure to keep at least my gameplay folder small. A great tip ive been using to do this is to go into my game and delete swatches I dont care about. If you use pooklet recolors of hairs especially, you'll find that each hair color (Black, Brown, Blonde, Red, and Grey) usually come with 3+ swatches. So after downloading a bunch of hairstyles, I make sure to go into my game and keep 1 swatch from every hair color. That way, the game goes from 15 swatches of the same hair to just 5! It has helped me sooo much, without forcing me to abandon hairstyles that I like. The same with clothes: when a shirt, for example, would have 5-10 swatches, I make sure to keep just my 3-5 favorites! Does wonders.
Tip #2. Keep the sets simple: With filming, I've found that sets that are heavily packed with CC drop my FPS (which causes lags) way more than sets with simple CC - so i make sure not to go overboard. I know you asked as a lets play player, but just incase any machinima filmers are reading this, here's a trick i do: Instead of building huge sets, I film little boxes that are decorated from the inside and not at all from the outside. Take a high school set, for example. If I want to film in a classroom, I'll just build that classroom instead of a full on school with exteriors and unnecessary rooms that I won't use but would otherwise be found in a school like hallways. And, if I need an exterior shot, I'll just build a seperate lot that I wont mind how big it is because ill just need for that one shot. Its basically like real life shows, where they film exteriors of homes for example, but the actual set is just in one of those warehouses? Hope that makes sense. As for lets players, I would suggest to keep things simple and confined to one floor! Don't go overboard with CC, though I for one LOVE a cluttered house :'( But we gotta do what we gotta do!
Tip #3. Keep the neighborhood simple (or remove it all together): As a lets player I would of course recommend that you keep it simple as opposed to removing it all together, since that would look terrible for gameplay. Of course, its sad because a nicely decorated neighborhood does wonders for that "open world" feel that Sims 2 is missing, but ive found that doing too much CC wise in the neighborhood lags the game terribly. Also, you can turn off your neighbors while keeping the decorations on. I've found this to help immensely, especially in neighborhoods that have a lot of sims living in it. As long as you decorate your neighborhood right (while not going overboard), then you wouldn't even be able to tell the difference - except when it comes to the lagging! I havent played a game with neighbors on since those sims 4t2 deco homes were converted!
For machinima makers I'd go one step forward: If you have scenes that are inside, turn off your decorations all together! Instead decorate around any windows your set might have, and even use one of those mural CC thingies of landscapes should your series be set be in a city. I cant remember the last time I filmed an interior scene with neighbors + decorations on!
Tip #4. Dont overwork your laptop: Make sure you dont have other "demanding" programs open while you try and film. For me, I've found that the game lags a lot more when the laptop is being overworked and getting heated, so closing programs like Sony Vegas (or other video editing programs) and Photoshop (or other photo editing programs) helps a ton! Really, I make sure to film with just the game and FRAPS open
Tip #5. Lower the quality: Push comes to shove and you've found that your computer just isnt handling it? Lower the quality of your game. Nothing drastic of course, nothing that would compromize your quality too much, but some small things like turning off shadows, for example, can come a looong way without making the game look too weird. And, if you do use it, stop using reshade. As a machinima filmer, this is my last resort when everything else I've tried hasn't worked: to stop using reshade and edit post filming. It sucks, but we can make it work :')
I'd also recommend looking up other programs should the screen recording program you're using not work with you. I personally have found that Fraps is the most user friendly, and I cant be bothered to learn new programs, so its what I stick to, but there are other alternatives that people swear by (i hear a lot of sims people recommend Bandicam because Fraps lagged too much for them, so you can always check that out). Hope these helped, and again I'm so sorry for not seeing this sooner! 💖
6 notes
·
View notes
Photo
but before i go looking in the tags, let’s talk about my latest gifsets!
what a worker bee i was both yesterday and today with prodigal son AND loki <3 never have i created so many gifs in a short amount of time it’s a damn miracle that my photoshop didn’t straight up cough up blood and keel over. alas, us bitches are stronger than that! if this post gets flagged because of the scenes i included....that would just mean that i made the right decision to exclude those scenes ajsdksajkldsa
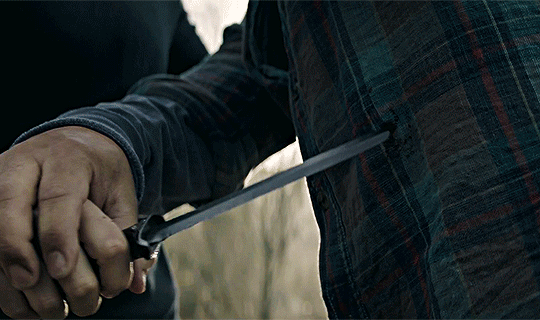
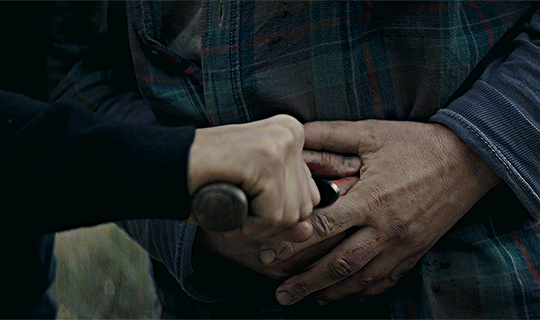
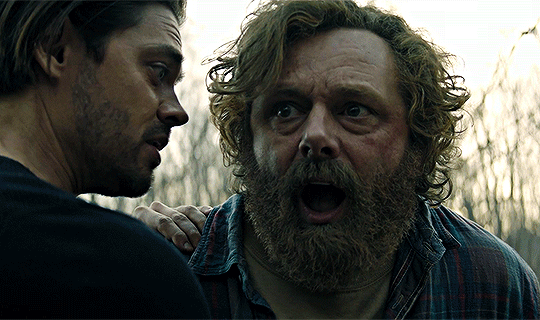
malcolm stabbing martin
when the episode finally downloaded, i took a peek at the ending before it aired to see how it all ends (just in case it doesn’t get renewed </3). GOSH, was i just in a TIZZY when i saw this happen and i couldn’t tell my dad what i saw because we were straight up watching the show as it aired. anyways, keeping my secret knowledge, i got to work on making this gifset. i missed a huge chunk of the episode bc it took me over TWO hours to make the six gif set. i was really torn on the “artistic” approach aka which scene to gif and which to leave out. because i saw the ending before anything else, i couldn’t play it out loud and i didn’t have my headphones to listen so i was like FREE FORMING THE SUBTITLES. plus the captions weren’t synced up so it was really hard to decipher what was being said :(
i really thought i would be able to create the set before 9 but i was running into unforeseen issues such as the subtitle problem, which on top of that, like i said earlier, my photoshop is c/racked and janky so....you catch my drift. i was actually going to gif the bisexual moment in the cafe which i think would’ve been MUCH easier but i jumped the gun and wanted to make the gifs of the shocking ending. funny part about that is the shocking part wasn’t even included in my set (malcolm driving the knife into martin) because i felt like the scene was too short...anyways, let’s talk about the positives:
i really do like the coloring of this one. i used a psd that i’ve used before and luckily it’s meant for outdoor scenes with greenery so the gif really popped. sharpening, buddy ole pal, love you sm. the caption was kinda last minute but i hoped to save it with the gradient. cropping was a bitch because for some reason, it takes forever when you’ve made multiple gifs beforehand (cache innit) pero we pulled through! i actually started not saving the psd files to try and save time which is very unusual for me pero i was getting frustrated with photoshop so i was like y’know what....so i just gave up entirely and stopped saving. i do save when i’m taking my time but jeez, it’s a bad habit. i like saving the psd file because i never know if there is a mistake i missed in post and when i go to publish it, it’s blatant and it needs to be fixed. please, save your psd files idc if it takes up space u can just delete them later. IT HELPS !! TRUST ME!!
first & “last” appearance
i actually premade gifs for this gifset! unfortunately, i didn’t realize that three of the five gifs were the wrong size (pictured above) because i flipped the ratio. instead of 268 x 250, i made them 250 x 268. i don’t know HOW i managed to fuck that up but luckily i saved the psd files (wink, wink) so the coloring was still intact. i think i had to restart photoshop or it was getting too late so i picked it back up in the morning. sucks that i had to remake the entire gif from scratch but we will take some wins xx
coloring is the same with the previous gifset (listen....it’s a good coloring) and i actually did have an alternative coloring that was very warm pero i didn’t end up using it. almost melted the two with the “last” appearance of gil but ultimately didn’t go through with it. also i was thinking of using baby malcolm as the first appearance because technically, that IS his first appearance in the show but i was like...just use adult malcolm lol. also i know that scene of dani isn’t the “first” but the first scene she has goes really quick and she is planked by gil so there isn’t much of a solo (even though this scene isn’t much of a solo either pero it’s better than the former). the lighting is weird in this episode and my coloring tried their best :/ i know gifmakers make each gif a diff coloring pero i’m lazy okay and looking to be time effiencent. another slight tangent is that i actually queued the post for the morning but since i woke up to a storm, i was like, i’m here so i’ll publish it myself.
other than that...i didn’t run into any other problem. i was actually hesitant to make the caption that because i wasn’t sure how to really describe the team. i have poor memory so if there was ever an official name, i do not remember it. i did a quick google search pero it turned up nothing. i stuck with “dream team” because, well, that’s what they are. plus i didn’t want to tarnish the gifset with any mentions of p/olice (i was thinking about putting sumn along the lines of ‘the nypd team’) so DREAM TEAM IT IS because it’s true! you cannot have the show without these five! also, i should’ve used quotations on “last” because there is a bunch of talk about a renewal pero...just in case... sorry y’all :/
odinson brothers parallels
this was made in the spur of the moment. i saw that the teaser trailer with shirtless loki dropped in hd, i came A-RUNNING! it was posted like 47 minutes after the fact and i was like...somebody probably already made a gifset of the scene so i was like...gosh, to make the gifset or not all the while i was trying to download the video. trying because again, this was in the middle of a storm so my wifi was acting up and wasn’t at its strongest (whatever that may be). so i was getting frustrated because neither cc nor 4kdownloader was downloading this small one minute clip. that’s when i knew i was gonna be too late to make the loki gifset so i was like whatever ig...
then i had an idea.
i love parallels so luckily it hit me that this paralleled with thor and how his hair got chopped off. so, i knew i had ragnarok downloaded and got to work <3 wasn’t sure what dimensions to use so i went with 268 x 268 to make perfect squares. because the loki scene was short, i could only make three so i was like..okay, i can work with this. three for loki, three for thor, they’re brothers and they share! i wasn’t planning to add subtitles but i had written them down for the plain gifset so i was like alright, we’re going all in. i didn’t take that long to make since again, they’re small gifs and i did have a coloring in mind that i always use for ragnarok (it’s my fave for non-marvel edits as well). there was a slight adjustment to the final loki gif because i realized the gif had that dark fade into the scene which i didn’t know if it was an artistic choice for the show itself or was added for the trailer only (it happens when companies cut a bunch of scenes together and it’s not at all how it actually plays out). i didn’t want to take any chances so i cut those parts out. i know the gifs are short on the loki side pero...that’s just how it is in show business.
thank you so much for listening and hearing me out! i like discussing my work and i try to have pride in them even if the numbers don’t reflect what i hope they would. either way, still learning, still growing, still thinking about buying p.s. like deadass this shit is RIDICULOUS -_- imagine opening up ps and like...it opens up in less than two minutes...shivers
#read more is because i typed up a lot hehe#i mean to me it doesn't look like a lot pero i don't want to clog y'all's tl
2 notes
·
View notes
Text
Ay Mami Likes It Rough Pt. 3
Christopher Velez x Reader
Warning/s: SMUT AF
S/N: SOOOOOOO, for some reason t*mblr deleted the contents of this and im like???????? wtf duddddde why??????? i just added some tags what gave you the right to delete everything, if i didnt back this up from my drive id have to type everything back up from memory and scratch akhakhsakhs thank u almighty for back-ups
-
“Erick?”
“Que?”
“Why are there dicks on my tour publicity materials?” You watched him edit the publicity material due later over his shoulders.
You, Erick and Joel, were at backstage in the lounge room waiting until it was time for soundcheck. Erick was designing the concert edits after the short photoshop lesson you gave him, and Joel was reading mountains of fanfics on Tumblr with your phone.
The moment that seemed like a calm afternoon turned into a stressful one in minutes.
“Erick, No! We don’t put dicks on our tour edits!”
“(Y/n)! Do you have any more of those fanfictions?”
“Hold on, Curls. Gotta stop Erick from turning the edits into a dick gallery before I get fired.”
After a little game of tug of war and few sermons, Erick ended up messing with an old tour edit instead of the ones due. You let out a stressful sigh and plopped next to Joel on the couch. He didn’t even bother to acknowledge you as he continued to be engrossed by the content he was reading.
“How is it?” You asked, amused that he was enjoying the Marvel fanfics you suggested him to read.
“Did you know that people write about me?” He muttered, eyes still glued on the screen.
“What?” You asked and checked your phone.
Oh, so he wasn’t reading marvel fanfics.
“Oh?” You knew about them but he doesn’t have to know that you read them during your free time.
"Yeah, they were so good, I'm not even mad!" He gushed, pointing at the phone. "I mean, It was flattering. Weird, but impressive."
You just nodded in agreement, and let him continue to read when Clara, Richard, and Zabdiel finally entered the room with a bag of doughnuts, back in time for sound check.
“Clara have I ever told you that you’re an angel.” You thanked her as soon as you get your hands on the blessed doughnuts.
“Least I can do for babysitting the children.” She motioned at the two already stuffing their faces with food.
“Oh, you should see what Erick did with the edits.”
“No don’t show her!” Erick panicked, his mouth filled with doughnuts and hid your laptop behind him.
“Cla, where’s Chris?” Joel asked, and when Clara was about to answer, Chris walked through the door of the lounge with a smile the moment he saw you.
When you noticed him start to walk towards your direction, you panicked and quickly sat in between Richard and Zabdiel, “So, my favorite daddies, how are you?”
He stopped and shifted his direction to join Erick on the other couch instead, giving you one last look before turning to his best friend.
It had been two weeks since the jacuzzi night, and both of you had the most intense sexual tension in the air. Even other people could feel it. You’re afraid if Chris came any closer to you with his sensual touches, you’ll end dragging him to the nearest room for the 2nd round.
That night in the jacuzzi was undeniably the best sex of your life but when you reached your hotel room, realizations hit you like a ton of bricks. You were breaking the“no sex on the job” rule, and it was hard to follow through when Chris wanted to go for a second round. He didn't even try to hide it when he was around you and touched you more than he used to.
The hoe in knew that if you bite into the bait, it’d be the endgame for you, Chris and your career. Even the way you saw Chris changed. He was Chris “the skater boy who steals all my uwus” to Chris the “ Papi, bend me over and fuck me senseless” in a snap.
You distracted yourself and was teasing Rich and Zabdi when one of the photographers rushed into the room, panting then sighed in relief when he saw you.
“(y/n)! I need you!” He asked if you could fill in the spot of one of the photographers for the show tonight, and once you agreed, he proceeded to orient you on the key placements for later.
As you both were reviewing, you both feel arms draped around both of your shoulders.
“What are you guys doing?”
Your body stiffened when you realize it was Christopher.
“Talking about the key spots for later, any suggestions?” The photographer asked and showed him the venue layout.
“Maybe have angles coming from this side…”
You tried to focus on the game plan, but can’t help notice Chris’ hand hanging dangerously in front of your chest, but he pulled them away, still conversing with the photographer.
“But (y/n) takes amazing shots so,” He says with a smirk. You don’t know if he was doing it on purpose or what, but his hands hanged dangerously close to your boob and with a little movement he can brush up on them accidentally.
You sighed in relief just when you thought he pulled his arm away. His hand slid down your back and paused just over the clip of your bra, curled his fingers as if he wanted to unclip them but thankfully didn't. He continued to caress down your back, and when you feel him move closer to your ass, you knew what’s about to happen.
AND NOPE NOT HAPPENING
When you quickly transferred to the other side of the photographer, Christopher frowned and looked confused but nodded his head anyway at the photographers’ instructions.
Although, you knew getting sexual with Chris was a bad idea but your body can’t help but look for his touch after that night. You just held everything in you not to drag him out of the room for that round 2.
*
It was an hour before CNCO's performance, and you were rushing down the hallway in a hurry to get to front stage for a proper evaluation of the venue. As you were fixing the settings of your camera, you suddenly feel a hand grabbed your arm and dragged you inside the nearest room
You were so ready to fight this person's ass, so you screamed and thrashed around until a hand muffled your protests.
“(y/n), shhh, calm down. It’s me.” The voice whispered, and your eyes snapped open to the sound of an all too familiar chuckle.
“WHAT THE HELL CHRIS!”
“Your face!” He harshly pulled you into a room, you were late, and his laugh rang in your ear in a really annoying way that you punched his arm.
“You’re such an irritation.” You cursed and glared, watching Christopher clutched his sides from laughing so hard, and when you realize that he wasn't going to take you seriously, you rolled your eyes and was about to leave when he stopped you.
“(y/n), wait, lo siento.”
You faced him and crossed your arms on your chest, feeling the weight of your camera heavy on your neck. You noticed that he was already wearing his blinding concert attire that you always questioned why management approved such a disappointing design.
“Aren’t you supposed to be preparing in…” you checked the time, “...in 50 minutes?”
He shrugged, “50 minutes is enough.”
You gave him a curious look, suddenly intrigued by what he meant. “Enough for what? and why are we in the bathroom?”
He eyed you cautiously and bit his lip when the confidence he built up earlier started to diminish. “Why are you avoiding me?”
“What makes you say that?” You scoffed and avoided his gaze when your cheeks heated up. How can you say that the reason you avoided him is that because you wanted him to pound inside you over and over again until you couldn't take it anymore?
“That night at the jacuzzi. I don't know. If it was bad, I'm so sorry.”
“No, it wasn’t,” you reassured him. “It was good, like really good.”
“Oh?” He cocked an eyebrow and his lips twisted into a smug smirk.
“Don’t get any ideas, buddy. I could get fired for that stunt we did.” You told him sternly.
“No, you won’t.” He teased and tucked a loose hair that was falling over your face. ”I got you.”
Christopher Velez back at it again with the soft fuckboy gestures.
“No, you don’t.”
“Yes, I do.” The moment that stupid grin appeared on his face, the strings of banters began.
You took a good look at him now that he hovering close to your body and thought to yourself, oh how you badly wanted him in between your legs. You got all excited and drowned into his minty and masculine scent that made you weak in the knees.
”Besides, ” he started, whispering.
A shiver ran down your spine when you feel his lips grazed against your ear but the next thing he said sparked electricity in between your legs.
“I wanna make you cum.”
You were surprised at how blunt he was but It wasn't long until you reached over and smashed your lips again his soft, luscious ones. You sensed him smiling into the kiss, his craving for your lips finally satisfied after weeks of longing for them.
When he snaked his arms around your waist and pulled you against him to feel your body against his. Chris lets out an “oof” forgetting about the camera in between you two.
You quickly apologized and he took your camera, placing it on the counter to keep it away from damage before he smiled at you darkly and resumed the kiss.
He pinned your body against the door with so much force that you gasped, and he took this as an opportunity to slid his tongue inside your warm mouth and massaged yours with his.
He pecked your lips and you moaned when he sucked your bottom lip. He pulled away to trail kisses on your cheek and traveled to your neck as he pressed himself against your body.
You let out a small moan when you felt Chris’ hard manhood pressed against your thigh. You wanted him so bad.
Kissing and sucking on your neck, Chris finally ground himself against your crotch and rolled his hips so you could feel how hard he was for you.
“Fuck, Chris.” You moaned and wrapped your arms around his neck, bringing him close to you as possible. You were so turned on at this point and all that worry about the no sex on the job thing was threw out of the window.
His hand slid down to your ass and grabbed it, giving it a good squeeze. He reached under the back of your thighs and picked you off of your feet. You wrapped your legs around his waist and deepened the kiss. Your arms snaked around his neck and tossed his cap to the side so you could run your hands through his hair.
He grunted when you tugged on the ends, enjoying the feeling of your fingers weaving around.
“Watch the hair, Mami. They just fixed that.” You giggled and continued to play with his hair. You squealed when he walked you both to the counter and sat you on it, not breaking contact.
Christopher ran his hands all over your body, wanting to touch every inch of skin he grabbed on to. He didn't even hesitate to go under your shirt and cupped your breast underneath your bra in the process because oh god how he loved your tits.
Your skin shivered at the coolness of his rings as it grazed the skin around your nipples when he thumbed your sensitive buds. You moaned and arched your back at the sensation sent to your now aching pussy, rocking your hips against his crotch to tell him that you wanted him now.
“How much time we have left?” He managed to huff through the kiss, and you pulled away to check your watch while you tilted your head and granted him access to leave hungry kisses down your neck.
“30 minutes until the show.” You managed to pant out and Chris cursed against your skin.
He lightly gripped your neck and looked you straight in the eyes. He was giving you one of his signature sexy glare. The same dark looked he had when he caught you touching yourself in the jacuzzi. “I’m going to fuck you properly soon.” He growled and squeezed your tits. “But for now, I’m not going to let you go until you cum for me.”
You groaned with the aching feeling in your wet pussy intensifying with every word. He pulled your leggings off all the way down and grinned at the sight of your soaked gray panties. “Wet for me?”
Before you could respond, you gasped when he rubbed you through the cloth. He licked his lips as he pulled your panties to the side and slides two fingers into your soaking pussy.
“Fuck, Chris!” You moaned loudly and grabbed his shoulders, his fingers working their magic as he moves and massaged your clenching walls. He was hitting the perfect spots and you didn't want him to stop.
You noticed his hard-on printing on his pants. He looked like he was begging for release so you reached over and rubbed him through his jeans.
“Missed my dick, baby girl?” He bites his lips at the sight of you withering for him.
You nodded your head eagerly, whimpering when Chris pulled out his fingers out of you to pull down his pants and set his blessed cock free, stroking it for you. Ready for you.
He pulled your body closer to him and hovered over your shaking body. He laid you on the surface of the counter to bring you pussy close to his hard dick and tease your wet folds with the tip of his head. When you were just about to demand him to put his cock inside you, Chris eased himself into you and cursed how tight you were around his cock.
“Fuck, babe, you’re tight” He groaned. It was so intense the way you clenched around him, taking his size all in. The pleasure was running down your core as he eased in and out of you, thrusting himself.
“Faster,” You begged and he increased the movements of his hips and thrust harder, deeper into you. You whimpered for him. You couldn’t take it. His dick felt so good.
“Oh fuck!” You cried out and threw your head back in pleasure, finally having his cock buried inside of you after weeks of wanting, craving for him. He grabbed your leg and brought your body closer to him so he can fuck you deeper.
Grunts and moans filled the bathroom as Chris continued to fuck you on the counter. “Fuck, babe. So fucking good.” You moaned and pulled him closer to your body, his dick filling your tight cunt. The way you moaned made him roll his hips faster, and harder into your pussy.
“Fuck baby!” You cried, and Chris pulled your hips closer to his, sinking his cock deeper inside of you. You were almost laying on top of the counter, your elbows supporting your body as he thrust his hips onto you, the sound of skin to skin filling your ears.
He pulled down the front of your shirt, exposing your black lacy bra as he thrust into you harder while his other hand rubs your sensitive clit that sent electricity all over your body. You start to feel the burning sensation of your climax forming in the pit of your core.
“I’m close, babe.” You gasped and wrapped your arms around him, sucking and kissing his neck as you near your finish.
Chris grunted, desperate to make you cum so he picked up the pace, and fucked you faster and harder while he rubbed your clit furiously. You didn’t want the feeling to stop, but you were so fucking desperate to cum.
“Cum for me, Mami.” He whispered into your ear and when you heard him call you ‘mami’ you were gone. You cried out his name and you came all over his dick. Chris smashed his lips with yours as you ride out your high. The sound of heavy breaths filled the room with Chris leaning on your shoulder while you sank back against the mirror, catching your breaths. When Chris pulled out of you he checked the time and cursed, “Fuck we’re late.”
He quickly pulled his pants up and helped you get into your leggings and panties before he carried you off the counter. You both checked yourselves on the mirror, fixing your hair and clothes.
“You go out first, and I go last so we don’t look sketch or anything.”
He grinned at you, “Who cares if people knew?”
You rolled your eyes and was about to swat his arm but caught your hand and pulled you towards him, giving you one last sensual kiss and a squeeze on your tits.
He pulled away from you and went to open the door discreetly. He smirked and gave you one final wink until he poked his head out the door to check for any passerby.
After he made sure that the hallway was clear, Christopher stepped out of the bathroom first. You waited and counted to 10. You took a deep breath and swung the door open. As soon as you did, the sooner you wish you hadn’t.
"Well, well, someone doesn’t understand the meaning of ‘no sex on the job’ rule.”
You gulped. You were screwed.
#cnco#cnco fanfiction#cnco fanfics#cnco headcanon#cnco imagine#cncowners#christopher velez fanfic#christopher velez#christopher velez imagine#christopher velez fanfiction#christopher velez smut#cnco smut#cnco fanfic#cnco fanfictions
818 notes
·
View notes
Note
Hi there! I love your blog so much!! i was wondering if you had any advice on putting yourself out there as a minecraft blog? I started a sideblog a few months ago and i find that my minecraft posts never get any interaction, thanks for any help in advance!
Hello c: Yes I think I can help! 💛🌻
My blog was undiscovered for a while before it grew in popularity, which at the time it was a little frustrating at first…so I can understand. Here’s the advice I give based off of my experience: (this is gonna be a long post so i’ll insert a “read more”)
Get shaders. Unfortunately not everyone can use shaders, so if you can, that is definitely a start. Shaders create a sense of realism to your content.
Get a pretty texture pack. The most popular one on Tumblr is Mizunos 16 Craft but there are other good ones out there. This combined with the shaders can lead to something really eye-catching.
Be your own photographer. When capturing your builds or scenery, work with all the angles of your subject and experiment with your screen capture. For example, sometimes a build or a pretty mountain doesn’t look good if you’re standing on the ground and looks better if you float up to a certain height. Perspective is key sometimes. What I do, is I take a bunch of pictures/recordings of one thing in all kinds of angles and then I choose the best ones. Optifine, the program that runs shaders, has a zoom option for the game which is really useful for taking screenshots or gifs with perspectives the vanilla game doesn’t offer. If you want to record, try finding a recorder that doesn’t mess with your FPS.
Use Photoshop or a photo editing program. A lot of my screenshots and wallpapers are enhanced using Photoshop. Try experimenting with an editing program (add filters, blurs, and color vibrance, etc.) Usually these enhancements are very important! Especially when making wallpapers. EZGIF, the site I use to convert videos into gifs, have decent editing options for your gifs as well.
Post regularly/ queue your posts up. The more content you give out, the more likely people will start to notice you. And sometimes it means not giving up even though you may feel discouraged. When I first started, I was lucky enough to get 10 notes on my videos, and for a while my blog felt empty. But the more original content I created, I slowly started to gain more followers. Make sure you post at a good pace. You don’t want to bombard your followers with a long line of posts on their dashboard, lol. Try posting at least 2-4 posts a day, or use the queue option. I set the queue settings to 3 posts a day; sometimes 2 or 4, depending on how I feel. You can choose which hours of the day as well, in case you don’t want your queued posts to be posted at 3AM, or while you’re asleep, for example. I 100% recommend using queue!
Use your tags wisely. When posting something, make sure you’re tagging your content correctly! Include tags like #mineblr or even #gaming. Try to incorporate anything in your photos/gifs/videos into tags. For example, if you are posting about trees or flowers, use #trees, #flowers, or even #nature. Some of these tags are very general which is good for people outside of mineblr to see.
Work with trial and error. I think this step is very important to understand as this crucial step can lead you to a successful blog. At first, I didn’t know if my lo-fi videos would get any attention, but after gaining a few followers, the notes blew up and I realized I was actually creating something people liked! There’s always going to be hits and misses with your content. There’s always gonna be something that you create that no one will care for, and that’s okay. We’ve all been though this at some point on Tumblr, especially the beginning! It really sucks, but who cares, just keep posting. Experiment with ideas or even familiar ones on the website. In my personal opinion, try doing something with your Minecraft content that no one has done before. I noticed nobody made minecraft lo-fi videos before I did, which I think is why people like them so much, it added something new to mineblr. I think you can do something similar! There’s no limits to what you can create, and no harm in trying. :)
Create content you find enjoyable for yourself, not just for other people. If you are creating content specifically to gain more people, eventually you will consider what you’re doing as a chore, instead of for fun. Unfortunately I did this with my old blog. I made content for others and was so worried about my follower count that I actually wasn’t enjoying making that content, and I ended up deleting the blog. But honestly I love chillcrafting! What I do is super fun, and I recommend finding that happiness first!
Don’t give up. I know it sounds cheesy. But this is sooo so important. There was a time where I wanted to give up on this blog. But I just shrugged that off, experimented, grew some patience and eventually became successful. Of course it’s not that easy, and I acknowledge it. But it definitely is possible!
That concludes my advice. Sorry it’s so long!!! I really like helping people out with these things and sometimes I get carried away. 😊
🍄🍃
108 notes
·
View notes
Text
GIF TUTORIAL
i’m finally getting around to giving the people what they want!! i hit 2.5k like 3 weeks ago and asked you guys what you would like me to do in honour of that...the resounding answer was ‘gif tutorial’ !!!!
so!! in true dnp fashion i’m merely here to give the people what they want and the people have demanded a gif tutorial, so here it is!
we’ll be learning to how to create this gif right here!

please keep in mind that this is how i make gifs!! everyone does things slightly differently and what i say and do may not match up with other people or your own personal style and that’s okay! editing is all about creative freedoms and you may use this as a basic starter so that you can branch into your own thing or you might really like how i do things and use the same methods. point is, it’s perfectly okay either way!!
right so!! let’s get the basic bullshit out of the way! i use ps cs6 but it’s basically all the same, so this should work perfectly fine no matter what ps you use.
1. we’re firstly going to choose our video to gif. for this tutorial, i’ve chosen pinof 10! pick a moment you like and get the timestamps from when the moment starts and finishes. i usually get a second before and a second after to make sure i’ve got it all!!


2. we’re now going to copy the url of the video and go to clip converter. clip converter basically is going to give us an mp4 version of our little timestamps so that we can put them into photoshop and make gifs from them! paste the url of the vid into clip converter and press enter once. once you’ve done that follow my settings and press start
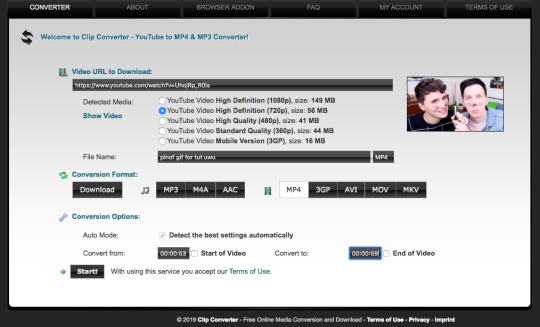
(of course you can name it whatever you want and put whatever timestamps you want in!!)
once it’s done converting, it’ll give you a download of your mp4 clip, which you’ll click!
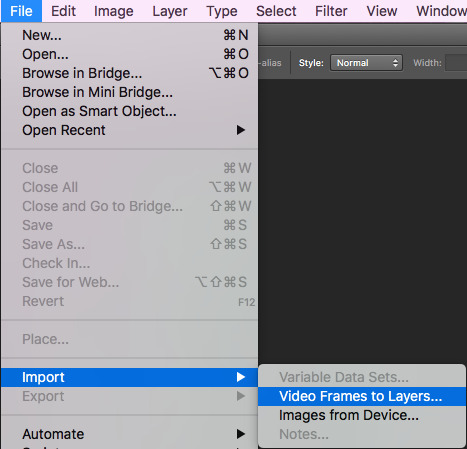
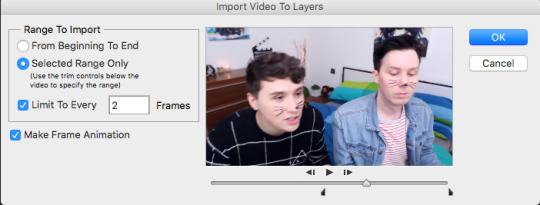
3. now open your photoshop. go to file, import, video frames to layers, like shown and select your video
once you’ve done that, put these settings in and trim the clip to your liking (the little black place holder things trim the clip!)
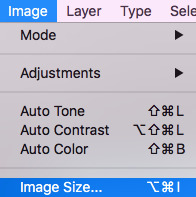
4. okay so!! we now have our gif imported and open on photoshop! we have to make it much smaller because right now it’s like...huge (that’s what she said hehehe)
simply click on image at the top of your computer and press ‘image size’, like shown
then make your settings like shown

5. so that’s done!! now, we have to change the pace of our gif to be a bit slower. i make my gifs real slow apparently but,,,,,personal preference man. click on the first frame of your gif and then scroll to the end of the frames of your gif. hold the shift button and click the last frame. this will select all your frames. press the little arrow thingy near the time of the frames. this will allow you to change the pace of your gif. press other and change the timing of the gif to whatever you want! i make my gifs like 0.07 normally but for this gif, i made it 0.09 because they’re moving so fast and it was giving me whiplash. anything under 0.1 is great!!
6. cropping time! you don’t have to crop your gif if you’d like, but mine is a little big for me, so i’m going to and show you how to do that! so basically press the cropping tool and put in the measurements you’d like, as i’ve done.


7. now we’re ready to convert our gif to the timeline method! select all your frames again, like before, as well as your layers. selecting your layers is the same as selecting your frames, so nothing new there, don’t worry! once everything is selected, press this lil guy.

once our gif is in the timeline method, right click your layers that should all be selected and turn them into a smart object, as shown!
8. righty-o! we’ve done all the boring, dumb shit! time to use an action to make our gif look a little nicer and sharper! i really can’t be assed showing you how to use an action in here because i suck and this is long as fuck as it is but!! i am nice enough to link you to a basic tutorial on how to use actions and how to download them! you can find that here! right so, i use a certain action on all my gifs and then edit it slightly, which i’ll show you! you can find a download for the action i use here !!!
i play that action and now my gif looks much nicer! however, it’s not quite the way i like it, so i push the gaussian blur layer to the bottom and i adjust the strength of it to this!
9. i lied. now we’re up to the fun part!! colouring!! colouring is my best friend and i love her dearly!! technically you could stop now and save your gif and be done but....that’s boring as fuck!
right so, colouring really, truly is your own preference, loves. you can do whatever you like, you do NOT have to follow what i put here. this is simply the colouring i chose for this gif. i do literally whatever i feel like every time i make a gif, so it’s forever changing!
i gave a bit of thought to what kind of colouring i’d do in this tutorial. did i want to do something extra basic and like...no colour changing? did i want to do something wildly vibrant? and then i decided not to do either of those things! so today, i’m going to teach you how to create a soft, almost pastel blue/purple colouring for the ap room *cough* set *cough*!!
firstly, here is the adjustment panel where all the tools you need for colouring reside !!

we’re firstly going to start with the boring crap,,,,,so i lied again....oops. firstly, we’re going to adjust the brightness, the levels and the curves. here are my setting for each, if you’d like to copy them!


here’s how the gif looks without all our colour layers!

10. and now all that crap is done, i promise it’s actually the fun stuff!! selective colour is where all the magic happens! i sometimes do two, three or even four selective colour layers, depending on just how heavy the colour changing is going to be in my gifs, as well as using hue/saturation, colour balance and gradient maps!!
firstly, we’ll start off with our first selective colour layer! here are my settings for it (sorry for all the pics rip)


once you’ve got all those sorted, onto a hue/saturation layer! this basically drastically changes the colours, if you’d like it to but it’s not quite as accurate or smooth as a selective colour layer, so i only really use it for small things or if the colour i’d like can be acchieved nicely with it. i didn’t change anything in the master setting, but here are my settings for the things i did change!

aaaaaaaand now we do another selective colour layer! i’ll just show you the layers i did change...everything else, leave as is!!
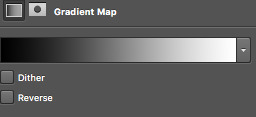
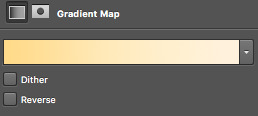
11. next is a few gradient maps and a layer of vibrance!! i promise, we’re almost done!! i add a bunch of probably unnecessary bullshit to my gifs but i like how it looks with all the extra stuff so!!! yeah!! make your first gradient map black and white, as shown and set the opacity to 10%
next step is to create a vibrance layer! when making a bright, colourful gif, i use about two or three vibrancy layers. i never EVER adjust the saturation, only the vibrancy. adjusting the saturation makes everything too heavy and it just looks kinda icky to me. the first layer, i normaly adjust the vibrancy to 100% and the rest being between like 20-50%, depending. i just thought i’d tell you guys because that’s vital if you’re making bright gifs!
we however are not, so i only adjusted the vibrancy to +14%, leaving the saturation alone....nasty saturation !!!
aaaaaaaaaaaaand finally, we are up to our last adjustment layer!! it is yet another gradient map oops. this gradient map is a light golden colour and i downloaded it in a pack somewhere ages ago. i do not remember where and i know that photoshop’s default gradient maps don’t have something like it so if you’d like, you can definitely just skip this last layer!! it’s not vital, i just think it gives the gif a nice touch!
for reference, the gradient map looks like this and i set it to 6% opacity!
12. that’s it!! the gif is complete! go to file, save for web and press on that! you might have to wait a little bit for it to load...photoshop is a really shit program sometimes, guys. once it loads you’ll see all these confusing settings. simply copy what i have here!

this is also the moment i realise my gif is over 3mb and go to fucking smack my head against a desk. tumblr basically has a thing against gif makers and will NOT allow gifs over 3mb to play once posted. this can be fixed though! i’ll show you how to shorten a gif right now because well...if you followed this tutorial, you’re stuck in the same boat as me and need to know how to fix it!!
so basically save your gif as is right now! now, we’re going to open the gif we just saved into photoshop. go to file, open and select your gif. it’ll open as a frame animation which is perfect! now, delete whatever frames from the start and end that you think you can live without. never delete frames from the middle because that’ll just disrupt the gif altogether. the less frames, the better!!
i got my gif down to 40 frames by deleting the first 15 frames of the gif and the last like 6 or so. now go back to ‘save for web’ and save this shorter gif as a whole new gif! this should be under 3mb. if it is not, go cancel the save and delete some more frames!
once that’s done....you’re done!!! congratulations!! you’ve made your very first gif, my dear!!!! here’s the finished labour of your hard work!!
i hope i wasn’t too confusing and i hope you now have a sound understanding of how to make a gif! if you’d like me to make another tutorial on something specific related to gifmaking or even to do with edits and edit-making, just send me an ask and i’ll see what i can do for you! happy giffing, loves!!
#i spent my entire day on this holy fuck#making tutorials takes fucking TIME !!!#but i've finally done it and i hope you guys get something out of it!!#i love you all !!#thank you for 2.5k <3#photoshop#yeahps#gifs#gifmaking#gif tutorial#completeresources#itsphotoshop#i have no idea how to tag this can u tell??#my gifs#my tutorials#hi im posting this now because there are people#gbfhbdfbghgthjdfbh
125 notes
·
View notes
Text
Beautiful Things
Request: Nah.
Word Count: 1665
Summary: Reader is in Peter’s photography class and very bitter about their less than optimal grade, especially compared to “Perfect Parker.” One night he hand delivers them the perfect way to an ‘A’.
Ships: Peter Parker x Reader
Warning: None. Enjoy your fluff.
Tag List: @morgiee @justinbiberlover12
Join My Tag List!!
A/N: Some of this fic was co-written by @problemforfuturetech . I really recommend you check out their blog!!!!!
You wandered around Queens, hoping for anything to get you a passing grade in photography. Maybe your teacher, Mr. Nichols, would be a more lenient if “Perfect Peter Parker” turned in one bad photo. No, every single one of his pictures was an awesome shot from an interesting angle. Most were from impossible heights. How could you compete? But, of course Peter set the standard.
It was past midnight, and you were hoping for some human interest. Unfortunately, most “human interest” out at this hour was a bit… sketchy. So far more than six people had asked you for money, and you’d quickly jogged past too many dark alleys with ominous sounds of drug deals and drunk men at the end.
Suddenly, you heard sirens in the distance that you chose to ignore. To your right you found a truly rare sight indeed: a dark alley with nothing ominous down it. Maybe there’d be a cat asleep swathed in orange street lights you could photograph. Curiously yet cautiously, you silently stepped down it.
“Fuck,” a distinctly familiar voice mumbled angrily. Peter Parker. What was he doing here? You ducked behind a dumpster to watch, and remained silent. You snapped a picture, hoping the click wasn’t too loud. There was certainly something interesting about to go down, and Parker’s surprising abs as he slid off his shirt certainly looked human. You took another picture. Just in case.
Peter quickly hopped out of his jeans. He was wearing Spiderman boxers. You started planning your escape route in case Parker had some weird alley hobbies, but luckily he picked up a heap of lycra. He stepped into it, and it fit him like a potato sack. You took a few pictures. He looked dorky enough that this could potentially be used to embarrass him. He pressed his hand to his chest, and suddenly the sack became a very attractive form-fitting Spider-Man suit. You took more pictures, and including ones showing him putting the trademarked mask on. This was far better than human interest, this was super-human interest.
“Parker!”
“Uhhhhhh…. Who’s Parker?” Peter tried his best, but he was an awful liar.
“How the fuck have you kept this a secret for so long?” You laughed, and Spidey’s eyes narrowed. You swore you could vaguely make out him pouting through the mask. “Wait! This is how you get all those cool pictures! You fucking cheater!”
“What, what pictures? I have no clue what you’re talking about, ma’am. Have a good evening, I’m off to fight crime now!” Before you could get another word in, he shot off into the night, probably towards the sirens.
The next day at school, you slipped a stack of photographs printed out to Peter. “If you wanted pictures of me shirtless, you could’ve asked. I probably would’ve said no, but it’d be less creepy.”
You rolled your eyes. “Please, Parker. I wouldn’t want to look at your chest if God themself had sculpted it. Stop deflecting. We both know what these pictures prove. I still have all the originals. Start talking, Parker.”
“Talk about what? Photography? Your angles could really use some work,” Peter chided. You glowered in response.
“Fine. I suppose the New York Times won’t have much of a problem with my angles when I send them these pictures identifying Spider-man.” He stayed composed, but his fidgeting gave him away.
“You can’t!”
“Why not, I don’t see why you would care. I mean since that’s not you. You shouldn’t care who has these pictures. Right?”
“I don’t,” he started defensively, “but I also don’t want to get harassed by people like you who think it’s me.” You scoffed. He could pretend all he liked, you knew what you saw.
“Fine then Peter, say you aren’t Spiderman, you still don’t want these pictures to get out, right?”
“Yeah,” he conceded. “Look, my aunt and I don’t have a lot of money, if that’s what you’re after, and Tony Stark doesn’t really take my calls.”
“I don’t care about Stark. Or money. I care about the fact that somehow this is the only class I’m getting below an A in, and it’s your fault.” Your voice got a bit louder in anger, and Peter glared at you.
“My fault? How is that my fault?!”
“Mr. Nichols is practically in love with you! Every picture you turn in might as well be covered in gold for how much he worships you. Next to your pedestal, everything else might as well be garbage.” Peter actually looked surprised. He’d genuinely never noticed the kind of favoritism he got. Somehow, Peter never seemed to notice how easily the world loved him.
“So, if I take pictures for you for the rest of the school year, you promise you’ll destroy these pictures?” He held up the stack you dumped in front of him.
“Of course not! I want your help. I’m not taking credit for anyone else’s work, but maybe you’re right. Maybe my angles, my composition, my lighting, and everything else needs work. Will you help? We can do it during lunch so you still have plenty of time after school to not be Spider-Man.” Despite the huge upper hand you clearly had, you were nervous. He probably hated you right now. Why should he agree? He could always deny the pictures, say they were photoshopped.
“Fine. Every lunch I’ll help you. I’ll make sure your grade in this class goes up. Then at the end of the year I watch you delete those pictures. Deal?”
“I’ll do you one better, Parker. The second my grade reaches a 90 or better, I’ll delete them. After which you can decide to keep helping me or not.”
“I guess we’ve reached an agreement then. See you at lunch?”
“Guess so. By the robotics lab?”
“By the robotics lab,” Peter affirmed.
The rest of your morning classes passed in a blur, and by lunch time your stomach had twisted in more knots than a thousand headphones. You stood by the robotics lab, camera in hand, waiting for Peter Parker. After an eternity slipped into five minutes, he finally arrived. “Sorry, you haven’t been waiting for me long, have you?” He actually sounded sorry, and any resentment slipped away. You could sort of see it. Why everyone who met him was so protective of him. You just couldn’t stay mad at him; it was like kicking a puppy.
“Nah, don’t worry about it, Spidey.” You playfully punched him on the arm, but you regretted it the second you did it.
“What was that?”
“I’m not sure, I think MJ’s rubbing off on me.” Peter let out a giggle, and you knew then you would never turn him in. The pictures were as good as deleted. “So, you wanna to start?”
“Sure! We should probably go outside though, the lighting in this school sucks.” You walked next to him towards the football field in less-than-comfortable silence. The second you stepped outside, away from the constant chatter and buzz of the lights, he lightened. You took a few candids of him, each more startled than the last.
“What, what are you doing?” He didn’t sound defensive, more bemused.
You laughed in response, prompting a smile. “I like to take pictures of beautiful things,” you responded, if only to make him blush. He did indeed, each cheek as pink as the cherry blossom petals littering the path out of the school.
“Oh, um, thank you? I mean, only May calls me ‘beautiful’, and why are you being so nice to me-” His rambling stopped when he saw the playful smile on your lips.
“It’s nice to see you’re not always so cocky. I’d much rather see you blush than without a shirt.”
“Well, you didn’t seem to mind me without a shirt. You even took pictures.” His words certainly carried an air of confidence, but he stared at the ground, and his cheeks grew redder with every word.
You scoffed. “When you say it like that it sounds kind of stalkerish. You were the one getting undressed in a random alley! Taking pictures of strange occurrences has become something of a second nature.”
“And me in sunlight just now is a ‘strange occurrence?’”
“No, seeing you relaxed. Indoors, especially around loud technology, you look perpetually stressed. Maybe that’s why you’re such a dick sometimes.” Your casual tone left him awkwardly laughing so hard he couldn’t quite breathe properly.
His laugh gave way to speech. “I’m, I’m a what?”
“Your casual comments about my angles? That cocky little smile? Sometimes, you’re the most infuriating person I’ve ever met. Then you can’t even be bothered to properly be a bad person! You’re actually kind of nice. Especially considering the situation.”
“Oh. I didn’t realize-”
You never do, you thought, but all you said was, “Don’t worry about it, Parker. C’mon, the football field has some interesting if not tacky leading lines.” You took his calloused hand and led him astray.
You slid a singular piece of paper over to Peter Parker. He curiously glanced at it, not a single trace of worry. You’d grown to trust each other, and somewhat comfortable. After the thousandth slip-up, he’d finally confessed to being Spider-Man. Plus, your best grade was in anatomy, and you were first-aid certified. It helped after a particularly bad fight to go by your place, and have you stitch him.
Peter held up the paper. “Your grades? Why would you give me this? I already know your GPA is insane.”
“And yours is only struggling because of your extracurricular. Look at Photography.”
Peter’s eyes bulged. “A ninety-six? That’s amazing!”
You poked his cheek teasingly. “All thanks to you, Parker.” There was no question of the pictures. He didn’t care if you still had them or not. He trusted you with them.
“Hey, um, would you want to still hang out around lunch?”
“‘Course, Bug-Boy. Being around you gives me another beautiful thing to take pictures of. Us.”
#peter parker#peter parker x reader#spiderman#spiderman x reader#spider-man#spider-man x reader#spiderman: homecoming#homecoming#spider-man: homecoming#x reader#imagine#fic#read this#fic rec#problemforfuturetech#peter parker fic#spiderman fic#spider-man fic#tom holland!peter parker
224 notes
·
View notes
Text
Icon tutorial
Someone asked me while a go to make an icon tutorial, and I finally have the time and energy to do this so here we go :d This tutorial is long and image heavy.
You’ll need:
Any form of Photoshop, I use CC
A psd or your own coloring
A screencap
Patience

Let me start by saying that I use some things that are also said in this tutorial, mainly the gradients, so full credit goes to her!!!!!!! (also the tutorial is really good, check it out)
fyi: English isn’t my first language so there will be mistakes in this tutorial. I hope I made stuff clear, if not, feel free to ask.
So I start with a screencap. Sometimes I use my own caps, or I google some (make sure to use images bigger than 500px width and try to use images as hq as possible, it makes it a lot easier), or I use screencapped.net. Tip: when looking at screencaps, make sure to check the lighting on it. If there’s too much contrast or the brightness falls onto part of the hair (making it almost white) it probably won’t work. (I sometimes only notice after I’m almost done, it sucks)
So I started with this:

What I sometimes do is add brightness, when the image is a bit too dark to work with. This one is good, so I’m going to cut out Octavia. I use the Polygonal Lasso Tool.
So you just trace around the person like this
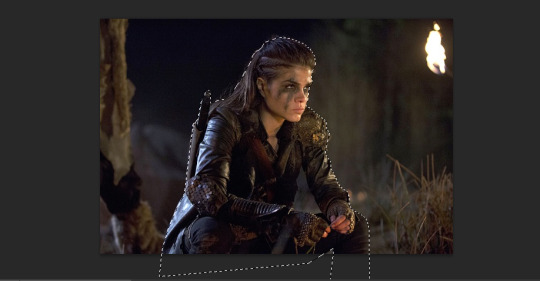
make sure that your start point is outside the picture, and that the end connects with the start point. You’ll kind of see when that happens :p (I’m sorry I suck at explaining)
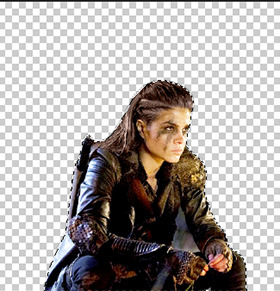
Then click ‘refine edge’ in your top bar

These are my settings, though I often change the smoothness (Smooth says ‘28′, Feather ‘0,3′ and shift edge ‘+5′.) Click ‘ok’. You’ll see the background disappear. Note: this takes practice... If I see my icons from months a go, they look horrible to me :p you kind of need to ‘develop’ the feeling of knowing what you have to include and what not (like parts of hair, you don’t have to include every single strand and just go around the basic outline).
The next thing I do is crop the image to make it square. I keep it the same size because it’s easier to add adjustments when you can still zoom in.
I’m adding coloring now. It’s mainly curves, levels, brightness, black selective color and some vibrance (sometimes color balance if the image is way too yellow/blue/...) Put your adjustments in a group (select all + control+g)

Okay now, in your ‘layers’ section, you see the cutout. Right click (make sure your cursor is on the image) and click ‘select pixels’. Then add a vector mask to your coloring group.

It’ll make sure your coloring doesn’t affect the background we’ll add layer (unless you want it too ofc)
okay next is adjustments. I start with the hair. I can’t tell you the color I always use, bc it’s always different :p Make sure to ‘select pixels’ again. For this screencap, I used #43251a. Normally I’ll make the layer ‘soft light’ but now ‘color’ looked better.
I duplicated the hair layer and put it to ‘soft light’ , opacity 42%.
I ALWAYS color over the lips too (on a new layer), to make them stand out a little bit. I used #a00303. The opacity of the layer is 76%, because I don’t really like it when the lips look like they have lipstick on them (it would also just look weird on this screencap)
i just noticed I forgot to remove the rest of the background (under her arm) so I’m doing that now :p I’ll just trace around the background with the polygonal lasso tool and click delete. Always make sure to delete everything hahaha :p I selected pixels again, inversed them (by clicking on select in the topbar and clicking reverse) then clicked on the vector mask on the coloring group and used the brush to delete coloring from that part too.
Now I do the clothes. I usually go with the color of the clothes, but in this case they’re black so I’m going with a dark blue. Again, new layer on ‘soft light’. I go over all the clothes I want to go over, they won’t turn blue, but they’ll stand out a bit more. I didn’t go over her sword but I used black for that.
This is what I have so far. I deselect the seleciton now.
Now I add gradient fills. You can find it here under ‘gradient’

These are the setting of the two gradients (both black&white)


for this one, i sometimes change the angle. Just play around with it to see what works best. Both layers are also on ‘soft light’. You can decrease their opacity if necessary
Now I resize and sharpen the icon. I always make my icons 100x100. I would give you the sharpening action, but I have no idea where I got it :/
Okay, now I add color fills UNDER the cutout image. I have a psd with all my backgroundscolors and textures in them.
You can find color fill where you found the gradients. Just choose a color you think looks best.

I add my texture (find textures here and here or on deviantart)

Sometimes I’ll add more textures. Just put the picture above the color, but under the image and set it on ‘soft light’ (you can choose the opacity).
this is what my layers look like:
54 notes
·
View notes
Last Seen Blogs