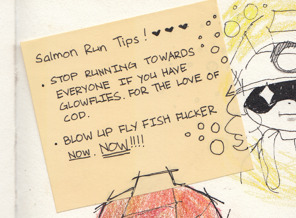
#photoshop only crashed once
Text


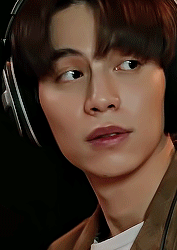


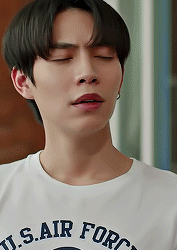


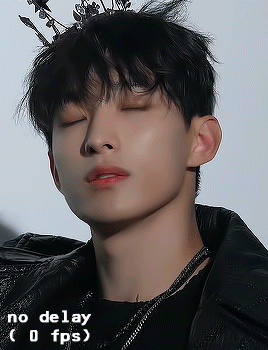
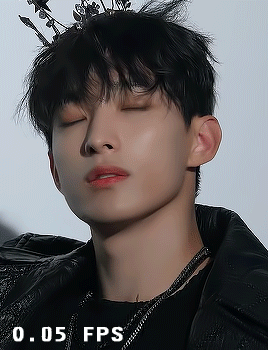
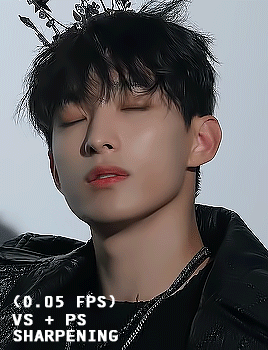
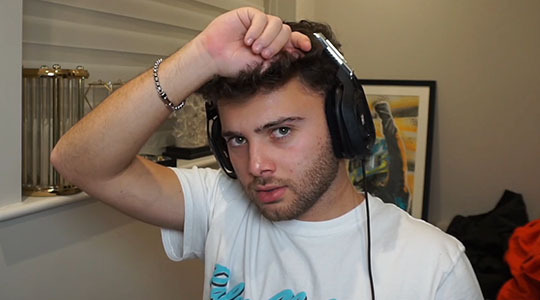
FIRST KANAPHAN as SAND in ONLY FRIENDS
#only friends the series#ofts#first kanaphan#sand#thai bl#ninisdarlings#tuserhidden#tusersilence#mjtag#userjamiec#useragatha#it's been 84 years *long suffering voice*#tw flashing#so proud of my laptop for surviving this set and me having 3840023 things open in ps#photoshop only crashed once#viviedits.
295 notes
·
View notes
Text


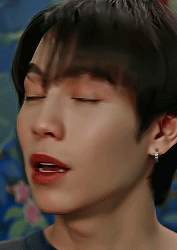
Are you ready to come home, Cahir? Yes. Prove it.
#cahir mawr dyffryn aep ceallach#the witcher#witcheredit#thewitcheredit#the witcher netflix#eamon farren#eamonfarrenedit#the witcher season 3#fantasyedit#adaptationsdaily#tvedit#cinematv#tvfilm#dailynetflix#fantasysource#usersource#usertelevision#gifs by disdaidal#testing 4k and my photoshop only crashed once yay#he's such a baby. a wet blanket. poor meow meow
102 notes
·
View notes
Photo


is that a yes?
#dragon age#daedits#daedit#gamingedit#inquisitor x sera#*#i attempted to photoshop#(and it only crashed once! a miracle!)#i was aiming for a scrapbook-ish look with this
44 notes
·
View notes
Text
May or may have not ended up drawing for almost 4 hours straight without breaks and now my wrists hurt
0 notes
Text
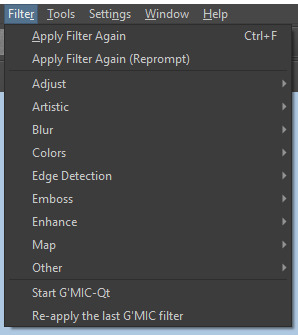
photopea gif tutorial!
i recently started learning the craft of gifmaking with the free software photopea. when i first started, i had to piece together several different tutorials as well as extrapolate from some photoshop tutorials because-- no one uses photopea.
but they should! it's free! it can run in your browser! it can do most everything photoshop can do and you don't have to deal with adobe or torrenting. so i'm making a tutorial of my photopea gifmaking process because that's what i needed a couple months ago, and i hope it can be of use to some others. let's go!
1: PREPARING
source the scene you want to gif. it's best to download your video when you can, but screen recording can work in a pinch. this is the video downloader software i use.
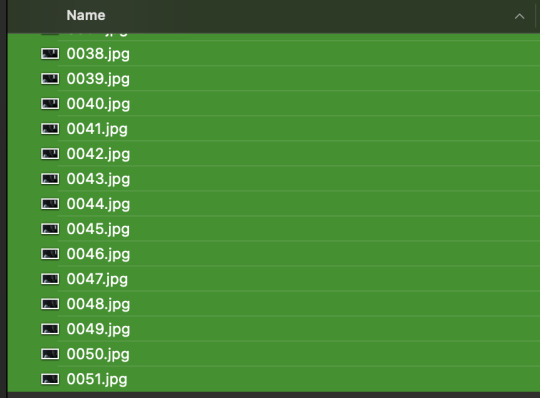
once the source video is downloaded, i like to pick out the specific moments i'm going to gif and save them as their own files-- this makes future steps easier. an individual gif shouldn't be more than 4ish seconds, so limit your selections to about that. name your files in a way that makes sense to you:

2: CONVERTING TO .JPG
i like to convert my video clips to .jpg format. it is possible to load video clips directly into photopea, but unless it is a very short <30fps clip, it is likely to freeze or crash in my experience. i use this website as it downloads a higher framerate (~25fps) than others i've used.

convert your video files and download the .zip folder containing your frames. make sure to unzip them and name them something helpful if you need to.
3: OPENING YOUR FRAMES IN PHOTOPEA
photopea looks like this when you open it:

select "open from computer" and select only the first frame of your first gif:
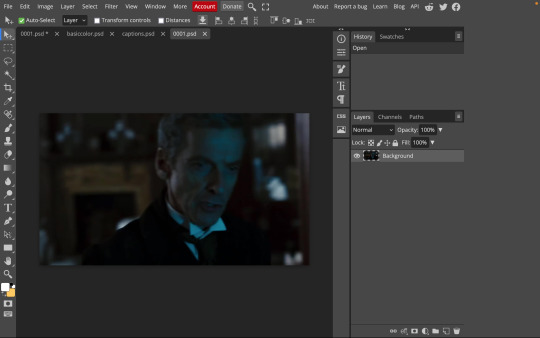
your environment should look like this (ignore the other projects i have open, you should just have 0001.psd or similar):
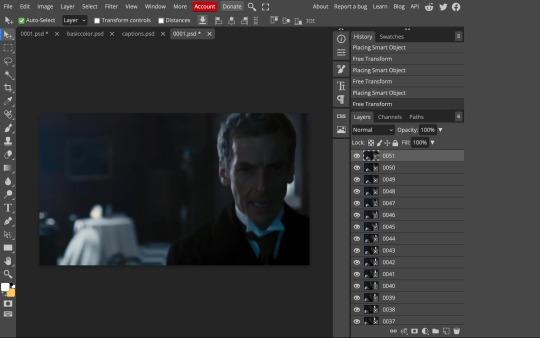
go to file> open and place, and select ALL of the rest of the frames from your first clip:
they'll load in one by one, and your environment should look like this:
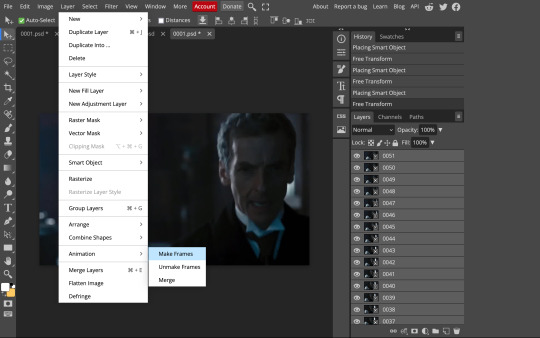
notice how all the frames have a little square in the corner? that means they are smart objects, and we need them to not be for our purposes. select all of your frames, right click, and choose rasterize:

in order to make the series of jpgs move as a gif upon download, select all of your frames and go to layer> animation> make frames:
all your layer names should now start with _a_. you can really do this at any point in the process so it's not a big deal if you forget at the beginning.
finally, you want to limit the frames in individual gifs to around 50 or less. if you find you have more, delete some frames off of the beginning or end by right clicking and selecting delete.
4: CROPPING AND RESIZING
select the crop tool on the left hand panel:

at the top bar, select fixed size:

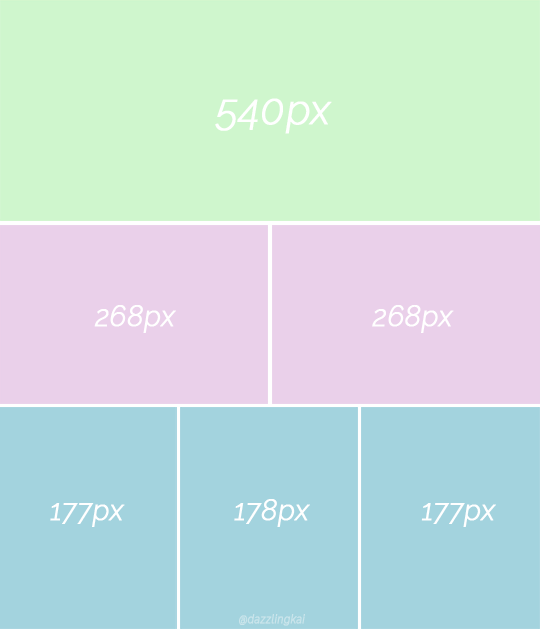
gifs on tumblr are limited to 540px wide for single column gifs, 268px for two columns, and 178px for three columns. the height is up to you; i like to use 350px height with the 540px width.
enter your values into the W and H fields and do not press enter yet. drag the cropped area to where you want it to be-- try to line up the top and bottom edges so as not to lose too much of your image. once you're satisfied with the selection, press enter. your gif is now cropped and resized to tumblr standards.
5: SHARPENING
(if you are working with low-qual video, check out this tutorial by @hellboys before sharpening. basically filter> filter gallery > grain, select soft and play with the settings. then proceed!)
still making sure all of your layers are selected, navigate to filter> sharpen > smart sharpen:
you should see this dialog box:
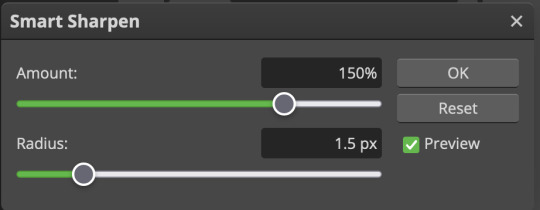
these are the settings i like to use, but you can play around to see what you like. here's the before and after of my sharpening settings:
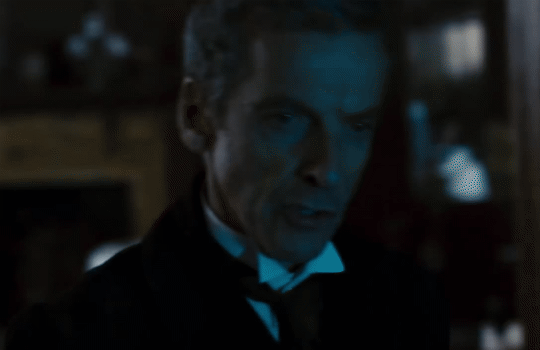
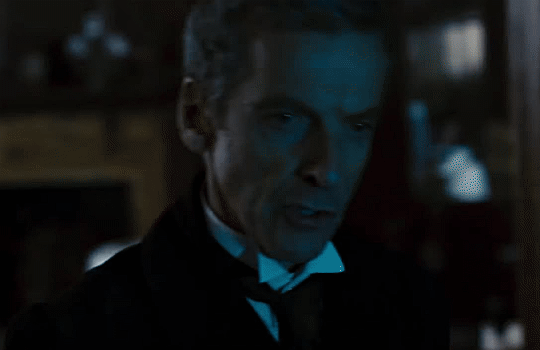
the difference will be more noticeable once we complete the next step-- brightening and coloring.
6: BRIGHTENING & COLORING
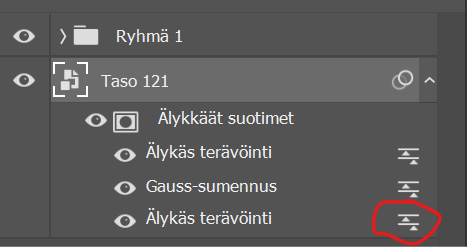
navigate to layer > new adjustment layer:
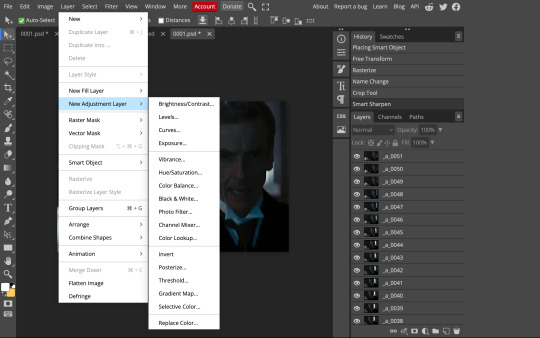
at any time, you can edit your adjustment layers by clicking this button in the right hand panel:

for each edit you make to your gif, you will add a new adjustment layer. always make sure they're at the top of your layer stack. i like to start with adjusting the brightness and exposure, which are both pretty straightforward.
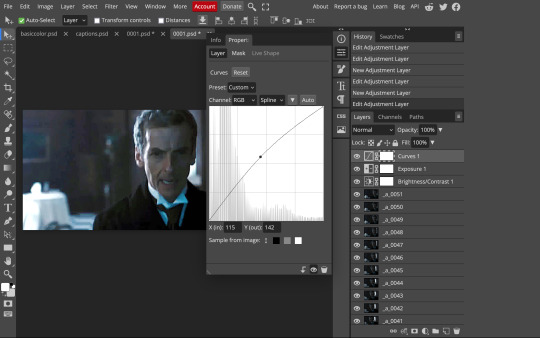
additionally ,you can select a curves adjustment layer, choose the RGB channel, and drag the curve just slightly upwards to further brighten your gif, like so:
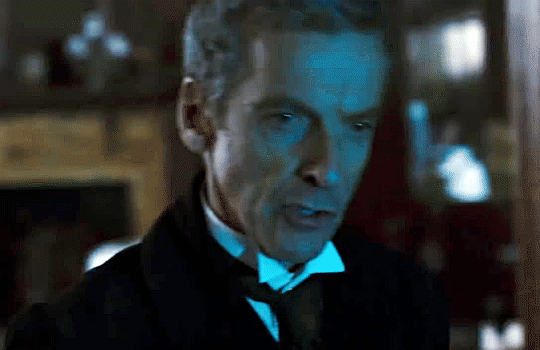
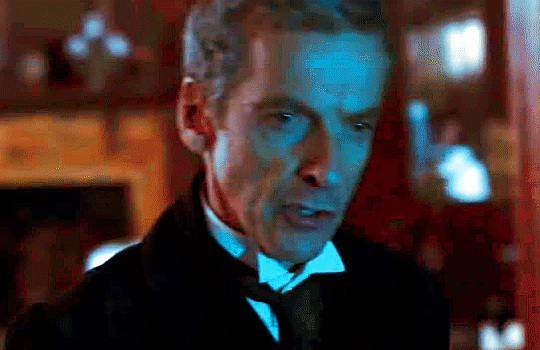
here's a before and after:
now for coloring-- i mostly use the saturation/vibrance, curves, color balance, and selective color adjustment layers. just play around with all of these until you find a style you like. i like my gifs to look really bright and colorful, so i push the saturation and try to draw out warmer tones in the color balance:
7: CAPTIONS
the font i like to use for captions is arial bold italic. you can download it (or any font of your choosing) from pretty much any free font website. if you choose to download a font not in photopea, go to file> open and select your font; it will now show up in the list of fonts.
navigate to the text button in the left hand panel:

and type in the captions for your gif. i make the font size 20 for 540px gifs.
next, while only your text layer is selected, navigate to layer> layer style > blending options:
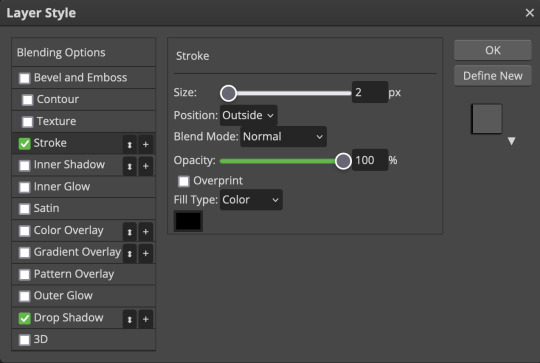
click on drop shadow, and play around with the settings until you get something you like. here's mine:

next, click on stroke and do the same thing:
when you're done, make sure your text is your top-most layer.
8: EXPORTING
you're done! head to file> export as> GIF. you'll be prompted with a dialog that looks like this, with your gif playing (you can also do these steps without saving if you want a preview of your gif during editing):
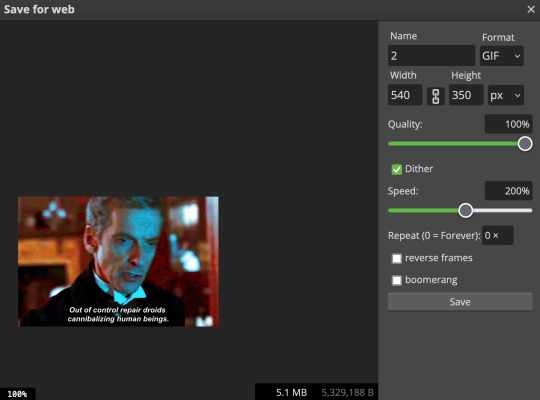
the only thing you should need to adjust is speed. this is the main difference between photopea and photoshop. the only way to specifically adjust the delay in photopea is to manually enter "_05" (or whatever amount of delay) at the end of every layer name. if you're like me you'll agree that is simply too much and settle for the speed slider.
i don't really know what logic governs the speed slider. it doesn't seem to be consistent across gifs, so play with it until it looks right. i've had it on 200% lately which seems insane but looks visually normal.
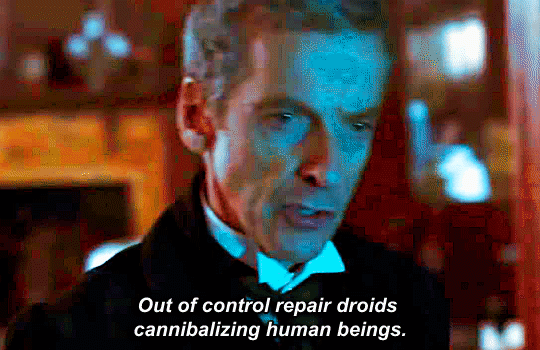
once the speed is adjusted, hit save and you're done! here's a final before and after of all the work:
BONUS: SAVING .PSD PRESETS
did you think manually creating and editing all those adjustment layers was a lot of work? here's how to streamline it for next time.
at the very bottom of your screen, below your layers, select the icon that looks like a folder (third from the right).
it will create another layer called folder 1. drag your adjustment layers into this folder, making sure they stay in the same order. your layers should look like this when you're done:
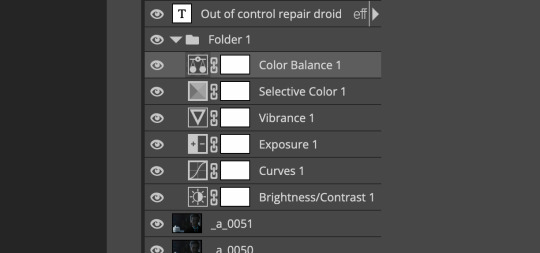
ONLY ONCE YOU HAVE SAVED YOUR GIF, delete all other layers that are not in the folder. then select file> save as PSD. save it somewhere convenient.
next time you're making gifs, after you've cropped and sharpened your frames, select file > open and choose your .psd file. it will open as another project. select the layer that says folder 1, and drag it to whatever project you're working on at the top bar. voila! your adjustment layers are applied to your new gif!
i still like to play with the settings, as coloring and brightness needs will differ from gif to gif.
thanks for reading! here's the gifset i made while making this tutorial :-)
#milk post#gif tutorial#doctor who#photopea#i can't tell if i went too detailed or not enough lol. tag me if you use this i want to see ppl's gifs!!
232 notes
·
View notes
Text
Krita tutorial the way I know it.
Basics: What is where.
Gimmicks.
Specific advice on specific tools.
Basics: What is where.

Upon opening the program this is what you're met with. First of all, must comment: The layout is HEAVILY editable so you can just drag menus anywhere you want, even leave them floating amidst the sheet you're drawing on.
You can create custom art templates, I have two o'mine here as both have my signature background color.
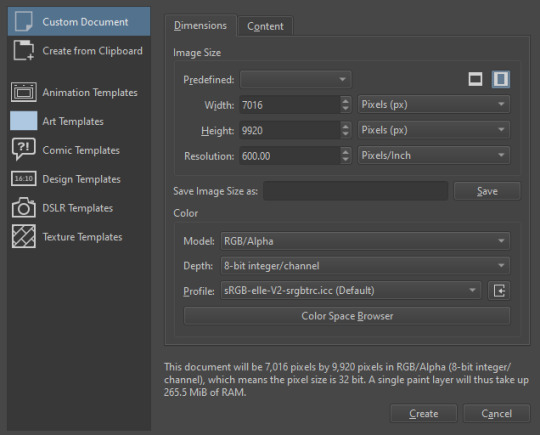
As well, you can edit the custom document settings, as in what size you want it, what resolution, even the initial content of the image. As well you can create from clipboard: Just copy some image from your browser and Krita will recognize it (useful for making meme edits lol).

Now, once you have your file, I will show you what is where.
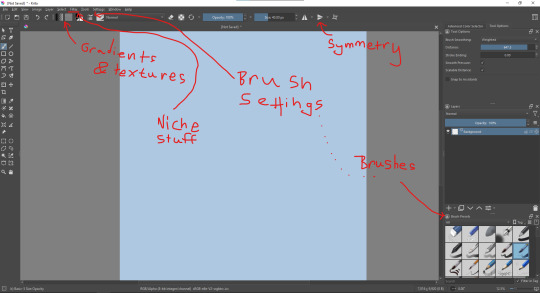
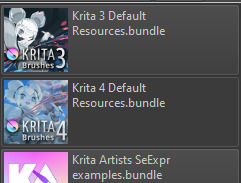
Brushes:
Brushes are easy to edit and there are tons of free bundles to download online. I myself only got one bundle, Jackpack (bit hard to find now due to original source being lost, it is still available but bit tricky to come by).
There. Are. Tons.

Some of these are my custom brushes for calligraphy in neography, you might even guess which ones. You can edit existing brushes, make new ones from the ones you've edited without changing the original, and all sorts of stuff (more below in the third chapter).
There are numerous packages of brushes once you enter Krita, but only one/two are available when you first open it. To unlock them all, click here:

And make sure all bundles are dark gray in color (example of both dark and light below).
Now Tools Options: those will pop up depending on what tool you're using.
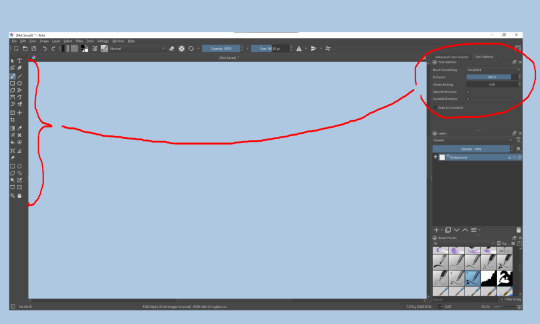
Symmetry: Fun stuff. You can drag the lines depending on how you need them and then center them back to the center of the screen if needed.
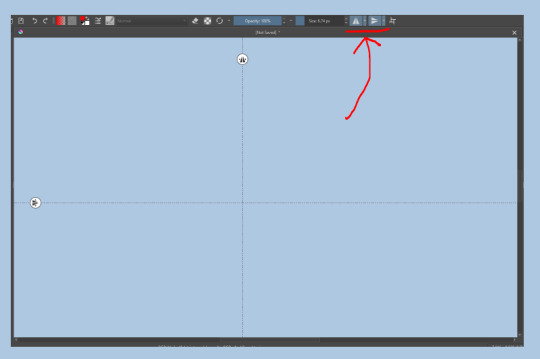
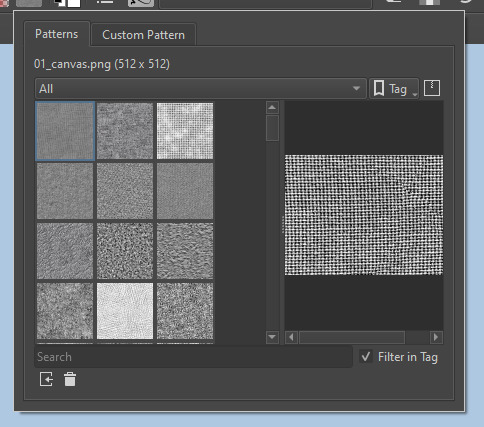
Gradients and Textures also have their tools options, you can play with those to get the feeling what they can do (more in third chapter).

The Filters tab is useful too. Blurring, motion blurring, color mapping, artistic filters and all that: Quite fun.
Gimmicks.
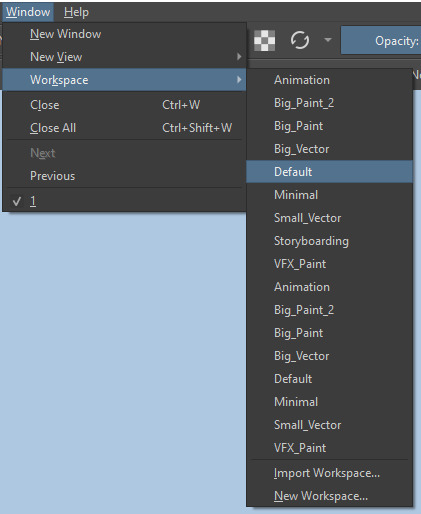
Krita allows you to customize your workspace freely. Floating menus, tabs, anything you want. It has quite many drivers at that-
To access the workspace templates, go to Window and choose Workspace.
Krita allows for copy-pasting any image onto the sheet. Though, for me it sometimes crashes if I accidentally copy-paste text into it without choosing the Text tool first.
The software allows for both raster and vector work. It is basically Photoshop sharpened to be used by artists primarily.
There are some interesting mechanics regarding the Eraser (default bind E).

You can use it with any brush, allowing for textured erasure/quick work. Good for sketching.
You can use it on gradients (given there's a transparent point on the gradient preset).
There's a Multibrush tool:

People say Krita is good for animation but my brain can't wrap around it yet honestly @~@.
The keybinds:
B - Brush tool.
E - Erase tool option.
M - Mirror (useful for checking accuracy from a new angle).
Ctrl - Color pick (when used with brush or other color-using tools).
Shift+L.Mouse+drag - Changes the size of the brush by dragging left and right.
Ctrl+E - Merge layer with the one below.
Ctrl+G - Group selected layers.
Ctrl+A - Select whole sheet.
Ctrl+Shift+A - Deselect everything.
F - Bucket tool.
G - Gradient tool.
Ctrl+S - Save document.
Ctrl+Shift+S - Save As document.
Ctrl+N - New document.
Ctrl+O - Open document (will be seen in a new tab on top of the sheet).
Ctrl+C - Copy selected layer or selection.
Ctrl+X - Cut selected layer or selection.
Ctrl+V - Paste copied/cut layer or selection.
Q - Multibrush tool.
R.Mouse - Interesting thing: Opens up a quick selector for brushes and colors you've already used in the piece.
1 - Zoom 100%.
2 - Zoom to fit the piece vertically.
3 - Zoom to fit the piece horizontally.
4, 5, 6 - Turn 15 degrees (4 and 6) or undo the turning whatsoever (5).
Ctrl+I - Negative filter applied to layer.
Ctrl+U - Color editing on the layer.
Ctrl+Y - Soft proofing mode (for color mistakes and stuff like that, mostly annoying for me tbh).
Ctrl+T - Transform selection/layer.
Ctrl+R - Square select tool.
Ctrl+J - Lasso select tool.
Honestly you can just hover your mouse over tools and see their shortcut binds, as well. Or edit them in Settings.
Specific advice on specific tools.
Brush:
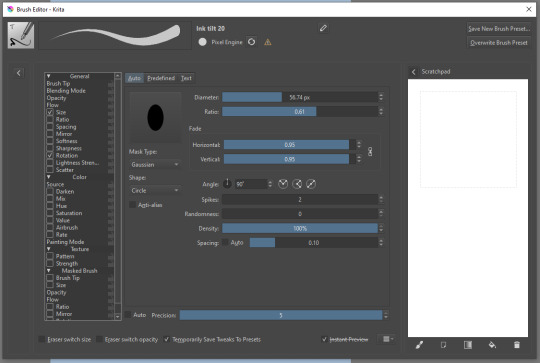
Brush editor is a great tool for making custom brushes, and it even has a sratchpad to test them out. Lots of settings, but no need to be afraid; Most of them you might never use on purpose.
Use Brush Smoothing for great and pretty lines in lining pieces or making calligraphy.
Gradient:
The four icons to the right top are:
Mirror gradient.
Arrange by lightness value.
Arrange by color value.
Space the stops evenly.
Click the gradient to add a new stop. The three things to the left are:
Make the stop use Primary Color.
Make the stop use Secondary Color.
Make the stop use a fixed color.
241 notes
·
View notes
Text
HELLO & WELCOME ♡
to an all inclusive giffing guide, which includes:
- vapousynth installation on windows / mac
- how to source giffable material
- resizing / deinterlacing / denoising / sharpening on VS
- step by step breakdown of how to use VS
- giffing after you've used VS
- giffing using only photoshop
- simple colouring guide
- watermaking and blurring captions
( a better and updated version of the previous one )
GIFFING USING VS + PS
1. VAPOURSYNTH & ITS INSTALLATION
VS is free to download and use. it is truly an amazing tool which allows you to resize, denoise, sharpen your gifs all at once and save the output in gifs, frames , mp4 and mov.
You can install vapoursyth from here. The site has download software and installation guide for both MacOs and Windows. Please watch and read the installation guide thoroughly, it is a very well written one and if you follow along, installation will be done easily.
It is best to use a video with minimum resolution of 1080p but a good 720p would work sometimes. This is how gifs look after sharpening a normal 1080p video:
2. SOURCING GIFABLE MATERIAL
➞ You can start with downloading a 4K Video downloader. It will allow you to download clean and best available resolution videos from youtube.
➞ If you don't want to download a software, you can use screenrecording.
- Windows : windows key + alt +R
- MacOs: shift + cmnd + 5
➞ .TS files
- for seventeen .ts files, you can go to rosebay
3. TUMBLR SIZING
Tumblr has it own resizing rules so that your gifs aren't blurry after you've uploaded them. Keep this in mind when you're using VS resizing tool.
4. USING VAPORSYTNH
After you've installed the VS properly. You'll have a VS script shortcut on which you'll drop your video file for giffing.
Once you drop your video file on the VS shortcut, a window like this will pop up:

After you've put your timestamps and gif duration, a resizer will open up in chrome ( or your default web) along with a VS Script Window (sometimes it’ll take a min to open).
GIF Size: WIDTH (left space) and HEIGHT (right space). Use the bottom left triangle to adjust you clip.
Make sure 'Preprocessor' is set to 'None' and "debilinear'.
Use KNLM for denoising and FineSharp for sharpening by selecting them and ticking the small check box beside them. DONOT mess with the denoise and sharpening cursor on the resizer tab, we'll adjust setting on the VS Script.
There are CCs who use BM3D for denoising but it never worked for me. Always gave me an error. KNLM has worked without an error for years for me.
NOW, there are CCs who like to set frame per second ( qtgmc) on the resizer itself but qtgmc is designed to work with interlaced video. Don’t waste your time with fancams, it won’t do shit.
[ Interlaced content: live performances, variety shows. Typical formats: .ts/.tp/.m2ts
Progressive content: fancams, vlive/instagram videos, some variety shows (basically 1080p/720p/480p/…, anything with a p. Typical formats: .mp4/.avi ]
Copy whatever code that comes on the top right.
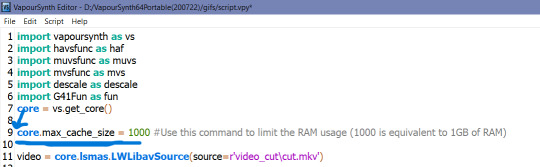
YOUR VS SCRIPT:
First, remove the # on line 9 to increase your cache size so that your VS doesn't slow down or crash. It is already removed in mine, but you'll have to remove the # on the start of line 9.
Remove everything from line 17 till before "video = core.fmtc.bitdepth(video, bits =16)" and paste the code you copied from the resizer on line 17.

After you've pasted the code, we put in our denoise and sharpen settings by changing these things.
denoise: 2, 6, 4 , 2
finesharp: 2
Now, Encoding aka Saving the output. Script > Encode Video and another window will pop up which allows you to select in which way you want to save your ouput.
I would highly suggest using the PNG sequence because it is easily editable and is saved in hd from. GIF output can often be dithered.
Ensure that header in in Y4M mode
Click on Start to start your encoding process. Don't close any of the window tabs before the encoding is completed.
Your output will be saved under "D:\VapourSynth64Portable(200722)\gifs\output".
Before you start encoding another batch of frames or a gif, please cut and paste the previous output in another folder because each new batch of output gets saved in the same folder with the same name, thus, automatically replacing the files.
after you’re done with accessing your output PNGs, close all the windows and repeat the same for a new set of PNGs for another gif.
TRIMMING GIFS
If your saving as PNG sequence, you can simply trim your gif by removing the unwanted frames!
If you're saving as a GIF output, after loading your gif and converting it into a smart object, you can cut it using the 'scissors' button on the timeline.
Place the cursor thing from where you want to cut the gif from and press the scissors button.
It will split the gif in two. Select the unwanted one and press delete.
REMOVING FLASES FROM GIFS
To remove flashes in gifs in a simple and easy way is to save them as a PNG sequence. With that you can clearly see which frame has a flash and simply delete that before loading in photoshop as stack.

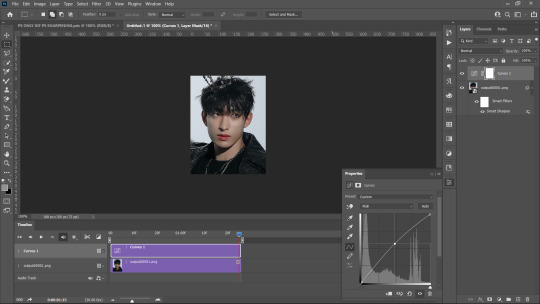
5. LOADING THE GIFS IN PHOTOSHOP
Firstly, turn on your timeline mode. WIndow > Timeline
To LOAD GIF FILE IN PS FOR COLOURING
File > Open > Select GIF > Enter
( a normal gif output will have a 0.02 FPS delay )
(if you want to sharpen or add any effects to the gif then:)
- Click the small button on the left bottom of the timeline to convert into into video timeline.
Select all frames on your right and convert them into a Smart Object (select all > right click > covert to smart object)
Add whatever filters you want.
Add your colouring and save.
TO SAVE AKA EXPORT GIF
File > Export > Save to WEB
6. LOADING PNG SEQUENCE FRAMES FOR GIFFING
File > Scripts > Load into Stack > Browse
Browse will open your File Manager. Select the frames you want to be loaded as a stack. Let them load and click OK.
After PS is done loading your frames, Follow these steps:
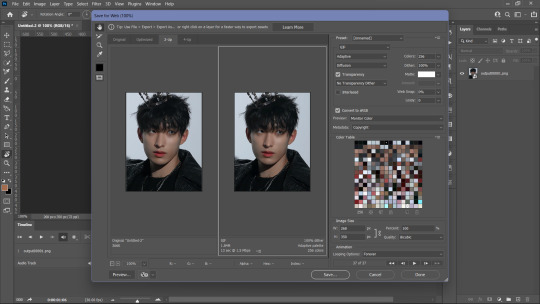
Click create frame animation. It’s show only one frame so you have to click this ≡ symbol on the top right of the timeline.
Then click Create Frames from layers and it’ll make all frames.
Then click ≡ again and click “reverse frames” because ps loads stacked frames in reverse so you have to un-reverse it.
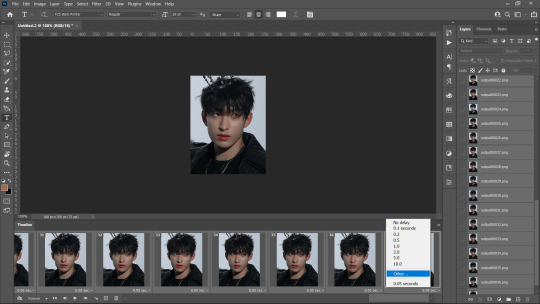
4. Most importantly, we need to set frames per second because we didn't set anything on the resizer. Frames per second can make a huge difference in how fast or slow you want your gif to be.
0.05 FPS is just my preferred setting.
To input your desired FPS settings, select all frame from the timeline, right click on any frame > Other > Input your desired setting.
( anything above 0.08 will make the gif too slow )
5. Click on 'Create Video Timeline' to turn this into a video timeline. (bottom left of timeline)
i made an action that does all steps from 1 to 5. Download it here <3
6. Then select all your layers from the side panel and convert it into a smart object so that you can sharpen it and add other filters.
7. Add your adjustment layers for colouring and save it!! Saving process as same as before. (File > Export > Save to WEB)
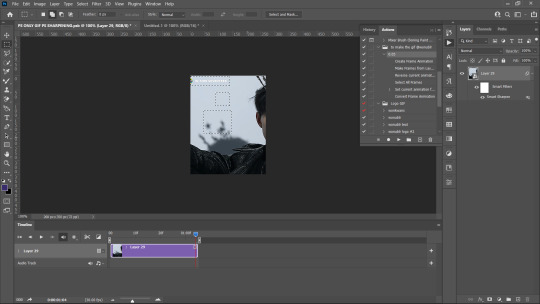
GIFFING USING ONLY PHOTOSHOP
If you don't want to go through hassle of installing and using vapoursynth, you can use this photoshop only method. You can simply cut the video and load them as frames.
File > Import > Video Frames to Layers
A window like this will pop up:
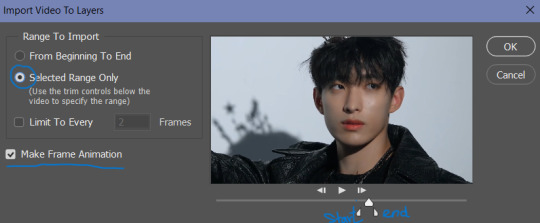
Use the triangle cursors to set the start and end of your clip. Make sure Make frame Animation is check. Press OK.
IMP: After you frames have loaded, you'll see the frames have loaded at a 0.04FPS. You can change it according to your preference but the speed is different (slower) for these gifs even if they're both at 0.05fps, that is because the number of frames is different than number of frames from a VS png sequence for the same clip.
You can adjust the fps the same way mentioned above.
You can see the difference even with the same FPS settings. The frames in the second gif are VS generated whereas the first one is PS generated.

After setting you desired FPS, click on the Make Video frame animation button at the bottom left on the Timeline tab,, Select all frames/ layers on the right and convert them into a SmartObject.
Now comes the main part, Resizing the gif according to tumblr.
For this, Image > Canvas Size. Input your desired dimentions and press OK.
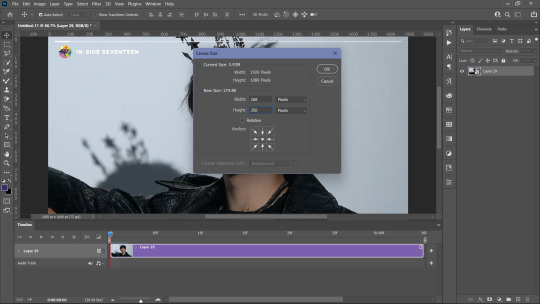
Then, Click of CTRL + T (Free Transform) and adjust the gif along the canvas. like this:

Press Enter. You gif is set. all you need to do is, add your sharpening (filters > smart sharpen).
You can also refer to this amazing tutorial by @jeonwonwoo for photoshop giffing.
BLURRING CAPTIONS IN GIFS
For this you only need a gif in a Smart Object, Marquee Tool and Gaussian Blur.
Marquee Tool is the small dotted rectangle tool. Click on it and then make your selection around the caption by clicking and dragging your cursor.

normal selection
Add to selection (to the normal selection)
( best for multiple captions, it lets you select in multiple places at once) Example:
after selection, go to Filters > Blur > Gaussian Blue > 3.0
IMP: If you want to add Blur using marquee tool on a smart object that already has a smart sharpen filter (or any filter) on then you need to convert that smart object into a smart object again.
after you've added your colouring adjustment layers, save your gif. File > Export > Save for Web
WATERMARK
To make you custom watermark shape, you can follow this wonderful tutorial by @yunaevis
How to set the custom watermark or any watermark, you can follow this tutorial by me. ( bonus: it'll also teach you how to use actions for watermarking)
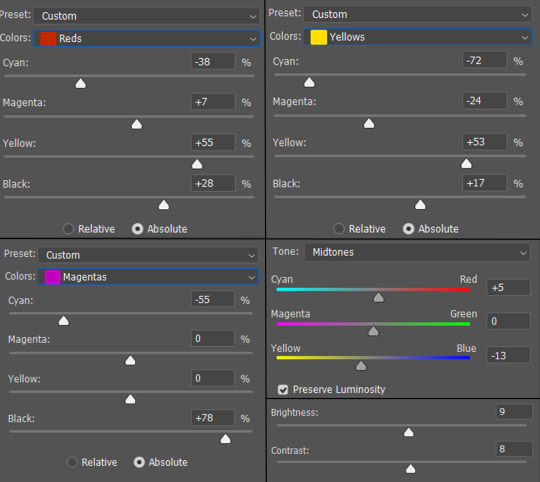
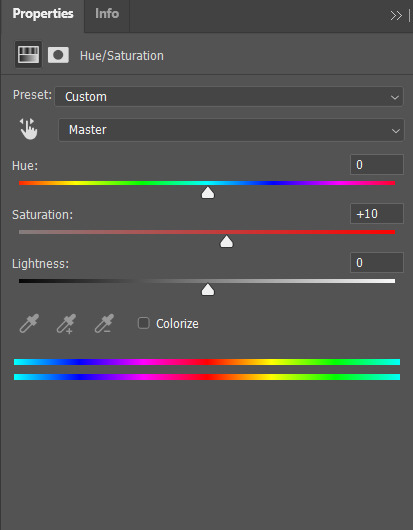
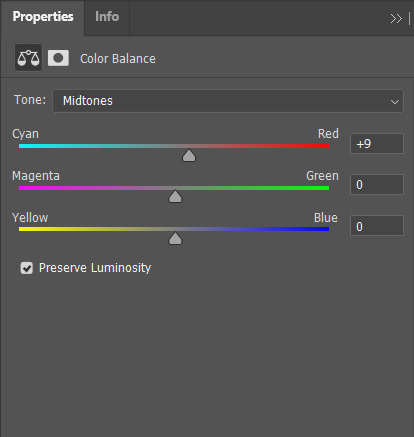
BASIC COLOURING
Start off Curves.
Click and drag the curves from the middle to upwards. This will increase the brightness .
For skin, we begin with Selective colours. Messing with Reds and Yellows, give the skin more even saturation. You can accentuate blacks and increase brightness + contrast too.
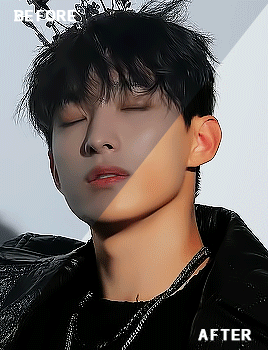
BEFORE AND AFTER:
for a detailed basic colouring tutorial, you can follow this tutorial!
DONE AND DUSTED,,,, THANKYOU <333
I hope this was somewhat helpful <3 if anyone has a doubt, they can always contact me!
#photoshop tutorial#vapoursynth tutorial#all in one gif guide#gif tutorial#kpopccc#lee.guide#ps tutorial#watermark#giffing#blurring captions#resources#guides#allresources#vs#vapoursynth#photoshop#gif making#300
541 notes
·
View notes
Text
On Hidden Agenda and if the Agenda is Really Hidden (Part 2)
Where we last left off on our road trip, @respectthepetty and I had pulled the clown car over, started checking out directions and trying to figure out where we went wrong in our theories and I sat down to re-watch the show to figure out what we missed. Last time I posited two theories and listed evidence to why I think that. Now that I have finished re-watching through episode 11, I think I'm backing off my Joke is a stalker theory. I'm not throwing it out completely, but I don't think that's what's happening here.
There's also something happening with Joke, Zo and the Clytie and Sunflower myth that Zo reads to Nita in episode 3. Zo is repeatedly conflated with the sun/sunshine - he has a sunset painting in his kitchen, Joke photoshopped Zo's face on a sun and said Zo is his sunshine. Joke is conflated with sunflowers - he gives them to Zo over and over. They do switch this role once each - Zo paints a sunflower on his ceramic vase in episode 3 and in episode 11, Joke tells Zo that he (Joke) is Zo's sunshine. To me, that also makes Joke Clytie, the one who was abandoned by someone they loved, who was just waiting for them to come back.
All of this in mind, here's the theory I've centered on: Joke did something bad in high school; his parents paid (or used other means) to get him out of any trouble he was in and it caused a huge fallout in their relationship. Oh, and it happened on Joke's birthday.
So with this new theory in mind, I'm going to go back through all the evidence I posted in the previous post and add it to this one, plus include evidence from the later episodes.
Episode 1:
In the flashback to the Freshy Contest, while Joke is scolding(?) Zo, he says, “What you said on that stage won’t change a broken system.”
Episode 2:
Joke tells Zo, “My tongue gets me in trouble.”
When Joke and Zo are debating about hidden agendas in relationships, Joke asks why he should tell someone things when he starts dating them because he should be able to tell things in his own time.
Episode 3:
Joke says “Before you get to know someone, you need to know yourself.”
Joke also asks/tells Zo to trust him for the first time.
Joke talks about the Triangular Theory of Love: Passion, Intimacy and Commitment
Joke is pretty worried when Zo crashes his bike and makes Zo ride with him instead.
Joke mentions that he used to go to the restaurant Zo picked out with his dad, back when they used to go out to eat; this suggests a distance between him and his dad.
During dinner, Joke says that “What you see of someone may not be the whole story,” and “Stay true to yourself.”
In the library, Joke tells Zo “I would never let someone I love face danger alone.”
The next day, Zo is sitting outside when Joke finds him and says that Zo wasn’t answering his calls. and it’s implied he was searching for Zo because he was worried.
Joke invites himself on Zo’s trip as if he’s afraid if Zo leaves without him, something bad will happen.
Episode 4:
Joke tells Zo he couldn’t leave Zo “alone and sad” and “I’ll never abandon you”
Joke also says “I only care for those who care for me.”
Joke is afraid of the glass bridge but he’s also to worried to let Zo go out on the bridge by himself.
After dinner, Joke says “Sometimes people don’t show all their cards.”
Episode 6:
Joke gifts Zo a sunflower pillow and tells him to look up the meaning, Zo searches up “liveliness sprung from despair.”
Joke insists on picking up Zo so Zo doesn’t go out in the rain/worried about his health.
Kot doesn’t seem to like Joke and extremely overreacts to the way Joke trying to get Zo to eat the food he bought. Now, Joke was maybe a little pushy, but Kot goes off the handle.
When cuddling in bed, Joke says “hugging for 30s releases Oxytocin” and if they hug longer, “it means we feel the same.”
Episode 7:
At the amusement park, Joke mentions he has fond memories of the park because he went with his grandma back in high school (implies the break or disconnect with his family occurred then).
Talk of changing bad memories to good ones (re: Puen)
Joke says "I've never seen so much blood and gore in my life" regarding the haunted house.
Joke's grandma tells Joke that any potential partner needs to be a "fighter".
When his motorcycle breaks down and Zo is surprised Joke can fix it, Joke says "when you love something you learn to take care of it"
Zo says that Joke "sounds like a life coach"
When dropping Zo off, Joke hugs him and says "it's been awhile since I hugged anyone besides my grandma" (ouch, just ouch)
When Joke can't get a hold of Zo, he panics and get the landlady to open Zo's door and is freaked out to find Zo asleep on the floor.
Joke and Zo take day off and make something that looks like vases and Zo paints a sunflower on his.
Despite Joke having a temper, he lets Zo handle Puen how he sees fit.
Episode 8:
Zo comments that Joke "spouts Hallmark lines"
When Zo tells Joke that he and Poom are going to Zo's room for school work, Joke asks "is he trustworthy?"
Joke gets a package of creepy pics (via Jeng) and races to find Zo.
Joke says "I'll take care of you" to Zo
When Joke, Zo and Nita bust Poom, Zo has to pull Joke off Poom.
Joke tells Zo "don't trust strangers too easily" and "if something comes up, we always talk"
Episode 9:
Joke asks "what will I do without you for three months" when Zo says he has to go home for break.
Joke wants three calls a day and a video chat before bed every night (that's a lot, Joke, damn)
Joke tells Jeng "you might regret it one day when you turn around and [Pok's] not there"
In the flashback to the Freshy Contest, Joke is sitting alone outside, looking melancholy when Zo approaches.
Zo offers to take Joke's place in the contest and asks if Joke is okay.
Joke says "no one should be forced to do anything" and "you're the first person to ask what I wanted"
Joke says he won't lie or hide anything during his apology
Zo insists "no silence, no hiding, no secrets"
Episode 10:
Joke is supposed to spend his birthday with his Grandma (Jeng is taking Joke's parents out to dinner).
Joke worries about Zo.
Zo's mom chooses "childhood trauma from parental conflicts results in troubled adults"
Zo quotes statistic of "50% of people with family conflicts commit crimes"
Joke tells Zo "your family and mine are not so different" and it's his "happiest birthday"
(holy time jump Batman - I guess three months have passed between leaving Zo's and the debate club scene)
We get the Wave and Trin back story but the most important part to me was Zo asking "was hitting someone the answer?"
Episode 11:
Joke advises his parents are not coming to the debate, he texted their family group chat and "got left on read"
Joke's family just rolls up to his apartment (does grandma have a key then?) and they just hang out waiting for Joke
Joke's dad films Joke's mom and grandma watching the competition video
Jeng comes by and says Joke is out with friends celebrating and Joke's dad says "it's good Joke is with friends"
Joke's dad sends the video of mom and grandma to Joke
With the preview for episode 12 alluding to more issues between Joke and his family, Joke's proven temper, his aloofness around people, his propensity to speak like he's been to therapy and his extreme concern over Zo, I think that something bad happened and Joke was the cause. His family/money/connections got him out of it, but he's angry and his family and him had a falling out (except for grandma). Abandoned by everything, he was left alone and in pain until he met Zo, his sun.
That is what is hidden in Hidden Agenda, and it was right in front of our faces the whole time.
#hidden agenda#hidden agenda meta#thai bl#I'm not saying Joke isn't a stalker because that's here too#but I actually think he might have some anxiety or PTSD due to past trauma#I'm so glad I rewatched the show
29 notes
·
View notes
Text
Misfits

Summary: Jane feels out of place in Valhalla. She isn't the only one.
Characters: Jane Foster, Loki (Sacred Timeline), Frigga, Odin
Warnings: This is a gen fic for all audiences. Light-hearted menace, non-graphic violence, frequent mention of death (obviously).
Length: 1810 words
Note: This is my first fanfic in about a decade. It started as a one-shot, but if people like it I'll probably turn this into the first chapter. (Also, please excuse the crappy photoshop above. I'm afraid my photoshop skills are as rusty as my writing.)
—————————————————
Jane leaned on the balcony railing in front of Odin’s hall, observing the einherjar on the battlefield far below.
It didn’t look so bad from up here, but she was quite certain it would be a chaotic nightmare once she found herself in the middle of it. Anguished screams carried up the hillside and echoed through the valleys, somehow carrying over the constant din of metal crashing upon metal. From time to time, another distant figure would fall and be still while the fighting carried on around them. In some places, groups of warriors seemed to work together, while elsewhere it looked like a free-for-all, with fighters attacking anyone and everyone within their reach.
One band of warriors managed to destroy their nearby foes in a brilliantly coordinated attack, then immediately fell upon their own comrades. Jane watched in horrified fascination as a mace-wielding berserker spun around, clearing the field around him in seconds, only to be cut down by a thrown axe.
What in God’s — er, Odin’s — name am I doing here?
She’d arrived in Valhalla only yesterday. Odin and Frigga were waiting for her in front of the hall by the time she’d made her way up the hillside. Frigga had embraced her warmly while Odin beamed at her. They’d been very kind, inviting her to dine with them privately for the first night. She’d accepted readily, relieved that she wouldn’t have to face the crowd in the massive mead hall just yet.
Over supper, Odin patiently explained what was expected of her as a warrior of Valhalla.
Jane had picked up a bit of Asgardian and Scandinavian folklore during her time with Thor — and a great deal more in New Asgard — but nothing had really prepared her for this. She was a scientist. She’d never believed in any sort of afterlife until she found herself face to face with Heimdall at Valhalla’s gate.
“Your duty is to fight, to train, and to ready yourself for the Final Battle,” Odin had told her.
What it boiled down to was that she would have to join the other warriors on the battlefield — and most likely die — every day, only to be resurrected in time for the evening meal. When she asked what and when the “Final Battle” would be, Odin was less forthcoming. Thor had told her that the army of Valhalla was a no-show at Ragnarok. Maybe they were being held in reserve for something even worse?
Jane wasn’t afraid of a fight, but she hadn’t particularly enjoyed it either. There was so much more to life — or, well, afterlife — than that, wasn’t there? It didn’t help that she had no idea what it was all for, in the end.
After a night of fitful sleep, she skipped breakfast. The growing feeling of dread and anxiety hadn’t left room for much of an appetite. Instead, she tried to delay the inevitable by inspecting her surprisingly spacious suite. In a closet, she found an assortment of clothing and armor, all in her size. There was even a near copy of her ‘Thor’ outfit.
She didn’t know yet whether she’d be expected to fight today, so she’d opted for a simple tunic, a tough leather jerkin, comfortable trousers that tied at the waist, and brown leather boots.
Frigga had found her in her room and showed her around the compound. In the armory, Jane picked up a hammer but found to her dismay that it was much too heavy for her to wield effectively. That had never been a problem with Mjölnir. The longer haft felt strange, too. Mjölnir’s unusually short haft had actually suited her quite well. Unfortunately, Thor’s hammer was still in the realm of the living. She would have to find another weapon, but she was at a bit of a loss there.
The truth was, she had to admit, Mjölnir had done much of the work for her.
She’d trained hard every day with Brunnhilde in New Asgard. If not for the stupid cancer, she would have been in the best shape of her life when she died, and a fairly decent fighter. Still, without her magical weapon, she was no match for the Asgardians and humans — most of the latter were Norsemen (and a smattering of women) who had been here for over a millennium — almost all of whom had trained in the arts of war from childhood.
Eventually, Frigga encouraged Jane to go watch the battle while she went to consult with her husband.
No longer really seeing the carnage laid out before her, Jane sighed. She didn’t even know many people here. There were Odin, Frigga, Heimdall, and a handful of New Asgardians who had fallen when the little town was attacked. No family or close friends. No Brunnhilde.
No Thor.
She wondered if it was too late to back out. Would Odin and Frigga be offended if she —
“Oh dear. I know that look.” The low, silken voice interrupted her thoughts.
Startled, she turned to see Loki standing next to her.
How did he…? Oh, right. Yeesh. Someone should put a bell on this guy.
The God of Mischief smirked at her surprise. “Didn’t expect to find me here, did you?”
He was dressed much the same as the last time she’d seen him, in a green tunic with gold embroidery, a long green and gold coat styled to make his shoulders look larger, and matching leather trousers with black boots.
Still just as vain, even in death.
She wondered whether he had a closet with clothing in it, or just conjured clothing to match his mood.
“I, um, I guess I hadn’t really thought about it, to be honest.”
He chuckled. “Not to worry. Trust me, nobody was more shocked than I was when I came to and found myself walking next to Heimdall on the road to Valhalla. Never saw this in my future.” He gestured, his arms encompassing the massive hall and the field of battle below.
She managed a weak smile and nodded, not knowing what else to do. This was unexpected. Her mind raced, trying to figure out what it meant that Loki was here. Should she be worried?
“Neither did anyone else,” he added, with a touch of — was it sadness? Scorn? A bit of both? “They drew lots to decide who would have the chance to kill me first. There was a queue…”
Jane found herself horrified and amused in equal measure. “I’m…sorry,” she choked out. “That sounds terrible.”
Loki waved his hand dismissively. “Oh, it wasn’t so bad. I even let several of them win — guards killed when the Frost Giants invaded Odin’s vault. I took them all on at once to make their ‘victory’ more believable. Turns out people are more willing to forgive past transgressions once they’ve brutally murdered you a few times.”
Jane snorted in spite of herself.
He winked at her. “Leaves more room for new transgressions.”
She wasn’t quite sure what to make of the mercurial, unpredictable god. She hadn’t forgotten that he’d killed quite a few people in her world. Then again, he had risked his life to help save her from the dark elf, Malekith. True, he’d been motivated by a desire to avenge his mother, but he’d also jumped to shield her from the blast when Thor destroyed the Aether, likely saving her life when Thor wasn’t even watching. Loki seemed to be full of contradictions.
I wonder if even he knows what he really wants.
Jane thought about what she knew of Valhalla’s entrance requirements. It wasn’t like the Christian Heaven, she remembered. It wasn’t about how you lived. It was how you died that mattered most.
She’d thought that Loki had died in Svartalfheim, which probably would have landed him here if it hadn’t been an illusion. Later, Thor had told her about Ragnarok and the nasty business with Thanos. Apparently, Thor was right. Loki really had died that time — and again, he’d died a hero.
More or less.
They stood silently a moment, watching the ongoing battle. Jane stole a sideways glance at Loki as he gazed down at the field. He seemed older than she remembered. Sadder, somehow, which was odd given that the last time she’d seen him, he’d just lost his mother and had now been reunited with her in death.
“What were you saying before? You know what look?” Jane asked.
“The look that says there’s been some terrible cosmic mistake, which will no doubt soon be corrected and you’ll be sent packing, off to where you really belong.” He mimed wrapping something up and tossing it into the distance. “I was the same when I first arrived.”
“And where’s that? Where do we really belong?”
“In my case… Hel. In yours?” He shrugged. “Wherever good little scientists go when they shuffle off the mortal coil.”
“But you don’t think that now?”
“Valhalla doesn’t make mistakes. If we’re here, it’s because we belong here.” He shrugged again. “Or so they say.”
“You’re not so sure?”
Loki turned to face her again, his mask of arrogant superiority slipping smoothly back into place. All trace of the vulnerability and uncertainty Jane thought she’d glimpsed had vanished.
“As it happens, I didn’t come here just to discuss theology with you. Odin, in his infinite wisdom,” his voice fairly dripped with sarcasm, “has decreed that you, my Lady, shall be trained in the subtle art of dagger combat.”
“Daggers? Why?” Jane couldn’t help but feel a bit disappointed. She had been ‘The Mighty Thor’, defender of New Asgard, after all. Now they were going to throw her into battle with nothing but a knife or two?
“I’m afraid we’re running low on magic hammers here. You’re tiny, but quick, and…reasonably intelligent,” he replied, haughtily.
“Gee, thanks.”
“Daggers require a certain finesse. Intelligence counts for more than brute strength.”
Loki leaned in. She was surprised by the way he towered over her.
He’s taller than I thought. I didn’t notice when he was with Thor.
“And you may not wish to thank me by the time we’re done,” he whispered. “I’m going to train you, seeing as I am the resident expert.” He stepped back and grinned wickedly as a pair of daggers appeared in his hands. The edges looked very, very sharp.
“Okay…”
Loki spun the daggers around in his hands and offered them to her, hilt first. She took them, hesitantly.
“Don’t worry,” he said in a mock-soothing tone that was anything but reassuring. “I promise to kill you quickly the first few times.”
“What?”
He laughed at her alarm. “You’ll get used to it.” Another pair of daggers appeared in his hands. He flipped them in the air and caught them expertly, then adopted a fighting stance and cocked his head, eyes glinting dangerously.
“Now then, my Lady. Shall we begin?”
8 notes
·
View notes
Text
I N T R O P O S T
hi 👋
My name is hauntedpotat, you can call me something related to that or Lyss! I am an AAA battery (aromantic, asexual, agender, for those who dont know), and my pronouns are xe/they/he, but I'm pretty much good with anything except she/her 👍
I am a minor, no creepy or nsfw stuff please
Shitty people FUCK OFF (you know EXACTLY who you are, and no I will not debate with you on if I should exist or not. Leave me alone. Thanks!)
Asks are cool!! Talk to Me (if you want)
I probably have adhd, idk but I'm most likely neurodivergent
I live in the US and like to make art! This blog is mainly OC and story art, art challenges, and general tumblr interactions. I have a fandom sideblog @themostuselesspotato where I post, you guessed it, fandom stuff (not specifying here, there are far to many). Outside of drawing, I also enjoy reading and most crafts.
I am currently in the process of writing/illustrating a webcomic that I plan to start releasing on webtoon this summer! The characters that I draw here will be part of it :)
I also have a pinterest, instagram (which I no longer use), youtube, and twitch (I haven't done anything with the last two yet, but I plan to in the future). You can find all of this at gpdsocials.carrd.co if you're interested
Adding a cut here, important stuff is above, spewing about my life is below (lol)
I am currently going to school for graphic design, so I know how to and frequently use Adobe Illustrator, Photoshop, InDesign, and Primere Pro both in and out of school. My current profile picture was made on Illustrator for an ongoing branding unit in one of my classes. I also learned how to design, cut, and press T-shirts.
On the topic of school, I also participate in band! I did summer marching band last year, and hopefully will continue to do so until I graduate. I am a percussionist, and my favorite instruments to play are bass drum, vibraphone, and this one specific marimba we have in class (no seriously, I could rant about how nice it sounds for HOURS). During marching band, I played second bass drum, and now snare.
I posted a complete Fishuary art challenge here! If you want to see my silly fish drawings, search the tag #fishuary2024
On the topic of tags, I also use #potats friend interactions (for general convo etc) and #potat rambles (for shitposts basically) All of these are tagged below, for easy access.
Random facts about me! Idk
I can kick someone of adult height in the face if I want to (for some reason I can just kick really high)
When I was in 3rd grade I handwrote a two page informational essay about mosquitoes from memory in an hour
I have a cat! Her name is Stormy, she's 3 years old :) lmk if yall want to see pictures of her, I've got so many pictures
The only video game I've played is minecraft on a kindle fire that I won from selling girl scout cookies at the age of ten. This shitty thing can support like one world at a time and STILL crashes
Once I smashed my knee between a boat and dock at 8am bc I was running off of hot cocoa and 5 hours of sleep and thought my knee was a good cushion for the boat that was coming in at the wrong angle. Don't do that!! Hot cocoa induced decision making is bad! And boats are still very heavy even if they're very slow!!
Idk what else to write here. I'm sure I will continue to update this post, so feel free to ask me questions in my asks or in the replies
Bye! 👋

8 notes
·
View notes
Note
how do you get your traditional art to retain its color once you photograph it?? Everything looks so vibrant and well lit it’s honestly incredible.
I was originally going to have a straight forward answer, but I think this is a good opportunity for me to share how I go about preparing my artworks for social media.
Disclaimer! I'm not an expert in photo manipulation. This is what I learned after doing some research and experimenting.
Capturing the artwork
I have to be transparent though that I do not photograph my work, I scan it! I use a CanoScan LiDE220. I've had it for 6 years. This is why I am able to retain the artwork's texture. However, the result of the scan is very washed out, and is not accurate to the artwork's actual colors. Example below:

The left image is the raw result from the scanner, while the right is an edited version that I have posted. As seen, the left image is washed out. So, to the best of my ability, I change different parameters of the image to get the closest to the real artwork. I use photoshop to edit the image, but it is possible to do it in any photo manipulation software (or you can get a cracked ver-)
Editing the photo
1) Levels

Levels is where you manipulate the values of the image. The left is for your lightest values, and the right is for the darkest values. Moving the left slider alters the lightest values of the image. Moving the middle slider alters your middle values, and same goes for the right slider for the darkest values. I often slide the middle slider to the right to darken the image. I hardly touch the other two. Alternatively, you can use Curves to darken the image, it is a more intricate version of Levels and gives you the most control. I am not super familiar with it, so I cannot talk about it.
2) Hue and Saturation
Hue controls the most dominant color of your image. Saturation controls the intensity of the colors in your image. I often bump up the saturation of my images. There are times I also alter lightness just ta bit for sketch sheets, to slightly washout colors (mainly the yellow of the paper)
3) Color Balance
Color balance indicates which of the colors in each slide is more intense globally. Meaning that if you put the slider closer to blue, then all yellow tones will be washed out. Sometimes the Hue and Saturation sliders aren't enough, so I use Color Balance to tweak it a bit.
4) Brightness and Contrast

Brightness refers to how light or dark the piece is overall. Contrast refers to the difference of the lightest and darkest values. I often use this when manipulating sketches, this is to make the inks pop out more.
Other stuff that might be relevant
every piece has it's own set parameters, I eyeball everything lol. I do not have any "set values"
If there is a specific part of the image that needs editing, I "Mask" that part of the image out. Meaning that only a specific part of the image will be altered. Masking does not permanently change the image, so you can easily delete it if needed. Crash course in "Masking": the visibility of the image is set in black and white. The black parts of the mask is hidden, while the white is seen (Image below.) So for example here, only the white parts will be affected by the color balance

as much as my scanner is helpful, it cannot scan large pieces. One of the largest sizes I am able to scan is A4. So, I have only been using that size or smaller. If you want to invest in a scanner, you should consider the sizes of paper you often use. You can also "stitch" the artwork together (i believe photoshop has this, but it might be a hassle. I can't speak about this because I haven't tried it.)
If you are doing paintings on a canvas, you will have to photograph it There is no other way around lol, paintings like those are really photographed. Professional artists either have their own photoshoot set, or they find a place where they can have it photographed.
Sticky notes, or paper with luminosity aren't picked up by the scanner. I've been struggling with this one for awhile lmao. Altering it with the aforementioned steps alone don't give the result I want. I use layer modes too. Still currently experimenting. Example is below, original is a neon orange sticky note.
(original scan)
(altered with brightness/contrast, darken layer mode w/ orange, and vibrance)
ANYWAY!!! This is a master post of how I currently go around my works. Very lengthy, but I hope it helps someone!
#art tips#photoshop tutorial#art tutorial#photoshop#art help#image manipulation#traditional art#danee answers#danee talks#anon ask
104 notes
·
View notes
Text
SANCHELINZ’S GIFFING PROCESS
hi hi so i figured i would compile a post for my giffing process as i have gotten several questions about how i gif so quickly/what i use/etc so!
tools i use:
- vapoursynth
- photoshop
specs:
i have two devices that i gif on, i just switch between the two depending on where i’m at.
for my desktop computer, i have an alienware aurora r11
- processor: intel core i7-10700K
- ram (memory): 32.0GB
- os: windows 11
for my laptop, i have a dell xps 15 9500
- processor: intel core i7-10875H
- ram (memory): 16.0GB
- os: windows 10
if you want see a side by side comparison of gifs i make on each, all my paradigm sets were made on my laptop (here, here, here, and here) while my taemin gifs and these two key mv sets were made on my desktop (here, here, and here). they generally look the exact same, my desktop is just faster bc it has more memory.
things i do first:
i always clip the video i’m working with first by writing out the timestamps i want to use solely bc that is what works best and quickest for me. every gifmaker is different and will have different tactics, but that’s just what i’m used to and what helps me expedite the process the most!
clipping things this way means that i spend less time rifling through frames and shots to find what i like bc i just make note of the timestamp where a certain shot i like is and can push it through the vapoursynth real easy
vapoursynth settings:
for vapoursynth i try not to do too much since i do most my work inside photoshop itself, and i keep these settings the same 100% of the time. and rather than going through each individual gif, i overwrite the code each time i start a new set so that i can keep the sizes the same from gif to gif. this also cuts down on time and makes it easier to focus on other parts of the process
video = core.knlm.KNLMeansCL(video, 0, 6, 4, 0.5, channels="YUV")
video = fun.FineSharp(video, sstr=1.5)
i only use a preprocessor (video = haf.QTGMC(video, Preset="Slower", TFF=True) bilinear) when the file i’m working with overlaps frames or has that ‘striping’ effect on it.
i trim all my clips/gifs on vs to start! if a gif ends up being too large, or i don’t like certain frames, or i don’t like the way it loops, i’ll simply delete as needed later in photoshop!
once i get my output and it processes (the processing time of the gifs is usually what takes the longest and i have found that this speed depends mostly on your device’s memory. my desktop is much faster than my laptop bc my desktop has twice the amount of memory on it) i copy and paste the output file into a generic copy like this. if i’m making a ton of clips (20-30+) then i will name them or separate into folders as needed
photoshop:
firstly, photoshop is very dependant on memory as well. the sole reason why my desktop has so much memory is bc of photoshop. you can go into settings to change how much memory photoshop consumes (edit -> preferences -> performance) and photoshop will recommend an ideal range to use too. i have mine set to 70% and it runs like a dream. the only crashes i’ve experienced have been when i’m running other programs that use a lot of memory at the same time.
i monitor my task manager regularly simply bc i like knowing why my computer is running the way it is and i can confirm that photoshop eats memory hardcore. if you use both vapoursynth and photoshop, and have issues with slowness and/or crashes, i recommend keeping photoshop closed until you are fully done with vapoursynth.
i don’t reuse colorings from set to set so i don’t really keep/use psds personally. i know a lot of gifmakers do have set psds that they make to use for certain kinds of videos and such, and that is def something that can speed up the process too ^^
what i personally do is group my coloring layers into a folder and once i’ve finished coloring one gif i will simply copy and paste it onto the next and make minor adjustments as needed!
coloring itself, it depends from set to set but the five layers i absolutely always use are: brightness/contrast, color balance, channel mixer, selective color, and exposure (i always keep my exposure layer on the very top, it’s a minor change but just a personal preference)
i try to make everything as easy as possible when giffing personally, so if i can turn a 20 click process into one click, then i absolutely will.
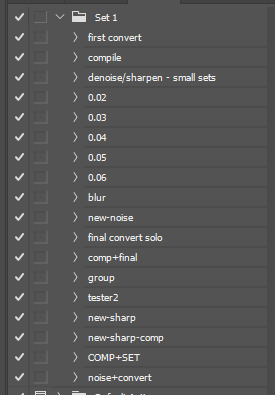
90% of the speed of my giffing comes from actions!
actions are my best best best friend in the universe when it comes to giffing. i have the same action sets on both my laptop and desktop so that i don’t have to remember my settings myself since my memory is horrible.
first convert: select all frames, select all layers, convert frame animation, convert to smart object
compile: select all layers, convert to smart object
0.02/0.03/0.04/0.05/0.06: frame speed settings/ selecting all frames, change frame animation speed
blur: for captions, i duplicate the og layer and select the area around the caption then use gaussian blur at radius 1.4 pixels to blur. i typically go in after the fact with the blurring tool to smooth the edges around the blur section so it isn’t as sharp!
i have an action for my noise settings to maximize efficiency too, then i do the same for my denoise/sharpening settings. i have two separate ones, one for small gifs (like for a 9-set, 3x3) and one for all other sizes of gifs
the final convert is simply flattening the frames into clips and converting the timeline, making frames from layers, then setting it to whatever speed i like. because im ultra lazy, i have those frame speed settings as an action so i can just do one click instead of like, three.
essentially, if there is something i know i will be doing and/or repeating often, i make it an action. that’s really what makes my process as quick as it is imo!
honestly i just try to streamline the process as much as possible bc the technical parts of clicking 100 different things are not what i enjoy about giffing, i enjoy coloring and playing with layers the most so that’s what i want to spend the brunt of my time doing. but i also tend to be super busy while also wanting to gif a ton so over time and with practice a lot of the process has become pretty snappy and easy just from that!
pls feel free to ask questions if anything doesn’t make sense im not the best at communicating my thoughts into words so i might be explaining things in a way only i can understand but i hope it makes sense enough and is helpful too!!
49 notes
·
View notes
Note
Okay, but can we just acknowledge not only the suspence and horror and the hurricane of emotions that was Hen seeing her best friend tortured and almost killed (repeatedly killed?) in front of her and (how she undoubtedly think about it) because of her even, and the aftermath and words between her and Chim... but also how very, very differently it was framed and filmed and acted, and as a result felt like, compared to the (on paper) technically somewhat similar shooting scene with Eddie and Buck, and their aftermath at the hospital, a season back?
Like, how to even articulate that jumbled mess of feelings there, please help :-)
Hi dear Nonnie!
Sorry it took me a moment to answer, I wanted to make a gifset to go along with this, and in addition to rl being difficult, photoshop keeps making my entire computer crash... DX
But yes, absolutely! And the crazy thing is, the Hen & Chim storyline with the kidnapping is a fantastic piece of the power true friendship holds. It’s Chim’s faith in Hen, together with her catching on to how Chim’s trying to use the defibrillator that save countless lives, including their own. There is so much love, trust and mutual understanding there. And it’s still so different to Buddie.
So I didn’t gif the moment of the shooting itself because I think we all have that tattooed onto the back of our eyes by now, right? But it’s complete insanity, that look between Buck and Eddie is so intense, the whole framing so intimate (for a moment there, it’s just the two of them in the world and that’s it, looking at each other desperately, a connection so strong it’s almost physical to the point that even after Eddie collapses, he’s reaching out for Buck). This moment is in fact so intense, it lingers even after it’s over, and Buck is still standing there, just staring at Eddie, and has to be forced by Captain Mehta to duck and take cover. In comparison, as much as Hen is distraught and weeping, desperate for Chim not to be killed, we never get such intense, meaningful eye contact between them. She’s also in full charge of her faculties during the whole time, she’s almost out of her mind with worry for Chim, but she never has even one second of fully losing it. And we know she loves Chim deeply. So that situates what Buck and Eddie have as something else.
We actually do get once again focus on eye contact during the ambulance scene! I just wanna emphasize, as you can see in this gifset I made for a canonically gay movie, that this kind of intense eye contact is often used on screen to convey a deeper connection, falling in love. Buck is trying to keep Eddie alive with everything he has, his eyes are open and wild, his voice pleading for Eddie to stay with him. And Eddie? Hears him out and for a second he’s back, and looking at Buck. Which is when he notices the blood on Buck’s shirt. This man, who is literally dying, now only has one concern and it’s for Buck’s well being. INSANE. Again, Hen and Chim? At no point share anything similar. Yes, Hen is crying and doing all she can for Chim, and if her best friend had been killed, I have no doubt she would have never forgiven herself for it, and it would have haunted her for the rest of her life. But you look at Buck during the shooting or in the ambulance, and you can tell that Eddie is his life. If Buck had lost Eddie, he would have lost his own life, too.
And here I have to point out that the whole structure of the “partner in danger” storyline is different! Because in 517, by the end of the kidnapping and electrocuting scene, Greenway has been paralyzed, with Chim and Hen being safe and sound, though obviously still shaken and emotional as they physically lean on each other (beautiful visual metaphor for their friendship). But in 414, neither when Buck saves Eddie by dragging him out of the shooter’s range, nor in the ambulance do we have that. Buck is still full on frantic as the shooting itself wraps up, signifying that this is just the beginning. What this will really mean for Buck and Eddie is gonna be so much bigger, and it’s still to come.
At the hospital, We have Hen and Chim dealing with recovery together, but at the same time, they’re dealing with it as friends, not romantic partners, which is especially clear when an actual romantic partner runs in. You can tell that Karen is a romantic partner who counts because she gets the dramatic running in, but she also gets to talk to Hen about how she felt with everything that happened and her thoughts on what might have been. In 414, Eddie technically does have a romantic partner, too! Ana is right there! But we never hear how she feels or what she went through as her bf was fighting for his life. She doesn’t get that dramatic “I heard and had to be here by your side right away” running. It’s Buck who does. In fact, the way it’s shot and framed, Ana is literally the obstacle that’s in the way of Buck and Eddie making relieved, happy to be reunited eye contact. YES, Buddie shared intense eye contact once more! Those fuckers are having it more than some canon couples have sex. So it’s Buck who runs to Eddie’s side, it’s their reunion that constitutes an emotional climax, evident in the way that it’s filmed, and it’s Buck who we see getting to have a talk with Eddie (after the phone call to Chris) where he gets to say how he felt and what were his hypothetical scenarios he couldn’t help running in his head...
Then the concluding talk itself! Chim and Hen have a conversation at the end because Hen feels so bad for dragging her best friend into danger. While she’s at it, she reminds him of how much he means to her, while he tells her how much he trusts her, and how there’d never be an option where he didn’t wanna follow her into danger. It’s a beautiful affirmation of their friendship and (platonic) love for each other. It’s emotional, it’s satisfying, and it’s neatly completed. In contrast, Buddie have a talk because Eddie can’t accept that Buck doesn’t see how much he matters. It’s instigated by the shooting and what Buck said following it, but it pertains to something bigger between them. And it’s handled in a way that’s so much more intense. Hen told Chim he’s the best friend she’s ever had. Eddie tells Buck they’re legally family. That Buck’s not just his friend and work partner, but his life partner.
In the last frame of this talk, Hen is sitting on Chim’s bed, holding hands. They’re smiling affectionately at each other. The shot emphasizes their bond by drifting away and showing us strangers passing by in the hall. The final shot of Buddie’s talk has no need of strangers for that. If the camera panned away from Chim and Hen, with Buddie the last two shots are close ups of Eddie’s face as he insists to Buck, “You’re wrong,” and then the parallel of Buck’s face when Eddie turns to him and looks right at him (again, the eye contact! We see only Buck’s side of it, but we can tell that they’re staring intensely at each other) to make sure the message and its full impact have been absorbed. It’s intimate and loaded. So much has been said between them, and implied even more that still hasn’t.
Thank you so much for this ask, I hope you enjoyed my reply and the gifset! Please don’t hesitate to let me know what you thought... xoxox
If you're looking for my ask replies, here is my ask tag! xoxox
#buddie#911meta#buddie meta#911 meta#9-1-1#evan buckley#eddie diaz#chimney han#hen wilson#hen and chim#hen and karen#karen wilson#edmundo diaz#evan buck buckley#ask#anon ask#911onabc#911 on abc#911abc#911 abc
127 notes
·
View notes
Text
I started reading the Barbarian romance series (the smut books about the blue alien guys with the infamously bad Photoshop covers), and aside from some issues I have with the writing, the notably lackluster book featuring the only evidently POC character (and her being compared to food at least once), the use of the word 'barbarian' (it's originally a slur used against North African people, btw) I really must admit...
... the romance and smut stuff is fine, but like, the cultural commentary on civilization?!? The loss of it after a catastrophic crash? Generational trauma?!?
The framework for the lore and the backstory of the sa-khui species?!?
The eventual discovery in book seven (yes, I read that far lmao) where they find archaeological evidence of plumbing in an abandoned alien city?!? That's goooooood. I WANT MORE OF THAT.
Does anyone have any good book recs vaguely related? Don't care about smut being included (I like to think something like this could be a part of a series about the development of Mintaka III, which I do think was some kind of Romulan colony accident). Like, stuff about advanced civilizations reduced to their relative stone ages and contending with that shit.
5 notes
·
View notes
Note
i have to shoot my shot and ask - HOW on earth do you make your gifs so crisp. they're so clean its literally out of this world!!!!!! when your gifs are on my dash i almost always know its you just by the QUALITY of the gif. help a girl out!!!
Hii! Thank you!! <3 I'm happy with the way my giffing process now goes but it's taken years and a few different fandoms and stumbling upon good tutorials which is why i decided to make one of my own too.
I still love figuring out new things to try and hopefully you can get some new tips to your process from me too. Under the cut is a long af post about gif making, focusing on some basic stuff and sharpening/coloring tips.
________________________
WAY TOO LONG INTRO
Before i get to the photoshop part, the base stuff is super important: You can't turn a very bad video into great gifs since there's only so much photoshop can do BUT you can turn a good video into great gifs. So, obviously the original video quality matters a lot.
I religiously stand by the correct tumblr size dimensions (see example, the numbers mean the width. Height doesn't really matter). However in 3 column sets i’ll sacrifice that one pixel and would make them all 177px. The empty space between gifs in 2 column sets is 4px, in 3 column sets it's 4px + 4px.
Since tumblr can only properly handle 540 gif pixels in the same row, sets with two wide gifs side by side can be laggy to scroll by. So for example, 268px gif will not be as sharp as 540px gif (if you click on it to see it bigger), since it legit has only half of the pixels, but if you plan to post 2 gifs in the same row, the 268px will look better on the dash in the gif set since it’s correctly sized for the best dash result.
I download videos when i can (dl is always better than screen recording), so that's youtube, instagram/twitter etc. Streaming sites/broadcasts i have to screen record and i use OBS to do it. It's the best i've tried for hq recording. I record with 60fps and use display capture. OBS is a heavy program, as is photoshop, so a good enough computer is also super important imo. I used to make gifs with a laptop of 4gb ram/128gb emmc and lost my mind after all the crashing and spent 1k€ on a new one. Basically, have as much performance as you can afford, and editing experience will be much much more pleasant. Of course gifs can be done with an average computer too, it'll just likely be slower and clumsier and you need more patience 😫
Also, i've gotten rid of the urge to be the first to post a gif set when new content drops. I'm not the fastest, i always do every coloring from the scratch. I save to drafts to see how it looks like on mobile, i go back to ps to correct the things that don't look right (too dark/bright, too green/yellow/red, too slow/fast), i make the changes, then save to drafts again and then post. I'd rather post a set i'm happy with than to post quickly knowing i could've made it look better with just a bit more time. (It'd bother me and i'd go back and re-color for my own peace of mind 😅) And i just wanna say it's totally fine when people make gifs of the same stuff!! The more the merrier, no need to think only the first to gif something somehow now has the rights to that moment. I just never get the best result if i try to hurry, so i’ve stopped trying to get my sets out asap. I’ll post when i’ll post.
________________________
SHARPENING
All these words and i haven't even gotten to the point yet 🫣 But fine tuning the details won't work if they don't have a proper base at first. Which!!! Finally brings us to your question:
I'm not sure if the order really matters but the main steps i do in this order: once the layers have been converted to video timeline and video timeline is converted into a smart object -> smart sharpen -> crop -> resize -> coloring
I like to sharpen things first, to me it makes sense to do it before resizing because after resizing you've already lost some pixels, so feels better to sharpen when you still have all the original pixels.
All the above steps (sharpening, cropping, resizing) will affect how the gif looks, so i do the coloring as the very last thing so i can better see how the end result will look.
To me sharpening and coloring go hand in hand, and you use both of them to get the best result. Sharpening obviously does what it says but good coloring will help to make the gif look cleaner and smoother too.
Finally, examples!! The key to a sharp result in my process is 2 sharpening layers. The main layer and the second layer.
Enjoy looking at judgy max f i giffed last year and chose to use as an example here. The source video quality was 1080px and i screen recorded with OBS.
I use photoshop CC2019 so cannot guarantee that these will work the same way in other ps versions. As always, it's about fuckin around and findin out 🙏🏻
__________________
1. Example with resizing done, but no sharpening or coloring (blurry and ungood)
2. Example with resizing and main sharpening layer (already much better)

3. Example with second sharpening layer included (more depth, dark spots are darker, almost too strong of an effect but coloring will fix that)

4. Example with all of the above + coloring (the final result)
5. The final result as a gif

And how did we get that result?
Main sharpening layer settings (yes, it’s in finnish but i think the options are in the same place in every language):

Because the sharpening is quite heavy, I double click on this thingy (red circle) in the layers panel to lower the opacity to 50-70%
The middle layer is gaussian blur, which i’ve set to 0,2.
So basically i intentionally oversharpen the gif and use the opacity function and blur to soften the effect. Dumb or smart, who knows not me, but it’s working for me so i’m rolling with it.
The top layer is the second sharpening layer. A godsend trick i’ve learned along the way: (the difference between the example photos 2 and 3 above)

(I've created an action, so i just gotta push one button and it'll run thru these sharpening settings, ie. i don't have to manually click thru these every time, saves crazy amount of time)
Wasn't sure at which point i'll mention this so i'm just putting it here: when saving the gif for web, i almost always use adaptive and diffusion.
________________________
COLORING
I’m not gonna go thru every coloring thing in my process since this is already so long hsdkfjdkjgkd but i’ll give some info on what i usually do and some tips i've found helpful.
My style is quite natural and i prefer colder tones. I hateeeee overly green/yellow/red skintones that are caused by bad lighting so I always try to correct that. The below stuff is more or less what i did to color that example gif too. (Everything is down to preference, these are just the way i like to color)
My most commonly used coloring layers:
Curves. Utilize the eye dropper tools, pick white eye dropper and click on a white spot on the gif (not pure white tho since it won’t do anything) and it will turn that spot to 100% white and correct the other colors at the same time. Black eye dropper will turn a dark spot you picked to 100% black. It can be super effective, just try a spot, undo, try another spot, undo, until you find what looks good. If you like the result but it’s too strong, lower the layer opacity. And of course you can just simply drag the curve up and get brightness that way. There are times when the eye droppers won't work nicely but it's always worth a try.
Levels. Works similarly to curves, they are basically the more efficient brightness/contrast combo.
Color balance. No gif of mine has been made in the last 3 years without dragging the blue in the midtones to the right. I also often drag the green to magnetas side.
B&W gradient map. I set the blending mode to soft light and lower the layer opacity. Gives the gif a bit more depth and pop to the dark/light parts.
If the dark parts in your gif are too dark, for example details around eyes look messy but you don't want to lower the contrast, then try adding light colored gradient map (light yellow-white or light blue-white etc) and set it to soft light and play with opacity. It will give light and brightness to the gif without making things blinding and not losing much contrast.
Photo filter. I’m almost always going for cold blue and 10-20 setting. (Orange filters can give a nice effect too, if you want to bring some warmness to the gif.)
Vibrance. Always adding at least a little bit, helps colors to pop and makes skintones look nicer.
Selective coloring. Just drag them sliders to left and right to see what works, that’s really the best advice i can give. If you want reds to pop, go to red and play around. If you think the white spots are a bit blinding, go to white and then slide the bottom one (black) to the right. If you want some more contrast, go to neutral and slide the bottom one (black) to the right. Same with black (black).
Also, i don't like to do too much with one layer. I tend to do different colors with different selective coloring layers, so if needed i can lower the opacity and it will only affect that one color. Also it's handy to duplicate layers if you really want a certain color to pop, one layer often isn't enough in that case so duplicate it and if it's too strong then play around with opacity.
(Left image below). If you want to correct overly yellow/green skintones, go to yellow and you can try these settings. Then lower the layer opacity to see what looks good.
(Right image). If you struggle getting rid of very red tones, you can use hue/saturation layer, go to red and just drag the middle slider to the left. (This is also a good tip with POC, when you think their skintone is overly orange/red but you are afraid of white washing. This setting will usually correct the orange and red tone without taking the dark/black color away.)


______________________
THE END
Wheew this is what happens when you give me an opprtunity to talk about giffing 😅 I hope it was easy to follow, feel free to ask if i was unclear about something!! And hopefully you got to learn something new.
Also these are obviously just my way of doing things, not the Only Correct way, do whatever you like and enjoy and don’t worry too much if other people do things differently. Most important thing is to have fun creating 🫡
#slowestlap's lowkey gif tutorial of sorts#answered#one thing about me is that if i start talking about photoshop#i simply do not know how to stop hdjdjdjdk#ok to reblog btw if you found this helpful#(thank ya again for the nice words anon <3)
26 notes
·
View notes
Note
Hi, I really enjoy you doing promts 💞
How about "us getting into an argument is not gonna stop me from kissing you goodbye before i leave for work..." for J/J?
Hi there! I enjoy doing prompts, although I must admit this one turned out to be a little challenging for some reason 😅 I hope you like it though 🖤
(1819 words)
~
“PORKO!”
Joonas, who was already awake but too comfortable under his duvet to get up and properly start his day, almost dropped his phone on his face when Joel’s ear-splitting shriek broke the calm silence.
“What?” Joonas shouted back, once the initial shock at the sudden noise had passed.
“Where’s my mug?”
Joonas clicked his tongue and rolled his eyes; they were both grown men, and yet, living with Joel, Joonas sometimes felt like he was the mother to a teenage son.
“Your what?”
“MY MUG!”
Finally Joonas threw aside his duvet, put on his bunny slippers, and stomped to the kitchen to see what Joel’s current crisis was about.
“Where have you put it?!” Joel demanded to know the second Joonas saw him, all but pulling his hair off his scalp.
“Put your what?!”
“My Trent Reznor mug! The one I was gifted by a fan on the US tour! The taxi will be here in five and I haven’t even had coffee yet!”
As a matter of fact, it was the only Trent Reznor mug Joel owned, and although it had been hilarious at the time, Joonas was getting rather annoyed about seeing the intentionally poorly photoshopped fan edit of the NIИ singer’s face staring at him from the other side of the table at every breakfast. Tragically, it was also the only mug Joel ever wanted to drink from since the day the bouncer of a concert venue gave it to him with a heartfelt-letter from a young fan.
“The dishwasher?” Joonas suggested, but when Joel yanked the door open, Joonas considered grabbing the nearest saucepan lid to shield himself from the upcoming walloping.
“You didn’t turn it on last night?! IT WAS YOUR TURN, PORKO!” Joel screamed with fire-daggers shooting out of his eyes at Joonas once he realised the plates, cups and glasses hidden inside the home appliance were as dirty as they had been the night before when they had finished their dinner.
“In my defence,” Joonas shook his finger at Joel while backing off towards the the kitchen door frame, “if I may remind you, I was too busy turning you on last night to–”
“Fucking hell, Joonas, you can’t do even the most simple tasks I ask of you! This is about the MILLIONTH you’ve forgotten–”
“Not even simple tasks? Which one of us spent the whole night assembling that bitch of an Ikea shelf while you–”
“–and how many times have I told you to UN-FUCKING-PLUG THE TOASTER after you have used it?! If we end up dying in a house fire–”
“Well, at least I don’t leave my wet towel on the floor after I’m finished taking mirror selfies–”
“You are so unreliable, Joonas!”
The thing with Joel Hokka was that he was a right drama queen – Joonas had known this for as long as he had known Joel, and over time he had learned how to handle it, perhaps even find it a little endearing. At times, however, Joel’s exaggerations went a step too far and, although Joonas could be quite thick-skinned, ended up actually hurting his feelings a little.
“I’m fucking sorry, okay? Just use another mug!”
Just when Joonas was about to offer his own vintage Star Wars mug he had found from a thrift store and snatched from the shelf right before Olli’s star-struck eyes, the horn of the taxicab waiting outside their house called for Joel insistently.
“If I have a meltdown on live national television, it’s your fault,” Joel grumbled and was almost walking past Joonas to hurry outside, but when their shoulders bumped, Joel grabbed the back of Joonas’ head and crashed their lips together.
“Fuck you,” Joonas snarled when Joel let go of him and stomped away.
“Fuck you too,” Joel mumbled before banging the door after him.
~
Joel tried to even his breathing while walking to the car, but his eyes were already blurred when he slumped on the back seat of the taxi next to Niko.
“What’s wrong?” Niko immediately asked with a cautious tone.
Frustrated with his sensitivity, Joel hid his tears behind his palms.
“We had a fight.”
“Over what?”
Joel needed to take a moment to inhale and exhale to keep his voice from breaking down.
“A stupid mug.”
Niko was silent, and Joel wasn’t planning on glancing at his friend through his fingers to see him holding back laughter.
“Chin up, Jori,” Niko said instead, tugging a still shower-wet strand of hair behind Joel’s ear. “You know Porko doesn’t hold grudges for too long.”
“Yeah,” Joel said quietly as he finally dared to reveal his face. He proceeded to stare out the window, avoiding Niko’s gaze. “I was a bit of a dick though.”
“And he loves you regardless.”
And I don’t deserve it.
Joel closed his eyes as he felt tears burning them again. He must have been silent for too long, for Niko reached his hand to give a brief tickle to Joel’s shoulder.
“You hear me, Joel? He ain’t going nowhere.”
Joel knew this; yet, he couldn’t help but think that Joonas was worthy of so much more, worthy of someone who didn’t lose his shit over one forgotten housework and call him unreliable of all things when, most of the time, Joonas was the only person in the world Joel knew he could rely on unconditionally and always, in every fucked up doomsday scenario he could think of.
Joonas, if anyone, was worthy of someone less of a wreck than Joel.
“I know,” Joel forced himself to say, blinking rapidly as hot tears rolled down his cheeks.
“So are you still up for doing the interview? Just say the word and we’ll drop you back home instead.”
Hastily Joel dried his cheeks on his sleeves and cleared his throat.
“Yeah, yeah, let’s do this, it’s cool.”
“Are you sure? I mean, no offence but I’d rather do it alone than have you bawl your eyes out over a lovers' squabble on live TV.”
“I won’t!” Joel protested. “I’m fine, we’re doing this, I’ll talk with Joonas after, we’re already late.”
A quick glance at Niko revealed he was about to say something more, but Joel guessed his deathly glare shut him up and the man turned to look out the window instead, eyebrows raised and a hand tapping a rhythm on his thigh.
~
The interview went fine, against all odds; the second they walked in the studio, Joel switched on his Professional Musician Mode™ and talked about their new single and the upcoming shows with no pause or hesitation whatsoever, and even managed to crack a few corny jokes to make the presenter of the morning show burst into giggles off camera. However, once it was time for a commercial break and they could return backstage, Joel breathed out the tension in his body and slumped his shoulders again as the thought of Joonas and the unresolved quarrel came back to his mind like a boomerang.
“You did well, buddy,” Niko rubbed Joel’s lower back, “but next time, you can just say no, alright? The interviews and shit are just one part of the job, you know?”
Joel wanted to argue that nothing to do with the band was just one part of the job for him, as Blind Channel was way more than just a job. Niko would have agreed, Joel was sure of it, but Joel wasn’t down for listening to any more of his singer colleague's life wisdom over how there are “more important things to worry about than promoting their new music”, because despite his constant complaining and the numerous breakdowns he had had over the years, in some twisted way he liked worrying about the band and all things related. Blind Channel was his life, his first and only love.
Then again, so was Joonas.
Niko rubbed Joel’s back again when he was in the middle of wiping his face with a make-up removal swab.
“Heard there’s a ride waiting for you outside.”
“Huh?”
“That’s all I know,” Niko raised his hands as if to prove his innocence, but the smirk Joel saw via the mirror in front of him was sly, to say the least.
Still, Joel began to look for a car he might recognize when he stepped out of the back door of the studio. He couldn’t find one, but then his eyes caught a black Mercedes with a yellow taxi sign on the roof blinking its headlights when Joel looked its way.
Joel doubted Niko would have gotten involved in a desperate fan’s schemes, but he was still wary when he approached the car.
Two metres away from the vehicle the back door window was rolled open, revealing a familiar mop of blond curls.
“Oh my god, just get in, you’re not about to be murdered!”
“Better safe than sorry!” Joel exclaimed, breathing out a chuckle of relief.
Seating himself next to Joonas, he barely had time to take a good look at his (now fully dressed) boyfriend before he felt something warm being put on his hand.
“To make up for this morning,” Joonas said softly and smiled (shyly, Joel would have estimated, if ‘shy’ was the kind of adjective one could use to describe Joonas Porko).
Joel inhaled the cosy smell of coffee, but when he lifted the cup to his lips to take a sip, he noticed something scribbled with a black marker on the side of the hot drink container.
Soon Joel understood he was looking at a drawing of a stick figure, with a few strands of hair falling from the top of its head and what Joel assumed was a beard of some sort decorating the bottom half of the face. It could have been representing practically anyone, really, but the wonky capital letters next to it reading TRENT REZNOR left little for interpretation. To make sure there would be no confusion over who the portrait was supposed to resemble, there was even an arrow pointing from the text to the drawing.
Near the bottom of the cup, almost completely hidden under Joel’s thumb, Joel discovered another, smaller writing:
(I’m sorry)
Joonas wouldn’t have even needed to use his puppy eyes to win Joel back to his side, but that was what Joel was faced with when he finally looked up from the coffee cup, his cheeks hurting from smiling giddily.
Careful not to spill its contents on the seat, Joel set the cup between his thighs. Then he turned to his boyfriend, who had already scooted to sit right by his side, and rested his forehead on Joonas’.
“I’m sorry too,” he whispered, eyes closed as to not let himself be completely carried away by the blue of Joonas’ own in the presence of a random taxi driver.
Joonas, being Joonas, was not quite so modest and caught Joel’s lips in a tender, lingering kiss.
~
thank you so much @percervall for helping me out with plot details <3
#blind channel#blind channel rpf#blind channel fanfiction#local conflict avoider struggles writing people fighting 😥#this was supposed to be a funny one but i did manage to squeeze in some angsty joel too so all's good! 😂#domestic fluff by theflyingfeeling
56 notes
·
View notes
Last Seen Blogs

sendalburik
Untitled

the-black-kitsune
Simply A Thief or Something Greater

abtudo
ABASCRPJ

designerexperience
Designer Experience

charlottetollare-blog
Davetiye