#clarify in the beginner's notes. notes are SO useful
Text
one day i might want to make a master post with all of my AO3-user tips because (and this is a toxic trait of mine ik) i get REALLY irritated with a lot of ‘advice’ posts that just repeat the same basic information in a patronizing way without offering like... actually specific input.
and i think ao3 as a whole is a relatively easy site to use you just gotta get the hang of it. in a sense i would really liken it to tumblr because one of the things about tumblr is that you can’t just join the site and then hit an explore page directly, that’s not really how this place works, you usually have to populate your dash with blogs. with ao3 it is significantly harder to just search up ships and works imo, it’s best if you already have favorite tags and how you do that is finding specific fics and then going from there and exploring in a branch off method. so once you use it for a while it’s extremely comfortable and remarkably convenient it’s just not really the easiest from the get go.
#nightmare.personal#i think a LOT of people talk about like. don't over tag. but idk do people know when they should and shouldn't overtag?#that's a specific thing i think about because. i mean TLDR i think when it comes to characters and ships#you tag them if by removing them from the fic you would lose a substantial portion of the fic's content#like a fleeting mention to a background character eh you don't need that#but if a background character is not directly pictured but is repeatedly referenced then yes i do say you tag that#though you can note them as being mentioned and i think that's a tag that filters into their main so#just helpful as an indicator#also as i was saying earlier you can tag pretty broadly#bc ngl there are a Lot of Really Specific Tags on ao3 but they honestly lack a LOT of tags that i at least commonly use#derealization and dissociation iirc aren't formal tags there so i kind of do my best to tag that anyway and then#clarify in the beginner's notes. notes are SO useful#i think when you approach something like a series of drabbles in one fic that gets a little more difficult to explain but#i think you can find a way to manage that too#it would just mean only tagging the most critical components of the fic or things that are sweepingly occurring#so like a several chapter dump of drabbles might warrant a whump tag if like 4/10 are whump centric#but if like 1 character appears in the background of only 2 of them i wouldn't say tag that#also having a table of contents chapter or very descriptive (non artsy) chapter titles + beginner's note is super helpful
2 notes
·
View notes
Text
yet another gif coloring tutorial
Okay, so, I posted a coloring tutorial for one of my moots a few years ago on my main, @zackmartin (I believe I've since deleted it) but that was the technique I was using when I started making gifs 7ish years ago, and I’ve since updated my routine so I decided to post a new tutorial with my new technique.
I'm going to show you how I achieved this:
I'm using Photoshop for this. I'll try to make this as detailed as possible so it's beginner-friendly, but you do at least need to know how to make and export a gif. If you have any questions, don't hesitate to reach out! just be aware, this tutorial really image-heavy
A few notes before I begin: 1) this is like, the bare minimum most basic way to color a gif. This is what I’d be doing if I was giffing a scene and that’s it. If you’re interested in different coloring styles (like my suite life episode series) then let me know!
2) When coloring gifs with POC, you need to make sure not to change their skin color by making them too light, too orange, too yellow etc. The JATP source blog posted a masterpost of different tutorials to teach you how to color gifs in different ways (like with the pastel coloring for instance) without whitewashing/orangewashing POC. But, honestly there’s a ton of tutorials out there that show you how to avoid this if you do a little digging. NO EXCUSES!
Anyway, let's get started! Before I do the coloring, I ofc make my gif, crop it, set the frame rate, resize, and sharpen. (you can find my sharpening tutorial HERE)
I. BRIGHTENING
(as a quick note, I don't focus much on London's skin tone during this stage, because I'm going to fix it during later steps)
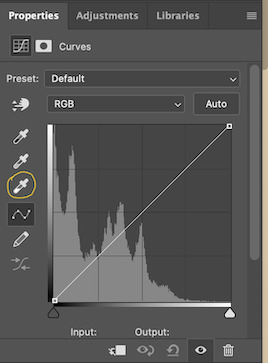
The first thing I do is white balance using a curves layer. To do this, I click the little circle thing in the toolbar below the layers, and then click curves like so (you'll do this every time you want to add a new layer):

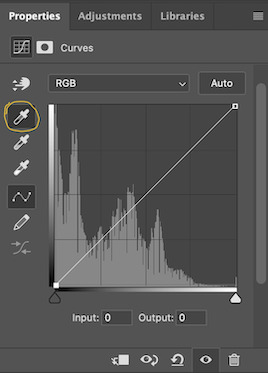
And then I click the bottom eyedropper tool on the left-hand side:
Then I click the lightest white part of the gif. (I’m not sure how to explain this well, but it basically white balances that spot to make it pure white. Like, if I clicked on the gold part of London's bracelet, then the whole gif would turn out really blue because it would be trying to white balance the gold) (hopefully that makes at least a little bit of sense)
Anyway, there’s a trick I use to find the lightest part of the gif; hold down the option key (or alt if you’re on windows) and while you’re holding down the option key, drag the little white arrow on the right-hand side:
(i apologize for the quality of the screenshots, tumblr keeps destroying them :/ let me know if I need to clarify anything)
Then I use another curves layer to do the same thing with but with the blacks. So, I add another curves layer, and then click the eyedropper tool at the top this time:
And then I click the darkest, black part of the gif. You can use the same trick by holding the option/alt key and dragging the triangle on the left-hand side:

Next, I add a levels layer. I drag the middle lever thing to the left, and the left lever to the right. (I don’t usually touch the little lever thing on the far-right, but it’s really up to personal preference. I learned to color gifs by basically messing around with settings, so I’d recommend doing the same and just seeing what you like best):
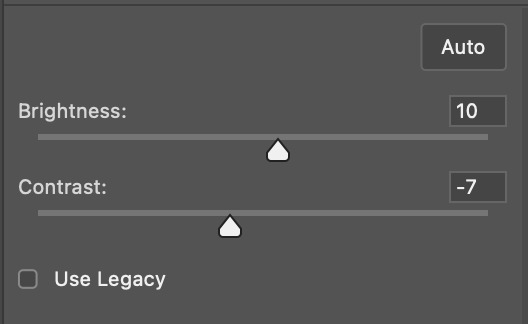
Finally, if I want to go even brighter, I usually add a brightness/contrast layer. I typically turn up the brightness a bit, and turn down the contrast. But, since I brightened a lot with the curves and levels, I usually don’t go that far. These were the settings I used for this particular gif (even though I'm going to share most of the settings that I used, I wouldn't recommend using the exact same ones on your own gif as it'll really depend on the scene you're using):
II. VIBRANCE
Now I add a vibrance layer. I like my gifs to be bright and vibrant, so I usually turn up the vibrance, and turn down the saturation a bit. These are the settings I used for this particular gif:

And this is what the gif looks like so far with just brightening it up a bit and adding vibrance (it might look a bit too bright right now, but I'm going to fix that in later steps):
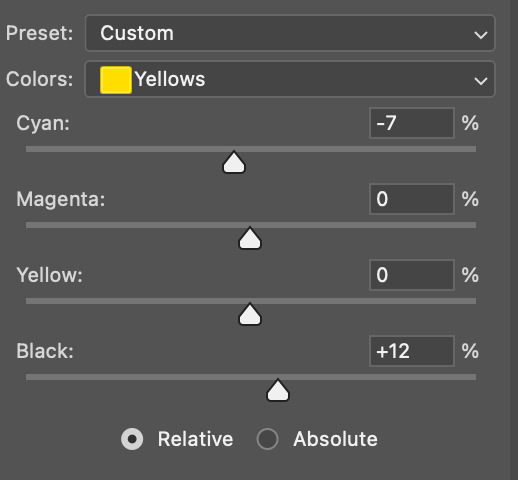
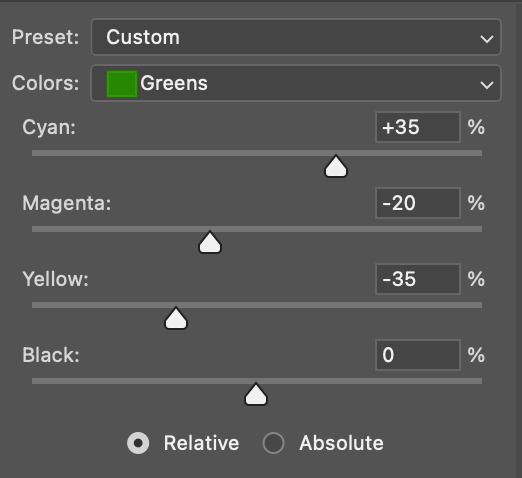
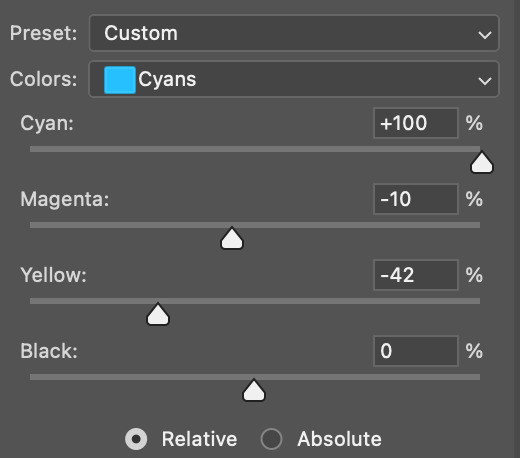
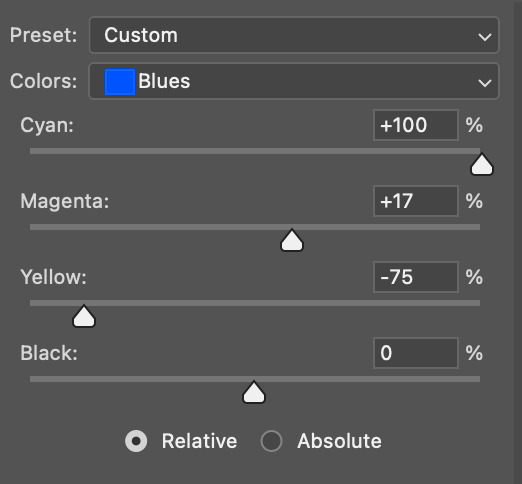
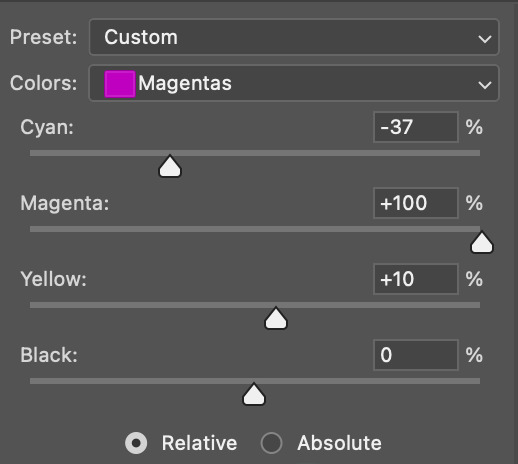
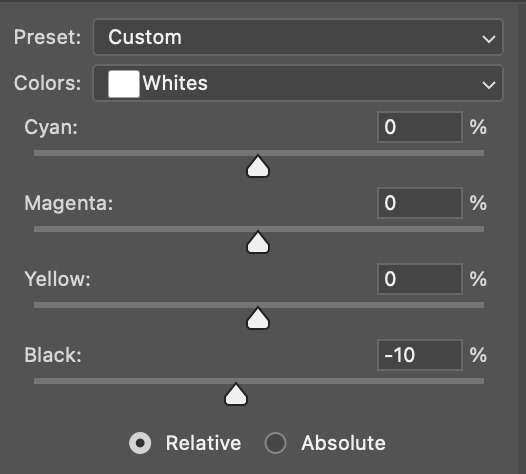
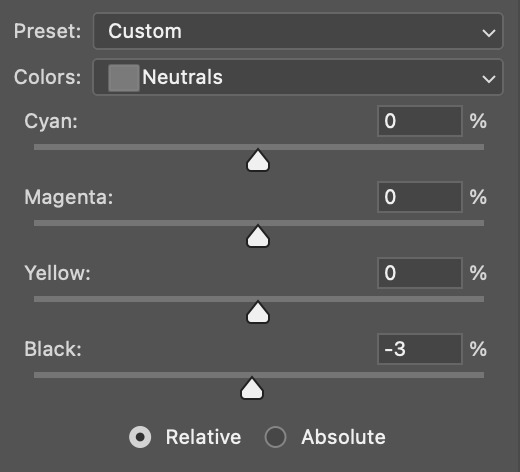
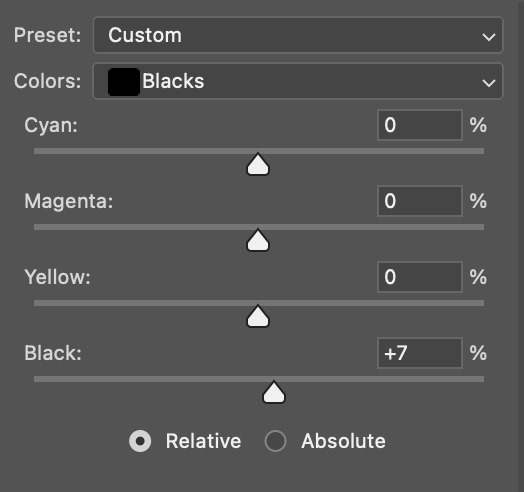
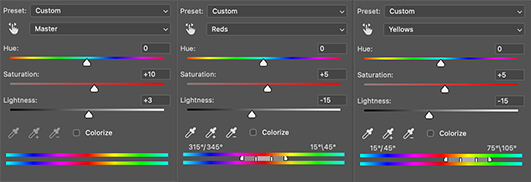
III. SELECTIVE COLOR
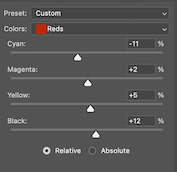
Now, I add a selective color layer. The reds and yellows typically affect skin tones, so this is where I'll start to fix London's. These are the settings I used for this gif (I usually wouldn't change all of the colors, but this is just one of those situations where they happened to be present in the scene I'm giffing):
IV. HUE/SATURATION
now I add a hue/saturation layer. I typically turn up the master saturation to +10 and the lightness between +3 - +5 regardless of the gif. Then if I still need to fix skin tones, I'll mess around with the reds and yellows. These are the settings I used:
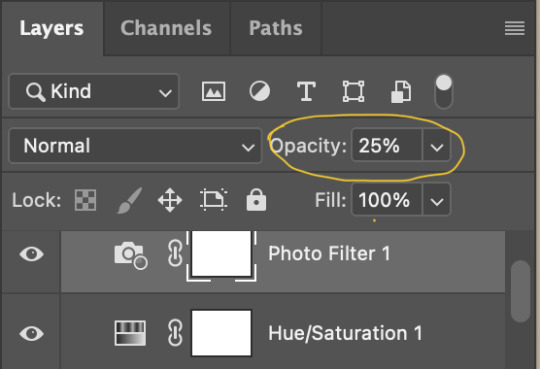
V. PHOTO FILTER
Next, I add a photo filter. I usually stick with the default one, I keep the layer set to normal, and I turn the opacity down to 25%:

VI. B&W GRADIENT MAP
finally, I add a black & white gradient map, and I click the little box to reverse it:
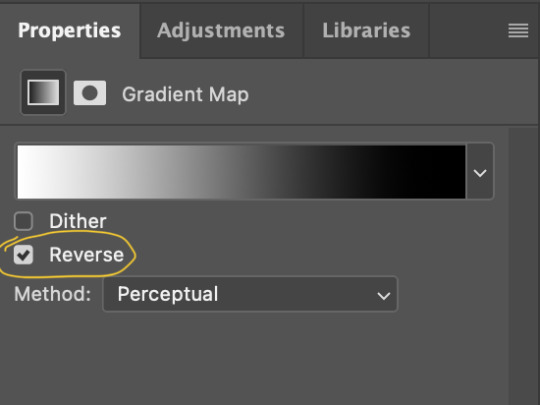
Then I set the layer to soft light and I turn the opacity down, between 10% - 20% depending on the gif:
A lot of times, I'll stop here. If I'm satisfied with the way the gif looks, and London's skin isn't too pale/orange/yellow etc, then I could just add my watermark, export and be done. But, there a few other optional steps I might take if I'm still not quite happy with it.
VII. OPTIONAL
Usually the next thing I'll add if I've decided to keep going is a color balance layer. It obviously does as it says, helps balance out the colors, but some gifmakers also like their gifs to have like, a reddish tint or a bluish tint or what have you, so this can help with that too. I wanted to balance out the reddish/yellowish tint, so these are the settings I used:
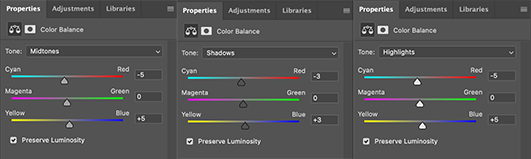
and this was the gif before the color balance:
and after:
And if I want to play around with the colors a bit more, or fix the skin tones further, I might add another selective color layer or a hue/saturation layer (or both, depending).
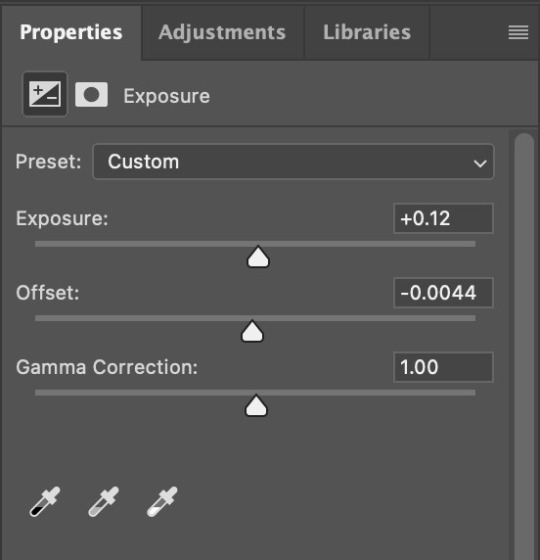
Rarely, I might add an exposure layer. (I added one to this gif for the purposes of this tutorial). These are the settings I used for that:
And if the gif came out a bit too bright, I might add another brightness/contrast layer, except this time I would turn down the brightness and turn up the contrast (again, I did that with this gif for the purposes of this tutorial).
And, that's pretty much it! This is my finished gif!
Like I said earlier, I pretty much learned how to color by messing around in photoshop, so I would really recommend playing with the different layers and settings for yourself, as well as checking out other coloring tutorials and other gifmakers methods and see what you like and what you don't. And finally, the best thing you can do is just,,, practice. I've been gifmaking for about seven years, but I feel like I didn't really become decent at it until this year
Again, If you have any questions let me know! and feel free to tag me in your creations! #userzackmartin 💕
#*tutorials#tutorials#gif tutorials#coloring tutorial#gif coloring tutorial#flashing gif#flashing gif tw#i'm not really sure it counts but just in case#flashing tw#dailyresources#photoshop tutorials#*
44 notes
·
View notes
Note
there's a scene in bon voyage s3 e6, when the members were eating and jhope mentioned that tae and jk were sleeping upside down and hugging each other's legs, i found jimin's reaction to the info kinda sus. the scene was overall weird, jimin was sitting down when hobi finished talking, with no apparent indication of standing up, and suddenly they show jimin's reaction and he's like "wae (what)!?!?" but he's standing up, and then another cut to hobi confirming the story, then the camera goes back to jimin who is seated again and says "that's weird". do you think they edited some of the conversation out?
Anon, this moment makes me 😆🤭
Sorry for making you wait. Let's go go go!
(Had too much fun with this one, it is quite long >.<)
Here is a clip of the moment
vimeo
Cr. Full video here
Let's Quentin Tarantino this. Do I think this was a sus moment? Do I think some of the convo was edited out?
Yes, to both. 👀
JM going from sitting to standing up without us seeing it happen didn't stick out to me too much only because in content like this (Not just BTS content), editors tend to show multiple viewpoints of a moment and I'm guessing JM stood up when we saw the close up of Hobi explaining what he saw. You can also see Hobi's eyes are looking upwards as he's talking.
What gets me tho is JM's initial reaction to Hobi, going eh?! And then needing to clarify what he just heard lol.
Then we cut to JM saying "왜 그래" with that face and that tone.

Side note: I'm not Korean and I'm not fluent in Korean. I have been learning for a while. I'm somewhere between beginner & intermediate and understand that context, tone, and the words used, explain so much when it comes to the Korean language. That's why I wanted to highlight this next part.
Let's talk about the sub-titles here for a moment.
The translator decided to go with "What's wrong?"
This is correct, but it's not the only meaning of those words. "왜 그래" can also mean the following depending on the tone, context, and intonation (rise & fall of voice): "Why is it like that?" "Why are you like that?" "Why are you acting like that?" "What's going on?"
This is a great post about how "왜 그래" can be used.
IMO, JM's tone sounded like it had a bit of a bite behind it. There was no rise in his voice at the end of the words to sound like a curious question. And his face was a little more on the serious side. Again IMO, something like "Why were you like that?" seems more accurate.
He gave off a WTF? vibe.
Back to the question about edited-out parts
I think it's hard to say if anything was edited out right before JM said 왜 그래 but I definitely think the reaction to what JM said was edited out.
There could have been more conversation, but I honestly think there was probably awkward silence after him saying that. 🤣
Because JK & V were both awfully quiet while Hobi was explaining, other than initially asking "Did we?" "Who did it?" There was no laughing, no smiling.
To me, it felt like JK & V were starting to sense JM's unrest with the whole thing and so they decided to stay quiet since an upset Mimi is not what you want to deal with. An upset Mimi is a feisty Mimi.
Look, we always talk about JK being the possessive one but I just think JK is louder about it than JM. There are 2 possessive men in the Jeon-Park Household.
While JK does do some type of skinship with all members, I do think JM enjoys his boyfie privileges. That there are just some things JK doesn't do often with others. And it was probably weird to hear that they were hugging each other's feet especially when JK is sensitive to smells 🤣
Before I go, I have to bring up our president Hobi.

Like, Hobi.
Why do I feel like you're snitching on them to Mimi??
🤣🤣🤣
That's the funniest part about this moment to me. After bringing up the situation to JK & V, Hobi is literally telling this story to JM.
I love Hobi. I miss him!
Thank you for the ask Anon. 💜💛
For you, Happy Jikook inc...

Cr. Daylight
36 notes
·
View notes
Note
HEY.
I'M FINALLY GETTING AN ACCORDION.
Do you have any advice on starting? Specific easy songs, techniques to pick up, mistakes to avoid? Maintenance I should be ready for? (I figure this would vary by type, but still.) It's a Hohner Student II, 12 bass piano.
I'm sorry to bring this news knowing you've had to put it to the side for a while, but I hope you can take heart knowing somebody else has seen your passion and that it was reason to take steps forward.
first off, i’m SO excited for you!! the accordion has been such a treat for me and i am bursting with joy knowing you’re picking it up soon! seriously, the thought of me in any way inspiring someone else to learn the instrument is so monumentally amazing that i can’t even process all my excitement!!
secondly, i wanna clarify again that i’m very much a beginner and my overall knowledge about accordions is unfortunately still very baseline. i’m not sure how much our accordions differ because i actually cannot remember the specifics of the accordion i’ve been renting, but i think mine is on the much larger side, older, and definitely not a student accordion.

it’s a Lira and that’s all i know. i feel really silly for not retaining any of this information even after all this time, but details slide off my brain way too easily. when i see my teacher tomorrow i will try to ask her again and write it all down.
some general rules of thumb would include:
always keep your accordion in a comfortable temperature. basically, if you’re uncomfy, your accordion is also unhappy. accordions have wax, leather and reed elements that can easily stress in extremes and they will live longest in controlled temps. [direct sunlight is also bad]
keep your accordion covered or in a case while you’re not using it. dust is really bad for the instrument and can clog elements. i’ve left mine not only in the open uncovered, but right under my AC for several weeks on end before [which was extremely careless of me], and it hasn’t been an issue yet but it keeps me up at night. just a blanket over it should be fine.
never extend or press the bellows without pressing a key or the air button. this can cause compression leaks in areas of the accordion.
the booklet my teacher prepared for me recommends the instrument be polished once a month with a soft cloth using either accordion polish or a good substitute, like Liquid Gold. this helps fight discoloration and build up the surface to protect against small scratches. i have never once polished my accordion in the many months i’ve rented it so i’m not a good example, but it will help the longevity of the instrument.
as for common mistakes, all my mistakes are in my technique. for weeks and weeks my teacher had to constantly get on me about the position of my hands. on the left side where your basses are, the accordion is held close to the body, elbow back and pulled nearly flush against your side, heel of palm firm against the edge of the accordion, and fingers curled in an extreme “claw” position. i would ALWAYS fall out of position, flattening my fingers and waving my elbow about, and long term that is awful for your hand. the claw position is very hard to explain so i would recommend watching a demonstration of it, but it will save you a lot of pain in the future.
on the right side of the accordion, it’s good to hold your elbow out. the hand is supposed to float above the keyboard, fingers curled on the end though not as extreme. if you curl your finger, the playing of the notes is a lot stronger and more precise as opposed to flat fingers slapping around. try it, the difference is striking.
my teacher has thrown many songs my way, most of which i love. she claims all her students hate them lol but they’re old and sweet sounding and some of them have gotten permanently stuck in my head. my two favorites right now are Drink To Me Only With Thine Eyes and In The Good Old Summertime. the former is veeeery good for beginners. it felt like a doozy to me as someone with zero previous music experience, and it was to learn, but once you get it down it’ll be so deeply ingrained in your psyche that you’ll never be able to pry it out. i can play it with my eyes closed [which isn’t saying a lot considering you don’t typically see much of the accordion while playing, but it sounds cool to be able to say]. the latter is a lot more complicated and i’m still kind of grappling with it but i just ADORE the tune. it’s so incredibly satisfying when you get it right. oh, and don’t forget Daisy Bell. simply cannot go wrong with that one. way more difficult, lots of bass changing and skipping around on the keyboard, but it’s so worth it.
also, i have to wonder; are you getting yours used or new? i’m guessing new but i am obligated to ask because used accordions can be so difficult to find in beginner friendly condition. either way, i am SO EXCITED FOR YOU!!!! this is a great thing! with your passionate and whimsical soul, i have no doubt you’ll be blasting past me in no time. keep in mind i haven’t been practicing regularly or at all in the last couple months because of the job i just quit so i’ve kind of stagnated for now but tomorrow i’m actually going back to class for the first time in ages so things are looking up!
the accordion is a really difficult instrument to learn but if my unfocused and impatient adhd self can learn, so can you. i know you got this! and please keep me updated on your journey!!
#asks#lucidowl#THANK YOU SO MUCH FOR THE ASK!!!!#sorry it took a while to respond. i was worried i would get my advice mixed up and misinform you#so i went back through my music binder and read my teacher’s accordion care guide again lol#i am so stoked you have no clue. i need to run around and swing around a lamp pole rn !!!!!#no id#accordion posting#long post
11 notes
·
View notes
Text
tw: talk about SA, alcohol:
(***note: omigod it is soo difficult to proofread for typos and clarity while drunk while also maintaining like. actual coherensy. i swear to godz this took like. 75 minutes to type. )
I'm currently (at home, safe) inebriated (made myself multiple drinks) (am staying hydrated) with many alcohol and I decided to place a large ice cube on my head just so i could to feel it melt down my scalp. that is the most bizarre thing I want to do while inebriated. *other than like, my desire to currently make pasta or text my best friend to tell her she's amazing and i love her. I will not make pasta bc that involves using a stove and that's not a good idea right now.
tw again: talk about sexual assault:
I do not want to force someone to have sex with me.
though very drunk, I am still very much aware of what consent is and what is good and what is wrong.
(less important for my point about humanity but more currently related to my existence as of this moment; yes I am hydrating and safe).
I know that I cannot reasonably consent in this state. neither can anyone else in this state. addionally, under any circumstances, that I should clearly state any intentions & clarify AND make absolute certain that I communicate clearly & that I am understood ESPECIALLY while in this state.*¹
I am aware of this & am drunk.
a rapist who is enebriated coulld still predate on a victim who is also inebriated*¹
bc even if me & a partner were doing the sexytimes (tm) and shared a few drinks together during that funtimes with the same level of intoxification; I would still know to make sure they were cool beforehand and during the funtimes(tm)
and then, even after confirming everything was like, cool, I'd still be like "hey we're too drunk to do this let's just cuddle"
that is the maximum I'd be cool with doing.
SO
even if a rapist could try to claim they were also "unable to consent" to their choice to r*pe someone, that's total bullshit.
alcohol doesn't like, remove your morality. it just removes the impulse control. you still have those impulses.
drunk me's impulsive thought was to type this while slowly letting an ice cube melt down my head and face. its been an whole hour
like. while drunk. I'm super concerned with even just making sure this is tw'd correctly so I don't hurt someone with bringing up painful topics. in other words. I am even more cautious to ensure that the reader of this post has consented to reading posts on this topic while inebriated.
again
rapists have 0 excuses.
*¹this is Even more than I try to do as an autistic person when I am sober bc I know that I communicate and understand fewer things while inebriated- so like. rather than using my inebriation as an excuse to ignore consent, i want consent's volume to be turned up and captions turned on bc I recognize I might not be able to hear it the best in this state.
*²autocorrect isn't helping me; I don't know how to spell inebriated??? enebriated???? is that even a word?? intoxicated???? under the influence of ethanol's drug effects. that. whatever I am now.
10 notes
·
View notes
Note
Hi!
I recently came across your blog since I was looking up micro expressions. Do you know of any books or trainings (the ones I have found are US based and since I’m not from US they are a little expensive for me) that could help out a beginner who’s trying to understand and learn about micro expressions, body language and deduction?
Hello! sorry for the late response, i've been busy. Unfortunately resources are very scarce when it comes to deduction as a topic, but if we look at any topics that make up deduction as a whole there's a lot you can find online. Tumblr and Youtube are gonna be your best friends tho, blogs like mine are the best source for deduction specific information (even ones that may be innactive now, try looking through old reblogs from Amateur Deductions, you'll find a lot of innactive blogs that still have their resources and posts, blogs like The Art of the Consulting Detective, Tiny Detective, The Brain Attic, The Deduction Page, Analytical Deduction), and there are some youtube channel that also have good information in the (check out The Art of Deduction on youtube).
When it comes to books, for microexpressions your best bet are Paul Ekman's books and the FACS, if you can get your hands on them (i'm not telling you to pirate them, but i'm definitely telling you to pirate them). For body language i recommend starting with What everyBODY is Saying by Joe Navarro. And for deduction specifically as a whole subject (in order of complexity) The Deduction Guide by Louise Blackwood, Snoop What Your Stuff Says About You by Sam Gosling, and Mastermind: How to Think Like Sherlock Holmes by Maria Konnikova
Also for a beginner i recommend taking a look at the training program Amateur Deductions put out a few years ago, it was never finished, but the sections on Observation do a great job at training the skill quickly and efficiently (quick link for it here). Not to toot my own horn but my two blogs (Amateur Deductions and this one) have a lot of deduction content are are still active (although admittedly i have periods where i don't post much)
A brief note on Microexpressions: it's come to my attention that there are people that would call them a scam, i've had conversations with at least one of these individuals and i've come to understand that the reason they have this stance is because there's "no evidence that they are a good indicator of when someone's lying". This stance comes from a study that they've sent me that i have read. As an attempt to try to appeace anyone who might have a problem with you using microexpressions for that purpose i would like to clarify that the purpose of microexpressions is not to help you discern lies. Microexpressions are physiological cues that point towards basic emotions people are feeling, this information can then be used as a tool (along with others) to discern if someone's lying, but it's by no means a given that if you learn to use microexpressions you'll learn to tell if someone's lying. You have to learn to use them in context and know how a person's emotional state affects if they're lying or not in any specific situation, this is one of many uses of microexpressions, since it's one of many uses of being able to tell how someone feels. This same reasoning applies to body language as a whole, so keep that in mind when learning about them.
#ask#deduction#deductionist#resources#learning#sherlock bbc#bbc sherlock#psychology#microexpressions#body language
29 notes
·
View notes
Text
Stop being scared of measure words, you already use them in English!
A take no beginner wants to hear probably: Measure words aren’t too hard to understand. To remember them all is a different story, but when you think about it we use them all the time in English!
Some quick examples: one (sheet of) paper, one (box of) tissues, a (heard) of cattle, one (bowl) of soup.
There’s a lot of ones that can be omitted or rearranged (some soup or tissue box) and while we have many, many animal measure words, they’re mostly only use when discussing a group. Still, if you go up to someone and say you want a cup of beer, it’ll raise some eyebrows. They have specific meanings and can clarify meaning. If I say I want a cup of tea over a glass, I’ll get hot tea instead of iced tea. The same is true in Mandarin.
Of course even native speakers default to 个 at times, because all speakers of languages simplify for everyday conversation (note: not that skilled of a linguist, but I believe that’s been the case from everything I’ve learned so far!) Plus, it brings a smile to my face that 条 for long, skinny things can be used for dogs! I think of it every time I see a Dachshund—what could be more perfect?
123 notes
·
View notes
Note
Hi, how can I go about working with Athena and Hermes? I've read some anthropological articles and book chapters about them, but I mostly revert back to the way I would praise the Christian god.
First, let’s clarify the difference between working with and worship. While “deity work” is often the general phrase for any deity relationship, ‘working with’ a deity is different from ‘worshiping’ a deity. The main differences are:
Motivation behind the relationship
Communication
Length of the relationship.
Working with a deity often involves a goal of some kind. You are not interacting with the deity for the sole purpose of interacting, but rather because you feel They can help you with your goal. Worshiping a deity is often done because you like that particular deity and want more of Their energy in your life.
Worshiping is often one-way communication. You give offerings, pray, and maybe sometimes meditate or do rituals with Them, but there’s not much of a pressure to receive communication from Them. I’d argue you can worship a deity without ever hearing a word back from Them. Most wouldn’t find that a fulfilling relationship, but it could be done. Working with a deity on the other hand, requires two-way communication. You are struggling with something in your life, and have asked for Their help, so you need to hear what Their advice is. What good is a mentor or teacher if you just talk at them and they never give any actual guidance?
Worshiping is generally considered a long-term relationship, lasting at least through a life stage. Working with a deity is generally considered a short-term relationship, as once the goal is reached the relationship ends. That being said, I have known beginners who worshiped a deity for two weeks before realizing it wasn’t the deity for them, and I have known pagans who worked with a deity for two decades before reaching their goal.
Now that we know the differences, I can start to answer your question.
Either way, you’ll want to start with an introduction. Sit somewhere you won’t be disturbed and give Them a food or drink offering. Maybe light a candle or incense if that is available to you. Call on the deity, using epithets to help ensure you get the right entity (i.e. “Gray-Eyed Athena” instead of just “Athena”). Introduce yourself, explain the offering is for Them, and explain why you are reaching out. You should know your goal at this point (if you want to work with Them), and be able to explain it to the gods. If you just want to worship Them, then your introduction will just be explaining who you are, and why you wish to worship Them.
Because ‘working with’ requires two-way communication, I find it polite to confirm the deity has agreed to help you. After the initial offering and introduction, you can ask for a sign that They have agreed to help you, or you can use divination to ask directly (my preferred method). This isn’t required (in my practice) for worshiping; you can just start worshiping the deities.
Lastly, let’s discuss that ending note. You feel uncomfortable praising Them like you praised G-d, but “praise” is a vague word. Are you uncomfortable with praying at all? Or just certain words you use in prayer that you associate with G-d? There is no “right” way to pray in Greek paganism, so if you feel like you need to modify the words or gestures to separate it from Christian prayer, feel free! If the words are the problem and you aren’t sure how to word prayers outside of a Christian framework, I’d recommend checking out the Homeric or Orphic Hymns to get an idea of what a prayer framework could be.
19 notes
·
View notes
Note
FWIW, I think it’s perfectly fine for you to learn by doing when it comes to GMing Pf2 (did I get that right)? Because like, even if you get something wrong, you’re learning. You have understanding players, right? If they haven’t played Pathfinder, then you’ll all learn together. If they have, they can help clarify rules if you get stuck somewhere as a GM. Maybe check Reddit for GM tips for beginners to the game you’re learning but otherwise give yourself permission to learn by doing. Remember Brennan literally got the rage rules wrong in Fantasy High with Gorgug cause he wasn’t entirely used to 5e? and he’s Brennan Lee Mulligan? If he can be wrong on camera and be loved anyways, you can be wrong off camera with a good party.
thank you! i know it will be fine and even fun lol. the main reason for my stress is that i was looking over my notes and realized "oh i don't even know where to start with this encounter." and pf2e is just complicated enough that it feels harder than it probably is in reality.
the best news is that none of my players know how to play either so like, we're all in the shit together lmao.
6 notes
·
View notes
Text
On “Real” Magick – A Look into White and Grey Witchcraft

Wiccan witch, green witch, kitchen witch, eclectic witch, garden witch, Christian witch, Satanic witch, elemental witch – the list goes on and on. There are many different types of witches, many of which we have discussed in depth in various articles. But regardless of which kind of witch you are, how long you have been practicing or how established and comfortable you feel with your practice, there is forever the lingering question – am I a real witch? Am I an authentic witch? What is a real witch? How can I be an authentic witch?
This type of insecurity is common not just in the budding witch of today, but also within the witches from way back in the day. In fact, it is almost as if the true mark of a witch is not witchcraft or magick, but the constant self-questioning and self-doubt about whether her brand of witchcraft is authentic or really witchcraft. Honestly it boils down to something rather simple – what is witchcraft? What is magick? There are many, many definitions of what constitutes witchcraft, but the truth is that it doesn’t really matter how someone else defines their craft because their craft is not your craft – and you don’t need to prove your craft to anyone. The sooner you understand that, the sooner you liberate yourself from this nagging desire to prove yourself. Is your practice improving, developing and flourishing? Is your practice fulfilling your intended magickal goals? If so, that is all that ultimately matters.
Witchcraft often conjures up imagery of bubbling cauldrons, satanic symbols and ancient blood sacrifices – but it needn’t be any of those things (it can, but it doesn’t). A lot of beginner witches, practitioners and “babywitches” get their start into the occult through Wicca. The Wiccan Rede (An’ ye harm none, do what ye will) gets cited often, as does the Rule of Three/Three-Fold Law. Among neopagans this gets interpreted as White Witchcraft or following the right hand path, and all of a sudden witchcraft is divided into a “white” path and a “black” or evil one. (Note: To clarify, the Wiccan Rede is not a sacred or holy text and is just a general guideline. One does not have to follow the Rede in order to be Wiccan. This is just a popular misconception. The same is the case with the Three-Fold Law.)

What is White Magic?
White magic often refers to altruistic magic, or magic done for the sake of good. As such, white magic is selfless, not done to further personal goals and ambitions and as such serves a greater purpose. A white witch is typically someone who embraces witchcraft as a source of good, with potential to nurture, heal and cultivate positivity in various forms. This is viewed in stark contrast to using witchcraft for self-motivated reasons or to do harm or evil – black witchcraft.
A Historical Case for White Witches

As we have already discussed, traditions within witchcraft tend to vary enormously. However, many link the concept of white witchcraft with the idea of cunning folk. Cunning folk were folk healers known from various folk contexts across Europe around the 15th to 20th centuries. Cunning folk are known by many names cross-culturally: leveurs de sorts (curse lifters) in French, hexenmeister (sorcerer) in German, banfháidh (prophet) in Irish, vedmak (warlock) in Slavic mythology. Cunning folk, for the most part, had positive associations, as the work they did was for the good of the community: removing hexes, healing injuries and sickness, and providing protection via charms, spells and other folk remedies. Many cultures perceived a distinction between white magic and black magic, with the latter believed to be connected to Satanic practices, demonic rituals and blood sacrifices. “Cunning-folk professed to cure the bewitched, practiced various kinds of prophetic divination, and offered to find lost goods or hidden treasure, among other activities…They were not witches, and…[Davies] notes that many cunning-folk also learned their rites from books, and created their own rituals…Many cunning-folk were tricksters, or hard-nosed business people, not saintly sages. Finally, the traditional cunning person is unlike any modern “witch” in that most were firmly Christian, and the curing of bewitchment was one of their main tasks.”
This is extremely fascinating to discuss because Owen Davies’ wonderful dive into cunning-folk paints a starkly different picture than what many believe: cunning-folk might be characterized as white witches or Christian witches, but all of them weren’t necessarily benevolent. As always, the picture is never truly as rosy as it appears from the outside. Cunning-folk, or white witches, exist in the gray space, in the middle path. In books, theories and flashy books of shadow/grimoires, white witches might be known as the ones following the right hand path and acting in totally selfless ways, but I’d argue that that rosy mist evaporates the second you inspect and dive a little deeper. Even the alleged predecessors to today’s white witches weren’t entirely selfless! Perhaps it is not even entirely possible to be both human and selfless.

Moreover, the concept of white witchcraft only makes sense when contrasted against the opposite absolute of black magic and black witchcraft, known as the path of sin and evil – the left hand path. To be honest, while there are many traditions that honor totems, ancestral entities, ghosts, spirits, demons and even the ideological concept of Lucifer himself, 99.9% of witches are not the diabolical devil worshipping, child sacrificing, animal slaying, blood drinking, demon orgy engaging cult members that black witches are stated to be. I’d argue then, that 99.9% of witches and magical acts fall within the gray magic (or simply, the magic and witchcraft category, doing away with shades entirely) category.
White Witchcraft and Consumption
After everything is said and done, one has to argue, why does the category of white witch even exist? While I acknowledge, appreciate and celebrate the long standing traditions of healers, cunning-folk, “white” witches, soothsayers, prophetesses/prophets around the world, I think the category of white witch exists today primarily as a capitalist tool for consumption. Unfortunately, while the right hand path/left hand path philosophy attempts to simplify witchcraft, it actually does the opposite and creates arbitrary absolute categories that I don’t think even need to exist. “Buy this wand and you’re a white witch. Buy this crystal to prove your worth as a white witch!” On the flipside, “buy this random skull and you’re an edgy black witch!” [If anything, those that manipulate you emotionally and make you doubt your own practice to make a quick buck are closer to “black magic” than anything else). I am 100% for self expression, experimentation and self-discovery. At Witchy Aesthetic, we admire and celebrate the vast cultures, traditions and even aesthetics involved within witchcraft, even as those things extend towards clothing, accessories and so on, but I have an issue when an ideology is being sold to unknowing people for the sake of making a profit. In short: by all means, buy whatever gorgeous wand or crystal as long as it enhances your personal practice, tradition or aesthetic, but don’t do it because you think you have to in order to be an “authentic” Wiccan or witch, or in order to prove your craft to others. The beauty of the gray path is the combination of light and dark – it is realistic, human and refreshingly authentic.
Are you a white witch? Your practice is of course valid, and I’d love to hear from you about your views – whether in agreement or opposition to my views. I would love to learn more about you and your tradition. Blessed Be.
https://witchyaesthetic.com/on-real-magick-a-look-into-white-and-gray-witchcraft/
4 notes
·
View notes
Text
Bring Concepts to Life: A Beginner's Guide to Drawing a Single Line Diagram
The ability to draw single line diagram is an underrated yet essential skill for engineers, designers, and creative professionals. A single line diagram uses just one line to represent complex processes, systems, or concepts in a simple yet informative way. This simplicity allows the viewer to quickly grasp key relationships and flows within the subject matter. In this beginner's guide, we will cover the basics of creating effective single line diagrams through understanding principles, choosing information to include, practicing layout and design, and applying labels clearly. By the end, you'll be able to bring your own concepts to life through a single line.

Understanding the Core Principles
Before putting pencil to paper, it's important to understand some key principles that make single line diagrams so powerful. These include:
Hierarchy and Structure
Single line diagrams follow a hierarchical structure, with the overall system or process represented at the top level and components or subsystems branching off in a structured way. This hierarchy helps viewers intuitively understand relationships and how parts fit within the whole.
Simplified Connections
Connections between elements are represented with a single line rather than accurate pipe or wire drawings. This simplicity focuses attention on the flow rather than obsolete details.
Standard Symbols
Common symbols are used to represent different element types like pumps, valves, generators. Using standard symbols that viewers will recognize facilitates comprehension.
Abstraction of Detail
Minor or irrelevant details are omitted to prevent clutter. The focus is on key relationships rather than granular specifics. This simplification prioritizes the big picture view.
Clear Flow Direction
Arrows or other indicators are used to show the direction of flow/process within the system. This facilitates understanding cause-and-effect relationships.
Choosing What to Include
With the goal of simplicity in mind, the next step is deciding what major elements and relationships are most important to include in the single line diagram. Some factors to consider include:
Key Components
Include the components that are most critical to understanding how the overall system or process works. Filter out minor or obvious components.
Inputs and Outputs
Be sure to represent sources and destinations of material, energy, or information flow entering or leaving the system boundaries.
Interconnections
Illustrate the connections and interfaces between high-level component groupings rather than individual parts.
Operational Steps
For process diagrams, indicate the major sequenced steps and progression of actions.
Controls and Monitoring
Include elements that regulate or oversee flow/operation like control valves, instrumentation, or software modules.
Operational Modes
Consider depicting different system configurations or modes like normal/backup operation.
With practice deciding what to prioritize, you'll be able to distill complex realities into focused graphical abstractions.
Layout and Design Considerations
Once you've identified the key elements, it's time to start sketching. Here are some tips for effective single line diagram layout and design:
Organize spatially - Group related elements and use space, proximity and alignment to show logical relationships.
Flow from left to right - For processes, show flow progressing from left to right which matches common reading habits.
Use hierarchy - Place overall systems or high levels at top and work down, like a family tree structure.
Ensure clarity - Use large, clear labels and leave space between elements to prevent clutter compromising understanding.
Standardize shapes - Stick to common schematic shapes like boxes, circles and lines for consistency.
Add notes judiciously - Short explanatory notes can clarify but over-noting detracts from diagram simplicity.
Consider sizing - Larger more important elements can stand out from smaller dependent elements.
Be consistent - Maintain styles, symbol/label placement, line weights etc for visual cohesion across the diagram.
With practice applying these design tips, you'll gain the ability to craft highly comprehensible abstract representations through a single line diagram.
Labeling for Understanding
Clear, consistent labeling is arguably the most important aspect for ensuring single line diagrams serve their purpose ofcommunication. Here are recommendations for effective labeling:
Use descriptive labels - Labels should briefly indicate the component/connection function rather than esoteric codes.
Be concise yet explanatory - Short, scannable labels balanced with enough information for understanding.
Standardize format and case - Keep labeling style consistent with fonts, capitalization, etc to facilitate scanning.
Face labels outward - Rotate labels outside components/lines for maximum legibility considering expected viewing direction.
Add identifier tags - Use alphanumeric tags like 'P-101' along with descriptors for unambiguous referencing.
Highlight important labels - Use bolding, larger text size or color to emphasize labels for critical elements.
Integrate with layout - Leave space and distribute labels thoughtfully considering the diagram layout flow.
Employ leader lines - Use leader lines from label text to non-text elements they reference when needed.
Clear, standardized labeling as the interface between your diagram and its audience is key to its purpose of illuminated communication.
Putting it All Together
With an understanding of principles, consideration for relevant content, design guidelines and effective labeling habits in mind, you're ready to create your first single line diagram. Here are the basic steps:
Sketch light structure
Roughly map out component positions and connections on a blank page without details.
Refine layout
Iteratively adjust positioning using tips until relationships are clear and logical.
Add basic elements
Roughly sketch in standardized symbols or simplified representations of key parts.
Draw connecting lines
Clearly show flows and interfaces using single lines of appropriate thickness.
Apply initial labeling
Include brief descriptive labels associating symbology. Iterate labeling until legible.
Add auxiliary components
Sketch any supporting necessary parts and connectivity at a lower abstraction level.
Review and refine
Ensure clarity of core information presented and make any needed adjustments.
Generate final artwork
Clearly render the finished single line diagram using your preferred tools at a shareable resolution.
With practice, you'll gain confidence in your ability to distill multifaceted subjects into focused simplified schematics capable of enlightening your audience through a skillfully drawn single line.
Applications
From industrial systems to organizational charts, biological pathways to software architectures, single line diagrams have broad applications across disciplines in both work and education contexts. Here are some example applications:
Process Flow Diagrams - Illustrate material or data movement through sequenced production steps.
Piping & Instrument Diagrams - Depict fluid flow configuration in facilities including pipes, pumps and controls.
Wiring Diagrams - Show electrical circuit connectivity and components much like plumbing schematics.
System Architecture Diagrams - Communicate high-level design of complex engineered or IT systems.
Organizational Charts - Map reporting relationships and divisions within companies or entities.
Biological Pathways - Represent metabolic or signaling cascades proceeding through organisms.
Network Diagrams - Illustrate topology and interfaces within physical or logical networks.
Workflow Diagrams - Visualize information movement through procedures, tasks and roles.
From technical documentation to presentations, the skill of distilling multi-faceted realities into focused simplified schematics through single line diagrams empowers clear thinking and communication across professions.
Conclusion
With practice applying the principles, techniques, and best practices covered here, you'll gain the ability to transform complex subjects into lucid conceptual diagrams utilizing only a single line. This optimization superpower serves important functions across technical, educational and creative contexts. By focusing on hierarchy, abstraction, flow, standardization and clarity - complex realities can be illuminated and comprehension enhanced through simple yet impactful schematics. I hope this guide has equipped you with a foundation for harnessing the power of single line diagrams to bring your own concepts and communications to life.
0 notes
Text
Poosanikai Or White Pumpkin Halva
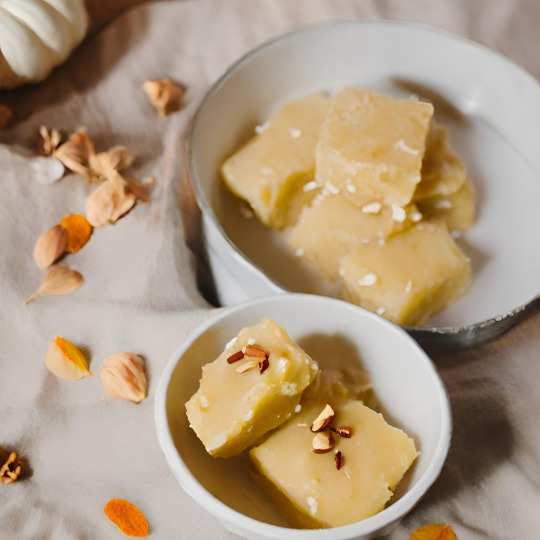
In this delightful blog, we bring you a step-by-step guide to making the traditional Indian dessert, Poosanikai Halva, also known as White Pumpkin Halva or Ash Gourd Halva. Made with the finest ingredients and bursting with flavors, this sweet treat is a must-try for all dessert lovers.
The Poosanikai Halva recipe showcases the unique taste of ash gourd, a versatile vegetable known for its high water content and subtle sweetness. We carefully peel and grate the ash gourd, extracting its essence to enhance the flavor profile of the halva.
Watch closely as we combine the grated ash gourd with a perfect blend of ghee, sugar, and cardamom powder, infusing the dish with aromatic notes and a rich, creamy texture. The heavenly aroma that fills the kitchen while cooking this halva is simply irresistible.
The blog demonstrates the simple cooking process, allowing you to follow along effortlessly. Our expert chef shares valuable tips and tricks to ensure your Poosanikai Halva turns out perfect every time. From achieving the right consistency to getting the balance of flavors just right, you'll learn all the secrets to create a memorable dessert experience.
Whether you're a seasoned chef or a beginner in the kitchen, this blog is your ultimate guide to mastering the art of Poosanikai Halva. Impress your family and friends with this delectable Indian sweet, perfect for festivals, special occasions, or simply as a delightful treat.
So, if you're craving a unique and flavorful dessert that will tantalize your taste buds, look no further than this Poosanikai Halva recipe. Indulge in the creamy goodness of ash gourd, and experience the joy of creating a traditional Indian sweet that will leave you wanting more.
Don't miss out on this incredible culinary adventure. Refer to this blog and Watch the video now to discover the secrets of making the mouthwatering Poosanikai Halva, also known as White Pumpkin Halva or Ash Gourd Halva.
Ingredients:
- 2 cups grated ash gourd (poosanikai or white pumpkin)
- 1 cup sugar
- 1/2 cup ghee (clarified butter)
- 1/2 cup milk
- 1/4 teaspoon cardamom powder
- 2 tablespoons chopped nuts (cashews, almonds, pistachios)
Instructions:
1. Start by grating the ash gourd (poosanikai or white pumpkin) using a grater. Remove any excess water from the grated ash gourd by squeezing it gently.
2. In a heavy-bottomed pan, heat the ghee over medium heat. Once the ghee melts, add the grated ash gourd and sauté for a few minutes until it turns translucent.
3. Add the milk to the pan and cook the mixture on low heat, stirring occasionally. This will help the ash gourd cook and soften further.
4. Once the ash gourd has cooked and the milk has evaporated, add sugar to the pan. Stir well to combine all the ingredients.
5. Continue cooking the mixture on low heat, stirring frequently to prevent it from sticking to the bottom of the pan. The sugar will melt and release water, creating a slightly liquid consistency.
6. Cook the mixture until the water evaporates and the halva starts to come together. It should become thick and glossy.
7. Add cardamom powder to the halva and mix well. This will enhance the flavor and aroma of the dish.
8. In a separate small pan, heat a tablespoon of ghee and roast the chopped nuts until they turn golden brown. This will add a crunchy texture and nutty flavor to the halva.
9. Add the roasted nuts to the halva and give it a final stir.
10. Remove the halva from heat and transfer it to a serving dish. Allow it to cool slightly before serving.
11. Serve the poosanikai or white pumpkin halva warm or at room temperature as a delicious dessert or sweet treat.
Enjoy your homemade Poosanikai or White Pumpkin Halva!
youtube
0 notes
Text
Welcome members, to our 15th year of dirt biking fun! The way that MDR has grown over the years is absolutely astonishing and as part of the board we are so thankful for each of you! Each person, each family, each rider, each volunteer, each sponsor...the list goes on, but because of each person, MDR is what it is today! What an incredible place to be! You will start seeing many posts from me as we lead into our 15th season and we kick off our 2023 Manitoba Cup at Fisher Rocks & Logs in Fisher Branch, MB!
So, this post is simply just some updates before race day registration opens (those details are coming soon). Take a peek because these will affect quite a few riders, but in a great way!
First on the agenda is the Intermediate Race. At the AGM it was discussed to add an additional colour for the sportsman loop as we have been adding a little extra on the track to help prep for the big loop. So our colours for race times are as follows:
-Beginner Race (Sat 1:00/Sun 8:30) will be BLUE
-PeeWee (Sat 2:15/Sun 9:45) will be PINK
-Intermediate SHORT Race (Sat 3:00/Sun 11:00) will be PURPLE
-Intermediate LONG Race (Sat 3:00/Sun 11:00) will be ORANGE
-Advanced Race (Sat 5:00/Sun 1:00) will be ORANGE
***The website will reflect these as well in the Race Classes section in the 'Race Loop' category, so if ever unsure, a quick check there will help.
Second on the agenda, while we mention the colours, the race times have been adjusted as well! So, Beginner and Advanced are NOT affected, but Sunday race times are a little different. Pee Wee Race will begin at 9:45 (instead of 9:30) and Intermediate will beginat 11:00 (instead of 10:30). At the AGM it was also voted on that the intermediate race will be REDUCED to One Hour (instead of the 90 minutes). This jumps into my next topic...
Third item...TEAM RACES! They are back and in full swing! With the reduction of time for the intermediate race, this now gives a little extra breath to those that want to have some extra fun and jump into the team race! The Team Race is Sunday only, points are counted, trophies will be given, and this is a great way to keep riding but be able to take a breather in between laps. How does it work? Team of 2, one rider starts and completes a full lap, bump your partners tire just after the yellow ribbon of timing and scoring and your partner goes out while you hydrate, then repeat, until the race is over. The advanced race is 2 hours in length, so count on a couple laps! Also note, that in order to ride the team race, you do need to already be an orange loop rider for the safety off all riders out there.
Next item up is Memberships! Memberships are currently open online for the year, BUT please remember that online memberships will close on Friday, May 12. After this, memberships will need to be purchased in person at the scoring trailer with cash. So if you need a membership and want to use PayPal, you still have about a week to do so.
Number 5 today is volunteering! We will have our volunteer sign up sheet available when registration opens and we really hope to see some familiar faces along with new faces this year. We are volunteer driven and we would like to get back into that amazing part of the club where we can lean on our members to help out. There are some spots that are the length of a race, some that are quick and easy, some that are a little longer, but we have a variety of options and all help is appreciated. Please check in with our Volunteer Coodinator to clarify any positions and to learn how!
I think that's it for this post! Stay tuned, there will be more coming as we get close to the start of the 2023 season!
Thank you! See you soooooooon!!
MDR Board
0 notes
Text

Little things to get your therapist! Because we love them!

My therapist was telling the members of our group therapy the other day that legally we can't give her $$$ or gifts... and that made us all sad. Like, these are the people that saved our lives!!! And all we can do to say thank you is by using words? BOOOOOO!! We will not stand for this!!!
She then clarified by saying if it is something small or handmade of course they can accept it. This is where I come in. I put my thinking cap 🧢 ⬇️ on and made a list of cute little things to gift to your own amazing therapist, for whatever occasion.
(side note: all therapists and facilities are different and have different policies, so this is just a starting point to give you fun ideas! Make sure to check with people before bringing!)
Pics for inspo @ the bottom! ⬇️⬇️⬇️

1. Anything you Bake! Pastries are great, because if they're homemade, you (sort of) didn't spend money on it, which is a big no-no! Ideas: Cookies 🍪, cupcakes 🧁, any slice of pie 🥧, or just a little candy 🍫. Also muffins! Just check with your therapist about any allergies/preferences! It may ruin the surprise, but it's worth it.
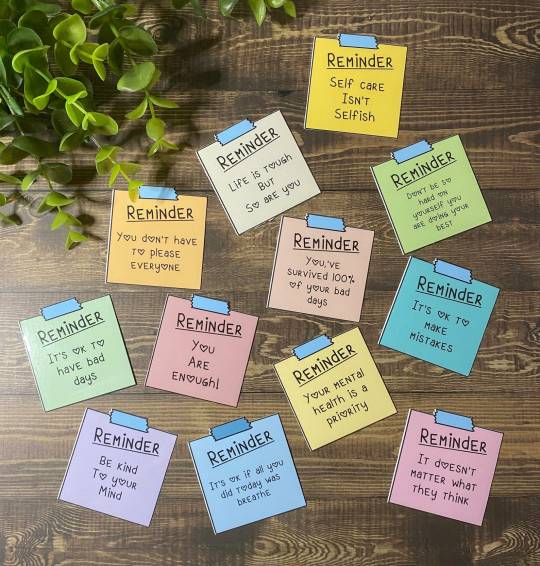
2. Any handmade crafts! This could be thank you notes, handmade art pieces, home made stickers, a personalized clay creation, or what have you. Again, because it's made by you, it's assumed you didn't spend actual money on it, so they of course can accept any treasure you create! 🎨🖼️🖌️
3. Something you knitted/crocheted! Again, the handmade rule applies. And, because it's made by you, it makes it so much more special and personal! And if you don't know how to do either of these things, there are many simple kits and youtube tutorials you can acquire. My recs will be at the bottom! ⬇️ 🧶
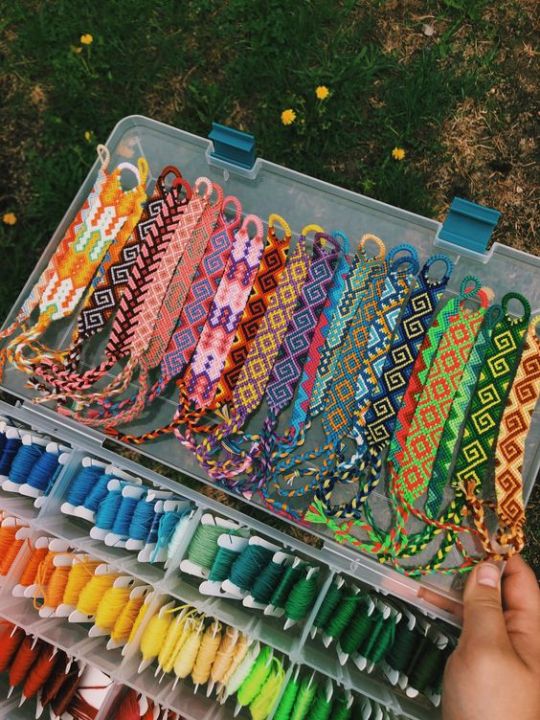
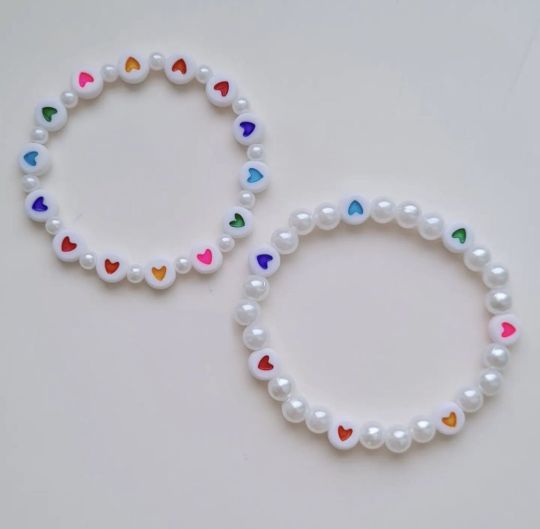
4. Handmade bracelets. That's it. They work for everyone. Of course, you know your therapist best, but they are just too cute and personalizable... lol and genderless! Hello!?!
5. Stickers! Even though you do spend money on these, they are so tiny it hardly matters! You can get them for whatever personality your therapist has, and its such a small but personalized gesture I know they'll love it. Also more recs will be below for these.... :) ⬇️
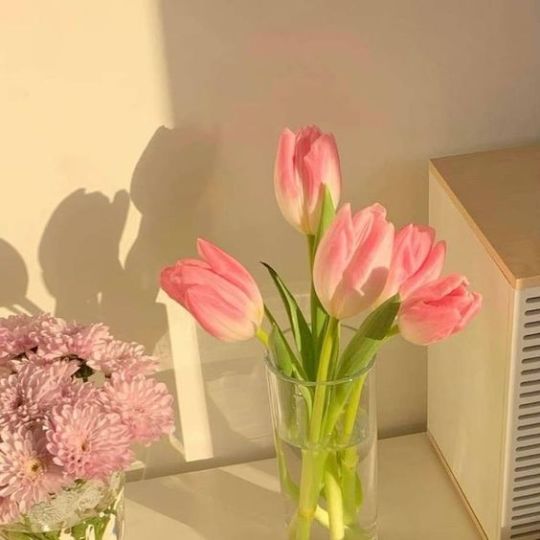
6. Flowers or plants! If you know their fav, then get it for them! Girl, You know it'll brighten their day. Don't go overboard, now. Let's say >>$25, deal? Deal. 💐 🌸
That's all for now!
Inspo!
Baked goods: ⬇️

Crafts ⬇️
youtube

Knitting/Crochet ⬇️
youtube
youtube
Bracelets! ⬇️
youtube
Stickers ⬇️


Flowers/Plants ⬇️

#therapist#therapy#mental health#birthday gift#gift guide#birthday present#psychotherapy#mentalheathawareness#care#psychiatric care#being nice#neurodiverse stuff#neurodivergent#actually autistic#actually neurodivergent#health care#medical care#psychology#psychologist#psychiatry#psychiartist#health care worker#care giver#Youtube
1 note
·
View note
Note
Hi, I just found your blog recently and am absolutely loving it! I have a question and I apologise in advance if you've already answered it. But I'm a person who, as soon as I talk to people outside my comfort zone, shuts down (social anxiety yeahh) and gets annoyed afterwards because I can't concentrate on the details of the person infront of me. It's like I'm in a trance or paralysis (idk how to describe it better, so sorry) Do you have any tips to prevent this or to improve myself?
Heyy, thanks for the question!
So first of all i would like to clarify i don't have that much experience with this problem, while i am an introvert, i don't have any semblance of social anxiety or even shyness, if you want to ask a deductionist that has much more experience in this field than i do i encourage you to ask @sleuth2k7
Now, i noticed you liked my "Deduction: passive or active?" post at around the same time you asked me this, which is great because that means i can reference that post in this answer!
So my first advice (funnily enough) is to not follow the advice on that specific post, not at first at least. As an experienced deductionist sometimes i write posts that are better suited for other experienced deductionists, that post specifically explains how interaction with the subject and the environment you're deducing can greatly improve your skills, but it's worth noting that beginners will probably have a harder time adopting that approach when starting out. Don't be afraid to just not demand these skills of yourself just yet, it's hard enough to deal with social anxiety as it is without the added worry of having to deduce as you deal with social anxiety. It's okay to adopt a more "bird watching" approach to deduction at first, an approach that involves sitting in a public space (or wherever the subject you're deducing is) without actually interacting with the people or the environment and limiting yourself to just observe and train your deduction skills from afar. Once your deduction skills are cemented enough and you don't have to dedicate a good chunk of your brain power to deducing, you can start integrating more interactive approaches to your method.
My second piece of advice (and again, this comes from my own experience, don't feel bad if this doesn't work with your situation, it just means you have to apply a different approach) don't try to make deductions as you interact with people, rather treat it as a very long "information gathering" stage. As you're talking to someone don't worry about deductions just yet, just observe, take mental notes of what you can (it doesn't have to be a lot, even a small amount of information can lead to an interesting deduction), and focus on noticing things. Anything from what words they often use when speaking, to how they're dressed, to how dirty their shoes are, and take note of that information. Once you're out of that social situation make deductions about the person retroactively using the information you took note of. This takes away some of the stress of having to interact with the person, observe them carefully and deeply, and make complex connections and deductions about those observations all at the same time, and it breaks the process down so you only have to worry about 1) observing as much as you can (and let me emphasise on as much as you can, remember that while we're aiming for a certain level of observation skills, we all have our limits with which we're comfortable) and 2) interacting with the person. The other complex stuff can come later
And finally a quick thing to keep in mind is that you should make being comfortable and calm (as much as possible) your priority, it's better to keep your cool and only push yourself to observe 2 or 3 things about a person that you can then use to deduce stuff about them, than to aim to observe 10 or 20 things while you deduce stuff about them, and getting overwhelmed because it's too much and your social anxiety is making things worse, and ending up not observing anything at all. you can get valuable practice with 2 or 3 observations, you can get no practice in with no observations, work within your limits to be able to expand them
I do hope some of this helped, and if you have any other questions just send them over!
Happy Observing!
-DV
#deduce#learning deduction#deductionist#deductive reasoning#deduction#sherlock#logic reasoning#observant#observation#profiling#psychology#logic#sherlock holmes#bbc sherlock#sherlock bbc#Sherlockian Deduction#How to think like Sherlock Holmes#study#studyblr#learning#ask
10 notes
·
View notes
Text
Directions: Choose 1 locomotor skill, 1 non-locomotor skill, and 1 manipulative skill (listed on page 167). Write three separate lesson plans to explain how to teach each of the skills you have chosen to young children around age 4-6. It should describe how to do each skill in detail so the child will know how their body should move while executing the skills. A lesson Plan gives explicit details about what you want to accomplish and how to best achieve that activity. It should be written as if you are giving it to a beginner teacher who has never taught the activity before and needs clear and detailed, step by step instructions. Helpful Notes: There are some really imaginative ideas online for all of the motor skills. Try to think of ways for the kids to use their imagination and HAVE FUN while they are learning these skills. A lesson plan that involves teaching a specific movement type should list detailed steps of each body movement involved in the skill. This will allow students to properly learn the required movement(s). Consider breaking your Lesson Plans down into subtopics to better clarify what is needed for the beginner instructor to help students execute the complete skill. Examples of subtopics might include: The Objective, Age Range, Activity Cues, Required Materials, Play Area, Description and Instruction, Activity Duration, Prerequisites, Assessment and Follow-Up. Maybe add music to your lesson if possible. Pictures can help illustrate the motor skill. You will have three separate lesson plans when you are finished with this assignment. ORDER THIS PAPER NOW. 100% CUSTOM PAPER CategoriesEducation homework help Leave a Reply Cancel replyYour email address will not be published. Required fields are marked *Comment * Name * Email * Website Save my name, email, and website in this browser for the next time I comment. Post navigation Previous PostPrevious Q-1 Explain the benefits that multinational companies get from using foreign excNext PostNext 1) For each of the data sets below, indicate which type of graph you would choo
0 notes
Last Seen Blogs