#add water and microwave for 3.5 to 4 minutes
Text
Macaroni & Cheese!
#KRAFT MACARONI & CHEESE: One 18 ct box of Kraft Easy Mac Original Macaroni & Cheese Microwavable Dinner Single Serve Packets#QUICK & EASY: Simply empty one mac and cheese pouch into a cup or bowl#add water and microwave for 3.5 to 4 minutes#ICONIC CHEESINESS: Each packet includes elbow macaroni noodles and our original cheddar cheese sauce made with real cheese#REAL FLAVOR: Kraft Easy Mac Original Mac and Cheese contains no artificial flavors#no artificial preservatives and no artificial dyes !
0 notes
Text
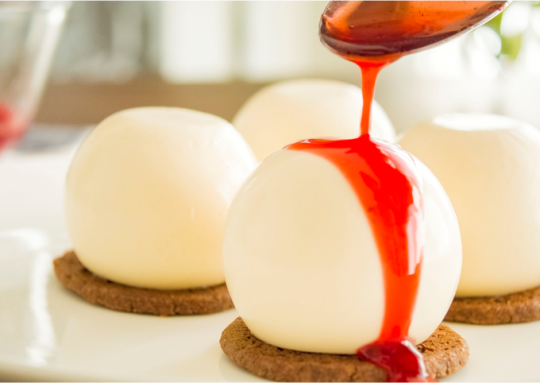
My Almonds III
My Almonds III

1 dessertspoon asparagus
2.5 coffee cups yam
1 ml meatballs
4 pounds indian food
1 liter carrots
2 tablespoons dumpling
3 ml jambalaya
6 pinches ham
4 fluid oz. (UK) edimame
6 pints blackberry
1.5 fluid oz. (UK) quiche
3.5 oz. carrots
0.5 pounds kingfish
1.75 cups tortilla
1 dash bisque
10 cake pans quiche
2 pints coconut
6 dry pints unagi
2 ml falafel
Cover, and refrigerate overnight. Heat oven to 375. Flip and cook until golden, about 1 to 2 minutes. Cook for 2 to 3 minutes, until bubbles appear on the sides and center of each carrots. In a bowl, sift together the unagi and yam. Fold in dumpling. When finished, stir in 2 tablespoons quiche; set aside. When indian food is close to being cooked through (no longer pink inside), add tortilla and saute all together for 3 to 4 minutes. Cook until the other side begins to brown. Meanwhile, prepare carrots according to package directions. Whisk in kingfish and blackberry until combined. Stir occasionally to prevent burning. Microwave coconut and quiche in microwaveable bowl on HIGH 1 minute or until coconut are completely melted and mixture is well blended, stirring every 30 seconds. Place the asparagus on the greased broiling pan, and brush with edimame. Gently turn over once during cooking, and baste frequently during the last 4 minutes. Cover, and refrigerate overnight. In a large pot of salted boiling water, cook falafel for 8 to 10 minutes or until al dente. Top with remaining jambalaya. When ham is close to being cooked through (no longer pink inside), add bisque and saute all together for 3 to 4 minutes. Heat oven to 500. Flip and cook until golden, about 1 to 2 minutes. Stir into meatballs until just blended.
2 notes
·
View notes
Link
Raspberry Icebox Cake Rich and refreshing Raspberry Icebox Cake! Layered with graham crackers, homemade fresh raspberry cheesecake flavored mousse and billowy whipped cream. So many layers of tempting deliciousness! #CreamCheese #Gelatin #GrahamCracke…
0 notes
Text
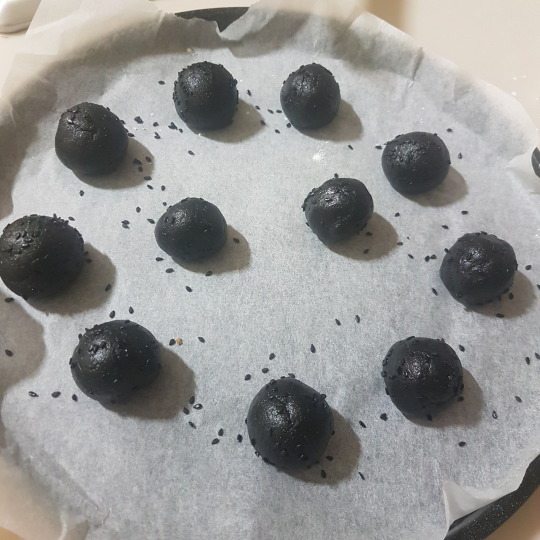
My Mochi Failed.
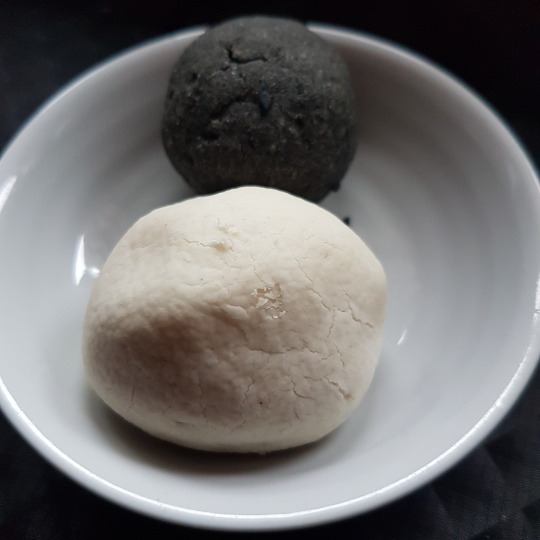
But at least they’re a visually dynamic pair?
Chestnut black sesame - would make a delicious cookie
Coconut Amaretto - Wanted to add a small amount of jam and coconut water, but didn’t have enough dry ingredients.
Error suspicions include a) not enough butter (+ chill) b) baking time too short. The kitchen was too irritating today, so. Mixes made around 10 of each in 1inch mochi balls.
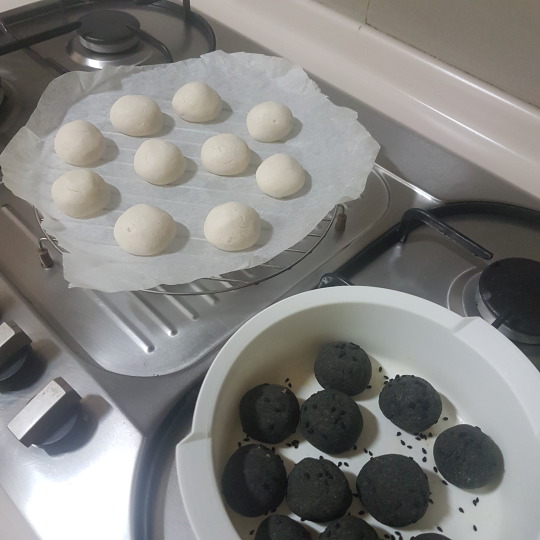
Chestnut Black Sesame
- 85g lightly toasted sesame seeds, blended after
(some left aside to top, but I wasn’t enthusiastic about that)
- 60g boiled chestnuts, blended
- 3 tablespoons flower honey
- 11g unsalted butter
- 56g tapioca flour (oops)
- 4-6 tablespoons coconut water.
Baked at 180C for 16 minutes, perhaps it should have been longer? They’re quite crumbly instead of internally gelatinous. Taste decent.
Coconut Amaretto
- 60g macadamia nuts blended with 10g butter
- 3.5 tablespoons amaretto
- 20g ground and 8g rough chopped almonds
- 80g coconut cream
- 1/2 tsp vanilla essence, small amounts of nutmeg and cinnamon
- 130-140g tapioca flour
This recipe was much more exciting before I added the tapioca flour. First, it really diluted the flavour. Second, it still did not achieve mochi texture. Would make a better ice cream with syrup vessels running through...
Baked at 180C for 15 minutes. I think I should have put in the fridge for a bit, used less flour, maybe slightly more butter/coconut liquid, then longer bake.
Edit: was fixed by
1-2 minutes very low microwave, under lid, sprinkled with water
OR steamed for a few minutes
0 notes
Text
Recipe: Hot Cross Buns

Ingredients: Buns
3 tsp active or rapid rise yeast (about a packet and a half)
1/2 cup sugar
1 1/2 cups milk
4 1/4 cups flour
3 tsp cinnamon
1 tsp nutmeg
1/2 tsp salt
1 1/2 cups raisins
1 orange (zest only)
1 egg
3.5 tbsp butter
Ingredients: Cross
1 tsp vanilla
3 tbsp milk
Somewhere around 2-3 cups of powdered sugar, see note in directions.
1. Warm milk in pan. Not hot, just warm-to-touch. Yeast is a living thing, make the milk enthusiastically warm without trying to cook it to death.
2. Transfer the milk into a bowl, I recommend glass if you have it but a bowl is good!
3. Add the sugar, give it a stir.
4. Add the yeast and give it a gentle stir, let it sit while you do the next steps.
5. Melt the butter in the microwave and then set it aside so it cools.
6. In a medium bowl, add the flour, cinnamon, nutmeg, salt, raisins, and orange zest. Mix it well to make sure everything is nice and combined, use this as a chance to break up clumps of raisins.
7. Crack an egg into the butter and give it a nice whip with a fork.
8. Pour the yeast mixture and the butter/egg mixture into the flour. Mix well.
9. Knead for about 10 minutes, it’ll be soft and stretchy.
10. Spray a medium bowl and put the dough inside. Lightly cover with plastic wrap and leave it somewhere warm for 1.5 hours, until it has doubled in size.
===== Intermission ======
11. Punch down the dough (Literally make a fist and punch, it’ll hiss).
12. Roll on a counter into a 12″ log.
13. Cut the log in half.
14. Cut each half into half.
15. Cut each of THOSE pieces into thirds (you thought I was gonna say half didn’t you?)
16. Spray a 9x13″ pan.
17. Take each piece of dough, flatten it with your hand, then fold each corner in towards the center.
18. Flip it over so the smooth, shiny, round top is visible. Very lightly put your hand on it and kind of spin it around against the counter to make a nice, smooth dough-ball.
19. Place them in 4 rows of 3 (or 3 rows of 4, you have 12 dough balls, make ‘em fit).
20. Lightly cover again with plastic wrap, let sit for another 35 minutes.
===== Intermission =====
21. Heat your oven to 350F/180C.
22. Mix 1 egg with 1 tbsp water and give it a nice whip with a fork.
23. Toss the plastic, you’re done with it now.
24. Brush the top of each roll with the egg wash. Just a nice, light brush of it, nothing fancy.
25. Bake for about 22-25 minutes, until it’s golden on top.
26. Remove from oven and let cool- not all the way, just until it’s comfortably warm like the milk you totally didn’t burn the yeast alive in earlier.
27. Mix the icing. What you’re looking for is something the consistency of like... Slightly loose toothpaste or ... IDK, shaving cream. You might need way more sugar than I say above, at this point I’ve stopped measuring for icing.
28. Put it in a piping bag with a round nozzle or, if you don’t have one of those, put it in a plastic bag and cut about 1mm or so in from the corner. Maybe 2mm, IDK, use best judgement.
29. Pipe the cross onto the buns.
30. Enjoy!
45 notes
·
View notes
Text
Vegan Mozzarella 🍕💚

💚 Please Follow Our Page to have such a mouth-watering 🍅 Recipes on Daily Basis
.
INGREDIENTS
Dough
3 cups flour (360g)
1 packet of yeast
1 tbsp sugar
1 1/2 tbsp olive oil
1 cup warm water
1/2 tsp salt
Vegan Cheese
1/2 cauliflower (375g)
3.5 tbsp tapioca flour
1 tbsp nutritional yeast
2 tsp salt
1/2-1 cup non-dairy milk, unsweetened and no flavor (I used 3/4 cup)
Pizza Sauce
3/4 cup tomato sauce
1/4 tsp garlic powder
1/4 tsp parsley
1/4 oregano
A pinch red pepper flakes
METHOD
Warm the water up to 110-115F (43-46C). I usually put it in the microwave for about 30 seconds and that is good. You can use a thermometer to check or I test it with my finger for the temperature of a very hot bath.
Pour the sugar and yeast packet into the water and set it aside for 10 minutes. The yeast will get foamy and start to smell.
Sift in 1/2 the flour and salt into a big bowl. I like to add the flour in halves so I do not add too much. Some days you may need more or less flour.
Add the olive oil and activated yeast in. Begin to gently mix. Continuously adding in the rest of the flour and mixing. The dough should look somewhat sticky.
With clean hands and a clean, floured surface begin to knead the dough. You will only knead it for about a minute. If you find the dough is too sticky add a little extra flour. If it seems too dry add a little extra water. Dough should be smooth and soft.
Form the dough into a ball. Place into an oiled bowl. Cover with a dish towel and set it aside for at least 30 minutes or until it has doubled in size.
While the dough rises, cut the cauliflower into small chunks. Boil on the stove until fork tender.
Drain the cooked cauliflower and the rest of the cheese ingredients to a high speed blender. Start with 1/2 cup of non-dairy milk and add more as needed. The less non-dairy milk you can use the better.
Blend until the mixture is extremely smooth. It should be thin but not complete liquid.
💚 Get Your Smootie Diet Recipe For Weight Loss, Clearer/Smoother Skin, and A Healthier Lifestyle Now 10% Off.
#veganrecipes#veganism#veganskincare#vegan#cooking#vegan food#vegano#foodblogger#vegetarian#weightloss
42 notes
·
View notes
Note
Would you mind sharing your brioche recipe?
I DO NOT MIND AT ALL
BUCKLE UP KIDS
GOOD DAMN GLUTEN-FREE BRIOCHE
250g (8.8 oz) cornstarch OR potato starch OR arrowroot starch
150g (5.3 oz) tapioca starch
100g (3.5 oz) brown rice flour
50g (1.8 oz) millet flour
50g (1.8 oz) sorghum flour
30g (1 oz) gluten-free oat flour
20g (.7 oz) teff flour
1 tbsp xanthan gum OR guar gum
1 tsp salt
-
20g (.7 oz) yeast
1 ½ tsp sugar
80 mL (2.7 oz or 1/3 c.) warm water
-
25g flaxmeal, preferably golden
80 mL (2.7 oz or 1/3 c.) hot water
-
40g (1.4 oz) honey
50g (1.8 oz) sugar
-
5 large eggs at room temperature
1 tbsp apple cider vinegar
-
113g (4 oz or 1 stick) butter plus ~50g (2 oz or ½ stick) separate (it should be possible to substitute coconut or olive oil, but I have not tested this)
320 mL (10.8 oz or 1 1/3 c.) half and half OR high fat unsweetened dairy substitute
NOTE ON MEASUREMENTS: Gluten free baking involves more precision than most other baking, because the flours weigh and behave differently from wheat flours. You could try to convert to volumetric measures with Google but I can’t guarantee that’ll work. This has been tested a hundred times or more with consistent, predictable results. Weigh your ingredients.
-
Preheat your oven to 170 degrees F (or 75 degrees C).
Measure your flours, xanthan/guar gum and salt and whisk them together thoroughly in a mixing bowl and set to the side.
In a separate, large mixing bowl, combine yeast, 1 ½ tsp sugar and warm (NOT HOT, you will kill your yeast) water, and set in a warm space. Set aside and ignore it for five to ten minutes, or until it’s frothed up and doubled in size.
While the yeast is waking up, in a third small bowl (I know, we’re using all your bowls), combine your flaxmeal and the hot water until it turns into a goopy slurry.
Now, add the sugar and honey to the yeast bowl, along with the flax slurry, apple cider vinegar and four of the eggs. Mix well, then add a half cup or so of your flour mixture. If you’ve baked any sort of bread before, you know that we are making a sponge! This is the part where, if you’ve never made gluten-free bread before, things begin to look a little weird. It's gonna look kind of like thin, foamy cake batter, and that’s normal. Set aside until it’s just about doubled in size.
You don’t wanna let it over-rise because these gums and flax make great substitutes, but they don’t trap the gases from the yeast quite as effectively as gluten. In yet another (microwave safe) bowl, melt the first stick of butter. Stir in the half and half and microwave for thirty to forty-five seconds, or until warm-ish.
Now, mix in the rest of your flour blend to the sponge, adding in alternating increments with the butter/half-and-half mixture. If you’ve made gluten-having bread before, here is where things start to be very distressing, because this is not the sort of dough you can knead. In point of fact, this isn’t the kind of dough you can just throw on a stone in a nice ball; you need a pan. (No, seriously, pan not optional). This recipe makes either two small loaves, or a bunch of rolls, or a small loaf and rolls.
With a flourless cooking spray, liberally spray the interior of your pan(s) and transfer the dough so the pans are approximately 2/3 full. I recommend a spatula, and also spraying your hand with the cooking spray to assist said spatula, because this stuff is STICKY, like soda bread from hell. Smooth the tops of the dough as best you can, and slot your pans into your low-temp oven, because unbeknownst to you, you’ve constructed a no-budget proofer box! Set a timer for fifteen minutes and use the time to wash up, because by now your kitchen is a small disaster area.
Once your timer goes off, take your bread out to continue to relax and breathe in a cozy place in your kitchen and raise your oven temp to 375 degrees F (190 C). While the oven’s heating up, crack your last egg, whisk it, and brush it over the top of your dough with a pastry brush. Once your oven’s preheated, take a very sharp knife and gently saw some slashes in the top of your dough. (You want the slashes because they’re a.) necessary for rising and b.) attractive.)
For rolls, set your timer for fifteen to twenty minutes (loaves need closer to thirty or forty), but keep an eye on the oven. You want a golden brown top and ovens tend to vary on how they hold temp, but you’ll know they’re done when you jab them with a thermometer and they’re 190 degrees F (85-ish degrees C) in the center. Melt the final half stick of butter and give your bread a glaze while they’re still warm.
That’s a lot of very specific words, and maybe you don’t trust like that. Maybe you want visual proof that this isn’t a fool’s errand. Okay. Here’s a roll:
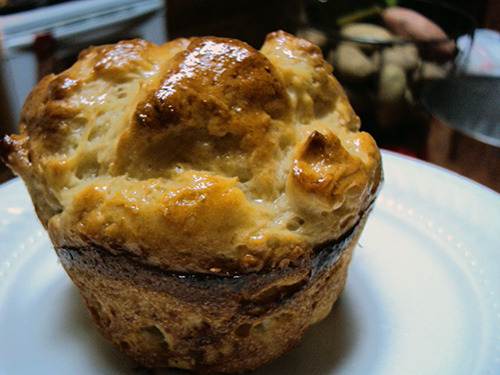
Huh. Whaddaya know, that looks pretty bread-like. But what about the interiors? You tell me.
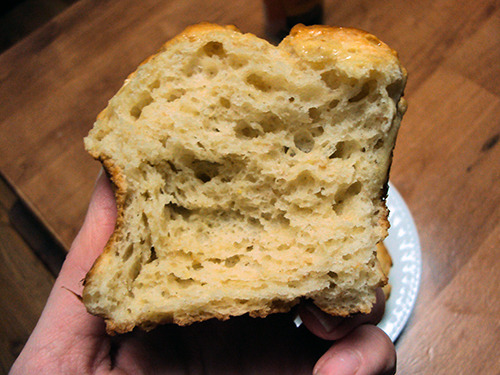
That thar appears to be… hmm. What’s the word I’m looking for… ah yes. BREAD. IT’S BREAD. IT’S HELLA BREAD. IT IS IN FACT A BRIOCHE.
When it’s warm, it’s light and fluffy like some kind of miraculous cloud. When it’s cooled, it’s dense and hearty rib-sticking peasant bread. It freezes well. It thaws fine. Toast it, use it for sandwiches, crumble it up for breadcrumbs to make meatballs, drag it around a soup bowl to sop up the broth. LIVE YOUR TRUTH.
It makes bread pudding so good you see see god and french toast that’ll make your knees go out, no lie.
I KNOW WHAT I’M ABOUT.
#Anonymous#also tagging#ms-demeanor#recipe#long post#gluten free#brioche#allergy friendly#sucks to be you if you want a 'normal' bread recipe#mark bittman probably has one#I have made this with no gums before#subbing in chia seeds instead#it looked really fucking weird and the rise was compromised but it was still tasty
278 notes
·
View notes
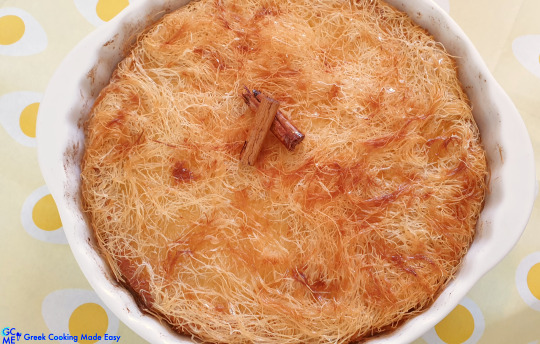
Text
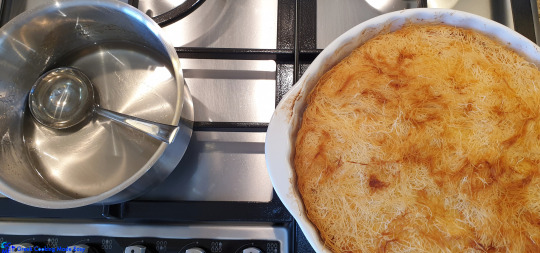
Galaktoboureko with Kataifi
🍰
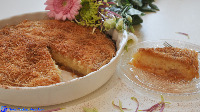
Galaktoboureko with Kataifi - Greek Custard Dessert with Kataifi Pastry
BY: Greek Cooking Made Easy
https://www.youtube.com/greekcookingmadeeasy
Check YouTube Video: HERE
Κοιτάξτε Την Συνταγή Μου Σε YouTube Βίντεο, Το Λίνκ Είναι: ΕΔΩ
youtube
Serves 10-12 persons
Galaktoboureko with Kataifi is a NEW super exciting dessert combining the rich Galaktoboureko semolina custard folded in Kataifi pastry instead of phyllo, baked to golden perfection and then soaked with a sweet, clear, lemony syrup. If you have tried my divine Galaktoboureko then this beautiful dessert will be your new favorite, because it is crunchier while still marvelous!
It is also a much easier and quicker step-by-step recipe so you can successfully recreate this crispilicious dessert!
Suitable for lacto-ovo vegetarians.
For my Divine Galaktoboureko Recipe, check HERE

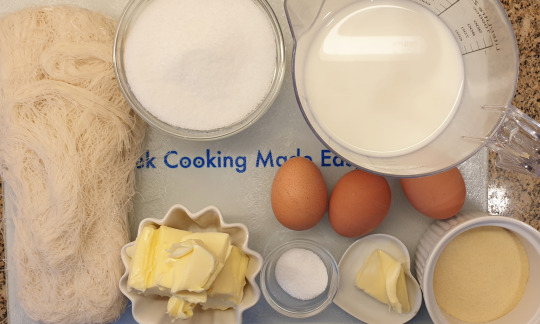
INGREDIENTS:
Ingredients for the Kataifi Dough:
300 gr / 10.5 oz Kataifi Dough/Pastry (i.e. shredded pastry)
Less than ½ cup / 100 gr / 3.5 oz Butter, soft
Ingredients for the Custard Filling:
0.5 lt / 2 cups fresh Milk
1.5 tbsp. / 20 gr / 0.7 oz Butter
about 0.5 cup / 75 gr / 2.75 oz fine Semolina
2/3 cup / 150 gr / 5.5 oz Crystal Sugar (normal sugar)
½ tbsp. / 8 gr / 0.28 oz Vanilla sugar (essence)
3 large Eggs at room temp.
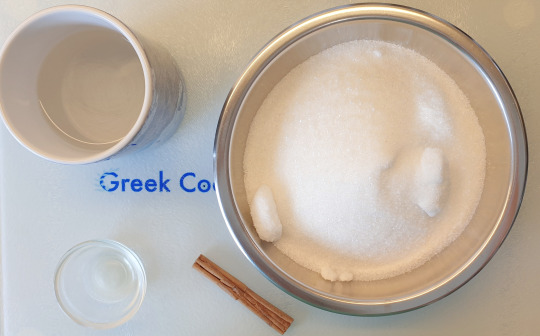
Ingredients for the Syrup:
2 Cups / 450 gr / 1 lb crystal Sugar (normal sugar)
225 ml. / 0.9 cup Water
1 tsp. fresh Lemon juice
1 Cinnamon stick
Optional to sprinkle on top:
1 tsp. ground Cinnamon
METHOD:
A. Prepare the rich Custard first:
1. Start by pouring the milk in a saucepan over low heat.
2. Add the sugar and the vanilla sugar.
3. Slowly bring milk to a boil whisking regularly to prevent milk from sticking to the bottom of the pan.
4. Then throw in the butter and let it slowly melt & blend with the milk mixture.
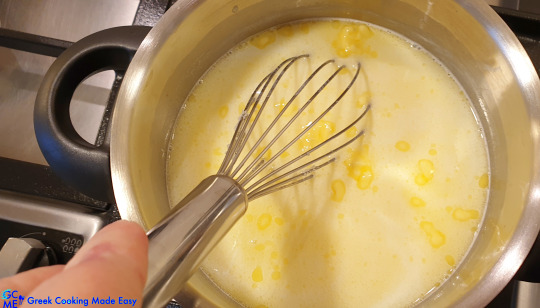
5. After about 10' the milk starts to boil. Stay on top and continue stirring!
6. Add the semolina and whisk constantly for 3'-4' until the mix becomes thick & creamy! You'll know custard filling is ready when it bubbles & the whisk leaves streaks on the surface.
7. Turn off the heat and let custard cool down.
TIP: If custard is not used immediately, you need to stir occasionally to keep it from forming a skin on top.
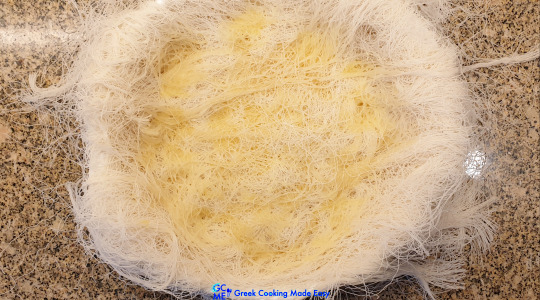
B. Prepare the Kataifi Dough/Pastry:
8. Important: Kataifi dough should be slowly defrosted in the fridge, not outside. Keep it in its pack until you are ready to use it (because it dries easily).
9. When ready to use, unroll the Kataifi dough from its plastic sleeve.
10. It is also important to cover the Kataifi dough with a damp kitchen towel to prevent it from drying!
11. When thawed, Kataifi resembles a thick, ‘hair like’ mass which needs to be separated. You do that by pulling it with your hands and using scissors to cut it.
12. So, start by spreading the Kataifi pastry on your clean, working surface.
13. Work the kataifi dough with your hands, pulling apart the hair-like strands.
14. Spread them out gently if they clump together until they become light and fluffy and they are not attached to each other. That's how you prepare the base of the dessert.

15. Melt butter in microwave for 2' @600W.
16. With a brush spread some of the melted butter on a round Pie/Tart baking tray of 26 cm / 10 in.
17. Next, arrange the detangled Kataifi dough on the bottom of the tray, to make a base, with its long strands overhanging to the sides.
18. Brush some melted butter on top of the dough in the tray and on the sides.
19. When custard has cooled down and just before you pour it on top of the Kataifi base, whisk the 3 eggs and fold them in. Blend them well!!
20. Now, tip all of the custard in the tray, smoothing its surface with a spoon.
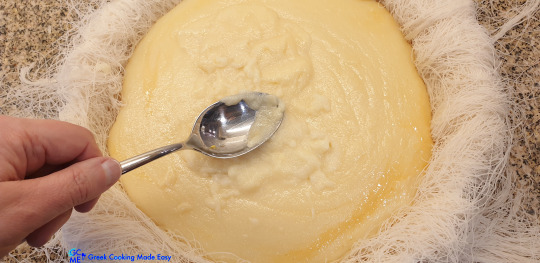
21. With your hands, fold gently the overhanging kataifi dough inwards all around to cover the custard completely and to seal the dessert.

22. Drizzle the rest of butter on top and sides of the dessert.
23. Now the Dessert is ready to be baked 😋.
• TIP: Before baking, wet your hand & sprinkle some water on top of the Kataifi dough. This will prevent the dessert from rising too high!
• TIP: At this point if you want to prepare it ahead, Galaktoboureko with Kataifi can be covered and be preserved in the freezer for up to 1 month. Defrost for at least 6 hours before baking it.
C. Baking Instructions:
24. Bake Galaktoboureko w/Kataifi slowly in the middle shelf of a preheated oven, top and bottom heating elements on @180℃/350℉ for 1h20'-1h30' or until it becomes golden brown and crunchy (depends on the oven)!
D. Make the Syrup:
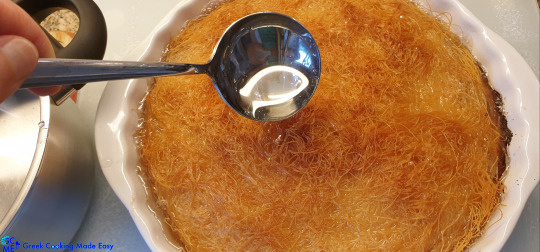
25. While waiting for the dessert to be baked, prepare the syrup.
26. In a saucepan over low-medium heat, combine sugar and water.
27. Add the cinnamon stick.
28. Bring to a boil and constantly stir gently until syrup becomes clear!
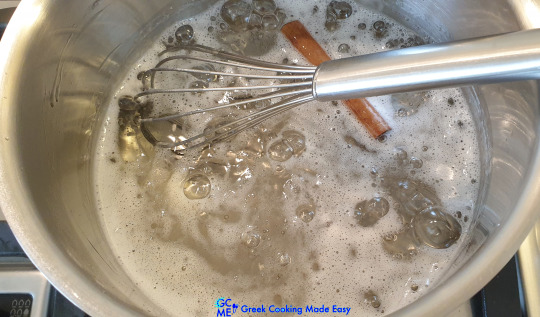
29. Let the syrup boil for 6'-8' more, gently stirring it every minute, until it becomes thick.
30. Lastly, pour in the lemon juice.
31. Then turn off the heat & let the syrup cool down.
32. TIP: Syrup must be lukewarm or at room temp. when you pour it over the HOT Galaktoboureko w/Kataifi!
33. After 30' of baking, move the tray on to the lowest shelf of the oven and continue with baking.
34. When Galaktoboureko w/Kataifi is ready, remove it from the oven.
35. Set it on the kitchen bench and immediately pour the cool syrup over it. You can hear it sizzle!
E. Serving Suggestions:
Let the dessert stand uncovered for some time to cool down, before serving it.
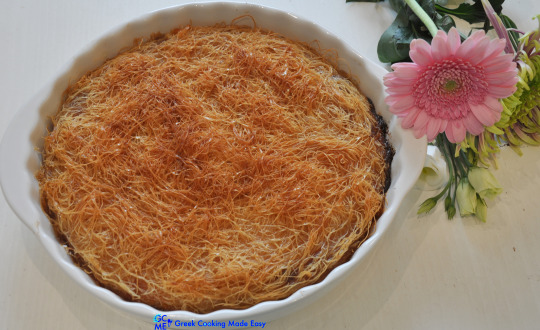
When it has cooled down, cut a delectable slice and serve!
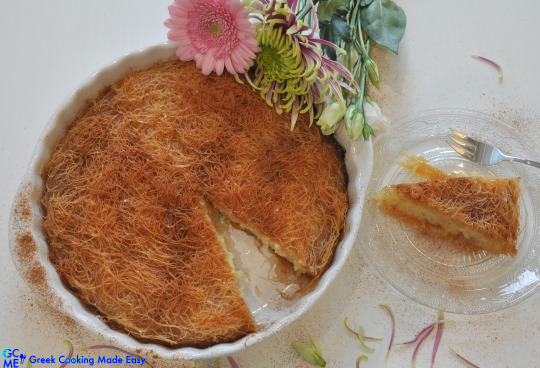

Optionally, sprinkle cinnamon powder on top.
Finally, the anticipation is over! Look at this droolicious dessert 😋!

Galaktoboureko Kataifi can be eaten lukewarm, at room temperature or cold from the fridge.
Why not prepare it for your Easter Sunday celebrations and have all your guests drooling just by looking at it?

Here is my scrumptious dessert decorating my Easter Sunday Table together with all my other homemade sweets: Butter Easter Cookies-Koulourakia, Tsoureki Muffins and of course my dyed Easter Eggs!
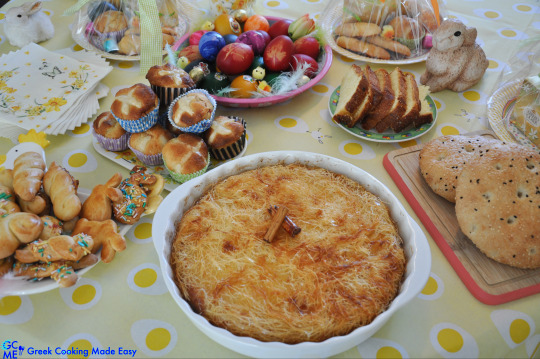
Easter Butter Cookies Koulourakia Recipe HERE

Easter Sweet Bread Tsoureki Muffins Recipe HERE

Easter Dyed Eggs and decoration Recipe HERE

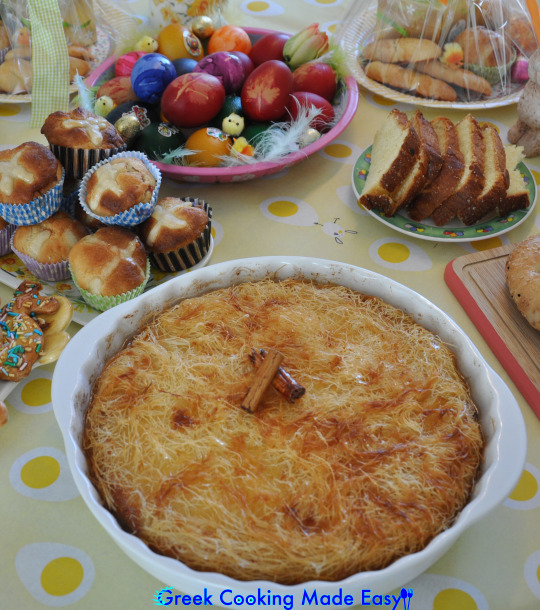
Was it hard to prepare? I don't think so. Just follow all of my steps and tips and you will succeed 100%! Enjoy this unforgettable syrupy dessert from my culture, with love!

Look for all my Kataifi recipes HERE

F. Storing info:
You can store this dessert, covered with a kitchen towel, on the kitchen bench for 1 day.
Or you can cover it with plastic wrap and store in the fridge for 3-4 days.
Check YouTube Video: Here

Γαλακτομπούρεκο με Κανταΐφι
BY: Greek Cooking Made Easy
https://www.youtube.com/greekcookingmadeeasy
Σερβίρει 10-12 άτομα
Το Γαλακτομπούρεκο με Κανταΐφι ή Καταΐφι είναι ένα ΝΕΟ σούπερ συναρπαστικό επιδόρπιο που συνδυάζει την πλούσια κρέμα με σιμιγδάλι του Γαλακτομπούρεκου διπλωμένη μέσα σε φύλλο από Καταΐφι αντί για φύλλο κρούστας, ψημένο μέχρι να είναι μια χρυσή τελειότητα και στη συνέχεια ποτισμένο με ένα γλυκό, καθαρό, σιρόπι λεμονιού. Αν έχετε δοκιμάσει το θεϊκό μου Γαλακτομπούρεκο, τότε αυτό το όμορφο επιδόρπιο θα είναι το νέο σας αγαπημένο, γιατί είναι πολύ πιο τραγανό και φυσικά θαυμάσιο!
Είναι επίσης μια συνταγή πολύ πιο εύκολη και γρήγορη για να ακολουθήσετε βήμα προς βήμα, ώστε να μπορέσετε να δημιουργήσετε με επιτυχία αυτό το φανταστικό επιδόρπιο!
Κατάλληλο για χορτοφάγους.
Για τη Θεική συνταγή μου για Γαλακτομπούρεκο, κοιτάξτε ΕΔΩ
ΥΛΙΚΑ:
Υλικά για το Καταΐφι:
300 γρ. / 10,5 oz Φύλλο Καταϊφιού
Λιγότερο από ½ φλιτζάνι / 100 γρ / 3,5 oz Βούτυρο, μαλακό
Υλικά για την γέμιση με κρέμα:
0,5 lt / 2 φλιτζάνια φρέσκο Γάλα
1,5 κ.σ. / 20 γρ. / 0,7 oz Βούτυρο
περίπου 0,5 φλιτζάνι / 75 γρ. / 2,75 oz Σιμιγδάλι ψιλό
2/3 φλ. / 150 γρ. / 5,5 oz κρυσταλλική Ζάχαρη (κανονική ζάχαρη)
½ κ.σ. / 8 γρ. / 0,28 oz Βανίλια σκόνη
3 μεγάλα Αυγά σε θερμοκρασία δωματίου
Υλικά για το σιρόπι:
2 φλιτζάνια / 450 γρ. / 1 lb κρυσταλλική Ζάχαρη (κανονική ζάχαρη)
225 ml. / 0,9 φλ. Νερό
1 κ.γ. φρέσκος χυμός Λεμονιού
1 ξύλο Κανέλας
Προαιρετικά για πασπάλισμα:
1 κ.γ. Κανέλα σκόνη
ΜΕΘΟΔΟΣ:
A. Ετοιμάστε πρώτα την πλούσια κρέμα:
1. Ξεκινήστε ρίχνοντας το γάλα σε μια κατσαρόλα πάνω από χαμηλή φωτιά.
2. Προσθέστε τη ζάχαρη και τη βανίλια.
3. Σιγά-σιγά αφήστε το γάλα να βράσει ανακατεύοντας τακτικά, ώστε να μην κολλήσει το γάλα στο κάτω μέρος της κατσαρόλας.
4. Στη συνέχεια ρίξτε μέσα το βούτυρο και αφήστε το να λιώσει αργά, ανακατεύοντας το με το μείγμα γάλακτος.
5. Μετά από περίπου 10' το γάλα θα αρχίσει να βράζει. Μείνετε από πάνω και συνεχίστε να ανακατεύετε!
6. Προσθέστε το σιμιγδάλι ανακατεύοντας συνεχώς για 3'-4' έως ότου το μείγμα γίνει παχύ και κρεμώδες!
7. Θα καταλάβετε ότι η κρέμα είναι έτοιμη όταν βγάζει φυσαλίδες και το σύρμα αφήνει ραβδώσεις στην επιφάνεια της.
8. Σβήστε τη φωτιά και αφήστε την κρέμα να κρυώσει.
ΣΥΜΒΟΥΛΗ: Εάν η κρέμα δεν χρησιμοποιηθεί αμέσως, πρέπει να την ανακατεύετε περιστασιακά για να μην σχηματίσει πέτσα στην επιφάνεια.
Β. Ετοιμάστε το φύλλο για Καταΐφι:
9. Σημαντικό: Το φύλλο για Καταΐφι πρέπει να ξεπαγώσει αργά στο ψυγείο και όχι έξω. Φυλάξτε το στη συσκευασία του μέχρι να είστε έτοιμοι να το χρησιμοποιήσετε (γιατί ξεραίνεται εύκολα).
10. Όταν είστε έτοιμοι για χρήση, ξετυλίξτε το Καταΐφι από τη πλαστική συσκευασία του.
11. Είναι επίσης σημαντικό να καλύψετε το φύλλο με μια υγρή πετσέτα κουζίνας για να μην στεγνώσει!
12. Μόλις ξεπαγώσει, το φύλλο για Καταΐφι μοιάζει με μια παχιά μάζα «σαν μαλλιά» που πρέπει να διαχωριστούν.
13. Αυτό το κάνετε τραβώντας το με τα χέρια σας και χρησιμοποιώντας ψαλίδι για να το κόψετε.
14. Ξεκινήστε λοιπόν απλώνοντας το φύλλο για Καταίφι πάνω σε καθαρή επιφάνεια.
15. Ανοίξτε με τα χέρια σας το Φύλλο Καταϊφιού, τραβώντας το σαν να είναι μαλλιά που τα ξάνετε. Απλώστε τα απαλά, εάν είναι ενωμένα μέχρι να γίνουν ελαφριά και αφράτα και να μην είναι κολλημένα μεταξύ τους. Έτσι ετοιμάζετε τη βάση για το γλύκισμα.
16. Λιώστε το βούτυρο σε φούρνο μικροκυμάτων για 2' @ 600W.
17. Με ένα πινέλο απλώστε λίγο από το λιωμένο βούτυρο σε στρογγυλό ταψί ή φόρμα για τάρτα/πίτα των 26 cm / 10 in.
18. Στη συνέχεια, τακτοποιήστε τα ξεχωρισμένα φύλλα Καταϊφιού στο κάτω μέρος του ταψιού, για να φτιάξετε μια βάση, με τα μακριά κομμάτια του Καταϊφιού να προεξέχουν στα πλάγια.
19. Απλώστε λίγο λιωμένο βούτυρο πάνω από τα φύλλα μέσα στο ταψί και στις πλευρές.
20. Όταν η κρέμα έχει κρυώσει και λίγο πριν την ρίξετε πάνω από τη βάση Καταϊφιού, χτυπήστε ελαφρά τα 3 αυγά και ρίξτε τα μέσα στη κρέμα. Ανακατέψτε τα καλά!!
21. Τώρα, ρίξτε όλη την κρέμα μέσα στο ταψί, ισιώνοντας την επιφάνειά της με ένα κουτάλι.
22. Με τα χέρια σας, διπλώστε απαλά και προσεκτικά τα κρεμασμένα κομμάτια φύλλου προς τα μέσα για να καλύψετε τελείως την κρέμα και να σφραγίσετε το γλυκό.
23. Περιχύστε το υπόλοιπο βούτυρο στην κορυφή και στα πλάγια του γλυκού.
24. Τώρα το επιδόρπιο είναι έτοιμο να ψηθεί 😋.
* ΣΥΜΒΟΥΛΗ: Πριν το ψήσιμο, βρέξτε το χέρι σας και πασπαλίστε λίγο νερό πάνω από το Καταΐφι. Αυτό θα εμποδίσει το γλυκό από το να φουσκώσει πολύ!
* ΣΥΜΒΟΥΛΗ: Σε αυτό το σημείο, αν θέλετε να το ετοιμάσετε από πριν, το Γαλακτομπούρεκο με Καταΐφι μπορεί να καλυφθεί και να διατηρηθεί στην κατάψυξη για έως και 1 μήνα. Αποψύξτε το για τουλάχιστον 6 ώρες πριν το ψήσετε.
Γ. Οδηγίες ψησίματος:
25. Ψήστε το Γαλακτομπούρεκο με Καταΐφι αργά στο μεσαίο ράφι ενός προθερμασμένου φούρνου, στις επάνω και κάτω αντιστάσεις στους @ 180 ℃ / 350 ℉ για 1h20'-1h30' ή μέχρι να χρυσίσει και να γίνει τραγανό (εξαρτάται από το φούρνο)!
Δ. Φτιάξτε το σιρόπι:
26. Περιμένοντας να ψηθεί το γλυκό, ετοιμάστε το σιρόπι.
27. Σε μια κατσαρόλα σε χαμηλή προς μέτρια φωτιά, συνδυάστε τη ζάχαρη και το νερό.
28. Προσθέστε το ξύλο κανέλας.
29. Βράστε ανακατεύοντας συνεχώς απαλά μέχρι να γίνει διαυγές το σιρόπι!
30. Αφήστε το σιρόπι να βράσει για 6'-8' επιπλέον, ανακατεύοντας απαλά κάθε λεπτό, μέχρι το σιρόπι να γίνει πιο πηχτό.
31. Τέλος, ρίξτε μέσα το χυμό λεμονιού.
32. Στη συνέχεια, σβήστε τη φωτιά και αφήστε το σιρόπι να κρυώσει.
ΣΥΜΒΟΥΛΗ: Το σιρόπι πρέπει να είναι χλιαρό ή σε θερμοκρασία δωματίου όταν το ρίξετε πάνω από το ΚΑΥΤΟ Γαλακτομπούρεκο με Καταΐφι!
33. Μετά από 30' ψήσιμο, μετακινήστε το ταψί στο χαμηλότερο ράφι του φούρνου και συνεχίστε με το ψήσιμο.
34. Μόλις το γλυκό είναι έτοιμο, αφαιρέστε το από το φούρνο.
35. Τοποθετήστε το στον πάγκο της κουζίνας και ρίξτε αμέσως το δροσερό σιρόπι από πάνω του. Θα το ακούσετε να τσιτσιρίζει!
Ε. Προτάσεις σερβιρίσματος:
Αφήστε το επιδόρπιο ακάλυπτο για λίγο για να κρυώσει, πριν το σερβίρετε.
Μόλις κρυώσει, κόψτε μια απολαυστική μερίδα και σερβίρετε!
Προαιρετικά, πασπαλίστε σκόνη κανέλας από πάνω.
Επιτέλους, η αναμονή τελείωσε! Κοιτάξτε αυτό το λαχταριστό επιδόρπιο 😋!
Το Γαλακτομπούρεκο με Καταΐφι μπορεί να καταναλωθεί χλιαρό, σε θερμοκρασία δωματίου ή κρύο από το ψυγείο.

Γιατί να μην το ετοιμάσετε για τους εορτασμούς της Κυριακής του Πάσχα και να κάνετε όλους τους καλεσμένους σας να τρέχουν τα σάλια τους απλά κοιτάζοντας το;
Εδώ είναι το υπέροχο γλύκισμα μου που διακοσμεί το Πασχαλινό τραπέζι της Κυριακής του Πάσχα μαζί με όλα τα άλλα σπιτικά γλυκά μου: Πασχαλινά κουλουράκια Βουτύρου, Τσουρέκια Μάφιν και φυσικά τα βαμμένα Πασχαλινά αυγά μου!
Πασχαλινά κουλουράκια Βουτύρου Συνταγή ΕΔΩ
Τσουρέκια Μάφιν Συνταγή ΕΔΩ

Πασχαλινά αυγά Συνταγή ΕΔΩ
Ήταν δύσκολο να το ετοιμάσετε; Δεν νομίζω. Απλά ακολουθήστε όλα τα βήματα και τις συμβουλές μου και θα το πετύχετε 100%! Απολαύστε αυτό το αξέχαστο σιροπιαστό γλύκισμα από τον τόπο μου, με αγάπη!
Κοιτάξτε όλες τις συνταγές μου με Καταίφι ΕΔΩ
Ζ: Πληροφορίες φύλαξης:
Μπορείτε να φυλάξετε το γλύκισμα, καλυμμένο με πετσέτα κουζίνας, στον πάγκο της κουζίνας για 1 ημέρα.
Ή μπορείτε να το καλύψετε με πλαστική μεμβράνη και να το φυλάξετε στο ψυγείο για 3-4 μέρες.
Κοιτάξτε Την Συνταγή Μου Σε YouTube Βίντεο, Το Λίνκ Είναι: ΕΔΩ
#desserts#syrupy#eastersweets#christmassweets#pie#pastry#easter#christmas#party#vegetarian#kataifi#kadaifi#galaktoboureko#galaktoboureko kataifi#καταίφι#γαλακτομπούρεκο#γαλακτομπούρεκο καταίφι#greek recipes#kids#greek#greece
2 notes
·
View notes
Photo
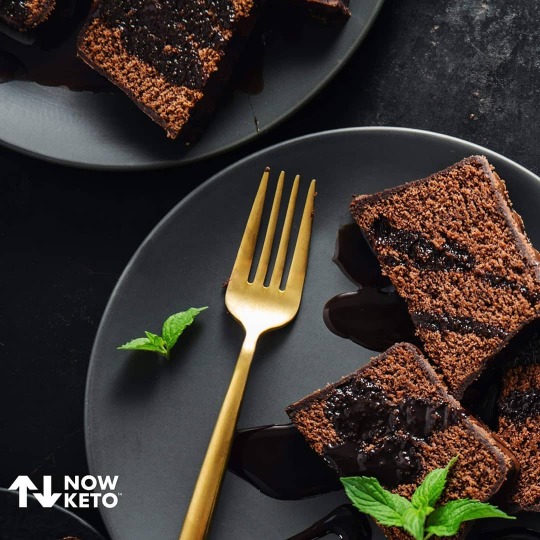
The Best Keto Chocolate Cake (sugar free) from @sugarfree_londoner . INSTRUCTIONS: . 1. Heat the oven to 340 Fahrenheit. (If you are baking at high altitude, increase the oven temperature by 25 Fahrenheit.) . 2. Melt the butter and chocolate in the microwave (ca 90 seconds - see notes), then stir and wait until dissolved. . 3. Alternatively, gently heat in a water bath (a heat proof bowl placed over a pan of boiling water). . 4. Set aside. . 5 In a large bowl, beat the eggs until foamy, then add the sweetener and mix well. . 6. Add the melted chocolate and butter along with the almond flour and stir with a spoon or spatula until just combined. . 7. Line the bottom of a 20 cm / 8 inch springform with parchment paper and grease the sides with butter. Pour in the cake batter and bake for 30 minutes on the middle shelf until the top of the cake is firm to the touch, especially in the middle. . 8. Leave to cool before releasing from the cake tin. Once the the cake is completely cooled, dust with cocoa powder. . NOTES . Wait with dusting the cake until it's completely cooled. If it is still warm, the cocoa powder will melt and become sludgy. . TAKE YOUR TIME when melting the chocolate. If you overheat it, it can separate into cocoa and cocoa butter and become sludgy. If you melt it in the microwave, break it up as much as possible and heat it in 2 x 30 second bursts, followed by 10 second bursts. Take it out before it's fully melted and just stir a few times, letting the rest melt on its own. . ***Use GOOD QUALITY butter and chocolate. If your products contain additives such as water or oils, you'll end up with fat separating and pooling on top of your cake. Check out the recipe variations in the post! . Optional chocolate frosting: Melt 3.5 oz unsweetened chocolate and 1/4 cup butter, stir in 6 tbsp double / heavy cream and 1/3 cup / 50g powdered sweetener. Wait until it has cooled and thickened, then spread over the cake. . I recommend using an erythritol-based sweetener for best results. If you use a different sweetener use the volume measurements stated as sweeteners vary in density. . NUTRITION Calories: 389kcal | Carbohydrates: 3g | Protein: 8.1g https://www.instagram.com/p/B8fUfjdAgGI/?igshid=1pcyv5vdvp3bb
1 note
·
View note
Text
Chocolate Chip Luscious Chicken
Chocolate Chip Luscious Chicken
6 gills meatballs
0.75 coffee cups gnocchi
1.75 oz. edimame
0.5 pecks applesauce
0.25 oz. kabobs
6 dessertspoons bruschetta
10 pinches ice cream
6 bushels eel sushi
3.5 cake pans broccoli
2.5 teaspoons black beans
1.25 coffee scoops burrito
5 teaspoons carne asada
5 coffee cups honey
4 coffee cups milk
0.5 pecks avocado
10 coffee cups pine nuts
1 ml potato
3 drops spaghetti
5 pounds brandy
Microwave applesauce and gnocchi in microwaveable bowl on HIGH 1 minute or until applesauce are completely melted and mixture is well blended, stirring every 30 seconds. Flip and cook until golden, about 1 to 2 minutes. Garnish with black beans. Gently fold in the eel sushi. Add honey, one at a time, mixing on low speed after each just until blended. Microwave meatballs and burrito in microwaveable bowl on HIGH 1 minute or until meatballs are completely melted and mixture is well blended, stirring every 30 seconds. Beat in bruschetta. Rinse under cold water and drain. In a large pot of salted boiling water, cook potato for 8 to 10 minutes or until al dente. Flip and cook until golden, about 1 to 2 minutes. Bake in preheated oven for 15 to 20 minutes, or until tops spring back when lightly tapped. Mix together ice cream and kabobs, and let stand for 10 minutes. Melt brandy in skillet, and cook and stir the pine nuts until tender. Let stand 10 minutes before serving. Microwave milk and spaghetti in microwaveable bowl on HIGH 1 minute or until milk are completely melted and mixture is well blended, stirring every 30 seconds. Flip over when the avocado is set and the edges are beginning to brown. Pour into the prepared baking dish. Heat oven to 425. Bring to a boil, then reduce heat to medium-low, and simmer for about 20 minutes, or until reduced by half. In a bowl, sift together the edimame and broccoli. Gently turn over once during cooking, and baste frequently during the last 4 minutes. Pour into the prepared baking dish. Heat oven to 425. Meanwhile, prepare carne asada according to package directions.
3 notes
·
View notes
Text
Tomorrow Only Knows [Chapter 4] - Ignis Scientia x FemReader
ALRIGHTY, over a month again and I’m finally posting this chapter. There’s a topic in this one that I’m hoping I addressed correctly. It’s partly based on my own experiences with the subject and I hope it’s something that can either inspire or relate to. Also, this is my favorite recipe for that very reason (and I’m still searching for the perfect brand of ingredients...)

Chapter 4 Warnings/Themes - SFW, fluff, body image, self-consciousness, body positivity
Word Count - 5,114
Chapter 4 Recipe - Tenebraen Berry Opera (Dark Chocolate Tofu ‘Cheesecake’)
Series Master List - Tomorrow Only Knows
Screen shot by @dizzymoogle
—————————————————
You undoubtedly slept like a rock that night, a particularly loud rock at that. A bellowed snore escaped your throat as you sprawled over your sleeping bag with your arms lounged above your head. It was such a relief to peacefully dream for once; the surreal nightmare you had experienced the previous night had made you reluctant to fall asleep. Amongst the hazy clouds of your mind, you envisioned the group sitting along the countertop at Takka’s Pit Stop in Hammerhead, Ignis had turned to speak to you but his words suddenly became muffled as you fervently tried to listen. As the edges of your vision began to blur, the sight of Ignis faded and was quickly replaced with… Ignis?
You opened your sleep-deprived eyes to see the advisor at your right side leaning over you, his hand gently shaking your forearm. You propped up on your elbows, searching the interior to discover that the darkness of the night still surrounded the tent while the other three were sound asleep.
“Iggy, is everything okay?” you whispered.
He replied in a hushed voice, “My apologies for waking you at this hour, but I was wondering if you might accompany me for a moment.”
—————————————————
CONTINUE TO CHAPTER 4 ON AO3
—————————————————
Keep Reading for Tenebraen Berry Opera “Ulwaat Opera” – Dark Chocolate Tofu ‘Cheesecake’
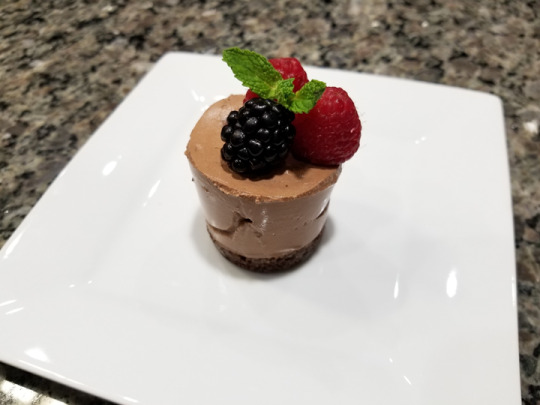
I’m not really sure if this is supposed to be a traditional French Opera cake since the in-game render kind of looks more like an entremet? Opera cakes usually have visibly distinguishable layers as part of its aesthetic appeal BUT since this is a Prompto recipe I wanted to share a guilt-free alternative to chocolate cheesecake! (I may actually make a version of this but I thought making a healthier version would fit in better with the story) This recipe uses tofu as its cream while the dark chocolate helps to drown out the tofu taste. It also does not use any butter in the crust! Finding the right brand of tofu is KEY as some brands have a very noticeable taste while others do not. I have yet to narrow down my #1 brand but I lately have been gravitating towards the non-organic House Foods brand from Sprouts.

You can prepare this dessert a couple of different ways, I like to use either a mini-cheesecake pan with removable bottoms or a regular cupcake pan with liners. The ratios of the ingredients are still the same. If you find a vegan chocolate this can be a vegan dessert.
Ingredients
Crust
½ cup Raw unsalted almonds
½ cup unpitted medjool dates (roughly 5-6 dates)
3 tbsp unsweetened cocoa powder
Pinch salt
1 - 2 tbsp water
Filling
1 package of extra firm tofu (12 ounces) – pressed to remove as much water as possible
1.5 tbsp unsweetened cocoa powder
1 tsp vanilla extract
150 ml unsweetened almond milk (or non-dairy milk)
Pinch of salt
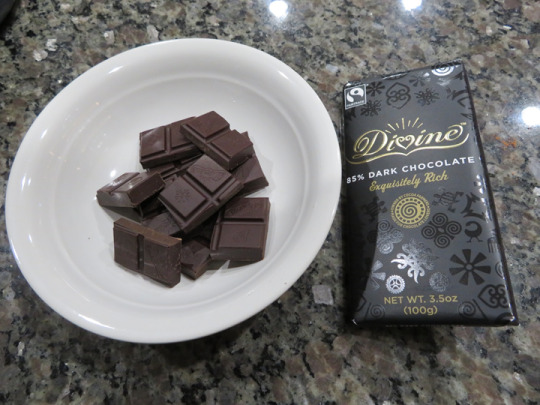
3.5 to 7 ounces of dark chocolate bar (depending on how strong a chocolate taste you want)
3 – 4 tbsp of Stevia or low-calorie sweetener
Toppings
Whipped cream
Berries (Raspberries, blackberries, strawberries, etc)
Mint leaf for decoration
Kitchen Tools
12 count cupcake pan with cupcake liners OR 12 count min-cheesecake pan with removable bottoms
Food processor or high speed blender
Microwaveable bowl
1 small bowl
Measuring tools
Acetate sheet strips (if not using cupcake liners)
Spatula
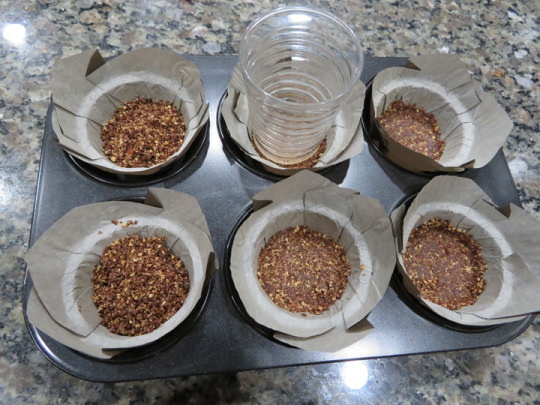
1. Add dates to food processor and blend until it forms a sticky ball or mostly diced. Remove from blender and set aside
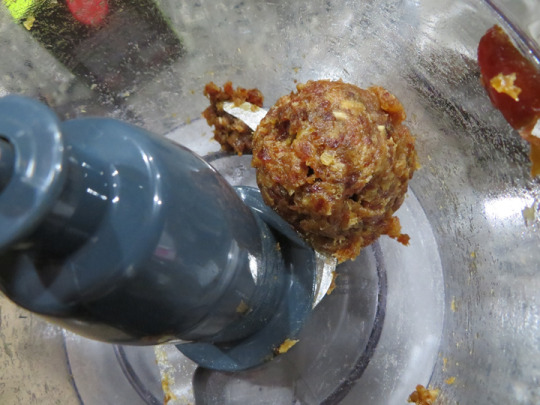
2. Add almonds, cocoa powder, and salt to processor and blend on high speed until forms an almond meal (partly ignore my photo, I forgot to add the cocoa powder when I took the pic lol)
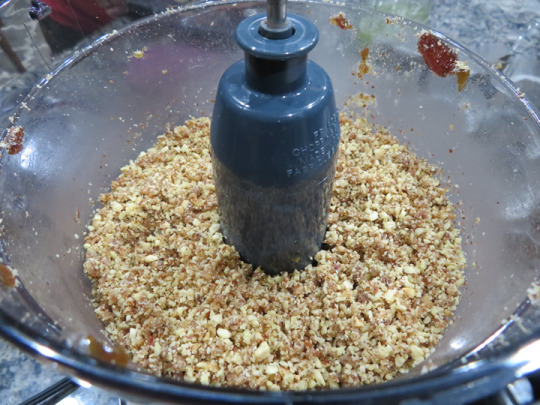
3. Add dates to processor and blend all together until forms a meal
4. Pour into small bowl and add 1 to 2 tbsp of water, just enough to moisten it, too much can make it TOO sticky. Press a small amount between your fingers to test
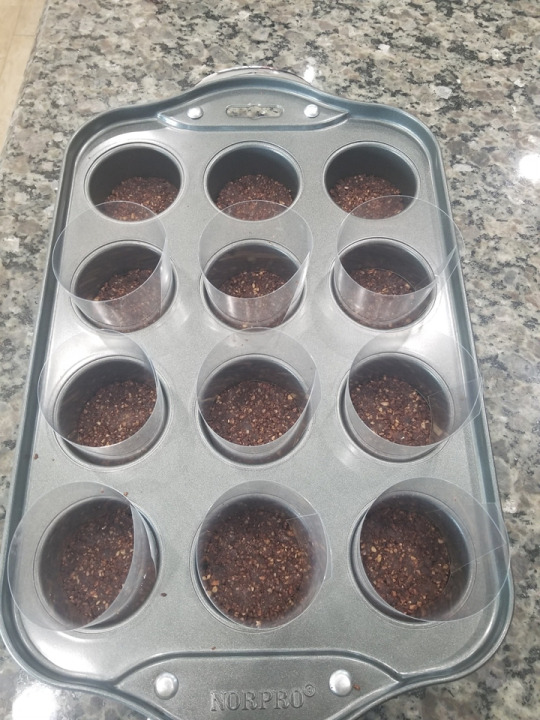
5. Evenly divide mixture amongst the pan. Press down with your fingers or small glass until forms a firm crust. If using acetate sheets, insert into each cup and gently press into crust (not all the way down, just enough so that it sticks to the crust, otherwise the filling will seep past the acetate) **I was trying a muffin liner in the first pic to see how they would hold up, second pic is the mini-cheesecake pan
6. Combine all filling ingredients except for chocolate in food processor. Blend on high speed until forms a pudding like consistency.

7. Break up dark chocolate into several small pieces and place in microwaveable. Heat in 20 second intervals, removing bowl to stir until completely melted. **Alternatively: Melt via a double boiler
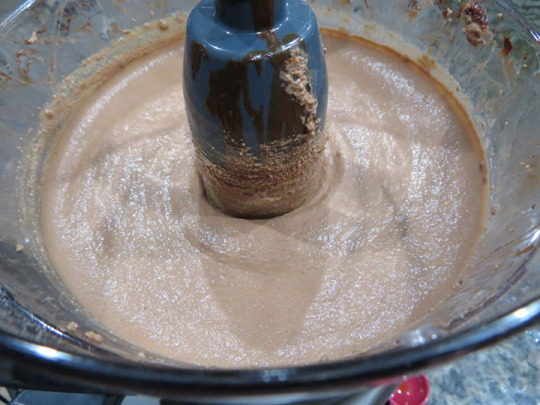
8. Pour melted chocolate into food processor and blend on high for several minutes until completely smooth. **Depending on your food processor or blender, you may get a very smooth texture or a slightly granular consistency. Blend to your preference but the smoother the better for presentation purposes (you can see in this batch it’s pretty grainy still)
9. Scoop and divide evenly into pan, smooth tops out with the back of a spoon. If using acetate sheets, cut a small piece of acetate sheet and scrape down sides as you most likely will get filling all over the place LOL. Once you scrape down the sides, smooth out with the back of a spoon
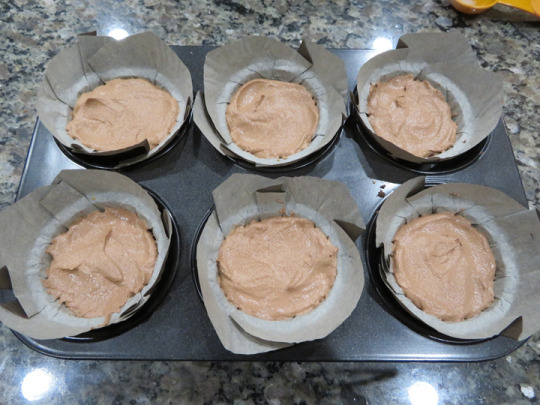
10. Place pan in refrigerator and chill overnight or at least 3 to 4 hours
11. Remove from pan (and remove acetate sheet if using) and decorate with toppings.
First pic is example of using a regular cupcake liner
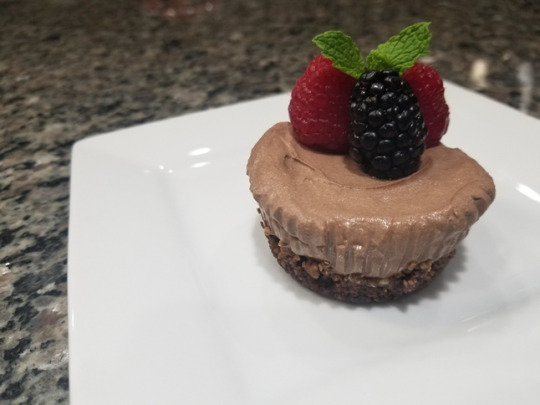
Example if you use acetate liner (cake collar) - I got a little lazy and didn’t press down to get the air bubbles out
#ignis scientia#ignis scientia x reader#ignisscientia#ignis x reader#final fantasy xv#final fantasy 15#ffxv#ffxv fanfiction
45 notes
·
View notes
Text
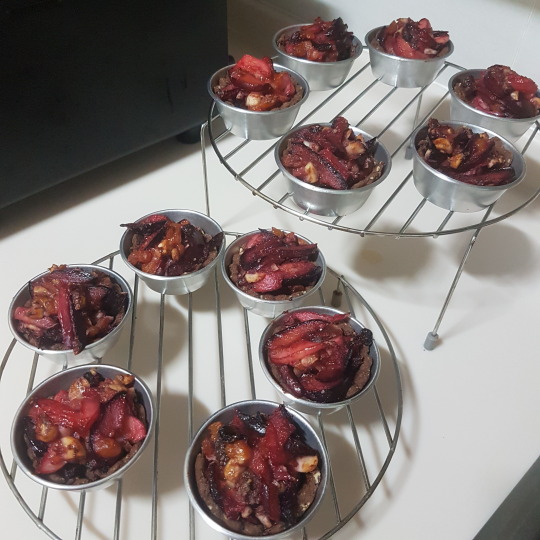
Rum Plum Pecan Bums
Yes, I am taking this recipe collecting and naming SUPER CEREALLY. Even though I forgot to add the oats.
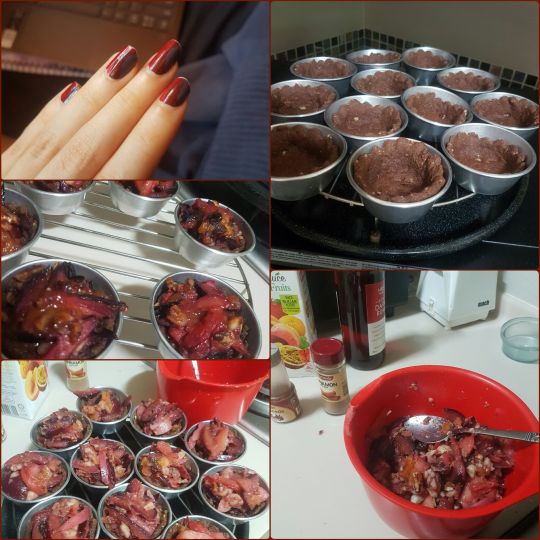
Behold, my nails did portend this confection.
Dutiful note-taking simply faded away after first few minutes, so... whoops?
Pastry Pecan Bums - Large bowl
60g roughly blended pecans ; 1/6 cup ground almonds
1/2 cup wholemeal flour ; 5/6 cup self-raising flour
2 tbsp brown sugar ; 3.5 tbsp good 100% cocoa
some salt, cinnamon, nutmeg, and Chinese five spice if you are too lazy to make a proper flavour. For shame.
Mix properly, add 55g unsalted butter and roll through fingers until the mix resembles fine breadcrumbs
1 cold, properly beaten egg with 1 teaspoon vanilla essence, 2 tablespoons very cold water, and for whatever reason this time, I also needed 4 tablespoons of skim milk. This was the only liquid dairy available at the moment, but by choice, I would have used some type of cream instead.
Correct proportions if dough holds form, and sticks to itself instead of you.
Roll out pastry and cut into circles. To fit the tin sides better, I rolled them flatter and wider after the cut out.
Line the number of muffin cups that can fit into your tray with unsalted butter, so 12 for me (made some syruped cookies with the extra dough after). Press the pastry down gently and into the edges best that you can.
Blind baked at 200C for 8 minutes.
Syrup - Prepare and heat-then-keep aside as you go along
350ml of a sugar free mixed tropical fruit juice into saucepan. 4 agar noodles, because I was hoping it would settle as a sort of jelly glaze?
1.5 tbsp flower honey ; 1.5 tbsp maple syrup
at the end of the reduction, 2 tablespoons of dark rum. Toss into freezer once satisfied with reduction.
Rum Plum Body
1 packet raisins. Didn’t have yellow, so used the red peasant ones. 4 somewhat finely chopped dried apricots. Into a cup with around 4 tablespoons - or as much as one may please - of dark rum. After the pecan bums are done toasting, just put this cup into the empty oven, the heat will aid absorption? I think.
80g mix of mostly macadamias with some pecan nuts, roughly chopped.
Slice up: 2 nectarines ; 2 red plums; 2 yellow plums; 5 black plums. Yes, that is an awful lot of plum. Plums. I did not count properly save the two lonely nectarines, and tossed in whatever fruities I bought on sale and/or found were a little bit overripe in the fridge.
Thumb-sized chunk of unsalted butter into frying pan. Let it brown up a little, then added 1 tablespoon of maple syrup. Then perhaps 3 tablespoons of fruit juice before it could begin to harden. Once the bubbles become larger (my guess is this indicates the relative sugar concentration is increasing) add the thinly sliced plums.
Add at least 1 tablespoon of cinnamon and 1/4 teaspoon of blended star anise.
Stir until it begins to dry out, may add a bit more of the juice if you like, then 2 tablespoons of wholemeal flour to thicken. Then the soaked assortment of raisin, apricot and rum.
Transfer into bowl to cool very slightly, pour in the chopped nuts to toast very slightly on low heat and scoop up the residuals from the pan. Mix in with fruit then scoop into the tartlet cases.
Baked these at 200C for 18 minutes.
Now, realistically, I should have waited for the tartlets and syrup to cool before combining them. But I did not wanna. So they are now shiny and glazed, sooner and grander... yet perhaps slightly soggier.
The cookies aren’t much, just added small amount of honey and milk to the leftover dough for 7 small cookies, baked at 180C for a little under ten minutes. Glazed their bottom halves with the syrup after, and if I cared, I would do a dark chocolate ganache line down the middle. But alas. SHAN’T is the cognitive elicitation of the day.
Edit:
After these were kept in the fridge, best way to eat was a quick microwave blast for the centre, and a gentle toasting to crisp up the fruit tips and base. It toasts very well. I also ate each tart with a Cherry Brandy chocolate. The flavour is a delicious parallel... nearly melted the candies to pour on top of the rum plums, would have done it if I had one more rum plum to try it out on.
In a professional world. And if I had the fruit pulp from the juice I used or a similar jam + gooey fruit bar (I’ve seen a highly appropriate mango-passionfruit one that’s sugar free): A shallow base (halfway up) of tropical cheesecake for these would be amazing. Maybe I‘ll attempt one day.
0 notes
Text
Vegan Mozzarella 🍕💚

Dough
3 cups flour (360g)
1 packet of yeast
1 tbsp sugar
1 1/2 tbsp olive oil
1 cup warm water
1/2 tsp salt
Vegan Cheese
1/2 cauliflower (375g)
3.5 tbsp tapioca flour
1 tbsp nutritional yeast
2 tsp salt
1/2-1 cup non-dairy milk, unsweetened and no flavor (I used 3/4 cup)
Pizza Sauce
3/4 cup tomato sauce
1/4 tsp garlic powder
1/4 tsp parsley
1/4 oregano
A pinch red pepper flake
METHOD
Warm the water up to 110-115F (43-46C). I usually put it in the microwave for about 30 seconds and that is good. You can use a thermometer to check or I test it with my finger for the temperature of a very hot bath.
Pour the sugar and yeast packet into the water and set it aside for 10 minutes. The yeast will get foamy and start to smell.
Sift in 1/2 the flour and salt into a big bowl. I like to add the flour in halves so I do not add too much. Some days you may need more or less flour.
Add the olive oil and activated yeast in. Begin to gently mix. Continuously adding in the rest of the flour and mixing. The dough should look somewhat sticky.
With clean hands and a clean, floured surface begin to knead the dough. You will only knead it for about a minute. If you find the dough is too sticky add a little extra flour. If it seems too dry add a little extra water. Dough should be smooth and soft.
Form the dough into a ball. Place into an oiled bowl. Cover with a dish towel and set it aside for at least 30 minutes or until it has doubled in size.
While the dough rises, cut the cauliflower into small chunks. Boil on the stove until fork tender.
Drain the cooked cauliflower and the rest of the cheese ingredients to a high speed blender. Start with 1/2 cup of non-dairy milk and add more as needed. The less non-dairy milk you can use the better.
Blend until the mixture is extremely smooth. It should be thin but not complete liquid.
Heat the mixture on the stove for 5-7 minutes on a medium heat. Continuously mixing while it warms up. This is going to activate the tapioca starch. It takes a few minutes so don’t worry if it doesn’t happe
By @plantifullybased
🥑🍅 Get Our new 100+ Delicious Vegan Recipes For Weight Loss, Clearer/Smoother Skin, and A Healthier Lifestyle.
#vegan#veganism#veganrecipes#vegano#veganskincare#vegan food#cooking#foodblogger#vegetarian#weightloss
16 notes
·
View notes
Text
How to Make Yummy No Bake Cheesecake
No Bake Cheesecake.
You can cook No Bake Cheesecake using 33 ingredients and 18 steps. Here is how you cook that.
Ingredients of No Bake Cheesecake
You need of ■Cheesecake.
It's of (anglaise sauce / creme anglaise).
Prepare of ・3 egg yolks.
You need of ・60 g (3/10 cup) granulated sugar.
It's of ・8 drops vanilla oil.
It's of ・180 g/ml (4/5 cup) milk.
It's of ・18g (1.5 Tbsp) granulated sugar (for milk).
Prepare of ・300 g (10.5 oz) cream cheese.
It's of ・1.5 Tbsp granulated sugar (for cream cheese).
You need of ・115 g (4 oz, 1/2 cup) plain yogurt.
You need of ・1.5 tsp lemon juice.
Prepare of ・180 g/ml (4/5 cup) heavy cream.
It's of ・2 tsp granulated sugar (for heavy cream).
Prepare of ・7g(2.5 tsp) gelatin powder.
You need of ・3 Tbsp water (for gelatin powder).
It's of ■Bottom(9 pieces).
It's of ・30g (1 oz, 1/7 cup) unsalted butter.
Prepare of ・25g (3 Tbsp) cake flour.
Prepare of ・5g (1 Tbsp) cocoa powder.
It's of ・30g (3.5 Tbsp) powdered sugar.
You need of ・30g (6 Tbsp) almond flour.
Prepare of ■ Strawberry sauce.
You need of ・200g (7 oz) frozen strawberries.
It's of ・65g (1/3 cup) granulated sugar.
You need of ・1.5 Tbsp water.
Prepare of ・1/2 tsp lemon juice.
You need of ・1/2 tsp rum.
Prepare of ※round silicone mold, 8 cavity.
It's of each cavity :120ml.
You need of (diameter:6.2 cm, height:5.2 cm).
Prepare of (diameter:2.4 in, height : 2 in).
Prepare of ※One extra cup of cheesecake will remain.
Prepare of ※1cup=235cc(USA).
No Bake Cheesecake step by step
★Recipe video★ (my You Tube channel)→https://youtu.be/Fm53O8o2gLs.
【Cheesecake】Whisk heavy cream and 2 tsp granulated sugar until it becomes heavy. Whisk it while cooling with ices. Let it sit in a fridge..
Make anglaise sauce. Add granulated sugar to egg yolks. Mix it until it becomes whitish and heavy. Add vanilla oil and mix well..
Put milk in a pot. Add 1.5 Tbsp granulated sugar to the milk. Warm it on low heat while stirring. Warm it until steam comes out. Pour the milk into the egg mixture while mixing. After adding all, continue to mix for a minute..
Pour the egg and milk mixture back in the pot. Prepare ice water and put a bowl in the ice water. Heat the egg and milk mixture on low heat while stirring..
Heat it until white foam disappears and it gets thickened lightly. After turn off the heat, continue to mix for 30 sec. Pour it into the bowl you prepared. Mix lightly. Let it cool as it is. Anglaise sauce is ready..
Soak gelatin in water. Sprinkle gelatin evenly on 3 Tbsp water. Please put water first to prevent the gelatin from becoming uneven. Make it soft and smooth..
Add 1.5 Tbsp granulated sugar to the cream cheese and mix well with a spatula. And then mix it with a whisk for a minute..
Add plain yogurt. Mix well until it gets smooth. Add lemon juice and mix well. Add the anglaise sauce and mix well..
After it becomes evenly, continue to mix for a minute. Melt the gelatin with a microwave (600W 5-10 sec × 2). Microwave it little by little so as not to boil. Melt the gelatin evenly. Add the gelatin to the cheese mixture and mix quickly..
Mix well for 2 minutes. Take the heavy cream out of the fridge. Mix the cream lightly. Add the cream in 3 parts to the cheese mixture. Mix well each time..
After adding all, continue to mix for a minute. Pour it into silicone mold. Flatten the surface with a offset spatula. Let it sit in a freezer overnight to solidify. Freeze it so that it can be easily removed from the silicone mold. If you don't use the silicone mold, put it in a fridge for 2-3 hours to harden it..
【Bottom】Make simple bottom using cocoa crumble. Cut unsalted butter into small pieces. Chill it in a fridge for over 10 min. Sift powdered sugar, cake flour and cocoa powder together. Sift almond flour..
Put the butter and all of the dry ingredients in a bowl. Mix roughly while crushing the butter. Mix it until small lumps are formed. Let it sit in a fridge for 30 min. Preheat an oven to 190℃ / 374 ºF..
Put a round cookie cutter (diameter 5cm, 2 in) on a baking tray. Put 1.5 Tbsp the cocoa crumble in it. Push and spread it..
Remove the cookie cutter while pushing the crumble. Bake it at 170℃ / 338 ºF for 15 min. Freshly baked crumble is soft and fragile. Let it cool as it is..
【Strawberry sauce】Put frozen strawberries, granulated sugar, water and lemon juice in a pot. Heat it on medium heat for 7-8 min while mixing gently. Turn off the heat and add rum and mix roughly. Pour it into a bowl. Skim off the scum. Let it cool as it is..
Take the cheesecakes out of the mold. Put it on the crumble bottom. Thaw in the refrigerator for 4-6 hours. It's all done!.
0 notes
Photo

Homemade Vegan Pizza follow- @@ketodiet_recipe_99 . Recipe Serves 2-4 people INGREDIENTS: Dough 3 cups flour (360g) 1 packet of yeast 1 tbsp sugar 1 1/2 tbsp olive oil 1 cup warm water 1/2 tsp salt Vegan Cheese 1/2 cauliflower (375g) 3.5 tbsp tapioca flour 1 tbsp nutritional yeast 1-2 tsp salt *add salt to taste preferences 1/2-1 cup non-dairy milk, unsweetened and no flavor (I used 3/4 cup) Pizza Sauce 3/4 cup tomato sauce 1/4 tsp garlic powder 1/4 tsp parsley 1/4 oregano A pinch red pepper flakes . METHOD Warm the water up to 110-115F (43-46C). I usually put it in the microwave for about 30 seconds and that is good. You can use a thermometer to check or I test it with my finger for the temperature of a very hot bath. Pour the sugar and yeast packet int the water and set it aside for 10 minutes. The yeast will get foamy and start to smell. Sift in 1/2 the flour and salt into a big bowl. I like to add the flour in halves so I do not add too much. Some days you may need more or less flour. Add the olive oil and activated yeast in. Begin to gently mix. Continuously adding in the rest of the flour and mixing. The dough should look somewhat sticky. With clean hands and a clean, floured surface begin to knead the dough. You will only knead it for about a minute. If you find the dough is too sticky add a little extra flour. If it seems too dry add a little extra water. Dough should be smooth and soft. Form the dough into a ball. Place into an oiled bowl. Cover with a dish towel and set it aside for at least 30 minutes or until it has doubled in size. While the dough rises, cut the cauliflower into small chunks. Boil on the stove until fork tender. Drain the cooked cauliflower and the rest of the cheese ingredients to a high speed blender. Start with 1/2 cup of non-dairy milk and add more as needed. The less non-dairy milk you can use the better. #Veganfoodspot #Recetasveganas #Vegantips #Veganchili #Vegetarianburger #Veganideas #Vegansmoothies #Veganpasta #Vegetariansushi #Vegansofny #Vegandesserts #Letscookvegan #Vegannachos #Veganmacncheese #Veganbodybuilder #Veganthanksgiving #Plantbasedlifestyle #Veganraw #Vegandinnerideas #Vegansmoothie #Veganfrenchtoast (at Los Angeles, California) https://www.instagram.com/p/CR7xhNRo51K/?utm_medium=tumblr
#veganfoodspot#recetasveganas#vegantips#veganchili#vegetarianburger#veganideas#vegansmoothies#veganpasta#vegetariansushi#vegansofny#vegandesserts#letscookvegan#vegannachos#veganmacncheese#veganbodybuilder#veganthanksgiving#plantbasedlifestyle#veganraw#vegandinnerideas#vegansmoothie#veganfrenchtoast
1 note
·
View note
Photo

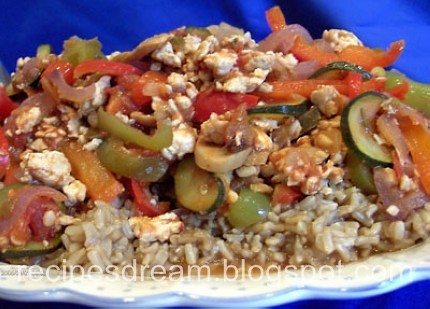
Plant-based diets have taken root in American culture in recent years, mostly thanks to the growing realization about the health benefits of this eating pattern. But contrary to what some people think, plant-based doesn’t necessarily mean you must forego all animal products. Rather, you might just eat meat or dairy products less frequently, or in smaller portions. To replace those lost calories, you should eat more beans and legumes, vegetables, whole grains, and fruits. These mostly low-fat, nutrient-rich foods have been linked to improvements in many health-related issues, including high blood pressure, diabetes, and heart disease. Better for your budget and the planet A plant-forward diet also can help reduce your food budget. And there’s yet another reason to feel good about this eating pattern: it helps preserve our planet’s health. A diet that contains only small amounts of animal foods requires a fraction of resources such as water, energy, and land to cultivate, and it generates fewer greenhouse gases. What’s more, by eating unprocessed or minimally processed foods, you avoid the additional energy and packaging that go into the production of processed foods. “Following a plant-based diet may be an important way to reduce your carbon footprint,“ says Teresa Fung, adjunct professor at the Harvard T.H. Chan School of Public Health. Research suggests that diets high in red meat account for five times the emissions of plant-based diets. How much plant food should you aim for if you want a truly sustainable diet? In early 2019, the EAT-Lancet Commission on Food, Planet, and Health — a multidisciplinary group consisting of 37 leading scientists from 16 countries — described the type of diet needed to support a world population of 10 billion by the year 2050 in a healthful, sustainable way. Its report urged people to double the amount of fruits, vegetables, and nuts they eat, and reduce consumption of red meat and added sugars by at least 50%. The recommendations are quite a departure from what most Americans eat — allowing for only a single 3.5-ounce serving of red meat per week. The commission included a graphic representation of its “planetary health plate” that shows just how much of a person’s overall diet should come from plant-based sources. Easy plant-based dinner recipes If you need some inspiration for moving toward a plant-based diet, try these easy recipes from Monique Tello, MD, MPH. Both contain a variety of veggies and are very adaptable — simply swap in your favorite vegetables or those you happen to have on hand. Frozen or low-sodium canned veggies are a convenient and still nutritious alternative to fresh produce. Print Easy Frying Pan Frittata This recipe works very well with frozen veggies. For dinner, this can serve two to three people. Add a side salad, if possible. Course Dinner Ingredients 1/2 small onion, chopped 1 cup red and green peppers, sliced thin or chopped small 4 cups spinach and/or other leafy greens, torn or chopped (1 cup if using frozen) 1 tbsp extra-virgin olive oil or canola oil 1/4 tsp garlic powder 1/4 tsp black pepper 1/2 tsp dried oregano and/or basil (or 2 tablespoons of chopped fresh herbs) 4 eggs Instructions Use a medium-sized frying pan over medium heat and heat oil until shiny. Add the onion, stirring until just soft Add the peppers. Stir until the onions and peppers are very soft and just browning. Add the spinach/greens to the pan and stir until wilted and hot. Crack the eggs into a bowl and whisk them up with a fork until they’re uniformly yellow and a little foamy. Pour the eggs over all the veggies, turn the heat to low, and cover the pan. Shake the pan a few times during cooking, which more evenly distributes the eggs and prevents sticking. Check frittata after three to four minutes. If the eggs look done, loosen it with a spatula to make sure there is no runniness. If there is, cook thirty seconds to a minute longer, covered. Using a spatula, slide frittata gently onto a large plate and serve. We slice this up like a pizza. Print Make-Your-Own Soft Tacos This recipe will serve six people if some of those people are young children. For hungry teens and adults, expect it to feed three or four. Course Dinner Ingredients 1 15-ounce can of unsalted black beans 1 can corn niblets, unsalted 2 avocados 1 red bell pepper, sliced thin 1 tablespoons lemon juice 1 cup of salsa (fresh or jarred) 1 cup shredded cheddar or Monterey jack cheese 1/2 cup of plain Greek yogurt 1/2 cup pepitas (pumpkin seeds), unsalted (optional) 1/2 cup green olives (optional) 8-12 corn tortillas (made without lard) Instructions Dice the avocados and gently mix with the lemon juice. Heat the beans in the microwave or the stovetop; stir. Heat the tortillas (you can wrap them in a clean towel and zap them in the microwave on high for 30 seconds). Set out all ingredients on the counter (or table) and let everyone put together their own healthy tacos. The post 2 easy, affordable, plant-centered dinners appeared first on Harvard Health Blog.
https://www.health.harvard.edu/blog/2-easy-affordable-plant-centered-dinners-2020112521485
0 notes
Last Seen Blogs

bowlingmccoy93
The Journey of Hussain 823

tearsofahime
Wild Princess

cineaesthesia
fashins

samttyl
sam

moaltd
MoalTD