#i hope this helps though
Text
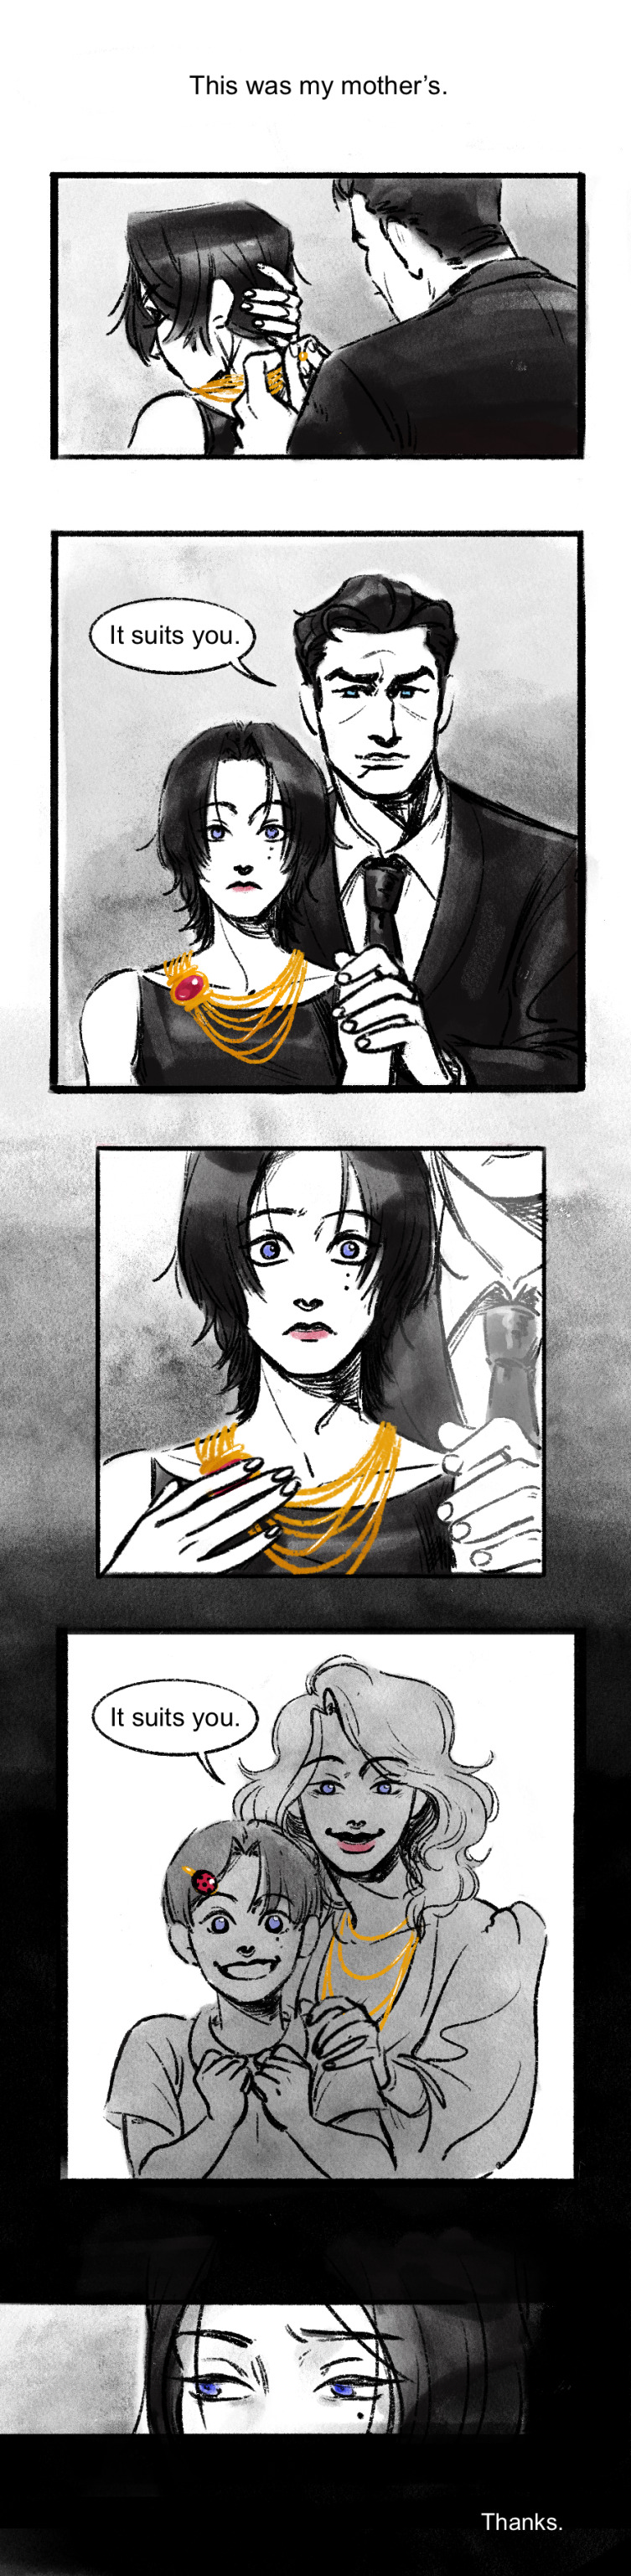
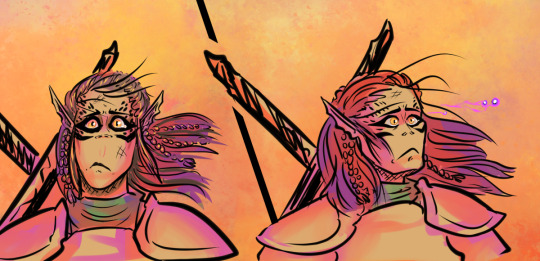
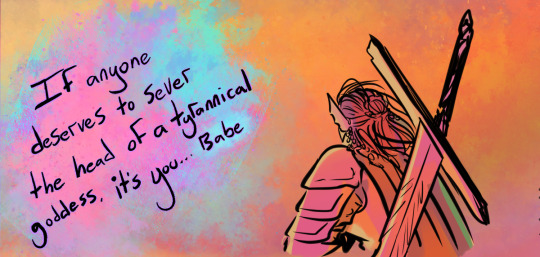
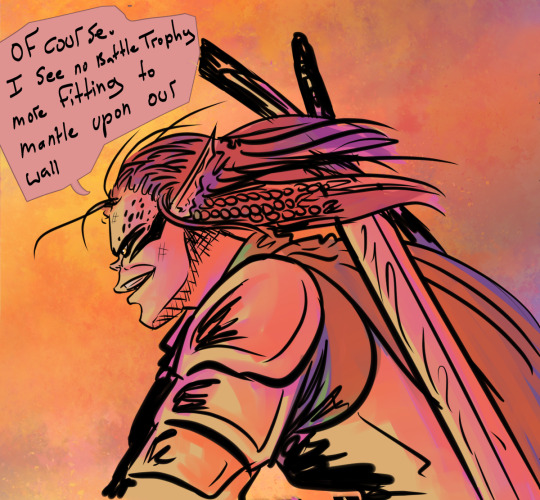
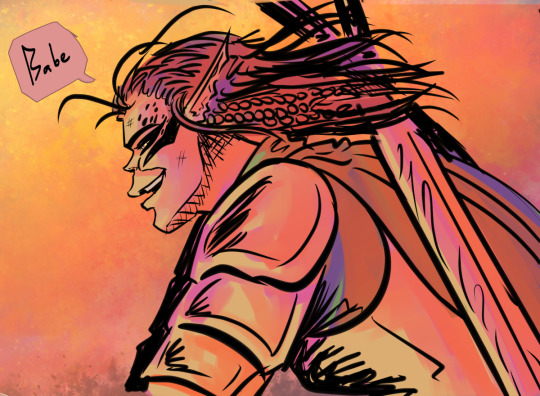
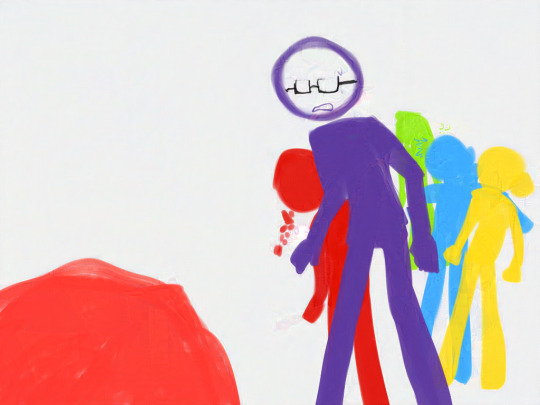
Red Tipped Feathers Bits and Pieces bc I cannot work on Chapter 8 atm
Jouno used to love reading when he was a kid. Him and his sister couldn't afford going to school so they they tried to make up for it by reading up on everything and anything they could find. They would often sneak into schools' and universities' libraries overnight or during storms and instead of actually sleeping, they would spend the time reading. He was lucky for the immense volume of information his brain could absorb in a short time, because he was never allowed to actually take any books with him, since they were heavy and ultimately useless.
At first, his favourite section to raid was the one with detective novels, but as he got older that developed into criminology text books. His sister had to rip the books out of his hands to force him to read about something else and form a general knowledge of every branch of social and natural sciences.
Tecchou's love for cooking actually started way before working at the bakery. The house he lives in now is in fact his childhood home (his parents moved away to live on the northern sea shore because they couldn't stand the extreme weather anymore) and the layout looked a lot different when he was little, since it had to accommodate three people, not one. Also their garden was much smaller, Tecchou's current garden and animal pens are a very recent addition. That put Tecchou's bed in his current living room/dining room/kitchen. Some of his favourite memories of his early childhood are waking up from his afternoon nap to the room being muggy and smelling heavenly, then immediately sitting at the table to watch his mom finish making dinner. He would ask her about the spices she's using and she would let him taste things before and after seasoning them, she taught him how to hold a knife when he was 7, which he fully believes is part of the reason why he's so good with his sword now, and he's been kneading dough since he was 5, whether for bread, dumplings or cookies, he had them all under his belt since before hitting a double digit age.
When Jouno first met Tecchou, he thought he was the most annoying person on earth. He thought his stories were dumb and his voice was grating his ears and he wished he would just leave him alone. But then the night would come and he would find himself constantly thinking about him, belatedly laughing at his jokes. He realized the only reason he disliked him was the fact that he was mortified of being hurt by him. So his initial hatred slowly transformed into neutrality.
Until he got hurt and Tecchou had to bandage him up. He wasn't sure why the spell worked that way, but injuries he got as a human were transferred to his swan body, and vice versa. So when his wing got impaled, so was his arm during the night. Jouno spent days agonizing, sliding from one fever dream into another, unable to move around because of the pain and he supposed he had gotten insanely lucky to have Tecchou treat his wound with some antibiotic.
Speaking of dreams, Jouno realized he might have a problem with Tecchou a couple months in, after waking up in cold sweat from a wet dream. He was so embarrassed he wanted to kill himself (or Tecchou). He only had about an hour until the sun was rising so he hurried to clean his clothes, and he didn't come out of the forest the entire next day, unable to be around Tecchou.
alr I think that's all for today see y'all later
#really wish I could work on chap 8 rn but unfortunately I have 5 exams in two weeks and I simply. lack the energy#i hope this helps though#suegiku#red tipped feathers#swan universe#wait is this the first time i've posted about rtf on here?#huh#anyway#bungou stray dogs#jouno saigiku#suehiro tecchou#bsd#my works#my fanfiction
19 notes
·
View notes
Text

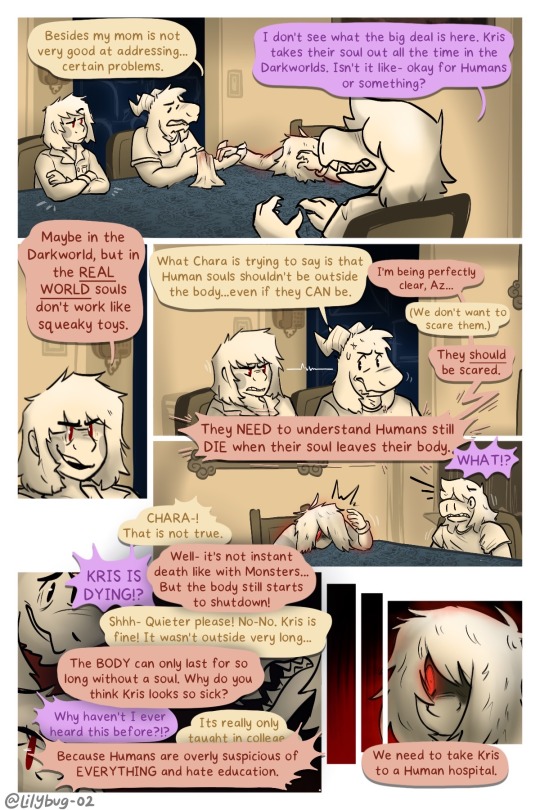
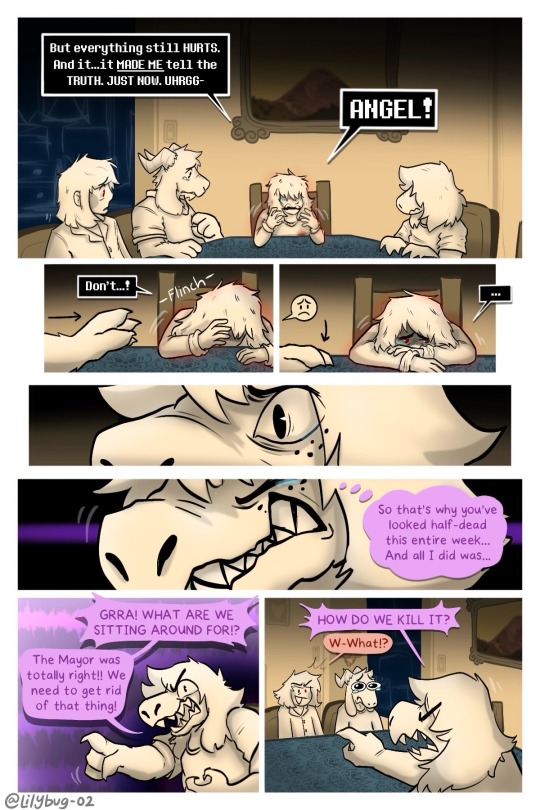
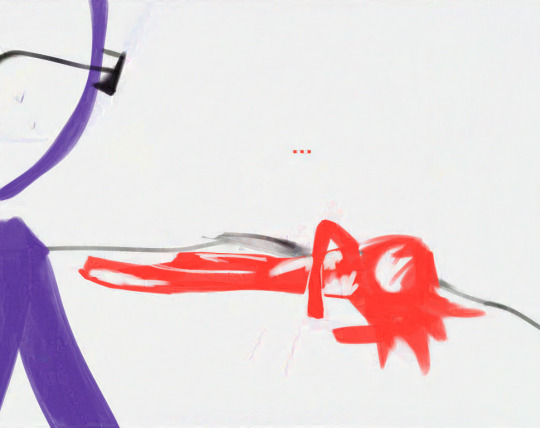
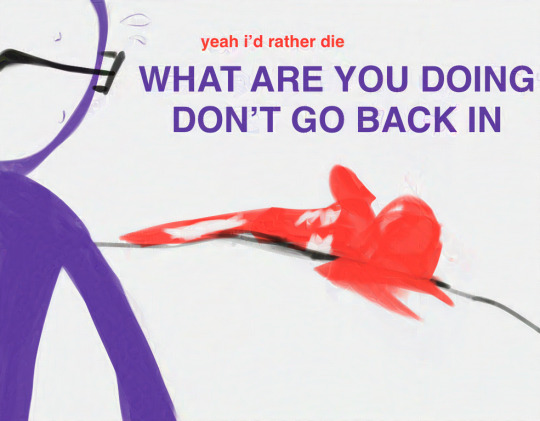
Pain is a great motivator…
Part 26 || First || Previous || Next
—Full Series—
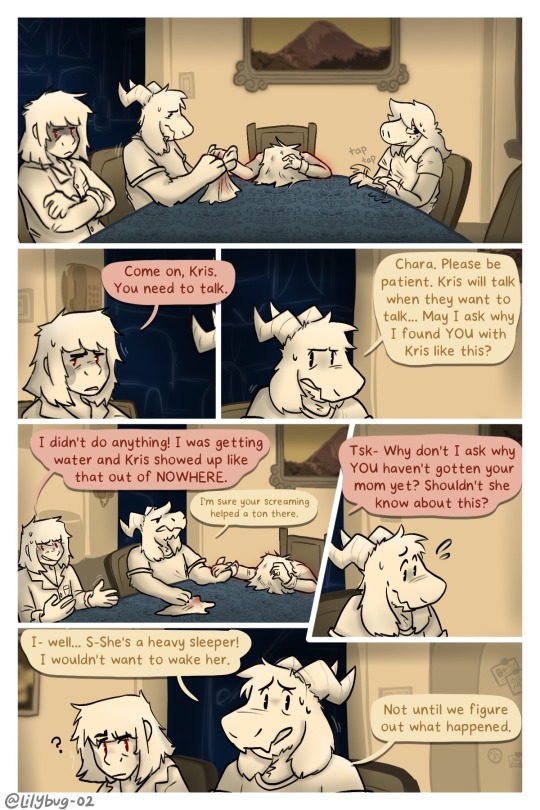
Meanwhile Toriel:
(Loud noises don't wake her up usually.)
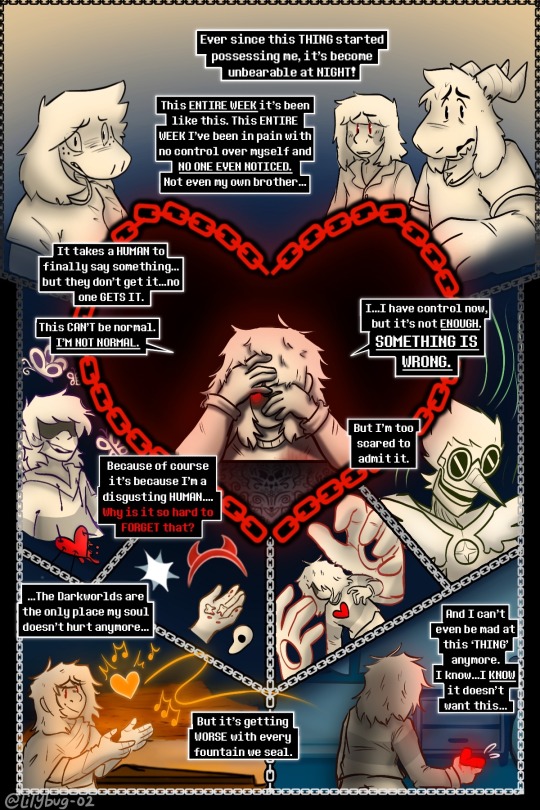
Artist note: I’m so proud of this :))) I know it’s a lot of dialogue and reading, but dialogue is grueling work for me. I’m glad with the art and for the amount of pages I made in such a relatively short time span -w- page 5 was super fun to work on. A lot of blood, sweat, and hours here... :) The backgrounds were a big bore tbh, but I finished them! Yippie!
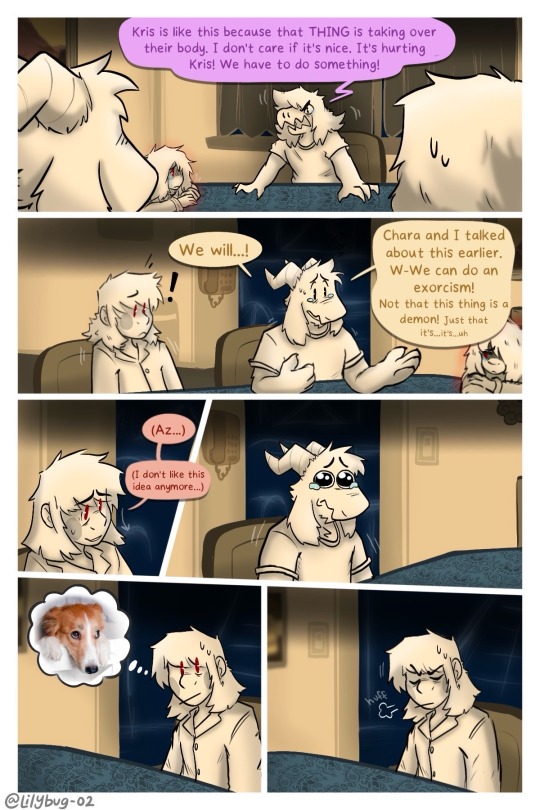
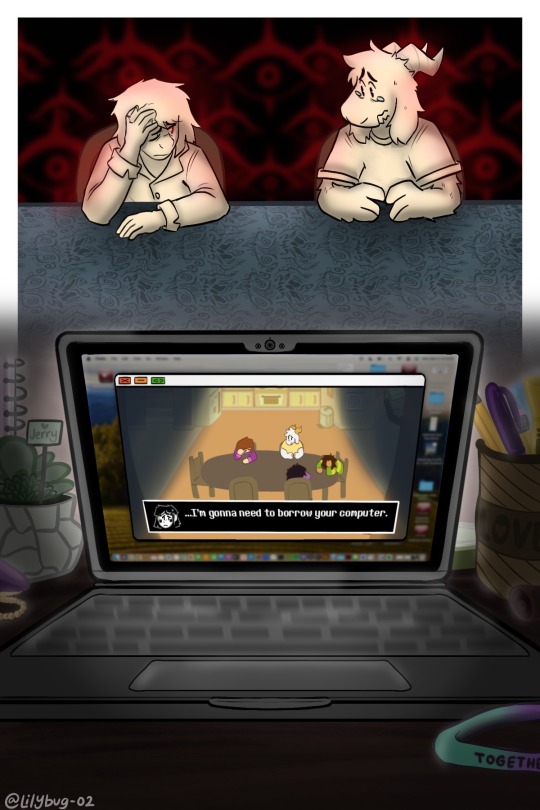
#CHARA WTF DO YOU MEAN “COMPUTER”????#lol i hope you guys dont hate me for what im doing in the next update.#IS THAT A MAC OS???#Yes......owo''#Kris and the Gang are LITTLE now. I've pixelated them and turned them into little game characters!#FINALLY!!#I never thought I would be going so far in the story to explain WHY Kris pulls out their SOUL and opens Darkfountains even when they killed#Berdly in Chapter 2. Pain can make people do horrible things.#Uhhhhhhhhh anyways. :3 I hope you liked it! I made this post a little too long for my liking and didnt get it out when i wanted too-#but thats okay! As long as people enjoy it :)#bread#art#deltarune chara timeline#deltarune chara timeline comic#seriously though#long post#man am I glad I switched over to the limited color palet! It helps me feel alot more relaxed uwu#This is....way over 16 hours of work q-q#chara#asriel#susie#kris#asriel dreemurr#kris dreemurr#kris deltarune#susie deltarune#deltarune#comic#my art
3K notes
·
View notes
Text
girl experiences gender euphoria and is immediately slammed by grief
for @litttlittt <3. this was supposed to be a portrait of caroline hill, but litta mentioned tim looking like janet when dressed as caroline and identity issues and angst and things spiraled
something about tim not knowing if he's his mother's child or bruce's or neither's.
figuring out the looks:
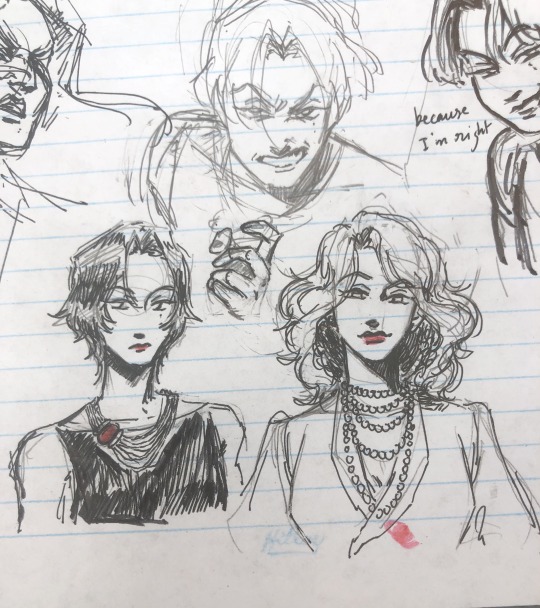
i wanted janet to have that poofy 70s hair
#tim drake#dc#bruce wayne#janet drake#sart#i'm picturing this as transfemme tim hence “he” and also compounding issues about bruce treating him as a daughter#which is exactly the gender validation tim wants and needs but isnt sure he deserves#but this also definitely works for trans tim#she gets to process that she looks like her mom!! and her mom will never get to know her daughter#would she have wanted to know her daughter? even though she showered tim with love when she was around#she barely knew her son#gender idk he's a girl 👍 hope that helps#i went down a rabbit hole looking up vintage dior necklaces -- hopefully something martha wayne wouldve worn#-- but dior necklaces are COMPLICATED#i almost drew pearls but i think that wouldve been too cruel to bruce lol#(a decent amount of my art--even when it's not femme tim--gets tagged 'gender' and i dont know what im going but im glad 👍)
3K notes
·
View notes
Text
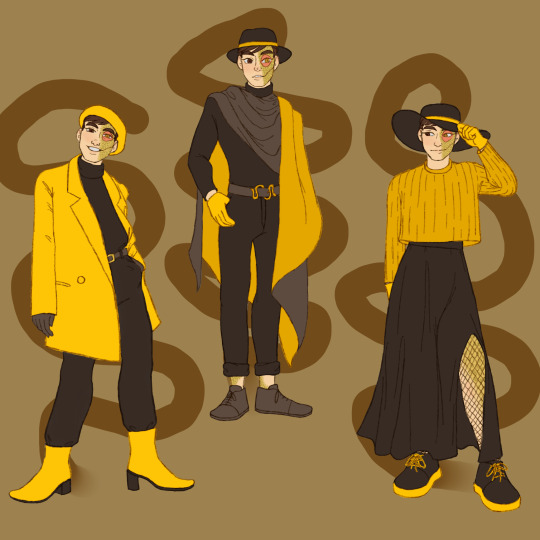

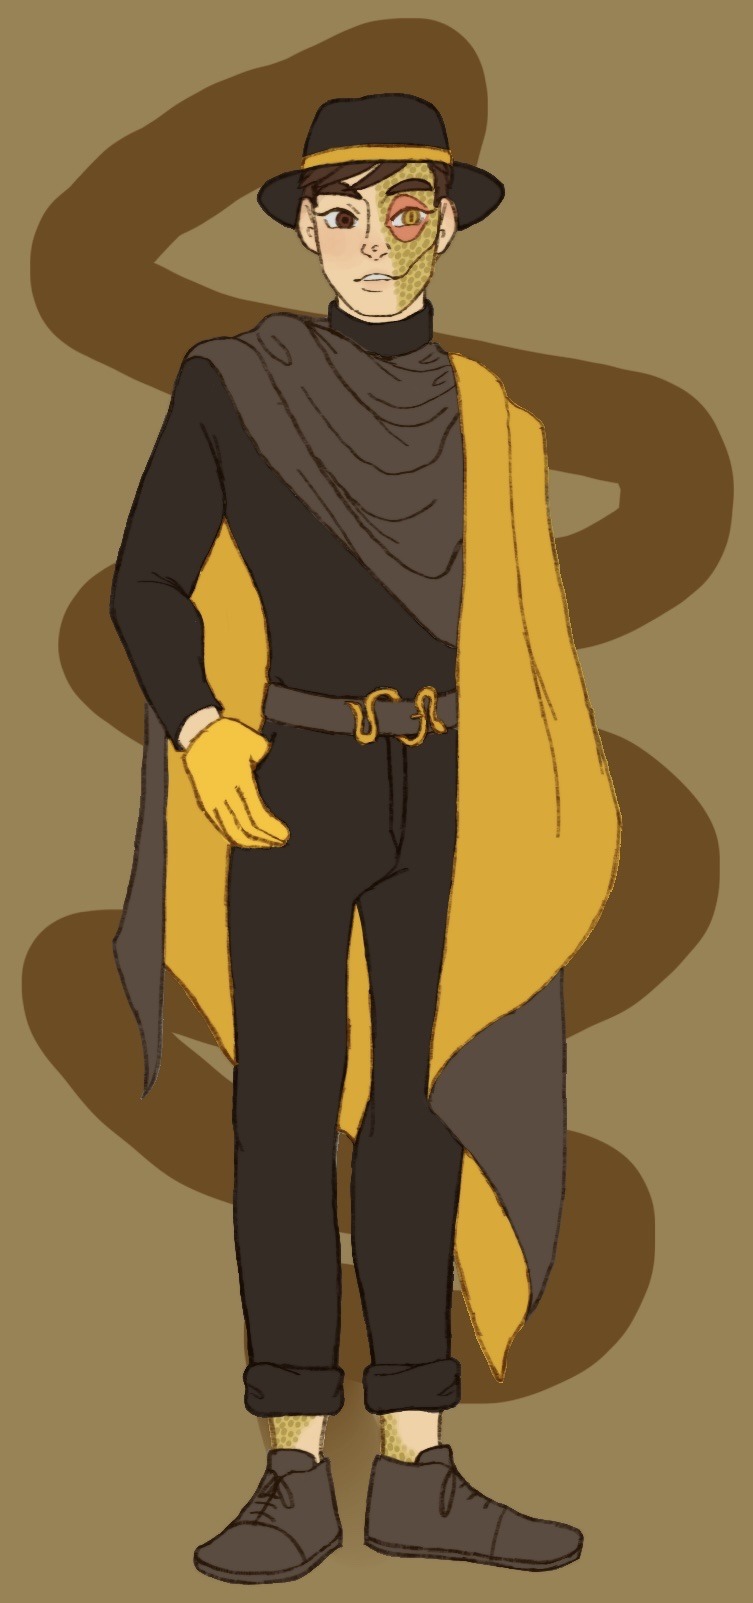
What do you mean I’m a bit late for Janus’ big day? Of course not, how could you say such a thing! I definitely didn’t forget all about it in my absence and only get reminded in the incorrect quotes video live chat; that’s not like me at all ;]
Anyways I decided to dress our sassy snake in some different outfits I think he’d like. He seems like the type to get all dolled up on his birthday and it goes with Thomas posting pics in outfits inspired by the sides on their appreciation days!
@thatsthat24
#sanders sides#janus sanders#ts janus#thomas sanders#sanders sides fanart#my hoard#I’ve returned!#the newest asides came out and I remembered how much I love it#so I’m hyperfixated again and I’ve not now peace since#it is nice to actually finish something again tho#I’ve been pretty busy working lately and now I’m starting to pack to move into my first apartment!#so not much time to really sit down and draw#and when I do have time I can’t get the motivation to actually draw anything#I want to get better about posting stuff on here#(even though it feels like I’m just dreaming into the void a lot)#even just silly little things or rough sketches I’ll never finish#I hope it’ll help me continue to draw and make things again#I forgot how nice it is#anyways if you’ve read this far thanks#have a cookie :] 🍪
1K notes
·
View notes
Text


i wanted to draw a sillay comic of them with my grownup designs/hcs so here u go
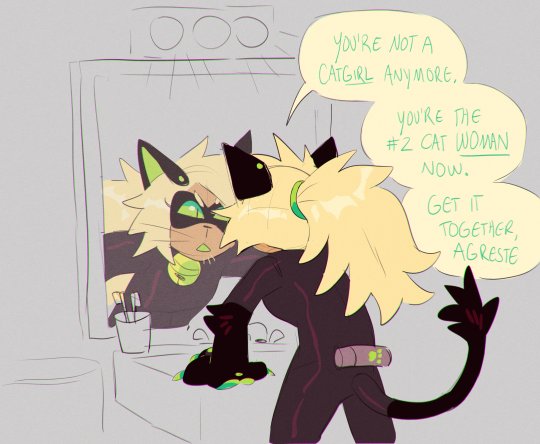
#miraculous ladybug#marinette dupain cheng#adrien agreste#chat noir#cat noir#adrinette#ladynoir#dia draws#digital#fanart#they are in their 30s and dot have kids even though i KNOW in canon they would have kids because i simply do not like giving characters kid#hope this helps#i have to make adrien the most pouty pathetic girl ever#adrien prns are he/she/nya and marinette is she/it
3K notes
·
View notes
Text


Firstly, I dedicate this cheese moment to the song LP- One Last Moment . Be sad with me.
Secondly, ha, this moment probably doesn't hold as much impact nowadays but I drew this when patch 0 only had TWO OPTIONS and NOTHING ELSE. You could say it's my loving 'like fuck we won't ever see each other again my sun, moon, stars, and all of the above' response to Lae'zel's Goodbye. Had to give myself hope gosh darn it. But it's lovely to know that Greygold wasn't wrong. So I share cheesy moment anyway.
Third. YEAH I SAID GO. BABE'S GOTTA KILL VLAAKITH. You think Greygold is gonna be selfish and ask her to stay now??? After all that? PUH. Greygold knows responsibility sucks, but set a killer hawk free and all that. (of course I checked what's up with the other choice after the game and 'oofed' but still. PRINCIPLES. Gave myself delusional hope anyway pssh.)
#bg3 spoilers#baldur's gate 3#bg3#lae'zel#greygold#bg3 fanart#bg3 comic#I will always love you -whitney housten is a strong contender for this dang moment too though but with more cussing#Really Every LP Song is a Lae'zel/GG moment#Except LP's 'when we're high'. That is strictly a GG and Emps moment. for funny reasons.#Sure Lae'zel's had the saddest eyes ever to exist#But Greygold couldn't help but notice she left with a smile so#Greygold had hope
389 notes
·
View notes
Text
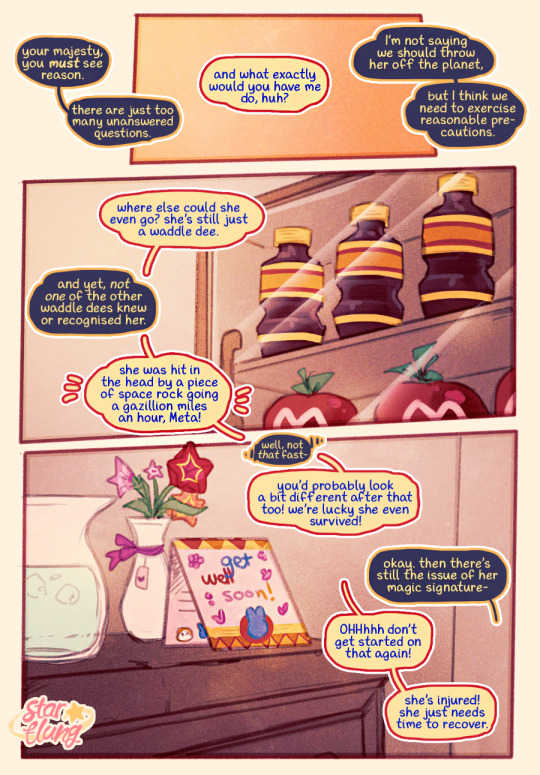
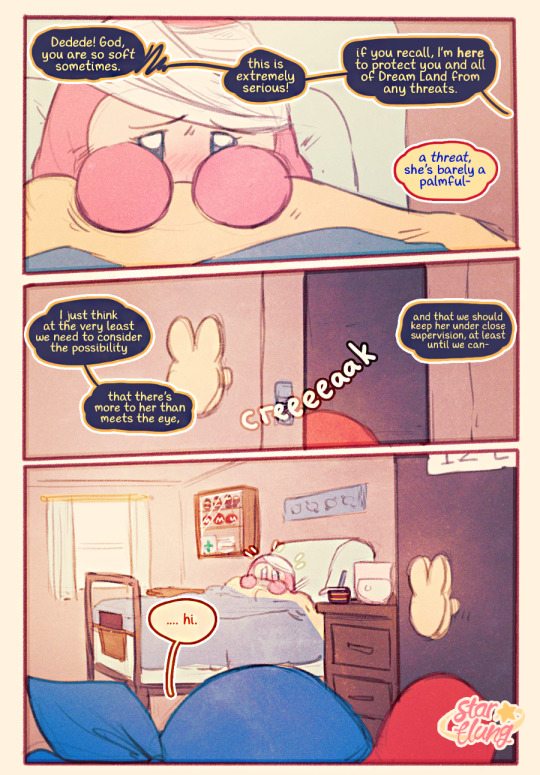
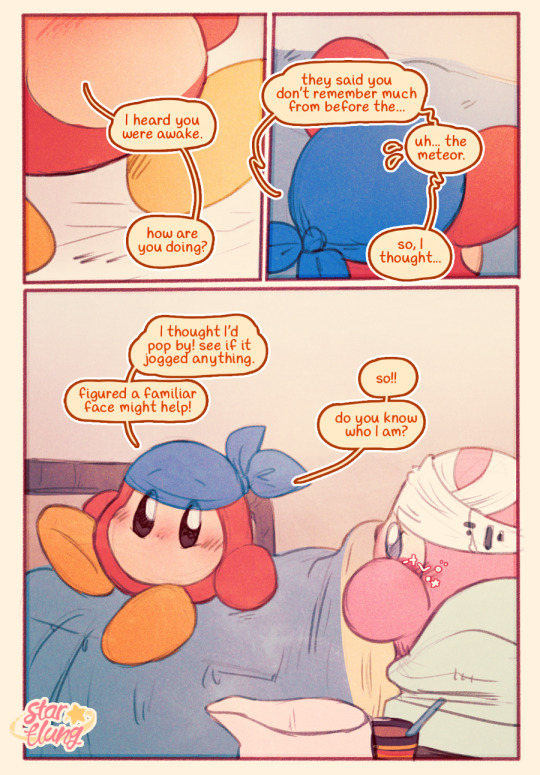
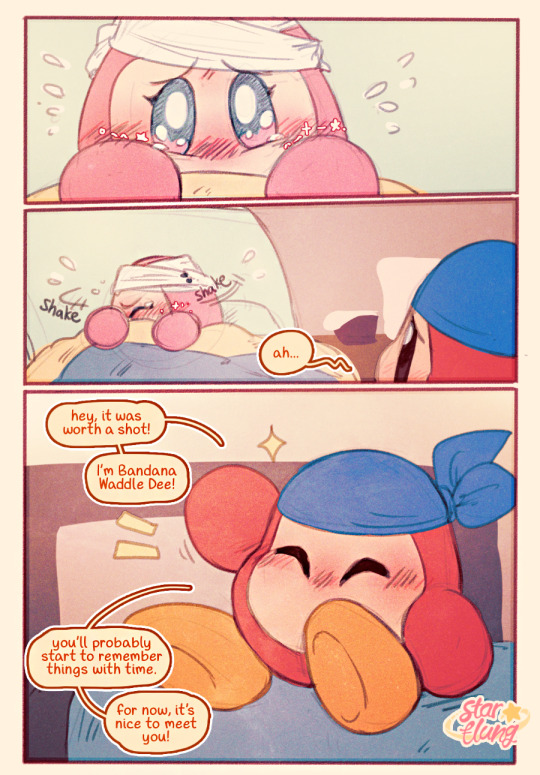
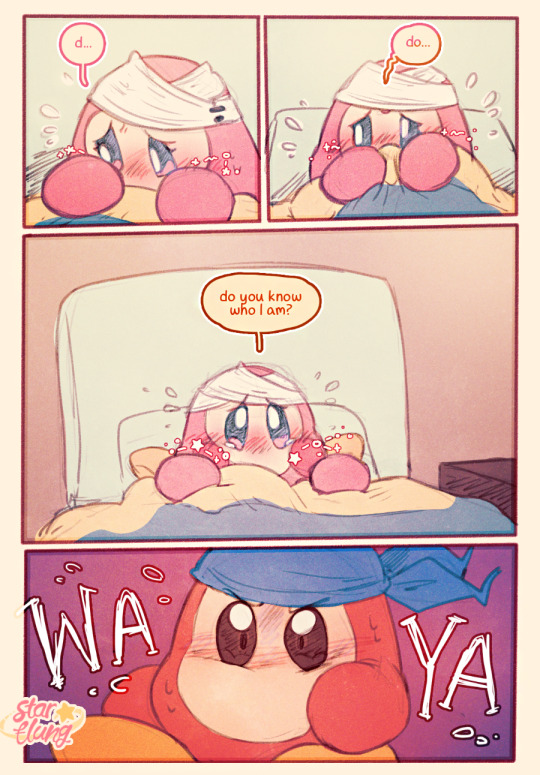

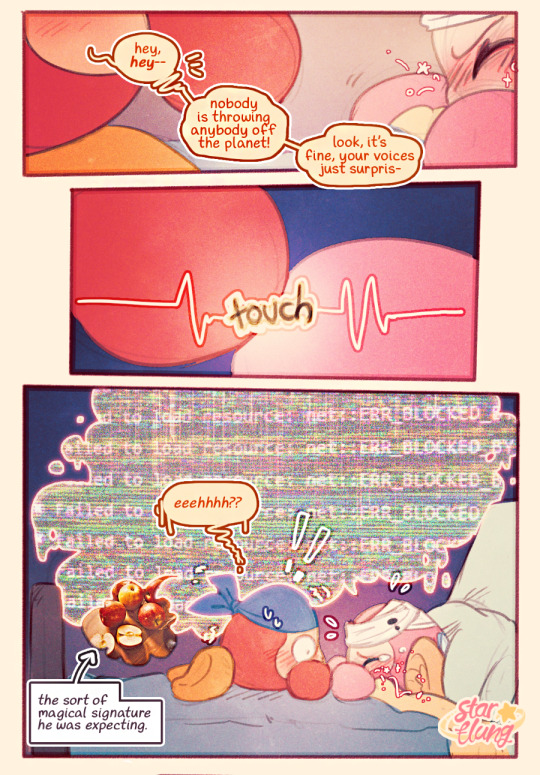


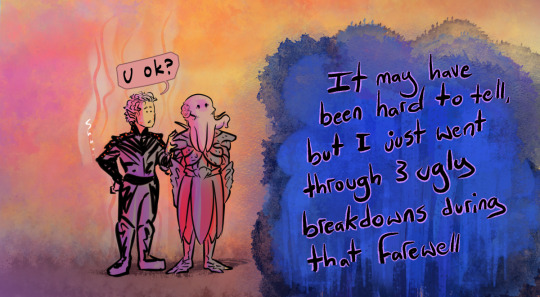
some rather strong first impressions were made.
required reading for the magical "voice" headcanon and another for starstruck's signature in particular. asked by @trainerbob23 !
#did i need to do a 9 page comic for this... well who knows. i had this scene in mind for a long time and wanted to do it justice!#important moment for both of them. you can see starstruck just generating the bandee shaped mental illness in real time.#and bandee resolving to be her point of contact with waddle dees if the others can't handle it#he is after all; the strongest and the bravest and the best of them.#“what is this signature like” it's like meeting something that has a human face but you can tell it is Not Human. think: uncanny valley#it also took her quite some time to pick up her own voice. she could not speak (popstarian) on her own for a while#she does not mimic anymore though if she can help it because it tends to weird others out and she wants to avoid that!!#it's not like a fun or enjoyable impersonation; it's like a perfect recording on a device.#also i guess this is *finally* the reveal of the 'hospital' mentioned previously that folks noticed and also like... her name 😂#anyway.... thank you to everyone who voted for starstruck in that poll and has encouraged this insane self indulgence... wow.#never thought i'd get to draw stuff like this and have others look forward to it. i really hope you'll enjoy this!!!#my art#my comics#starstruck dee#bandana waddle dee
616 notes
·
View notes
Text
To terminally-ill disabled people: you aren't going to be forgotten. You deserve a space here in this world no matter how long you'll be here. You deserve every chance to be happy, to be welcomed, to be understood, to be accommodated, and to be taken care of to the fullest extent. You haven't "given up," you are so incredibly important, and it takes so much to be in your shoes. I hope you can find pride in who you are. Your existence is meaningful.
#disability#watched a video about a terminally-ill person and... though he's gone i could tell he's such a bright light im this world#the whole 'dont give up!' mentality is just... disheartening. you haven't given up; you have already done enough#if you cannot stay on this earth for long just know that you aren't bad for it#yes it can be tragic and horrifying but... you aren't terrible and you have tried and i know it#whatever you're feeling is only natural and there is no shame in it#i know this is an outsider looking in but i hope that maybe this could help in some tiny miniscule way? maybe that's hubris huh
652 notes
·
View notes
Text
cleaning out my files, oc art and misc edition
#some of this i don't. remember drawing lol#but a lot of it i do. and a lot of it means the world to me even though they're shitty sketches#i'm hoping posting a lot of this will help me get a clean slate moving forward#but i'm not going to forget what my art means to me#fern's sketchbook#not tagging all those characters lol#eyestrain#original art
534 notes
·
View notes
Photo

I don’t have an excuse for this one I’m gonna be honest
#got possessed ://#it wasn’t really me guys you have to trust m#something something House can’t help but love despite his attempts not to#While Wilson keeps wanting to love even if it takes many many attempts#i hope neither of them dies actually!#bet there’s nothing to worry about though right#right#dr house#house md#james wilson#hilson#rambling
1K notes
·
View notes
Text

✨ Simple Gif Colouring for Beginners ✨
I wrote up my basic gif colouring process for a friend recently, but a couple of people here mentioned they'd also find it helpful! so, as requested, this is a beginner-friendly walkthrough of the way I colour my gifs :) it's aimed at brand new gif makers with no prior experience with photoshop or photo editing.
when I first started gif making I found colouring and photoshop in general suuuper daunting, so I've tried to simplify everything here as much as possible. hopefully this will be relatively easy to follow and not too intimidating!
a couple of things to begin with:
I'm only talking about colouring here - this is not a full gif making tutorial. I've linked to some of my favourites of those here!
I personally like to make bright, 'clean' looking gifs with vibrant but natural colours, so that is the style of colouring this tutorial is geared towards. most of gif colouring is subjective and about personal taste - the only thing that I'd say is possible to get wrong is skin tones, which I talk about a lot in this guide.
as I mostly gif Thai dramas, most of the advice is geared towards colouring for East Asian/South East Asian skin tones - but the techniques should be fairly universally applicable (and here are some tutorials that talk about gif colouring for other skin tones).
I'm not an expert! I'm not claiming this is the best or the only way to colour gifs - it's just how I do it.
this post is very image-heavy. if the images aren't loading (or the gifs are running slowly or cutting/looping weirdly), then try viewing the post in its own tab (rather than on the your dash or someone's blog) and refreshing the page.
okay, full walkthrough beneath the cut!
contents:
1. intro
a. natural gif colouring goals
b. very very basic colour theory
2. super simple colouring (the essentials)
a. curves
b. selective colour (and skin tone correction)
c. hue/saturation
d. saving and reusing colouring
e. another simple colouring example
3. other adjustment layers
a. brightness/contrast
b. levels
c. vibrance
d. colour balance
e. channel mixer
4. troubleshooting
a. curves
b. saturation
5. fin!
1. intro
the colouring part of gif making can be super overwhelming, especially if (like me when I first started!) you're completely new to photoshop and/or have no experience with colour theory or photo/video editing.
if you're opening photoshop and making gifs for the first time, I highly recommend getting used to making a few basic, uncoloured gifs to begin with. just to practice, rather than post anywhere (though you can always come back and colour them later if you want) - but it'll make the rest of the process much easier if you're already beginning to get used to working in timeline mode of photoshop. give yourself a bit of time to practice and get a feel for things like how many frames you tend to like in a gif, where you like to crop them for the best loop, what kind of aspect ratio you like etc* - so that you're not trying to navigate all of that for the first time on top of everything else!
* frames: for me between 60-90 frames is ideal, but 40-120 frames is the absolute min-max I'd personally use in a normal gifset
loops: for the smoothest loops, try to avoid cutting someone off mid-movement or mid-word if possible.
aspect ratio: for full-size (540px) gifs, I tend to go for either 8:5 (slightly 'skinnier' gifs), 7:5, or 5:4 (particularly big, thick gifs lmao)
✨ natural gif colouring goals
part of what can be so daunting about starting gif making is not knowing where to start or what you want to achieve. this is definitely something that gets easier with practice - the more gifs you make, the more you'll get a feel for what kind of look you like and the more instinctively you'll know how to get there. it also helps to see if any gif makers you like have made "before and after colouring" posts - these can help with getting a sense of the kinds of changes made through gif colouring. here's one I made!
in general, I like to make my gifs bright and 'clean' looking, with vibrant but natural colours. these are the things I'm usually hoping to achieve with colouring:
brighten dark scenes
remove muddy, yellowish lighting or filters
saturate colours
correct any skin lightening filters or overexposure
make lighting and colours as consistent as possible between gifs within a single gifset, especially gifsets featuring gifs from multiple scenes/episodes/videos
this guide is focusing on natural colouring, but of course there are many cool ways to make stylised/unnaturally coloured gifs. imo you'll need to master these basics first, but if you want to learn how to do things like change the background colour of gifs or use gradients or other cool effects, then @usergif's resource directory has loads of super helpful tutorials!
✨ very very basic colour theory
[disclaimer! I don't know shit about fuck. I do not study light or art. this is just an explanation that makes sense to me exclusively for the purposes of gif making.]
the primary colours for light/digital screens are red, blue, and green. having all three colours in equal measures neutralises them (represented by the white section in the middle of the diagram).

so to neutralise a colour within a gif, you need to add more of the colour(s) that are lacking.
in practice this usually means: the scene you want to gif is very yellow! yellow is made of red and green light, so to neutralise it you need to add more blue into your gif.
it can also mean the reverse: if you desaturate the yellow tones in a gif, it will look much more blue.
looking at the colour balance sliders on photoshop can make it easier to visualise:

so making a gif more red also means making it less cyan.
removing green from a gif means adding magenta.
taking yellow out of a gif will make it more blue.
tl;dr:
neutralise yellows by adding blue (and vice versa)
neutralise reds by adding cyan (and vice versa)
neutralise green by adding magenta (and vice versa)
2. super simple colouring (the essentials)
starting with a nice sharpened gif in photoshop in timeline mode. (these are the sharpening settings I use!)
some scenes are much harder to colour than others - it helps to start out practising with scenes that are bright/well-lit and that don't have harsh unnaturally coloured lights/filters on. scenes with a lot of brown/orange also tend to be harder.
I usually save a base copy of my gif before I start colouring just in case I end up hating it, or find out later that it doesn't quite fit right into a set and need to redo it etc.
so here is my base gif!

it's an okay gif, but it has a bit of a yellow tint to it that I want to reduce.
colouring is easiest to do in adjustment layers, which can be found under layer -> new adjustment layer - or for me they are here:

there are lots of different types of adjustment layers that do lots of different things - but for me the absolute essentials for colouring are curves, selective colour, and hue/saturation.
I also use brightness/contrast, levels, exposure, vibrance, colour balance, and channel mixer sometimes, depending on the gif - but I use curves, selective colour, and hue/saturation on every single gif.

✨ curves layer
the first thing I always do is a curves layer. when you first open one it will look like this:

first I usually click the ‘auto’ button, just to see what happens. sometimes it makes a big difference (it usually brightens the gif a lot) - but on this gif it didn’t do much.
if it had made the gif look nicer then I would have kept it and added a second curves layer on top to do the rest of these steps.
the next step is selecting the white and black points with the little eyedropper tools.
the bottom eyedropper lets you pick a white point for the gif. click somewhere super light on the gif to see what happens - for this gif, I clicked on the lampshade on the left. if it looks weird, I just undo it and try somewhere else - it usually takes a few goes to find something that looks good.
here's what that did to the gif:

then I pick the top eyedropper and use it to pick a black point by clicking somewhere really dark, again playing around until I find a black point that looks good.
here's what the gif looks like after picking the white and black points:

this can take some experimenting, but you can make super easy drastic changes to your gif just with this. in this case, the curves layer took out a lot of that yellowy tint.
and this is what the curves graph looks like now:

you can click and drag those lines to make further changes if you want - I usually leave them alone though. the colours of the lines indicate which colours have been changed in the gif - for example, you can see from that steep blue line on the graph that blue has been added to neutralise those yellows.
next I usually do another curves layer and just press the ‘auto’ button again to see what happens. usually it brightens the gif a bit more, which I like.
‼️if nothing is working: usually with a bit of fucking about a curves layer works well - but sometimes you can’t find a good white and black point anywhere, and instead your gif turns wacky colours and nothing looks good. this happens more often with very heavily colour tinted scenes :( the troubleshooting section at the end goes over some options, including starting with a levels layer instead.
✨ selective colour (and skin tone correction)
skin tones are made up of a mixture of yellow and red.
removing yellow (or adding blue or red) to a gif will make the skin-tones too red - and removing red (or adding cyan or yellow) to a gif will make the skin-tones too yellow.
adding blue to this gif with the curves layer took out the yellowy tint, which I wanted - but it also took the yellows out of Kim's skin tone, which I don’t want. so I need to put yellow back into the skin tones specifically - without putting it back into the rest of the gif.
selective colour layers let you select an individual colour and adjust the levels of other colours within that colour. you can change how yellow the green shades are, or how much cyan is in the blues, for example.
I need to add yellow back into the red tones to correct the skin tones on this gif. this is the case for most gifs in my experience - the vast majority of the time, unless a scene is very heavily tinted in another colour, a curves layer will add blue/remove yellow.
in the 'colors' dropdown, select the 'reds' section and drag the 'yellow' slider higher - this will add more yellow into just the red shades within the gif.

the amount of yellow you need to add back into the reds depends on how much yellow was taken out of the gif initially - I just play around with the slider until it looks right. if you're not sure, it helps to have some neutrally-coloured (not white-washed!) reference photos of the people in your gif to compare to.
here's the result. Kim's skin is a lot less pink toned and much more natural looking:

✨ hue/saturation
this adjustment layer lets you adjust the hue and saturation of the gif as a whole, and also of each colour individually.

I don't use the hue or lightness sliders unless I'm trying to do something more complicated with the colouring.
clicking the dropdown menu that says 'master' lets you edit the saturation of each colour individually. this is useful if your gif is still super tinted in one colour.
I thought the yellows on this gif were still slightly too bright, so I switched to the yellow channel and desaturated them slightly. (remember if you do this then you need to go back to selective colour and add more yellow into the red skin tones to balance out the desaturation!)
then I increased the 'master' saturation of all the colours to +5:
I usually find the right amount of saturation is somewhere between +5 and +12, but it depends on the gif.
‼️if the gif feels undersaturated, but the saturation slider isn't helping/is making the colours worse, try a vibrance layer instead.
done!

✨ saving and reusing colouring
you can copy and paste adjustment layers between gifs to make your colouring even across each of your gifs for one scene - so if you're making a set of multiple gifs of the same scene, or you think you might want to gif the same scene again in the future, you can save it as a psd so you can reuse the colouring again later.
each gif's colouring will then still need tweaking - different cameras/angles/shots of the same scene can still start out with slightly different colouring.
I recommend uploading the gifs as a draft post on tumblr so you can see what they all look like next to each other and catch any inconsistencies.
✨ another one! (speedrun!)

HI KEN!
the white point for the curves layer was in the window behind them.
the curves layer removes the muddy yellow tint, but again it makes their skin tones (especially Ken's) very red toned, which is adjusted by the selective colour layer.
3. other adjustment layers
imo many many gifs can be coloured really nicely with just those three adjustment layers, but some need different adjustments.
✨ brightness/contrast

pretty self explanatory!
I personally usually avoid using the 'brightness' slider because I rarely like the effect - I only tend to use the 'contrast' one.
the 'auto' button is sometimes useful though, especially if you’re struggling with the curves layer.
✨ levels

levels alters the white and black points of the gif, like curves - but unlike curves it doesn't also alter other colours.
use the sliders beneath the graph to alter how dark/light the gif is. you can slide the black slider further to the right to make the blacks darker, and the white slider to the left to make the whites lighter.
levels is a good place to start if your curves layer isn't working.
(I'm going to hit the image limit for this post lol so here are some screenshots of a table I made to demonstrate this rather than actual gifs. sorry!)


on both sides, I dragged the sliders up to where the big jumps are on the graph - this is usually a good place to start!
✨ vibrance
vibrance... makes the colours more vibrant. it's more subtle than saturation.
it's really helpful for gifs that feel grey. sometimes adjusting saturation just makes the greys kind of weirdly tinted, but a vibrance layer can fix that.

vibrance is much more subtle!
✨ colour balance

colour balance affects the overall balance of colours within a gif.
it's good for scenes with heavy tints.
I tend to stick to the 'midtones' dropdown, but you can also alter the colour balance within the shadows and highlights if you want.


✨ channel mixer
I avoided channel mixer for such a long time because it scared me. but it's great for scenes that are very heavily tinted in one colour.
basically, it works with the levels of red, green, and blue within a gif. you select an output colour and then play around with the levels of the colour you selected within each other colour.
kind of the reverse of selective colour?

so in the 'blue' channel, the levels of blue are at 100%, and the levels of red and green are at 0% - but you can impact how much blue is in the reds and greens and blues.
this tutorial explains it well - but imo the best way to get to grips with channel mixer is just to play around with it a bit (sorry)
(when I made this guide for my friend, I also made a slightly more complicated gif colouring walk-through that included using channel mixer. there isn't space to include it within this post, but if anyone is interested I could always upload it as an 'intermediate' gif colouring tutorial - lmk!)
4. troubleshooting
‼️curves
usually with a bit of fucking about a curves layer works well - but sometimes you can’t find a good white and black point anywhere, and instead your gif turns wacky colours and nothing looks good. this happens more often with very heavily colour tinted scenes :(
for example, with this base gif:

using many of the brightest points as a white point turn it wacky colours, like this:

yikes :(
some options for these cases:
try brightening the gif first with the 'auto' button on the curves layer or with a levels layer. having a brighter gif to start with can give you better options for picking a white point.
try finding an alternate, whiter/brighter white point. look for places the light reflects - on this gif, using the light on Porsche's cheekbone works well as the white point. it also helps to find places that would be white if the scene wasn't tinted - the lightest part of a white shirt is often a good place to start, for example.
skip the curves layer, and instead use a levels layer to alter your white/black points, and colour balance or channel mixer to balance the colours.
‼️over/undersaturation
if your gif (especially the skintones) is looking a little washed out or lifeless, it might be undersaturated. boost that saturation - or if that's not working, try a vibrance layer.
oversaturation is often easiest to spot in the mouths and ears of any people in a gif. if the mouths are looking unnaturally, vibrantly red, then you've gone too far with the saturation.
5. fin!
and done! I hope this was coherent helpful to somebody.
if there's anything that I've missed or that doesn't make sense pls feel free to shoot me an ask or a message and I'll do my best to help! I've also collated a bunch of additional reading/resources below.
happy gifmaking 🥰
✨ some links!
photoshop basics by @selenapastel
gifmaking for beginners by @hayaosmiyazaki
gifmaking guide for beginners by @saw-x
dreamy's gif tutorial by @scoupsy-remade (includes instructions on how to blur out burned-on subtitles or annoying video graphics)
beginner's guide to channel mixer by @aubrey-plaza
how to fix orange-washed characters by aubrey-plaza
colour correcting and fixing dark scenes by @kylos
does resampling matter? by usergif
how to put multiple gifs on one canvas by @fictionalheroine
watermarking using actions by @wonwooridul
resource directory by @usergif
#i got a couple of asks about this so i figured i'd type it up as a post#it's been sitting in my drafts for a while now though i'm so sorry omg.#i had to replace my laptop and it took me a while to get round to downloading photoshop on the new one#but i hope this is helpful!!#gif making#tutorial#photoshop tutorial#colouring tutorial#coloring tutorial#gif colouring#gif coloring#photoshop resources#gif tutorial#gif resources#userbunn#uservik#darcey.txt#darcey.gif#usergif
390 notes
·
View notes
Text
I love the QSMP. Not only has it introduced me to many amazing international creators, it's also introduced me to the French and Brazilian community, who are so sweet, funny, and chaotic in their own unique ways. I love seeing fans sharing their culture and learning from one another, and I myself have learned a lot this past year. I think it's incredible how QSMP brings so many different people together – all of us united in our love and passion for this project and its goals.
But passion can often evoke strong emotions, and these strong emotions aren't always positive.
The past few months, I have seen multiple waves of hate, bad-faith generalizations of communities, and racist remarks directed at fellow fans – especially those who are part of the French / Brazilian community. This kind of behavior is inexcusable, and is in direct conflict with the mission of QSMP, which is to break language barriers and unite communities.
We are a global community with a variety of people from different backgrounds. Miscommunications may occasionally occur because of cultural differences and/or language barriers, but we should use these moments as opportunities to learn and engage with other people rather than assuming the worst about them and starting fights.
Although certain issues can be resolved with communication, sometimes it’s better to block and move on. Avoid spreading negativity or hate, and save yourself the headache of interacting with people who are just looking for someone to argue with.
No matter what community we're a part of or what languages we speak, we're all here to have fun. Please remember to be kind to each other. We have more in common than we have in conflict.
#QSMP#mod talk#Additionally: we should avoid stereotyping entire communities for reasons I hope are obvious.#I think everything will work out in the end#I don't typically see this kind of stuff on here but I figured I'd post this anyways since I'm posting it to Twitter too#It's understandable that emotions are high because of everything that's happened to the QSMP community the past few months#but it's very sad to see fans attacking each other#everyone's a bit on edge it seems. I rarely use my personal Twitter but I opened it today and saw some close mutuals snapping at people#then after stepping away and calming down coming back to a conversation and apologizing#it's sad to see everyone in this state#So... comments from the peanut gallery I suppose. I do hope this helps someone though#I don't usually post things like this because frankly-#I don't think every single drama / controversy / whatever necessitates a public statement from every single member of the fandom#but I've been thinking a lot about this#Anyhoo. Hopefully I can start sharing clips again tomorrow. I've been moving the past week and life was hellish#hopefully things ease up a bit now
228 notes
·
View notes
Text
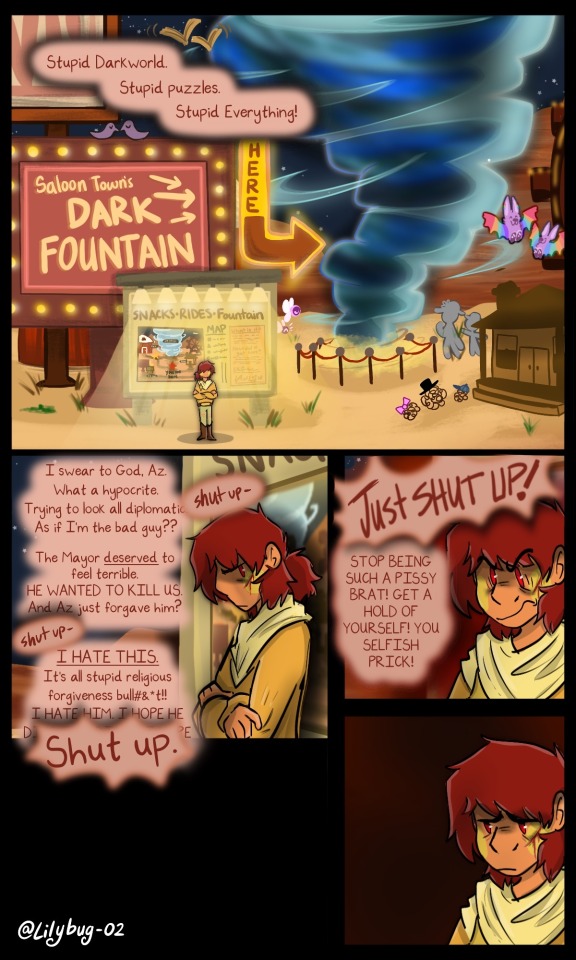
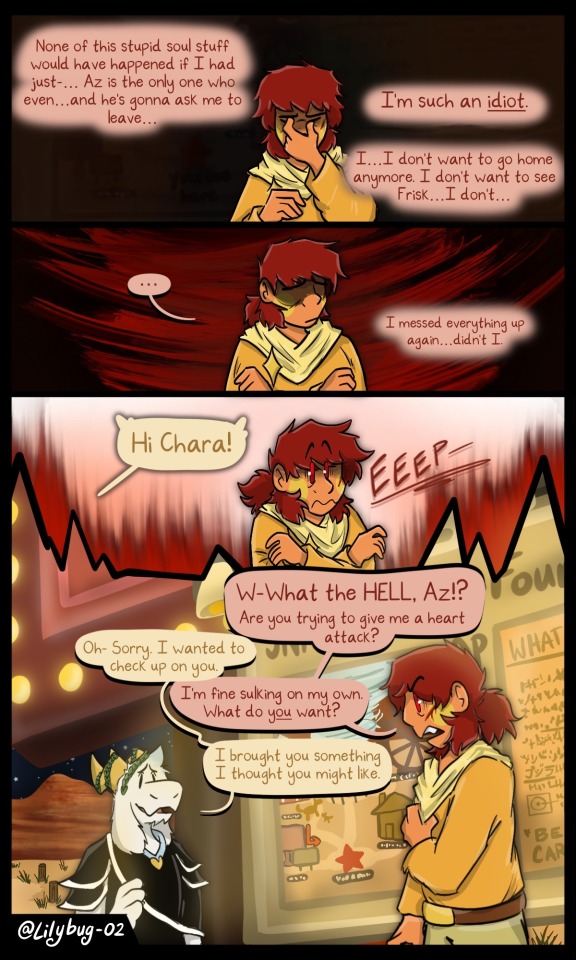
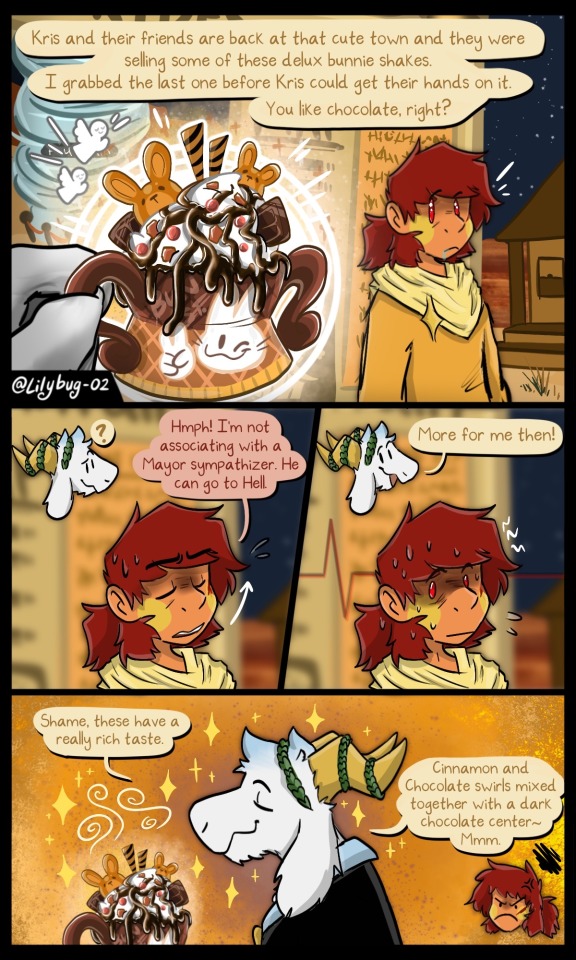
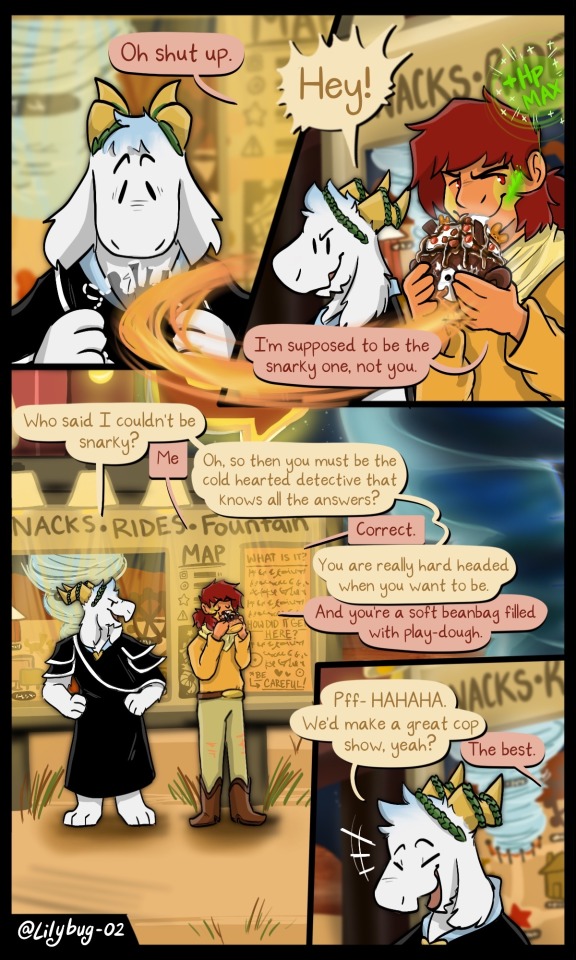
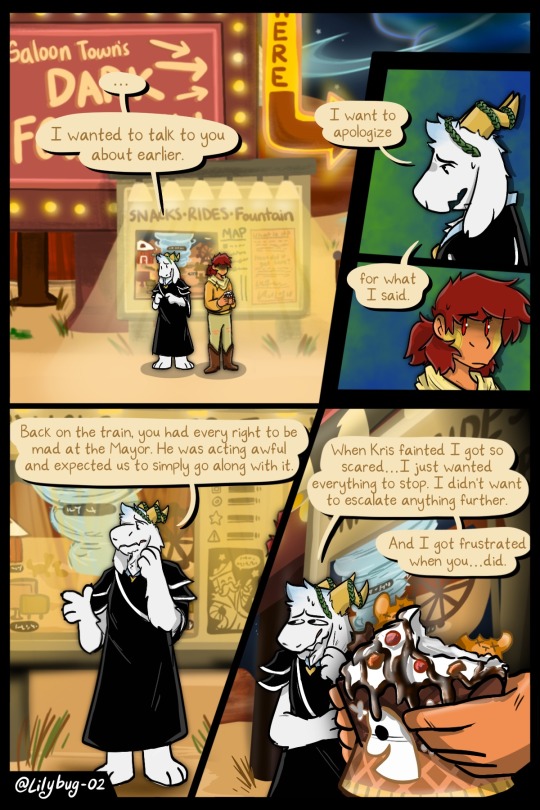
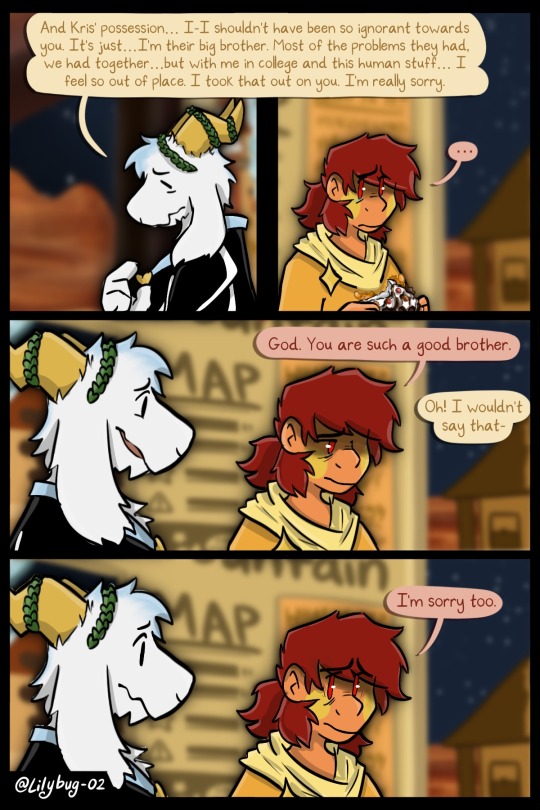
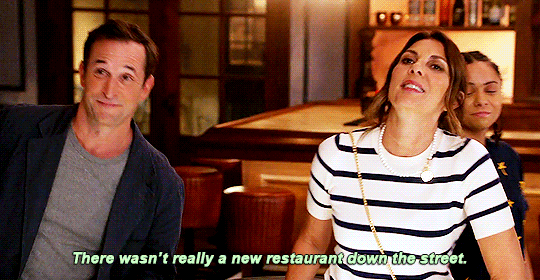
Bribed with Chocolate. The way it should be.
Part 22 || First || Previous || Next
--Full Series--
More to come as this is a two-parter. But you know how I am with schedules.
Bonus:
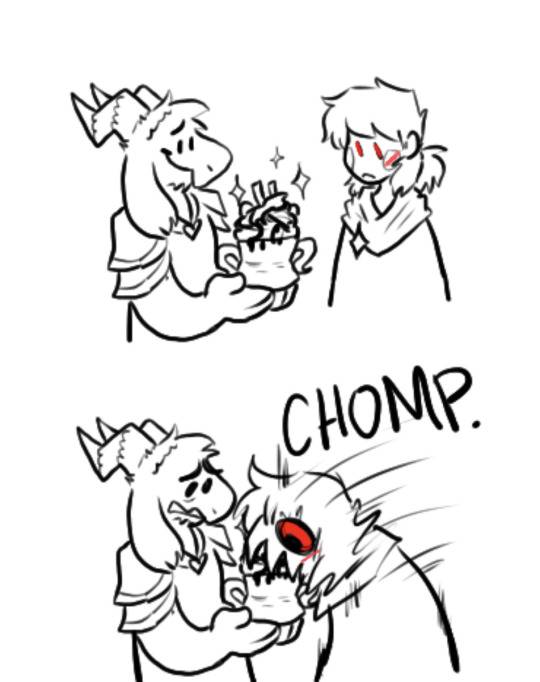
I think this was an equally possible reaction from Chara.
#Chara and Azzy have another talk#Finally Chara shows their mischievous side.#and Azzy knows Chara's language well#my art#deltarune chara timeline#art#bread#deltarune#ngl im so happy with how that chocolate shake came out. I want to eat it so bad#yay 6 pages of taking :') i hope you guys like that lmao#Glad I got this one done in basically a month and a week! Hah. I'm trying me best :') Halloween.. Exams and a ton of other things came up#surprisingly these backgrounds weren't terrible to do... I mean took more than two hours but you know what I mean#i struggled with how to frame the background though. I actually liked drawing it. But because both the background and my characters--#--are super colorful I have to make sure I don't muddle the whole page.#Ive been thinking of doing the overworld in black and white recently... may help me actually finish the comic lol. idk i may make a poll#gonna try and get the new part out in maybe a month again? sorry. Thanksgiving and Christmas get me exhausted.
1K notes
·
View notes
Text
i spent 5+ hours trying to glaze this dumb joke about if dark survived in stick!alan au. anyway my vision when i was talking about this last night
(reblogs > likes)
#tommy's stickmen tag#i hope this is actually funny because this was hell#i didn't even glaze it in the end. it took 7 hours and failed lol#tommy's stick!alan#everyone say thank you mystic for their service in helping me get this glazed. love you bestie#stick!alan#c!alan#ava#ava/m#the dark lord#ava the dark lord#ava tdl#ava dark lord#ava alan becker#ava au#animation vs animator#animator vs animation#pitch's art#fuck me though. wish there was easier access for glazing
304 notes
·
View notes
Note
I promise I searched your blog, but how do you (specifically) zero draft? The post that showed up in a search of your blog was like, bullet point writing whatever is in your head for the.wip, which I think is v cool and would help me finish lofm! So I'm curious how you do it!
Oh yes, okay! I don't think I've actually explained it anywhere, but I love talking about this.
what is a zero draft?
The great thing about a zero draft is that you can pretty much make it whatever you need it to be. For me, I was having a hard time with the middle of my story. I've started and stopped this wip so many times, always getting hung up at the same part as I approach the middle. I've always had a very clear picture of the beginning and the end, but never how to get all the way through from point A to point B. My original outline had things in brackets like [character growth] and [plot stuff], but what does that mean!?
My goal was to get all the way through. So I opened a blank document, started at the beginning, and literally rambled and talked my way through the entire story. I didn't write real prose. It was all stream of consciousness. It was me describing what happens in the story as if I was telling it to a friend. The zero draft was my rubber duck. This was my brainstorming document. I used common vernacular and slang and abbreviations. There are bullet points, numbered lists, sidebars where I rambled about a scene I completely forgot to mention in a previous section. Lots of comments about things I need to include in the next draft. Literally anything and everything I thought of went into the zero draft.
A zero draft can be as long or short as you need it to be. Mine ended up being around 40k words. But I've seen other people say a zero draft is 10k to 20k words. It's really up to you! And when you feel like you've covered enough of the story to move on to the next draft.
And you don't have to go about a zero draft the way I did! Recently, an author I love and follow on instagram (Casey McQuiston) shared in their stories that when they were writing their most recent book, they zero drafted each chapter before they wrote it out. Casey said that because of this, it was first time they didn't have major edits and rewrites afterwards. So if you find yourself needing a little more structure and sense of where you're going, I think a zero draft could be super helpful!
Of course you don't have to have a zero draft, and if you've got a good sense of the plot and character arcs, you might not need one. But it can be a great way to brainstorm and figure out those things if you need to!
#zero draft#zero drafting#writeblr#writing tips#answered#kaatiba#i hope this makes sense and helps!!#am i psyching myself out about having to write real words now? yes#but i'm very excited about my wip again though#so that's helpful too
294 notes
·
View notes
Photo

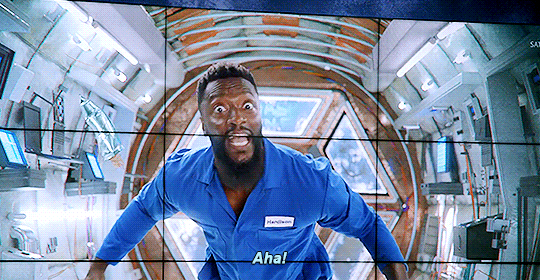


I can’t take another freeze-dried meal, I can’t, tastes like baby powder. I missed three DC movies, three! I don’t know what’s going on, who’s fighting who? Guys please, help me, I’m desperate. Help your boy, help your boy.
LEVERAGE: REDEMPTION 2.13 | The Crowning Achievement Job
#leverage#leverage redemption#leverage redemption spoilers#leverageedit#alec hardison#parker#eliot spencer#sophie devereaux#harry wilson#breanna casey#photoset#when I saw his name in the credits I let myself get my hopes up that he was actually going to appear and help them#but hardison in space content is better than nothing#I want to see them steal space though!!!
1K notes
·
View notes
Last Seen Blogs

sebbiebaby
WE STAN THE STAN
rank-farts
groove town
vazaez
Call me Vaz!
nrm-rumfilm
portfolio

bratschilautaro-blog
Lautaro ~ {1994}