#NO WORK TOMORROW
Text
ok but... i kinda sorta love minthara.
4 notes
·
View notes
Text
hey whats up it was 9 then I played skyrim and now it's midnight what's up
#vwitty banter#no work tomorrow#didnt get up til like 11 today so im gonna game til im tired#cause woooooo vacation
6 notes
·
View notes
Text
me and all my different personalities having a meeting

#NO WORK TOMORROW#AND THAT MEANS#CONTENT FOR YOU GUYS#AND ALSO NAPS FOR ME#MUAHAHAHAHHAHA#not bnha#llyn is annoying
33 notes
·
View notes
Text
Feeling alone, sad, scared, and bored all at once
#personal#me#anxiety#drunk#let’s talk#nothing dumb#if I don’t reply it’s dumb#drinking#hurricane ian#hurricane drinking#no work tomorrow#bored#I want to talk
4 notes
·
View notes
Text

trying to decide if I need to get a nap..
3 notes
·
View notes
Text
Ideal work schedule:
I show up and am given a list of cognitively engaging but achievable tasks
I complete the list
I leave immedietly
#guy who is getting out of work at 1pm!!!! 📢#tomorrow is my last day but u have loved this job. i love to leave.#trb.txt#i* have
102K notes
·
View notes
Text
been seeing homies get deep into "the terror" and making me want to rewatch SO i spent two hours in the dead of night reading the wiki/the subreddit/other linked articles and like. one of those articles was deadass fucked up
there was a woman who spoke inuktitut who was writing a book containing a lot of inuit oral histories, and in nunavut she was able to hear passed-down recollections of when survivors from the franklin expedition were passing through
and like. i can't imagine being an inuit family/group, knowing that europeans exist but having never seen them, seeing 8-9 shambling, blue-skinned, cold-to-the-touch out-of-their-minds white men come wandering by. they invited the men inside their igloos for warmth, for food, to be hospitable. the men refused to eat, refused to speak, and when trade was offered, clutched their possessions close and refused to entertain the idea of trade. this was, offputting, to say the least. the group set them up in their own igloo, with their own fire, and left three whole seals for them to eat. and then they fled cause what the FUCK get out of there. they came back in a few days to check on the strangers. the three seals were completely untouched, while all of the men had killed and eaten each other
i mean. fuck dude. there are obviously pretty dark angles to view the franklin expedition from– honestly can't think of a good angle, it's pure colonialism and british exceptionalism– but that specific interaction, that inuit group who were living lives as normal until a dozen fucking walking dead showed up and did cannibalism. no wonder that story got passed down, i'd be shitting my pants if i saw that
#I will try to find a link to the article again tomorrow but I'm on 4 hours of sleep rn#On account of spending 2 hours reading about The Terror on a work night#So the fact checking will have to wait. But holy fuck dude#The Terror
16K notes
·
View notes

Text
seriously have been thinking about this all night long. call me autistic but the fact that 90% of workplaces the point is not to get your work done and then be done doing it but to instead perform an elaborate social dance in which you find something to do even when you're done doing everything you need to do in order to show your fellow workers that you, too, are Working . because you are at Work . disgusting why cant we all agree that if there is no work immediately to be done. we just dont do anything
#i personally like to not be doing things constantly at all times. it stresses me out#i know there are ppl who thrive on cosntant activity#but me i like to chill out.#and the problem then becomes that i only ACTIVELY remember to do work and Find More Work To Do when im stressed#at the thought that others might want to see me working#if im ever relaxed i just dont look for stuff to do#catch 22 of modern work culture which permeates even ostensibly noncapitalist structures like public libraries#for instance: will it really kill anybody if the books get shelved by me now after a very busy day?#or shelved tomorrow morning by. well probably me since i'll be the one at the desk#not in the slightest#but it was work that wasnt being immediately done by me. therefore it was incorrect behavior#that i failed to identify because my instinct is to relax when not immediately presented with a Situation#this got me labeled as 'having no initiative' by my dad from a very early age#and even as an adult i still feel like im a child with no initiative
55K notes
·
View notes
Text
I’M FREEEEEEEEEEEEEEEEE
0 notes
Text
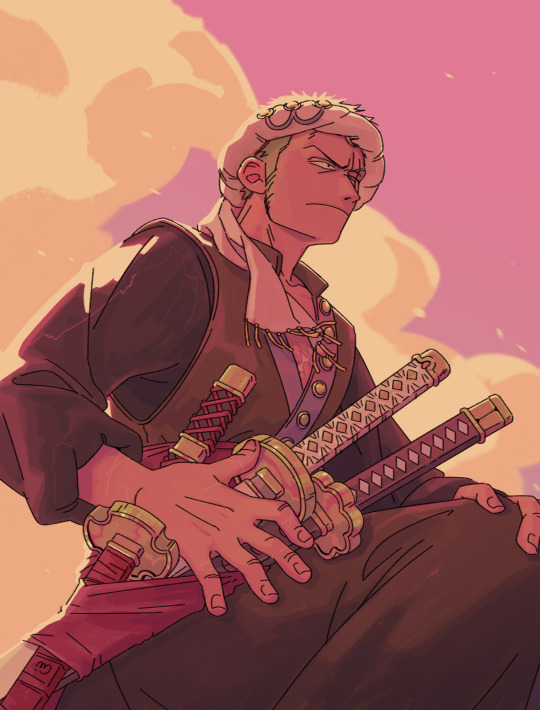
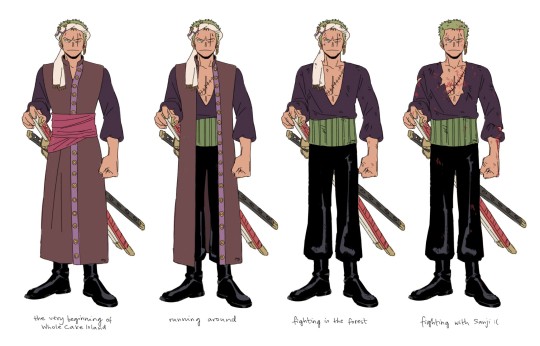
I'm not just cooking, i'm baking a whole ass CAKE
not 100% happy with the design but I wanted to get it out of my system, I went for darker and more muted colors for Zoro while still utilizing the usual elemnts of his outfit like the sash and the haramaki. also the color palette for the full outfit turned out very tasty, like it makes me think of chocolate and sweets. not sure about the use of haramaki though, I feel like it makes the proportions a bit awkward when everything else is dark, but it does make the shirt fold nicely so I may keep it in the end
now that I'm further into WCI I think I should add a suit version as well for the wedding bit hmmm
My idea for this is after coming to Big Mom's territory and fighting her commanders they get to the Germa carriage just like in canon. Zoro watches Sanji fight Luffy, restraining himself from interfering. He respects Luffy's decision to not fight Sanji back, but the moment Luffy gets knocked down it's Zoro's turn to try and bring the cook around and he's not gonna hold back
a very tense fight ensues
#I have a comic for the fight in my head but I'm gonna need time I have so many artworks started lmaooo#amazing that tomorrow is Sunday#have a whole another day before monday and going back to work#and I dont have to do anything!!#anyway#my art#zosan#zoro#roronoa zoro#sanji#whole cake island#whole cake arc#wci#one piece fanart#one piece#fun fact: I was coloring the top pic while having an evening mode on my screen and I didn't realize it#but I liked it with that filter so much that I recriated it at the end thats why it has them juicy sunset colors#wci zoro au
4K notes
·
View notes
Text

bedtime story with my love !!
#mine#cats#oooooooooogh im so cold....bath time bath time :3 !#i hope everyone is hvaing a good week i am now DONE with work !!!!! hehe !!!!!!!!!!#i might not do any drawing for a little while . maybe just felt tips#also. cannnot for the life of me decide what 2 read...am like 30% way thro assassins fate but Um its . a little intense so im taking a brea#idk what im in the mood for....something....fun... but isnt bad#i feel like all 'light' books r bad. maybe i will just reread the goblin emperor. as i always do when all else fails#also. am going ice skating tomorrow i am SO excited . i hvent been in so so long its so exciting !!!!!!!!!!!!!!!!!!!!#mwah. hve good evening :3
4K notes
·
View notes
Text
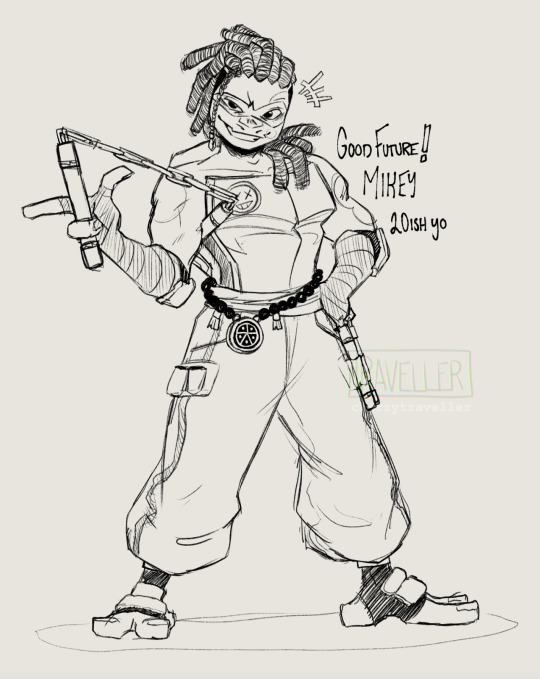
Future Mikey?? Good Future Mikey?? No crying???? No ascent to godhood via insurmountable rage and grief, but only funky vibes???
Twitter || Ko-fi || Instagram
#rottmnt#teenage mutant ninja turtles#tmnt#rise of the teenage mutant ninja turtles#hamato mikey#future mikey#rottmnt mikey#digital sketch#digital art#clip studio paint#fanart#travellerdraws#this is a wip actually bc i was gonna sketch my bad future mikey too for comparison#but im tired and also have to work tomorrow hjHBSBDBHJ#bedtime for me!!
3K notes
·
View notes
Text
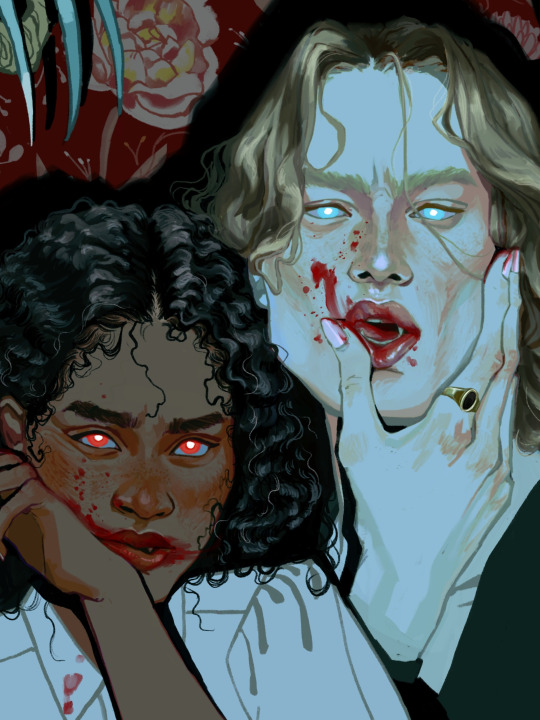
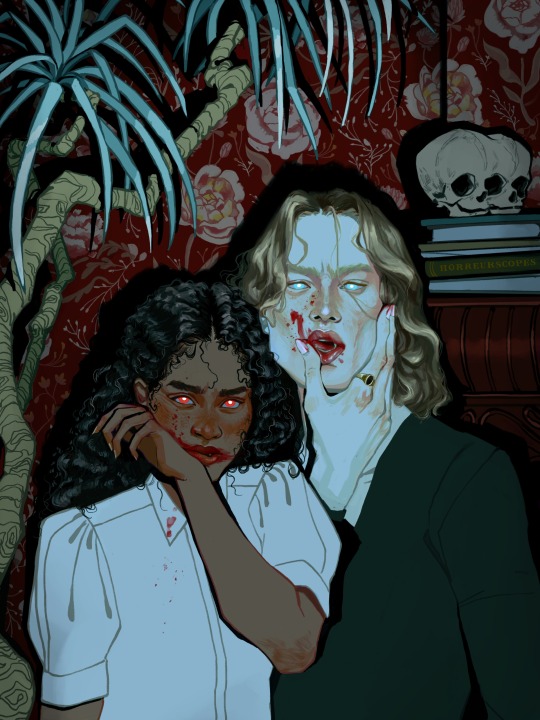
ELEKTRA: I am the shape you made me. Filth teaches filth.
(prints)(process video & high res)
#interview with the vampire#iwtv#the vampire chronicles#claudia iwtv#lestat de lioncourt#amc iwtv#iwtv fanart#ive been working on this between commissions since ep 5 came out two weeks ago but luckily for me ep 6 was even more thematically on point#anyway someone made that web weave about lestat being claudia's mother and i haven't been the same ever since#also this is an ode to my lovehate relationship with backgrounds#THIS TOOK SO MUCH WORK AND IT WASNT SUPPOSED TO. WHY CANT I JUST DO A QUICK DOODLE. A LITTLE FLAT COLOR FANART. I AM CURSED#horreurart#anyway this is going on ig and twitter tomorrow at the appropiate algorythmic-posting times but for you tumblrinas#you can have it at my organic unhinged hour#illustration#art#artists on tumblr
31K notes
·
View notes
Note
Any tips on learning to make buttonholes? I've been putting it off for.... *checks notes* like three years.... but better late than never and all that. I don't have any fancy machines so I gotta do it by hand but that seems right up your alley.
Thanks!
It IS up my alley, yes, I do most of my buttonholes by hand!
I'm actually part way through filming an 18th century buttonhole tutorial, but I expect it'll be a few more weeks before I finish that and put it on the youtubes, so in the meantime here's the very very short version. (The long version is looking like it'll probably be about 40 minutes maybe, judging by how much script I've written compared to my last video?)
Mark your line, a bit longer than your button is wide. I usually use a graphite mechanical pencil on light fabrics, and a light coloured pencil crayon on dark ones. (I have fabric pencils too, but they're much softer and leave a thicker line.)
You may want to baste the layers together around all the marked buttonholes if you're working on something big and the layers are shifty and slippery. I'm not basting here because this is just a pants placket.

Do a little running stitch (or perhaps a running backstitch) in fine thread around the line at the width you want the finished buttonhole to be. This holds the layers of fabric together and acts as a nice little guide for when you do the buttonhole stitches.

Cut along the marked line using a buttonhole cutter, or a woodworking chisel. Glossy magazines are the best surface to put underneath your work as you push down, and you can give it a little tap with a rubber mallet if it's not going through all the way.

I'm aware that there are some people who cut their buttonholes open using seam rippers, and if any of them are reading this please know that that is abhorrent behaviour and I need you to stop it immediately. Stop it.
Go get a buttonhole cutter for 10 bucks and your life will be better for it. Or go to the nearest hardware store and get a little woodworking chisel. This includes machine buttonholes, use the buttonhole cutter on them too. If you continue to cut open buttonholes with a seam ripper after reading this you are personally responsible for at least 3 of the grey hairs on my head.
Do a whipstitch around the cut edges, to help prevent fraying while you work and to keep all those threads out of the way. (For my everyday shirts I usually do a machine buttonhole instead of this step, and then just hand stitch over it, because it's a bit faster and a lot sturdier on the thin fabrics.)

I like to mark out my button locations at this point, because I can mark them through the holes without the buttonhole stitches getting in the way.
For the actual buttonhole stitches it's really nice if you have silk buttonhole twist, but I usually use those little balls of DMC cotton pearl/perle because it's cheap and a good weight. NOT stranded embroidery floss, no separate strands! It's got to be one smooth twisted thing!
Here's a comparison pic between silk buttonhole twist (left) and cotton pearl (right). Both can make nice looking buttonholes, but the silk is a bit nicer to work with and the knots line up more smoothly.

I've actually only used the silk for one garment ever, but am going to try to do it more often on my nicer things. I find the cotton holds up well enough to daily wear though, despite being not ideal. The buttonholes are never the first part of my garments to wear out.
I cut a piece of about one arm's length more or less, depending on the size of buttonhole. For any hole longer than about 4cm I use 2 threads, one to do each side, because the end gets very frayed and scruffy by the time you've put it through the fabric that many times.
I wax about 2cm of the tip (Not the entire thread. I wax the outlining/overcasting thread but not the buttonhole thread itself.) to make it stick in the fabric better when I start off the thread.
I don't tend to tie it, I just do a couple of stabstitches or backstitches and it holds well. (I'm generally very thorough with tying off my threads when it comes to hand sewing, but a buttonhole is basically a long row of knots, so it's pretty sturdy.)

Put the needle through underneath, with the tip coming up right along that little outline you sewed earlier. And I personally like to take the ends that are already in my hand and wrap them around the tip of the needle like so, but a lot of people loop the other end up around the other way, so here's a link to a buttonhole video with that method. Try both and see which one you prefer, the resulting knot is the same either way.


Sometimes I can pull the thread from the end near the needle and have the stitch look nice, but often I grab it closer to the base and give it a little wiggle to nestle it into place. This is more necessary with the cotton than it is with the silk.
The knot should be on top of the cut edge of the fabric, not in front of it.

You can put your stitches further apart than I do if you want, they'll still work if they've got little gaps in between them.
Keep going up that edge and when you get to the end you can either flip immediately to the other side and start back down again, or you can do a bar tack. (You can also fan out the stitches around the end if you want, but I don't like to anymore because I think the rectangular ends look nicer.)
Here's a bar tack vs. no bar tack sample. They just make it look more sharp, and they reinforce the ends.

For a bar tack do a few long stitches across the entire end.

And then do buttonhole stitches on top of those long stitches. I also like to snag a tiny bit of the fabric underneath.

Then stick the needle down into the fabric right where you ended that last stitch on the corner of the bar tack, so you don't pull that corner out of shape, and then just go back to making buttonhole stitches down the other side.
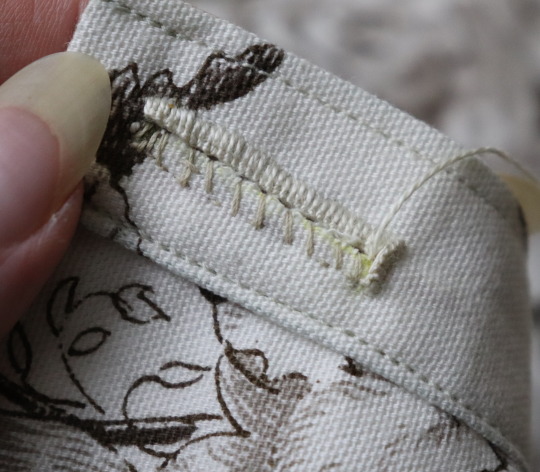
Then do the second bar tack once you get back to the end.

To finish off my thread I make it sticky with a bit more beeswax, waxing it as close to the fabric as I can get, and then bring it through to the back and pull it underneath the stitches down one side and trim it off.


In my experience it stays put perfectly well this way without tying it off.
Voila! An beautiful buttonholes!


If you want keyhole ones you can clip or punch a little rounded bit at one end of the cut and fan your stitches out around that and only do the bar tack at one end, like I did on my 1830's dressing gown.

(I won't do that style in my video though, because they're not 18th century.)
Do samples before doing them on a garment! Do as many practice ones as you need to, it takes a while for them to get good! Mine did not look this nice 10 years ago.
Your first one will probably look pretty bad, but your hundredth will be much better!
Edit: Video finished!
youtube
And here's the blog post, which is mostly a slightly longer version of this post.
#ask#buttonholes#sewing#hand sewing#sewing tutorial#I've been procrastinating on the video this week#I want it done! I don't want to work on it I want new projects! I want to cut out more gloves!#currently forcing myself to do the last few buttonholes on these pants and then maybe I can cut out new gloves? as a treat?#but I hope I get some filming done tomorrow too
3K notes
·
View notes
Text
i love a man who is the living embodiment of mnt Everest
#he is Looking#könig#ghost#AIGHT i am officially working on the comic tomorrow b4 i kick my own ass#once again prying my grubby paws off of a current mind rotting obsession to do the comic HHRGGH it hurts#BUT i so want to move on to The Next Phase of the comic im so ready i can Taste it#each page is closer to pontis intro and HOOOOOOOOOOO#aight peace#fanart#my art#call of duty#konig cod#konig#ghost cod#ghost mw2#mwii#cod mw2#cod mwii#cod#call of duty modern warfare 2#call of duty modern warfare#mw2#konig mw2
10K notes
·
View notes
Last Seen Blogs
princess-badass1996
Fandom Craziness

svtdarlingbby
Seventeen writing blog!

galaxykoii
Endless Space

mrboost30
Trung

noensark
noen.