#can minecraft windows 10 play on servers
Text
Download the Minecraft Launcher: Unleash Your Creativity
Minecraft, the beloved sandbox game, has captured the hearts of millions of players around the world with its endless possibilities and creative gameplay. Whether you're a seasoned Minecraft enthusiast or a curious newcomer, the first step to embarking on your block-building adventure is to download the Minecraft Launcher. In this article, we will explore the importance of the Minecraft Launcher and how it unlocks the full potential of your Minecraft experience.
What is the Minecraft Launcher?
The Minecraft Launcher is a program that acts as a central hub for launching and managing your Minecraft game. It serves as the gateway to the vast and immersive Minecraft world, allowing you to access various game versions, mods, resource packs, and multiplayer servers. The Minecraft Launcher ensures that you have a seamless and convenient gaming experience by providing essential features and updates.
Why is the Minecraft Launcher Important?
- Game Updates and Version Control:
The Minecraft Launcher ensures that your game is up to date by automatically downloading and installing the latest updates. Minecraft constantly introduces new features, improvements, and bug fixes, and the Launcher ensures that you have access to these updates. Additionally, the Launcher allows you to switch between different game versions, including snapshots and older versions, giving you the flexibility to experience Minecraft's evolution and play with friends on different versions.
- Modding and Customization:
One of the great advantages of Minecraft is its modding community, which allows players to customize their game and add new features, mechanics, and content. The Minecraft Launcher provides easy access to popular modding platforms such as Forge, Fabric, and others, making it simple to install and manage mods. Whether you want to enhance gameplay, introduce new items, or transform the entire Minecraft experience, the Launcher enables you to explore and experiment with a vast library of mods.
- Resource Packs and Skins:
The Minecraft Launcher also allows you to customize the visual aspects of the game. Through the Launcher, you can easily install and apply resource packs, which change the textures, sounds, and visual effects in Minecraft. Resource packs enable you to create a unique and personalized aesthetic for your Minecraft world. Additionally, the Launcher provides a simple interface for changing and applying player skins, allowing you to express your creativity and individuality within the game.
- Multiplayer and Server Access:
Minecraft's multiplayer component is a significant part of the game's appeal. The Minecraft Launcher grants you access to the multiplayer aspect by providing a straightforward way to join official Minecraft servers or connect to community-hosted servers. Through the Launcher, you can browse server lists, enter server addresses, and connect with friends or fellow players from around the world. The Launcher facilitates seamless multiplayer experiences and opens the doors to collaborative building projects, exciting minigames, and engaging social interactions.
How to Download the Minecraft Launcher:
- Visit the Official Minecraft Website:
Head to the official Minecraft website (minecraft.net) using your preferred web browser.
- Navigate to the Download Page:
On the Minecraft website, locate the "Download" tab or button, which will direct you to the download page.
- Choose Your Operating System:
Select the appropriate version of the Minecraft Launcher for your operating system (Windows, macOS, or Linux). Click on the download link to initiate the download.
- Install the Launcher:
Once the download is complete, open the downloaded file and follow the installation instructions provided by the Minecraft Launcher installer. The installation process may vary slightly depending on your operating system.
Minecraft Parkour Servers For Bedrock
- Launch and Enjoy:
After the installation is complete, launch the Minecraft Launcher. Log in with your Minecraft account details or create a new account if you don't have one. Once logged in, you can start your Minecraft adventure by selecting a game version, customizing your settings, and exploring the world of Minecraft.
The Minecraft Launcher is an essential tool for every Minecraft player. It allows you to download the latest game updates, access different game versions, and manage mods, resource packs, and skins. The Launcher provides a convenient and user-friendly interface, simplifying the process of customizing your Minecraft experience. Additionally, it enables seamless multiplayer interactions, connecting you with friends and communities around the globe. So, download the Minecraft Launcher, unleash your creativity, and embark on a block-building adventure like no other. The Minecraft world awaits your imagination!
#SERVERS MINECRAFT PE#Why Can't Minecraft Connect To Servers Please Make Sure You Are Online And Minecraft Is Not Blocked#minecraft servers that allow hacks 1.8#minecraft java servers hosting#Minecraft Premiumsuz Servers#can minecraft windows 10 play on servers#Minecraft 1.9 pvp servers#How to have install plugins for minecraft servers#How To Login Minecraft Servers#how to allow mini maps on minecraft servers
1 note
·
View note
Text
Unforgettable Experiences: Joining the Best Minecraft Servers
Minecraft, the beloved sandbox game, offers a vast array of multiplayer servers that provide unique and unforgettable experiences. These servers, created and managed by dedicated individuals and communities, offer a diverse range of gameplay modes, themes, and communities. Whether you're seeking thrilling adventures, creative building challenges, intense PvP battles, or friendly social interactions, the best Minecraft servers have something to offer for everyone. In this article, we will explore the world of unforgettable experiences by joining some of the best Minecraft servers available.
Hypixel: The Epitome of Minecraft Multiplayer
Hypixel stands tall as one of the most popular and renowned Minecraft servers. It offers a wide range of game modes, including competitive PvP battles like SkyWars and BedWars, immersive adventures in RPG-inspired settings, and innovative minigames that captivate players of all ages. With a massive player base, regular updates, and a vibrant community, Hypixel provides an unparalleled Minecraft multiplayer experience.
Hermitcraft: The Realm of Creative Collaboration
Hermitcraft is a highly regarded survival multiplayer server where a group of content creators and players collaboratively build and create in a shared world. Known for its impressive and intricate builds, Hermitcraft showcases the creativity, skill, and imagination of its players. With a focus on community-driven projects, challenges, and events, Hermitcraft offers an unforgettable experience for those who enjoy collaborating with others and pushing the boundaries of Minecraft building.
CubeCraft: A Hub of Fun and Innovation
CubeCraft is a prominent Minecraft server that excels in delivering diverse and innovative gameplay experiences. With a vast selection of custom mini-games and unique game modes, CubeCraft ensures that players are always entertained and engaged. From competitive PvP arenas to parkour challenges, CubeCraft offers a hub of fun and excitement for players seeking fast-paced and dynamic gameplay.
The Hive: Whimsical Adventures and Casual Fun
The Hive stands out as a server that focuses on providing whimsical adventures and casual gameplay experiences. With a delightful collection of mini-games, players can engage in block-shifting madness in BlockParty, test their parkour skills in DeathRun, or compete in thrilling hide-and-seek challenges. The Hive's emphasis on fun, friendliness, and inclusivity creates an inviting environment for players of all skill levels.
Wynncraft: A Sprawling RPG Adventure
Wynncraft is an exceptional Minecraft server that offers a sprawling RPG adventure within a custom-built world. Players embark on epic quests, explore captivating landscapes, and engage in intense battles. With a rich lore, unique classes, and a dedicated team of developers, Wynncraft provides an immersive and unforgettable roleplaying experience.
Why don't any survival minecraft servers have jetpacks?
Joining the best Minecraft servers opens the door to unforgettable experiences in the vast world of Minecraft multiplayer. Servers like Hypixel, Hermitcraft, CubeCraft, The Hive, and Wynncraft provide unique gameplay modes, creative collaboration, diverse mini-games, and immersive adventures. Whether you prefer intense PvP battles, creative building challenges, casual fun, or epic RPG quests, these servers offer unparalleled experiences for players of all backgrounds and interests. So, embark on your Minecraft multiplayer journey, explore the realms of these exceptional servers, and create memories that will last a lifetime.
#Minecraft 1.12.1 glitch where i can't join servers#What Is The Matter That We Can Not Connect Minecraft Servers#minecraft servers why timeout#how to change your ping on minecraft servers#how to add servers on minecraft windows 10 edition#minecraft servers 1.5.2 no login#Minecraft Best Servers Ever#what port does your computer use to connect to servers minecraft#how to play on servers have to get on servers on minecraft pocket edition#What Minecraft Servers Are The New Update
2 notes
·
View notes
Text
Begin Your Minecraft Journey: Free Download of Java Edition
Minecraft, the immensely popular sandbox game, has captivated the hearts of millions of players around the world. Known for its endless possibilities, immersive gameplay, and boundless creativity, Minecraft offers an extraordinary journey that allows players to shape and explore a unique virtual world. If you're eager to embark on your Minecraft adventure, the Java Edition is an excellent choice. In this article, we'll guide you through the process of obtaining the Java Edition for free and kickstarting your Minecraft journey.
- What is Minecraft Java Edition?
Minecraft Java Edition is the original version of Minecraft, designed for PC gaming. It offers the most extensive range of features, customizations, and community-created content. Java Edition has been the foundation of Minecraft's evolution and has a vibrant modding community, allowing players to enhance and personalize their gameplay experience.
- Check Your System Requirements:
Before downloading Minecraft Java Edition, ensure that your computer meets the necessary system requirements. The minimum requirements for Minecraft Java Edition include:
- Operating System: Windows 10, macOS, or Linux
- CPU: Intel Core i5 or AMD equivalent
- RAM: 8GB or more
- GPU: Integrated or dedicated GPU with OpenGL 4.4 support
- Storage: At least 4GB of available storage space
- Create a Mojang Account:
To download and play Minecraft Java Edition, you'll need a Mojang account. Visit the official Minecraft website at minecraft.net and click on the "Get Minecraft" button. You'll be directed to the account creation page. Provide the required information, including a valid email address, and set a secure password for your account.
- Verify Your Email:
After creating your Mojang account, you'll receive a verification email. Check your inbox and click on the verification link provided to complete the account setup process. This step is essential to ensure the security and integrity of your Minecraft Java Edition download.
- Claim Your Free Minecraft Java Edition:
Minecraft Java Edition is not available for free by default, but there is a way to obtain it at no cost. Minecraft Java Edition offers a free trial period that allows players to experience the game before making a purchase. During this trial, you can explore the Minecraft world and enjoy the full features of the Java Edition for a limited time.
To claim your free Minecraft Java Edition trial:
- Visit the Minecraft website and log in to your Mojang account.
- Navigate to the "Downloads" section and select "Minecraft: Java Edition."
- Click on the "Play Demo" button to start your free trial.
- Enjoy the Minecraft experience during the trial period and decide if you want to purchase the full version afterward.
- Purchase the Full Version:
Once you've had a taste of the Minecraft Java Edition trial and fallen in love with the game, you may want to consider purchasing the full version to unlock the complete Minecraft experience. The full version offers unlimited playtime and access to all the latest updates, features, and future content additions.
To purchase the full version of Minecraft Java Edition:
- Visit the Minecraft website and log in to your Mojang account.
- Navigate to the "Store" section and select "Minecraft: Java Edition."
- Choose the desired edition (individual or gift code) and proceed to the checkout.
- Complete the payment process using the available payment options.
- Once the purchase is confirmed, you'll receive a Minecraft Java Edition license key that you can use to activate and play the full version of the game.
- Download and Install Minecraft Java Edition:
With your Minecraft Java Edition license key in hand, you're ready to download and install the full version of the game. Follow these steps:
- Log in to your Mojang account on the Minecraft website.
- Navigate to the "Downloads" section and select "Minecraft: Java Edition."
- Click on the "Download" button to initiate the download process.
- Once the download is complete, run the Minecraft installer.
- Follow the on-screen prompts to install Minecraft Java Edition on your computer.
- Launch the game and log in using your Mojang account credentials.
- Begin your Minecraft journey in the immersive and creative world that awaits you.
Minecraft Java Edition offers an unparalleled Minecraft experience, allowing you to unleash your creativity, explore vast landscapes, and connect with a vibrant community of players and content creators. Downloading and starting your Minecraft journey with the Java Edition provides access to the rich history and vast possibilities that have made Minecraft a global phenomenon.
So, claim your free trial, dive into the world of Minecraft, and let your imagination run wild as you craft, mine, and build your way to countless adventures and unforgettable memories. The blocky universe of Minecraft awaits you, so don't miss out on the opportunity to begin your epic journey for free with Minecraft Java Edition.
Fun Bedrock Minecraft Servers
#Alice popkorn#alicepopkorn.de#Best servers for minecraft bedrock#Minecraft Servers Where You Can Eat Stone#im playing minecraft beta windows 10 and it wont let me into any servers what do i do#factions servers minecraft#Where in the .Minecraft file the list of servers is stored
1 note
·
View note
Note
headcanons for how Idia and Malleus play Minecraft?
~ Headcanons for twst characters playing Minecraft.
I was a little late, but here are the headcannons! :D
Also, a little friendly reminder that English is not My native language and if you find errors in the text, please write to me about it.
Another parts about :
Azul and Lilia!
Riddle and Leona!
Jade and Floyd!
[Idia]
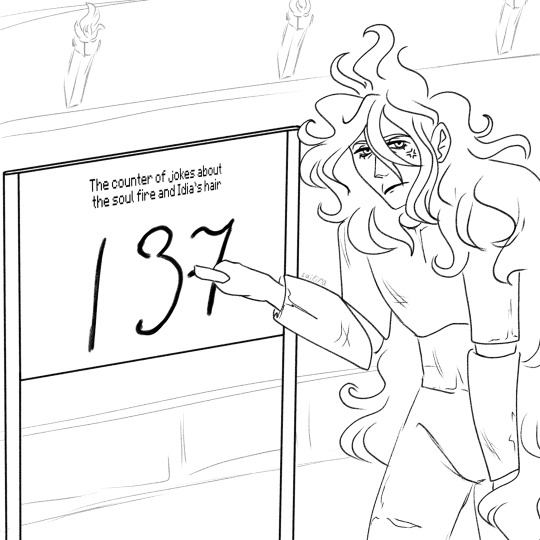
1) Absolute pro.
2) During the entire game, big bro has already set up His own server with tens of hundreds of buildings, houses and cities, on which all of Ignihyde plays...
But for you, beginners, He will of course make a new one.
3) Lives not in an ordinary house, but in a secret underground complex with hundreds of traps, secrets and secret passages. The entire dungeon is arranged quite professionally and beautifully, in a black and blue palette, using wool, clay, stone and several types of thin blocks and half-blocks, steps and other things. Instead of ordinary torches, he uses blue torches with soul fire.
4) He doesn’t trust his account to anyone except Ortho, but he tries to make sure that his beloved younger brother doesn’t waste any important resources or do anything unnecessary.
5) His favorite and least favorite location is Nether.
6) His base is guarded by three dogs with blue collars.
7) The same walking guide that explains to everyone and everything how to play and answers all kinds of questions.
8) The bro on the server has absolute power... After all, he is the admin here and the main expert in cheat codes.
9) Despite the fact that he feels much more confident in the square world, he still does not like to interact with other players and prefers to play alone. If there are too many players on the server, He either rushes to retire, or barely uses the microphone and hangs around somewhere in the corners.
He is most comfortable playing with Lilia, Ortho, Azul and possibly Yuu.
10) Keeps a joke counter when someone compares His hair to the blue soul fire (137)...
11) Loves block art and other buildings like statues of favorite anime characters.
12) Usually, he plays with a ton of shaders, mods and other additions, but since not all dorms are equipped with powerful hardware, like in Ignihyde, bro have to play with a minimum amount of additional details.
13) Knows all the cool bugs, recipes, theories and locations of Minecraft.
14) In one of the secret rooms he built a cemetery for His pets.
15) Of all the players, he comes to the server most often, and could have reached the dragon in one day, if not for Ortho’s gentle reminder that on a joint server you need to play TOGETHER.
16) His main fear is if His mother somehow logs onto the server.
17) Always swears at updates.
18) Sometimes he seriously thinks about buying the rights to the game...
19) Minecraft is my life!
20) MINECRAAAAAAAAAFT
(Insert audio from that screaming russian schoolboy meme)
[Malleus]

1) He doesn’t know what Minecraft is and when Yuu and Idia invite him to play (Invitation???? He’ll definitely join!), he asks Lilia what “Minecraft” is and what spell can He use to get into this mysterious world?
2) When he sits down at the computer for the first time, he falls into a crisis and looks at the square icon for a long time (3 hours), in sincere bewilderment.
Then he decides to try to figure it out on his own... And accidentally blows up the computer.
(Poor Lilia.)
4) FINALLY having figured out the controls on the phone (Still poor Lilia), he came onto the server and falls into a new crisis and shock from the appearance of the game...
"This is definitely... It will be interesting..."
5) Absolute noob. Bro sometimes even forgets that his character is weak and mortal. Several times, He simply walks into lava, forgets to eat, or swims in the water for a long time and is genuinely perplexed as to why his character is dying.
6) Tsunotaro's house is a simple wooden box made of dark oak logs, vines and flowers. There is no floor - only fragrant green grass. The windows are also missing and replaced with fences. Right at the doorstep is a garden with flowers, and on the roof there will be creepy, crooked figures made of blocks and half-blocks of stone and basalt (Gargoyles were planned).
Perhaps He will try in the future to rebuild the house into something more gothic, but Tsunotaro like architect, is like a Grim like nutritionist... Yuu is His most frequent guest and Draconia, according to all the rules of etiquette, tries to feed the visitor and force him to stay as a guest with Him, like a decent owner.... Oh, Yuu invites Him to visit...?
...He will definitely come and build Yuu a crooked gargoyle as a sign of gratitude... And I hope that a human child will be smart enough not to destroy His building...
.......No, I'm serious. Don't.
7) He doesn’t understand anything and either follows other players 24/7 or gets lost and Idia eventually finds him a couple hundred chunks away from the spawn location, trying to make friends with the bat.
8) Griefers? Who is this? Is there such a crazy person who would try to break down His house...?
9) Oddly enough, his main occupation is taming everyone he can. Cats? Parrots? Dogs? A whole farm with a variety of livestock from small to large? Two little slimes? Strange guy with white eyes behind the tree? Yuu? He will take care of everyone.... Rest assured)
+ Animals in this game do not age and cannot die unless you put them in danger, or play it safe and give them name tags....
10) The same guy whose game constantly crashes for some reason or whose microphone crashes.
11) Belongs to the type of people who can simply take and give another player either a beautiful, freshly picked flower, or incredibly rare and expensive armor or weapons, with several layers of enchantment, which He obtained from an unknown place and in an unknown way.
12) For a reason unknown to anyone, all mobs such as monsters, villagers and pillagers, except animals and children, bypass him.
13) Loves to wander through abandoned villages and mines.
14) In PVP he is not particularly smart and sticks with more neutral and calm players and rarely gets into fights with anyone... If at all anyone wants to fight with Him.
15) He dreams of building a GIANT Gargoyle, but so far, all he gets is another crooked, creepy pile of stones, only of larger sizes.
16) When he learns that the goal of the game is to kill the dragon and take It's egg, his reaction is literally: ....Mother?🤨
17) He doesn’t want to fight with His relative, and when Idia kills the dragon, he bursts into His room with lightning and thunder in order to interrogate the corpse of Gloomurai, which did not survive several heart attacks.
18) Tsunotaro took the egg for Himself and built a kind of temple for It (Surrounded by gargoyles, of course), and sincerely waited for it to hatch, until Lilia, who came to the rescue, said that this was not possible in the game.
19) Conclusion: One was disappointed because He could not atone for the brutally murdered dragon mother and raise Her child, and the second, although He laughed amicably, still grabbed a couple of Vietnamese (Briar Valley) flashbacks.
(Poor Malleus and Lilia)
20) Later, scared to death, Idia will install a mod especially for Tsunotaro that allows him to hatch and tame a dragon from the egg he received in The End 😊
(Poor Idia)
That's it! I am waiting for your new requests :3
Reblog Me, please? <:]
#art#мой арт#artists on tumblr#memes#twisted wonderland#twst#twst idia#idia shroud#twisted wonderland idia#malleus draconia#twst malleus#twisted wonderland malleus#malleus x reader#malleus x yuu#twst memes#minecraft#twst characters playing Minecraft#twst headcanons#headcanons#reblog me#request#funny#cute
188 notes
·
View notes
Note
24, 26, 37, 49
24. if we were together on a rooftop, what would we be doing?
I know kissing is like the correct answer, but if I am being honest I would be inching around the outside to see if there was a way down if there wasn't a window or something we could escape through.
26. a scenario that you’ve replayed multiple times?
Other than the standard cringe compilation that everyone has of themselves locked and loaded to be thought up without notice, I often think back to seeing you when you came to get me at the airport after me being masked up for over 14 hours straight, the relief of finally getting to take my mask off with my ears so sore and the devouring the wendys you got me because I hadn't eaten since the night before. Getting proposed to shortly after was also a nice touch on top of that emotional roller coaster of a day haha thanks for that! <3
37. someone in your life, other than a relative, you’ve known for 10+ years?
Sori my dear internet friend Sori :) He isn't on tumblr but we have been playing minecraft together on his server since I was in middle school. He has seen the worst of me and the best of me and yet he has not gotten rid of me lol. I watched him grow up and get married and have a kid and now I play minecraft with her too! A few years ago she really liked playing house so I made sure that all of my builds were extensively furnished and with lots of different rooms and she loved it so much. It influenced how I play minecraft even now :) I also think that me and @everysinglepheel have probably reached that 10 year mark by now!! Thank you for being my friend pheel you are the best!!
49. can you skip rocks?
I think maybe I got a three skip once. I never had a body of water and an adequate supply of flat rocks to practice but I think it would be a really neat trick to learn if I did!
#Thank you for the asks! :D#Even though you had to pick through and find the things you didnt already know haha
4 notes
·
View notes
Text
Getting Started: Downloading Minecraft for Beginners
Minecraft, the renowned sandbox game, has captured the hearts of millions of players worldwide with its endless possibilities for creativity and adventure. If you're new to Minecraft and eager to start your blocky journey, this article will guide you through the process of downloading Minecraft and help you embark on your first steps in this captivating virtual world.
- Minecraft Editions:
Before downloading Minecraft, it's important to understand the different editions available. The two primary editions are Minecraft Java Edition and Minecraft Bedrock Edition. Java Edition is the original version and offers the most extensive modding and customization options. Bedrock Edition, available on multiple platforms, offers cross-platform play and compatibility with consoles and mobile devices. Choose the edition that best suits your needs and platform.
- Minecraft Website:
To download Minecraft, visit the official Minecraft website (minecraft.net). On the homepage, you'll find information about the different editions and pricing options. Select the edition you prefer, and you'll be directed to the purchase page.
- Creating a Mojang Account:
To download and play Minecraft, you'll need to create a Mojang account. This account serves as your gateway to Minecraft and other Mojang games and services. On the purchase page, click on the "Create Account" button to begin the account creation process. Follow the instructions to provide the necessary information and create your Mojang account.
- Making the Purchase:
Once you've created your Mojang account, you can proceed with the purchase of Minecraft. Select the edition you want and follow the prompts to complete the transaction. The price may vary depending on your region and any ongoing promotions. Ensure you have a valid payment method available.
- Downloading Minecraft:
After purchasing Minecraft, you can proceed to download the game. On the purchase confirmation page, you'll find the download button for your specific edition. Click on the download button, and the game installation file will start downloading to your computer.
- Installing Minecraft:
Once the download is complete, locate the installation file on your computer. Double-click the file to start the installation process. Follow the on-screen instructions to install Minecraft on your computer. The installation process may vary depending on your operating system.
- Launching Minecraft:
Once the installation is complete, you're ready to launch Minecraft. Look for the Minecraft icon on your desktop or in your applications folder and double-click it. The game will launch, and you'll be greeted with the Minecraft launcher.
- Logging into Minecraft:
In the Minecraft launcher, enter your Mojang account credentials to log in. Once logged in, you'll have access to your Minecraft profile and preferences. The launcher also provides options for selecting game versions, installing mods, and accessing the Minecraft Marketplace (for Bedrock Edition).
- Singleplayer and Multiplayer:
After logging in, you have the choice of playing in singleplayer or multiplayer mode. In singleplayer mode, you'll embark on solo adventures, explore the Minecraft world, and build to your heart's content. In multiplayer mode, you can join servers, collaborate with friends or other players, and engage in various activities, such as mini-games or cooperative building projects.
- Begin Your Minecraft Adventure:
With Minecraft successfully installed and launched, you're ready to begin your Minecraft adventure. In singleplayer mode, start by creating a new world and exploring the vast landscapes, gathering resources, and building your first shelter. In multiplayer mode, find a server to join or invite friends to play together. The Minecraft world is yours to explore and shape as you please.
What Servers Are On Windows 10 On Minecraft
Remember, Minecraft is a game of discovery and learning. Take your time to experiment, follow tutorials, and engage with the vibrant Minecraft community to enhance your skills and knowledge.
Download and Unleash Your Creativity:
Downloading Minecraft is the first step toward a world of boundless creativity and adventure. Whether you're building grand structures, surviving in challenging environments, or collaborating with friends, Minecraft offers a captivating experience that will keep you engaged for hours on end. So, visit the official Minecraft website, select your preferred edition, create a Mojang account, and download Minecraft to begin your exciting journey in the blocky world of Minecraft.
#Oc Cities#OCCITIES.ORG#small survival servers minecraft 1.17#minecraft servers tlauncher#Minecraft servers how to determine corrupt chunks#hide and seek servers for minecraft pc#Minecraft pe prison servers 0.11.0
2 notes
·
View notes
Text
HEY HEY HEY!!
So!
Are you interested in joining a SMP but the ones you seem to be the ones for you end up being Java and you're unable to get it? Or maybe you do have Java but some things don't work out and you aren't able to join?
Well, regardless, we've got a SMP for Bedrock players! It does have limited space(at least for the first season) and is allow-list and invite only, but you can try your hand in luck and apply!
If you don't get accepted, don't get bummed out! There is plan for at least two(maybe three) seasons in which players will be accepted!
Here is the application form!
And if you're interested yet iffy, then consider reading below the cut!
Voidfall is a bedrock only SMP that's got plenty of lore opportunities. With 9 players* within the world of Voidfall, who knows what could happen?
If you're confused what bedrock edition is on:
-Windows 10/11
-Xbox One
-Xbox Series S/X
-Playstation 4/5
-Nintendo Switch
-iOS
-Android
-Windows Mobile
{If you play on a laptop:
Install an iOS or Android emulator(Smartface, Appetize.io, Corellium, Bluestacks, LDPlayer, Nox Player)
You can either use an APK(version 1.19) or pay from the play/app store!}
While there are 9 players within the world(for season one), there will only be 8 people accepted from the form. Don't get bummed out if you end up not getting in for this season! Who knows, maybe in the season that'll change!
With plenty of chances for exploration, building, lore, and excitement - you should consider applying! While the player count begins limited it doesn't mean you should turn away from the chance to make new friends!
And guess what! You don't need to publish anything on media if you're uncomfortable with that, if you don't like that idea, or if you're not able to for any reason! All that's asked of you is to record any lore that you do - for sake of the story making sense and for the sake or putting things together correctly.
None of your clips, recordings, or findings will be put out on the internet without your consent. The only thing of yours that will make it to the internet is your amazing character creating skills and your voice.
It'll be asked that you use VC if you're able to. It isn't directly required, but would be appreciated, especially during the opening of the SMP, server-wide lore moments, and whatever the closing of S1 may be.
Now, besides the obvious of Minecraft basics, lore chances, and possibility of friendship... what do we have to offer?
We have the offer of a safe space! You'll be allowed regardless of disorders, disabilities, sexuality, preferences, identity, etc! A safe community for amazing people!
Not only that, but we also offer the chance to step out of your comfort zone. If this is your first time being interested in a multiplayer server outside of your friend group, then we welcome you with open arms!
Whether this be your first SMP or not, we welcome you and invite you to apply to the Voidfall SMP! We'll be waiting!
#Voidfall SMP#Bedrock#Bedrock Edition#Minecraft#Minecraft Lore#Mineblr#Lore#OC Lore#Minecraft Bedrock#Minecraft SMP#Vanilla Minecraft#Video Games#Echo Post
2 notes
·
View notes
Text
How To Play Minecraft Java Edition With Friends (2022)
In Minecraft Java Edition, players can either jump into a world on their own and explore it, or they can join their friends in a multiplayer world and play together. Arkadne-igre From the very beginning, the popular sandbox game had an online experience where a player could join other players from around the world and play together.
Since then, the game and its online capabilities have expanded exponentially, and now, one of the best ways to play the game is through multiplayer. Players can either start in a plain world and build structures together, or join a pre-established world where thousands of other players join in and play all kinds of modded minigames. The multiplayer scene in Minecraft Java Edition is bigger than ever, and there are certain ways to play with friends and other players.
Ways to play Minecraft Java Edition with friends (2022)
If players want to join forces and explore the world of Minecraft with others, there are a few different ways to do it. The Bedrock Edition of the game has a straightforward approach to multiplayer as anyone can easily create a server world. However, this is slightly tricky in Java Edition. Mainly, there are three ways to play Minecraft online:
1) Pre-existing public servers
One of the easiest ways to play online with friends is by jumping into a pre-existing popular public server. Servers like Hypixel, Mineplex, Complex Gaming, etc. are filled with loads of players playing all kinds of minigames. These servers also offer players their own area to play the vanilla version of the game with other players. With this method, players don't have to worry about setting up a server. They can simply enter the server address in the multiplayer option of the game and enter the world to join their friends and other players.
2) Creating a Minecraft Java Edition server manually
This is one of the most difficult ways to play with friends in the game. Mojang offers players a way to create their own server using their PC and play with others. However, setting up the server can be tricky for most novice players. Setting up a server requires a Java file to be downloaded from the official site. If players are on a Windows PC, they will have to tinker with the path environment variable and then run the java file with a specific command in the command prompt.
The only plus point is that players will have their very own server world where they have full control and can play privately with other players.
3) Playing on Realms server
This is the easiest way to create a private server world in Java Edition. However, this method costs real money. Realms is a feature in the game through which players can pay a monthly subscription fee to Mojang in order to get a personal server world where they can play with friends. Here, players don't have to fiddle with complex commands and java files as the company will give them the server world. In one Realms world, a total of 10 players can join and play together.
The price to have Realms world is $7.99 per month. Hence, if players want a hassle-free private multiplayer experience, they can pay to get this feature in Minecraft Java Edition.
Additionally, there are several websites that offer free or subscription-based server worlds as well. However, players are strictly advised to not go to free server world websites as they can be malicious and dangerous. Players should stick to the established and trusted ways of creating a Minecraft server. Some websites might even be creating Minecraft servers illegally.
2 notes
·
View notes
Text
i think if you guys have a spare desktop laying around (unsure if this is something normal people have) u should try to install a beginner friendly linux distro and just play around with it..... ive had very minimal issues with kubuntu it runs smoother than windows 10 did on this old shitty pc... seems more lightweight super customizable & no annoying mandatory bloatware. im using it as a home media server now and maybe minecraft server if she can handle it but so far i havent run into anything i can't do. most of my steam games are compatible as well
0 notes
Text
The Front Preview (Steam Early Access)

For our The Front Preview, we play a survival open-world crafting shooter. We play the role of a resistance fighter sent back in time to stop the rise of a tyrannical empire. Collect resources, craft tech, build shelters, and fight monsters to accomplish our mission.
The Front Preview Pros:
- Decent high-quality graphics.
- 37.99GB Download size.
- Graphics settings - dynamic resolution, graphics preset, windowed mode, fps, shader effects, anti-aliasing, shadows, view distance, texture quality, visual effects, foliage quality, FSR, and gamma correction.
- Mouse and keyboard options - Invert axis and sensitivity sliders, the field of view slider, can remap controls, set aiming mode, advance mode, camera follow, and helicopter control styles.
- Streaming mode - profanity on/off.
- Server browsers are split into 3 types - Official, dedicated, and solo/hosted games.
- Create your own dedicated server with your own options for - name, password, player limit, survival mechanics, and how resources work. There is a lot to tweak.
- Solo/hosted also houses a crazy amount of settings just like the dedicated server. I mean you can edit jump height, exp rate, how much food will fill you up and so much more.
- Two modes of play - PvP and PvE.
- One main map with a second beta test version of a new map.
- Basic character creator - male/female, head, hairstyle, and hair color.
- Has Ark vibes for the game options, choosing a spawn point, etc.
- Open-world survival gameplay.
- Hunger, thirst, and stamina mechanics are in play by default.
- Punch and collect resources from the world.
- Full day and night cycle with different weather effects
- Earn exp from everything and unlock new quests, crafting, and more.
- Full crafting and recipe system.
- Play how you want but you do get quests to help keep you on track.
- On screen exp bar fills up as you earn exp.
- The ui can be tweaked to your liking but it's very clear and has a lot of trackers on it.
- All your hunger, thirst, health, etc is displayed in the corner.
- Compass helps navigate the world.
- The map lets you filter by points of interest, it fills in question marks as you explore and you can put your own markers down.
- Familiar controls.
- You can craft weapons and items to hunt the many animals.
- Massive tech tree that populates as you level up - basic, weapons, structures, vehicles, gear, supplies, and technology.
- Basic tools and weapons can be crafted in the inventory menu whilst bigger things require a crafting table.
- When starting out you have a protection status to help ease you in, after level 10 that's it you are all grown up!
- Just like Ark and Minecraft you hit trees, rocks, etc, and get the materials, different levels of tools change the speed and amount of materials you get.
- You can just hold down the action button for swinging axes and using weapons etc.
- There is AI in the game and they are usually hostile!
- Set more within the modern world with broken down cars, and settlements to find.
- By default when you die you drop everything in a crate and you can then try and get it back.
- Once dead you can respawn in a designated place or respawn where you died.
- Fantastic looking world.
- Very addictive for those who like to craft and explore.
- Territory flags help keep structures and items together but you can get raided in PvP.
- Weapons and tools degrade with use and eventually break.
- It does feel like a living world even in solo play.
- All the quests have progress numbers to help.
- Moving the mouse cursor on the map shows cos ordinates.
- You can fast-travel between your placed markers.
- Vehicles are a huge part and I mean you can build tanks! Or tractors, I mean you wanna eat.
- Traps can be for humans or animals.
- The base building is some of the best I've seen.
- It goes to the level of you can program doors to open, set up alarms and generators and so much more.
- Each time I advanced in the era of weapons and tools it felt like a whole new game and world again.
The Front Preview Cons:
- No controller support.
- Very daunting opening screens of menu options.
- No real tutorial as such and instead is just a load of quests and checklists.
- Very basic character creator and even calling it that is a stretch.
- So much to take in especially if this is your first foray into open-world survival games.
- Combat is very button-mashy.
- You can completely break the game with the settings.
- Takes a long time to get going in terms of base building and getting familiar with the combat.
- If you let it the game can just destroy your productivity in the real world.
- The animations of the Raiders and Ai is quite robotic.
- Animals don't move and react that well.
- A lot of the performance can be up and down.
- A big undertaking.
- Griefing can get out of hand quickly.
- Building and surviving on the PvP side of things is really tough.
- Few hit detection and building detection issues.
- The controls can be awkward and I mean more the ones where you have to hold a button to press a button.
Related Post: Truck Driver: The American Dream Video Review (PlayStation 5)
The Front:
Official website.
Developer: Samar Studio
Publisher: Samar Studio
Store Links -
Steam Early Access
Read the full article
1 note
·
View note
Text
Master the Art of Block-Building: How to Download Minecraft on PC
Minecraft, the beloved sandbox game developed by Mojang Studios, has taken the gaming world by storm with its endless possibilities and creative gameplay. If you're eager to dive into the blocky universe and unleash your imagination, downloading Minecraft on your PC is the first step. In this article, we'll guide you through the process of downloading Minecraft on PC, so you can master the art of block-building and embark on your own extraordinary adventures.
Step 1: Visit the Official Minecraft Website
To begin your journey, visit the official Minecraft website at www.minecraft.net. This is the official source for downloading Minecraft and ensures that you obtain a legitimate copy of the game.
Step 2: Choose the Edition
On the Minecraft website, you'll find different editions of the game. The two main editions are Minecraft Java Edition and Minecraft Bedrock Edition. Each edition has its own features and benefits, so choose the one that aligns with your preferences and requirements.
- Minecraft Java Edition: This edition offers the full Minecraft experience and is highly customizable. It allows you to install mods, resource packs, and play on community servers. Java Edition is recommended for players seeking advanced customization and modding capabilities.
- Minecraft Bedrock Edition: Formerly known as the Pocket Edition, Bedrock Edition is a cross-platform version of Minecraft that allows you to play on various devices, including Windows 10 PCs, consoles, and mobile devices. It offers cross-platform multiplayer and access to the Minecraft Marketplace for downloadable content.
Step 3: Create a Mojang Account
Before downloading Minecraft, you'll need to create a Mojang account. Click on the "Register" or "Sign Up" option on the Minecraft website to create your account. Provide the necessary information, including your email address, desired username, and password. Once you've filled in the required details, click on "Create Account" to proceed.
Step 4: Purchase Minecraft
After creating your Mojang account, log in to your account on the Minecraft website. Select the edition you wish to purchase, whether it's Minecraft Java Edition or Minecraft Bedrock Edition. Follow the prompts to complete your purchase. You'll be asked to choose a payment method and provide the necessary information to finalize the transaction.
Step 5: Download Minecraft Installer
how to change your nickname on minecraft servers
Once your purchase is complete, you'll have access to the Minecraft download page. Click on the download link provided to obtain the Minecraft installer file. Save the installer file to your preferred location on your PC.
Step 6: Install Minecraft
Locate the downloaded installer file on your PC. Double-click on the file to start the installation process. Follow the on-screen instructions to install Minecraft on your computer. The installation process may take a few minutes, depending on your system's speed.
Step 7: Launch Minecraft and Sign In
After the installation is complete, locate the Minecraft shortcut icon on your desktop or in the Start menu. Double-click on the icon to launch Minecraft. You'll be prompted to sign in using your Mojang account credentials.
Once you've signed in, you'll be greeted by the Minecraft main menu. From here, you can select your game mode, whether it's Survival, Creative, Adventure, or Spectator mode. Choose your desired mode and start your block-building adventure in the vast Minecraft world.
Immerse Yourself in the Blocky Universe:
Downloading Minecraft on your PC opens up a world of creativity, exploration, and endless possibilities. Whether you're crafting elaborate structures, embarking on thrilling quests, or collaborating with friends, Minecraft offers a truly immersive gaming experience.
Remember to check for updates regularly to ensure you have the latest version of the game, which includes new features, bug fixes, and improvements.
So, grab your pickaxe, gather your resources, and let your imagination run wild as you master the art of block-building in Minecraft. Whether you choose the Java Edition or Bedrock Edition, the PC version of Minecraft provides the perfect platform for you to unleash your creativity and embark on extraordinary adventures.
#why can't i add servers on minecraft ps4#Minecraft vanilla 1.8 servers#how to review servers on planet minecraft#How to grief minecraft servers#How do you beat us minecraft servers#minecraft faction servers mcmmo#Cool servers in minecraft pe#minecraft op factions servers#What Minecraft Servers Have Hunger Games#Minecraft server hosting
1 note
·
View note
Text
Building a Better Minecraft Experience: Your Server Setup Tutorial
Minecraft, the beloved sandbox game developed by Mojang Studios, offers a world of endless possibilities and creativity. While playing Minecraft solo can be enjoyable, creating your own Minecraft server opens up a realm of multiplayer adventures and collaborative building projects. Setting up a Minecraft server may seem daunting at first, but with the right guidance, you can build a better Minecraft experience for yourself and your friends. In this tutorial, we will walk you through the process of setting up your own Minecraft server, step by step.
Step 1: Choose Your Server Type
The first step is to determine the type of Minecraft server you want to create. There are two primary server types: Java Edition and Bedrock Edition. Java Edition is compatible with Windows, macOS, and Linux, while Bedrock Edition is compatible with Windows 10, consoles, and mobile devices. Select the edition that aligns with your preferences and the devices your friends will be using to join the server.
Step 2: Obtain the Server Software
To set up a Minecraft server, you will need the official Minecraft server software. Visit the official Minecraft website (minecraft.net) and navigate to the "Downloads" section. Look for the server software that corresponds to your chosen edition and operating system. Download the server software to your computer.
Step 3: Configure Server Settings
Before launching your Minecraft server, it's important to configure the server settings according to your preferences. Open the server software and locate the server.properties file. This file contains various settings that determine gameplay aspects such as difficulty, world size, and player limit. Customize these settings to create the desired multiplayer experience. You can also create a whitelist to control who can join the server or enable plugins to enhance gameplay.
Step 4: Port Forwarding and Network Configuration
For others to connect to your Minecraft server, you need to configure port forwarding on your router. Access your router's settings and forward the appropriate Minecraft server port (default is 25565) to your local IP address. This step ensures that incoming connections are directed to your Minecraft server. If you are unsure how to port forward, consult your router's documentation or contact your internet service provider for assistance.
Step 5: Start the Minecraft Server
With your server settings configured and port forwarding in place, it's time to start your Minecraft server. Open the server software and wait for it to initialize. You should see a console window displaying server information. Once the server is running, you and others can connect to it using the server's IP address and the Minecraft client.
Step 6: Invite Friends and Enjoy
Now that your Minecraft server is up and running, it's time to invite your friends to join the fun. Share the server's IP address with them, along with any necessary instructions for connecting. Collaborate on building projects, embark on multiplayer adventures, or simply enjoy the shared Minecraft experience with your friends.
Step 7: Maintain and Moderate
To ensure a smooth and enjoyable Minecraft server experience, it's important to maintain and moderate your server. Regularly update the server software to benefit from bug fixes and new features. Monitor player activity and address any issues or rule violations promptly. Engage with your community, listen to feedback, and make adjustments as necessary to create a thriving and inclusive server environment.
By following these steps, you can build a better Minecraft experience for yourself and your friends. Setting up your own Minecraft server opens up a world of collaborative possibilities, allowing you to create memorable adventures, unleash your creativity, and foster lasting friendships. So, gather your friends, embark on shared journeys, and let your Minecraft server become a haven of fun, creativity, and camaraderie.
886.lv
#what kind of servers are minecraft ran off of#What minecraft servers have i been on#how to hack minecraft 1.9 servers#Servers minecraft pe 0.13.0#minecraft java modded servers#Minecraft Pvp Practice Servers With Bots#How to stop lagging out on minecraft servers#how to get rid of connecting to servers in minecraft#best parkour servers minecraft java#Minecraft Bedrock Highschool Roleplay Servers
1 note
·
View note
Text
Minecraft Download: Enter a World of Endless Possibilities
Minecraft, the iconic sandbox game developed by Mojang, has taken the gaming world by storm with its pixelated charm and limitless creativity. With its open-ended gameplay and a world that stretches as far as the imagination can go, Minecraft offers players a truly unique and immersive experience. Whether you're a seasoned gamer or new to the world of virtual adventures, downloading Minecraft is your gateway to a world of endless possibilities. In this article, we will explore the process of downloading Minecraft and delve into the wonders that await you in this blocky universe.
- Visit the Official Minecraft Website:
To embark on your Minecraft journey, the first step is to visit the official Minecraft website at www.minecraft.net. This is the trusted source for downloading the game directly from the creators, ensuring a safe and authentic experience.
- Choose Your Minecraft Edition:
On the Minecraft website, you will find different editions of the game, including Minecraft Java Edition, Minecraft Bedrock Edition, and Minecraft Education Edition. Minecraft Java Edition is recommended for players on PC, offering extensive modding support, larger multiplayer communities, and a wide range of server customization options. Minecraft Bedrock Edition is designed for various platforms, including consoles, mobile devices, and Windows 10, allowing for cross-platform multiplayer. Minecraft Education Edition is tailored for educators and students, providing a learning-focused experience with educational tools and resources. Choose the edition that aligns with your platform and preferences.
- Create a Mojang Account:
Before downloading Minecraft, you will need to create a Mojang account. If you don't have one already, click on the "Register" or "Sign Up" button on the Minecraft website to create a new account. Fill in the required information, including a valid email address, and follow the prompts to complete the registration process. This account will be used to log in to Minecraft and access the game.
- Download Minecraft:
After creating your Mojang account, return to the Minecraft website and log in with your account credentials. From the main page, click on the "Get Minecraft" or "Buy Minecraft" button. On the following page, you will have the option to purchase Minecraft or download the demo version.
- Minecraft Demo Version: The demo version provides a limited experience of the game, allowing you to try out Minecraft's features and gameplay for free. Click on the "Try Minecraft for Free" or "Play the Demo" button to download and install the demo version on your computer. The demo version serves as a great starting point for newcomers to get a taste of Minecraft before committing to a purchase.
- Minecraft Java Edition: If you decide to purchase Minecraft Java Edition, click on the "Buy Minecraft" or "Get Java Edition" button. Follow the instructions and choose the appropriate operating system for your computer. After completing the purchase, you will be able to download the Minecraft Java Edition launcher.
- Install and Launch Minecraft:
Locate the downloaded Minecraft file, which is typically named "MinecraftLauncher.exe" or similar, and double-click on it to start the installation process. Follow the on-screen prompts to install Minecraft on your computer. Once the installation is complete, launch the Minecraft game by double-clicking on the Minecraft icon or finding it in your computer's applications or programs menu.
- Log In and Begin Your Adventure:
Upon launching Minecraft, you will be prompted to log in with your Mojang account credentials. Enter your username and password and click the "Log In" or "Play" button to proceed. After logging in, you can select a game mode, create a new world, or join existing servers to start your Minecraft adventure.
Minecraft is a game that knows no bounds, offering a world of endless possibilities. Minecraft servers with classes and races Whether you choose to embark on epic quests, build magnificent structures, explore diverse landscapes, or simply unleash your creativity, Minecraft is a canvas waiting to be painted with your imagination. By downloading Minecraft, you are opening the door to a universe where the only limit is your own creativity.
So, visit the official Minecraft website, create a Mojang account, download the game, and step into a world of infinite adventures and boundless potential. Get ready to dig, craft, and explore as you embrace the wonders of Minecraft and embark on a journey like no other. The blocky universe awaits your arrival.
#Minecraft servers to play#How to tell what version required for minecraft servers#Why does my connection to minecraft servers suddenly#survival servers minecraft java#Cracked minecraft servers 1.11#How To Get On Servers While Banned Minecraft#How to use mods in minecraft pmcpe in servers#commands for minecraft servers#What do i need to do to set up lan servers in minecraft#How to bypass anti cheat minecraft servers
1 note
·
View note
Text
Minecraft Download: PC vs. Console Editions
cottagecore minecraft servers
Minecraft, the popular sandbox game developed by Mojang Studios, offers players the opportunity to explore a vast virtual world and unleash their creativity. With its immense popularity, Minecraft is available on various platforms, including PC and consoles. In this article, we will compare the PC and console editions of Minecraft, exploring the differences and helping you decide which edition is the right choice for you.
PC Edition:
Minecraft Java Edition is the original and most feature-rich version of the game, specifically designed for PC players. Here are some key features and advantages of the PC edition:
- Customization and Mods: Minecraft Java Edition provides extensive customization options and supports a thriving modding community. Players can modify game mechanics, add new features, and even completely transform their Minecraft experience using mods. The ability to customize the game and access a wide range of mods allows for endless creativity and gameplay possibilities.
- Multiplayer and Dedicated Servers: PC players using Minecraft Java Edition have access to dedicated servers and a robust multiplayer community. These servers allow players to connect and collaborate with others, participate in mini-games, engage in PvP battles, and showcase their creations. The PC edition offers a vast multiplayer landscape with countless servers to choose from.
- Redstone Mechanics: Minecraft Java Edition offers more flexibility and complexity in redstone mechanics, allowing players to create intricate contraptions, automated farms, and complex circuitry systems. The redstone system in the PC edition offers advanced functionalities, making it an ideal choice for players interested in engineering and automation.
- Modding and Resource Packs: PC players can install and use a wide range of mods and resource packs to enhance their Minecraft experience. Mods offer new content, gameplay mechanics, and customization options, while resource packs allow players to change the game's visuals, textures, and sounds.
Console Edition:
Minecraft Console Edition refers to the versions of Minecraft available on popular gaming consoles, including Xbox, PlayStation, and Nintendo Switch. Here are some key features and advantages of the console editions:
- Ease of Use: Console editions of Minecraft offer a user-friendly and streamlined experience. The game is optimized for console controllers, allowing for comfortable gameplay on a big screen. The intuitive interface and simplified controls make it accessible for players of all ages and skill levels.
- Couch Co-op and Split-Screen Multiplayer: Console editions excel in local multiplayer experiences. Players can enjoy couch co-op by connecting multiple controllers to a console and playing together on a shared screen. Split-screen multiplayer allows friends and family to collaborate or compete within the same virtual world, fostering social interactions and cooperative gameplay.
- Cross-Platform Compatibility: Console editions of Minecraft also offer cross-platform compatibility to some extent. For example, the Bedrock Edition (available on Xbox, PlayStation, and Nintendo Switch) allows cross-play with other Bedrock Edition players on different platforms, such as Windows 10 and mobile devices.
- Console-Specific Features: Each console edition of Minecraft may have unique features and content tailored to that platform. For instance, console editions may have exclusive DLC packs, skins, or mini-games that are not available in the PC edition.
Choosing the Right Edition:
The choice between PC and console editions ultimately depends on your preferences, gaming setup, and desired gameplay experience. Consider the following factors:
- Customization and Modding: If you value extensive customization options and want access to a wide range of mods and resource packs, the PC edition is the way to go.
- Multiplayer and Community: PC edition offers a vibrant multiplayer community with dedicated servers, while console editions excel in local multiplayer experiences. Consider whether you prefer online multiplayer or couch co-op gameplay.
- Controller vs. Keyboard and Mouse: If you prefer playing with a controller and want the convenience of playing on a bigscreen, console editions are a better fit. PC edition offers the precision of keyboard and mouse controls.
- Cross-Platform Play: If you want to play Minecraft with friends on different platforms, consider the cross-platform compatibility offered by console editions, particularly the Bedrock Edition.
- Redstone and Technical Gameplay: PC edition provides more complex redstone mechanics and advanced technical possibilities for players interested in engineering and automation.
Both the PC and console editions of Minecraft offer unique advantages and cater to different preferences. The PC edition (Java Edition) provides extensive customization options, modding capabilities, and a vibrant multiplayer community. Console editions offer a user-friendly experience, local multiplayer options, and cross-platform compatibility to some extent. Consider your gaming setup, preferred playstyle, and desired features to determine which edition suits you best. Regardless of your choice, Minecraft's immersive world and endless possibilities await, allowing you to embark on exciting adventures and unleash your creativity.
#How to get free private servers on minecraft with commands#minecraft pe roleplay servers#How To Find What Servers Your Minecraft Account Has Been On#Minecraft 1.10 pvp servers#how to join minecraft bungeecord servers#Minecraft hangout servers#Best survival servers minecraft 1.16.4#Minecraft pve only servers#roleplaying servers for minecraft#how to make private servers on minecraft ps4 edition
1 note
·
View note
Text
Downloading Minecraft: Your Gateway to Endless Adventure and Creativity
best public minecraft servers
Minecraft, the beloved sandbox game developed by Mojang Studios, has captured the hearts of millions of players worldwide. With its vast open world, limitless creativity, and exciting gameplay, Minecraft offers an immersive experience that keeps players coming back for more. If you're ready to embark on an adventure of a lifetime and unleash your creativity, this article will guide you through the process of downloading Minecraft and set you on the path to endless possibilities.
Step 1: Visit the Official Minecraft Website
To begin your Minecraft journey, open your web browser and navigate to the official Minecraft website. You can easily find it by searching for "Minecraft official website" using any search engine. Once you're on the website, take a moment to explore the various editions available, such as Minecraft Java Edition and Minecraft Bedrock Edition, and choose the one that suits your preferences and platform.
Step 2: Choose Your Edition and Create an Account
On the Minecraft website, you'll find different editions of the game tailored for different platforms. Minecraft Java Edition is primarily for PC players and offers a wide range of mods and customization options. Minecraft Bedrock Edition, on the other hand, is designed for consoles, mobile devices, and Windows 10 PCs, and allows for cross-platform play. Select the edition that matches your platform and click on the appropriate option.
If you don't have an account already, you'll need to create one. Click on the "Sign up" or "Create account" button and follow the prompts to create a Mojang account. Provide the necessary information, such as your email address and desired password, and complete the registration process. Having a Mojang account will not only allow you to download Minecraft but also provide access to other Mojang games and services.
Step 3: Purchase Minecraft (If Required)
Depending on the edition you chose, you may need to purchase Minecraft before you can download it. Minecraft Java Edition requires a one-time purchase, while Minecraft Bedrock Edition may have different pricing options depending on your platform. Follow the instructions on the website to complete the purchase, ensuring that you have a valid payment method available.
Step 4: Download and Install Minecraft
After completing the purchase (if required), you'll be directed to the download page. Click on the download button for your chosen edition of Minecraft. The download process will begin, and the speed will depend on your internet connection. Once the download is complete, locate the downloaded file on your device.
For Minecraft Java Edition, the file will typically be an executable (.exe) file. Double-click on the file to launch the installer, and follow the on-screen instructions to install Minecraft on your PC. For Minecraft Bedrock Edition, the installation process may vary depending on your platform. Follow the platform-specific instructions provided on the download page to install the game.
Step 5: Launch Minecraft and Start Your Adventure
Once the installation is complete, you're ready to embark on your Minecraft adventure. Locate the Minecraft icon on your desktop or in your applications folder, depending on your operating system. Double-click on the icon to open Minecraft and log in using your Mojang account credentials. After logging in, you'll find yourself in the Minecraft main menu, where you can select and create new worlds, join multiplayer servers, or explore the endless possibilities that Minecraft has to offer.
Minecraft provides a unique blend of adventure, creativity, and endless exploration. Whether you're building towering structures, delving into treacherous dungeons, or discovering hidden treasures, Minecraft offers an experience that caters to all types of players. Additionally, the Minecraft community is vast and active, with countless player-created mods, resource packs, and custom maps that can further enhance your gameplay and introduce new challenges.
So, embrace the power of Minecraft and let your imagination run wild. Download the game, step into the blocky world, and embark on a journey that will keep you captivated for hours on end. Get ready to build, explore, and create in the realm of Minecraft, where adventure and creativity know no bounds!
#how to get less ping in minecraft servers#why do some minecraft pc servers not allow you to build on top of the nether#Minecraft servers make your own#why is minecraft not letting you on servers#What Are Faction Servers Minecraft#how to get other servers on minecraft pe#medieval minecraft modpack servers#Minecraft classic prison servers#Free servers for minecraft#ACTION SERVERS MINECRAFT
1 note
·
View note
Text
Setting Up a Minecraft Server: A Beginner's Guide
Minecraft, the immensely popular sandbox game, offers players the opportunity to create and explore their own virtual worlds. While playing on public servers can be fun, setting up your own Minecraft server provides greater control and customization options. If you're new to server setup, this beginner's guide will walk you through the process step by step, helping you create your own Minecraft server and invite your friends or community to join in on the fun.
Step 1: System Requirements
Before diving into the server setup process, ensure that your computer or hosting environment meets the necessary system requirements. Minecraft servers are not resource-intensive, but you'll need a computer with sufficient processing power and RAM to handle multiple players. At a minimum, aim for a dual-core processor and 4GB of RAM. A stable internet connection is also vital for a smooth multiplayer experience.
Step 2: Choose a Server Edition
Minecraft offers two primary server editions: Minecraft Java Edition and Minecraft Bedrock Edition. Java Edition is the original version, compatible with Windows, macOS, and Linux, and provides greater customization options through mods and plugins. Best 1.18 minecraft servers Bedrock Edition, on the other hand, is compatible with Windows 10, consoles, and mobile devices, allowing for cross-platform play. Consider your preferences and the platforms your intended players will be using when choosing the server edition.
Step 3: Download the Server Software
To set up your Minecraft server, you'll need to download the server software from the official Minecraft website. Visit minecraft.net and navigate to the "Downloads" section. Select the server edition you've chosen, and click on the download link to save the server software to your computer.
Step 4: Create a Server Folder
Create a dedicated folder on your computer where you'll store all the server files. Name it something easily recognizable, such as "Minecraft Server."
Step 5: Configure Server Settings
Open the server software file you downloaded earlier. This will generate the necessary server files within your server folder. Once the files have finished generating, locate the "server.properties" file in the server folder. Open this file with a text editor to configure the server settings. Customize options such as the server name, maximum number of players, difficulty level, and game mode according to your preferences.
Step 6: Port Forwarding (If Hosting Locally)
If you plan to host the server on your own computer, you'll need to configure port forwarding on your router. Port forwarding allows incoming connections from the internet to reach your Minecraft server. The process for port forwarding varies depending on your router model. Consult your router's documentation or visit portforward.com for specific instructions on how to configure port forwarding for Minecraft.
Step 7: Start the Server
With the server settings configured and port forwarding set up (if applicable), you're ready to start your Minecraft server. Double-click the server software file to launch the server. A console window will appear, and the server will begin loading. Once the server has finished loading, it's ready to accept player connections.
Step 8: Invite Players to Join
To invite players to join your Minecraft server, they'll need your public IP address (or domain if you have one) and the server port (default is 25565). Share this information with your friends or community members, and they can enter the server address in their Minecraft client to connect to your server.
Step 9: Customize and Manage Your Server
Congratulations! Your Minecraft server is up and running. Now you can customize and manage your server to suit your preferences. Explore additional features like mods, plugins, and server management tools to enhance your server's functionality. Consider installing popular server management plugins such as EssentialsX or LuckPerms to streamline administrative tasks and ensure a smooth player experience.
Setting up your own Minecraft server may seem daunting at first, but with this beginner's guide, you have the knowledge to create a customized multiplayer experience for you and your friends or community. Remember to check the system requirements, choose the appropriate server edition, configure the server settings, and set up port forwarding if hosting locally. With your Minecraft server up and running, you can invite others to join, explore endless possibilities, and create unforgettable adventures together. So, gather your friends, unleash your creativity, and embark on a Minecraft journey that's entirely your own. Happy building!
#Parkour servers minecraft 1.16.4#minecraft pc servers skyblock#Minecraft Kit Pvp Servers 1.8.9#How to join open minecraft servers#How do i make money with minecraft servers?#minecraft servers pe 0.11.1#More servers for minecraft pe#1.16 minecraft servers#how to join minecraft servers on xbox 360#Need staff minecraft servers
1 note
·
View note
Last Seen Blogs