#the background is a texture filter
Text
Can they find peace in the aftermath?
More importantly will she ever wake up, and take control — will he finally rest?
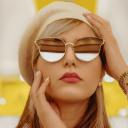
#Dream-Leapers are born#not made#until her#her dream leaper form is very much different from her human form#and as the years go on#the question stands#can she even remember what it is to be human?#digital artist#digital art#beginner artist#the background is a texture filter#from avatan bc i was too lazy to actually do anything with it#avatan>>>picsart
0 notes
Text


Took a shot at that style thing mmmm
#rain world#rw spoilers#five pebbles#rw survivor#i think i'd need to define the details/shading/textures on the cutscene ones more to fit the style better#at least the pebbles one lol. I did that one first#but it's alright for now#i need to explore my main art program's capacity for brushes and textures more#(it's paint tool sai 2)#it's all a bunch of settings instead of nice brushes you can just import#and is overall just... more limited imo#i wish it was like more like csp or photoshop in that respect#i have to port files over to those to do more heavy-duty backgrounds#or use filters more advanced than gaussian blur. -_-#oh yeah also. i was basing “cutscene” off of vanilla style#and since pebbles only has like one distant picture there#i reffed off moon more for him#i could nitpick at this for hours tbh#art#flickerdoodles
247 notes
·
View notes
Text

look at them having a completely normal non-manipulative friendship what good friends they all are. look at those happy smiles and ignore the red lines im sure the red has no symbolism at all hahaha
#mishapen draws#qsmp#jaiden fanart#took a few days to figure out exactly what i wanted to do with this and im really happy with where it turned out :]#i normally dont put so much effort into a piece but i wanted a cool new banner#my fave detail is absolutely the little bits of red though#if you look very closely there's a little bit of red in the cucus smiles and eyes#(and a little bit of red on the arm behind cucurucho's back- hiding evidence)#and the red that emphasizes jaiden's smile is extra bright red#enjoy the island etc etc#i dont normally use texture backgrounds or leaf brushes but i totally get why people do holy crap they're SICK#the perfect lil bit of background noise hehe#i had a lot of trouble with the colours until i put a greyscale filter on everything and realized that jaiden's values blended her into#the bg. it got a whole lot easier when i paused to figure out the values and then added the colour#overall i think im happiest with jaiden's face though she just. she looks so happy#but that fucking red.....#okay tag ramble over godspeed nerds remember that if your colours look fucked up you may just need to experiment with the values
236 notes
·
View notes
Text

The Chase
#rain world#my art#rain world art#rain world fanart#rain world vulture#rainworld#rainworld art#digital art#art#rw#rw art#gggggg tagging is my least favorite part >.<#for this one i was mainly trying to do a wacky perspective#and im pretty happy with it!#theres also a white lizard hidden in the upper right :D#only thing im a bit :l about is the texturing on the background and objects#i kinda got lazy there so its looks a bit plain#luckily unsharp mask and my color filters came to my rescue!
97 notes
·
View notes
Text
A vast collection of unique and very easy-to-use Photoshop Effects.
Available now at ⚡mockupcloud.com
#mockup#branding#psd#template#showcase#mockupcloud#brand#stationery#inspiration#download#filter#effect#photoshop#graphics#graphic#assets#typography#background#retro#overlay#texture
7 notes
·
View notes
Note
could i ask what program you use? your art is so gorgeous!
Yes, certainly! And thank you very much!
For pixel art, I use Medibang Paint to draw/color. I just turn of anti-aliasing and use the normal pen brush with pressure (usually 1.5px for line art and 4 or 5px for coloring). Only reason I use it is cause it's pretty hassle free and straightforward. I find it awful to use for actual painting though.
For "painterly" pieces, I used to use Procreate, and now I use Infinite Painter (I sold my iPad and got a Tab S7+, I like it a lot better). The two programs are extremely similar, though infinite painter has nicer hand gestures. I just use a pencil or pen brush for line art, and a square-ish brush for painting. Sometimes I use the "blend" setting on the paint brush, sometimes not. (I know you didn't ask, but a matte screen protector and metal pen tip feel incredibly nice to draw with!)
After the drawing is done, I edit it using Snapseed. I think balancing light/colours after drawing sometimes makes a huge difference in making a dull picture look way nicer. Because I'm indecisive, I often make a few versions and do another pass over in medibang/infinite painter, and then post whichever version I'm feeling after!
#Sometimes I photobash the backgrounds using any program then filter/edit/modify it and paint over it. It helps add details/noise that I like#The photos kind of give an idea of the space and add texture that I have a hard time painting manually! The collages are quite messy though#I'm not formally trained and don't consider myself a professional#The actual process of drawing is pretty random every time and I kind of just wing a lot of stuff :P
21 notes
·
View notes
Text
Another quick drawing from last night
#keese draws#eternal gales#oc posting#oc#ocs#oc art#experimented a lil bit with giving her some more visible dark fur#I think I like it but Im gonna have to draw her a few more times to make sure I think#my main concern is that it might make her look a lil too similar to mason pattern wise#which is already smth Ive struggled with in the past lol#also yeah I <3 using brushes incorrectly#idc what the creators of any given brush intended if I can use it for funky lineart I Will use it for lineart#also yeah Ive been grabbing a bunch of free brush packs lately so thats why Im actually drawing shit again lol#tbf the glory drawing was me wanting to use a base procreate brush Ive been meaning to mess around with but I used some texture brushes too#with all my new texture brushes making bullshit backgrounds will be a breeze 👍#oh also Ive been trying to use those dumb layer filter mode thingies for the first time lately with my shading#idk how Im feeling abt them tho tbh multiply is nice ig but I kind of dont like how it dulls out the colors sometimes#like I know it makes the shading more coherent but idk sometimes I like the more grading shading#idk can yall even tell the different dndmdkdndh#I might just be being too picky with my colors or smth I always tend to assume the worst abt my colors#anyways sceduled and now eepy time from the past and good morning future me
11 notes
·
View notes
Text
Did you know? Or did you forget? You can do whatever you want with your art. Put random scribbles wherever. Horizontal lines over your character. Add dots everywhere and on everything. Draw eyes different than the rest of the face. Change art styles halfway through. Cut and glue paper cutouts. Use paints and markers together. Use all the filters. Use photos on top to add texture.
You can do what you want. Like literally literally literally.
Add a rubber ducky in the corner for no reason, put text in different languages on the background, leave your handprints or wipe your fingers on the paper.
Go have fun now this stuff isn't meant to be stressful for you
#artist on tumblr#artist inspiration#Artblr#Artist motivation#Recovery#Art#Digital art#Traditional art#Mod talks#Art help
23K notes
·
View notes
Text
One day I'll finally get into digital art enough to be okay at it and I'll post my first digital drawing of a person online and someone will have the nerve to be like "That's not real art!!! Look at how fucked up the hands are!! Wow I can't believe people are trying to fake artistic talent online," and they simply will not believe that I just suck at hands and I'll be dragged online. And that will be the day that I actually do my homework for AP Bio.
#this post is way longer than I wanted it to be so sorry about that#those packets are going to kill me#literally whose idea was it to let sophomores take AP classes#ai art#i hate ai art#also the hands aren't even the best way to tell the difference its the backgrounds#also in AI art everything has the same texture and it kinds looks painted but like they just put a filter over it not like a real painting#nova's clownposts#text post
0 notes
Text
Here are some of process snapshots of this piece of Astarion in Baldur's Gate.

I am a messy painter and I often adjust and change the designs as I paint. (Mostly because I don't have the patience to do proper line art haha)
I start out with a rough sketch, I usually sketch ideas out on my ipad and move to my cintiq to work with colors.

Next I block in rough color thumbnail. I keep this part messy as I just want to figure out the value structure and the overall mood.
At this point, I have collected a myriad of screenshots and reference images from the game, pinterest, and also from artists work that inspires me.
With the references on one screen, I start to paint the details, I work from foreground to midground to background. (Sometimes I'll bounce between the depth when I get bored from painting one thing for too long)
Sometimes after I block in the colors I'll make adjustments. I didn't like how warped the perspective was getting on the building on the screen right side, so I adjusted the vanishing point and added more tiers to the design. I went back into the game and looked at more how the stairs were designed and figured it out more thoroughly with a sketch on on top.
I think sitting down and doing the details is the most time consuming part. I still want the focus to be on the character despite all the detail going on the background. At this point I'm toggling on black & white filters constantly to check the value, grouping everything in the background together, making sure the lighting frames the subject in focus. At this point I realized, I forgot to paint Astarion's hair LOL, and that the bg was getting a bit too detailed, so I used a more textured brush and painted away some of the edge details of bg buildings.

Last, I make final adjustments, and I make a overall lighting/fx adjustment folder. Adding in some noise, adjusting the contrast, color balance, and lighting over all and call it done!
Link to Print shop!
#astarion#astarionfanart#bg3#baldurs gate astarion#baldur's gate 3#artprocesses#art tutorial#astarionpainting#bg3art#bg3fanart#art process#artists on tumblr
8K notes
·
View notes
Text
dome sweet dome
As some of you may know, I have been going to language school for the last few months in order to learn the world's most widely spoken and useful language: Slovenian. At this point, my Slovenian is about as coherent as, well, a McMansion. In order to feel better about myself, I have sought out a McMansion that is worse than my cases and word-order. This house (in Naperville, IL, of course) does, in fact, make me feel better, but will probably make you feel worse:
This Cheescake Factory house, built in 2005, boasts 5 bedrooms, 8.5 bathrooms and can be yours for the entirely reasonable sum of $3.5 million dollars. Also for some reason all the photos look like they are retouched with 2012-era Instagram filters.

First of all, trying to visualize the floor plan of this house is like trying to rotate seven cubes individually in my mind's eye. Second, if you stand right beneath the hole in the ceiling you can get the approximate sensation of being a cartoon character who has just instantaneously fallen in love.
Even if this was a relatively mundane McMansion it still would have made it into the rotation because of the creepy life-sized butler and maid. Would not want to run into them in the middle of the night.

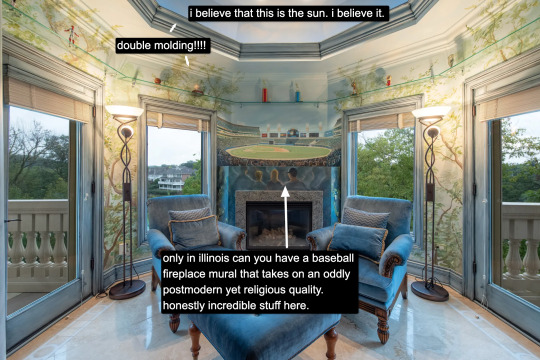
The mural is giving 1986 Laura Ashley or perhaps maybe the background they use for Cabbage Patch Kids packaging but the floor? The floor is giving Runescape texture.
Have you ever seen so many real plants in your life? A veritable Eden.

The overwhelming desire to push one of the chairs into the haunted jacuzzi...but in reality they probably put those chairs there to keep from accidentally falling into the tub at night.
(elevator music starts playing)
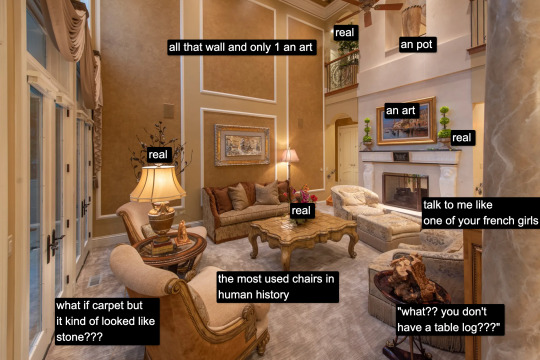
This is one of the all time [adjective] rooms of McMansion Hell. I personally am in love with it, though I don't think I understand it. Perhaps it is not meant to be understood.....,

Continuing with the baseball theme, the guy in the painting looks how I feel after it's been raining in Ljubljana for two straight weeks. (Not ideal!!)
And finally:
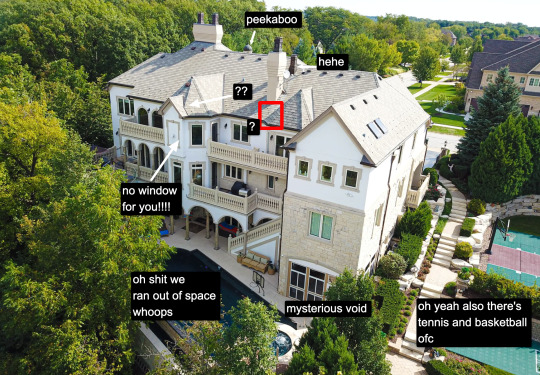
We love a house that has four unused balconies and also a sporting grounds that is large enough to build a whole second McMansion on top of. Everyone should so value their health.
Thank you for tuning into another edition of McMansion Hell. Be sure to check out the Patreon for the two bonus posts (a McMansion and the Good House) which both also go out today!
If you like this post and want more like it, support McMansion Hell on Patreon for as little as $1/month for access to great bonus content including a discord server, extra posts, and livestreams.
Not into recurring payments? Try the tip jar, because media work is especially recession-vulnerable.
#architecture#design#mcmansion#mcmansions#interior design#2000s design#illinois#2005#bad architecture#ugly houses#2000s core
5K notes
·
View notes
Text
The Rising Signs’ 🦢
In The Signs Series™

ARIES RISING
Looks tense like somebody just said something stupid. A lot of them have a widows peak or just a very square hairline to draw attention to their head. The hairline can sometimes be so good it looks like they are wearing a wig, and not only in the forhead but the whole hairline even behind the ears looks super good. They can have a high forhead like Rihanna whos an Aries Rising. There tend to be a ”bitchiness” to them but at the same time they got this innocence to them. Some of them have a babyface while some of them have a more sharp and angular look. Men with this rising sign can have hairline shaped like an M. Might also start to bald early. Some of them might have red tints to their hair or beard and freckles are also common(depends on cultural background tho) Might have oily skin or very ”leather” like texture to the skin. These peoples hair is usually very prominent which is who they can easily be mistaken for a Leo Rising. If they have a lot of Mars squares in their chart they can be very confrontational with a lack of filter. They look very good in anything sporty and tight. These people might have people wanting beef with them because they can come across as cocky or rude when they are not. There is something very respectable with them especially when they have a Capricorn Midheaven. Like you really want them to like you. They also have the most gorgeous eyebrows and face shapes. There is this ”Since nobody else will, I will do it.” They are the ones who might stand up for someone when nobody else does. The real go getters. Unfortunately might be involved in a relationship where they have to do anything because people expect them to.
TAURUS RISING
A lot of Taurus Risings have the Taylor Lautner look with the smaller eyes and short nose, very ”cute” but there is also the Taurus Risings with the longer look like Jake Paul and Robert Pattinsson with the prominent long chin and the small ears. The longer types are usually skinnier with a longer nose while the short nose ones are usually heavier built. If the Ascendant is conjunct fixed star Algol the look can be very intimidating and the person might be more aggressive in both appearance and behaviour like Conor McGregor whos a Taurus Rising. The women with this Rising are very often praised for their good looks like Halle Berry. They have the that calm feminine aura to them. There is a strength to Taurus Risings in a way that they look very kind but at the same time you can see that there is a raging bull inside of them ready to put someone in their place. For example Snoop Dogg whos a Taurus Rising, super kind and funny but very quick to show it of he find an interviewer or fan annoying. These people can have a skin thats completely flawless. They usually have extremely even skintone. They can also have those super small pointy ears. A lot of Taurus Rising look curvy even if they are skinny and if Lilith is on the Ascendant the curves can be very pronounced for example Megan The Stallon. There is always something about the nose that stands out and a lot of them might want to highlight it by having a nose ring. The neck can be very thick and short or super slim and long and they like to show the neck of by wearing a chain. Taurus Rising is found in a lot of criminals especially when it conjunct the violent star Algol.
GEMINI RISING
There can be a roundedness to their features but still pointy? Look at Pamela Anderson and Jessica Biel for example they are both Gemini Risings, very round but still pointy. Can have a cleft chin or a cleft on the nose to show ”hey im parted” or a mole on only one side of the face but very close to the middle of the face to show ”here is where the other side of be begins”. The mouth can be very shapely and while closed might give of the look of an M. Like the opening of the mouth is shaped like that when the mouth is closed instead of just being one straight line. Might remind you of a bird in some way. Some of them stand and walk with their feet pointing outwards like a bird. The upper body can sometimes be larger than the lower body and legs. The nosestrils might not be visible unless you are standing below them. Might color their hair or change hairstyles very often. The Gemini Risings with a longer face usually have a slightly bigger nose like Lady Gaga and Amy Winehouse who are both Gemini Risings. Gemini Risings from a cultural background where big noses/roman noses are not common usually have a rounder face shape with a very ”bent” nose instead. A lot of them have this slightly sneaky look like Drew Barrymore like they just did something very naughty. A lot of them have a signature hairstyle or signature makeup look that makes it easy to know its them. Like Pamela Anderson and her messy bun. If someone said ”paint this person” its easy to paint them and everyone will know who it is. They look good in parted hairstyles and midpart to show that there is two sides to them.
CANCER RISING
Very glossy hair, can look veeeery kind just like pisces rising. Some of them look ”wet” like super hydrated. The iris of the eye is close to the inner corner of the eye. There are two types of Cancer Risings: 1. The ones with the more round face, usually lighter skintone than other family members no matter cultural background, smaller facial features, sneaky eyes, shorter hair, curvy. And type 2. Skinny, darker skin than others from the same ethnicity, longer hair, longer face and big forhead, a longer nose and sometimes a roman nose. Larger eyes than the round faced Cancer Risings. The Cancer Risings with the long face are usually less shy and can be very outgoing while the roundfaced Cancer Risings usually have a more shy personality and they are also more calm personality wise. Type 2 are usually very funny and seem to smile more than type 1. Cancer Risings also have a special relationship to children. They are warm people and when they form connections they want it to last for life. These people can suffer from some very intense moodswings tho. Cancer Rising men come in the same 2 different types too but here the round faced ones are often the more outgoing ones while the longer face ones are less social. Cancer Rising men can often have a M shaped hairline with a very defined widowspeak. The eyes can sometimes bulge out. The round faced Cancer Rising men are usually very into fitness and might have a very defined jawline. There can be some intense issues with masculinity and self esteem in these men since at an early age they knew they were sensitive which was not considered ”manly”. Some of them seek out a mother/father figure in their relationships.
LEO RISING
These people are very confident and might even come across as bitchy. They come in two similar types as Cancer Rising, Selena Gomez obviously being type 1. They take a lot of pride in their hair. Some of these people might have hair so long it touches their butt, but there are also Leo Risings who rock the shorter hair, for example Tina Turner. The Leo Risings with shorter hair might have thicker hair from what Ive noticed. They can have a feline look to them and some of them can have this cute cozy look like Selena Gomez. If afflicted the ego become a real issue here and they might start to compare themselves with everyone around them which can make others back off from them. Men with this rising sign might want to have long hair and you can often see them with a bun. These people love to be seen and might start acting weird when focus is not on them. They love to show off and they love the feeling of being the center of attention. When younger they might be loud or even annoying to get this attention but Ive also seen a lot of very shy Leo Rising. There are a lot of ”cat” looking Leo Risings like Emma Stone with the cat eyes and wider face and prominent cheekbones, but not all of them got that feline look. Jessica Alba for example does not look feline at all and shes a Leo Rising. They love fashion since its their way of expressing themselves and they absolutely love looking good. A lot of them love leopard print. They absolutely love brand name clothes and anything quality since they are a fixed sign. They look sooo good in sunglasses, orange, gold and beige.
VIRGO RISING
Think DOLL. There is a perfection to these people that can be almost creepy. I have a Virgo rising friend and I swear that every single hairstrand on her head is the exact same length. Her hairline is so perfect it almost look like she shaved it. These people are youthful but not in a childish way. The skin can be very perfect too. They are very refined almost to the point you feel ashamed cursing infront of them. Very well groomed. They are ethereal just like their sister sign. Their shyness will often be mistaken for being snobby or arrogant tho. This is something ive noticed with a lot of Virgo Risings, being accused of being arrogant. Some of them are tho since Virgo is a very picky and judgmental sign but most times they are just shy. Their personality infront of people they feel safe with and people they dont differs a lot. There is a charming quality to their mouth and to the way they speak. A lot of them prefer a more natural look and might look better without makeup than with it. There is a ”perfection” here that is impossible to copy. No matter what they wear it looks neat and tidy. They usually have sensitive stomachs so they have to be careful what they eat and ofc they are. They look smart and the eyes can be penetrating but not in the same way as scorpio risings. They dont have that ”I will expose you look” like scorpio risings have they have more of a ”I know what you are doing but I feel bad for you” look. They need to be careful not to be too perfectionistic and picky tho since this can have a very negative effect on their self esteem. There is very often a huge issue with the self esteem with this rising sign. These people might not be approached often because they look ”out of your league”. The head is often diamondshaped.
LIBRA RISING
Looks like they thought of every detail. Not a hair out of place. Ive seen a lot of Libra Risings and they all looked so different tl eachother. I think Libra Rising is the rising sign most affected by their chart ruler sign because they all looked like that sign. But they all had söme things in common and that was flawless skin, symmetric face, nice body with evenly distributed fat. They were also friendly and polite. They spend a lot of time perfecting themselves because these people care a lot about how they are seen. When you see someone and you instantly see think ”that probably took a long time” then most likely a Libra Rising. They know their flaws and they know what their best features are. These people are born stylists. Knowing what need to be hidden and what to highlight comes naturally for them. Not all Libra Risings care this much about appearance tho. And its not always about them being vain, its just that looking presentable is important for them because they are the socializers and they just want to look nice. For them its a sign of respect too. They would never show up at your party underdressed because for them thats disrespectful to YOU. So its not only about themselves. A lot of them have a strong cupid bow and their mouth might even be shaped lile a heart. The outside corners of the mouth are always pointed upwards making them look like they are always smiling. This makes them seem very friendly and makes people approach them easily because you can see that this person wont diss you. Them being so approachable blesses them with a lot of social contacts. They might have dimples either on the lower back or on their face. They can also have a mouth thats always slightly open.
SCORPIO RISING
A lot of teeth showing when they talk, almost looks like they are talking with their teeth, gummy smile and sometimes vampire teeth. Can look very different from other family members for example light skin that cant tan while living in a warm country or dark skin while rest of the family is pale and living in a cold country. Remember that pluto rules being the black sheep of the family so this rising have a high possibility of looking different than other family members. Eyes are impossible to miss because they can be very small or very big. Usually framed by a shadow or darker pigment around the eyes, like they were born with eyeshadow. The scorpio risings with the smaller eyes usually have extremely arched eyebrows and a pointy small nose while the ones with the larger eyes have less arched brows and instead usually have a rounder nose OR a roman nose. There is also the scorpio risings with a more square face and square shaped nose. Some of them have a protruding brow bone giving them a predatory look and adds to the shadow around their eyes. The guys can have a prominent, low hairline and sometimes it almost look like the hair is a helmet. Can also have very pointy ears. Moles and beautymarks. Very good at talking with their eyes. They like to watch people and especially people who they are intimidated by. They cant hide envy, their eyes turn all reptilian when they envy someone. Good at having a conversation without revealing anything about themselves. You talk to them for 2 hours only to leave without knowing anything. Might smile without saying a word when you talk to them, making the conversation uncomfortable.
SAGITTARIUS RISING
There is always something with the walk here. The walk might be extremely attractive and model like or they can be super clumsy, or both. These people will definitely have others noticing them because of how they walk. They are naturally funny without trying. They might look super tall from far away even if they are short because their legs are usually longer than their upper body. They can have a horse like look to them like Kim K. With a longer prominent nose and a oval face. But there is also Sag Risings with a more round or even square face. The Sag Risings with the round or square face usually have a wider forhead and smaller nose. The butt and breasts might be very pronounced and protruding here making them look curvy even if they are not. Might have a protruding belly. The smile will be one of their best qualities. They might walk a lot or just be outside all the time. These are the kind of people who are almost never home. Gen Z Sag Risings might be very different tho since a lot of them have Pluto in the 1st house. These people can be very reckless and sometimes dont think about consequences. They come across as super friendly and have an easy when it comes to interacting with people. These people can be extremely popular especially if mixed with a strong Venus influence. A lot of the most popular people in the world got this rising sign like Princess Diana, Bob Marley, Elizabeth Taylor, Kim K. They just attract attention wherever they go.
CAPRICORN RISING
The arch of the eyebrow starts at the very end of the eyebrow. Looks like they hade work done. Could get wrinkles and grey hair early or have no wrinkles at all at 70, usually one or the other. The hairline on the side can be close to their eyebrows. Looks like they are squinting their eyes to see you better. They usually dont like people who act innapropriately in public and they will show it. Very well mannered and aware of social codes. They care a lot about who they are seen with in public. Very scared of public humiliation. Can look very tired. Might come across as rude. The hair is usually gorgeous and very thicker than others from the same cultural background. Can have a very prominent t-zone. Might have a bigger chin or just very prominent shape. They can also have creases on the sides of their mouth instead of dimples or hollow cheeks. The cheekbones are prominent and high. They look aristocratic. Some of them have very small ears with a pointy top. They can be very petite and have a thigh gap. The teeth will also be prominent and might even protrude making it hard for them to close their mouth completely. Their face change a lot until they reach their 20s thats when they start to grow into their looks(this does not mean they didnt look good before tho). A lot of them experience skin issues but since Saturn rules ”You reap what you sow” they have the possibilty to have really good skin if they take care of it well. The younger years are usually difficult and they might suffer a lot with their self esteem. The best part of their life starts after their Saturn Return. The corners of the mouth usually point downward making them look less approachable but also makes them look serious. They look like they are someone important.
AQUARIUS RISING
These people always have striking eyes. They look tall even if they are short because the limbs are usually long. They can have some very uncommon physical features like super light blue eyes with darker skin tone while everyone else in their family is light, or jet black hair mixed with super pale skin making them look like they colored their hair. Might be hard to guess which country they are from. Some of them can have such a unique look to their eyes that you think they are wearing contacts. Definitely striking. Some of them have a very long chin. The hair have a tendency to stand right up even if they have straight hair almost like they were electrocuted. They can have a very shocking style and they usually have their own look like Nicki Minaj for example with her bangs and pink hair. They look so good in neon colors. Some of them have a shocked expression like Jared Leto. Something about the body language, way of talking or way of thinking might be considered unique and people easily become fascinated by them. The eyes can also be downturned at the outer corners. They could be asked where they are from a lot just like Sag Rising. They are usually popular because they are social and easily gets to know new people. They have this friendly ”I know everyone” aura mixed with their down to earthness just look at Barack Obama. They can have an interesting mix of sharp and soft. The cheeks might be shubby paired with a pointy nose or slim and bony faced with a very rounded button nose. Some of them have a baby face. They might be taller than average or shorter than average.
PISCES RISING
These people have a vulnerability to them. They might look sad or tired. They might have the bedroom eyes like Marilyn Monroe who had Neptune in the 1st house. The lips and eyes are their strongest features. Some of them could even be accused of being on drugs, look at Billie Eilish and you know what I mean. They can look unreal because they have this Disney Princess look sitt the glossy eyes and helpess expression. Some of them even have the baby voice to go with the look. A lot of them look younger than they are and can have that little babydoll look like Barbara Palvin. People might overshare to them a lot. They look much more innocent than what they actually are and people might be disappointed when they find out they were not that helpless damsel in distress. There is usually rumours about them because people cant figure them out so they have to talk about them. They might be quiet when around a lot of people and then super talkative when around people they are comfortable with. Dark circles under the eyes are common too, adding to the sleepy look. The lips might be naturally pouty. The eyes are watery. These people absorb energies easily and they need to learn that not everyone should be trusted. They feel bad for people easily and people can see this. The eyelashes can be longer than average like Zayn Malik whos a pisces rising. They could also have a lot of baby hair forming a natural gloria as the little angels they are. Some of them look glittery because the eyes are watery and the skin is usually watery so everything just shines and glows. Usually shorter than average. The Bratz Dolls of the zodiac.
Aspects to Ascendant is not taken into consideration in this post. Aspects to Ascendant and planets in the 1st house can make you look different than your Ascendant sign. ❕
© 2023 Zeldas Notes All Rights Reserved
4K notes
·
View notes
Note
May I ask what's the story of your profile picture?
The lil‘ ghost pal! Not much really, I just wanted to play around with some features on ibisPaint and scribbled something cute while testing the mirror and circle tools, which ended up being this drawing!
Later when searching for something to use as a profile pic, I browsed through my drawings, saw it and went *yup, this is it*
#another anon ask#you can’t really see it but there’s a glitch effect filter on the ghost as well#plus the backgrounds‘ actually got a texture layer on it
0 notes
Note
How do you get that gorgeous texture on your art? Are you using specific brushes, or is it the background? I wanted to try and recreate it 😅
It’s usually a mix of a noise filter, textured brushes and this paper texture image I have on a low opacity “Add” layer. I think this paper texture mainly ties it all together (you won’t be able to see it well if you have a dark tumblr theme but it’s there lol)
582 notes
·
View notes
Text


Neural Filters Tutorial for Gifmakers by @antoniosvivaldi
Hi everyone! In light of my blog’s 10th birthday, I’m delighted to reveal my highly anticipated gifmaking tutorial using Neural Filters - a very powerful collection of filters that really broadened my scope in gifmaking over the past 12 months.
Before I get into this tutorial, I want to thank @laurabenanti, @maines , @cobbbvanth, and @cal-kestis for their unconditional support over the course of my journey of investigating the Neural Filters & their valuable inputs on the rendering performance!
In this tutorial, I will outline what the Photoshop Neural Filters do and how I use them in my workflow - multiple examples will be provided for better clarity. Finally, I will talk about some known performance issues with the filters & some feasible workarounds.
Tutorial Structure:
Meet the Neural Filters: What they are and what they do
Why I use Neural Filters? How I use Neural Filters in my giffing workflow
Getting started: The giffing workflow in a nutshell and installing the Neural Filters
Applying Neural Filters onto your gif: Making use of the Neural Filters settings; with multiple examples
Testing your system: recommended if you’re using Neural Filters for the first time
Rendering performance: Common Neural Filters performance issues & workarounds
For quick reference, here are the examples that I will show in this tutorial:
Example 1: Image Enhancement | improving the image quality of gifs prepared from highly compressed video files
Example 2: Facial Enhancement | enhancing an individual's facial features
Example 3: Colour Manipulation | colourising B&W gifs for a colourful gifset
Example 4: Artistic effects | transforming landscapes & adding artistic effects onto your gifs
Example 5: Putting it all together | my usual giffing workflow using Neural Filters
What you need & need to know:
Software: Photoshop 2021 or later (recommended: 2023 or later)*
Hardware: 8GB of RAM; having a supported GPU is highly recommended*
Difficulty: Advanced (requires a lot of patience); knowledge in gifmaking and using video timeline assumed
Key concepts: Smart Layer / Smart Filters
Benchmarking your system: Neural Filters test files**
Supplementary materials: Tutorial Resources / Detailed findings on rendering gifs with Neural Filters + known issues***
*I primarily gif on an M2 Max MacBook Pro that's running Photoshop 2024, but I also have experiences gifmaking on few other Mac models from 2012 ~ 2023.
**Using Neural Filters can be resource intensive, so it’s helpful to run the test files yourself. I’ll outline some known performance issues with Neural Filters and workarounds later in the tutorial.
***This supplementary page contains additional Neural Filters benchmark tests and instructions, as well as more information on the rendering performance (for Apple Silicon-based devices) when subject to heavy Neural Filters gifmaking workflows
Tutorial under the cut. Like / Reblog this post if you find this tutorial helpful. Linking this post as an inspo link will also be greatly appreciated!
1. Meet the Neural Filters!
Neural Filters are powered by Adobe's machine learning engine known as Adobe Sensei. It is a non-destructive method to help streamline workflows that would've been difficult and/or tedious to do manually.
Here are the Neural Filters available in Photoshop 2024:


Skin Smoothing: Removes blemishes on the skin
Smart Portrait: This a cloud-based filter that allows you to change the mood, facial age, hair, etc using the sliders+
Makeup Transfer: Applies the makeup (from a reference image) to the eyes & mouth area of your image
Landscape Mixer: Transforms the landscape of your image (e.g. seasons & time of the day, etc), based on the landscape features of a reference image
Style Transfer: Applies artistic styles e.g. texturings (from a reference image) onto your image
Harmonisation: Applies the colour balance of your image based on the lighting of the background image+
Colour Transfer: Applies the colour scheme (of a reference image) onto your image
Colourise: Adds colours onto a B&W image
Super Zoom: Zoom / crop an image without losing resolution+
Depth Blur: Blurs the background of the image
JPEG Artefacts Removal: Removes artefacts caused by JPEG compression
Photo Restoration: Enhances image quality & facial details
+These three filters aren't used in my giffing workflow. The cloud-based nature of Smart Portrait leads to disjointed looking frames. For Harmonisation, applying this on a gif causes Neural Filter timeout error. Finally, Super Zoom does not currently support output as a Smart Filter
If you're running Photoshop 2021 or earlier version of Photoshop 2022, you will see a smaller selection of Neural Filters:


Things to be aware of:
You can apply up to six Neural Filters at the same time
Filters where you can use your own reference images: Makeup Transfer (portraits only), Landscape Mixer, Style Transfer (not available in Photoshop 2021), and Colour Transfer
Later iterations of Photoshop 2023 & newer: The first three default presets for Landscape Mixer and Colour Transfer are currently broken.
2. Why I use Neural Filters?
Here are my four main Neural Filters use cases in my gifmaking process. In each use case I'll list out the filters that I use:

Enhancing Image Quality:
Common wisdom is to find the highest quality video to gif from for a media release & avoid YouTube whenever possible. However for smaller / niche media (e.g. new & upcoming musical artists), prepping gifs from highly compressed YouTube videos is inevitable.
So how do I get around with this? I have found Neural Filters pretty handy when it comes to both correcting issues from video compression & enhancing details in gifs prepared from these highly compressed video files.
Filters used: JPEG Artefacts Removal / Photo Restoration
Facial Enhancement:
When I prepare gifs from highly compressed videos, something I like to do is to enhance the facial features. This is again useful when I make gifsets from compressed videos & want to fill up my final panel with a close-up shot.
Filters used: Skin Smoothing / Makeup Transfer / Photo Restoration (Facial Enhancement slider)
Colour Manipulation:
Neural Filters is a powerful way to do advanced colour manipulation - whether I want to quickly transform the colour scheme of a gif or transform a B&W clip into something colourful.
Filters used: Colourise / Colour Transfer
Artistic Effects:
This is one of my favourite things to do with Neural Filters! I enjoy using the filters to create artistic effects by feeding textures that I've downloaded as reference images. I also enjoy using these filters to transform the overall the atmosphere of my composite gifs. The gifsets where I've leveraged Neural Filters for artistic effects could be found under this tag on usergif.
Filters used: Landscape Mixer / Style Transfer / Depth Blur
How I use Neural Filters over different stages of my gifmaking workflow:
I want to outline how I use different Neural Filters throughout my gifmaking process. This can be roughly divided into two stages:
Stage I: Enhancement and/or Colourising | Takes place early in my gifmaking process. I process a large amount of component gifs by applying Neural Filters for enhancement purposes and adding some base colourings.++
Stage II: Artistic Effects & more Colour Manipulation | Takes place when I'm assembling my component gifs in the big PSD / PSB composition file that will be my final gif panel.
I will walk through this in more detail later in the tutorial.
++I personally like to keep the size of the component gifs in their original resolution (a mixture of 1080p & 4K), to get best possible results from the Neural Filters and have more flexibility later on in my workflow. I resize & sharpen these gifs after they're placed into my final PSD composition files in Tumblr dimensions.
3. Getting started
The essence is to output Neural Filters as a Smart Filter on the smart object when working with the Video Timeline interface. Your workflow will contain the following steps:
Prepare your gif
In the frame animation interface, set the frame delay to 0.03s and convert your gif to the Video Timeline
In the Video Timeline interface, go to Filter > Neural Filters and output to a Smart Filter
Flatten or render your gif (either approach is fine). To flatten your gif, play the "flatten" action from the gif prep action pack. To render your gif as a .mov file, go to File > Export > Render Video & use the following settings.

Setting up:
o.) To get started, prepare your gifs the usual way - whether you screencap or clip videos. You should see your prepared gif in the frame animation interface as follows:

Note: As mentioned earlier, I keep the gifs in their original resolution right now because working with a larger dimension document allows more flexibility later on in my workflow. I have also found that I get higher quality results working with more pixels. I eventually do my final sharpening & resizing when I fit all of my component gifs to a main PSD composition file (that's of Tumblr dimension).
i.) To use Smart Filters, convert your gif to a Smart Video Layer.
As an aside, I like to work with everything in 0.03s until I finish everything (then correct the frame delay to 0.05s when I upload my panels onto Tumblr).
For convenience, I use my own action pack to first set the frame delay to 0.03s (highlighted in yellow) and then convert to timeline (highlighted in red) to access the Video Timeline interface. To play an action, press the play button highlighted in green.

Once you've converted this gif to a Smart Video Layer, you'll see the Video Timeline interface as follows:

ii.) Select your gif (now as a Smart Layer) and go to Filter > Neural Filters

Installing Neural Filters:
Install the individual Neural Filters that you want to use. If the filter isn't installed, it will show a cloud symbol (highlighted in yellow). If the filter is already installed, it will show a toggle button (highlighted in green)

When you toggle this button, the Neural Filters preview window will look like this (where the toggle button next to the filter that you use turns blue)

4. Using Neural Filters
Once you have installed the Neural Filters that you want to use in your gif, you can toggle on a filter and play around with the sliders until you're satisfied. Here I'll walkthrough multiple concrete examples of how I use Neural Filters in my giffing process.
Example 1: Image enhancement | sample gifset
This is my typical Stage I Neural Filters gifmaking workflow. When giffing older or more niche media releases, my main concern is the video compression that leads to a lot of artefacts in the screencapped / video clipped gifs.
To fix the artefacts from compression, I go to Filter > Neural Filters, and toggle JPEG Artefacts Removal filter. Then I choose the strength of the filter (boxed in green), output this as a Smart Filter (boxed in yellow), and press OK (boxed in red).
Note: The filter has to be fully processed before you could press the OK button!

After applying the Neural Filters, you'll see "Neural Filters" under the Smart Filters property of the smart layer

Flatten / render your gif
Example 2: Facial enhancement | sample gifset
This is my routine use case during my Stage I Neural Filters gifmaking workflow. For musical artists (e.g. Maisie Peters), YouTube is often the only place where I'm able to find some videos to prepare gifs from. However even the highest resolution video available on YouTube is highly compressed.
Go to Filter > Neural Filters and toggle on Photo Restoration. If Photoshop recognises faces in the image, there will be a "Facial Enhancement" slider under the filter settings.

Play around with the Photo Enhancement & Facial Enhancement sliders. You can also expand the "Adjustment" menu make additional adjustments e.g. remove noises and reducing different types of artefacts.

Once you're happy with the results, press OK and then flatten / render your gif.
Example 3: Colour Manipulation | sample gifset
Want to make a colourful gifset but the source video is in B&W? This is where Colourise from Neural Filters comes in handy! This same colourising approach is also very helpful for colouring poor-lit scenes as detailed in this tutorial.
Here's a B&W gif that we want to colourise:

Highly recommended: add some adjustment layers onto the B&W gif to improve the contrast & depth. This will give you higher quality results when you colourise your gif.
Go to Filter > Neural Filters and toggle on Colourise.

Make sure "Auto colour image" is enabled.
Play around with further adjustments e.g. colour balance, until you're satisfied then press OK.
Important: When you colourise a gif, you need to double check that the resulting skin tone is accurate to real life. I personally go to Google Images and search up photoshoots of the individual / character that I'm giffing for quick reference.
Add additional adjustment layers until you're happy with the colouring of the skin tone.

Once you're happy with the additional adjustments, flatten / render your gif. And voila!

Note: For Colour Manipulation, I use Colourise in my Stage I workflow and Colour Transfer in my Stage II workflow to do other types of colour manipulations (e.g. transforming the colour scheme of the component gifs)
Example 4: Artistic Effects | sample gifset
This is where I use Neural Filters for the bulk of my Stage II workflow: the most enjoyable stage in my editing process!
Normally I would be working with my big composition files with multiple component gifs inside it. To begin the fun, drag a component gif (in PSD file) to the main PSD composition file.
Resize this gif in the composition file until you're happy with the placement

Duplicate this gif. Sharpen the bottom layer (highlighted in yellow), and then select the top layer (highlighted in green) & go to Filter > Neural Filters

I like to use Style Transfer and Landscape Mixer to create artistic effects from Neural Filters. In this particular example, I've chosen Landscape Mixer
Select a preset or feed a custom image to the filter (here I chose a texture that I've on my computer)

Play around with the different sliders e.g. time of the day / seasons
Important: uncheck "Harmonise Subject" & "Preserve Subject" - these two settings are known to cause performance issues when you render a multiframe smart object (e.g. for a gif)

Once you're happy with the artistic effect, press OK
To ensure you preserve the actual subject you want to gif (bc Preserve Subject is unchecked), add a layer mask onto the top layer (with Neural Filters) and mask out the facial region. You might need to play around with the Layer Mask Position keyframes or Rotoscope your subject in the process.
After you're happy with the masking, flatten / render this composition file and voila!

Example 5: Putting it all together | sample gifset
Let's recap on the Neural Filters gifmaking workflow and where Stage I and Stage II fit in my gifmaking process:
i. Preparing & enhancing the component gifs
Prepare all component gifs and convert them to smart layers
Stage I: Add base colourings & apply Photo Restoration / JPEG Artefacts Removal to enhance the gif's image quality
Flatten all of these component gifs and convert them back to Smart Video Layers (this process can take a lot of time)
Some of these enhanced gifs will be Rotoscoped so this is done before adding the gifs to the big PSD composition file
ii. Setting up the big PSD composition file
Make a separate PSD composition file (Ctrl / Cmmd + N) that's of Tumblr dimension (e.g. 540px in width)
Drag all of the component gifs used into this PSD composition file
Enable Video Timeline and trim the work area
In the composition file, resize / move the component gifs until you're happy with the placement & sharpen these gifs if you haven't already done so
Duplicate the layers that you want to use Neural Filters on
iii. Working with Neural Filters in the PSD composition file
Stage II: Neural Filters to create artistic effects / more colour manipulations!
Mask the smart layers with Neural Filters to both preserve the subject and avoid colouring issues from the filters
Flatten / render the PSD composition file: the more component gifs in your composition file, the longer the exporting will take. (I prefer to render the composition file into a .mov clip to prevent overriding a file that I've spent effort putting together.)
Note: In some of my layout gifsets (where I've heavily used Neural Filters in Stage II), the rendering time for the panel took more than 20 minutes. This is one of the rare instances where I was maxing out my computer's memory.
Useful things to take note of:
Important: If you're using Neural Filters for Colour Manipulation or Artistic Effects, you need to take a lot of care ensuring that the skin tone of nonwhite characters / individuals is accurately coloured
Use the Facial Enhancement slider from Photo Restoration in moderation, if you max out the slider value you risk oversharpening your gif later on in your gifmaking workflow
You will get higher quality results from Neural Filters by working with larger image dimensions: This gives Neural Filters more pixels to work with. You also get better quality results by feeding higher resolution reference images to the Neural Filters.
Makeup Transfer is more stable when the person / character has minimal motion in your gif
You might get unexpected results from Landscape Mixer if you feed a reference image that don't feature a distinctive landscape. This is not always a bad thing: for instance, I have used this texture as a reference image for Landscape Mixer, to create the shimmery effects as seen in this gifset
5. Testing your system
If this is the first time you're applying Neural Filters directly onto a gif, it will be helpful to test out your system yourself. This will help:
Gauge the expected rendering time that you'll need to wait for your gif to export, given specific Neural Filters that you've used
Identify potential performance issues when you render the gif: this is important and will determine whether you will need to fully playback your gif before flattening / rendering the file.
Understand how your system's resources are being utilised: Inputs from Windows PC users & Mac users alike are welcome!
About the Neural Filters test files:
Contains six distinct files, each using different Neural Filters
Two sizes of test files: one copy in full HD (1080p) and another copy downsized to 540px
One folder containing the flattened / rendered test files
How to use the Neural Filters test files:
What you need:
Photoshop 2022 or newer (recommended: 2023 or later)
Install the following Neural Filters: Landscape Mixer / Style Transfer / Colour Transfer / Colourise / Photo Restoration / Depth Blur
Recommended for some Apple Silicon-based MacBook Pro models: Enable High Power Mode
How to use the test files:
For optimal performance, close all background apps
Open a test file
Flatten the test file into frames (load this action pack & play the “flatten” action)
Take note of the time it takes until you’re directed to the frame animation interface
Compare the rendered frames to the expected results in this folder: check that all of the frames look the same. If they don't, you will need to fully playback the test file in full before flattening the file.†
Re-run the test file without the Neural Filters and take note of how long it takes before you're directed to the frame animation interface
Recommended: Take note of how your system is utilised during the rendering process (more info here for MacOS users)
†This is a performance issue known as flickering that I will discuss in the next section. If you come across this, you'll have to playback a gif where you've used Neural Filters (on the video timeline) in full, prior to flattening / rendering it.
Factors that could affect the rendering performance / time (more info):
The number of frames, dimension, and colour bit depth of your gif
If you use Neural Filters with facial recognition features, the rendering time will be affected by the number of characters / individuals in your gif
Most resource intensive filters (powered by largest machine learning models): Landscape Mixer / Photo Restoration (with Facial Enhancement) / and JPEG Artefacts Removal
Least resource intensive filters (smallest machine learning models): Colour Transfer / Colourise
The number of Neural Filters that you apply at once / The number of component gifs with Neural Filters in your PSD file
Your system: system memory, the GPU, and the architecture of the system's CPU+++
+++ Rendering a gif with Neural Filters demands a lot of system memory & GPU horsepower. Rendering will be faster & more reliable on newer computers, as these systems have CPU & GPU with more modern instruction sets that are geared towards machine learning-based tasks.
Additionally, the unified memory architecture of Apple Silicon M-series chips are found to be quite efficient at processing Neural Filters.
6. Performance issues & workarounds
Common Performance issues:
I will discuss several common issues related to rendering or exporting a multi-frame smart object (e.g. your composite gif) that uses Neural Filters below. This is commonly caused by insufficient system memory and/or the GPU.
Flickering frames: in the flattened / rendered file, Neural Filters aren't applied to some of the frames+-+
Scrambled frames: the frames in the flattened / rendered file isn't in order
Neural Filters exceeded the timeout limit error: this is normally a software related issue
Long export / rendering time: long rendering time is expected in heavy workflows
Laggy Photoshop / system interface: having to wait quite a long time to preview the next frame on the timeline
Issues with Landscape Mixer: Using the filter gives ill-defined defined results (Common in older systems)--
Workarounds:
Workarounds that could reduce unreliable rendering performance & long rendering time:
Close other apps running in the background
Work with smaller colour bit depth (i.e. 8-bit rather than 16-bit)
Downsize your gif before converting to the video timeline-+-
Try to keep the number of frames as low as possible
Avoid stacking multiple Neural Filters at once. Try applying & rendering the filters that you want one by one
Specific workarounds for specific issues:
How to resolve flickering frames: If you come across flickering, you will need to playback your gif on the video timeline in full to find the frames where the filter isn't applied. You will need to select all of the frames to allow Photoshop to reprocess these, before you render your gif.+-+
What to do if you come across Neural Filters timeout error? This is caused by several incompatible Neural Filters e.g. Harmonisation (both the filter itself and as a setting in Landscape Mixer), Scratch Reduction in Photo Restoration, and trying to stack multiple Neural Filters with facial recognition features.
If the timeout error is caused by stacking multiple filters, a feasible workaround is to apply the Neural Filters that you want to use one by one over multiple rendering sessions, rather all of them in one go.
+-+This is a very common issue for Apple Silicon-based Macs. Flickering happens when a gif with Neural Filters is rendered without being previously played back in the timeline.
This issue is likely related to the memory bandwidth & the GPU cores of the chips, because not all Apple Silicon-based Macs exhibit this behaviour (i.e. devices equipped with Max / Ultra M-series chips are mostly unaffected).
-- As mentioned in the supplementary page, Landscape Mixer requires a lot of GPU horsepower to be fully rendered. For older systems (pre-2017 builds), there are no workarounds other than to avoid using this filter.
-+- For smaller dimensions, the size of the machine learning models powering the filters play an outsized role in the rendering time (i.e. marginal reduction in rendering time when downsizing 1080p file to Tumblr dimensions). If you use filters powered by larger models e.g. Landscape Mixer and Photo Restoration, you will need to be very patient when exporting your gif.
7. More useful resources on using Neural Filters
Creating animations with Neural Filters effects | Max Novak
Using Neural Filters to colour correct by @edteachs
I hope this is helpful! If you have any questions or need any help related to the tutorial, feel free to send me an ask 💖
#photoshop tutorial#gif tutorial#dearindies#usernik#useryoshi#usershreyu#userisaiah#userroza#userrobin#userraffa#usercats#userriel#useralien#userjoeys#usertj#alielook#swearphil#*#my resources#my tutorials
395 notes
·
View notes
Text
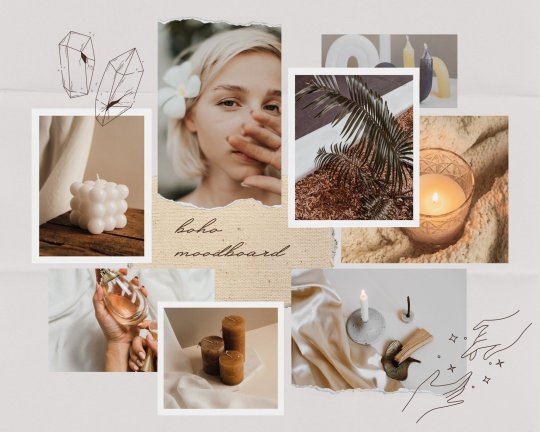
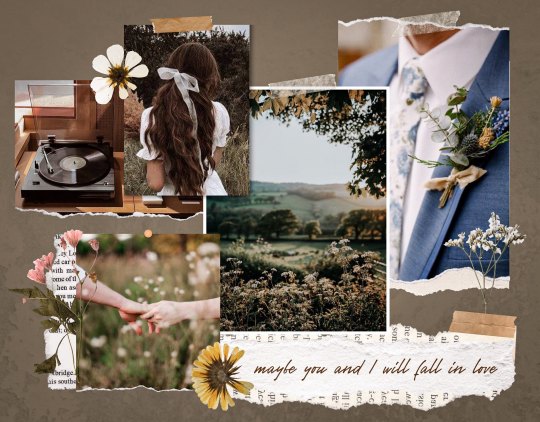
—HOW TO USE CANVA TO MAKE MOODBOARDS

I got a kind message asking how I make moodboards in Canva, so I wanted to do a little tutorial! Canva is a free graphic design app/website, and I use it for everything.
To start - open the app/page and use the search bar at the top to search for a template. I usually use: photo collage, scrapbook, aesthetic moodboard - all of these will pull up pre-made templates for you to use.
[I have a couple linked below that I’ve used and liked, or have bookmarked to try:]
one | two | three | four | five | six | seven | eight
Anything with a crown is for Canva Pro members - you used to be able to use the templates as a free member (just not the paid assets) but that changed recently. The linked templates above are all free ones that you can use right away.
PHOTOS:
Once you’re in the template, you can press the + in the bottom corner to bring up the menus. The Elements tab have items you can add in (more on that later) - for now you want to go to Uploads, and add the photos you want to use. I mostly get mine from Pinterest and Google Images.
[If you are writing an x reader fic and are looking for tips for creating an inclusive moodboard, there are some awesome resources here: one | two !]
After that, go back to your template and click on the different photo frames, and use the Replace button in the toolbar - it will let you replace the template photos with your own. Double tap to move and resize your image within the frame, (and there are also filters you can use if you want!)
When working on moodboards, I like to move things around. You can replace the frames they use by clicking on the item and then clicking the Trashcan. Then go back to the + menu, and then Elements, and scroll down to Frames. You can scroll through them all, but my fave keywords to use in the search bar is: polaroid, torn, and ripped.
Once they’re added, you can move them wherever you want. There’s a button on the toolbar that says Position, and you can shift the object forward/back between the items around it.
DETAILS:
Once you add your photos, then comes the details! You can change the background color and add/change the fonts (or upload your fave font to use!) Try out all the tools on the toolbar to see what you can do, there’s a lot of options.
I love love layering with my moodboard, so I will go back to the + / Elements tab, and then search for things to layer in. My fave searches for Graphics recently are: ripped paper, grunge patterns (to use in the background), star patterns, dried flowers, and dried leaves.
You can use the Position tool on them to fit them in-between or in front of your photos. I usually use them to hide harsh edges or in places that look a little empty.
I also like adding fabric texture to the backgrounds, to fill the space between the photo frames. There isn’t an easy way to do this - the best way I figured out is to find an image of the texture you want, and then to add a photo frame with a torn or jagged edge in the very back (and then use your new texture there). You can duplicate and move it, to cover the space (you can see some examples below - the beige flower pattern in the Din one, the black velvet for Alfred).
Here are some examples of the original templates, and then what my finished ones look like. You can see what I swapped out, moved, and added:
original image | my moodboard

EDITING:
Once I am happy with the design I download it, and then edit. I love this part - pop it into your fave editing app, and play around with the exposure/contrast/hues/sharpness. I will mess with the color balance & vibrancy as well - this can really take a moodboard I like, to one I love.
Here’s some gifs I made showing before /after editing - both are pretty before but I think the after has an oomph that I really appreciate.

[When you finish with one and want to use the same template, you can click Make a Copy, and it will duplicate it. I began with templates but everything I do now are copies of heavily/edited templates or ones I’ve made from scratch. But for starting off, I think a template is the way to go!]
And that’s it!! I would really suggest just opening it up and seeing what you can do. Not all of mine turn out great, but each time I think I get a better handle on all the different options and what my moodboard style is.
I really hope this helps! And feel free to tag me if you post any you make, I’d love to see them (or drop me an ask if you have any questions!) 💖💕
#please give this a reblog if it was helpful! 💖#and just a note the 4th example is an OC x Character fic moodboard#moodboards#graphics#tutorials#aesthetic moodboard#resources#fic moodboard#fan fic meta#fic writing#writing resources
696 notes
·
View notes
Last Seen Blogs

theaquariumguide
The Aquarium Guide

jumbolovesporn
无标题
weishutong
Nice & Beauty
timmons-gam
a normally Asia guy.
soutzouart
Melina| 23