#my gif tutorials
Photo


Rotoscoping Tutorial by @antoniosvivaldi
Hi everyone! I’m excited to announce my long-delayed Rotoscoping Tutorial - requested by a number of people over the past calendar year.
In this tutorial, I will show you how to create the cutout gifs like this (and seen in most of my gifsets under this tag) with Rotoscoping on After Effects. I’ll also provide additional examples and a number of things that I do to optimise my giffing / Rotoscoping workflow (e.g. useful shortcuts & other things to be aware of).
This is the structure of the tutorial:
Why Rotoscoping? Photoshop video timeline’s limitations
Photoshop workflow pt 1: Preparing your gif
After Effects workflow: Interface, shortcuts, and Rotoscoping tools
Photoshop workflow pt 2: Assembling your gif; with multiple examples
Bonus content: Rotoscoping tips* & workarounds to common issues
For quick reference, here are example gifsets (and where Rotoscoping is used in the posts) that I will mention in the tutorial:
Example 1: Cutout gif effect | panels 2 + 4
Example 2: Changing a gif’s background colour | all panels
Example 3: Cutout gif effect in a shape | all panels
Example 4: Putting it all together | panels 1, 3, & 5
What you need & need to know:
Software: Photoshop & After Effects (After Effects 2021 or later for Rotobrush 2.0)*
Hardware: 16GB RAM required to run later versions of AE*
Difficulty: Advanced; Knowledge in making gifs, applying layer masks, and using video timeline interface assumed
Key concepts: Rotoscoping (AE) / Video Timeline (AE+ PS) / Layer Masks & Groups (PS)
Supplementary files: tutorial resources
*I’m currently running the latest version of PS & AE on an M2 Mac, but I’ve also used older versions (CC 2015 & 2020) on Intel-based Macs. I’ll outline some known compatibility & performance issues, and workarounds later in this tutorial that could help streamline your giffing workflow.
Tutorial under the cut. Like / Reblog this post if you find this tutorial helpful. Linking this post / the example gifsets in your post caption, will be greatly appreciated if you read this to create effects seen in Examples 3 + 4.
1) Why Rotoscoping?
My Rotoscoping journey is motivated by the shortcomings on Photoshop - namely the limited options to manipulate the Layer Mask keyframes in the video timeline interface, as well my need to gif more efficiently.
Suppose I want to cutout this subject or recolour the background of a gif on Photoshop: I personally classify the gifs that I prepare on PS into 3 types based on the motion of the subject
These are the common Photoshop-only approaches when attempting to mask the subject in the gif.
Case 1: minimal motion in the subject → a simple layer mask will do the trick
Case 2: some linear panning of the subject in the gif → using the Layer Mask Position keyframes in the video timeline interface will do the trick
Case 3: subject moves around a lot (e.g. zoom motion) → Unfortunately this is where a Photoshop-only workflow will require frame by frame masking. Layer Mask Position keyframes only apply positional translation (but not transformation / rotation) on the layer mask
Enter Rotoscoping on After Effects: Instead of resigning to frame by frame procedure on Photoshop, I opted to make my life easier by learning to Rotoscope on After Effects. This essentially provides me an opportunity to cutout / recolour a wider range of gifs with relative ease.
2) Photoshop pt. 1: Preparing your gif
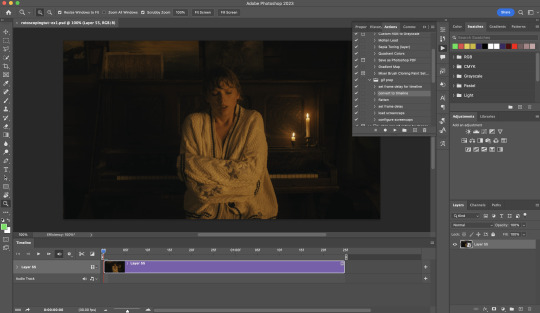
Prepare your gif the usual way - whether you screencap or import frames from video.
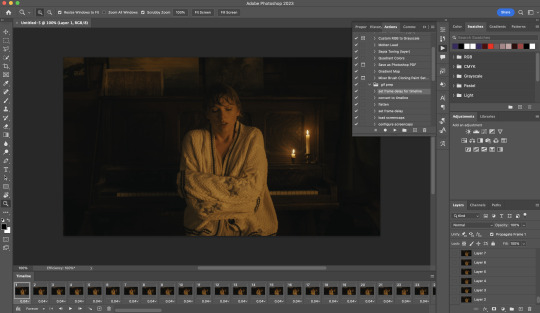
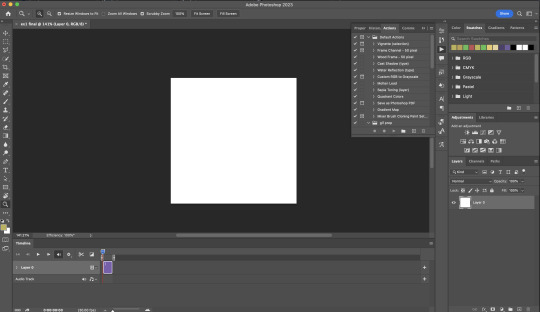
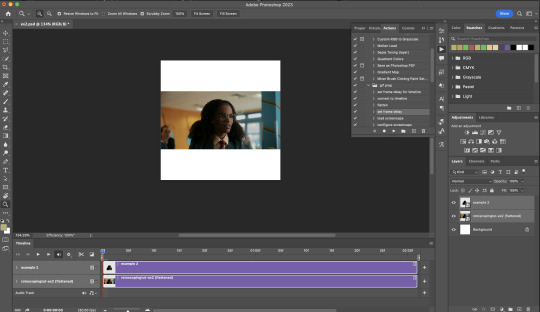
Then your Photoshop should look like this:
Now, I shall walkthrough & explain my personal giffing workflow (as of 2023) after loading the gif frames. To speed up the process, import my gif prep action file to Photoshop.
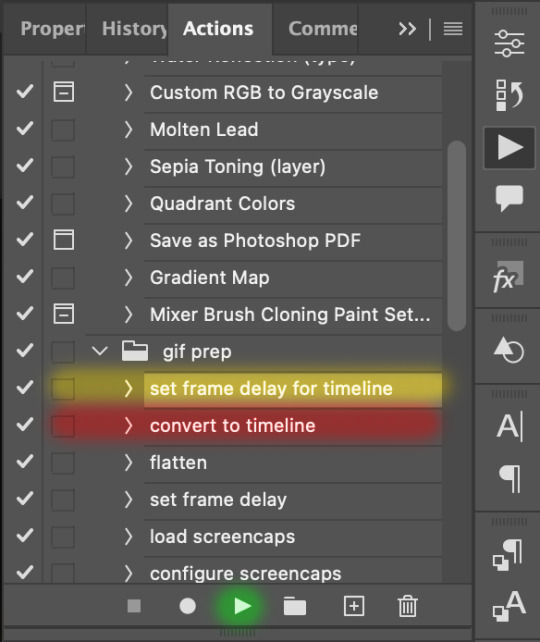
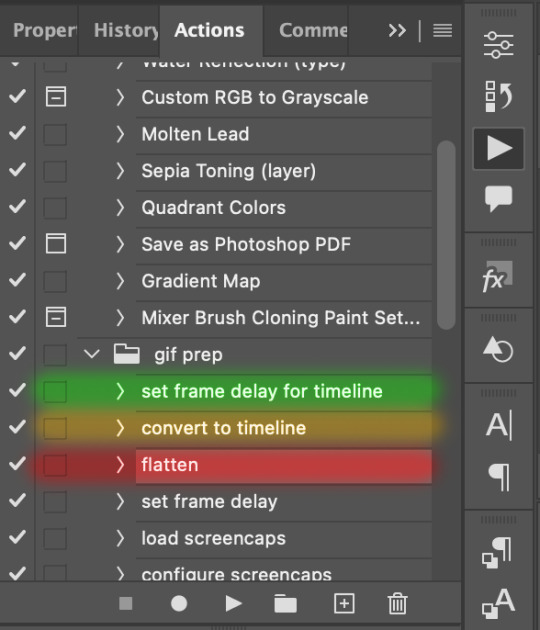
Going to Window > Action, you’ll see a set of actions under the “gif prep” folder.
"set frame delay for timeline” (highlighted in yellow) will set all of your entire gif’s frame delay to 0.03s
“convert to timeline“ (highlighted in red) will take you to the Video Timeline interface
To play an action, press on the Play button (highlighted in green)
i. Set the frame delay of the entire gif to 0.03s. (play “set frame delay for timeline” from my gif prep action pack)
I work with everything in 0.03s frame delay (or equivalently 30fps) at first. It’s always possible to change the frame delay of the final gif to 0.05s before uploading onto Tumblr.
ii) Convert this gif to a Smart Video Layer (play “convert to timeline” from my action pack)
Note: I personally don’t resize the gif just yet. That’s because Rotoscoping in full video resolution will render higher quality details around the edges as well as more flexibilities later on in the editing process.
Performance optimisation: If your computer has 8GB of RAM or less, you might find it helpful to crop / resize your gif to Tumblr dimensions now for a less sluggish performance in After Effects later on.
(I have giffed on a desktop with 8GB of RAM and it’s quite slow at rendering individual frames of a 1080p short clip on AE)
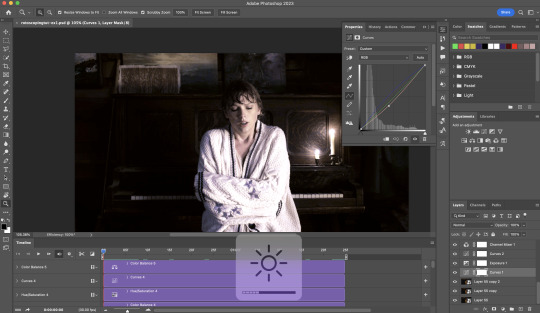
iii) Add colouring adjustments on the gif. This will save you A LOT of time when you Rotoscope gifs that are originally very dark / poorly lit (e.g. the uncoloured Taylor Swift gif shown just above).
If you usually colour your gifs at the very end of your giffing process (i.e. after sharpening), this will be a bit of a change.Nevertheless I still highly recommend adding some base colourings now to at least increase the contrast between the subject and the background.
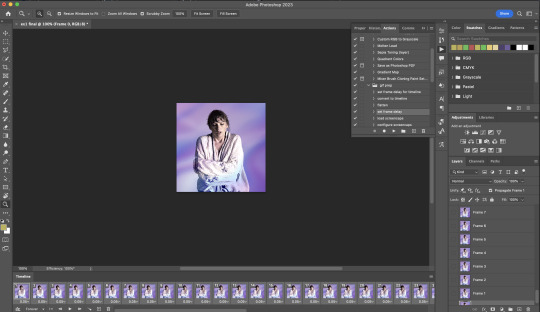
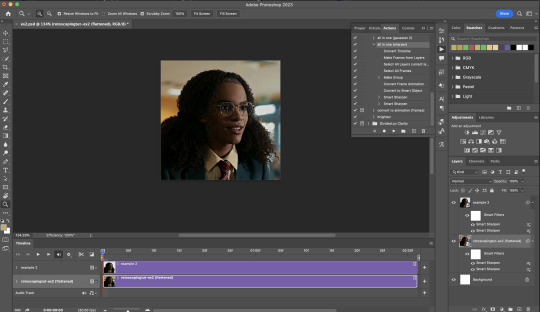
iv) To minimise lagging on After Effects, simplify this gif file as follows:
Flatten / Unsmart this gif file back to frame animation mode: play “flatten” (highlighted in red) from my gif prep action pack
Set the frame delay to 0.03s: play “set frame delay for timeline” (highlighted in green)
Convert the simplified gif file back to the video timeline interface: play “convert to timeline” (highlighted in yellow)
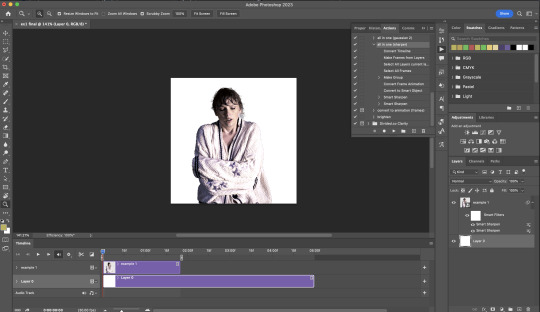
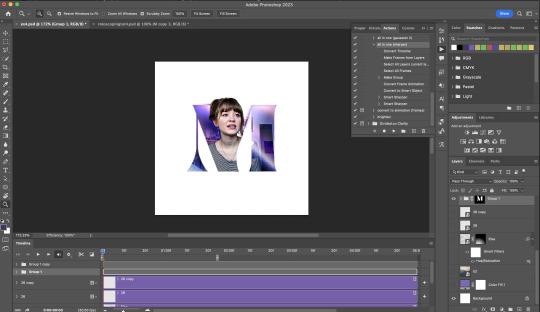
After “unsmarting” and converting back to the video timeline, your interface should look like this

And voila! This gif PSD is now ready to be imported to After Effects for Rotoscoping work!
3) After Effects: Interface and useful shortcuts
Open After Effects and Import (Cmmd / Ctrl + I) your gif PSD that you’ve just prepared.
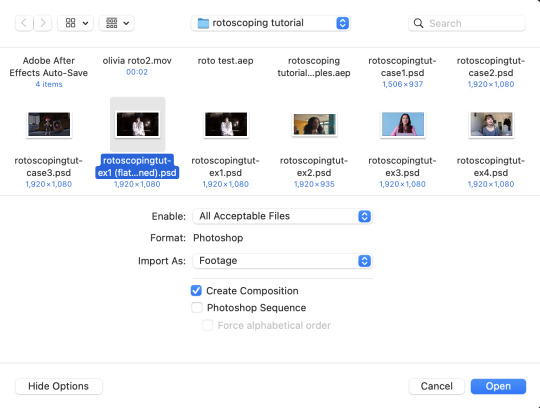
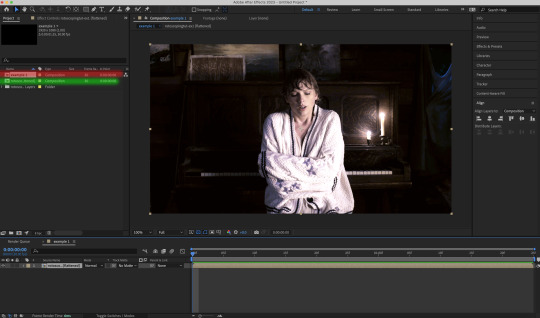
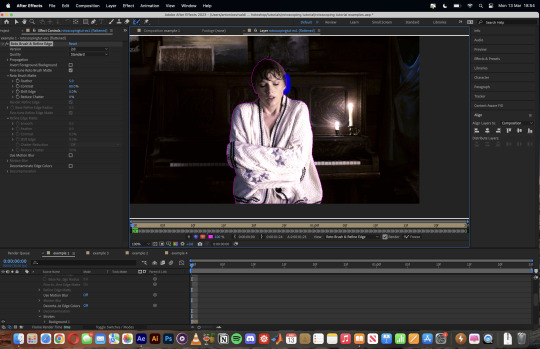
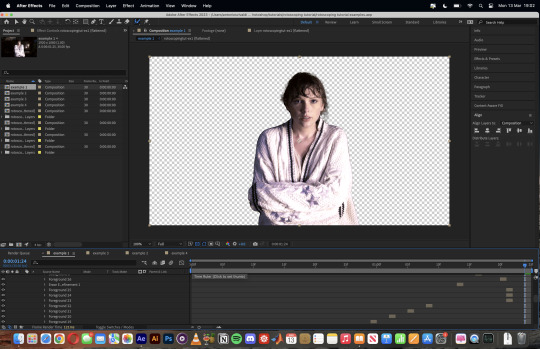
After importing your gif PSD to After Effects, the interface should look like this.
In the screenshot below, there are two compositions: the imported gif (highlighted in green) & another composition file made from selecting the imported gif (highlighted in red)
For the rest of the workflow, we will edit from the clone composition (the one highlighted in red), so select this one.
Before we take our plunge into the Rotoscoping, here are a few useful shortcuts to remember. I’ll explain the Roto Brush tool in the next section.
Preview the previous: fn + up arrow
Preview the next frame: fn + down arrow
Add to Roto Brush selection: holding Shift while you’re using the Roto Brush Tool
Subtract from Roto Brush selection: holding Alt while you’re using the Roto Brush Tool
Change Roto Brush size: while holding Cmmd / Ctrl, click + drag your mouse left / right
4) After Effects: The Rotoscoping Process
To access the Rotoscoping tools, click on the Roto Brush icon (highlighted in red in the screenshot below)
Then you’ll get the following dropdown options with two Rotoscoping Tools
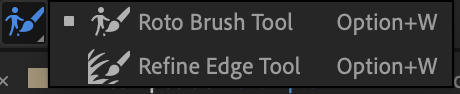
Roto Brush Tool: This is where you add / subtract your Rotoscoping selection in your composition
Refine Edge Tool: Paint around the edge of your selection for more refined edges. Very helpful for Rotoscoping fuzzy edges / hairs
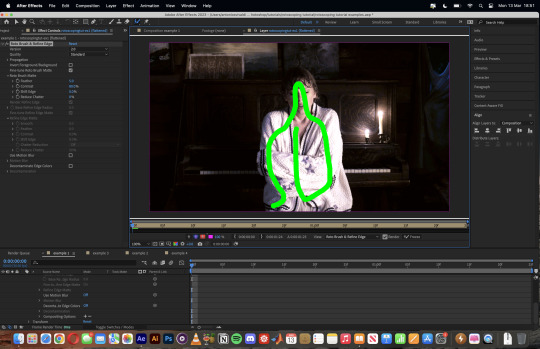
To make some Rotoscoping selection, first grab the Roto Brush Tool and click on the subject you want to cut out from your composition.
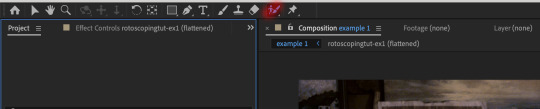
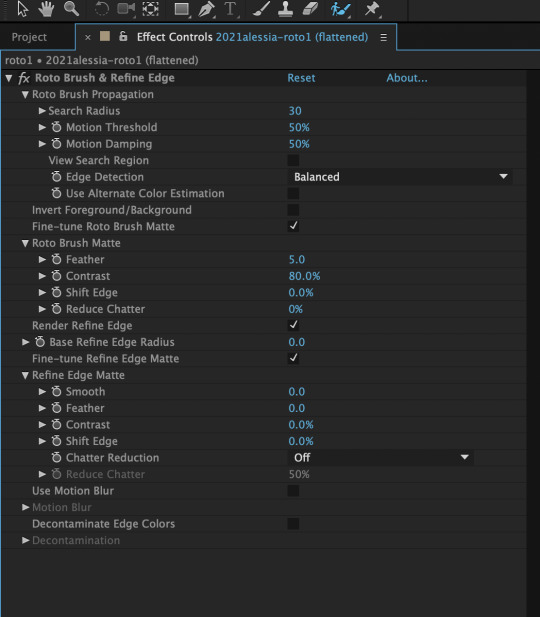
When you’re Rotoscoping you’ll see this in the Effect Controls panel.
There are two versions of Roto Brush:
Version 2.0: The Rotoscoping selection is powered by AI for higher accuracy when you propagate the frames.
Version 1.0 (Classic): This is the legacy Roto Brush Tool that uses a lesser algorithm. Recommended only if Roto Brush 2.0 is unstable on your machine due to RAM issues.
And two quality settings for Roto Brush 2.0:
Standard
Best
Note: I am currently unable to use Roto Brush 2.0 with Best quality model on my machine to compare the differences myself, so I’ll link this page that explains the two quality settings.

Note: if you’re using an older version of After Effects you’ll see this instead. This corresponds to Roto Brush 1.0 / Classic in the newer versions of AE.
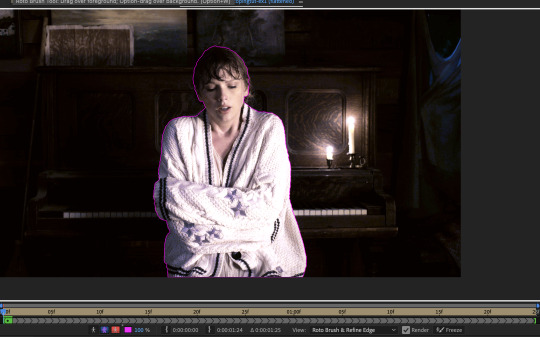
When you’ve made a selection using the Roto Brush Tool, you’ll see the pink lines around the subject. This is the region that you’ve selected to Rotoscope!
To bring out some details around the edges, grab the Refine Edge Tool and paint around the edges
Then the interface will look like this

To view the Rotoscoping selection that you’ve made more intuitively, you could click on the following buttons.
Personally I like the viewing my selection using Toggle Alpha (the second box from the left) & Toggle Alpha Boundary (the 3rd box from the left)

Toggle Alpha
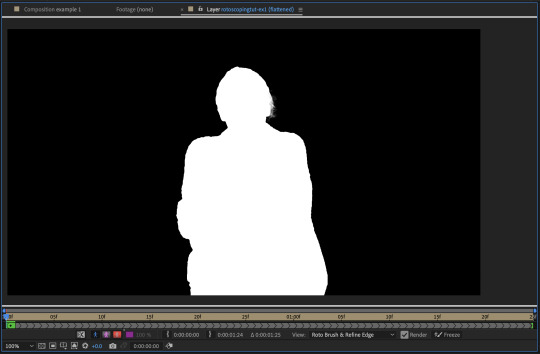
Toggle Alpha Boundary

Note: If you aren’t happy with the initial Roto Brush selection, you can always add (press Shift while using the Roto Brush Tool) / subtract (press Alt / Option using the Roto Brush Tool) your selection.
After you’re happy with your Rotoscoping selection in the first frame of your composition, press fn + down to view the next frame.
Repeat pressing fn + down and fix the selection along the way (e.g. I subtracted a small area from my Rotoscoping selection with the Roto Brush tool to make the edge look cleaner).

After fixing the selection along the way, go back to the composition file (select the clone composition again) and you will see that a cutout gif is made!
To export this, go to File > Export > Add to Render Queue. You’ll be redirected to the Render Queue panel at the bottom of After Effects.
Highlighted in red: click to change export setings
Highlighted in green: click to change save destination
Highlighted in yellow: click to render video

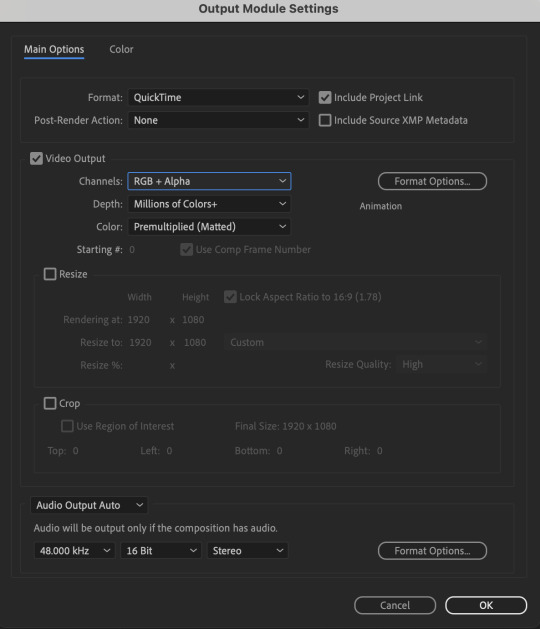
To preserve the transparency of your cutout gif, you need to change your export settings in the Output Module.
Under the Video Output section, change your Channels to RGB + Alpha. Press OK. Then Render the video.
5) Photoshop pt. 2: Assembling your final gif
The essence is to drag the cutout gif (aka the video file that you’ve just rendered on AE) into a new PSD composition file. This will be where you’ll do the rest of your giffing. Your workflow will contain the follow steps:
Make a new blank PSD composition file in Tumblr dimensions
Enable the Video Timeline
Follow the instructions detailed in the individual examples i.e. drag the cutout gif into the PSD & adjust the timeline start / end points
Exporting the final gif. If you’ve worked in 0.03s frame delay all the way up to here, just play the action that I’ve provided in the tutorial in the following order to set the frame delay to 0.05s.
EXAMPLE 1: finalising your cutout gif | sample gifset
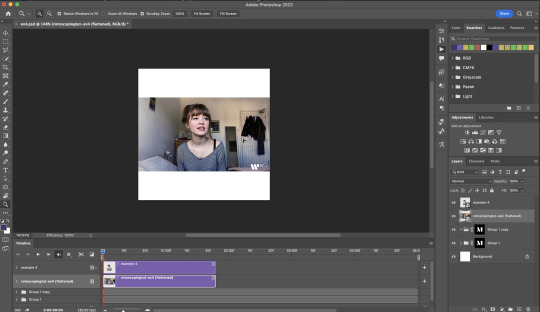
After enabling the Video Timeline in your PSD composition file you’ll see something like this
Go to your folder, drag the cutout gif you’ve made on After Effects, resize / reposition, then press Enter.
And also make sure to adjust the Video Timeline’s start / end values.
Add some finishing touches. Because I did the Rotoscoping at full HD resolution, I’ll also need to sharpen my gif in this step.
After you’re happy, you can export this into a gif file and do what you usually do to change the frame delay to 0.05s.
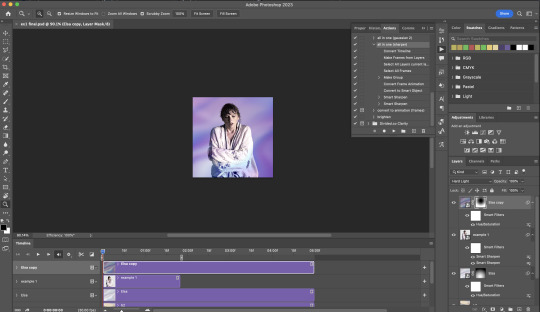
Notes on my “Unsmarting” approach:
To prevent accidentally writing over a PSD composition file that I’ve spent time editing, I personally render this into a short video (File > Export > Render Video) and use the following export settings (to prevent quality loss)
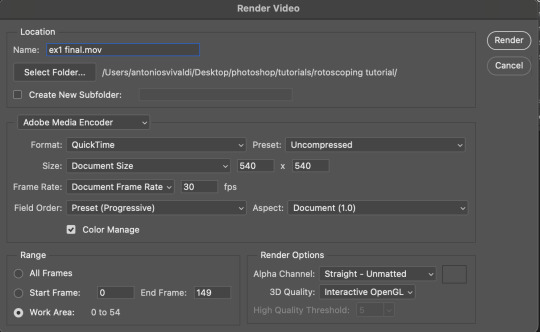
Then I open the rendered clip and play the actions in my gif prep action pack as follows:
flatten: this “Unsmarts” the clip / video
set frame rate: this sets all frames to have 0.05s frame delay
This is the final interface that I get before I pull up the Save For Web window.
EXAMPLE 2: changing your gif’s background colour (for Case 3 gifs) | sample gifset
From your folder, drag BOTH the cutout gif (rendered on AE) and the original gif to your blank composition.
Important: you need to make sure that both layers are properly lined up in the composition file (i.e. selecting both layers when repositioning / resizing)
On Photoshop, press Enter twice and place the cutout gif on top of the original gif from the Layers panel. Then you should get something like this
Select both layers and resize / reposition them in your PSD composition until you’re satisfied with the placements.
The basic idea here is to add some adjustment layers / other things in between the cutout gif and the original gif. To do this, select the original gif layer in the Layers panel.
Then you can start adding.a bunch layers e.g. textures, onto the composition.
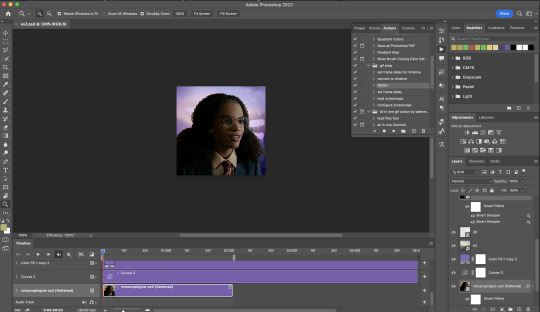
And then here’s the exported gif!

6) Fancier Rotoscoping examples
Note: knowledge in using layer masks / groups and making shape / text layers assumed
In the next two examples, I’ll show you how to combine the two previous examples with shape / text layers.
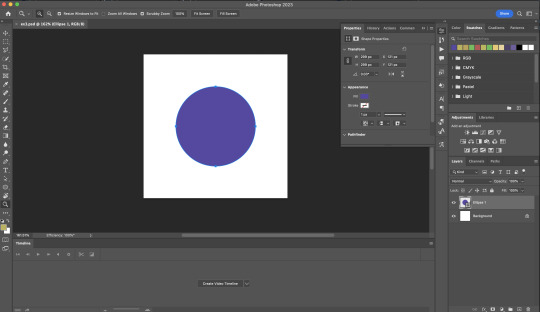
EXAMPLE 3: Placing your cutout gif into a shape / text layer | sample gifset
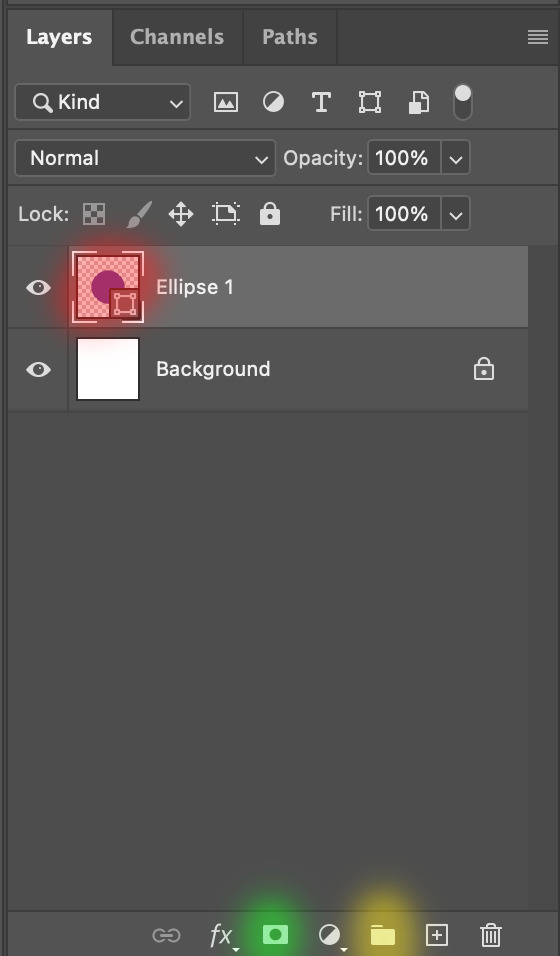
Add a text / shape layer to your blank PSD composition
We want to prepare a masked group so in the Layers panel:
Make selection from layer: Cmmd / Ctrl + Click (highlighted in red)
Make a new group: click on the folder icon (in yellow)
Create layer mask: click on the icon (in green)
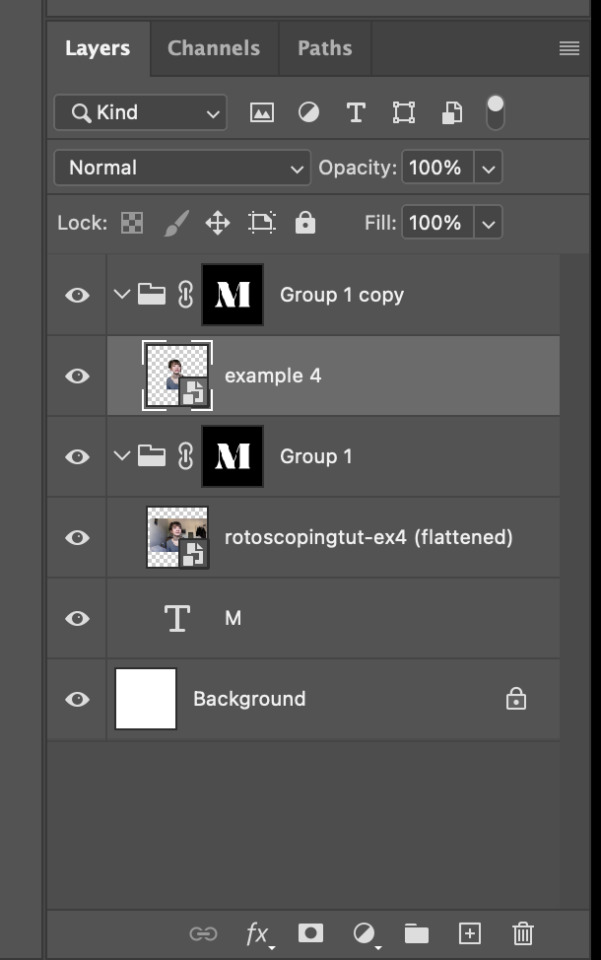
After duplicating the masked group you’ll get something like this in the Layers panel
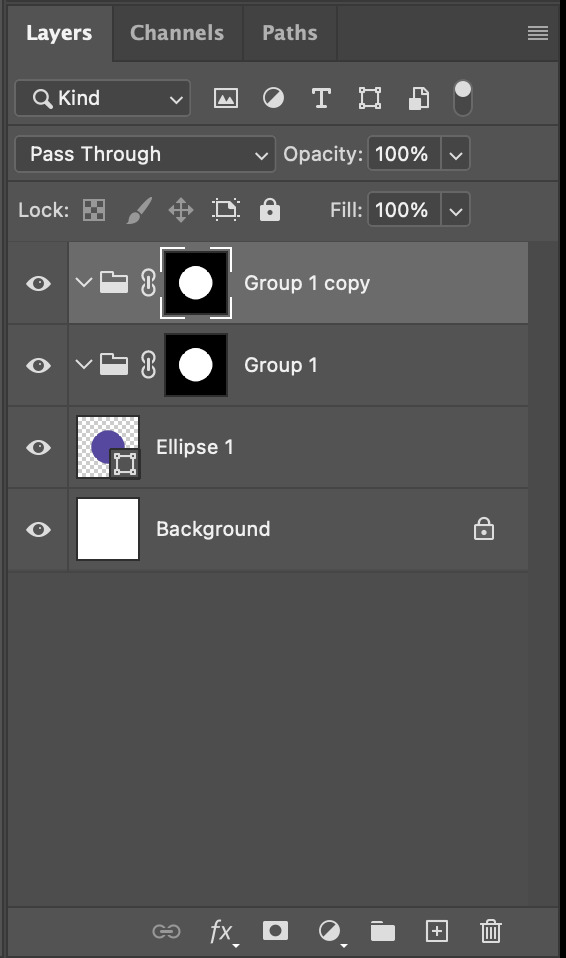
Drag your cutout gif into the PSD composition

Place the cutout gif into the masked group on top
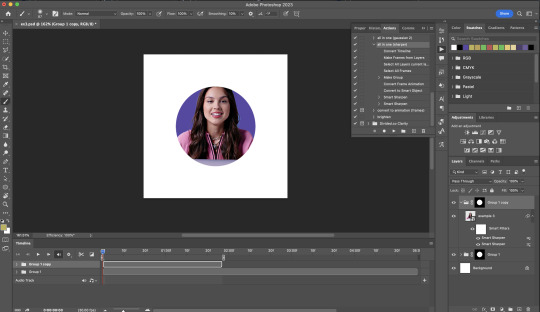
Select the mask of the top group and paint (in white) over the region you want to reveal for the cutout gif
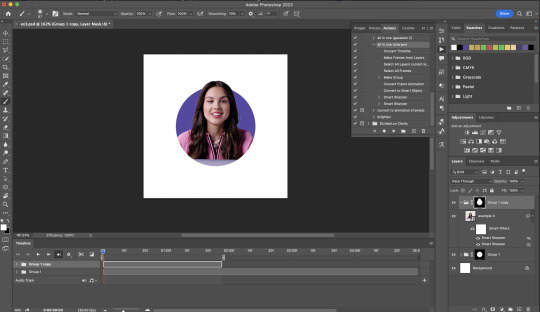
Add some finishing touches & export the gif!
EXAMPLE 4: Putting it all together | sample gifset
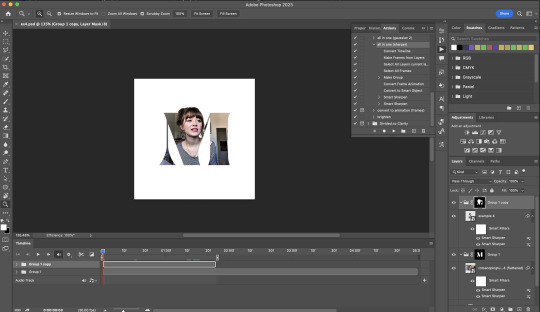
You follow the same approach as in Example 3 to prepare the masked groups, but you need to drag two gif layers in (and resize them using the approach outlined in Example 2)
Place the gif layers as follows
While selecting the mask of the group on top, paint (in white) over the region that you want to reveal in the cutout gif
Now select the original gif (placed within the other group) and add some adjustment layers
After adding some finishing touches & exporting the gif, I get this!
Note: you can do even more overlay effects in the background portion of example 4. There will just be more masked groups + adjustment layers
7) Bonus: Some useful Rotoscoping / giffing lifehacks
GIFFING LIFEHACKS:
— Use best quality footage that you could find & Rotoscope in full video resolution, for better details around the edges
— Poorly lit scenes & low contrast edges are harder to Rotoscope (e.g. Toy Story set / TS evermore set).
If you’re new to AE, I would recommend choosing videos with well-lit gifs with simpler backgrounds and high contrast edges (e.g. Maisie Peters Cate’s Brother set)
— Use Rotobrush 2.0 if you’re using After Effects 2021 or later. It’s more difficult to Rotoscope / change background colour for gifs with a lot of movements with the classic Rotobrush tool. If the scene is tricky, you might want to switch to the��“Best” quality model.
HARDWARE-RELATED PERFORMANCE OPTIMISATION:
— The recent versions of Photoshop require at least 8GB of RAM. If you have less RAM, it will still work provided you have enough scratch disk space. For better performance, it’s best to close other applications when you’re using Photoshop.
— The recent versions of After Effects require at least 16GB of RAM. If your machine has less RAM than this, there are some workarounds to prevent your machine from hanging:
Essential: close other applications that you’re running on your computer
Resize your gif down to Tumblr dimensions & sharpen it before importing to After Effects.
Install an older version of AE
8) Bonus: Some known software + hardware issues, and workarounds
KNOWN ISSUES ON PHOTOSHOP:
I currently have minimal issues in my giffing workflow, but I’ll nevertheless outline a few common known Photoshop issues for anyone who needs some workarounds.
— Video Timeline interface missing: this affects Apple Silicon Macs (i.e. M1 / M1 Pro / M1 Max / M1 Ultra / M2 / M2 Pro / M2 Max)
Update to newer version of Photoshop (updated 2022 or 2023)
Open Photoshop with Rosetta
— Scratch disk full error: This is a common issue with machines that lack RAM & have nearly used up internal storage. Editing video layers in the timeline interface uses a lot of memory hence will require a lot of scratch disk space.
Make sure that you have enough free storage space while using Photoshop. Alternatively you can use an external hard drive as a scratch disk.
KNOWN ISSUES ON AFTER EFFECTS:
These are a few issues that I have personally ran into over the course of giffing on multiple devices & multiple versions of After Effects.
Note: Inputs from M1 / M2 Mac users with regards to experiences on using the After Effects Rotoscoping tools are welcome!
— Rotobrush 2.0 set to “Best” quality model causes AE to crash: this affects anyone who’s using MacOS Ventura
I’m currently experiencing this issue on my M2 Mac. The workaround right now is to change the Roto Brush 2.0 quality setting to Standard.
This is due to some software compatibility issues on Adobe’s side specifically with MacOS Ventura. Fingers crossed that they will properly fix this bug in the future updates!
— Cannot re-open project files with Rotoscoping: this affects anyone using the initial release of After Effects 2020 (I had installed this on an Intel-based machine and it sucked)
The only option here is to update to a later version of After Effects.
8) More useful Rotoscoping resources
Rotoscoping + Keyframes Tutorial by @jenna--ortega
Rotoscoping + Masking Tutorial by @usergif
Rotoscoping For Beginners in After Effects | Motion Graphics Tutorial
I hope you enjoy reading this! If you have any questions / need any help related to this tutorial, feel free to send me an ask!
#after effects#tutorial#gif tutorial#photoshop tutorial#dearindies#tusermelissa#usernik#useryoshi#usershreyu#usercim#userrobin#useralison#userannalise#userkosmos#userisaiah#usergiu#userives#*#my resources#my tutorials
2K notes
·
View notes
Text

The silent art of gif making
The gif above has 32 layers plus 6 that aren't shown because this is part of a larger edit. I wanted to share it to give everyone a glimpse of the art of gif making and how long it usually takes for me to make something like this. This one took me about an hour and a half but only because I couldn't get the shade of blue right.
I use Adobe Photoshop 2021 and my computer doesn't have a large memory space (I don't know what to call it) so usually most of psds get deleted because I'm too lazy to get a hard drive. It doesn't really bother me that much because I like the art so when it's done, it's done. Off to somewhere else it goes.
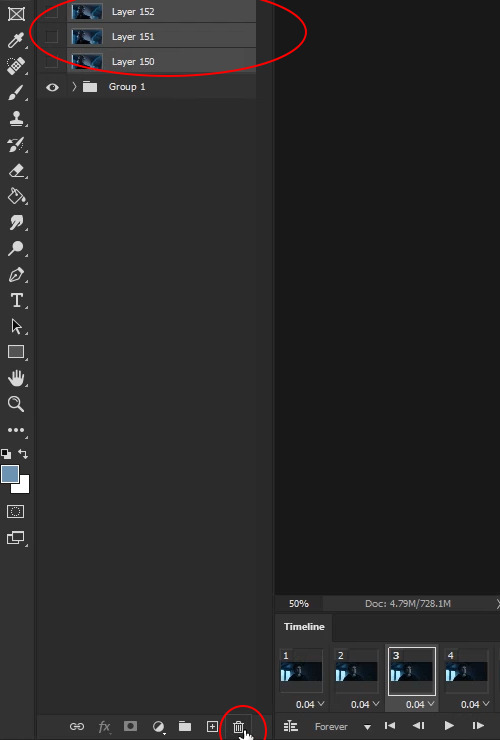
Here are the layers:

Everything is neat and organized in folders because I like it that way. I prefer to edit it in timeline but others edit each frame. There's a layer not shown (Layer 4 is not visible) and it's the vector art. Here it is:

Now it is visible. I don't plan to make this a tutorial, but if you're interested I'd love to share a few tricks about it. I'm pretty new to the colors in gifmaking but the rest is simple to understand. Here, I just want to show how much work it takes to make it.

I opened Group 2 and here's the base gif. I already sharpened and sized it correctly but that's about it. Let's open the base coloring next.

Yay! Now it looks pretty! The edits are in Portuguese but it doesn't matter. There's a silent art of adding layers depending on how you want the gif to look but you get used to it. The order matters and you can add multiple layers of the same thing (for eg. multiple layers of levels or curves or exposure).

This was pretty much my first experiment with coloring so I don't know what I'm doing (this happens a lot with any art form but gifmaking exceeds in DIYing your way to the finished product) but I didn't want to mess up his hair, that's why the blue color is like that. Blue is easy to work with because there's little on the skin (different from red and yellow but that's color theory). I painted the layers like that and put it on screen, now let's correct how the rest looks.

I was stuck trying to get the right teal shade of blue so yes, those are 10 layers of selective color mostly on cyan blue. We fixed his hair (yay!) we could've probably fixed the blue on his neck too but I was lazy. This is close to what I wanted so let's roll with that.

BUT I wanted his freckles to show, so let's edit a little bit more. Now his hair is more vibrant and his skin has red tones, which accentuates the blues and his eyes (exactly what I wanted!). That lost Layer 2 was me trying to fix some shadows in the background but in the end, it didn't make such a difference.

This was part of an edit, so let's add the graphics and also edit them so they're the right shade of blue and the correct size. A few gradient maps and a dozen font tests later, it appears to be done! Here it is:

Please reblog gifsets on tumblr. We gifmakers really enjoy doing what we do (otherwise we wouldn't be here) but it takes so long, you wouldn't imagine. Tumblr is the main website used for gif making and honestly, we have nowhere to go but share our art here. This was only to show how long it takes but if you're new and want to get into the art of gif making, there are a lot of really cool resource blogs in here. And my ask box is always open! Sending gifmakers all my love.
#gif making#gif tutorial#resources#completeresources#y'know what that post yesterday got me into this#i love creativity so i send all my love to gifmakers#this is HARD#my tutorials#tutorials
252 notes
·
View notes
Text
gif tutorial
i was asked to make a tutorial for this set i made, so let's get right into it!

first things first, i downloaded the music videos from youtube in 1080p using 4k video downloader. unfortunately, the quality of youtube videos always seems... not great, to put it simply. plus these music videos are from the 90s, so they've been upscaled to 1080p after the fact. all of this works against us, but i've definitely worked with videos of lesser quality than these, so at least there's that!
when i gif, i import video frames to layers rather than screencapping. this comes down to personal preference. after everything has loaded, i group all my layers together and set the frame delay to 0.05. i then cropped my gif to 540x500.
the next step in my process is sharpening. i did play around with my settings a bit given the quality of the footage and the dimensions of the gif. i compared both @hellboys low-quality video gif tutorial to my regular sharpening action and my vivid sharpening action and in this case, i preferred my normal vivid sharpening action. i used this tutorial to create the action for myself, and you can find other sharpening tutorials here. this action converts my frames to video timeline and applies sharpening.
once my gif is sharpened and i'm in timeline, i begin coloring. i wanted to simplify the amount of colors used in these gifs, again because of the video quality -- i knew it wasn't going to have the crispness i would normally like for my gifs. here are my coloring adjustment layers and their settings (not pictured: my first layer is a brightness/contrast layer set to screen) (explanation in alt text):


all of these layers and their settings will vary depending on your footage and its coloring (and obviously, feel free to make the gradient map whatever colors you like if you aren't going for this exact look).
pretty basic coloring, especially with just slapping a gradient map on top (my beloved), but at this point, i still didn't like the quality of the gif, so i added a couple textures/overlays.


i put the left one down first and set the blending mode to soft light and the opacity to 8%. depending on what look you're going for, you could increase or decrease the opacity or play around with different blending modes. i like using this texture with lower quality footage because even when it's sized up a bit, it adds some crispness and makes things feel more defined. for the second texture, i set it to overlay and 75% opacity. we love and respect film grain in this house.
now for the typography! sometimes i really enjoy typography and other times it's the bane of my existence for the sole reason of just how many fonts i have installed. anyway, here are the settings i used for this set:

make sure the color of your font is white and then set the blending mode to either difference or exclusion. i can almost never see a difference between the two, but for this set, i used exclusion. below are the blending options (double click on your text layer to bring up this menu or right click and select blending options).


now we have to add the warp effect. with your text tool still selected, click this icon at the top of your screen:

from the dropdown menu, select twist. these were my settings, but feel free to play around with different warp options and their settings. the ones i use most often are flag, fish, and twist.

this last step is completely optional, but it's an effect i use in most of my sets with typography. duplicate your text layer (select the layer and ctrl+j), turn off the layer effects (click the eye icon next to effects), and set the blending mode to normal. right click on the layer and select rasterize type. right click on the layer icon itself and choose select pixels.

at this point, you should see the moving black and white dotted line showing that only your text is selected. then go to edit > stroke. here are the settings i almost exclusively use.

this is what your text should look like now:

using ctrl+T, move the layer off the canvas so you can't see any of the text anymore. you should be left with only your outline. click anywhere on your canvas to de-select the text we just moved. use ctrl+T again as well as your arrow keys to nudge the outline over to the left 2px and up 2px. this is personal preference as far as the positioning, but i almost never move it any other way. you can leave it like this, which i sometimes do, or you can set the blending mode to soft light like i did for a more subtle effect.
and that's it! rinse and repeat for each gif in your set or use a different warp effect on each gif to switch it up! if you have any questions about this tutorial or would like me to make one for anything else, please feel free to ask any time!

#gif tutorial#my tutorials#gifmakerresource#completeresources#dailyresources#chaoticresources#userdavid#coloring tutorial#typography tutorial#tutorial#photoshop tutorial
172 notes
·
View notes
Text
How To Gif: Glass Shatter Effect
By popular demand (ie, 7 people who voted in this poll), here is a tutorial on how to do the glass shatter effect I used to create the first gif in this set.
I use Photoshop CC 2015 (yes I know it's old) for my gifmaking, but you should be able to apply everything to newer versions of Photoshop. For this tutorial I'll be assuming you know the gifmaking basics, but if not, I would recommend this tutorial, which is the process I use to make gifs. Note that this particular process involves saving all of the frames, importing those frames into Photoshop, and then using an action to convert to a smart object.
Keep reading below the cut to learn how to do this effect!
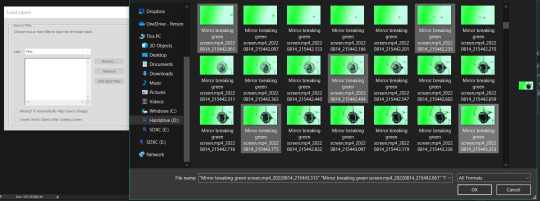
Before I could start making this gif, I needed three things; the two scenes that I wanted to use, and a video of the glass shattering effect. I already knew the scenes I wanted, so then I took to YouTube to find a video which I can't for the life of me find again, but it looked like this:
Something like this is what you want. Ideally the green part would be entirely white, but as long as there are two clearly different colours you can usually work with it.
This looks a lot slower than the gif that I made, but that's not because of the frame rate - which is exactly the same above as in the final gif - it's just because there are extra frames in this slower one that I cut out. In the video I used, the glass shattering happened very slowly. I didn't want that, so I ended up skipping several frames when I loaded the frames into Photoshop before using my gifmaking action. I just did this by manually selecting one frame, skipping the next several before selecting another frame, and repeating this until I had selected 60 frames.
After using my gif action, I had a smart object of the glass shatter effect that looked like this:
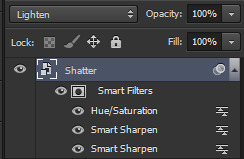
That's a much better speed! It still wasn't quite where I needed it to be though. I needed this in black and white, so I slapped a hue/saturation adjustment on the smart object and set the saturation all the way down to -100.
Okay great, I could start putting the gif together now.
First, I made a copy of the glass shatter smart object, because I'll need that later. Then, I pulled in frames from the scene that I wanted to appear in the hole after the glass shatters, and I used those to create a new smart object with my gif action (we'll call it Scene-bg). I pulled Scene-bg into the same window as the glass shatter objects. Then I created a new smart object by combining one of the glass shatter objects with Scene-bg, which I did by selecting both layers right clicking, and selecting "Convert to Smart Object".
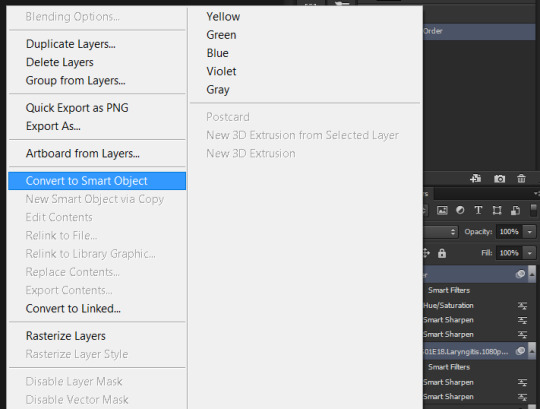
I renamed this smart object to Shatter-fg. I opened it by clicking on the little icon next to the layer name in the layers window here:
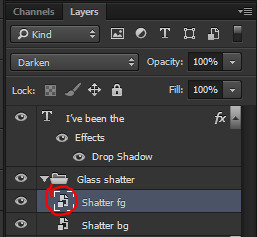
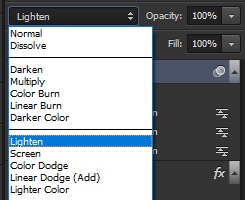
The most important thing here is that the shatter effect object should be the top layer, and I set the mode to "lighten". This will make sure that the lightest colour of either this layer and the layer behind it is displayed; that means that anywhere that's white in our shatter animation will still show up, but anywhere that's black we'll see what's in the layer(s) behind it.
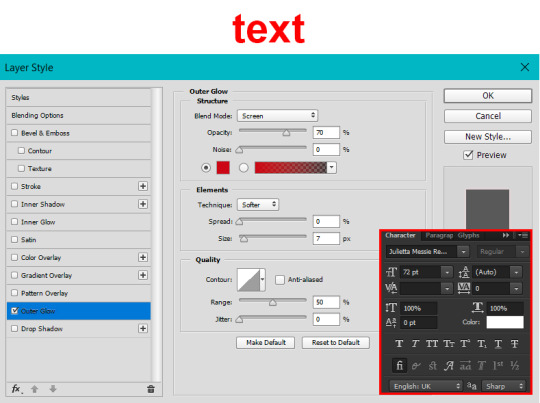
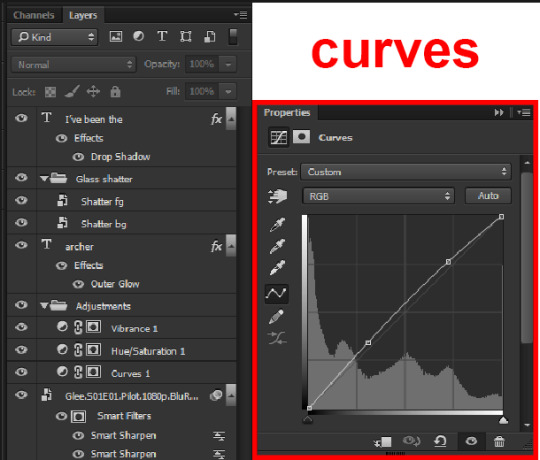
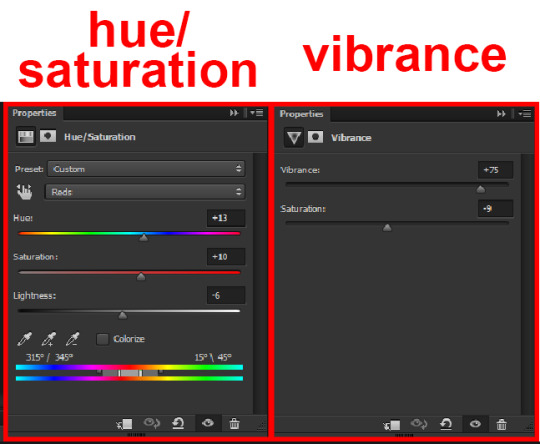
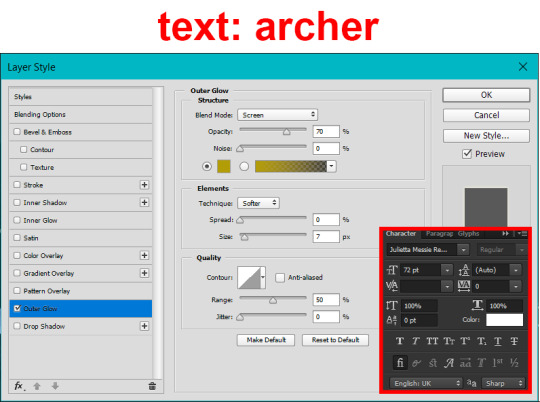
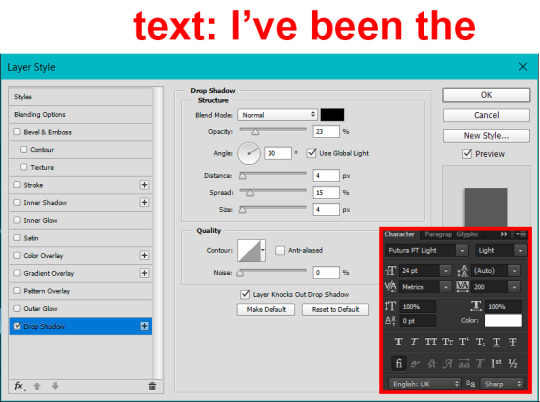
Then I threw some adjustment layers between them to get the colouring I wanted. I used a curves layer, a hue/saturation layer, and I also added text with an outer glow layer effect. Here's what the layer order looked like and the settings I used for each layer:
After this process, Shatter-fg looked like this:

Okay nice, this is starting to look like something! I saved this and went back to the main file with the other glass shatter object.
I needed to invert that other glass shatter object. There's a weird quirk with the version of Photoshop that I use where it doesn't like it when I apply specifically an invert adjustment to a smart object (it appears correctly when editing, but not on export) so I did this by creating a new smart object which included a separate invert layer, but if you have a newer version of Photoshop you can probably just apply the invert adjustment directly. Just note that you'll need to do one of these options; it won't work if you add a separate adjustment layer in the main file, it needs to be applied specifically to the smart object (which we'll now be calling Shatter-bg). It looked like this after I inverted it:
Once that's done, I made sure Shatter-fg was the layer directly above Shatter-bg, and set the mode of Shatter-fg to "darken" and Shatter-bg to "lighten". Since Shatter-fg is set to darken, it will be visible only when it is darker than the layer behind it. By setting Shatter-bg to lighten, I've guaranteed that the layer behind it will always be lighter (ie, white) in the places we want Shatter-fg to be visible, and will be black otherwise. Once I update those settings, this is what the gif looked like:
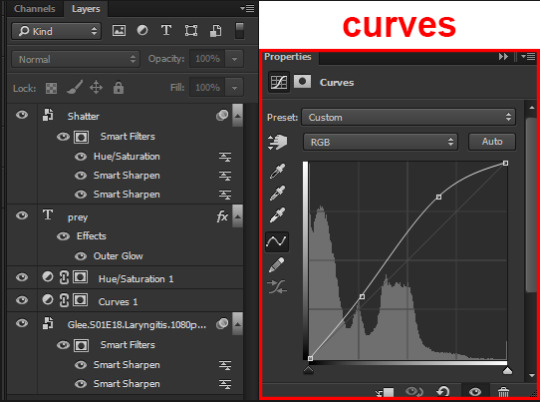
This is all there is to the glass shatter effect itself. Next I pulled in frames from the second scene to fill in the black areas. This layer needed to go below both glass shatter layers, so that it only shows through where the black. Then I added adjustment layers and some text. I used curves, hue/saturation, and vibrance adjustment layers, and I also added the "archer" text below the glass shatter layers so that it would be hidden to reveal the "prey" text. The other text I added above all of the layers, since I wanted this to be visible all the time. Here is the layer order and all of the settings I used for each of the layers:
I also grouped Shatter-bg and Shatter-fg and shifted them on the timeline so there would be some time to see the background gif before the shatter effect starts.
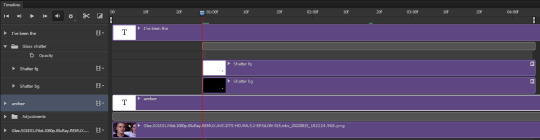
And that's all! Then it''s just a matter of exporting the finished product:
This is the first gifmaking tutorial I've ever made, so I hope I was able to be reasonably coherent and helpful! I'd love to hear if you make anything by following these steps, or even if you just feel like you've learned something reading through this. And if you have any outstanding questions, feel free to reply or send me an ask and I'd be happy to answer!
#gifmaking#tutorials#gifmaking tutorial#gif tutorial#photoshop#photoshop tutorial#usergif#gleesource#my tutorials#mine#how to gif#tw mark salling#mark salling tw#not tagging as glee because it's not actually about that but wanted the tw tags just in case#this was so much more effort to put together than I thought it would be lmao#I was like oh yeah I've already made the whole gif I just need to go back and explain how I did that...#it took A WHILE#anywayyyy it was fun though so I'm glad I did it#would love to know if anyone finds this helpful or interesting or tries out the effect or something similar!#you can also just grab the black/white gif I included above if you want to do the effect since I can't find the video... sorry lol#but yeah you have my permission to steal the black/white gifs for gifmaking purposes if you would like#just don't like. post your own tutorial claiming you made it or something?? but like you don't need to credit me or anything obviously.#ANYWAYYYY#I feel like... a LITTLE pretentious thinking I'm good enough at making gifs to be qualified to make a tutorial#but like it's fineeee everything is fine#gonna finally post this now enjoy byeeee
98 notes
·
View notes
Text
Gif/Coloring Tutorial

I was asked by @just-lost-inbetween-worlds how I make, specifically, my Titans gifs so I figured I’d just make a tutorial on the gif making and coloring since the show is SO blue and the process is the same for all of my gifs.
I did try and go into every step so it’s hopefully beginner friendly lol It did get a little long but I hope it helps!!
What you’ll need:
Clip of what you’re giffing (try using footage that’s 1080p or 4k, nothing below 720p)
Adobe Photoshop (I’m using 2022)
Step 1:
Open photoshop, click file > import video frames to layers

Use the cursors to trim the part you want to gif, make sure you have “make frame animation” selected

Step 2:
Group all of the frames you want to be a part of your gif. Click your first layer then crtl+shift+click your last layer

Step 3:
Delete the frames and layers you don’t want to be a part of your gif. Select the layers and click the little trash can at the very bottom of your layer panel. Do the same in your timeline
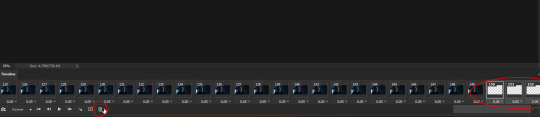
Step 4:
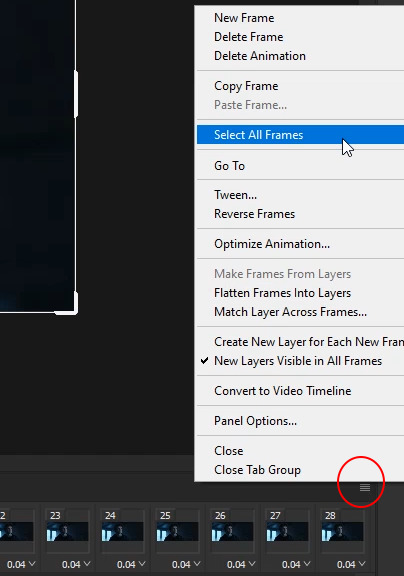
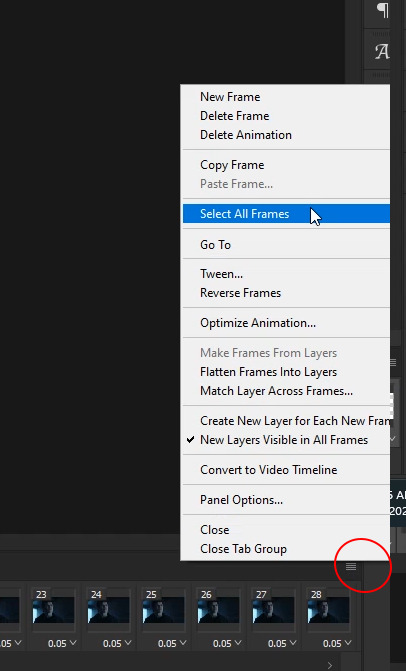
Click the hamburger stack at the right hand side of your timeline then click “select all frames”
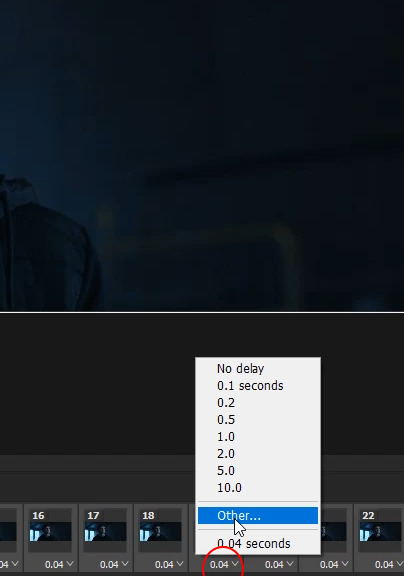
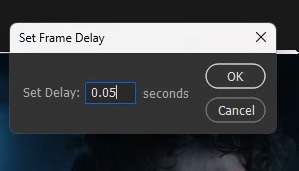
Click one of the little arrows on one of your frames and change the speed to 0.05
Step 5:
Change the size of your canvas. Tumblr has specific dimensions for gifs. For 1 column gifs, the width should be 540px, for 2 column gifs the width should be 268px, and for three column gifs the width should be 177px on the outside gifs and 178px for the middle gifs.
My favorite dimensions are 540px by 340px but you can mess around with the height. The height of the gif does not matter


Step 6:
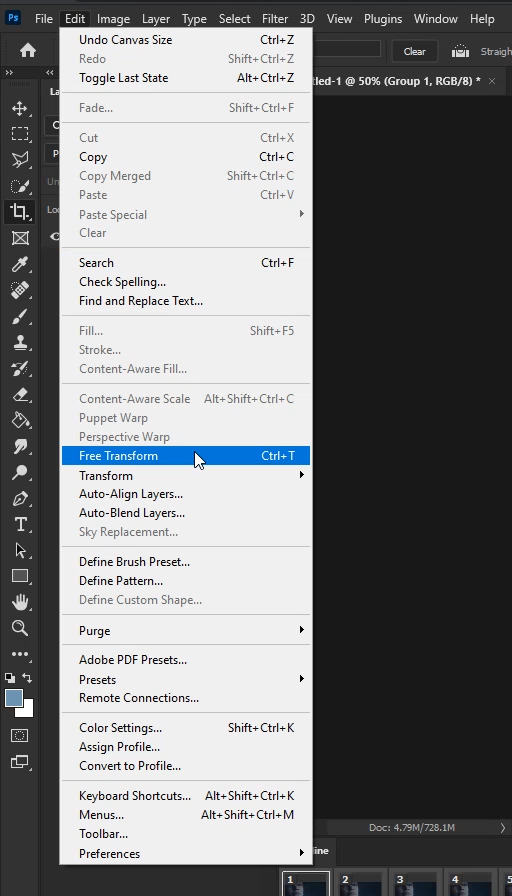
Select your group then go to edit > free transform. Use free transform to adjust your frames to fit your new canvas size

Step 7:
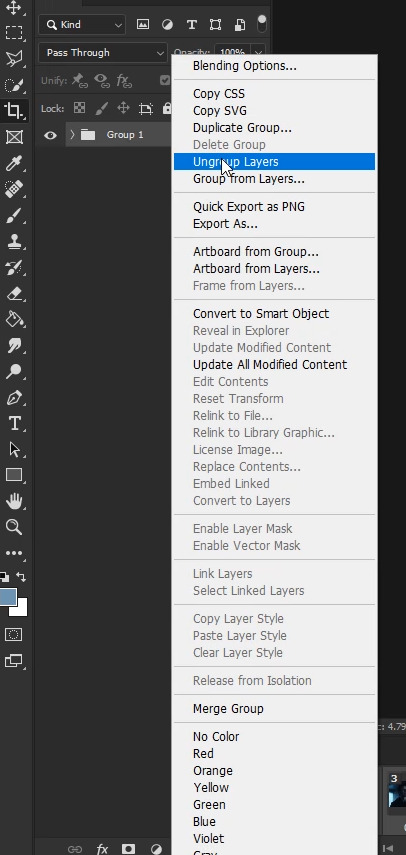
Click the hamburger stack and select all frames. Ungroup your layers by right clicking your group then “ungroup layers”. On the bottom left side of your timeline, click the little hamburger stack with a line through it to covert your timeline to frame animation. Just make sure all of your frames and layers are selected when you turn your timeline into frame animation


Step 8:
Select all of your layers and right click > “covert to smart object”
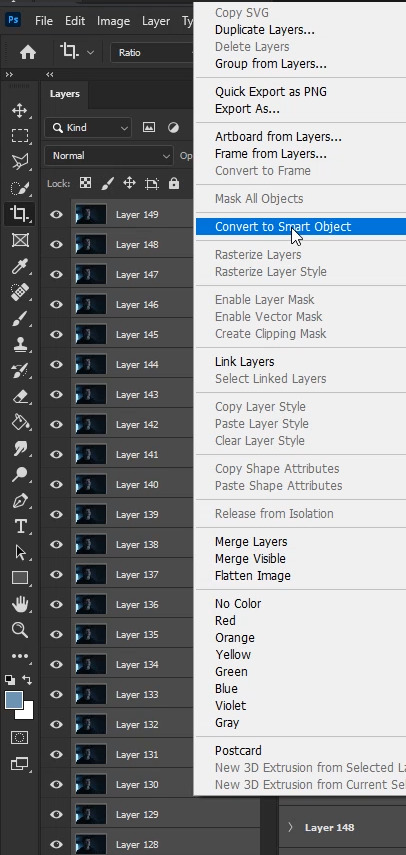
Your work space should look like this
Step 9:
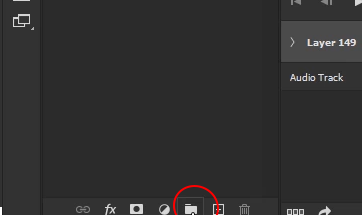
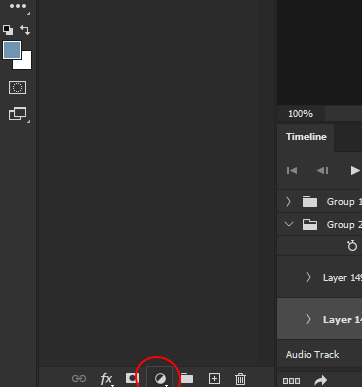
The coloring! Click the little folder at the very bottom of your layers panel
Step 10:
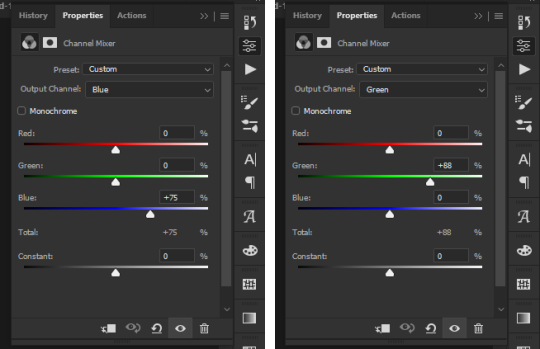
Click the adjustment layers option and select “Channel mixer”.
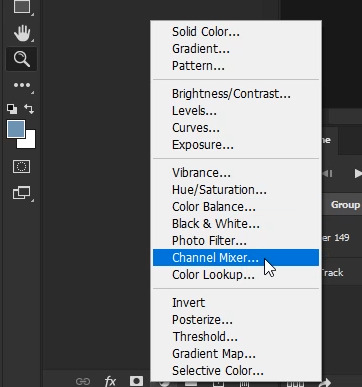
I really like channel mixer for scenes that are really blue and really yellow. It’s a quick way to reverse those filters. Channel Mixer works with contrasting colors. So, your blues go yellow, your greens go purple and your reds go blue. I highly recommend this tutorial by @zoyanazyalensky . It is amazing and they explain channel mixer worlds better than I ever could lol
For my gif, it’s really blue, so I go to the blue channel and bring the blue blues down a little
My gif starts going a little bit green so I open the green channel and bring the green greens down a little bit

I just messed with the blue and green mixer until I was happy with it. My channel mixer settings ended up looking like this
Step 11:
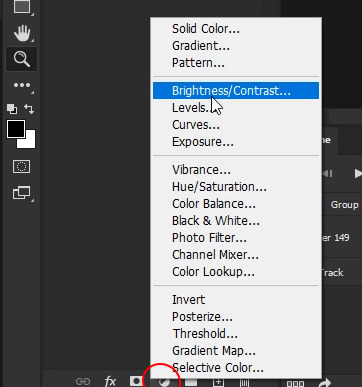
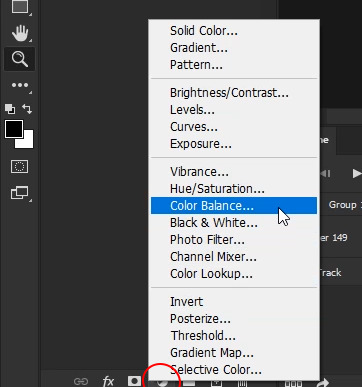
Click the adjustments layer option and select "Brightness/Contrast”
These are my brightness and contrast settings. Set these to whatever works best for your gif. Be careful not to brighten too much because your gif can go a bit grainy if you do
Step 12:
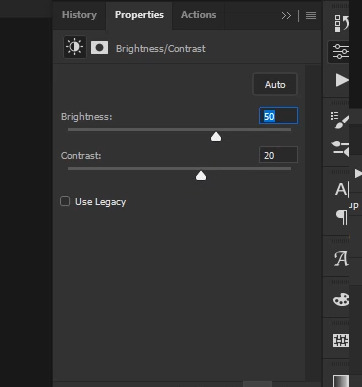
Click the adjustments layer option and select “Color Balance”
I love color balance. You can adjust a lot with it and it’s a great adjustment layer. For every gif, I start with midtones. For blue gifs like this one, I slide all of the sliders to the right and staircase them. There isn’t a specific number I set them to since every gif is different so I just slide them until I’m happy with them.
Next, click the drop down menu that says “midtones” and select “shadows”. For shadows, I also slide them just a little bit to the right.
Next, click the drop down menu and click “highlights”. Again, just move those a little bit to the right.
This is what mine looks like
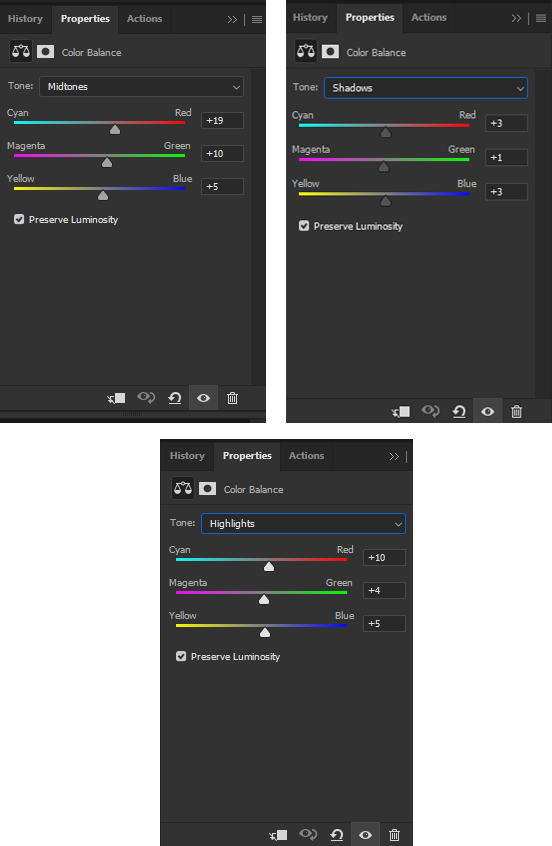
For gifs that are more yellow, you’ll likely slide your sliders to the left instead of the right!!
This is what my gif looks like with Channel Mixer, Brightness/Contrast, and Color Balance

Step 13:
Click the adjustments layer option and select “Selective Color”
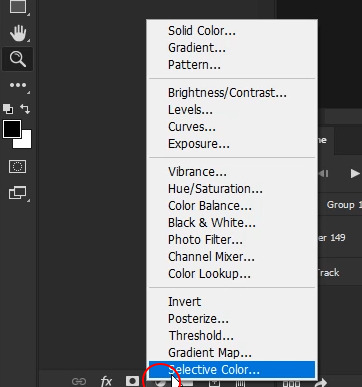
Selective color is great because it allows you to fine tune individual colors within your gif rather than changing the entire color of it. Selective color is really helpful when it comes to skin tones as well. There isn’t a specific way I do this lol I just slide the sliders left and right until I like what it looks like lol
This is what mine looks like
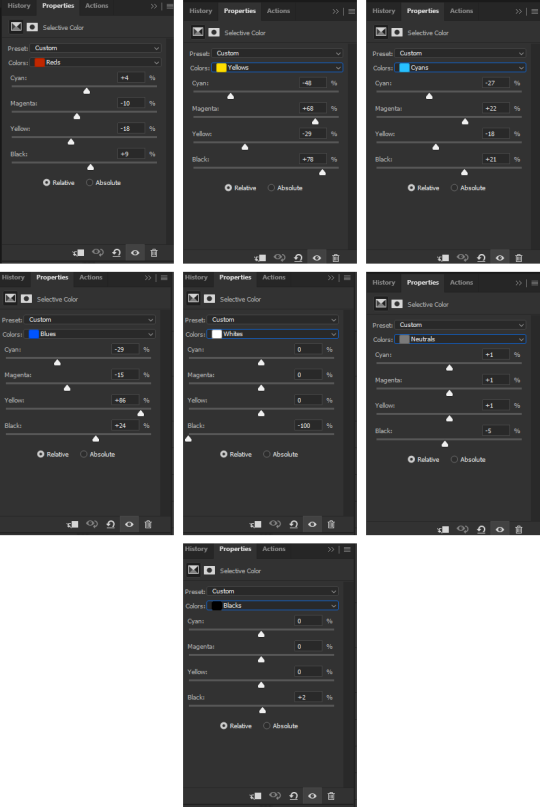
I almost allows brings the white blacks all the way to -100 and have the black blacks set to +1 to +3
Step 14:
Click the adjustments layer option and select "Vibrance”. I just upped the vibrance and saturation a bit since Jason’s skin was looking a little washed out.
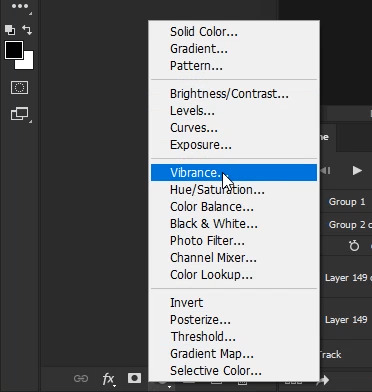
This is what mine look like

Step 15:
Add your sharpening!! Click your smart object then go to filter > sharpen > smart sharpen. I’m using sharpening by @anya-chalotra but I usually set the reduce noise to 7

Step 16:
Export!! Go to file > export > save for web


Make sure your gif is under 10mb (red circle) because if it’s over 10, it won’t play on Tumblr.
Make sure your colors are set to 256 and your dither is 100% (green circle), the quality is set to “bicubic” (blue circle), and the looping is set to forever (pink circle). The yellow circle are my other settings. You can play around with those but I find adaptive and diffusion work best in most cases!!
Step 17:
Photoshop will export your gif with a speed of 0.07 so now you need to fix that. Once your gif is saved, open your gif in Photoshop again. Select all of your frames and change the speed to 0.05. Then export it like above and save!!
And that’s it!! I hope this was at least somewhat helpful!! If you have any questions, feel free to send me an ask!!
Here are some other gifs I’ve done following these same steps


#tutorials#tutorial#gif tutorial#coloring tutorial#photoshop#adobe photoshop#photoshop tutorial#giffing tutorial#chaoticresources#completeresources#allresources#dailyresources#userautie#userzesty#userriel#userfaiths#tusernoor#my tutorials
160 notes
·
View notes
Text
𝓣utorial
"Como fazer header com gif no canvas"

💭 Me pediram para ensinar a fazer a header que estou usando no momento, e como a explicação iria ficar muito grande decidir criar esse tutorial. Levem em conta que esse é meu primeiro tutorial, então se não ficar bom peço desculpa antecipadamente.
A header:

Vamos lá:
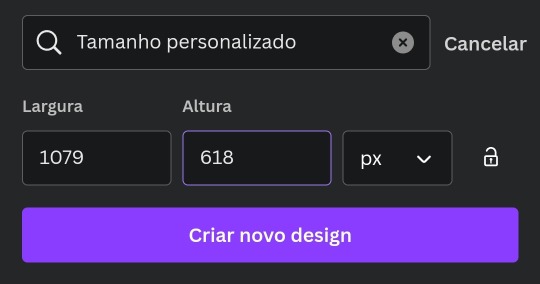
▫️ Abra o app e crie um novo design personalizado com o tamanho 1079x618
▫️Com o design aberto você vai clicar no "+" na parte de baixo. (imagem 1)
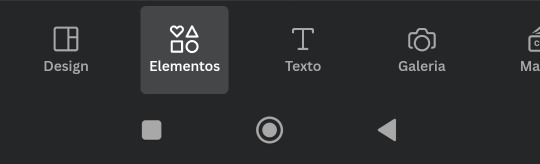
▫️Depois clique em "Elementos" (imagem 2)
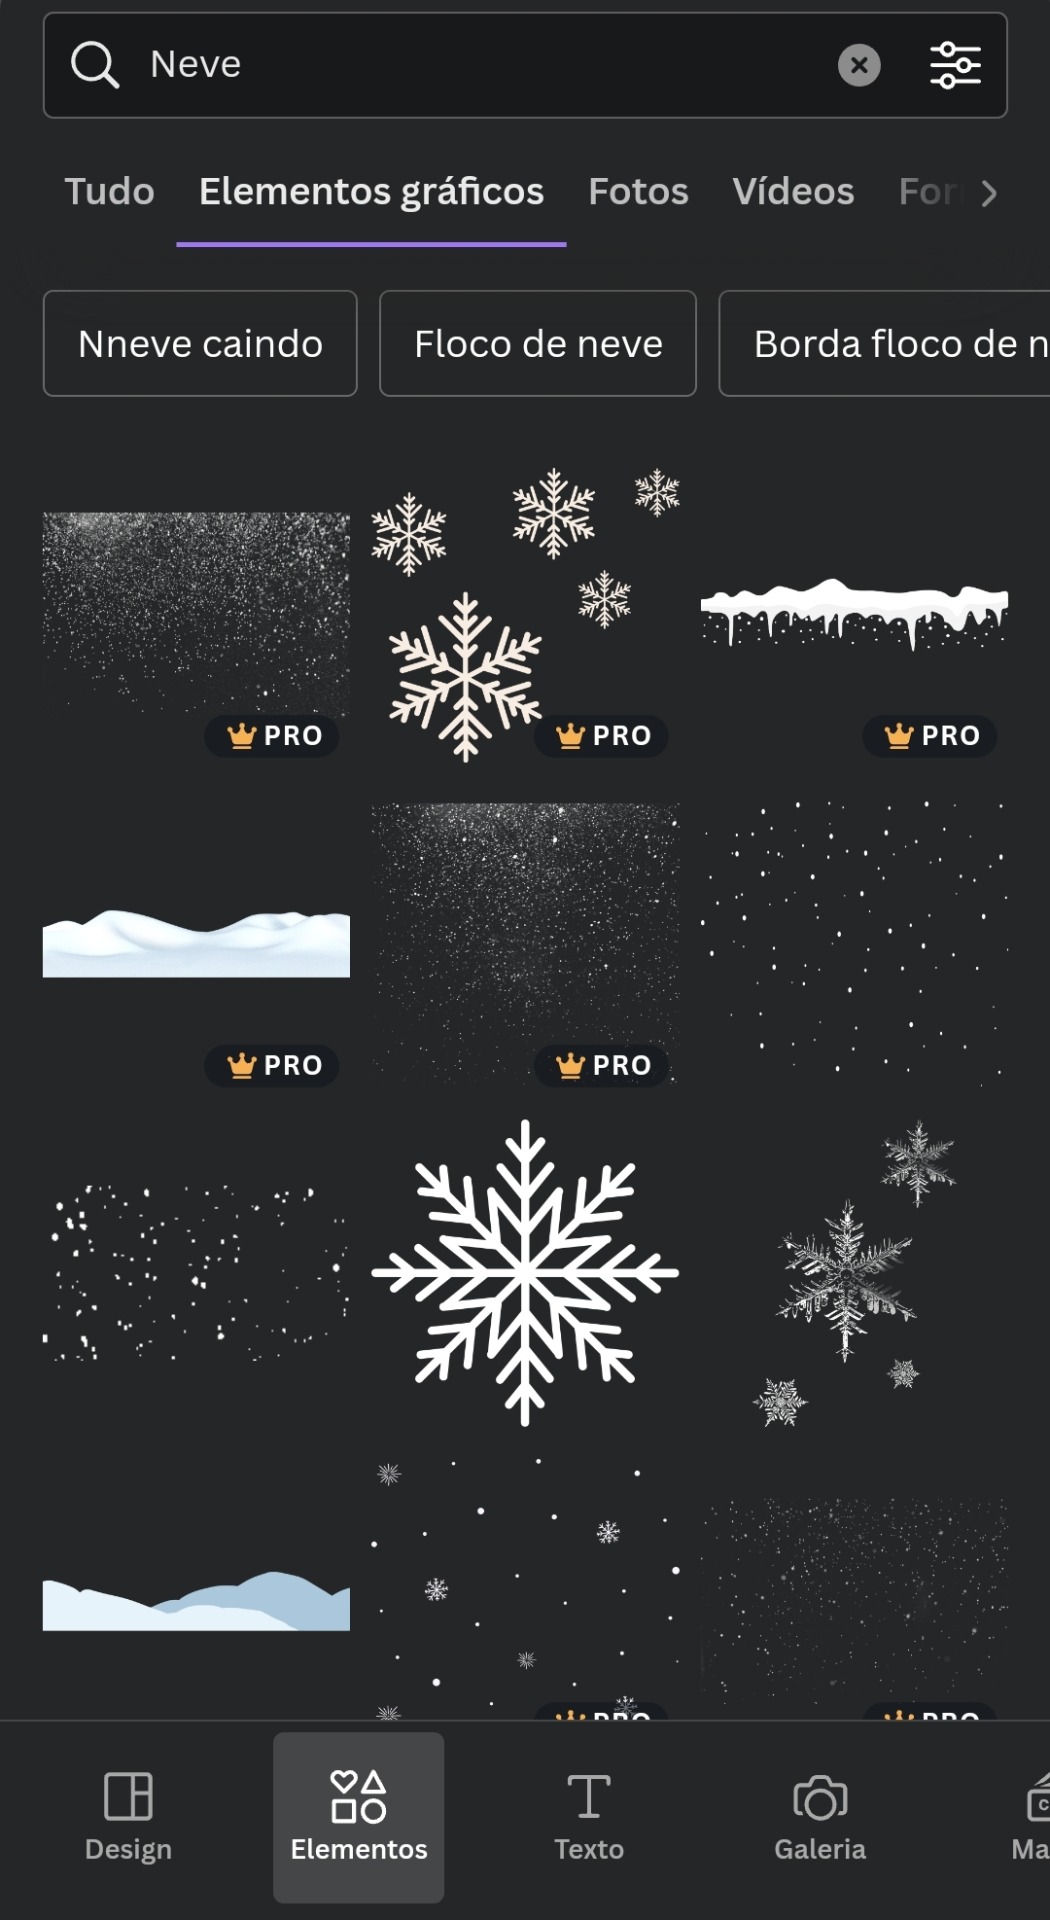
▫️Agora você vai na barra de busca e escreva o nome da figura que você quer usar.
▫️Depois você clica na aba "Elementos gráficos".
▫️Escolha a figura que quer usar e adicione no design em branco.
▫️Faça isso até encontrar tudo que quer usar.
▫️O gif de neve caindo você encontra em "Elementos gráficos" também.
▫️Agora use sua imaginação e crie um design completo usando apenas figuras.
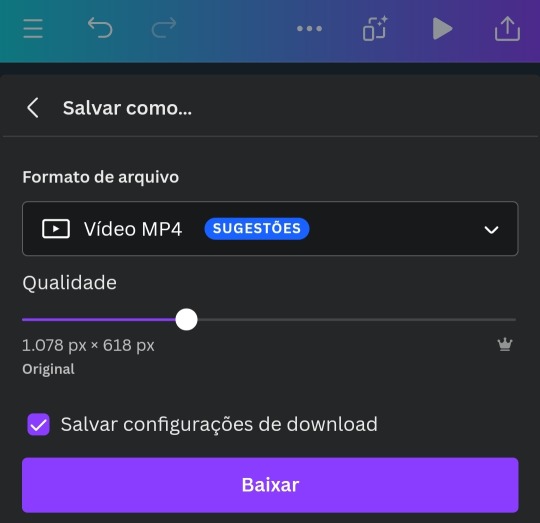
▫️Depois de editar tudo você salva e baixa no formato de "Vídeo MP4", por causa do gif de neve.
▫️Se você salvar o design como gif de primeira, o tumblr não aceita como capa. Bom, pelo menos no meu celular não funciona.
▫️Depois de fazer tudo isso, você vai nesse link aqui e transforma o vídeo em gif e salve na sua galeria.
▫️E tá pronto o sorvetinho... ops, digo o design 🤭😉
t𝗎𝗍𝗈𝗋𝗂𝖺𝗅ㅤ©ㅤestrelinha-s • 𝗅𝗂𝗄𝖾ㅤ𝖺𝗇𝖽ㅤ𝗋𝖾𝖻𝗅𝗈𝗀ㅤ𝗉𝗅𝖾𝖺𝗌𝖾.
#﹫estrelinha-s ᐧ 𝗇𝖾𝗐 𝗉𝗈𝗌𝗍 𝗇𝗈𝗐.#ㅤ📎 ㅤ' ㅤ tutorialㅤ ♡#tumblr tutorial#kpop#kpop tutorial#tumblr headers#my tutorials#aesthetic headers#random headers#arquivo#messy headers#aesthetic christmas#aesthetic
36 notes
·
View notes
Note
hi, if it’s okay with you could i ask how you got that beautiful dark tone in your hellcheer gifs? have a good day ✨
Hi, thanks for asking me! :)
My Hellcheer coloring is actually based on color erasure:

The original scene - sharpened. Lots of green here, not much else.
There are many ways to alter and even erase colors entirely in PS. Once upon a time, I happened to stumble upon Channel Mixer's preset list and discovered some pretty handy filters there.
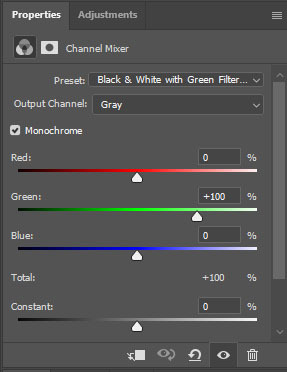

Since we're dealing with mostly greens here, you'll want to choose Black & White with Green Filter.
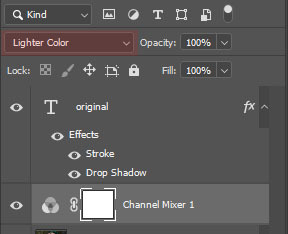
Then set it to Lighter Color.

The greens are now entirely gone, leaving more room for other colors to shine. :)
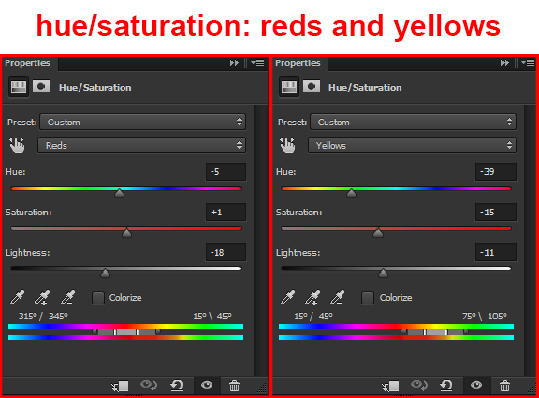
After that, I added some Levels, Brightness/Contrast and Selective Color (reds, yellows, blacks) and finally achieved this:

Hope this helps. :)
#replies#anon#photoshop#gifs#gif tutorial#coloring#allresources#completeresources#my tutorials#i had a feeling someone might ask me this soon#and i'm happy to deliver :)#gifs by disdaidal
77 notes
·
View notes
Text
Hi there! I have never gotten around to make a gif tutorial because there are plenty of good ones out there and I suck at explaining things. Back when I basically use my side blog (@marvelsaos) as my main, I didn’t get that many questions regarding gif making, I presume because many people who followed me there weren’t gif makers. But this year, I finally come back to my real main blog and started posting more gifs over here. This blog is where I mostly follow gif makers and is mostly followed by gif makers. I have gotten a lot more ask on how to achieve certain things in my gifs, most notably my recent Winnie The Pooh set. And this is why I decided to make this post. This is by no means a tutorial, just a post sharing my giffing journey and the things I do in gif making that might be of your interest.
‼️Tons of rambling below. Text, image & gif heavy. Proceed with caution‼️

Table of Contents
Introduction
The Basics
Everything about making a simple gif from start to finish
How to optimize your giffing process
The more advanced stuff?
“Recolouring” & rotoscoping in After Effects
Tutorials mentioned in this post
Acknowledgement
Feel free to jump to any section you find useful. Most of the ramblings are in the introduction.
1. Introduction
i. How I started
You thought that was the intro?! I’m the kind of person who someone would know for a decade without hearing me say a word, and when I finally spoke (usually about stuff that I’m passionate about) I just go on and on and on and it shocks people to no end. I’ve been on tumblr 10 years now as some of you might know I’m doing my 10 year celebration, but I didn’t start giffing until about 7 years ago. And I just realised I have never properly introduced myself. Hi! My name’s Winnie and my username across all social media is Ms_Stanatic. Before I started giffing, my main fangirling platform was IG, and boy I’ve got sooooo many accounts I don’t even remember all of them, the bigger ones were mofy, ouat & aos related, and these days I’m giffing all of my old favs for old time sakes. If you happened to know me back then, drop by and say hi. It probably felt like I drop off the face of the earth when I quit IG. The show that got me started on giffing was, as some of you might know, Agents of SHIELD. @marvelsaos was my “main” blog for the first 6+ years of my giffing journey. Now thinking back it was because I finally got my first laptop when I got into uni and didn’t have to make edits on my android phones anymore. But at the time, all I wanted to do was to capture Melinda May’s eye rolls and actions and static images just weren’t doing it for me anymore. And that’s how I embarked on the journey of gif making.
ii. Tools/ Softwares I used
I had a Macbook air back then, and finding a cracked photoshop for mac was kinda hard, so I had to settle with GIMP. Without the GAP plugin may I add because I do not know how to install it till this day, so it was just pure nightmare. Making gif in the beginning was the most tedious thing I ever did, I’ll explain a bit more later on. The giffing community felt very different back then. I don’t know if it’s because I wasn’t aware or because I wasn’t in it. I felt like there wasn’t as many giffing tutorials on this site, and all I kept seeing was people sharing their psds. It might have been useful if I had photoshop but I didn’t. So the idea was that you can just open up the psd files and drag the adjustment layers onto the image stacks that compose of your gif, and the adjustment layers would affect all the layers beneath it. Not with GIMP though. In GIMP, the adjustment layer(s) only affect the single layer right underneath it. You heard me right. At that time the gif size limit on tumblr was 2mb, a gif I made is usually 20-30 frames/ layers. So I had to duplicate the adjustment layers 20-30 times, them move them right above each image layer. And if I don’t like how it looks, I had to do it all over again. This is slowly turning into a rant but seriously thinking about it gives me headaches. Also, did I mention I didn’t even read up on tutorials and stuff, I basically just googled everything I needed, how to screencap, import it into GIMP, crop & resize, how to use curve, then lastly how to export. No sharpening, no nothing. I didn’t even learn about recolouring like less than 2 years ago (my AoS peeps know which post I’m talking about 😉). This went on for about a year or two, then uni got busy and my life basically went downhill. Somehow, AoS pulled me out of that deep dark hole and get me back on my feet again also because I finally graduated but I’d like to think it’s my love for tv that saved me. I got a bit more time on my hand, I decided to go back to giffing and this time I was determined to get GAP installed on GIMP and have it working. But alas I have failed once again. It was around that time I found out photoshop’s older versions like cs5 was free to download, so I got that instead and finally begin giffing with photoshop.
Moral of the story: Try your best to get photoshop for giffing. It’ll save you so much headache.
And my story didn’t end there. While I was using cs5, I think many people have switch to photoshop cc which has the timeline function for things like smart sharpen (which was a major topic back then) and keyframes (which is what I heard people talking all about these days). Even without timeline, photoshop is definitely a step up from GIMP personally and I managed with a workaround on the smart sharpen function thanks to Julie (@doramilaje). Side note, all the gif makers (beginners & experienced alike) I’ve talked to are all such amazing people. They put so much energy into this craft and are more than happy to talk to you about it when asked. So don’t be afraid, just ask nicely. And maybe go off anon, you might make a friend or two.
2019-20 were probably my most prolific giffing years, I giffed non stop every single day as if it was my full time job. For me, it was something small and easy to complete and it kept my days going. And eventually my Macbook Air that I’ve been using for 5 years was starting to give up on me. And when I upgraded the OS system to Catalina, it no longer supports cs5 and I was devastated. I eventually got my hands on photoshop cc 2020, and in some ways I re-learnt how to make gifs again (like for the third time?).
I knew it was about time to get a new laptop. And now that I know I’m gonna use it for some heavy duty, and I didn’t want to get another macbook because I’m just not that crazy about it and at that time I wanted to use avisynth (more on that later) which was only available on windows (I didn’t know how to install vapoursynth on my macbook ok?). Eventually I got a gaming laptop with a 10th gen i-7 processor and a Wacom Intuos Pro using my sibling’s student discount. I got the Wacom tablet trying to get into digital drawing, but eventually it came in super handy with just day to day editing and especially recolouring.
Moral of the story: Start with whatever you’ve got, then upgrade your equipment when you’re serious about it.
iii. What I’m doing now?
This year has been kinda different for me. In the past, it has always felt like I’m on my own sitting in front of my laptop churning out gifs 24/7. This year, I’ve joined a couple other blogs and gif maker/ ps user networks, learnt a whole lot of new things and diversified my giffing content (I have been giffing AoS 99.9% of the time non stop previously I kid you not). And I’ll be back in school for my part time masters a month or two later, so who knows how often I can gif. I don’t ever wanna stop giffing but I know one day I will, and before that day comes I just wanna share some of my memories with you guys on this hell site. So, basically all that led to this post.
2. The Basics
I’m gonna assume you have a bit of knowledge about gif making. If you’re a complete newbie, I’ve tried my best to link some tutorials to help you understand or get started. And don’t get intimidated by the length of this post. Even though a lot goes into gif making, once you get everything sorted and find your routine, it’ll become second nature. The following is simply my workflow of gif making. It is by no means the right/ better way of gif making. Everyone does things a bit or drastically differently, I’m just here to share my process in hopes that someone might learnt something new or find something interesting. If I got something wrong, feel free to inbox/ message me and address it politely, since I didn’t exactly started out giffing with clear directions, I do get some of the fundaments wrong. And I am no expert in photoshop or any editing software, it’s more of a learning as I go sort of thing. So just take everything with a grain of salt. With all the disclaimers out of the way, here come the things you’re probably here for.
i. Video source
There’s one simple rule, go with the most HQ one, I’m talking 1080p or 4k and make sure it’s the biggest in file size because not all 1080p are created equally. Here’s a post by Taylor (@kylos) explaining all of that and where to download as well. For the most part I just use 1080p because I personally can’t tell the difference but I’m sacrificing a lot of time for a 4k video to load/ process. It’s only instances like these I would use a 4k source.

(gif taken from my set here)
Downloads are gonna take up space but you probably want to keep them if you might gif the show/ movie in the future again since you already spend all that time downloading, so you might need to invest in some hard drives for this. I used to use my uni’s unlimited gdrive plan which was available even after I graduated, but after Google cancelled it I was in huge trouble. I save pretty much all my hd downloads and all my psds & gifs. I’ve recently got a WD Elements 12TB just so I can transfer all 6+TB data on my gdrive to there with space left for the next couple of years.
ii. Screencapping vs Video clipping
So there are a couple of ways to go about this that I’m aware of.
screencapping with mpv (tutorial by Taylor) or other softwares
video clipping with handbrake (here’s an in depth tutorial on gif making including clipping with handbrake by Nums @cillianmurphy), vlc, km player, etc.
video clipping + cropping + resizing with Vapoursynth (download here | tutorial by Em @realstraykids)
I have tried all of the above. I started with screencapping till around late 2020, when I found out about avisynth (now replaced by vapoursynth) and finally got my hands on a pc where I can download it. I was using screencaps for a really long time because older versions of ps don’t have timeline, I would end up having to convert the video back to frames anyways so why don’t I just import screencaps as is. I think it’s the same logic for me now, because I start all of my editing in timeline, so it’s just quicker to import video clips for me (especially when comparing screencapping with mpv vs video clipping with handbrake). From late 2020 till now, I mostly use avisynth/ vapoursynth. There should be less detail lost when resizing using vapoursynth compared to ps. Personally, I think ps does a pretty good job and I wouldn’t say vapoursynth is a must, it just happens to be a video clipping and resizing two in one tool for me. Vapoursynth has additional denoise & sharpening tools, but I just couldn’t quite get the setting right to incorporate them into my giffing routine, so I stick with ps for those purposes.
Here’s a comparison for you if you’re thinking about using it. On the left is how I used to gif without vapoursynth. I did the same thing for both gifs except for sharpening, because the clips from vapoursynth just look slightly sharpened to me so I compensated with more sharpening on the left. Honestly, now looking at it side by side I actually like the one without vapoursynth more 😂 I’ll let you decide for yourself. Also, when I’m doing a huge compilation set where there are a lot of gifs and they are basically tiny and I don’t really have the dimensions in mind yet, I’ll just go with video clipping. It’s faster and I can resize it later.
iii. Resizing
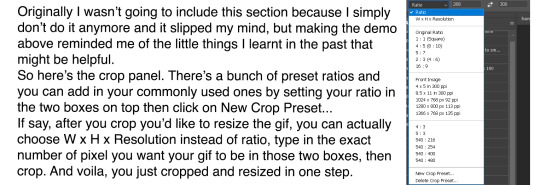
There might be reasons why you don’t want to use the W x H x Resolution crop for your gif, because in the image size panel you can actually choose how you want your resampling setting. Normally I just go with Preserve Details 2.0, and set reduce Noise to 100%.

iv. Sharpening
Once I load my clips into ps, the first thing I do is add smart sharpen to them. For the longest time I only sharpen once. Here’s a sharpening tutorial by Ava (@anya-chalotra). I think those settings are mostly what people use and if you’re new to this you should probably stick with that. But I’ll let you on a secret (not a secret anymore now that’s in the open), I don’t do the whole over sharpen then blur it out thing, I just sharpen to the amount I like. This is coming from someone who spent the first 2? years giffing without sharpening, and when I do realize people sharpen I didn’t even look/ properly follow a tutorial on how to do it. I just knew smart sharpen is a thing. So, I’m sure there’s good reasons why you should sharpen to 500% then add gaussian blur and you probably should do that too. Prior to using vapoursynth, my settings were like radius 0.3, amount 100%-200%. With vapoursynth, I find it slightly sharpens my clips so I go with radius 0.3, amount 50% like 90% of the time.
Then there’s the second sharpen thing if you noticed in my banner gif which I learnt from Sid’s (@sidonidoneeey) tutorial recently. I think it adds more contrast & definition to the objects in the gif.

Here’s a comparison for you to decide for yourself. I tried the max sharpening then add gaussian blur method in the second gif, and I’m still not quite convinced.
v. Colouring
This I would say is pretty much the essence of a gif maker’s style. Again, everybody does it differently, different gif makers swear by different adjustment layers.
Here are some tutorials for getting rid those difficult colour cast:
Kate’s (@dewandawise) channel mixer tutorial
Airam’s (@magnusedom) colouring tutorial
The best/ most experienced gif makers I know all swear by channel mixer so you should definitely check out Kate’s tutorial.
Personally, my routine adjustment layers are like the ones in the banner gif. Levels → (+/- Curves) → Colour Balance and/or Selective Colour and/or Hue/Saturation → (+/-Vibrance). Then repeat any of those if necessary.
Levels:
Personally, I always start my colouring with levels. When I first started giffing, all I heard about is curves and I spent a lot of time fussing around with it not knowing what it actually does. Until I found out about levels. It is way easier to understand than curves and very suitable for beginners in my opinion.
You basically drag the right most arrow to meet the right side of the histogram. What you’re doing is telling ps what value in the gif you want to be the brightest (aka white), and everything beyond that value is going to be white as a result. You do the same thing on the left, and in this case defining the darkest/ black in your gif. I find this to be the simplest way to brighten and add contrast to gifs. The results as you can see is night and day.
Curves:
Curves can basically do what levels do but more. See those two arrows under the histogram in curves (right), they basically do the same thing as what I just showed you in levels (left). And then obviously you can manipulate the curve to get your gif how you want, but honestly I still don’t fully understand what curves is so I’m not gonna try and explain that to you. What I can do is show you some other neat tricks you can do with curves.

You can click on the hand with the pointing finger icon, click and drag up to brighten or down to darken on any area in the gif you’d like to edit.
Another thing I like to do is click on the white (last) or grey (second) eyedropper, then click on an area where you think should be white or grey to get rid of any unwanted colour cast. This video tutorial goes more in depth and is more of a proper way of doing it, but I just don’t bother with doing all of that normally.
So here you can see I click on the grey eyedropper, than I clicked somewhere in the background I think should be grey, ideally further away from that blue light beam behind her because everything near that is just gonna be more bluish. And you can see immediately the ground has less of a cyan tint and there’s more red in her skin. Sometimes, you have to try a couple of different places to get the best results. Sometimes, it just won’t work at all.

You can also Alt+click on the auto button, and a panel shows up. Click on them and see if any of those works for you. But normally I don’t use this because I have already enhanced the brightness and contrast with levels.
Once I get my overall values how I like it, I go into colour correcting. Usually nothing drastic, just trying to get rid of any colour tint and get the gif to look more neutral in colour. My go to are colour balance, selective colour and hue/saturation.
Colour balance:
This is usually my go to to adjust the overall tone of the gif, and the panel gives a good visual of rgb vs cmy.
Selective colour:
This is when I only want to adjust the tone of a particular colour without affecting the rest of the gif. I usually go to red the most to adjust characters’ skin tones. Also, people often ask if they should use relative or absolute mode. I would say for simple adjustment I would go with relative because it’s more subtle, but for major colour change and I want it to really show I’ll go with absolute.
Hue/Saturation:
This I usually go in and click on the hand button then click on wherever in your gif you want to change the colour. Slide the hue or saturation slider around till you’re satisfied.
If you want to, say, change your background to a single colour, check the box colourized. And slide the hue slider to your desire colour. Then paint black over the object in the layer mask to preserve it’s original colours.


Also, that slider you see right there. The center light grey region is where the colours would be affected by the changes you made. And the two darker grey regions flanking it are sort of a buffer so the colour transition isn’t as stark if it makes sense. You can basically slide those sliders closer to each other so the adjustment affects a smaller targeted range of colours. You can always crank the saturation to the max to see what part of the gif you’re changing the colours of.
Photo Filter:
This is a cool one that I learnt about recently. You can basically apply a warming/ cooling filter to quickly change the tone of the gif. Sometimes it helps with getting rid of that last bit of an unwanted colour filter.
vi. Blend modes
Do you know that you can change the blend modes of your adjustment layers to get a different result? I don’t think a lot of people do this, I don’t either most of the time. But there are a couple ones that you might find helpful.
Screen: This will brighten up the gif a lot, could be helpful with really dark scenes.
Colour: When I want my adjustment layer to only affect the colours but not the brightness of the gif.
Luminosity: When I don’t want my adjustment layer to affect the colours.
Here’s a video explaining all the blend modes in photoshop.
vii. Denoise & Clean
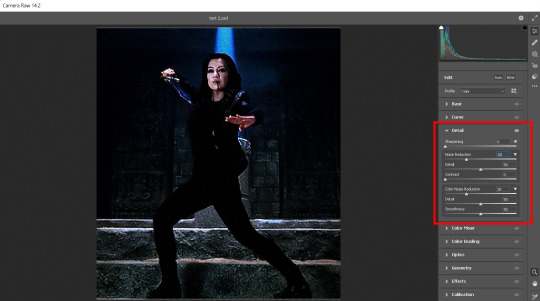
It was from the same post that I learnt about avisynth that I found out about Topaz Labs, particularly their denoise plugin & clean plugin. I won’t go in depth into that because I’ve tried it a couple of times and couldn’t get the settings that work for me and it is very time consuming. But if it is something you want to try, here’s a post of the user sharing her topaz settings. What I actually want to talk about is Camera Raw in ps.
I normally add my denoise filter after I coloured the gif, because all the brightening and saturating the gif with colours add more noise to the original clip itself. But if a scene is particularly grainy to begin with, I’ll add a denoise filter right after sharpening, add my adjustment layers, then another denoise filter if necessary. Also, if you want to keep more details in the certain areas like the hair of the characters, just take a soft round brush and paint black in the smart filter layer mask.
Go to Filter → Camera Raw Filter. The denoise function is under the tab Detail. I usually only move the noise reduction and colour noise reduction slider, and keep the detail at 50.
There’s so much more you can do with camera raw. Here’s a tutorial by @michietuts on how to colour your gifs with camera raw. I actually completely forgot about it until I went digging for tutorials for this post. I think the reason why I never got into using camera raw to colour gifs is simply because there’s too many sliders and it’ll take a long time to figure out what works, so I just stick with what worked for me.
viii. Convert to frames & export
After I add all my adjustment layers and denoise filters, I normally convert it back to frames for further editing because I find it takes so long for the video to play in timeline mode. It’s just easier for me to gauge what I want to do with the gif in frame mode, such as whether more adjustment is needed, or how I want to crop my gif. I know a lot of people would just edit everything in timeline mode, and convert back to frames as a last step to change the delay to 0.05s before exporting. You can do it however you want. It’s just spending so much time with cs5, I’ve grown accustomed to editing in frames mode.
Here is my export settings:

For most people, it’s the choice between selective vs adaptive and diffusion vs pattern. Personally I prefer how adaptive pattern looks and I rarely change it across different gifs because I have my export action automated. There’s more explanation and comparison in Ava’s tutorial here.
ix. Subtitles
The majority of gifs I make are what I call “scene edits”. Not that I’m lazy or anything and don’t want to be bothered with making fancier gifs, it’s just what I like to do. Especially when giffing a show I haven’t giffed before I always start with making plenty of scenes, to the point where I can recall just about any scenes from that show when I want to make a fancier gif set. So I’m just gonna share me text settings for the subtitle, show you how I center the text box to the bottom and how to duplicate it to the rest of your files.
Press T for the text tool, and type in whatever subtitle you need. Here are my subtitle settings:

Alt+A to select the whole canvas then press V for the move tool. Then select align horizontal centers and align bottom edges.

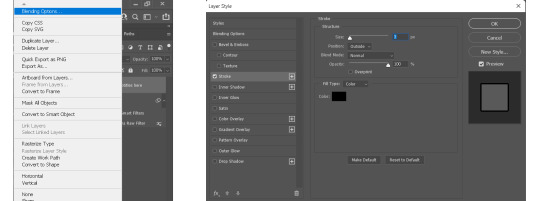
Now that you have your text centered at the bottom, you might want to style it. I usually go for a stroke outside the text, some people op for drop shadow or both. Right click your text layer and select Blending Options... Check the Stroke box, change the size to 3px, position to outside and colour to black.
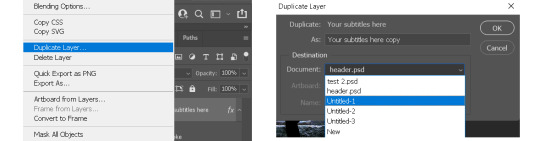
To duplicate text box to the same exact position in another gif, right click your text layer and choose Duplicate Layer... Then choose whichever document you want to duplicate to and press ok.
And of course I have my text duplication automated, so the text would show up in all my gifs in a matter of seconds.
x. Recap

3. How to optimize your giffing process
i. Actions
This one single function in ps is gonna save you sooooo much time & energy my friends. If you’re a chronic giffer like me, you probably spend all your time starring into your computer and just clicking away like a manic, especially those times when new episodes drop and everyone is trying to get their gifs out there as quick as possible. Let me tell you, life before I found out about actions was miserable. Back then, my laptop was even slower, so maybe after I did one thing I had to wait for it to load, then repeat the same process to the rest of the gifs in the set, which is normally 10 in total. I had to grab my laptop with me during meals because I basically couldn’t walk away from it. Actions was a lifesaver, especially for things you’d routinely do when making gifs like sharpening, resizing, denoising, convert to frames, export, etc. You basically use actions to record yourself doing it once, and you can just hit play every time you want ps to do it again. And to take it a step further, you can automate ps to play that action on all the opened files. You then record that automation into an action, then voila you can sharpen/resize/export all your gifs in one click. Now, I can click automate convert to frames, go out and eat dinner and come back to it.

Now here are my actions. I know the naming doesn’t make much sense to you, but basically I have actions to automate sharpening, denoising, converting to frames, setting frame delays, exporting and saving. And yes, I do regularly hit that automate save button so I don’t lose everything when my ps crashes. Then there’s actions for formatting subtitles, duplicating layers, pasting frames after or over frames. I think this covers about everything I use on a daily basis.
Here’s how you record an action and automate said action. (Left gif) First you click on the folder icon to create new set, name it and click ok. Click the + icon to add new action, name it and press record. Then you do whatever you want to record, and when you’re done click to stop button to stop recording. (Right gif) To create an automation of the new action, click the + icon to add new action, name it and press record. (Third gif) Then go to File → Automate → Batch. Choose the set the action you want to automate is in, then choose the action. Click ok then stop recording. Now you have an action to automate the previous action you made.

(gif below) The box on the left of your action is the dialog on/off button. Basically if you check it those dialog boxes will pop up every time after you played the action, which is good if you want to customize every time but not so much when your goal is to click one button and let it run across all gif without interruption. I check most of them off except for the denoise filter which I do want to customize for each gif.
To get the action panel to look like the one I showed in the first picture, click on the little button on the top right corner of the actions panel and choose button mode. And you’ll get to play an action by simply clicking on it.

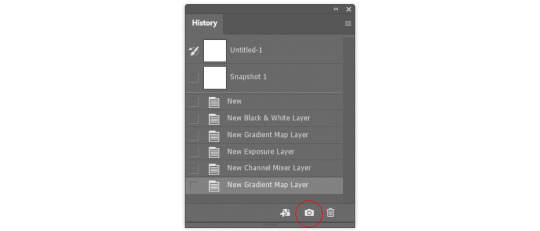
ii. History
There are a couple of things I do in this panel. Have you ever make an adjustment, undo, make a new adjustment, and now no matter how many times you hit revert you just can’t get back that first adjustment you made? There’s a simple fix in the history settings. Click on the little button on the top right corner of the history panel and choose History Options, then check the box “Allow Non-Linear History” and click ok.

I often like to use the history to go back to previous adjustment, because I can see clearly what has been done (sometimes I click on the wrong button without knowing) and I can go further back without keep hitting Crl+Z. You can also click on the camera icon in the bottom right to take a snapshot of the current process/ step of the gif, so in case you don’t like some changes you make, you can always go back to that snapshot. Or you can take snapshots of different adjustments you made to the gifs, then you can quickly compare how they look by toggling between snapshots.
iii. Keyboard Shortcuts
Know/ customize the shortcuts for things you often do, such as Crt+Z for undo, T for add text, V for move, Crl+A for select all, etc. It’ll save time & effort in the long run.
To customize, simply go to Edit → Keyboard Shortcuts.
iv. My Workspace
I’m the least organized person I know but I still want to talk about my ps workspace. It’s been structure to fit my giffing needs. Basically all the panels I need are there, and I maximize my space for the document window and timeline.

If you go to Window → Workspace → New Workspace, you can save your current workspace as a preset. So maybe if you moved things around or accidentally closed some panel that you don’t remember the name for, just click on that preset workspace, or if it says you’re already in that workspace click reset “whatever the name of your workspace” and your workspace will be reset. There’s mainly 2 workspace I toggle between, one for giffing and another for digital painting.

4. The more advanced stuff?
i. “Recolouring”
I’m not gonna spend a lot of time on this part because the next part is actually what I really want to talk about. But Hue/Saturation is going to be your friend if you want some major colour change. Then add a gradient map over it for good measure. I’ll link some tutorials for you if you don’t know what I mean.
Becca’s (@yenvengerberg) mega colouring tutorial
Kate’s tutorial on @usergif (←there’s all sorts of gif tutorials in their resources directory, go check it out)
People would always tell you to find gifs where the character barely moves or the background is of a contrasting colour to make the process easier. Now, with timeline you’ve got keyframes to help with slightly more movement. But what if you want to make something like this gif below? 😨
I made this during my earlier days of recolouring (which was not that long ago), and the only thing I could think of was colour it frame by frame. This gif has 73 frames. There are 8 gifs in this set which I had to all colour frame by frame. It was a long and tedious process I tell you, but the results, in my humble opinion, is stunning!!! But what if I tell you it can be done without colouring it frame by frame and it only takes a fraction of the time I spent?
(gif taken from my set here)
ii. After Effects & Rotoscoping
The reason I started using after effects was for this gif set. I got a gif request and my inspiration was the intro from the youtube channel sortedfood. Here’s how one of the gif looks like.
See the character cut out on the right? Basically the same thing in my recent Winnie the Pooh set. In my first trial, I was trying to do it frame by frame on ps like I always did, but there was no way I could get it looking smooth, it gets very jagged when the background was a completely different scene. And with some googling, that’s how I found out about rotoscoping on after effects.
This is the youtube tutorial I learnt it from and the one I send it to people when they ask me how I do character cut outs like that. I’ll try to quickly show you how I do it below, but please refer to that video if you want more details.
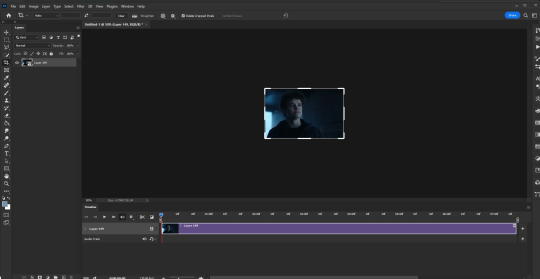
Usually I export my gifs as videos in timeline mode in ps, then import the video into ae. After I’m done, I’ll export the ae file as video, import it back into ps, convert back to frames and do the rest.
Here are my steps to rotoscoping:
Double click the layer you’d like to work on. The layer window should pop up and that is what you want to work with.
Click on the Rotobrush tool and paint across the object you want to include. Always paint across, not outline.
I have my roto brush set to version to 2.0, and I would change the quality from standard to best.
Continue painting until everything is included. Alt+drag to deselect unwanted parts. Hit spacebar when done and let it run.
You can change the properties of the roto brush selection in effect controls.
If you want a more detailed written explanation than this. Go to adobe’s help page on roto brush here.
Once you have the cut out of the object you desire, there are many things you can do with it.
Duplicate the original layer, change the colour of the bottom layer as aforementioned. And now you have a gif with a different coloured background.
Or you can have a different background (either a solid colour or a different video/gif)
You can have text behind the object, etc.

You get the idea. (This is a simple demo, please excuse the quality and choppiness of the gif)
Now you’ll never recolour gifs the same way again. Here’s a Kate & Yelena gif for you guys (even though it’s not the best, could’ve blurred out the edges a bit more but it’s still pretty damn awesome and I wouldn’t have coloured it like that if it wasn’t for ae)
(gif taken from my set here)
Here’s another gif I made with AE from this set. The possibility is endless and I’m barely scratching the surface. I can do a separate AE tutorial if you guys are interested. Let me know in the comments or tags.
5. Tutorials mentioned in this post
i. Text tutorials
@kylos’s film downloading and screencapping tips for making gifs
@kylos’s gif tutorial
@cillianmurphy’s giffing 101- your ultimate guide on how to make gifs
@realstraykids‘s gifmaking with vapoursynth tutorial
@anya-chalotra‘s sharpening & exporting tutorial
@sidonidoneeey‘s sharpening tutorial
@dewandawise‘s the beginner’s guide to channel mixer
@magnusedom’s colouring tutorial
@yenvengerberg’s mega colouring tutorial
@usergif’s how to change the background of any gif tutorial
adobe’s Roto Brush and Refine Matte
ii. Video tutorials
PiXimperfect’s Color Correction with Easy "4-Point" Technique!
PiXimperfect’s The Science of All 27 Blend Modes in Photoshop!
@michietuts‘s How to Color Grade Gifs Using Camera Raw
C.M. de la VEGA ‘s Get the Best Results with Rotobrush 2
6. Acknowledgement
Thank you so much to the authors of all the amazing tutorials, everything was so eloquently written, well explained and easy to follow.
And a huge shoutout to the people at @pscentral & @womenofmcu. Our conversations on gif making have prompted me to write this post.
I’ve learnt so much from the people at psc and thank you Ace & Val for creating this place that I didn’t even know I needed. It is one place I feel truly belong. So If anyone is interested in gif making, come join us at pscentral.
And thank you to the ladies at womenofmcu for being so nice and welcoming, always love chatting with you lot.
Last but not least, I’m patting myself on the back. For someone who’s terrible with words this is one hell of a long text post.
As always, happy giffing!
#completeresources#allresources#ps resources#userdanni#maystag#usergiu#tuserheidi#usershreyu#uservivaldi#userfnuggi#supervalcsi#aphrandt#userdean#userannalise#userrainbow#uservier#userelio#rogerhealey#tusercat#my tutorials#gif tutorial#even though I said this is not a tutorial I still need to tag it in a way I can find it
295 notes
·
View notes
Note
Hi, your latest edit for jjk is so cool!!
https://www.tumblr.com/the-mother-of-lions/748476440327176192/the-strongest?source=share
I was wondering if you would please post a tutorial for it?
Hi! Thank you, yeah I don't mind sharing my process.
I put this together under the assumption that you have basic photoshop understanding.
This is my psd for the circle! I made it myself but you can use it without crediting.
I also learned to make the circle turn with this tutorial, but I'll go over it here as well.
After picking your scenes, sharpening and cropping and turning into a smart object, you're going to duplicate the circle into the base gif. Then, duplicate the top gif on top of that.
Arrange your layers so that the top gif is in between the solid circle and the dotted circle layers.
Clipping Mask - Left click on the top gif layer and select Create Clipping Mask from the options. This is going to clip the top gif to the circle so that it stays within the dotted circle.
Your gif and layers should look like this
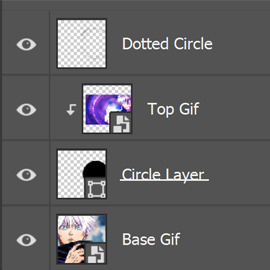
3. Making the Circle Move - On the Layers panel, right click on the Dotted Circle layer and select Convert To Smart Object. This will allow us to make the circle move. Moving to the timeline, I'm going to click the arrow beside the Dotted Circle layer. In the drop down I'm going to click on the stopwatch symbol next to Transform. A Yellow triangle will appear next to where you clicked.
Now click on the timeline to make the line move to the end of your gif. Ctrl + T or select the Move Tool and rotate the image in the direction you want your circle to move. I'm going to turn mine to the right to 45 degrees. The further you rotate the circle, the faster it will move.
You should now have a gray triangle on the other end of the timeline.


Honestly this is pretty much it! In the set you referenced I did a lot of recoloring to take out everything but blue in the Base Gif and I added a Color Overlay effect to the circle to make it white.
Pro Tip: Make sure your gifs are the same length! If you want to do any recoloring to the top gif, make sure you clip those layers to the gif so it only affects that layer instead of the whole thing.
You can also make the black dotted circle white by inverting it/using Ctrl + i instead of doing a color overlay effect.
Let me know if you have any more questions!
#photoshop tutorial#photoshop#adobe photoshop#gif edit#gif tutorial#icybtchgifs#my tutorials#jujutsu kaisen#gojo satoru#jjkedit#jjksource#hyeahjujutsu#anonymous#asks
8 notes
·
View notes
Note
do you mind sharing your font settings? my subtitles always end up looking so blurry and i’m wondering what i’m doing wrong 😭 tysm.
Sure thing :) I always use Arial Rounded MT Bold as a font for my subtitles.
Here are the settings I use and, as you can see, they're very basic.
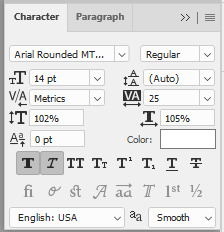

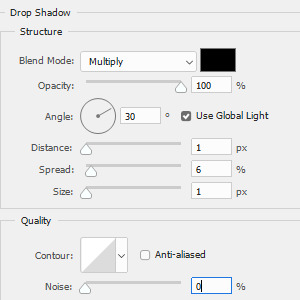
So the text should appear like this:
13 notes
·
View notes
Text


Neural Filters Tutorial for Gifmakers by @antoniosvivaldi
Hi everyone! In light of my blog’s 10th birthday, I’m delighted to reveal my highly anticipated gifmaking tutorial using Neural Filters - a very powerful collection of filters that really broadened my scope in gifmaking over the past 12 months.
Before I get into this tutorial, I want to thank @laurabenanti, @maines , @cobbbvanth, and @cal-kestis for their unconditional support over the course of my journey of investigating the Neural Filters & their valuable inputs on the rendering performance!
In this tutorial, I will outline what the Photoshop Neural Filters do and how I use them in my workflow - multiple examples will be provided for better clarity. Finally, I will talk about some known performance issues with the filters & some feasible workarounds.
Tutorial Structure:
Meet the Neural Filters: What they are and what they do
Why I use Neural Filters? How I use Neural Filters in my giffing workflow
Getting started: The giffing workflow in a nutshell and installing the Neural Filters
Applying Neural Filters onto your gif: Making use of the Neural Filters settings; with multiple examples
Testing your system: recommended if you’re using Neural Filters for the first time
Rendering performance: Common Neural Filters performance issues & workarounds
For quick reference, here are the examples that I will show in this tutorial:
Example 1: Image Enhancement | improving the image quality of gifs prepared from highly compressed video files
Example 2: Facial Enhancement | enhancing an individual's facial features
Example 3: Colour Manipulation | colourising B&W gifs for a colourful gifset
Example 4: Artistic effects | transforming landscapes & adding artistic effects onto your gifs
Example 5: Putting it all together | my usual giffing workflow using Neural Filters
What you need & need to know:
Software: Photoshop 2021 or later (recommended: 2023 or later)*
Hardware: 8GB of RAM; having a supported GPU is highly recommended*
Difficulty: Advanced (requires a lot of patience); knowledge in gifmaking and using video timeline assumed
Key concepts: Smart Layer / Smart Filters
Benchmarking your system: Neural Filters test files**
Supplementary materials: Tutorial Resources / Detailed findings on rendering gifs with Neural Filters + known issues***
*I primarily gif on an M2 Max MacBook Pro that's running Photoshop 2024, but I also have experiences gifmaking on few other Mac models from 2012 ~ 2023.
**Using Neural Filters can be resource intensive, so it’s helpful to run the test files yourself. I’ll outline some known performance issues with Neural Filters and workarounds later in the tutorial.
***This supplementary page contains additional Neural Filters benchmark tests and instructions, as well as more information on the rendering performance (for Apple Silicon-based devices) when subject to heavy Neural Filters gifmaking workflows
Tutorial under the cut. Like / Reblog this post if you find this tutorial helpful. Linking this post as an inspo link will also be greatly appreciated!
1. Meet the Neural Filters!
Neural Filters are powered by Adobe's machine learning engine known as Adobe Sensei. It is a non-destructive method to help streamline workflows that would've been difficult and/or tedious to do manually.
Here are the Neural Filters available in Photoshop 2024:


Skin Smoothing: Removes blemishes on the skin
Smart Portrait: This a cloud-based filter that allows you to change the mood, facial age, hair, etc using the sliders+
Makeup Transfer: Applies the makeup (from a reference image) to the eyes & mouth area of your image
Landscape Mixer: Transforms the landscape of your image (e.g. seasons & time of the day, etc), based on the landscape features of a reference image
Style Transfer: Applies artistic styles e.g. texturings (from a reference image) onto your image
Harmonisation: Applies the colour balance of your image based on the lighting of the background image+
Colour Transfer: Applies the colour scheme (of a reference image) onto your image
Colourise: Adds colours onto a B&W image
Super Zoom: Zoom / crop an image without losing resolution+
Depth Blur: Blurs the background of the image
JPEG Artefacts Removal: Removes artefacts caused by JPEG compression
Photo Restoration: Enhances image quality & facial details
+These three filters aren't used in my giffing workflow. The cloud-based nature of Smart Portrait leads to disjointed looking frames. For Harmonisation, applying this on a gif causes Neural Filter timeout error. Finally, Super Zoom does not currently support output as a Smart Filter
If you're running Photoshop 2021 or earlier version of Photoshop 2022, you will see a smaller selection of Neural Filters:


Things to be aware of:
You can apply up to six Neural Filters at the same time
Filters where you can use your own reference images: Makeup Transfer (portraits only), Landscape Mixer, Style Transfer (not available in Photoshop 2021), and Colour Transfer
Later iterations of Photoshop 2023 & newer: The first three default presets for Landscape Mixer and Colour Transfer are currently broken.
2. Why I use Neural Filters?
Here are my four main Neural Filters use cases in my gifmaking process. In each use case I'll list out the filters that I use:

Enhancing Image Quality:
Common wisdom is to find the highest quality video to gif from for a media release & avoid YouTube whenever possible. However for smaller / niche media (e.g. new & upcoming musical artists), prepping gifs from highly compressed YouTube videos is inevitable.
So how do I get around with this? I have found Neural Filters pretty handy when it comes to both correcting issues from video compression & enhancing details in gifs prepared from these highly compressed video files.
Filters used: JPEG Artefacts Removal / Photo Restoration
Facial Enhancement:
When I prepare gifs from highly compressed videos, something I like to do is to enhance the facial features. This is again useful when I make gifsets from compressed videos & want to fill up my final panel with a close-up shot.
Filters used: Skin Smoothing / Makeup Transfer / Photo Restoration (Facial Enhancement slider)
Colour Manipulation:
Neural Filters is a powerful way to do advanced colour manipulation - whether I want to quickly transform the colour scheme of a gif or transform a B&W clip into something colourful.
Filters used: Colourise / Colour Transfer
Artistic Effects:
This is one of my favourite things to do with Neural Filters! I enjoy using the filters to create artistic effects by feeding textures that I've downloaded as reference images. I also enjoy using these filters to transform the overall the atmosphere of my composite gifs. The gifsets where I've leveraged Neural Filters for artistic effects could be found under this tag on usergif.
Filters used: Landscape Mixer / Style Transfer / Depth Blur
How I use Neural Filters over different stages of my gifmaking workflow:
I want to outline how I use different Neural Filters throughout my gifmaking process. This can be roughly divided into two stages:
Stage I: Enhancement and/or Colourising | Takes place early in my gifmaking process. I process a large amount of component gifs by applying Neural Filters for enhancement purposes and adding some base colourings.++
Stage II: Artistic Effects & more Colour Manipulation | Takes place when I'm assembling my component gifs in the big PSD / PSB composition file that will be my final gif panel.
I will walk through this in more detail later in the tutorial.
++I personally like to keep the size of the component gifs in their original resolution (a mixture of 1080p & 4K), to get best possible results from the Neural Filters and have more flexibility later on in my workflow. I resize & sharpen these gifs after they're placed into my final PSD composition files in Tumblr dimensions.
3. Getting started
The essence is to output Neural Filters as a Smart Filter on the smart object when working with the Video Timeline interface. Your workflow will contain the following steps:
Prepare your gif
In the frame animation interface, set the frame delay to 0.03s and convert your gif to the Video Timeline
In the Video Timeline interface, go to Filter > Neural Filters and output to a Smart Filter
Flatten or render your gif (either approach is fine). To flatten your gif, play the "flatten" action from the gif prep action pack. To render your gif as a .mov file, go to File > Export > Render Video & use the following settings.

Setting up:
o.) To get started, prepare your gifs the usual way - whether you screencap or clip videos. You should see your prepared gif in the frame animation interface as follows:

Note: As mentioned earlier, I keep the gifs in their original resolution right now because working with a larger dimension document allows more flexibility later on in my workflow. I have also found that I get higher quality results working with more pixels. I eventually do my final sharpening & resizing when I fit all of my component gifs to a main PSD composition file (that's of Tumblr dimension).
i.) To use Smart Filters, convert your gif to a Smart Video Layer.
As an aside, I like to work with everything in 0.03s until I finish everything (then correct the frame delay to 0.05s when I upload my panels onto Tumblr).
For convenience, I use my own action pack to first set the frame delay to 0.03s (highlighted in yellow) and then convert to timeline (highlighted in red) to access the Video Timeline interface. To play an action, press the play button highlighted in green.

Once you've converted this gif to a Smart Video Layer, you'll see the Video Timeline interface as follows:

ii.) Select your gif (now as a Smart Layer) and go to Filter > Neural Filters

Installing Neural Filters:
Install the individual Neural Filters that you want to use. If the filter isn't installed, it will show a cloud symbol (highlighted in yellow). If the filter is already installed, it will show a toggle button (highlighted in green)

When you toggle this button, the Neural Filters preview window will look like this (where the toggle button next to the filter that you use turns blue)

4. Using Neural Filters
Once you have installed the Neural Filters that you want to use in your gif, you can toggle on a filter and play around with the sliders until you're satisfied. Here I'll walkthrough multiple concrete examples of how I use Neural Filters in my giffing process.
Example 1: Image enhancement | sample gifset
This is my typical Stage I Neural Filters gifmaking workflow. When giffing older or more niche media releases, my main concern is the video compression that leads to a lot of artefacts in the screencapped / video clipped gifs.
To fix the artefacts from compression, I go to Filter > Neural Filters, and toggle JPEG Artefacts Removal filter. Then I choose the strength of the filter (boxed in green), output this as a Smart Filter (boxed in yellow), and press OK (boxed in red).
Note: The filter has to be fully processed before you could press the OK button!

After applying the Neural Filters, you'll see "Neural Filters" under the Smart Filters property of the smart layer

Flatten / render your gif
Example 2: Facial enhancement | sample gifset
This is my routine use case during my Stage I Neural Filters gifmaking workflow. For musical artists (e.g. Maisie Peters), YouTube is often the only place where I'm able to find some videos to prepare gifs from. However even the highest resolution video available on YouTube is highly compressed.
Go to Filter > Neural Filters and toggle on Photo Restoration. If Photoshop recognises faces in the image, there will be a "Facial Enhancement" slider under the filter settings.

Play around with the Photo Enhancement & Facial Enhancement sliders. You can also expand the "Adjustment" menu make additional adjustments e.g. remove noises and reducing different types of artefacts.

Once you're happy with the results, press OK and then flatten / render your gif.
Example 3: Colour Manipulation | sample gifset
Want to make a colourful gifset but the source video is in B&W? This is where Colourise from Neural Filters comes in handy! This same colourising approach is also very helpful for colouring poor-lit scenes as detailed in this tutorial.
Here's a B&W gif that we want to colourise:

Highly recommended: add some adjustment layers onto the B&W gif to improve the contrast & depth. This will give you higher quality results when you colourise your gif.
Go to Filter > Neural Filters and toggle on Colourise.

Make sure "Auto colour image" is enabled.
Play around with further adjustments e.g. colour balance, until you're satisfied then press OK.
Important: When you colourise a gif, you need to double check that the resulting skin tone is accurate to real life. I personally go to Google Images and search up photoshoots of the individual / character that I'm giffing for quick reference.
Add additional adjustment layers until you're happy with the colouring of the skin tone.

Once you're happy with the additional adjustments, flatten / render your gif. And voila!

Note: For Colour Manipulation, I use Colourise in my Stage I workflow and Colour Transfer in my Stage II workflow to do other types of colour manipulations (e.g. transforming the colour scheme of the component gifs)
Example 4: Artistic Effects | sample gifset
This is where I use Neural Filters for the bulk of my Stage II workflow: the most enjoyable stage in my editing process!
Normally I would be working with my big composition files with multiple component gifs inside it. To begin the fun, drag a component gif (in PSD file) to the main PSD composition file.
Resize this gif in the composition file until you're happy with the placement

Duplicate this gif. Sharpen the bottom layer (highlighted in yellow), and then select the top layer (highlighted in green) & go to Filter > Neural Filters

I like to use Style Transfer and Landscape Mixer to create artistic effects from Neural Filters. In this particular example, I've chosen Landscape Mixer
Select a preset or feed a custom image to the filter (here I chose a texture that I've on my computer)

Play around with the different sliders e.g. time of the day / seasons
Important: uncheck "Harmonise Subject" & "Preserve Subject" - these two settings are known to cause performance issues when you render a multiframe smart object (e.g. for a gif)

Once you're happy with the artistic effect, press OK
To ensure you preserve the actual subject you want to gif (bc Preserve Subject is unchecked), add a layer mask onto the top layer (with Neural Filters) and mask out the facial region. You might need to play around with the Layer Mask Position keyframes or Rotoscope your subject in the process.
After you're happy with the masking, flatten / render this composition file and voila!

Example 5: Putting it all together | sample gifset
Let's recap on the Neural Filters gifmaking workflow and where Stage I and Stage II fit in my gifmaking process:
i. Preparing & enhancing the component gifs
Prepare all component gifs and convert them to smart layers
Stage I: Add base colourings & apply Photo Restoration / JPEG Artefacts Removal to enhance the gif's image quality
Flatten all of these component gifs and convert them back to Smart Video Layers (this process can take a lot of time)
Some of these enhanced gifs will be Rotoscoped so this is done before adding the gifs to the big PSD composition file
ii. Setting up the big PSD composition file
Make a separate PSD composition file (Ctrl / Cmmd + N) that's of Tumblr dimension (e.g. 540px in width)
Drag all of the component gifs used into this PSD composition file
Enable Video Timeline and trim the work area
In the composition file, resize / move the component gifs until you're happy with the placement & sharpen these gifs if you haven't already done so
Duplicate the layers that you want to use Neural Filters on
iii. Working with Neural Filters in the PSD composition file
Stage II: Neural Filters to create artistic effects / more colour manipulations!
Mask the smart layers with Neural Filters to both preserve the subject and avoid colouring issues from the filters
Flatten / render the PSD composition file: the more component gifs in your composition file, the longer the exporting will take. (I prefer to render the composition file into a .mov clip to prevent overriding a file that I've spent effort putting together.)
Note: In some of my layout gifsets (where I've heavily used Neural Filters in Stage II), the rendering time for the panel took more than 20 minutes. This is one of the rare instances where I was maxing out my computer's memory.
Useful things to take note of:
Important: If you're using Neural Filters for Colour Manipulation or Artistic Effects, you need to take a lot of care ensuring that the skin tone of nonwhite characters / individuals is accurately coloured
Use the Facial Enhancement slider from Photo Restoration in moderation, if you max out the slider value you risk oversharpening your gif later on in your gifmaking workflow
You will get higher quality results from Neural Filters by working with larger image dimensions: This gives Neural Filters more pixels to work with. You also get better quality results by feeding higher resolution reference images to the Neural Filters.
Makeup Transfer is more stable when the person / character has minimal motion in your gif
You might get unexpected results from Landscape Mixer if you feed a reference image that don't feature a distinctive landscape. This is not always a bad thing: for instance, I have used this texture as a reference image for Landscape Mixer, to create the shimmery effects as seen in this gifset
5. Testing your system
If this is the first time you're applying Neural Filters directly onto a gif, it will be helpful to test out your system yourself. This will help:
Gauge the expected rendering time that you'll need to wait for your gif to export, given specific Neural Filters that you've used
Identify potential performance issues when you render the gif: this is important and will determine whether you will need to fully playback your gif before flattening / rendering the file.
Understand how your system's resources are being utilised: Inputs from Windows PC users & Mac users alike are welcome!
About the Neural Filters test files:
Contains six distinct files, each using different Neural Filters
Two sizes of test files: one copy in full HD (1080p) and another copy downsized to 540px
One folder containing the flattened / rendered test files
How to use the Neural Filters test files:
What you need:
Photoshop 2022 or newer (recommended: 2023 or later)
Install the following Neural Filters: Landscape Mixer / Style Transfer / Colour Transfer / Colourise / Photo Restoration / Depth Blur
Recommended for some Apple Silicon-based MacBook Pro models: Enable High Power Mode
How to use the test files:
For optimal performance, close all background apps
Open a test file
Flatten the test file into frames (load this action pack & play the “flatten” action)
Take note of the time it takes until you’re directed to the frame animation interface
Compare the rendered frames to the expected results in this folder: check that all of the frames look the same. If they don't, you will need to fully playback the test file in full before flattening the file.†
Re-run the test file without the Neural Filters and take note of how long it takes before you're directed to the frame animation interface
Recommended: Take note of how your system is utilised during the rendering process (more info here for MacOS users)
†This is a performance issue known as flickering that I will discuss in the next section. If you come across this, you'll have to playback a gif where you've used Neural Filters (on the video timeline) in full, prior to flattening / rendering it.
Factors that could affect the rendering performance / time (more info):
The number of frames, dimension, and colour bit depth of your gif
If you use Neural Filters with facial recognition features, the rendering time will be affected by the number of characters / individuals in your gif
Most resource intensive filters (powered by largest machine learning models): Landscape Mixer / Photo Restoration (with Facial Enhancement) / and JPEG Artefacts Removal
Least resource intensive filters (smallest machine learning models): Colour Transfer / Colourise
The number of Neural Filters that you apply at once / The number of component gifs with Neural Filters in your PSD file
Your system: system memory, the GPU, and the architecture of the system's CPU+++
+++ Rendering a gif with Neural Filters demands a lot of system memory & GPU horsepower. Rendering will be faster & more reliable on newer computers, as these systems have CPU & GPU with more modern instruction sets that are geared towards machine learning-based tasks.
Additionally, the unified memory architecture of Apple Silicon M-series chips are found to be quite efficient at processing Neural Filters.
6. Performance issues & workarounds
Common Performance issues:
I will discuss several common issues related to rendering or exporting a multi-frame smart object (e.g. your composite gif) that uses Neural Filters below. This is commonly caused by insufficient system memory and/or the GPU.
Flickering frames: in the flattened / rendered file, Neural Filters aren't applied to some of the frames+-+
Scrambled frames: the frames in the flattened / rendered file isn't in order
Neural Filters exceeded the timeout limit error: this is normally a software related issue
Long export / rendering time: long rendering time is expected in heavy workflows
Laggy Photoshop / system interface: having to wait quite a long time to preview the next frame on the timeline
Issues with Landscape Mixer: Using the filter gives ill-defined defined results (Common in older systems)--
Workarounds:
Workarounds that could reduce unreliable rendering performance & long rendering time:
Close other apps running in the background
Work with smaller colour bit depth (i.e. 8-bit rather than 16-bit)
Downsize your gif before converting to the video timeline-+-
Try to keep the number of frames as low as possible
Avoid stacking multiple Neural Filters at once. Try applying & rendering the filters that you want one by one
Specific workarounds for specific issues:
How to resolve flickering frames: If you come across flickering, you will need to playback your gif on the video timeline in full to find the frames where the filter isn't applied. You will need to select all of the frames to allow Photoshop to reprocess these, before you render your gif.+-+
What to do if you come across Neural Filters timeout error? This is caused by several incompatible Neural Filters e.g. Harmonisation (both the filter itself and as a setting in Landscape Mixer), Scratch Reduction in Photo Restoration, and trying to stack multiple Neural Filters with facial recognition features.
If the timeout error is caused by stacking multiple filters, a feasible workaround is to apply the Neural Filters that you want to use one by one over multiple rendering sessions, rather all of them in one go.
+-+This is a very common issue for Apple Silicon-based Macs. Flickering happens when a gif with Neural Filters is rendered without being previously played back in the timeline.
This issue is likely related to the memory bandwidth & the GPU cores of the chips, because not all Apple Silicon-based Macs exhibit this behaviour (i.e. devices equipped with Max / Ultra M-series chips are mostly unaffected).
-- As mentioned in the supplementary page, Landscape Mixer requires a lot of GPU horsepower to be fully rendered. For older systems (pre-2017 builds), there are no workarounds other than to avoid using this filter.
-+- For smaller dimensions, the size of the machine learning models powering the filters play an outsized role in the rendering time (i.e. marginal reduction in rendering time when downsizing 1080p file to Tumblr dimensions). If you use filters powered by larger models e.g. Landscape Mixer and Photo Restoration, you will need to be very patient when exporting your gif.
7. More useful resources on using Neural Filters
Creating animations with Neural Filters effects | Max Novak
Using Neural Filters to colour correct by @edteachs
I hope this is helpful! If you have any questions or need any help related to the tutorial, feel free to send me an ask 💖
#photoshop tutorial#gif tutorial#dearindies#usernik#useryoshi#usershreyu#userisaiah#userroza#userrobin#userraffa#usercats#userriel#useralien#userjoeys#usertj#alielook#swearphil#*#my resources#my tutorials
367 notes
·
View notes
Photo


GIF TUTORIAL BY HVITSERKK
This was requested and while I do have older tutorials, my process has definitely changed since my last one. If you need something more in-depth, I have an A-Z tutorial here (which I still use besides the coloring/editing) and a master list of specific gif tutorials here. This tutorial will go over coloring using levels, color balance, curves, channel mixer, selective color and other adjustment layers.
This is what I’ve been using for the past year or so, but we’ll say that this is up to date as of May 2022. Please reblog if this helps!
TUTORIAL BELOW (IMAGE AND GIF HEAVY):
I’ll mainly use the gifs above during the tutorial, but I might add one to show a certain step a bit more clearly. I always use more then one scene for my gif tutorials because I want you to be able to see the steps on more then one gif with different lighting, color tones and skin tones so you can get more of a feel of how to use different adjustment layers.
I’m going to start off right after sharpening, and I still use the action linked in my A-Z tutorial. The only difference is on the top layer (there’s only two), I set it to 70% instead of 60%.
So here are my before gifs (minus one that’s used in the first step):


As I mentioned, they’ve only been resized (to 268X268) and sharpened. Now let’s jump right in!
1. The first thing I always start with is a "Levels" layer. I want to bump up the entire gif before so I don't have to use so many other brightening layers later. Nothing to drastic, just move the left slider (shadows) towards the middle, the middle slider to the left and the right slider (contrast + brightness) to the left. Remember to only move them a little bit, the next step using curves will do the bulk of the brightening. Here are my level settings:

And my before gif:

and the gif after levels:
2. The next step is to add two "Curves" layers. You could do the next step on one layer, but I like to keep them separate so I can lower the opacity on each individually. But I name one "Curves - White" and "Curves - Black". Using the black and white liquid droppers, you just click on the the darkest and lightest spots on your gif.

You may have to click around to find the perfect spot, and note that if you click on a blueish white or yellow white, it could alter the entire coloring of your gif, so be sure to find a spot that doesn't do that. Don't be afraid to zoom in and click on one single pixel!
You can also click on slightly darker (with the white dropper) or lighter (with the dark dropper) shades to add more contrast, ie clicking on a light gray cloud with the white dropper will turn that shade and any lighter shade pure white and add a lot (or maybe too much) contrast.
So if you want something pure white (#ffffff) use the white dropper and click on the white area of your gif. Here's my gif, I clicked on the snow that’s stuck to his coat on the left next to his ear:

Now, if you want something pure black (#000000) use the black dropper and click on a dark area on your gif. Here's my gif, I clicked on the darkest spot in the center of his beard:
I used the same gif to show you how big of a difference the curves alone make. Now you can lower the opacity of each layer to your liking. Personally, I like a super contrast look, so I only lowered them 10-15%.
Here's another gif to show you on a different coloring and lighting, the before:

"Curves - White", with the white dropper, I clicked on the sky in the background closer to the window seal where it’s a bit darker:

"Curves - Black", with the black dropper, I clicked on the left side near his eye in the shadow of his hair:
You can see that the gif is way better, but now it’s a bit too pink/magenta. Let’s fix that in our next step.
3. There are two different adjustment layers that I use to balance or “fix” the colors. I'll go over both. The first is the "Color Balance" layer. I only use this if the color looks "off" just a little bit. Here’s the after, followed by how and why:
Like I mentioned, the before gif was a bit too pink. That's a more simple change, so I'll add a "Color Balance" and focus on removing the magenta. If it was more orange, I'd focus on the reds, but pink is more magenta-ish. The shadows (the darkest shades) look fine and so do the highlights (the brightest, near white shades), so I only need to adjust the "midtones". Again, removing the magenta, so sliding the Magenta/Green more towards the green. I also added a bit of blue just to add more of a "cool" tint. Here's the settings I used:

Here's another gif that could benefit from a "Color Balance" layer:
As you can see, the before gif is very colorful, but it's very dull. I can add a color balance layer to give it more depth. The shadows aren't as intense, so I want to add more. I'm only editing the "Shadows" by sliding the first set of colors more towards the red, since my gif is more "cool" (blues, greens) adding red will darken it and add more saturation without turning my gif overly blue. I also add a bit green and yellow to make the shadow more neutral as opposed to just adding a dark red. Here’s my gif now:
And here's the settings:

4. The other way you can balance colors is by using the "Channel Mixer". It may seem super complex, but think of it the same as the color balance, either you add or remove tones from the main colors of the gif. I only use this with gifs that have major lighting issues (lol). Here's my before gif:

and after using the channel mixer:

Huge difference right? Now, you don't always have to use this because some scenes have that lighting and we don't really have to change it and make it "normal". Imagine they're in a photography red room, we definitely don't need to try to make it normal. If they're in a club with neon green lights, same thing we don't need to make it normal. But if it simply needs major adjusting, this is how to do it. Using the guidelines from the "Color Balance" from above, take a look at your gif and see what tint is too much. For this gif, it's definitely too yellow / orange.
To make things easier, what color was with the yellow on the color balance layer? Blue, so basically if I want less yellow, I need to add more blue. That's very surface level, but that will help you to understand for an easy start.
So I want more "Blue" so I need to go to the blue channel and add more blue into the reds and greens. Here are my settings:
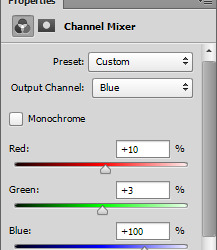
Now my gif:
It's still a bit off, as you can tell it's a bit too peachy instead of a more "natural" tan / beige tone. So I want to go into the red channel and drag the red down until the tint is a bit more natural. Here's my settings:
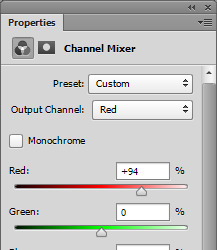
and my before and after gif:
As you can see it's much more neutralized and will be much easier to edit in the next steps.
5. Next is "Selective Color", my personal fave. You can really do a lot with this layer, you can remove colors, change colors and make colors really pop. I only really ever make "natural" looking gifs, so besides the previous edits, I don't do pale, or grayscale gifs at all. So what I'm going for is really vibrant, saturated gifs but still natural looking.
Here's my before:
As you can see in my before gif, there's a lot of popping color. The red in the scarf and the bits of blue/cyan in his jacket and in the background. You can use the selective color layer to target just these colors to really make them stand out. To add more red into her scarf, in the "Red" color, I want to add more red by sliding the first set towards the red side. I also want to add a bit of magenta so the scarf is more of a blood red, instead of a brownish red. Then I want to add a bit of yellow to really add some saturated color. Red is a bit tricky because nine times out of ten, it will also alter skin tones too. Just be mindful of that, and you can still make reds pop. If you do get too much pink in the skin, just go to the "Magenta" color and play around with the settings to neutralize the skin (most often by sliding the magenta to a negative and the yellow to a positive number). Here are my settings:

For that cyan, I want to go to the "Cyan" color and with cyans and blue I always slide both the first and last set of colors. I literally never want to go with the green-ish blue that cyan leans to, I want more of a super saturated baby blue, so if I add cyan, I will always add a bit of blue. So, I will slide the first row (cyan) into a positive number to target the cyan tone, then I'll also slide the second to last row (Yellow) into a negative number to add more blue, and less yellow (and less green) to get a more "true" blue color. Here's my settings:
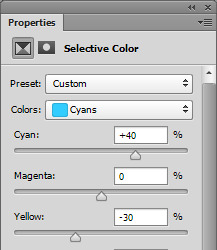
and my before:
and after only editing the reds and cyans:

You can add more or keep it more mild. This is only two colors, so imagine what you can do with all of the colors available in the selective color layer.
5. A super important step when you're using "Selective Color" is the white and black color. I always my color pop selective color (from above) and a "Selective Color - Black" and "Selective Color - White", which ofc you can do on the same layer, but I like the option to lower the opacity individually. For me personally, I like slightly darker shadows and over the top bright white highlights. I also like to further tweak them while I'm there.
So to start, "Selective Color - Blacks". If your gif has a shadow that is too "one color" you can use the black color to balance that out. So for example this gif:
and the after:
You can see in the before that the shadows are too red, too warm. To remove that, I want to go to the "Black" color. So taking what we learned in the color balance layers, the basic tones are: red + cyan, green + magenta and blue + yellow (so to get less red, add more cyan, to get more green, remove magenta). So since my shadows are too red, I want to slide the cyan color to a positive number (thus "adding" cyan). Doing so might alter the color too much in another direction, so if I add too much cyan, it might be overly green, so I need to add magenta, which oops, caused it to be a bit blue, so I need to add a bit of yellow. I almost always slide the top three sliders to a positive number to achieve and almost neutral, no color black, which is why these settings have a bit of everything:
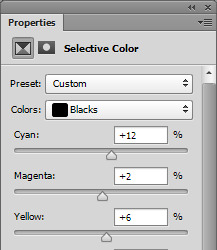
Now, the last slider, the black, basically either adds black, or removes it. Since we're on the black slider, we don't want to remove any black, or it will go white. Since I like my dark colors super dark, I will add black by sliding it to a positive number. Here's my settings:

Adding only a little bit, +4. I usually stick to below +10 because it can easily muddy and ruin your gif.
6. Now "Selective Color - Whites". The same concept of the black color from above, but now the bright, near to white or whites in your gif. I love adding a lot of white to my gifs to make things like the little sparkle in eyes pop, or white backgrounds really bright and a lot of contrast. I don't usually mess with the top three sliders unless there's a lot of color in my white. I mostly change the last slider, the black to a large negative number (so removing black to make white). Here's my before gif:

and after white:
See how it just makes the highlights really pop? You can really see the it in her eyes, around the strands of hair and in the sun spots in the background. You can't always get this look by adding a ton of white because you can over do it. I mostly do this on gifs that don't have a ton of highlight or on lighter skin tones because you just blend the lighter (but not white) tones to much. But for this gif, I can and did, so here are my settings:

And for good measure a before black and white selective color:

And a ton of black and white:
And my settings:
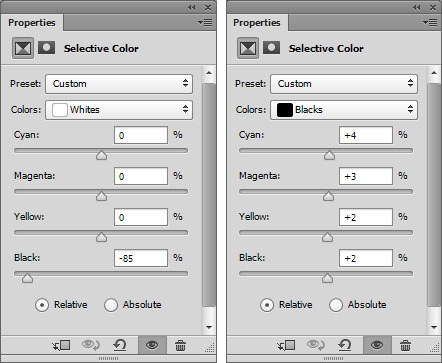
7. Now the last step is up to you, I usually do a mix of the three or just one of the three. I will show you each, but I always finish my gifs off with either a "Brightness/Contrast" layer if my gif is a bit lackluster, a "Levels" if I want an even, overall boost (my usual end) or an "Exposure" if I have enough contrast but want a more bright look.
Don't worry if this step washes out the skintone of poc gifs, I have a very, very last step that will fix that (below the next step).
If your gif isn't as bright or vibrant as you'd like, add a "Brightness/Contrast" layer. As a rule of thumb, I always add to both, but focus on one, that way you don't get that super bright yellow look. So don't add 50+ to both, add a bit to contrast and a lot to brightness, or vice versa. So my settings are simply: Brightness + 18 with Contrast +5

Before:
After:
Now if you're gif has enough black and contrast in the dark shades, but is too dark overall, use an "Exposure" layer. For this gif, the dark hair and jacket are pretty much pure black, but my gif is too dark. And exposure layer is pretty much: exposure - add or remove contrast, offset - add or remove black and gamma correction - add more remove brightness. So I want to add to the gamma buy sliding more towards the right. It will almost always wash out your gif, so don't go wild. Then slide the exposure to the right to add a bit of contrast. Incase your gif does get washed out on the black tones, just slide the offset to the left to add more. Here are my settings:
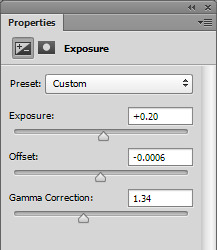
Before:

And after:

And lastly, if your gif is pretty good contrast wise, has an okay brightness but you want to boost everything without losing much in terms of color and lighting, use a "Levels" layer. About 85% of my gifs end with a levels layer because I personally love the look it gives. Here's my gif:
and after a levels layer:
The before wasn't too bad, but I definitely want more brightness but I don't want to add to much contrast or just wash out my gif with light. So adding a levels layer and moving the first slider the the left and the middle and last slider to the left will work perfectly. The last slider is the "shadows", the middle is the "midtones" and the far right slider is the "highlights". So adding more shadows to the gif will add more contrast to the dark tones and blacks, adding more highlights will add contrast to the lighter and white shades and the middle will either lighten or darken your gif without adding too much contrast.
I always edit in this order: slide the middle to the left until the brightness I want is reached, then slide the last slider towards the left to add a bit of contrast if the brightness is dull, then slide the first slider towards the right to add more black. Don't go wild, but also don't be afraid to slide them over a good amount. Here's my settings:

Here’s a gif from earlier that also needed a levels layer, the before:

And after:

And the settings I used for that one:
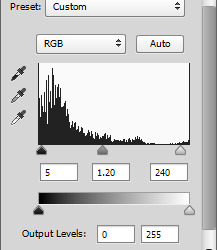
8. The very last step is to even out washed out skintones. This is especially important for this style of gif (as opposed to pale style gifs where the look is still poc skintones, just pale). I don't want a washed out look, because there's no need for it, no reason in my "natural" colored gifs. So to fix this, I always add this layer with these settings and I just lower/raise the opacity as needed.
Since most skintones are mostly affected by the reds (for example add a hue/saturation layer, go to the red color and change one of the settings to see how much it messes with skintones), I only edit the "Red" color. Here are my settings:

my washed out gifs:

now my more true-to-tone gifs:

9. As for saving, I only ever use 0.05 on the frame delay except for gifs with fast moving objects (like the snow and hair blowing gifs I used for my main previews) and these save settings.
Another note, I always use 1080 videos, very rarely do I go with 720 and even then it’s always for music videos or movie/tv trailers downloaded from Youtube.
That's the end of my tutorial! I really hope you've learned something and of course all of this is for you to apply to your own style. If you don't like super crispy highlights, don't add so much white or if you want gifs that aren't over the top bright, I hope I've left you with enough tips that have you confident to play with settings and change things up and still love the gifs you end up with.
If you have any questions or need any help, please let me know! I don't mind at all. If you want more in-depth tutorials on specific layers, I do have some on almost all of the things I wrote about, but they are super old so I can update those if needed.
Happy giffing!
120 notes
·
View notes
Note
Hi, I love your blog and your edits. I was wondering if you could do a tutorial on how you combine multiple gifs into one in the first gif of yours MIKELOGAN’s 5K FOLLOWER CELEBRATION || GET TO KNOW ME MEMEFAVORITE ACTORS [2/10]Colin Firth (September 10, 1960) set? Thank you for reading this and helping me.
thank you so much, that's so kind!! this is the post in question (which was inspired by this gorgeous set) and i'll break down how to do it step by step below the cut!

i ended up saving this gif as a psd because i remember it taking me so long and being really frustrating, i just wasn't sure why. for reference, i posted that set back in september, just over four months ago. looking at the psd, i can see just how far i've grown as a gifmaker bc that thing is a hot mess. i made it about 3x more complicated than it needed to be, so let's do this the right way lol
note: i was still using 0.07 frame rate at this point. i have since switched to 0.05 for smoother, quicker gifs.
what we're going to do is create all of these gifs separately and put them together at the end. in total, there are 6 individual gifs. let's start with harry.
i gif by importing video frames to layers, but if you prefer to screencap, load those in instead. because this ends up being a pretty large gif, both in size and length, i kept it to 20 frames per clip.
once you're satisfied with the frames you've chosen, crop your canvas to 540px x 540px. this is what i'm left with
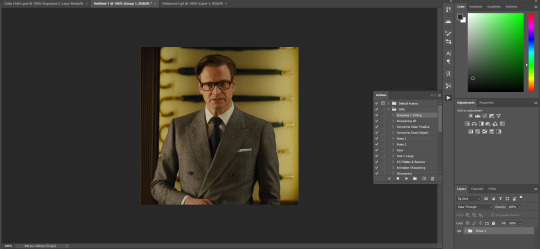

this is when i sharpen my gifs. everyone's process is a little different. i created my own sharpening action, which converts my frames to video timeline and then sharpens.
the next step is to color your gif. if you're going for the overall look in mine, here were my layers:
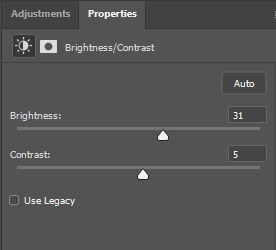
a brightness/contrast layer with brightness set to 31 and contrast to 5. this will depend on the scene you're working with

a levels layer using the black and white eyedroppers. the top one is your black eyedropper. to use it, click it and select the blackest part of your gif. do the same with the white eyedropper and select the lightest part of your gif. you may need to play around with selecting different points depending on your scene and the original coloring
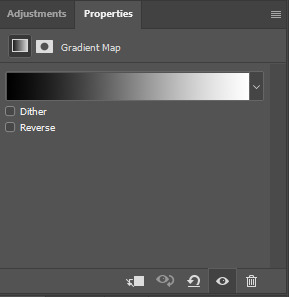
finally, a simple black & white gradient map layer on top
now we're going to add the thin rectangular border in the middle of the gif. i use the rectangle shape tool for this (press U on your keyboard) and these are my settings (x and y coordinates don't matter):

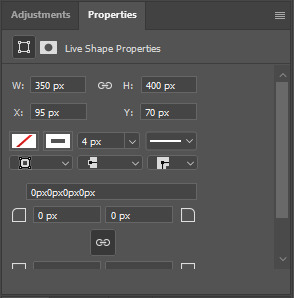
to center it perfectly, i use ctrl+T and drag it until it snaps into place with both the vertical and horizontal guides.
next, let's add the "choose your gentleman" text that goes at the top of the border. here is the font i chose and its settings:

once again, press ctrl+t and drag this to the vertical center of your gif and to the center of the top of the border. you should feel and see it snap into place. this is what we have now:
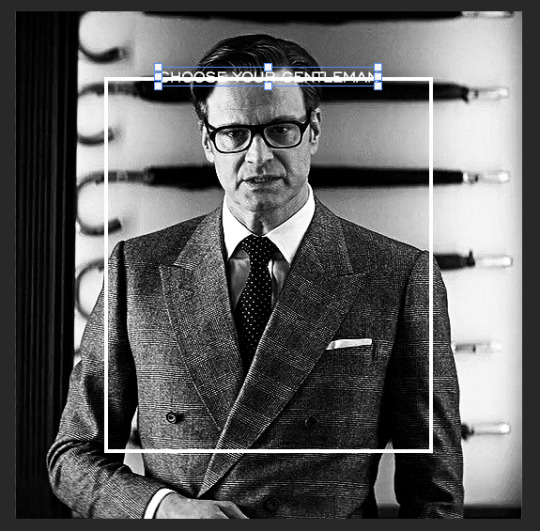
now, we're going to use a layer mask on the border so we can read the text. select the rectangle layer and click the layer mask button
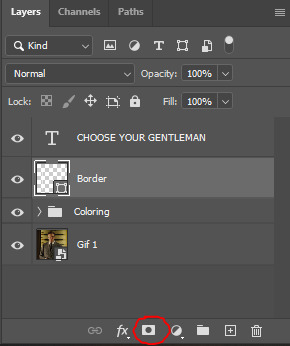
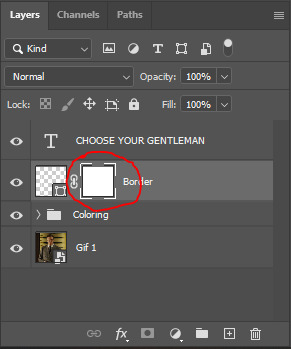
with the layer mask selected (as shown in the second image), use the rectangular marquee tool (M on your keyboard) to draw a rectangle around your text, taking care to keep it just a little larger
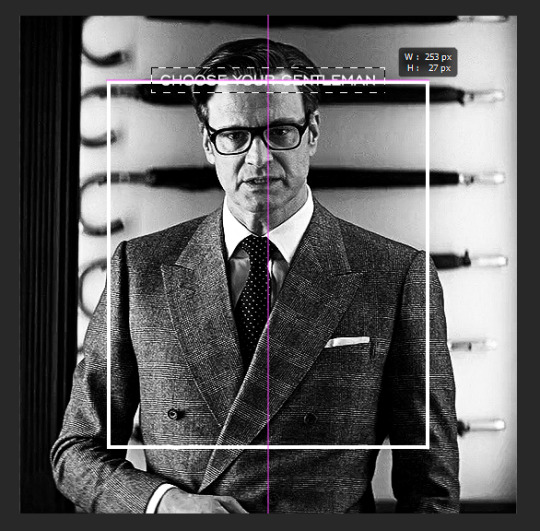
as you can see, you'll know when you're perfectly centered through your text layer and vertically on the entire canvas. select your brush tool without deselecting this rectangle (B on your keyboard) and paint the selection with a black brush. this masks that part of the border!


let's add the small square gif that goes at the bottom of the border now. i think the easiest way of doing this is to use the rectangular shape tool (U) again. the size of this gif is 110x110, so create a black square of that size with no stroke. Use ctrl+T to drag it to the center of the bottom of the border (the x and y coordinates don't matter):
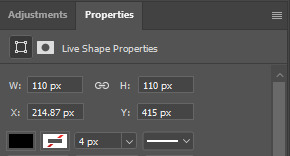
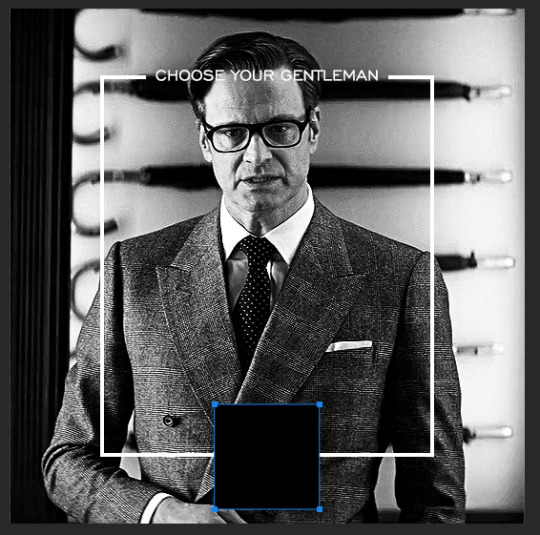
now duplicate your original gif layer (ctrl+J) and drag it to the top of the layer panel. right click on it and create clipping mask. this will make it so the gif only appears within the confines of the square we just created. resize your gif by using ctrl+T and, making sure the proportions are locked, drag the corners to the edges of the square.
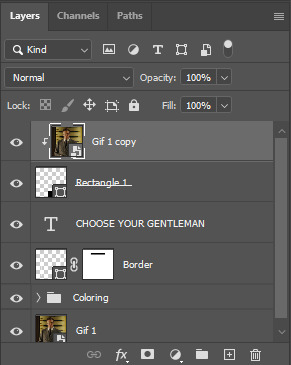
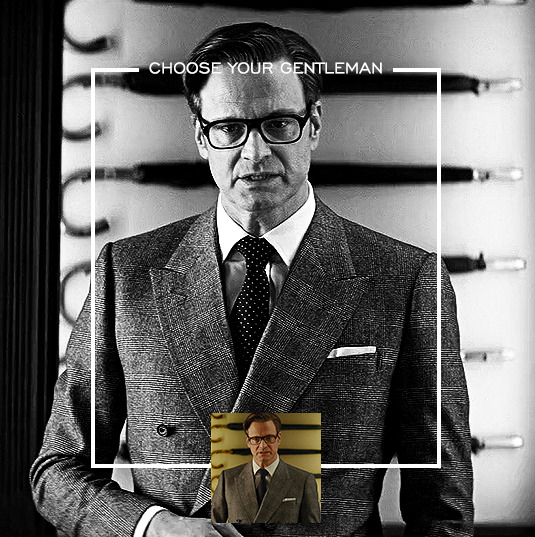
this gif is not colored at all as we only duplicated the gif itself and not the coloring layers. i duplicated those as well and dragged them on top of our small gif, but it's important to make sure those are using the clipping mask as well. you can click this on the properties layer of each adjustment layer to make sure they do.
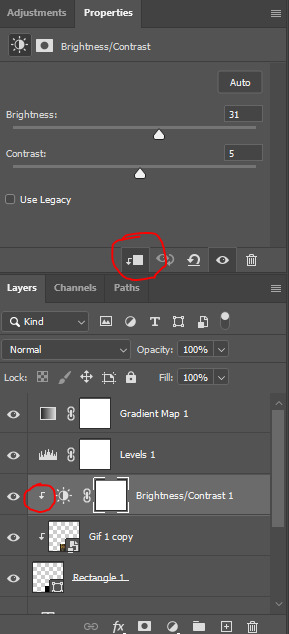
you'll know you've been successful when you see the small arrow next to each of your coloring layers. this keeps them from affecting the coloring of the larger, main gif.
we're going to change the gradient map adjustment layer from black & white to black & lime green (or the color of your choosing). click on that layer and then on the map. this will bring up the gradient editor. click on the small white color stop at the far right end of the gradient and then on the color picker, choose a new color.

the hex code i used for the lime green is #00ff0c
our last steps are the angle brackets on either side of the gif and harry's name in the center. here are the settings i used for those (angle brackets on the left and harry on the right):
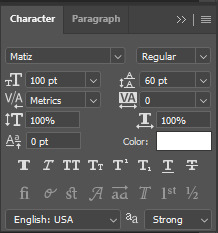
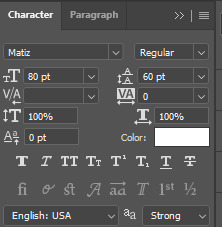
the layer styles for harry's name (double click on the text layer to call up this menu OR right click > blending options):
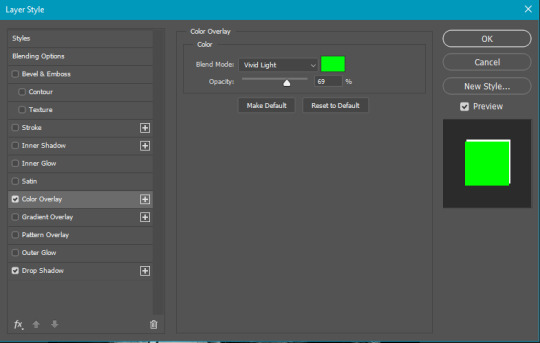
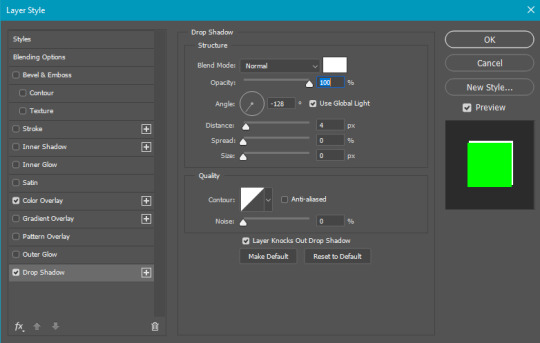
and for the angle brackets:
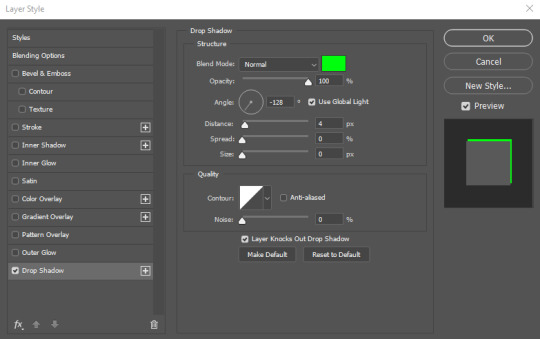
by now, you know how to utilize ctrl+T to move these layers where you'd like them. harry's name is centered horizontally and vertically and rotated at a bit of an angle and the angle brackets are centered horizontally and i just eyeballed where to put them in relation to the space between the border and the edge of the gif.
this is the complete first gif. what i would do for your own sanity since you have two more of these two create is 1) save it as a psd just in case something crashes and 2) don't convert it to a smart object until you have all 3 gifs completed and are ready to put them together.
the nice part about having the first one done is you've ultimately done the hard part. create your two other gifs, but you'll be using at least roughly the same coloring and all the same text, just with the colors adjusted, so you can drag those layers from your completed first gif to your others as you work on them.
once you have all 3 gifs completed and still on 3 separate canvases (and saved as psds bc this is adobe friggin photoshop and shit breaks all the time), convert all layers on all the gifs to smart objects. this will simplify the final gif and make things much easier.
then, bring gif #2 and gif #3 both onto gif #1's canvas. this is what it will look like at first on the timeline and in your layer panel:

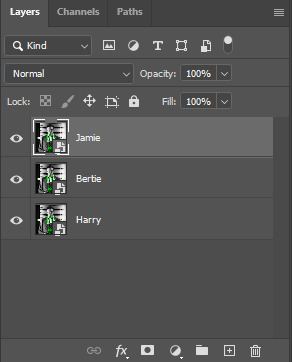
(full disclosure, i'm not making the other two lmao, i'm lazy and i already did it once in a way harder way 😂)
to get the gifs to play after one another rather than simultaneously, you just have to drag them after one another on the timeline!
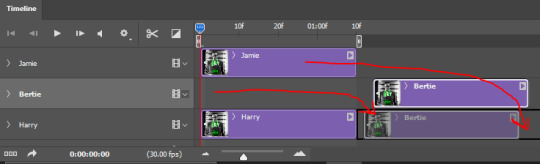
a little bit hard to show the actual process, but you're just clicking the bertie layer and dragging it down to harry's line after the harry layer. then do the same with the jamie layer, dragging it down to the harry layer after bertie. when you're done, it should look like this:
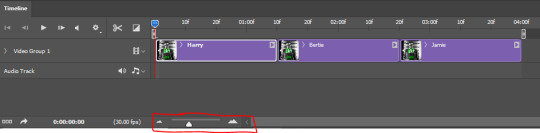
btw, the little slider i circled is what enlarges or shrinks the timeline view, so if you need to see something broken down a bit more/slower, drag it to the right. if you need to zoom out, drag it to the left.
and that's it! export and save your gif!
if you have any questions or anything is at all unclear about this, please let me know! i'm happy to help!
#answered#Anonymous#gif tutorial#my tutorials#gifmakerresource#completeresources#dailyresources#LISTEN. the way i did this 4 months ago was SO FUCKED#i made it SO SO much harder than it needed to be#you know what that is? growth.
89 notes
·
View notes
Note
Where did you download the xo kitty episodes from in HD? Btw your gifs are so crisp!
Hello there!
I usually use torrent to download stuff because it allows me to find movies/tv shows in the highest quality possible. I use 1080p files in .mkv format. Remember - the higher the file size, the better the quality. (for example, my files of xo kitty s1 are 12gb in total)
Another option is the DDL (Direct Download Links) It's safer than using Torrent (Your IP address is visible to other individuals who are downloading the same torrent. This implies that if companies discover you are downloading their content, they may issue you a warning letter or give you a fine you (depending on your country's regulations). Use common sense, ie. adblockers, vpns, link and file scanners, and antivirus/malware protection.
I'm going to leave you some links with tutorials for both safe torrenting and DDL:
General Guide
DDL
Another thing you can do in order to make your gifs look crisp is to use the correct post widths for your gifs. Plus experimenting with sharpening settings and export settings can give you a completely different result. Here are my Smart Sharpen filter settings (I apply the filter twice) :
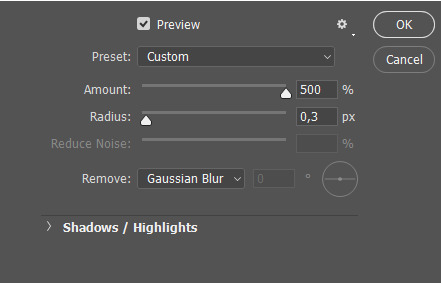
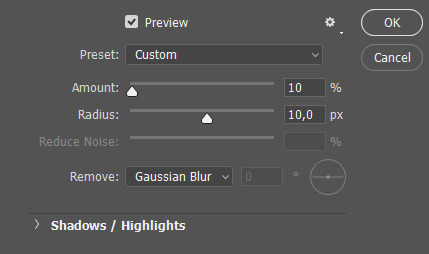
Gif Examples:


As for the export settings - you just have to find the ones that work best for you. But as always, the screenshot of my settings:

I hope it answers your question, anon). But if you have any more questions - you can dm me / leave a reply under one of the gifsets and I'll get back to you as soon as possible.
5 notes
·
View notes
Text
GIF Basics: How to make a GIF
This tutorial has been requested quite a few times, so let’s jump right into GIF making 101, how to make a basic GIF.

As always, instructions are below the cut.
Step 1
First make sure you have the Timeline feature on. This is really important to making a GIF.

For this next part you’re going to need to have your video clip saved for this. In PS go to File > Import > Video Frames to Layers. This will open your file explorer. Select your video and press Open.

Now, lets trim our video to the portion we want to GIF using the smaller guides. Make sure to have the same things selected I do. Once you’re ready, press OK. This is going to load the video as individual frames.

Once those frames load, you need to adjust their speed. I recommend 0.04 or 0.05 for a nice rate.
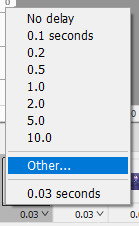
Now you can edit the frames: cut, resize, add text and whatever psd you want to use. Make sure you’re FIRST frame is selected in the Timeline and the top frame is selected in the Layers so that your static layers will be placed correctly and visible on all frames. Than drop in your PSD, add texts, etc.
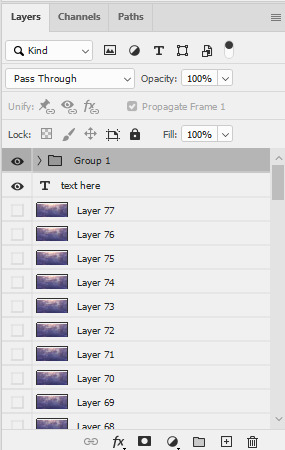
Now go into Timeline and select all frames (select the first layer, press shift and select the last frame to select them all) and select that little icon there in the corner like in the image below.

Next, select all of your layers and right click > Convert to Smart Object. This will bundle all of your layers together and get you ready for your final steps. You’re almost there!

It’s time to save your GIF! Go to File > Export > Save for Web Legacy as show below. This will open up the page to make your final adjustments and settings.

These are the settings I use for my best quality GIFS, so I recommend using these as a baseline until you get more proficient in GIF making. Before selecting Save, always be sure to play a few loops for your GIF because this is where any errors you might have missed can be seen, and your first few times there will be errors. If you spot any just go back to correct them. If you’re happy with it, smash that Save button.
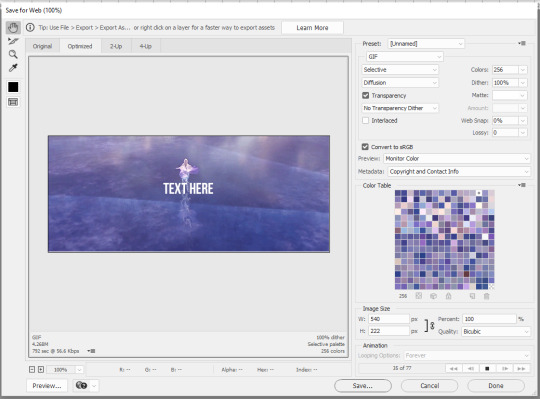
Congrats! You just made your first GIF!

Thank for reading my tutorial. I’ll have more on GIFs coming soon.
3 notes
·
View notes
Text
A general cane guide for writers and artists (from a cane user, writer, and artist!)
Disclaimer: Though I have been using a cane for 6 years, I am not a doctor, nor am I by any means an expert. This guide is true to my experience, but there are as many ways to use a cane as there are cane users!
This guide will not include: White canes for blindness, crutches, walkers, or wheelchairs as I have no personal experience with these.
This is meant to be a general guide to get you started and avoid some common mishaps/misconceptions in your writing, but you absolutely should continue to do your own research outside of this guide!
This is NOT a medical resource!!! And never tell a real person you think they're using a cane wrong!
The biggest recurring problem I've seen is using the cane on the wrong side. The cane goes on the opposite side of the pain! If your character has even-sided pain or needs it for balance/weakness, then use the cane in the non-dominant hand to keep the dominant hand free. Some cane users also switch sides to give their arm a rest!
A cane takes about 20% of your weight off the opposite leg. It should fit within your natural gait and become something of an extension of your body. If you need more weight off than 20%, then crutches, a walker, or a wheelchair is needed.
Putting more pressure on the cane, using it on the wrong side, or having it at the wrong height can make it less effective, and can cause long term damage to your body from improper pressure and posture. (Hugh Laurie genuinely hurt his body from years of using a cane wrong on House!)
(some people elect to use a cane wrong for their personal situation despite this, everyone is different!)
(an animated GIF of a cane matching the natural walking gait. It turns red when pressure is placed on it.)
When going up and down stairs, there is an ideal standard: You want to use the handrail and the cane at the same time, or prioritize the handrail if it's only on one side. When going up stairs you lead with your good leg and follow with the cane and hurt leg together. When going down stairs you lead with the cane and the bad leg and follow with the good leg!
Realistically though, many people don't move out of the way for cane users to access the railing, many stairs don't have railings, and many are wet, rusty, or generally not ideal to grip.
In these cases, if you have a friend nearby, holding on to them is a good idea. Or, take it one step at a time carefully if you're alone.
Now we come to a very common mistake I see... Using fashion canes for medical use!
(These are 4 broad shapes, but there is INCREDIBLE variation in cane handles. Research heavily what will be best for your character's specific needs!)
The handle is the contact point for all the weight you're putting on your cane, and that pressure is being put onto your hand, wrist, and shoulder. So the shape is very important for long term use!
Knob handles (and very decorative handles) are not used for medical use for this reason. It adds extra stress to the body and can damage your hand to put constant pressure onto these painful shapes.
The weight of a cane is also incredibly important, as a heavier cane will cause wear on your body much faster. When you're using it all day, it gets heavy fast! If your character struggles with weakness, then they won't want a heavy cane if they can help it!
This is also part of why sword canes aren't usually very viable for medical use (along with them usually being knob handles) is that swords are extra weight!
However, a small knife or perhaps a retractable blade hidden within the base might be viable even for weak characters.
Bases have a lot of variability as well, and the modern standard is generally adjustable bases. Adjustable canes are very handy if your character regularly changes shoe height, for instance (gotta keep the height at your hip!)
Canes help on most terrain with their standard base and structure. But for some terrain, you might want a different base, or to forego the cane entirely! This article covers it pretty well.
Many cane users decorate their canes! Stickers are incredibly common, and painting canes is relatively common as well! You'll also see people replacing the standard wrist strap with a personalized one, or even adding a small charm to the ring the strap connects to. (nothing too large, or it gets annoying as the cane is swinging around everywhere)
(my canes, for reference)
If your character uses a cane full time, then they might also have multiple canes that look different aesthetically to match their outfits!
When it comes to practical things outside of the cane, you reasonably only have one hand available while it's being used. Many people will hook their cane onto their arm or let it dangle on the strap (if they have one) while using their cane arm, but it's often significantly less convenient than 2 hands. But, if you need 2 hands, then it's either setting the cane down or letting it hang!
For this reason, optimizing one handed use is ideal! Keeping bags/items on the side of your free hand helps keep your items accessible.
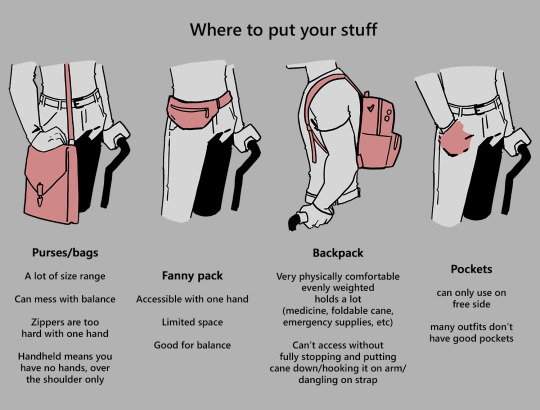
When sitting, the cane either leans against a wall or table, goes under the chair, or hooks onto the back of the chair. (It often falls when hanging off of a chair, in my experience)
When getting up, the user will either use their cane to help them balance/support as they stand, or get up and then grab their cane. This depends on what it's being used for (balance vs pain when walking, for instance!)
That's everything I can think of for now. Thank you for reading my long-but-absolutely-not-comprehensive list of things to keep in mind when writing or drawing a cane user!
Happy disability pride month! Go forth and make more characters use canes!!!
#mobility aid#cane user#writing tips#writing advice#drawing tips#art tutorial#art tips#art reference#art resources#art help#my art#long post
73K notes
·
View notes
Last Seen Blogs