#might need to start learning how to recolor
Text
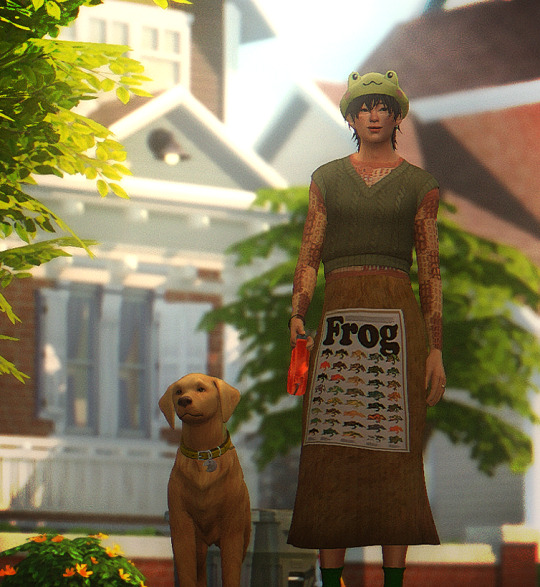
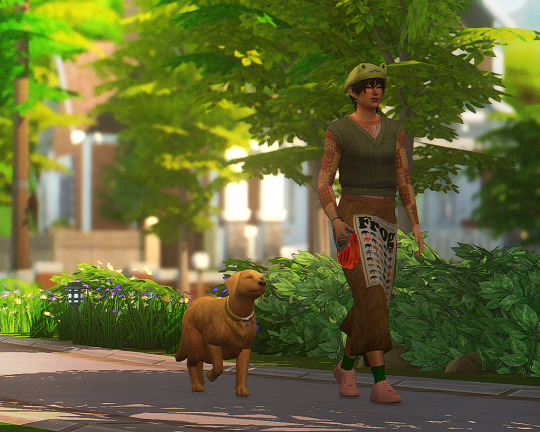
welcome to the fam, leaf! 🍃
#i forgot we can't control pets#need to download mod#ts4#ts4 gameplay#sim: ribbit#+ leaf#i need more frog cas stuff but its hard out here 😭#might need to start learning how to recolor#nsb gen 1
79 notes
·
View notes
Text
Autonomous crafting for all teen+ Sims
I've never before been so happy to share a creation! Get ready to get crafting, because it's about to get autonomous! Released today in collaboration with the wonderful @joplayingthesims who has built a community lot for the mod, seen in the pictures below. Exciting!
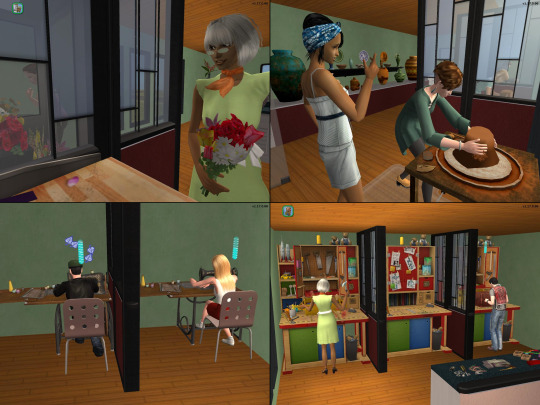
In my game, I have a community lot with crafting stations for Sims who can't afford one, or don't have space for one. But as I visited it recently with one of my college students wanting to learn flower arrangement, I got a bit depressed by all the empty stations and the other visitors just standing around chatting. I wondered if anyone had added autonomy, and I came upon iCad's autonomy enabler. While neat, it only adds autonomy for the active household which is the opposite of what I wanted. So I made my own that enables it for visiting Sims as well, only to quickly realize how annoying that got. All these Sims asking me to pick a recolor for them, blergh! So I went on tweaking, fixing the annoyances as they came up, and here we are! Finally it is possible to have a lively crafting studio where all Sims participate, without being annoying for you the player! Are you excited? Because I am excited!
What does the mod do?
- Enables autonomy on "make many" and "continue" (see readme for more info on why not make one) for all five original crafting types - Robots, toy making, flower arrangement, pottery and sewing
- Does NOT charge your Sims money for background Sim crafting. Money sounds and visuals show for all Sims, but only your current households crafting charges household funds.
- By default only autonomous on community lots. Has optional autonomy on residential/apartment lots, you can enable autonomy on those lot types by placing the Autonomy Toggler object somewhere on the lot (custom object made using parts of the FT crafting clutter, found in hobbies/misc for 1 simoleon). I set it up this way as residential autonomy sounds irritating to me, but I'm all about flexibility for the user. Perhaps you want to run arts classes at your residential playable school, or you simply like autonomy more than I do :) Please note that autonomy advertisement is tuned with community lot use in mind, so it might be higher than you'd want for residential. If there's interest I am happy to make a second version with lower advertising for those who primarily want residential use. If you are somewhat familiar with TTAB edits yourself, you can try changing attenuation code to low or medium to limit advertisement distance which will reduce appeal to Sims.
VER 2: Toggler object now also works on community lots, turning off autonomy if present on community lot. Residential/apartment behavior remains the same as before.
- Fixes annoyances with background crafting, such as selecting recolors and pop ups about progress
- Changes inventory mechanics to allow for owned studio-type use, in case you'd like a friendly owner Sim present to provide instruction. Crafting now only goes to business lot owner if done by an employee, otherwise crafting Sim gets the object. Includes home business, so if it bothered you that family members don't get to keep their work, this also fixes that. If that part annoys you, see readme for how to remove this feature.
Download mod on simfileshare | Download ver 2 on simfileshare
(New version out, fixing a bug reported by Nemertes. More info here)
You might say "Okay well fun for you Gummi, but I don't have a community lot with crafting stations, so why would I need this?". Well fortunately Joandsarah has the solution for that problem! Check out the cute crafting studio she built to give all of you a place to start community crafting! Available on MTS

Conflicts: Only known conflict is iCad's original autonomy enabler, you have to pick if you want hers version of autonomy, or mine :) Readme contains breakdown of the functionality of all parts, to help you decide a load order should you encounter conflicts. It should be possible to resolve conflicts though if there are any others, so please report them to me :)
Credits: @joplayingthesims for collaborating with me and providing a lot that you can get started with if you don't have one, iCad at @dramallamadingdang for the original autonomy enabling mod, @cityof2morrow who helped playtest the mod
If anyone else builds a community lot intended for autonomous use, I hope you let me know somehow so I can add links to it in my post :) If any other modders see ways to improve on what I did, please feel free to do so :) I am hoping to eventually post an update that sends all crafting to inventory to fix the make one issue, and the station clogging that happens over time.
597 notes
·
View notes
Text
THE FIRST SOLDIER: CHAPTER 6
It's time, folks! After five agonizing months of waiting, we FINALLY get a story update. And I'm here to recap for your convenience! So, spoilers below under the cut.
Story opens up ten days after Shinra reinforcements arrived on the island. They're building a reactor via a site dig. Glenn and crew have been watching Rosen's smoke for days now just in case.
Lucia remarks that Sephiroth did most of the heavy lifting in terms of prep. Glenn is getting ready to celebrate with their upcoming bonus. Sephiroth isn't interested in pay though according to him.
An engineer calls them over and tells them they need to go kill monsters in the area. When Glenn asks where Sephiroth is, the engineer tells him that he's out scavenging corpses and that it's kind of creepy.
Seph has apparently been going off on his own for a while. Lucia suggests they go look for him while they take care of the monsters.
Ugh. More filler monsters. And of course the level cap is trillions of numbers ahead that of the last chapter's. This fucking game smh.
The music on this section is nice. EC has a good soundtrack ngl. Better than it deserves, in my opinion.
After an incredibly tedious fight with a recolored ostrich monster, the gang comes across a shard of materia in the ground. This comes into play later.
They find Sephiroth digging around corpses at the old Rhadoran base. He clarifies that it might LOOK creepy but he's actually looking for the picture of his mother. Like most children with precious comfort items, he ended up dropping it somewhere and he's looking through the bodies to see if it's somehow under them.
So here's some clarification, the photograph is NOT a photograph so much as a locket/necklace that Sephiroth wears. So it's not in his front pocket, he's wearing it around his neck. Neat.
The gang offers to help him look for it, taking out filler monsters in between. Sephiroth mentions that he feels the need to protect the team as the leader. That's his job. There's some cute banter between Seph and the trio. Awww.
All the Rhadorans except Rosen are gone now. Matt keeps going on and on about their religion--Planetology. Lucia is unfamiliar with this concept and Matt explains the concept of mana and souls returning to the planet to Sephiroth.
Glenn feels REALLY guilty now about what they did to the Rhadorans, worried they'll just be forgotten since they're gone now. Kinda too late for that, bud. And now it's just Rosen left alone.
Hojo mention from Seph btw. Hojo told Sephiroth "No matter how logically you explain something, there will always be people who don't understand because they have a different view of the world."
When Glenn worries about the Rhadorans being forgotten, Sephiroth takes what he learned from Glenn earlier about compassion to heart, saying that the PLANET will remember them.
Glenn understands how important mana is now. It's life force, life energy. That's why the Rhadorans hated what Shinra was doing.
They can't seem to find the necklace anywhere. Sephiroth is glumly resigned to accept that it's gone for good.
Instead, thanks to Glenn's sudden moral dilemma, they decide to bury the Rhadorans as a means of "apologizing". Sephiroth eagerly offers to help.
While they're burying the bodies, the island starts shaking. The reactor dig is going to start soon. And THAT'S what will awaken the mana overflow Rosen mentioned earlier. They'll set off explosives that will start a chain reaction. Sephiroth says they're going to have to evacuate.
They're blocked by a bunch of branches. Seph finds the materia fragment from earlier and uses it to incinerate the area to make a path. Glenn gushes over how cool Seph is.
Seph cuts down a big tree to make a bridge too. Glenn thinks Seph is SUPER FUCKING RAD OKAY. Seph asks if he's impressed with his "cyborg powers" and Glenn says no, not wanting to hurt Seph's feelings again.
Seph says that he feels he can say anything to the group and that he doesn't want them to hold back. Glenn is in full support mode now and he and Seph seem very in sync with each other. It's very cute. They've gotten close during the gap.
They find another materia shard during a blocked path of rushing water. Sephiroth uses it to freeze the water to move across.
Seph is eager to get his team back to the chief engineer, but Glenn is worried about Rosen. He wants to see if there's a way to make sure Rosen's safe but Seph says there's no time. Glenn seems to be ready to ask Seph something but then drops it.
This section is called "Inseparable". They arrive at the helicopters. Glenn wants to delay the dig so he can warn Rosen in time. But they've already started.
Glenn gets agitated and then punches the engineer, who threatens to tell HQ. Glenn doesn't give a fuck. Matt and Lucia decide to support Glenn. Sephiroth doesn't stop them.
Lucia hijacks one of the choppers and kicks a soldier out after holding them at gunpoint. They're going to fly over to Rosen's Island with it.
A monster shows up just as shit starts to get crazy. It's Stamp the goblin-frog! He's huge and mutated because of the mako. Glenn wants to finish him off for good.
They take care of Stamp and the group is going to go rescue Rosen and Refu. The other chopper throws down a ladder for them for the evacuation but the trio is basically defecting.
Matt said Sephiroth isn't fired because the chief knows that it was the trio's idea, not his. But they're going to have to leave Seph behind so he isn't dragged into this.
Glenn tells Sephiroth to stay safe as the trio departs. Sephiroth is visibly hesitating on whether or not to accept the ladder or follow the group after they've left.
The trio gets ready to take off in their hijacked chopper. And Sephiroth. Is going. WITH them.
Holy fucking shit Sephiroth tried to defy Shinra asrdfghkjgfd just so he could stay with his friends. I'm gonna cry. Fuck, I already am. INSEPARABLE. AHHHHH.
Overall, a decent chapter. Much better than I was expecting. Babyroth is so endearing and it's clear he's now very attached to the trio. Even more than Shinra. Him just suddenly losing the picture/necklace is kind of bullshit but whatever. I guess he had to lose it somehow? Maybe it'll turn up again later.
Sephiroth's rebellion will obviously have consequences later.
#ff7#ffvii#final fantasy 7#sephcanons#sephiroth#ffvii first soldier#first soldier#ever crisis#ffvii ever crisis#spoilers#ff7ec#glenn lodbrok#matt winsord#lucia lin#hojo#holy fuck#an unexpected fucking twist if ever there was one
97 notes
·
View notes
Text

i didn't have a tutorial yet... so i made one lol. its longer than i wanted it to be, but i wanted to make sure it's easy to follow for people who've never made cc or have no experience with photo editing software, and fully explain my process. it's by no means hard at all though lol, i guarantee you making skin details is the easiest thing aside from recolors and if you want to learn this is a good place to start :-)
for people who are more experienced than that, and want to know specific things-- i've sectioned everything so it should be easy to skim through until you find what you need!
requirements.
this tutorial will only require sims 4 studio (free) and photoshop (not free) or gimp (free). i pirated photoshop 2022 myself. any version will do but i think 2022 just has nice new features for making content! if you don't want to buy or pirate, gimp is a similar alternative.

1.1 how to find skins to use as a base.
in case you don't have (a) skin(s) in mind to use for your skinblend, my tip is to download as much random ones as you can find. this way you have a lot to choose from and it's easier to get an idea of what you want.
go-to creators for maxis match skins: heihu, madmono, pyxiidis, faaeish, miikocc, emmibouquet and stretchskeleton.
creators for maxis mix/alpha skins: sims3melancholic, obscurus, ddarkstonee and pralinesims.
creators for maxis mix/alpha skins that only allow editing for private use: northernsiberiawinds, remussirrion and thisisthem.
go into cas and try them all out. if you like a part of a skin, write down which skin it is and what part(s) you want to use of it from which swatch if it has multiple.
for example, i almost always use one or two skins for just the nose shape, one for the eyebags, one to three for the lips and one for the basic shading of the face. don't be afraid to use the opposite style skins of what you're going for, you can always add or erase details.
1.2 exporting the skins.
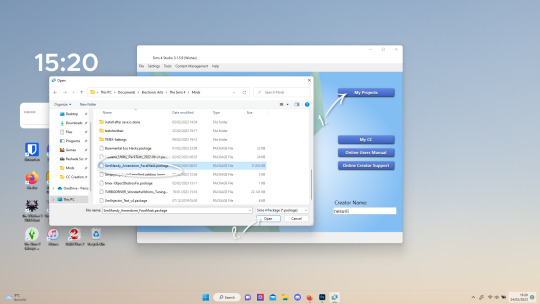
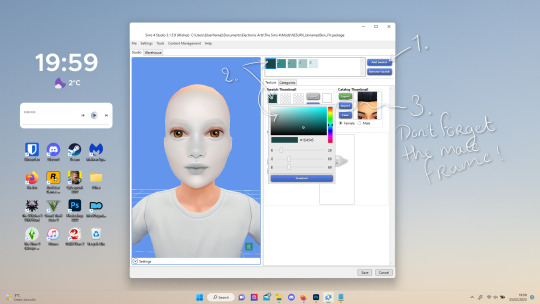
now we're gonna export the skins with sims 4 studio. click on "my projects" (1) and navigate to whereever you have the skins you want to use, and select one and click "open" (2).
the colored little boxes in the top right are the swatches. click whichever swatch you wanted to use something from (1), then click the "export" button (2). you'll get a window to save the exported skin now.
tip: i highly recommend making an organized folder for your skinblend, to have all your files together and easy to find. if you haven't made it already you can easily do so within this window.
i put mine in a folder called "resources" in a folder named "unnamed skin" for example.
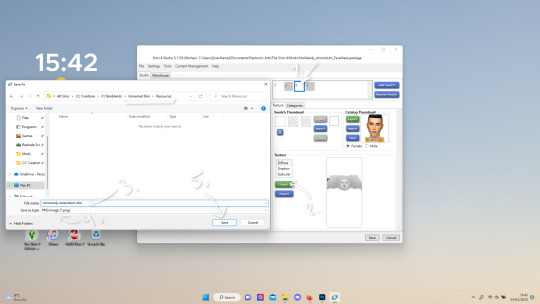
name the exported skin file (3) and make sure the "save as type" is set to .png (4).
after saving the file, you can just click "cancel" on the bottom right to go back to sims4studio's starting screen. if you have multiple skins you want to use, repeat the above process for all the other skins to export them too.

2.1 opening the exported files in photoshop/gimp.
open your program of choice and click on "file" from the top bar (1) and then "open..." and navigate to the skin files. you can left click and hold down your CTRL key to select multiple at once to open.
we have to layer them all in one file, but before we do that we have to check if they're all the same size.
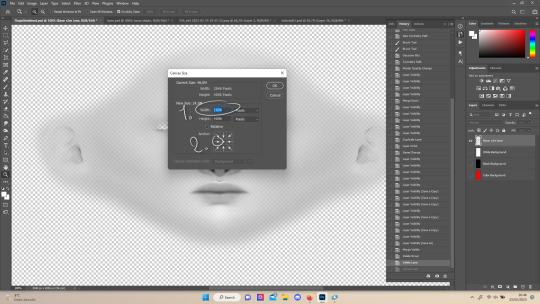
note: some skindetails might be 2048x4096, others may be 1024x2048. unless you want your skin to be compatible with the HQ mod, you should just opt for 1024x2048, as without the mod both resolutions look identical. the bigger one will just make your fize unnecessarily large.
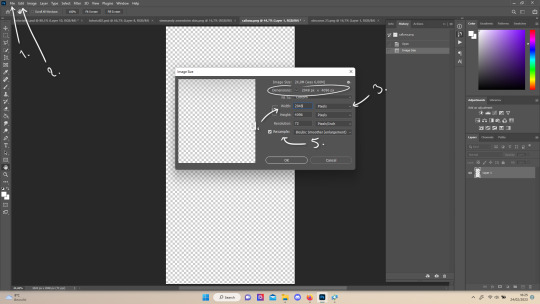
click "image" at the top bar (2), then "image size". it'll say the size at dimensions. if it's at the size you want it to be at, just exit the window.
if you need to edit it, select "pixels" from the dropdown menu (3), and put in 1024 for width and 2048 for height OR 2048 for width and 4096 for height. if you're sizing up select "bicubic smoother (enlargement)" under resample (5).
repeat this for every skin you opened.
2.2 layering the skins together.

copy and paste all the skins individually onto one by selecting them with CTRL + A and CTRL + C on your keyboard, and pasting them into one of the other opened skins with CTRL + SHIFT + V. you can then close all the other tabs.
the file now has multiple layers. you can rename them by double clicking the layer name. this makes it easier to keep track of whats what. you can reorder them as well by dragging them with your mouse. put the skin you want to use as base (for the general facial shading, highlighting) at the bottom.
tip: i recommend making all white and all black background layers to see the skins better. you can do so by pressing D, then CTRL + SHIFT + N. for the white layer then press CTRL + BACKSPACE and for the black layer repeat the first two steps and then press ALT + BACKSPACE. now there should be two new layers in black and white. drag them to the bottom of the list. i prefer using white so i put black last.
2.3 changing the opacity in parts of the base skin layer.
to make ea's preset details (cheek/nose bridge sharpness, dimples) come through your skinblend, you need to change the opacity of the base skin sometimes. alpha skins tend to be fully opaque but maxis match skins are usually already transparant enough.
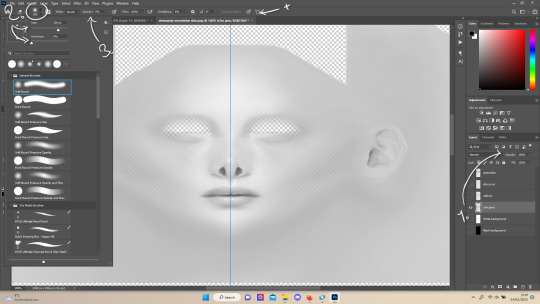
hide all the layers aside from this base layer by clicking the eye icon next to the layer names. you can see the transparancy with the visibility of the grey-white blocks or if you find it easier you can also unhide the black background to see it instead.
to change the opacity, you can either edit the entire layer's opacity (1) or use the eraser tool (E key) to add transparancy at specific parts.
if you have photoshop 2022, turn on vertical symmetry (+). if you don't have it, you can choose to edit only one side of the skin and mirror it later or do both sides and embrace some asymmetry.
i selected the eraser (2) and set the brush size to about 200px and 0% hardness. the opacity of the brush i set to about 10% (3). i used the eraser on the lower cheeks, the nose bridge and tip and the bottom of the chin. i also erase the upper eyelid 100%, cause i prefer to have eyelid freedom :p. it then looks like the above! this will very subtly let through details, if you want more you should make it more transparant.
2.4 optionally: editing out freckles, pores and/or eyelashes.
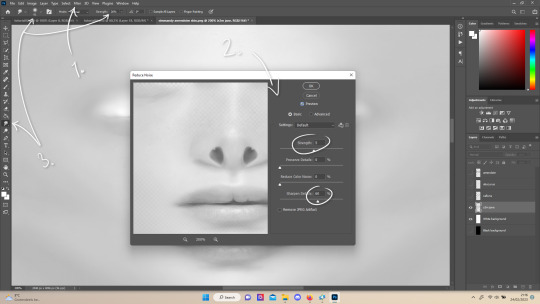
your base may have pores, freckles or moles you want to get rid of. to smoothen everything at once, click "filter" at the top bar (1), "noise" and then "reduce noise". i only edit the strength and sharpen details setting (2), this setting erased the pores and most of the freckles for me while keeping the details looking sharp, but you likely have to adjust it a little cause it depends on how large/fine the details are.
the remaining freckles, pores and eyelashes i remove by using the smudge tool, with 0% brush hardness and at 25% strength. (3) brush size depends on the size of the details. i just go over it in circular motions until the freckle or whatever it is has been blended away without pixelation.

for this part i'm going to only show how i do the nose as an example, however it works the same for editing in eyebags, lips, jaw lines or whatever you want to add in too.

unhide the layer of the skin you want to use a part of, and hide the base layer.
if you are going to use multiple parts of that skin (for example, you want both the nose and the lips of that skin), duplicate the layer by right clicking the layer name and choosing "duplicate layer...". then hide the duplicated layer. it's easier to edit one part at a time.
use the selection tool (M) to select the part. press CTRL + SHIFT + I and then DELETE. press CTRL + D to unselect. should look something like the above.
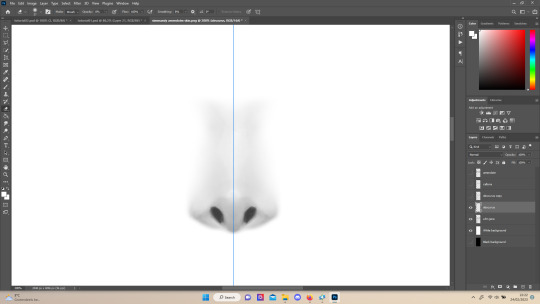
use the eraser tool (E) at a moderately small size like 30px~ with about 30% hardness and 100% opacity to erase around "hard lines", like the nostrils in this case and the bottom of the nose. the nose bridge has "soft lines", so if you were to use a hard brush for that, the shading of the nose bridge would look far too harsh and unblended.
for the soft lines, set the eraser tool at a bigger size like 100px~ with 0% hardness and a lowered opacity between 15-45%. erase soft lines "gradually", so the shadows blend in with the layers underneath it. should look something like the picture above.
always look at the newly added part with both a black and white background to see if there's anything you need to erase more. then look if it blends in properly with the layers underneath. if it's too dark or light, you can click on "image" on the top bar, then "adjustments" and "brightness/contrast", and lower or raise the brightness until it blends in better.
i'm using two separate skins to make the nose, so i've repeated the process above for the second nose skin, then used the method of step 2.3 to erase certain parts and make other parts more transparant / blended in. as you can see above, it's now the perfect offspring between the two noses i used.
note: for a maxis match nose, you'll want to avoid a completely opaque nose, mainly at the nose bridge it should be more transparant. i always make sure the lips and eyebags are fully opaque though, unless you're going for a vanilla type of skin it doesn't look good transparant.

at this point, i like to save the file with the white background layer on and see what it looks like in sims 4 studio. this gives you a better idea of what it looks like on sims and what you may want to change or add. press CTRL + SHIFT + S and name your file, and set the file type to .png.
open any skin or skin detail cc file just like in step 1.2, and instead of exporting anything, click "import". now navigate to the file you just saved, and open it. the sim model now displays what your skin looks like. should look something like the above! you can click cancel after you've looked enough, so you don't have to worry about ruining the original cc file.

maybe you're happy with the skins current state... but in case you want to add or change some things, here's a step by step how i do it.
5.1 drawing shadows & highlights.
as you probably have noticed, everything needs to be done in greyscale, so select black (for shadows) or white (for highlights) in the top right colored box. make a new layer (CTRL + SHIFT + N). select the brush tool (B) and set the brush at about 0px with 100% opacity. draw the shape of the shadow or highlight where you want it. make sure to make a new layer for every shadow and highlight!
now you can either use the smudge tool to blend it out, but i prefer using "filter" from the top bar, "blur" > "gaussian blur". i just play around with the radius until it's blended out but still has some shape to it. it depends on how small or wide and blended you want it to be.
then i use the eraser to shape the shadow/highlight further. for example, i want the shadow in this case more blended out towards the eye, but harder towards the forehead and nose, so i use the eraser on that side. lastly i change the layer opacity to make the shadow/highlight less dark/light. my preference lays with subtle details, but of course you can make it as contrasted as you like!
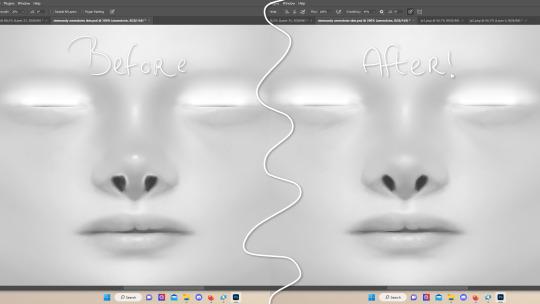
5.2 drawing small details.
to draw your own details, use the brush in 1-3px brush size, 100% opacity in black. i can't help you here cause it's just drawing where you want and then blending it out with the smudging or blurring tool where needed, and using the eraser at lower opacity to blend it in.
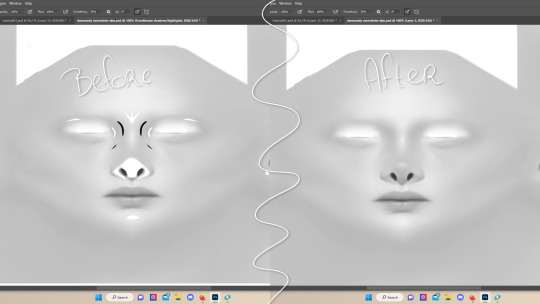
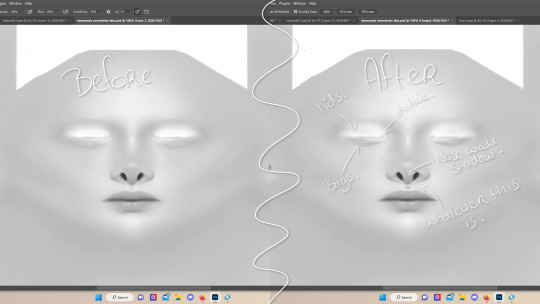
to give you some ideas, i usually draw some details on the nose like sharper nostrils or a nose wall, some texture on the lips and the eyebags. i like using reference pictures of real peoples skins to see where and how to draw things. before and after pictured above! (i'm so proud of these eyebags yall T-T)
5.3 adding other creators cc skin details.
if you don't like drawing things yourself or know just the right cc skin detail your skin needs, you can also use other creators' skin details on yours.
maxis match + mix details: pyxidis about face, miikocc face kits, okruee face details, sammi-xox face details, lamingtonsims face details.
maxis mix + alpha details: detail overlays by obscurus-sims, ddarkstonee & sims3melancholic
like in step 1.2, just open the file in s4s and export whatever swatches you want to use. remember to make sure the resolution of the file is the same as your skin's before copy and pasting it on your skinblend! and remember you can lower the opacity layer for these too.
5.4 mirroring your skin.
if your skin isn't mirrored/symmetrical yet, save your file as a .psd and then right click the layers, click "merge visible", press CTRL + ALT + C, and set the canvas width to half what it is now (either 1024 or 512). (1) click the arrow in the left middle if you want to mirror the left side, or the arrow on the right middle for the right side. (2) press "ok".
press CTRL + A, then CTRL + X, then CTRL + SHIFT + V. delete the layer beneath the active one (it's empty). then press CTRL + ALT + C again, and put the canvas width back to the original (2048 or 1024). select the same arrow you selected before, and click "ok".
press CTRL + A again, then CTRL + C. now click "image" from the top bar, "image rotation" and then "flip canvas horizontal". now press CTRL + SHIFT + V .... and voila, your skin should now be mirrored.
note: ik there's a ridiculous amount of steps for such a simple thing so i feel like there's probably a much faster way to do this, but i hate following tutorials and guides (the irony) so this is just the way i taught myself lmao
5.5 last test & optional last touches.
at this point, i'm done with the skin. i erase everything aside from the face if the skin still has a full body texture cause i prefer face-only skinoverlays. i always save as .psd and .png, .psd is to edit it later on if need be. once again import your skin into s4s like in step 4, and see if you're happy with the skin. if not, just keep editing whatever you need!
i also like to add alternate versions of the skin lastly here. some examples: a soft nose or hard nose bridge (justice for flat soft noses, simblr loves to erase them lol), different eyebags, lighter or darker lip option, version with eyelid overlay or without.

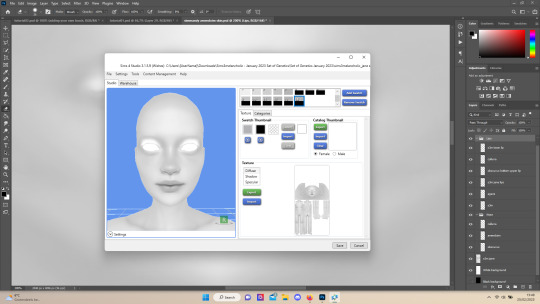
6.1 creating the package file.

to make the package file for your skinblend, open s4s and select "create cas standalone" and then click "cas". (2) now select "skin detail forehead" from part type (3), click the most left forehead wrinkle and click "next" (4). name the skin file whatever you want, you can always change it later!
click "import" and open your skin file. and voila! you're pretty much done!
6.2 editing the age, gender & occult flags and category.
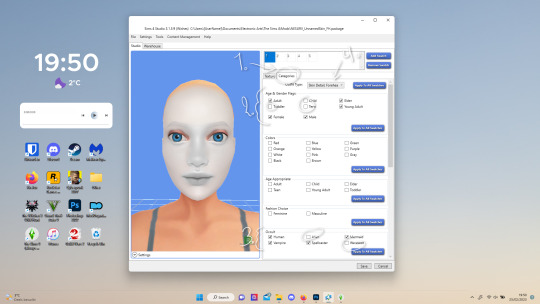
right now your skinblend is only available for young adult to elder sims, and not for aliens and werewolves, so you probably want to change this. go to "categories" (1) and check the boxes you want under "age & gender flags" and "occult" (2). you don't need to change any of the other things.
if you wish to change the skin detail slot it's in, you can change it at "outfit type". most people use either forehead or mouth crease, but you can use any of the ones that start with 'skindetail'.
6.3 adding swatch colors, thumbnails or additional swatches.
if you want, you can add multiple swatches (1). you can also edit the color of the swatches (2) and upload a custom thumbail with 104x148px resolution (3), make sure to upload for both male and female frames.
6.4 editing the sorting layer.
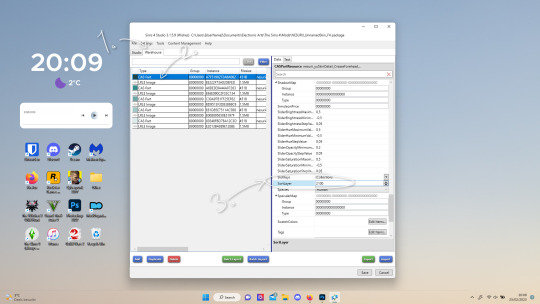
it's not the end of the world if you don't do this, but you may run into some skin details or freckles/moles that won't display on top of your skinblend if you don't edit it :).
click on the "warehouse" tab (1), select the first "cas part" (2). scroll down on the right to find "sort layer" (3) and put in 2100. you're gonna want to change this for each cas part individually.
now just save your file... and try it out in game!
if you need any help or have any questions please comment below <3 feel free to tag me in the end result if you want too.
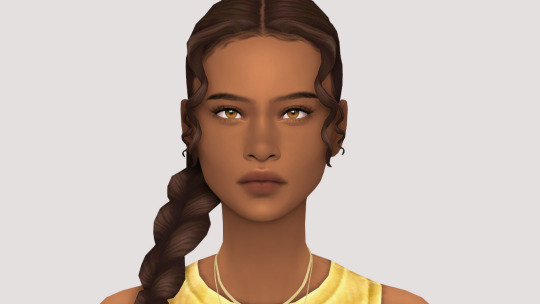
(my end result)
242 notes
·
View notes
Text
🟨 Modding Poses for Cyberpunk 2077 (and general modding reminders!)
It's really exciting to see everyone getting into modding latetly, especially pose making 🤏
I want to throw a couple of resources into One Big Post to make sure everyone has everything to get started- BUT FIRST
a couple of general Modding Reminders 🤲
━━━━━━━━━━━━━━━━━━━━━━━━━━━━━━
▶ Remember that modding, just like any other creative outlet, is supposed to be fun!
When a project start to frustrate you, make you doubt your ability/skills, when you start comparing yourselves to others-
Stop! Disconnect, and take a break, walk a bit, splash water on your face, eat something! It's really easy to spiral down (been there, done that)
It's important to remind yourself of why you're modding in the first place! Take a look at your inspiration, your blorbos
Don't lock your brain into One Frustrating Project; have a couple of smaller projects or ideas on the side that you can go to when the creative juice is flowing to not get stuck on one particular project
▶ Modding is exciting, and you want to mod ALL the things asap! Other do as well, and might have the same ideas
It can be frustrating to see someone else release a mod that you thought of doing, that might've been sitting in your to-do list for a long time. That's ok! It's normal to feel that way, but don't let that sap your creativity
Someone made a pose/pose pack that is similar to what you wanted to make? Do it anyway! It won't be the same, because it comes from you! This applies to general modding as well, to clothes, to recolors
Everyone have their own vision of things. It might be a similar pose, but the body language is different, the hands sit on the skin differently... The model you want to port won't have the same materials, normal map, or colors as the one that is already available!
Modding is accessible by everyone. Nobody owns ideas, or references, or models available on the internet. Don't let anyone tell you otherwise, and mod what you want, when you want to, and how you want to!
━━━━━━━━━━━━━━━━━━━━━━━━━━━━━━
▶ Tutorials and Resources for pose making
With the reminders out of the way, here's everything you'll need to get into Pose Making! I see this is something that a lot of you want to tackle, and it's better to have everything ready to get started 🤲
The tutorials are in order of workflow!
🔹 XbaeBsae's Tutorial - Custom Poses and Animation
This is the first step!
With those templates, you'll be able to start creating the poses in Blender using the Cyberpunk's body models (Woman, Man, Man Big...) ⚠ Be sure to get the proper requirements and versions!
🔹 PinkyDude's Tutorial - Retargeting Animations
🟠 ROKOKO PLUGIN
OPTIONAL
If you want your poses to be available for other rigs (Man poses for Man Big, or Woman poses for Man, etc) this is how you achieve that! You'll learn all about retargeting.
It's also useful if you want to import other games's animation/poses into CP77
🔹 Halkuonn's Tutorial - Retargeting Animations
🟠 BLENDER ANIMATION PLUGIN
OPTIONAL
Same as the above tutorial!
🔹 Halkuonn's Tutorial - Importing Poses into CP77
An important step;
getting your poses from Blender to an .anim file!
🔹 ManaVortex's Resources - Poses for AMM
🔹 ManaVortex's Resources - Poses for Photomode
Both type of additions are compatible with each others!
I personally recommend working on the AMM addition first, as you'll be able to use the same files and mod structure later for the Photomode addition :D
🔹 XbaeBsae's Resources - Nibble to NPCs 2.0
OPTIONAL
The Nibble to NPC 2.0 mod has a resource pack for modder to make their poses pack compatible with the Nibble Replacer! Make sure to update all of the requirements, and AMM, to have the ability to pose NPCs using custom poses in Photomode
━━━━━━━━━━━━━━━━━━━━━━━━━━━━━━
⚠ KNOWN ISSUE | T-posing
You probably saw me and a couple of other pose modders and users complain about the T-posing issue- it's sadly still ongoing, and no real fix has been found so far.
We tried using unique workspots and entities for each packs, but they somehow keep overwriting one another in really random ways (MA and MB are compatible, but sometimes MA and WA won't be useable together? Sometimes you won't be able to use different packs from a same modder, etc)
Once (if!) we find a fix, we'll be sure to update our mods and to share the knowledge with y'all 😩 for now, we make do
As always, don't take this post as THE modding method! I'm simply an old modder sharing my two cents for all the new baby modders rolling in, hyped as fuck 🤲 Welcome to the modding side 🧡
#Cyberpunk 2077#Cyberpunk 2077 Modding#Tutorial#Pose Making#UUHHH Idk how to tag this but Yeah!!#Please don't overwhelm yourselves- it can happen even unconsciously! Take breaks and be gentle with yourselves 🤏#and don't hesitate to ask around for help! There is a lot of resources and tutorials#and good people willing to answer questions or share knowledge as well :3#long post#text#apologize for any typo or spelling ITS GETTING LATE and I didn't re-read myself 👁👄👁 ahgfhhgf
74 notes
·
View notes
Text

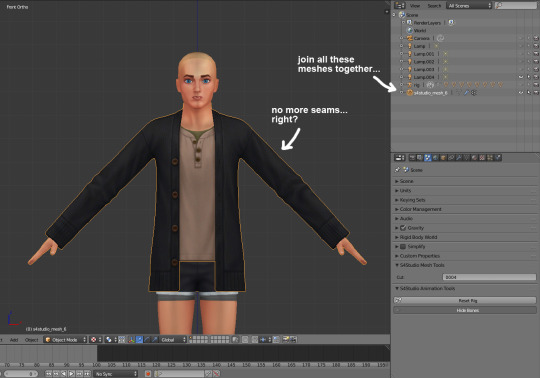
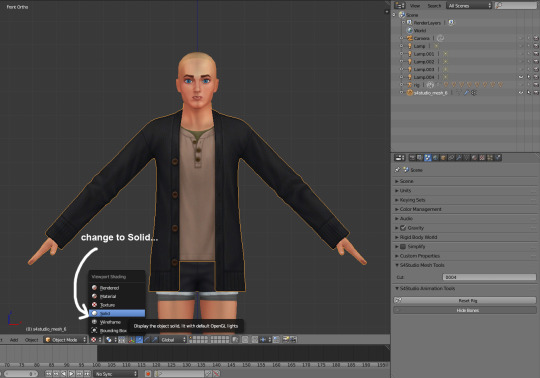

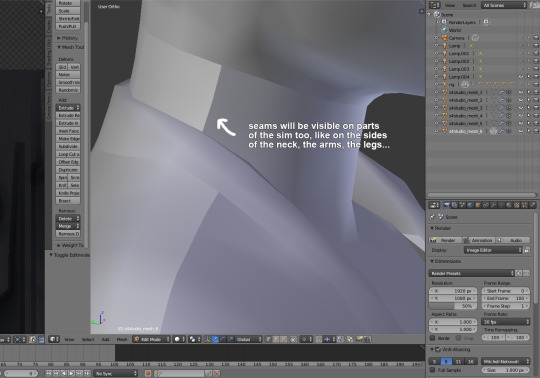

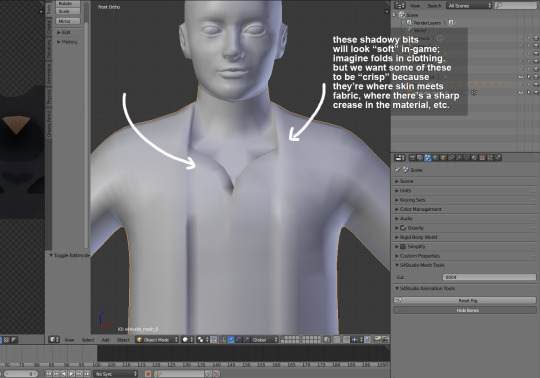
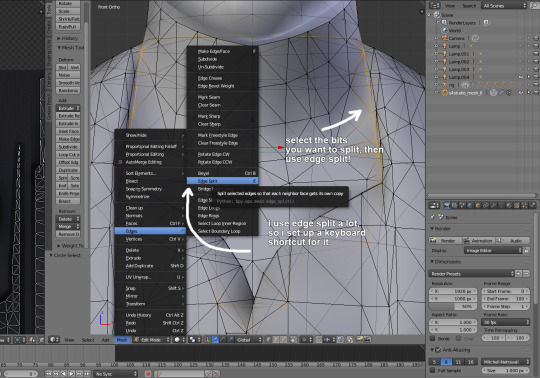

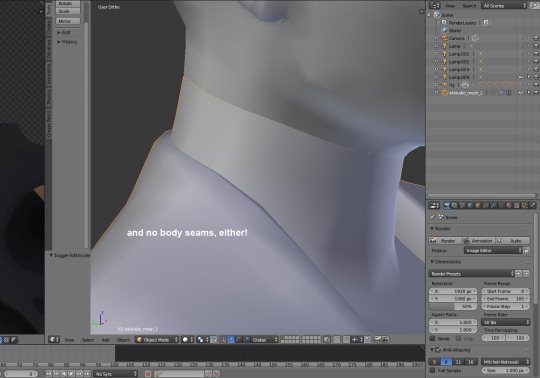
i've been making custom content for almost a year now, so i thought it might be helpful to start sharing little things i've learned to do in blender! i created this step-by-step guide on how to remove seams from a maxis mesh and how to edge split parts of meshes which should appear "crisp." i think they really help to make custom content look neater in-game.
you don't need to do this if you're making recolors, but if you export the mesh from sims 4 studio (i.e. to make something from a pack base game compatible), these seams will appear.
i hope this is helpful for others who are starting off editing maxis meshes themselves! 💪💪
#let me know if this is like. an obvious tip. lol#i never saw it in tutorials so i thought i would share :3c#oh god i have to think of a new tag.#tips and tutorials#there. descriptive.#also this assumes that you know a lot of blender basics.. if anyone is interested in like a toe to tip ''how i make cc'' thing i can do tha
72 notes
·
View notes
Text
2024 Simming Goals
Fewer CC posts - Less than a hiatus, but weekly posts are burning me out and leaving me without enough time to learn new skills, which brings me to...
Learn new skills - I want to figure out how to properly do accessories, try converting hair (both 4t2 and age), etc
Fix old stuff - A bunch of my stuff needs tweaking. I should do that already. I also want to rid my game of dark spots and side seams. I'll share edited meshes from time to time
Finish WIP's - And this time, I mean it!
Write tutorials - Bone weights, naming groups, and maybe an overview of my 4t2 process
Do more little things - Shoe swaps, recolors, etc. It doesn't all have to be new mesh conversions
Make over my blogs - I have ideas, but I never get around to them
And for my personal game, as always, sort out those downloads. I have 23gb, and my game loads forever. It's about 2 hours from launch to playing. It would be nice to somehow winnow it down to like 15gb. Might be impossible, but I'll keep trying.
I also started a (still empty) gameplay simblr, @kaluxplayssims and I should probably actually post something there.
All of that goes along with trying to slide my life out of constant crisis mode. The worst parts seem to be over. It's time to repair and move on. That's the energy I want to carry into the new year.
24 notes
·
View notes
Text
DRAGON QUEST'S LOCALIZATION SUCKS, ACTUALLY. PART 2
While my feelings about the almiraj's name are mostly based on personal preference, there are multiple other monster names that have been changed pointlessly to the detriment of the game. Case in point:

This is a slime. Possibly the most iconic and lovable mascot creature ever conceived. Pikachu eat your heart out.

This is a different slime. It's gone by various names over the years. Older translations decided to call it "Red Slime," because it's both red and a slime. They're the obligatory stronger recolored version of an enemy that you meet later on in the game (They might even be the progenitors of that trope.)
The Japanese name for these guys is "スライムベス" (Slime Beth.) The "Beth" part comes from the second letter in the Hebrew alphabet, essentially denoting these guys as the second slime you encounter. There's all sorts of ways you could localize this: maybe Beta Slime? Maybe Slimer, with a later stronger slime called Slimest (A la Horizon's Gate?) Maybe 2lime if you wanna get wacky with it? Or you could just leave it as Slime Beth and preserve the original intention, and maybe have some curious people learn a little about Hebrew in the process.
The current DQ localization team chose none of these options, and instead decided to name these "She-slime." Why? Who knows! The only thing I can figure is they saw slimes are blue and thought "Well blue is boy color and orange is kinda like pink which is girl color!" It's already pretty dumb to pointlessly gender slimes, but it's even dumber given the fact that there are multiple Dragon Quest Monsters games with actual gender mechanics in relation to monster breeding.
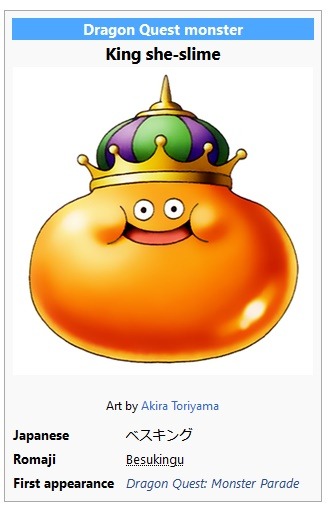
But it gets even dumber! When 8 slimes congregate together, they can merge and become a King Slime. So obviously, 8 she-slimes should form a Queen Slime, right? Uh oh! There's already another monster called that!
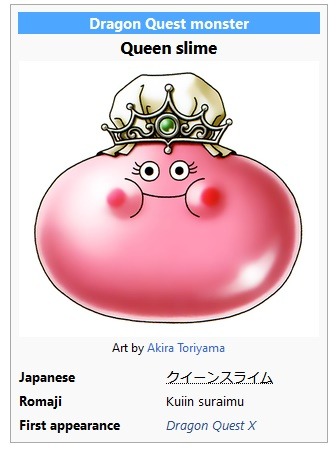
This is how the localization team painted them into the incredibly awkward sounding "King she-slime"
But wait! We can go dumber! The King she-slime is actually one of two possible monsters that these guys can amalgamate into, and which one you get depends on the gender of all the slimes involved. It's a pointless confusing ambiguity that only exists because the localization team decided to arbitrarily assign a gender to something that didn't need to be gendered in the first place.
And this isn't the first time this has happened. Here's another one:
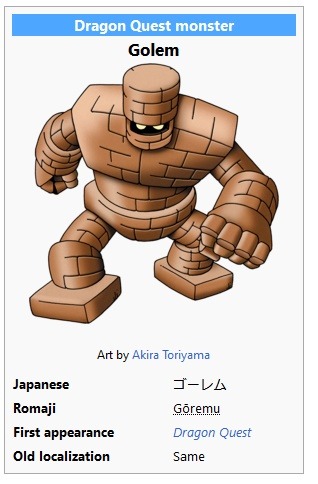
This is a Golem. They've been a series staple since the first game, where one appeared as a boss monster.
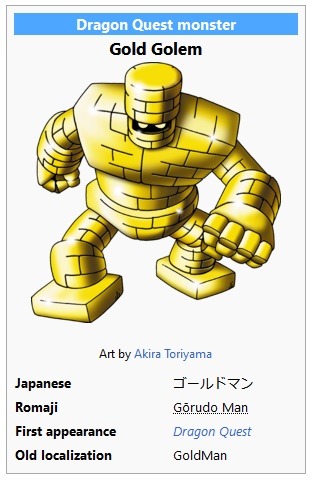
This, according to the current localization, is a Gold Golem. They're fairly weak, but they drop a ton of gold if you manage to kill them, similar to metal slimes with EXP. You can see that the Japanese name for them is literally just the English words "Gold Man." I can at least understand where the localization team were coming from when they changed. After all, it looks like a golem, but it's made of gold, hence "Gold Golem." One small problem:
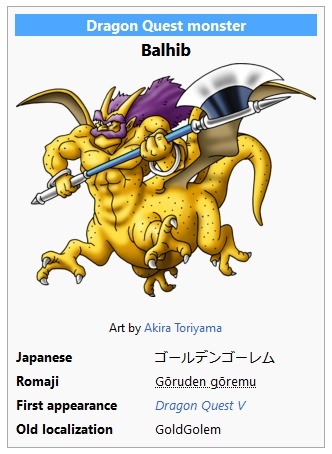
There's already another monster named that. Keep in mind, the current localization we have didn't start until Dragon Quest 8, so both of these monsters were known entities at this point. So why'd they change it's name to "Balhib?" Again, who knows! According to the wiki, it's a medieval Egyptian name for the Great Sphinx of Giza. I'd like to give them points for at least using another obscure mythological reference, but I would have to immediately take them away again because this guy looks nothing like a sphinx. There's nothing cat-like about it, and it's got 6 limbs. Worse still, it was named "Golden Golem" in Japanese because like Gold Man/Gold Golem, it also drops a ton of gold on defeat. You wouldn't have any way to know that if you're playing in English though!
You might think that the fact he's yellow would give it away, but the thing is both of these monsters were introduced in the exact same game and DON'T drop a ton of gold when you kill them:
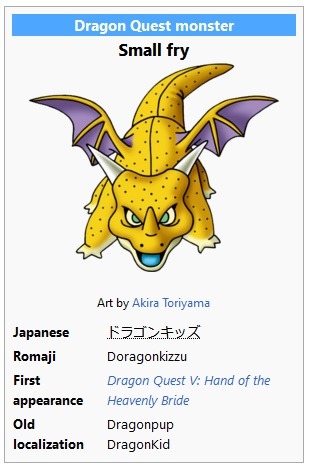
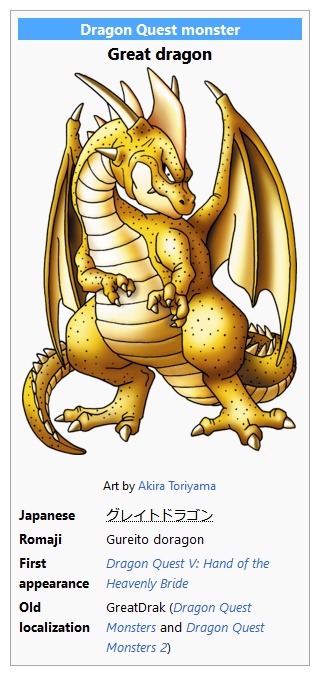
Sure, that's kinda on Toriyama for using the same speckled yellow skin pattern for all of them, but the name "Golden Golem" was clearly picked to help differentiate it and tell the player "Hey, this thing is made of gold!"
These may seem like a couple of minor gripes, but there's a whole bunch of straws in the series being piled on top of a camel with already weak knees. Plus, it speaks to a shortsighted carelessness in how DQ's localization team handles things. I feel like if I were in the same position and a change I made caused something to sound awkward or confusing, I would want to go back and fix that instead of just slapping another, equally awkward name on there and calling it a day. But hey, at the end of the day, the games are still gonna be just as fun, right? Why do I care about any of this? Story time:
When I was growing up, one of my friends was half-Japanese. Every summer, he'd go to japan and visit the other half of his family there, and when he came back he'd have all sorts of manga and candy and video games you could only get in Japan. This was the early 2000's, so at the time this was even cooler than having an uncle who worked at Nintendo. He would show us all sorts of stuff that we had no idea even existed. I specifically remember him showing me Dragon Quest Monsters: Caravan Heart, which never got a western release, and being blown away by the fact that you got to have humans and monsters in your party at the same time.
As cool as all this was though, it also caused a very specific issue. Since he got most of his games in Japan, most of them were, obviously, in Japanese. This meant that, when it came to pokemon, he knew everything by Japanese names, but my other friends and I only knew the English ones. I remember many occasions where our discussions of pokemon would come to a screeching halt and we'd have to play 20 questions to try and figure out what the hell other person was talking about.
We're 2 decades out now and it's not just a few kids on the playground anymore. The internet makes it easier than ever to connect with people in the same fandom all around the world, and it's kinda ridiculous that DQ fans have to keep a Rosetta Stone of name changes in their head any time they want to communicate or look up something in another fandom's language. I mean look at all the monster names up there! They're already in English! The entire reason DQ exists is because the first game was made as a love letter from Yuji Horii to western RPGs! It seems kinda shitty to me that the west has taken that love letter and scribbled all over it arbitrarily.
One of the things that came up during the twitter thread I mentioned in my last post was just how poorly the west has treated Japanese media in the past.
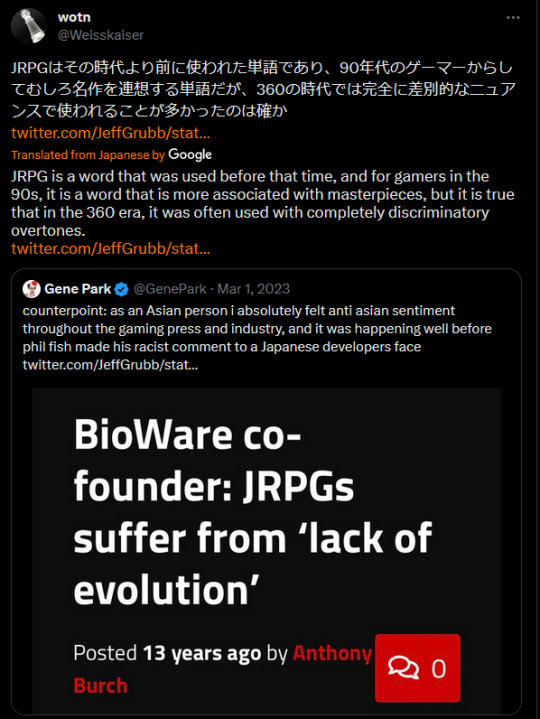
Yoshi-P recently said in an interview that a lot of Japanese devs don't like the term "JRPG" because it was often used as an insult in the past. And it's not hard to see why they would feel that way. This was a review that X-Play put on TV for fuck's sake.
(as an aside, Baten Kaitos is another one of my favorite series and you should absolutely go play it if for no other reason than sticking it to Adam Sessler.)
Anyways, this mostly covers my gripes about monster names. One other little thing I'll mention is that a lot of the English names are now so wordy and overly-complex that in the most recent DQ game, Dragon Quest Monsters: The Dark Prince, you physically can not give monsters their default name, because it's too many characters to fit in the name field. I think Shakespeare said "Arbitrarily adding additional argot for alliteration's sake is the soul wit," right?
Next up: My conspiracy theory about lunch time at the DQ localization offices.
CONTINUED IN PART 3 (Will update with link when I post it.)
5 notes
·
View notes
Text
You know. I've been doing this 200 word challenge for a few days and I'm easily going over 200 words to finish the thought, but I think 200 words maybe the perfect amount for a simblr post too. I've learned a bit too...
I find that I'm enjoying just writing without any tedium of posework or screening the perfect shot and all the damned preparation that goes into it plus all the post editing.
I don't know if any of you feel like this, but sometimes. I think being a simblr hinders my creative processes. It stops me before I start because I know I will have to go through a day or two of preparation, updating mods, looking for the perfect set, deco sims, a build, dressing, makeup, and poses (not that it's difficult these days with all the great pose makers out there- @helenofsimblr , @rebouks, @samsimss , @Hercsims , @natalia-auditore and so many others that it'd be too long of a post)... but it's starting to become something I'm thinking about more and more these days.
I hope folks who are outside of simblr realize that these stories that we tell, it's not just us playing a game. I mean sometimes yes.... but we do so much more than anyone realizes. It's like being every single job on a credit list of a tv series or movie and promotion and creating meshes/mods/recolors AND potentially being a student, or working or parenting OR all of the above! We're doing it all and not only that but we're doing it with an extremely restrictive and buggy set. It's exhausting!!
I think more people need to read about the behind the scenes and see just how much stuff we all go through to get a few screens that most people will only look at as it's scrolling by through the feed and even less will take the time to like it and even less will comment on it.... and even less than that reblog to a reblog site or on their personal blog for various reasons up to not wanting to confuse others about their own story because they get so few interactions that they fear adding any reblogs because it might be deemed "too cluttered to be bothered to read through to find the actual story."
It can be disheartening. I hope you're having a great day though and I hope this little blurb of mine makes you feel less alone cause I know what you're doing to stay creative.
5 notes
·
View notes
Text
Victory Apartment - Watchmen & Valkyrie Recolors
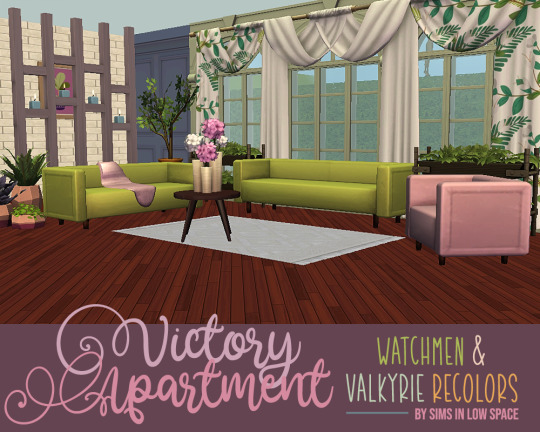
Hi everyone! I'm so excited to share this recolor set today! I adore all of these meshes, and best of all, I finally conquered the repository technique! 🍾 So naturally I made a ton of recolors. XD Swatches, info (important!) and downloads below the cut!
I started this back in April, when I decided to recolor the seating from @kestrelteens' conversion of @awingedllama's Apartment Therapy and realized all three pieces used an identical texture, but redundantly. This seemed like a good opportunity to learn how to repository, so I settled in with a tutorial, got to work...and failed miserably for the next two months. But, after much cursing and wailing and wondering whether I might actually be A Moron, I figured it out and went to work finishing this set.
So! Meshes recolored are:
Couch, loveseat and armchair from Apartment Therapy (loveseat and armchair repo'd to the couch)
Coffee table and dining table from Apartment Therapy (dining table repo'd to the coffee table)
Fluffy blanket from Apartment Therapy
Eye of the Beholder Window conversion by semio (how this beautiful window stayed off my radar for so long I'll never know)
Triomphant Textile curtain conversion by @morepopcorn
Holey Moley Divider conversion by Michelle (right segment repo'd to left)
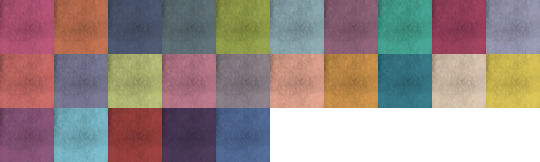
I apologize in advance for the enormous swatches. There are individual, numbered swatches in the downloads, but I had to combine most of them to stay under Tumblr's image limit.
The seating comes in Watchmen and Valkyrie:

There are also matching curtains, plus 4 with the floral patterns from my Spring Floral Wallpaper set in large and small sizes (these were made with icons from this Plants Icon Pack by Rudiyana over at Flaticon):
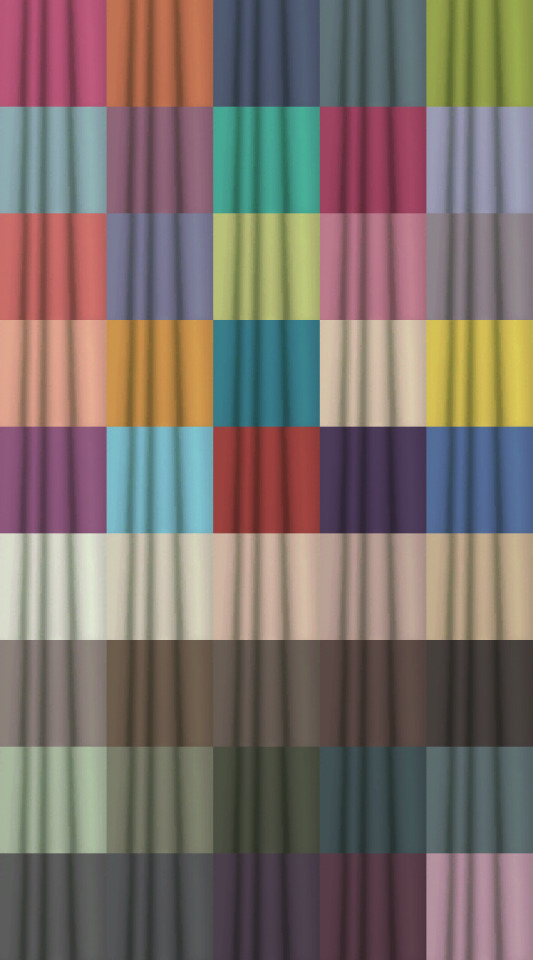

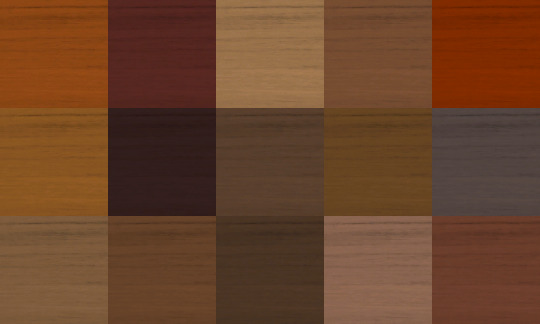
The dividers come in Watchmen and Valkyrie, plus 15 colors from The Woods are Lovely (the candles only come in Watchmen and Valkyrie). This is the two piece deco version; I only just realized that @shastakiss posted a functional light version to GoS, so there will be recolors of that in the future as well XD (I really adore this divider):

The tables also come in the same 15 wood colors. I used a new texture for these because the original was giving me a headache and it was easier just to redo it:
The Eye of the Beholder Window comes in Watchmen and Valkyrie:
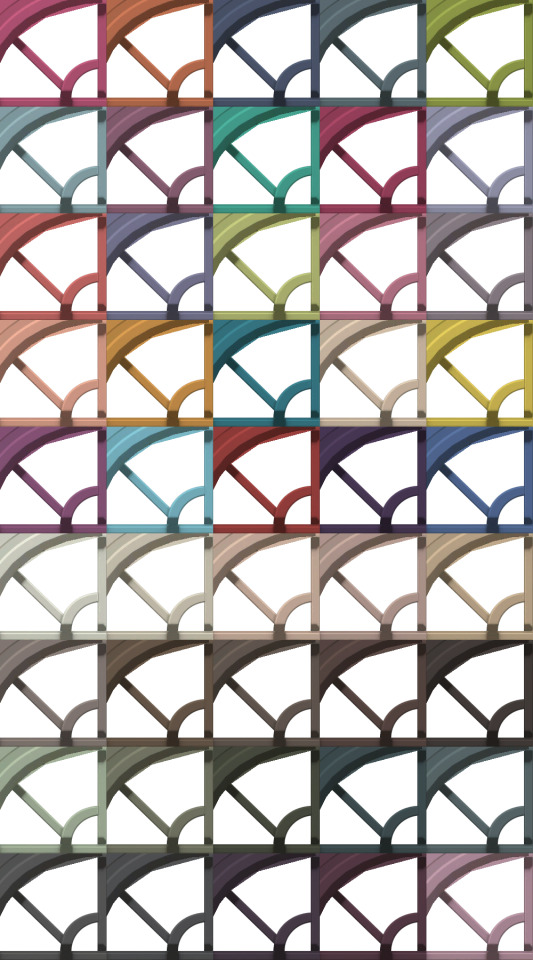
And the fluffy blanket comes in Watchmen and Valkyrie as well:

Whew! Okay! So now for some 🚨🚨 important information! 🚨🚨 All the meshes are included, but if you already have the seating and/or tables from Apartment Therapy, or the Holey Moley Divider from Michelle's 4t2 Spa Day conversion set, you will need to delete those meshes to use these recolors! You can also delete recolors for the loveseat, armchair and dining table since they'll be redundant.
Lastly, since this is such a huge set, I'm offering separate downloads by color palette, plus one big 'ol download if you want the whole thing. The required meshes are included in each download, so be mindful of that if you're grabbing a couple of parts. Also, the curtains and dividers come with their original recolors since they're packaged up with their meshes.
If I messed anything up, please let me know! This is definitely some new territory for me, plus it's been a lot of files to handle. 😅
DOWNLOAD THE WHOLE SET (SFS) Recolors are ~36.5MB
DOWNLOAD WATCHMEN (SFS) Seating, curtains, dividers, window & blanket ~14.5MB
DOWNLOAD VALKYRIE (SFS) Seating, curtains, dividers, window & blanket ~11MB
DOWNLOAD THE WOODS ARE LOVELY (SFS) Tables & dividers ~7.75MB
DOWNLOAD FLORALS (SFS) Curtains ~1.75MB
Lots of love,
Spacey
#s2cc#ts2cc#ts2 download#sims 2 download#ts2 custom content#sims 2 custom content#s2 cc#ts2#ts2 recolors#ts2 comfort#ts2 surfaces#ts2 curtains#ts2 sculptures#ts2 windows
128 notes
·
View notes
Text


I started a TS4 to 3 conversion project in Blender 3.4 today!
The first image shows the original TS4 outfit, the second image is my edit in progress. If you are interested to read about the details of this project (warning, it gets technical), read on!
I have not checked whether this has been converted before, because I am changing so much it is basically a new mesh 😆
I have to google every little thing and have trouble finding stuff in the new Blender. With those major version changes, they like to move things and change how they work. The nodes feature is interesting, though it seems a bit like rocket science to me at the moment. I followed a basic tutorial to get the marble/stone effect so I can have a sim statue in Blender 😁
I wanted to make a ts4 to 3 conversion for a while now. I guess this outfit is a good place to start, I just randomly selected it because I like the high-waisted look.
The TS4 bodies have different proportions, especially on hips and arms, and adjusting them to the Sims 3 body figure is a lot of work, but I think I did a good job so far. I remapped half of the stuff already, adjusted and tweaked the legs to have a bit more space between the legs, and so on.
I'm not done yet. I am currently remaking the belt loops from scratch, just like I did with the belt. I just don't like the loosely stuck-together geometry that Sims 4 meshes seem to have. Those can easily lead to floaty bits in TS3 and who wants to see a random belt loop floating around a sim? Not me 😬
I am properly anchoring the belt loops so they are directly connected with the pants, vertex on vertex. This method was used on TS3 meshes. Idk why the devs changed it, maybe it was too tedious or produced too many vertices.
Converting from TS4 is a pretty ungrateful task, at least if you want the stuff properly mapped and recolorable. Now I know why a lot of conversions look bad with patterns, you'd have to remap a lot to improve this and you can't reuse the default textures as easily if you do that.
Sims 4 seems to have less texture space than Sims 3 when it comes to tops and bottoms. Upscaling these textures with an AI upscaler to 2k could yield improvements though, that might be worth a try for projects where keeping some of the original textures is more important.
For this, project, I am just going to toss the original textures and will make my own. There were not many texture details on those wide pants anyway, and I want a proper greyscale texture, and removing the pattern from the original to achieve that is not worth it due to the other issues I mentioned.
All in all, it is easier for me to heavily edit and remap the mesh to TS3 size and make a new texture than to work with the weirdly mapped UV pieces and tiny textures.
Making the patterns look great on the mesh is my main concern and that is why I make meshes in the first place. I don't care how much work is going into those, if I do not do it to fit my standards, there is no point for me in doing it at all.
Making textures from scratch is not super easy either, I might be able to recycle some ts3 ones though, we'll see.
I'm a bit sad that there are so few creators that make new TS3 meshes (not necessarily conversions) with patterns in mind. If you know some good ones, please let me know! I've been looking for new clothes to download recently, but most of the stuff that works well with patterns is years old.
I think we may need new era of Marvelous Designer stuff, the Maxis Match era. MD now supports quads, meaning even rows and columns of vertices that you can easily decimate to reduce polygons and that you can easily adjust to fit to TS3 standards. And not everything that is made in MD has to have hundreds of exaggerated folds 😉
It's probably less time-consuming to mesh new clothes with Marvelous Designer than to convert stuff from TS4. Maybe I can find some decent tutorials, I'd love to figure out how to make Maxis Match meshes and learn more about MD. If you know any good ones, please share :)
I just hope my enthusiasm does not get crushed by the harsh reality again (I have way too many wips that never amounted to anything 😫).
34 notes
·
View notes
Note
do you have any tutorials reccs (or even tutorials urself but ik they can take awhile to make) for learning how to make poses, poses with accesories, posing accessories, etc? i've been at the start of ur legacy and seeing u grow makes me feel so happy n i rlly inspire to be at ur lvl
hey thank you so much!! tbh i've been feeling really insecure about my storytelling abilities lately so this made me feel really nice ahahaha. the majority of the things i've learned in blender are by reading @thefoxburyinstitute's blog!
tutorial for learning to pose in blender - the tutorial is really long but REALLY helpful if you're a complete beginner and you need help with getting used to blender
shorter video for learning to pose in blender - still pretty basic, but a lot shorter in case you're somewhat used to blender's controls etc.
how to pose custom rigs in blender - i literally just discovered this tutorial days ago and it has been lifechanging!!
how to create custom accessories for poses - this has been such a useful tool for making more interesting scenes. i also only just recently discovered this tutorial, i used it for the first time in this post and i love the effect it gives!! seriously lifechanging ha. there are a TON of tutorials on thefoxburyinstitute's blog that give detailed instructions on how to do all kinds of things, from recoloring to making your own meshes to posing. if you ever need advice on how to do something i'd highly recommend checking them out first!
i also have a cc finds blog @stinkfinds and if you search for my posts tagged "tuts" you'll find some more resources for various things. that's about as organized as it gets on my blog, so you might have to dig to find something that's useful for you lmao, but there are resources there if you're willing to look.
if there's anything else you have questions about feel free to ask. i'm still learning how to do a lot of things myself, but i'll try to help as best as i can :')
#jade answers#anonymous#thank you for the reassurance i mean it. i needed that right now#i appreciate you anon <3
11 notes
·
View notes
Note
hi! a while ago we spoke in the comments on your post about retaking the cc making community back (my name was joeyplumbob but i've changed it since then!)
i was wondering if you have any go-to tutorials for beginners? as in, i know absolutely nothing and would like to start from scratch with the basics, haha. all the tutorials i've found are great i'm sure but they talk so fast and my neurodivergent brain cannot keep up!
i've downloaded the programs needed, just need a little push in the right direction if you please don't mind helping! thank you x
hi !! yeah i can point you in the right direction !!
i highly recommend starting with recoloring since it's pretty simple to do and you can apply what you learn to making your own clothes in the future (if you want to ofc) here's a great tutorial for that!
thefoxburyinstitute here on tumblr has loads of tutorials all organized by difficulty and is a great resource to have on hand.
i also recommend the sims 4 studio tutorials and the forums !! ESPECIALLY the forums if you come across a problem, you'd be surprised how many times i managed to fix my problem by looking in there !!
i'm not entirely certain with what you want to make, but for hairs i learned a lot from watching others speed meshes !! i know a lot of people start with franken-meshing hair and that's how i started as well! here are a couple of vids that helped me out in a lot early on 1 / 2 / 3
alternatively, if u have a specific question u need answered my inbox is always open to help w whatever ur working on and i can help you to the best of my abilities !! i know there's plenty of other ppl on here as well that have great advice and wouldn't mind helping, so if i can't help you they might be able to offer advice in the comments !!
good luck !! i hope this could help <33
15 notes
·
View notes
Text
Someone Else Did It
One of the most important things to comprehend as a software developer is that whatever problem you are tackling, whatever construct or edifice you are erecting...Someone has already written much of the code you’ll need to use.
This is at once true and false.
The true analogy is that you are crafting a house and therefore you do not bake your own bricks and mold your own nuts and bolts and wrenches and extrude your own insulation and melt and pour your own glass. The tools and the materials, you copy.
But even a true McMansion makes adjustments based on things like zoning requirements and optimal light based on what direction the house faces.
With code this is even more pronounced, because - at least on backend - each piece of code is developed with a specific capability in mind. Someone says,
“Write something that lets me input a text document and determine how many words are in it.”
“Write something that lets me give a name and find out what year that name was its most popular.”
“Write something that reorders the alphabet at random and uses the randomized alphabet as a cipher.”
All three of these might involve solutions that use an array. But you don’t reinvent “storing data in a list of similar items organized by numerical reference values” when you can just use int[] counts = new int[26] or what-have-you.
One of the weird things to learn in software development is how far up the chain to go. For instance it wouldn’t take long to write a bit of code to compare a character to an alphabet and discern whether it’s a letter or something else (such as a number, or punctuation). Or you could use isLetter that just returns a boolean of True or False depending on whether it’s a letter. People have had to figure that out before.
When I started learning to code we were presented with a 7-step process for writing it:
Work examples by hand. Come up with some miniscule version of the problem you’re trying to solve that lets you verify that any of your reasoning is sound. Their example was if you want to recolor pixels, do a 2x2 “grid” of just four pixels by hand.
Write down what you did. List out every step of your process. If you got a number, added seven, and divided in half, then printed out your new number, each of those gets its own step.
Find patterns. Part of the point of coding instead of doing the general problem by hand is to let a computer handle all the stuff that’s repeatable. So if you realize you’re doing the exact same thing four times when recoloring your 2x2 grid of pixels, that’ll be a loop. If you’re using the same piece of information over and over in different places, that’ll be a variable.
Check by hand. Find out whether the written version you’ve created - especially once you’ve modified it for simplicity with the patterns you’ve spotted - works the way you expect. If you want to turn all red pixels blue, but you put your if statement in the wrong place, you might never turn a pixel blue, or you might start turning all pixels blue once you reach a red pixel.
Translate to code. Pro tip here: take your pseudocode from where you wrote down what you did and condensed it to make use of patterns, and copy-paste it into your program. It can be your commenting, because comments on code are generally supposed to be exactly that: a description of what the segment of code is supposed to do. You can also kind of use it as a checklist, adding the actual code until every comment has an attached code segment.
Run test cases. Basically, use the section of code for a few examples of what you’d want it to do. Try to make them kind of varied from one another (for pixel replacement, if your original has little to no red the “turn red to blue” algorithm might do nothing - or might do something but not at a level the human eye can catch)
Debug failed test cases. If there’s something screwy with the results coming back from the tests, head back to section 2 or 3. Maybe your process of generalizing from the specific process you wrote down left something out, either by being too specific or becoming too generalized.
Somewhere in there - like a 4.5 or a 5a or something - I’d recommend
Look for where it’s maybe already been coded by someone else.
For instance String already has built-in functionality to detect whether a word starts with a certain letter, to extrude a substring, to trim whitespace from around a word, to make letters in the string all caps or all lowercase, and a lot more. For a lot of easy stuff it can be tempting to program a quick solution, but if it’s a common problem you probably ought to just look up the quick solution someone else already found, potentially decades ago.
0 notes
Text
Legion timewalking mage tower

#Legion timewalking mage tower how to
The Mage Tower is set to go live permanently in World of Warcraft on March 29. Next week, the Mage Tower will return to WoW permanently, giving players the chance to complete any challenges and earn any rewards they might have missed out on when the Mage Tower was launched previously. “Having heard feedback and seen how it has played out, we agree that a personal skill challenge being available only for a short window of time every few months isn’t in the spirit of these types of event,” Blizzard said in an announcement made earlier today. If you would like to learn more about what else is available during Legion Timewalking or other mounts available in Patch 9.1/9.1. Completing all 7 of the Mage Tower challenges will unlock the Mage-Bound Spelltome Mount. When the Legion Timewalking event ended, though, the Mage Tower departed from the live servers with it. Completing this Mage Tower Challenge will unlock a unique recolor of the Tier 20 Raid Set from Tomb of Sargeras. Blizzard brought the Mage Tower back to WoW last year as part of the game’s Legion Timewalking event, which gave players access to the Mage Tower, as well as several Legion dungeons. The Mage Tower had previously been a feature that was exclusive to the Legion expansion, which ended in 2018.
#Legion timewalking mage tower how to
Related: How to earn the Soaring Spelltome mount in World of Warcraft Rewards for completing the challenges inside the Mage Tower include full transmogrification sets for your class, as well as the Soaring Spelltome mount. The Mage Tower is a unique game mode that gives WoW players a chance to test their strength in class-specific challenges. Legion Timewalking Mage Tower Rewards The first Legion Timewalking date isnt until December, but you can start planning which characters and sets you want to prioritize If you want a transmog set for a class, you only need to complete one of the challenges. 🧙♂️ /VoPDowXSUV- World of Warcraft March 21, 2022 The Mage Tower is returning… permanently.
0 notes
Text
GIMP - Basic Recoloring - Curves
When I described a possible “quick tutorial” yesterday, I should have known better. I decided to break it up into three minis, each about a specific method. In this first part, we’ll be looking at Curves.
Curves can be used as GIMP’s equivalent of Photoshop Actions. You’ll want to download some Curves first. There’s a treasure trove of them by @iakoasims here. Someday, I’ll learn how to make more, to round out the selection of the usual TS2 color palettes, but Iakoa’s selection is substantial. Go get a few.
This tutorial miniseries will ONLY teach you the GIMP part of recoloring. It assumes you already know how to extract a texture, make your recolor file, and then import a DDS. It will work for clothes, objects, makeup, hair, etc. If you need beginner’s level help, you’ll need to find a tutorial for whatever type of project you’re doing. You’ll also need GIMP installed. Go get it, if you haven’t yet.
Since this is a basic tutorial, I’m using a simple texture we all know and love. Trapping’s separated Fanseelamb PJ tee. It’s all one color, and it comes in gray.

Curves are best used on a gray base. (At least for everything I’ve ever recolored.) If there’s no gray texture already, you can use the Color > Desaturate > Desaturate tool to turn everything gray. You should probably run it on grays too, just to be sure there aren’t any funky pixels that might go weird when you recolor. This texture starts out a little lighter than we want, so let’s darken it. I like the Color > Hue-Chroma tool for darkening. It’s gonna be part 2, but for now we’re just using it to darken the texture to a mid-gray.
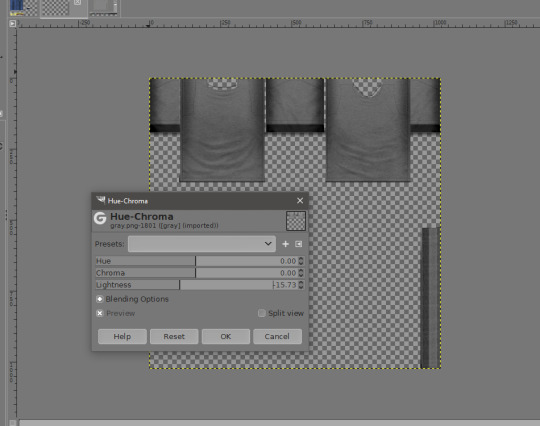
Click “OK”. Now for the Curves! Click Color > Curves to bring up the tool.
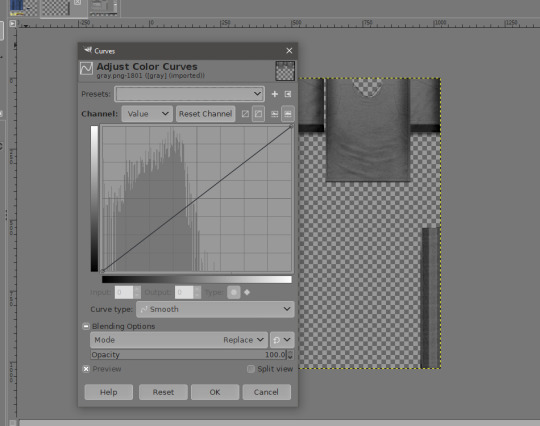
To apply a preset curve (the ones you downloaded and unzipped somewhere easy to find), you’ll click the little backwards play button looking thing next to the presets dropdown menu. It will bring up a file opening dialog. Pick a Curve to use, and apply it. (I probably should have gotten a screenshot of that, but you know what picking a file looks like, right? I might come back and circle that button, because tinytiny.)

If you like the result, click “OK”. If not, click “Reset” at the bottom. It will revert to dark gray, but the Curves tool will stay open, and you can pick another Curve. Some curves do need a lighter base, mostly pastels. If your results aren’t right, try adjusting the lightness of the texture. If you get bright or dark spots, adjust the contrast with the Color > Brightness/Contrast tool.
That’s it. It’s that simple. Once you like a result, File > Export will let you export it as a DDS file for importing into SimPE. This method is great for making stuff match. It’s what I used to do pretty much all of my recolors that are in a popular Sims 2 (or 4) color palette.
I learned how to use Curves from Iakoa’s tutorials. My tutorial is very condensed, and uses a more recent, English language version of GIMP. Hers are still very much worth a look. This one will teach you the basics, and this one will help you in way more depth if your results aren’t turning out right.
In the next mini-tutorial, I’ll show you what I use when I want -exactly- the color I want.
Let me know if anything here needs clarification.
38 notes
·
View notes
Last Seen Blogs

sometingjustlikethis00
Oh Yeah

homelandercollection
Homelander's Mommy Kink

orb-the-watchman
let's see what dwells in the depths of my blog


gilbertkingelisa
Gilbert King Elisa