#garment applique
Text
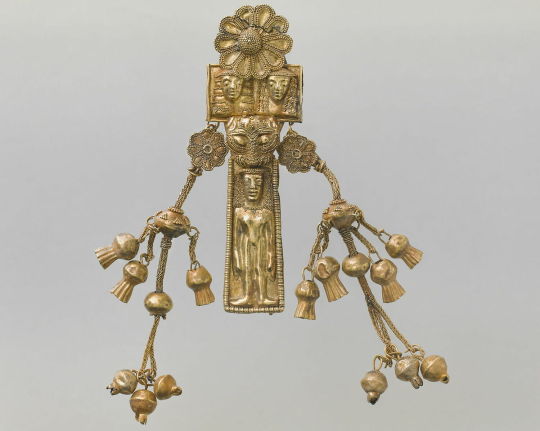
~ Garment Applique.
Date: 650-600 B.C. (2nd half 7th century B.C.)
Place of creation: Rhodes; Place of discovery: Camiros
Period: Orientalizing
#ancient#ancient art#history#museum#archeology#roman#ancient history#archaeology#garment applique#rhodes#camiros#Orientalizing#650 b.c.#600 b.c.
621 notes
·
View notes
Text
I detached things: the charms from bracelets, the bows from dresses. This was a time—the early 60s, an outpost, really, of the 50s—when little girls’ dresses had lots of decorations: badly stitched appliqué, or little plastic berries, lace flowers, satin bows. I liked to remove them and would often then reattach them—on a sleeve or a mitten. I liked to recontextualize even then.
-Lorrie Moore, “On Writing”
#lorrie moore#writing#bricolage#citation#textual construction#deconstruction#clothes#women against garments#applique#ornament#cut and paste
1 note
·
View note
Text
Goth DIY
It has become apparent that the gothy DIY knowledge of years past has not fluttered out to many folks. Here, let me give you some quick suggestions:
The Tights Thing: Get a pair of tights. (Which can often be found at dollar stores and thrift stores!) Cut out the crotch, and cut off the feet or make holes for your thumbs and fingers. Ta-da! A shirt!
Things To Do To Any Garment:
Safety pins: Get lots of safety pins (which can also be found at dollar stores), and use them to make designs on an item of clothing. (I've added safety pins in a line down seams on jackets.)
Paint pens: Draw on your clothes! Write song lyrics or quotes! (This also works with bleach pens.)
Appliques: You can sew or use safety pins to attach damn near anything you cut apart from another garment, a patch, or pieces of other fabric to something else.
Change the buttons. You can buy all sorts of interesting buttons from fabric stores, Amazon, eBay, Ali-Express ... you get the idea. Change the plain buttons on a shirt or jacket to interesting ones!
Add trim: Lace, ribbons, fringe, grommet tape ... hell, you can even sew chain onto things.
And finally, here's the Gothic Charm School post on Gothy DIY essentials! Go forth and alter your clothes!
16K notes
·
View notes
Text


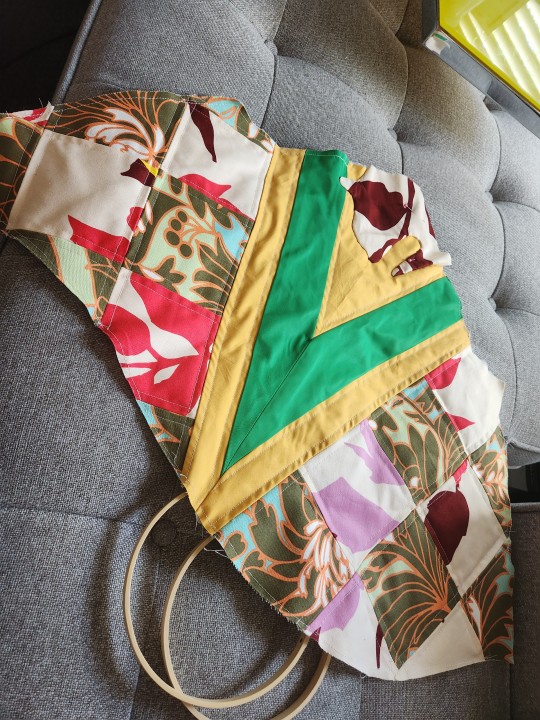
AHAHA. DONE. FINALLY. I've never done so much hand stitching on a non-embroidery sewing project.
I've been sitting around with piles and piles of fabric that are too big to consider scraps and too small for many projects- so I quilted them into a coat! Lining is also squares of fabric that I only had little bits of left.
DOUBLE LAYER OF BATTING.
HAND APPLIQUES.
HAND STITCHED BINDING.
The only visible seams are in the quilting process but there should be none in the garment construction.
531 notes
·
View notes
Text
"It's too big."
The way Kory titters gives him butterflies even after all these years. From where she stands in front of him, Dick watches fondly as her shoulders tremble from her giggles, as she looks over her shoulder at him with an easy smile and bright eyes.
"I believe the saying goes, 'That's what she said,' yes?" Kory says, out-of-pocket. It makes Dick snicker, unabashed as he presses an adoring kiss to Kory's shoulder. She hums at the affection, sighing pleasantly. When she reaches behind her to drag her fingertips high up Dick's thigh, Dick jolts from surprise, barking out a short laugh when she teases, "I don't mind though."
Dick loves her.
"The corset." He says, disappointed if only because it's fun when Kory wants to dress up and even better when she wants Dick's help. With all the excess to the garment though, there's no way for Dick to lace her into it. Not in the way it was intended, at least. Not in the way Kory was hopeful for. She had been so excited about it, too.
He wonders if the shop Kory went to earlier that day is still open and if he ran like a fool, Dick could make it and charm his way into an exchange. He'd be willing to try, if nothing else.
"You're supposed to tighten it." Kory tells him, the cheeky minx.
With the same cheek, Dick tugs at the excess corset. Pulling Kory back into him with a surprised 'oh!' before she laughs and, 'oh,' indeed. Butterflies again - just like that.
She pulls at the corset, too, for the first time noticing that it's looser than all her others and likely not the same as what she'd meant to buy at the shops. A shame, but they can always have their fun without it, too—
"This must be Jason's." Kory explains, far too casual for such a bold, earth-shattering statement. Though she goes on to talk about how she must have grabbed the wrong bag when they were checking out, Dick's thoughts are still caught on: this must be Jason's.
Meaning... the corset Dick has in his hands - the one he'd been lacing up and cinching tight; all pretty boning and alluring mesh and delicate appliques actually belongs to... for Jason to... oh. Oh.
The visual is there before Dick can stop it and, try as he might, he can't make it go away. He stands there, stupefied and actually stupid, because oh. Oh, no. His thoughts race faster than he can keep up with, that image of Jason inappropriately at the forefront of it all.
He knew that Jason and Kory went out earlier. They go shopping together often. Is the lingerie shopping a part of their thing? Do they always buy the same pieces?
Oh, Dick thinks again, helpless as a flush warms his cheeks and stings his ears because the implications are damning: his girlfriend and his little wing have matching sets of lingerie.
Whoah. Wow.
Lost in his thoughts of being pressed between two corseted beauties with their bolstered racks, Dick is oblivious to how Kory turns to face him, her hand holding loosely to the ill-fitting bodice. It gives Dick a blessed view of her chest, but before it has a chance to distract him Kory is laughing at him, giggling with a fond endearment. Tickled, she calls him out, "You're fantasizing it!"
Dick startles to attention, wide eyed, overheated, and utterly exposed. "I'm not!" He sputters, but his voice cracks and Kory is delighted by it.
"I know this blush," She says as she pinches Dick's reddened ears, gaze softening as she looks him over - takes him in. She smiles warmly at him even as she teases him and makes him blush worse, "You are flustered. Imagine how I was feeling, to see him!"
"I'm really not," Dick insists half heartedly around embarrassed laughter.
"Lies, I see you." Kory laughs, too. Not so much embarrassed as she is zealous to be able to share this with him, now that she's found Dick out for the truly degenerate man he is, "Don't leave me alone with these feelings!"
Not for the first time that day, that evening, that very hour - Dick is taken by how truly beautiful Kory is. She stands in front of him, holding the too-loose corset up, and reenacting her afternoon spent out with one of her dear friends. Gesturing to her own chest, pressing her breasts together so that Dick can have a proper visual and understanding of just how bewitching Jason's cleavage is.
"I understand now why you always want to smother yourself in mine."
She's teasing him again, but alongside it is a cute comprehension. Dick laughs when Kory tells him her love for him is second to none, but his chest —and she feels him up then with her hand to his pec, pressing her fingers into muscle while hmm'ing and haa'ing— is too firm; it's not soft. The gesture she makes, the grabby hands, disarms Dick. It's too sweet, but Kory is as enthralled as Dick by the majesty of Jason's chest.
"Don't change this though," She warns Dick, tapping Dick's chest. Dragging her nail down his abdomen, finger catching at the waistline of his pants and smiling over how Dick shivers, melts.
Kory raises both her hands then, catching the corset awkwardly with her elbows. When she grazes her thumbs over Dick's cheeks, Dick raises his hand to hold her. Turns his head to kiss the heel of her palm and smiles soft when she flusters, too.
Dick loves her so much it takes his own breath away. He feels tongue tied. Bashful in a way he hasn't been since Kory and he were young. To love and be loved by someone so warm and wild and wonderful — Dick kisses her hand again, the tips of her fingers.
=====
@alexandraisapenguin — alpengu somehow, someway I lost your ask, but this is based off of what you sent me most recently! With Jason wearing something more fem + Dick and Kory and ahhhhhh somehow it became entirely dickory being cute and appreciating hot toddies, whoops. At the same time, I can't be sorry because they're so freaking cute?? ;U;
Here are some additional thoughts to bring it around to something that involves Jason a little more:
A no-cheating!AU where it's actually Kory that puts all the depraved thoughts of Jason in Dick’s head hahahahahaha. Because 1) Kory is interested and 2) it flusters Dick so easily and that's cute
Dick, taking the hint and having that conversation like:
'You want him to...' and Kory is like, no.
And Dick pales because while he'd suffer through it for Kory, Dick isn't the most keen on the alternative: 'oh, you want him...to me...?' and Kory laughs because again, no. The opposite!
Which, oh.
All in all Kory wants the both of them to fuck Jason and Dick just about passes out because oh my god
Just Dick, scandalized but also so completely understood by his partner hahaha
But yes, there being a joint effort to pursue Jason. And Kory already loves him, but Dick falls just as hard as he comes to really know his little wing and it's beautiful and ahhhhhhhh <3
Okay here's a dickjay bit since that was supposed to be the ask:
Something with Dick happening on Jason trying to tie his own corset. Maybe he seeks Jason out for intel or a mission or because there was another family falling out, but Jason isn't expecting him.
And Jason feels so humiliated and exposed because the delicate clothes are too big a vulnerability. Especially since they're 'ill fitting' and 'wrong' for someone like him
Cue some fights and scrapping because Jason lashes out in his embarrassment until Dick gets Jason pinned, front against a wall, and he pulls the corset tight and Jason just sort of ohs
Or! Dick gets Jason pinned with Jason's back to the wall, instead. And they're pressed close, chest to chest. And Dick gets distracted in an instant because Jason's heaving bosom ohhhhhhh hello
Regardless, Dick telling Jason, 'Let me.' and Jason relenting and it's just this quiet, intimate thing
And Dick marvels at all of Jason, fingers trailing along the cut of his waist
Ugh, Dick smiling that heart stopping smile and telling Jason that he looks really nice. And that soft/delicate/beautiful things suit him ;A; Which sort of devastates Jason in the softest of ways
And it's because the corset is too tight that he loses his breath, not because of fucking Dick
Another potential scene, where Dick and Kory have successfully wooed Jason into their lives and while Kory is chill, Dick is very much not, never:
Dick is always nestled in Kory's chest. And constantly peeks at Jason to test the waters there. And Jason stubbornly crosses his arms over his chest because no, not a chance
Until one day (among way too many) Dick is again staring at Jason's toddies and Jason heaves the greatest of sighs before clicking his tongue and telling Dick to just do it - he's so damn embarrassing
And Dick dives right in, face first into Jason's chest before choking out the most sinful of sounds and Jason startles because omfg, stooooooop
Also, Dick and Kory taking one toddy each to rest on ahahaha. Meanwhile Jason stares deadpan into the void because what's happening? How did this become his life?
========
Thank you to anyone who has read this far! And to alpengu, thank you very much for the ask again (and tags on some of your reblogs - I see you lol). Quiet as I've been lately, I really do appreciate all the support from everyone. //U///
But yes, ngl I miss posting a lot too and hope to be able to write more again ahahaha. More often than not the thoughts are rough/disjointed, but I'm happy with how the drabble portion of this turned out!
#dickory#dickjay#dickjaykory#dickoryjay#??#basically Dick and Kory appreciate the hot toddies#as they should#hot toddy appreciation#degenerate!dick grayson agenda#words
55 notes
·
View notes
Text
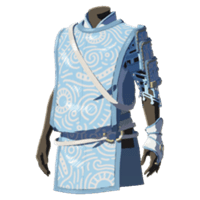
Cultural Fashion: Kahola Pt. 2 - Clothing
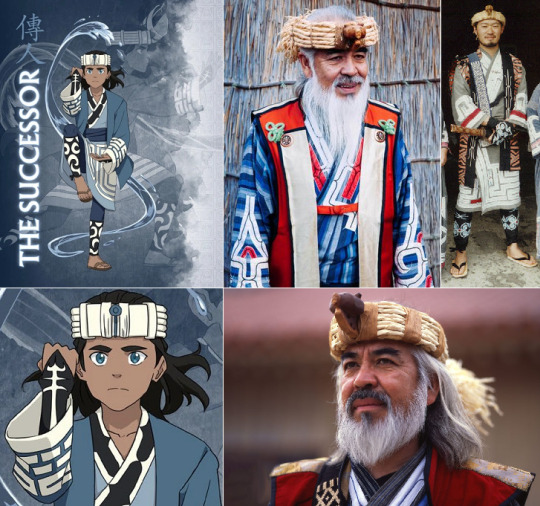
Kahola is a character from Avatar Legends: The Roleplaying Game Core Book. He is the child of Southern Water Tribe pirates. His design is inspired by Ainu culture.
As this is not the first time I’ve written about Ainu clothing, expect a lot of quotes from my previous posts. I think one of the reasons Ainu clothing was chosen for Kahola’s design is the preponderance of blue in traditional Ainu clothing, just like in the Water Tribe. There’s actually a practical reasons for this:
The color blue is actually closely associated with the Ainu people, due to natural indigo (aizome/藍染め) being one of the most common and resilient traditional dyes in Japan.
So if you ever wondered how the Water Tribe gets enough blue to dye all of their clothing that trademark color, they likely get it through trade with ATLA’s Japan-equivalent, Kyoshi Island.
Regarding the patterns and designs all throughout Kahola’s design...
Traditional Ainu decorations favor bold, geometric shapes along the openings of the clothing. These decorations were seen as charms that warded off evil spirits and protected the wearer, hence why the the patterns appeared on areas of the clothing considered vulnerable: Collars, cuffs, hems and backs... From a practical standpoint, adding embroidery and applique to the areas most vulnerable to wear and tear extends the life of a garment, in addition to adding aesthetic appeal.
Unlike the designs of the Kyoshi Islanders--- which had to be simplified for animation purposes--- Kahola’s Ainu-inspired clothing gets to be as beautifully elaborate as its real-life inspiration. The embroidery and appliques (kaparamip / カパラミプ) added to the robes are said to be imbued with the love and soul of the embroiderer. The designs of these appliques are inspired by aspects of nature that Ainu people view as embodying strength and protection.
For example, the swirls on Kahola’s leggings are called moreu (モレウ), meaning spirals. These spirals are stylized representations of whirlpools, symbols of power in Ainu culture. Considering Kahola is both a waterbender and a pirate, he likely shares a similar reverence for them. The designs on his lapels are called ayusi (アイウシ), meaning thorns. This design is meant to ward off evil spirits from the wearer, just as thorns ward off predators from plants. Finally, the boxy patterns on the coat are called utasa (ウタサ), meaning intersecting shapes. They do not seem to represent any specific element of nature, but appear to act as general protection charms.
Finally, underneath their distinct robes, Ainu wear form-fitting undershirts and leggings. It’s worth noting that the patterns on Kahola’s sleeves loosely resemble Ainu hand tattoos, which also acted as protective charms. He also wears sandals, which are quintessentially Ainu (and Japanese) footwear.
Overall, I like Kahola’s design almost as much as I like Tsemo’s; I just wish it was for a Kyoshi Island character instead of a Water Tribe person. Both of his parents are Southern Water Tribe pirates so his choice of clothing doesn’t really make sense for the arctic seas. And Ainu aren’t any more known for being pirates than any other Asian ethnicity. I believe he was primarily given this design to distinguish him from the other waterbenders in the game. Personally, I would’ve put Kahola in a parka, put his guardian (Honu) into a Yakut-inspired dress, and have Honu come from the Northern Water Tribe. That way you’d have a SWT, NWT, and Swampbender character.
Like what I’m doing? Tips always appreciated, never expected. ^_^
https://ko-fi.com/atlaculture
#avatar#atla#Avatar The Last Airbender#water tribe#Kahola looks exactly how I imagine Sokka and Suki's child would look#Can I just pretend he's Sokka's kid?#Cultural fashion#avatar legends
282 notes
·
View notes
Text
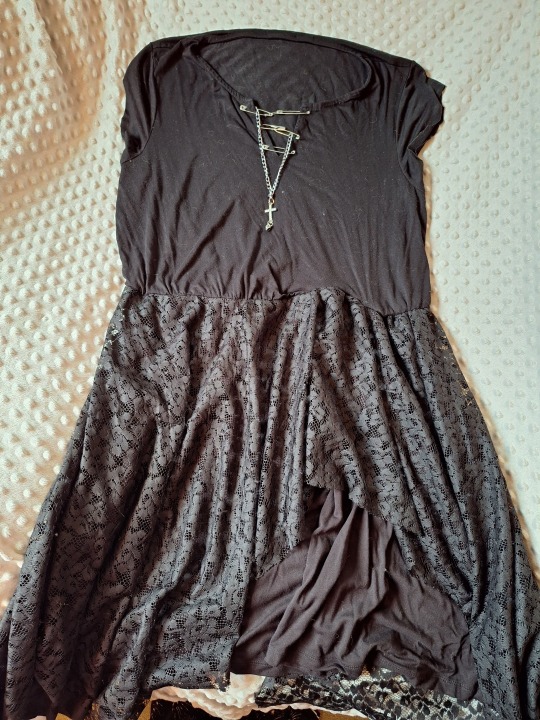
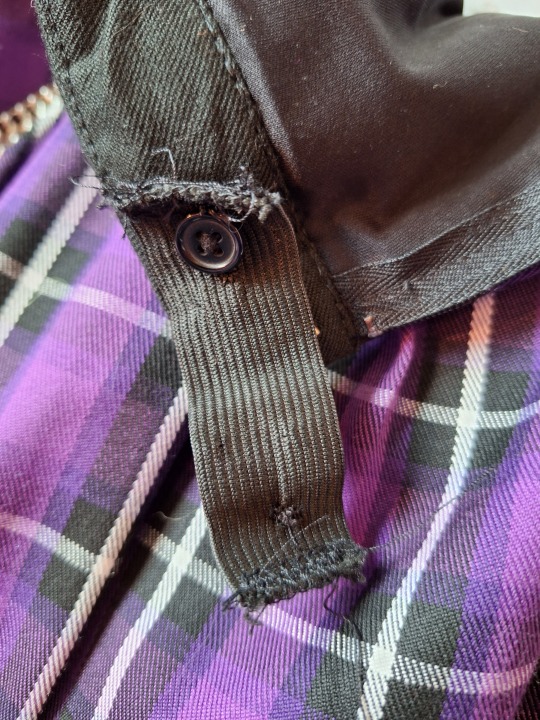
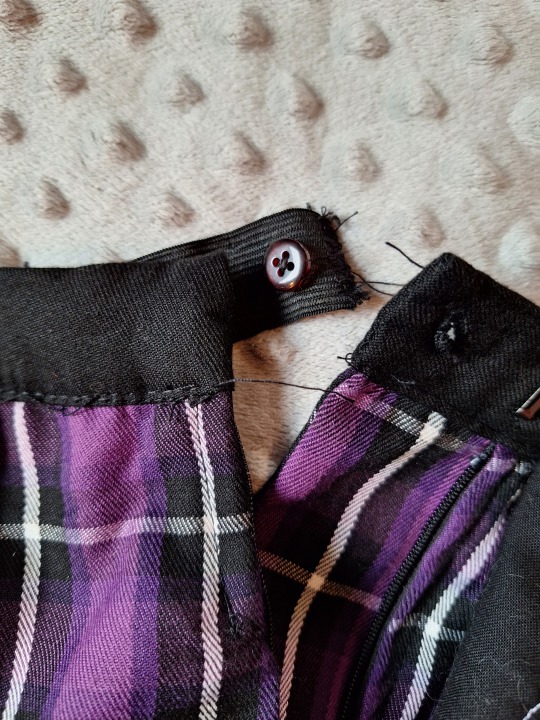
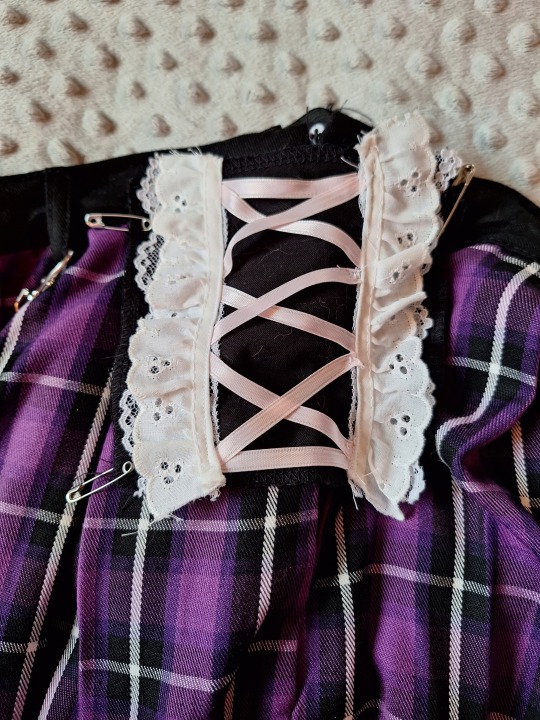
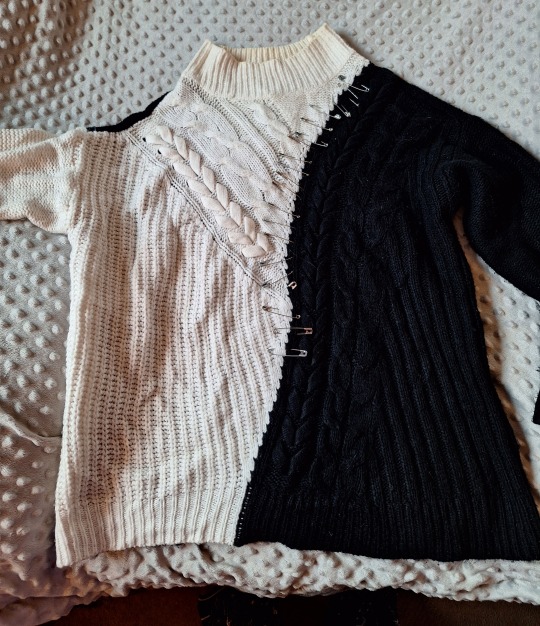
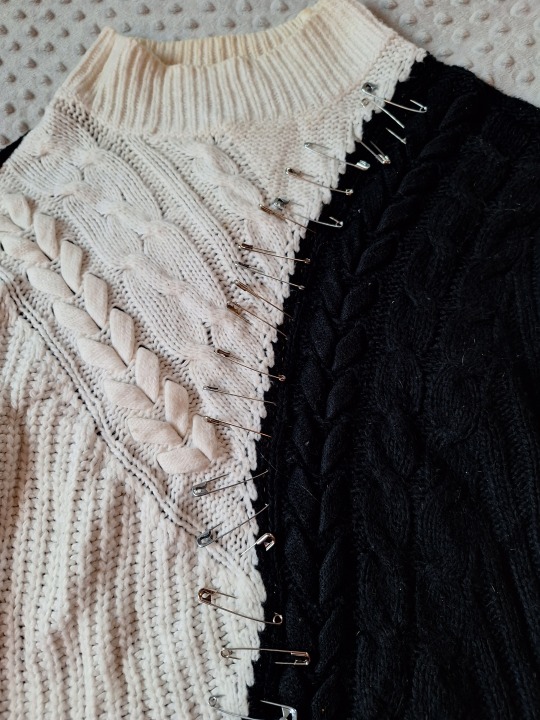
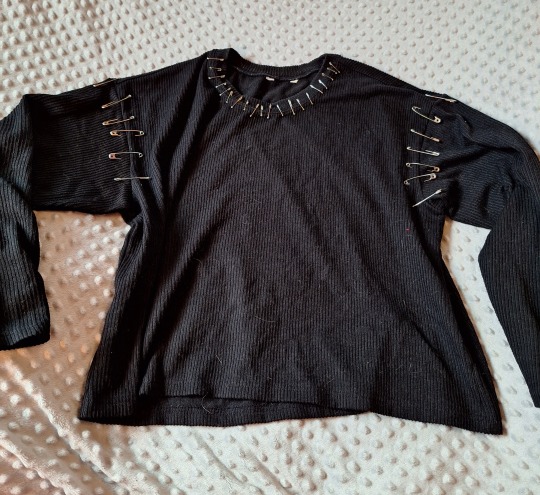
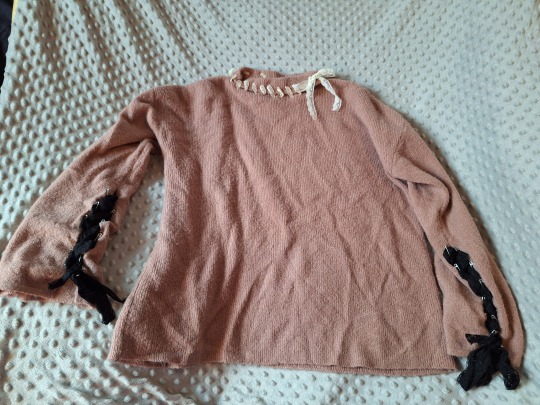
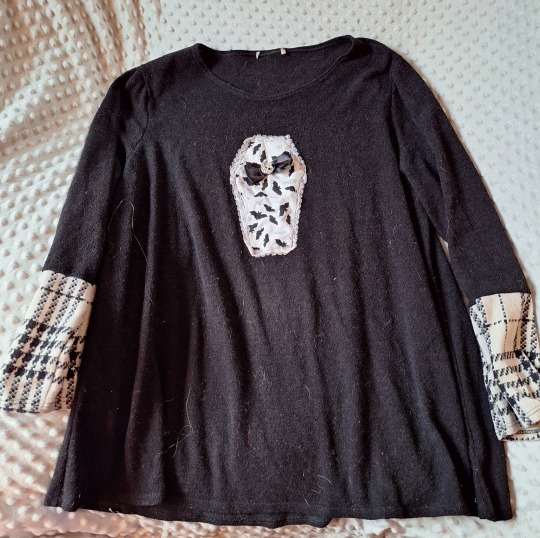
Goth DIY: Altered Clothing part 2 (final part)
Part 1
This part will be shorter since we have less to cover. But it's still a long post, so I'm putting it under a cut.
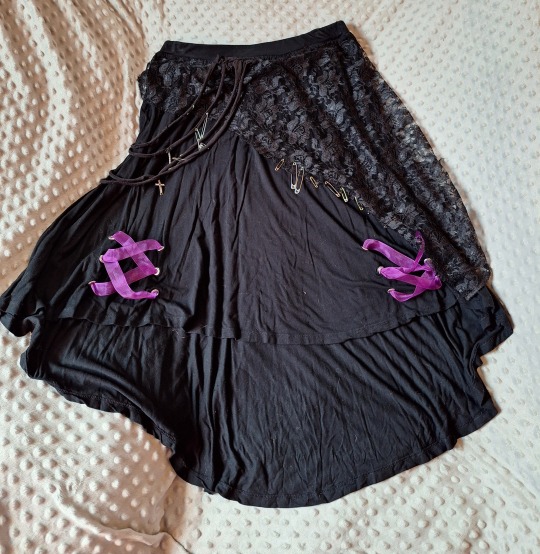
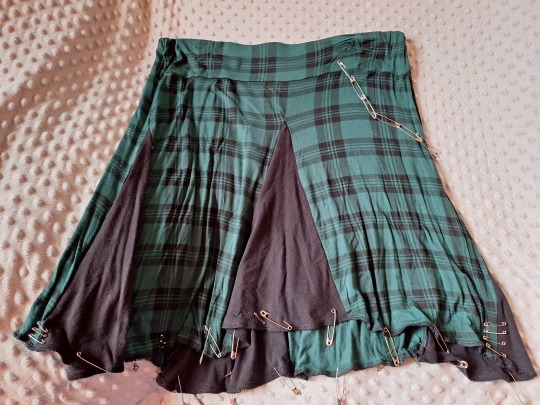
Skirts and dresses! The last two dresses and green skirt took the most sewing, but the first dress was as simple as sewing studs on the neckline. The black velvet skirt was altered a bit more to fit me, as it was originally a skirt that had small pleats at the top that made the skirt cling to my stomach and flare out further down, which wasn't flattering on me, so I cut that part off and added a new waistband to get a circle miniskirt, then added lace trim to the hem for extra cuteness and a fancy touch.
Attaching skirts to a crop top is an easy way to make a dress if you don't want to sew one from scratch, but the waistlines did turn out a little wonky, so I use a belt or cardigan to hide that. I also sew a thin line of elastic onto the skirts to gather them before sewing them to the top to make it a little easier and to maintain stretch, since these dresses just pull on. I also don't hang them by the tops, but by draping them through a hanger to avoid stretching out the tops because the skirts are a little heavy (at least mine are, since I added so much to them).
For the green skirt, I added triangular inserts called "godets" to make the skirt flare out, since it was too tight before and didn't swish. I like a good swish.
The skirt with all the lace and pins and grommets and nonsense was one of my earlier projects, so it has three mistakes which I implore you to avoid. One: I didn't line the fabric loops up with the waistband very well, so they look crudely tacked-on. Two: I didn't add any fray check to the holes I made for the grommets, so they stretched out and the grommets are no longer attached to the fabric, just floating there on the ribbon. Three: I didn't stretch the skirt as I sewed on the lace, so now it doesn't stretch in that area; it still fits my waist, but I have to fight with it to get it over my hips. The design is still cute, but I would definitely do it better if I were to make it nowadays.
The half-and-half skirt only has a small alteration, which was actually to make it fit rather than to change how it looked. You see, sometimes you order something online in the same size you always wear from that brand, and sometimes that thing ends up running small and has no stretch. When that happens, when the skirt almost fits you and is just so close to buttoning all the way, get yourself a waistband extender. I made one, but you can also buy them. It's just a piece of elastic with a button on one side and a button hole on the other. Put that on, and BAM! The skirt (or pants) fit you. They won't quite zip up all the way, and it is a noticeable change, so I made a cute lace-covered patch to cover up that alteration so you can't tell I changed anything about it at all.
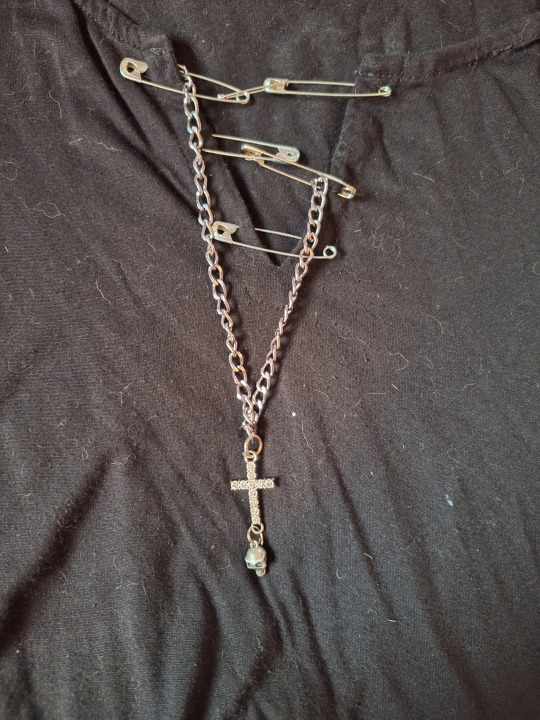

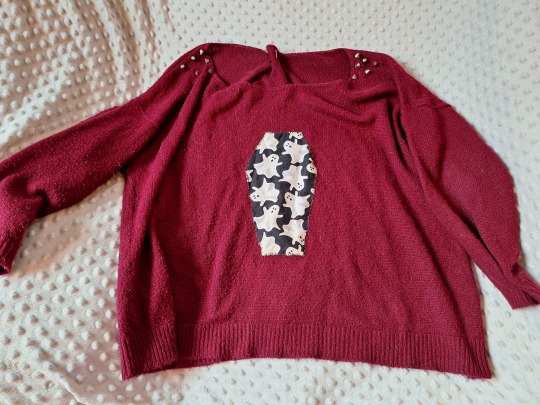
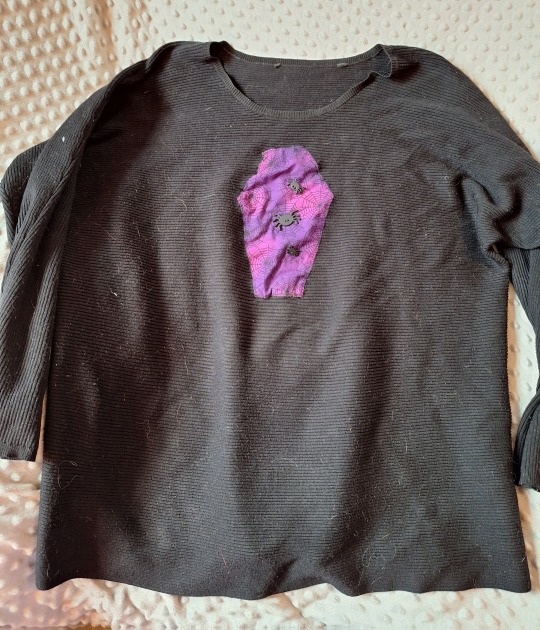
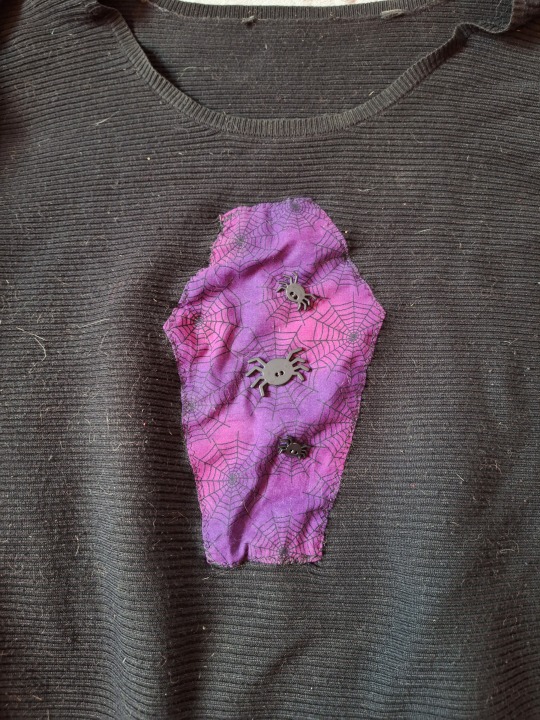
Now onto the sweaters. I love wearing sweaters in winter, but there seems to be a shortage of goth ones. Nothing a few safety pins and lace trim can't handle! The first three only have safety pins added to them. The coffin ones were done the same way I did my sweatshirts, but this was before I knew about fusible interfacing for appliques, so they got a little wrinkled and don't look as nice. I have a better method now, as detailed in the post I linked. The fabrics were all Halloween fat quarters from Walmart, and I found a picture of a coffin on Google Images as a base to cut out the right shape.
All of these sweaters were thrifted except the two solid black ones with pins--the first one came from Walmart, and the second one was given to me by my mom. Sweaters are plentiful at thrift stores, and they don't even have to be black to be turned into something goth.

That's all of my altered clothing so far, unless there's anything I'm forgetting! Which there easily could be, because I shared about forty garments O-O
I'll share the jewelry I've made next, and then the clothes I've sewn from scratch! This will come sometime in the future, though, because it took awhile to find everything, take pictures of it, and then write about it. And between you and me, I've made a LOOOOOT of jewelry and clothing, so give me some time. As I said in the last post, feel free to message me if you want more detailed instructions or ideas. I'm always happy to help!
Stay crafty!
#diy advice from your local goth#goth diy#goth diy tutorial#diy tutorial#diy#gothgoth#goth#goth subculture#goth fashion#goth clothing#goth fashion diy#crafting#sewing#mine
45 notes
·
View notes
Text
I know I'm a nerd because the amount of time I've spent obsessing over the Vojvodina dress is. Way too much.
This dress doesn't actually have a name (probably), but it's from late 19th century Vojvodina, and I kind of obsessed over it when I was at the Serbian Ethnographic Museum in Belgrade (main site is available only in Serbian).
(Unfortunately, I'm trying to work within the tumblr image limit, but here's a google drive!)
BTW, if you enjoy this post, please consider leaving a tip! I spent more time than is reasonable putting this together.
Also, due to tumblr being Odd, you may want to open this in a new tab to avoid having the posts expand to full; the dashboard view only lets there be one image per line, for some reason. If you open in a new tab, they are much more neatly organized into sets, and quicker to scroll past.
Due to the fact that I can't really describe these photos in a way that means anything to readers unless they have a large technical vocabulary or background in Balkan fashion history, and there being so many pictures, I will not be including image descriptions. However, my commentary on those photos throughout the latter half of the post should hopefully give you a solid summary on what the photos contain, even if it's not going into details for most.
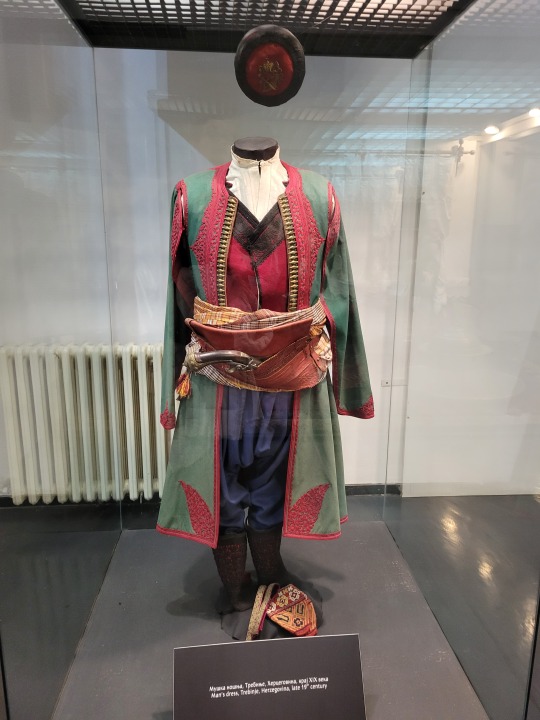
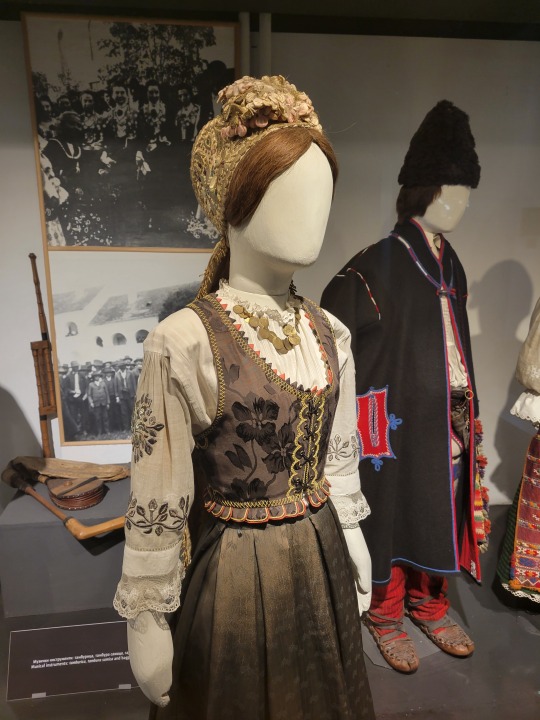
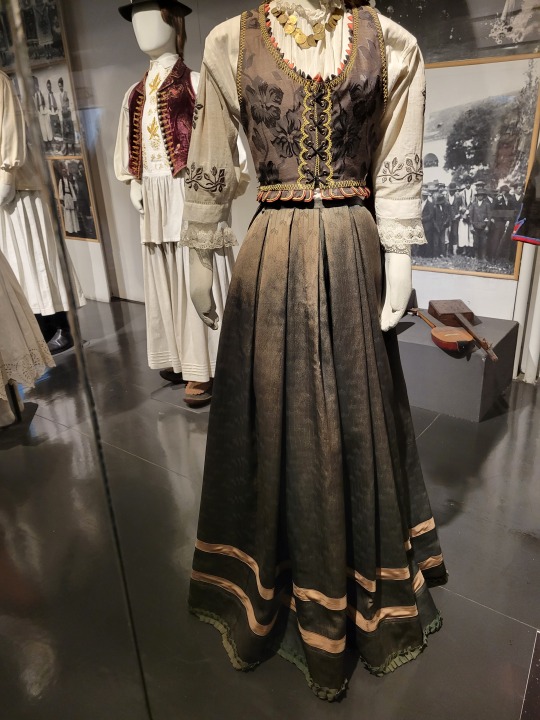
Here is the general shape of what you see in 19th century Serbia (incl. Kosovo), Montenegro, Bosnia&Herzegovina, and Croatia:
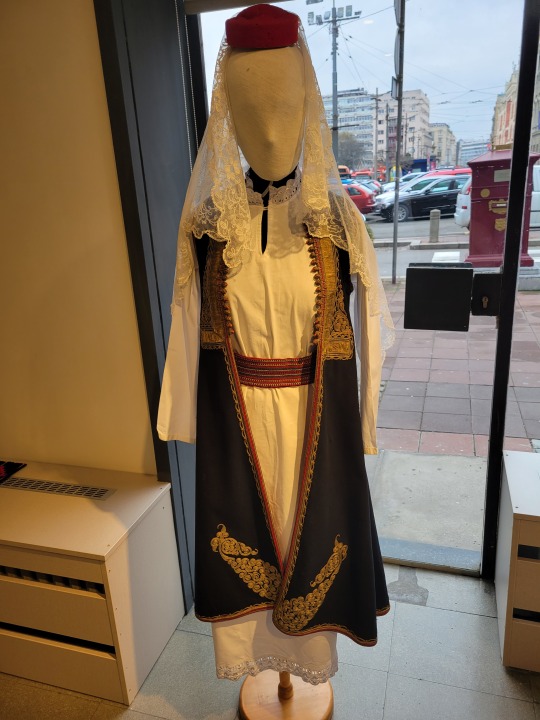


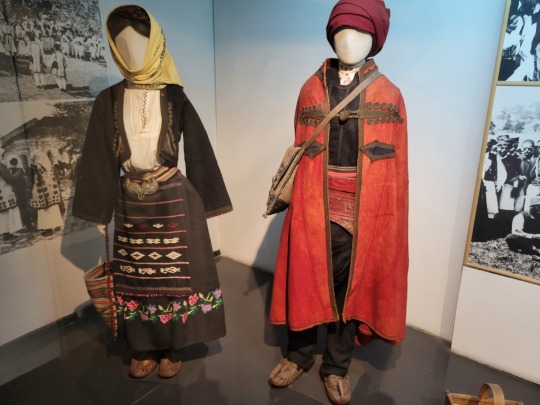
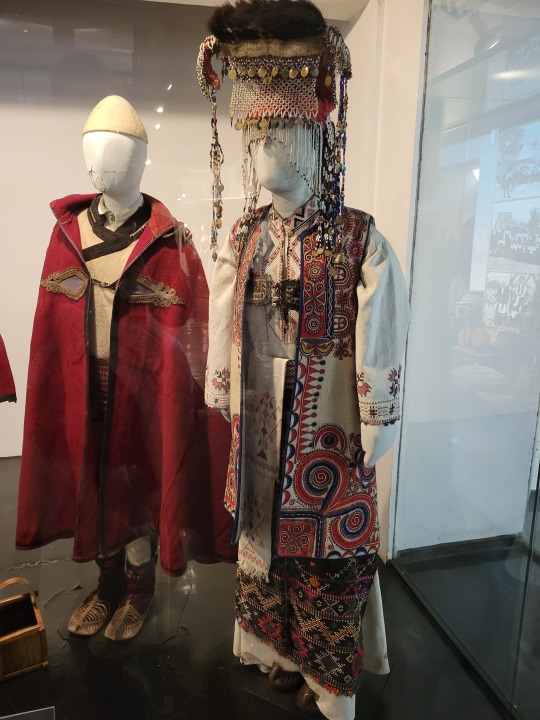

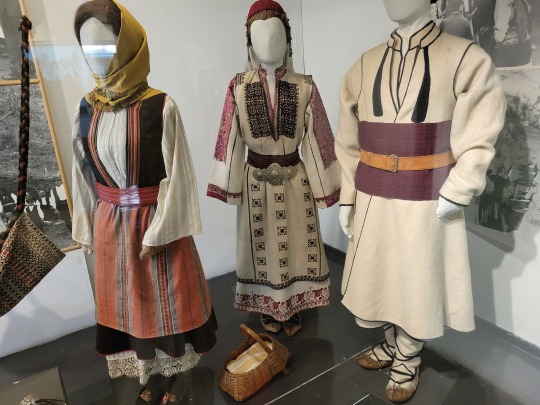
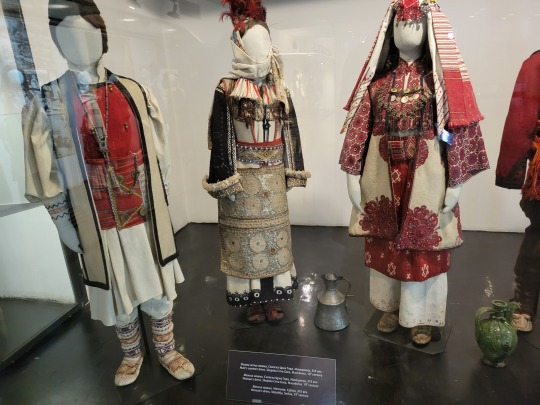


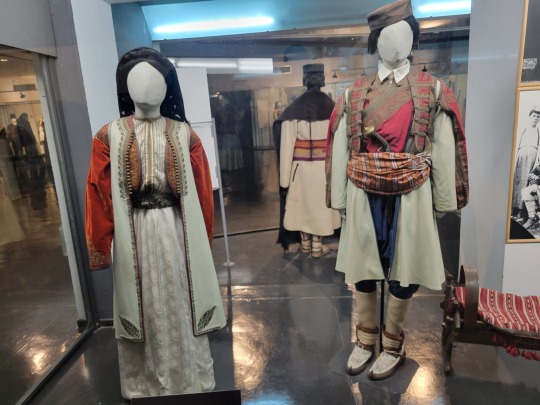

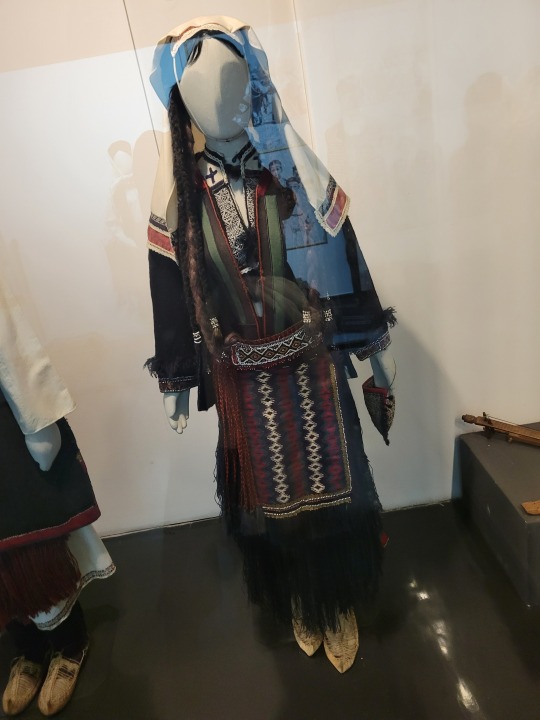

You can see a few throughlines, even with the variety from one region to the next. Certain types of fabric are more common, especially that heavy plain-weave white fiber (I think usually cotton, nowadays, but probably historically flax) with the small knots; my grandmother's apartment is still stocked with that as the default bed linen! You see it all through the exhibit, most frequently in the skirts, but often for blouses or chemises, too.
There are a lot of hand-woven fabrics, which you can see on display best with the aprons, and a very specific style of applique trimmings on the cropped vest. The arm's eyes and necklines have similar proportions. The lengths are similar. Most things are cut on the rectangular, or not cut at all. Hems are often tassled, for complex weaves, or simply folded under for the white base fabrics; plain, non-white fabrics tend to get a textured applique at the hems. Lace is usually eyelet.
There are exceptions, of course. I'd love to know more about that mint green cardigan(?) from Montenegro, with the gored pieces. I think it's made of doeskin (the tight wool weave, not the leather), and I wish I could get more information on the history. Most of the larger green dyes, not counting floral motifs or minor elements of a multicolored weave, are from the Bosnian section of the display (wide stripes along the collar, for instance), presumably due to Ottoman influence leaving a large Muslim population. And then there's this mint green cardigan from Montenegro made of a fabric I'm not seeing on any other garments? Tell me more, please.
(Also, in the close-ups, you can see that the hook and eye closure has released rust stains onto the blouse!)
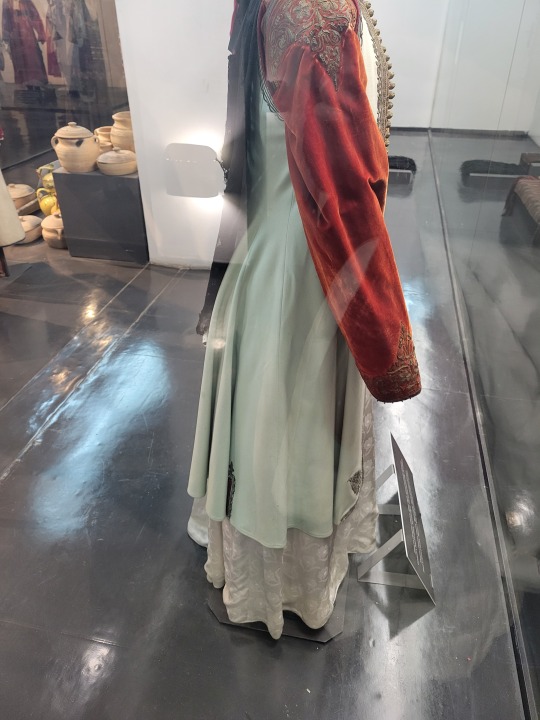
There are so many more pictures, but unfortunately, I have a thirty-image max and really want to talk about this one specific dress:
The image description on the floor below describes this as:
Woman's festive dress with a zlatara cap, Banat, Vojvodina, late 19th century
(I have minimal commentary on the hat. It's a traditionally Serbian vestment, but there's nothing too unusual about it.)
So, here are a few things to note at first glance:
The arm's eye on the vest is wide. It dips further in towards the neck than most vests, and swoops further down towards the ribs. Most of the traditional vests have a much tighter arm's eye.
Relatedly, the straps are much thinner than most of the vests, maybe half as wide. This is partly the arm's eye, and partly the width of the neckline to start!
The vest comes down in a slightly pointed oval ending at the swell of the bust, rather than curving back up or being a rounded shape a few inches higher. It's also finished with these little satin triangles?
The vest is laced at front, rather than hook and eye closure.
The bottom edge has tabs!
The hems on those tabs are chain stitched in yellow, and then the hem is wrapped in a thin orange ribbon that I would hesitantly say is satin? Plus all the other yellow embroidery, which to my eye looks really different from the embroidery you see on various aprons, and also different from the metallic appliques you see on most vests!
That bottom edge also appears to be straight across (most of the vests curve up slightly at front), and is very tight to the body. While some of the vests are tight, those are generally the shorter ones. Longer vests are much looser than this one, which cuts off and cinches at the waist, right where it meets the skirt.
The fabric itself! I'll get back to this but it seems to be a satin jacquard??? A jacquard that matches (in thread, not in pattern) to the skirt? Insane.
[Disclaimer: Some of these deviations, such as the arm's eye size or the dropped shoulder hem, could be a matter of the mannequin being the wrong size for the clothing. Unfortunately, I don't have enough background information to be sure. It could be just the right size. It could be far too small. I only have these photos and the most basic of background information to go off of.]
Okay moving on to the blouse:
It's not completely unique to be sheer, but it's definitely uncommon!
The chest is not pintucked or a flat weave, but rather the sheer fabric has thin stripes of more opaque weave? I don't actually remember what that's called but it's definitely cool to see.
We also see a net lace at the cuffs, which is similarly uncommon; most of the fashions I saw had eyelet lace instead (which we can see at the collar of the blouse).
The dropped shoulder! The shoulder seam sits much higher on most of the pieces I saw (there are a few exceptions, but mostly from regions nearby). In fact, most of the examples had the shoulder seam hidden, between the higher seam and the width of the vest; it's both the dropped seam and the thin straps of the vest that let us see this here!
That metallic embroidery. Again, most of the embroidery we see on the other pieces is cross stitch or done with a much thicker thread; sometimes, you get lineart, but not filled in in this manner. This kind of thin-thread embroidery that fills the space between the lines isn't common in the other pieces!
I don't think I can actually say much about the sleeve length? I feel like most of the pieces have sleeves that are full or bracelet length, while this one is a three-quarter, but I'm not 100% on that actually being true. It's a bit hard to tell in some cases. Might just be summer clothes?
The skirt:
SATIN JACQUARD
BOX PLEATS
SLIGHT OVAL HEM
SATIN RIBBON TRIM
I'm gonna be honest this was a huge part of why I began to obsess over this dress let me just. Whoo!
This fabric is, as far as I can tell, a satin jacquard, very probably machine-woven. It is very different from basically every other fabric we see in this exhibit. This is not a plain weave, and it is not a hand-woven design. This is a meticulously, mechanically repetitive pattern done using satin-weave manipulation to adjust which sections have shine and which don't. Given the time period, it's probably silk. (Take a look at this portion of a video on silk by Nicole Rudolph to understand what I mean by jacquard. If you want to know more about satin weave, you can watch the full video.)
I'd guess that the vest is made of the same type of fabric, even the same threads, just in a different pattern.
The pleating! If you take a look at the other photos, the general pattern is 'put together some rectangles, gather at top, and you have a dress. Cover with a hand-woven apron in front and possibly in back.' There are, again, some exceptions, but this dress has both the box pleating and the satin jacquard. The structure of this skirt is completely different from 90% of this exhibit.
In conjunction with the pleating, the skirt had a very slight oval shape around the bottom. I didn't get a good photo of that part, but it's typical of 1890s dresses in Western Europe to have a sort of egg-shaped hem if you look at them from above, through use of pleating, strategic panel shapes, and bum pads or petticoats. In short, the dress is just slightly longer at back without being a full-on train. Most of the other pieces, due to the rectangles and gathers, are a much simpler circle shape around bottom.
Length! Part of why the egg-shaped hem is happening is because this dress actually brushes the floor. Ankle-length is the default across the exhibit, even for formal wear.
Simple satin ribbons for decorative trim, rather than something textured, shaped, or multicolor!
Then, the actual hem of the skirt: a center-pleated green ribbon. This is, again, really different from most of the hems. Most of the skirts don't reach the ground, and aren't made of a fancy fabric. Those white dresses/skirts that form the base of most looks are easily washed and have hems that don't drag on the ground. If they aren't left to just the selvage, they're very simply hemmed; I think what I saw most frequently was a double-folded hem. The pieces that have more decorative hems, like blouses and vests and aprons, aren't pieces that get the same form of wear.
However, since this dress does reach the ground, it needs a centimeter or so of additional fabric to take some of that wear to protect the fancier skirt fabric, like hem braid, which the easily-replaced ribbon could conceal for this skirt since it's a festival item.
I think that might also be part of why there's a seam about twenty centimeters up from the bottom edge; it's a replaceable section in case it needs replacement, or the seam is for a protective layer inside. However, it could also be a seam used for a stiff inner lining meant to help the skirt flare out just a touch, like this.
Now, finally, why is all this even a thing, and why do I care?
Vojvodina, the region this outfit is from, was under Austro-Hungarian control during the latter half of the 19th century; whether it was officially Hungarian, Austrian, or both changed from one decade to the next, but it was definitely under that sphere of influence for a very long time. Despite this, it was and is culturally Serbian, and is majority Serbian in terms of population; it was even back then! However, the 19th century saw a large number of ethnic Hungarians and ethnic Germans in the region as well, and the cultural impact from Vienna was not to be underestimated.
This dress is a great example of how a culturally Serbian individual would have clothing that integrated those foreign influences. For most of the Balkans, the greatest influence was the Ottomans, due to five centuries of imperial rule, but this dress is a great contrast due to Hungarian occupation, and then Austrian. It contains elements of the culture that birthed it, yes, but the influence of the West is so very, very clear.
(I wish I could talk more about the Pannonian elements in general, but I'm still learning.)
I hope you enjoyed this rambling deep dive into a single outfit from the Serbian Ethnographic Museum. Visit it if you get a chance!
And if you've read this whole thing and feel like dropping a tip, you can do so on this blog, post, or over on ko-fi. You could even join my Patreon!
#serbia#vojvodina#fashion#fashion history#the vojvodina dress#serbian stuff#balkan stuff#balkans#Banat#Hungary#Austria Hungary#austro hungarian empire#phoenix posts
171 notes
·
View notes
Text

Le Petit écho de la mode, no. 15, vol. 17, 14 avril 1895, Paris. 1. (1.) Jaquette hussard en drap bleu; — (2.) Vêtement en satin et dentelle noire. Ville de Paris / Bibliothèque Forney
(1.) Jaquette hussard en drap bleu. — Les devants ajustés sont garnis de brandebourgs et soutache noire disposée en appliques ; le dos ajusté également forme jupe godets, manches garnies comme les devants et col droit.
(1.) Hussar jacket in blue cloth. — The fitted fronts are trimmed with frog and black soutache arranged in appliques; the fitted back also has a godet skirt shape, sleeves trimmed like the front and a straight collar.
Matériaux: 3 mètres de drap uni.
—
(2.) Vêtement en satin et dentelle noire de forme cloche, la garniture se compose d'un volant de dentelle disposé comme une seconde pèlerine surmonté d’un galon passementerie et broderie de perles, col froncé en dentelle, nœud et longs pans en ruban satin.
(2.) Garment in satin and black bell-shaped lace, the trim consists of a lace ruffle arranged like a second cape topped with a trimmings braid and pearl embroidery, gathered lace collar, bow and long sides in satin ribbon.
Matériaux: 2m,25 satin, 5 métrés de dentelle.
#Le Petit écho de la mode#19th century#1890s#1895#on this day#April 14#periodical#fashion#fashion plate#cover#description#Forney#dress#jacket#cape#gigot
11 notes
·
View notes
Text
Just a curiosity about the type of materials folks prefer for designs. Like if I were to put a star shape on material (garments or accessories), what is your preferred form.
29 notes
·
View notes
Text
DAYDREAM

LEE JENO
Prologue: Dreams leave with you zero control, they can spoil your mood for the day, or make it better, you never know
Genre: Suggestive
Wordcount: 920
Warnings: Sexual Content [ make out + stripping + oral male and female receiving ]
A/N: wrote this spontaneously because i know we are not getting over nyfw jeno anytime soon

"No! Please don't go!" You moved your careless hands in the air, cursing and for a brief moment, it was an unexplainable feeling of dissatisfaction and impatience before it all faded away. A sudden white light peered through your eigengrau eyes.
The annoying sounds flooded inside your ears; they were slowly getting back to their senses.
Before you could even comprehend it, it was the morning, and the clock next to your bed signalled it was time for the dreams to end, and they did, abruptly.
-
"Can I please not get it done after one coffee?" You questioned in a daze, letting out a sigh after your plea was harshly refused. Yeah, Fashion Week was a big event, after all.
Patches of cloth, unfinished seams, appliques that were yet to be fastened, and silk that was waiting for its turn to get ironed. You were still unphased as if floating on waves that would take you somewhere you did not know. Boredom, exhaustion, frustration, it could be called any of them.
"Y/N, I need you to go and assist with the fittings. Right now. Rush!" Someone in a collared t-shirt and a walkie-talkie in hand clamoured. "Alright" you agreed as you dragged off your feet.
-
"Yeah, just make sure that collar stands straight, it's not be moved." You noted, fixing the garment on the model.
"Okay, next. Jeno Lee." Reading the name and scrapping it off from the clipboard, nonchalantly.
Nonchalantly only until you saw the beauty of the man that stood right before your eyes.
Tall, well built. His skin was glowing as it contrasted with the black fabric of his fit. Eyes that were sparkling, but no, it was not for the lenses. He looked exactly like the perfect icing on the cake, satisfying.
"Oh fuck!" You swore mentally.
All you had to do was simply tie the robe at the back and maybe it was all under control. Had you not seen that slit in his pants tracing itself all the way up from this ankle to the thigh, stopping just where it should have, it would have been a lot easier.
"Arms." You said in disbelief.
"Hmm?" The boy looked at you with confused eyes.
"I need you to raise your arms so that I can fix this."
"Oh of course." He smirked, never breaking the lock of his eyes.
It was pretty common for models to don the bare minimum and for designers to touch their flesh, but what was happening right now was something that was not meant to be happening.
-
"You think I could not tell?" Jeno whispered against your ear, gliding his hand through your jaw, staring deep into your soul.
"What do you mean?" You said, gripping him by the arms, the arms that you fancied hours ago.
"The way you just.." One of his hands lifted up your chin, the other running itself down and deeper. "You just could not help but stare at me, I thought you made it really obvious." He continued.
"I thought you made it obvious, who asked you to come and do your slutty little dance right next to me at the after-party?"
Jeno shut you up with a kiss. There was something about kissing a stranger that felt so right, yet so wrong.
You backed off. Glancing at the boy, again. He was a daydream.
"You don't wanna ruin these clothes, It's an expensive designer label." And that was enough for him to give one good lick to his lips and start unbuttoning his white shirt, the one with the grey and black gradient.
You decided to sit and enjoy the show, seating yourself on the edge of the bed, and rubbing your legs together. You knew you've wanted this for so long.
"The pants." You pointed out. "They're expensive too, aren't they, Jeno?"
He obeyed. Unbuckling, unzipping, and finally stepping out of his pants that only left him with his essentials, the concealing was light enough to tell you he was just as excited.
"Don't expect any more kisses on the lips if you stand in front of me like this."
Your eyes looked up to meet his, so filthy.
Jeno took your hands in his, placing them at the edge of the waistband of his innerwear and then leaving them to do whatever they wished, another look in his eyes and you could sense the tension, not wasting a second, you pulled them down, giving him just what he wanted. Pleasing him and earning endless moans from him, he breathed heavily, spitting out a few curses each time.
But Jeno was not selfish, he was just as eager to please. "Your clothes.." He hissed. "Aren't- aren't they expensive too?"
"You don't even have to stand, you can lay down and let me return you the favour." He suggested, and he did return more than just a favour. Filling that empty space in your gut, the one that had been hollowing you for long.
-
Your eyes opened again. The same sensations again, the same beige curtains being fluttered away by the winds as the sunlight escaped through the narrow windows.
Was this all a dream again?
The clothes on your bedroom floor suggested otherwise.
But Jeno was nowhere to be seen, the bed was cold.
He had left.
The empty feeling returned, and this time it was your heart rather than your body, unless your gaze fell on a small piece of paper, crankled with black ink writings on it.
2304xxxx00
~ jeno ;)
LET ME KNOW YOUR VIEWS + ALSO SEE : MASTERLIST
PLEASE REFRAIN FROM PLAGIARIZING ,TRANSLATING, OR POSTING OUTSIDE THIS PLATFORM.
#jeno#jeno smut#nct smut#nct hard hours#nct dream smut#jeno nyfw#nct jeno#jeno lee#nct dream ff#nct ff#jeno oneshot#jeno imagine#jeno drabbles#jeno headcanons#jeno scenarios#nct dream 00 line#nct dream hard hours#nct scenarios#nct drabbles#nct headcanons
258 notes
·
View notes
Text
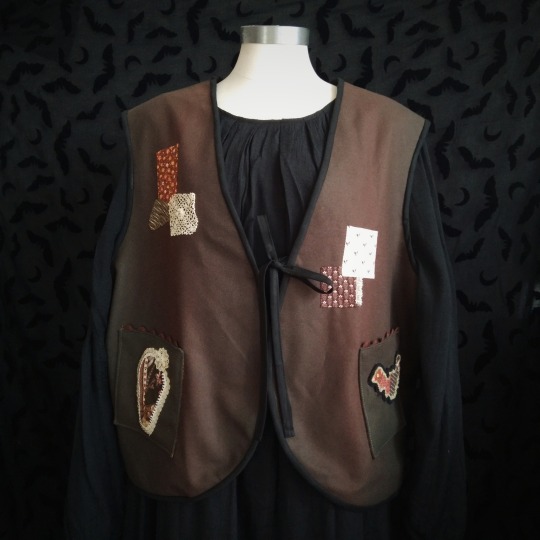

Patchwork Grannypunk Vest *is finally listed!!*
Wanna be the coolest one at the quilting bee? Cosplay as a granny orc at a local convention? or just to visit the nearest dark forest to bring some snacks to your cryptid pals? This is the vest for you.
Made from a swamp green wool fabric, inside lining is a brown patterned deadstock fabric. The patchwork appliques on the back and front of the garment were hand pieced and sewn by me. All the scrap fabric used is from the 20s to the 50s. The lace used on the front of the vest is also vintage scrap. The bias tape, rickrack and ties are 90s deadstock.
Size: L-XXL
Available in this shop: HERE
#eco punk#dark cottagecore#cottagepunk#alternative fashion#folk punk#queer punk#art punk#cryptidcore#mosscore#dnd#goblincore#thewidowshouse
12 notes
·
View notes
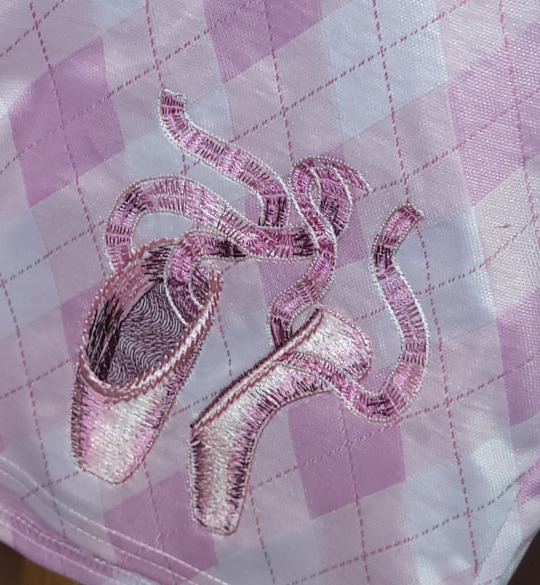
Text
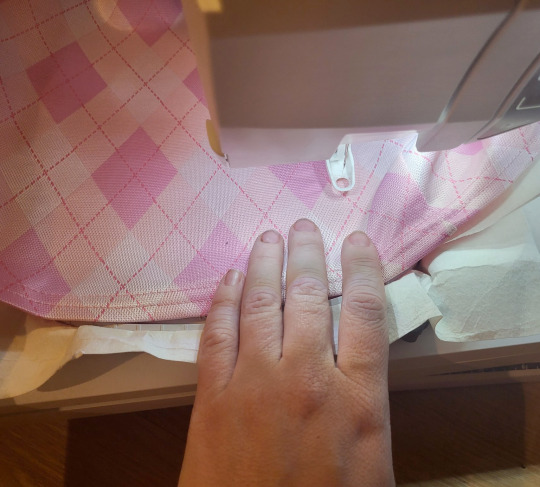
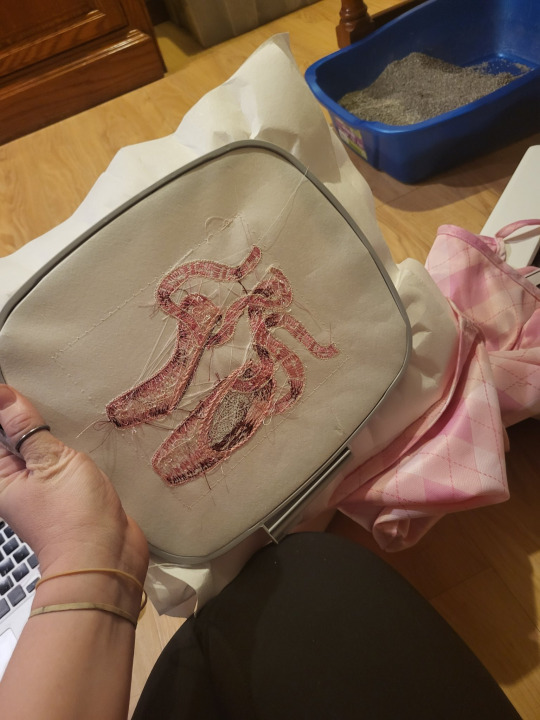
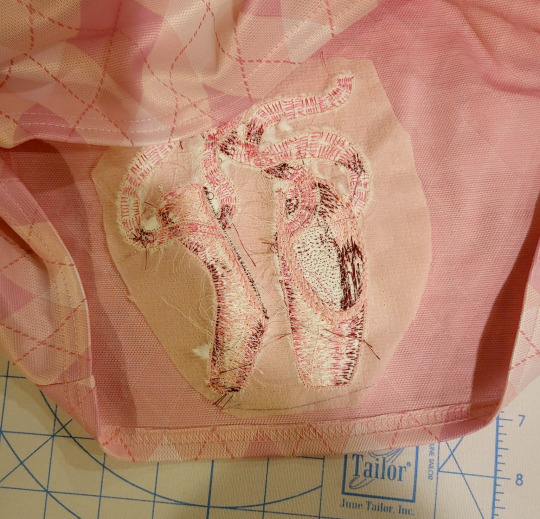
Machine embroidery tutorial: Shaded pointe shoes.
I know from working in a sewing machine store that a lot of people are intimidated by machine embroidery. So, I made this pattern the other day, and let's go into how I stitched it out.
Embroidery does not need to be this hard. If you've never used the embroidery part of your sewing machine before, stick some cheap stabilizer in the hoop with some fabric, grab a random pattern from inside your machine, and run all or part of it. Once you do this, you will be much less afraid of it. Some brands of machines will include some stabilizer and fabric for you to run an initial test on.
So, let's get into something more complicated. There's a few things that we're going to do to make this more complicated. The first is the surface that we're embroidering on. I'm using a dress from Five Below, which is made of a knit fabric without a whole lot of stretch. The surface that you embroider on does impact how you want to set up the design. I also want to do the embroidery very close to the bottom edge of the dress, so it's won't fit in the whole hoop. The third difficult thing about this design is that there's a machine applique in the very start. This applique will let you embroider this on a fabric that isn't pink, and the shoes will stay pink.
Regarding the applique, I've been told that it's small enough that you could cut up an actual pointe shoe and use the satin from that, if you want to. I don't have a shoe on me, since I don't dance (I just do the costumes). But, if you're making a gift for someone who dances on a level where they're throwing away dead pointe shoes instead of keeping them in a memory box, it could be a fun addition. Here is a template to show you how big the pieces need to be. Important: do not cut out the appliques using this template. The machine will cut them out for you later. You can use this template to know if the pieces of fabric you are using for your applique will be big enough. You want your pieces to be larger than this template, but they don't need to be significantly larger.

The first problem that we're going to deal with is the fact that the dress has a small amount of stretch in it. We don't want the section of the dress that has our embroidery to stretch at all. At best, it'll look bad, and at worst, it'll destroy the whole embroidery. To stop the area with the embroidery from stretching, we're fusing a fusible non-showing mesh stabilizer onto the area to be embroidered. I'm doing this design in 6x6 hoop, so I got a piece that was about 8x8 and fused it on the area.
When you're using fusible stabilizer, you want to iron it on from the fabric side. Some nylon meshes will melt if you iron them, but most importantly you want the face of the fabric to be perfectly smooth.
When the design is done, this stabilizer will remain in the design forever. This stops the design from stretching, even when the garment is worn or washed. The mesh is light and flexible enough that it doesn't drastically change the way the fabric moves.

The next thing we need to do is add stabilizer to the hoop. Embroidery machines put a lot of stress on the fabric, and so it's not usually possible to embroider without stabilizer. In this case, we're also using the stabilizer to hold the fabric, since we can't get it in our hoop.
This is two layers of soluble tear-away stabilizer. If I'm using tear-away, I always use lightweight tear-away. Using multiple layers of tear-away will put less stress on the stitching when you rip it away, because you rip one layer at a time. This requires less force than ripping a thicker layer away all at once. We're using tear-away because we don't want to keep all this stabilizer in the design. The specific one I'm using is a tear-and-wash stabilizer, where the extra bits of tear-away can be washed out of the finished design.
The other thing that I did while the iron was still hot was to press the pink satin that I'm going to use for my applique. Applique is much easier if the fabric you're using isn't wrinkled.

We're going to pop the hoop into the machine. Now is a good time to go into your machine's manual and find out where the basting line setting is. Bernina, Viking, and Pfaff all make this super easy, and Baby Lock and Brother do not. For Brother and Baby Lock, it's often in the "embroidery edit" mode. If it really gives you trouble, tell me what hoop you need it for, and I'll make you a version of this file with a predone basting line.
Some people like to spray-baste into the hoop. I do not like this, because it makes your hoop and your machine all ugly and coated in spray shit. If you are one of those people who likes spray, 100% take the hoop outside to spray! It's not good for your body and you'll get overspray glue all over your shit. If you're not a person who spray-bastes, do not become one.
Some people like to use tacky or sticky tear-away for this. That's a completely fine and valid option, but that shit is expensive. Basting line is cheap. A general stabilizer rule is that you can cheap out on tear-away and cut-away, go mid-price on fusible, and buy a good brand of tacky or wash-away. This is because it's pretty hard to fuck up cut-away stabilizer, but also pretty hard to make a good stabilizer that's also tacky and n'gones when you need it to. Since I have 200 things I'd rather do with $86 than buy a roll of stabilizer, I just use the basting program for 99% of my embroideries.
Before you run the design, flip through your color blocks. Make sure that your design starts with five blocks of the same color. If your machine decides to "help" you and merge the color blocks together, this won't work properly.
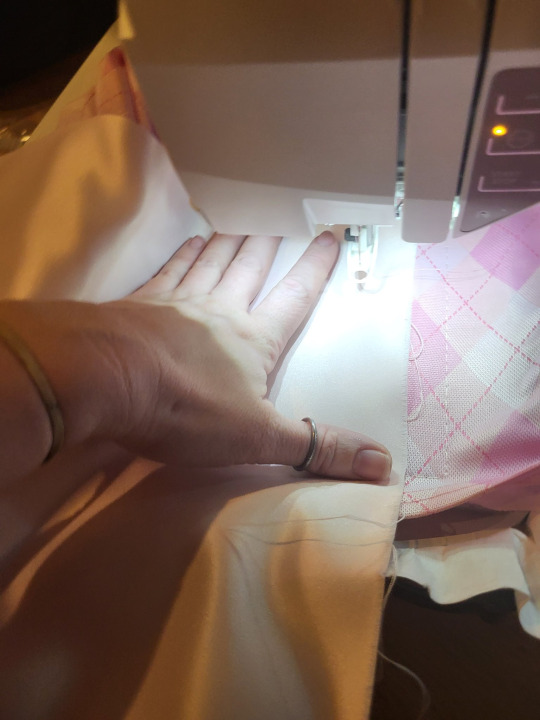
Now, put your fabric in the hoop, wherever you want the final design to go. I lined the hem up with the bottom of my hoop. Run your basting line, holding your fabric flat on the hooped stabilizer. You might need to pause and unpause the machine several times to move your hand and keep the fabric flat. Remember that as long as your hand is flat on the fabric, and you have a presser foot on your machine, you can't hit your fingers with the needle. Despite what this image shows, I often hold the fabric down with my whole hand in the center of the hoop.
Floating the fabric like this, instead of hooping, also allows you to line the fabric up very precisely. It's hard to hoop something 100% straight, but it's pretty easy to float it 100% straight.
Another advantage of floating with a basting line is that the line will show you exactly where the design is going to go. If you don't like where it's going to go, you only have about 50 stitches to rip out so that you can change the location. You'll know that your embroidery unit will have enough space to move. All hail the basting line.

The machine is going to sew an outline, and then stop. This is showing you where to place your applique fabric.
A good general rule is that any time a pattern sews an outline and then stops, you're supposed to put fabric down there. If your pattern does this, and you're not sure why, see if there's any instructions that tell you what applique fabric to use where.
If your machine sewed this outline and then kept going, make sure you have color block merge turned off, and that you're not in monochrome mode.
Just like when you were basting your garment onto the hoop, you're going to hold the applique fabric over the outlined area, and keep it there while your machine runs the next color.

Once the machine has sewn the applique fabric down, you'll want to trim away the excess. I use some very small curved scissors for this, since the curve lets me get very close to the stitching line. Generally, you want to be as close as possible to that line.
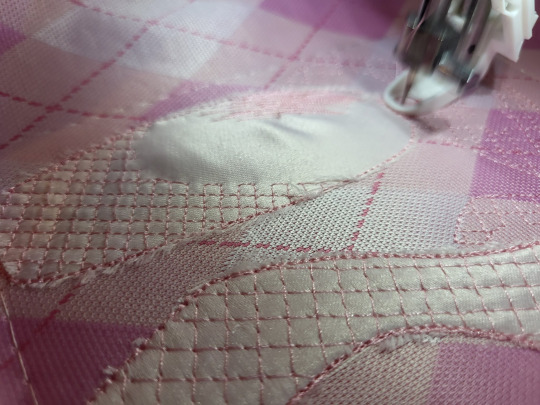
Once you have your applique fabric sewn in, you can more or less just watch the machine and change the colors when it asks you to. You'll see that I have a bulge in my applique fabric on the lefthand shoe. This isn't ideal, but since this design has so much stitching, it all got flattened down in the end.
You'll see that there's a lot of crosshatching on the surface before the colors go on. This is to stabilize the fabric and keep it in place when the big feathered stitches start. These stitches also sew the stabilizer to the back of the fabric, which means that if your fusible mesh starts to lose fusion, it'll still be completely sewn down.
If your machine has manual tension, you'll want to lower it after the crosshatching layers are done. You can change it after color block 5.

The reason that you're lowering your tension is that these stitches are particularly lorge and lomg, and that means the machine can pull just a bit harder than normal when it moved form place to place.
If your machine doesn't cut jump stitches (the long stitch the machine leaves when it jumps from one section of embroidery to another), you will want to trim them between color blocks, instead of waiting until the end.
If you're watching this stitch out and going, "Wait, I was told my machine embroidered at 1200 stitches per minute! This isn't going at 1200 stitches per minute! What gives?" well, I'll tell you. Your machine's stitch speed was rated by the absolute fastest that the machine head can go. It doesn't actually take into account how fast the embroidery unit can move. Since these are longer stitches, the embroidery unit can't move fast enough to keep up with the machine going 1200 stitches a minute, so the machine has to slow down to deal with the e-unit's speed.
If you did this correctly, the back of your embroidery will not be sewn to the front of your embroidery, and you'll have something that looks like this.

You'll need to cut your bobbin thread about every 10 stitches in your basting line. This is pretty easy, because the stitches are so big. I do this from the back side because the stabilizer protects the fabric from my scissors.
Then, flip it over and rip out your tear-away, one layer at a time. You'll notice that my back side is really ugly. This is because Viking and Pfaff don't cut the bobbin thread between jump stitches. In the old days, this meant that they jammed and locked up significantly less than other brands, but now there's things like wiper feet and tail-clearing programs that work a lot better. No, there's no way to activate bobbin jump cuts. If there was, I'd have done it by now.
Now, using your iron if you need to, peel back the extra fusible mesh and trim around your design. You can get closer to it than I did here. I'm just lazy.
If you're using polyester embroidery thread, you get some pretty good results by sticking a press cloth over the design and ironing it. This will make sure the threads line up and stay extra shiny.

And that's important because polyester thread already doesn't have the same luster as rayon thread. It's more sparkly than lustrous. However, some brands of thread are just easier to work with. When we're testing machine problems in my store, we test with isacord, since it's the least likely to have problems, so we can rule out thread problems. But man, I just think it's so ugly. I used polyester for this design, because it's long stitches on a garment, and I need that strength, but I'm not happy about it.
Anyway, there you go, that's the basics of a somewhat complex machine embroidery pattern.
I'm considering making a separate blog for embroidery stuff. I'm really tired of the embroidery industry charging for tutorials like this or instructions on the embroidery software (looking at you, Floriani Total Control University DVD for $218), but this blog isn't really for my vendetta against the embroidery industry.
#machine embroidery#tutorial#not lolita#applique#pointe shoes#ballet shoes#you know that moment in welcome to the black parade where they modulate and it's just such a good moment
40 notes
·
View notes
Text

Hear me out - on the back of a levi jacket for a cool, wearable and comfortable Hawks cosplay.
It would be more disability friendly, while also having a cool 3d effect.
3 notes
·
View notes
Text

Overblot Emil
I was originally going to fully render this, but I decided to just keep this as a flat ref for me to use. That said though, I wanna take some time and ramble about this character design because I spent so much time on this and wanted to incorporate so many little references and things into it.
Let's start with the obvious:
The overall garment design is drawn from Mother Gothel as seen in Tangled.
The Sun on the waist corset/belt thing is absolutely a reference to the sun insigna from Tangled .
You would assume because TWST is a Disney property that I would only pull from that rendition, but TWST has shown to pull from multiple adaptations or aspects of the tales they used. So I wanted to do the same with my depiction of Dame Gothel. As such, the blot and ink specifically on the arms, face, boots and cloak? All of them are supposed to look like roots, calling back to the Grim's version most people know. The idea I had in mind is that Emil's inner turmoils have become uprooted and exposed as a result of someone stealing something of his (oc plot related stuff to be revealed eventually). So I felt that a call back to the original tale would be incredibly symbolic of this.
Some of the design elements were taken from the 1980s original cast designs of Into the Woods, with additional references in the form of the bean appliques on his boots; the lace and mesh on his face and belt that are designed to look like gates and brambles- inspired by the scene where Gothel forces Rapunzel's prince to go blind both in the OG and in Into the Woods; and the eye motif on the belt to represent how Gothel helped the MCs fight the giants. And the big reason why eyes is for both the prince and the giants, they end up going blind.
I've never been the best at character design, but I felt really proud of myself for all of those little references all coming together cohesively in this piece. I thought you all might also like it, so I thought I would share.
#TWST#twst ocs#my ocs#my art#my refs#oc refs#Emil Lehr#Overblot#twst overblot#mother gothel#dame gothel#into the woods#tangled#rapunzel#Seris talks
5 notes
·
View notes
Note
Awesome that you´re open for cosplay advice! This might help others or others might have other solutions so no need to answer privatly.
I´m currently working on the Mystic Armor set from Tears of the Kingdom and I have almost everything figured out but one sleeve which is giving me headaches. Specifically the one on his upper left arm underneath the shoulder armor. It’s connecting to something underneath the undershirt or the undershirt itself and is a cutout with 3D elements. I thought about doing a stretch mesh base and adding embroidery or beading to it but that probably wouldn’t work bc that doesn’t stretch and doing it probably wouldn’t feel great bc it goes over the armpit too. Doing stretch applique wouldn’t give me the 3D effect and I’m generally not a big fan of it. So maybe you have any other ideas I could look into?
Hello there!
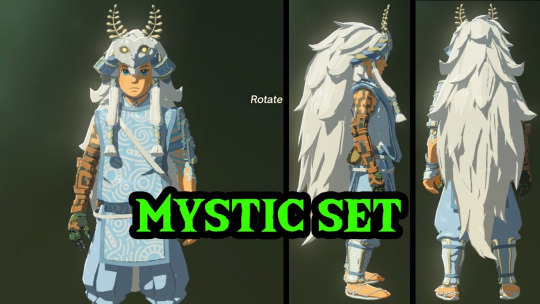
I know you don't want to do applique but I would personally do it as stretch applique on mesh and pad it out for the 3D effect. Cord elastic underneath the applique would create the effect of the lines quite nicely. I would then cut the mesh so the little dangly bits can actually dangle and not be backed by mesh.
If you went with embroidery, it would be tough, but you might be able to do it with a stretch thread.
You can also get away with having it not as stretchy by making the fit looser -- it doesn't seem to conform to Link's arm, so having it loose at least around the bicep would open up a LOT of options. You can also fudge it a little by using mesh and stretch fabrics for the body of the shirt, and then having it loose and covering another material (like cording, EVA foam, plastics, etc.) with your stretch fabric for the part below the armor strap on the bicep. That would prevent the discomfort issues, and the part that is most visible would be the technique you REALLY want and the rest that is stretch applique or whatever else for comfort is mostly hidden.
Another option: make the shirt out of pleather and just have actual cutouts. Depending on the type of pleather you use you might need to stabilize the backside to prevent it from stretching out from the weight, but since it doesn't fray, you can just. Cut out the shapes. and not have to worry about it. It would also be flexible enough to wear over areas like your shoulder that see a lot of movement. You can even combine this with some padding for dimension.
Yet another option since you mentioned beading: Do whatever fabric underneath, and bead with clear stretch thread. This would allow for the garment to stretch, and would still get your beaded look. It won't stretch a LOT and you'll need to be careful to use stitches that stretch a bit, but it would stretch between the beads and give you that beaded look still. Use a fabric of the same color as the beads underneath so when it does stretch, you don't notice the gaps as much.
Cursed option: make the fit loose and do macramé
I know that's a lot of options and not really a solid answer, but since that's all up to your taste, I hope it still helps! I would personally do either padded stretch applique on skin tone mesh or the pleather look, or even a combination.
#bodyguard-of-the-galaxy#link#the legend of zelda#tears of the kingdom#mystic armor#fabrickind gives solicited advice#helpful things#sorry this took a while#i was busy having migraines
8 notes
·
View notes
Last Seen Blogs

capricorn-0mnikorn
From the Edge of the Map

godfreydeeny
Untitled

aloneinthehellfire
Alone In The Hellfire

biggest12fan
i love doctor who

nbhanazawa
TERU ZONE