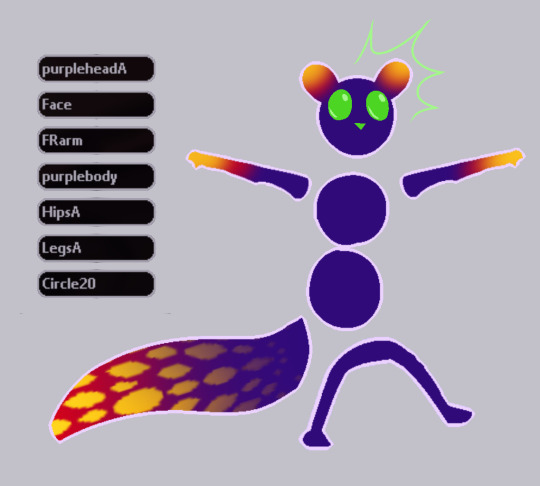
#edit: i added more versions... and colors to make it easier to pick out the parts! ;)
Text
a sneaky list of full poto movies! ;)
youtube
1925
1937 song at midnight
1983
1987 animated
1989 mall
1990
1991 staller
1993 y/k
1995 wishbone
1996 ivan jacobs
2000 ken hill audio
2013 ken hill
2021 korean y/k
leroux audiobook
(these last two are privated every so often, so they're not always available)
musical
lnd
ok.ru
musical
lnd
1943
1962
1974 paradise
1989 freddy
1998 rat phantom
2004
dailymotion
1925 in hd
1995 phantom lover
2011 y/k takarazuka
night gallery
internet archive
musical
1925 original
1974 paradise
1974 hollywood
1983
2004
2004 takarazuka
#i go back to the lnd one every once in a while so i figured i'd put it here for safekeeping! ;)#there are so many other versions on ok.ru! :o#the '25 one has a billion copies on youtube so each number of the year leads to a different video!#same with the mini series ('19' is part 1 and '90' is part 2)#and some of them have backups on other websites! ;)#edit: i added more versions... and colors to make it easier to pick out the parts! ;)#edit boogaloo: third time's a charm since this blew up after adding the private ones! ;D#it only took 8 months for people to find the treasure! :)#now everyone can bask in the goodies!#...and the smol typo
639 notes
·
View notes
Note
your icons are soooooo so cute honestly!!! i wanted to ask if there's any way you can make a tutorial on how to make them? of course if you want, if you don't want to, that's okay :)
Hi! I really appreciate that you like my icons, thank you so much! 💖💖💖🥹
It's been a long time since I've done a tutorial so I hope I can explain it well haha
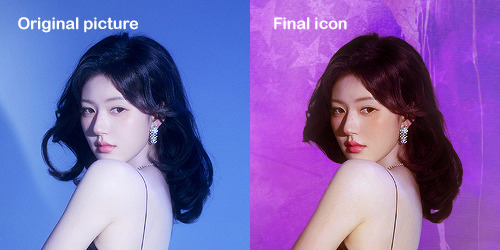
So I will explain how i go from the original picture and the final icon below:
I'm using Adobe Photoshop 2024 but you can use other versions too!
First, I create a 250x250px document and apply a random color fill layer to be the background color of the icon, you can do it by going on Layer > New Layer Fill > Solid color (the color in this moment doesn't matter because I change them later according to the picture I choose to edit).
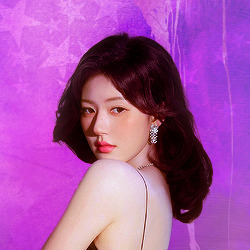
Then I place the picture I want, adjust the size to make the subject on the center and apply some smart sharpen:
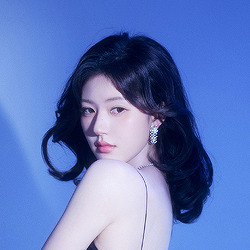
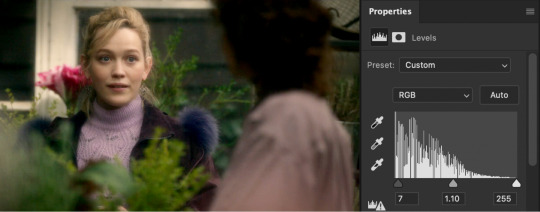
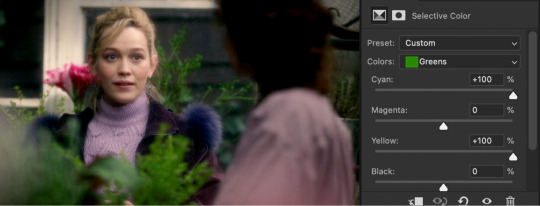
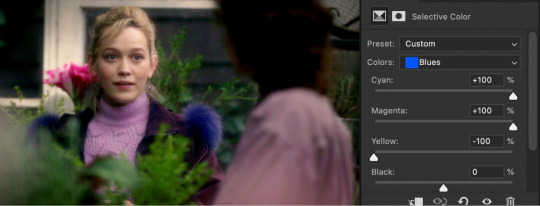
I apply some adjustments to try to color correct if the original picture using Levels, Selective Color and Color Balance to get something like this:
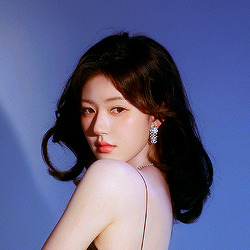
If you want to know the exact adjustments settings I used on this picture you can download the psd here.
To remove the background, I do the hack where I go to the Properties panel (Window > Properties) and click on the "Remove background" option. It's not always that I will get a perfect result but I think it makes easier for me to adjust the little details such as hair and accessories, etc. And I do that using the Lasso tool (shortcut L).
Now, with the background removed I pick a color that I think will match the icon in the Color Fill layer that I created before. To make the background more "fun" I like to add a Gradient Fill layer (Layer > New Layer Fill > Gradient) with a color that might go well with the one I picked earlier to make a smooth and light gradient.
My result until now:
Now it comes the fun: adding textures! I like to add some textures to make the icon more lively and I usually download them on deviantart or on resources websites. You can download some cool textures here, here and here. On this part I really test a lot of textures with different Layer blending. There are a lot of different blending options so you can try as much as you want.
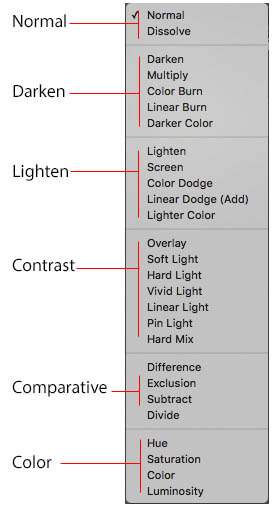
Other thing I like to do is add a clipping mask above the subject layer when I want to color something specific in my picture such as the hair, the clothes or even applying some "fake" blush on the cheeks. I do this adding a new layer, then using the shortcut option (or alt) + command (or ctrl) + g to make it a clipping mask and then using the Brush layer to color what I want. For the blending mode I usually use Soft Light and sometimes Color if I want the color to really stand out.
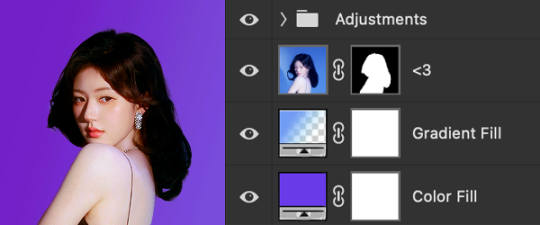
And in the end I will have something like this:
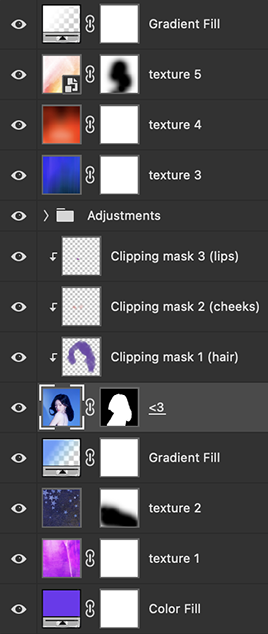
And my layer tab will be like this:
For using on the dashboard I usually resize it to 100x100 to make it look more sharper and defined but it's really a choice, you can already start making your icon using the size you want, I just prefer doing on 250x250px because i'm used to.
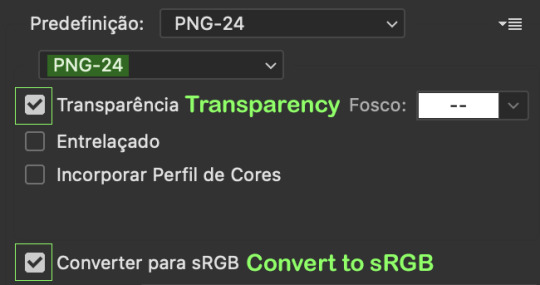
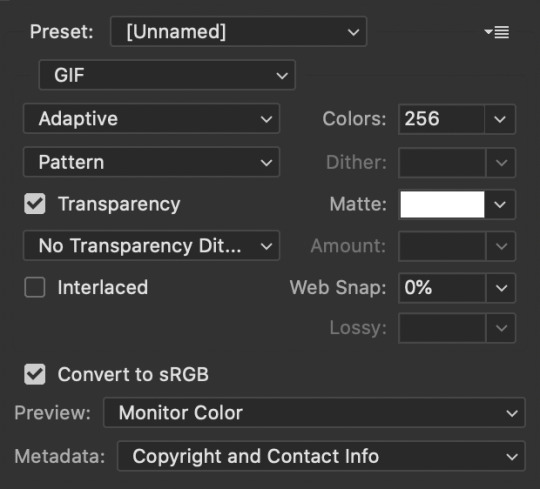
To save it I use the shortcut shift + option (alt) + command (ctrl) + s to save it for web with these settings:
And that's it! Sorry for not going to deep in each step but I guess you can get the feeling when you try making your own icons! Is really about trying different methods and things until you became satisfied with your result.
71 notes
·
View notes
Note
Hey, Can I ask how you edit your gameplay pics? I am a mac user and my ss' are bad and I struggle so hard cause I've never used photoshop before starting a simblr and I can't use reshades to assist me :\
I'd really appreciate any help esp how you blur the backgrounds and make everything look so pretty. TYSM
hi! thanks so much for the compliment!
this is specifically for gameplay posts, but what I do in ps is pretty much using actions then I play around with those settings.
here's a not so little tutorial for you:
here are some actions I've downloaded and use:
smooth by earlygrape // perfect for smoothing out pictures
avonlea // another action that's good for smoothing out pictures, you need topaz clean for 2 of them, but the other 2 you don't (like smooth sharp -- use that one)
sonder by intramoon // these actions will change the color of your pictures and there's a lot of options! it might be a little advanced but these will give you a chance to play around with the style of your pictures once you're more comfortable
sunbloom by fairyfang // these are old but I used them when I was first starting to edit posts myself and they're good to use when playing around and getting the hang of using actions, these are other actions you can play with to change the color/overall vibe of your pictures
how to load actions: you load actions by locating 3 tiny lines on the top right hand of your actions window then drop down to load actions. this will open up finder so you can select the files. the files will have the title.atn, select that and they'll load into photoshop
where to find actions in ps: you find actions by going to window > then select actions, it should be the 2nd one listed after 3D. a little box will pop up and once you have loaded some actions, that's where they will be
how to use the actions: so you downloaded, you located them in ps, now its time to use them. how you do this is by finding the one you want to use > selecting the folder > pick a specific one > then at the bottom of the actions tab will be a little triangle, click that & you will have used the action. it'll either be added on top of your picture in a new layer as a folder, or it'll just change the picture.
tiny tip: if you don't like how it changed your picture, there's a tab called history that you can go to and delete what you did
another tip: it helps to just always make a new layer or copy a layer bc if you make a mistake it's easier to locate where the action started or you can just delete the layer and start over. to copy, it's command+j, for a new layer there's a little + inside of a box at the bottom of your 'layers' window. if you don't have a layers window, you can also find that in window >layers
that's pretty much the basics for actions, now onto blurring:
for starters, there should be a little tool bar on the left side of your screen (that's where mine is) you'll know it's the tool bar bc it'll have a little + with arrows on each corner, a dashed box, a lasso, a magic wand, etc. the tool bar has what you need to begin the blurring background process.
there are multiple ways to blur backgrounds but here's my basic version: right click the magic wand > select quick selection tool.
like in sims, you can make the brush bigger and smaller with [] depending on how big the area that you want to blur is.
then go over the area you want to blur, it'll have the moving dashes around the area once its selected. now go to filter > blur > lens blur (or any other selection you want to play with) > then go to radius & adjust the number to make your selection more blurred or less blurred > hit ok & you're done!
that's pretty much the basics, so I hope this helped! please feel free to reach out again if you need clarity or more help or send me a little chat! ♥️
14 notes
·
View notes
Text
ON1 Brilliance AI Explained By Example
If you are trying ON1 Photo RAW, the ON1 plug-ins like ON1 Effects or ON1 HDR, or upgrading your ON1 software to a newer version, please consider using my affiliate link. There is no extra cost to you and it helps support ON1 tutorials like this one. Ready to buy? Use the offer code SDP20 at checkout and SAVE 20%!
It’s here! ON1 has released Photo RAW 2024 and the marquee feature is Brilliance AI. I wrote an article about Brilliance AI when it was first announced, and how I like ON1’s approach to AI. Brilliance AI takes the heavy lifting out of getting an image to a strong foundation. With just a click your image is off to a great start, and in a single control panel, you can adjust and refine the treatment Brilliance AI applies.
What’s even better is ON1’s approach to Brilliance AI leaves you in control. You guide how much or how little Brilliance Ai adjusts your photo, and you always have the option to “overrule” the AI and make tonal and color adjustments yourself. Why is this great? Because you get to focus your energy on adding your signature style with Effects filters.
I have put together a short mini-series about Brilliance AI. In the overview video, learn what Brilliance Ai does to your photo and how it makes the changes, so if you want to refine the AI, you know where to look. In the workflow videos, you’ll see several examples of how you can put Brilliance Ai to work, how to fine-tune it, and when you may need to step outside of Brilliance AI. It’s important to know where artificial intelligence ends and human intelligence begins!
Learn more about Photo RAW 2024 below the videos.
What’s New in Photo RAW 2024
Modern User Interface: Photo RAW offers a newly enhanced, user-friendly experience for both long-time users and newcomers. Its modern, clean interface provides easy access to essential tools while retaining full feature accessibility.
A Seamless Workflow between Managing and Editing: The Browse & Edit modules will be closely integrated; you can now switch between them instantly. The filmstrip in Edit lets you change folders, albums and navigate recent photos seamlessly without returning to Browse.
Layers Pane: The layers pane in Edit is much improved. The height is adjustable, it will show settings applied to each layer, and switching layers will be faster and smoother.
Keyword AI Enhancements: Keyword AI will now detect regions, not just objects. Automatically create keywords for things like the sky, trees, water, snow, sand, etc. Perfect for landscapes that may not include a subject-object. It also will add related keywords. It can also automatically add generated keywords to your XMP keywords so they are searchable in other apps.
ON1 Photo RAW MAX: Photo RAW MAX: Utilize ON1 Photo RAW as a plugin with features like Develop, Effects, Portrait AI, Sky Swap AI, NoNoise AI, HDR, Resize AI as one installation. Compatible with Photoshop, Lightroom, Affinity Photo, and more. Includes 200GB Cloud Storage, 3 activations.
AI Style Advisor: Do you want award-winning or dull photos? With the power of AI, Photo RAW can analyze your scene and make recommendations for picking the correct effects filters.
Searching Capabilities: The new Search Bar will significantly improve the way you can find photos. It is now located at the top of the window browse module. It also makes common searches easier by exposing things like faces, types, and edits.
Auto-Embed Metadata: If you shoot JPG, you can automatically embed your metadata changes losslessly, so they can be searchable in other apps.
Performance Improvements: It’s much faster to switch between Browse and Edit and between photos in Edit.
Apply Local Adjustments Automatically: Using the powerful Brilliance AI technology, easily detect regions in your photo and apply local adjustments automatically, such as darkening the sky or enhancing foliage with complete user control.
Enhanced Cataloging: Users will have more control over cataloged folders. Easily control the preview size, scan frequency, CPU utilization, Keyword AI scanning, and Cloud Sync publishing for each cataloged folder. Plus, we have made performance improvements to make cataloging up to four times faster.
Improved Highlight Recovery: The improved highlights slider is both stronger and more natural looking.
Batch Adjustments with Brilliance AI: Use Brilliance AI in Browse with the new pane located on the right side. You can add it to a selection of photos all at once. The settings dialogs now work correctly with Brilliance AI as well, for copy/paste/sync.
Add Text Layers: The Text tool is moving to a new layer type. You will see each text block as a layer in the layers stack. They behave like a normal layer where you can now mask, blend, and use filters on them. You will also be able to create luminosity masks with them soon. You can also rotate them.
Paste Pixels: Now, you will be able to paste pixels from other apps as new layers into Photo RAW. This can be the path to a supported file or pixel selection in an editor like Photoshop.
Access DCP Files: Develop can now use Adobe DCP format camera profiles in addition to ICC profiles. It will scan the default Adobe install location and display them in the profile list. Note you can’t import your own DCP files at this time.
Photo RAW 2024 also adds support for a host of new cameras and lenses.
Pricing & Availability
Photo RAW 2024 is available now. There are two variants of ON1’s latest software, Photo RAW 2024 and Photo RAW 2024 MAX. The MAX version lets you use Photo RAW - the entire suite - as a plugin to other editors like Lightroom, Photoshop, and Affinity Photo.
Photo RAW 2024 MAX w/ plugin capabilities, US$149.99 upgrade, or US$179.99 for new customers
Photo RAW 2024, standalone use only, US$79.99 upgrade, or US$99.99 for new customers
ON1 is also offering some bonuses with a purchase. Check their website for details.
0 notes
Note
hey!! hope you don’t mind me contacting you - I saw in a tag that you found my literacy comic hard to read and really appreciated hearing that. organizing information clearly and accessibly is something I’m always trying to work on. I made the comic with my own visual/reading needs in mind, but I obviously only have my limited and personal experience!
I didn’t expect the comic to get traction before I edited in a transcript today, so I’m very grateful someone added an ID.
no pressure to answer, but if you have the bandwidth, do you mind telling me what made the comic hard for you to read? (layout, size or style of lettering, style of writing, color contrast, or something else?)
if you have extra bandwidth, besides including plaintext ID, do you have any suggestions about what tends to make things easier to read for you?
just gathering info for future projects, but I completely get if you’re not feeling like answering in detail. thanks so much either way! hope your day is going well.
hi! would like to start off by saying: i totally don't mind at all, and i'm glad you've decided to send this in, really.
link to the comic mentioned
[rest of the answer under the cut]
i should probably mention that i am in no way an expert in comicking or layout, just someone who struggles with reading comics sometimes, so definitely feel free to take all of this with a grain of salt
i'd say that the first thing that jumps out at me is that it's a lot of small text. it does read better on a computer screen (which is what i assume it was originally drawn on/meant to be read from) but on a phone screen, it really is hard to read
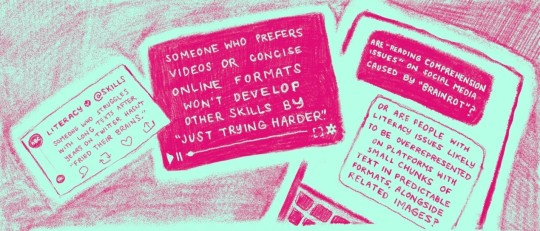
^ especially this section from the second page. while i do think the panelling here is quite smart, the text in the leftmost panel (the "tweet") and the rightmost panel (the "text messages") is far too small to read comfortably compared to the rest of the text, especially since they're both tilted

^ another textbox that's a little hard, also because of the slight odd angle combined with the size of the text
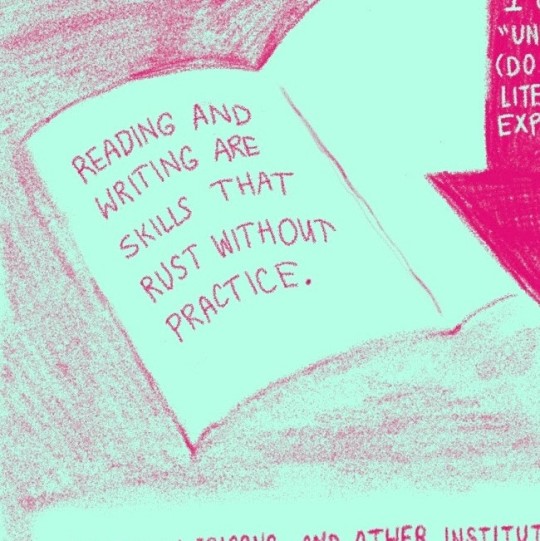
^ although, i found this one comparatively easier to read. the larger text really does help.
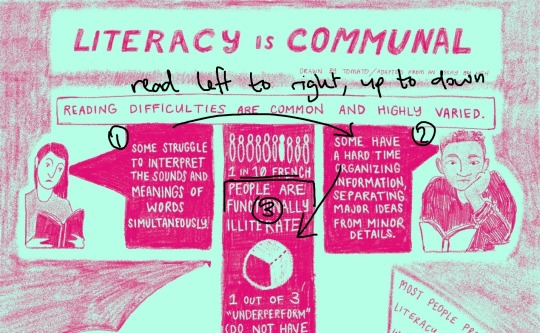
another thing that made it more difficult for me to read was that the order of textboxes was obscured by the layout sometimes, most obviously in the first page

^ after looking at this page for a while, it's obvious that the rightmost panel is supposed to be read, then the middle panel. but at a glance, it's not really visually clear, and the flow of the text is already a little harder to follow
it might be clearer to shift things around a little like this:
where either the entire middle panel begins lower, or the text and images start a little lower down.
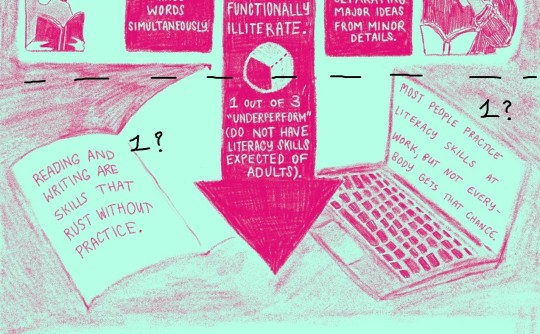
^ similarly for this panel, it's a small thing, but the order is slightly obscured because the left panel (the first panel) is noticeably lower than the right panel (the second panel)
i've spent a lot of time picking apart your comic.... so i'd like to at least end off by saying that i really did enjoy it, even if it was a little difficult to visually latch onto for me! it is really lovely to look at visually, the colours are pleasing, i love the texture, and i was definitely happy to see an adapted version of that essay (which i just so happened to read recently. funny how that works)
anyway. once again i'm glad you decided to send this ask in, and i'm very, very happy to help. i sincerely hope that you found this helpful!
#leologisms#ask#oh. apologies if these images are tiny. they were hastily screenshotted and scribbled over in ms paint
1 note
·
View note
Text
Download Filmora Wondershare crack (keygen) latest version RUP!

💾 ►►► DOWNLOAD FILE 🔥🔥🔥
Download it here. Filmora bit Crack Download has all the video-altering gadgets to make Hollywood-like home movies with titles, impacts, and changes from every standard video, sound, and photograph. Filmore Full Version Free Download With Crack 32 bits can import video cuts in various associations and save them as different kinds of reports to the plate. It can detach sound exchanges and catch reviews from video cuts. It can manage pictures and accounts and curtail the length of the video. This software enables you to import video secures of different strategies by adding them to the plate as a substitute kind of record. Filmora For Windows 10 can provide security to your media files. Wondershare Filmora Also, you will be ready to fuse your most loved music into your film to make the best climate. Besides, you can make incredible vivified messages from the substance and title library. It has a vast extent of video channels and video effects on peruse. Besides, I promise you that the video channels and video impacts that they have will satisfy you! WonderShare Filmora Patch is made for novice video makers like me who need to make an incredible video! I love the surprising way convincing and important this item can be! With all of the features that Filmora has, you can undoubtedly envision this item as best-in-class changing programming like Adobe. You can also edit and export videos with resolutions up to 4K with Wondershare. But, it is truly unique in a good way. Filmora Registration Code can also turn your clips around to play them backward. You can also see a frame-by-frame preview to get the best results. This app can pick up on when the scene changes on its own. You can also get rid of camera shake and make your videos more stable by using the keygen for Filmora. Simply put, you can do anything you want with your videos. Wondershare Filmora Crack It gives you more Text and Titles with animated messages that are fun to watch. Filmora Mac Crack Latest Full also lets you use overlays and filters to make your movie look great. You can make your videos funny, scary, romantic, or tense by adding music from its library. Filmora 11 Serial Key needs a patch. She said that this software is easier to understand and use than Sony Vegas, and when I tried it, I agreed. People like me who have never made a video before but want to make a good one can use this software. I love how well this software works and how useful it is. But in a good way, it is different. On the other hand, Filmora is easy to learn in one sitting. You might be able to set the right mood in your movie with your favorite songs. You can also make beautiful cartoon emails with the text and title collection. Filmora All of the videos that have been edited can be managed and shared on social networks. Any program can compress data and then run Setup to get to work. You can also download DaVinci Resolve 18 Crack. Features: Insert workspace into the video. Get videos straightforwardly from other external resources. It can import pictures to your home account. Include vogue names to movies and photos using movable printed styles, colors, etc. Increase the brief level of your video very quickly. Thirty channels are available for your video and picture work. Get smoothed out the video for playback. Save the changed video on your access device. Add a part of a moving thing in your video with auto development following. Alter development by adding keyframes to change the position, turn, scale, and haziness. Match the shade of picking catches to another packaging from another fasten. Quickly obscure your music, so your talk stands out Change faster-using orders. Switch between light and dual mode for the whole day, changing comfort. Change position, turn, and size of a title generally on the player. Audit and scour through your course of occasions using the touch bar. Filmora Activation Key:.
1 note
·
View note
Text
Download Filmora Wondershare crack (serial key) latest version 6C0№

💾 ►►► DOWNLOAD FILE 🔥🔥🔥
Download it here. Filmora bit Crack Download has all the video-altering gadgets to make Hollywood-like home movies with titles, impacts, and changes from every standard video, sound, and photograph. Filmore Full Version Free Download With Crack 32 bits can import video cuts in various associations and save them as different kinds of reports to the plate. It can detach sound exchanges and catch reviews from video cuts. It can manage pictures and accounts and curtail the length of the video. This software enables you to import video secures of different strategies by adding them to the plate as a substitute kind of record. Filmora For Windows 10 can provide security to your media files. Wondershare Filmora Also, you will be ready to fuse your most loved music into your film to make the best climate. Besides, you can make incredible vivified messages from the substance and title library. It has a vast extent of video channels and video effects on peruse. Besides, I promise you that the video channels and video impacts that they have will satisfy you! WonderShare Filmora Patch is made for novice video makers like me who need to make an incredible video! I love the surprising way convincing and important this item can be! With all of the features that Filmora has, you can undoubtedly envision this item as best-in-class changing programming like Adobe. You can also edit and export videos with resolutions up to 4K with Wondershare. But, it is truly unique in a good way. Filmora Registration Code can also turn your clips around to play them backward. You can also see a frame-by-frame preview to get the best results. This app can pick up on when the scene changes on its own. You can also get rid of camera shake and make your videos more stable by using the keygen for Filmora. Simply put, you can do anything you want with your videos. Wondershare Filmora Crack It gives you more Text and Titles with animated messages that are fun to watch. Filmora Mac Crack Latest Full also lets you use overlays and filters to make your movie look great. You can make your videos funny, scary, romantic, or tense by adding music from its library. Filmora 11 Serial Key needs a patch. She said that this software is easier to understand and use than Sony Vegas, and when I tried it, I agreed. People like me who have never made a video before but want to make a good one can use this software. I love how well this software works and how useful it is. But in a good way, it is different. On the other hand, Filmora is easy to learn in one sitting. You might be able to set the right mood in your movie with your favorite songs. You can also make beautiful cartoon emails with the text and title collection. Filmora All of the videos that have been edited can be managed and shared on social networks. Any program can compress data and then run Setup to get to work. You can also download DaVinci Resolve 18 Crack. Features: Insert workspace into the video. Get videos straightforwardly from other external resources. It can import pictures to your home account. Include vogue names to movies and photos using movable printed styles, colors, etc. Increase the brief level of your video very quickly. Thirty channels are available for your video and picture work. Get smoothed out the video for playback. Save the changed video on your access device. Add a part of a moving thing in your video with auto development following. Alter development by adding keyframes to change the position, turn, scale, and haziness. Match the shade of picking catches to another packaging from another fasten. Quickly obscure your music, so your talk stands out Change faster-using orders. Switch between light and dual mode for the whole day, changing comfort. Change position, turn, and size of a title generally on the player. Audit and scour through your course of occasions using the touch bar. Filmora Activation Key:.
1 note
·
View note
Text
Download Filmora Wondershare crack (license key) latest version C7F0!

💾 ►►► DOWNLOAD FILE 🔥🔥🔥
Download it here. Filmora bit Crack Download has all the video-altering gadgets to make Hollywood-like home movies with titles, impacts, and changes from every standard video, sound, and photograph. Filmore Full Version Free Download With Crack 32 bits can import video cuts in various associations and save them as different kinds of reports to the plate. It can detach sound exchanges and catch reviews from video cuts. It can manage pictures and accounts and curtail the length of the video. This software enables you to import video secures of different strategies by adding them to the plate as a substitute kind of record. Filmora For Windows 10 can provide security to your media files. Wondershare Filmora Also, you will be ready to fuse your most loved music into your film to make the best climate. Besides, you can make incredible vivified messages from the substance and title library. It has a vast extent of video channels and video effects on peruse. Besides, I promise you that the video channels and video impacts that they have will satisfy you! WonderShare Filmora Patch is made for novice video makers like me who need to make an incredible video! I love the surprising way convincing and important this item can be! With all of the features that Filmora has, you can undoubtedly envision this item as best-in-class changing programming like Adobe. You can also edit and export videos with resolutions up to 4K with Wondershare. But, it is truly unique in a good way. Filmora Registration Code can also turn your clips around to play them backward. You can also see a frame-by-frame preview to get the best results. This app can pick up on when the scene changes on its own. You can also get rid of camera shake and make your videos more stable by using the keygen for Filmora. Simply put, you can do anything you want with your videos. Wondershare Filmora Crack It gives you more Text and Titles with animated messages that are fun to watch. Filmora Mac Crack Latest Full also lets you use overlays and filters to make your movie look great. You can make your videos funny, scary, romantic, or tense by adding music from its library. Filmora 11 Serial Key needs a patch. She said that this software is easier to understand and use than Sony Vegas, and when I tried it, I agreed. People like me who have never made a video before but want to make a good one can use this software. I love how well this software works and how useful it is. But in a good way, it is different. On the other hand, Filmora is easy to learn in one sitting. You might be able to set the right mood in your movie with your favorite songs. You can also make beautiful cartoon emails with the text and title collection. Filmora All of the videos that have been edited can be managed and shared on social networks. Any program can compress data and then run Setup to get to work. You can also download DaVinci Resolve 18 Crack. Features: Insert workspace into the video. Get videos straightforwardly from other external resources. It can import pictures to your home account. Include vogue names to movies and photos using movable printed styles, colors, etc. Increase the brief level of your video very quickly. Thirty channels are available for your video and picture work. Get smoothed out the video for playback. Save the changed video on your access device. Add a part of a moving thing in your video with auto development following. Alter development by adding keyframes to change the position, turn, scale, and haziness. Match the shade of picking catches to another packaging from another fasten. Quickly obscure your music, so your talk stands out Change faster-using orders. Switch between light and dual mode for the whole day, changing comfort. Change position, turn, and size of a title generally on the player. Audit and scour through your course of occasions using the touch bar. Filmora Activation Key:.
1 note
·
View note
Note
do you have a tutorial on how you make your gif sets? they’re so pretty! the last time i tried, either the quality was too low or the frames were jumpy.
Thank you so much for the ask! I apologize for the delay in response. It took me a while to format this in a coherent way. ;-;
I don't have a proper tutorial posted anywhere at the moment, but I can do my best to explain how I make my gif sets. ^-^;
(I feel like I should add a disclaimer here that my method of making gifs is excruciatingly tedious. >.< I also use some pretty dated programs. There are much faster and easier ways to make and edit gifs, but I've gotten so used to my method and my programs that I just follow the same process for all the gifs I make.)
First, I record the shots I want in game with Bandicam, although any recording software that's compatible with SSO (or whatever game you may be recording in) should work just fine.
After closing out of the game, I open the recordings in my video editor. I use Movie Studio Platinum 14, but any video editor that allows you to pause and skip frame-by-frame will do.
This is where it starts to get tedious. xD I open my dirt-ancient version of photoshop (which includes ImageReady--more on that later) and in the video editor, I pick a spot in the recording that I like. I try to narrow it down to a minimum of about 25 frames, and a maximum of about 45 frames. 20 frames or less will often make the gif loop look kinda choppy and short, and tumblr has gif size limits so I try to avoid going over 45 frames if I can help it. I then copy-paste each frame from the video editor onto a separate layer in photoshop. Once I have all the frames I want, I crop and resize the photoshop file to fit tumblr specs (540px wide, in this example). At this point in time, the file usually looks something like this.

Once that's done, I close my video editor to spare my poor computer, and then I start adding editing layers in photoshop. You need an exact copy of each edit layer per "frame" layer, so I just duplicate each edit layer and then drag 'n drop it into the same order for the layer below it. This can easily get out of hand, so I try to keep my edit layers to 4 or less per "frame" layer. If done correctly, every layer will look like this.

After that, I start merging all the edit layers with their respective "frame" layers, starting with the bottom one. In the above example, I started with the Curves layer (lots of ctrl + E ensues) and merged them all down onto their frame layer. After that, it looked like this.
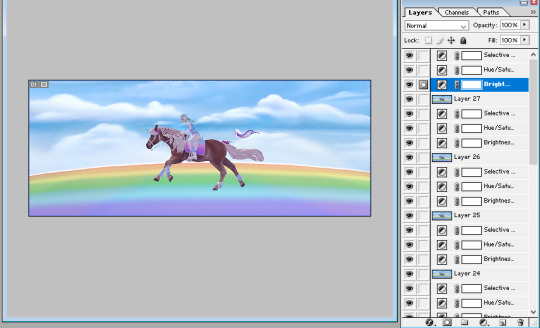
Repeat the same thing for all of your edit layers in order. In the example, the next layer merged down would be Brightness/Contrast, then Hue/Saturation, then Selective Color last of all. If you have a lot of frames (35+) and more than 2 editing layers per frame, this process may take awhile. When that's finally done, the layers should all look like this again, but instead with the improved look of the editing layers you merged into each frame.

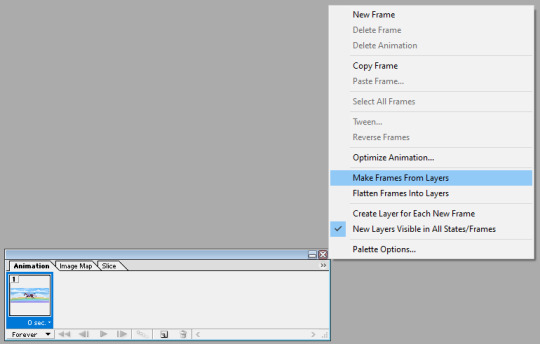
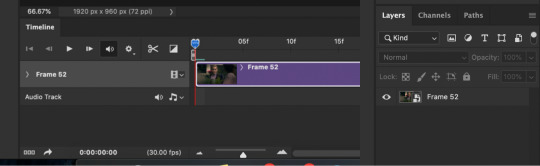
At this point, it's time to move the file over into ImageReady. I click on this icon while the WIP gif file is still open in photoshop. (ImageReady will automatically open the file in another tab, which is convenient if you need to delete frames or smooth out a loop.)

Once ImageReady is open, I click on the double arrows in the top right corner of the animation window (it usually pops up in the bottom of the window by default). This opens a drop-down style menu, and I then press “Make frames from layers”.
By default, mine is set to loop forever with a 0 second delay between frames, but you can adjust this if you’re going for a different effect with your gifs. Once I’ve made all the layers into separate frames, I hit the play button and watch the gif loop a few times to check for any mistakes I may have missed.
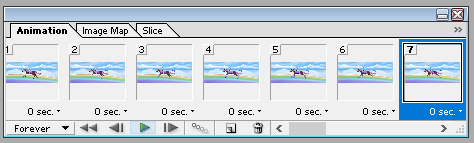
If everything looks all right, I then go up to the “File” tab in the upper left corner of ImageReady and select “Save Optimized As”. This should let you save the file as a gif.

With that, I call the process “done”, and move on to the next gif in the set. xD
Keep in mind, when switching between photoshop and ImageReady, you may want to ctrl + Z or “undo update from ImageReady” if you’ve been looping the gif, otherwise it tends to mess up the layers a bit.
Aaaaaand that’s how I make gifs. c’x Sorry for the long-winded explanation, but hopefully it’ll be helpful!
0 notes
Photo
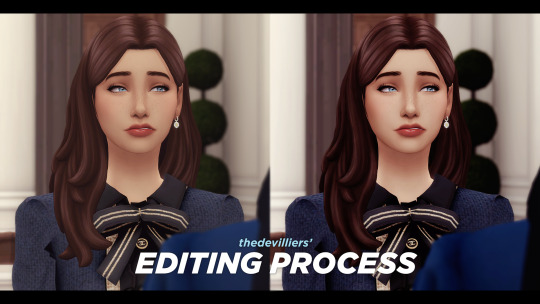

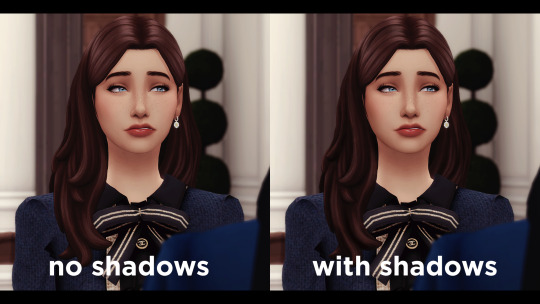
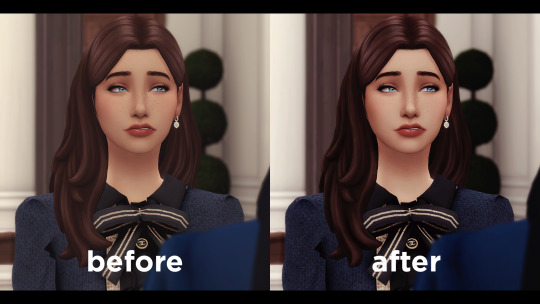
here’s my editing process, request by an anon! It’s nothing out of the ordinary; I just draw on shadows, highlights and add adjustment layers. I use photoshop cc 2020. everythings under the cut! if you have any questions, my inbox is open.
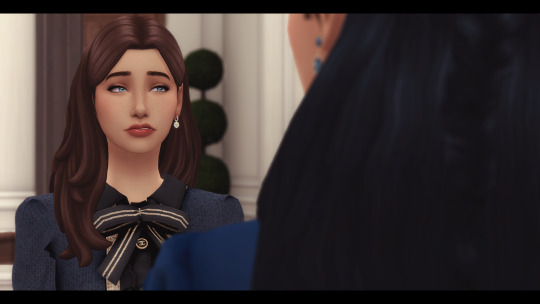
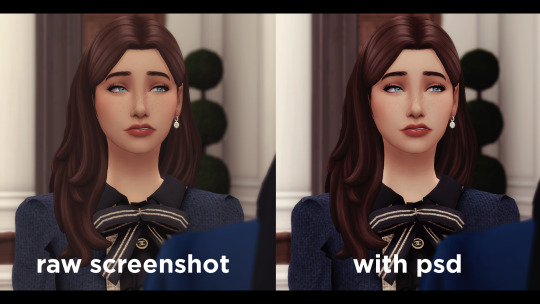
1. first off, opening my raw screenshot. I use reshade, more specifically my own modified version of simemi’s reshade v2! I just open it in photoshop.
2. next, on top of it I add my own psd I made to compliment my reshade.
some basics on color correction and adjustment layers you can do are: curves, levels, color balance, vibrance, exposure and contrast.
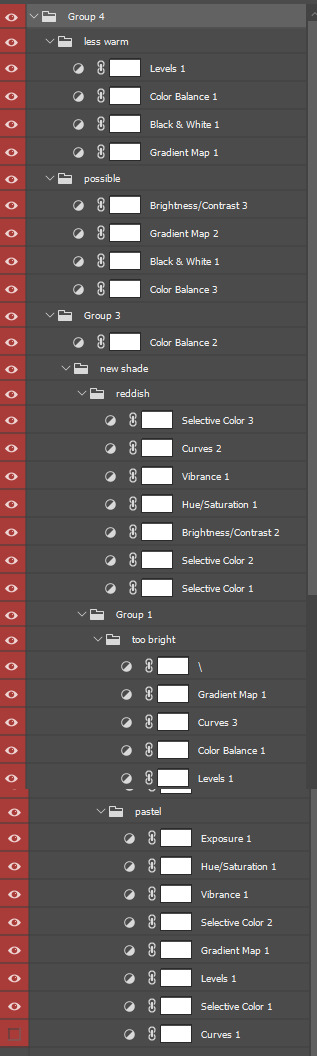
the amount of layers I have is definitely too many with many of them being barely visible and me not even remembering what half of them do. so don’t be like me. 👁️👁️
the MESS of adjustment layers i have (all vary in opacity and strength) [you are allowed to make fun of me]
3. next is sharpening! I do Filters > Sharpen > Smart Sharpen. these are my settings:

4. adding shadows: THE time consuming part since you have to do it on each panel you have + depends on the amount of people in your screenshot. i’d recommend being careful with shadows since sometimes without noticing you can go a lil overboard! if this happens, use the eraser tool to make it less strong.
first off, you make a new layer and you set this layer blending mode to Multiply.
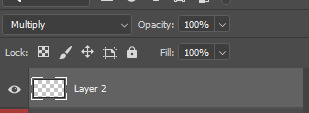
with the color picker (shortcut: i) I pick a color from her cheeks to draw the shadows on + the base opacity I use for softer shadows is 6%. for stronger ones i go to 10-15%.
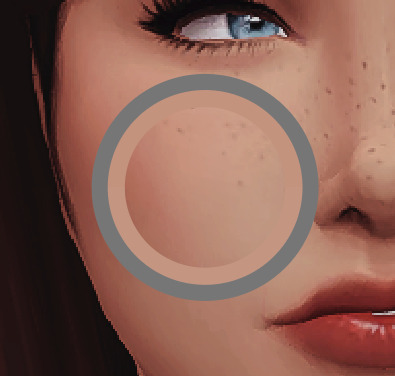

here, a few lil gifs [they are sped up]:

[ in the 2nd gif, i erased a shadow on the left side of the nose that was too strong. if you don’t like a shadow, just erase!]
i do the same process on her hair shadows, but this time with the color picker I choose a color from her hair. anddd the shadows result:
I find giving shadows to not only the sim, but the overall scene adds more “depth”, especially when the sims can look a bit flat. I also add shadows on objects such as food, chairs, decor, etc! of course everyone can edit (or not!) they way they want!!
I’m not doing it in this exact screenshot, but if there’s lightning that would realistically bounce off the sim, i’ll add it with a new layer set in Linear Dodge (Add).
5. adding highlights. the easier step! I use the dodge tool with very low exposure.

I duplicate my base layer in case I make any mistakes / I don’t like the end result.
I usually add highlights on faces (lips, nosetip, cupid’s bow, eyes, chin, a lil on the forehead and hair. if there’s a lot of jewelry in the scene, I also add highlights on earrings/necklaces.

6. anddd that’s it!! then I’ll just add my text on top.

andd one last tip, this time about text: to make text always be in the same spot, just duplicate your type layer (aka the text) into all your screenshots instead of creating a new type layer each time. I usually do it in one screenshot (which I call the base one), and just duplicate it by right clicking and doing duplicate layer. always make sure your text layer is on top of all adjustment layers.

now, rinse and repeat for all your panels 🧎♀️
#howto#ts4 tutorial#ts4#ts4 simblr#simblr#ts4 resources#i guess. i still dont know how to tag these things ok ANYWAYS#it actually didnt take me long since this was just one panel skdjfklf#ALSO FREE SPOILERS?!? uhm no comment
98 notes
·
View notes
Text
Basic Giffing Tutorial
How I make gifs for a simple scene + coloring + captions under the cut:

I’ll show you how to make this ^^^ gif (including the sharpening, coloring and captioning process).
Okay let’s start with what you need to do this: A version of photoshop with timeline (I use photoshop 2020 but probably any version will work, the program layout might just look a bit different), HD videos to gif from (preferably 1080p, especially for making big gifs, but 720p is also okay if you can’t get anything better, I just recommend making smaller gifs with it), some kind of video player that lets you trim clips in it (I use Quicktime Player because it’s the default for Macs)
1. Start with a video clip of the scene you want to gif. I usually download full episodes and clip scenes from the episode. My computer is a MacBook Pro and the default video player is Quicktime so I just trim my clips directly in that. In Quicktime you can just press CMD+T and it’ll give you trimming options. Most people use the screencapping method to make gifs, but it requires extra software and that’s not how I learned, so I’m going to tell you how to gif straight from video clips. I have no idea if there’s a difference in quality or ease between the two methods, but if you find that my way is too difficult then there are plenty of tutorials on how to do it via screencapping too like this one.
2. Open the clip in Photoshop. Just hit CMD+O and then select the video you want to gif from (or go to File > Open). Then, in the Timeline window at the bottom, scrub through the video and trim it (with the little scissor icon to the left) at the first frame of the scene/shot you want to gif and the last frame. Delete the excess clips. Before the next part, I usually crop off the black borders that some videos have if their original aspect ratio isn’t 16:9 (which most aren’t). For TV shows from Netflix, for example, the aspect ratio is usually 2:1 (or 540:270) so if you set the crop ratio to this you can get rid of exactly the black, no more and no less. I have several preset crop ratios (540:270 for TV shows, 540:225 for most movies, etc.). You can do further cropping after you have made and colored the gif, but getting rid of borders before converting the video to frames makes this easier. If your video does not have these black borders to begin with, ignore this part.
3. Convert video to frames. In the upper right hand corner of the Timeline window there is an icon that is four small lines stacked on each other (time line menu). When you click on it, a drop down menu will appear. In this menu select “Convert Frames > Flatten Frames into Clips.” Then click the button in the lower left hand corner (three small rectangles next to each other; frame animation button) that says “Convert to frame animation” when you hover over it.

After, it should look like either of these. Sometimes, if you crop the video before you start the process, it gives you two frames like in the image on the right above. If this happens, delete the frame with the shorter time stamp on it (as indicated by the number at the bottom). Next, click the dropdown menu in the timeline window again and select “Make Frames From Layers.” It will then turn into multiple frames, as shown below:

Delete the first frame (it will have a number under it, while the rest of the frames say “0 sec”), then use “select all frames” from the dropdown menu so that they are all highlighted and click “0 sec > other” and set the frame delay to “.06 seconds.” Scroll down to the bottom of the layers channel window and click and delete “Video Group 1″ then scroll back to the to top of the window and select all the layers by holding Shift and clicking on the top layer. Click the icon in the lower left hand corner that says “Convert to Video Timeline (video timeline button) and the frames should convert to long purple bars stacked vertically on top of each other. Then, under the “Filters” drop down menu at the top of the screen, select “Convert for Smart Filters.” This converts the layers to a smart object, turning the stack of bars a single purple bar and a single layer in the layers channel. When you press play in the timeline window, the image should move and play through like a video. If it doesn’t, you missed a step. It should now look like this (the left is the timeline window; the right is the layers window):
This seems like a lengthy process, but I have compiled most of these steps into a few Actions. With the actions (starting at step 3 of this tutorial) you use “Part1″, delete the frame with the shorter time stamp on it (if needed), “make frames from layers,” delete the first frame and Video Group 1, select all frames in Timeline and change frame delay to .06 seconds, select all layers in the Layers window, then use "Part2″. I assign my actions to function keys so all I have to do is use a few keyboard shortcuts ( i.e. Part1 is F1, Part2 is F2, etc.). This makes the whole process much quicker. Here is a link to download the actions I created for this process. Once you get the hang of using the actions, it all goes pretty fast. Also, when using the actions you might get messages like this:
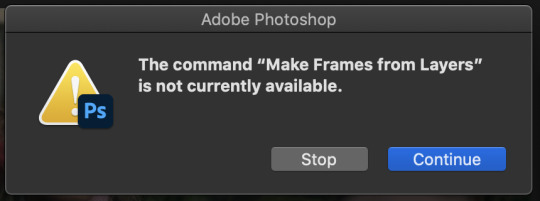
Just click stop and keep going with the instructions.
4. Duplicate the frame in the layers window and set the top layer to screen using the drop down menu in the window (it’s the second from the top and should say “Normal” to begin with. That changes the scene from this:

to this:

5. Make coloring adjustments. Everyone colors gifs in their own ways, so you absolutely don’t have to follow what I do. This is just the basics of how I color:
I always start with Levels (some people use curves, some people use both, I never learned how to use curves though). Under the levels adjustment menu, I start by using the black point dropper and select the darkest part of the image. Sometimes it takes a bit of clicking around with the dropper to find what works. Depending on the scene (colors, lighting, etc.) I also move the sliders if needed. There’s no real formula to it, I just do everything by sight, changing things until it looks good to me. For this gif, I selected a dark part of Jamie’s hair with the black point dropper. Then I did some minor adjustments with the sliders on the graph. If you’re coloring a darker scene, the sliders are very useful for brightening the scene, but this is a fairly well lit scene so not much is needed. This is the scene with Levels added:
Next, I usually use color balance to fix the color changes that Levels made. This looks too yellow to me now, so I use the yellow-blue slider to add in blue. You’ll have to play around with what looks best for whatever scene you’re giffing, but I’ve found that most scenes I add blue and sometime add red or cyan, but rarely use the magenta-green slider. With color balance added:

Next I use a series of selective color layer. Make a new layer for every different color adjustment you make, it makes it easier to edit if you make a mistake or want to make changes later. I always start with Black, usually just adding a little to Cyan, Magenta, and Yellow so that it increases the contrast of the whole scene.

From there, you have to pick out what colors you want to accent or correct. You get better at this the more you do it. In this scene, I want to accent the green of the plants and the purple of their clothes. Normally I would do Red next to adjust skin tone, but because I want to increase the green in the picture, I’m going to start with Yellow. This will make skin tones look too yellow-green, but you can correct this with a Red Selective Color layer. The Yellow layer made the plants greener, but the Red returned the proper color to Dani’s skin.


I keep adding more selective color layers to bring out more color in the scene.

To make it even more vibrant, I use several Hue/Saturation layers to increase the saturation of certain colors.


Sometimes I also add a Vibrance layer, but for this scene it wasn’t needed. Lastly, I usually add a Brightness/Contrast layer. I prefer to get contrast out of deepening the blacks in the scene rather than use the contrast setting in this adjustment layer, but sometimes I do use it. Most of the time I just increase the brightness a little, depending on the lighting in the scene.

Really, coloring is all about just messing with different settings until things look right to you. I’m still learning new things every time I make a new gif. There are tons of other adjustments available that I haven’t even tried out, so feel free to mess around with them. Note: The more adjustment layers you add, the more the quality might decrease. I do try to do minimal adjustments normally, but I wanted to make this coloring fairly vibrant so it has a lot more layers.
If you are making multiple gifs from the same scene, repeat the process of Steps 1-4 and then copy the adjustment layers from the first gif to each subsequent gif. I normally group all the adjustment layers together (select the layers and press CMD+G) which makes it easier to copy the layers to another PSD.
6. Crop and resize the gif. You can crop your gifs any way you want. I’m in the habit of making rather large gifs (which is thankfully now possible due to the 10mb size limit) and most of my gifs are cropped at ratios of 3:2, 4:3, or 1:1. For longer scenes I usually use 16:9. Crop your gif at whatever ratio you want and then resize it. For Tumblr, there are specific dimensions that gifs have to be for them to format properly in posts. For “large” gifs (one per row), they must be 540px wide. Height does not matter. For smaller gifs they have to be either 268px (two per row) or 177px (three per row). Resize the gif by either using CMD+OPTION+I or going to the “Image” dropdown menu at the top of the screen and clicking on “Image Size” If you already cropped at your desired ratio, just change the width to 540, 268, or 177, according to the size gifs you want.
7. Sharpen the gif. After you have cropped and resized the gif as desired, you need to sharpen it. Because of the method I used in the beginning (duplicating the layers and setting the top to screen), you will have to add a Sharpening filter and a Gaussian Blur filter. Select the top layer of the gif (not the top coloring layer) and click on the “Filter” dropdown menu at the top then select “Sharpen > Smart Sharpen” These are my sharpening settings (if you’ve ever giffed before, or looked at other tutorials, you’ll notice this is sharper than most people would use. That’s because you also have to slightly blur the layer below it, which dilutes it to a proper sharpness):
Next, select the lower layer of the gif and go back the the “Filter” menu and select “Blur > Gaussian Blur” and set the radius to “1.0 pixels.”
These sharpening and blur settings are also actions I’ve created. If you download the action I listed before, assign them to function keys and you will just have to select the appropriate layer and use the function key to do the work. Additionally, learning the keyboard shortcuts speeds along the process.
8. Export/save the gif. Go to “File > Export > Save for Web (Legacy)” or CMD+OPTION+SHIFT+S. These are my save settings (I actually have no idea what any of these things mean... I’ve never changed any of them).
The important thing really is that you make sure that under looping options near the bottom (not shown in this screenshot) it says “Forever,” not “Once.” And also check how big the file is in the bottom left corner:
As long as the number under GIF is less than 10M, you’re good to go. Then save the file and name it.
9. Caption the gif (if needed). You can either do this in the PSD you already had open to create the gif or you can open the gif you just saved and caption it there. I find it easier to add captions directly in the current PSD. When it comes to captions, it’s really based on your own preferences. I’ve seen people use all different fonts, sizes, colors, and placements for captions. Some fonts I can recommend are: Myriad Pro, Calibri, Arial Rounded MT Bold, and Keep Calm.

There are plenty of others too. The main thing is that they normally look best when they are bolded and italicized. I have been using Keep Calm for my captions lately. I also add Stroke and Drop Shadow to the text (my text settings are also included in my Actions):

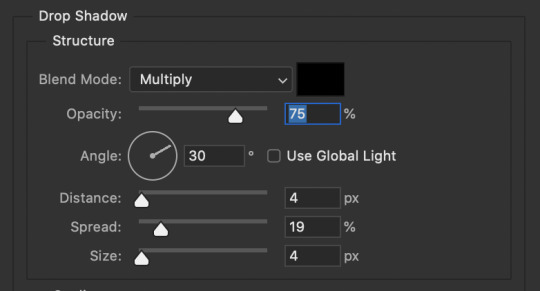
Just make sure the text is centered and has a good margin from the bottom.

This is what it looks like with those effects ( font: Keep Calm; size: 13; tracking: -25).
Anyway, that’s my basic process for gifmaking and coloring. I hope this gives you some kind of foundation to work off of. Just keep experimenting with different techniques and you’ll keep getting better. Read other people’s tutorials and tips and try them out to see what you like and works for you.
#if you're seeing this now i dont make gifs like this anymore#if you ask i'll make an updated tutorial#riah.txt
223 notes
·
View notes
Text
christmas with ateez (hyung line)
reader: gn!, m!, f!
notes: merry christmas! i hope y'all enjoy this and are having a good holiday season!
edit: you can read the maknae line here 0w0
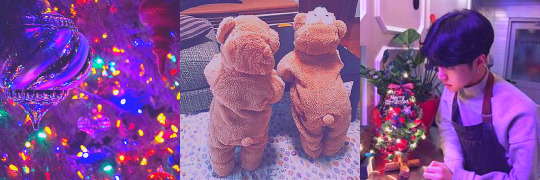
seonghwa:
“Minji, be careful!” You call out to your daughter as she runs around the living room, Christmas lights in hand while her twin sister, Minjung, runs after her.
You invited your boyfriend, Seonghwa, to help decorate the Christmas tree you picked out and set up in the corner of the living room. It was almost complete: just a few more ornaments, the lights, and the angel topper were all that was missing.
And just as you had predicted, Minjung tripped over the lights carried by her twin. Fortunately for her Seonghwa had just stepped into the living room in time, managing to catch her before she hurt herself on the lights and the floor. He knelt down in front of her, making sure she was okay before Minji joined her.
“Jungie— I’m sorry are you okay?” She frantically asks her twin.
The girl in question, always being the quieter of the two, only nodded. She nuzzled into Seonghwa’s hand when he cupped her cheek, giving it a light pinch. “No more running. Alright, you two?”
The girls nodded and went over to you, handing you all the other decorations you needed. Your heart melted at the sight of how your boyfriend interacted with your daughters. They weren’t his biological children but he treated them like they were his own. He always showered them in love and never failed to check up on them whenever he could. Sometimes you would joke about how he loved them more than you.
Time goes on as the four of you continue decorating and the only ornament missing on the Christmas tree was the angel topper. Seonghwa gingerly took the angel from its box as it was a bit fragile. But before he could set it on the tip of the tree, he felt a gentle tug to his pants leg.
He looked down to see Minjung shyly play with the fabric on his pants. “What is it babygirl?”
“Can we put the angel on top, daddy?” Minjung asks with rounded eyes, lips pursed in a pout.
“Yeah, daddy can we?” Minji added as she jumped up and down from her spot. “I’ll put the halo on the angel!”
Shock fills your system while your eyes widened at what the girls had called your boyfriend; your jaw dropped in pleasant surprise. You look to Seonghwa who had the same expression on his face— except that his eyes were more glossy than usual: a telltale sign that he was close to tears.
He manages to hold back from crying and nodded, his initial shock melting into a soft smile. “Of course my little stars,”
He lifted Minjung first who set the angel on top before lifting Minji next who carefully placed the halo on its head. They both thank him by placing a kiss on each of his cheek, giggling to themselves when he hugged them in return. You then move to switch on the lights of the tree, allowing it to glow in all its beauty.
Seonghwa, overwhelmed by the emotions he was feeling, scooped up all three of his girls into his arms, eliciting a bout of laughter from all of you. You four fell back into the couch as he showered you in kisses. The little girls squealed in delight at the onslaught of affection being given to them.
Seongjwa lets them go before turning to you, all the stars in his eyes. “I love you so much, _____.” He leaned in to kiss you, cupping your cheek in the process.
“Ewww, mommy, daddy. There’s no mistletoe, don't kiss.” Minji whined when she saw you two locked in an embrace.
Seonghwa smiles at the title, grateful that you let him not only into your life but into the girls’ as well. Because in the end, he managed to create this little family with you.
hongjoong:
You chuckle as you trail after your boyfriend who was shuffling over to a particular sweater that caught his eyes. He ran his hands over the soft woolen fabric, pushing it to the side to see if there were anymore when he gasped in pleasant surprise.
“_____ look,” Hongjoong said as he coaxed you over. A bright grin adorns his lips when he showed you the item that got him excited.
Behind the striped, Christmas themed color sweater he liked was another version of it. Except the colors were reversed with the previous ones. It was a clear sign that these sweaters were meant to be matching with each other. Hongjoong wasn’t usually the type to practice couple matching activities but it was Christmas- this time was an exception.
He pulled both sweaters off the rack and held both of them out. “What do you think?” He asks as he looked up to you.
“I think both would look good on you, baby.” You tell him with a fond smile.
Hongjoong rolled his eyes in amusement and lightly swat at your chest. “I meant which one would you like?” He looked over at the two articles of clothing again.
You deflate a bit at the thought and shove your hands into your pockets. “Oh, I- I dunno if either would suit me…” You trail off.
Your boyfriend turned to you with a small frown. You’ve brought this up with him before- that sometimes you feel a little insecure with what you wear. You feel a little intimidated with the clothes you aren’t used to- afraid that you wouldn’t pull it off like he would. Hongjoong always seemed to make whatever article clothing on-hand work. And if he wasn’t satisfied he’d reform it into something better.
With a small sigh, he reached up and cupped your cheeks, a small yet gentle smile on his lips. “Trust me on this baby, you’d rock this look.” He says before sliding his hands down to yours to give them a comforting squeeze. “And it’s not just me being biased.”
You release another sigh and look over at the sweaters in his arms and decided that maybe it wouldn’t hurt to try it on. “Can I try them on at least?”
Hongjoong’s bright toothy grin returned as he led you over to one of the dressing rooms while handing you the sweaters that fit your size. You come out in the dominantly blue one with white adjacents. The dressing room attendant nearby saw you and gave you a warm smile.
“I think the sweater you have on right now suits you very well.” They say.
“They look good in it don’t they?” Hongjoong asks the attendant while shooting you a smirk that read “I told you so.”
You roll your eyes, briefly sticking out your tongue at him (to which he mimicked), and laugh to yourself. Battling your insecurities was so much easier with Hongjoong around. Especially when you get to see that cute grin of his that never fails to lift your spirits.
You lean into his arm while the both of you lined up at the checkout counter, arm looped with his. You lean up to briefly kiss his cheek, knowing that he wasn’t too fond of PDA. “Thank you, baby. I love you so much.”
“I love you more,” He tells you as he kissed your temple. “I can’t wait to spend Christmas with you.”
yunho:
“DADDY! PAPA! WAKE UP!!”
A groan escapes you when you feel a weight land onto your chest, shaking you and your husband Yunho awake. Your eyes crack open one by one to be greeted with the gap-toothed smile of your daughter, Iseul. Her hair was sticking out everywhere from her bed-head, pajamas askew.
She squeals in delight when Yunho pulls him into his warm chest, nuzzling into her hair. “What’s got you so excited bub?” He asks as your daughter wriggles around in his arms.
“It’s snowing! We should go outside and play,” She says as she poked her father’s cheeks and writhed out of his hold. She tugs at your arms when neither of you moves to get up. “C’moooon, I don’t wanna miss anything.”
You turn your head to the window and true enough, white powder coats the window sill while frost crept on the glass in intricate designs. Muffled sounds of children laughing and yelling outside were heard along with the occasional thud of snowballs hitting their target.
“Alright, alright,” You relent and sit up, a lazy grin playing on your lips when Iseul lets on an excited cheer and shuffles off the bed. “Slow down sweetheart, daddy and I are still half-asleep.”
“That’s why I brought you two coffee-” She says as she points to the tray beside your bedside table. True enough there were two steaming mugs of coffee. Most likely it was the instant ones since those were easier than the brewed ones. You were worried that she could have hurt herself in the process but she was ten years old, old enough to do a lot of things on her own. Something soft hits your face and you look down to see it was your scarves, gloves, and hat.
Iseul was at the foot of the bed, bouncing on the balls of her feet. It was evident that she shared the same type of energy with her father at the way she was practically vibrating with excitement. That was when Yunho jumps out of bed and scoops her up into his arms, blowing raspberries into her cheek while she laughs at the ticklish feeling. “You go down ahead, bub. Papa and I will follow you.” He says with a kiss on her cheek, setting her down and fixing her pajamas.
Your daughter nodded and ran down to put on her coat and gloves, more than ready to play out in the snow. You on the other hand fought back the urge to flop back down onto the bed. Yunho sees you sluggishly make your way out of bed, going over to your side and helping you up.
“Good morning my darling,” He cooed to you as an arm wrapped around your waist, placing a kiss to your chapped lips.
“Ugh, morning breath.” You tease only to earn a dramatic gasp in return. You hush him up by kissing him despite your fake protest, humming in content at the moment you shared with your husband.
Yunho looked down at you with love in his eyes when you two pulled away. You couldn’t help but blush at the way he smiled dorkily at you, grin lopsided and his gaze soft at you. “Whaaaaat?” You whine.
“What do you mean ‘whaaaaaat?’” He imitates. “I just wanna cherish this moment with you.”
“You doofus,” You huff in amusement, pecking his lips in a silent request to let you meet your daughter downstairs. “C’mon, before she goes out in the snow without her boots… again.”
So that was how you spent your morning, playing in the snow and enjoying the cold with the two loves of your life.

yeosang
You grunt as you lift the heavy box of Christmas decorations from your garage and into the living room where Yeosang sat cross legged on the floor, stringing some popcorn onto some nylon threads for the Christmas garlands. He looked up to see you huffing when you threw the box down to the ground, falling back into the couch. He couldn’t stop the soft giggle that bubbled from his throat, effectively catching your attention.
“What’s so funny?” You whine at him, getting up from your spot on the couch and tossing a couple of popcorn pieces into your mouth.
“You just looked silly.” He tells you honestly with a small but loving smile.
He swats your hand away gently when you keep reaching for some compopcorn. He complained that you’ll finish eating his decorations before sneakily grabbing a bite of some while you weren’t looking. You became quiet as you fell into the routine of unpacking the decorations. It was a nice sort of silence, one where you knew things didn’t need to be said because sometimes, the silence alone was enough.
A couple of questions were thrown here and there, like “where does this go again?” or “are you sure this still has batteries in it?” Yeosang managed to finish a couple of garlands, which could have been four but you both grew hungry, and stood up to help you decorate the house. There were a few ornaments you had bought but most of them were DIY-ed by the both of you. It wasn’t as neat as the ones from the store but that was the charm to it. Besides, you didn’t mind having “hethetmon” being put up in a few places. Yes, things were going smoothly.
That was until you had to untangle the Christmas lights for the outside of the house. You grunt as you yank out a few knots in the wires while trying not to break the filament glasses. And Yeosang as usual was watching you struggle. It’s not that he didn’t want to help you, it’s just that he’d rather you ask him to do so.
He turned from his spot by the wall from hanging stockings, going over to you and picking up the other end of the lights. Although he made no move to help you untie it, instead he resorted to directing you on how to do it. You didn’t mind though because at least you had another pair of eyes to see knots where you couldn’t but the wires seemed to furl even more together.
“You know what Sangie, why don’t you do it?” You huff in annoyance and hand it over to him. “My fingers hurt.”
“You were at it for only 30 minutes, _____.”
“Well it’s tangled as hell I can’t undo it easily.” You argue before watching him fight with the Christmas lights.
For a few minutes, he seemed to be able to work it out but as he goes along further down the line, he sees more knots, causing him to throw down the lights in frustration. You laugh at his reaction, sticking your tongue out at him.
“Not so easy huh?” You tease.
“Haha— really funny doll.” He teases back before tossing the remains back into the box. “You know what, lets just take a break and watch some Christmas films.”
Your eyes light up at this and you straighten up in excitement. “Can we watch Die Hard?”
“For the hundredth time, Die Hard isn’t a Christmas film.” Yeosang argues with you but failed to hold back that small yet loving smile he had whenever you get excited about things.
“But it’s set in Christmas and released around that time!” You whine.
Eventually he gives in, but not before saying that he’s watching this because you want to and not because it’s a Christmas classic. It all works out in the end because you’re settled comfortably in Yeosang’s arms while you two watch the iconic film.
The decorations could wait.
#ateez#ateez x reader#ateez x gender neutral reader#ateez x male reader#gender neutral reader#male reader#ateez fluff#ateez imagines#ateez smut#park seonghwa x reader#kim hongjoong x reader#jeong yunho x reader#yeosang x reader#seonghwa x reader#hongjoong x reader#yunho x reader#kang yeosang x reader
243 notes
·
View notes
Text
okay it’s been a while since i last did one of these updates so here’s some stuff i’ve been working on for school! under the cut bc i have no self control and it got long
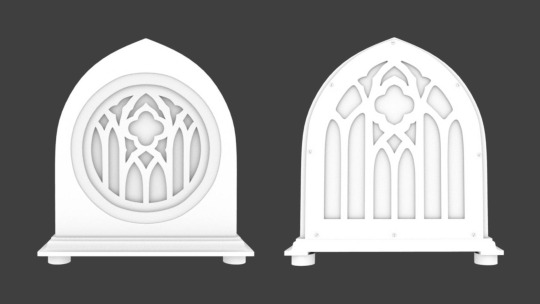
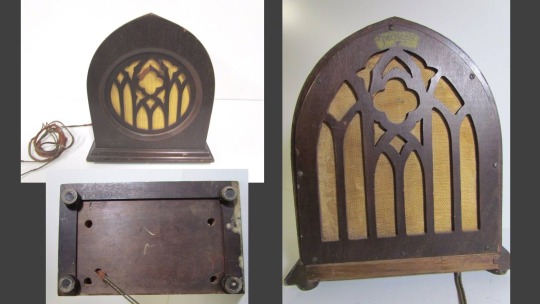
so after the lamp we started working on a really intricate antique radio which was tough but a lot of fun too. we were taught how to start from negative space and build out from there. we also had to plan out mesh flow (basically just the organization of the lines) so that we’d have an easier time of putting everything together later
(and some photos for reference)
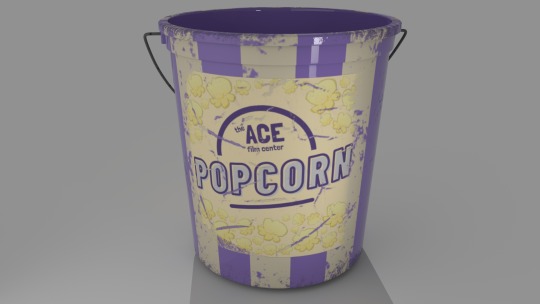
then my next assignment was to texture a bucket (the model was already given to us). so i used photoshop to make a color map (a map that just has. the colors.), a bump map (a map that adds depth to objects, making elements BUMP in or out of an object), and a specular map (which determines how rough or glossy an object looks). bump and spec maps are all greyscale. the lighter something is on a bump map, the more it pops out, and vice versa. and the lighter something is on a spec map, the more it shines, and vice versa.
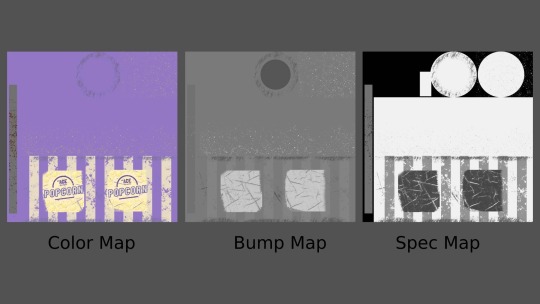
so here’s a rendered version of my final bucket:
there was also a week where we learned how to use substance painter to make textures instead of doing it in photoshop. substance painter is cool because it uses what’s called physical-based rendering to make the textures, meaning that you can literally paint the textures onto the object and the software shows you what it looks like in real time. with photoshop, i had to make edits, then upload the files into maya and attach them to the model to see what my bucket looked like, then go back to photoshop and make whatever edits i wanted, then rinse and repeat til i lost my mind. substance made it much quicker and easier. here’s a pumpkin i textured in substance:
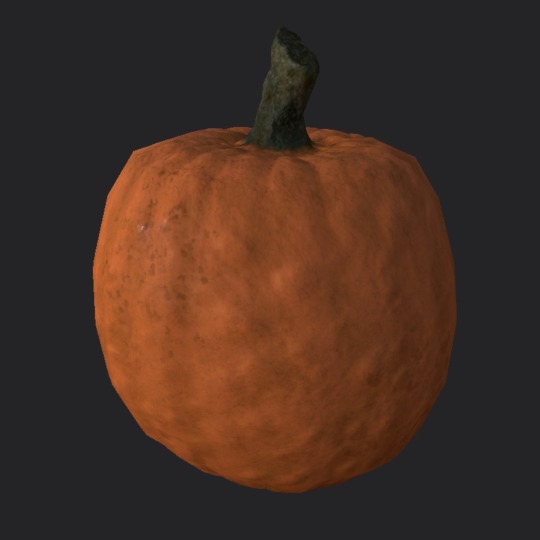
(it doesn’t look as good bc i’ve been too lazy to sit down and learn how to render objects in substance. forgive me)
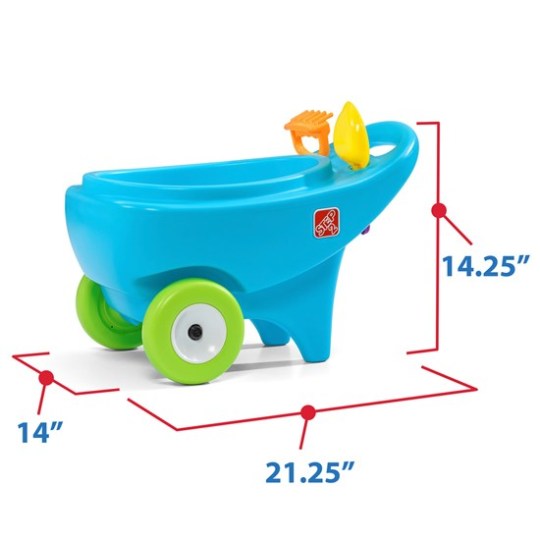
then after THAT we did another week of complex modeling where i made this toy wheelbarrow. this assignment was just about getting us used to modeling smoother, more complex objects.


and now i’m working on my final project, which spans over three weeks. for the final we get to pick out a teapot from online and recreate it, so i found this one that i liked and then this past week was spent modeling it.
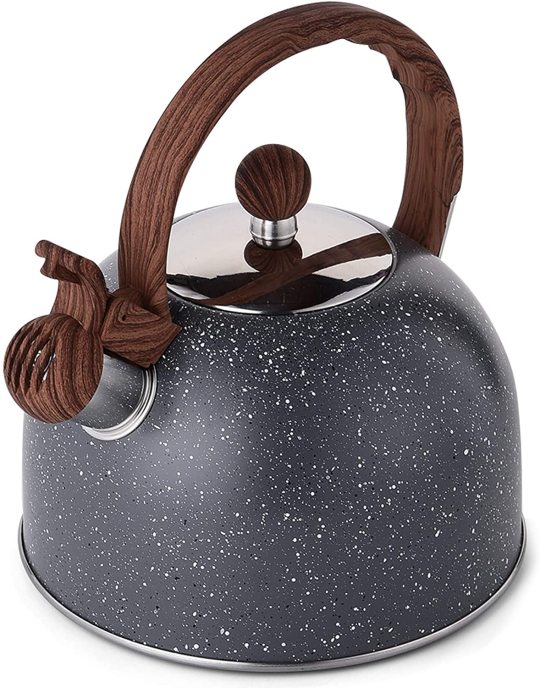
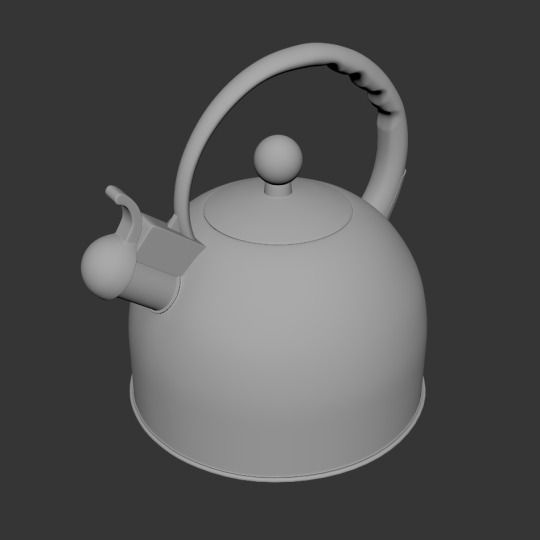
this was a fuckin BITCH to make let me tell ya, one of the requirements was that the spout had to be connected to the pot, so i had to figure out how to attach them without messing up the smoothness of the model. surprisingly that was pretty easy, the little doohickey on the end of the spout with its little thing sticking out to open it was what really kicked my ass. that and adding the finger dents into the handle. i don’t think any of those words make sense i apologize. i’m probably gonna do a more in-depth post on this pot later since it’s a longer project than usual. this week we’re doing the prep work so that next week we can start texturing
so anyways that’s what i’ve been up to lately! i’ve been working on a couple of side projects too but only one is finished and this post is already long so i’ll probably talk about those some other time. if you’re somehow still reading this, thank you for sticking through my rambling and shitty explanations
#if any of that didn’t make sense. which is likely since i’m shit at explaining things. feel free to ask about it#i like talking about this stuff because it’s cool and i really love doing it#personal#my posts#updates
13 notes
·
View notes
Note
Hi ! Just wanted to ask , how do you put your own slugcat skin in game? I know it's works with fancy slugcat mod,,, but i don't know how to use it ;-; , can you teach me
i can try! although i only learned most of this very recently, so i’m not the most knowledgeable. i also use BepInEx as the modloader.
im going to start with the assumption that you already have fancy slugcats installed and working, after this you’re going to need the custom assets and custom tails mod. both can be found on RainDB.
keep in mind, each of these mods contains a read me with more information, so reference those if you don’t understand something in my explanation. everything is under a read more as this post is very long.
ive also attempted to be as detailed with this tutorial as possible.
and lastly, please read through the entire tutorial before starting work as it’s very likely you’ll end up having to redo things otherwise, mostly because of the way custom tails functions.
part 1: custom tails
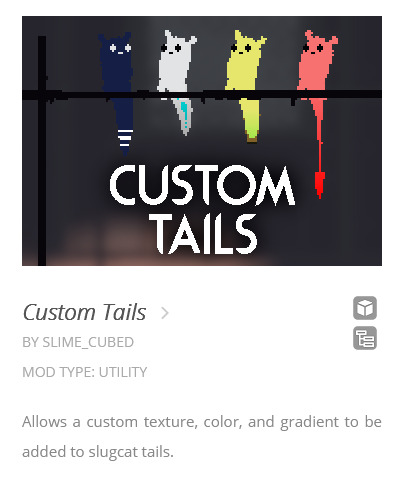
we’ll start with adding a custom tail, the custom tails mod requires ConfigMachine, fancy Slugcats and Custom Assets. (publicity stunt is only required if you still use Partiality, not if you use BepInEx) download and apply these mods first. (the .dll files)
once you’ve downloaded custom tails you’ll find an “examples” folder in the .zip file, this contains the files you’ll edit to make your own custom tail.
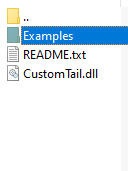
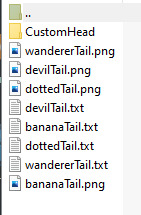
each of the example tails is shown on the thumbnail for the custom tails mod, so you can get an idea of how they look in action.
sidenote: the devil tail png is completely white, and thus it can be hard or impossible to see on a default photo viewer, open it on something like paint tool sai and add a colored background.
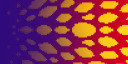
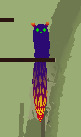
once you’ve selected which base you want to use, extract (or just copy and paste) that tail png along with its txt file somewhere you can work on it, desktop works just fine. now you can make whatever modifications you want to the tail, i’ll use my firecracker tail as an example.
note: if you leave parts of the sprite purely white, it will get colored in with whatever color you choose in the fancy slugcats menu, its essentially transparency.
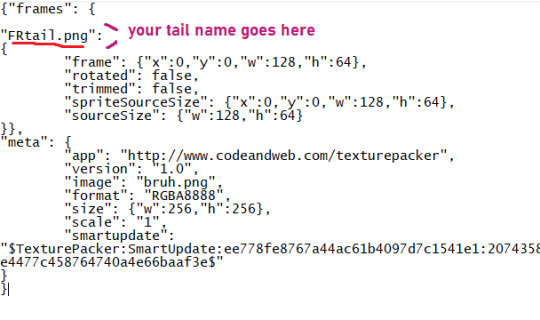
once you’re happy with how it looks, it’s time to apply it. firstly, change the tails name into something recognizable, like FRtail.png
now take your txt file and name it the same thing you named your tail, and make sure to be exact or things might break.
then open said txt file and change the default tail name into your tails name.
once all that is done, you have to navigate into the atlases folder in your rain world install. to get there open up steam, find RW and right click it in the menu to bring up this text box
choose “properties” at the very bottom to open up this menu
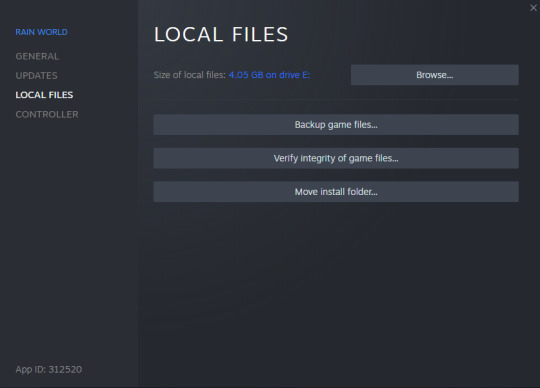
select “local files” on the side, and when you see this screen press “browse” and it will open up the root folder of RW.
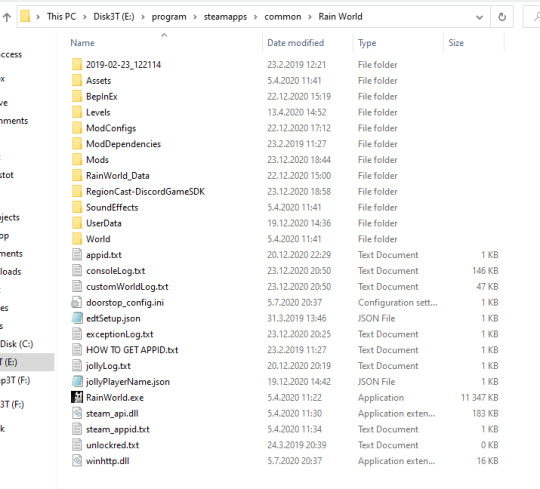
(i have quite a bit more stuff in my install folder due to mods, so don’t worry about not having all of it) from here you want to open the “Assets” folder near the top, from there you open Futile > Resources > Atlases.
now all you need to do is put both your tail png and txt files into Atlases like so:
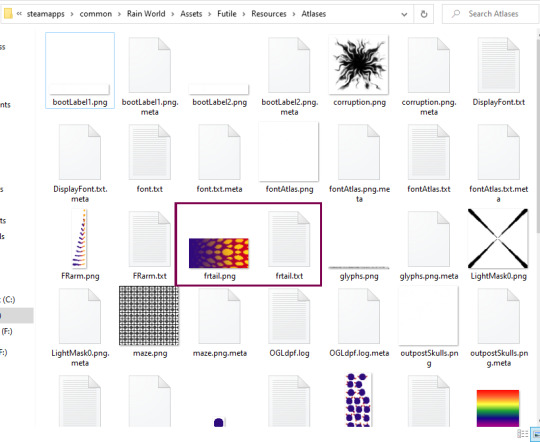
note: capital letters matter, if you used capital letters in your name you have to use those same capital letters in every name, for example if you use frtail.txt and FRtail.png it wont work. it all has to be the same in every case.
once that’s done, go back to your RW root folder (the one where RainWorld.exe is located) and open the “ModConfigs” folder, from there go to Fancy slugcats > custom heads. it will be empty if you haven’t made any modifications yet.
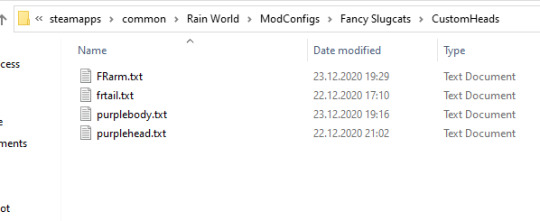
once youre here, make a new txt file and name it the same name you’ve used for your tail.png and txt files. then open it and type the same name inside it, don’t forget to save.
now you should be ready to open up RW, remember to enable the required mods: fancy slugcats, custom assets, custom tails, config machine and publicity stunt (partiality only)
note: if your game opens up to a black screen and wont start, it usually means something is wrong with the txt files, either you forgot to add a name inside one of them, you forgot to save when you added the name, or you’ve misspelled the name. double check all the names for your png and txt files.
now then, let’s get to adding your tail to your slugcat
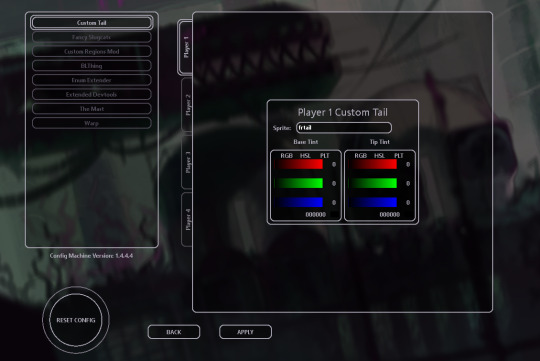
once the game is open, navigate to settings and open mod config, from there you should see custom tails in the menu. once here type your custom tails name into the “sprite” box, remember to be exact with the name.
if the name shows up red, you’ve made a mistake somewhere in the process, if it shows up as white, its been successfully added!
if you touch the sliders it will add a gradient to your tail and undo/cover up any sprite changes, so keep them as black. you can also change your tails size in the fancy slugcats menu as usual.
now you have a snazzy tail to show off to the world!
“.......but wait” i might hear you say “my tail isn’t the same color as the image i made!”
that’s because whatever color you apply to your slugcat in the fancy slugcats menu gets applied on top of the image you made. meaning if your slugcat is a rather more dark color, it will make your tail darker as well. meaning not only will bright aspects of it not be bright anymore, the base of your tail will be darker than your base slugcat color, thus it wont match. this is a problem i ran into as my slugcat is purple with bright accents.
the transparency i mentioned earlier helps with this “if you leave parts of the sprite purely white, it will get colored in with whatever color you choose in the fancy slugcats menu, its essentially transparency.“
you can use this transparency to make the base of your tail match the rest of your slugcats body, now all the white will be filled in with whatever color you’ve chosen in the menu, however it still wont fix all other parts of it having the base color applied to them.
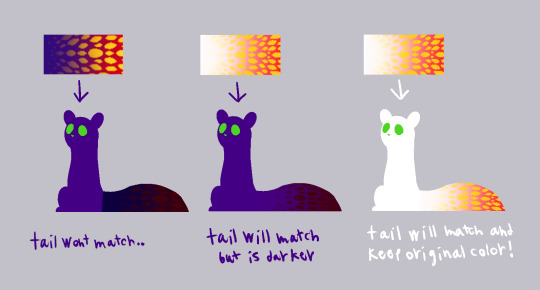
now if your base slugcat color is white, you don’t have to worry about any of this at all! the tail will stay how you made it!
if your slugcat will be lightly colored but not completely white, or your dark slugcat will have dark markings, this is all stuff you can reasonably account for while making the markings themselves (once you’ve made the txt and png files and put them in the right places, you can edit the png in the atlases folder directly) but if you want to do something more close to my slugcat, we’re going to have to do it by changing the color of slugcat using sprites.
part 2: sprite edits
so, to get around this problem and to get the freedom to edit the sprites however we like we’re going to be editing each sprite separately. this way you can virtually add anything you like to your slugcat, antlers, spikes, fur. although this might require you to change the position of the sprites to get them to line up properly in-game.
i’ll only touch on recoloring sprites as i haven’t edited the shape of any of them yet, i’ll update this tutorial with extra info once i’ve tried it out myself.
some of slugcats sprites have multiple versions that will get bundled in order to make the animations you see in game (head, arms, legs)
others are static sprites and only have one version (tail, body, hips)
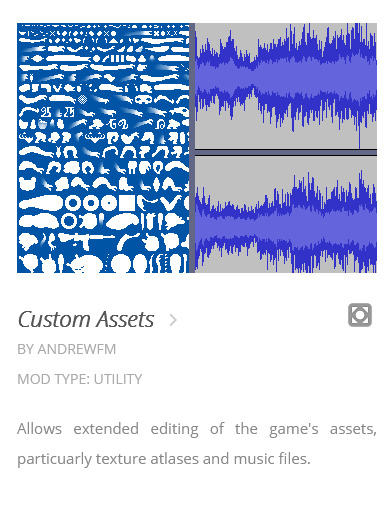
firstly, you’ll need to find the sprites you’re going to edit, all of these sprites are included in the custom assets zip file you downloaded from RainDB.
you’ll find slugcats sprites in Unpacked Atlases > RainWorld, extract this folder to make looking for the correct sprites easier.
note: all of the sprites are white by default, this makes them incredibly difficult to see in a folder without opening them in some external program, thus i’ve changed my windows settings to make the folder background dark (this can be found in Personalization)
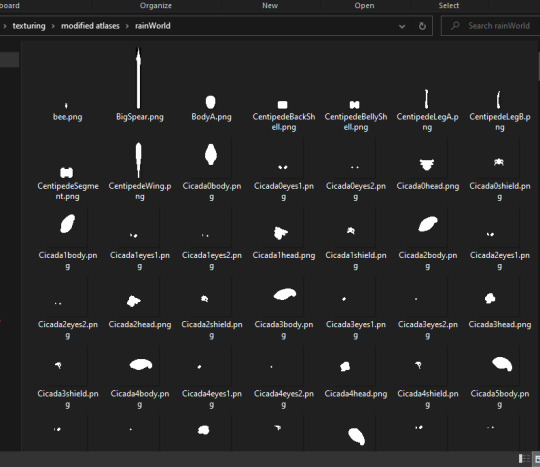
this folder includes the sprites of most of the creatures in RW, so picking out slugcats sprites can be a tad... difficult. thus i'll name every single sprite you’ll need to hopefully make it easier.
BodyA, HipsA, PlayerArm0 to 12, FaceA0 to 8, FaceB0 to 8, FaceDead, FaceStunned, HeadA0 to 17
aaand all the leg sprites are in a png because they have so many names
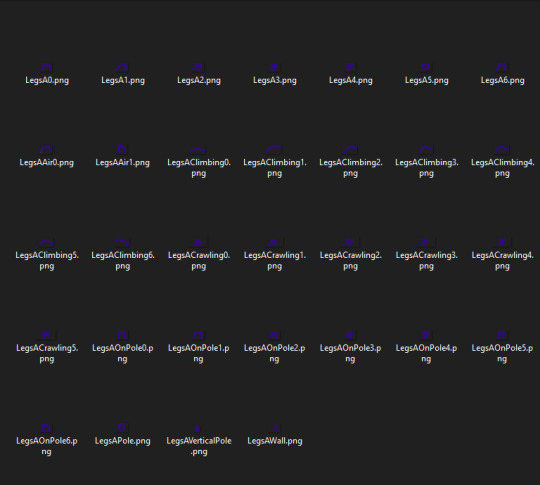
most of them can be found bunched up together in the RW folder, a tail texture isn’t included as that will still be handled through custom tails as detailed above.
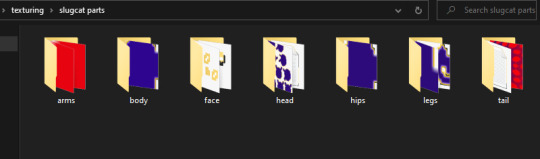
now i suggest you make some way to store all of slugcats sprites neatly, as it will save you a lot of hassle in the long run. i separated all body part sprites into folders.
now you’re free to make any edits you like to the sprites. however, i’ll go about this tutorial with the expectation the only edits are color edits, not shape edits, as again i don’t have experience with those.
once your sprites are all colored and neatly organized its time to compile them, each body part gets compiled into their own bunch (arms in one, legs in another) for this you’ll need a program called texture packer, i can’t provide a direct link because my post might get thrown into the void by tumblr, there is however a direct link in the custom assets read me.
once you’ve downloaded texture packer, heres an easy to follow short video tutorial made by AndrewFM on how to use it.
once your sprites are bundled you’ll go through the same process as with adding your custom tail. i’ll use arm sprites as an example.
you’ll get a png file with all of your edited sprites in them, as well as a .json file that contains placement information, turn that json file into a txt by renaming it (yourarmname).txt
now open the txt file and rename every single part to whatever name you decided to give your arm sprites, but keep the numbers at the end of the sprite names, they are important.
note: do not rename the individual sprite png’s before they are packed
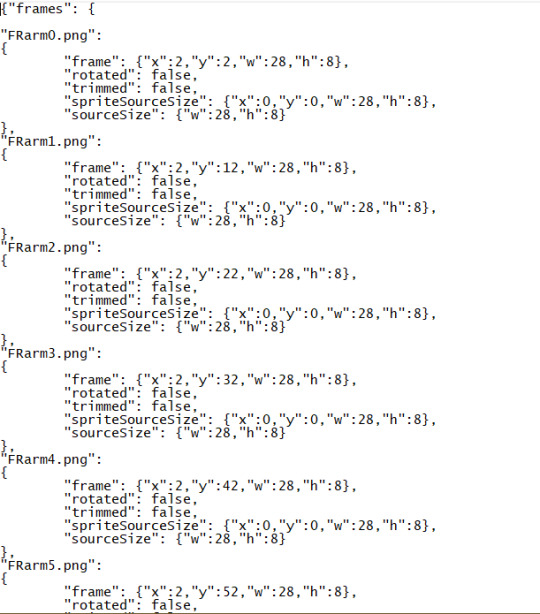
now that your txt and png files are ready, drop them into the same Atlases folder in your RW install as you did with your custom tail, and similarly add another new txt file into ModConfig > FancySlugcats > CustomHeads and rename it to the same name you named your sprite, and add that exact same name inside the txt file itself.
if the game yet again refuses to start, remember to double check the names in the txt files.
now we’re ready to apply the sprites in-game, open up RW and head to setting > mod config,
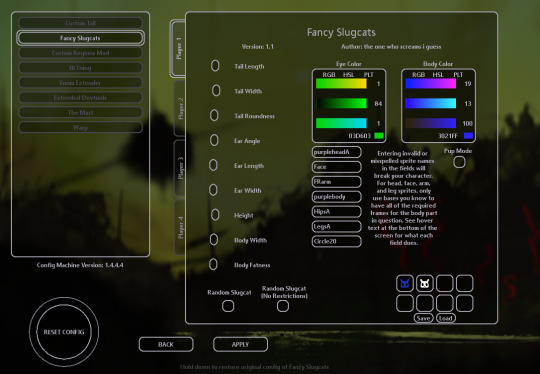
depending on which sprites you’ve edited, you’ll need to enter the sprite name into the specific field it belongs to, for me i’ll add the name to the arms section. you’ll get more details about what goes where when you hover over the text field.
for some of them, you’ll need to include A at the end of your sprite name, but only in the mod config menu
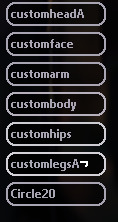
this shows where they are needed.
now you need to repeat this process for each bundle of slugcats body parts and apply them. note: body and hips despite both being part of slugcats main body gets applied separately, and even though they only have one sprite each you still need to pack them with texture packer and go through the same process as for the others.
this all might seem tiresome, and in certain ways it definitely is, but once you’ve gotten the hang of the packing, adding to folders and applying the process gets a lot faster.
once all of your sprites are applied, legs, hips, body, head, arms, tail. you want to make sure in fancy slugcats settings to make your slugcats color pure white so it wont affect your custom sprite coloration in any way. however you can apply color to slugcats face through the menu as usual.
there is a known issue where slugcats fists when climbing poles don’t get colored, this issue currently can’t be fixed easily.
the end result? quite a fancy slugcat indeed!
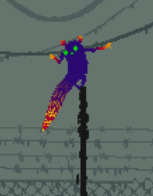
if i made any mistakes, or there’s extra info i should add, then message me and i’ll edit the post accordingly!
if there’s anything you can’t figure out no matter what you try, join the RW discord and ask people in the modding support channel, thats where i got most of my information from!
hopefully this is helpful to some of you! i spent quite a while making this tutorial so reblogs would be very much appreciated!
77 notes
·
View notes
Text
DA:O Mod Recommendations
I made one of these a while back but I’ve since played with mods a LOT more and have found a bunch that I love and wanted to share. Includes tools, bug fixes, weapons and armor, gameplay changes and edits, texture replacers, companion morphs, cosmetics and character creation bits, and some cutscenes (primarily for the Dalish origin and Alistair romance). All from the Nexus. Let me know if any links aren’t working or are mismatched.
Tools
Make Console Commands Visible
What it says on the tin. No more having to guess what you’re typing into the console.
Change your hero hair and face anywhere in the game
Allows you to change your character’s hair and face anywhere in the game. Seems a bit daunting to use at first, but once you get the hang of it it’s incredibly simple. Works with Awakening. Automatically backs up your saves for you.
Redefine your hero voice
Allows you to use the console to change your Warden’s voice set in game.
Bug Fixes
Awakening Silverite Mines Bugfix
Fixes the bug in the Silverite Mines that steals all your equipment and never gives it back.
TSM Jowan's Intention Fix
Fixes a bug that prevented the quest Jowan's Intention from showing up on the Chanter's Board (which should trigger if you tell Jowan "Run. I never want to see you again" in the Redcliffe dungeon)
Awakening Party Banter Fix
Stops certain banter between Anders and Velanna repeating.
Give Robbed Elves Money Patch
Fixes a bug that prevented you from giving robbed elves in Lothering money.
Joining Ritual Fix For Awakening Companions
In vanilla Awakening, if you pick up either Sigrun or Velanna last out of all the companions, you wouldn't be able to have them undergo the Joining. This mod fixes that.
Weapons and Armor
Grey Wardens of Ferelden
Gives your character and all Grey Warden characters armor based on Dragon Age 2’s Grey Warden armors. Works with Awakening. Armor is automatically added to your inventory after the Joining, can be added via the console and upgraded versions can be purchased from Soldier's Peak.
Armor of the Black Fox
The weapons I prefer to use for my dual wield rogue and the armor I use for Leliana.
Gameplay Changes/Edits
Extra Dog Slot
Lets you take Dog everywhere with you, without taking up a companion slot. Your companions won’t banter with him and you can’t access his inventory or level him up, but he will be included in cutscenes, you can make him pee on things for Mabari dominance, all his tactics work and you can enter conversation with him.
No Helmet Hack
Allows you to hide your character’s helmet. Works for Awakening as well.
Skip the Fade
Skips the godawful Lost in Dreams section of the Circle Tower missions. Automatically gives you all Codex entries and buffs. Essential if you’ve done more than two playthroughs.
Character Respecialization
Adds a raven to various locations that will allow you to respec you and your companions.
ZDF Dialogue Fix
Fixes some weird dialogue in game. As a heads up I do still get a couple instances of strange dialogue (for example during the conversation with Leliana at camp after her personal quest) but I can’t for the life of me figure out how to fix them.
Advanced Tactics
Tweaks the tactics system to make it more user friendly, giving you more options for giving your party commands. Works for Awakening. This one is an essential for me.
Personal Annoyance Remover
Gets rid of the visual effects of some abilities such as bard songs and Rally.
Traps Away
Reduces the time it takes to put down traps.
Awakening Lore-Friendly Epilogue Rewrite
Rewrites the Awakening epilogue slideshow to be more lore-friendly and in line with Dragon Age 2 and Inquisition events.
A Nug for Leliana
Getting Schmooples for Leliana can be fiddly. This makes it much easier. You still have to speak to the dwarf who sells you Schmooples, but you don’t need to speak to Leliana beforehand or have her in your party.
Happy Owen Sells Far Song
Allows you to obtain the bow Far Song from Owen so you don't have to kill him if you want it.
Origin High Cunning Flag Reductions
Reduces the Cunning needed for the player to access certain dialogue in the Human Noble, Magi and Dalish origins.
Natural Lighting For The Character Creator
Makes it easier to see what you're doing in the character creator. No waiting until the middle of your origin story to find out what your eye colour actually is.
Cleaner Screenshots From Conversations
Gets rid of the subtitles and dialogue choices in your screenshots.
Texture Replacers
White Teeth
Makes everyone's teeth a lot less yellow.
Neutral Female Armor (Medium and Heavy Edition)
Gets rid of the weird squished-titty effect that medium and heavy armors have on female characters.
Practical Morrigan Robe
Lore friendly retexture of Morrigan's robe to cover up her titties while still maintaining the vibe of her original outfit.
Glossy Hair and Beard
Improves the texture of the base game hairs and beards.
Some Dalish Textures
Improves the quality of halla textures and makes the aravels match the ones in DA2 and Inquisition.
Female Noble Clothing Overhaul
Makes female noble clothes much more attractive.
Maric's Blade Blues
Edits the colouring of Maric's Blade (obtainable through Return to Ostagar) to match how it's described in the books.
Bow Replacer
Makes all vanilla bows less chonky and ugly.
Companion Morphs
Inquisition Inspired Morphs
I use the vanilla Morrigan and Leliana morphs. The vanilla Morrigan morph has slightly big ears but I find it really quite cute.
Alistair Morph - Highlights
I use the Lighter Brown hair with the Light Brown Eyes. This mod is dependent on Pineappletree’s Vibrant Colors.
Unique Face Textures for Companions
I wanted to share this one even though I don’t use it because it really is gorgeous - the problem is that it’s too gorgeous and makes your companions prettier than literally everyone else in the game. Alistair was looking so hot it was distracting. Wynne looked hotter than my PC while still being lore friendly.
Cosmetics and Character Creation
Pineappletree's Vibrant Colors
Adds new hair, skin and eye colours to the character creator and replaces the default eye colours with brighter ones. This mod is needed for the Alistair morph I use.
Hairstyle Day Vol.2
Has the braid hairstyle I use for Lyna.
Hairstyle Day
More absolutely gorgeous hairs from ShepShy.
Warden Complexions with Eyebrows
I use the Tabris complexion for Lyna.
Anna Complexion
Another complexion with eyebrows.
Elf Ears
Edits all the standard elf presets to have bigger ears, more in line with what we see in DA2 and Inquisition.
Cutscenes and Alistair Romance Indulgence
Clan Sabrae Says Goodbye
Adds a cutscene at the end of the Dalish origin where you properly mourn Tamlen and say goodbye to your clan.
DahliaLynn's Sleep Until Dawn
Adds a tent to the campsite that allows you to sleep until dawn. Sleep alone, snuggle with the dog or with a romanced companion.
Alistair Romance Eavesdropping
Adds a bench to the party camp that allows you to activate multiple cute cutscenes once you've romanced Alistair. 10/10 for screenshots, nice way to hear some banter from companions that you don’t usually take with you.
Let me know if y’all want me to make these for my DA2 and Inquisition mods. I don’t mod the later two games anywhere near as much as Origins (especially since Frosty terrifies me lmao) so the lists would be much smaller.
#dragon age#dragon age origins#dragon age mods#modding dragon age#dao#dao mods#da:o mods#dragon age origins mods#how many tags do i need to put here#mods
97 notes
·
View notes
Text
Speculation on the Historical Influences on the Kyoshi Warriors of Avatar
(Disclaimer: I know there are multiple influences. This is just something I found that I thought was really interesting. And we’re not going to get into how ATLA appropriated, appreciated, and cherry-picked Asian cultures. This is just a fun thing I found out. It might just be a coincidence. If you wanted an essay on “how terrible Bryke is”, go under the “anti bryke” tag and laugh at the toxicity. This is about history.)
I don’t know if this has been done already, but I was really excited when I found out, so I had to share!
So, I’m not quite sure how I found this out, but I think I was both off-and-on researching premodern combat weapons of different cultures (link here if you want to spend a few hours ogling swords and daggers) and trying to figure out what kinds of cultural things influenced the Kyoshi Warriors. I figured out (at least I’m pretty sure I did, sword experts feel free to correct me) that they do, in fact, wield the Japanese katana (I don’t know which period. Not trying to lump anything together, just thought it was best to refer to it as a collective for fear of being wrong). This was kind of odd to me, as the Earth Kingdom appeared to have *mainly* Tang and Qing dynasty influences. So I decided to dig a little deeper on this subject.
(SECOND Disclaimer: People more well-versed in the different parts of Asian culture I will be referencing can tell me I’m wrong in the comments and I’ll edit this. I really and truly am not trying to be offensive or say my opinion is correct blindly, but at the same time, I did do my research and that has to count for something.)
Introduction
I’m an ATLA nut, as well as an Asian women’s dress nut. I’ve made connections between real clothing and ATLA clothing before, but then realized that other people had already done it, and done it much better.
But I haven’t seen anyone really talk about the inspiration behind the Kyoshi Warriors yet, besides a few mentions, so here I am with my two cents!
The First Thing (Swords)
The first thing I noticed that started me on this quest was realizing that the Kyoshi Warriors wield katanas (also called nihonto), as opposed to a Chinese weapon that would be more fitting for their position in the Earth kingdom (like we see with Jet’s hook swords).
For clarification, I figured this out by using still frames of Suki from the show, then measuring the rough length of her sword to her height, approximating the length to see if it would be correct (it was). Then I watched the video of the Kyoshi Warriors’ fight with Team Azula, which is (if I’m not mistaken) the only time we actually see them use their swords as well as their fans.
In a few frames, we can see Suki’s sword has the characteristic tsuka ito (cord wrap) around the hilt of her sword, a gold-colored habaki (blade collar), as well as a golden kashira (butt cap/pommel), paired with a golden fuchi (a band at the end of the handle before the tsuba (guard)) to make a fuchigashira. From what I can gather, these are usually intricately decorated, but we can blame early 2000s animation for exempting that detail.
But anyway, the presence of the katana got me thinking. What other Japanese influences are displayed in the Kyoshi Warriors?
(Actually, scratch that. The first thing that got me clued in to the presence of Japanese influence was the red and white makeup that the Warriors wear. It seemed similar to that of the geisha, but I disregarded this as it wasn’t similar enough to warrant real research on my part. Just google ‘geisha makeup’ and you’ll see what I mean.)
And the answer was: a good few. Something Mina Le (a fashion youtuber) already touched on in her video on Avatar. But the question is, what exactly influenced them?
So, back to katanas. Once I figured out that they wielded katanas, it was a simple conclusion that they drew inspiration from the samurai of feudal Japan.

War Fans (Tessen)
Another similarity that ties them into samurai are their characteristic fans.
I actually learned about the art of Japanese war fans (tessenjutsu) before I even watched Avatar. The fans called tessen are made out of iron, but the other types of war fans, gunsen and gunbai, don’t seem to fit the bill for what the Kyoshi Warriors use them for. So, instead of being made of iron, their fans are made out of a golden metal, probably to fit their gold-and-green aesthetic.

An illustration of a warrior using a tessen.
The way they use these tessen to fight is debatably accurate. I have never studied tessenjutsu, nor do I really trust modern videos of tessenjutsu, so I have no basis. But it is said that wielders would use one to attack and one to parry, and that does seem to be somewhat what they do? Not sure if their forms or usage or that one time that one girl threw both her fans at Azula like some sort of razor-sharp Frisbee is accurate. Tessenjutsu practitioners, feel free to correct me!
But all this talk about fans and swords isn’t coming to the real core of my speculation. There is one crucial fact: samurai are men. But the Kyoshi Warriors are girls. Were there any female samurai?
The Onna-Bugeisha
Yes, there were! They were called onna-bugeisha, literally meaning “female martial artist.” You can read more about the onna-bugeisha on their Wikipedia page.

Let’s start with the similarities between the Kyoshi Warriors and the onna-bugeisha.
Clothing/Armor
The first, and most obvious, is their clothing. The onna-bugeisha appear to wear both the traditional kimono or large, loose pants in illustrations. This really does seem to differ a lot based on source material, and I’m not knowledgeable enough to really affirmatively say why. But they do appear wearing the pants when riding horses, and the kimono when they’re standing or looking super regal in the illustrations.

Empress Jingū, a mythological example of onna-bugeisha. She became empress after her husband, the fourteenth emperor Chūai, was slain in battle. She is said to have led an expedition to Korea around 200 AD, and was the first woman on a Japanese banknote. This illustration is probably not accurate, as it was made by a European man, but it does illustrate one of the earliest known cases of onna-bugeisha in Japanese culture.
Hangaku Gozen, a famous general of the Genpei War (allied with the Taira clan).
The Kyoshi Warriors!
Bryke/the animators chose the dress route for making the Kyoshi Warriors, dressing them in split-front dresses colored in shades of green, with a dark green layered underdress under a lighter green overdress crossed left over right at the collar (like many, many different kinds of traditional Asian women’s dress). The coloration appears to be more to signify “Earth Kingdom” than to be historically accurate to the onna-bugeisha, something that was probably a good idea. Remember, this was made to be a kids’ adventure show, and they had already established the color-coding based on country.
The sleeves are voluminous, which is definitely a characteristic of the onna-bugeisha. They are cinched at the wrists with dark cuffs, which isn’t a characteristic of all the different illustrations/photographs, but is certainly present in some. These cuffs are paired with two-toned gloves, which are always a good idea in any kind of weapon battle, but aren’t present in many, if any, photographs, but at least in some illustrations.
Partially covering the dresses is the thing that most tipped me off: the armor. It seems to be of black plating, which bears a striking resemblance to the plating/ridging on the onna-bugeisha’s armor. The chestplate itself bears a really, really close resemblance (if it isn’t an exact copy) to the chestplates of the onna-bugeisha, though the color isn’t the striking red that seems to appear a lot of the time. The rectangular shoulder/upper arm plating that is present in nearly all depictions is severely lacking, however, though this seems to be a choice to make the Warriors seem less bulky and more dynamic. Plus, it would be easier to animate. (They do have slimmer shoulder plates that attach, though.)
But the (for lack of a better word) skirt plates of the armor remain really, really similar to the onna-bugeishas’ armor. It really just looks like a scaled-down, black instead of red version. And I think that’s super cool, and one of the best pieces of evidence that backs my theory.
Topping off the “Kyoshi look” are gold-and-green headpieces that are different depending on the warrior, and a hairstyle that differs depending on the warrior. I’ll probably go more in-depth about the headpieces and hairstyles on a different post, but the gist is that yes, the presence of headpieces is historically accurate, at least in some photos/illustrations (which appears to be the norm. Can I ever get something concrete here?).

Examples of onna-bugeisha wearing headpieces.
All of them wore helmets (obviously), but some seem to have some sort of decorative aspect (again, tell me if I’m wrong and the pieces have a meaning or purpose).
Edit: One commenter, @atla-headcanons, said that their Japanese grandmother once said that warriors’ headdresses were status symbols, as well as ways to tell allies from enemies. This would be supported by the fact that Suki, as the leader of the Kyoshi Warriors, would have a headpiece similar to Kyoshi’s, and the rest of the Warriors would have different ones. I was unable to fact-check this at the time (may return to it later), but it seems likely, and it would be really cool if it was intentional on the characters’ designs!
Avatar Kyoshi
The second thing that made me speculate whether the Kyoshi Warriors were connected to the onna-bugeisha was actually Kyoshi herself.
We all know about badass Avatar Kyoshi. She’s amazing. A definite certified badass. But there might actually have been a real-world counterpart to her. Nakano Takeko, a famous onna-bugeisha of the Aizu Domain who fought and died in the Boshin War, could have been possible inspiration for her.

Statue of Nakano Takeko. I don’t trust that the pictures on Pinterest are actually her.
Not only is Nakano a certified badass, taking down five to six men with her naginata in the Battle of Aizu, she also taught women and children to fight with the naginata for a time. Sound familiar? It might just be a coincidence, but I’m sticking to my theory here. You can read more about her here, but I’ll give a rundown of the highlights that make her a Kyoshi-Level Badass™:
- Taught naginata to the lord of Niwase’s wife
- Taught naginata to women and children in Aizuwakamatsu castle

An onna-bugeisha wielding a naginata. They’re pretty awesome!
- Worked in defense of the shōgun Tokugawa Yoshinobu
- Fought in the Battle of Aizu using a Japanese weapon (naginata) against a white weapon (guns)
- Created and headed an ad-hoc group of female warriors in the Battle of Aizu, retroactively called the Jōshitai (Girls’ Army). She did this without permission, as the senior Aizu retainers didn’t want them to fight and wouldn’t let them fight as an official part of the domain’s army
- When she was taken down by a rifle shot to her chest, she asked her sister Yūko to behead her so that the enemy couldn’t take it as a trophy. Her sister employed the help of Ueno Yoshisaburō, and did as she was asked
- With the reforms of the Meiji Era (samurai class abolished, western-style army established), Nakano Takeko was one of the last samurai in history.
Conclusion
That concludes my essay! Remember, this is all speculation. If you have your own take, please tell me! I love hearing all the cultural influences in Avatar.
Now, if Bryke meant to make the Kyoshi Warriors to be inspired by the onna-bugeisha, then there is something more that I would have liked to see. It would have been really cool to see them use naginata in the show, as it was actually originally a weapon for females to use, its length compensating for the smaller body size and comparatively lesser brute strength of women warriors.
(Also, I just want Suki utterly destroying Sokka with a naginata in that episode where she kicks his butt to prove a point. Hey, I’m a simple girl with simple tastes.)
Sources:
Basically all Wikipedia. I’m sorry I couldn’t reference, like, ebooks on this subject. But I did look at the reference lists for the Wikipedia articles I used, and they all seemed to be credible ones. So, don’t come at me, please! I did the best I could!
I really appreciate whoever read this far. It takes stamina!
Thanks for reading!

#avatar theory#avatar the last airbender#kyoshi warriors#a:tla#atla#atla theory#atla essay#onna-bugeisha#samurai#japan#japanese culture#suki#sukka#avatar kyoshi#atlaworld
40 notes
·
View notes
Last Seen Blogs

beautifultimemachinecollec-blog1
Untitled

notsovainanymore
Enjoy
rihometal-moved
addicted to sumoa sunday

mithunmits-blog
mithun.madhusudanan
ajcrowlor
bottom demon theory // top angel theory