sybilsacred
hollywood party.
❝𝘔𝘢𝘺𝘣𝘦 𝘪𝘵'𝘴 𝘢𝘭𝘭 𝘢 𝘥𝘳𝘦𝘢𝘮, 𝘮𝘢𝘺𝘣𝘦 𝘯𝘰𝘵. 𝘈𝘭𝘭 𝘸𝘦'𝘳𝘦 𝘢𝘭𝘭𝘰𝘸𝘦𝘥 𝘵𝘰 𝘬𝘯𝘰𝘸, 𝘭𝘪𝘧𝘦 𝘪𝘴 𝘧𝘰𝘳 𝘸𝘩𝘰'𝘴 𝘯𝘰𝘵 𝘢𝘧𝘳𝘢𝘪𝘥 𝘵𝘰 𝘧𝘢𝘭𝘭.❞
I'm a 20 years old girl who 𝒅𝒆𝒔𝒑𝒆𝒓𝒂𝒕𝒆𝒍𝒚 loves to play with editing videos and images programs, such as Sony Vegas and 𝑷𝒉𝒐𝒕𝒐𝒔𝒉𝒐𝒑. I also have a DeviantArt account where I post my resources. Enjoy my blog!
120 posts
Don't wanna be here? Send us removal request.
Last Seen Blogs
samandcolbyownme
𝐖e𝐥c𝐨m𝐞 𝐇o𝐦e 🖤

capitanduck
sup bae

sreejithsreeblog07
Untitled
blastofsports
Sports

triceegoppa
still got a reason why?
Photo


GIF Colouring n. 09 - ‘Deadpool’s BACK!’
⋆ Please credit if you use.
⋆ Like & reblog if you like.
Download ↬ DA
© 𝐇𝐨𝐥𝐥𝐲𝐰𝐨𝐨𝐝 𝐏𝐚𝐫𝐭𝐲
#deadpool#marvel#movie#ryan#reynolds#avengers#gif#gif psd#psd#colouring#coloring#resources#photoshop
7 notes
·
View notes
Photo
GIF Colouring n. 08 - ‘Far Past’
⋆ Please credit if you use.
⋆ Like & reblog if you like.
Download ↬ DA
© 𝐇𝐨𝐥𝐥𝐲𝐰𝐨𝐨𝐝 𝐏𝐚𝐫𝐭𝐲
#harry potter#harry potter and the goblet of fire#movie#hogwarts#hermione granger#ron weasley#resources#gif#psd#colouring#photoshop#coloring#gif psd
9 notes
·
View notes
Photo

GIF Colouring n. 07 - ‘In the Galaxy’
⋆ Please credit if you use.
⋆ Like & reblog if you like.
Download ↬ DA
© 𝐇𝐨𝐥𝐥𝐲𝐰𝐨𝐨𝐝 𝐏𝐚𝐫𝐭𝐲
#Guardians of the Galaxy#peter quill#starlord#gamora#ego#infinity war#marvel#avengers#movie#chris pratt#zoe saldana#groot#nebula#mantis#drax#Rocket Raccoon#gif#resources#photoshop#psd
4 notes
·
View notes
Photo


GIF Colouring n. 06 - ‘Pastel Spiderman’
⋆ Please credit if you use.
⋆ Like & reblog if you like.
Download ↬ DA
© 𝐇𝐨𝐥𝐥𝐲𝐰𝐨𝐨𝐝 𝐏𝐚𝐫𝐭𝐲
#spiderman#Spider-Man: Homecoming#tom holland#movie#marvel#avengers#infinity war#pastel psd#psd#gif#resources#photoshop#gifset
2 notes
·
View notes
Photo


GIF Colouring n. 05 - ‘Gamora’s Fights’
⋆ Please credit if you use.
⋆ Like & reblog if you like.
Download ↬ DA
© 𝐇𝐨𝐥𝐥𝐲𝐰𝐨𝐨𝐝 𝐏𝐚𝐫𝐭𝐲
#gamora#guardians of the galaxy#marvel#Avengers#infinity war#movie#zoe saldana#peter quill#starlord#chris pratt#drax#groot#gif#resources#gif psd#psd#photoshop#graphic#design
0 notes
Photo

GIF Colouring n. 04 - ‘Gamora’s Feelings’
⋆ Please credit if you use.
⋆ Like & reblog if you like.
Download ↬ DA
© 𝐇𝐨𝐥𝐥𝐲𝐰𝐨𝐨𝐝 𝐏𝐚𝐫𝐭𝐲
#gamora#guardians of the galaxy#zoe saldana#starlord#peter quill#chris pratt#marvel#avengers#infinitywar#movie#gifmaking#resources#psd#colouring#coloring#gif
1 note
·
View note
Photo

GIF Colouring n. 03 - ‘Gamora’s Soul’
⋆ Please credit if you use.
⋆ Like & reblog if you like.
Download ↬ DA
© 𝐇𝐨𝐥𝐥𝐲𝐰𝐨𝐨𝐝 𝐏𝐚𝐫𝐭𝐲
#gamora#guardians of the galaxy#marvel#avengers#peter quill#starlord#zoe saldana#Chris Pratt#actor#actress#movie#infinitywar#gifmaking#gif#gif psd#psd#resources#colouring#coloring#photoshop file
0 notes
Photo


GIF Colouring n. 02 - ‘Penelope’
⋆ Please credit if you use.
⋆ Like & reblog if you like.
Download ↬ DA
© 𝐇𝐨𝐥𝐥𝐲𝐰𝐨𝐨𝐝 𝐏𝐚𝐫𝐭𝐲
#penelope#jamesmcavoy#christinaricci#colouring#coloring#psd#gif psd#gifset#gif#gifs#resources#photoshop#ps#graphic#design
2 notes
·
View notes
Photo

GIF Colouring n. 01 - 'Green Forest'
⋆ Please credit if you use.
⋆ Like & reblog if you like.
Download ↬ DA
© 𝐇𝐨𝐥𝐥𝐲𝐰𝐨𝐨𝐝 𝐏𝐚𝐫𝐭𝐲
#gif#gifs#colouring coloring#coloring#psd#resources#photoshop#how to#gif psd#big little lies#reese witherspoon#zoe kravitz#girl#landscape
2 notes
·
View notes
Photo
GIF Action n. 01
⋆ Please credit if you repost.
⋆ Like & reblog if you like.
Download ↬ DA
© 𝐇𝐨𝐥𝐥𝐲𝐰𝐨𝐨𝐝 𝐏𝐚𝐫𝐭𝐲
#gif#gifs#resources#download#photoshop#graphic#design#marvel#drax the destroyer#mantis#guardians of the galaxy#gamora#zoe saldana#Chris Pratt#peter quill#Starlord#Rocket Raccoon#Groot#movie#infinity war
0 notes
Photo

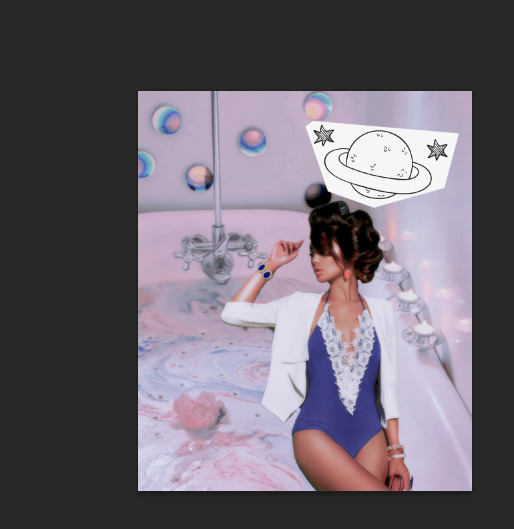
┊First of all, open Photoshop.
┊Then, open a background image.
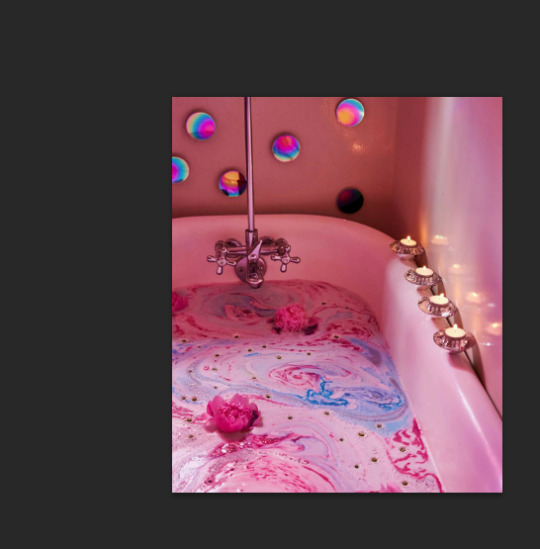
IMAGE SIZE is 500x600 pixels.
┊Choose another image, with a person, to put onto the background.
┊Cut the borders of the second image with the Eraser tool [100 % hardness].

┊With ‘Selective Color’, I modified a little the colouring of the single images [select your image, & go to ‘Image/Adjustements/Selective Color] to amalgamate the colours.
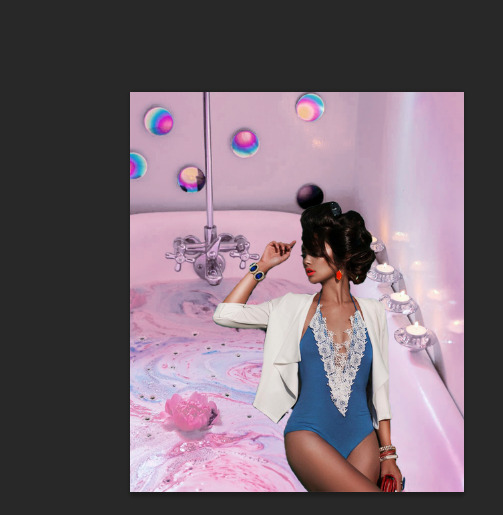
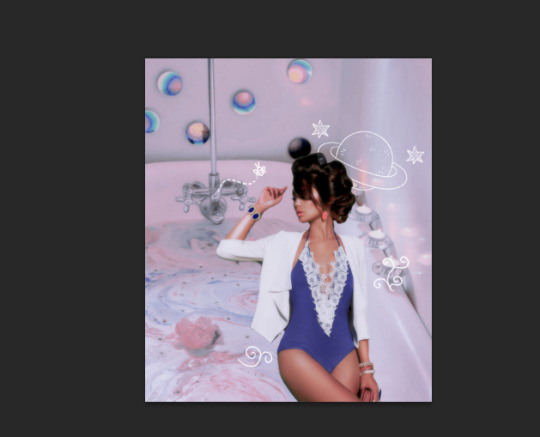
┊Now let’s add a colouring to the image. I choose a PSD of mine, ‘A deranged girl’s diary’.

┊I applied a little bit of TOPAZ CLEAN, with these settings: ↓↓

┊First, I applied these settings to the single images [Select your image & apply], then selected the entire image, went to ‘Edit/Copy merged’ and pasted above all the layers [also the PSD]. Then, I changed the opacity to 59% [but you can re-apply the effect so it’s more evident].
┊I applied some hand-drawn sketches and brushes I took from these resources websites: ↓↓
→ Photoshop Brushes
→ Brusheezy
→ Freepik
┊Here the result: ↓↓
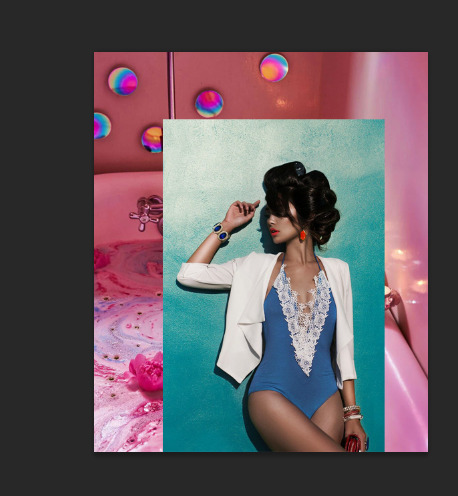
┊Then I selected the background image and applied the ‘Black&White’ filter [go to ‘Image/Adjustements/Black and White’].
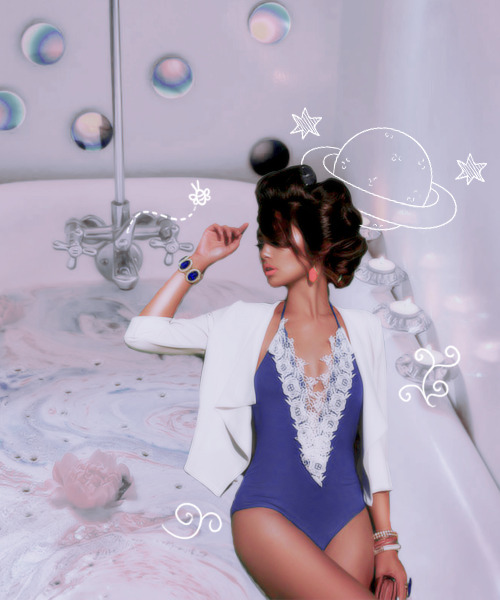
IMAGE SIZE is 500x600 pixels.
┊You can also replace the background image with a solid colour [file PSD included]: ↓↓

500x600 pixels.
┊Or with some writes: ↓↓
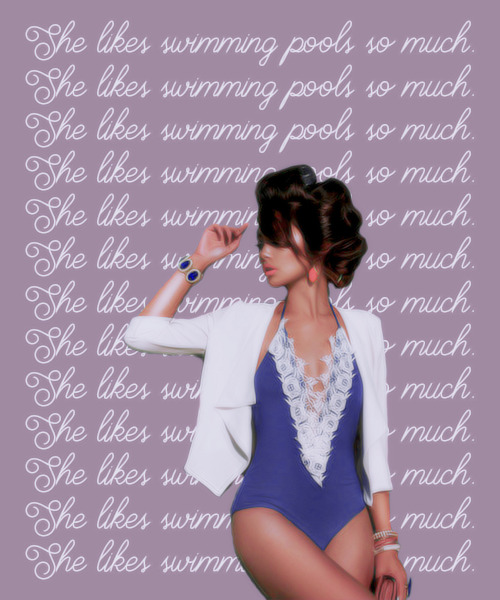
500x600 pixels.
Backgound image + model:
Pinterest
File PSD donwload ↬ Deviantart

© 𝐇𝐨𝐥𝐥𝐲𝐰𝐨𝐨𝐝 𝐏𝐚𝐫𝐭𝐲
#tutorial#edit#vintage#resources#tumblr#aesthetic#pastel#colouring#psd#coloring#model#girl#pinterest#pink#violet#purple#how to
4 notes
·
View notes
Photo
Today I want to teach you how to apply a vintage recording/holographic effect to your photos with Photoshop!
I’ll provide to you a PSD file that contains all the resources necessary to create this effect ↓↓
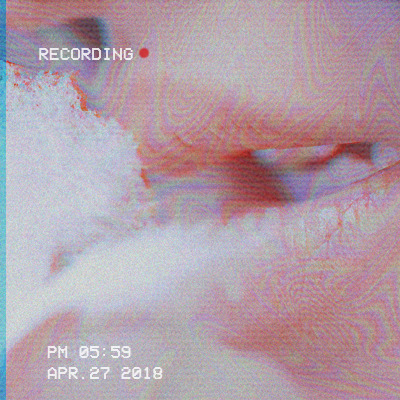
IMAGE SIZE IS 400x400 PIXELS.
┊First of all, open your Photoshop.
┊Now open my PSD file.
┊You’ll find the sample image, the textures ALL MADE BY ME SO CREDIT IF YOU USE!!!, the new PSD I’ve made just for this effect, and the text files.

┊There’s an option for the text: instead of the write ‘Recording’ with the red spot symbol, you can select the ‘Play’ version.
Fonts is:
➺ VCR OSD Mono

┊All textures are made by me. There’s the holographic one that’s optional. You can use all these textures for other purposes but ONLY IF YOU GIVE CREDIT TO ME.

┊The PSD contains some optional layers. Below the PSD there’s a layer which makes the colouring of the photo more of a cold tone. Again, you can use this PSD for other projects by CREDITING ME.
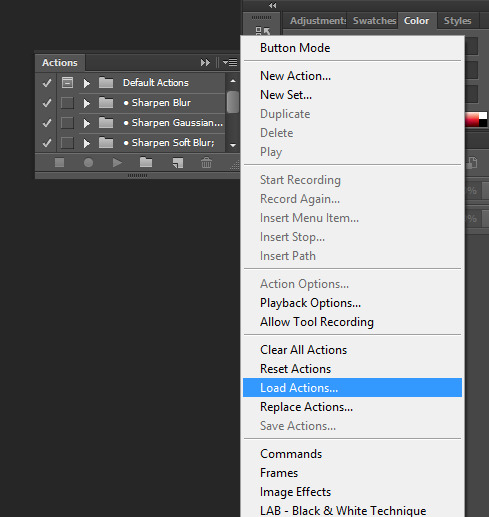
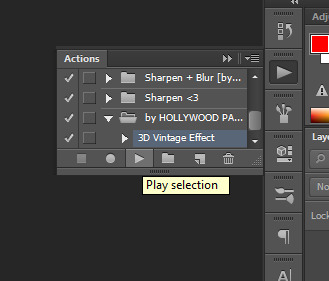
┊You just have to open a new project with a white background [SIZE → 400x400], open your photo, then duplicate it into your project, resize it, load my action and press the play button on it. Please credit me if you use this action or you want to repost it.
┊Now you can duplicate the layer at the bottom of your main project, under ALL the layers.
• • • • • • • • • • • • • • • • • • • • • • • • •
If you want to delete that little blue vertical line at the left of the image, just resize it with the Crop tool.

SIZE IS 389x400 PIXELS.
┊Now unconstrain proportions.
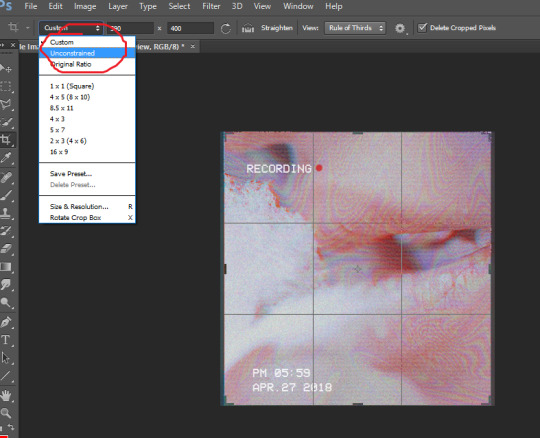
┊And finally drag the right edge of the selection. Then press on the ‘Tick’ button in the upper right corner of the window.


▸ OPTIONAL STEP ➺ to soothe the 3D effect.

〚 Yayy 〛

DOWNLOADS:
☆ Font: Dafont
☆ PSD file: Deviantart
☆ Action: Deviantart
© 𝐇𝐨𝐥𝐥𝐲𝐰𝐨𝐨𝐝 𝐏𝐚𝐫𝐭𝐲
#tutorial#vintage#recording#record#resources#photoshop#psd#colouring#action#actions#coloring#melanie martinez#aethstetic#soft colors#psd pastel
3 notes
·
View notes
Photo

┆ First of all, you have to download the program ↘
LINK: https://kmplayer-free.it.softonic.com/
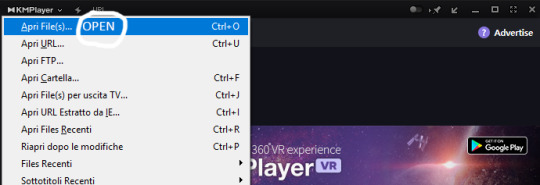
┆ Then, you have to open it.
┆ Click CTRL + G and a window will appear. Move this window out of the program’s panel [even if you don’t under stand why, but it is important].
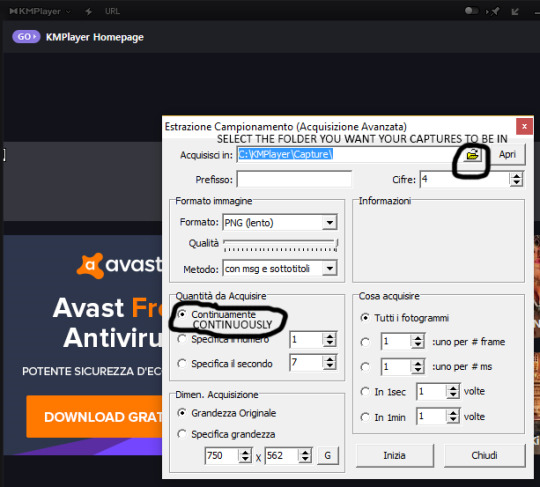
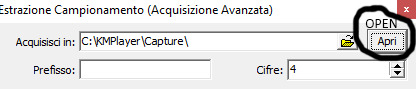
Choose the folder you want your captures to be in and select ‘Continuously’.
┆ Open your video.
┆ Then you press ‘Start’ on the capture panel at the start of your scene. When you’re done, you simply press ‘Stop’. Then, you press ‘Open’ to open the folder in which you saved your frames.
┆ Now you have to reverse the order of the captures in your folder [just to be more comfortable with the entire process of making the gif] / [just in case you put the screencaps into the automatically selected folder, but you can simply create one].
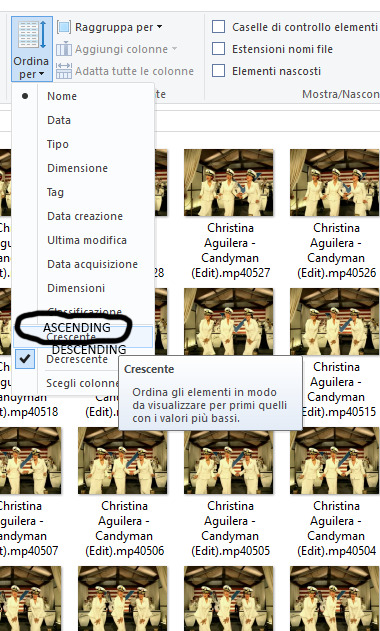
Select ‘View’ up above in the folder, then press ‘Sort by’ and then select ‘Ascending order’.

┆ Open Photoshop [what a surprise].
┆ Select ‘Scripts’ and then ‘Load multiple DICOM files’.
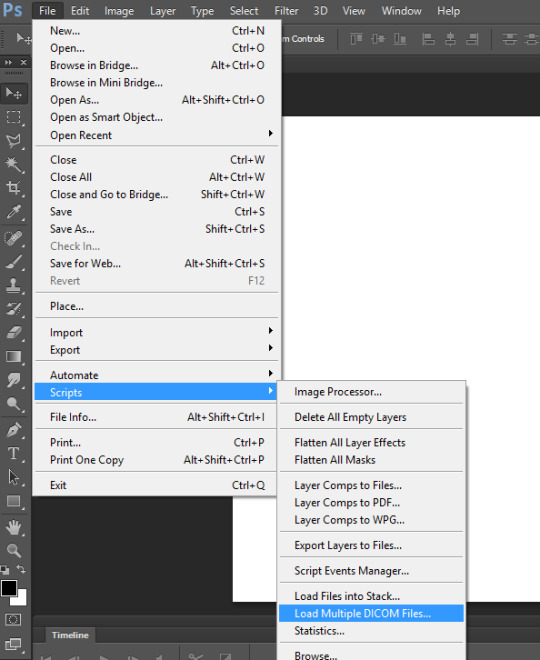
┆ Select the folder you created only for the frames of your gif.
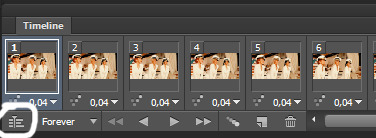
┆ Once it loads all the frames, press ‘Create Frame Animation’ from the panel at the bottom of your Photoshop [the Timeline].

┆ Then you press the tiny arrow with three lines on the top right of the timeline and select ‘Make frames from layers’.
┆ Now press ‘CTRL + ALT + A’ and then ‘CTRL + G’ in order to make a group out of the layers.
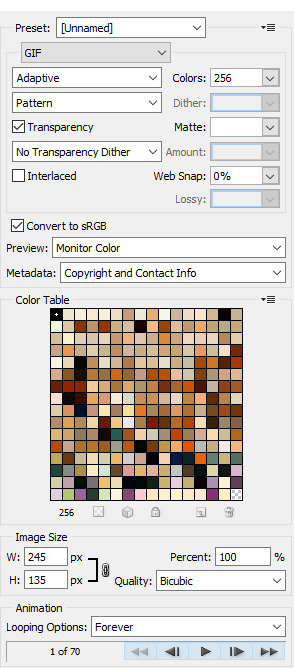
┆ Open a new project with the dimentions you want for your gif. I’ll put 245x135.
┆ Duplicate the group into this new project, then press ‘Create Frame Animation’.
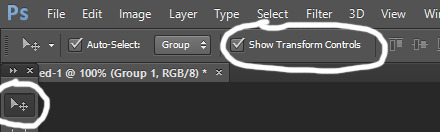
┆ It’s time to resize our gif! Click on the arrow tool [that one which moves the layers] and then, on the top of the window, click on ‘Show transform controls’. Now click on the borders of the image and then new settings will appear on the top. Click on the little chain between the width and the height and then you have to resize your image manually.

┆ Then we’re going to make the gif [come true]! You can either follow the instructions on my previous video tutorial ↬ click on this, or change that method to this new one.
┆ Now convert the timeline animation into the video timeline by clicking on this button here ↘
┆ At this point you just apply the sharpening and other effects by clicking on ‘Filter’ and then ‘Convert for Smart Filters’ and you apply the effect.

┆ Time for colouring! Open any colouring and then duplicate into the gif project.
┆ Now click on Files/Save for web and put my settings here below ↘
┆ Now the last step: the speed! Reopen your gif and change the speed by selecting all of your frames [arrow w/ three lines ➺ ‘Select all frames’] and then click on one of them and change the speed to 0,04 or more.
┆ Save the gif with the same settings I put above and you’re done!
P.S. If you want to create a gif with an image still and an overlay, you have to apply the same method we used in the video tutorial in which I showed you how to put a group of gif layers with another. You have to open your image and then create other frames in the Animation Panel [the same amount as your gif/overlay]. Then, before you copy the overlay frames into this project, remember to select all frames of the still and Right click on one of the frames, then choose ‘Do not dispose’. It’s to avoid the speed to be irregular. I discovered this by myself, but it helped me save a lot of time!

© 𝐇𝐨𝐥𝐥𝐲𝐰𝐨𝐨𝐝 𝐏𝐚𝐫𝐭𝐲
#tutorial#gif#gifs#resources#photoshop#graphic#design#psd#colouring#coloring#aesthetic#how to#how to make a gif#how to make gifs#tumblr#Christina Aguilera#candyman#music video#video
2 notes
·
View notes
Text
How to create gif actions with Photoshop
You’ll need:
• Photoshop CS5 / CS6 [I use the latter]
• to watch my previous tutorial about making gifs ➺ how to create gifs with Photoshop
youtube
If you got any question don’t hesitate to contact me!
Also through my FB page ▸ Hollywood Party ✧ ✧ ✧
© 𝐇𝐨𝐥𝐥𝐲𝐰𝐨𝐨𝐝 𝐏𝐚𝐫𝐭𝐲
#tutorial#gif#gifs#how to#how to make a gif#create#resources#edits#aesthetic#video#video tutorial#action#gif action#photoshop#graphic#graphic design
0 notes
Text
How to make gifs with Photoshop
Wonder how to make a gif in Photoshop? Here’s the [I hope clear] answer!
You’ll need:
-Photoshop [I recommend CS5 or CS6, I use the latter];
-VLC media player.
How to record your clips with VLC? Simple & easy → you select the second panel, then click on the red button ‘Record’ & then ‘Stop’.

Now you’re ready for my video tutorial! If there’s something you don’t understand, don’t be afraid to ask! You can also send me messages through my FB page » Hollywood Party ✧ ✧ ✧
youtube
© 𝐇𝐨𝐥𝐥𝐲𝐰𝐨𝐨𝐝 𝐏𝐚𝐫𝐭𝐲
#tutorial#tumblr#gif#edits#resources#photoshop#aesthetic#colouring#coloring#psd#video#how to make a gif#how to#create
1 note
·
View note
Photo

Template by © 𝐇𝐨𝐥𝐥𝐲𝐰𝐨𝐨𝐝 𝐏𝐚𝐫𝐭𝐲
Download → DA
#template#tumblr#resources#photoshop#file#psd#colouring#Willy Wonka#Johnny Depp#Charlie and the Chocolate Factory#man
0 notes
Photo

Template by © 𝐇𝐨𝐥𝐥𝐲𝐰𝐨𝐨𝐝 𝐏𝐚𝐫𝐭𝐲
Download → DA
1 note
·
View note