#stone tutorial
Video
youtube
Water coming soon.
like and sub pls thanks ♥️
Did you know I have a TikTok as well? You can watch my Shorts on there too! o3o https://tiktok.com/@sheepbroadcast
#youtube shorts#vertical#minecraft#getting stone#stone#tutorial#stone tutorial#minecraft tutorial#suspense#unexpected#wow#crazy#stone generator#reddit#minecraft shorts#tiktok#tiktok memes#minecraft memes#minecraft tiktok#thesheepbroadcast#funny#video
2 notes
·
View notes
Text
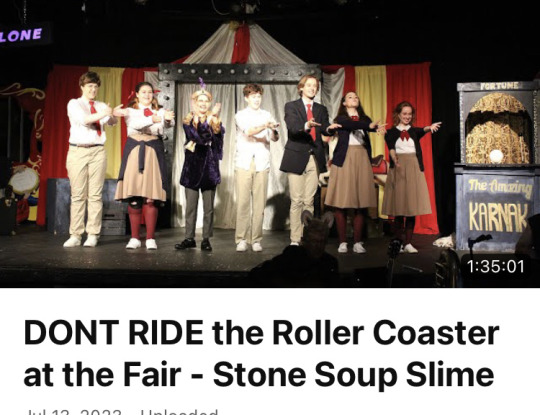
Taking name suggestions
#ride the cyclone#ride the cyclone stone soup#musicals#musical#musicaltheatre#youtube#ridethecyclone#musicaltheater#slime tutorial
86 notes
·
View notes
Text

Thinking about little helper francois
#dr stone#dr stone fanart#dr stone francois#francois dr stone#that tutorial was so cute#i saw tiny francois#and i just had to draw them#bblinks art
145 notes
·
View notes
Text
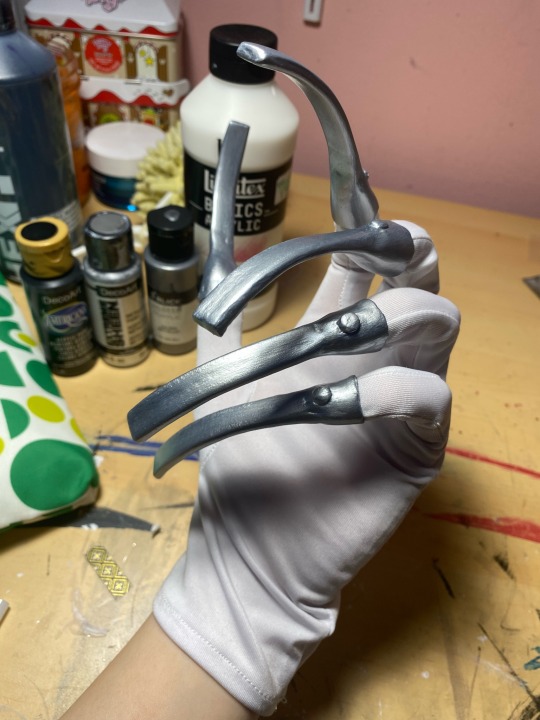
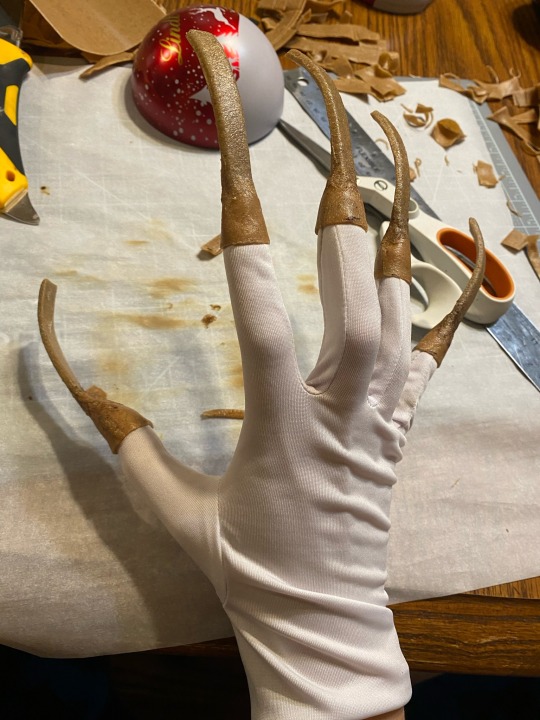
How i made xenos nails!!
Materials
-worbla
-2mm eva foam
-scissors
-heat gun
-soldering iron (technically optional but helps A LOT)
-gesso (i used regular gesso, but if you can id buy heavy body gesso)
-P400+P600 sand paper
-acyrlic paint (just silver is ok, but black will help)
-white gloves
-hot glue
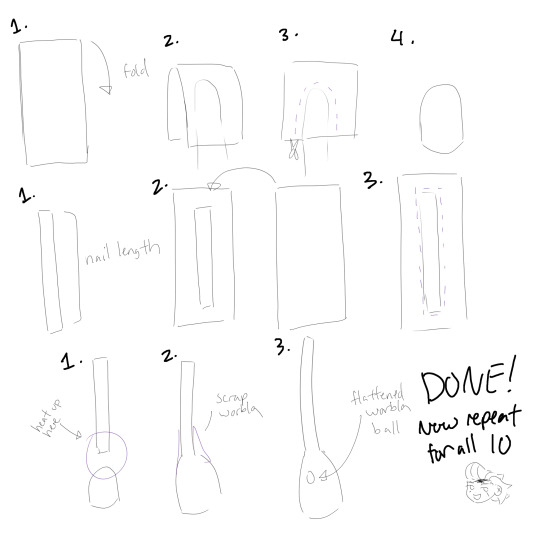
PART 1- forming the base
This part is VERY hard to explain so hopefully the diagram helps- ill explain every step here
Finger tips
1. Cut out a piece of worbla thats double the length of the finger tip you want + a little extra.
2. Heat it slightly and fold that piece of worbla in half around your finger.
3. Form it slightly around your finger, leaving a little extra space for the glove material, then cut it out with good scissors. (NOTE- if you try to form it on your finger while wearing gloves, the worbla MAY stick to the gloves. Id recommend just doing it on your bare finger)
4. Heat it up again until its very soft and round out the shape, making sure the sides stick together. If its too small when you test fit it around the glove, try to push out the walls a bit more.
Nails
Watch this video before starting this part-
youtube
1. Find a good length for your nails- mine are approx. 3 inches. Make a template and then cut the shape out of eva foam.
2. Cut out TWO pieces of worbla a little bigger then the nail strip and heat one up, sticky side up (the sticky side is shiny). Put the eva foam strip in the middle. Heat up the second piece of worbla and put it on top, sandwiching the eva foam.
3. Score all around the eva strip then cut AS CLOSE as possible to the edge.
Attaching the pieces
1. Heat up the finger tip and half of the nail. Attach the nail to the finger tip while wearing it to make sure it doesnt cave in. Use a picture from the manga as reference while doing this part
2. Once again, using a manga reference, use scrap worbla to fill out the sides and smooth everything down. This is the part where you can use a soldering iron to smooth everything out- be careful though, because you can easily burn the worbla.
2.5. I forgot to make a diagram but dont forget to curve the nails! I used a little metal dome to get a consistent curve for all of them.
3. Make little worbla balls, flatten them with something flat, then attach them to the nails while still hot.
Now repeat ALL these steps for all 10 nails! Yay!
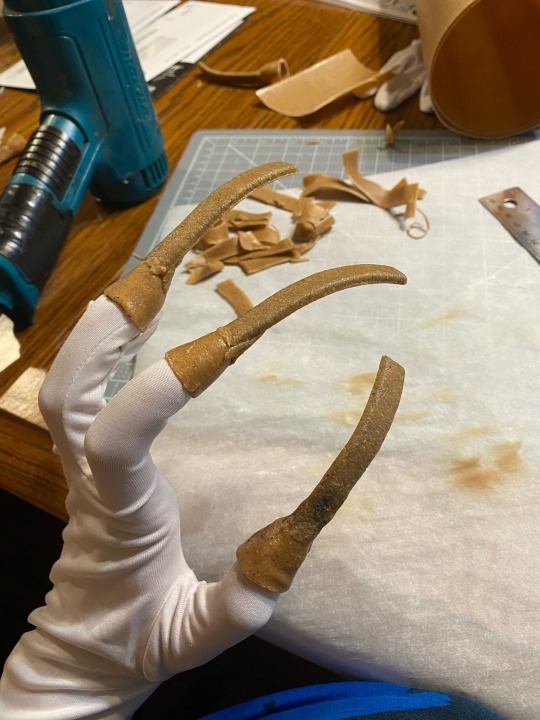
PART 2- priming
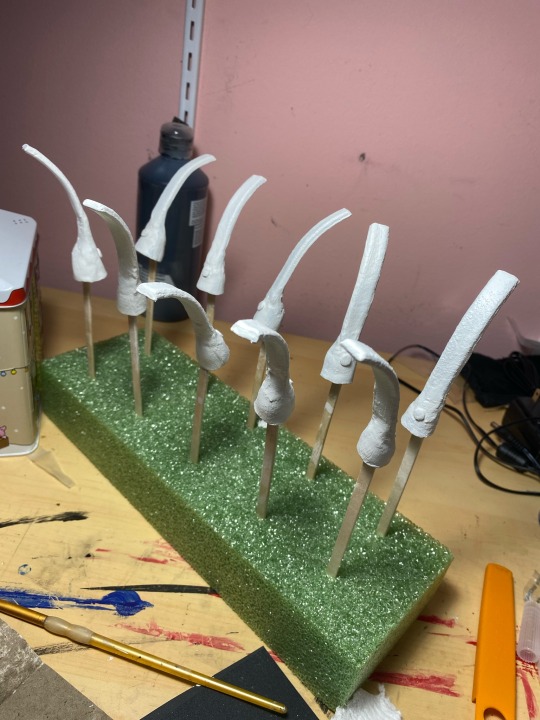

For priming i used regular gesso because I was impatient, but if you have plenty of time I recommend heavy body gesso. It took me 12 layers to get everything decently smooth, but if you used heavy body it would probably take 3-5 layers.
I also used floral foam, craft sticks, and sticky tack for my painting setup- if you can think of a better method without sticky tack id recommend trying something else- just because i had to pick out the sticky tack with tweezers, and it took forever lol
Two things to note about gesso-
1. It doesnt self level so you need to sand it smooth
2. DO NOT DRY SAND!! Always wet sand gesso
My exact steps were this-
4 layers of gesso -> sand with P400 -> 4 layers of gesso -> sand with P400 -> 4 layers of gesso -> sand with P600
This part is very time consuming if you use regular gesso, but its definitely worth it for the smooth finish.
PART 3- painting
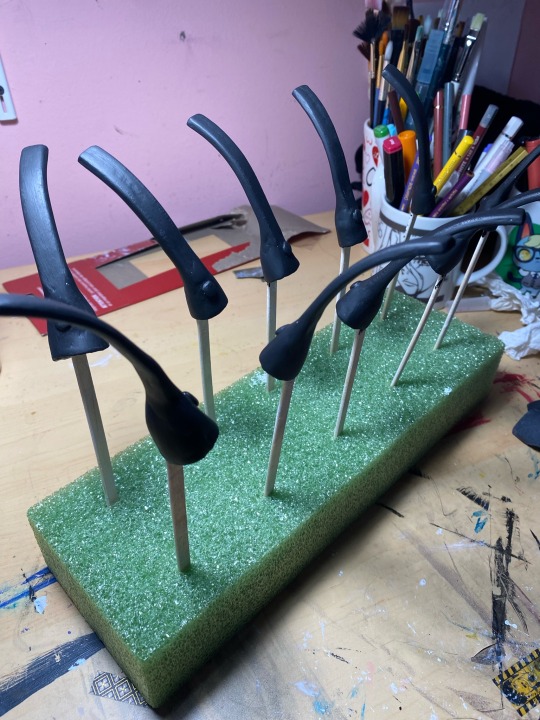
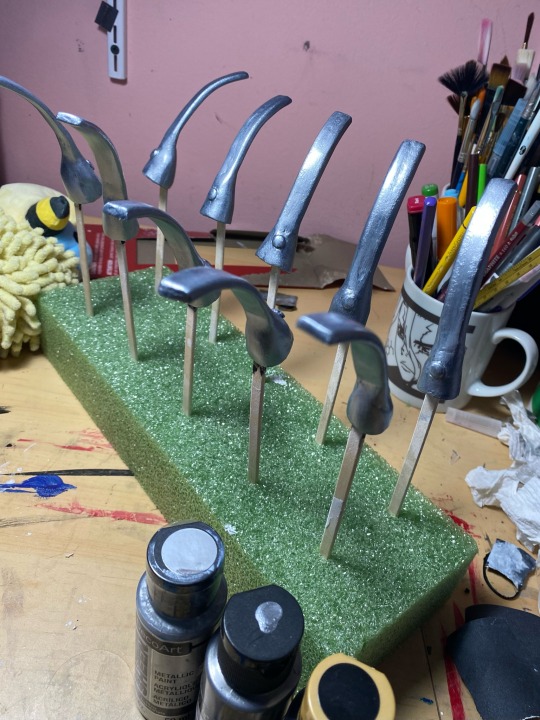
Before adding silver, I threw down a quick matte black layer. It tends to make metals look much better and it wont take long to dry, so I highly recommend it.
For the silver, i used decoart extreme sheen in silver, which i highly recommend. Relatively cheap and can be found in any craft store
Id also recommend having all your brush strokes go vertically if you can- it looks much cleaner.
PART 4 (final part)- attachment
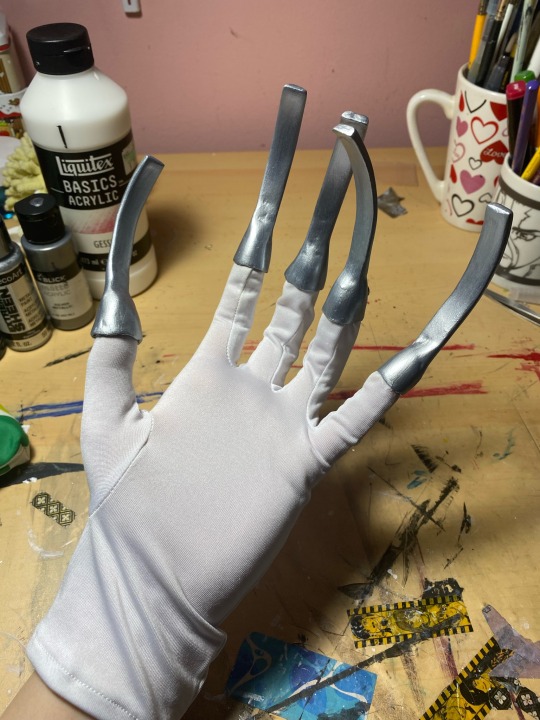
I used a pair of white gloves i bought a while back at spirit halloween, but you can make them or buy them- doesnt matter as long as you like them.
This part is kinda dumb but I genuinely dont know if theres a better method… i put hot glue in the nails, let it cool for a couple of seconds, then put them ON MY FINGERS while wearing the gloves. It gets you the best fit possible but also burns a little so watch out.
And thats it! Thats all there is to it. Let me know if you found this helpful, and if anything was confusing leave a comment and ill try to help you.
As a bonus heres a picture that works very well for reference
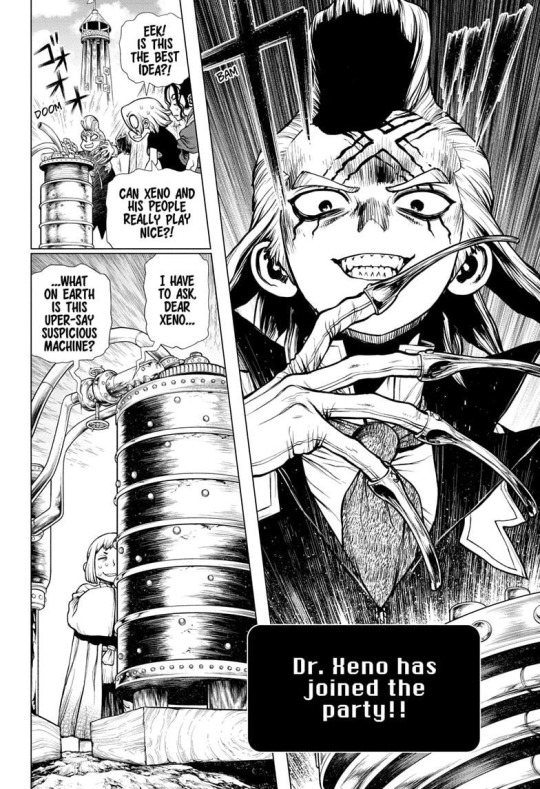
#dcst#dr stone#cosplay#cosplay tutorial#worbla#xeno houston wingfield#xeno cosplay#xeno dr stone#xeno#Youtube
59 notes
·
View notes
Text
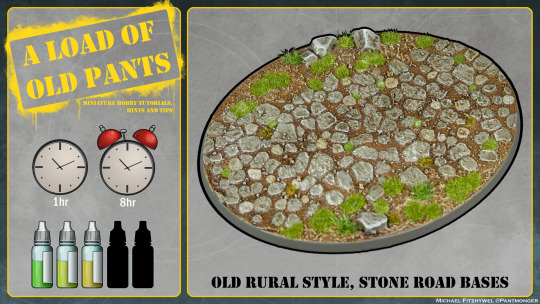


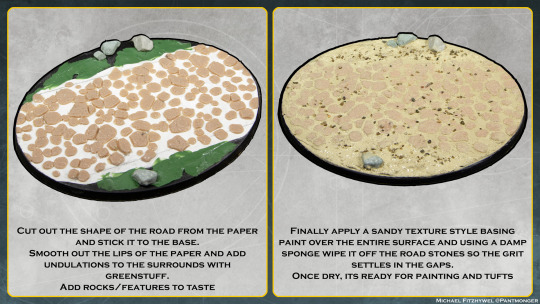
Want to know how I sculpted the stone road on my most recent base?
Its not overly difficult (if a bit time consuming) and as it uses polyclay it can be worked till you are happy.
37 notes
·
View notes
Text
HOW TO ADD LINKS TO YOUR BIO

Paste the above code into your bio, replacing the link section with the full link and the text section with your desired text. Be sure not to leave a space when copying over.
If it's breaking, or you're lost, check this post here.
*note: these links will only appear in your mobile/automatic theme. if you have a desktop theme with a custom description this method will still work.
#tumblr themes#themes#tumblr pages#tumblr codes#beginner coding#page theme#tutorial#coding#how to#for beginners#links#css#html#on the old stone wall#tumblr#tumblr tips#links in bio#how to put links in bio
31 notes
·
View notes
Photo
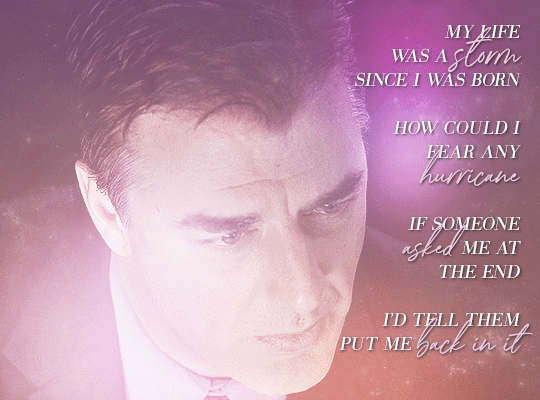


how could you think
darling, i’d scare so easily
now that it’s done
there’s not one thing that i would change (x)
#law & order#law and order#criminal intent#mygif#cigif#logif#mike logan#ben stone#benjamin stone#loganstone#sunlitcas#fun fact: i just went through all 200 of my drafts#and the tutorial from sunlitcas for this coloring#was the very first one from back in 2014#i lovelovelove this tutorial so tysm!!#anyway have more sappy gifsets for a rarepair in a dead fandom 🥰#anyway francesca was written about mikey
13 notes
·
View notes
Text
Water

Fire

Earth
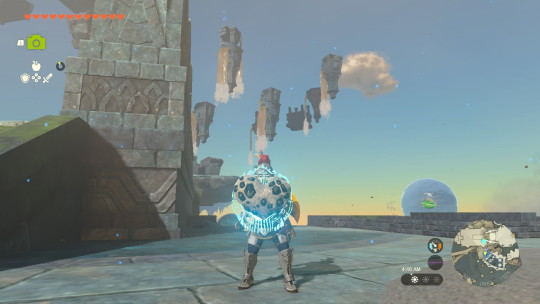
Gloom???
Maybe??
#everytime I try to look up if the gloom talus gives you a specific heart stone#I just keep gettig fuckin tutorials on how to defeat talus'#that is not what I NEED#so if someone knows please tell me!! I am trying to collect all of them on shields:)#totk#tears of the kingdom
12 notes
·
View notes
Note
i really love your art style and i especially love the way you draw lyon (specifically his hair,,,,) and i hope to see more drawings from you!!
i saw an earlier ask where someone asked how to draw eliwood's hair (ty for posting that btw, it was very helpful :D) so i was wondering if you could show how to draw lyon's hair? thank you and have a great day!!
THANK YOU LYON my sweet purple prince......... 💜 ye ofc i can show how i draw his hair it's one of my very faves to draw! :) under the cut
what's up guys welcome to my tutorial where today we're drawing another sad boy. shoutout to today's sponsor,,, house renais
sooo lyon's hair splits in the middle which is nice cause despite of how unkempt it is you'll at least know in what *general direction* his hair will fall, so i start with drawing where his hair would split
i kind of see his hair as having two (very choppy) layers where the upper layer curls slightly outwards and the second curls back in. so i start off with the upper layer which reaches just over his ears
still on the upper layer, connecting it to the top of his head and adding his cowlick since we're up there anyways ¯\_(ツ)_/¯
here's where i start the lower layer, going slightly inwards just over his shoulders, very pointy almost like arrows
add some hair to the back as well ofc, it's a lil puffier back there
here's where i add some extra hair sticking out just to give him that messy look cause let's face it formotiis isn't combing nobody's hair
and then i just add some details AGAIN with the stupid circlet these rich boys seem to love wearing... what's the purpose. i always forget

that's all, thanks :)
#lyon#fire emblem#sacred stones#fe8#fe#drawing tutorial#anon#ask#inquask#lyon is right up there with lucius for me when it comes to fave characters to draw just cause of the hair lol
58 notes
·
View notes
Text

drive.google.com/file/d/14QIX2uokG5VV6AFd2Mwjf7zAwjgArjMl/view?usp=drivesdk
Me trying to get people to watch the Stone Soup slime tutorial
#ride the cyclone stone soup#ridethecyclone#ride the cyclone#musicaltheatre#musicals#ride the cyclone musical#musicaltheater#ride the cyclone slime tutorial#rtc slime tutorial
14 notes
·
View notes
Text
How to draw Stone Columns and Pillars
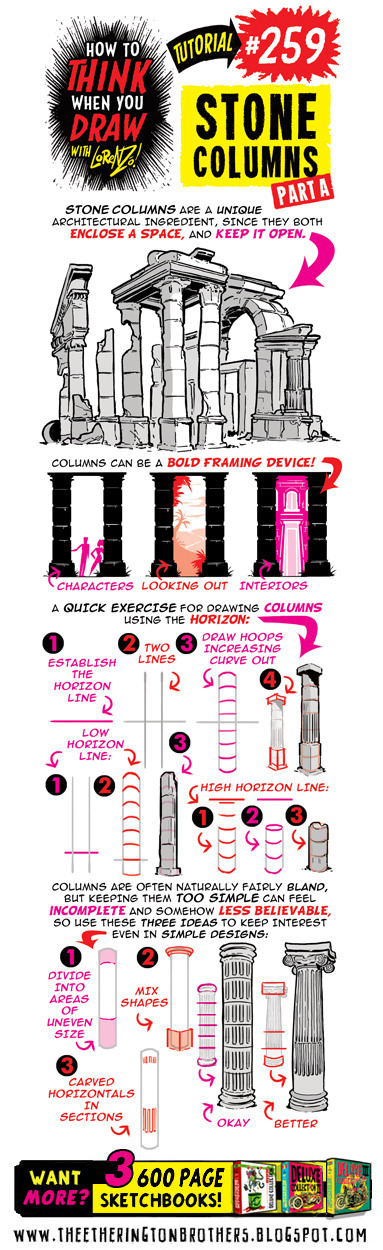
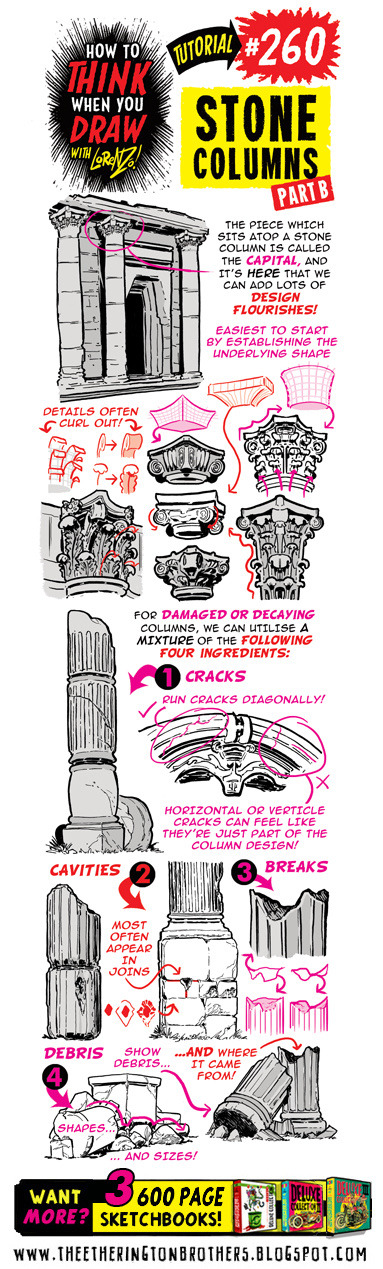
Credit: Etherington Brothers
#259#260#tip#stone#column#pillar#columns#pillars#Greek#ancient#historical#architecture#interiors#exteriors#interior#exterior#building#room#art tutorial#drawing tip#art tip#art tips#art tutorials#drawing#drawing tips#drawing tutorial#drawing tutorials#decoration#art#design
11 notes
·
View notes
Text

have a grungy star plat
#lichdraws#ty to lostcryptids for giving me the link to the tutorial btw!! it didnt work directlyyyy because im in csp but looking at the steps was a#HUGE help#my art tag#star platinum#jojo#jjba#stardust crusaders#diamond is unbreakable#stone ocean#stands#star plat#jotaro kujo#jojo's bizarre adventure#jojo no kimyō na bōken#jojo no kimyo na boken#sdc#diu#stocean#clip studio paint#clip studio#anime#manga
91 notes
·
View notes
Text
Ok I don’t think it’s me, these contraptions are just straight up not responding to anything
#I’ve tried four different tutorials and none of them have worked#does red stone just not work on this server??#what the heck#I’m not even angry anymore I’m just sad#rozu thoughts
11 notes
·
View notes
Photo

Prompt 6: a scary situation!
#dr stone#dcst#drst#yo uei#suika#shovel#shovel dr stone#wmdraws#inspired by the shining (a movie i havent watched)#and mike mignola (whose comics ive never read but that one graveyard tutorial looked cool enough to inspire this lol)
19 notes
·
View notes
Text

#posted like this bc <code></code> doesn't work on tumblr and I'm not doing individual screenshots#tumblr themes#themes#tumblr pages#tumblr codes#beginner coding#page theme#tutorial#coding#how to#for beginners#links#css#html#on the old stone wall
22 notes
·
View notes
Photo


we were supposed to be just friends
you don't live in my part of town, but maybe i'll see you out some weekend
depending on what kind of mood and situation-ship i'm in
and what's in my system
i think there’s been a glitch (x)
#law & order#law and order#law and order og#mygif#logif#ben stone#mike logan#flashing gif#glitch#listen.#the glitch gif looked SO mcuh better in my head#but i was having a TIME#i was looking at another tutorial and it got worse and it was a whole thing#i spent HOURS on that one gif lmao#and i would have been able to recreate the colors a little better on mikey's#bc i had done ben's first and loved it#and there's no gradient map for the background#it's just color balance and selective color#but our power went out and i didn't have it saved as a psd 🙃#so if the text looks different no it doesn't#i did the best i could okay#and there's like 3 people who will even care about this lmao#myself included#so if it's chill with you guys#we'll say it looks good and call it a day#loganstone
7 notes
·
View notes
Last Seen Blogs

a-what-n0w
|| Please don't feed the animals ||

sun3i
Sun

frankie-the-bad-guy-lupelli
Ask Frankie!

asdloli
πάντα ῥεῖ

bitchytigercollector
Angel Delor James