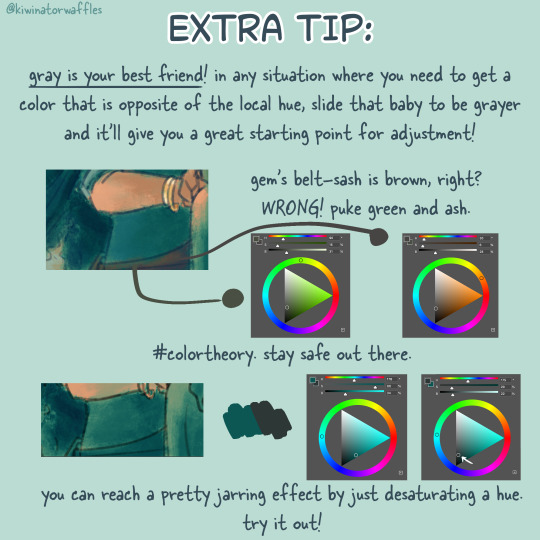
#art tip
Text
DEAR ARTISTS, PLEASE READ THIS POST I STUMBLED ACROSS
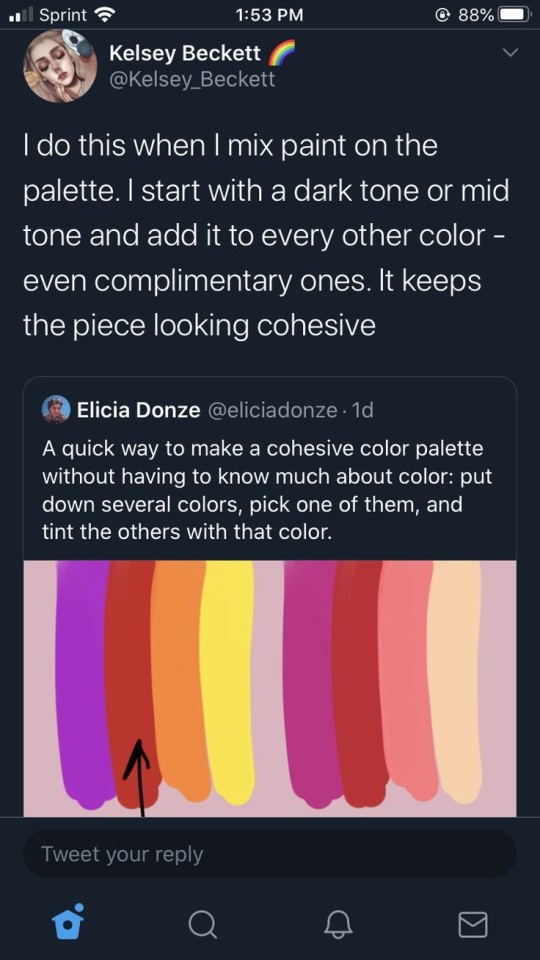
IF YOU ARE NOT DOING THIS ALREADY, YOU SHOULD TRY IT
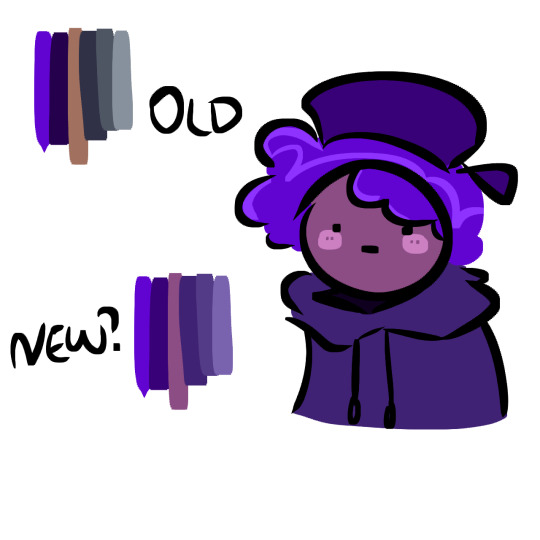
I even tested it out myself, it works great
#art#artist tips#artist tip#digital art#colors#color pallete tips#color pallete#art tip#art tips#drawing tip#drawing tips#digital art tips#digital art tip
61K notes
·
View notes
Text
ADOBE IS DISCONTINUING CREATIVE CLOUD SYNCED FILES ON FEBRUARY 1ST OF 2024
DOWNLOAD ANY IF NOT ALL FILES YOU HAVE STORED
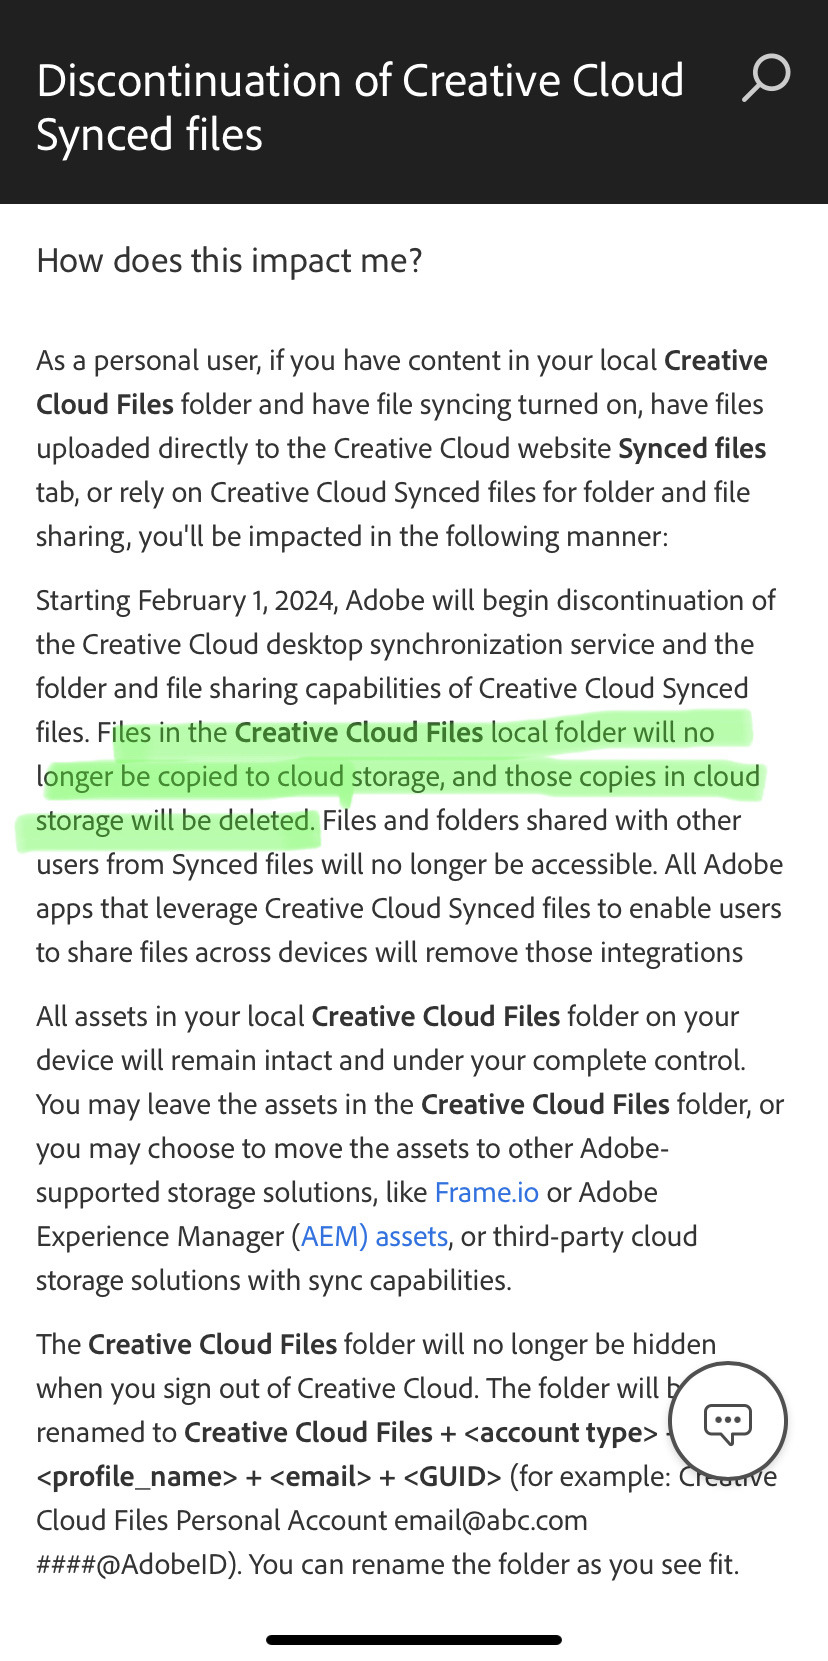
Full article here
#yep#art tip#adobe#creative cloud#photoshop#illustrator#adobe illustrator#adobe photoshop#premier pro#adobe after effects#adobe lightroom#indesign#adobe indesign#adobe acrobat
10K notes
·
View notes
Photo
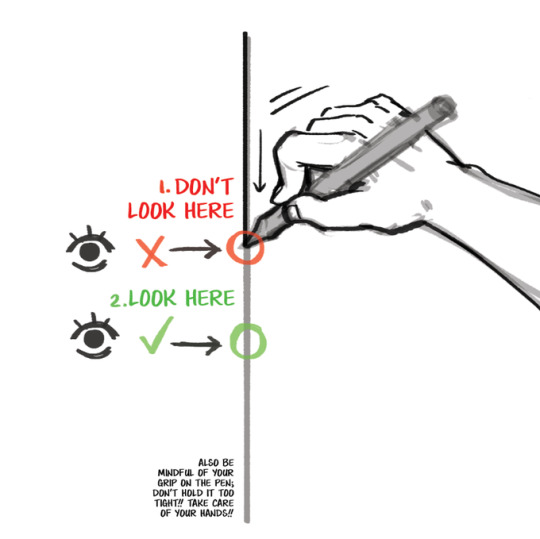
This Art Tip is a little one for beginning inkers, or people who are struggling to get their lines looking steady and confident: look ahead of the line you're drawing, not at the tip of your utensil where it meets the canvas!
All Art Tips I’ve done are here.
16K notes
·
View notes
Photo


quick tutorial on how I shade with solid black (a lot of people ask, hope this helps)
prints | patreon
11K notes
·
View notes
Text
I made a tutorial about drawing clouds, but it ended up also being about a bunch of other stuff, like shape variation, hard vs soft edges, and conveying volume. Here’s some snippets from that video for you!
For the full tutorial, check out my Patreon!
4K notes
·
View notes


Text
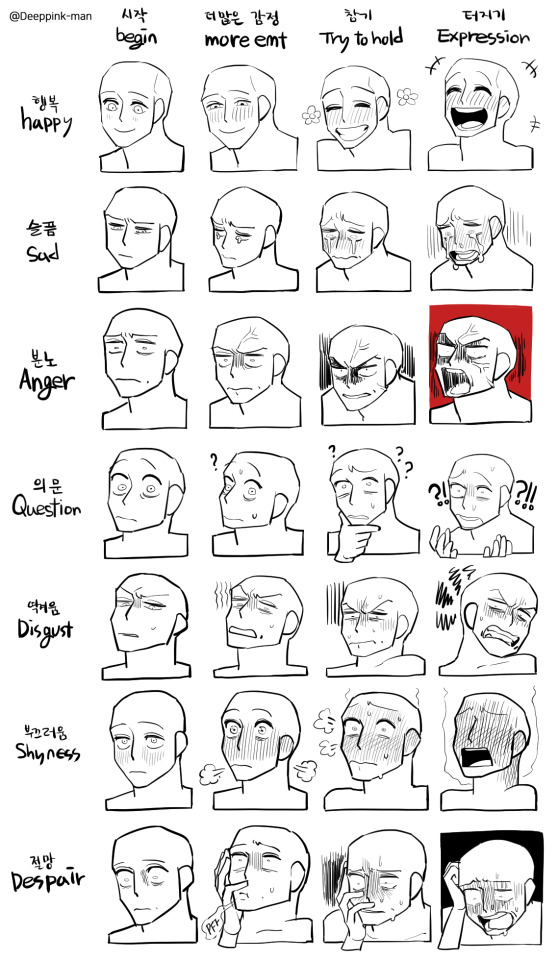
Didn't I post this on my tumblr????
It's level four of emotion. I posted it on Twitter, but I can't remember if I posted it on my tumblr. I hope it will help you when you draw a character's expression.
1K notes
·
View notes
Text
Art tip for developing your own style: Reference your own favorite art pieces!
If you look at the parts you love about your own art, you’ll replicate them and your style will become stronger and more consistent!
785 notes
·
View notes
Text
HOW I PAINT WITH GRADIENT MAPS

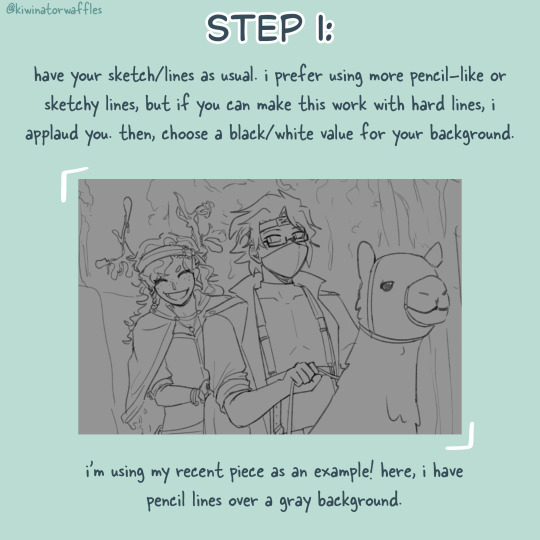
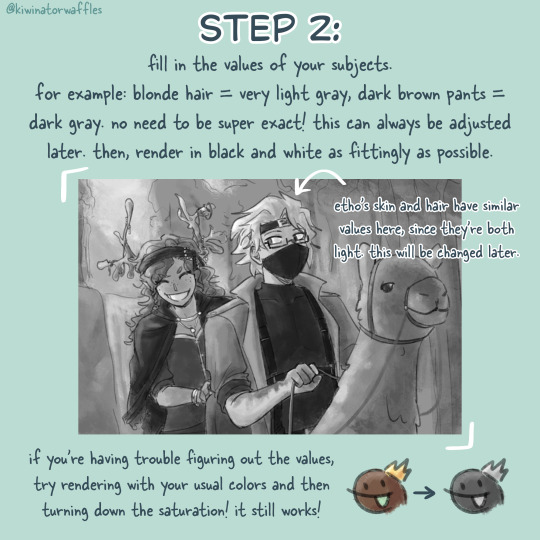
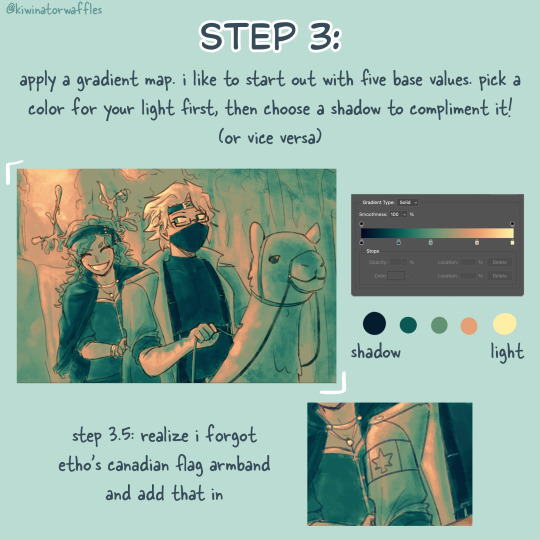


the post by arcanescribbles where i learned this technique! check out their works!
an even simpler version of this is to just lightly brush colors over a base color in the background and then go off of that. otherwise, i hope this can help!
a full version of my example piece here
#congrats to etho for being in all 3 of my gradient map paintings so far#art tip#art tips#art tutorial#painting tutorial#digital art tips#art help#drawing tips#digital art#kiwi’s scribbles#kiwisonator
410 notes
·
View notes
Text
full render (semi) tutorial teehee
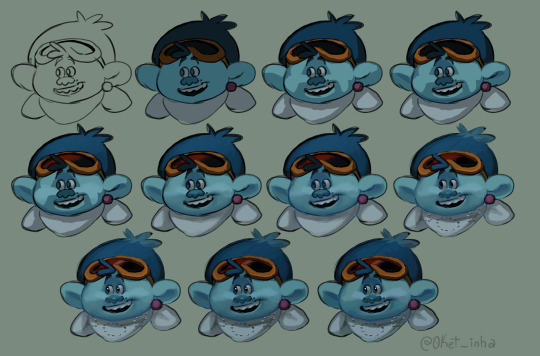
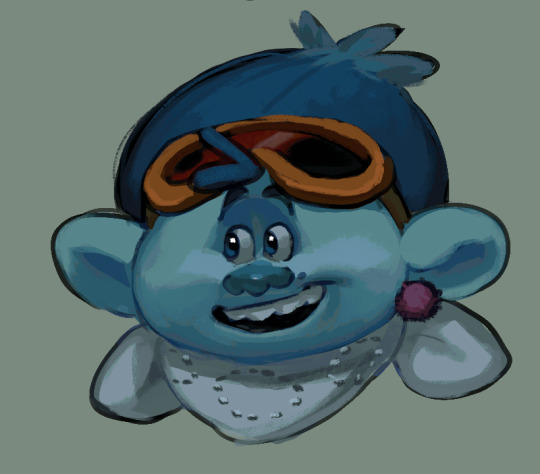
#art#artists on tumblr#artwork#kritaart#original#original art#character#illust#0ketlyn-s#trolls#digital art#digital paint#dreamworks trolls#paint#trolls brotherhood au#brotherhood au#brotherhood#trolls au#tutorial#art tutorial#art tip
339 notes
·
View notes
Text
How to draw: The position of the Fingers in Hand Poses Correctly (FINGERS WORK TOGETHER)
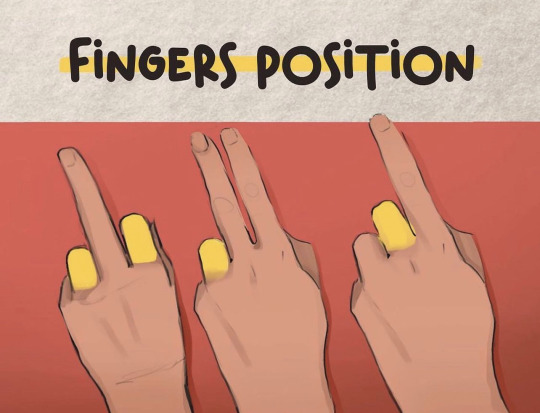

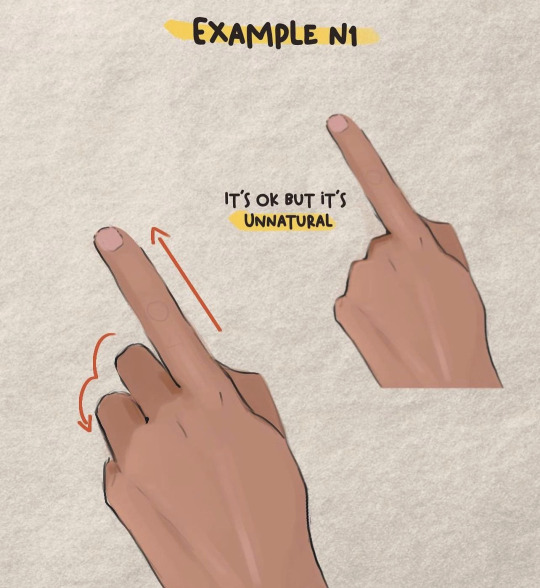
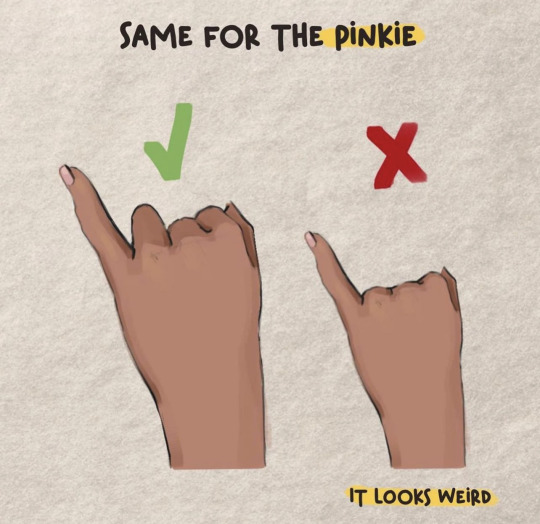

Credit: Valentart_
#random tip#random tips#hand#hands#finger#fingers#anatomy#human anatomy#pose#pose ref#pose reference#pose references#proportions#proportion#art tutorial#drawing tip#art tip#art tips#art tutorials#drawing#drawing tips#drawing tutorial#drawing tutorials#art#posing
1K notes
·
View notes
Photo
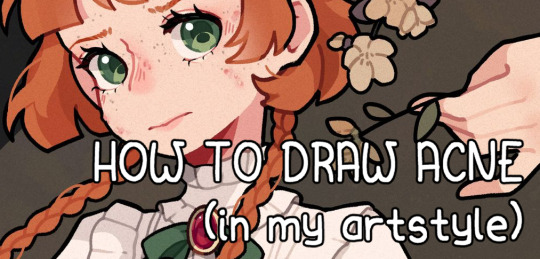
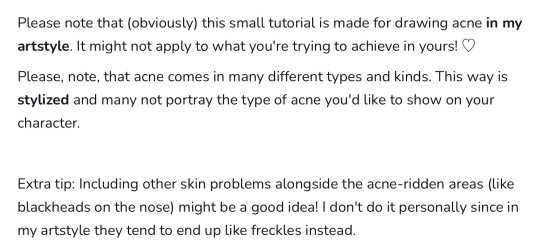

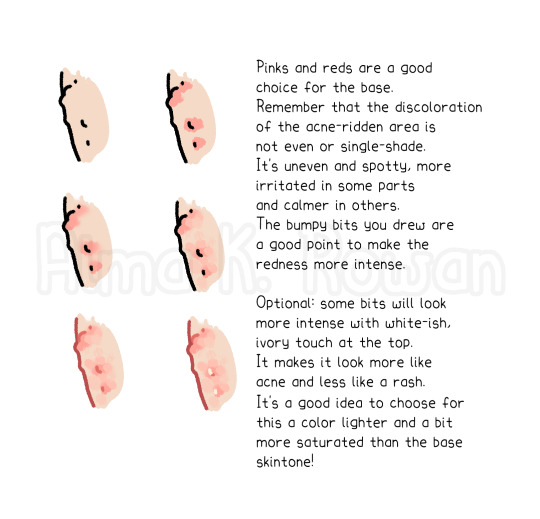

A small acne drawing/painting tutorial I made a while ago 🥰 (I wish more characters had acne so me-from-the-past could feel less out of place).
#tutorial#art tutorial#how to draw#how to draw acne#acne drawing tutorial#drawing tutorial#art tip#i hope my tagging ways aren't too annoying#I'm still not sure how to use this site LOL#almakrowantip
2K notes
·
View notes
Text
My opinion to "desperate" artists and TIPS TO IMPROVE YOUR ART
This is my art journey
6 years later...
If artists want support and followers, they should earn them by their own accomplishments and hard-work.
I hate it when they earn it from guilt-tripping others, being desperate and earn followers out of pity
You can never have a stable and healthy relationship with your followers that way, and you may get worse when you dont gain any interactions with them
Please stop doing this, and start growing your acc on your own. If you feel like your art doesnt appeal to others, start taking advice and study from other artists around you that you like. There are thousands of FREE resources on all platforms: Instagram, Youtube (recommended) , Pinterest (for reference) ,... And alot of separate websites you can find!
Trust me, hard work pays off
Its okay to feel like you dont improve at all, but thats not true, if you study and practice often (no need to do it everyday, it can be 2-4 days a week) you're already better than yourself yesterday
Compare your art to other artists has alot of benefits since you can see what to improve and see the progress. But dont do that too often, it'll turn to be an unhealthy obsession and in this world where there're always people better than you, you'll suffocate yourself forever. Thats a hard hit to reality but it's the truth. In this i recommend:
Find artists that you like and set them as your art goals, they can be artists with totally different artstyles, art is never something stable and its always good to try new things
From your art goals, start "taking" some of your favourite things about the artists and "artistically" add them to your own.
Tracing is another way to study privately for beginners, but i dont recommend doing this for long, it can stagnant your progress if you rely on it too much.
Unless its your style of choice, practice confidence in your streaks and lines, use your whole arm to draw (i know it can be boring at first, but everything you do now will have a rewarding result)
Stepping out of your comfort zone sometimes. You dont have to do this if you consider art as a hobby, but if youre serious or wanting your art to take a new step, i recommend expanding your art to many categories, like drawing backgrounds, hands, poses, anatomy, ect.
Study color theory, this is optional but i heavily recommend, this makes your art UPGRADE NO EXCEPTIONS
Here are some of my very basic tips, you've probably seen them everywhere and hear these thousands of times already, but if you're reading this and feel motivated, consider this the start of your journey! This is gonna be an exciting, might be tiring and frustrating, but memorable
Goodluck! The future awaits new extremely talented artists to bloom��
458 notes
·
View notes
Photo
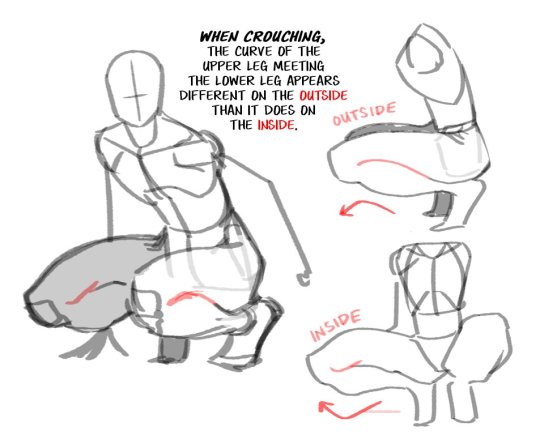
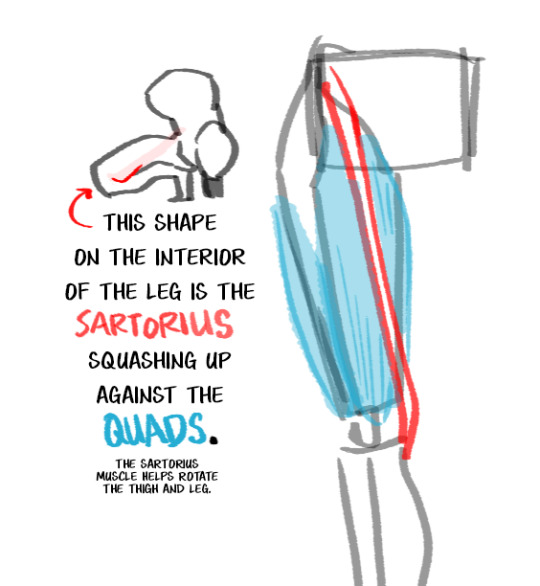
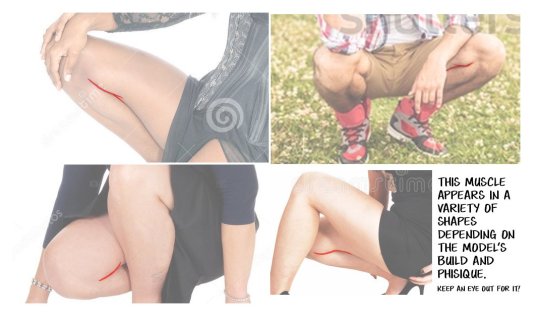
Here’s a little Art Tip about a very specific part of the body. Pop a squat and see how it looks on you.
37K notes
·
View notes
Note
I love your art so much!!! I was just wondering how you draw Tim and Kon hair, I can't figure it out and you draw it so nice. Hope you have a wonderful day :)

Tried to break it down best I could
For kons hair, I usually do this:
1. Start with the S curl with the root around the center of the forehead line, and to make it look puffy I show the “underside” of the hair? I’m not sure how to describe it so I added a visual. They’re anime hair vents

2. The middle one is the longest bang, then I do a few smaller ones along the forehead line and where the hair meets his undercut.
3. The curls on the top of his head are usually grouped in sets of 3-4 big swishy waves going one direction, and then 1-2 more bunched up waves going the other, if that makes sense. It’s hard to get the volume right so it’s trial and error.
As for Tim I usually do this:
1. I start right at the center of the forehead line and draw like one bang that cuts through and usually falls on his eyes, and then the bang on the other side that you can see the underside of to show the puffiness of the bang.
2. I basically so some zigzag motion until he’s got like 3-4 big v shapes in his bangs, and usually draw a small line on top to show that it’s separate from the rest of his hair.
3. As for the back of his head, it’s sort of like a wolf cut but the top is very angled and grouped together and then separates into small waves towards the back of his neck.
Im sorry if that was confusing but hopefully the video helps a bit? I’ll try to take a diff Timelapse to maybe show u if u still want more insight into it! Hope this helps a bit tho!
But ty and i hope you have a good day too!
502 notes
·
View notes
Note
I have seen your art for five seconds and I am whole heartedly in love with your style
The way you draw poses for your characters is so fluid and expressive!! It's just so shaped and pleasing to look at each one is so good!! Do you have any tips at all?
thank you so much omg!!! That’s so kind 🥹🥹
My posing and shape probably comes from my animation background— we’re trained to draw solidly so the animation doesn’t morph and also to push the posing in a way that compliments the character’s personality.
If there’s any concrete tip I could give it would be to exaggerate your drawings and to try avoiding the obvious pose when posing. I posted this to twitter showing my “no-go-poses” which are the poses I actively avoid in order to force myself to make more creative choices ✨

358 notes
·
View notes
Last Seen Blogs
i-am-afraid-of-kittys
Bored As Fuck
mmmmart
Amor

weinnoiserie
wei vi, not wei way! 🍮
sawyersheila
Sawyer Sheila