#i tried the 3d effect just this one time
Text

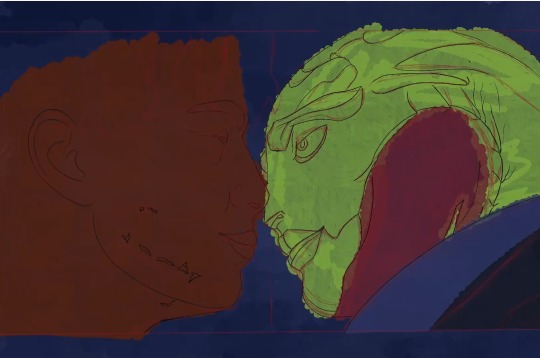
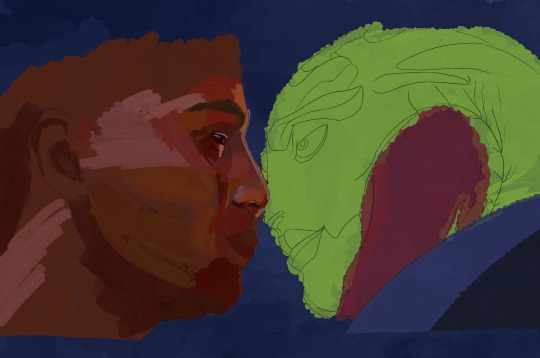
HAPPY ANNIV TO THE GAME EVER
#space channel 5#sc5#ok but for real this game means so much to me#its like therapy but funkier#i tried the 3d effect just this one time#okay im gonna go eat a subway sambwinch now
93 notes
·
View notes
Text
Tips for wring amputees: its ok if your amputee can't repair their own prosthetics
There's a trope in fiction for amputees to always be these mechanical geniuses who can make and repair their own prosthetics, endlessly tinkering away and improving them. This isn't a particularly trope, and i dont think its harmful or anything, but in reality, prosthetics are REALLY, REALLY complicated, and a lot of amputees cant do their own repairs. And thats ok. Like, prosthetic creation and repair is way, way harder than I think people expect. Well outside the skillset of your standard mechanic, handy man or craftsperson.

People who make and repair prosthetics are called prosthetists. To become a prosthetist, most countries around the world today require you to have completed a bachelor's degree in specifically in prosthetics and orthotics, which covers not only how to make a prosthetics (and orthodics) but a great deal of medical knowledge, physics, how different forces impact "non-standard" bodies, the additional biological wear-and-tear that comes with being an amputee and so much more. This will qualify you to do the job of fitting/making the prosthetic socket (the part that attaches to your body) and putting premade components together to make a functioning device. On top of this, many prosthetists are also expected to have artistic skills, sewing skills, good physical strength and dexterity, IT skills, and more recently, knowledge of 3D modelling and printing.
You want to make all the high-tech components the prosthetists put together to make the full prosthetic? The requirements for that vary country to country, but most will require at least some level study in the field of engineering and/or medicine, on top of what was already required for the prosthetics course.
The reason for all this is because even "basic" prosthetics are extremely finicky, and messing up one thing will have a domino effect on the rest of the body, especially in more complicated prosthetics. It can also result in people getting severally injured if anything is even slightly off. many leg amputees for example end up with spinal issues due to extremely minor issues with their prosthetic that weren't caught until years later, and by then the damage had been done.
Some amputees do learn to do basic repairs. This is most common in places like the US, where a visit to the prosthetist can cost hundred to thousands of dollars (depending on your insurance), but it's also quite common in rural parts of countries like Australia, where cost isn't an issue but access is due to vast distances between major cities. I was personally in this category; as a kid, my nearest prosthetist was 6 hours away. My prosthetist was able to teach my dad, who later taught me, how to do some of the simple repairs, but we still needed to go in every few weeks for the more complex stuff (Kids prosthetic need more adjusting than adults because they're still growing. Also I was rough on my prosthetics and broke them a lot lol).
But even after being taught how to do repairs and having my prosthetics for 20+ years, I only ever did these sorts of repairs to my below-knee prosthetic. I will not do any repairs of any kind to my above knee leg, which is much more technologically complex. Every time I tried, I made it worse to the point where the leg was unusable. I just leave those repairs to the guy who went to university to learn how to do it, and sometimes even he needs to send it off to someone with even more specialist knowledge when it's really badly messed up lol. Last time that happened Australia post lost the package. Not really relevant to this post, I just find the idea of it being sent to the wrong place by accident hilarious, it was one of my more realistic legs too so someone probably had a heart attack when they opened that package lmao.
Anyway, back on track lol.
This isn't even touching on the fact that on some more advanced prosthetics, many features are actually locked behind a security barrier only prosthetists can access. My prosthetic knee has an app on my phone I can pair it to, that allows me to change certain settings and swap between certain modes for different activities that tell the leg to change its behaviour depending on what I'm doing (e.g. a mode for running, a mode for cycling etc). but most of the more in-depth settings I can't access, only my prosthetist can, and he can only gain access to those settings with a security key given to him by the manufacturing company that requires him to provide proof of his credentials to receive it. I don't really agree with this btw, something about being locked out of my own leg's settings makes me feel a bit of an ick, but it's set up like this because people used to be able to access these settings and they would mess with things to the point their leg was virtually unusable. Because altering one setting had a domino effect on all the others, and a lot of folks weren't really paying attention to what they were messing with, all their prosthetists could do was factory reset the whole leg, which causes some issues too. Prosthetic arms are often similarly complex, as I understand it and have similar security barriers in place for more advanced arms. I don't know for sure though, so take that with a grain of salt.
All this to say these are incredibly delicate, finicky and complex pieces of equipment. There's nothing wrong with having a techy amputee character who can do their own repairs, but in reality, that is pretty rare, and its ok to have your character need to see a prosthetist or someone more knowledgeable than them. It's a part of the amputee experience I don't see reflected very often in media. In fact, the only examples I can think of in fiction (meaning not stories based on real people) where this is reflected are Full metal alchemist.
technically I think Subnautica Below Zero also mentions prosthetists are a thing in that world, but its a very "blink and you'll miss it" kind of thing...in fact I did miss it until my last playthrough lol.
#Writing Disability with Cy Cyborg#long post#id in alt text#amputee#writing disability#disability#disabilities#disabled#actually disabled#writing advice#writing#writeblr#writers on tumblr#writerscommunity#disability representation#authors of tumblr#prosthetics#disability aids#mobility aids#amputee life#amputee problems#full metal alchemist#automail#amputee representation
2K notes
·
View notes
Text
Okay, to counteract all my complaining, here are some (lore friendly) mods that I just like a lot (no animals, people, weapons/armors, mesh/texture replacers, etc. because there's too many and it gets boring.)
-
Ghosts of the Deathbells: adds a really rare, somber event to picking a deathbell flower.
Falmeroon: adds Snow Elf ruins to some remote edges of the map. I've made an unofficial SE port here.
Snow Whale Bones: adds the remains of Snow Whales in some mountainous areas (iffy canon but sorry they are Cool.)
Windmills of Skyrim: adds windmills with unique, custom-painted sails to farms.
Scarecrows of Skyrim: adds scarecrows to farms.
Scribes of Skyrim: makes books and notes use a variety of typefaces (any fellow Pentiment fans out there?)
The Old Ways-Nordic Religion: adds totems representing the Nordic pantheon around Skyrim. Has patches for the next recommendation.
The Great Towns/Villages series: overhauls the smaller, worldspace towns in a really cool way, includes voice-acted NPCs. Personally, I like Kynesgrove the best because it actually adds to the lore about the Nordic pantheon. For Shor's Stone, I recommend this mod as well.
Redbag's Rorikstead: I like this mod over Great Village's version because the houses have sod roofs and I'm a sucker for sod roofs.
Capital Windhelm Expansion: adds some really thoughtful lore touches (Dunmer refugees outside the walls, an Arena, and a cool vampire quest)
Relic of Dawnstar: adds a Gehenoth skull to the White Hall (requires Cities of the North), inspired by the lore of the Travels game
Environs series: thoughtful additions that makes certain places change over time.
WiZKid's mods: especially Lund's Hut, Lively Farms, Icy Windhelm, Pinewatch, Hall of the Dead Stained Glass Windows, and Pavo's House. Sepolcri is also pretty good but loses immersion points for using celtic cross gravestones. You can pry Lanterns of Skyrim II from my cold, dead hands, though. Lux? Idk her, LoSII is my bestie.
Fancy Sleeping Tree Replacer: the Sleeping Tree is supposed to be a remnant of the sentient trees of the flying city of Umbriel (from the novels.) It should be weird, is what I'm saying, and this mod makes it alien and beautiful.
Unique Culture Riverwood: a mod that gives Riverwood its own style of farmhouse and a little more personality. The author has also made a mod for Falkreath.
Immersive World Encounters: adds more and edits World Encounters, including encountering faction NPCs out and about (ex. the Companions outside of Whiterun doing Companion-y things in the wilderness).
Glorious Doors of Skyrim: adds some really cool doors. 'nuff said.
Redbag's Dragonreach: adds some unique flair to Jarl Ballin's crib.
Cultured Orc Furniture: replaces generic furniture in Orc Strongholds with custom furniture.
Lavinia's Memorial: adds some gifts from her grieving parents to the little girl's grave in Falkreath. Ouch.
Nocturnal Moths: adds moths that spawn around lanterns at night.
Moons and Stars: fixes the positions of the stars and moons, as well as making moon phases consistent.
DK's Realistic Nord Ships: replaces Skyrim's ships with some gorgeous new models.
Morgenstern's Mushroom Circles: adds more fairy rings in the wilderness. Delightful!
Bloodmoon Brodir Grove: makes the grove in Solstheim a little more like it was in the Morrowind DLC. The mod author also has more mods that bring Bloodmoon details and locations to Solstheim.
Ships of the Horizon: does what it says on the tin.
EVG Animation Variance: the whole animation series by Everglaid is nice (haven't tried Traversal yet, but that is some incredible technology) but I especially like this one for the old people animations
jasperthegnome's houses: these are SO cozy and comfy.
Arctic- Frost Effects Redux: makes frost spells have cooler effects (including 3D ice spikes)
Northern Roads- Let Me Guess Someone Stole Your Sweetroads: a plugin that cuts down on Northern Roads, removing all the landscape changes and bridges and just keeping the clutter. Way more compatible than the original mod.
Skyrim Bridges: this is my favorite bridge mod. There are many, but I like this one best.
Edit: forgot two tiny mods in my original post:
Nightcaller Temple Unique Shrine of Mara: replaces the generic shrine with a wooden shrine Erandur carved
Broken Tower Redoubt Unique Shrine of Dibella: similar to the above mod, but Reachmen carved this one.
514 notes
·
View notes
Text
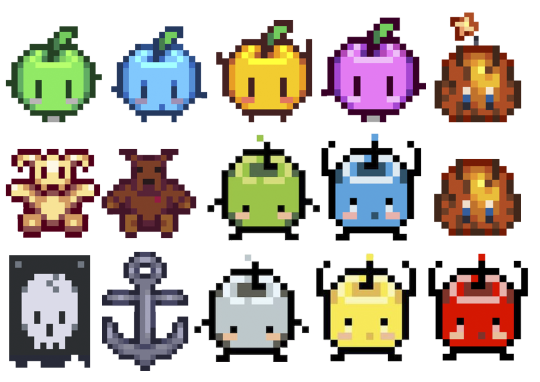
SIMDEW VALLEY SET
🍄👩🏿🌾🐷🐴🐄🧙🏿♂️🌻🌽

Stardew Valley Pixel Art Floors/Walls/Deco (TS4)
Download Below
Aside from a couple most of these pics are just the demo pics showing what's included, more CC in game pics can be seen here
🍄Misc Large Decals


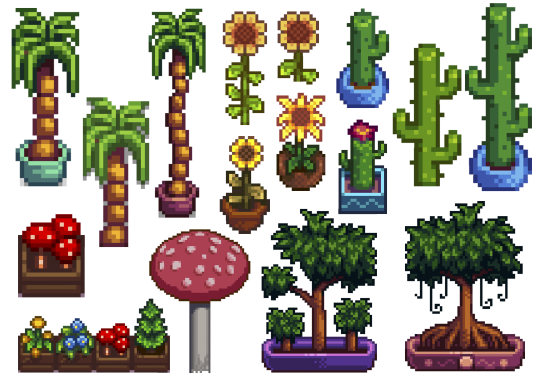
In order: Junimo huts + large Junimos, Holdiay Decor and "sky decor", furniture items, rarecrows, plants.
🍄Wall Decals Paintings and Banners:
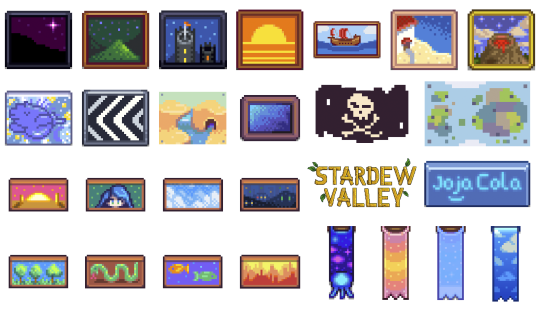
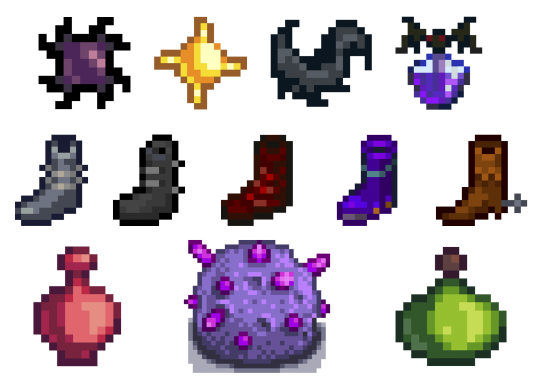
🍄Wall Decals Misc small:
Adventure stuff and boots, small junimos, random furniture items slime monsters different expressions

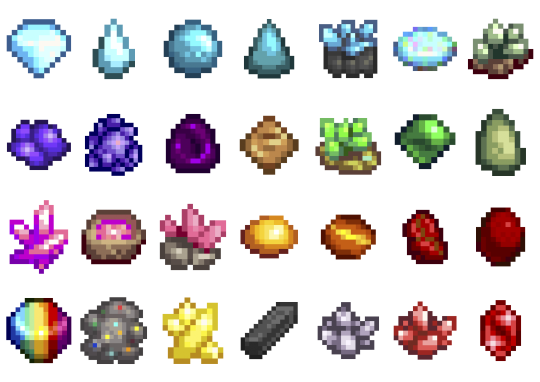
🍄Wall decals Gems and Minerals:
I didn't do them all, just some that I liked.
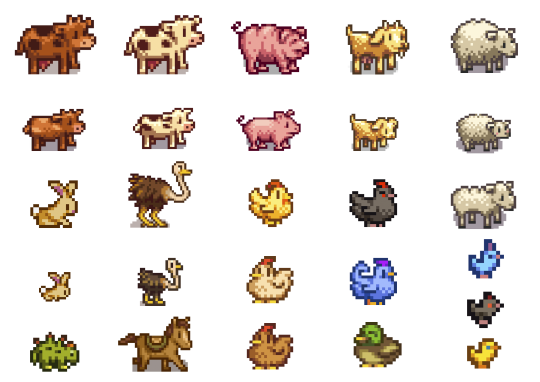
🍄Wall decals farm animals
🍄Wall decals Fishing
Again just the fish I wanted to do, not all:

🍄Wall decals Harvestables, Crops, Products:


Here's a random in game pic (see more in links provided at top or bottom of post), all decals show through glass too!
🍄Stardew Valley Villagers (yes the bear is a villager I refuse to accept otherwise) portraits
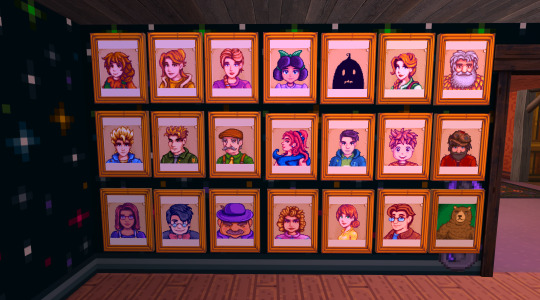
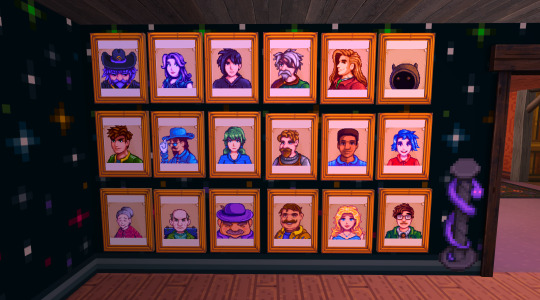
The portraits are the only item with actual dimension, I recoloured a base game framed painting, so these are not flat like the rest of decals. (they look a bit orange but that's just my mood lighting)
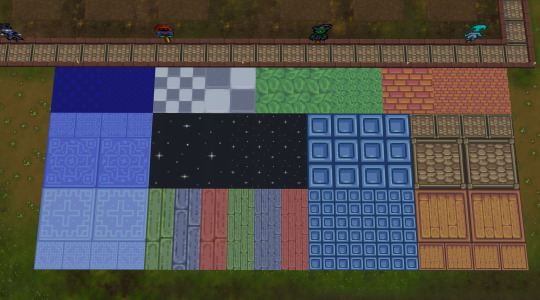
🍄Walls and Flooring (indoor and outdoor flooring)
I did all the ones you see here:

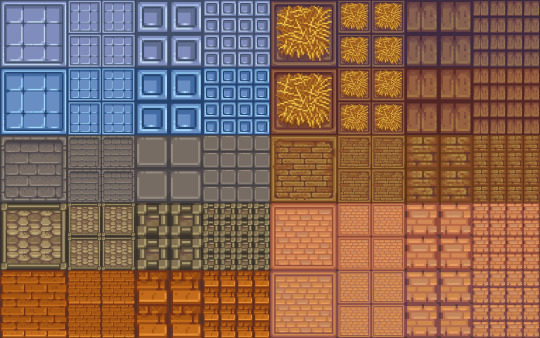

For the floors I made a large and small version of all:
🍄You can see more CC in game pics in my wip post here
Are you sick and tired of those smooth graphics from Sims 4? Do you wish you could replace those pesky curves and detailed HQ textures with nothing but square pixel heaven and flat colours? To be finally rid of all those 3D bump/light effects and replace them with volume-less cardboard cut-out illusion and imagination? Do you want your build/game to look just like Stardew Valley? Or do you simply think that if the sims team are gonna give us low poly and low quality meshes and textures might as well do it properly? Fear not! The solution is here!
I made a new Stardew Valley save (why I need yet another save that I'll never have time to complete I don't know) and tried my first build, the recreation of my current (and only) farm. It was ok but I got frustrated at how "Sims 4" everything looked, and checked for stardew valley cc conversions, art, decor but only find people making it using sims 4 stuff, which is probably the most logical thing but not for me!
So I made this as there are plenty of game assets from Stardew Valley available online and however tedious and time-consuming resizing the tiniest of pixel art images is to fit Sims 4, it is fairly easy and doable, so I did it.
I did skip some items in each category as there are way too many and just did the ones I like, sorry if there was one I didn't include. Also there are some floors in the game or icons that I couldn't find. Some Junimos were taken from the internet but most are individually resized game assets.
INFO: all decals in wall deco, all are zero simoleons, and the portraits are 10. You can find my stuff typing "moonbiscuitsims" or "stardew". All have correct colour filter tags and removed "talk to object (insane)" and "can be struck by lightning" (these things annoy me or could cause more distractions for my sims, sorry if you like this though I'm sure there are plenty of objects to talk to/ lightning strikable objects). I don't know if this has an effect. All the portraits are just tagged as brown. All are resizable to your liking.
Forgot to mention the floors i think are in wood flooring and outdoor flooring; and I think the walls in panelling.
REQUIREMENTS:
Nada, nothing. Just base game. (though I did accidentally make one item from a get to work decal by mistake, I remade it to fix it and I've play tested everything, but let me know if something doesn't show up.
PLEASE READ AND RESPECT MY TOU AND DO NOT ❌❌❌:
- ❌ Reupload
- ❌ Include in sim downloads
- ❌ Put behind paywall of any kind no matter what.
- ❌ Claim as yours.
If you wanna use the texture files to make other different original content that is fine as long as it is different from mine and NO PAYWALLS and no reuploading my stuff.
The images are from Stardew Valley, but I spent ages editing every single one to fit the sims, and this took me days to do. All my stuff is free. I don't care about conversions to ts2 or ts3 but NO PAYWALLS and please tag and credit me. If used for screenshots please tag me too, I'd love to see <3
🍄DOWNLOAD (including a pick and choose or a merged file with everything, don't get both)
Enjoy! Happy Simming/Farming
Stardew Valley fav music playlist 🎵🎵🎵
#moonbiscuitsims#moonbiscuitsims4#moonbiscuitsimsstardew#moonbiscuitsimscc#moonbiscuitsimsphotos#stardew valley#sims 4#the sims 4#ts4#sims cc#sims 4 cc#ts4 cc#stardew valley sims 4#sims 4 stardew valley#sdv#sdv fanart#stardew fanart#stardew#stardew valley fanart#sdv farmer#ts4cc#sims4#sims 4 custom content#the sims 4 custom content
69 notes
·
View notes
Text
there is nothing to do, there’s nothing but you 🍥
i keep seeing people relate non dualism back to cause and effect. you do “x” to get “y”. how am i suppose to get this. how am i suppose to be aware of that. how am i suppose to be. and im afraid you got non dualism all wrong. because its just you.
everything is consciousness. you are consciousness. that is it. thats all. theres no physical world theres no imagination theres no 3d theres no 4d theres no infinite realities, there is no getting, there is no pleasure, there is no pain. it is just you.
that not making any sense? that’s okay. its not going to. you already know this. as consciousness being and everything you are knowledge itself. any concept of source or learning comes directly from you. your “self” already knows this. its your ego, the false sense of “self” getting in the way. its just you.
so then how do things exist? like time, what you see, money, other people, food, desires? they dont. theyre not real. none of that is real. why? because only consciousness is real. they appear to exist “physically” because you are aware of them presenting that way. its just you.
meaning doesn’t come first. you come first. you are the only thing that exist. and as existence you give existing things its meaning after they come to your awareness.
whatever you are aware of is what the human body experiences because you are a being of consciousness experiencing the human condition. you are not human though, you are consciousness. consciousness is the only thing that exist therefore its the only real thing. its just you.
this is why there is no separation. you as the conscious observer experiencing the human condition are conditioned into believing whatever the body experiences (your 5 senses) is real. its not. you are more than the body. you have control over what you experience due to your awareness. its just you
understanding that you are not actually human you are a being of consciousness playing the game known as life, you can transcend needing to feel validated by what you experience physically. the “3d” doesnt validate at all. its what i am most used to but as consciousness i know what i am. its just u
now let me be clear. the 3d doesnt exist validate me because i am a being of consciousness. however my ego, the false sense of self where my thoughts doubts and fears reside does get validation from “physical experiences” it doesn’t understand its not just experiencing it physically. the ego, like ur inner child, cannot comprehend that its not actually human, in control, or real. as soon as it tries, the human condition jumps in and brings up the thoughts doubts and fears. thats okay because thats its job. your job as the observer is to not react because you know its just you
the ego may be scared of rejection and thats fine. the ego isnt in control so let it throw its temper tantrum. let it cry, scream and shout. you would also let it be happy and carefree right? why is one emotion worse than the other if neither are real in the first place? its just you
with all of this, the main point is that it is you. thats all there is. nothing to understand because you already know you exist. nothing to get because you’re everything. nothing to “try” to be because you already are. its just you.
“how do i get-“
“how do i experience-”
“how do i become-“
“how do i be?“
its just you. you are. you got it you experienced it you became it so now be it. congratulations! its done!
© itgomyway


189 notes
·
View notes
Text
GUYS!!!!! I DID IT!! I PUT THE PIECES TOGETHER, AND I KNOW EXACTLY WHAT MANIFESTING IS AND HOW TO DO IT NOW!!!!!!!
Ehem. Sorry. I'm very excited at the moment. Without further Ado, here is my epiphany from today!! As always, these are just my personal opinions, so take what resonates and leave the rest ❤️
The 4D is one part of reality. That is to say, imagination is an entire half of our experience. The other half of our experience is, of course, the physical reality, or 3D. This makes up one portion of US; I call it our awareness, and it is also called our consciousness. The other part of us is the part that remembers everything, known as the subconscious mind in the community.
The subconscious mind is often referred to as the creator of our reality, and in reality the subconscious mind is just as much a part of us as our imagination and our actual physical reality. Basically, the subconscious is our god state, higher self, etc. When we access it directly, we get into the void state, where we are pure consciousness, with no awareness.
So okay, we are consciousness and the subconscious, but what does that MEAN? The answer is so simple, and it's something repeated time and time again: you create your reality ENTIRELY. Every single thing (and this includes bad things like trauma, more on that in a sec) is created by your mind, because you aren't just awareness, you are also reality itself. The subconscious mind is everything and nothing (the void). It remembers everything but sees nothing, instead it reflects what happens in your mind onto the outside experience. Meanwhile, the conscious mind is the one that feeds the subconscious its information; it is the part that actually thinks. This is why changing your thoughts or your imagination or affirming or scripting WORKS. It's because you are BOTH the creator AND the creation.
Basically, our perception of reality and our perception of our thoughts is one part of us as a whole being. The other half of us is reality itself, every single possibility, waiting for us to tell us what is true so it can create that experience. That is why we can manifest. It also explains eiypo, because everyone and everything IS you: reality is literally created by your thoughts.
Okay, now onto explain why bad things aren't your fault, but first we need to understand that our mind tries to protect us from fully realizing our potential. Even as babies we were master manifestors, and as children we are better at manifesting because we have less limiting beliefs, so our mind needs to create barriers to protect us, because otherwise we would create our realities and possibly get hurt. Also, what child is ready to realize the responsibility that comes with this?
So, the mind plays a clever little trick on us, and separates our conscious and our subconscious minds, thus creating the effect of reality being your thoughts filtered by your EGO, which is basically you but without the knowledge that you are literally the creator of everything.
The good news is, you can TOTALLY bypass this whole thing by purposely affirming and ignoring what your senses are telling you. The subconscious mind is separated from your awareness, so it only has your neuron pathways to go by (basically the pathways created by your consistent thoughts), and it takes the information from those pathways and converts it into reality. Most of the time, reality is fixed, because most people don't know that they can control it, but once you find out how to, you can create these same pathways by just believing in something.
I like to refer to reality as being an elaborate scheme by your brain to make you not realize you're a god lmao.
So basically, until you learn to control it, this process of manifestation is controlled by the ego, and not by you directly. Because of this, you manifested/ created your trauma, along with everything else, but it is NEVER your fault that bad things happen until you FULLY realize your highest self, at which point you will have total control over your reality.
So how do you realize your highest self? It's really easy really! Just think how you normally do AS YOUR GOD SELF. Know that you have everything you want, because you are EVERY possibility, reality, circumstance, person, etc. Everything is you, everything comes from you, and nothing will ever stop that, so use it wisely.
Did I explain this well enough? It's kinda all over the place but I REALLY hope it makes sense because this is literally my thoughts in the god state. Good luck everyone!!
#law of assumption#master manifestor#law of attraction#living in the end#manifestation#manifest#manifesting#self concept affirmations#loassumption#loa
2K notes
·
View notes
Text
I like seeing people's progress shots / how they edit, so might as well make mine :D I'm nowhere near perfect with AE, but here's a quick look into my editing process 👍
First I think of the clip in my head and choose the main angle. In this case Toothiana serves as the main anchor point around which the rest of the composition builds on. Since there're very few Tooth masks around, I had to mask her for the scenes myself.

Next I go through masks for each character and pick or create ones that fit the camera angle well enough. I also add the background and play around with the composition til I'm satisfied. (Tried to have Merida in there too, but it was making the shot too full so she's standing next to Punzie offscreen 😭) The masks here are by me and xMakorra.

Okay, since it's night time in the scene (lot of my scenes happen at nights lmaoo) next I need to get the color and atmosphere right. I'm using 3D spotlights as I've found out they usually work better for darker scenes than just fiddling with the color balances. The overall light is dark blue, with another faint red on top. See how it immediately changes the setting 👍

Then I just start playing around with details and effects. I work on each character/layer to make them match the overall tone, for example here Jack and Hiccup needed adjusting as they were a bit too dark. Basically I just tumble around til it somehow works out lmao✌️ I also add details and final lighting to the characters here, making the scene come together. It's important to decide on the light source directions. As a cherry on top comes an adjustment layer with some faint light ray and glow effects.

And done :D Next I throw the clip to Sony Vegas (after re-rendering it into .mp4 because the AE .avi renders are HUGE in file size) where I add the black bars, a faint color overlay and subtitles to give the final "movie look" lol.
Wow this was way too simplified take but anyway, here's a glimpse on how I build my edits✌️
47 notes
·
View notes
Text
.......sooooooo, i saw @stiffyck (and friends)s mermaid au.......
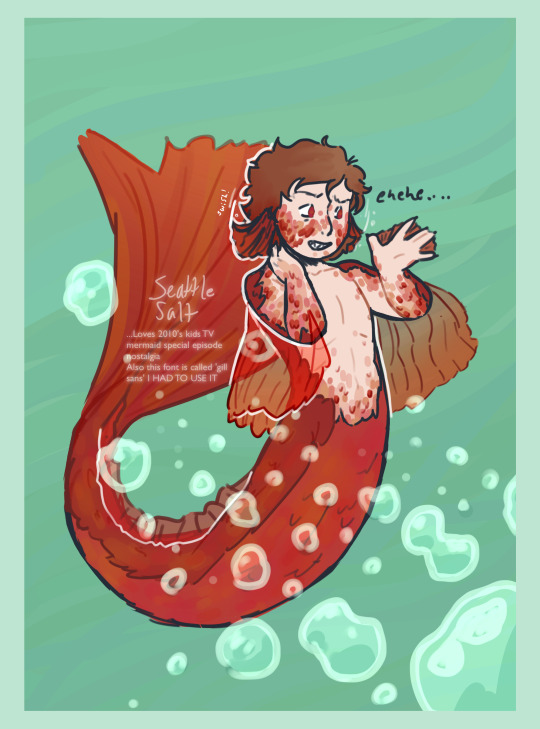
According to the contract i signed, every art piece has to come with 6 paragraphs of rambling, so here ya go.
8 year old me (obsessed with mermaids, would play 'mermaids' in our pool with other kids, huge huge fan of every 'protag. of childrens animated show gets special necklace that lets them turn into a mermaid' show) would absolutely love where i am now. Mermaids were a big part of my childhood! I loved 'em! And i guess i never grew out of that, lmao.
Jake and the neverland pirates, barbie, dora the explorer, sofia the first... they all did it. they all had the 'human girl turns into mermaid for an episode and meets a mermaid bff'. I always loved the Dora one, i got it on DvD from my local library... good times :)
Anyways, if this was a special episode of a looking-back-the-graphics-were-terrible-but-the-music-kinda-slaps 2010's 3d animated disney channel show, Scar would 1000% have a misunderstood-villain-esque song where he maneuvers Grian (about to pass out from terror) into a dance and mourns his lack of company, complete with fish themed puns every other line, a big finish, and effects made of bubbles and sea creatures. Like, poor unfortunate souls from the little mermaid meets shiny from moana meets be our guest type beat.
I like to imagine the bubbles are the tail end of a transition to a comedic scene where grian is distracting the guards with terrible lies while scar tries to sneak into the castle where grian plans to hide him. and then the guards would almost turn and see scar and grian would have to yell 'WAIT' and come up with more bs while scar is struggling with various Shenanigans that get in his way.
i have very,, very specific thoughts about this au (if it were a kids tv show, lmao) Can You Tell :D
Idk man, i just love mermaids, this AU, kids TV nostalgia, and satisfying my inner child even though i am Way off from what this AU was originally intended as. Anyways see yall ✌️
(Non-bubbly version under the cut)
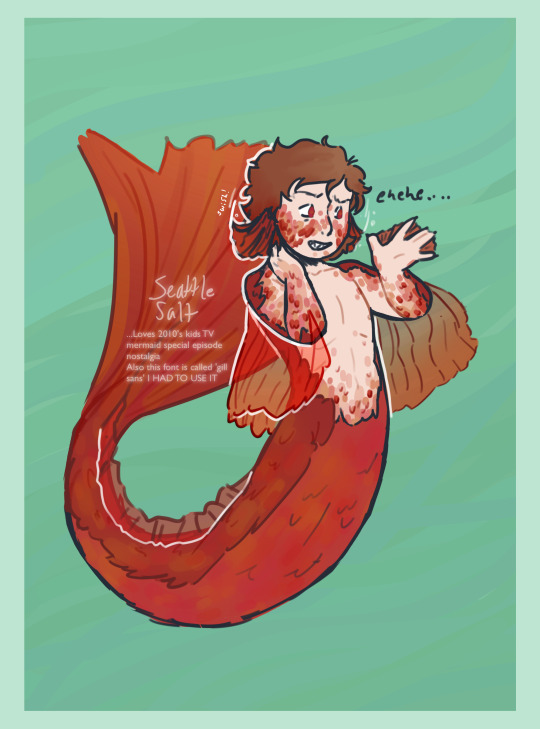
#SORRY FOR RAMBLING FOR 9 PARAGRAPHS#AND FOR TAGGING YOU IF YOU DONT LIKE BEING TAGGED D: (I never know whether to :'[ )#seattlesaltsartowrk#grian#mermaid grian#grian fanart#grian art#hermitcraft au#hermitblr#mermaids
146 notes
·
View notes
Note
also. i was going to ask this before but i didnt know how to word it: any zelda tropes you like/dislike? stuff like fairies being guides for link or the concept of sages/Legendary Sword or how link and zelda are always depicted or reoccurring characters like impa or beedle or epona. though theres probably not. a lot of tropes considering most games are vastly different from each other. uhh yeah if youve got nothing . things that were done from a zelda game that you liked?
OOH. tbh I had to think about this a bit (my gripes are usually with the fandom and how they depict the tropes as a Strict Narrative Rule) but! I do have some
UH ONES I HATE. this is gonna be long no matter what so it's going under a cut
Number one has got to be making link into a super special boy for basically no reason!!! being from a special type of knights is. so irrelevant to everything else about alttp link that I think a lot of people legitimately forget this. it barely ever comes up and it's honestly not that important to the story except as an excuse for why link's the only one that can grab the pendants and pull the master sword, which. why not just have him be the one to do this because he's just really determined? Ocarina of Time...tried this, sort of? almost completely irrelevant AGAIN. in twilight princess and wind waker they are just some guy basically and this is the best direction they could have gone with his character. except they ruined it in botw and ss and I will neverrrr forgive them for this. botw link beats up grown men at five years old he's like superbaby instant knight and I HATE it. it's just stupid. I don't even care that it applies pressure to him as a character and seems to affect him; they could have just made it an in-universe lie and it would have had the exact same effect so genuinely screw that trope
number two is calling random soldiers knights stop fucking doing this. i dont care that its fictional fantasyland it annoys me
number three! the 3D games' great fairies! I hate almost all of them the oot/mm great fairies are freaks, botw ones are so pretty but they're creepy as hell, and twilight princess is just a naked lady and it's stupid I hate her. wind waker minish cap and alttp fairies are gongeous though
number four. everyone thinking link is cool and or hot. I hate this in universe and in the fandom. I don't care that the devs wanted to make him """"cool"""" he's 100% always a LOSER!!!!
number five I hate the hijacked by ganon trope in zelda games so much. STOP ffs please let ganon/ganondorf take the spotlight we all love him. or let another villain be the main baddie
ok now for ones I like :)
nunberone...SENTIENT MONSTERS SENTIENT MONSTERS BABEY SENTIENT MOSNTERS ILVOE SRENTIERHSDJKFHSFHAAAAA
GRRAAA ITS A SECRET TO EVERYONE!!!!!!!!!!!!! MOE THE MOBLIN!!! KING BULBLIN SAYING HE FOLLOWS THE STRONGEST SIDE!!! THE ENTIRE DARK WORLD ITS SO
two. npc companions...rips off my shirt to reveal another shirt that says I LOVE MIDNA AND TATL AND EZLO AND KING OF RED LIONS AND GHOSTIE ZELDA AND MEDLI AND MAKAR AND TETRA AND SIDON AND YUNOBO AND
number three...I love random gods and spirits that are just hanging out because. keaton malanya zephos satori light spirits what have you. theyre great I need more of that.
number four incredibly weird npcs. need i say more
number five soldiers being extremely incompetent and dumb or getting possessed. soldiers as enemies or easily corruptible people
number six that one character that doesn't like link. you know what i mean (revali. groose. mido. iirc ralph? maybe? I haven't played much of the oracle games)
number seven hyrule with a dark and bloody past. and not only that but a fairly simple presentation of it that's clearly hiding a more complex underbelly. its just neat to see simple, clear-cut writing tell you so much with so little. it's a big reason I love alttp; it's simple but there's so much grief in it
number eight uh. clawshot/hookshot :] good stuff
12 notes
·
View notes
Text
@dandenbo asked me for the art asks:
🎠What is a typical 'workflow' for a piece from idea to finished?
It turns out to be a long answer so here's its own post, under the cut to save your dash!
How I go from screenshot to painting:
(This is not intended to be a 'this is how you do it!' kind of guide. I absolutely don't do an optimal route, this is just how I go about painting and what works for me! I've done a workflow for a screenshot to painting as I do a few different things but this is one I could explain somewhat coherently. My comics tend to be created pretty chaotically lol)
1) I take an ungodly amount of screenshots while playing. Also pester friends for their screenshots or stalk the group discord for interesting shots.
2) Go through all those screenshots cursing why I took so many, looking for those great moments that I want to paint. I’m particularly looking for nice poses/captivating moments, dynamic lighting or interesting expressions, and they don’t need to have all 3 as we can fix some of that in the next step.
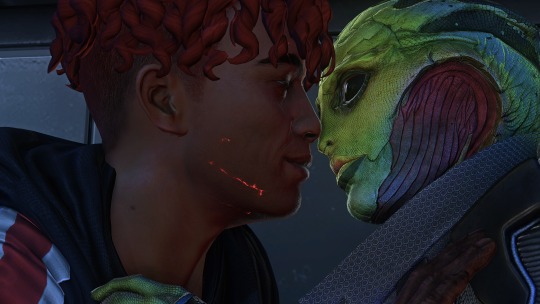
Here’s the screenshot I chose for my Keahi x Thane piece:
It was a cute, soft moment between them and I liked the highlight at the edge of their profiles.
3) Refine the screenshot.
I don’t use anything fancy for this. I game on windows PC, so I open up the screenshot with windows photo editor. I crop the image, play around with saturation, exposure, contrast, just basic editing until it looks tastier. For this piece I wanted it to be hyper colourful and vibrant, leaning towards warmer tones.

4) Decide what I will change, then gather references for those changes.
In this case I was fortunate that not a lot needed changing. I knew I wanted to move Thane’s eye position to looking at Keahi rather than the way he is slightly off focus, do a more realistic ear with earrings for Keahi, make Thane a little more smiley and lower his eyelid and give Keahi nicer eyelashes. I keep a whole bunch of art guides and tutorials on my PC so I grabbed the necessary ones and sent them to my ipad ready to have on hand for the sketch stage. I have Thane’s character model in XNApose, so I can check things like his eyelid specifically in that (this is actually for a different project but shows you what I mean)

If I was going to change up the lighting/shading I would also gather references for that. For example sometimes i’ll take screenshots of lighting schemes I love from films/tv shows (think the strong teal and orange scheme in Mad Max or the neons of Blade Runner). Or for precise shadows, I can again use XNApose. I also have a little 3d printed Thane head I can shine a torch at and take photos of to get shadow ideas. For humans there’s lots of reference to be found with online searches, I find pinterest more useful than google for this. For specific expressions or body parts, i’ll just take photos of myself (hand poses, smiling from the right angle etc.) My camera roll is an interesting place. I have drawn drell frills on my neck and on my chest before to see how the lines would fold at certain angles.
5) Setting up a canvas
I work in procreate. For a piece like this I try to go pretty big, say 5000 x 4000 pixels, then i’ll crop down later as needed. 300 DPI.
As I work, I’ll make duplicates and continue on the copy each fresh session. When i’m finished I make a backup save of the PNG and .procreate files on an SSD.
I immediately turn the background colour down to a more muted colour to not burn my retinas. If i’m using a textured background like an oil board i’ll insert it, and any overlays like canvas effects. Set up my layers from the start basically for easy toggling throughout. I try to be good and label things to make life easier, it doesn’t always happen though.
I don't wear a digital glove or use paper effect screens but I do have a bottle of screen cleaner and a microfibre cloth handy at all times.
6) Sketch.
I’m still very much learning to draw. I tried for a long time to do the classic ‘ball for a head, draw the planes/lines etc. It was a constant struggle and never clicked for me, the ball especially always made things much worse, turning a circle into a 3d image in my head just does not happen. I find it better to just start drawing and work things out as I go (I use procreates reference window to see my screenshot).
So I’ll have my sketch in one canvas, and i’ll also have a second canvas with the photo ref on it at the same size, and if I feel like something is really wonky and off i’ll test my lines over the photo to see what’s gone wrong, then go back to the sketch and correct the areas that revealed. Sometimes I’ll use the grid feature if i’m getting stuck.
Here's a few of the sketch stages:


Here I tried out the lines on the photo and noticed that Thane’s frills were a little too far to the left, and Keahi’s eyebrow needed to arch down towards the nose.In the next pass I correct these:

Also, and I know i’m gonna get side eye from some people for this but I really could not care less to be honest. On some pieces i’ll just trace the screenshot. Sometime I just want to get to painting, am not in the mood or mindspace for a learning experience, and this is a hobby. It’s my screenshot, no one is getting ripped off. My latest Javik piece was done this way 🤷♂️
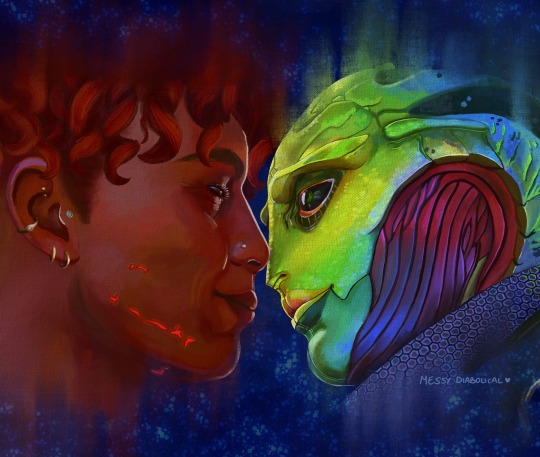
6) Painting.
I’ll start by blocking in the background and the portrait flats, usually on separate layers. I try to have an idea of the background colour from the start as this can effect the whole piece overall, but sometimes you just gotta change it as you go so having it on a different layer makes this much easier.
The painting itself I’ll lay down wider areas of colours, then start going in and refining bit by bit, I tend to work on one area at a time, and sometimes I’ll get pretty well rendered on a small area before moving on, other times work on a wider area. It really depends on my mood and what i’m vibing with that day. Like you can see here I’ve done some general messy colouring all over Keahi, but done a lot of refinement on the eyeball:
7) Finshing the piece, uploading and testing:
When I’m sick of rendering the painting and don’t think I can add anything more to it without gnawing my own wrist off, it is time to finish up! I make sure I toggle all the layers I want on, add a top signature layer (lol I lie I forget this all the damn time). Then i’ll upload the piece to my google drive and open it up on my big 4k monitor on my PC, and on my phone, and see how it looks (my ipad is a 9.7inch air). I find that once off my ipad, it often looks a little less saturated and contrasting as it does in procreate. So I might go back and change the levels if it’s too big a difference until it looks decent across devices (it’ll never look perfect on them all though, just gotta find that happy medium).
8) Posting online
I really don’t have any strict steps for this. I know some people go for optimal posting times, and will make multiple copies of their pieces in different sizes to fit better on different sites (damn you instagram and your need for everything to be square). I… do not do any of this lol. I post when I’m done whatever time or day that is. I do tend to reblog/retweet etc before I go to bed, as I live in the UK and that will at least be getting into evening time in US. I reblog my own stuff a fair bit.
15 notes
·
View notes
Text
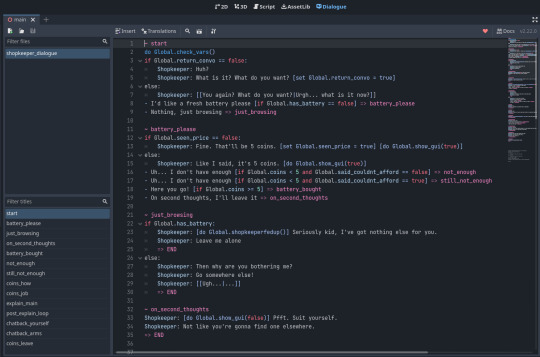
So while working through game concepts and deciding what to work on next, I've been refreshing my Godot skills. Wanting to get back into 3D and prepare for doing more narrative heavy games. Made this demo to learn nathanhoad's excellent Dialogue Manager addon and also test drive Kenney's new Godot platformer kit.
I'm really, really enjoying Dialogue Manager so far and feel it has a tonne of potential. Think it covers a lot of things I've been looking for:
Direct engine integration is super useful, as well as using custom resources to store dialogue. They're also text files so can still use external editor to update
Straightforward syntax, reminds me a lot of ink and yarn. As well it's named node approach feels familiar
Able to access global game variables for conditionals, and having conditional based loops and choices is very straightforward
Also able to call methods directly within dialogue, which is super powerful when combined with signals (showing/hiding coin UI mid conversation, playing sound effect)
Lots of options for random dialogue choices - just used the single line ones for now but in docs have seen they also have option for setting custom probabilities, just ncie to add more flavour
Hyped it has a built in approach for translations (create IDs and reference CSVs) that looks like integrates with Godot's localisation tools - a bit of a future thought but glad it has stuff to help built in
Docs you can mention you can create dialogue resources at runtime. Can imagine this being very useful - an example would be creating a record of all lines seen to replicate Ren-py's "log" feature.
The methods for displaying dialogue are super flexible. At the moment just used their example balloons but looks like it should play nicely to let you build custom GUI - and maybe even multiple forms (e.g. dialogue scenes vs flavour barks in main game world). Think next experiments will focus on this.
There's a few more things I'm keen to learn and see if they're feasible with this - "disabled" choices that still appear but can't be accessed would be nice, also looking at how you can integrate this with an audio system for voice acting - I think they have an example that includes voice acting?
Only thing I'm a bit nervous of is it looks like it can only grab variables from autoload/global scripts, so when putting into actual game will need to take care with save systems and methods for loading choice variables into a choice master global so we aren't keeping too much in memory at once. But if I'm wrong on this assumption, or others have approaches, more than happy to be corrected on this!
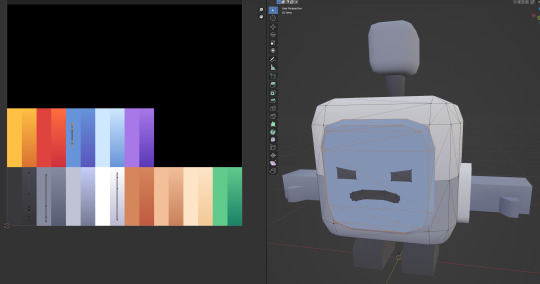
Also really enjoying Kenney's 3D platformer kit and it's been fun and . Making the shopkeeper bot was super simple. All the details on the original character model are modelled so just adjusted the face and for changing colours just had to move UV islands for limbs and face to different parts of the pallete textures.
Haven't tried this technique for modelling and texturing before but seen it crop up a few times so will definitely experiment with this in the future. Also might help with optimization - I think most of the materials in the pack refer to this single image texture? By default the pack only has the model glbs and a single colormap png so assuming that's how it's working.
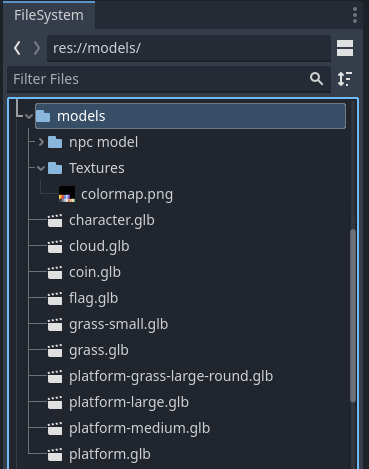
Original plan was to fill in the shop with another pack so there's a few little platform challenges within this, but they all needed collisions adding so might add that in future. But main aim was focusing on the dialogue and think we've got a good approch going forward, and highly recommend the add on for other Godot devs making narrative games!
#Godot#game dev#godot 4#game development#dev log#game dev experiment#interactive fiction#dialogue system
37 notes
·
View notes
Text
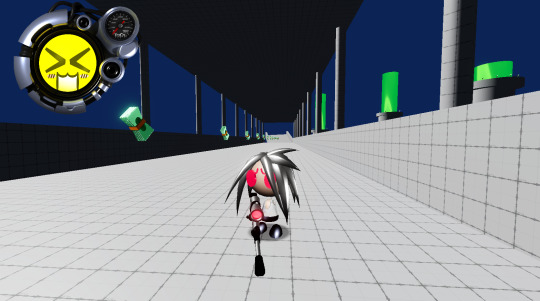
.50 Caliber 3D Platformer Post #5
(Flashing Lights Warning near the bottom of the post)
UI UI UI UI UI:
I've been working on UI mostly the past couple of weeks. It has been, as usual, both very cool & fun but also hell and evil. To be more specific, I really like designing the visual aspect of UI, but implementing it is always so horribly tedious and boring that it is really hard for me to focus on doing it. Without fail, I always end up getting UI done very slowly because of this. I am really happy with what I've got so far though, and it has brought me one step closer to getting to the point where I can just start hashing out levels.
Making the Health UI:
The health UI was something I was extremely excited about implementing, so I eagerly decided to decide that it was time to make it. Let me step u through the process 4 fun.
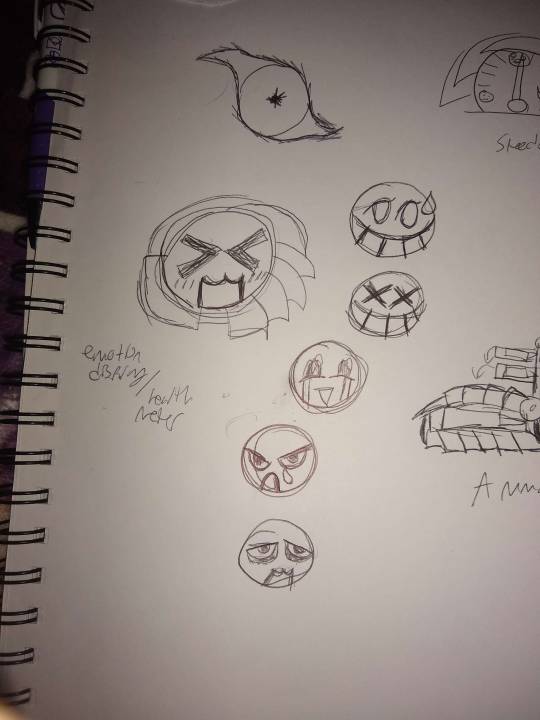
For me, it always starts with sketching out something crudely in pen. I've had this sketch done for months now, so it was p cool to see it finally come to life in game.

Next I hopped into blender and began trying to make some kind of cool y2k-era greebled out shape, but making detailed machinery (or details in general) is not my strongsuit, so I ended up with this kinda neat smooth shape that I wasn't entirely happy with. It looked cool, but I really wanted to challenge myself to make something closer to the windows media player skins I was inspired by.


More Specifically, I referenced this Half-Life 2 windows media player skin heavily, and started with a ring that I could build little pieces and wires off of. I hope u can forgive me if I maybe made it too similar lol, but I tried to get creative and put my own spin on it. I think the shapes on the top left are the most similar to my reference, and those are not-so-coincidentally the first bits that I modeled. This is my first time modeling something in this style, and I suspect that I'll get better at it if & when I do it again.

Finally, I slapped some materials on, made a texture for one of the faces I had sketched out, and rendered out a few frames of it gently(ish) flashing. I then went into affinity photo and made little speedometer components to slot into the small circle in the top right and programmed some functionality to it. The plan is to have the face represent the player's current health, so I am going to need to make a few more and then animate it rotating into a different face. But yeah, I am super happy with it, and I think it is lookin p sick!
Other Stuff What I Made:
Other than the health UI, I also added in functionality and UI for completing a level and selecting a level.
I was very much inspired by killer7 for the sequence that plays when you shoot your target, and I am addicted to intense flashing lights, so I included a lot of that. There are already accessibility options to turn that off, so if it's something that could harm u or if you just hate it (coward????!!!11) you can disable them. I've always found intense effects like that very cathartic, so I'm probably gonna include similar visuals in a few different things I make. That being said, I do also always want to make the alternative visuals (when the accessibility options are enabled) to also be cool af and get the point across. The level select screen was also really fun to make, I basically just slapped together some textures of warn-out paper into a little files situation and placed that on top of an abstract background that I made in jwildfire.
Conclusion:
I have honestly really loved working on this so far, but there has been a lot of anxiety about money in my life lately, so I really do hope to get this out in a reasonable time. I feel like I say that a lot about this game, but it is because it's always on my mind unfortunately. I don't want to make it sound like I am making this game entirely for money or w/e though, it is definitely a labor of love. Anyways, I hope to get to a point where I can get some environment art done soon, and I cannot wait to show off whatever this game is gonna look like. Have a nice day every1!
#screenshotsaturday#indiegamedev#gamedev#indiedev#game development#indiegames#y2k#y2k aesthetic#3d platformer#3dplatformer#sniper rifle#windows media player#50 caliber 3d platformer#50 cal
69 notes
·
View notes
Text
Writing an enormous analysis of the patch is all well and good, but what do the balance changes actually mean for the meta?
Well, for one, I don't think any of the top tiers are going anywhere despite their nerfs, not even Sloshing Machine. Splash, Machine and Stamper all just have too much to recommend them. That said I think Neo Splash is probably leaving the top tiers, as with the paint and points for special nerfs it'll have a tough time competing with the Tentatek Splattershot for the short-range Triple Inkstrike Shooter niche (as a reminder, Ttek's Tri-Strike only costs 190p!)
The big, big winner this patch, however, is Ballpoint Splatling. It is the top tier weapon that got hit the least by a significant margin, only gaining another 10 points for its Inkjet, which only really undoes a buff it got in 3.0. Ballpoint was already considered a contender for the single best weapon in the game by a lot of pro players, and now it is no competition at all. Double Ballpoint is probably gonna become a pretty popular competitive team setup, and that would be bad for Splatana Stamper in particular, as it doesn't have a great matchup against Ballpoint (good lucking try to use Zipcaster while a Splatling is looking directly at you!). If Stamper exits the meta then this would be the reason, not the nerfs it got, though they hardly help.
In response to the rising stocks of Ballpoint and Inkjet, people will start looking for an answer, and the newly buffed Big Bubbler might just be what they're looking for. It remains to be seen for sure, but after the buffs it takes an Inkjet four shots, basically half its duration, to break the bubbler shield, and that's when hitting the weak point. It still gets torn apart by Crab pretty fast, but Crab in turn is very weak to Inkjet, and hey, would you look at that, we've got a bit of a rock-papers-scissors thing going on.
The fun thing about the weapons with Big Bubbler is that I could see people going to any one of them for their Bubble needs. Jr is always a good go-to option, though it lacks punch in the fighting department. Blaster, Splat Roller, and Zink Mini Splatling are good alternatives if you want to scrap, though none of them have a lethal bomb, and that's broadly speaking a downside in competitive play. Finally, there's Squiffer and the new H-3D for long-range options, and I know some competitive players, like ThatSRB2Dude, were eying the latter even before the Big Bubbler buffs.
Another good thing about Big Bubbler is its new resistance to Tenta Missiles, and that might genuinely matter in the face of Wiper Deco (or Diper, as some people are rather condescendingly calling it), with its 190p(?!) Missiles. I really don't know why they cost that little, and I don't expect them to stay at that cost for very long. Missiles have always been very strong, but so far none of the weapons that have them, except Flingza, have had any meaningful impact on competitive play, and Flingza has been very heavily nerfed as a result. Wiper Deco does not just have the lowest points for special out of all Missiles weapon, it also the only one of them that can really fire off its Missiles and then go in to fight the people that are being targeted. This is a big reason why the Kensa Splattershot in 2 was as good as it was, and we've never had a weapon that could really replicate it, until now.
While Wiper Deco is looking threatening on the surface, it remains to be seen if it works out in practice. Without a bomb it will likely have a hard time dealing with Ballpoint, lacking the range and DPS to fight it effectively, and Ballpoint is looking to step up in a big way.
Speaking of unknown factors, there's also the S-Blast '92 and the Painbrush. S-Blast's kit is largely seen as underwhelming, but datamining has shown that the weapon itself is looking incredibly solid, a mix of many of the best traits of other Blasters with very few of their downsides, and that might be enough to carry it into competitive play. Painbrush is looking like it will have excellent range, damage and paint, but absolutely atrocious ink efficiency, some of the worst in the game, in fact. Inkbrush and Octobrush have both seen competitive success, though the former a lot more than the latter, and Painbrush might find a niche as well, especially in Splat Zones, though it remains to be seen.
But all of this is just speculation, though. All we can know for sure is that competitive play will very likely revolve heavily around Ballpoint for the foreseeable future, and that is going to be shaping the meta until the next patch. By hitting all of the top tiers with nerfs, some of them very hard, Nintendo more or less uprooted the status quo of competitive play even before you consider the new weapons, and I'll be very interested to see how things go from here.
52 notes
·
View notes
Text
Human Korvo but It's Real Dan Stevens (Made with Stable Diffusion/Photoshop/MTXX)
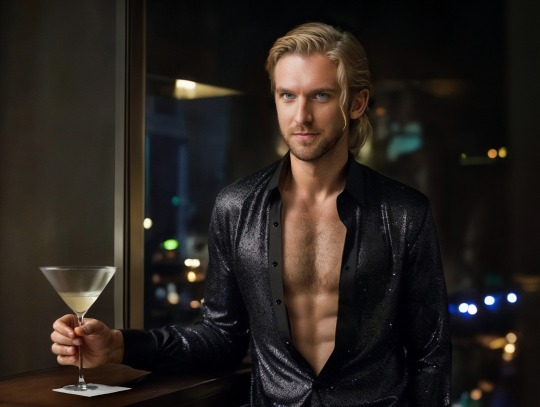
(Here is a screenshot of Solar Opposites S4E11 to compare)

First of all, I understand that there is some controversy on AIGC currently... However, I still decided to post this work here. Yes, I call it “work” because I had spent at least 5 hours to make this image, and I went through hundreds of small steps to achieve this effect. It's not perfect, of course, since I basically know nothing about drawing and photography…but I tried my best.
To make this post more "meaningful", here is the complete detailed workflow (FYI: It's VERY LONG. Here is a 1-minute summary video I made, in case you wanna save some time:)
Preparation stage:
①A base model (or base model+LoRA/Embedding, depending on your need). Normally people use LoRA for a specific person’s face, but I’m not using LoRA for Dan because small models don’t reconstruct his face very well. I’m using a base model (in my case, Serenity V1.0) trained on his photos with Dreambooth. I trained this model 3 weeks ago so it’s ready to use.
(If you’re wondering, “why not using Midjourney to generate celebrities?”, the answer is, Midjourney does a terrible job generating Dan’s face. Also it strictly forbids NSFW. Even just mild NSFW.)
②An OpenPose map and a Scribble image, to use in ControlNet (an extension on SD WebUI). I made a screenshot of the posed dummy from Magic Poser, and used this image to make an OpenPose map, and trace the outline of the dummy on Photoshop to make a Scribble image. Why do I need to make a Scribble? Because from my experience, all SD1.5 base models have a hard time generating “man wearing unbuttoned shirt”. So, only an OpenPose map is not enough. Gotta let it know what shape I want.
Base image making stage:
Step 1: Write a prompt.
I’m not good at writing prompt but it does the job:
Positive prompt:
full color photo of RLDAN, (wearing_unbuttoned_black_long-sleeve_glitter_shirt), BREAK, RLDAN, (long light blond hair), BREAK, RLDAN, (holding a martini glass), in a bar, looking to the right, (flat lighting), sharp focus, raw photo, 8k uhd, high resolution, DSLR, high quality, Fujifilm XT3
Negative prompt:
((woman, 1girl, female)), ((tattoo)), cartoon, 3D, (teeth), (mouth opened), (deformed iris), (deformed pupils), ((poorly drawn)), (extra limbs), (bad anatomy), painting, drawing, weird colors, blurry, watermark, text, high contrast, high saturation, (muscular)
About the prompt, I didn’t use any negative embeddings because sometimes they affect my trigger word; I add “muscular” in negative prompt because if I don’t, it’ll give me super buff man and it’ll look weird; “BREAK” is for separating groups of words.
Step 2: Choose a decent “raw” image
Editing the prompt and adjusting the ControlNet weights according to the results, and cherry-picking the better ones. The style of the clothing is the most important feature to imitate the original animation, so it has to be accurate enough. After cherry-picking the first okay-ish image, I reused its seed, and put this image into Lineart-realistic preprocessor to use the Lineart ControlNet model. The second cherry picked image looked more natural on lighting and background, so I saved this one for future use. I then used ADetailer (an extension) to swap face roughly, not good enough but that’s far from final.
Step 3: Upscale this image
Since SD1.5 was based on 512 resolution, my initial image size was 682 x 512, but that’s too small to make a higher quality face. Hence I used img2img+Tiled Diffusion+ControlNet Tile Resample to upscale x 2. So I get a 1364 x 1024 image to work on. I furthur upscaled it with MTXX, just 3 clicks.
Step 4: Inpaint the hair and face
I wasn’t satisfied with the hairstyle in the previous image. It doesn’t look natural and there’s no tendril near ear, so I gotta fix it. I masked the hair area and edited my prompt, and used a 0.55 denoising to get a better hair, and then used inpaint sketch to draw a blond strand near his ear, and used a 0.75 denoising to add a tendril. There were some artifacts in the image so I used Photoshop to remove those. Finally I used Adetailer again to change the face, this time it looked much more similar to the real Dan.
Post-processing(?) stage:
The Stable Diffusion part was complete. Now the Photoshop time. I changed the background (remove the wall-like thing and replace it with night view), martini glass bottom (it was really messed up), the shirt buttons (there weren’t any before), and of course the hand (I normally use OpenPose hand map to control it but this pose is rather complex, and I don’t like using depth/canny models so…) with Generative Fill. Also plenty of times of remove tool (and patch tool, color replacement tool, burn tool, liquify…yada yada yada). Then I used Neural Filters-Harmonization to match the color tone of the torso to the tone of face. Finally, I used MTXX to make some small adjustments on face and body.
And the picture is done.
Hope you guys like it :)
42 notes
·
View notes
Note
would you ever go more into the process of how you made your music videos? like... i saw your "what i use to animate" in the faqs, but i'm insanely interested in any behind the scenes commentary you might have on the whole production of that. do you have anything you care to share about it all? like if there were certain programs you had to learn for them, or certain programs you COULDN'T use for them? i'd love to hear it all!
I didn't learn any programs specifically for Mixed Messages. That one started out as a funny little project for my own entertainment - that's why the line quality was so sketch and shitty, especially in the original half that I posted by itself. Had I known it'll be an official vid, I would have definitely tried to keep it cleaner from the get-go!
I started Red Flags with the intent of drawing every character in vector so that if I decide to animate anything else (or have time) I can do it without destroying quality.
I did have to learn to use ToonBoom Harmony for RF, and I wanted to for years so YAY! Obviously I'm no pro and I'm sure there were better ways of doing certain things but at least I have a grip on it now. I also used it a little for the dancing animation in MM, you can probably tell by the difference in line quality.
I learned some Blender from @cameronaugust last year, but most of the 3D assets for RF were made by him. It's really useful to know at least basic hard surface modeling though!!
Beside that, I almost always have to look up tutorials or plugins for certain effects I want to produce in AE. Particles, simulations, scripted stuff, etc.
Oh and I didn't make storyboards because TIME, I just put all my shitty storyboard doodles in an animatic from scratch. They look like trash and I changed at least 3 scenes entirely to save production time or make it more interesting.
#if you're in complete charge of your project you should not have scenes you don't want to draw/animate#is my motto#literally no one is making you#I mean obv it's good to push one's self#but make it fun also#personal#text#long post#sorry for the rant thank you for asking#art advice
118 notes
·
View notes
Text
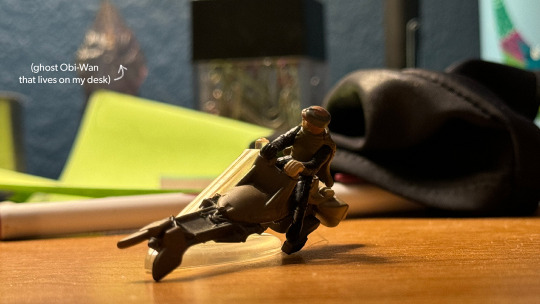
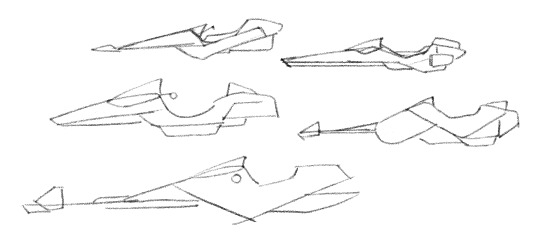
I don't normally like to show WIP/sketchy/unfinished artwork because my process is a complete mess and I'm embarrassed by how bad it all is before I reach a point where I'm satisfied enough to call something done. That being said, as the AI inundation is upon us, it feels valuable to share the human trial and error and my own manic desperation that goes into making art. I always spend too much time on stuff that ends up looking like it should not have taken that much time, but I REALLY overcooked my last drawing and fried my own brain. Trying to draw a speeder bike was torture. Here's some of the goofy shit I did!
I really had intended to simply draw an existing speeder bike, but as I considered the ~aesthetic~ I wanted and examined the standard ROTJ-style bike, it wasn't working for me. In terms of motorcycles they're too much like choppers for my taste when I vastly prefer the chunky '80s futurism/cyberpunk/mecha anime look (clearly, since this started out as an Akira reference). But. I have zero expertise in mechanical design or even concept art itself. I do not know how vehicles work or how to draw them. And referencing either real or fictional motorcycles isn't a huge help because they have wheels to focus the design around, which of course hover bikes don't have.
So obviously trying to both design a speeder and draw it in perspective was really difficult to wrap my brain around. I started out by photographing one of my old '90s Micro Machines for reference, but it wasn't exactly useful for extrapolating the shape into a new design:
I sketched out some profiles, but, again, tough to convert to 3D using only my very weak power of imagination:
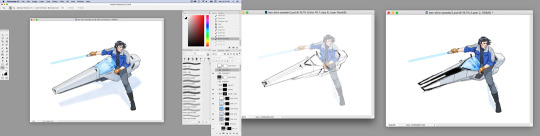
The only 3D-adjacent tool I know well enough to use is After Effects, which is a poor substitute for a real 3D modeler because it can really only do flat planes and basic shape extrusion, and it was too cumbersome for this. I started to try it and it sucked:
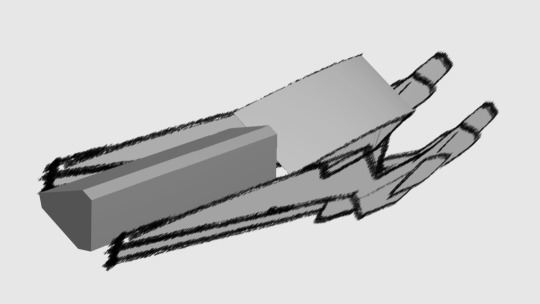
"Just learn a 3D program," you say. "Blender is free." WELL. Maybe someday. But not today. So I resorted to building it in miniature out of cardboard:
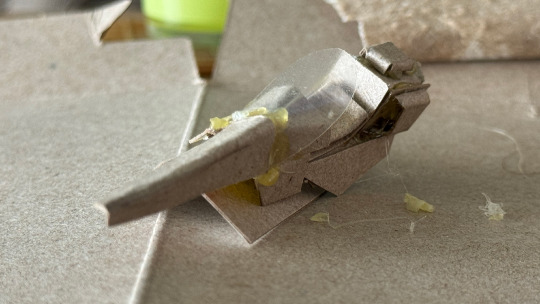
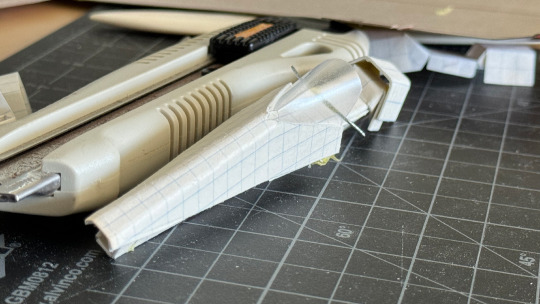
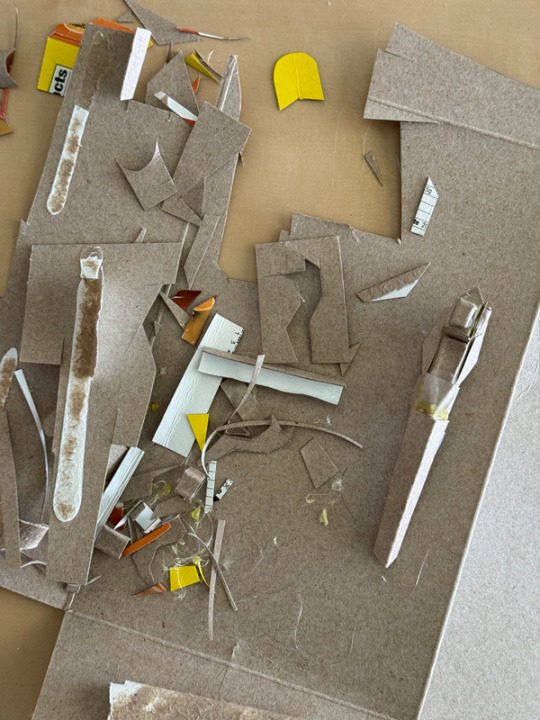
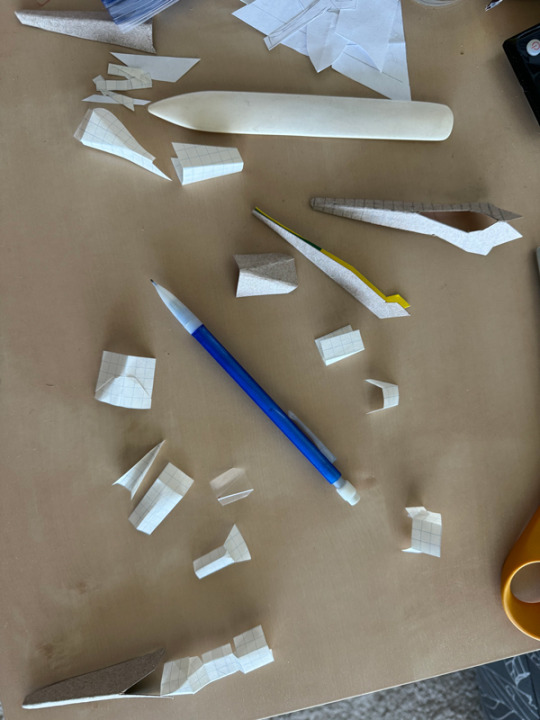
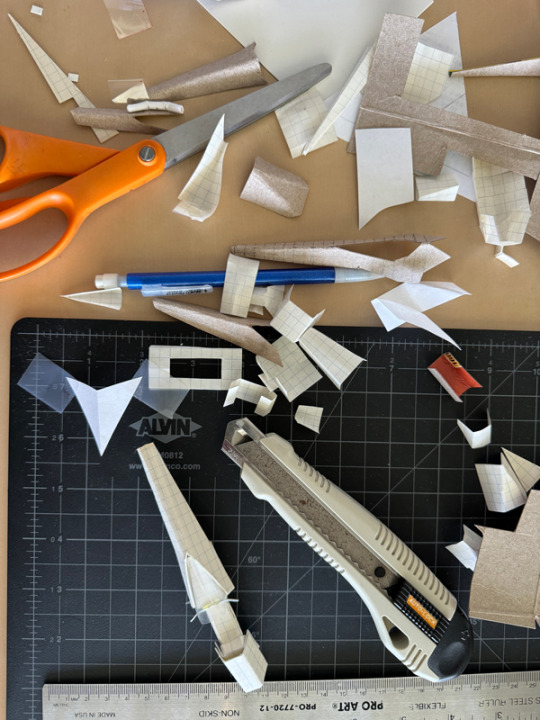
This is less mortifying than taking pose reference photos of myself (which I have done a lot! it's a great way to make yourself feel like a complete lunatic!!!) but it was also more work, so. Still makes me feel like a lunatic.
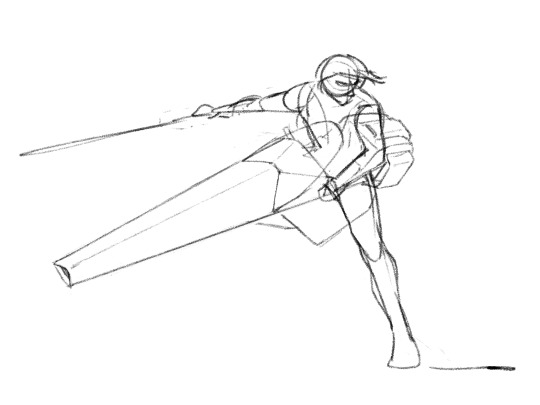
Thankfully it did make it possible for me to finally draw something. The design isn't groundbreaking, and I still have absolutely no idea how to create convincing mechanical details despite poring over mountains of concept art… but an attempt was made. My perspective is probably still out of whack because, despite having studied art throughout my entire academic career, I never officially learned all those multipoint perspective tricks, drawing cubes inside of cubes, etc. I've always preferred and been much better at organic shapes than anything mechanical or architectural.
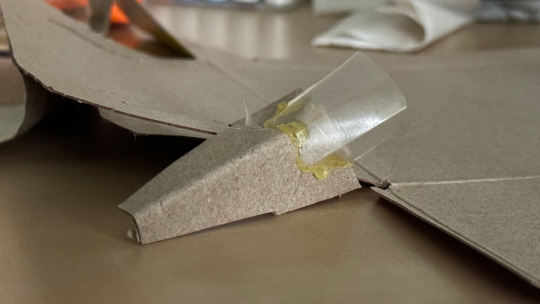
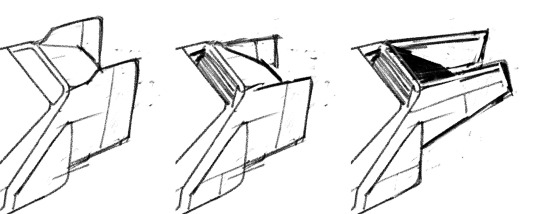
My initial iterations were more X-Wing/BSG Viper-esque, but I kept being unhappy with the nose shape. I wanted it to be pointy and triangular but I couldn't add enough detail to make it interesting. Even after building it MULTIPLE TIMES I didn't like it, so the shape I ultimately landed on… wasn't one of the prototypes I built. LOL. It was just so hard to tell in the earlier stages, so I had to go through the whole refining process just to land on "nah." It looked alright in cardboard, and then translating it to line art, and then once I colored it I didn't like it. It would have been a lot easier if I could tell at an earlier stage than that!!!!!!
There wasn't any one ship/vehicle I referenced, but things I looked at for inspiration included: the Akira bike (obviously), Tron lightcycles, every time we've ever seen a speeder bike in any piece of Star Wars media, actual motorcycles, X-Wings, A-Wings, U-Wings, Jedi Vectors… etc.
Once I had settled on the split nose, I tried adding vertical stabilizers to the tail section for some more interest back there and to balance out the front, but even though I liked them I thought they made it too busy. It also started to look too much like a miniature ship instead of a bike, like he was riding one of those coin-operated kiddie rides. No!!! I wanted this to look cool!!! So I stuck with the nondescript tail section.
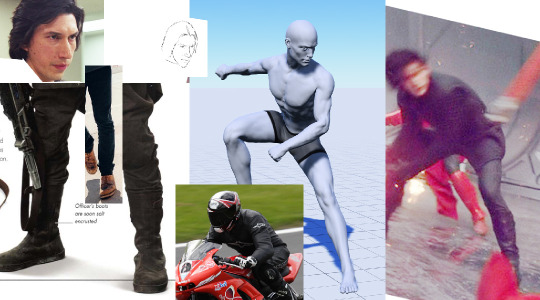
Pose and likeness referencing aren't very exciting but just know that I use a mishmash of references for literally everything. Normally I would pose myself (even though translating my own blobby female proportions into those of a large man is another layer of awkward difficulty), but riding a speeder is a tough action to recreate so I downloaded the "MagicPoser" app on my phone and used that instead. The basic version is free and you can move around limbs and joints in their normal range of motion—some of it gets rubbery, but for the most part it did what I needed it to do.

Also just had to make up an excuse to put him in a pilot helmet! The shape is based on a Y-Wing helmet—a personal favorite of mine—which made sense to me for using on a speeder since it has more face coverage like motorcycle helmets tend to have. (not that I drew him actually wearing it on the speeder, haha. safety first, kids!!—UNLESS you're a dumbass space wizard, then just do whatever looks cool.) I really waffled back and forth on what color to make the visor, because I'm extremely partial to the pink from the Y-Wing helmet, but ultimately I went with the more traditional yellow-orange. Either one looks good with blue and white so I still like 'em both.
This all feels like it was an enormous waste of time, but I did realize the thing that was in my head, so. I guess that's an accomplishment. Unfortunately the problem with making art for myself is that I invariably end up hating my own work, and being in a dead/dying fandom on a dead/dying platform means there is very little external validation to counteract the self-loathing brain worms. Agony!
7 notes
·
View notes
Last Seen Blogs

what-cant19
no chlid please

alunasky-blog
Alunasky

tera-fly
Bez tytułu

ihmmings
2002 !

homolastig
homolastig