#i hope it was at least a little helpful
Note
Hi. I was just wondering if you had any tips for new Tumblr users to get their posts seen. I am a writer and want to post stories on my page. I tried doing that with a fic I wrote and had no luck in getting it seen in the tags I listed. Tried doing support and was left hanging. I created a new blog and want to post it there as a fresh start but don't want to redo the deletion and creation process over again. Any tips for a new user and writer?
hi! i do technically have tips, but im afraid they might seem unhelpful. regardless:
i have found, and i am in no way an authority but believe this is the general consensus, that unless you run a gimmick blog here on tumblr, the process of accruing followers, notes and reblogs on original work, is extremely slow compared to other websites.
i started this blog almost exactly seven years ago. thats seven years of posting three (more recently two) prompts every day. i don't think ive ever taken a hiatus longer than three months, and there have only been two or three of those. im not saying you have to put that much work in or wait that long, just that if youre asking me youre asking someone who went through all that to get to 25k followers (who say nice things and who i love). and! a lot of that was luck! talented people noticing the prompts and answering them, or that one popular octopus post from my now defunct writing blog.
i hope that all didn't sound disheartening. what I REALLY wanted to say is that if you want to get your posts seen, its going to take time and consistency, unfortunately, plus the things youre already doing. and! (hopefully this is the uplifting part) i think that it IS worth it!
tumblr for all its many faults can be a place of genuine community, which you personally get to curate. no one is trying to sell you anything, and personally, i appreciate the authenticity that adds to the experience.
its the wild west out here, it can be hard to get your stuff seen, but time and consistency will win out. luck many even give you a boost, sooner or later. its also fine if that's not for you. if you'd rather look for a better way to get a lot of eyes on your writing fast, thats totally cool! but again, tumblr probably isn't the place to expect it.
if you want to keep trying, keep trying! keep making your stuff (making stuff just to make stuff can be a good experience, but i think its important to be seen too, ddw)! time. consistency.
love and best wishes from L
(oh! and before i forget my actual piece of real advice, get yourself something like a gimmick. pick a mascot for your blog, or a posting schedule. do some sort of weekly 'event', or change your url to tell people exactly what kind of content they'll mainly be getting. advertise a little! nothing wrong with that! people like a gimmick it can be anything it can be an octopus. trust me)
#wow this turned out long#i hope it was at least a little helpful#don't be discouraged it takes ages and its hard think about how hard it is to make real life friends!#and thats face to face!
39 notes
·
View notes
Text
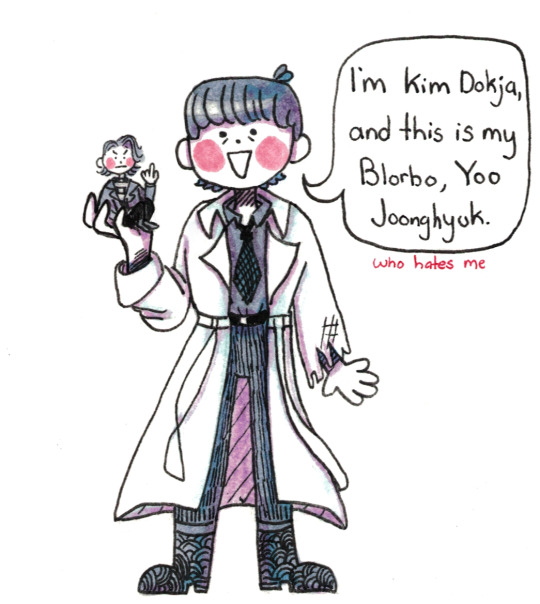
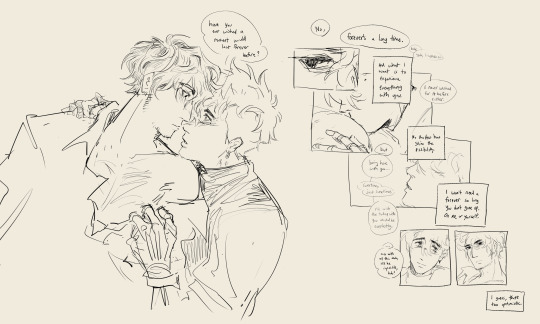
ORV is about enduring the horrors in real time.
(for @everyonesfavoritebastard)
#omniscient reader's viewpoint#kim dokja#yoo joonghyuk#I read a few arcs of ORV a few years back so I am at least loosely familiar with the characters and premise.#ORV dares ask the question: “what if you finally met your beloved blorbo who helped you cope through the horrors - and he *hates you*”#The reversal of what most people feel about some of their blorbos (love them but would never want to meet someone like that in person)#I would love to keep reading orv but it is very long and I already promised to finished like...3 other shows and several books.#my gesture of affection is consuming the media my friends care about. Alas I have none who are into orv to motivate me.#Also hey there raffle winner everyonesfavouritebastard - you gave no prompt at all so I took a random swing based on ur pfp and blog#I hope you like kim dokja! I am terribly sorry if you meant to leave a prompt and something glitched#EDIT: Found out raffle winner everyonesfavouritbastard didn't know it was a raffle. Homie...I'm So Sorry.#Now I *really* hope you like Kim Dokja.#You're so valid; I too would be mesmerized by the beauty of stackedbird's lovely little apple art.
633 notes
·
View notes
Photo

soft (and some bittersweet)
#trigun stampede#trigun#vashwood#vash the stampede#nicholas d wolfwood#i think they both spent majority of their lives in solitude and ofc vash went town to town and made friendships promises and etc along the w#way + he had his home and whatnot in the long years he's been alive but he still just seemed so lonely.#in prior versions of trimax he had friends at home at least and maybe he mightv made some but luida and brad are basically just his#guardians in this adaption. like brad used to be a homie.... vash watched that little dude grow up.... and jessica too.... but he doesn't#have that in this adaption. nor a town like july where he had grown close to the townspeople and shaped that tragedy to be closer to his#heart. and wolfwood spent years fighting under the eom and doing shit under their jurisdiction when we saw him so adamantly try to reject#and fight back against that fate. i dont think he had a second at all to get familiar with townspeople or even care to#so its just these two lonely ass souls and vash immediately seeing the good in ww and points it out#ww who is under orders again to be involved in vash's business but he's also SO touchy about it bc vash is so careless and lack that self#regard and also just is not seeing the world that ww is seeing. but then vash helps him and saves him by sharing a piece of what /he/ sees#and it fucking. rescrambled ww's brain for a sec. HE GAVE HIM HOPE!!! he gave him hope!!!! and in turn ww gave vash hope too and its#all done in like 3-4 eps. there's so much fervent attachment in what they managed to give each other in such a short time#but theyre limited to the contract to the inevitable confrontation with knives - so while theyd want to give into that chance to love this#person who managed to give them smth special they just can't at all#ruporas art
2K notes
·
View notes
Text

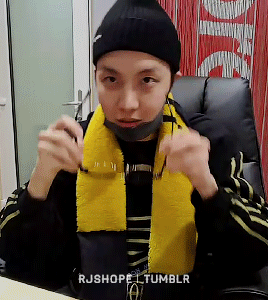
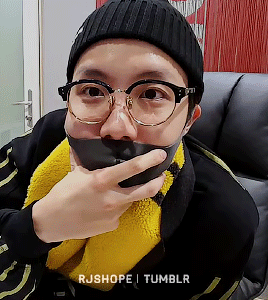
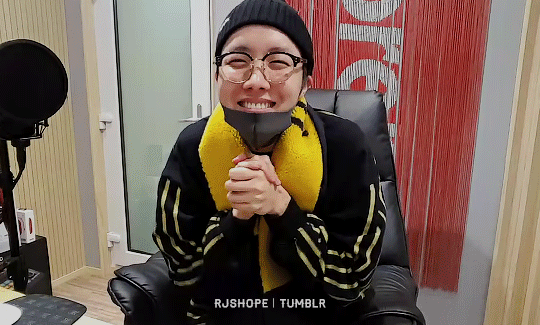
Hobi being a ray of sunshine for @raplinenthusiasts and @cordiallyfuturedwight 💛
#btsgif#btsedit#userbangtan#dailybts#cyphernet#usersky#annietrack#usermaggie#userkelli#useremmeline#trackofthesoul#userkosmos#heyginkgo#hoseokedit#bts#jung hoseok#vlive#*#i hope this will help you to feel better (at least a little bit🥺)#sending the most positive vibes your way <33
590 notes
·
View notes
Text
Hi! I’m a femme. My partner is butch, and previously identified as stone butch but has been gradually moving out of that label over the past year. Something which has been really important for our relationship, and their healing, is having an emergency plan for when they become triggered especially as they have been re-evaluating their boundaries. I have a slightly different emergency plan from their emergency plan; mine is designed to help me help them, as a partner. I thought I could share it, as it might help somebody out.
❤️🚨the triggered state emergency care plan for a partner 🚨❤️
Identify - Recognise your person is triggered. This can be a little different for everybody, so if you’re not sure I suggest discussing with partner what a triggered state might look like for them at an appropriate moment, when they feel secure and comfortable to have that conversation. My partner is often but not always non-verbal when triggered. They will have stiff, controlled body language, sometimes not moving. They will not respond towards the sound of my voice, or touch. They will not seem like themself. They will stare at nothing. They will often be very pale and clammy. It can be quite scary if your partner presents like this- but do not panic! Take a nice deep breath and remember they’ve got this, and you’ve got this.
Remove - remove the trigger, as much as possible. Be calm and clear about what you are doing. My partner and I agreed that when they are in a triggered state, I have their permission to move their physical body away from what is triggering them if necessary, for example if they are on top on top of me I can roll them safely off and away from me, or get them from a chair to the floor. Please do not offer or suggest this if you are not confident that you can physically move your person safely and without potentially re-traumatising them. Do the best you can; there is 0 shame in not agreeing to do something if you’re not sure you can do it. The key thing here is that because my partner and I both know they may be unable to consent in the moment, we have establish an ongoing prior consent agreement in the interest of their safety. We both understand the risks involved, and have discussed the best approach to mitigate the risks. This is understandably a very difficult and complicated topic for them to discuss, so establishing this has taken a very long time- and I suggest you take your time talking to your partner about what they want as well. Examples of removing could include switching off the TV program or music, immediately stopping any kind of physical activity that had been happening (doesn’t have to be sexual but it could be), or removing something which has a particular touch or scent. I will always tell them what I am doing, regardless of whether they respond. It might be that this is a new trigger or you’re not sure what’s triggered them. Stay calm, and logically assess what happened immediately before. Chances are you can make an educated guess- for example, your partner might have gone into a triggered state in the middle of you watching TV together, something thats normally fine. What was on TV? Were you cuddling up together? If you’re not sure whats triggered them and they can’t tell you, don’t get too wrapped up in trying to figure it out. You can reflect on that later- right now you just need to do your best, and focus on them getting grounded back into the present.
Ground - Once the trigger is mitigated, I help my partner use their preferred grounding techniques. These are methods to help relax their nervous system and bring them back to the present moment. I can maybe make a separate post about what these are if anyone wants them. We have practiced their grounding techniques together, and expect their techniques to evolve over time. Sometimes it is enough for me to just sit and observe whilst my partner does their grounding alone, other times they need me to gently prompt them or do the grounding with them. I will speak calmly and clearly to my partner and maintain relaxed body language. I stay with them and let them know I’m going to stay. I respect their personal space. I let them know what I am going to do before I do it, and remain focused on their evolving situation.
Soothe - through grounding, my partner will come back into themselves slowly. They are usually tired, and not very talkative. At this point I offer compassion and understanding. I ask them what they need, ie: “would you like your warm blanket” *nods head* “okay I’m going to grab that for you. I’ll be upstairs for 2 minutes.” I might offer a soothing touch if they indicate they’d like that- more typically I would let them come to me and ask for it rather than suggest this. This is very often running my fingers through their hair, or gentle arm scratches with my long nails. Following a period of disassociation, I would encourage my partner towards self-care. They prefer to be alone for this, so I give them space. I do household bits and bobs so they’re not burdened by it later, like meal prepping and filling up their bike.
Re-assess - I check back in on my partner later. Once they’ve been triggered they will be affected by it for some time afterwards, and are more likely to go into a dissociative state again. If that happens remain calm, and go back through the process.
Reflect - I will invite my partner to come to me for reflection on what happened when they’re ready. In the meantime, I will take time out to privately reflect on it. I talk to my therapist and use my journal, and my art practice. I acknowledge everything that my partner being triggered brought up for me, and how I feel now. I observe my feelings without attaching to them. I make note of what worked and what didn’t, and try to recall what happened before, during, and after my partner was triggered. I do this away from my butch. They might speak to me about their experience of it, and they might not be able to. I accept that I am always learning and so is my butch, and I show myself compassion as we work this out together. You’ve got to remember you cannot care for your partner if you are not also caring for yourself!
Disclaimer: I do not suggest that this is for everybody, and I strongly recommend you seek support from a trauma informed healthcare professional if you’d like advice on supporting a loved one on their healing journey. I have learned so much over the past year and I am learning all the time- there is no such thing as the perfect supportive femme with this, and it is important you show yourself compassion, keep learning, keep communicating with your partner, and keep trying your best!
#This was long sorry!#I hope it’s at least a little helpful for someone hopefully#Trauma#stone#stone butch#butch femme#butchfemme#butch/femme#femme4butch#butch4femme#queer trauma#butch lesbian#butch#Femme#femme lesbian#stone identity#Trauma management#Advice#mental health
156 notes
·
View notes
Text

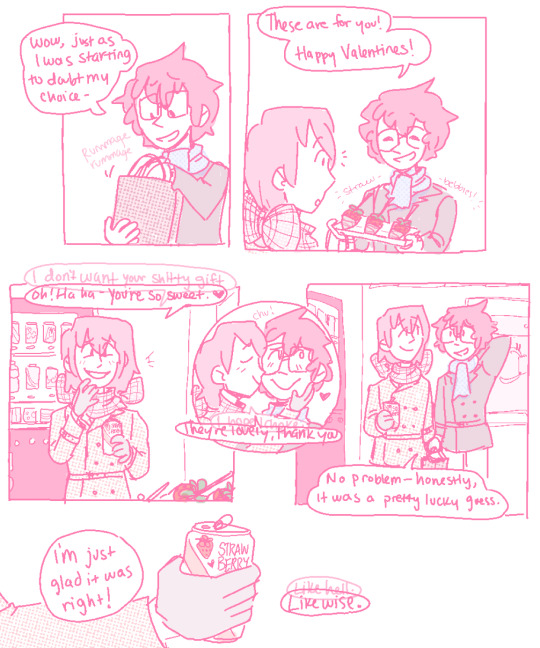

Happy Valentines, Akira.
Happy Valentines, Asshole.
If you can’t read what Akechi’s secondary inner-dialogue says cause I obscured it too much behind his regular dialogue, here’s a transcription in panel order:
Hello, you fucking-
Ah- Hello, Akira!
Fuck off, why should I tell you-
Just a soda- there’s a new flavor.
I don’t want your shitty gift.
Oh- haha! You’re so sweet.
I hope I choke.
They’re lovely, thank you.
Like hell.
Likewise.
There’s no way it’s just a coincidence.
Still though, it’s a funny coincidence.
#p5#akeshu#akechi goro#kurusu akira#wow- me?? posting a valentines comic... actually on?? valentines????? wack. absolutely wack#it's a short one! I purposefully tried to keep it short. it was a challenge and it still ended up being 3 pages. but i blame my canvas size#also in case u can't see what akira is holding out to akechi: theyre chocolate covered strawberries on sticks!#i saw them irl and was like oh god i want those. i am going to project that feeling on my favorite characters so help me god#and now! here we are! but my shitty-ass coloring & line quality make it hard to discern them so. sorry about that lmaooooo#ANYWAY i don't do enough post-maruki stuff so. i made this one a little bittersweet. :)#why did i put akechi's scarf in a bow? honestly i dont know! i think i saw some art a while ago that did that too and i thought it was cute#well. plus i guess there's the symbolism of 'akechi being alive and reciprocating your feelings (however involuntarily) IS a gift' part#hence that hes wrapped up in a bow. like a present. :)#also god. the first panel is supposed to be akechi's reflection in a vending machine window. I could NOT get it to look right#so for reference!!! just so you guys understand!!!!!! thats what that panel is supposed to be!!! he is NOT in fact a ghost. (sigh)#hope you enjoyed and had a lovely valentines!! for my part i have eaten nothing but sweets today and hoo boy will that have been a mistake#ALSO in terms of the audience-participation comic...hopefully coming soon. if i can ever gain the will to draw it.#but at least tumblr has polls now so i can do the audience-choose-y bit without needing to use a separate website! so thats good i guess#anyway anyway anway thanks for listening to me ramble if you made it this far! have a lovely rest of your day and hopefully see u again soon
708 notes
·
View notes
Text
think about all the places we could go
buck/eddie | 2k+ | ao3
“I,” Athena says, slowly, “have a lot of questions.”
“That’s understandable,” Eddie says. “Take your time.”
Athena takes two long, deep breaths. The other officer next to her doesn’t seem to know where to look; Buck sees him desperately pretend to be interested in the one solitary picture Eddie has hanging on his wall, like their family trip to the zoo is pertinent to the matter at hand. “I don’t suppose anyone knows about this,” Athena says.
It’s not a question, but Buck is also currently wang-out in front of his boss’s wife, so he has enough self-preservation not to get caught on semantics, now. “Uh, no ma’am.”
“Don’t you ma’am me,” says Athena.
“Sorry.”
The other officer is now almost nose-to-nose to the picture with the force of his feigned ignorance. Athena just looks grieved. “Why, then,” she says, “did you get military-grade handcuffs? Were the pink fuzzy ones not macho enough for you?”
Her tone drips with derision. She’s absolutely going home to tell Bobby all about this. “We kept, uh, breaking the pink fuzzy ones,” Eddie admits, and then, “Buck, don’t preen.”
“I’m not preening,” Buck says, probably definitely preening, but like it’s his fault, okay? It’s good to know the bicep curls are working. “Look, we’re two big firefighters. Those flimsy sex store handcuffs weren’t gonna hold us.”
read on ao3!
#my fic#im. so sorry.#this was also not the fic that was meant to be written but alas the taylor book fic is taking her sweet time#it appears the only fic i can write is crackfic. but sometimes its what a girl has to do 🫶#also on a real note these silly little shorter crackfics kinda help with like....idk making ao3 casual again sdgfhsdf#sometimes i can get a bit nervous about posting on hammersmiths bc i get in my head and think everything has to be at least 15k+ and perfec#but sometimes it can be 2k and silly as rocks!!#so anyway hope u enjoy i missed writing fic so BAD
185 notes
·
View notes
Note
I've been thinking a lot about gender identity and stuff lately, but to my shame I’m not the most educated person when it comes to lgbt related stuff. Every time I try to search it to learn more I end up freaking out and clearing my browsing history because of the feeling of being watched. I know I’m being unreasonable, but it’s stronger than me. I don’t have anyone to ask about this kind of stuff. Everyone around me is negative about lgbt, I grew up among this negativity. I’m afraid to ask my online friends because I don’t want to seem ignorant or stupid. What have I decided to do? Send an anonymous ask to a stranger about my concerns (sorry about that), whose blog helped me to accept the fact that I might not be who I though I was at the first place. It feels more safe. Back to the point.
As a teen I used she/they pronouns and a different gender-neutral name online for years. I still do it as an adult and now I realise that “she” was more like a compromise for me because it was what I used to be referred as for my whole life, but didn’t feel quite comfortable with. So it’s they/them for me, I guess. Okay. I’ve always preferred to not be related to any gender, but now I see that there’s more to it. I might be a nonbinary, but what if I’m actually an agender? I also consider the possibility of being a genderfluid because one moment I wear a dress and think that it looks good, and the other moment I cry in front of a mirror because of the idea of wearing it. So yeah, it depends on my mood. I don’t know how it works. I’m just so confused. The only thing I know that I’m not comfortable with being referred to as a female anymore. I’ve never really been.
Admittedly, as someone who is binary trans, I do not have a lot of knowledge in this area. I do know what it’s like to not know what you’re “supposed to be” though. And I know it can be frustrating and scary to be lost in trying to figure out your own identity.
I asked some of my friends, who are nonbinary and genderfluid themselves, and the first thing we all have to say is you should allow yourself more kindness. I am sorry that you grew up around so much negativity. But I want you to know that it’s both okay to feel afraid but also okay to not know everything. If a friend is going to treat you badly for asking questions, they’re not a very good friend.
One of my friends says the part you said about “making compromises” resonated a lot with them a lot, so you aren’t alone there. As for how you feel in a dress, clothes do not equal gender. You can like how you look in a dress without any of it having to do with girl-ishness. I suggest you try to think about why you like it when you do, and why you don’t when you don’t. My friends also suggested trying other clothes you can express yourself with. Think about why you like them, or why you don’t like them. (Of course, sometimes the answer has nothing to do with gender. I like athletic clothing because they make me look sporty, which is a neutral thing. But it’s good to know what parts aren’t related to gender at all too.) That extends beyond clothes too, any part of your presentation that you think you can play with without getting yourself into danger, you should.
It’s tempting to feel like you have to scramble to figure out a label. Especially when advice and other people you can talk to can feel sort of “grouped” under them. And there’s a lot of knowledge to be gained that way for sure. But there’s a lot of knowledge to be gained just in figuring out what you do and don’t like. What makes you feel bad, what makes you feel at ease, what makes you super excited. You‘ve got it nailed down that you don’t like being called a female, that’s not a bad start!
If your friends are people you think are good and kind, I would suggest reaching out to them so that you can explore things a little more with them, considering they know you better than I would. I know it's scary, but there's nothing wrong with not knowing things, and I hope they'd be aware of that too. And even if you call yourself something now and explore more into it, there's no harm if in the future it doesn't fit so good. There's no wrong way to be a gender, and more importantly there's no wrong way to be you.
56 notes
·
View notes
Note
Lasombra fashion show?
Now how did you know I've been meaning to draw fashion 'shows' for all the clans…?
But! Here's some Lasombra fashion stuff for you!
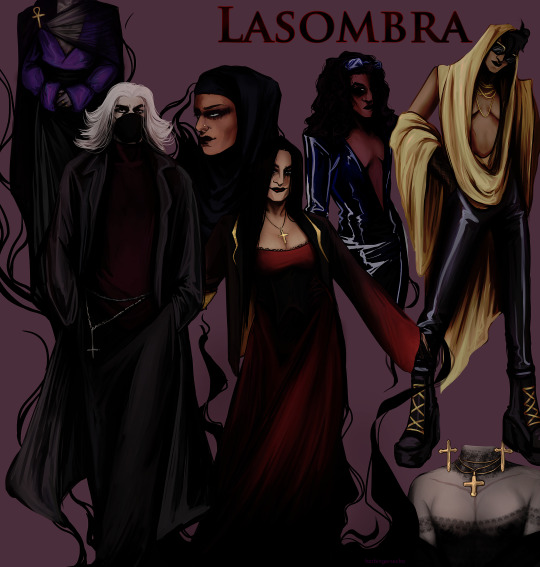
+ bonus because I love bullying Lasombra abt their tech issues (:
#vtm#vampire the masquerade#clan lasombra#lasombra#outfit design#mine#*24#ask#lasombra is kind of interesting/difficult imo in terms of making a fashion 'style' for them bc they're very varied internally#from corp goth shadow ceos to religious leaders to streetwise survivors. theyre unlike their counterpart ventrue in that their appearance#isnt rooted in sociological reasons as much as theyre personal ones imo. if that makes sense lol. but i tried to do a few different things!#something classically lasombra and then some more modern discreet + showy stuff. hope you like em? <3#for me lasombra is like dark fuschia-violet-purple and gold. silk velvet and dark lace. and ofc religious symbols#none of these guys have backstories or names or anything btw i just threw shit together. its easier to make up styles for chs#that have a story or a personality but like. i cant put rafael in this stuff or whatever lol he's kinda boring fashion wise#i thought abt doing shadow fashion too but i was like. thats way too impractical.#i kinda wanna finish those tremere fashion 'sketches' too. and maybe do some of deja's outfits bc she's a fashionista. there's also my#outfit wips for rose who's a ventrue... but also i wanna do freaky sabbat outfits... and a toreador look book... and finish the new#nikifor tzimisce fashion looks... help mee. at least the tzimisce one is like 85% done i just gotta work on the extra stuff a little -_-
96 notes
·
View notes
Text

g1 season is upon us! i'm too lazy to gif every match myself! the world needs gifmakers like you! yes you!
this guide includes: basic gifmaking, actions, how to blur on-screen graphics, coloring tips catered specifically to wrestling footage (mainly aew and njpw), how to add subtitles, what tags to use
what you will need:
photoshop (i currently use cc 2017 for windows which you can grab from this post by birdysources)
kmplayer (for extracting frames)
what you might need depending on what you're looking to gif:
4k video downloader (for downloading videos off youtube)
vkopt (browser extension that lets you download videos off vk)
step 1: getting the footage
if you're directly downloading from a site this step is super easy. just make sure to always go for the highest quality of footage available (for njpw this is nowhere near 1080p, and even aew's 1080p footage is pixelated in places—but don't let this deter you!)
if you plan on giffing something off a ppv, chances are you might need to torrent the event. if you can, look for versions off fite with either web or webrip in the title for the best quality. this applies to weekly television too (fite doesn't have picture-in-picture). always seed your torrents. yes, even that one match from 2012. especially that one
you can also get recent shows off watchprowrestling dot co (previously org) which includes njpw tour shows and indie events as well. check out indy★wrestling★group on vk for smaller promotions and japanese promotions outside of njpw (tjpw, stardom, noah...)
step 2: choosing a clip
wrestling footage quality is not consistent. entrances with too many flashing lights or small particles will have huge quality drops, so unless it's something really special, don't put yourself through that. close-ups are generally your best friend but don't shy away from clips with lots of movement (you do sometimes want to gif the wrestling parts of wrestling too)
step 3: extracting frames
open your video in kmplayer. go to the part that you want to gif (though, i suggest leaving a bit of fodder before and after the actual clip. you can always trim the frames down later and it's better to start off with more). then, press ctrl + g
this should bring up this window:

your settings might be different if it's your first time downloading the app so just copy what you see here
kmplayer automatically captures into its own folder, which you can change if you want, but i just left it as is. i recommend pinning the folder you regularly use to the quick access menu in your file explorer
hit start, start the video, let it capture frames for however long, and then hit stop on both the extractor and the video itself. and now you have a bunch of frames in a folder. cool!
step four: converting frames to layers
open photoshop. this will take ages but open it. go to file -> scripts -> load files into stack...
this will bring up this window:
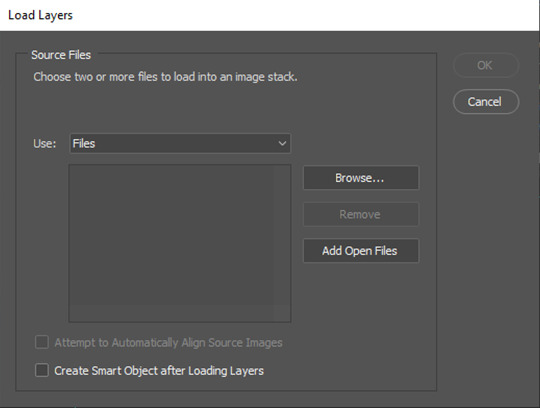
click browse... and select all the frames you just extracted. depending on the number of frames, this might take you a bit. then hit ok and let your layers load into photoshop. this will take a long time (saying this as someone whose laptop tends to heat up to the temperature of an egg pan at this point in the process)
step five: actions
i use actions (user-built series of recorded commands, meaning you don't have to click everything manually) for everything except coloring. i use a mishmash of like three different actions that i never bothered to organize. these are the two most important ones:
actionpack #1 by giulia (i use the setup and save portions from this one)
squishmoon actions by lildohnut (i use the hd sharpening from here, first layer on 0.3 for close-ups and 0.2 otherwise, and the second layer at the suggested 50%)*
*most sharpening settings you'll find are made for current films and tv shows so you do have to make some adjustment to fit your crunchy wrestling footage
step six: sizing
pick a size for your gif! here is a handy chart:
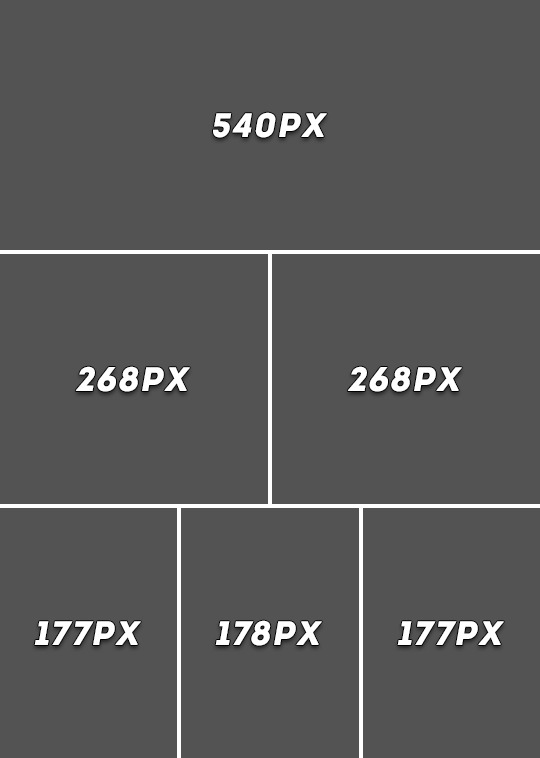
as for height, it can range anywhere from 300px-540px and beyond. most people go for 350px-450px. 400px is the sweet spot
personal preference: adjust canvas size not image size and fit your footage accordingly. some footage (looking at you aew) can have an odd black bar at the bottom, and manual resizing can help getting rid of it. if you just resize the whole image that will stay there and bother you
additional tip: guidelines
9/10 times you will leave your footage centered. however, there are times when this can look a bit awkward, depending on the framing, in which case i like bringing in a few guidelines. go to view -> new guide layout...

rule of thirds is generally good for drawing the eye to certain places. these settings will divide your canvas into nine squares that help you reposition your main gif layer
optional step: blurring pop-up graphics and banners
so, you have your sharpened, resized gif... but the sharpening made the small text and other unwanted elements on your screen shrivel up like raisins. you can leave it as is, people won't mind, it's a wrestling gif, who cares. but, if you want, you can just blur it out
i'm at least a little bit certain that i'm personally the guy who brought this over from k-pop tumblr (not saying i invented the concept, i just love being a trendsetter) and so i can give you a few reasons as to why people do this. such as:
adding subtitles over pre-existing, burnt subtitles (example: njpw post-match comments off njpwworld and not youtube)
getting rid of elements that might distract people from the focal point of the gif (the hotties... and the moves. mostly the hotties)
it makes your otherwise milquetoast sharpening look a little better in contrast
it's gonna be ugly either way so it's a pick your poison type of situation. if you do want to try the blurring method, you will need a basic knowledge of filters and layer masks
step-by-step blurring process:
duplicate your gif layer
blur the layer on top (i typically go for a 4.0 gaussian blur; for this, go to filter -> blur -> gaussian blur...)
apply a layer mask to the blurred layer and make the layer mask black (this will remove the blur effect, don't be scared). to access the layer mask just click on it. you can press alt before clicking to "enter" the layer mask (though you won't see your gif this way)
go in with a soft round brush (or any brush) with white and draw over the bits you want blurred. this is the tedious part
profit?
here's a comparison:

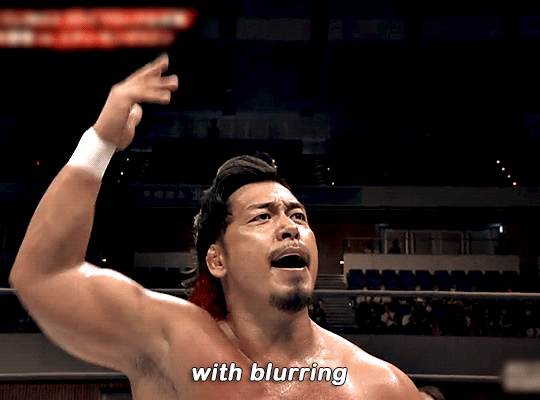
it's really down to personal preference ٩(ˊᗜˋ*)و
i convert my base gif layer and the blurred layer into a smart object before moving on with my process because sometimes photoshop likes to do this thing where it only applies the blur to the frame you're on. you can avoid this by combining the layers manually
if you're working with njpw footage and your clip plus coloring combination allows you to, you can also just go over the banner with black and blend it into the background. it's by far the best option but there's so rarely an opportunity to utilize it (i did it in the little header i made... go back and look at how beautiful she is)
step six: coloring
the big one. oh boy. prefacing this with: you can just skip coloring if you want. the sharpening settings i recommended earlier give a nice contrast to the gifs as is, so if it looks fine like that, you don't need any fancy colors. that being said...
my thought process going into coloring is to focus on skin tones and adjust everything around them. i don't tend to use psds, i always just manually color correct based on the actual footage i'm working with (venues differ, lighting differs, hues differ... incredibly hard to plan for all of it in advance). if i plan on making multiple gifsets of the same event/match, i do re-use settings, but sometimes minor adjustments are still needed
to begin coloring, you will need to use adjustment layers. you will pretty much need a basic knowledge of all of them (to the extent of knowing what the sliders and values do)
[1] i always begin with an exposure layer. this will remain above all of your layers (unless you plan on adding subtitles). here are my settings:
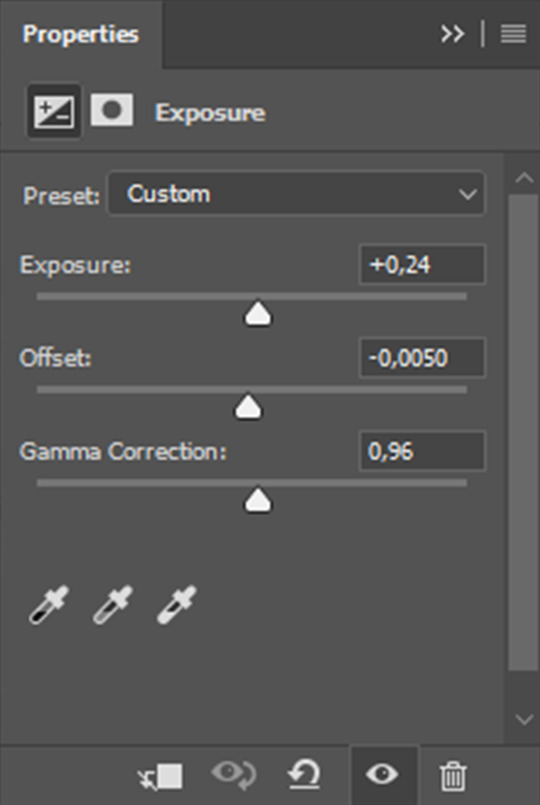
again, every layer you add after this will go below your exposure layer
[2] i add a selective color layer to further adjust the blacks. this will vary gif to gif but keep your adjustments small
[3] i add a vibrance layer. wrestling footage has major saturation problems that you can manage early on to make your life easier. take back a tiny bit (usually from -3 to -5) of vibrance before you begin your other color adjustments
[4] this is the big skin tone adjustment step using a curves layer. it does most of the heavy-lifting in my process. here is a video tutorial that explains the technique i use. it works the same with gifs as it does with images. the key differences are:
the image you are color picking off of shouldn't be a limited skin tone chart but rather an image of the wrestler(s) in natural (or as close to natural as you can find) lighting. i just go for renders used on the roster page. fan photography is way too edited to use here
try picking from a darker area of skin (shadows, midtones). it fits better with match lighting
this step will most likely correct color tints, but keep in mind that different promotions/shows/venues have different lighting. here are my personal observations:
aew dynamite and rampage have strong magenta tints
aew collision and roh honor club have strong red tints
njpw has a washed out blue tint
impact has a strong green tint
you can either lean into these (play around with making them really vibrant) or cancel them out using opposites on the color wheel (for example: to get rid of the magenta tint on dynamite, either decrease the magenta slider in your neutrals using selective color or add more green using color balance)
you will almost always have to add more cyan as well (either using color balance or channel mixer; channel mixer can also help you fine-tune skin tones with its blue tab—don't get rid of yellow undertones!)
[5] here is where i start fiddling around with manual adjustments that i seriously can't help you with... just add layers and change colors until you think it feels right. don't be afraid to start over if needed
[6] finishing touches! if you're like me you will have overcolored in the previous step. don't be afraid to add a saturation layer and decrease specifically the saturation of the reds (this will affect the skin tone; if you feel like you're on the right track but it's just too orange-looking, it's a saturation issue)
i also tend to add a black & white layer below the exposure layer up top set to soft light and lowered to 10% opacity. this gives you a bit of additional contrast that pulls the final gif together in my opinion
optional step: adding subtitles and watermarks
always add text layers above your coloring!
[1] subtitles
the font i use for subtitles is arial rounded mt bold, which you can download for free here. the point of subtitles is for them to be readable, so feel free to use any other font as long as it can be read with ease (nothing too thin or too blocky). if you plan on using the font i use, make sure to set it on faux bold and faux italics
font size differs based on the size of your gif, but it should normally be between 17pt and 23pt. i like to keep my tracking (letter-spacing) the same as my font size (so for 21pt subtitles i would have the tracking also at 21). i keep leading (the space between multiple lines of text) 3pt or 4pt
if there are two people speaking, i like setting the second speaker's text color to #ffd300. this is a generic yellow caption color that is still easy to read
after you have your basic text done, right click on your layer to add blending options. adding a stroke and a drop shadow can further help bring your text to the foreground. I keep my stroke (hah) at a simple 1px black. here are my drop shadow settings:

here is a more detailed guide about subtitles by clubgif
as for placement i add a horizontal guide at 95% and put my text on top of the line (while also keeping it centered vertically)
[2] watermarks
i personally don't use watermarks because i just don't care to, but if you want to add one, the same general ideas apply. just lower the opacity of your text layer at the end (if you want... again, a watermark is personalized)
step seven: timing
this is where you'll have to convert your video timeline back to a frame animation!
delete the frames that you don't need and then set a consistent timing (click on your first frame and shift + click on your last one to select all of your frames before adjusting). i like my gifs at 0.04, but depending on the footage you can go for 0.03 (newer bte episodes) or 0.05 (this also works if you don't have enough frames and want your gif a bit slower)
step eight: exporting
go to file -> export -> save for web (legacy)...
here are my export settings:
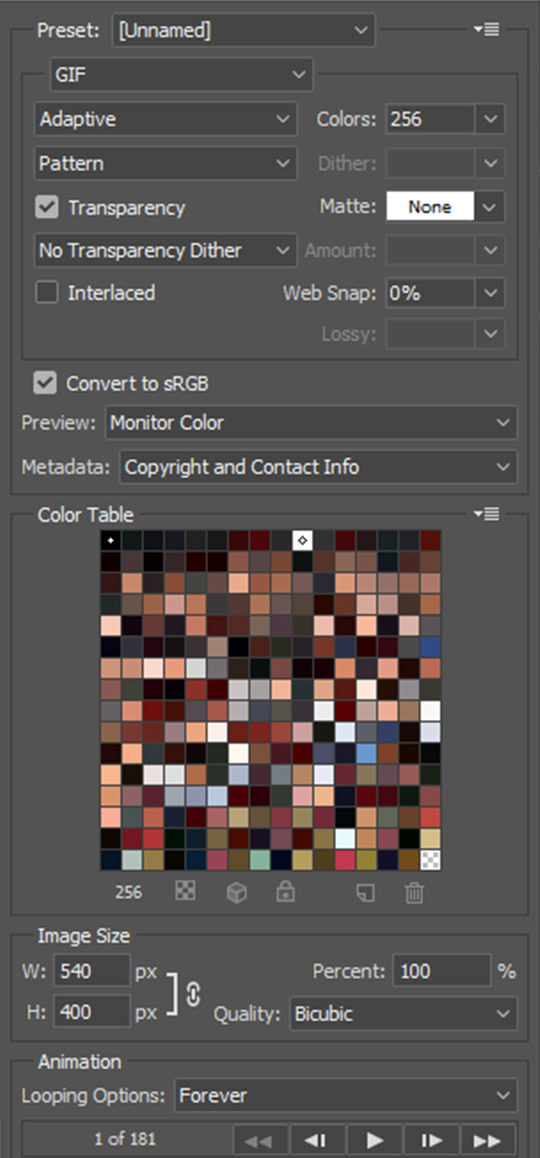
make sure to keep your gif under 10mb! if your file exceeds 10mb, you can't upload it to tumblr. you either have to cut some more frames or add compression to your gif (something i would never do, i always just cut frames)
additional tip: tagging
you have your gif! but how do you get people to actually look at it?
i always tag wrestlers* (full name, for both searchability and tag filtering purposes), promotions (initialisms like #aew over #all elite wrestling; if it's a more generic promotion name i.e. impact, go for #impact wrestling), tracked edit tags (#aewedit, #njpwedit; this not only helps source blogs find your posts and give them a bigger reach but it lets you browse other people's works). if you want to go the extra mile you can also include which event/video the gifset is from somewhere in your tags (if it's not already in the caption)
*even if you feel like it personally hurts you to tag that one wrestler you can't stand who happens to be in a match with your fave: do try tagging all wrestlers involved for ease of filtering, especially if you don't add image descriptions to your gifsets (tumblr's post content filtering system picks up on those)
general tumblr etiquette but don't cross-tag (i.e. tag a wwe gifset as #aew). no one likes cross-taggers. crossover events are exempt from this rule of course (forbidden door, multiverse united...)
additional tip: accessibility
don't use gradient text in your captions. screen readers can't read them!
if you can, include an image description. no matter how basic. this not only helps people with screen readers but the alt text of your gif is what's going to be displayed in case the gif isn't loading properly. here's a guide on how to caption gifsets by shangs
and you're done! all that's left to do is get silly with it. once you have the basics down you can virtually do anything. you can make those pretty graphics with blending. you can gif every single match of your fave in chronological order. sky's the limit
don't be discouraged if your gifs are not "perfect" from the get-go. this is a hobby just like any other hobby, and with time you'll get better at it. don't compare yourself to others and don't put your efforts down. only you can make the exact gifs you want to see
189 notes
·
View notes
Text

#absol#they look happier than umbreon which is strange to me. umbreon being all sad and angry while absol#known widely as The Edgy pokémon‚ is like. smiling a little bit. they're vibing they're totally fine#they're glad they got to be in rescue team#you go girl. go off‚ absol. even in rescue team they didn't feel like they had a Super cohesive tie to the story besides Being There and#helping and whatever but maybe that's just rescue team being my least favorite pmd game. but maybe that's part of *why*#if i'm right. i might not be right. maybe i just didn't pay enough fuckin attention in rescue team. there's *two of them*. someone out there#must like them enough for there to be a remake. and i know the general pmd community considers rescue team better than the 3ds games bc they#'re all nostalgia-driven like all pokémon fans and think that the older games are OBVIOUSly better even though the 3ds titles are#total masterpieces just like the rest of pmd. i'm not gonna complain abt this here bc i think the general pmd fanbase on tumblr are like#generally pretty nice and appreciate the 3ds games. y'all are nice here. elsewhere it gets scary. luckily everywhere else is crashing and#burning before our eyes. score. although apparently tumblr is also trying to given the whole “collapse reblogs” thing they're doing??#big yikes. hope that doesn't happen. anyway
168 notes
·
View notes
Text
Popcorn the clown is back, baybee!!!
#clown#clowncore#my artwork#artists on tumblr#digital art#cute#original character#basement buddy#bright colors#eye strain#slight eyestrain#sorry if this isnt eye strain i just noticed some ppl tag my art w that and im not sure which posts need it#but i hope im helping a little at least
1K notes
·
View notes
Note
Mmm maybe Lance and/or Silver for the lil character doodles? 👀✨
Life has been quite unforgiving as of late—but I really do dearly hope things get easier for the both of us huhu. Take care Mold, and don’t forget to drink a lot of water 🤲❤️
couldn't decide on which one so i did both! Lance and his son Silver! ✨
#mold answers#my art#i been making sure to drink plenty of water!! i hope you been too fluffs!! ;v; along with taking care!#life just doesnt wanna give us a dang break...i do hope things get better soon and we are free from the suffering!!#do hope this silly doodle at least helps even if its just a little bit <3
83 notes
·
View notes
Note
Small tutorial or tips on poses/anatomy/drawing the body???? Please and thank you!
Your art is so satisfying!! <3!!
Hey thank you!!! I don’t have a tutorial properly made but I did do some studies a while back that I can talk about!
All these poses are referenced from http://reference.sketchdaily.net
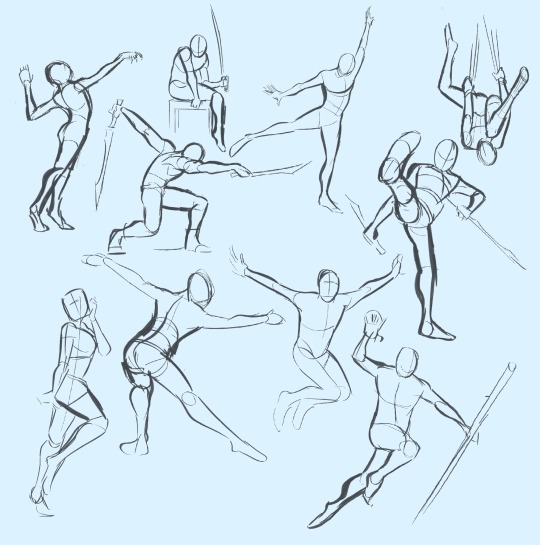
I’m no pro but when drawing the body, I usually find myself doing it in simple shapes split off into sections:
starting from the head, the angle of the chest, and angle of the waist, then the limbs
Depending on the activity of the pose the torso kinda reminds me of an accordion with the chest and hips kinda sandwiching the abdomen together:
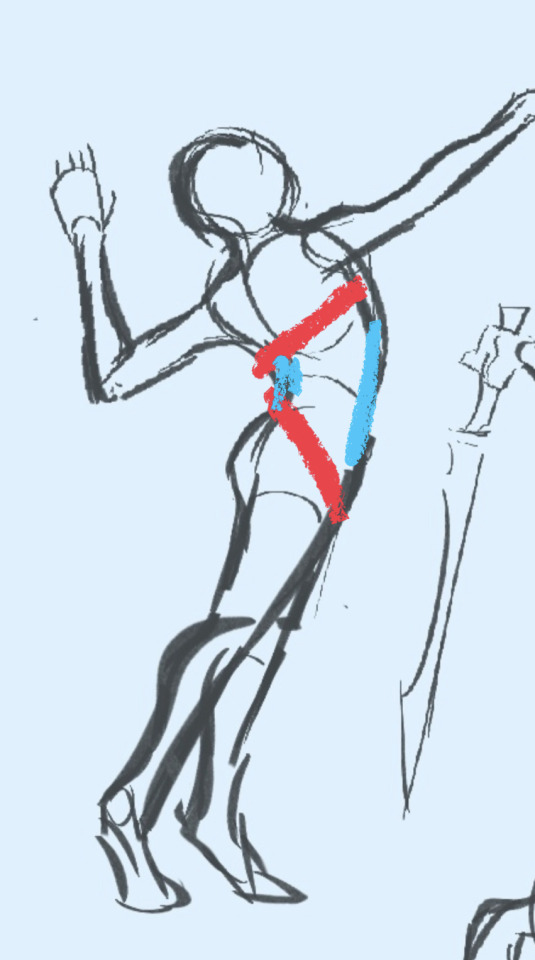
After doing these though, I kinda simplified the poses into their curvy and gestural forms just to make it easier to grasp how fast I can nail a pose down with fewer time spent on it
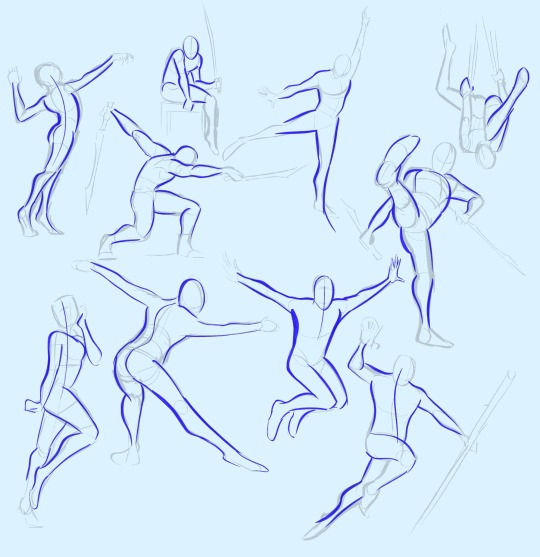
I think the best mindset to have when taking on anatomy/poses is realizing the power of shapes (it can rly help a lot!!)
Ofc there are other many other ways and processes of drawing the body, this way is just one I’ve grown to be comfortable with :D

#ask#I always get so nervous with tutorial stuff I have so much denial about my skillset 😭#thanks for askin tho!#I hope this helps at least a little
187 notes
·
View notes
Note
howdy! I'm also a robot enthusiast and I'm trying to get better at designing robot characters. I absolutely adore all of your robot designs, especially the sweet salt cosmonauts! do you have any advice for designing robots?
Ohh thank you~!! ✨✨
The biggest advice I can give is to study the functionality! That’s the most interesting part of robots to me, and influences all my designs. You definitely don’t have to understand the mechanics completely, but getting an idea of the basics, and knowing what the function and purpose of the robot is, and what parts help to carry out that function, is always a good starting place!
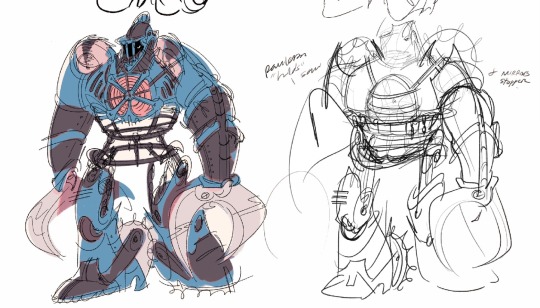
Here’s an example of how I was mostly focused on the saw mechanics of the shoulder, because that’s what was important to the story, and made the rest mostly aesthetic driven.
Whereas with Thylo, I had an idea of how I wanted his legs to look, and built the mechanics around that, to serve the aesthetic, but it also plays into his motion, and how he stands, and his balance.
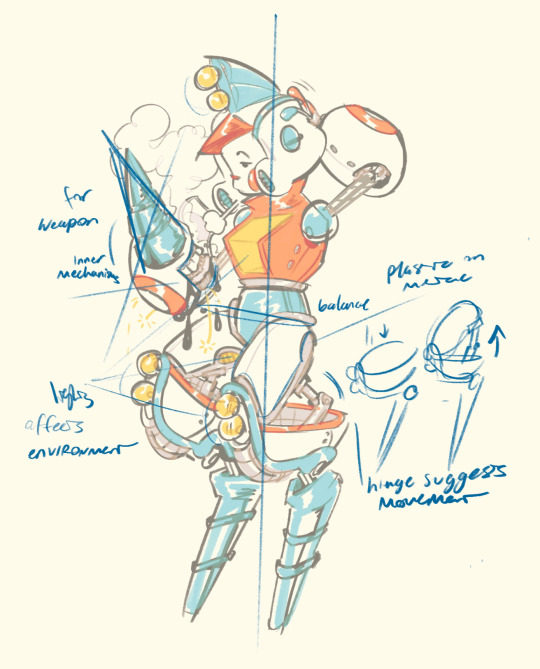
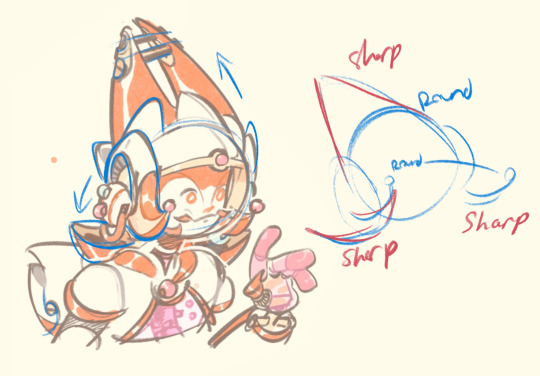
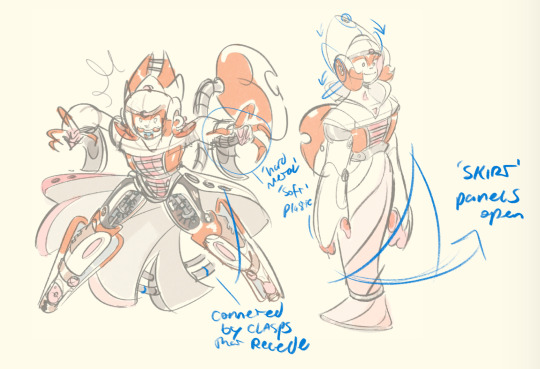
For Snap, both her new and older designs are more personality driven, and wanted to keep her more ‘human’ elements more round and approachable, and her mechanical parts sharper, to sell that they’re weaponry, and that she’s both kind and a fighter. But even her sharp aspects are never perfectly straight, keeping it fun and light-hearted.
Her’s is also a transforming design, and every little piece serves that function, especially the head area, and I consider how the panels will fall or open, or attach. Again, it doesn’t have to be mechanically accurate, but if you’ve got a solid idea of how the physics work for the character, it really sells the design!
Even for less humanish designs, you can give a clear idea of the robot’s function through decals, or how it affects the environment/other characters.
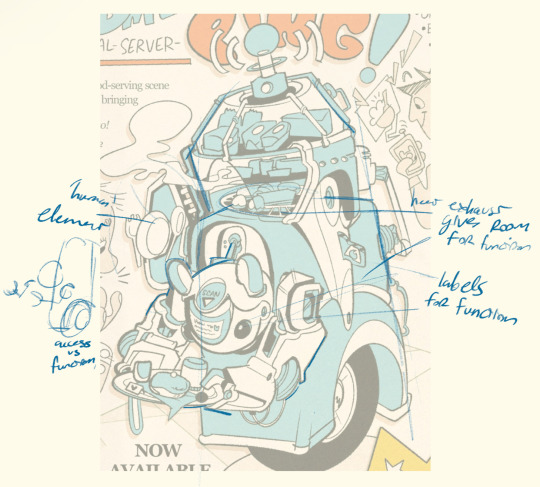
Here’s a little example: let’s say I wanna make a robot whose purpose is to lift boxes on top-shelves, and bring them down to a pallet. It would need a way to see the box, a way to reach it, and to push it onto the pallet.
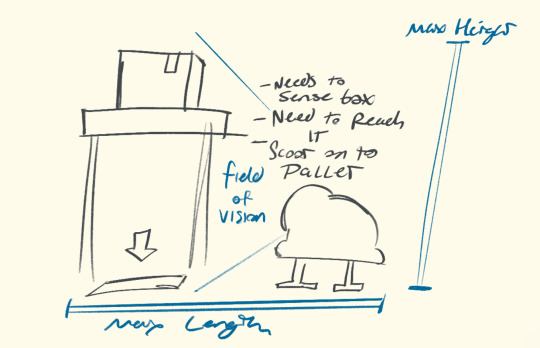
So, I’ll play with the idea of his functionality first. I could go with some sort of scissor lift, or hydraulic system, but I settle on mostly a telescoping mechanism, and build a little warehouse, or dock worker aesthetic around him.
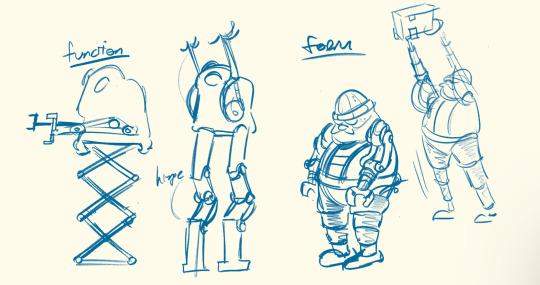
In short, I’d say just study mechanism that interest you, play with their shapes, their motion, figure out the purpose or character of your robot, and how they function, and what ways you can best convey that through their design! Hope this helps! ✨
#sorry if that’s too rambly or incoherent I could go on for days about robots so I tried to keep it short#I didn’t even get into the degrees of freedom or end effectors lol#I guess it’s similar to drawing clothing in that it doesn’t have to be practical or realistic so long as it makes sense for the character#or the story or environment#but thanks so much for asking and hope this helps at least a little! ✨⭐️#asks#Thylo#Snap
82 notes
·
View notes
Note
You inspired me to write! And I got up to 2k words for the first time ever when it comes to writing for myself... but I'm struggling a bit 😅 Do you have any advice about narrator POV and how you use your verb tenses? It's like I have no idea how you manage to "head-hop" while still being an omniscient narrator so smoothly & effortlessly. And verb tenses. if I write "was" one more time I might pop a gasket lol. any help is appreciated <3 have a good one!
First of all, that's freaking amazing! 2k is a lot, congratulations! That might sound weird coming from me considering how many words I put out, but I 100% remember the struggle of being newer to writing and hitting multiple thousands of words for the first time - I'm so happy for you!
Second of all: I actually write exclusively in third person limited POV, not third person omniscient! Even though I'm writing in third person, the narration is fully from the perspective of the point of view character, which I personally enjoy a lot because it allows for a lot of unreliable narration and also characterization through how their train of thought manifests (choppy, stressed, dreamy, etc). That's why when I'm writing from the point of view of character A, for example, any assumptions about character B's motivations are what character A is thinking, not an omniscient narrator informing you.
That said, you still have to head-hop specifically to write the actual visible actions and dialogue of the second character, and that's actually the most recent thing that I used to struggle with in writing specifically because I got most of my initial writing experience doing roleplay where I was only ever responsible for one character's thoughts and actions at a time.
Honestly, the main thing I can say is that it gets much, much easier with practice. When you start out, it will genuinely just take you longer to switch from the mindset of one character to another! I used to take character notes to put together little snapshot profiles of character headspaces to re-orient myself between the characters I was writing when I felt like I was getting lost. They included things like a few traits to keep in mind, behavior mindset, and snippets of dialogue that I thought were very representative. I don't use these anymore, but I do still do things like rewatch episodes or reread portions of books when I'm learning new characters to orient myself to their personality. It's like code-switching to me nowadays.
As for verb tense: I was a consummate Homestuck, so I started out writing in second person present tense, hahaha, and while I've adopted the third person POV (and believe me, this took adjusting), I've kept writing in present tense as a personal preference. I like it because it makes things feel more in-the-moment as they're happening, because there's less grammatical fuckery involved when describing the past vs the present, and just because I'm used to it. That said, past tense is more common and stands out less to people, and I think that you are finding all of your "was"s a lot more noticable than a reader would! People generally don't really notice the tense of what they're reading once they get into the flow of it.
#ask#personal#Anonymous#my writing#writing advice#I also tried to switch to past tense and kept fucking it up#like genuinely switching tenses halfway through a paragraph and not noticing at ALL#and unlike writing in second person POV it didn't seem like an actual issue wrt readability so I just stopped trying#long post#I hope this was at least a bit helpful!#I've honestly never written an omniscient narrator so I'm afraid I can't be much help with that#I'm too much of a sucker for unreliable limited narrators haha#I love how telling a narration can be about a character's mindset#also side note my oldest fic on AO3 which is a little Soul Eater oneshot from 2015 is in second person hahaha#A RELIC#(ofc I have some fantroll stuff on there as well but that's SUPPOSED to be second person)
35 notes
·
View notes
Last Seen Blogs
deusstrix
Haru Haru...
yurigenki
Never give up on the things that make you smile.

elangatechnologies
Elanga

tempatmagangditanggrang17
Tanpa judul
ishophom7017
Untitled