#curvature pen tool
Text
youtube
الحل السحري لعلاج تقوس وانحناء الظهر The magic solution to treat curvature and curvature of the back
#magic the gathering#back relaxation device#yoga to correct spinal curvature#back pain#back relaxation#back stretcher#curvature pen tool#photoshop curvature pen tool#curvature pen tool photoshop#new curvature pen tool#curvature tool#photoshop curvature tool#curvature pen tool in photoshop cc 2018#curvature pen photoshop#photoshop curvature pen#back pain relief#curvature#correct spinal curvature#learn magic the gathering#spinal curvature#gym body#gym bro#gym routine#gymlover#gymlife#gymfit#gym#home gym#tumblr milestone#gymwear
0 notes
Text
i figured out how to make custom shapes in photoshop today i’m unstoppable
#i can’t stand photoshop tutorials so it’s just a long process of doing things the hard way until i figure out how to do it the easy way#curvature pen tool is my best friend
0 notes
Text
man I HATE giffing yt videos.................. so much compression.......... even in hd.................. wtf...................
#also curvature pen tool is the best tool adobe ever created#MAN THAT THING IS A LIFESAVER#dasha.txt
0 notes
Text

adobe illustrator..... bad.......
this was my first experiment with illustrator as part of an exercise to try out a new program! i didn't like it! i'm fairly comfy with the adobe suit but illustrator is just... not.. good to use.... as my girlfriend put it, "it's less a learning curve and more a learning u-turn". but i'm relatively proud of my ability to trouble shoot and self-learn new programs that are objectively not user friendly though!
skills i used/learned:
creating a pattern, creating a brush with that pattern, pen tool, creating vector shapes with curvature, adjusting artboards and resolution
3 notes
·
View notes
Text
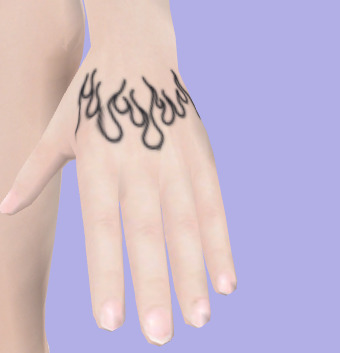
the quality of the texture leaves something to be desired but tbh i’m pretty happy w this. i had a vision and i actually made it happen ??
achievement unlocked: learn to use curvature pen tool
22 notes
·
View notes
Text
Unveiling Illustrator's Secrets: My Journey to Perfecting the Pen Tool with Advanced Tips
Mastering the Pen Tool in Adobe Illustrator is a fundamental skill that every designer strives to achieve. As a professional copywriter with a passion for creating visually stunning designs, I embarked on a personal journey to explore the advanced techniques of the Pen Tool. In this blog post, I will share my experience and motivation for delving into the intricacies of this powerful tool, as well as provide valuable insights and tips for those who are eager to enhance their own skills. Join me on this journey and discover the secrets of mastering the Pen Tool.

The Power of the Pen Tool
The Pen Tool in Adobe Illustrator is a true powerhouse when it comes to vector design. Its versatility allows designers to create precise and intricate paths, resulting in smooth and scalable graphics. However, for beginners, the Pen Tool can be quite daunting. Many struggle with understanding its functionality and feel overwhelmed by the complexities of manipulating anchor points and Bezier handles. But fear not, for with practice and patience, you too can master this indispensable tool.
Starting the Journey
My initial encounters with the Pen Tool were met with a mixture of excitement and frustration. Like many beginners, I found myself struggling to create smooth and accurate curves, often resulting in jagged lines and awkward shapes. However, these setbacks only fueled my determination to conquer the Pen Tool once and for all. With each failed attempt, I learned valuable lessons that shaped my understanding of its mechanics and propelled me towards improvement.
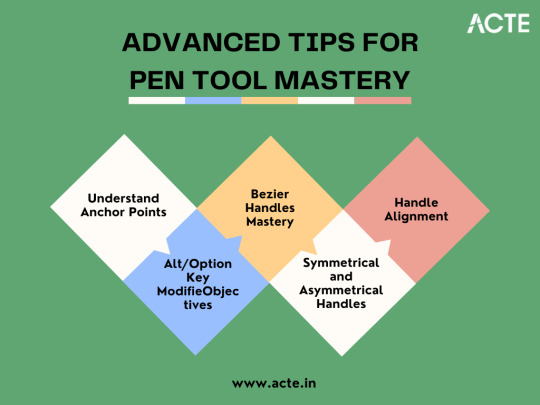
Advanced Tips for Pen Tool Mastery
To truly master the Pen Tool, an understanding of advanced techniques is essential. Let's dive into some of these techniques and explore step-by-step instructions to perfect your path creation skills.
Anchor Point Manipulation
One key technique in leveraging the full potential of the Pen Tool is mastering anchor point manipulation. By strategically placing and adjusting anchor points, you can create precise shapes and curves. Start by selecting the Pen Tool and click on the canvas to create an anchor point. To manipulate the anchor point, use the Direct Selection Tool to select and drag it to the desired position. Practice manipulating anchor points to create clean lines and curves that define your design.
Creating Smooth Curves
Achieving smooth curves is a hallmark of a skilled designer. Thankfully, the Pen Tool offers a solution in the form of Bezier handles. To create a smooth curve, click and drag the Bezier handle attached to an anchor point. The length and direction of the handle determine the shape of the curve. Try out several handle placements to get the curve you like. Remember, practice makes perfect, and refining your control over Bezier handles will greatly enhance your design capabilities.
Mastering the Bezier Handles
Understanding the intricacies of Bezier handles is crucial in mastering the Pen Tool. By mastering the techniques of symmetrical and asymmetrical handle placement, you can manipulate the curvature and direction of your paths. To create symmetrical handles, simply click and drag the handle in a direction that aligns with the angle of the curve. For asymmetrical handles, hold down the Alt/Option key and drag the handle to create a varied curve. Experiment with these techniques and witness the magic of the Pen Tool unfold.
Real-World Applications
Now that we've explored the advanced techniques of the Pen Tool, let's delve into its real-world applications. By mastering the Pen Tool, you can elevate the quality of your design projects across various industries. Whether it's creating intricate logos, designing visually appealing typography, or crafting beautiful illustrations, the Pen Tool will become your trusted ally in bringing your creative vision to life. To showcase its power, here are some before-and-after images that illustrate the transformation achieved through the mastery of the Pen Tool.
Overcoming Challenges
During my own journey to Pen Tool mastery, I encountered numerous challenges that tested my patience and determination. One common obstacle was the struggle to maintain a steady hand while creating paths and curves. To overcome this challenge, it is important to practice regularly and gain muscle memory. Additionally, understanding the principles of anchor point manipulation and Bezier handles will aid in overcoming the initial difficulties. Don't be discouraged by setbacks, for each mistake is an opportunity to learn and grow as a designer.
Tools and Resources
To complement your Pen Tool journey, Adobe Illustrator offers a plethora of features and tools that enhance its functionality. Take advantage of the Pathfinder panel to unite, divide, and intersect multiple paths. The Shape Builder Tool enables you to create and merge shapes effortlessly. Furthermore, external resources such as online tutorials and books can provide invaluable insights and guidance. Explore these tools and resources to accelerate your path to Pen Tool perfection.

Personal Insights and Reflections
Throughout my journey to mastering the Pen Tool, I witnessed a remarkable evolution in my skills. The countless hours spent practicing and experimenting culminated in several "aha" moments that fundamentally transformed my understanding of the tool. One breakthrough was the discovery of the delicate balance between precision and artistic expression. The Pen Tool is not merely a mechanical tool for creating paths; it is a gateway to limitless creativity.
Showcasing Your Work
As a testament to the power of the Pen Tool, I would like to showcase some of my own artwork and design projects where I have applied the advanced techniques discussed in this article. By harnessing the full potential of the Pen Tool, I was able to achieve intricate details and flawless curves, elevating the quality of my designs. Witness the transformation and unleash your own creativity with the Pen Tool.
Encouragement for Aspiring Designers
To all aspiring designers who may be struggling with the Pen Tool, I offer words of encouragement. Remember that mastery takes time, practice, and patience. The Pen Tool may seem daunting at first, but with perseverance and continuous learning, you can unlock its full potential. Embrace each challenge as an opportunity to grow, and never lose sight of the passion that drives you. You have the ability to create extraordinary designs – all it takes is a little faith in your own abilities.
In conclusion, my journey to Pen Tool perfection in Adobe Illustrator has been one of personal growth and discovery. From the initial frustrations to the remarkable breakthroughs, I have come to realize the importance of persistence and dedication in advancing my skills. The Pen Tool is a remarkable instrument capable of transforming mere lines into works of art. Embrace this tool, practice its techniques, and unleash your creativity like never before. if you need help with Adobe Illustrator or have questions about its features. These sources include official Adobe Illustrator training programs, discussion boards, and websites like ACTE Institute that provide Adobe Illustrator classes. All of these sources provide helpful advice and insights. Happy designing! Happy designing!
6 notes
·
View notes
Text

Second assignment:
Scoliosis is a curvature that occurs in the spine and usually appears during adolescence because it is a period of rapid growth. When I learned about scoliosis, it was through the exposure of one of my relatives to this health problem, which prompted me to embody this problem as there are shapes that curve in the form of the letter S and One of them is in the form of the letter C, and the word scoliosis contains the two letters, so I took advantage of this by comparing the letter “S” as if it were a curved spine.
The work was digital through the Illustrator program, in which I drew with the pen tool on the letter S, and the rest of the letters were written using the text tool.
@uob-funoon
23 notes
·
View notes
Text


The first poster is continuing my practice in InDesign with my expression of aroha poster. Ive included the maori translation as well as the English translation. Playing around with different typefaces for both translations. Learning how to implement shapes and add colour, overlap them to create a darker shade while messing around with the tint. What I find thats working is my placement of the green ovals, and what I could try next is maybe placing the text inside the circles or find a different layout for the text. For my experimental page, i’m messing around with different shapes. Playing around with the colour and tint as well as trying to figure out the pen tool. Using the pen and pencil tool to then place text on that with the curvature of the line. I enjoyed using the cutting tool to sculpt out the glyphs and the layering effects with the coloured lines. Printing these pages out I found that it dilutes the colour compared to it being on screen. Taking into consideration that I am using pastel colours, really using the tint effect it still came out of the printer duller then expected.
0 notes
Text
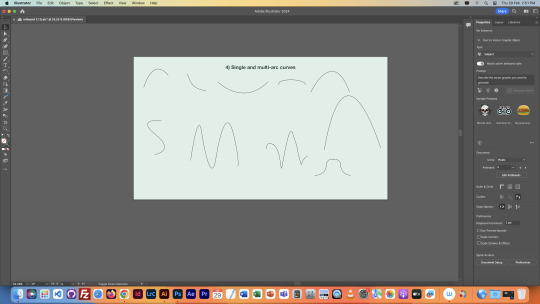
Single and multi arc curves.
Using the pen tool and the curvature tool I copied what toby did on the screen and board to match these shapes. The multi-bounce on the bottom seemed to look different because I couldn't figure out the second bounce up part.
Feeling good about these so far!
0 notes
Text


CHRISTMAS BREAK: Enamel pin creation continued. Manually vectorised my chosen pin designs in Illustrator. My prior knowledge of Illustrator was very limited, so I went about teaching myself how to use the pen tool by following illustrator Brad Colbow’s video tutorial on YouTube, which was super clear and helpful and allowed me to quickly adjust to the rules of using the pen and curvature tools. I also learned how to adjust a sketch to make it as visible as possible for tracing via the curves panel in Photoshop. I used the pen tool and curvature tool to line and colour my sketch in Illustrator, making sure to use the Pantone swatches for my colour and limiting my colour palette as much as possible. Honestly very proud of how sleek this design is. Hoping to make another ready for the deadline.
0 notes
Video
youtube
Test 5 Photoshop'ta Pen Kalem Aracı ile Seçimler Yapmak Aykut ilter Bilgisayar Destekli Tasarım 5. PHOTOSHOP’TA PEN (KALEM) ARACI İLE SEÇİMLER YAPMAK YazdırTüm Cevapları GizleMateryal Listesine Dön ________________________________________ Soru 1: Photoshop yazılımında “Pen” aracı ile çizim modlarından hangisinde otomatik olarak yeni katman oluşur ve vektörel özellikte bir çizim yapılır? (Çoktan Seçmeli) ✔ Shape Path Pixel Marque Polygonal Cevap : Shape ________________________________________ Soru 2: Photoshop yazılımında “Pen” aracı ile manuel seçim yaparken en sık kullanılan ve hem kavis hen de doğrusal çizimlere imkan veren araç aşağıdakilerden hangisidir? (Çoktan Seçmeli) ✔ Pen Tool Freeform Pen Tool Curvature Pen Tool d ) Path Selection Tool Direct Selection Tool Cevap : Pen Tool ________________________________________ Soru 3: Photoshop yazılımında “Pen” aracı ile yapılan çizimi seçime dönüştürmenin kısayolu aşağıdakilerden hangisidir? (Çoktan Seçmeli) Ctrl + “Space” tuş kombinasyonu ✔ b ) Ctrl + “Enter” tuş kombinasyonu Ctrl + “Shift” tuş kombinasyonu Ctrl + “BackSpace” tuş kombinasyonu Ctrl + “Alt” tuş kombinasyonu Cevap : b ) Ctrl + “Enter” tuş kombinasyonu “Pen” aracı,Shape,Bilgisayar Destekli Tasarım,PHOTOSHOP’TA PEN (KALEM) ARACI İLE SEÇİMLER YAPMAK,manuel seçim,kavis hem de doğrusal çizimlere imkan veren araç,Pen Tool,“Pen” aracı ile yapılan çizimi seçime dönüştürmenin,Ctrl + “Enter” tuş kombinasyonu,Photoshop yazılımı,doğrusal çizimler,Curvature Pen Tool,Freeform Pen Tool,Path Selection Tool,Direct Selection Tool,Ctrl + “Shift” tuş kombinasyonu,Ctrl + “BackSpace” tuş kombinasyonu,Ctrl + “Alt” tuş kombinasyonu
0 notes
Text
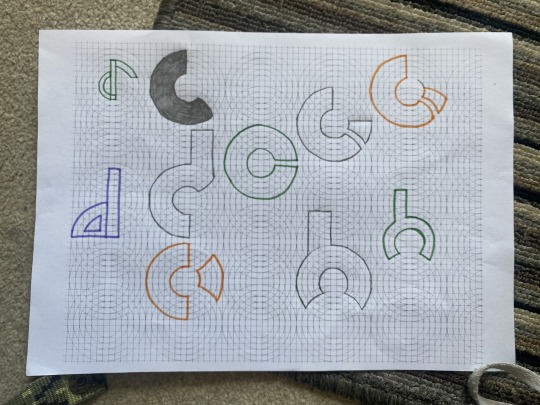


Circular Grid Font Further Experimentation
This was some further experimentation on the circular grid letterforms. I traced over them digitally in illustrator using the pen tool and the curvature pen tool. I feel the 'd' and 'h' work really well and I like the round effect the grid has given the letters. I think the 'i' looks unique and different but I don't know if people from an outside perspective would know what letter it is.
0 notes
Text
Seamless Edges, Stunning Results: Clipping Path Mastery
In the world of visual content creation, the precision of edges can make or break the impact of an image. Clipping paths, often considered the unsung heroes of graphic design and image editing, play a pivotal role in achieving those seamless edges that elevate the quality of visuals. From product photography to digital artistry, mastering the art of clipping paths can transform ordinary images into extraordinary visual experiences.

Understanding Clipping Paths
At its core, a clipping path is a technique used to isolate a specific portion of an image from its background. This technique allows for the removal of unwanted elements, the creation of a transparent background, or the placement of the clipped object onto a different backdrop. It involves precise outlining using tools like the Pen Tool in software like Adobe Photoshop or Illustrator.
Importance of Seamless Edges
Seamless edges are the hallmark of professional-grade visual content. They ensure that the subject stands out cleanly and precisely, free from jagged edges or remnants of the original background. Whether for e-commerce product images, marketing materials, or artistic compositions, seamless edges contribute significantly to the overall quality and impact of an image.
Challenges in Achieving Seamless Edges
However, achieving this level of precision isn't without its challenges. Perfecting clipping paths requires a keen eye, a steady hand, and a deep understanding of the tools and techniques involved. Even the slightest deviation in the path or inconsistency in curvature can disrupt the seamlessness, requiring meticulous attention to detail.
Techniques for Achieving Seamless Edges
To achieve mastery in clipping path creation, several techniques prove invaluable. Precision in path creation, refinement using various tools, and employing adjustment layers and masking techniques are fundamental to achieving those flawless edges.
Precision in Path Creation: The Pen Tool is the go-to for creating clipping paths. Understanding its functionalities and mastering Bezier curves is crucial for accurate outlining.
Refinement and Smoothing Methods: Utilizing tools like the Anchor Point or Direct Selection Tool aids in refining the paths and smoothing out curves for a more natural appearance.
Adjustment Layers and Masking: Leveraging adjustment layers and masking helps fine-tune the clipped object, adjusting contrast, color, and transparency for a seamless integration into different backgrounds.
Steps to Clipping Path Mastery
The journey towards mastering clipping paths entails gradual progress from basics to advanced techniques and industry best practices.
Learning the Basics: This involves understanding the foundational tools and practicing precision with simple shapes before advancing to more complex subjects.
Advanced Techniques: Delving into complex object outlining, handling transparency, and mastering batch processing techniques enhances proficiency and efficiency.
Industry Best Practices: Embracing quality control measures and effective communication with clients ensures the delivery of high-quality, tailored results.
Benefits of Clipping Path Mastery
The benefits of mastering clipping paths extend beyond achieving seamless edges. They include enhanced visual appeal, increased professionalism, time and cost efficiency, and a competitive edge in the visual content creation industry.
Case Studies and Examples
Exploring before-and-after demonstrations, real-life applications across diverse industries, and success stories from professionals who've mastered clipping paths offer practical insights and inspiration.
Conclusion
In conclusion, the mastery of clipping paths isn't merely about technical proficiency but about the enhancement and transformation of visual content. With dedication, practice, and an eye for detail, achieving seamless edges through clipping path mastery becomes a cornerstone in elevating the quality and impact of visual storytelling.
0 notes
Text
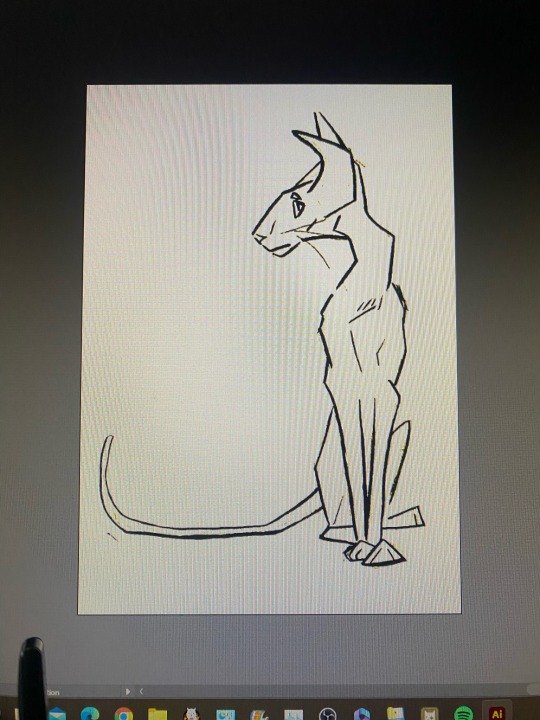
Day 6 - 8
Days 6 - 8 were spent using ADOBE Illustrator to create the character design. It was useful to use the pen tool alongside tools such as ellipse to get the necessary curvature of a character with such an art style. The nickname I gave the character was Noodler, due to the spaghetti themed silly aspects of the character.


A sketch of the initial character design followed by the design process used to design the character.
0 notes
Text
Vector path Photoshop
A vector path in Photoshop is a type of graphic element that consists of a series of points connected by lines or curves. It is a mathematical representation of a shape or outline that can be easily modified or resized without losing any quality.
To create a vector path in Photoshop, you can use the Pen tool or any other shape tool such as the Rectangle tool, Ellipse tool, or Custom Shape tool. The Pen tool allows you to create paths by adding and manipulating anchor points, which determine the direction and curvature of the lines or curves. Once you have created a vector path, you can apply various operations and effects to it, such as stroke, fill, or gradient. You can also convert the path into a selection or a shape layer, which gives you more control and flexibility in editing and styling. Vector paths are particularly useful when working with logos, icons, or any other graphics that require scalability and precision. Unlike raster-based images, vector paths in Photoshop can be resized and manipulated without pixelation, making them ideal for both print and web design projects.
How to create a vector path in Photoshop?
To create a vector path in Photoshop, follow these steps:
1. Open Photoshop and create a new document or open an existing one.
2. Select the Pen Tool from the toolbar. It is typically located in the left sidebar.
3. Choose the path type you want to create by selecting one of the three options: Shape, Path, or Pixels. For creating a vector path, choose the "Path" option.
4. Click on the canvas to start creating the path anchor points. Click and drag to create curved segments, and click without dragging to create straight segments.
5. Continue clicking and creating anchor points to define the shape of your vector path.
What is the purpose of a vector path in Photoshop?
The purpose of a vector path in Photoshop is to create and manipulate scalable, resolution-independent shapes and lines. Unlike raster images, which are made up of pixels and can lose quality when resized, vector paths are defined by mathematical equations, allowing them to be resized and edited without any loss of quality.
In Photoshop, you can use the Pen tool to create vector paths. These paths can be used for a variety of purposes, such as creating precise and smooth selections, designing custom shapes, creating paths for text to follow, or creating complex artwork. Vector paths are especially useful for tasks that require precision and flexibility, such as logo design, illustration, and typography.
By using vector paths, you can easily modify and transform shapes, apply stroke and fill attributes, and even convert paths into selections or masks. This makes vector paths an essential tool for creating and editing graphic elements in Photoshop.
How to edit a vector path in Photoshop?
To edit a vector path in Photoshop, you can follow these steps:
1. Open your image in Photoshop and select the Pen Tool from the toolbar. Alternatively, you can press the "P" key on your keyboard to select the Pen Tool.
2. Click and create anchor points to outline the shape or path that you want to edit. Each click creates an anchor point, and you can connect these points to form straight or curved lines.
3. To adjust an existing anchor point, select the Direct Selection Tool from the toolbar or press the "A" key on your keyboard. Click on the anchor point you want to modify, and you will see handles appear that allow you to adjust the shape.
4. To add or remove anchor points, select the Pen Tool and position it on the path where you want to make the change. To add an anchor point, simply click on the path. To remove an anchor point, press and hold the "Alt" or "Option" key on your keyboard and click on the anchor point.
5. To modify the path between anchor points, select the Convert Point Tool from the toolbar or press the "Shift" + "C" keys on your keyboard. Click and drag the handles attached to an anchor point to reshape the path segment.
6. You can also move the entire path by selecting the Path Selection Tool from the toolbar or pressing the "A" key on your keyboard. Click and drag the path to reposition it within your image.
7. Once you have made the desired modifications to the vector path, you can save your changes. If you want to keep the vector path editable, save your document in a format that supports Photoshop's vector features, such as PSD. If you want to export your vector path as a non-editable format, such as a JPEG or PNG, you can use the "Export As" or "Save For Web" options under the "File" menu.
Remember, when working with vector paths in Photoshop, it's always a good idea to make a copy of your original image layer or save your work as a separate file. This way, you can always go back to the original if needed and avoid accidentally overwriting your original image.
How to convert a raster image to a vector path in Photoshop?
To convert a raster image to a vector path in Photoshop, you can follow these steps:
1. Open Photoshop and import your raster image by going to "File" > "Open" and selecting the file.
2. In the Layers panel, right-click on the layer containing your raster image and select "Rasterize Layer." This will convert your image into a bitmap raster layer.
3. Use the "Pen Tool" from the toolbar on the left side of the screen. Zoom into the image for precision.
4. Start tracing the shape or outline of the image with the Pen Tool by creating anchor points. Click and drag to create curves if needed.
5. Continue placing anchor points along the desired path, following the contours of the image. Be patient and take your time to accurately trace the shape.
6. Once you have completed the path, right-click on the path and choose "Make Selection." This will create a selection based on the vector path.
7. With the selection active, go to "Layer" > "New Fill Layer" > "Solid Color." Choose a color and click "OK." This will create a new layer with the vector path filled in with the chosen color.
8. You can also use the "Paths" panel to save the path for future use or export it for use in other software.
Keep in mind that converting a raster image to a vector path may not always produce perfect results, especially for complex or detailed images. It is recommended to use dedicated vector editing software like Adobe Illustrator for more accurate and precise results.
How to use the Pen tool to create a vector path in Photoshop?
To use the Pen tool to create a vector path in Photoshop, you can follow these steps:
1. Select the Pen tool from the toolbar. It looks like a pen nib.
2. Determine which type of path you want to create: a shape or a path. You can switch between these options in the toolbar at the top of the screen.
3. If you're creating a shape, ensure the "Shape" option is selected in the toolbar. If you're creating a path, ensure the "Path" option is selected.
4. Click on the canvas to place the first anchor point of the path. This will be the starting point of your path.
5. Click again on a different part of the canvas to add a second anchor point. Photoshop will automatically create a straight line between the two anchor points.
6. To create curved segments, click and drag the mouse after placing an anchor point. This will create direction handles that control the direction and curvature of the path.
7. Continue adding anchor points and adjusting the direction handles to create your desired path. You can create straight and curved segments as needed.
8. To close the path, click on the starting anchor point. A small circle will appear next to the Pen tool cursor when you're hovering over the starting point to indicate that the path will be closed.
9. Once you've created the desired path, you can modify it further by adjusting the position and length of the direction handles. You can also add or delete anchor points using the Pen tool or other path editing tools.
10. If you're creating a shape, you can fill it with a color or apply a stroke by selecting the shape layer and using the options in the toolbar or the Layer Style window.
That's how you use the Pen tool to create a vector path in Photoshop. Practice and experimentation will help you become more proficient with this powerful tool.
How to apply different stroke styles to a vector path in Photoshop?
To apply different stroke styles to a vector path in Photoshop, you can follow these steps:
1. Use the Pen Tool (P) to create a vector path on the canvas. You can also use existing shape layers or text layers with vector masks.
2. Select the "Path Selection Tool" (A) from the toolbar.
3. Click on the vector path or layer that you want to apply the stroke style to. This will activate the path.
4. From the menu, go to "Window" > "Properties" to open the Properties panel.
5. In the Properties panel, locate the "Stroke" section. If you can't see it, click on the disclosure triangle next to "Properties" to expand the options.
6. Adjust the stroke settings to customize the style according to your preference. You can modify parameters such as size, color, opacity, and alignment.
7. To change the stroke type, click on the drop-down menu next to "Stroke" and choose from the available options, such as Solid, Dashed, Dotted, or Custom.
8. For custom stroke styles, click on the "More Options" button (represented by three dots) next to the drop-down menu. This will open the Stroke Options dialog box where you can adjust parameters like dash length, gap length, and dash offset to create a unique stroke style.
9. Once you are satisfied with the stroke style, you can further customize it by applying layer effects, such as Bevel and Emboss, Outer Glow, or Gradient Overlay, from the "Layer Style" dialog box.
How to apply different fill colors to a vector path in Photoshop?
To apply different fill colors to a vector path in Photoshop, you can follow these steps:
1. Select the "Path Selection Tool" from the toolbar. It looks like a black arrow.
2. Click on the vector path you want to apply a fill color to. This will select the path.
3. In the top options bar, you will see the "Fill" option. Click on the small color swatch next to it to open the color picker.
4. Choose a color from the color picker or enter the specific color values you want. Click "OK" to confirm the color.
5. The selected vector path will now be filled with the chosen color.
If you have multiple vector paths and you want to apply different fill colors to each path, you can repeat the above steps for each path individually.
How to transform and modify a vector path in Photoshop?
To transform and modify a vector path in Photoshop, you can follow these steps:
1. Open your vector path in Adobe Photoshop by selecting "File" > "Open" and navigating to the file location on your computer.
2. Make sure the "Paths" panel is visible. If it's not already visible, you can go to "Window" > "Paths" to enable it.
3. In the Paths panel, you should see your vector path listed. If you don't have a path yet, you can create one by using the pen tool or any other selection tool and converting it into a path.
4. Select the vector path you want to modify by clicking on its thumbnail in the Paths panel. This will make the path active.
5. To transform the path, you can use the Free Transform Path tool. Select the tool from the toolbar or press "Ctrl+T" (Windows) or "Command+T" (Mac) to activate it. This will create a bounding box around the path with handles that you can use to resize, rotate, and shear the path.
6. To modify the shape of the path, you can use the Direct Selection tool. Select the tool from the toolbar or press "A" to activate it. With this tool, you can click and drag individual path points to move them or adjust the handles to change the curvature of the path.
7. If you want to add or remove points from the path, you can use the Pen tool or the Add Anchor Point tool and Delete Anchor Point tool, respectively.
8. You can also apply various layer styles and effects to the vector path by selecting the path layer in the Layers panel and using the options in the Layer Style dialog box.
Remember to save your work when you're done by selecting "File" > "Save" or "Save As".
How to combine multiple vector paths in Photoshop?
To combine multiple vector paths in Photoshop, you can use the "Path Operations" feature. Here are the steps:
1. You can also press "A" on your keyboard to access it.
2. Hold down the "Shift" key and click on each vector path that you want to combine. This will select multiple paths at once.
3. Right-click (or Ctrl-click on a Mac) on one of the selected paths and choose "Combine Shapes" from the context menu.
4. In the "Path Operations" dialog box, choose one of the operations to combine the paths. The options include "Add", "Subtract", "Intersect", and "Exclude Overlapping Shapes". Select the appropriate option based on the desired outcome.
5. Click the "OK" button to apply the selected path operation and combine the paths.
The combined vector paths will now be merged into a single path based on the chosen operation. You can then manipulate, fill, or stroke the combined path as needed.
Note that the ability to combine vector paths in Photoshop is only available when working with vector shapes and paths, not with pixel-based layers or images.
0 notes
Text
Mastering Water Drops Effects in CorelDraw: A Step-by-Step Guide
1. Introduction
Creating stunning water drop effects in graphic design can elevate your designs to a whole new level. Whether you're a seasoned designer looking to enhance your skills or a beginner eager to learn the ropes, this step-by-step guide will walk you through the process of mastering water drop effects in CorelDraw. From creating the perfect shape to applying realistic textures and reflections, this tutorial will provide you with the techniques and tools you need to create eye-catching designs that will leave a lasting impact. So, grab your pen tool and let's dive into the world of water drop effects in CorelDraw!
https://unsplash.com/@thisisengineering
2. Understanding the Water Drops Effect in CorelDraw
Understanding the Water Drops Effect in CorelDraw
Before we dive into the process of creating water drop effects in CorelDraw, it's important to have a clear understanding of what this effect entails. The water drop effect is a popular technique used in graphic design to create a realistic and visually appealing representation of water droplets.
In order to achieve this effect, it's crucial to pay attention to the details such as shape, texture, and reflection. By carefully manipulating these elements, you can create water drop effects that are so lifelike, viewers will be tempted to reach out and touch the droplets.
In the upcoming sections, we will explore the various tools and techniques in CorelDraw that you can use to create stunning water drop effects. We will discuss the importance of shape creation, texture application, and reflection adjustment, providing you with the knowledge and skills necessary to master this effect.
So, let's roll up our sleeves and get ready to delve into the world of water drop effects in CorelDraw!
3. The Tools and Techniques for Creating Realistic Water Drops
In order to create realistic water drop effects in CorelDraw, it's important to familiarize yourself with the various tools and techniques available. These tools and techniques will allow you to manipulate shapes, textures, and reflections in order to achieve the desired effect.
One useful tool for creating water droplet shapes is the ellipse tool. By adjusting the size and curvature of the ellipse, you can create droplets of different sizes and shapes. Additionally, the shape tool can be used to refine the edges and add dimension to the droplets.
Texture application is another important aspect of creating realistic water drops. CorelDraw offers a variety of texture fill options, such as gradient fills or pattern fills. Experimenting with different textures can help you achieve a more lifelike effect.
Lastly, adjusting the reflection of the water drops can greatly enhance their realism. CorelDraw provides tools for adjusting reflection, such as transparency options and blending modes. By playing around with these settings, you can create reflections that mimic the appearance of water.
In the next section, we will explore these tools and techniques in more detail, providing step-by-step instructions for creating stunning water drop effects in CorelDraw. So, grab your creative gear and let's dive in!
4. Step-by-Step Guide to Mastering Water Drops Effects in CorelDraw
In this section, we will provide a comprehensive step-by-step guide to mastering water drop effects in CorelDraw. By following these instructions, you will be able to create stunning and realistic water droplets in your designs.
Step 1: Creating the water droplet shape
- Select the ellipse tool and draw an ellipse on your canvas.
- Use the shape tool to refine the edges and shape of the droplet.
- Experiment with different sizes and curvatures to achieve the desired droplet shape.
Step 2: Adding texture to the droplet
- Select the droplet shape and choose a texture fill option from the fill options menu.
- CorelDraw offers gradient fills, pattern fills, and other texture options. Try different textures to achieve a more realistic water droplet appearance.
Step 3: Adjusting reflection
- Adjust the reflection of the water droplet by using transparency options and blending modes.
- Play around with different settings to create reflections that mimic the appearance of water.
Step 4: Enhancing realism with additional effects
- Consider adding additional effects like shadows or highlights to enhance the realism of the water droplet.
- Experiment with different effects and settings until you achieve the desired result.
By following these step-by-step instructions, you will be well on your way to mastering water drop effects in CorelDraw. Stay tuned for the next section, where we will provide tips and tricks for adding finishing touches to your water droplet designs.
5. Tips and Tricks for Enhancing the Realism of Water Drops
In this section, we will provide you with some valuable tips and tricks to enhance the realism of the water drop effects you've created in CorelDraw. These techniques will add that extra touch of authenticity to your designs.
Tip 1: Play with transparency and opacity
Adjusting the transparency and opacity of the water droplet can create a more convincing effect. Play around with these settings to achieve the perfect level of transparency for your droplets. Remember to observe how light interacts with water in real life to replicate the effect accurately.
Tip 2: Experiment with lighting and shadows
Incorporating realistic lighting and shadows can greatly enhance the realism of your water droplet designs. Utilize CorelDraw's lighting effects and shadow tools to experiment with different angles and intensities for the droplets. Mimicking natural lighting conditions will make the droplets appear more authentic.
Tip 3: Utilize the power of gradients
Gradients can add depth and dimension to your water droplet designs. Experiment with different gradient fills, especially those that mimic the colors present in water droplets. By carefully selecting and placing gradients on your droplets, you can make them appear more lifelike.
Tip 4: Add water ripples or splashes
To take your water droplet designs to the next level, consider adding ripples or splashes around the droplets. You can create these effects using various tools and techniques in CorelDraw, such as the distortion or mesh warp tools. Be careful not to overdo it though, as subtlety is key for a realistic appearance.
With these tips and tricks, you will be able to enhance the realism of your water drop effects in CorelDraw. Stay tuned for the final section of this guide, where we will showcase some inspiring examples of water droplet designs and provide additional resources to further improve your skills.
6. Applying Water Drops Effect in Various Design Projects
In this final section, we will explore how to apply the water drop effect in various design projects using CorelDraw. The versatility of this effect allows you to elevate your designs in different contexts. Let's dive in!
1. Advertising: Incorporating water drops in advertisements can add a touch of freshness and realism. Imagine a crisp, dewy water droplet on a vibrant fruit or a refreshing drink. It instantly captivates the viewer's attention and enhances the overall visual appeal.
2. Packaging: The water drop effect is a popular choice in packaging design, particularly for beverages, skincare products, or any items associated with water. The droplets create a sense of luxury and purity, making the product appear more enticing and desirable.
3. Web design: Add a dynamic element to your website by integrating water drops. They can be used as hover effects, where the droplets appear when users hover over a specific area. This interaction not only engages the audience but also reinforces the theme or concept of the website.
4. Branding: Incorporating the water drop effect into your brand identity can convey a sense of freshness, purity, and reliability. Use it in your logo, stationery, or promotional materials to create a cohesive and visually appealing brand image.
By applying the water drop effect in these various design projects, you can elevate your visuals and create a lasting impression on your audience. Don't be afraid to experiment and explore different ideas to find the perfect application for your designs. Remember to always keep the principles of balance and harmony in mind.
With that, we conclude our guide on mastering water drop effects in CorelDraw. We hope this step-by-step guide has empowered you to create realistic and captivating water droplet designs. Don't forget to continue practicing and exploring new techniques to further improve your skills. Happy designing!
7. Final Thoughts and Further Exploration of CorelDraw Effects
Final Thoughts and Further Exploration of CorelDraw Effects
Congratulations on mastering the water drop effect in CorelDraw! By following this step-by-step guide, you now have a powerful tool in your design arsenal that can enhance various projects.
Remember that CorelDraw offers a wide range of effects that can take your designs to the next level. Take some time to explore and experiment with other effects such as shadows, transparency, and gradients. These effects, when combined with the water drop effect, can create stunning visuals that leave a lasting impact on your audience.
Additionally, continue honing your skills by practicing and creating new designs. Join design communities or forums to connect with other designers and learn from their experiences. CorelDraw also provides tutorials and resources that can further expand your knowledge.
In conclusion, mastering the water drop effect is just the beginning of your journey as a designer using CorelDraw. Embrace new challenges, stay open to learning, and keep pushing the boundaries of your creativity. The possibilities are endless. Happy designing!
1 note
·
View note
Last Seen Blogs

bitterblue98
Sinestesia.

blossom-ghoul
Don't Kid Yourself and Don't Wound Yourself

cyborgmoved
the age of cyborg is here!

the-mo-erectus
The (Ho)Mo Erectus

dreamerbeliever29
Enthusiastic Optimist