#curvature pen photoshop
Text
youtube
الحل السحري لعلاج تقوس وانحناء الظهر The magic solution to treat curvature and curvature of the back
#magic the gathering#back relaxation device#yoga to correct spinal curvature#back pain#back relaxation#back stretcher#curvature pen tool#photoshop curvature pen tool#curvature pen tool photoshop#new curvature pen tool#curvature tool#photoshop curvature tool#curvature pen tool in photoshop cc 2018#curvature pen photoshop#photoshop curvature pen#back pain relief#curvature#correct spinal curvature#learn magic the gathering#spinal curvature#gym body#gym bro#gym routine#gymlover#gymlife#gymfit#gym#home gym#tumblr milestone#gymwear
0 notes
Text
i figured out how to make custom shapes in photoshop today i’m unstoppable
#i can’t stand photoshop tutorials so it’s just a long process of doing things the hard way until i figure out how to do it the easy way#curvature pen tool is my best friend
0 notes
Text


CHRISTMAS BREAK: Enamel pin creation continued. Manually vectorised my chosen pin designs in Illustrator. My prior knowledge of Illustrator was very limited, so I went about teaching myself how to use the pen tool by following illustrator Brad Colbow’s video tutorial on YouTube, which was super clear and helpful and allowed me to quickly adjust to the rules of using the pen and curvature tools. I also learned how to adjust a sketch to make it as visible as possible for tracing via the curves panel in Photoshop. I used the pen tool and curvature tool to line and colour my sketch in Illustrator, making sure to use the Pantone swatches for my colour and limiting my colour palette as much as possible. Honestly very proud of how sleek this design is. Hoping to make another ready for the deadline.
0 notes
Video
youtube
Test 5 Photoshop'ta Pen Kalem Aracı ile Seçimler Yapmak Aykut ilter Bilgisayar Destekli Tasarım 5. PHOTOSHOP’TA PEN (KALEM) ARACI İLE SEÇİMLER YAPMAK YazdırTüm Cevapları GizleMateryal Listesine Dön ________________________________________ Soru 1: Photoshop yazılımında “Pen” aracı ile çizim modlarından hangisinde otomatik olarak yeni katman oluşur ve vektörel özellikte bir çizim yapılır? (Çoktan Seçmeli) ✔ Shape Path Pixel Marque Polygonal Cevap : Shape ________________________________________ Soru 2: Photoshop yazılımında “Pen” aracı ile manuel seçim yaparken en sık kullanılan ve hem kavis hen de doğrusal çizimlere imkan veren araç aşağıdakilerden hangisidir? (Çoktan Seçmeli) ✔ Pen Tool Freeform Pen Tool Curvature Pen Tool d ) Path Selection Tool Direct Selection Tool Cevap : Pen Tool ________________________________________ Soru 3: Photoshop yazılımında “Pen” aracı ile yapılan çizimi seçime dönüştürmenin kısayolu aşağıdakilerden hangisidir? (Çoktan Seçmeli) Ctrl + “Space” tuş kombinasyonu ✔ b ) Ctrl + “Enter” tuş kombinasyonu Ctrl + “Shift” tuş kombinasyonu Ctrl + “BackSpace” tuş kombinasyonu Ctrl + “Alt” tuş kombinasyonu Cevap : b ) Ctrl + “Enter” tuş kombinasyonu “Pen” aracı,Shape,Bilgisayar Destekli Tasarım,PHOTOSHOP’TA PEN (KALEM) ARACI İLE SEÇİMLER YAPMAK,manuel seçim,kavis hem de doğrusal çizimlere imkan veren araç,Pen Tool,“Pen” aracı ile yapılan çizimi seçime dönüştürmenin,Ctrl + “Enter” tuş kombinasyonu,Photoshop yazılımı,doğrusal çizimler,Curvature Pen Tool,Freeform Pen Tool,Path Selection Tool,Direct Selection Tool,Ctrl + “Shift” tuş kombinasyonu,Ctrl + “BackSpace” tuş kombinasyonu,Ctrl + “Alt” tuş kombinasyonu
0 notes
Text
Seamless Edges, Stunning Results: Clipping Path Mastery
In the world of visual content creation, the precision of edges can make or break the impact of an image. Clipping paths, often considered the unsung heroes of graphic design and image editing, play a pivotal role in achieving those seamless edges that elevate the quality of visuals. From product photography to digital artistry, mastering the art of clipping paths can transform ordinary images into extraordinary visual experiences.

Understanding Clipping Paths
At its core, a clipping path is a technique used to isolate a specific portion of an image from its background. This technique allows for the removal of unwanted elements, the creation of a transparent background, or the placement of the clipped object onto a different backdrop. It involves precise outlining using tools like the Pen Tool in software like Adobe Photoshop or Illustrator.
Importance of Seamless Edges
Seamless edges are the hallmark of professional-grade visual content. They ensure that the subject stands out cleanly and precisely, free from jagged edges or remnants of the original background. Whether for e-commerce product images, marketing materials, or artistic compositions, seamless edges contribute significantly to the overall quality and impact of an image.
Challenges in Achieving Seamless Edges
However, achieving this level of precision isn't without its challenges. Perfecting clipping paths requires a keen eye, a steady hand, and a deep understanding of the tools and techniques involved. Even the slightest deviation in the path or inconsistency in curvature can disrupt the seamlessness, requiring meticulous attention to detail.
Techniques for Achieving Seamless Edges
To achieve mastery in clipping path creation, several techniques prove invaluable. Precision in path creation, refinement using various tools, and employing adjustment layers and masking techniques are fundamental to achieving those flawless edges.
Precision in Path Creation: The Pen Tool is the go-to for creating clipping paths. Understanding its functionalities and mastering Bezier curves is crucial for accurate outlining.
Refinement and Smoothing Methods: Utilizing tools like the Anchor Point or Direct Selection Tool aids in refining the paths and smoothing out curves for a more natural appearance.
Adjustment Layers and Masking: Leveraging adjustment layers and masking helps fine-tune the clipped object, adjusting contrast, color, and transparency for a seamless integration into different backgrounds.
Steps to Clipping Path Mastery
The journey towards mastering clipping paths entails gradual progress from basics to advanced techniques and industry best practices.
Learning the Basics: This involves understanding the foundational tools and practicing precision with simple shapes before advancing to more complex subjects.
Advanced Techniques: Delving into complex object outlining, handling transparency, and mastering batch processing techniques enhances proficiency and efficiency.
Industry Best Practices: Embracing quality control measures and effective communication with clients ensures the delivery of high-quality, tailored results.
Benefits of Clipping Path Mastery
The benefits of mastering clipping paths extend beyond achieving seamless edges. They include enhanced visual appeal, increased professionalism, time and cost efficiency, and a competitive edge in the visual content creation industry.
Case Studies and Examples
Exploring before-and-after demonstrations, real-life applications across diverse industries, and success stories from professionals who've mastered clipping paths offer practical insights and inspiration.
Conclusion
In conclusion, the mastery of clipping paths isn't merely about technical proficiency but about the enhancement and transformation of visual content. With dedication, practice, and an eye for detail, achieving seamless edges through clipping path mastery becomes a cornerstone in elevating the quality and impact of visual storytelling.
0 notes
Text
Vector path Photoshop
A vector path in Photoshop is a type of graphic element that consists of a series of points connected by lines or curves. It is a mathematical representation of a shape or outline that can be easily modified or resized without losing any quality.
To create a vector path in Photoshop, you can use the Pen tool or any other shape tool such as the Rectangle tool, Ellipse tool, or Custom Shape tool. The Pen tool allows you to create paths by adding and manipulating anchor points, which determine the direction and curvature of the lines or curves. Once you have created a vector path, you can apply various operations and effects to it, such as stroke, fill, or gradient. You can also convert the path into a selection or a shape layer, which gives you more control and flexibility in editing and styling. Vector paths are particularly useful when working with logos, icons, or any other graphics that require scalability and precision. Unlike raster-based images, vector paths in Photoshop can be resized and manipulated without pixelation, making them ideal for both print and web design projects.
How to create a vector path in Photoshop?
To create a vector path in Photoshop, follow these steps:
1. Open Photoshop and create a new document or open an existing one.
2. Select the Pen Tool from the toolbar. It is typically located in the left sidebar.
3. Choose the path type you want to create by selecting one of the three options: Shape, Path, or Pixels. For creating a vector path, choose the "Path" option.
4. Click on the canvas to start creating the path anchor points. Click and drag to create curved segments, and click without dragging to create straight segments.
5. Continue clicking and creating anchor points to define the shape of your vector path.
What is the purpose of a vector path in Photoshop?
The purpose of a vector path in Photoshop is to create and manipulate scalable, resolution-independent shapes and lines. Unlike raster images, which are made up of pixels and can lose quality when resized, vector paths are defined by mathematical equations, allowing them to be resized and edited without any loss of quality.
In Photoshop, you can use the Pen tool to create vector paths. These paths can be used for a variety of purposes, such as creating precise and smooth selections, designing custom shapes, creating paths for text to follow, or creating complex artwork. Vector paths are especially useful for tasks that require precision and flexibility, such as logo design, illustration, and typography.
By using vector paths, you can easily modify and transform shapes, apply stroke and fill attributes, and even convert paths into selections or masks. This makes vector paths an essential tool for creating and editing graphic elements in Photoshop.
How to edit a vector path in Photoshop?
To edit a vector path in Photoshop, you can follow these steps:
1. Open your image in Photoshop and select the Pen Tool from the toolbar. Alternatively, you can press the "P" key on your keyboard to select the Pen Tool.
2. Click and create anchor points to outline the shape or path that you want to edit. Each click creates an anchor point, and you can connect these points to form straight or curved lines.
3. To adjust an existing anchor point, select the Direct Selection Tool from the toolbar or press the "A" key on your keyboard. Click on the anchor point you want to modify, and you will see handles appear that allow you to adjust the shape.
4. To add or remove anchor points, select the Pen Tool and position it on the path where you want to make the change. To add an anchor point, simply click on the path. To remove an anchor point, press and hold the "Alt" or "Option" key on your keyboard and click on the anchor point.
5. To modify the path between anchor points, select the Convert Point Tool from the toolbar or press the "Shift" + "C" keys on your keyboard. Click and drag the handles attached to an anchor point to reshape the path segment.
6. You can also move the entire path by selecting the Path Selection Tool from the toolbar or pressing the "A" key on your keyboard. Click and drag the path to reposition it within your image.
7. Once you have made the desired modifications to the vector path, you can save your changes. If you want to keep the vector path editable, save your document in a format that supports Photoshop's vector features, such as PSD. If you want to export your vector path as a non-editable format, such as a JPEG or PNG, you can use the "Export As" or "Save For Web" options under the "File" menu.
Remember, when working with vector paths in Photoshop, it's always a good idea to make a copy of your original image layer or save your work as a separate file. This way, you can always go back to the original if needed and avoid accidentally overwriting your original image.
How to convert a raster image to a vector path in Photoshop?
To convert a raster image to a vector path in Photoshop, you can follow these steps:
1. Open Photoshop and import your raster image by going to "File" > "Open" and selecting the file.
2. In the Layers panel, right-click on the layer containing your raster image and select "Rasterize Layer." This will convert your image into a bitmap raster layer.
3. Use the "Pen Tool" from the toolbar on the left side of the screen. Zoom into the image for precision.
4. Start tracing the shape or outline of the image with the Pen Tool by creating anchor points. Click and drag to create curves if needed.
5. Continue placing anchor points along the desired path, following the contours of the image. Be patient and take your time to accurately trace the shape.
6. Once you have completed the path, right-click on the path and choose "Make Selection." This will create a selection based on the vector path.
7. With the selection active, go to "Layer" > "New Fill Layer" > "Solid Color." Choose a color and click "OK." This will create a new layer with the vector path filled in with the chosen color.
8. You can also use the "Paths" panel to save the path for future use or export it for use in other software.
Keep in mind that converting a raster image to a vector path may not always produce perfect results, especially for complex or detailed images. It is recommended to use dedicated vector editing software like Adobe Illustrator for more accurate and precise results.
How to use the Pen tool to create a vector path in Photoshop?
To use the Pen tool to create a vector path in Photoshop, you can follow these steps:
1. Select the Pen tool from the toolbar. It looks like a pen nib.
2. Determine which type of path you want to create: a shape or a path. You can switch between these options in the toolbar at the top of the screen.
3. If you're creating a shape, ensure the "Shape" option is selected in the toolbar. If you're creating a path, ensure the "Path" option is selected.
4. Click on the canvas to place the first anchor point of the path. This will be the starting point of your path.
5. Click again on a different part of the canvas to add a second anchor point. Photoshop will automatically create a straight line between the two anchor points.
6. To create curved segments, click and drag the mouse after placing an anchor point. This will create direction handles that control the direction and curvature of the path.
7. Continue adding anchor points and adjusting the direction handles to create your desired path. You can create straight and curved segments as needed.
8. To close the path, click on the starting anchor point. A small circle will appear next to the Pen tool cursor when you're hovering over the starting point to indicate that the path will be closed.
9. Once you've created the desired path, you can modify it further by adjusting the position and length of the direction handles. You can also add or delete anchor points using the Pen tool or other path editing tools.
10. If you're creating a shape, you can fill it with a color or apply a stroke by selecting the shape layer and using the options in the toolbar or the Layer Style window.
That's how you use the Pen tool to create a vector path in Photoshop. Practice and experimentation will help you become more proficient with this powerful tool.
How to apply different stroke styles to a vector path in Photoshop?
To apply different stroke styles to a vector path in Photoshop, you can follow these steps:
1. Use the Pen Tool (P) to create a vector path on the canvas. You can also use existing shape layers or text layers with vector masks.
2. Select the "Path Selection Tool" (A) from the toolbar.
3. Click on the vector path or layer that you want to apply the stroke style to. This will activate the path.
4. From the menu, go to "Window" > "Properties" to open the Properties panel.
5. In the Properties panel, locate the "Stroke" section. If you can't see it, click on the disclosure triangle next to "Properties" to expand the options.
6. Adjust the stroke settings to customize the style according to your preference. You can modify parameters such as size, color, opacity, and alignment.
7. To change the stroke type, click on the drop-down menu next to "Stroke" and choose from the available options, such as Solid, Dashed, Dotted, or Custom.
8. For custom stroke styles, click on the "More Options" button (represented by three dots) next to the drop-down menu. This will open the Stroke Options dialog box where you can adjust parameters like dash length, gap length, and dash offset to create a unique stroke style.
9. Once you are satisfied with the stroke style, you can further customize it by applying layer effects, such as Bevel and Emboss, Outer Glow, or Gradient Overlay, from the "Layer Style" dialog box.
How to apply different fill colors to a vector path in Photoshop?
To apply different fill colors to a vector path in Photoshop, you can follow these steps:
1. Select the "Path Selection Tool" from the toolbar. It looks like a black arrow.
2. Click on the vector path you want to apply a fill color to. This will select the path.
3. In the top options bar, you will see the "Fill" option. Click on the small color swatch next to it to open the color picker.
4. Choose a color from the color picker or enter the specific color values you want. Click "OK" to confirm the color.
5. The selected vector path will now be filled with the chosen color.
If you have multiple vector paths and you want to apply different fill colors to each path, you can repeat the above steps for each path individually.
How to transform and modify a vector path in Photoshop?
To transform and modify a vector path in Photoshop, you can follow these steps:
1. Open your vector path in Adobe Photoshop by selecting "File" > "Open" and navigating to the file location on your computer.
2. Make sure the "Paths" panel is visible. If it's not already visible, you can go to "Window" > "Paths" to enable it.
3. In the Paths panel, you should see your vector path listed. If you don't have a path yet, you can create one by using the pen tool or any other selection tool and converting it into a path.
4. Select the vector path you want to modify by clicking on its thumbnail in the Paths panel. This will make the path active.
5. To transform the path, you can use the Free Transform Path tool. Select the tool from the toolbar or press "Ctrl+T" (Windows) or "Command+T" (Mac) to activate it. This will create a bounding box around the path with handles that you can use to resize, rotate, and shear the path.
6. To modify the shape of the path, you can use the Direct Selection tool. Select the tool from the toolbar or press "A" to activate it. With this tool, you can click and drag individual path points to move them or adjust the handles to change the curvature of the path.
7. If you want to add or remove points from the path, you can use the Pen tool or the Add Anchor Point tool and Delete Anchor Point tool, respectively.
8. You can also apply various layer styles and effects to the vector path by selecting the path layer in the Layers panel and using the options in the Layer Style dialog box.
Remember to save your work when you're done by selecting "File" > "Save" or "Save As".
How to combine multiple vector paths in Photoshop?
To combine multiple vector paths in Photoshop, you can use the "Path Operations" feature. Here are the steps:
1. You can also press "A" on your keyboard to access it.
2. Hold down the "Shift" key and click on each vector path that you want to combine. This will select multiple paths at once.
3. Right-click (or Ctrl-click on a Mac) on one of the selected paths and choose "Combine Shapes" from the context menu.
4. In the "Path Operations" dialog box, choose one of the operations to combine the paths. The options include "Add", "Subtract", "Intersect", and "Exclude Overlapping Shapes". Select the appropriate option based on the desired outcome.
5. Click the "OK" button to apply the selected path operation and combine the paths.
The combined vector paths will now be merged into a single path based on the chosen operation. You can then manipulate, fill, or stroke the combined path as needed.
Note that the ability to combine vector paths in Photoshop is only available when working with vector shapes and paths, not with pixel-based layers or images.
0 notes
Text
How to Make a Curved Line in Photoshop Elements
Introduction
Photoshop Elements is a versatile and powerful software that allows users to enhance their images and unleash their creativity. One of the fundamental skills every Photoshop Elements user should learn is how to create curved lines. Curved lines can add a touch of elegance, fluidity, and dynamism to your designs, whether you're working on digital illustrations, graphic designs, or photo manipulations. In this article, we will guide you through the step-by-step process of creating curved lines in Photoshop Elements, helping you unlock endless possibilities for your artistic endeavors.
Understanding the Pen Tool
Before diving into creating curved lines, it's essential to familiarize yourself with the Pen Tool in Photoshop Elements. The Pen Tool is a versatile tool that allows you to create precise and customizable paths. With the Pen Tool selected, you can click on specific points to define straight lines, and by adding anchor points, you can create curves. Mastering the Pen Tool will empower you to create any curved line with ease.
Read More
Step 1: Selecting the Pen Tool
To begin creating a curved line in Photoshop Elements, select the Pen Tool from the toolbar. It is represented by a pen icon. Alternatively, you can use the keyboard shortcut "P" to activate the Pen Tool.
Step 2: Creating the First Anchor Point

Click on the canvas where you want your curved line to begin. This click will create the first anchor point of your path. Ensure that you click on the desired location with precision, as this will determine the starting point of your curve.
Step 3: Constructing the Curved Line
To create a curved line, click and drag on the canvas. This action will create direction lines extending from the anchor point you just created. The length and angle of these direction lines will determine the curvature of your line. Experiment with different click-and-drag motions to achieve the desired curve. Remember, you can always adjust the shape of the curve later.
Step 4: Adding Additional Anchor Points
Continue adding anchor points along the desired path of your curved line. Each new anchor point will connect to the previous one, forming a continuous curve. Add as many anchor points as necessary to create complex and intricate curves.
Step 5: Modifying Anchor Points and Direction Lines
After constructing your curved line, you can further refine its shape by adjusting the anchor points and direction lines. To modify an anchor point, select the Direct Selection Tool from the toolbar (shortcut: A) and click on the desired anchor point. You can then click and drag the anchor point or its associated direction lines to reshape the curve.
Step 6: Converting Paths to Selections or Shapes
Once you have created your curved line, you may want to convert it into a selection or a shape for further manipulation. To convert your path into a selection, right-click on the path and choose "Make Selection" from the context menu. Adjust the selection settings as needed and click "OK." To convert the path into a shape, right-click on the path and select "Define Custom Shape." You can then access the shape from the Custom Shape Tool (shortcut: U) for future use.
Learn More: Product photo editing service
Step 7: Applying Stroke and Fill
To enhance the appearance of your curved lines, you can apply stroke and fill options. With the path selected, navigate to the Options bar at the top of the Photoshop Elements interface. Choose a stroke color by clicking on the color swatch and selecting the desired color. Adjust the stroke width to your preference, keeping in mind that thicker strokes create more prominent lines. You can also apply a fill color to the enclosed area created by your curved line, giving it a solid or gradient color.
Step 8: Experimenting with Brush Styles
In addition to stroke and fill, you can explore different brush styles to further customize your curved lines. Select the Brush Tool from the toolbar (shortcut: B), choose a brush style from the Brush Preset Picker in the Options bar, and adjust its size and hardness. With the Pen Tool-selected path active, click on the "Stroke Path with Brush" button located at the bottom of the Paths panel. This action will apply the selected brush style to your curved line, adding texture and artistic flair.
Step 9: Combining Curved Lines
Creating complex designs often requires combining multiple curved lines. To merge two or more curved lines into a single path, select each individual path while holding down the Shift key. Once all the paths are selected, right-click on any of the selected paths and choose "Combine Shapes" from the context menu. This action will merge the paths into a single shape, allowing you to manipulate and style them collectively.
Step 10: Saving and Exporting
Once you're satisfied with your curved lines and overall design, it's important to save and export your work. To save your project as a Photoshop Elements file (.psd), go to File > Save As and choose the desired location on your computer. This format allows you to retain all the layers, paths, and other elements for future editing. If you want to share your design with others or use it in other applications, consider exporting it as a common file format like JPEG, PNG, or TIFF.
Conclusion
Congratulations! You've learned how to create curved lines in Photoshop Elements and discovered various techniques to enhance their appearance. By mastering the Pen Tool, adjusting anchor points and direction lines, converting paths, applying strokes and fills, exploring brush styles, combining paths, and saving/exporting your work, you now have the ability to rejuvenate your imaginative dreams. Remember, practice and experimentation are key to mastering any skill in Photoshop Elements, so continue exploring and pushing the boundaries of your artistic capabilities. Happy designing!
0 notes
Text
Reflection
Looking back on fundamentals I think the class has reinforced my skills in regard to using adobe software - the most helpful was InDesign which I had never used before.
For Illustrator & Photoshop the class has reinforced my previous knowledge while building new knowledge about different tools/processes and has made me think about the process of using the software and made me more organised through learning techniques, shortcuts & file management - something which I didn't pay much attention to previously.
For Illustrator my main struggle was using the pen tool as I had previously only used the curvature tool and would default to using it instead of the pen tool. This class forced me to actually learn the tool and improve which I am very grateful for as I probably wouldn't have otherwise.
With Photoshop the main learning for me was masks - which are also something I generally avoided previously. The class made me learn them which is something that i'll be taking through to whenever I work in photoshop in the future.
Adjusting to InDesign was a challenge at first as I kept wanting to use it like Illustrator & Photoshop but learning the software and continuing with it will be important for my future design work.
For the final book I wish I had been able to spend more time on it as feel I could have done a much better job particularly with the illustrations as I just did silhouettes for the most part.
This is a generally bigger problem that I have with my work sometimes as I can let the amount of work i have to do pile up - The catch up session that we did earlier in the course was a big help for this though.
In regards to the class itself the moments I enjoyed it the most were the ones where we were driving the work - eg when we created our illustrations independently using the previous tools we learnt. This helped with learning alot as the lesson was much more engaging for me.
This is a problem that I have with the course sometimes as I feel the tutorials could be presented in a more engaging way so as we aren't just copying whats on the board. I also feel as if some classes could have been shorter so as to keep the information short and sweet so it sticks in the mind easier.
Thanks
0 notes
Text
Putting patterns onto the final outfits
Since our group has now selected the three strongest designs which will be used in our final project, I am in the process of editing the textiles samples and patterns which I have created onto these outfits.
This post will be about my process to do this on Photoshop.
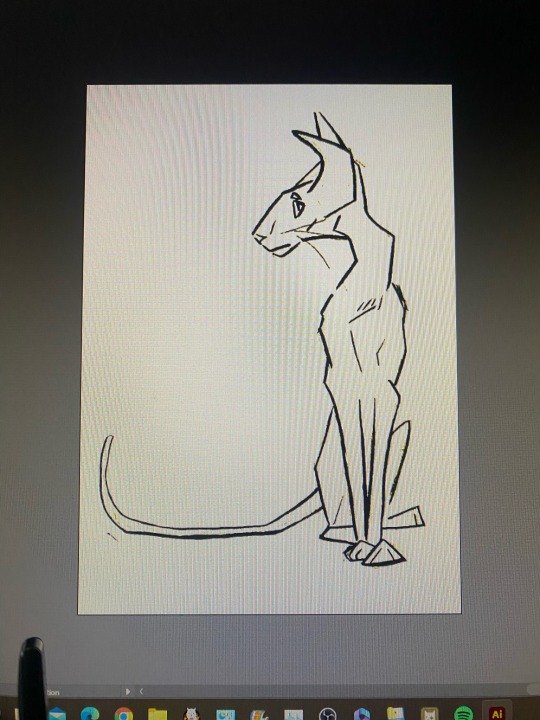
To begin with, I started out with a sketch which was drawn and then scanned and put onto Photoshop.

First, I made the skirt black and experimented with the opacity and then, using the pen tool, I shaded in the skirt and added extra detail to it. Since one of the main features of these clothes is the drawstring (which makes each garment adaptive) I took my time rendering this area of the skirt to ensure that the drawstring and the texture of the ruched fabric was emphasised.
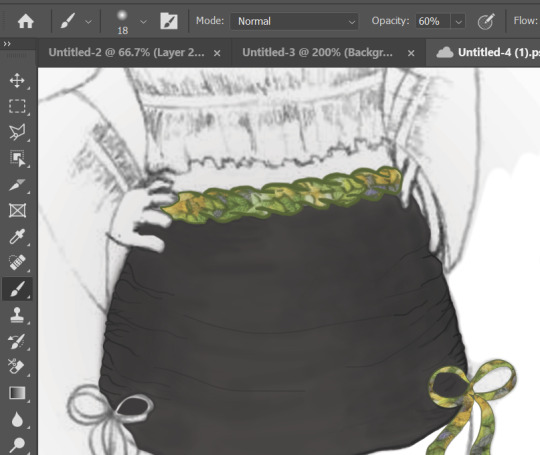
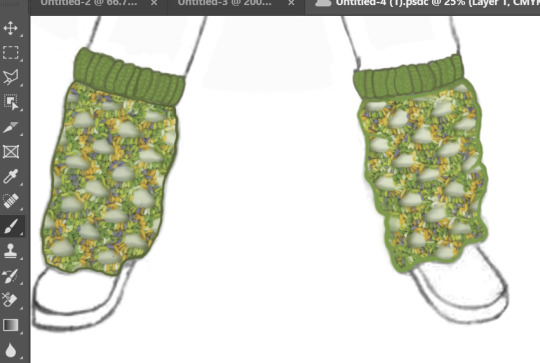
I used a clipping mask of some fabric samples i made for the belt, ribbons and legwarmers. I may experiment further with colour options; I have two different shades of green in mind, as I used 2 different types of green yarn to create samples.


After doing a detailed comparison of the two options, I decided upon using the light green samples as I feel they match better with the theme, but also because they have better contrast against the skirt, making them stand out. and catch the viewer's attention.
The colour green holds connotations of new beginnings and growth, so incorporating these green statement pieces into the outfit (which is otherwise made up of neutral colours) gives the outfit an edge and makes it exciting and unique. Green is a colour which can be observed most recently in new trends. It is a colour which is coming back into style, so by incorporating this into our line, we are keeping current with the trends while simultaneously keeping our collection minimalistic and timeless.
To finish off the legwarmers, I used the pen tool to fill the cuffs green and then I used a darker shade of green to shade in the legwarmers and add depth. I added a knitted texture to the cuffs as this kind of knitting would be stretchy and soft, ideal to hold the legwarmers up whilst also being comfortable.
Next, I added colour and shading to the top. To begin with, I used the curvature pen tool to create an outline of the top.
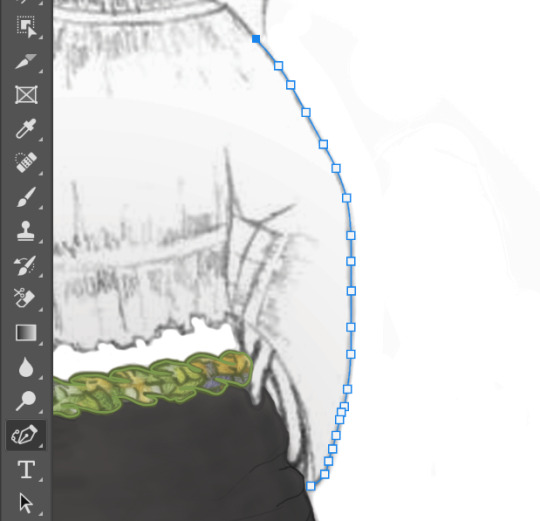
Then I filled it and lowered the opacity to reveal the shading and details in the drawing. I further emphasised these details, and added more shading, using the pen tool at a low opacity, and building up layer by layer to make the shading more realistic. Below to the left is the top without the shading, and to the right is after adding shading and emphasising the ruched detailing.
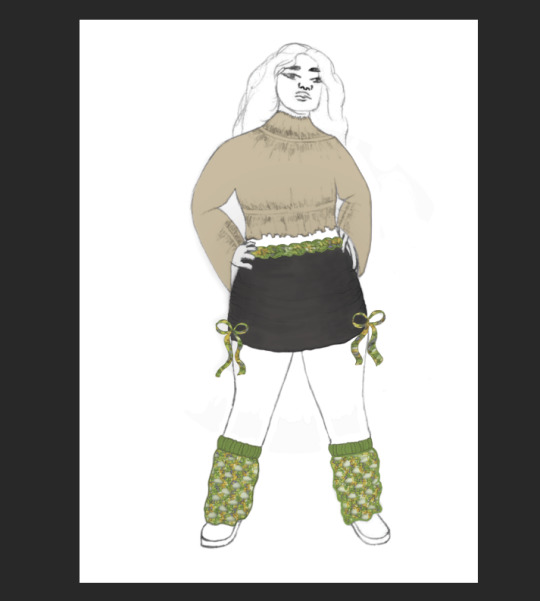

I am very happy with the outcome of this outfit as I think the rendering/shading on the skirt is very detailed and effective, and the colours in the outfit match together nicely. I have kept the basics of the outfit very simple with beige and black, but then to add some intrigue and a pop of colour I have included a green mesh pattern I made to use for the belt, bows and legwarmers. I did originally experiment with leaving the belt and ties plain, however in my opinion it really brings the outfit together and makes it cohesive when all three are green.
0 notes
Text
Là một giải pháp hoàn chỉnh cho việc xử lý các hình ảnh kỹ thuật số chuyên nghiệp, Adobe Photoshop CC 2023 có chứa các công cụ mới nhất để làm việc với hình ảnh và cơ hội mới để thực hiện các ý tưởng sáng tạo có thể cải thiện đáng kể năng suất. Chỉnh sửa hình ảnh với độ chính xác tuyệt vời, sử dụng các công cụ trực quan và quy trình công việc mới để tạo đồ họa 3D, các dự án 2D và phim ảnh.

Ở bản Photoshop 2023 có gì mới ?
Màu sắc và Luminance Range Masking trong Adobe Camera Raw
Trình quản lý Brush Preset mới trong Photoshop 2022
Brush Stroke Smoothing và Paint Symmetry
Công cụ New Curvature Pen
Phông chữ và cải tiến Typographic
Chú giải ý nghĩa các công cụ, dễ tìm hiểu hơn cho người mới bắt đầu
Truy cập ảnh trong Lightroom từ Màn hình Bắt đầu của Photoshop CS
Hoàn thiện spherical 360 pano workflow
Link tải Adobe ph0toshop CC 2023 ở trên đã được tích hợp Active sẵn. Ngoài ra, bạn có thể tham khảo hướng dẫn cài đặt để có thể đạt sự ổn định nhất khi sử dụng. Hãy tải ngay từ trang DalatComputer nhé !
0 notes
Text

Adobe Photoshop
Adobe Photoshop offers a variety of tools for graphic artists, photographers, web developers, and other design professionals to improve or enhance their work.
Adobe Photoshop is the world’s most popular image editing software , used by photographers, web designers, graphic designers, video editors, concept artists and others related to the multimedia industry
Photoshop is most useful for photo manipulation, pixelated art, and web graphics.
Adobe Photoshop Features
Photoshop allows you to edit photographs,MockUps, image based designs
It also allows you to add grids and smart guides which helps us to know the safe lines where we can add our text and which is tension free so that while printing any photographs, designs etc.. the texts don’t cutoff and spoil the design.
It allows you to work with single ARTBOARD inside a project
It allows you to create and edit raster images
It allows to save a single object in a layer where you can edit the the layer without disturbing other layers in the work file.
It allows you to edit text according to you perspective of the object .
Photoshop Makes the work more easier where This gives a option of removing background within a tool .
SOME SHORTCUTS
W-MagicWand tool ,object selection
G- gradient tool,PaintBucket
P-pen tool,curvature pen tool,content aware pen tool
Ctrl+D-Deselect
Ctrl+J-Duplicate of layer
Ctrl+enter -Make select
Shift+F5- fill
Ctrl+shift+S- Save As
0 notes
Text
Adobe photoshop cc keygen mac

#ADOBE PHOTOSHOP CC KEYGEN MAC HOW TO#
#ADOBE PHOTOSHOP CC KEYGEN MAC CRACKED#
#ADOBE PHOTOSHOP CC KEYGEN MAC SOFTWARE#
#ADOBE PHOTOSHOP CC KEYGEN MAC WINDOWS 8.1#
#ADOBE PHOTOSHOP CC KEYGEN MAC PROFESSIONAL#
Similarly, Adobe Photoshop CC 2022 23.1.1.202 carries a basic video editor that is integrated with all of the conventional tools. Adobe Photoshop CC 2022 Crack 23.1.1.202 Key + Keygen Lifetime It previewed project Aero, a brand new AR authoring tool that permits creators to style reality experiences. A brand new program designed to accelerate painting and drawing workflows across Project Gemini, apparatus, coming to iPad from 2022.
#ADOBE PHOTOSHOP CC KEYGEN MAC PROFESSIONAL#
Adobe Photoshop CC 2022 Keygen is a professional image editing application that has been the industry standard for amateurs and graphic designers. And with your Adobe Photoshop CC 2022 membership, you get them when we release them. Photoshop is getting better, with new attributes rolling out. Paint in designs, get polished looks and make textures. Paint and draw anything you dream up using gear made for illustrators.Īdobe Photoshop CC 2022 23.1.1.202 Free Windows + Mac With templates and tools, even novices can make something awesome. Adobe Photoshop CC 2022 Crack 23.1.1.202 From posters to packaging banners to sites that are amazing logos to icons that are eye-catching, Photoshop retains the world. Adobe Photoshop CC 2022 23.1.1.202 Crack Key Download Make and enhance 3D art, illustrations, and photos. Adobe Photoshop CC 2022 23.1.1.202, then you can create it using Photoshop CC, design program, and the world’s most exceptional imaging.
Also, Use the crack to activate the software.Adobe Photoshop CC 2022, the industry standard for digital image processing and editing, provides a comprehensive package of professional design tools and can be packaged with robust editing features created to inspire.
Then, Start installing Adobe Photoshop CC.
Then, pick up which version you want to download.
First of all, click on the direct download link to download the crack.
Supports Intel Core 2 Duo processor or advanced.
The RAM memory size is required to be 2GB.
A 2GB free hard disk space is required.
#ADOBE PHOTOSHOP CC KEYGEN MAC WINDOWS 8.1#
Supported Operating System is as follows Windows 7, Windows 8, Windows 8.1 and Windows 10.
Wonderful Properties panel improvements.
Copy and paste a number of layers in classes.
Incredible brushes out of Kyle T.Webster: Offers over than 1000 electronic brushes from the popular award-winning Kyle T.Webster.
Curvature Pen tool: Enabling you to improve paths faster, in addition, to pull & push segments right.
You might even attain cleaner lines & curves to get a fantastic polished appearance with new brush stroke smoothing.
Advanced Brush Management and performance: this attribute lets you organize your brushes on how that you desire.
has tools such as fast conversation menu, changeable fonts, curvature pencil instruments, lightroom photograph accessibility, brush smoke thumbnails, paint saturation, luminance and color hiding controls, and brush direction. Electronic customization is also considered by having brushes, effects, and patterns. For professionals, they will enjoy making great works with the photography tools which has various options. The layouts fit perfectly into photographers and designers preference. The picture editor handles all types of retouching from illustrations to 3D layouts. Its compatibility with various devices makes it easy for you to create stunning pictures.
#ADOBE PHOTOSHOP CC KEYGEN MAC SOFTWARE#
Its advanced new tools make it easy for users to build professional images by retouching pictures, masking undesired elements and also building realistic portraits.Īdobe Photoshop CC CrackThe software creates an opportunity to edit photographs in a professional outlook. Besides, users can create professional images with Adobe Photoshop CC Latest version with ease. Adobe Photoshop CC Final release provides creative tools with an intuitive interface in addition that it is based on Adobe Mercury graphics which allows its users to retouch pictures, merge images, add effects, add colors, add brightness and also build professional images and designs. A number of templates are in place making it easy to design. The program is contained in the Adobe creative cloud support. Among the tools in the program imaging and design.
#ADOBE PHOTOSHOP CC KEYGEN MAC CRACKED#
And in this tutorial, we are going to share a thorough manual to download the cracked versionThe intuitive tools makes it easy to design posters, banners, sites, mobile applications, and icons.
#ADOBE PHOTOSHOP CC KEYGEN MAC HOW TO#
So for one to experience this, we will explain to you how to install the has been rolled out recently. And of course eye and professional after-effect as possible. This software will make your photos look more attractive. If you love to flaunt yourself to the camera edit pictures, then here is the program for you. Download Now Download Setup Adobe Photoshop Elements 2020 Crack + Keygen freeloadĪdobe Photoshop Elements 2020 Crack the very best picture editing software presently.
0 notes
Text
Danh sách 1 how to curve a line in photoshop hay nhất
Danh sách 1 how to curve a line in photoshop hay nhất
1 Draw and edit vector paths and curves
Tác giả: helpx.adobe.com
Ngày đăng: 05/01/2022
Đánh giá: 4.89 (977 vote)
Tóm tắt: · The Curvature Pen tool is located under the Pen tool in the Tools panel. Select it, and then select Shape in the tool mode drop-down menu in the
Nguồn: https://helpx.adobe.com/sg/photoshop/how-to/draw-edit-curves-curvature-tool.html
View On WordPress
0 notes
Text
Can photoshop help in vectorize art?
The Shape tools in Photoshop are the easiest tools to use when making a vector object, these tools will allow you to easily create geometric or personalised shapes even if you are not a graphic artist.Try creating your own vector objects from scratch as your skills improve with Photoshop's Curvature tool and Pen tool.
0 notes
Text
im also hyped but also not hyped to finish up my animation for my class bc it's taking a while to do and i'm kinda doing an unconventional way but i cannot stand adobe animate's drawing tools they just don't work for me
#esp bc i have a huion and apparently adobe shit doesn't work well with those tablets#given how photoshop fucks up my line width im honestly not surprised#but everytime i would draw a line in animate and lift up my pen to stop drawing it would continue to draw these long messy lines#sometimes a continuous one#and i know you can adjust line curvature and shit but i am not going to do that for every damn line i draw
0 notes
Note
hi i absolutely love your header! do you mind giving a tutorial on how you made it?
yeah ofc!
I did not save the final psd for that gif so this turned out a bit different than the actual header but the process—which assumes some photoshop familiarity, but includes lots of examples—is the same and gets us really close
if anything feels skipped, confusing, or glossed over, pls feel free to ask questions 😊
FOREGROUND
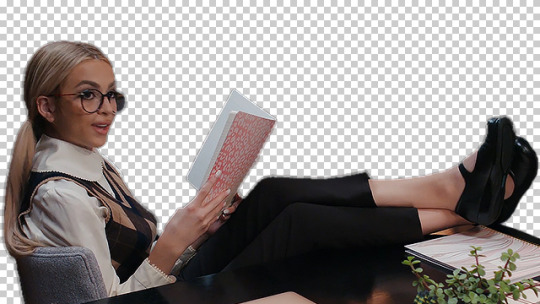
— alright so we’ve got a shot of lexi from saved by the bell

— before cropping, convert to smart object at its full size so it’ll retain its quality in case there’s any need to resize later
— then just crop to mobile header dimensions: 640 x 360. and adjust the shot until it fills that space the way you’d like

— there are a few ways to mask but for a still frame esp, I think the easiest is object selection (W) because you get pretty clean edges. I find rectangle mode misses too much, so set it to lasso mode on ‘add to selection’


I missed the entire desk but bc of add to selection, I can just loop around and add it without losing what’s already selected

you’ll notice you truly do not need a steady hand for this, just get close and the tool will do the heavy lifting
— add a layer mask


— then just brush over the missed parts (like the edge of the desk) and erase the extra (like where it caught some of the bookshelf by her shoes)
— so that’s pretty clean except there’s a noticeable stroke around the layer (much more obvious against a background). if there’s a way to avoid this idk what it is! but it's simple enough to get rid of with the brush. in this case I used 10px at 60% hardness + 100% smoothing


— so now you can make any adjustments on coloring and sharpening. running through it really quickly, I got this

— and that looks fine so the foreground is done!
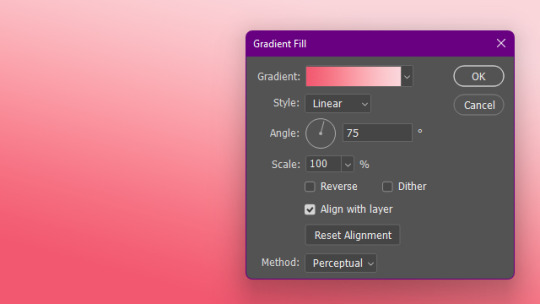
BACKGROUND
— for the background, just add a gradient layer


OVERLAY
— the overlay is from this pack: https://www.deviantart.com/scottvandyne/art/GIF-OVERLAYS-PACK-by-scottvandyne-796712849
like i mentioned, I do not have a psd for our header but the first overlay in the pack works the same as any of the others, so I’ll be using 'falling sparkles' for this tutorial. but there are like 43 options. lots to have fun with
anyway
— create video timeline if you haven’t already
— open the overlay psd of your choosing. drag (or copy then paste) it into the header file above the gradient
— this overlay is only 500 x 281. you can duplicate it to cover the extra space but it’s honestly not that much smaller so I just resized it


— blending will get rid of the black background and just leave the sparkles
if you want dark or colorful sparkles you could invert and/or use the other modes (really good video on the topic btw: https://www.youtube.com/watch?v=i1D9ijh3_-I), but we’re gonna keep white sparkles over the gradient, so we only want the lightening modes
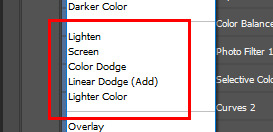
literally any one of them work fine, it’s just a matter of preference. I am always a sucker for linear dodge (add) which gives us this:

BORDER
— you could do what I’m entirely sure I originally did and pull a vector off pixabay if not google tbh and then clip layers to it and use masks and do too much
however pen tool is quicker + less messy
— use the curvature pen tool. as you leave anchor points, it will curve the line for you. it doesn’t matter what color you use (esp since you can alter it later) but stroke will determine how thick the upper line is

tweak the anchor points to clean up curves

— copy the line shape layer, then paste in place (ctrl + shift + v)
— raise one line higher, leaving a gap between them at whatever thickness you like

— rasterize the lower line, use the magic wand to select both the line and the empty space below it
then brush over everything

— when you brush over the selection, you lose smoothness. there’s a trick to smoothing it out but honestly just copy the upper line (which should still be a shape layer), paste in place, and lower until it rests just above the rasterized layer. same effect, no brainpower
just to show the difference:

— and that’s it! just save as a gif and you’re good to go!
ok sike. actually the overlay is a good 200ish frames so whether you export from timeline or flatten to clips/convert to frames, remember to shorten the work area first

— ok that’s it for real this time!

vs. the original. not too far off!

61 notes
·
View notes
Last Seen Blogs

urchicago
UR Chicago

smalljoe99
just some interests

ruby-0-sandra-allen
Ruby Sandra Allen


prkdl08
perkedel