#I highly recommend cardstock if you can
Text
Oh my god oh my god oh my god
There's a Vash and Wolfwood dog papercraft
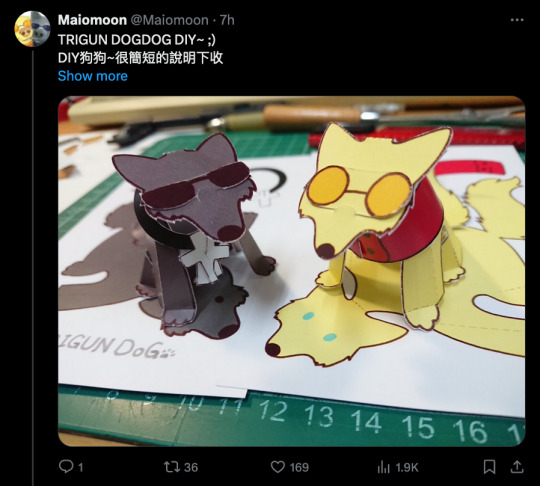
#Trigun#I know that op shows a lot of tools at the beginning of the tutorial#But this is a SUPER basic papercraft if you want to give it a go!#I highly recommend cardstock if you can#But you can get away with it if it's all you got#I don't think regular paper will stand up as well#Matte photo paper would probably be the best but that shit's expensive#I'm going to work on a couple modifications for my version#Either double-sided printing or two layers...#I think the former#Anyway#The moment this awful migraine is gone#I KNOW WHAT I'M DOING#(As it may be apparent I'm a papercraft addict and I'm totally willing to give anyone advice if they need it!)#(I'm still working on the Trigun foxes btw just working Vash and Wolfwood yin yang kitties first)#I LOVE that this is glue-free tbh#I'm so fucking messy at gluing
229 notes
·
View notes
Text
2024 Simp Calendars
Folks enjoyed this last year, so this year I have remade my simp calendars for the 2024 year! There are a few different versions where each month displays the official emblems on suitor’s birthdays for Ikevamp, Ikepri, and then a combination calendar with both Ikevamp and Ikepri suitors. I've also added a set of blank ones without these emblems, in case you'd just want a plain one for whatever reason.
Each set has a blank spot where you can place any photo you’d like for each month, and a small section for notes.
They were made with my wallet in mind to be wary of when cyb*rd may drop birthday sale sets.
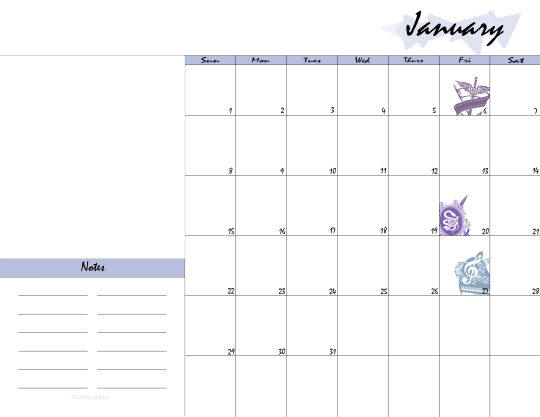
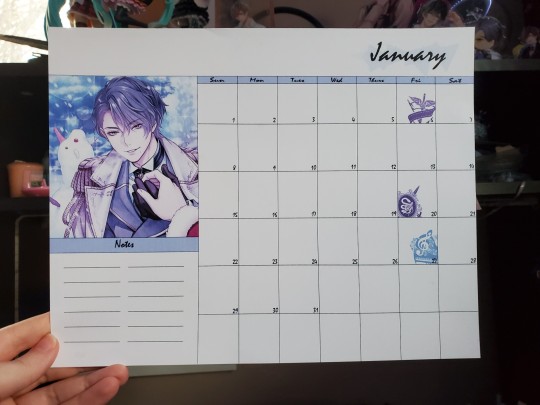
Here’s an example for how the Jan 2024 Ikevamp/Ikepri calendar download looks, as well as how it looks printed out:
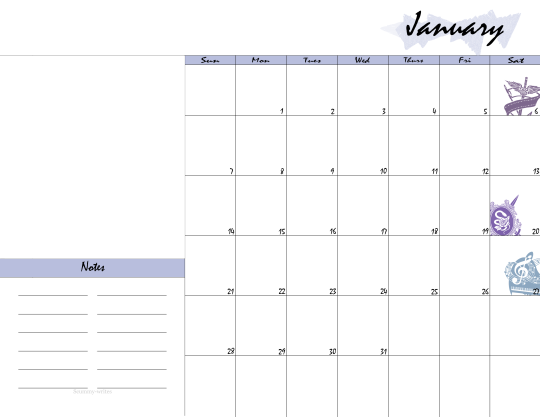

user error (me) caused the side to be cut off when printing, please ignore that
Download Links: Ikevamp/Ikepri Calendar || Ikevamp Calendar || Ikepri Calendar || Blanks
Notes:
This time, I've included a 2025 version of January!! Please do not get it confused with the 2024 January!!
This was made for fun, and I am not an artist at all, so there may be small imperfections and boring design choices. I am sharing since friends and followers were interested.
The size of the calendars overall are made to print on a full sheet of regular printer paper (8.5x11). (I highly recommend using cardstock if you have the option!) You should be able to use your computer’s default printing option to print these off fine.
The size for the customized photo window is 1129x1241 pixels. You should be able to edit this in any program designed for editing photos, I even tested it and made sure you could put in a photo using MS Paint!
Keep in mind that when printing, some printers may skew the colors a bit and make them either lighter or darker.
Ikevamp also has no July birthdays, so there is just a blank calendar in the Ikevamp Only set. In the other sets, it will only show the Ikepri bday for that month.
For the jp spoiler characters in ikevamp and ikepri, their bdays are not listed. I don't have their emblems/crests so I could not add them.
If there is an issue like a misspelling or a suitor’s birthday being listed wrong, please let me know 🙏
If you enjoy this or end up using it, please consider reblogging or commenting! That way I can consider revisiting this in 2025 and trying to make improvements based on the interest.
Ikevamp Masterlist || Ikepri Masterlist || Ikevamp/Ikepri server (18+)
47 notes
·
View notes
Text


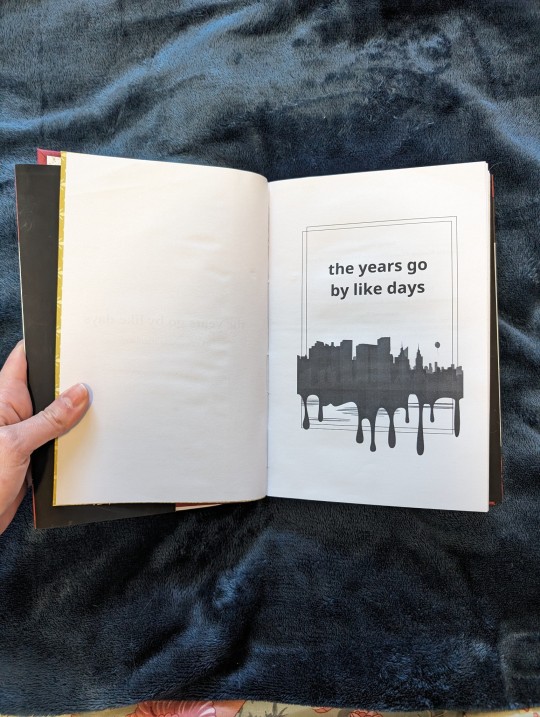


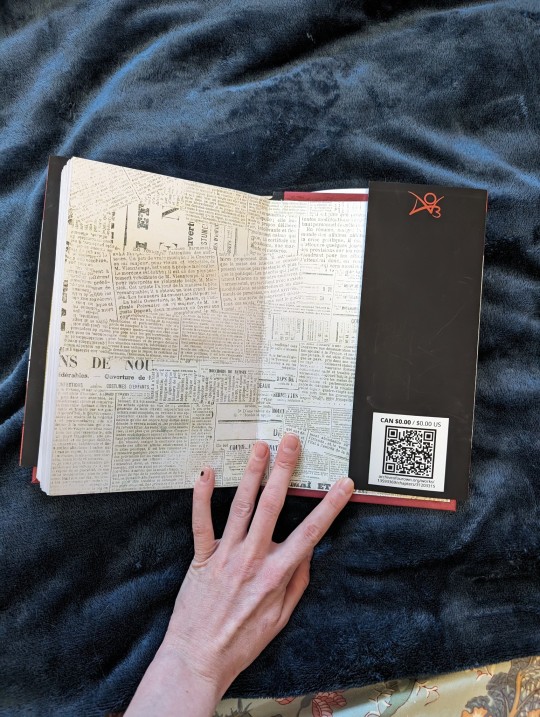
I just finished my 4th fic bind and I'm finally feeling proud enough of a bind to post it!
It's for the fic 'the years go by like days' by georgiestauffenberg. It's for the ship reddie (Richie Tozier/Eddie Kaspbrak) from It! This fic is my reddie canon and if you haven't read it but ship those two I HIGHLY recommend checking it out.
Anyway, into the bind.
I learned a lot with my first three binds and I applied those months of trial and error to this one. The parts I'm proud of are:
A paper cover! For the other 3 I did pretty simple cardstock covers but I wanted to try out making a paper cover for the fic this time, that way I could go a little more crazy with the design. I think it turned out super well! I'm definitely going to be doing this again for some of my fics in the future!!
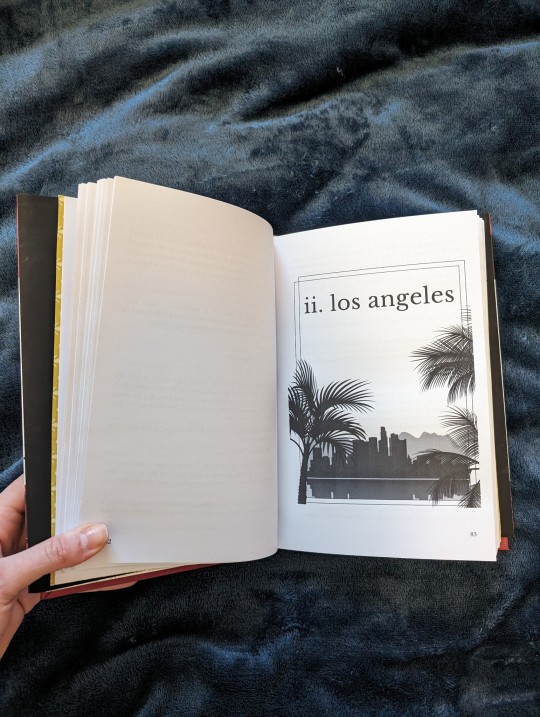
The 3 sections the fic is split into (Derry, Los Angeles, and New York) all have their own full page illustrations to separate the sections
A fake price tag that is actually a QR code to the fic on Ao3
FINALLY FIGURED OUT MY PREFERRED TEXT SIZE! I've always liked fics with slightly larger text and this time I think I got it perfectly and my margins are good (I really struggled with margins for my first ones)
The things I didn't like slash messed up on and will remember to do differently next time are:
The cover is a few millimeters too small (which you can clearly see in the pictures). Next time I'm going to make the design bleed out quite a bit so I can cut it to the exact right dimensions once it's printed.
The text on the spine of the cover is a little too close to the top and needed a bit more space, it looks a bit crowded how it is.
((thankfully these are both things I could easily fix by just editing the sleeve and printing it again))
So all in all I'm sooooo proud of this bind and really amazed at the improvement between this one and my first fic bind, especially because I've only been binding fics for a few months. I have one other fic I'm already in the middle of binding and I'm trying another technique (going super traditional with this one), so I can't wait to see how it turns out!
#fic binding#fanfic binding#it stephen king#reddie#richie tozier#eddie kaspbrak#my fic bind#my post#non hp
24 notes
·
View notes
Note
👁👁 i recall you bookbinding at one point in time, what would i need in order to do the very basics?
So I have great news for you: bookbinding is SHOCKINGLY ACCESSIBLE and very very easy to pick up as a hobby! (But it's an unusual enough hobby that everyone around you will just ASSUME you have highly specialized and developed skills, hahaha).
I made my last few bookbinding projects out of stuff I had around the house. But prior to that, I got almost all of my supplies from the dollar store.
You will need:
-Paper (any. Big enough to fold to whatever size you want your book to be)
-Some sort of chip board or cardboard (I like buying dollar store sketchbooks...the backs are this perfect dense-but-thin cardboard, and I tear out the pages for my paper. I basically flip a cheap generic sketchbook into a unique hardcover sketchbook!)
-Acid-Free White Glue (Elmer's makes a good cheap one. Scrapbooking glue is great too. Anything that dries clear and is suitable for archival, meaning it won't degrade the paper over time. Some people even mix their own!)
-Needle and Thread. (Any. Curved needles are easiest, but straight needles work just fine. Use those until you can find the curved variety. Any thread works, but pro-tip: get ahold of some cheap wax --beeswax probably-- and then run the length of your thread along it to smooth the fibers. Do that, and your thread will never tangle, which saves a lot of time. It also helps prevent your paper from tearing!)
-Something to wrap around the cover. (You can get really creative with this. You can use paper or fabric or leather or cardstock or basically anything that you can wrap and glue down to the board of your cover. I've seen people use old jeans: I've seen people use giftwrap. Experiment!)
-Something to puncture the signature holes (the actual tool for this is something called an awl, and I have one at this point, but dollar store push-pins work fabulously if you're just giving it a try)
-Something to fold your signatures (you can use your hands, but it's much easier with a tool called a bone folder. Craft stores sell them. A small ruler made of wood or plastic works very well, too.)
And that's it!
There are a few other things (like book paper for the covers, corner protectors, book tongues, ribbon for attached bookmarks, cheese cloth to strengthen the spine, etc.), but I don't consider those the absolute BASICS needed for a first project. All the things I've listed are cheap, easy to find, or easy to substitute. Try it out before you decide if you wanna invest in the fancier stuff!
Sea Lemon on YouTube makes great, easy to follow tutorials for the actual construction. I also recommend watching a few bookbinding ASMR videos; watching someone apply their skills in a relaxed but steady way is a great way to learn, imo.
If you give it a try, let me know how it goes!
17 notes
·
View notes
Text


Look at what I got from the Dollar Tree! It's a Princess Jasmine paper doll!!!
I loooooove paper dolls, bc they're so easy to store for regression, so the fact that I saw one of my favorite princess!! In a store!!! Was really cool!!!!
So, here's a picture of it - the doll itself is printed on cardboard, while the clothes and accessories are printed on cardstock. Everything is preferorated, so all you gotta do is punch everything out and fold the tabs back. It's kinda hard to see in the picture, but the doll itself also has little slits that you can slot the clothes into, so it's pretty secure. oh! and it's about 9.5 inches tall including the stand
if anyone likes paper dolls, I highly recommend this one. there was also a Barbie one with modern clothes, in case anyone is curious, but like - favorite princess. I had to get Jasmine
but uhh, yeah! I love her and am having a very nice time dressing her up
#toddler babbles#toybox#babyre#totre#agere#age regression#if this set would have had the red-jafar outfit... it would be Literally Perfect#as it is i have a printer if i reeeeeeaaaaally wanted it so...#(also fun fact: princess jasmine is part of the reason i go by jazzy on here lol)#(i was rlly into just dance 2 and you get to pick a nickname for high scores and i always picked jazzy among friends and family)#(bc of princess jasmine)#(so! in an alternative universe i could've gone by sunny or something lmao)
21 notes
·
View notes
Note
Hey 😊 I'm very interested in getting into fan binding, and I love your work! I wonder, how much does it normally cost you to bind a book? I see you made quite a few in 2022 and I would love to hear about the average amount you normally spend :) best of luck on your future projects!
Aww thank you for the compliment! ❤️ I'm also really terribly sorry for how long it took for me to write out this response--I've been really busy lately, and properly calculating what actually goes into my books is something I haven't really done previously, as I typically engage in fanbinding as a hobby, and I don't usually keep track of how much is going into my books. It's also a bit difficult to exactly calculate materials wise as often things I buy end up going a long way... so breaking down the prices can be difficult as you'll see below.
Anyhow! Fanbinding is a really lovely hobby, and highly encourage you to get into it when you have the time and energy! If you are interested and haven't yet joined the Renegade bindery discord (18+ however!) with all the lovely fanbinding/bookbinding enthusiasts, I'd highly recommend you do as they have a bunch of resources for beginners and are an absolutely lovely community.
To properly answer your question, what one spends on making books can really depend on the materials you use. Hell, there was a document from Renegade on how to make really low cost book out of materials you just have lying around at home, which I unfortunately can't find right now. Personally the cost has also varied depending on where I'm getting my resources, and as you become familiar with whats in you area, you can also minimize cost for certain resources. Below the read more I'll actually give a break down of what generally goes into a 100 page (about 100k) A6 book. Everything will be given in CAD as I live in Canada.
Basic A6 100 pg Book:
Paper: 1.7$ as 100 pages would be 50 sheets of paper. It's 17$ for a ream (500 pages) of cream paper. I'm not sure the exact price for the printer, as that I own my own printer. I know that for just plain bright white and black and white text you are charged .20 per page at Staples, which for a 100 page book would be 20$.
Bookboard: .80-3$ I've had quite a variety of bookboard I've bought; currently am getting 9$ for a pack of 6 chipboard which makes about 12 a6 books; so about .79$, but I've previously bought chip board that is much more expensive (15$ a pack for about 4 books, which would be 3.75$ per book). I've also used the back of old sketch books, stiff and flat shipping envelopes for prints,and I've recently seen that someone recycles old books from library sales where the books are just going to go to the landfill.
Endpaper: I like coloured end and cover papers; per one sheet, it is usually about $5-10. Depending on my use of the paper, usually I can get about two A6 book worths out of the paper, which means about per 1 a6 its 2.5-5$ for the end paper.
Cover paper: For cover paper I often use a mix of paper. I also usually use the same type of fancy papers as the end papers, so thats an extra 5-10$, which can be halved. However, I often mix this with simple single coloured cardstock paper for scrapbooks. Normally, since I'm cheap, I buy the dollar store paper which is about .75$ per sheet. So about cover paper goes from 3.5-6$.
Ribbon: I like to make my books with ribbons so they are not just supported by sewing. Again, I'm not fancy so I use micheals/dollarstore polyester ribbons; a roll costs about 1.5-3$. For spine ribbons, getting a white or neutral colour is best as that in-between the signatures the colour isn't obvious. However, for adding ribbon bookmarks, it's nice to have a colour that matches the colour scheme of the book. The rolls obviously end up being used for more than one book project, so it's somewhere in the cents for the ribbons per book. I like silky polyester for ribbons as for those used as a bookmark, you can easily ensure the end doesn't fray by using a lighter to melt the very edge.
Thread: I just use sewing thread that I double when sewing the signatures together. It's about 3$ for a roll of white, and will last a very long time. I do like to add beeswax to the thread, which is somewhat optional. You could probably also use other soft waxes such as those used in candles if you don't specifically have beeswax. That cost will be under beeswax though.
Backing cloth - I purchase micheals squares of linen fabric, which you can buy for $2-3 for the cloth backing of the spine. Again, you can get quite a few cloth backing out of one square of fabric. You can also choose to use cloth instead of paper for a book cover, which then you would swap the coverpaper to the price of the cloth. Again, purchasing a neutral cream-white for the cloth is the best for the backing for the cracks between the signatures. I also know people will use misprint paper for backing, which would be even cheaper.
Paste: Personally as I'm cheap, so I like to make bookbinders paste at home; this is made by boiling a flour-water mixture. However, bookbinders paste takes long to dry, and for the first time or two might be more damp then you want and can leave your pages a bit wrinkly; as well, I'm not sure how acid free it would be considered in the long run, and its not a strong bond if it's not a large surface area that's paper-paper. Lots of people like to use ph-neutral PVC glue instead, which an art store near me sells around 10$ for 8oz, which is definitely pricier in comparison, but you'll end up using it for many books, so it can pay off. I've also however used simple Elmer's glue a couple of years ago in my first bookbinding forays, which is also cheap.
Head bands
Twine: lots of people use different types of cores for their headbands, but something that can remain an even width is good. I use this type of twine, which costs about 12$ per roll. The one I use is one I already had at home. Obviously you can get a quite a few headbands out of a ball of twine.
Embroidery floss: about 1.5$ for two different colours. Again, you'll only be using part of the whole embroidery floss for the endbands.
Beeswax proofing
Beeswax: 7 oz for 7$. Again, a fraction of one of these bars is used per book.
Mineral Spirits: also a fraction required for the a single book. A bottle however is about 11$ for 4.2 oz.
So if you are going by the bulk items, without anything at home including everything and going middle of the road for prices, that would be about $84... however, most of these costs are negligible in the long run per an individual book, plus often you may have some of these lying around already, which can significantly cut into these costs. As a result a more accurate cost of materials per a single individual book would be about maybe $30.50 on average, and going by middle of the road for some prices, and utilizing the 20$ for the text block via staples. The heaviest cost will always be printing out your textblock, which can be minimized if you have your own printer at home (but then you need to invest in one...).
However, cost again can really quite vary, depending on what materials you are using! Starting off with things you already have at home significantly cuts into material costs, and starting on smaller projects will make the material cost cheaper. Plus, some fancy paper can be bought in packs for cheaper then they type of paper I tend to purchase. I hope this was at least somewhat informative, even if it took forever for me to write this up for you, apologies again about that!
#rose serpent bindery#rose serpent press#asks#bookbinding materials#rsp asks#rose serpent press asks#renegade bindery#also u can tell ive been busy because zero books have been made in the past few months...
7 notes
·
View notes
Text
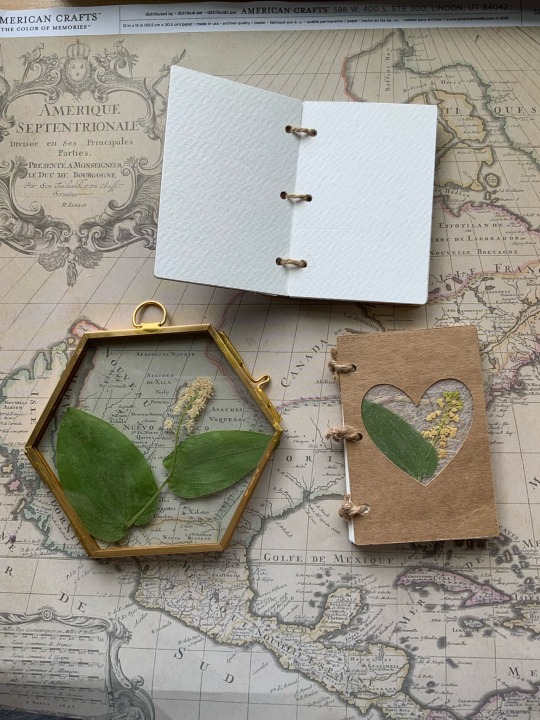
3 Beautiful Ways to Use Pressed and Dried Flowers | DIY Crafts You’ll Actually Keep!
I started working with dried flowers and pressed botanicals a few years ago, and it has taught me a few things.
Delicate dried flowers can burn or disintegrate in epoxy resin.
Glossy Mod Podge however much we love it, can make you cry (and even ruin your floral project).
Depending on your project, pressed flowers MUST be chosen as carefully as you would choose fabric, paper, or paint colors.
So how can you still work with these lovely mediums and create long lasting, archival art that you can be proud of? Read more to learn about 3 of the most botanical-friendly crafts.
Framed Glass Art
What you’ll need:
Double sided glass frame. (any size)I buy mine on Aliexpress or Amazon.
Clear glue, glossy mod podge, or a tape runner.
Pressed flowers
Scissors
How to make it:
Start by selecting your botanical specimens and arranging them in your frame. Use scissors to trim and refine your arrangement until it is to your liking.
Remove all of the flowers, and strategically place dots of clear glue on the inner glass. Wait until your glue becomes tacky. The time will depend on the type of glue that you’re using.
Tip: Test out the cure time by placing a few different sized glue dots on a plastic surface. See how long it takes for the glue to become more viscous and less runny.
Place the flowers onto the glass. Make sure to tack down all specimens with glue until they’re difficult to move. Allow the glue to dry completely before closing the glass frame.
Once dry, display your beautiful arrangement!
I love making smaller arrangements for office spaces and display shelves. These also make adorable secondary gifts in care packages.
Glass offers a more eco-friendly alternative to epoxy resin. Though I love working with resin, I’ve started to become more conscious and selective of my usage to creation ratio.
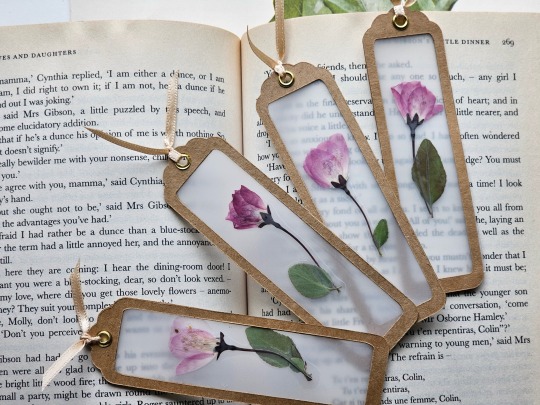
2. Floral Bookmarks
What you’ll need:
Pressed flowers. Preferably long stem flowers that press very flat such as fleabane and daisies. You can also use small flowers without stems.
Self or thermal laminating sheets.
Thermal laminator. (If using thermal lamination)
Scissors
Cricut Cutting Machine (highly recommended for a cleaner result) However, you can also create your own frames. Simply use two gift tags or rectangular pieces of paper. Measure and cut out another rectangle of your preferred size in the center of your paper. Use an X-Acto knife to make the cut out.
Kraft paper cardstock
Glue stick, or my personal recommendation, Kuretake Glue Pens. They will make less of a mess, and create a longer lasting bond on kraft paper.
How to make it:
If using a Cricut machine, start a new project in Cricut Design Space.
Search for “bookmark frame” in the “images” section.
Select a design you like the shape of. You can also create your own by “slicing” new shapes into existing templates.
Resize your design. Choose whatever size will accommodate the shape of your flowers.
Cut out your frames out on kraft paper.
Once you’ve cut out your design, remove half of the frames from the mat. Leave the other half on the mat. This will make keeping them flat easier once you’re ready to assemble everything.
Laminate your flowers. Be sure to use your frame as a guide to arrange them within the window. Leave an inch of space between each arrangement for cutting if you’re making more than one bookmark.
Cut around the flowers, leaving a bit of allowance for gluing them onto the frame. I never measure like I should. Just use the frame as guide to avoid cutting off too much laminating plastic. We will hide the ugly jagged cutting job later. 😅
Return to the mat and apply a generous layer of Kuretake glue to the entire surface of the frames still stuck to the Cricut mat.
Carefully place the laminated floral arrangement on the frame.
Apply another layer of glue around the edges of the lamination, and also on the other frame.
Place the second frame over one of the mat frames, and press down firmly. Tip: You can also place a book on top to keep them flat.
Let your bookmarks dry for about 20 minutes before adding your embellishments. I love using key charms, grommets, ribbons, or tassels.
Check out my inspo photos below! Get creative with decorating.
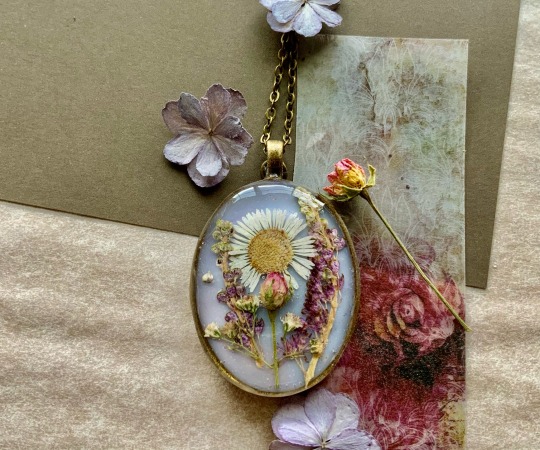
3. UV Resin Pendants
Before I started working with UV resin, I was told that it isn’t light fast. Which is true for most resins on the market. I’ve also heard that it yellows over time and that the UV light burns flowers.
These are all things that I’ve experienced working with flowers in UV resin. However, I’ve managed to make projects that have stayed glossy, clear, and beautiful for over 2 years now, and I want to share my tips and tricks!
Tip #1: USE a high quality UV resin such as the one from Counter Culture DIY.
Tip #2: AVOID using delicate flowers such as forget-me-nots, hydrangeas, larkspur, etc. If the petals are thin and delicate, they WILL become distorted or burn. Think florets, spaced petals, and small leaves.
Tip #3: USE opaque, strong, and VERY flat flowers such as pressed Violets, Chamomile, Fleabane daisies, Rosettes, Queen Anne’s Lace, and Baby’s Breath.
Tip #4: AVOID flowers with too many overlapping petals. These will trap air bubbles inside of your resin layers that tend to express during curing. They tend to cause very large holes and gaps.
What you’ll need:
Very high quality UV resin (My suggestion: Counter Culture DIY)
Cabochon bases or frame pendants
Barrier tape (if using a frame instead of cabochon base.)
Toothpicks to pop bubbles (I actually prefer using a sewing needle)
Light Curer such as a nail lamp. I use the Melody Susie 36W nail lamp from Amazon. Counter Culture DIY sells one specifically for their UV resin as well.
Pressed Flowers (My favorite seller on Etsy)
Optional: Colorants. I use mica powders, acrylic paints, and black and white resins from Counter Culture DIY (not sponsored, I wish!) These give your resin a background to stand out against.
Nitrile gloves
How to make it:
Start by applying a thin layer of UV resin to your base or taped frame. This will be the layer with color (if using pigments).
2. Pop any visible bubbles with a toothpick and cure the first layer for about 1-3 minutes.
3. Apply a thin dot of clear resin to the first cured layer. This will give your flowers something to stick to as you arrange them.
4. Once your flowers are arranged, apply a few strategic dots of resin around them to keep them in place. Cure the first thin layer without covering the flowers completely. Remember to pop bubbles!
5. Continue to add thin layers. Cure each layer for 1-3 minutes each. Repeat this process until your flowers are covered and your top coat has a domed appearance.
6. Finished! Avoid touching your project for several minutes until fully cooled. You don’t want fingerprints in your shiny top coat!
For more floral project ideas, check out my Pinterest below!
#pressed flowers#unique gifts#vintageinspired#art#home & lifestyle#floraldesign#fashion#books and literature#cottagecore#beauty#art tutorial#easy art#art ideas#artists on tumblr#books & libraries#floralart#handmade art#diy art#diy tutorial#journaling#inspo#writing#craftinspiration#my art#art supplies#artwork#floral#flowers#paper craft#diy ideas
3 notes
·
View notes
Text
@randomtangle answering your reply in a post, because I have a lot of words to say about notebooks lmao.
So, quick answer first: I'm using a 2023 Hobonichi Weeks, which is a weekly planner. You can buy them from the Hobonichi website here, from Jetpens, or also Amazon.
I'm using the Weeks for a couple of reasons;
It's what Sean McCoy set up in the initial dungeon23 post!
I like the format of the notebook! The way that the weekly entries are one side, and a blank grid on the other is well suited to dungeon23 entries. The daily entries are also compact, meaning I focus more on getting something done rather than extraneous details.
I already liked Hobonichi as a brand, and the paper is very nice. The Weeks uses a super thin, but still fountain pen friendly kind of paper. I like to write with fountain pens (because they're fun) and the super thin paper keeps the notebook itself very compact. It is deceptively thin!
So for me, the Weeks ticks all the boxes! If you have the cash to burn on a fancy notebook, highly recommend them. That being said! The Weeks are a tad on the pricier size compared to similar planners (its a combo of the high quality, but also some of it is definitely branding).
If you're looking for something with a similar format to the Weeks, but you don't need the particular paper quality, searching for different weekly planners on amazon or etsy (or honestly just google Hobonichi Weeks dupes, or weeks planner)will turn up plenty of cheaper options.
Midori makes similarly formatted weekly planners, though they have cardstock covers and one planner doesn't cover a whole year (you'd need two). they're designed to work with their Traveler's Notebooks covers, but would work totally fine as just little notebooks! They also have very nice quality paper, and are in the same format as the Weeks (you'd want the standard size over the passport size, as a heads up).
The heart of dungeon23 is really just getting out there and writing! So you don't need a fancy notebook (I've seen people using all sorts and also going digital). But I do think a fancy notebook is fun. But I also like notebooks 😅
9 notes
·
View notes
Text
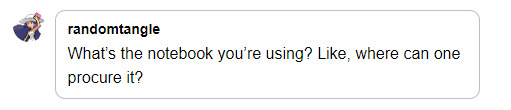
Finished a couple more copies of this book for the author and a friend! Here's a link to the original post if you'd like to learn more about (read: hype tf up) this wonderful writer and their work, otherwise feel free to click beyond the read more to hear the bindery stream of consciousness.


So the copy in muted colors is the first one I made for myself, and the second two are made using really nice colors requested by one of the recipients.
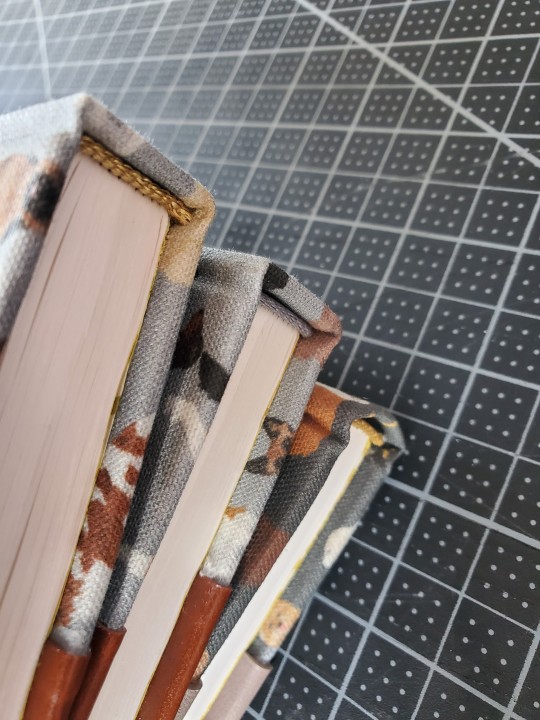
The cloth is spoonflower's cotton linen canvas, which I had surprisingly excellent results applying straight on the cover without making it into bookcloth first. The texture is pleasant but will show through on thinner htvs, as you can see in the pictures. One fat quarter should be more than enough to get you through a standard-sized project.
The htv is Siser's gold easyweed. It is indeed easy to weed, but also actually hideous to apply. Please send advice if you've got any, because I have another roll of it to get through before I can go back to using Cricut's gold option.
The gray goat leather is from a regional leather supplier called Tandy. Great option if you're trying to be mindful etc etc, but was not fun for a first attempt at binding in leather. Quickly gave up on skiving it and just applied it full thickness, resorting to some interesting trimming on the corners and struggling with not accidentally putting a bunch of leather edge imprints into the textblock during the final press.
The other two copies are bound in a nice affordable binding-ready goat leather from Book Craft Supply and went on as easily as a standard bookcloth. Great classic color, too.
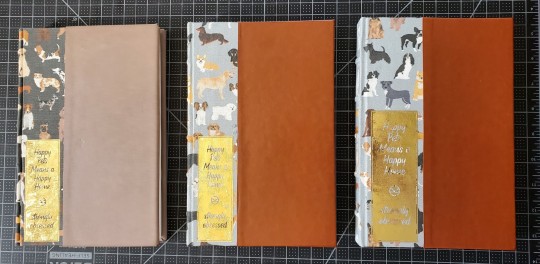
Tried different spine thickness on all three books: Talas' red flex board on one (highly recommend), board the same thickness as the covers on another, and slightly thinner board on the third. No favorite, but I like the look of the spine banding with the Talas cardstock, and the way the gray headbands meld perfectly into the thicker spine board.
Raised bands are made from leather lace, which I've been loving because it's easy to get for free, it's easy to uniformly trim, and it remains flexible after being attached.
14 notes
·
View notes
Text
What is a Cricut Mat, and How Many Types are There?
If you are dealing with what is a Cricut mat and its types, then you are in the right place. Whether you are a new joiner or a senior crafter, you need to know the cutting mats' basics. All the crafting materials are placed on its surface, helping the user to cut down all the projects. Currently, there are four types of Cricut products available for the DIYers.

Moreover, choosing the correct one is important without risking the craft's quality. Although, it depends upon the material type you'll be using while designing the project. Let's skip to the good part by suggesting details about this supply, its uses, and its varieties.
What is a Cricut Mat and Its Key Features?
First of all, let's focus on what a Cricut mat is and its features. This crafting accessory is a flexible and reusable mat utilized during the crafting process. Additionally, it has a strong adhesive area spread across the mat, which holds the material strongly in place. Some of the common features of this smart cutting mat features are:
Firstly, it is easy to remove the cutting material from it and store it away for the next project.
Secondly, this item can be used multiple times by covering it up from the specific plastic sheet and last long upto 40-50 washes.
Thirdly, this Cricut mat is available in different types and colors with strong adhesive and supports most materials.
Lastly, they are cost-efficient, and the new user can easily purchase them for crafting.
4 Different Cricut Mats Available for Cutting Machines
Apart from learning about the smart cutting machine and its features, let's pay attention to the cutting mat varieties. However, knowing completely about each of them can be a little confusing. Let's break the ice and understand them via the coming pointers:
1. LightGrip Mat (Blue)
In this situation, the Light-Grip mat has a little adhesive designed to work well with light-weighted material. As per the DIYers, this product is highly used with standard paper, scrapbook paper, light cardstock, and many more. Additionally, it clutches down the material in its place during the cutting process. Lastly, it is available in Blue color and supports the Maker & Explore machine.

2. StandardGrip Mat (Green)
Furthermore, this is the best option for what is a Cricut mat. This product is specially developed for medium-weighted materials. Most of the crafters recommend this Cricut product. Other than that, it is one of the reusable mats, which makes it simple to remove finished pieces once the cut is completed. In addition, it is offered to the DIYer in green color.

3. StrongGrip Mat (Purple)
So forth, the StrongGrip mat is developed for heavyweights materials. The materials list includes specialty cardstock, chipboard, mat board, etc. Secondly, this cutting machine ensures the perfect adhesion ratio with the longest possible life. Thirdly, it has been upgraded with water-based paint and adhesive. For the best performance, opt for the correct type of material.

4. FabricGrip Mat (Pink)
Meanwhile, this supply combines increased strength and density plus a little adhesive. Most of the fabrics are cut down with a Rotary blade or Bonded-Fabric blade. Remember, this Cricut cut-die machine product is used with cotton, denim, polyester, etc. With two mats included, one can be loaded to cut down in Cricut. Prepare the next material for further process.

Frequently Asked Questions
Question: Can Cricut Cut Without Cutting Mat?
Answer: There is a complete possibility that the crafter can simply cut down the various materials without cutting a mat. However, they need to purchase Smart Materials, which supports some of the smart cut-die models. One must simply load the material and let the machine do the work. It will examine the sensors and cut down the loaded item. However, it should be a DIYer's duty to load the correct product before starting the cut-down method.
Question: How Can I Make Cricut Mat Sticky Again?
Answer: If your respective is losing its stickiness and damaging the project, you must re-stick it for future reference. To maintain the mat quality, keep it covered with the cover sheet, and clean it regularly. However, if you want to make your mat stickier, buy the new best-quality adhesive and spread it equally across the mat. Ensure that you also cover the edges equally without any thickness.
Question: What is a Cutting Mat Cleaning Process?
Answer: Some of the common methods that will help the DIYers in cleaning their respective mat are as follows:
Firstly, you can use the fresh lint roller to remove leftover material or small bits of materials.
Now, wipe with alcohol-free baby wipes by moving them in a circular motion gently using at least 1-2 wipes.
Then, use the tweezers or scraper tool to remove the fuzz or bits of material from the cutting mat.
#cricut.com/setup mac#cricut.com/setup#cricut design space#cricut explore air 2#design.cricut.com#cricut design space login#cricut setup
0 notes
Text
Adult skye paw patrol costume

ADULT SKYE PAW PATROL COSTUME TRIAL
Your Skye PAW Patrol costume is ready to wear! Pin it to your head using bobby pins or glue it onto a headband. Make your vest using the instructions below – make sure to measure with a loose-fitting shirt to ensure you get the size right!!
ADULT SKYE PAW PATROL COSTUME TRIAL
Do this by trial and error, and measuring it on you.Ĩ. Cut two more strips of light pink felt and attach it at an angle so that it’ll hang down when the goggles lie comfortably on your head. Glue it together as pictured, with the ears connected about a centimeter away from the “lenses” of the “goggles”. Cut out a much smaller bit of “hair” to go in the front.Ħ. Cut out two light brown ears in the shape below.ĥ. Cut a strip of lighter pink felt about two inches wide. It should basically cover the length of the long side of the felt.Ĥ. Money Back Guarantee ensures YOU receive the. To make the head piece: Draw the following shape on apiece of hot pink felt. Shop the Largest Selection, Click to See Search eBay faster with PicClick. Attach hook and loop closure to the ends. Cut a strip of light pink felt large enough to fit your neck (or glue two strips together). /rebates/&252fthumbnail252ftv-movies-gaming252ftv252fpaw-patrol252fpc252f1382252fc252f3811252f3208.uts26tc3dbing-&idspirithalloween&nameSpirit+Halloween&ra3. For the collar print on card stock, laminate, cut out and punch a hole in the Skye badge.Ģ. How to make a DIY Skype PAW Patrol Costume:ġ. These printable badges (print and cardstock and laminate with packing tape).Light brown, hot pink, and pastel pink soft felt (hot pink CAN be used in fleece from the vest).What you need to make a DIY Skype PAW Patrol Costume: When you’re done, toss it into the dress-up box for year-round dramatic play! Pair it with a tutu to make it more fun, or just use it as-is. It’s the perfect costume for a toddler or preschool aged girl, or for mom – to make your little one jump with joy! I highly recommend just getting hot pink felt or fleece, whatever it takes. I spray painted it hot pink which was kind of a mistake. I couldn’t find hot pink fleece when I was making it (that would ship quickly enough) so I bought white instead. The headpiece is a long flat piece that you can glue to a flat headbandor pinin place I like I did). This DIY Skye-inspired costume is easy to wear. Disclosure: this post contains affiliate links. Please keep in mind that refunds are for the cost of the merchandise only and return and/or original shipping charges are not refundable.Ready for the last of my PAW Patrol-insired costumes? I made this DIY Skye PAW Patrol costume for… myself! Of course, it’s also perfect for your preschooler – just adapt my tutorial in a smaller size (and add a tutu, of course). Try your shoes on indoors in a carpeted area to avoid making them ineligible for a return.Īll orders placed through, eBay, or other third-party marketplace such as Walmart and Target+, should consult the return policy of the relevant site. Wigs, beards, facial hair, or any other artificial hairĪll shoes must be unmarked (without scuffs), unworn and in new condition.Shoe covers, boot tops, slippers, or other, similar footwear.The following items qualify for a return ONLY if they are in their unopened, original packaging - these items must not have been worn, used or altered in any way: During the Halloween season (September through November), returns may take up to 4 weeks. Returns are typically processed within 2 weeks of receiving the item. Replacement items will be shipped using the same method as the original order. Contact Customer Service within 14 days of the original order date, and we'll do everything we can to ensure you receive the replacement product(s) quickly. If you received an item that is damaged, we'll fix it - fast. We will refund your original order (minus original shipping charge.) You can place a new order to ensure it arrives by your event date. You can pay to reship the order, with an updated address, via the shipping level desired. Your order may be subject to a $15 charge. If your order is sent back to us as undeliverable and you still need your order, we can assist you. An order with Premium or Express shipping may be delayed if only a PO Box is provided. Incorrect Addresses and Return-to-Sender Packages: If an incorrect shipping address is provided, the delivery of the package may be delayed. Note: Returns for seasonal merchandise (e.g., Easter, Halloween, and Christmas) can be returned up to 7 days prior to the holiday. For your protection, we recommend you insure your return shipment.We recommend using a traceable shipping method with delivery confirmation.Item(s) must be new, unused and in their original packaging, along with all accessories.Items returned for a refund will incur a 12% restocking fee.Returns must be postmarked within 15 days of the original order date.The following criteria must be met to be eligible for a refund: During the Halloween season, we accept online returns to our return center postmarked prior to October 24th, 2022.
1 note
·
View note
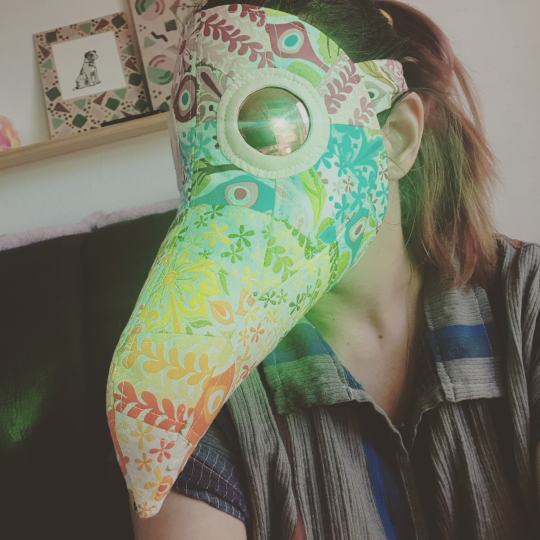
Photo
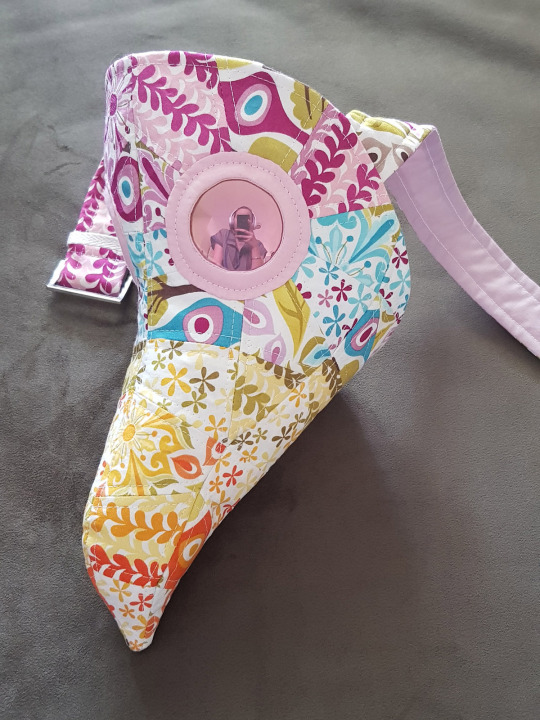
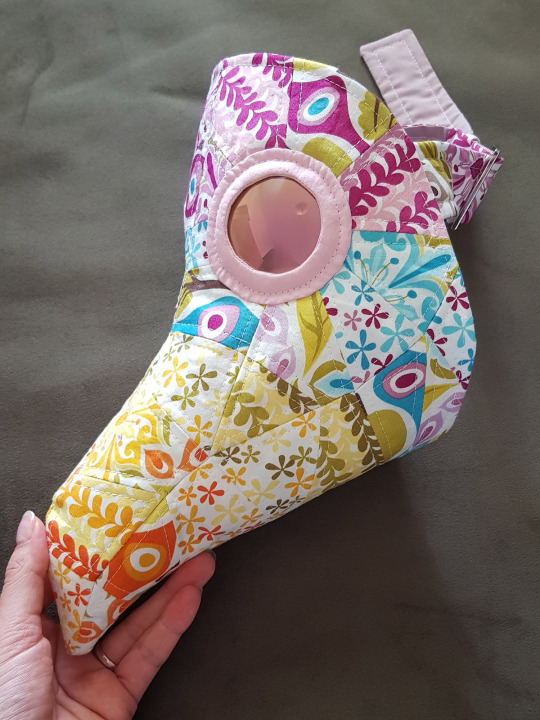
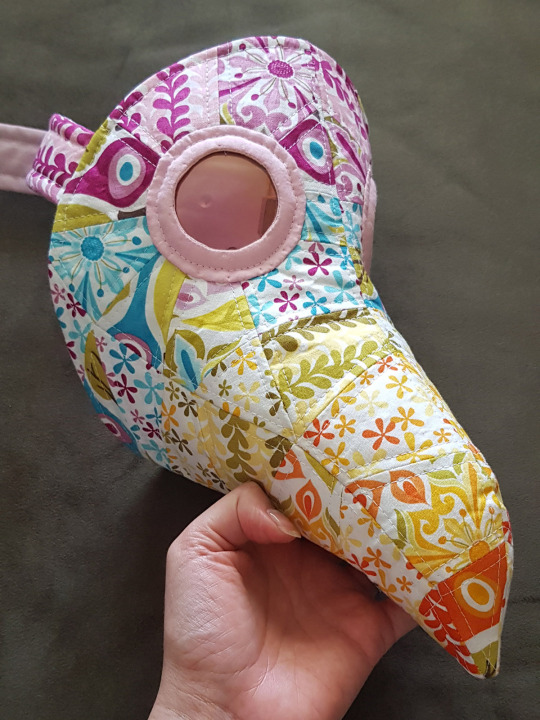
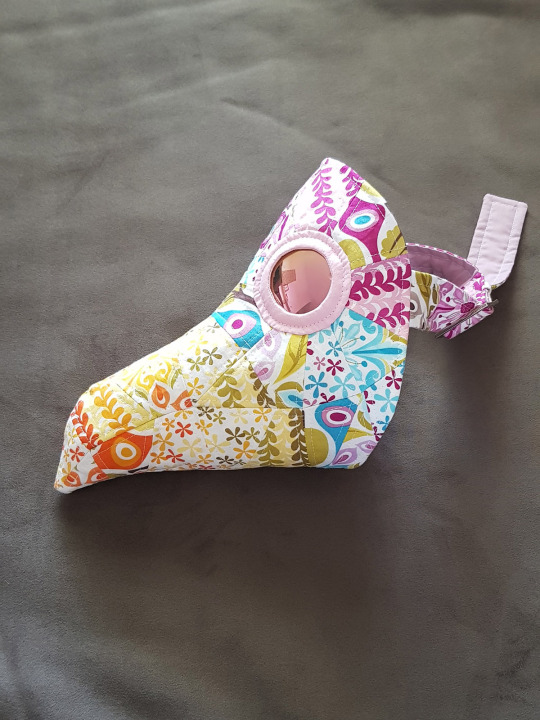
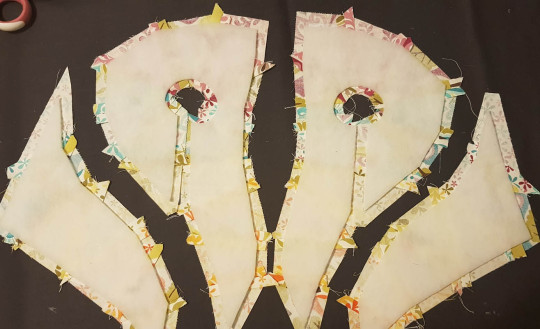
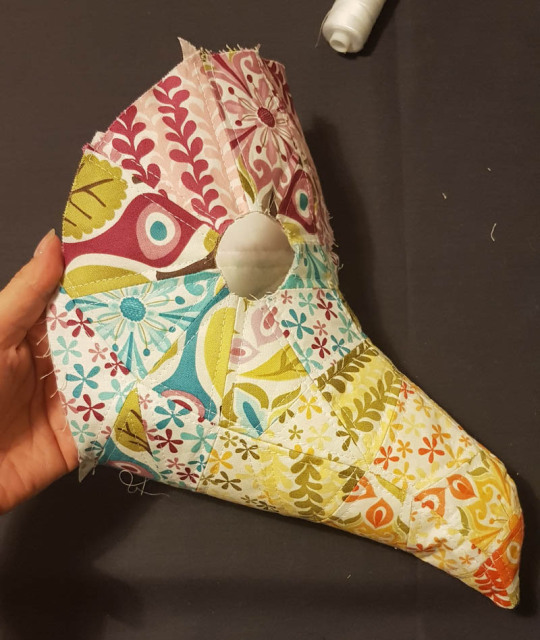
Here it is! The instructions to make a pieced and quilted plague doctor mask!
Just as a heads up, this pattern is not really recommended for beginners. There is not a whole lot of explanation of the basic techniques, and it requires a fair bit of precision, two types of fusible interfacing, and an assumption that you can keep a consistent seam allowance and do some hand sewing and know when to sew things right sides together and such.
I am not promising anything, different methods will yield different results, I have never made a pattern exactly as it was written and neither should you. If you want something the same as the next person, go to the shops.
Actually, nevermind, this is a quarantine craft, stay home.
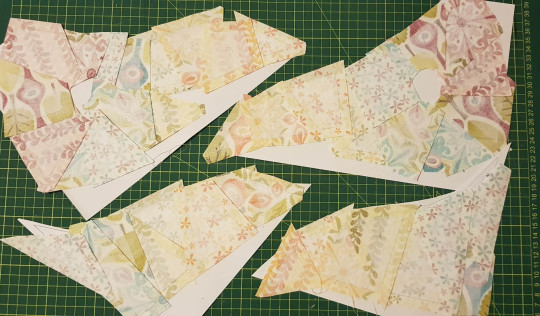
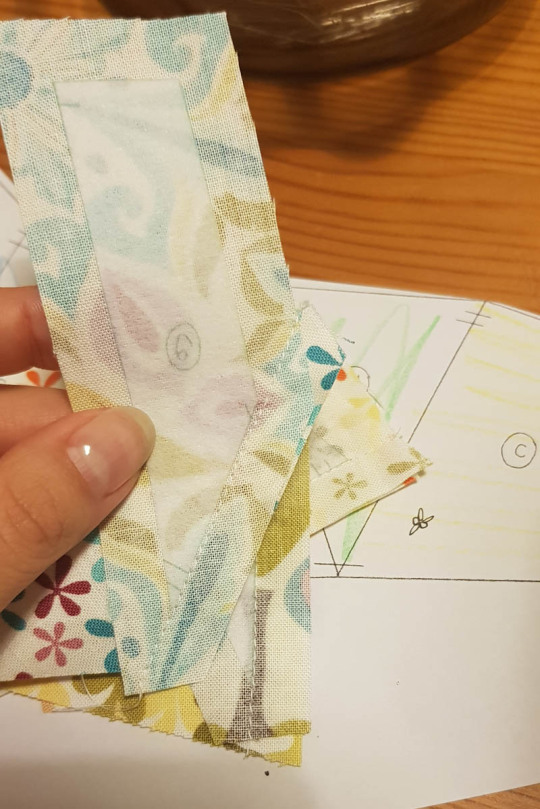
There are two ways to do the piecing for this project. The first is a quilting technique called English Paper Piecing, there are plenty of tutorials online, but it is done by hand and I do not have the patience for it. Still, if you have the time but not the machinery, it is probably your best option for a very good finish. Cut the pattern net out of card, glue the bits onto your fabric, sew them up, pull them out and add interfacing after. I sewed three hexies together once and got bored and gave up.
The method I actually used involves my favourite cheat for sewing: you can use an inkjet printer to print on non-woven fusible interfacing! There are ridiculously overpriced pre-cut packs available, but also you can just cut up some midweight to the right size. I just have a boring old Epson printer, and I can get away with just putting some scotch tape along the edge that feeds in for a bit of stability. Alternatively, depending on the brand, you can “fuse” it onto some non-stick baking paper, cut it to size, and then peel it off without losing too much adhesive. (My pictures look a little different because my original A4 version fits on the page differently than the shared version)
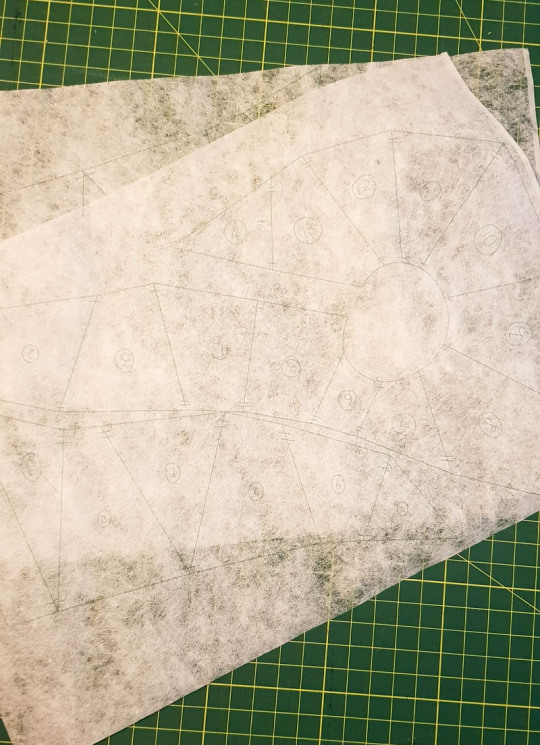
Printing onto interfacing means I know my dimensions are perfect, and I have the markings on the pieces so I know what joins to what. If you only have a laser printer, or your inkjet hates you and wont let you print on interfacing, I still recommend using fusible interfacing for structure and precision piecing. You will just need to keep a lot better track of what is what, because the pieces are all slightly different and they only go together one way.
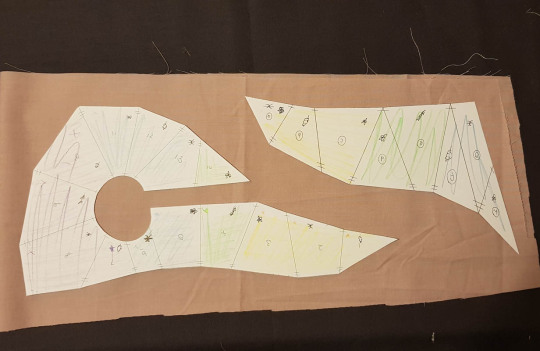
The actual “pattern” for this project is a geometric net. I highly recommend making one in paper or cardstock first, because we all have different sized heads. As with most quilting projects, it will generally get to be a little bit smaller again once it is all sewn together, so keep that in mind.
This is a link to the PDF on Google Drive. It is a 4 page document, for printing on US letter size. There is enough space around the pieces that it can also print onto A4 paper: the one inch square should measure 2.5cm. Similarly, the extra space means it can be scaled up a bit before any gets cut off, if you have a particularly large face.
(Edited to add: if you were going to make this in a single fabric rather than pieced together patchwork pieces, I have uploaded a simplified version of the pattern, which has more curved seams which are easier to match. The technique is otherwise the same, but note that these patterns do not have seam allowances - you will need to add them when you cut your fabric so that the pieces match.)
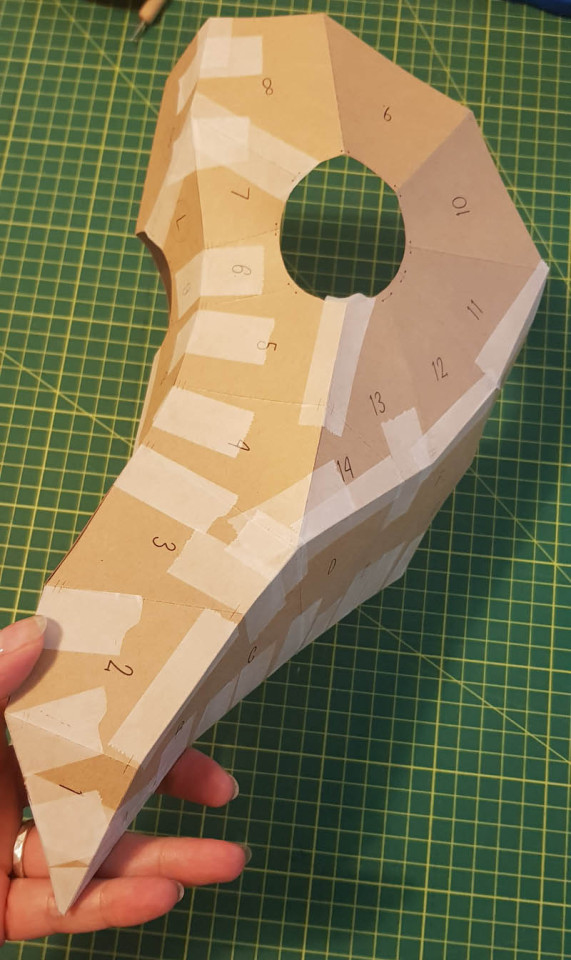
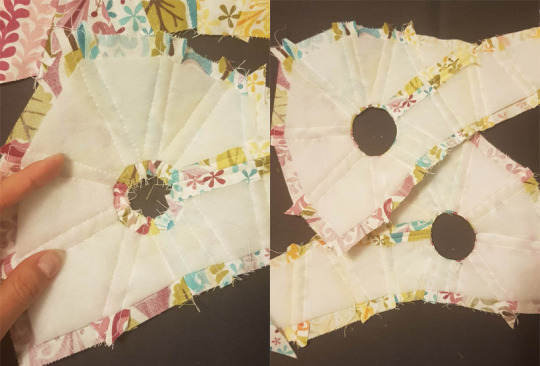
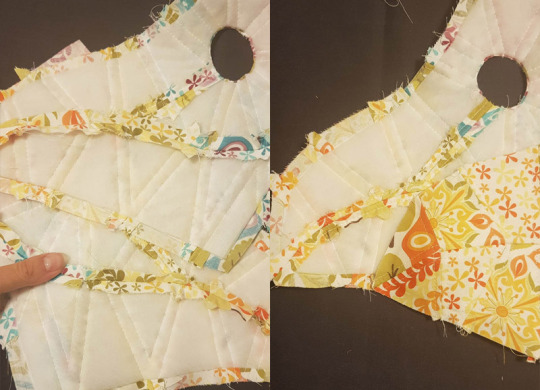
The body of the mask is made up of two mirrored (four total) pieced together bits, plus some circles to go around the lenses. There are two mirrored top pieces, and two mirrored bottom pieces. The top pieces are numbered 1-14, and are split over two pages and need to be joined together. The bottom pieces are lettered A-H. On one side of the pattern the numbers and letters are circled, so you know which side you are working on. There are also small dashes in the corners of the pieces; single dashes connect to single dashes, double dashes connect to double dashes. At the parts that become the edges of the eye holes, there are little dots at the end of the dashes.
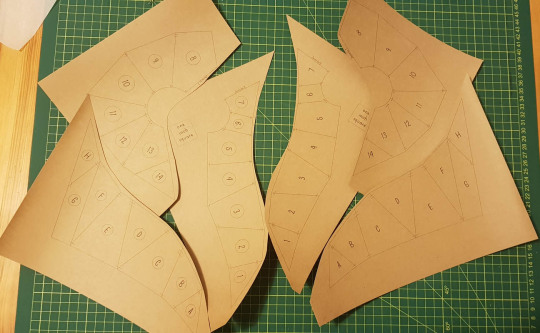
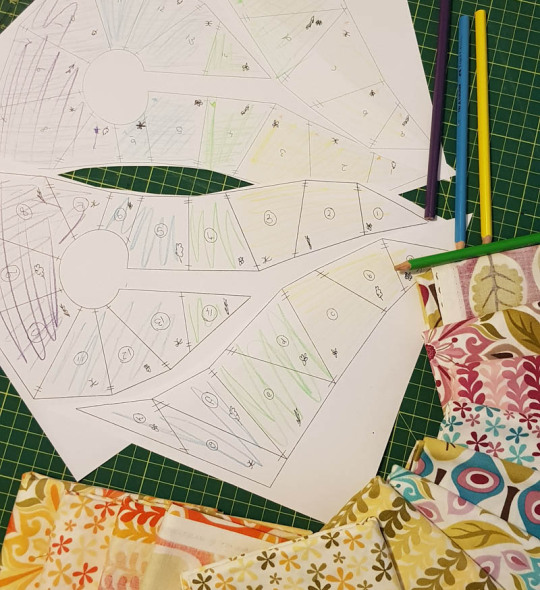
Even if you are printing onto interfacing, you will also need to do a paper printout, as it will be used later as a pattern to cut the batting and the lining. The paper printout can also be used to work out your fabric placement, if you are going for a certain look (again, this one was printed as an all in one A4 sheet, but it works the same).
Cutting the Patchworked Outer
If you have managed to print onto fusible interfacing, all you need to do is cut the pieces. Otherwise, do what you need to trace the pieces onto interfacing, making notes of where they go and which sides align to what.
Once you have your interfacing pieces cut and organized, fuse them to your fabrics with at least enough room between and around them for seam allowances on each side.
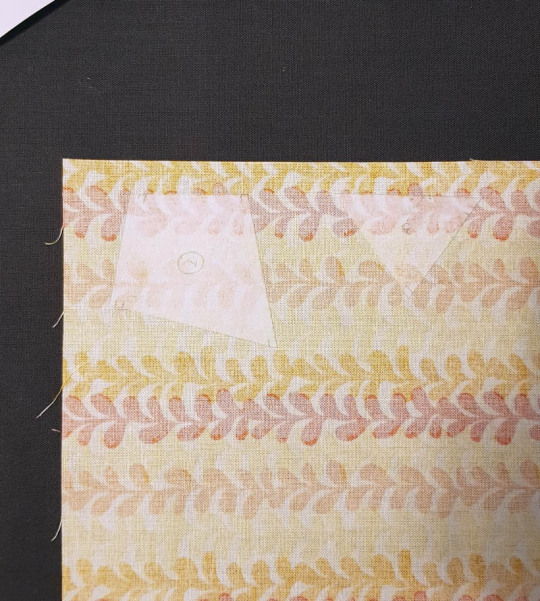
I use a 1cm seam allowance, but feel free to use a quarter or half inch if that is what you are used to.
Trim all the pieces to have a consistent seam allowance.

Lay the trimmed pieces out on the paper printouts. This will let you know if there are any pieces missing, or any parts where fabric duplicates might share a seam.
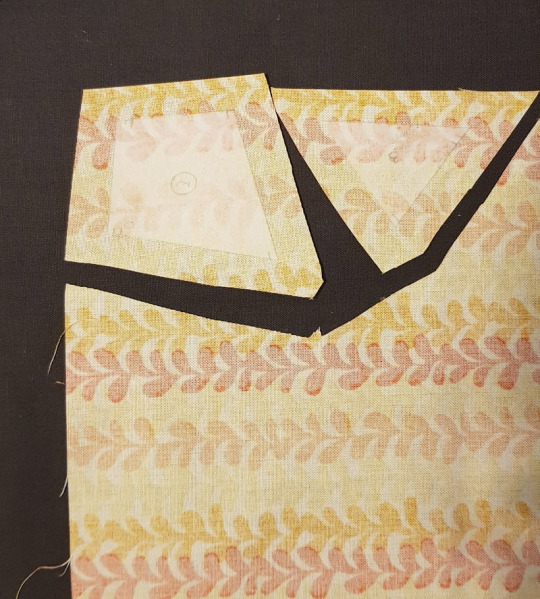
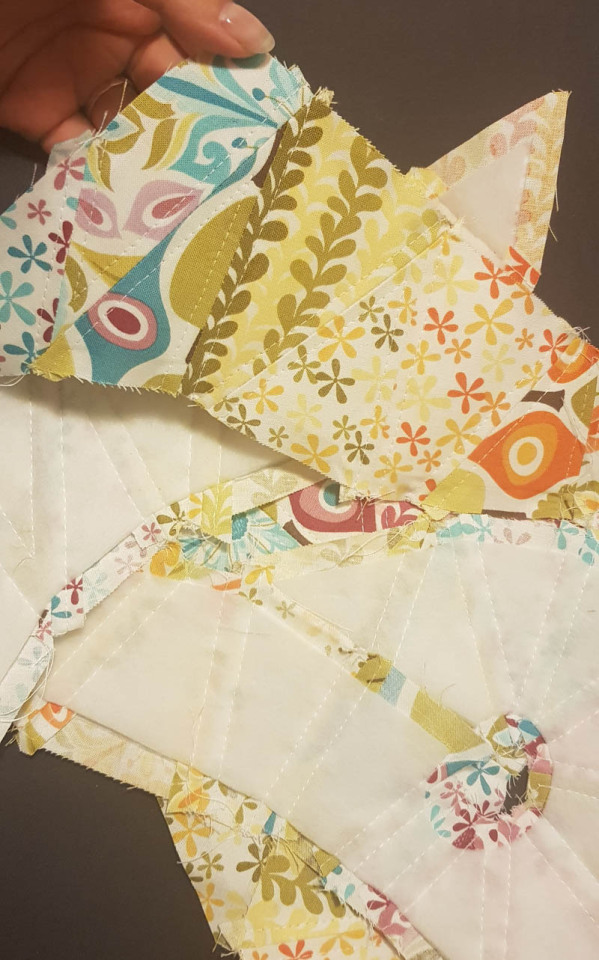
Piecing the Patchworked Outer
First, piece together the nets of the bottom pieces. Put a straight pin straight through at the corners of the interfacings of two neighboring pieces, so they are perfectly aligned. Then angle the pin on the right hand side so it comes back up along where the seam will go, and angle the one on the left so that it is going across.
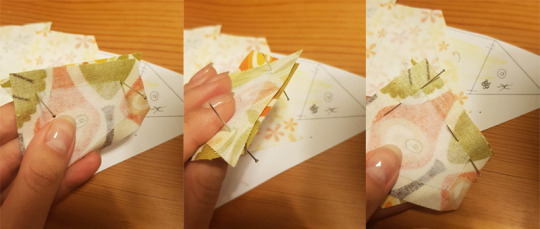
Sew along the edge of the interfacing, aiming for just alongside of it, not on it.
Finger press the seams open, then repeat until all the pieces are together.
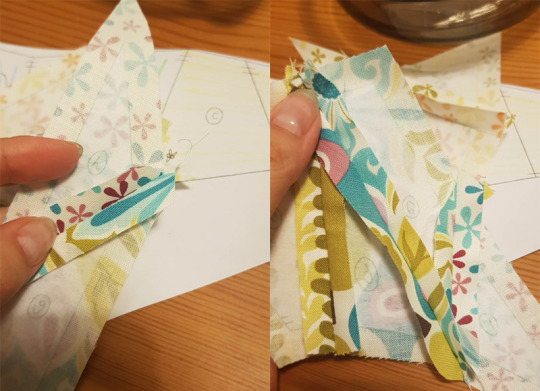
The technique for the top pieces is the same, but at any join which ends at an eyehole (marked on the pattern with a black dot on the ends of the dash), backstitch at the end of the interfacing, so that it won’t pull apart at the edge. The seam allowance at this part will be cut off, so it needs to be secured before that point to prevent it from pulling apart.
Batting and Quilting
Properly press all the pieces, with the seams open.
Using the paper pattern, cut out two mirrored top and bottom pieces from fusible batting.
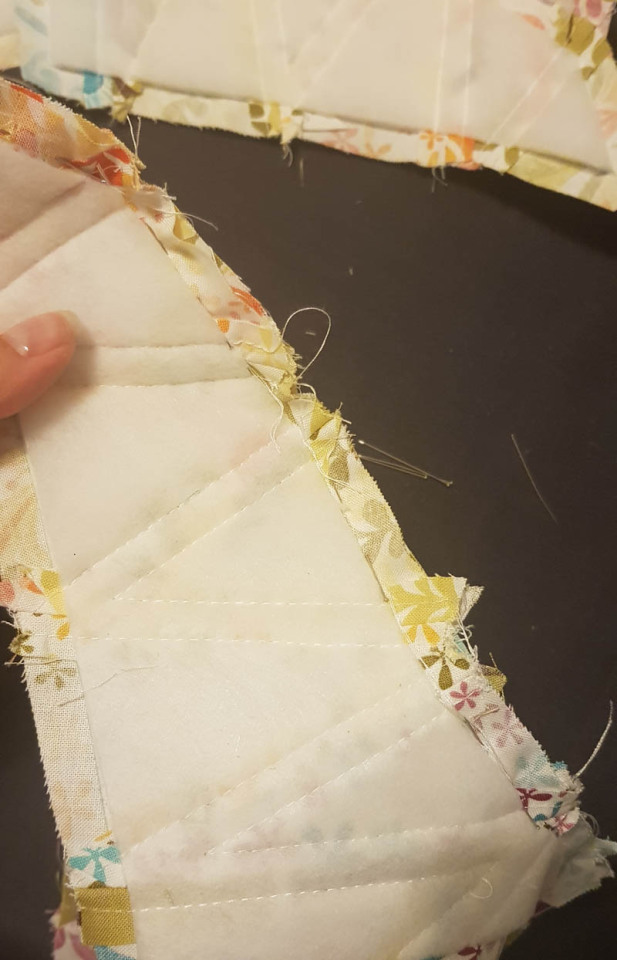
Iron these onto the inside of the pieced parts, so that their edges line up with the interfacings. In my experience, the best way to iron on fusible batting is from the right side, so I pin them in place and flip them over, iron a little bit so they barely stick, pull out the pins, and fuse properly.
Do some quilting. I just went 5mm to the side of every seam, because the next lot of seams need to be topstitched in the same way, and I like the consistency.
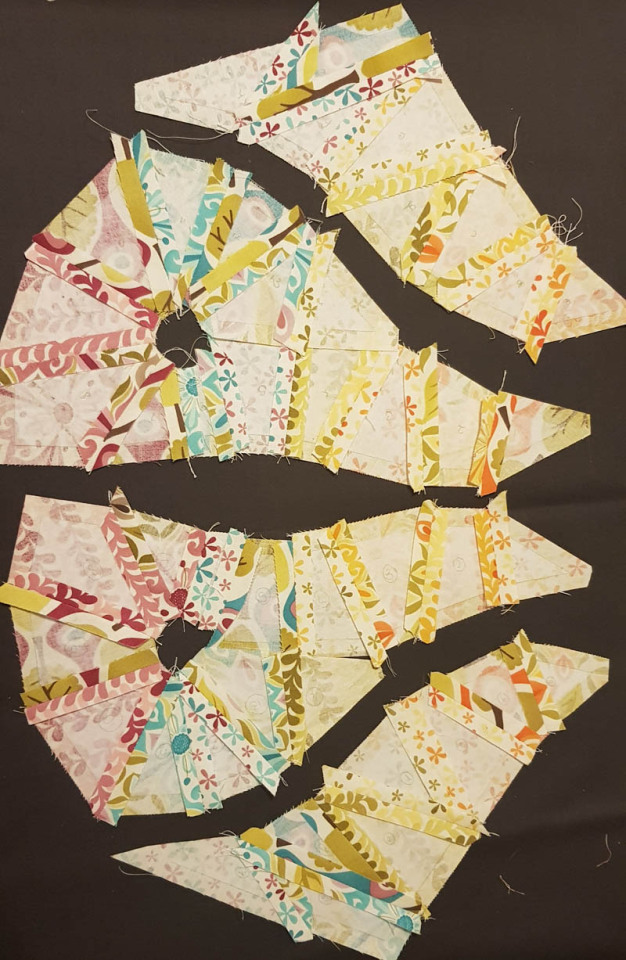
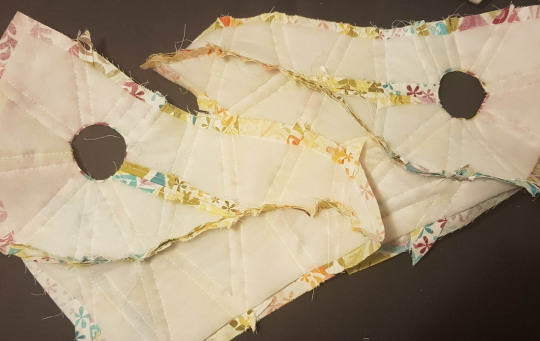
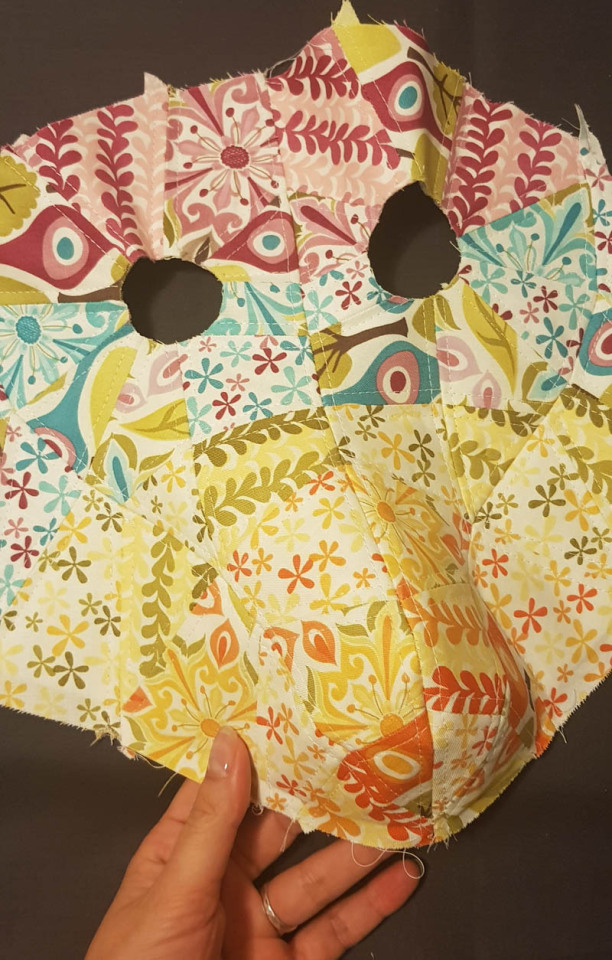
Assembly of the Patchworked Outer
Join together the gap in the top pieces. The batting was aligned to the interfacing, so the technique is the same.
Press the seams apart and topstitch the seams to either side.
Trim off the excess seam allowance around the eye holes to the edge of the batting and interfacing. this was why we needed to backstitch earlier.
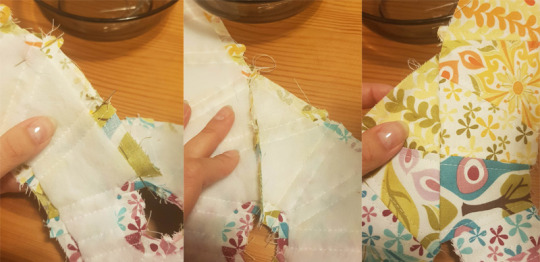
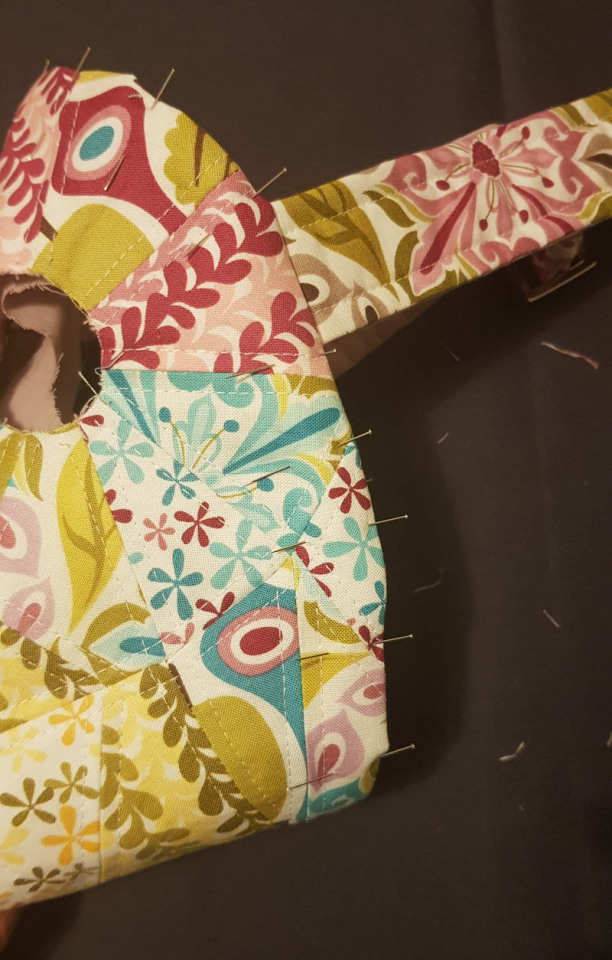
The next step joins the top and bottom pieces together. The bottom piece attaches to the more curved edge of the top piece - that last seam that was joined after adding the batting will meet these side seams, angled towards the tip of the beak. Sewing the sides is the trickiest bit to do on the machine, so, while I would normally say basting is for cowards, if you want the points to match perfectly, this is a time when pinning will not really cut it. I just hand sew through each point where the seams join, go back through a couple of threads over, and tie it off.
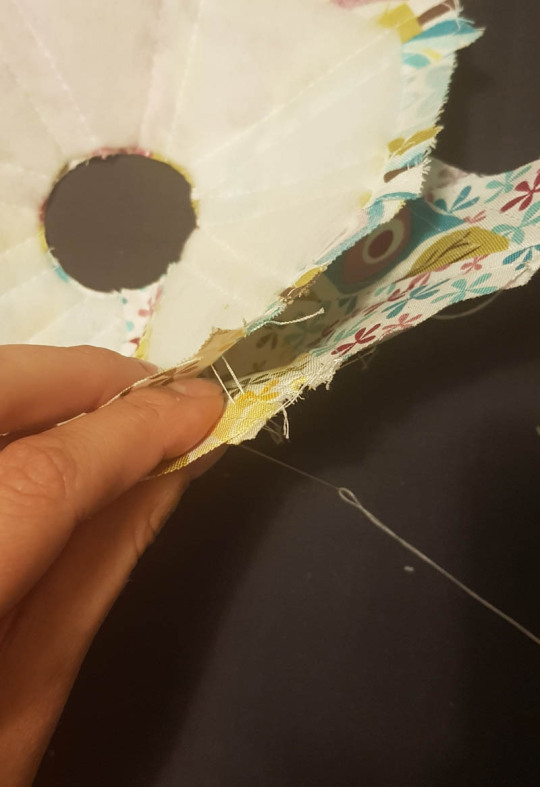
Then I put pins through the longer seams.
When sewing it with the machine, try to keep the lines as straight as possible, making turns only at the seams where you put a basting stitch.
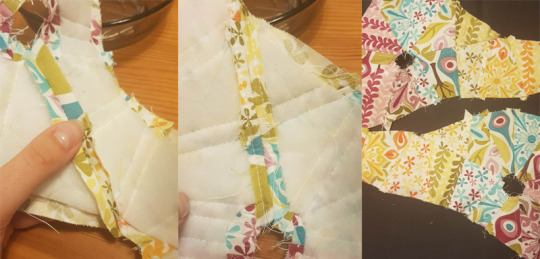
Once both sides are sewn, press the seams open and topstitch to either side.
Repeat this step for the top centre seam. You can just pin baste this one if you would rather, because the angles match, but it is literally right there in the middle where everyone can see it, so if you are not confident in matching points, baste it.

Press the seams open and topstitch.
The technique is the same for the bottom centre seam, but topstitching all the way to the tip of the beak is not possible, so you will have to do the last bit of top stitching by hand.
It doesn’t matter so much if it is a bit messy, because it is not in a place where it can really be seen, but spitting the seam will help it hold its shape more nicely.
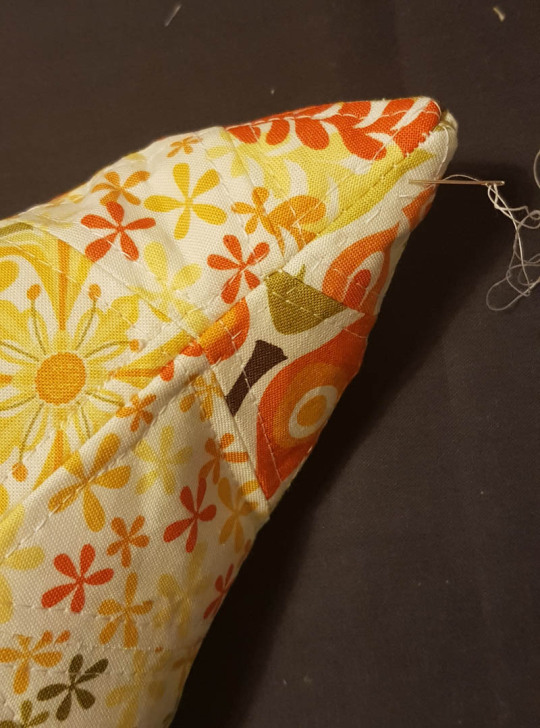
That is the pretty outside bit done.
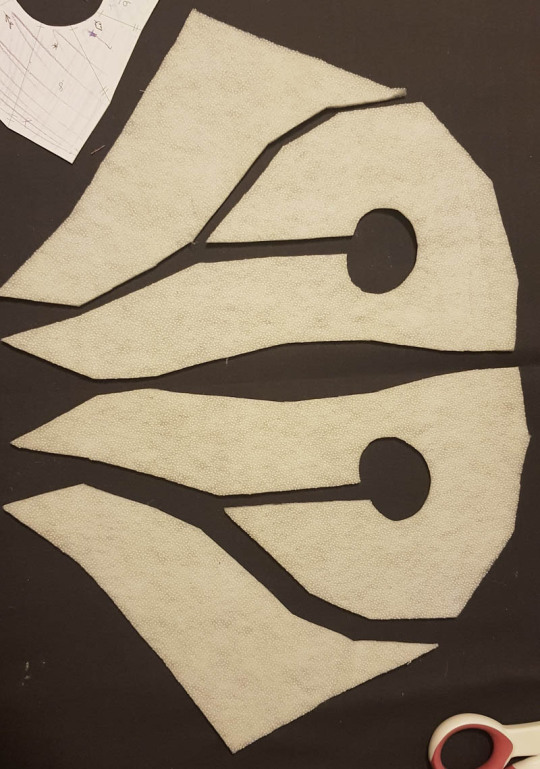
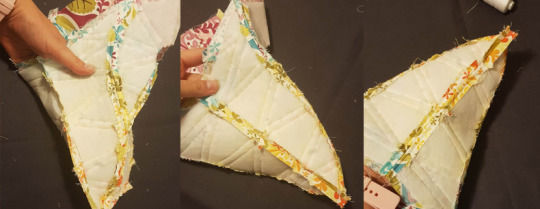
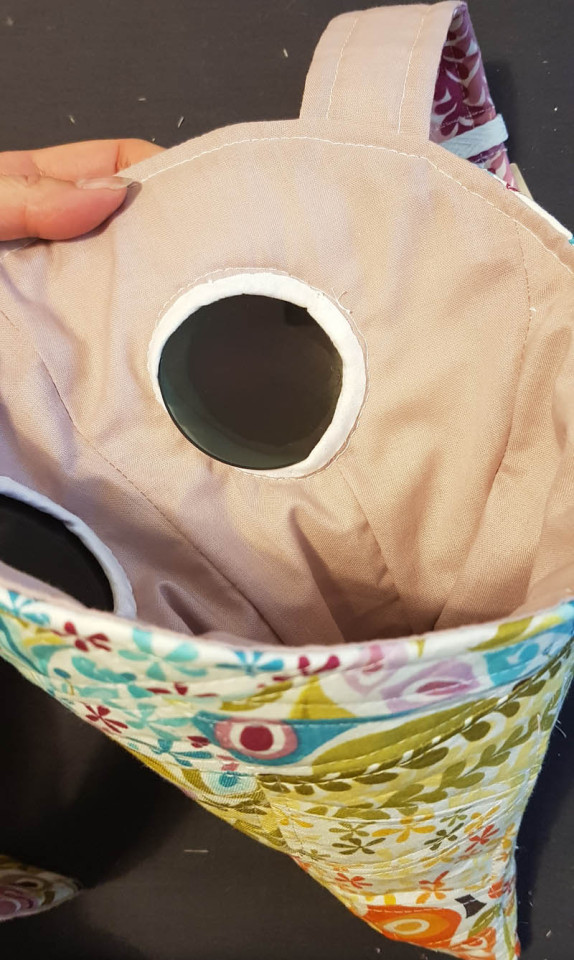
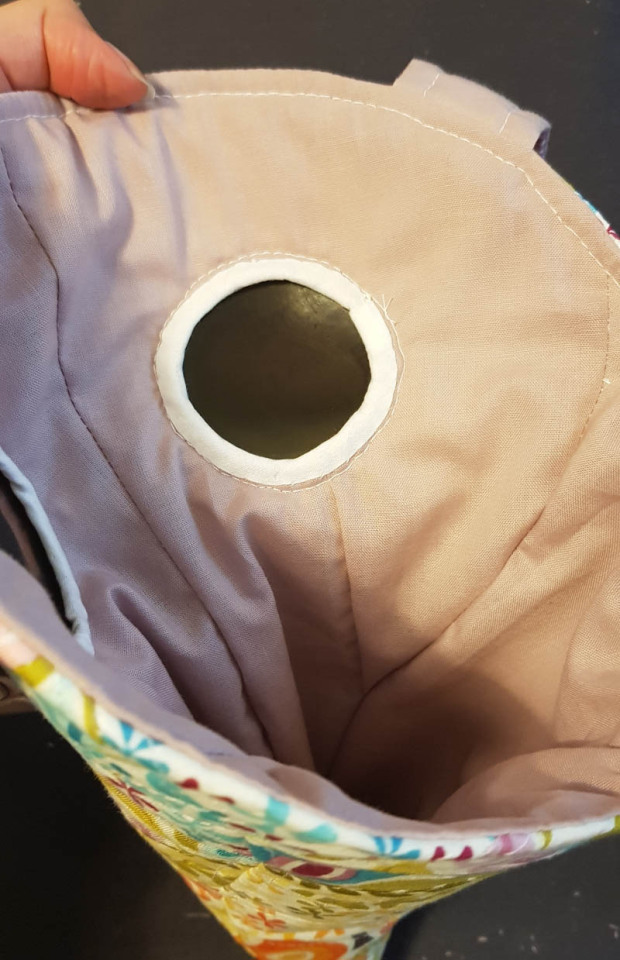
Making and Attaching the Lining
To make the lining, use the paper pattern to cut two mirrored pieces of the top and bottom pieces, with whatever seam allowance you prefer.
The gap on the top piece will have a maximum possible seam allowance of about a quarter inch, but this is enough for a secure internal seam. The eye holes do not need a seam allowance.
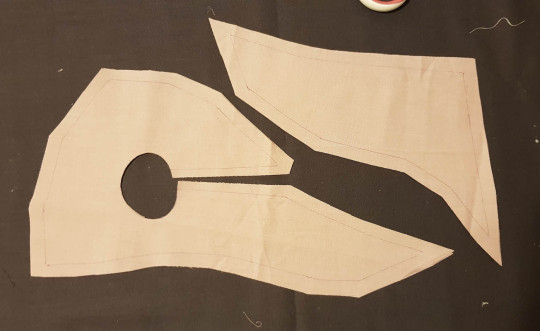
Sew together the gaps in the top pieces, then sew the top seam of the top pieces and the centre seam of the bottom pieces together.
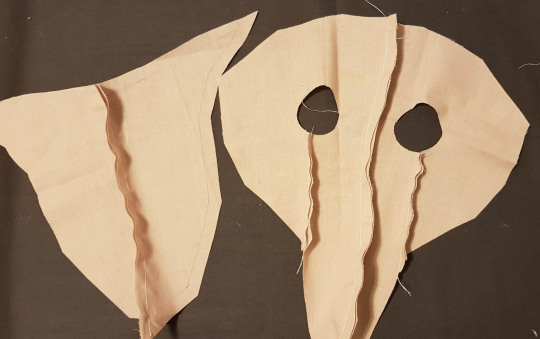
Open up both pieces and sew the sides together. You should have a lining piece that is a floppy, boring version of the outside piece.

I have not included a step for how to make a strap, because everyone has their own preferred methods, and there are plenty of alternative options. If you don’t want to worry about making strapping you can use ribbon or elastic, or put a small loop there to thread something through afterwards. Whatever the choice, pin to the centre of the back edges of pattern pieces #10, facing towards the eye holes.
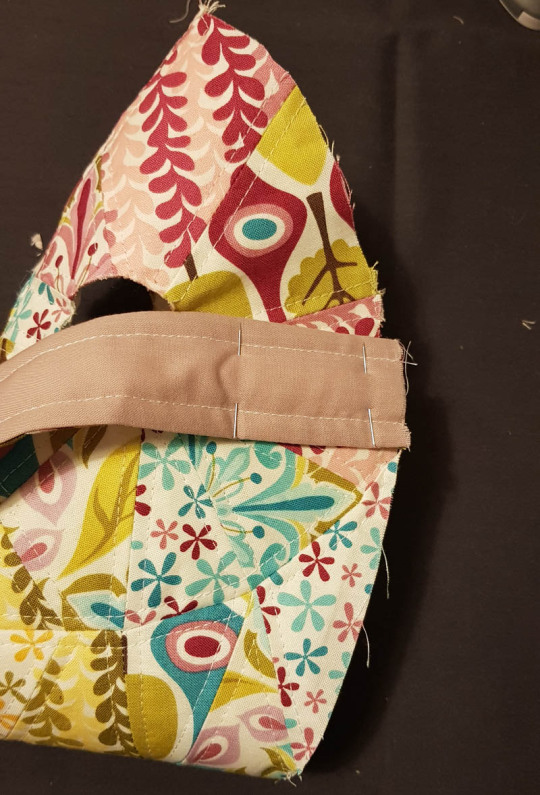
Put the lining piece, facing right side in, over the pieced outer and the strap pieces and pin around the edges, lining up the four seams of the lining with the seams on the outer.

Sew around the edge.
Turn the piece right side out through one of the lining’s eye holes. You just sort of pull the pieced outer (which is currently inside) back a bit, until the tip of the beak can come through an eye hole, and then try to pull it through as gently as possible so that the raw edge of the eye hole doesn’t get too stretched and frayed.
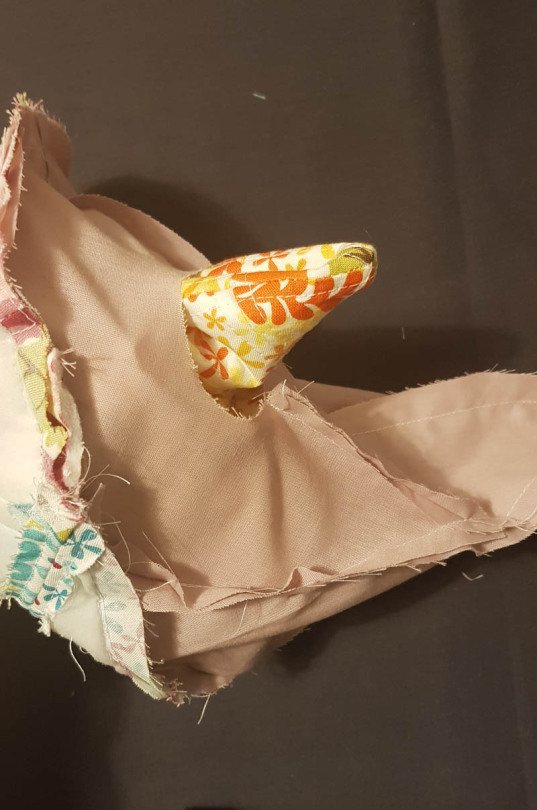
Then push the lining back into the pieced outer body of the mask.
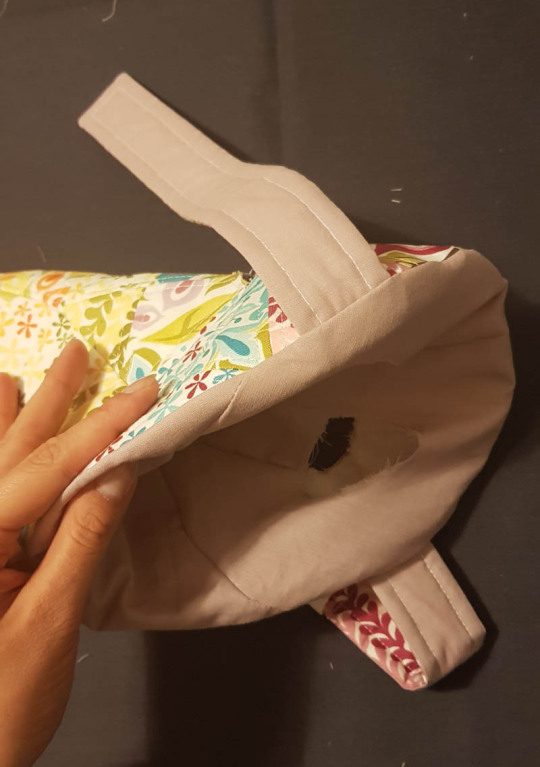
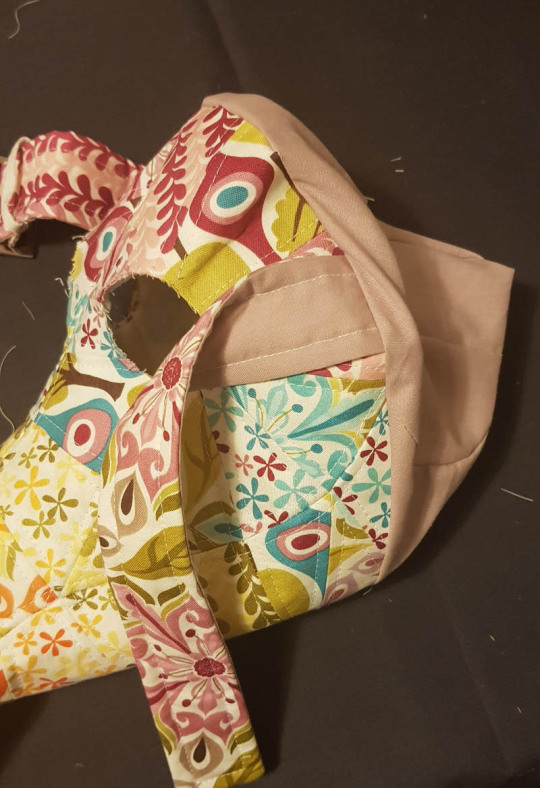
Pin around the edge, so that the lining is all tucked neatly inside.
Top stitch over the edge.
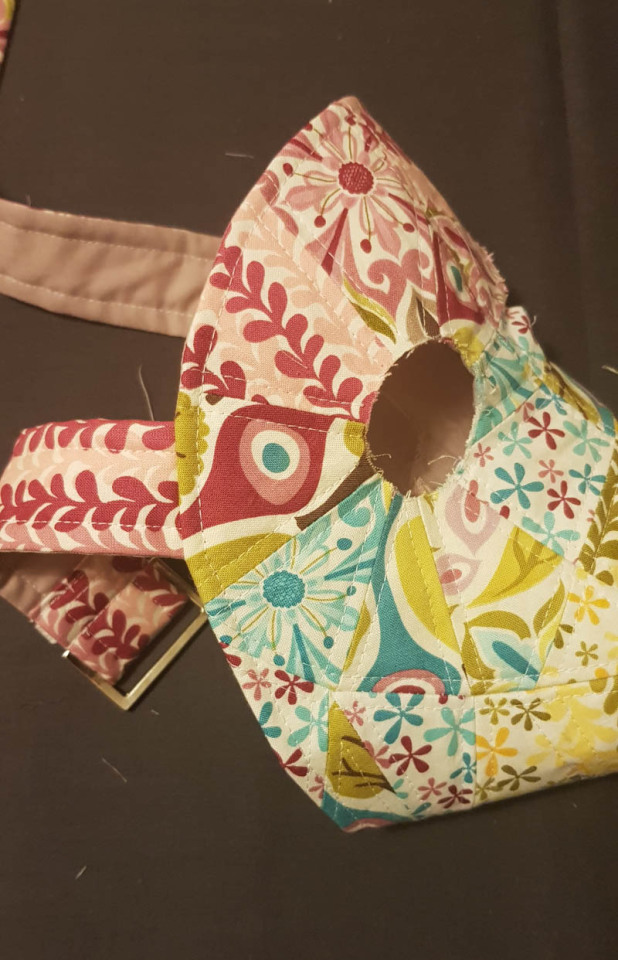
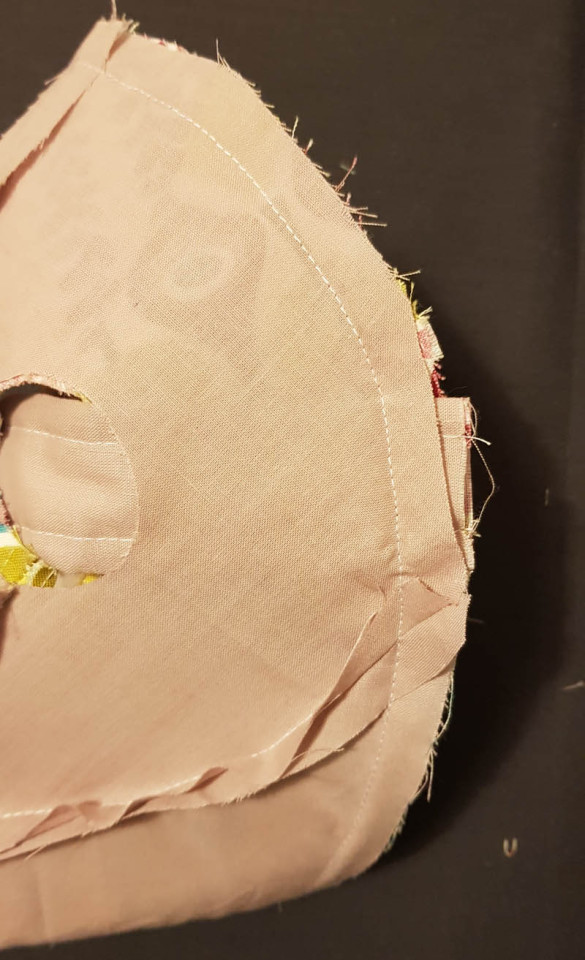
Eye hole time!
Pin the outer and lining together in the eye holes, and top stitch about 4mm (1/6th of an inch) from the edges. Trim any fraying bits.
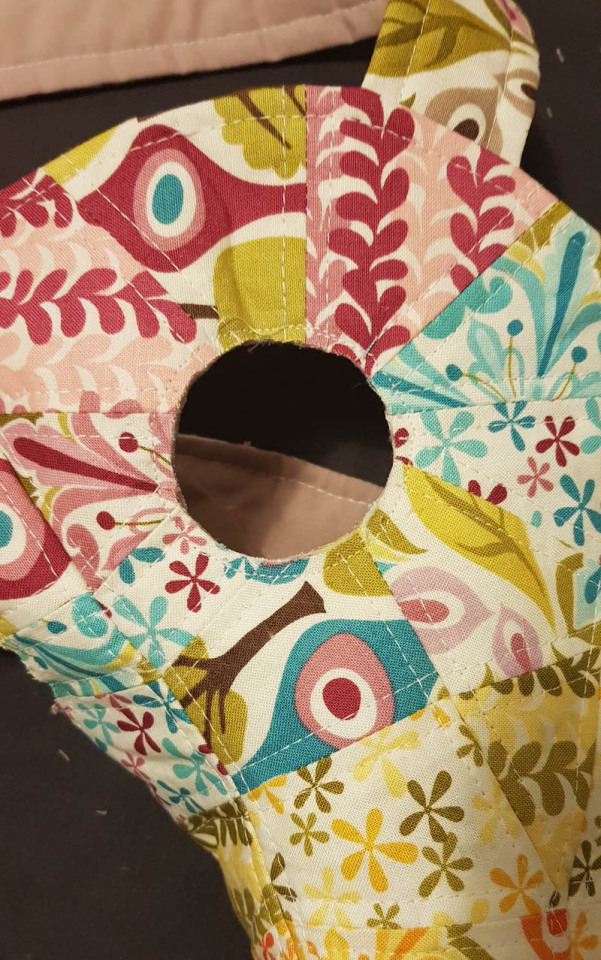
Hand stitch 1 inch wide bias binding to the inner edge of the eye hole, just over the top stitch.
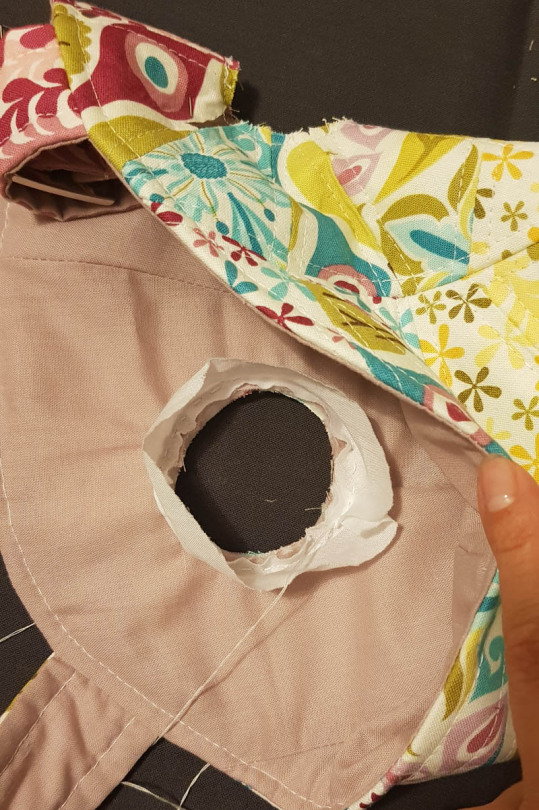
Flip the bias binding through the eye hole to the outer, fold the raw edge of the bias binding under itself, and hand stitch it down to the outside. Repeat for the other eye.
This next step is the worst bit, and if you have another method, go for it. Theoretically you could use something thicker that wouldn’t fray, like a felt or leather, so that you didn’t have to worry about lining the eye holes, but it depends on the look you are going for.
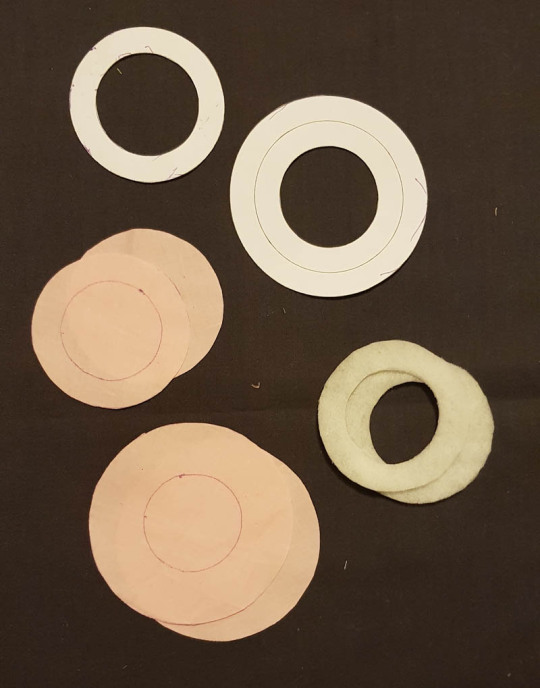
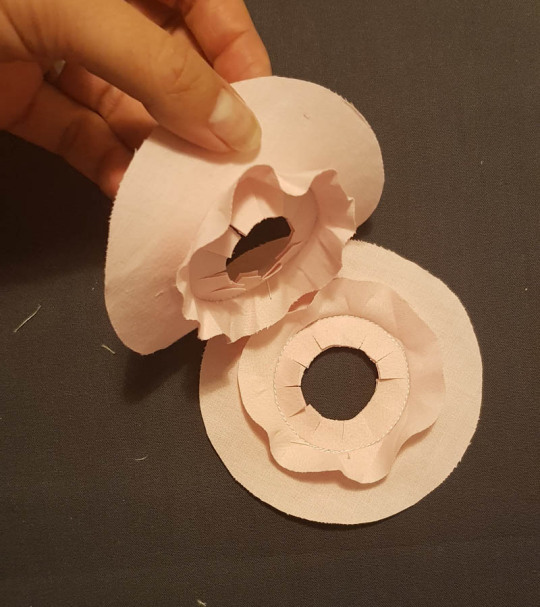
Cut out four circles from fabric, two of the biggest size, two of the medium size. Draw the smallest size circle in the middle of the back of the medium sized circle, and stack it on top of the centre of the big one, right sides together. From the fusible batting, cut two donut shapes of the medium size with the smallest circle cut out of the centre.
Using very small stitches, sew around the small circle drawn on the medium sized circles. Fuse the donut of batting to the back of the large circle, with the inside of the donut matching the sewn line. Cut an even smaller hole out of the middle, so that the seam allowance that remains is a slightly smaller width than the batting. Clip this into at least 12 pieces.
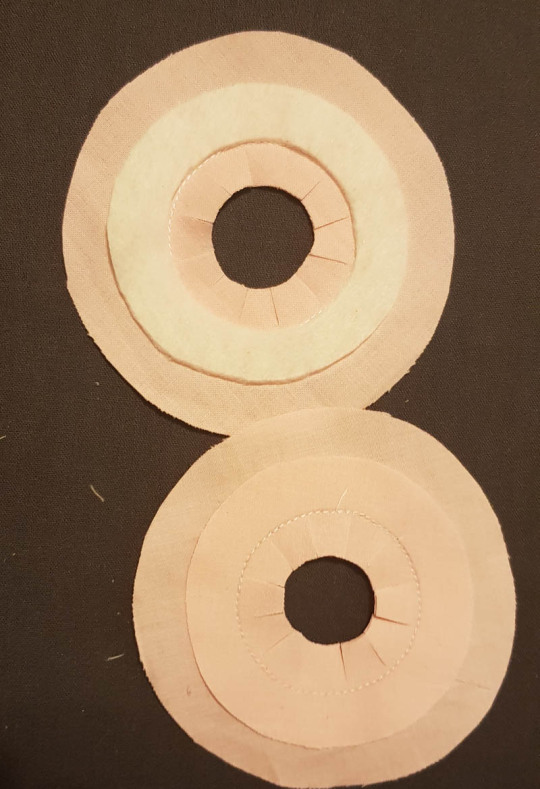
Press the smaller circle towards the centre, so that it can be turned in though the hole.
This will take a lot of careful ironing and pinning. Let it sit for a bit, so that it learns to be there.

Then unpin it, but hopefully the little clipped bits will stay there. Fold the bigger circle down over them – you will need a lot of little tiny pleats – making the outer edge as round as possible.
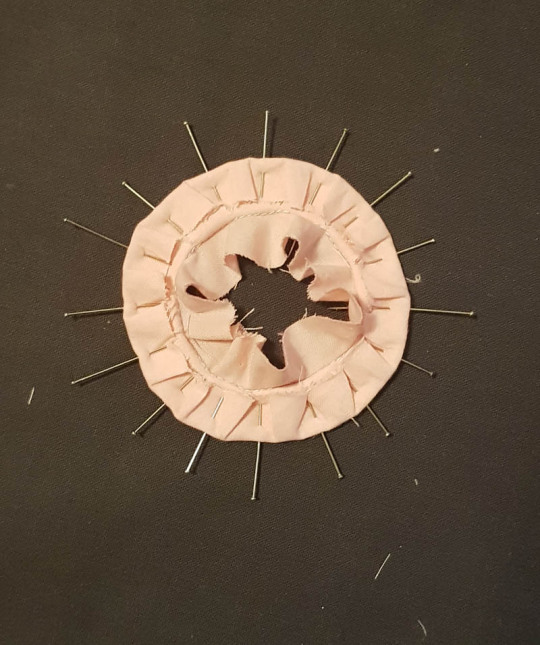
Then press that smaller circle back down over the pleats, so that it is level with the folded outer edge. If it sticks over in any places, trim it back, but only just.
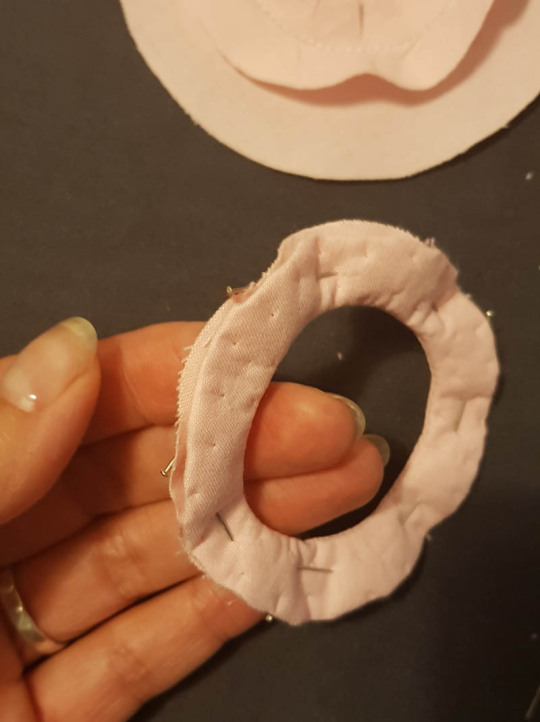
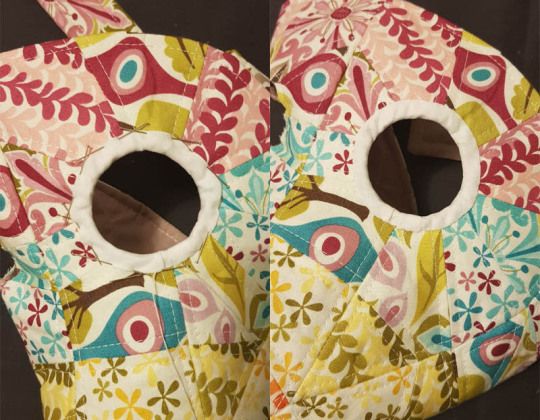
Pin this donut shape over the eye piece. The inside edge of the donut should be level with the inside of the bias binding, the raw edge up against the outer fabric.
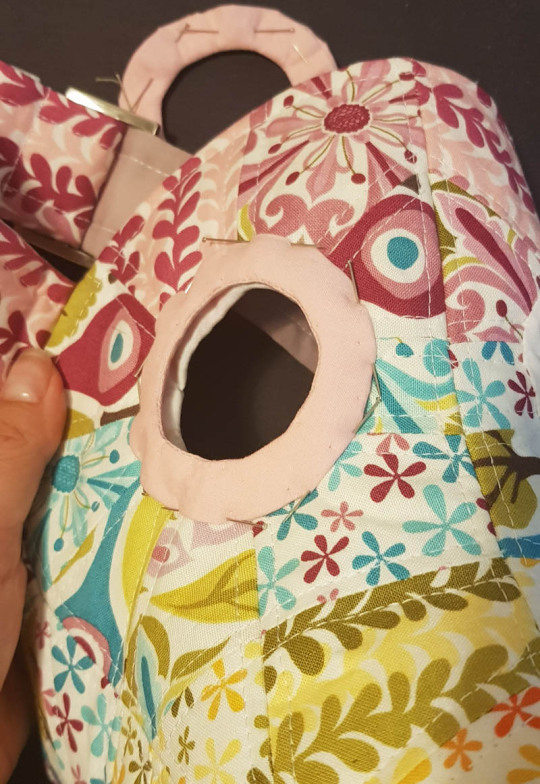
Hand sew around the outer edge of the donut to the pieced fabric. Make sure that the raw edge from the smaller circle is under the donut, but do not let it flip out through the middle. On the machine, top stitch about a quarter inch from the outer edge.
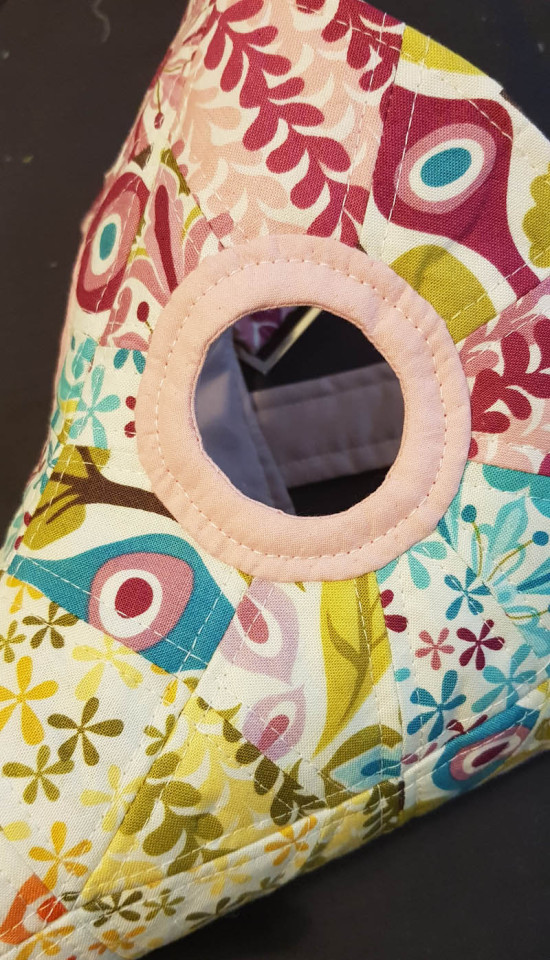
This should catch the raw edge inside, and leave a ridge between the outer eye donut and the bias bound eye hole. From the inside, it should be possible to pop in a round lens from a pair of sunglasses, or an improvised lens such as a circle of clear plastic cut from the lid of an old takeaway container, or some transparent holographic vinyl, such as this stuff on amazon. Repeat for the other eye hole.
Hooray! You are all done!
I am really not sure on the efficacy of this as an actual viable mask. On the one hand, there are a lot of seams through which germs could pass, but on the other hand, the fact that the lining is a bit loose and baggy inside the beak might cancel that out.
Depending on your materials, it should be machine washable, although it will almost certainly look a lot less crisp.
I had a lot of issues with my lenses fogging up after a couple of minutes of me wearing it, but who knows, maybe I am just a very wet breather.
I am not going to charge anything for this pattern, nor am I going to place restrictions on what you do with the items you make. I do not control your right to profit from your work. All art is derivative, and you making your own version transforms this pattern. Don’t let assertions of intellectual property rights be another way you are alienated from your labour. If you decide to sell your work, demand fair remuneration for your time and skills. Someone offering to pay for the materials is not enough. If you have decided to take an activity you love and turn it into work, make it worthwhile.
On the flip side, please don’t try to sell this bit of writing or the PDF of the pattern net or these photographs. They are free for you and for everyone else. Resist society’s message that you should try to profit from your every action, and especially resist the notion that true success is achieved by profiting from anyone else’s labour.
If you want to discuss this stuff further, I would love that! I am researching the commodification of creative knowledge for my PhD, focusing on quilt patterns and designs. Message me @mctreeleth on tumblr and instagram or @sarasewsstuff on twitter for my uni email.
Edit: I have added in a link to a simplified version if you are going to make this with a single fabric rather than patchwork piecing.
#plague doctor mask#quilting#sewing#quarantine craft#sewing pattern#craft pattern#long post under the cut#with so so many pictures#it has been a wild five days#I haven't slept in about 37 hours#I have three of these but only one set of lenses#that just fog up instantly
35K notes
·
View notes
Text
2023 Simp Calendars
I made some plain, but hopefully helpful calendars for 2023! I made three different versions where each month displays the official emblems on suitor's birthdays for Ikevamp, Ikepri, and then a combination calendar with both Ikevamp and Ikepri suitors. Each set has a blank spot where you can place any photo you'd like for each month, and a small section for notes.
They were made with my wallet in mind to be wary of when cyb*rd may drop birthday sale sets.
Here's an example for how the January Ikevamp/Ikepri calendar download looks, as well as how it looks printed out:
Download Links: Ikevamp/Ikepri Calendar || Ikevamp Calendar || Ikepri Calendar
Notes:
This was made for fun, and I am not an artist at all, so there may be small imperfections and boring design choices. I am sharing since friends and followers were interested.
The size of the calendars overall are made to print on a full sheet of regular printer paper (8.5x11). (I highly recommend using cardstock if you have the option!) You should be able to use your computer's default printing option to print these off fine.
The size for the customized photo window is 1129x1241 pixels. You should be able to edit this in any program designed for editing photos, I even tested it and made sure you could put in a photo using MS Paint!
Keep in mind that when printing, some printers may skew the colors a bit and make them either lighter or darker.
For the Ikevamp Only calendar: Faust's birthday is normally on a leap year, and since 2023 isn't a leap year, I set his birthday as 02/28 instead.
- Ikevamp also has no July birthdays, so there is just a blank calendar in the Ikevamp Only set. In the other sets, it will only show the Ikepri bday for that month.
If there is an issue like a misspelling or a suitor's birthday being listed wrong, please let me know 🙏
If you enjoy this or end up using it, please consider reblogging or commenting! That way I can consider revisiting this in 2024 and trying to make improvements based on the interest.
Other fun(?) things I have made are: Ikevamp Suitor Envelopes || Ikevamp Birthday Envelopes || Ikevamp Peen-kun Emoji Edits
Otherwise I normally write and mod a server:
Ikevamp Masterlist || Ikevamp Server (18 plus)
#ikevamp#ikemen vampire#ikepri#ikemen prince#wheezes#i know these arent super cool but these were born from my frustration with reg calendars and not liking the official ones#i wanna be able to put whatever photo I want for each month so...!
104 notes
·
View notes
Note
Girlieeeeeeee!!! How did you even get started with book-binding fics?? I wanna try it out sometime because you've completely inspired me!!! Did you watch a video about it? Did you just try it out one day? Like where do you even begin? I need the juicy deets haha
WHAT IS UP SPIFFY XD
AHHHH I’M SO EXCITED YOU’RE INTERESTED IN BINDING!!! So you’re getting ALL my notes over the past 5 months of binding YEET
But note, I have only been doing this for 5 months so I’m still new to it :)
Buckle up kiddos! Because I’ve got my whole list of supplies, tips, videos, tutorials, etc. compiled into this post.
Bookbinding tips and tricks master list
How did I get into bookbinding?
Believe it or not, this actually started as a New Years resolution! The past two years were very dull for me creativity wise. Just as I was adjusting to college life, which was hard enough, my parents told me they were getting a divorce at the beginning of 2019 (on April fools day my dudes... they didn’t plan that one well).
I tried several times to find a craft that I could burry myself in during this time, but honestly? Nothing I tried kept my attention span for long. Instead, I began reading books and fics (and was busy getting DEEP into Mob Psycho 100).
That’s when I began reading Issho. I normally don’t read long books (because my attention span is… bad), but it was exactly what I needed with what I was going through at that time. Once the fic was finished, I literally sat there and thought to myself, “Oh my god if there was a physical copy of this I would 1000% buy it right now like... holy shit that was so good.”
And I was like, “Why don’t you just make your own–” “HOLY SHIT I CAN JUST MAKE MY OWN!”
And then I got really into bookbinding XD
Supplies & Such
The essentials (and the low budget alternatives):
PVA Glue - This stuff drys as hard as a rock and is great for paper crafting in general.
Ruler (but I’d get a safety ruler for, uh, reasons)
Cutting mat
Chipboard - You can also use the cardboard from the backs of sketch pads, or even cereal boxes as the cheapest option.
Book Fabric - Here’s a tutorial on how to make your own
Thick white thread (You can do other colors, but they normally will show through the book so that’s a style choice on your side)
Cardstock (for endpapers)
Specialty Paper - This just means paper with a pretty pattern. You’ll use this for your cover if you don’t want a to use book cloth for the whole cover.
Utility blade - To cut the edges of the book to make ‘em smooth.
Sandpaper - To smooth out the freshly cut edges.
Bone folder - Okay, honestly? I just use a butter knife to get nice crisp edges when folding the actual paper for the books XD.
Heavy books - this is to make sure the glue dries nice and secure)
Needle - to sew but also to poke holes in your text block)
Awl - You can just use a thick needle to poke holes if you want.
Binder clips - I use small ones to clip the end pages to the actual cover itself before I glue it.
Something to smooth out a thin layer of glue - I use a silicone paint brush but I’ve seen a regular paint brush and even a rubber spatula!
Not needed, but I encourage these for “pro” binding:
A Printer - Clearly, you can make plain books without a printer, but if you want to print fics, you kind of have to buy one unless you want to go to a print shop. And if you invest in a printer, MAKE SURE IT PRINTS DOUBLE SIDED!
Silhouette cutting machine - This is for making vinyl titles on your books. (YA’LL WHILE I WAS TYPING THIS I JUST GOT A NOTIFICATION THAT MINE CAME IN THE MAIL TODAY I’M SO HYPED!)
The Guillotine™ - I’m getting one of these so I don’t have to use a utility blade.
Book Press/Finishing press - This replaces the heavy books. You don’t need it, but if you don’t want to mess around with accidentally shifting the book while the glue is drying, I highly recommend it. You can even make your own!
Then there's the optional fun stuff. If you wanna go all out and do gilded edges, rounded spines, or gold leaf imprints on leather, I recommend looking at TALAS for these items. They’ve literally got anything you could ever dream of for anything bookbinding. For paper, I get all of mine either at HobbyLobby or Michaels (Both have different selections, so if I can’t find what I want at one store, I go to the other). As for fabric, I always go to JoAnn’s. They have sooooooo many cool types of fabric that can be make into book fabric!
Typesetting a fanfiction
Aaaaand now for the hard part...
Typesetting.
Theres many MANY ways to typeset, but here is how I do it as a Word user:
First, you’ll want to change the size of your document to be US Legal. To do this, go to the layout tab at the top of the document and select size. It should be there as a preset.
Next, in the same tab, go to custom margins and change the margins to these settings: top 1.5″ bottom 1.5″ Left 1″ Right 1″. This way, when you are cutting the edges of your text block with a utility blade, you won’t cut too close to the text.
Now for the set up of the first few pages! First, you’ll want to set up two blank pages. That way, when they print out, you’ll have one page of nothing before the title page.
The third page is where you’ll put your title page (title of book, author, artist, etc.)
For me, I like to use the fourth page for all the info Ao3 has on the book (the link, the fandom, tags, published date, all that jazz). This is optional though, so if you don’t want to do that, leave this page blank.
Then, for the fifth page, you can begin writing your paper!
Because you are changing the size to US Legal, you’ll want your text to be pretty large (remember, 4 pages are fitting onto one piece of paper). I recommend starting with font size 18 as the smallest and then working up from there.
This is just a suggestion, but I also recommend using the “Justify” option for your paragraph alignment. It just makes the book look cleaner as a whole!
Then, export your document to a PDF!
Now for the signatures. A signature is a booklet. To make your full book, you stack multiple signatures on top of each other.
For this to work, you’ll need Adobe Acrobat (trust me, it is worth the investment in the long run. For bookbinding, and in general, I use this literally every day). Get ready though... this is the tricky part. (Here is a good tutorial I found for this part!)
Are ya ready for some math??? I wasn't
First, after you open your PDF document, you need to check the number of pages your document is. It must be a multiple of 4 (So you must be able to divide the amount of pages by 4). If not, you’ll need to add some extra pages.
You’ll want to add the extra blank pages at the end of the document. To add extra pages, go to “Organize Pages” and there should be a tab at the top of the page that says “Insert.” Simply click on “Insert Blank Page” and you're set!
Now, to figure out how many signatures you need.
Signatures tend to be in groups of 12, 16, 20, or 24 pages (so booklets of 3, 4, 5, or 6 pieces of paper) and you need to decide how to divide your pages.
I’ll take the fic Break as an example. It was originally 117 pages and I needed to make it a multiple of 4, so I added 3 blank pages to the end. That way, the number of pages added up to 120.
The next step is some trial and error (and there’s probably a better way to do this, but I suck at math so here we go). You need to figure out which of the groups (12, 16, 20, 24) fit into your amount of pages. With Break, I got lucky and knew that 20 x 6 = 120, so I need to print my pages in groups of 20.
TIME TO PRINT!
So, although Acrobat is great, it does this dumb thing where it shrink the page to ‘fit everything in’. To stop this from happening, go to print and then, when the window to print shows up, you’ll want to click on “Page Setup.” There, you’ll get a window that should have the option of “Paper Size.” Go to “Manage Custom Sizes” and change each of the “Non-printable Area” measurements to 0. Now, it won’t shrink your stuff!
Time to print signatures! Select “Booklet” and then go to the box that has the number of pages. Back to the Break example. I wanted to print 6 signatures with 20 pages each, so I want to input that into the pages section by printing first pages 1 - 20, then 21 - 40, 41 - 60, etc. in a booklet form.
Now, my printer sucks and doesn’t do double sided pages, so if yours is like mine, you’ll have to manually make them double sided by printing the odd pages first then the even pages. But, if you have a printer that actually, ya know, does its job, you should have an option to print double sided. Be sure to check that box and your signatures should print like a charm!
Please let me know if you’d like me to make another post or video about this part. This is the section that took me weeks to figure out so if it doesn't work out the first time, same my dudes...
Processes of binding a book
I’m honestly just gonna link my YouTube playlist for this one! My favorite people to watch are SeaLemon for beginner bookbinding, and then DAS Bookbinding (YouTube ; Website) for more advanced (and expensive) bindings. He’s got crazy cool techniques like rounded spines and leather book covers which I hope to do when I have the funds (shameless Ko-Fi plug)
Tips and tricks I’ve learned the hard way so far
Measure it once! Twice! Thrice! Those little 1/8 of an inch can make or break your finished product.
When you are working on the actual case of the book, make sure to apply the glue to the board. If you apply it to the paper directly, it can warp the page and it’s really hard to stick it to the board properly.
When gluing your special paper to your cover, make sure to stretch it out (but careful not to rip it). You just want to make absolute sure there are no air bubbles. Use the bone folder/butter knife to smooth it out.
When it comes to PVA glue, you need to apply a thin layer. Be sure to smooth out the glue in some way to make this happen.
After you’ve glued your end pages and your book is ready to press, make sure there is some sort of thick page (I use the cardboard from my cereal boxes) between the glued side and the actual text block. Otherwise, when it’s put in the press, the body text could warp (and that sucks... I had to throw away my first book because this happened...)
Be careful with blades (yikes)
Speaking of blades, if you use a utility blade to cut the edges of your paper, make two slits on either side of your text block before going ham with it. That way, when you’re cutting, you have a guide and the sides don't slip and cut funky.
Take your time. You don’t gotta rush. I already need to redo one book (cinderella-esque) because I rushed the heck outta it. Yes, you get that serotonin when it’s finished, but now the sides of it are all weird and I can’t really fix it.
Always check that you have added an extra page when printing! If you are going in groups of 20 and you print 1 - 20, remember to START with 21 and print pages 21 - 40 so you don’t re-print page 20 (I did that with Break... so much wasted paper and ink :’))
If there are any questions (seriously, any) about what I’ve posted above whether its “What is this tool?”, “What fonts do you use for your fics?” or even, “Words are hard... can ya make a video?” let me know! I’ll be sure to either add it to this post or create a new one!
#bookbinding#bookbinding tutorial#fanfiction bookbinding#tutorial#babovens bindings#Hoooo boy that was a lot#5 months worth of research put into one tiny post XD
121 notes
·
View notes
Note
Okay wow my ask was kinda rude, considering you have an etsy shop where i can just purchase the prints, i apologize!
I was just very enthusiastic. 😳♥️
Not at all rude! I totally encourage people to make spore prints if they are interested. Mushrooms are interesting and beautiful and I love them. I'm a total mycology nerd, and I love making spore prints. They are easy to make, just take a little practice. And by practice I mean learning how to lift the cap off the paper, because the spore prints are really delicate. If you have mushrooms in your area, I highly recommend trying it.
Basically, you find a mushroom you like, collect it, bring it home, remove the stem from the cap, place the cap on a piece of paper, cover it with a bowl or Tupperware container or something and leave it for a few hours to overnight. The spores will rain down from the gills and leave a print. Let the print dry overnight and spray with fixative (art spray).
https://namyco.org/spore_prints.php
Basic materials:
Mushroom, Paper, Something to cover mushroom caps, fixative.
I use whatever paper I have. At the moment, I have water color paper and black art paper. I've used printer paper and cardstock.
Also, I recommend learning a bit about mushrooms, because some species are poisonous. They are safe to handle, just don't eat mushrooms you don't know and wash your hands.
And thank you for noticing I have an Etsy shop! Yes, I sell spore prints, but no you don't have to buy them, you can totally make your own if you want! Spore prints are unique, no two are the same, unless you use the same mushroom for multiple prints. I use one mushroom per print and leave them overnight, so my prints are thick AF. So if someone does purchase a print from me, they get a unique piece of art, and I put all the time and materials into the art piece.
I've gotten better at identifying mushrooms, and with the all the rain we've had in my area, the mushroom have emerged EVERYWHERE; it's beautiful. So I've been busy making more prints.
Cheers!
7 notes
·
View notes
Text
CleverMax: SDCC 2021 Masquerade Entry
Comic-Con@Home Masquerade Entry: Adventures of Clever
Costume Title: CleverMax - Mr. Clever as a Borderlands boss
Costume Description: Recreation of Mr. Clever from the Doctor Who episode Nightmare in Silver, written by Neil Gaiman, done in the style of the video game, Borderlands.
Bio: They/He pronouns
Greetings all!
I realized that I never wrote about how I made my CleverMax mashup cosplay, so when SDCC posted about their At Home masquerade, I figured this was the perfect time to do so! Most of you know that I cosplay exclusively as Mr. Clever from Doctor Who, with the random mash up thrown in here and there. I’ve always wanted to be a Borderlands cosplayer, and the following is how I managed to combine the two together.
As always, enjoy the blog and if there are any questions, please feel free to contact me.
Let’s step into the TARDIS and jump back to October 20, 2009, when the first Borderlands game was released. It was my first foray into FPS (First person shooters) and I was hooked from day one. In 2012 they released Borderlands 2 which is, in my not so humble opinion, the best video game ever created. We got some of the most iconic charcters and storylines in that game. Including the best DLC ever, Bunkers and Badasses. And my second favorite villain of all time – Handsome Jack.
Jack’s sass, sarcasm and charm fits well with Mr. Clever’s personality. And in the pre sequel you get to play a version of him called the Dopplegnager. I mean, this pretty much wrote itself.

Handsome Jack from Borderlands 2 and Mr. Clever from Doctor Who
Borderlands cosplayers have aIways left me in a state of awe and admiration. The style of the game is so unique and seeing it recreated in person is nothing short of incredible. I’ve always wanted to figure out a way to be a Borderlands cosplayer. For the past eight years I have only ever cosplayed as Mr. Clever from Doctor Who. In the summer of 2019 I decided that was the perfect time to try to make this happen before NYCC.
When I initially decided to do this, it was going to be more of a mash up between Handsome Jack and Mr. Clever. I had planned on wearing Jack’s basic outfit, but in Clever’s colors with the a few add ons. Namely the bow tie and the cybernetics.
After much research and drafting, I decided against that. I ended up just turning Mr. Clever into a Borderlands boss. Same basic outfit as Mr. Clever/11th Doctor, but cel shaded and with weapons, cause Borderlands.
I made the accessories, chess set, and obviously the working cyberplanner piece itself for my Nightmare in Silver version of Clever, but I have never tackled anything this ambitious. An entire costume from scratch? Not something I thought I could do. Not knowing how to sew and being visually impaired were both challenges that I had to work around.
I started with looking around my house for various items that I thought I could use. I figured if I messed up, might as well mess up on something I hadn’t spent money on yet! I was going to toss a pair of my old paddock boots as they had some rips in the leather. Ripped leather? How very Pandora. They were the first thing I tackled.

Old paddock boots that I refurbished for the cosplay
This was my first time using leather paint and I have to say I am very pleased with the Angelus brand of leather paint. I have worn these in the rain and through puddles, and they have held up 100%.
After the boots were done, I started on the vest. I had an old black vest lying around the house that was sort of the shape and size I wanted. I don’t have a dress form, so I put it on myself, inside out, and used safety pins to make it the size I needed, then hand sewed around the safety pins. Not ideal, but it works.
I had a spare pair of black jeans, button down light blue shirt and a plain bow tie that I just ended up cel shading.

The only item that I really couldn’t figure out was the purple frock coat. Try as I might, I couldn’t find one to modify. So the coat was actually made by my friend Heather Long. I did alter the length after NYCC.
With the clothes themselves all set, for the most part anyay, it was time to paint. This was my first time trying to recreate the art style of Borderlands, often referred to as cel shading. I have a few “art of Borderlands” style books that I poured over before I sat down to attempt this.
Other than the accessories and anything leather, I used the same materials and techniques for each article of clothing. Instead of describing each seprate piece, I’ll just explain what I did to achieve the overall look.
When you look at a Borderlands character on screen, it can be a bit overwhelming. So many colors, and so many nuances of each color. I did my best to visually sift through all that, and try to establish what I thought was the base color.
Once the base color was determined, I just added blotches, blobs, shading, low lights, highlights and other variations of the base color itself throughout each piece. I recommend keeping your fabric wrinkled and using those wrinkle as guidlenes for where the lines and shading would fall naturally.
Once all of that dried, I then went over different sections of the fabric with white and black lines. To get that crisp, almost comic book looking outline of each piece I used black sharpie, and white fabric pens as well as white fabric paint.
When I sat down to do the coat, I wanted something a little different than just cel shading. During a second playthrough of Tales from the Borderlands, I noticed Rhys and other characters had interesting logos and designs on the back of their jackets. I ended up putting a chessboard pattern on the back as a homage to the chess game between the 11th Doctor and Mr. Clever in the episode.
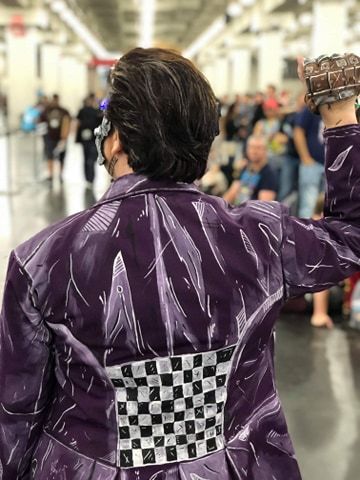
Great shot of the chess board and my Judd Nelson pose
The materials that I used for all of the clothing items were craft paints that I had around the house. Any brand works, but I prefer Americana paints. I then added an additive that you use to make the paint water proof and used various sized brushes. Dry brushes are also very useful if you have them.
Black sharpies of different sizes and any fabric markers are also very helpful. Heat setting is required to make the paint waterpfoof, so if you mess up before you add sharpies, you can wash the clothes and start over.
A few tips if you decide to undertake cel shading clothing: Until now I hadn’t noticed that there aren’t many thing in Borderlands that are true black. Due to the art style most things that appear black are in reality shades of grey, with a grey base colr. This makes it easier to add the lines, shading, and what not. Looking back, I should have bought GREY clothes. It was a ton of work to make the pants look like they were a mixture of greys. And as a result of so many laers of paint, they are stiff, lost their stretch and feel an entire size smaller! So I would recommend grey fabric as a base for black clothing and buy a size larger.
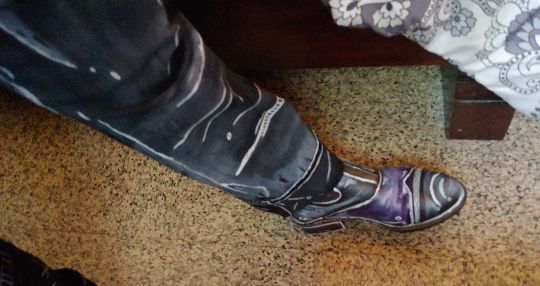
The pants are so stiff that I think they will stand up on their own
This entire process was way more fun than I thought it would be and I’ve since become addicted to cel shading anything I can. I may or may not have started cel shading my guest room.
After the clothing was finished, I started on some accessories and props. The first being the easiet – a wee little cybermite that I cel shaded. My cosplay of Mr. Clever always has a cybermite on my lapel, so I took one of my older ones and repainted it.
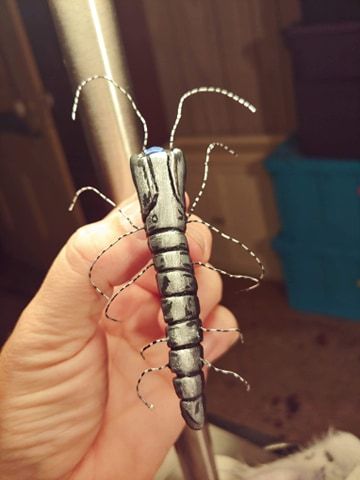
You can’t have a Borderlands character without some sort of weapon, so I painted a nerf gun that looks similar to the one that Clara Oswald holds in the episode.
I have never had to carry a gun for my Mr. Clever cosplay before so weapon checks are sort of new to me. I didn’t want to go through that at NYCC so I came up with a clever, no pun intended, way around it.
I took a photo of each side of the gun. Went to Staples and had them printed on heavy cardstock. Then I cut around the guns, glued them together between a piece of cardboard then added some black electical tape around the edges. Viola. Instant weapons check approved gun that is lightweight, and also acts a fan when it gets hot. It was a huge hit at the con. A few security guards were like “ we have to check your…wait..is that flat?” And they proceeded to play with it. I highly recommend doing this!
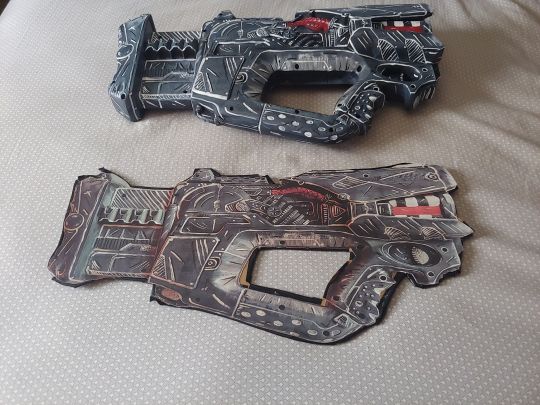
Gun and its flat counterpart
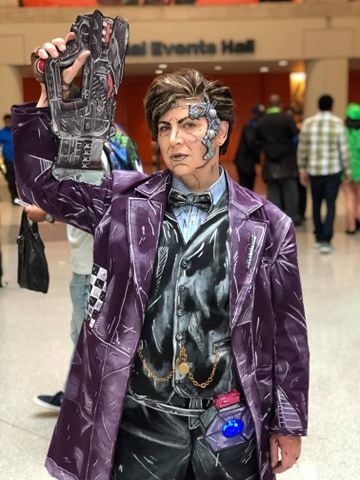
I am holding the flat gun in this picture from NYCC
In the actual game, you can equip your characters with mods that give them certain abilities and bonuses. In the Pre-Sequel, you can play as a Dopplganger of Handsome Jack so I searched for some of his mods and found one in purple which seemed perfect. I made the mod with cardboard, covered it in craft foam, modge podge to set, and installed led lights. The first time I wore it I put it on my belt which didn’t work. It kept falling off. I eventually put it on my lapel and wore it like Jack does. Unfortunately, someone glomped on me at a con and broke it, so I recently had to remake it all over again.
No Borderlands costume would be complete without cel shading on yourself. This was a huge challenge for me for a few reasons. One, I’m visually impaired so doing line work like this was challenging. Two, I am highly allergic to so many materials and ingrediants that finding a make up brand that I could wear was a trial and error process that ended up with many break outs and rashes before I found the perfect combination.
I used mostly eye liner pencils and liquid eye liner to achieve the look. The Wet n Wild liquid eye liner lasts forever, and is actually difficult to remove, but that is not a bad thing as it stood up to the heat of a very crowded venue.
As for the cel shading itself, I relied on many refernce photos of various characters in the game. I started with the eyebrows first as that seemed to frame the face nicely and give me a nice mischvieous look. I then just outlined the bones of my face, adding some random lines here and there. It never looks the same way twice, but that’s ok. Playing with different angles, lines, shading etc is half the fun!
The only real challenge were my hands. The make up didn’t last that long on my hands so I had to touch it up throughout the con. I also eventually started to use band aids that I cel sahded to cover up a tattoo on my inner wrist.
Figuring what to do with my hair is an on going process that I still haven’t 100% mastered. I opted to not use a foam wig as I have over heating issues on a cool day let alone trying to wear one if it gets warmer. I have had adverse reactions to craft foam in the past, so I don’t want it touching my skin, and lastly, I think a wig AND a facial prosthetic would be too much for me. So I decided to just cel shade my hair.
This takes forever to do, and I’m still figuring out better techniques every time I wear it.
I have a really great brand of colored gel, called Mofajang which I apply with a baster brush that you would find in the kitchen gadgets aisle. I also use a clean mascara brush to add some finer lines here and there. Set with way more hair spray than I ever used in the 80’s and it becomes fairly waterproof.
I have learned that due to how hard the make up and hair color is to remove, I really need to wear this on the LAST day of a con. I made the mistake of wearing it on day one of Long Island Who one year, and spent hours scrubbing my skin and hair for the next day. Far better to just leave the con with a tad bit of left over cel shading. Which makes it very interesting when you stop at a roadside bathroom on the trip home.
With the entire costume done it was time to work on the actual cyberplanner appliance.
Next time I make a variation of Clever, I will make this FIRST. Making these pieces is the bane of my existence – I love wearing them, hate making them. It’s a long process.
I am allergic to latex, silocone, scuply, most clays, and so many other things that seem to be every cosplayers go-to. When I made my first cyber piece back in late 2013, I spent weeks trying to find a substance that would keep attached to my face all day without causing a rash. Like an alchemist in a fantasy novel, I submerged myself into creating the perfect concoction. It took 22 days to finish the final product.
I admit that I rushed a bit on the Borderlands one. As a result, it doesn’t quite fit as well as my others, and is a bit heavier than I expected. I only added two working lights, instead of the usual four, to hopefully balance the piece out. It lasted through two full days of a con, despite the heat of a crowded venue, but I did end up tweaking it a bit after. Even with the tweaks, it still doesn’t fit as well as I would like. It is too heavy and brings down the entire left side of my face, making it difficult to keep my eye open at times. I really need to sit down and force myself to make a new one.
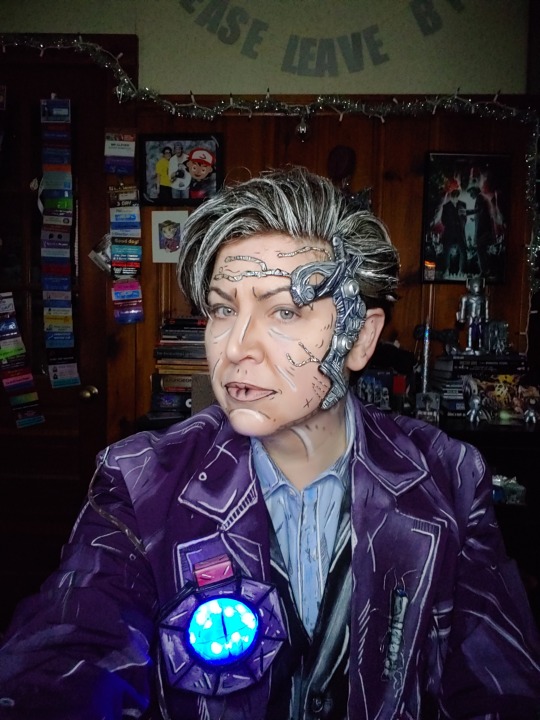
There are a few more things that I would like to add to this costume eventually. Like a belt of grenades, and maybe another gun. But aside from that, I am incredibly pleased with how this costume turned out. It is by far, my favorite Clever variation that I have done.

I hope this post gives you the inspiration to go off and cel shade something, and possibly even play some Borderlands!
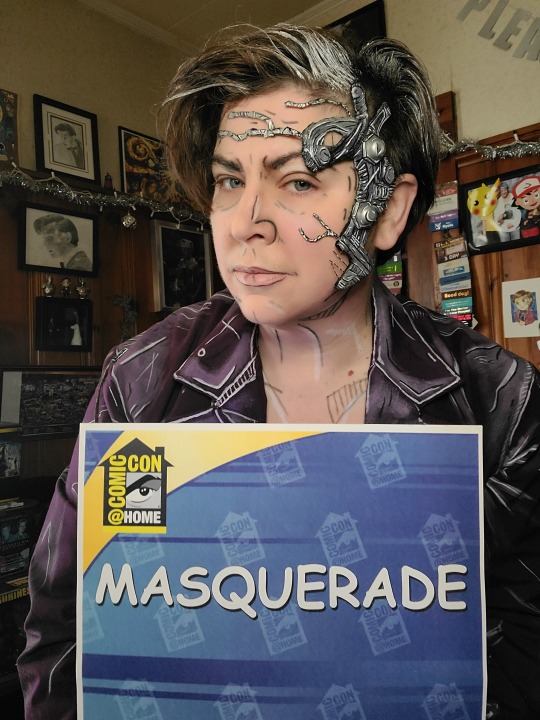
#doctorwho#misterclever#mrclever#nightmareinsilver#cosplay#borderlands cosplay#doctor who cosplay#comic-con#comic-conathome#comic-conathome2021#comic-conathomemasquerêde#cyberplanner#borderlands
19 notes
·
View notes
Last Seen Blogs

josiahpartin
Untitled

al3xryder
Either hated or ignored.

helluva-hazbin
Hello!

jill-fine
Jill Fine

cumssi
Kinky Aussie Bi Sissy