
sweetlysavory
Sweetly Savory
Preparing practical meals and learning every single day.
97 posts
Don't wanna be here? Send us removal request.
Last Seen Blogs

taselatexub
Untitled

akr-krs
Ω少年店舗

m1zzytehvamp
𖤐🦇💜🎀M1ZZYL0LZ🎀💜🦇𖤐

lolduin
On Thursdays, we're teddy bear doctors.

thewhaledreamer
it me Bean
Text
Veggie Filled Morning Glory Muffins
It was around last autumn I made Morning Glory Muffins - and a YouTube Short video to go with them! I usually only make muffins like these once a year, because they can be time consuming. I'm not a fan of standing over a grater for 30 minutes - but hang on - a food processor does the same trick in a fraction of the time. Not only can I shred carrots and zucchini but also grind oats into flour.
Applesauce also is a major player in these muffins, adding flavor and a unique texture to the batter. Whichever applesauce you choose to use, store-bought or homemade, it's best for it to be all-natural without any added sugar. If you have extra time, or apples, on your hands - homemade applesauce is a surefire treat. You can flavor it with cinnamon, nutmeg, allspice - or brown sugar. A little bit of sweetness can go a LONG way. For my version of homemade applesauce, check out the video linked below.
Mixing the ingredients is done in two parts - wet and dry - to see they're evenly incorporated and not overmixed. I've read in several versions of this recipe calling for a combination of oat flour and all purpose flour say that you don't want to overmix the batter; my rational thought would be that the batter becomes glutenous or the muffins when baked could come out too chewy. I found that by only using oat flour, this doesn't happen. This could also be coincidence, or oat flour is better? (This is a mystery for another day.)
Another piece I've played around with the last few weeks is the portion size. The Dark Chocolate Chip Muffins from my previous post were coming out of the oven looking like strange little discs. Not chewy or tough, but shaped oddly. The first time I made these Morning Glory Muffins, the same thing happened, prompting me to play around with proportions and ratios of ingredients. I found that for my muffin trays, a Black and Decker brand and a Food Network brand, the ratios listed in the ingredient list below worked for me. It's said time and time and time and time again that "Baking is an Exact Science". And I certainly know that. If I were to make Mary Berry's Cherry Cake - I would definitely be dusting off my food scale and counting each cherry before sliding the bunt pan into the oven. Except there are some baking recipes that don't always come down to "An Exact Science". Here's what I believe:
Morning Glory Muffins include ingredients that can be subjective. Zucchini: it is not guaranteed you will snatch two "medium" zucchini's off the produce shelf, nor will you be able to pluck them from your garden. Carrots are the same! No two vegetable or size of vegetable is alike - just like people. So while you can level off "4 cups oat flour" or "1 teaspoon cinnamon", vegetables can be measured once shredded and drained, but I prefer to plan my dry ingredients around the wet ingredients for these muffins. Not to mention - the size of my particular muffin trays I mentioned before, in addition to depending on if you want muffins that are more dense or soft and moist, you could do the same! But this is how I make mine:
Morning Glory Muffins
Wet Ingredients:
2 medium zucchini, about 1 cup total shredded and squeezed
2 medium carrots, about 1/2 cup total shredded
3/4 cup applesauce
1/4 cup maple syrup
2 eggs
1 cup oil, vegetable or coconut oil
Dry Ingredients:
4 cups oat flour
1 teaspoon baking soda
1 teaspoon cinnamon
1/4 teaspoon nutmeg
1/4 cup shredded coconut (optional)
1/4 cup chopped walnuts (optional)
1/4 cup raisins (optional)
Other Tools:
food processor with grinding blade, and grating / shredding blade
paper towel
2 large mixing bowls
1 large mixing spoon
1 cookie or muffin scoop; a large dinner spoon will also work
2 muffin trays
Crisco or canola spray
toothpick(s)
butter knife or frosting spreader
airtight container, Tupperware or take-out container
Process:
Measure out 4 cups of oatmeal. Using the grinding blades on a food processor, blend 1-2 cups of oats at a time depending on the size of your processor. With chunkier flour, the texture of your muffins might be bigger or puffier, and smoother flour could yield a more cohesive muffin. Blend the oats to desired flour type. Set aside the flour in a large mixing bowl for all dry ingredients.
Gather and measure out the baking soda, cinnamon, and nutmeg. Mix in with the flour to combine.
Using a kitchen knife and cutting board, cut the zucchini and carrots into sizable pieces to fit into your food processor. Replace the grinding blades for the food processor with the grating or shredding blade. First grate the carrots, and set aside in a second mixing bowl for wet ingredients. Grate the zucchini one at a time, dumping and squeezing into paper towel to drain off excess liquid. Once squeezed, add to the wet ingredient bowl with the carrots. Finish shredding, squeezing the rest of the zucchini and add it to the wet ingredients bowl.
Gather and measure out the remaining wet ingredients of applesauce, maple syrup, eggs, and oil. Mix in with the carrots and zucchini to combine.
Preheat the oven to 350 degrees Fahrenheit (176 degrees Celsius). Grease the 2 muffin trays with either Crisco or canola spray.
Add half of the flour mixture to the wet ingredients bowl, giving one to two stirs with the large mixing spoon, then dump the rest in. Stir all of the ingredients together until combined.
Gather and measure the shredded coconut, walnuts, and raisins if adding.
Using the cookie scoop, or large dinner spoon, scoop out heaping portions of the batter and put into the muffin cup tray. Fill the muffin up just over the top for big muffins. Depending on the size of muffin cups on your tray, the batter might make 18 large muffins.
Bake for 27 minutes, and check for doneness. Poke one of the muffins with a toothpick, it should come out clean. If the toothpick doesn't come out clean, bake for another 5 minutes, for a total of 32 minutes. After the 5 minutes are up, check with another toothpick. At this point, the toothpick should come out clean.
Let the muffins cool in the tin until you can touch them. They should come out clean from the tin. If they are tough to get out, slide the butter knife or frosting spreader around the outter edge of the muffin, and take the muffin out.
Store in an airtight container in the fridge up to 5 days.
youtube
youtube
3 notes
·
View notes
Text
Healthy Double Chocolate Chip Muffins
Who wants a boring breakfast to get the day started? No hands?
I am all for breakfasts that incorporate vegetables in unique ways. Carrot Cake Overnight Oats quickly became a staple for our breakfast, which became a bread version about a year later. Two years of some variation of carrot cake, I was looking for something a little different and sweet potatoes fit right in.

Thankfully chocolate blends with the sweet potatoes - since I'm the one who's obsessed with them. Dairy-free chocolate chips, oat flour, and sweet potatoes? For breakfast? I'm in!
Using my trick to blend old fashioned oats in the food processor to create flour saves a pretty penny. Plus, you can save the rest for oatmeal, granola, or cookies.
What you'll need is:
2 sweet potatoes; baked, cooled, and mashed
1 cup milk (dairy-free)
2 eggs
1 teaspoon vanilla
2 cups oat flour
¼ cup ground flaxseed (optional)
1 teaspoon baking soda
¼ cup cocoa powder
¼ cup chocolate chips (dairy-free)
¼ cup nuts (optional)
To make:
Preheat your oven to 450 degrees Fahrenheit. Bake 2 sweet potatoes for about 1 hour, or until a fork can be stuck in without any push-back. Let them cool completely before step 2, or not – immediately moving on to step 2 will melt the chocolate chips, and there’s nothing wrong with that. But for whole chocolate chips, let the potatoes cool.
In a large bowl, peel the skin off the potatoes and mash using a *masher* or fork. Then add the remaining wet ingredients: milk, eggs, and vanilla. Stir to combine with either the same fork, or whisk.
If not using store-bought oat flour, add 2 cups old fashioned oats to your food processor or blender. Blend until powdery and soft. Add to the wet ingredients, along with the baking soda, and cocoa powder. Stir to combine.
Pour in the chocolate chips and nuts, if adding, and just stir to incorporate. If your sweet potatoes haven’t completely cooled, the chocolate chips will begin to melt a little and swirl into the mixture.
Spray muffin tins with canola oil, or whatever baking spray you have on-hand. You’ll want something that doesn’t have an overpowering flavor. Using a cookie or muffin scoop, fill the muffin cups with 1 scoop. Our cookie scoop scooped exactly will make smaller muffins, so I fill the cups *just* to the top with the mixture and this makes decent sized muffins.
Once you’ve filled up the tins, bake at the same 450 degrees Fahrenheit for about 30 minutes or until a toothpick/food thermometer comes out clean. Make sure to keep an eye on your oven and get to know it, since all ovens and stovetops are different.
When time is up, or the toothpick comes out clean – take out the muffins to cool on a cookie rack. They don’t have to cool completely before taking out of the tins, but the tins should be sort of comfortable to touch.
If not enjoying immediately, store in airtight containers in the fridge up to five days.

youtube
youtube
youtube
youtube
0 notes
Text
Holy Yogurt, Batman!
Yogurt can be made at home – and I tend to forget this. Or am I intimidated by my instant pot? (A little of both.) It’s probably more cost effective and will be a tad healthier. Even though I eat plain, Evan gets vanilla – that changed when I incubated my first batch of yogurt in my kitchen.
Yogurt is what is the fermentation of milk from bacteria known as yogurt cultures. Calling it fermented milk isn’t marketing friendly, and therefore was called by the ancient Greeks: oxygala. “Oxi” meaning sour, and “gala” meaning milk. Written about by Greek physician, Aelius Galenus, and Roman author, Pliny the Elder, the earliest yogurts were enjoyed much like we do today – with a touch of honey. Seen throughout cultures from Greeks, Turks, and Russia – with a variety of milks like water buffalo, camels, and goats – and a myriad of flavors like mustard seeds and cinnamon in Mughal Indian Empire – today’s yogurt sold in the U.S. would be unrecognizable. Companies like Dannon and Colombo made yogurt what it is today for our store shelves. And what happened to Colombo? It was bought out by General Mills in 1993, then transitioned to focus on Yoplait.
Credit: Fooducate.com
To sweeten plain, unadulterated yogurt for American palates, Colombo Yogurt added fruit preserves to the bottom creating the “fruit on the bottom” craze. This idea alone brought in more than $1 million dollars per year. The yogurt industry has blossomed with different styles like Icelandic, Lassi, Probiotic Yogurt Drinks – and what I’m interested in making myself – Lactose Intolerant Yogurt. According to the package of live cultures it can be made with dairy free milk! I’ll try that one later – right now, let’s make Instant Pot Yogurt.
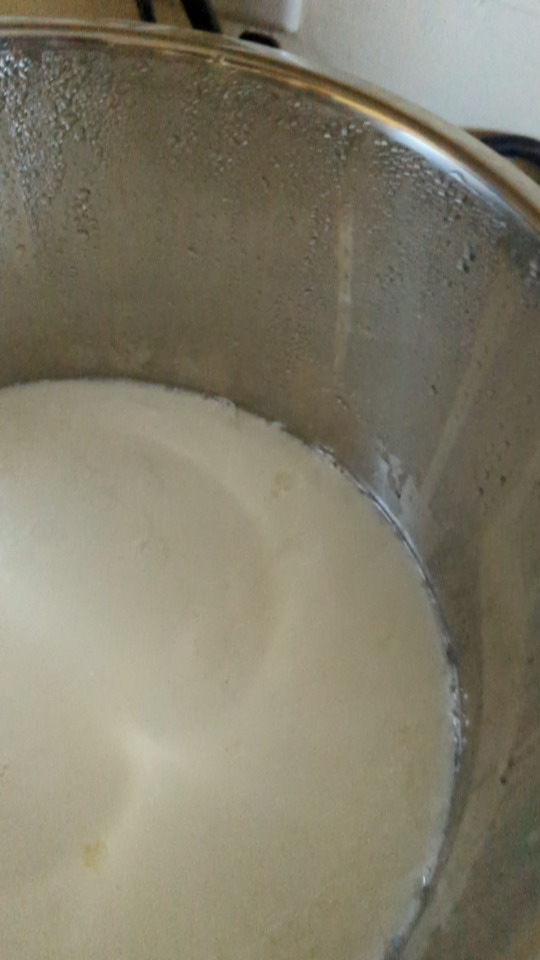
Before adding the milk and cultures to the pot and smashing that YOGURT button, the milk first needs to be pasteurized. To do that, set the sauté and let the milk warm up to around 180 ͦ Fahrenheit (82 ͦ Celsius).
After the milk has reached the necessary temperature, fill the skink with cold water, and cool the pasteurized milk to around 116 ͦ Fahrenheit (46 ͦ Celsius) so the cultures don’t immediately die when added. Stir to combine the active cultures, cover the instant pot, then finally slap that YOGURT button.

You can choose to incubate this from 12 to 24 hours, I did mine at 24 hours and daaaaamn did this turn out better than expected. Even just after the reveal, I found thick Greek style yogurt like described by Galenus and Pliny the Elder.
To strain and keep that Greek style, you can invest in cheese cloth and a hook to drip the whey out. Or if you’re creative like me: a metal strainer and coffee filters work just fine! I had these left over from making snowflakes for my Annual Ugly Sweater Party – and finally have a new use for them! Layer a few filters around the strainer, and pour your yogurty goodness on in. It might be more practical to spoon in at first to create less mess, but when filming and cooking – both hands need to be used for the cooking.
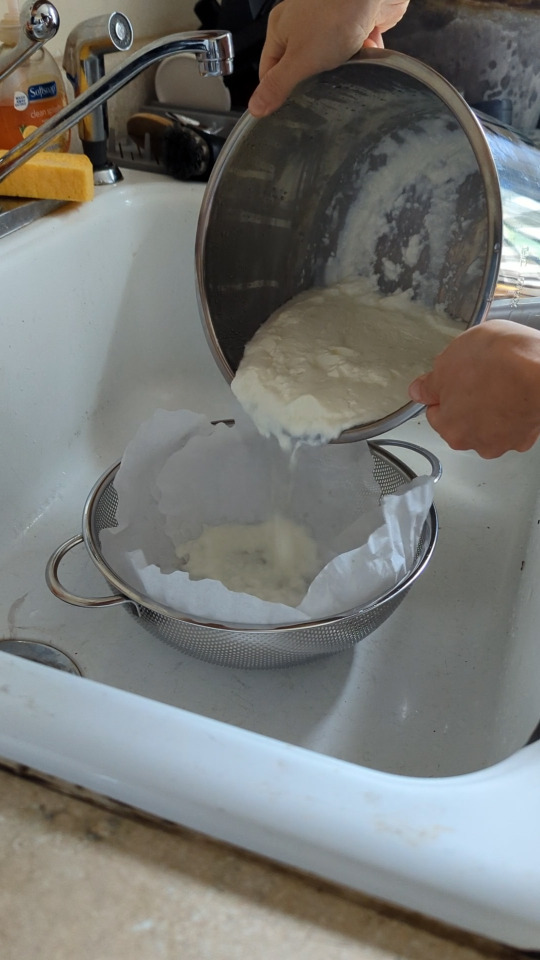
Set the strainer back over the pot used from incubation, and finish draining the whey. I let mine sit a total of 2 hours (cause I’m impatient!), but for extra thick goodness – 4 hours will do the trick. Then scoop out to store or eat straight away!

“Yogurt History”, Wikipedia: https://en.wikipedia.org/wiki/Yogurt#History
“Colombo Yogurt”, Wikipedia: https://en.wikipedia.org/wiki/Colombo_Yogurt
“The Home Cooking Survival Guide for Your Busy Work Week”, Pro Home Cooks, YouTube: https://www.youtube.com/watch?v=0boZvBnzQzc
Yogurt Cultures: https://www.amazon.com/gp/product/B00XQHND6M/ref=as_li_tl?ie=UTF8&camp=1789&creative=9325&creativeASIN=B00XQHND6M&linkCode=as2&tag=broth0b5-20&linkId=935dbc1465ae128c96c4add9b5fff0a2
#instant pot#yogurt#instant pot yogurt#how to make yogurt#yogurt at home#homemade yogurt#youtube#cooking#sweetly savory#sweetly savory kathleen#inspiration#tasty#breakfast#food#homemade
2 notes
·
View notes
Text
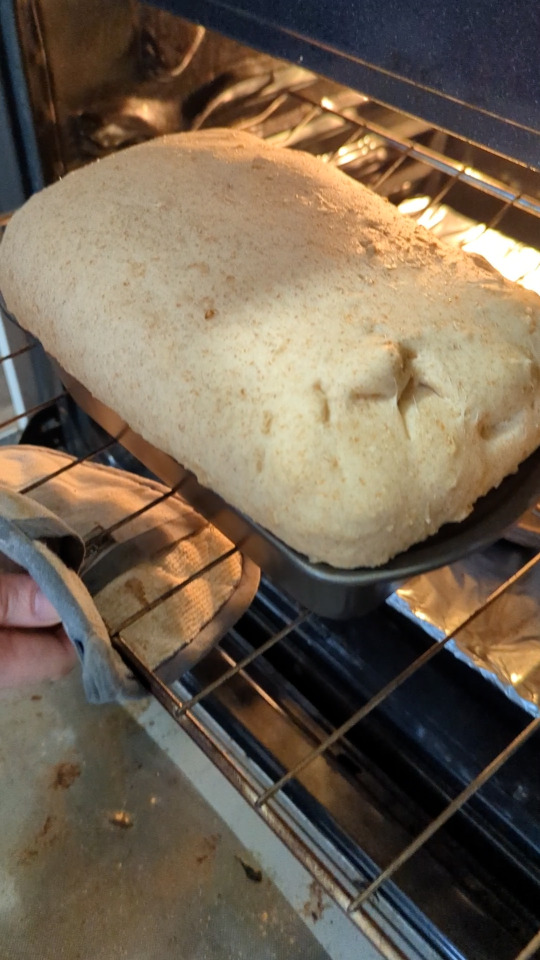
Raise your hand if you love homemade bread!
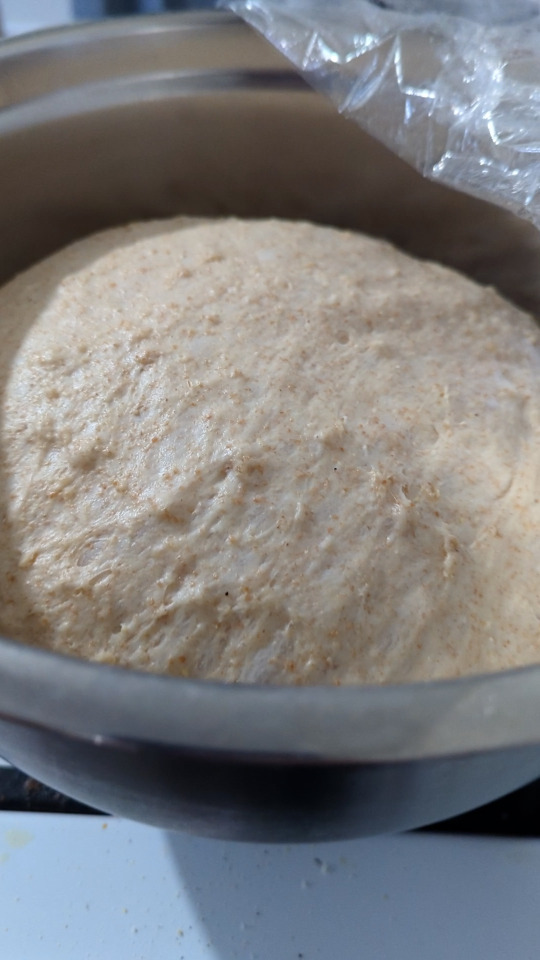
You can't deny, there's something about homemade bread. Our go-to is honey oat, perfect for avocado toast (like in the video "Millennial's Dream") or grilled cheese! With just a couple important steps, and a wee bit of patience, you're on your own way to bready heaven.

The ingredients speak for themselves, but it's imperative when putting in the yeast and salt to *put them on opposite sides of the bowl*. Salt kills yeast, and your bread won't have the lovely rise it's expected to during proving.

Now you're probably like me, watch 1,000 hours of Great British Bake Off and say - it's called "proofing", not "proving". However, I take a page from Julia Child's video series from 1995 "The Way to Cook: Soups, Salads & Breads" (linked below). When you let the yeast sit with a little bit of sugar, or in our case honey, the yeast will prove to (you) that it's alive and well, and ready to go to work".
The second most important step will be the order of which honey and vegetable oil are added. Perhaps it's preference, but you'll have an easier time getting the honey out of your measuring cup after first measuring out the oil, since it coats the surface. If you enjoy a sticky mess, by all means - lick the measuring cup!
With a dough hook, incorporate all of the ingredients and mix for about 7-10 minutes. When adding wheat flour, only mix for 7 minutes because the gluten in wheat flour is weaker than by just baking with plain white flour. Any longer than 7 minutes, and the gluten strands will break.


After the dough has formed into a ball, let it rest in a greased bowl for 2-3 hours, or until it has doubled in size.
Press into a loaf pan and shape, or use a baking stone for a free-form loaf. With either option, you will use your oven as a "proof box". Another term I picked up from GBBO, and this is where the bread will get a second chance to "prove itself". Fill a stainless steal, or cast iron, pan about half way with water and put in the oven below the loaf pan of bread.
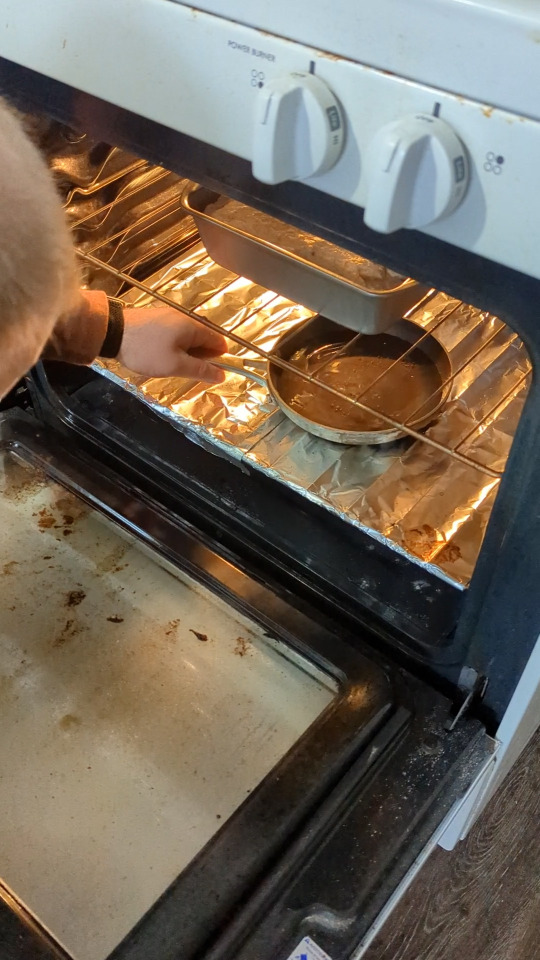
The moisture will aid in the second prove, but also create a lovely crust. (Just remember to use potholders to remove the pan when you're done!)
Bake at 280 degrees Fahrenheit (137 degrees Celsius) for about 1 hour, then crank up the heat to 375 degrees Fahrenheit (190 degrees Celsius) for the final hour of baking.
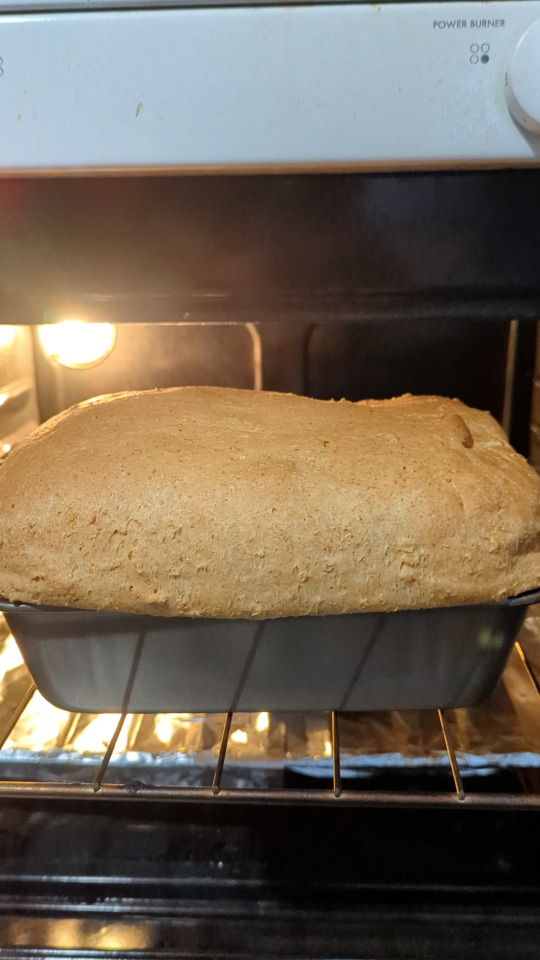
The test to knowing if bread is done - taping on the crust once it's been taken out. Hollow sounding bread will ensure it is fully baked. Of course, this skill comes with time and practice - like most baking.
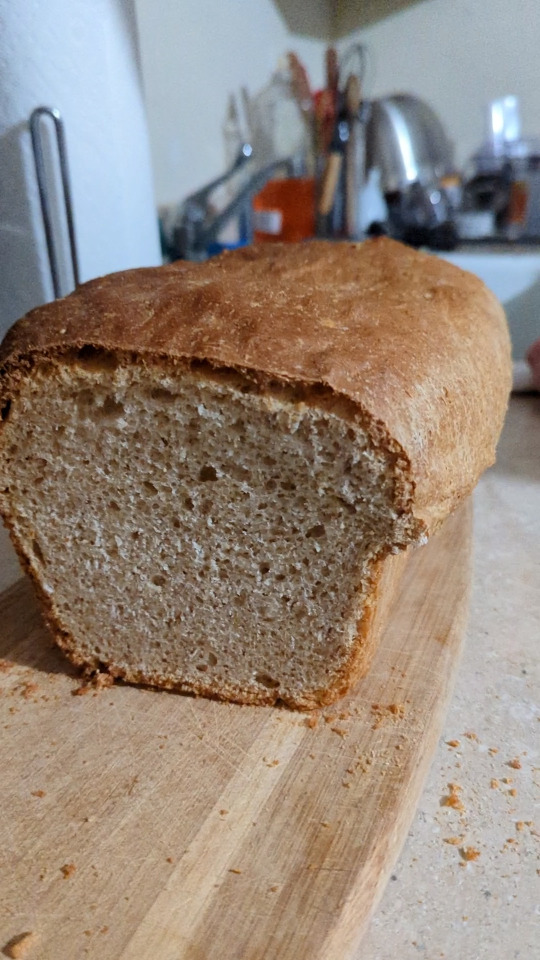
Slice open for pockety, fluffy, and flavorful goodness!
Make sure to subscribe to Sweetly Savory by clicking the link below!
youtube
youtube
#making bread#make that dough#make dough#homemade#homemade bread#youtube#cooking#julia child#julia child bakes bread#how to make bread#making bread at home#Youtube
2 notes
·
View notes
Text
Second Breakfast is real - and other brunch facts!
Over the last year, I’ve done a few breakfasty foods on Sweetly Savory… and even though I have the playlist “Brunch O’Clock” – I’ve neglected to cover what brunch is, where it originated from, and most importantly that Second Breakfast is *a thing*. Plus, I’ll share one of my easy go-to brunch dishes, shakshuka, that will be sure to impress.
Brunch, beautifully put by “Joy of Cooking: All About Breakfast and Brunch” authors Rombauer, Becker, and Becker, is a “charming social hour” which is the fusion of breakfast and lunch. This blending of two words was first used in late nineteenth century England, then spread to the United States in the 1930s.
With a traditional full English breakfast consisting of eggs, meat, baked beans, toast, and tomatoes, the American brunch most commonly features the Eggs Benedict.

Sources are conflicted on the dish’s origin. Delmonico’s in Lower Manhattan claim to have created it in 1860, later published as Eggs à la Benedick in 1894 by one of their former chefs, Charles Ranhofer. However, it could have been indirectly made by a New York Times food columnist’s uncle’s friend, by way of the Ranhofer recipe with “hard-cooked egg, and ham mixture” added to the hollandaise sauce. I’ll keep mine with the smooth hollandaise sauce, thank you very much.
I love Eggs Benedict as much as the next person, but one late breakfast dish I’ve really gotten into making recently is shakshuka – a Northwest African dish of poached eggs in a sauce of tomatoes spiced with cumin, paprika and cayenne pepper. Now before you say: “poached eggs – that’s why I get Eggs Benedict at a restaurant”, the preparation method is far from the pot of swirling boiled water.

Dice up ½ an onion, and sweat it down with some peppers, then garlic. Remember to only cook the garlic for about 30 seconds, it burns super quickly.
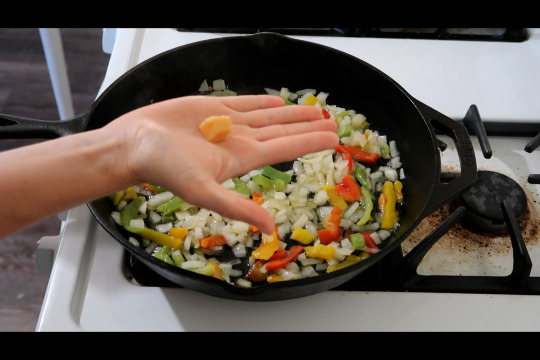
Toss in the spices now so the flavor can bloom, and aromatics are added to your cooking oil. This will infuse your whole meal.

Go ahead and add the canned tomatoes, and cook for about 5 minutes over medium heat, stirring every so often. Make little wells in your sauce, and crack in 4 eggs.

Turn down the pan to low-ish, and cover with a lid, cooking the eggs until the white are set.

There are definitely “starters” or sauces that you could substitute if you’re short on time, or too hungover. I’ll link those below. Now, what is “Second Breakfast”? It is real, not just a meme of Pippin and Merry.

This meal in-between meals is popular in German, Poland, Czech Republic, Spain, Hungary, and Austria – to name just a few – and can be as simple as a cup of coffee and pastry. Or for farmers in rural areas, their first breakfast would be to get them going before taking care of the animals, followed by the second heartier breakfast after the morning chores are finished. These traditions most likely inspired Tolkien’s second breakfast mentioned in “The Fellowship of the Ring”, where Pippin is in shock that Aragorn has no idea Hobbit can have up to 6 meals a day including elevenses, luncheon, afternoon tea, dinner, and *then* supper. If you think about the mid-day snack breaks of yogurt, or tea, and a bedtime snack – you are kind of eating like a Hobbit. Am I a Hobbit?

Sources/Inspiration:
“Second Breakfast”: https://en.wikipedia.org/wiki/Second_breakfast
“Brunch”: https://en.wikipedia.org/wiki/Brunch#cite_note-1
“Eggs Benedict”: https://en.wikipedia.org/wiki/Eggs_Benedict
“Joy of Cooking: All About Breakfast and Brunch”: https://books.google.com/books?id=yrTKLHbl4TkC&pg=PA8#v=onepage&q&f=false
“The Hobbit Trilogy Filming Locations”: https://www.newzealand.com/uk/feature/the-hobbit-trilogy-filming-locations/
“Shakshouka”: https://en.wikipedia.org/wiki/Shakshouka
“How to release more flavor from your spices.”: https://www.youtube.com/watch?v=-_eKEh52RVQ&t=92s
“Chunky Spicy Shakshuka”: https://www.traderjoes.com/home/recipes/chunky-spicy-shakshuka
Where to find Starters & Sauces:
Spicy Chunky Tomato & Pepper Pasta Sauce: https://www.traderjoes.com/home/products/pdp/spicy-chunky-tomato-and-pepper-pasta-sauce-065510
Shakshuka Starter Recipe: https://www.traderjoes.com/home/recipes/shakshuka
#brunch#brunch food#second breakfast#lotr#food meme#youtube#cooking#inspiration#tasty#breakfast#homemade#sweetlysavory#food#meme#history#food history#history of brunch#what is brunch#eggs benedict#how to cook eggs#ways of cooking eggs#poached eggs#Lord of the Rings#memes#food facts#delmonicos#shakshuka#north african cuise#north african cooking#full english breakfast
0 notes
Text
I made the Taco Bell Breakfast Burrito - but better!
I saw recently an advertisement for Taco Bell’s breakfast menu – and you’re thinking, “Taco Bell meets breakfast”, so it’s gonna be a little inspired. I went to their website, and it is anything but inspired. Sausage or bacon, and cheese and egg wrapped up in a burrito. Seriously? C’mon guys! It’s Taco Bell! They have the crunchwrap surpreme gordita with cheese and all sorts of stuff and put Doritos in things! I decided to step it up a notch! I’ve got my breakfast burrito right here – little bit of taco seasoning, little bit of salsa, all wrapped up nice in a warm tortilla.

While slicing the veggies, I realized my onion technique – the same one I showcased in my Sweet Secrets video – is a little haphazard. Yes, the skin needs to come off but even with a small knife, trying to adjust the root to stem slices can be tricky. If you’re looking to up your onion dicing game, like I am, I recommend checking out Ethan Chlebowski’s video that I linked below on why you should be slicing from root to stem and how to safely accomplish it. No home chefs were injured in the making of this scene.
This homemade burrito differs from Taco Bell’s by not adding the breakfast meats, since they are a tad pricy now. To give our burrito a variety of textures, the onions and peppers will do the trick! And let’s talk about spices – cause it’s sometimes that “Taco Bell flavor” you’re craving – but like I said, this item on their menu really only offers meat, eggs, and cheese. I say it’s time to bring the taco flavor to breakfast! I did a video on my own taco seasoning, but this one truly is Taco Bell-esque.


With the vegetables on the cooktop, and 4 eggs scrambled, dump in the spices. It might look like a lot, except it will get soaked up into the eggs making the flavor disperse throughout the burrito. Get your tortilla shell warmed up for easier construction. And you’ll notice when adding the eggs all that seasoning getting absorbed. Flip the tortilla after a couple of minutes and Sprinkle on some cheese – any kind you have, but cheddar is better for a good stringy melt.

To safely transport everything for assembly, portion the scrambled eggs in with the tortilla. I’ve made enough eggs here to prep this for a few days, just warm it all up and build for a quick, filling breakfast to-go!

Spoon on a little salsa for more flavor, just make sure not to add to much. Burritos can fill up quickly! Then tuck and roll. I used to say there was an art to rolling wraps, except with these ingredients, it’s messy … so tuck and roll.


Now that my friends is what a breakfast burrito should taste like!
It’s got a lot of kick, you’re gonna have that taco seasoning flavor in there. It’s gonna get permeated into your eggs and man, really wake you up in the morning! And it’s this nice little convenient to-go wrapper - I mean, you can just eat this all!
It’s got a lot of kick, you’re gonna have that taco seasoning flavor in there. It’s gonna get permeated into your eggs and man, really wake you up in the morning! And it’s this nice little convenient to-go wrapper - I mean, you can just eat this all!
Sources/Inspiration:
Taco Bell’s Crunchwrap Supreme at Home. Ethan Chlebowski, February 4, 2022.
Chlebowski, Ethan. “Why I always slice Onions from root to stem” YouTube video, 1:32. June 27, 2021. https://www.youtube.com/watch?v=NUXKbBEjSqU&t=0s
Taco Bell, Cheesy Toasted Breakfast Burrito Bacon: https://www.tacobell.com/food/breakfast
Mentioned Sweetly Savory Content:
"How To: Dicing Garlic & Onion" - https://youtu.be/lDWrN6DSusU "Love Me Some Taco Salad!" - https://youtu.be/rNF67zZvCVE
"I made the Taco Bell Breakfast Burrito - but better!" - https://www.youtube.com/watch?v=txAQItsl7E8
#taco bell#burrito#breakfast#breakfast burrito#taco bell breakfast#taco bell burrito#taco bell copycat#taco bell copycat recipe#copycat#copycat recipe#sweetly savory#sweetly savory kathleen#Sweetly Savory Kathleen#sweetly savory burrito#sweetly savory copycat#sweetly savory copy cat#taco seasoning#homemade burrito#homemade taco bell#taco bell at home#how to make a burrito#burrito technique#technique for burrito#vegetarian burrito#meatless burrito
0 notes
Text
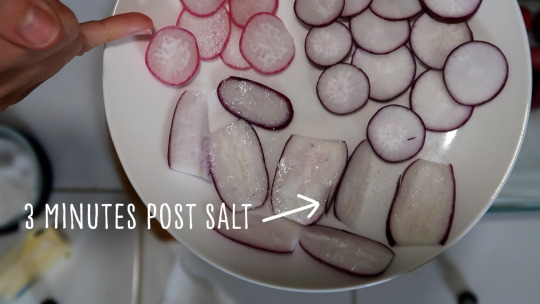
I put another TikTok trend to the test!
Have you seen TikToks for radish, butter, and salt? Why is it popular? Aren't radishes bitter? Butter on veggies? What's salt gotta do with this?

Use a kitchen knife – I’m using my all-purpose cleaver – to slice these up. I start by taking off the root and tip, and for this one I sliced it vertically purely to see what difference it made, and it certainly made it a little tougher at the end. Cool presentation, but I’ll stick to the big rounds.

With the radishes done, I sprinkled a little bit of salt on some of them before buttering, seeing if that would make a difference to the end flavor. It made a visual difference right off the bat here – the oblong ones had salt on them for about 3 minutes, and you can already see osmosis happening where water is moving across the radishes’ cell wall from the less salty side to the salty one. Salt also decreases our perception of bitter flavors, mellowing radishes out for this unique snack.
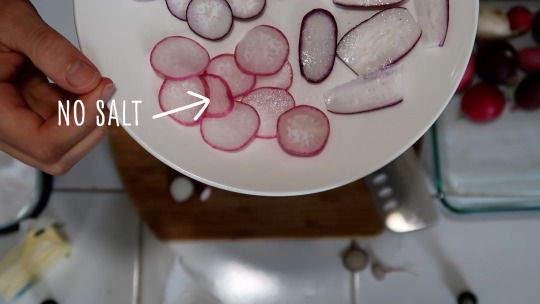
While just about everyone recommends cultured butter because there’s similar micro-organisms similar to those in yogurt that make cultured butter more tart and creamy – it’s not necessary. I’ve got some run of the churn butter – unsalted – and at room temperature, it does the trick. I’m sure I’d notice a difference in taste, but this was in the fridge. And notice how the pre-salted radishes are trickier to spread the butter – science in action!

I needed to work super quickly with this, cause at the rate which the salt was pulling out moisture from the radishes that you saw, it was like *finger snap*And why you can see a bunch of these whipped up on TikTok. Let’s see if the order of operations really does matter.
First, I tested the pre-salted ones and then the butter schmered on, and the salt. And what's really cool is you don’t even taste the bitterness of the radish.
Next, is the radish without the salt on the top of the butter – this is just the salt on the radish, and then the butter. Not as complex a flavor without the salt on top of the butter. But still, you get the richness of the butter. Salt will enhance that complexity of the flavors together - mellowing out the radish and bringing that together with the butter.
Thirdly, are the ones that I tried to salt quickly and see if there was a difference in the timing - which it does nothing to the taste, since the process of salting is all the same.
However, I feel like the thinness, cause a lot of these I did really thin and that’s probably because I’m used to pickling these – doing a quick pickle. The thinness of the radish with the ratio of the butter and the salt, that’s definitely playing into the taste factor of the radish.
Finally to the ones that don’t have any salt before the butter, and there is salt on the top of this one. It’s *okay*. On the whole, I am going to recommend that you salt the radishes before you put the butter on there. I know that it makes it a little bit more difficult, because the salt it going to pull out the moisture from the radishes – but the key thing you’re going to be doing is pulling out the tartness or leveling out the tartness!

You’re going to enhance the flavor of the radish, because radishes don’t really have a “flavor”, they’re just kinda spicy like horseradish or mustard seed. They’re looked down upon because people don’t really know to eat them, how to incorporate them. I’m definitely going to be enjoying this in the future.
Sources/Inspriation:
Nosrat, Samin. “Salt Fat Acid Heat: Mastering the Elements of Good Cooking.” New York, Simon & Schuster, 2017.
Yoder, Ross, May 27th, 2022. This “Magical” 3-Ingredient Snack Is Suddenly Everywhere (From TikTok To Trendy NYC Cafes), But The French Have Been Eating It Forever: You can make it at home in under five minutes – no exaggeration. Buzzfeed. https://www.buzzfeed.com/rossyoder/radishes-with-butter-salt-summer-snack-review
Trader Joes, 2022. “Cultured Salted Butter.” https://www.traderjoes.com/home/products/pdp/cultured-salted-butter-053720
Are Radishes Bitter? (Explained). Thrive Cuise, 2022. https://thrivecuisine.com/is-it-bitter/are-radishes-bitter/#:~:text=Radishes%20have%20a%20crunchy%2C%20bitter,radish%2C%20it%20is%20almost%20tasteless.
#tiktok#food trend#snack#radish#butter#how to eat radish#food science#osmosis#way to eat radish#tiktok food trend#tiktok video
0 notes
Text
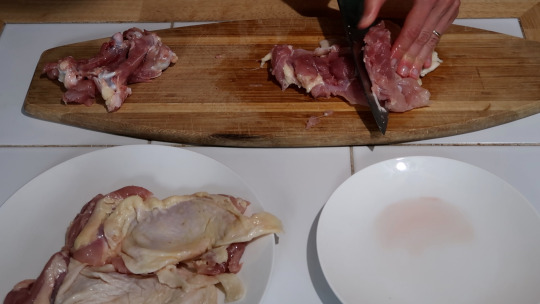
I coated chicken in mayonnaise.
Have you ever thought about “marinating” your chicken in mayonnaise? Probably not! I hadn’t until a little while ago. The result is super flavorful, juicy chicken.

I attempted to debone both semi-thawed and fully thawed chicken thighs – both of which I had “okay” results. For some reason, these fully thawed thighs cooperated today. I’m honestly not sure if I could recommend deboning either semi or fully thawed chicken thighs, however the process is the same. Using a large, sharp kitchen knife slice into the meat surrounding the bone, making small incisions, ensuring the bone or you aren’t sliced. Carefully slice until the bone is free – the most important thing I have come to terms with is that the bone does not have to be perfectly clean.

Make lengthwise incisions part-way in the chicken to flatten it out and creating more contact surfaces when cooking. By doing these steps you will not only halve the cooking time but also increase the browning, or Millard reaction, of the chicken.
Coating the chicken in mayonnaise will ensure the seasoning stays on, and release more easily from the cooking surface. The emulsion of egg yolks, vinegar, and oil will adhere best for cooking because droplets of oil surround the egg yolk. Water and oil marinades work well to infuse flavor, but they don’t mix and adhere to the food itself, leaving you with food stuck to the cooking surface being yanked off and lacking that Millard reaction.

The Millard reaction is the chemical transformation between amino acids and reducing sugars during cooking. Named after its discoverer, Louis Camille Millard, this reaction gives baked goods distinct browning and grilled foods their characteristic flavor. It’s like the umami of five basic tastes – salt, sweet, bitter, sour, and umami or savory.
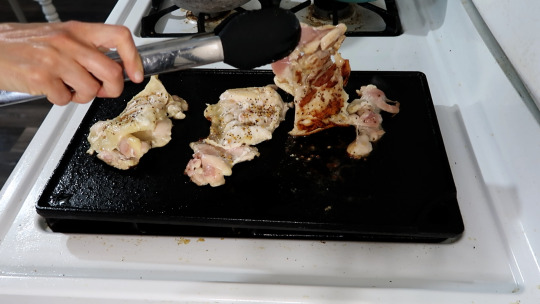
Now right there – that’s some juicy chicken! Even though I did cut into it, so it lays flatter like a book when you cook it, so it cooks evenly. Part of it did get a little crispy, but it didn’t get dried out. The chicken on the outside gets that crisp, but on the inside, it’s going to stay nice and moist. The mayonnaise is going to retain that moisture in your chicken, it’s not going to dry it out as it’s cooking.
Noelle Carter. June 8, 2017. “Why you should be grilling with mayonnaise.” https://www.latimes.com/food/dailydish/la-fo-grilling-with-mayonnaise-recipes-20170610-htmlstory.html
Wikipedia. May 10, 2022. “Millard Reaction.” https://en.wikipedia.org/wiki/Maillard_reaction
Wikipedia. May 21, 2022. “Umami.” https://en.wikipedia.org/wiki/Umami
Wikipedia. May 2, 2022. “Taste.” https://en.wikipedia.org/wiki/Taste#Basic_tastes
Wikipedia. May 25, 2022. “Mayonnaise.” https://en.wikipedia.org/wiki/Mayonnaise
Cheblowski, Ethan. “The three Chicken Techniques all home cooks should know.” YouTube video, 10:13. January 26, 2022. https://www.youtube.com/watch?v=xFX9gz-WMSw&t=34s
#grilledchicken#easy dinner recipies#easy dinner#dinner#grilling#youtube#homemade#inspiration#umami#mayonnaise#eat#food recipes#foodlover#cooking#recipe#food#foodpics#foodblogger#food vlog
1 note
·
View note
Text
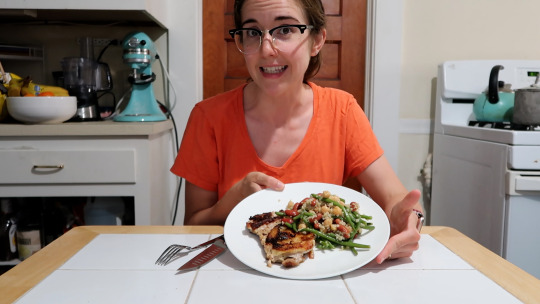
Not just another salad - this time it's three bean!
Here's a tried and true from the way-back times at the bagel shop - Three Bean Salad! I had lots of kidney beans to be used from the Cincinnati Chili episode, and chickpeas (because I'm the Chickpea Queen) - so insert a food pun here, and let's get started!

First off, the recipes I browsed to jog my memory of this salad after I bought the ingredients all called for canned green beans. I have nothing against canned vegetables, I just typically get frozen since my pantry shelves are filled with things like beans, tomatoes, and different vinegars. I’ve considered doing an episode on what I stock in my pantry – let me know your thoughts on those topics in the comments below!

Make sure to only cook your frozen green beans for about 7-9 minutes. You don’t want these over cooked and soft. Once done, drain and cool. They don't have to be completely dry
In your favorite mixing bowl, add together the rinsed beans, onions, and celery (remembering that towel to help with the cutting board!). If some of the slices are bigger than others – I cut them in half for uniformity.
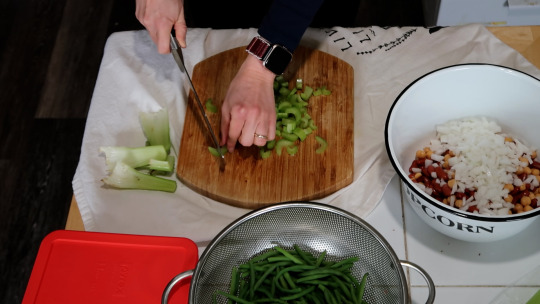
These green beans are a tad long, and to make this salad less messy, I’ll just give them a rough chop down the middle. You might find some are already that size, just plop them on in!

I find mixing together a dressing in a measuring cup to be easiest – it’s one stop for measuring and … you guessed it! Mixing! Finish getting the dressing together so the spicy mustard can be added. Dry mustard can be used, and I have ground it up in the past, but ain’t nobody got time for that today.

And to make sure I was even headed in the right direction, I doled out a couple of tablespoons and tested this combo of oil and apple cider vinegar with mustard to make sure I wasn’t going to make a nasty dressing. Spoiler: it comes out quite delicious! In the end, I seriously recommend testing a dressing or sauce before committing to making a whole thing. You can add ingredients, but you cannot take away.

The final result came out delicious - the combination of honey and mustard really is a winner. I prefer that this recipe doesn't have granulated sugar, and that's probably what makes other versions of this salad a bit on the sweeter side and more cost effective for restaurants. Although, the tablespoon of honey feels sweeter at 64 calories. But if we have a tendency to add less, then the overall calories are decreased. According to the Division of Agriculture, Research & Extension: the same tablespoon of sugar has only 45 calories, but you're more likely to add that full tablespoon (and some if what you're making isn't sweet enough). Please use this information as food for thought, and read more on this topic in the embedded link.
Thanks for reading if you made it this far! Check out Sweetly Savory on YouTube for *fantastic* editing and live action versions of these recipes!
#30 minutes recipe#homemade#salad dressing with mustard#inspiration#tasty#youtube#sweetlysavory#dinner#salad dressings vegan#salad dressing#salad#chickpeas#kidney beans#recipes with chickpeas#salad recipes#quick salad recipe#quick side dishes#side dish#vegetarian#vegetables#veggies#vegitarian#plant based#honey#sweetner#cooking#healthy food#summer vibes#whatsfordinner
0 notes
Text
30 minute Mango Ginger Chutney Chicken.
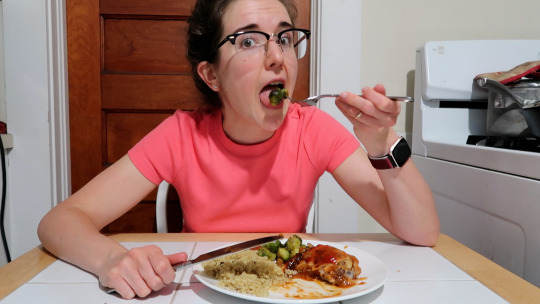
Tonight for dinner I made mango ginger chutney chicken! Super easy, only a few ingredients and incredibly flavorful.


Keeping this one simple, I’m going to leave the bones in and skin on these thighs. The bone will consequently add to the cooking time by about 10 minutes, except the trade off is flavor, in my opinion. Once your chicken is in the pan, get roasting the sprouts. The earthiness of Brussel sprouts works well with the sweetness of the chutney, but broccoli or asparagus are tasty, too. I don’t want to over-season the grain or vegetables, since the chicken is the star of the show. I have a whole video on roasting frozen vegetables that I’ll link below, along with the quinoa that’s quietly bubbling away in the left-hand corner.
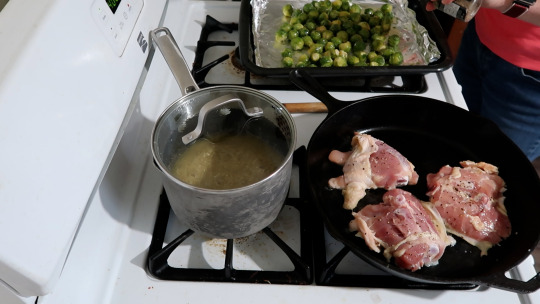
At about the 5-minute mark, or when you start to smell the fat rendering, flip the chicken. This was when I added the chutney to begin building the flavors into the meat. While the main ingredient of this condiment is mango, red wine vinegar, golden raisins, and a hint of cayenne pepper goes into it. Chutney can be found in many grocery stores in the international isle, this was just the one I used.

These little frozen ginger cubes are awesome cause I don’t use a knob of ginger quick enough from produce, and these are already prepped for use. I also put them in my tea and it helps cool it off quicker.

Now, it’s hard for me to believe that I was able to make this in about 30-40 minutes on the stovetop, instead of in the crockpot. This is definitely dynamite! The warmth from the chutney, and the spice with the chili sauce – If you haven’t tried anything like a chutney before, I definitely recommend it.
youtube
youtube
#chicken#mango chutney#homemade#youtube#dinner#indian food#indian inspired#weeknight meals#weeknight dinner#easy dinner#easy dinner recipies#dinner for 2#dinner for two#4 ingredient recipes#30 minutes recipe#30 minute meals#dinner in under and hour#supper#tasty#lunch#sweetlysavory#cooking#food#eating#cooked chicken#easy#meal#filling#food recipes#foodphotography
0 notes
Text
Husband approved no bake protein snacks
Sundays can be for lounging around, but in our kitchen – we’re doing *a lot* of food prep. Thankfully this one is no bake and tastes like a treat!
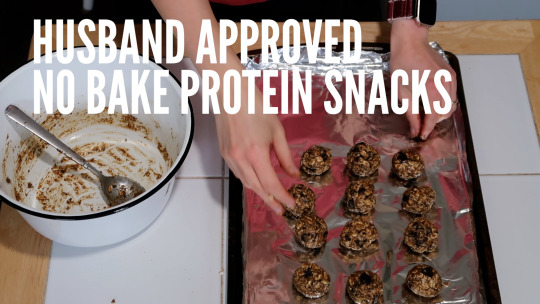
Thankfully I found one that is a no bake snack, because our oven is currently occupied with breakfast and lunch. There’s no room left to bake anything else in there– nor any time!
Needing to stay satisfied for long hours at work, I decided to go back to my own archives and think of something that would be quick and easy, and really healthy – no bake protein balls!
Now these don’t have any protein powder, it’s just ground flax seeds. Which is going to give you your protein and keep you satisfied for long periods of time.
Dairy-free chocolate chunks are in here! I wanted it to be dairy-free, don’t want to have to take extra Lactaid, or worry about being gassy…

The old-fashioned oat is probably one of the most adaptable budget foods, whether it’s homemade granola, ground up for flour, or baked into cookies, oats are the bees knees.
If your cutting board is like mine, and slides all over the place, I’ve seen other home cooks put a towel underneath. When I remember to do this, it helps so much.
You could use regular milk chocolate or chip shape to skip the chopping, but if you want to keep this snack dairy-free I found these semi-sweet chunks at Trader Joe’s.
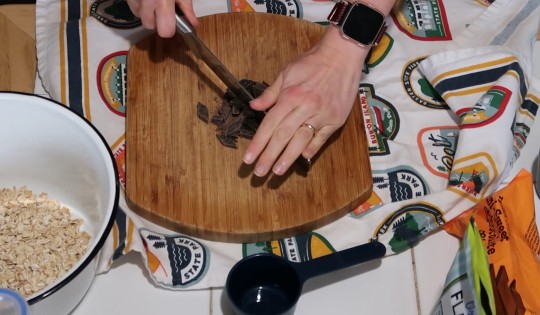
I hadn’t had flaxseed in a very long time, I knew it was a little too hippy for the husband. But mixed with peanut butter, a little sweetener, and chocolate – these were husband approved!

On a cookie tray, line it with foil or parchment paper, and scoop servings that are about golf-ball size. This recipe will make 12 balls of that size, about 6 servings. Freeze until set, about 1 hour.
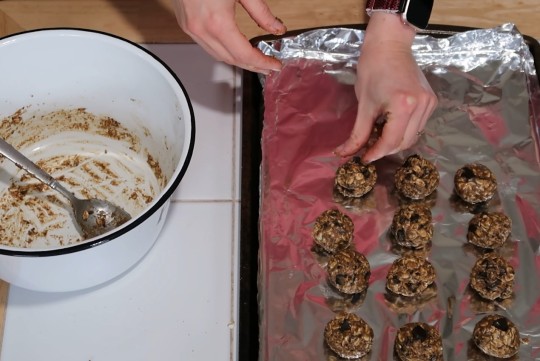
After these have set, and I’m transfer them to a storage container. I like to use the kind that left over from … leftovers! ^_^ Cause I mean you still paid for them technically.
If you’re not used to having the ground flaxseed, these might look not all that appetizing… Definitely earthy with the ground flaxseed. Has a very wholesome flavor and texture to them. I like the crunchiness of the oats. Definitely a *winner* with the chocolate! Feels more like a special treat, and it’s gonna give you that sugar boost that you probably need. “Yes! I can get through this!”
#Protein#husband approved#no bake snacks#dairy-free#dairy free#chocolate#oats#old fashioned oats#protein snacks#quick snacks#prepped snacks#prepping#food prep#vegan snacks#vegan prepped food#prepping vegan food#snack food
0 notes
Text
I'm not skilled with the Instant Pot - but I used it!
So, I was thumbing through some Buzzfeed articles for inspiration this week, and I came across one that really caught my attention: broccoli and cheddar mac and cheese. I love the broccoli and cheddar combination, if you can’t already tell from the soup I made for Super Bowl Sunday!
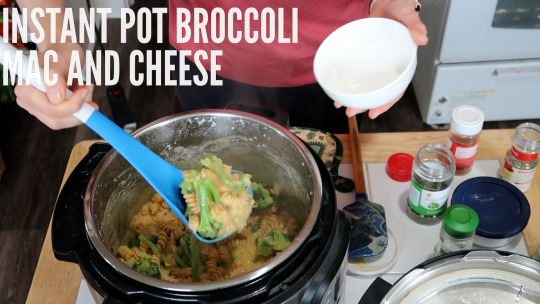
I decided to make this mac and cheese thinking that I have an instant pot, why I don’t I go ahead and use it? Dust it off, it’ll be fine! Well, let me tell you about fine – it’s not as instant as it sounds. But, I mean whatever is? Let’s go ahead and dive into this recipe!

The only button I trusted at first on this popular gadget was sauté, especially for something that has only a few of them. But “sauté” is going to do only what I’ve asked it to, melt the butter.
After doing so, add in the full box of pasta, water, and salt. If you’re familiar with Sweetly Savory at all, I love my chickpea pasta, which I still make for this recipe. Things just get a little messy, but that’s nothing new either.
It’s easy to say in the instructions to “use the manual setting”, except when nothing is labeled manual. When in doubt, hit pressure level to high and the time noted – 5 minutes. Anyone who is seasoned with this contraption can go about their business fully aware the Instant Pot is doing its job appropriately. Those who don’t just continue poking…
Once pressure is done and the clock runs out, carefully release the valve.
But the mess that came of the superiorly starched chickpea pasta was a whole different tale. I’m working on a little side research into why this happens, so stay tuned for future episodes.

With the pasta lovely, we’re ready to get cheesy. Since there’s extra starch in the cooking water, we don’t need to add milk or flour to thicken. Just the veggies and a little seasoning.
The pasta, even though I use chickpea pasta, and in the past when I’ve tried to do different methods like the one for the baked feta and it came out kinda wonky. It still tasted fine, but it still felt like it wasn’t how it was supposed to come out.
And the super starchiness that you saw coming out of the pressure valve of the instant cooker it just looked super messy.
Despite all of that, it made for a really good cheese sauce! Not having to add any milk or flour to it. The pasta didn’t taste chewy. And adding in the seasoning at the end, you have the notes of sage and thyme in the background.

#mac and cheese#instant pot#easy instant pot recipes#Mac and cheese#cheese#macaroni#broccoli#recipes for mac and cheese#broccoli mac and cheese#mac and cheese with broccoli#brocolli#brocolli mac and cheese#recipes for instant pot#how to use instant pot#using an instant pot#pasta recipes for instant pot#quick instant pot meals#meals for instant pot#dinner instant pot#quick instant pot#quick meals in instant pot#family food#meals for kids with vegetables#mac and cheese for kids#mac and cheese with vegetables#fun meals for kids with vegetables
0 notes
Text
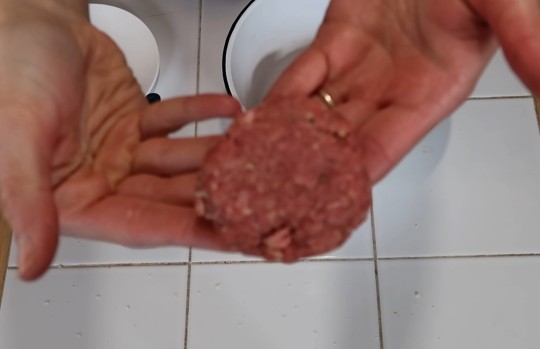
I make Hogwarts inspired breakfast sausage!
When you think of breakfast food, you don’t normally think about Harry Potter along with it. Except when you have a copy of the Unofficial Harry Potter Cookbook - everything can be extraordinary!

This original recipe as in Dinah Bucholz’ book, calls for 1/2 pound each ground veal and beef (or pork). I’m not fan of veal and hoped to get 1/2 pound of pork to substitute in for the veal, but alas was not able to find it. Instead of going from store to store, I ultimately used the whole pound of ground beef at home.

As for the full cup of panko crumbs, this felt more akin to meatloaf rather than sausages. But the seasonings were certainly breakfast.
Making the patties into disc shapes, I was able to make 12 out of the pound of meat.
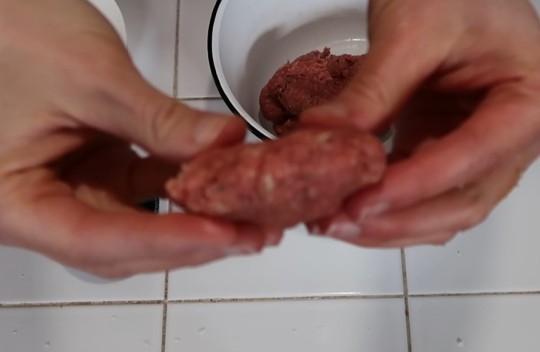
Melt two tablespoons of butter, then space out half of the patties in the pan to not over-crowd. In about 2 minutes you’ll start to smell the fat rendering off and hear a good sizzle. Flip them, and if you want to flatten them out, feel free to.
By this point they’ve probably shrunk a wee bit, and I pressed mine down, so they cook evenly. You’ll want these to be around 165 degrees Fahrenheit, or 74 degrees Celsius, internally. I’ve linked our food thermometer below, since this is hands down one of the most important tools in our kitchen.
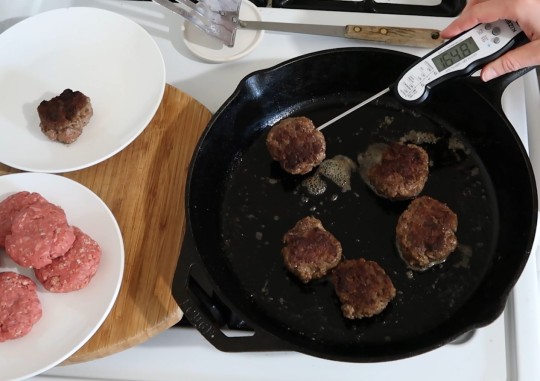
The difference in meat ratio for half of veal, and half of hamburger or pork – it definitely does bring that flavor complexity. But if you only have a pound of hamburger, then you’re just gonna have little breakfast hamburger patties. It’s flavored really well with the sage, marjoram, and thyme – it has that breakfasty sausage aspect to it. It’s still going to be delicious!
Sources:
#breakfast#harry potter food#harry potter#hogwarts#hogwarts inspired#breakfast food#sausage#Hogwarts inspired#harry potter inspired#food inspired by harry potter#harry potter brunch#harry potter party#party food#brunch food#brunch#homemade brunch#homemade breakfast#homemade food#Hogwarts homemade#Hogwarts is my home#breakfast side#what to serve with breakfast#sausage for breakfast#how to make homemade sausage#homemade sausage#homemade breakfast sausage#what to serve with eggs#what to serve with pancakes#what to eat with eggs#what to eat with pancakes
1 note
·
View note
Text
I give (surprisingly) Cincinnati Chili 4 out of 5 stars.
Inspired by "Beach Too Sandy, Water Too Wet", where the Schiefer siblings read 1 star reviews in the *most dramatic* fashion.
The challenge was to get reviews written by tourists of Skyline Restaurant chili. I try out this recipe, because with a review including an adjective "swill" - I need to put this to the test.

Dice up about 2 cups of onions, small enough so they get soft quickly but not so small they disappear in the chili.
Next up are seasonings, I’ve set them aside in pinch bowls to quickly toss in. I really like the way the chili, cumin and cocoa powder look together – which makes things interesting later.

I used my cast iron Dutch oven, but any large pot will do. Making sure it’s warmed up over medium heat, put in your ground beef. Use a spatula or potato masher to break up the meat. I’ve come to prefer a potato masher for things like this; the meat will cook faster, and it’ll be reminiscent of what you’ll get at the restaurant.

Add in the diced onions and finish breaking up the meat. Return the cover but don’t forget to season with a little salt. Salt will not only add flavor, but help the onions to sweat or soften. As we learn in “Salt Fat Acid Heat”, salt weakens pectin, an undigestible carbohydrate, allowing vegetables to soften as they cook.
Let the meat brown, this may take 5-10 minutes total depending on the size of your pebbles and cooking pot. Pour in the plain tomato sauce and beef stock, combining and bringing to a boil.
After 20 minutes, everything should have thickened and cooked down. Adding in those spices is going to make everything smell a bit different. I did stick my face in the pot a few of times just to get a hearty whiff. I was in uncharted territory.
While this is all stewing, you can prepare spaghetti – or have leftover pasta like I did. My assumption from the Yelp reviews is that this is all served luke warm, but my pasta is cold and chili hot – does that cancel it all out to “luke warm”?
Before testing this concoction, make sure to add the toppings: onion and cheddar cheese.

I actually really like it! I get a lot of heat from the chili powder and the cayenne. Gosh, there were so many awkward seasonings – like putting all spice and cinnamon in chili? You can’t even taste the cocoa powder, it’s kind of buried but it adds to the warmth of the rest of the flavors. It’s so unsuspecting!

I hope that I wouldn’t be disappointed going to a Skyline Restaurant and trying it there. Why are people hating on this?

#beachtoosandywatertoowet#beachtoosandy#youtube#homemade#inspiration#dinner#sweetlysavory#Cincinnati#cincinnati chili#skyline chili#saltfatacidheat#salt fat acid heat#cooking science#science#food#cooking#what to make with ground beef#how to make skyline chili#what to make with spaghetti#spaghetti#what's for dinner#what to cook for dinner#secret ingredient
0 notes
Text
It's about time I made the Baked Feta Pasta.
My question to my past self is: why didn’t I make this sooner?! I don’t usually do food trends, except this one on TikTok (from 2021) included everything I love: feta, tomatoes, and pasta. I made my own tweaks on it, and tried a new method for cooking pasta.

In honor of 1 year for Sweetly Savory's YT channel, which was a few weeks ago, I decided to do a food trend to celebrate! I settled on making the "Baked Feta Pasta" TikTok trend. I know that it was from last year, and it was really big – and then it kinda like fizzled off, but I'm here to bring it back! (or try to)
This was my version of the #TikTokBakedFetaPasta!

Method:
Start off by thinly slicing the onion, leaving it in long lanky pieces. I opted for onion instead of shallot in this recipe because of cost. What you get for a large shallot versus an onion is probably twice the price, and while we splurge with the feta, the onion swap isn’t too much of a deal breaker for me.
As for the block of feta I found that it was dang expensive. I usually get a pre-portioned container that’s only a few bucks, and I’ll most likely get it that way if I choose to make this recipe again.
I chose a lovely 8 inch by 8 inch glass baking dish for aesthetics, but you’ll see it makes it a little tough for mixing and bake times.

Finish adding all the seasonings, and it’s pretty enough to eat – not before baking in a pre-heated 400 degrees Fahrenheit, or 204 degrees Celsius, oven.
Bake time is going to vary from this video to what you cook, since everything was crammed in my baking dish….
Time for PASTA!
I learned of a new method to prepare pasta from Ethan Chlebowski, who’s incredibly in-depth video I highly recommend and I’ll link it below. The gist is to shorten cook time for the same al-dente result.

I won’t get into the specifics of it, as my results didn’t come out as expected. Here are a few take-aways from this first-time trial:
1. Don’t worry about weighing the pasta and water for exact ratios
I understand that cooking and baking do heavily rely on exacts and have experienced these results. But as a home-cook who doesn’t have the luxury of time (anymore), I tend to stick to tried and “true” methods. My prediction would be if you have enough water to cover the pasta, rather than weighing it out, you might get the same results. I say this because I follow the steps of using a shallow pan and checking the temperature for cook times. Which brings me to point number two:
2. Alternate pastas, gluten free or chickpea, cook differently
I cook chickpea pasta over regular pasta for the overall health benefits. Everything is fine in moderation, but I found for my diet, the best change I could make to still enjoy pasta was to swap in chickpeas. As you can see, the water gets far starchier than if it were prepared normally with the big pot of boiling water for 7 to 8 minutes. And for this application, I would at least try it the first time (or second time now) with regular pasta. With that being said:
3. Try this method a few times before disregarding it
Science wasn’t figured out in one day. Food science is the same way in my opinion. I’m learning new methods, like this one, all the time. I might tweak it by using the cast iron skillet, or just running the water over the pasta to cover instead of taking out the food scale. But I hope this part illustrates a new approach for you to try out cooking pasta.
Since the goal of the pasta was to cook it in about half the time, it’s going to be a while before the feta and tomatoes to be done. Originally this recipe was to bake for 40 to 45 minutes. Although this is a jam-packed dish, and I took it to check and stir, since it didn’t look like much was happening. Back in the oven it went for another 15 minutes.
I'm still asking myself: why didn’t I make this sooner?! Because this is *so* delicious! I don’t know why I waited. I am so mad at myself! But I’m happy now because I am definitely going to be making this again. I am going to be using a bit smaller block of cheese (or the crumbled kind), cause I realized that I had like 10 ounces or 14 when I only needed 8.
This pasta was different than the pasta that was used in the other video, and I had only tried out that method for the very first time. I’m definitely going to be testing this method a lot more.
I’m definitely going to be making this (again). *fancy dinner night*.
Make sure to subscribe to Sweetly Savory! Thank you and I will see you for the next food trend – a year too late with Sweetly Savory.
#tiktok food#tiktok#homemade#feta#foods with feta#feta cheese#pasta#whatsfordinner#youtube#subscribe to my youtube channel#sweetlysavory#baked feta pasta#feta pasta#adobe premiere pro#food blog#food recipes#food aesthetic
3 notes
·
View notes
Text
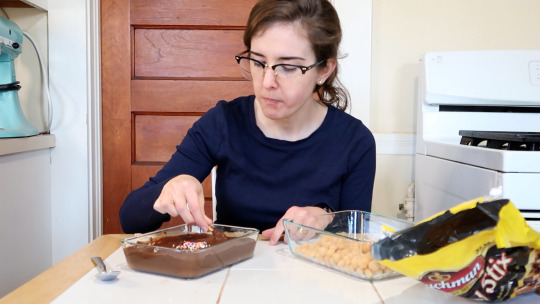
Don't know what to make with chickpeas? Brownie Hummus!
Chickpeas and chocolate together? Yes, I was skeptical at first, too. But this dip is *delicious* and can easily be made at home! This cost-effective snack is fantastic for fruit, pretzels, or can be eaten on it's own (by fridge light at 10PM...)

This is probably one of the simplest recipes I've made on the blog, with only 5 ingredients:

As for the cost effectiveness for this recipe, on average chickpeas cost around $1.00. I’m able to find them for $0.80 or even less some weeks – and that is why I feature them in *a lot* of my recipes on the channel. These are amazing little pea pods things that are just waiting for you to take advantage. Nothing will go to waste in this recipe, either. You'll need to drain the chickpeas, but make sure to reserve that liquid (aquafaba) to thin out the hummus instead of using olive oil. Olive oil is usually added to savory hummus’ to thin them out, but in my opinion they can overpower the flavor of the hummus itself, like garlic or roasted red pepper. In order for the chocolate to shine through for this one, adding the liquid that the chickpeas were cooked in doesn’t complicate those flavors.
Cocoa powder averages around $2.00 - $3.00. It might look like you’re measuring out the whole canister for this recipe at ½ cup but believe it or not this has lasted me through 2 batches of my Depression Era Cupcakes, some King Arthur Hot Cocoa, with more to spare. It’s insane sometime what you can make with just a couple bucks! -- I haven't added the Depression Era Cupcakes to the blog yet, so make sure to check out my YouTube channel!
Method:
After a quick blitz to these chickpeas, add about ¾ of the aquafaba in small increments while incorporating the cocoa powder. If you’ve added too much and it’s runny, like I ended up doing, don’t worry – it’ll thicken up in the fridge after a few hours.

Finally, add the teaspoon of vanilla, pinch of coarse salt and ½ cup and 1 tablespoon sugar. I started off this recipe with ½ cup sugar, but after testing it, Evan thought it needed *just* another tablespoon to make it a little bit sweeter. With that in mind, start off with the ½ cup. Base this on your preference.
youtube
#chocolate#hummusrecipes#ideasforhummus#Chocolate#hummus recipes#fruit dip#ideas for hummus#homemade hummus#hummus made at home#cost effective recipes#recipes for chocolate#recipes with chocolate#cocoa powder recipes#homemade chocolate recipes#is hummus good at home#non-traditional hummus#recipes with chickpeas#what goes into hummus#5 ingredient hummus#hummus with aquafaba#can aquafaba be used#what to do with aquafaba#what is aquafaba#vegan dessert#vegan snacks#vegan dips#make vegan food at home#Youtube
0 notes
Text
Adding Crushed Bay Leaves to Italian Seasoning? Why Not!
Do you have spices like garlic, onion, Italian blend, or even bay leaves in your cupboard? Well, today I’m going to show you two completely different seasonings of how you can use these ordinary spices to make these two fantastic additions to your cooking repertoire.
First up is a take on the Trader Joe’s famous 21 Seasoning Salute. I know there’s only 9 spices listed here, but the beauty of Italian blend is the composition of things like thyme, and oregano. But it also includes marjoram and savory, which I find are less common in other everyday recipes. My advice is to use these blends to your advantage!
Now for the crushed mustard seed – break out that mortar and pestle! This is a great opportunity to take it for a spin. I wish I could remember where I learned this: breaking up spices opens their aromatics to be more powerful. I’ve been absorbing so much cooking material from “Salt Fat Acid Heat” by Samin Norsat, to YouTuber Ethan Chlebowski, it’s blending together. I’ll link down below where you can find these sources. (*Note to self: keep a notepad handy!)
As for the mortar and pestle, I try leaving it on the counter to encourage break up spices before adding them and I suggest you try that, too.
Before getting started on the pizza seasoning, the mustard seeds need to be cleaned out. I have been under the impression that simply wiping the mortar and pestle will suffice but have learned from food blogger, Kristen Martinelli, it’s best to season them like you would a cast iron skillet. I don’t do that in this video, so I will link my Cast Iron Care video for how that’s done.
Before we get into what pizza seasoning is known for, let’s meet the unexpected party guest – bay leaf. I would never have thought of adding it to a blend like this, since these are traditionally added to soups or rice dishes. Except, breaking them up, as you’ll see I resort to using my hands instead of the mortar and pestle, you will awaken flowery notes.
From Ethan Chleblowski’s video on bay leaves, he shares that “applying heat to (them) will release the aromatic compounds”. While they are typically taken out of the dish before serving, I’m going to attempt to leave them in and see what difference that makes. I’ll use this seasoning in a future video, so make sure to subscribe to Sweetly Savory in the link below and ring that bell to be notified!
Finally, I added the remaining ingredients in with the crushed bay leaves to muddle the flavors together.
After tasting the 21 Seasoning Salute:
It’s a combination of flavors that I really wouldn’t have thought of putting together. I mean, you think about it, when you’re going to make something like chickpea salad or tuna salad, you’re not thinking about putting all these seasonings together. I know that it’s really easy to grab one of those things from the store, one of those blended seasonings. But if you have all of those seasonings in your pantry already, especially the Italian seasoning which is so versatile, you can put it in whatever you want!
And you don’t have to have all the separate ingredients, even though that’s really fun to do, who has the space for that? What kind of pantry do you have? I would like to have your pantry! Can I please come have your pantry?
So, long story short, that’s why I make these seasonings, because I don’t have a lot of space in my pantry. If you want to go ahead and maximize your dollar and your taste buds at the same time, I don’t understand why anyone wouldn’t do that. I really hope that you these seasonings, especially this 21 Seasoning Salute as easy as it is to make at home. Please check me out in the links below!
youtube
#seasonings#EthanChlebowski#SaltFatAcidHeat#mortar and pestle#21seasoningsalute#traderjoes#traderjoescopycat#williamsonoma#cookingathome#Youtube
0 notes