#i used mod podge for example
Text
EVER WANTED TO OWN A LITTLE EUGENE FIGURE??? NO?? I DONT CARE YOU CAN NOW HAVE A PAPERCRAFT EUGENE BAMABMABAM
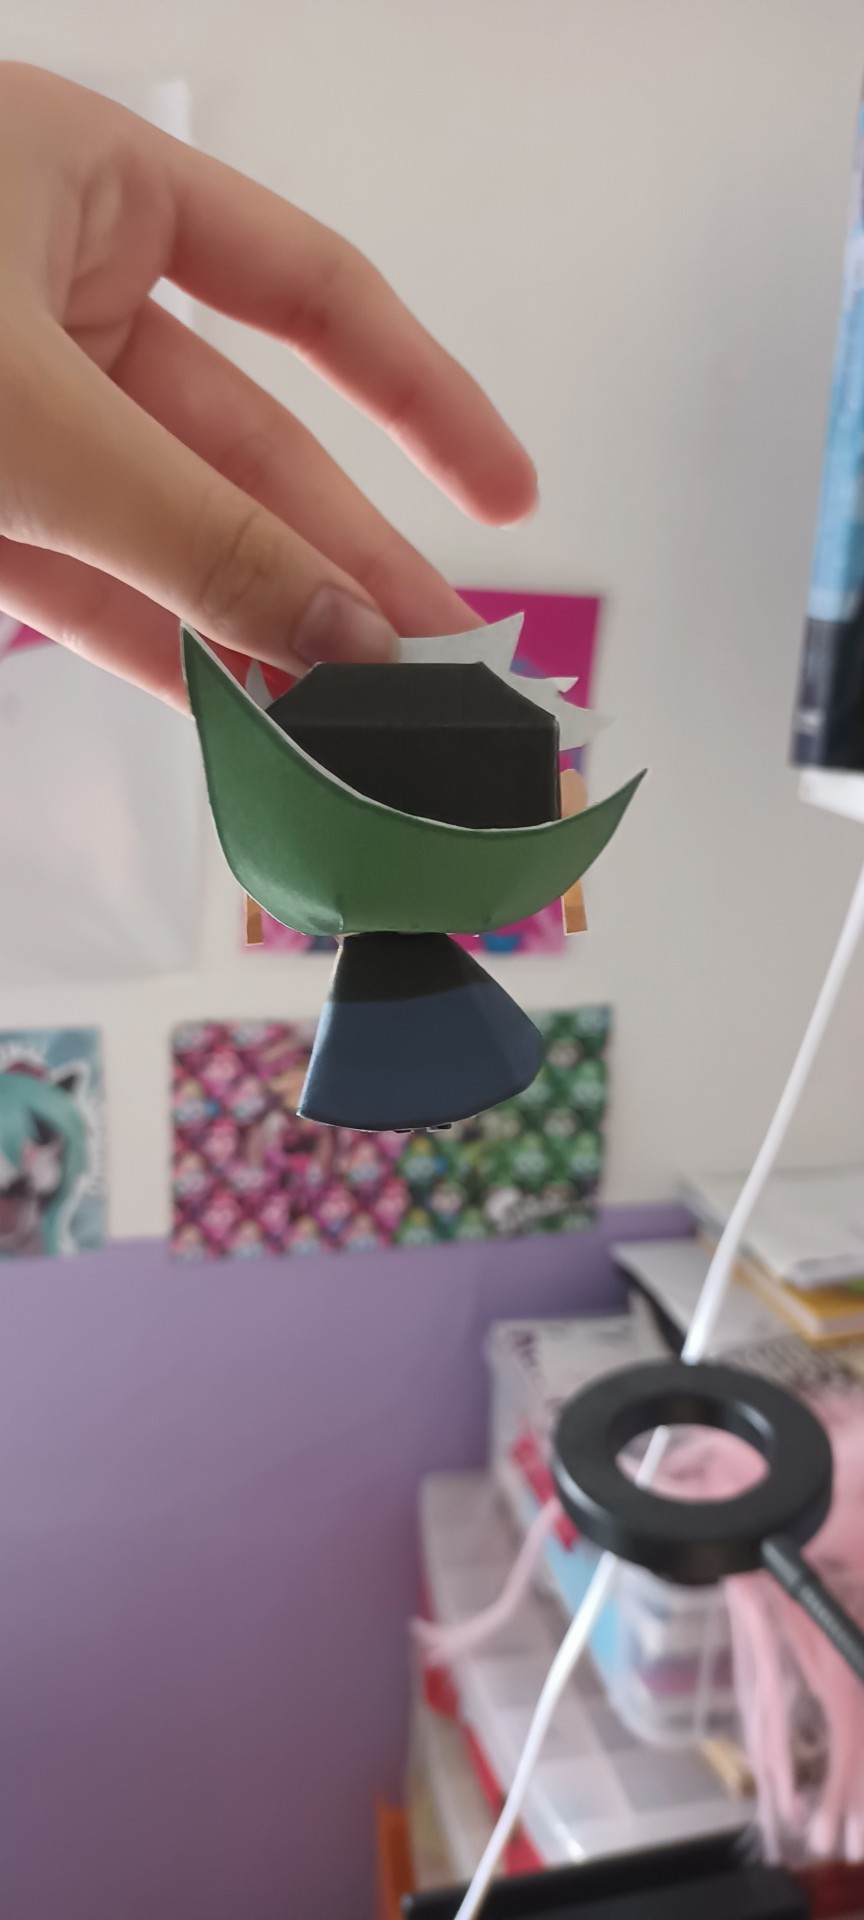
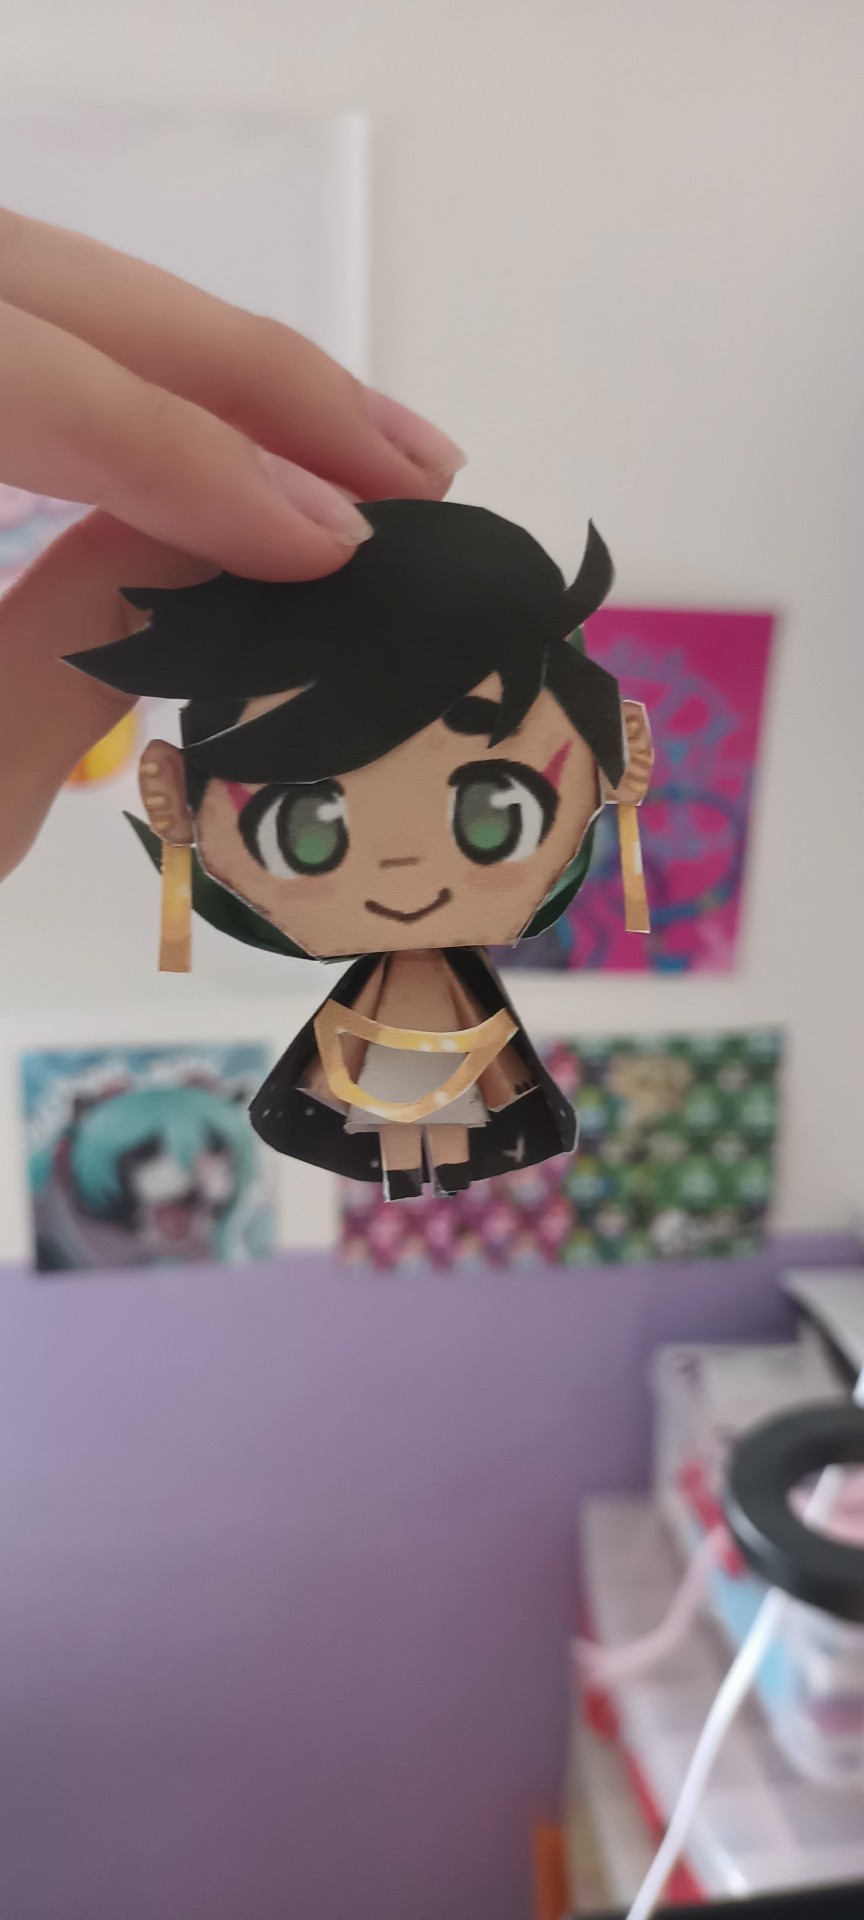
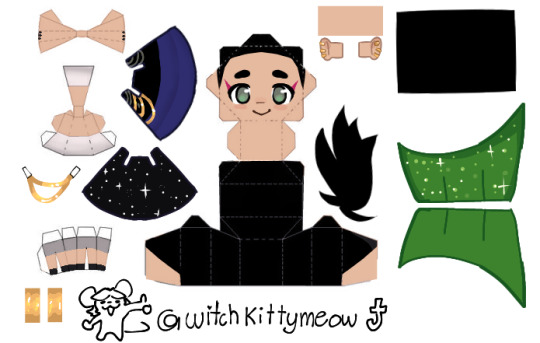
I worked hard on this template, IF ANY OF Y'ALL BUILD HIM PLEEEEEASEE TAG MEE HES SO TOINYYYY
(oh and if yall are struggling to build him feel free to dm me AWAWAWA)
#drawtectives#drawfee#eugene finch#drawtectives fanart#drawfee fanart#papercraft#art#i recomend using a stronger glue other than just gluestick#i used mod podge for example#the cape and collar work in the way a lego cape works#they overlap wit eachother#oh and ears and hair have a backside so you can paste em and they look good from both sides
426 notes
·
View notes
Text
Thoughts on a show CBS should give a second chance and a show that perfectly complements it enough that they should stay together
So Help Me Todd (#savesohelpmetodd #renewsohelpmetodd #wrongdecisionCBS)
Interesting opening
Feeling sympathetically overloaded on Margaret's behalf
Is she going through some sort of Lesson Zero scenario
oy Todd, really, tacos
Nice meta reference to show's fate struggle
Now that's a different way to commit a crime
Of course Todd watches Ghosts (or their universe's version)
Todd and his ego applied to funeral arrangements, holy Hamilton
nice to see more Todd and Lyle even if it is "Lyle after dentist"
Ok Folding backstory please, why does he have a server despite not showing up at work
Of course Lyle's the sysadmin
LYLE SAID THE SHIPNAME!
What is with everyone and the really obnoxious patterns this episode (some might be fine on their own but not all at once!)
OK this just turned into a Shakespearean comedy
I really hope more seasons of this show mean more of Todd pretending to be a lawyer (perhaps as potential foreshadowing)
Did Todd-as-Folding, Susan and Lyle just pull a Leverage and let's go steal a client?
Hmm... wonder if more seasons might reveal some identity thieving ring shenanigans as that reminds me of Veronica and there's still the Tuttle case implicitly up in the air
Again, Allison, a little too relatable
Very Murder She Wrote of a case crack
instance #2 of Todd making himself come off as a lawyer that could foreshadow things in more seasons
and Todd figures out what I figured out
and proof of the Shawn/Gus inspiration for Tyle
sweet ending
Was the part about trust the product them pleading with the network
Elsbeth
doctors, dinner parties that almost feel like family dinners, rejected partnerships, what is this So Help Me Todd
Well hello another example of how "kids these days" are the Elsbeth writers' kryptonite
First Grey Gardens in E4 now a needle dropera (I guess it halfway-counts as the Musical Reference Of The Episode to have some Carmen show up), this show never ceases to amaze
And Elsbeth gets more and more neurodivergent every episode
Worst foe of anyone with ADHD, someone else using speech-to-text
Hey don't knock the polka dots
oh how convenient with the doctor thing
Further proof why the shows shouldn't be separated, that reenactment thingie was totally a Todd/Lyle move
Thank you texts on screen
Elsbeth standing out against the white and stimming with things she shouldn't
Elsbeth, they're lesbians
I'd be concerned about anything coming at my face
Sheep placenta, ew
is this whole episode just going to have a generation gap theme
Hello symbolism (and good taste) with Elsbeth's love for Alice In Wonderland and her climbing through the statue and hello clarification on what she's here to do
Kaia saw, Kaia sus or nah
either way another couple-or-just-besties-coded moment with the sneaking up behind and that close to her mouth
Smooth trying to sneak the insinuation at Wagner's guilty conscience
Ok so what's the wife got to do with anything
Oh so that's what (fake chart info)
Thank you other surgeon for not making Elsbeth feel insecure
sympathizing with um actuallying someone about the law
If the shoes fit
Girls bonding over mod-podge and Elsbeth spills the beans, let's see how this ripples
#so help me todd#so help me todd cbs#cbs so help me todd#cbs elsbeth#elsbeth cbs#elsbeth tascioni#savesohelpmetodd#renewsohelpmetodd#wrongdecisionCBS
1 note
·
View note
Text
5/18/23
So... I left the window open night before last. And I was writing last night about how cold it's been getting. And... I think I left it open last night too? Either way... I woke up after about 5 hours sleep and... shit was just off. I couldn't really figure it out. But I felt hungry, so I said fuck it and got up and ate cereal and passed out in the comfy chair. I had a stream on and passed out with earbuds in.
I woke up to a recording of some True Crime thing they were playing on the RP stream. There's this whole PD corruption arc going on, and I'm guessing this streamer was using this as an example for her audience of what real corruption looks like? Either way, I woke up to an actual corrupt cop doing super sketchy shit with a young girl, and real voice recordings and shit... and it pulled me out of sleep. So... not the greatest note to officially start my day on. Adding to that, I physically felt like absolute ass.
I have barely recovered, honestly. Until about 1 or 2AM I have been feeling horrible. At my worst, I popped in my earbuds and had my phone ready to go and spend the night in the bathroom puking. And I mean that. I managed to slowly get food into my system, slow enough that I didn't aggravate the nausea to the point of puking. The nausea is still there a little, but not too bad. It started as serious heartburn and dehydration, and it feels like it's kinda tapering off back into the same shit. So... big-time nausea, what feels like a slight fever, tired. Not a fun day because of that.
I gave myself some slack and let myself just chill and watch the highly anticipated stream I was looking forward to, which did not disappoint. And I popped the heat on, no clue if that is helping too or not.
Luckily, because I started feeling better, I was able to push myself a bit to finish Mod Podging the beads. They're all done now. Now, all I need to do is remember how I was sanding them when I had a really reliable system, and do that tomorrow. I'm pretty sure all I did was pop them on a wooden skewer, dip them in water, then poke the skewer through some Carhartt pants that are too small for me, and slowly spin the bead while gently applying pressure. I remember that working really well, even better than 600 grit sandpaper which was actually tearing off the Mod Podge. So... I'll give that a try tomorrow.
I hope I get rested and feel better tomorrow. I know dreams were a factor yesterday, and stress, but honestly... this kinda just felt like being straight up normal run-down... like the edge of being sick. I had a day like this not long ago, I remember it pretty clearly, just... not how long ago. My big bowl is still out and on standby from that, so it had to be somewhat recently. I got a bit anxious that it might be part of a pattern, this out-of-the-blue run-down, nausea, fever kinda thing. But I was able to keep that anxiety well contained, which is good.
I did skip yoga today, though. So... you know what? I'm gonna go and do like 10 minutes by myself real quick and get a little bit of ice cream after. Fuck it. I was going to call it off, but honestly... Okay, I'm just going for it here. Yoga is not about doing a routine. It's about connecting with your body, syncing, all that. So... ultimately... my goal with yoga is to be able to have enough of an established language with it that I can get on the mat and just... do whatever my body is kinda asking for. Whatever my body needs that day. Like a tune-up. So if I'm feeling like garbage today and I just need to do some gentle easy stuff on just certain parts of my body? That's good. That's not lazy. This isn't training for a fucking triathlon. It's taking care of mind, body and spirit; whatever they may need at that moment. So yeah, I'm gonna do that when I wrap up here.
One last thing that's on my mind. And I'm a little anxious about this one, but... stream of consciousness, so here it is. I read the post of someone I follow on here when I went to write this. If you're reading this, hi! Sorry for not commenting, I got anxious and didn't reply because... I didn't want to be a buzzkill and was afraid I couldn't phrase it properly. They recently set up on TikTok for art stuff. They got hit with DMCA, which I got legit angry about, like... they're doing DMCA on fucking social media now? Like... that isn't even for money... I don't understand how they can make an argument on that one, it's gotten so fucking petty and shameless. It's like no one is even challenging it anymore. ANYWHO. This guy is really talented, and I mean that. Very creative, very original style, very recognizable. I envy how natural his character design is, it's inspiring. He got some traction on TikTok. Like... a very decent amount. And that's a huge rush, and it makes you feel really fucking good about yourself, your creative self. It's a massive affirmation. And in his case, he definitely deserves that! That and more! And... you're waiting for it... the "b-word" is coming... But... That is exactly what TikTok wants you to think and feel.
I know it sounds conspiracy or whatever, but like... it's literally how the app is designed, and there's plenty out there to corroborate this, unfortunately. And I didn't know this until I read a post on an art forum on Reddit about a week ago, and this is apparently commonly known. Your first posts are "boosted", giving you a big jump in algorithm placement. If you don't catch a massive wave there... yeah... So... I wanted to... warn him. Not to kill his buzz, though that likely would be the outcome... but to... god, this is so hard to phrase. To let him know that he is talented, and he should be getting this much attention, but... that a major social media company was essentially creating a false feeling... an illusion... to get him hooked. And it's working. Because just watching it, as a bystander... it's... I'm sorry, I just don't know what to do.
I want to think telling someone that they aren't really getting attention, that it's just a lot of people getting something new forced into their feed and they swipe through it like any other post... I want to think that telling them that is like... merciful, a good thing. Grounding. The truth. But like... it feels like telling a kid Santa isn't real. And I'm not the bad guy here. That fucking company that literally targets children with this system, that shit is fucking evil. It's dirty, man. It fucks with peoples' mental health, their self esteem, their self worth; it's literally designed to do that, to get you excited, to keep you engaged. You give them a huge boost of "I'm popular, people like me, I'm worth something, these people value me!" For like 4 days. Long enough to get them hooked. Then you drop the "training wheels", the artificially inflated views. The viral shit goes viral, the rest... not so much. And then they think... --- and this is why I wanted so badly wanted to reply --- they think it's their fault. They think they've gone from thousands of views to 10 because of a drop in their quality, or a drop in their creativity, like "whoops, had spinach in my teeth during the job interview" kinda thing. And with something as personal as genuine art? Art, of course, being a glimpse into the artist's personal experience of life. Yeah. That is what I was seeing. I was seeing 3-4 days from now, when this poor guy and his legitimately exciting inspiration to do animated storyboards with music - dude, if you're reading this, do it! It's a really cool idea, one that I've wanted to get into but can't keep my attention on it long enough! And if you do, please post them here, or at least link them! - when those posts... that he put a tremendous amount of his heart, soul and labor into... get a fraction of the public response... I just... I know he's going to blame himself. Because if I didn't know this shit about TikTok, I would too. I would do the same thing. "Guess no one gives a shit about this piece, must be something wrong with it." That's not correct. It's just not reaching people who appreciate it.
So yeah, that whole tirade wouldn't fit into a reply, and I didn't want to kill the buzz. I just didn't know how to respond. So I was planning on... if he posts in a few days about how his new projects flopped, to reassure then. As much as I want to... forewarn, to help soften that blow. And hell, maybe he strikes gold, I don't know. I really do wish the best to him on that, he truly does have a lot of talent. But I guess my conscience needed to get that off my chest.
I'm so conflicted on this new habit of like... writing really heartfelt shit to people online in comment sections... and then deleting it and never posting it. It's mostly because I have done it so many times in the past and had it just... go unnoticed. Or even gotten pushback. Because so many idiots are out there literally just looking for a fight. And I just... I want to be careful, and thoughtful. Intentional. And all my intentions are always benevolent, philanthropic, well-meaning. But they aren't always received that way. And... I guess my faith has been a bit wounded as of late. So, to those out there with kind hearts who would not be offended by my input... sorry for assuming. It's my problem, a byproduct of the problems of others, not yours.
Alright, with all that out and done... I'm gonna go do some quick yoga, water my plants, get a quick bite of ice cream and then head to bed. The newest necklace should be done tomorrow (hopefully), I'm very excited!
1 note
·
View note
Text
error 20 3utools
The first consideration when thinking about adding a custom wine cellar for your personal home is location. Advantageous be on the ground level of the home? Anyone have a basement? In the long term be on the 2nd floor or higher? Will your cellar be associated with interior of the home and is it alongside an outside wall? Anyone have a specific space you want to use like an existing closet, below a staircase, away from the dining room, a pantry, an unused room or will you be adding an addition to your home? A wine cellar could be built in any of these locations. Each presents different challenges when adding a climate control system to can make.
Cut out words and pictures from scrapbook papers, magazines and even junk mail to decoupage your weed. Create a theme by selecting similar words or images, for example Spring. Tissue paper is really a great material to decoupage pots. You're able use one color or a variety of coordinating colors for a fun, semi-transparent look. Crinkle the tissue paper inside your hands and tear into pieces. Make use of a foam brush to apply decoupage glue (such as Mod Podge) to your pot. 3utools Activation Key Free over pot within a random form. 3utools Crack with another coat of decoupage glue.
3utools Crack Full Version should the hands are planning to be immersed in water any kind of length of the time. Extensive periods in water can dry out the fingernails making them brittle.
Once 3d coat tend to be finished sit quietly and skim both articles. I promise, you will be exposed to the techniques to both of your prompts, providing you the opportunity make amends to yourself by bringing your actions and your thoughts in location. You will begin to walk your thoughts and your talk And yourself. There's nothing more powerful and a battle worth fighting.
Don't abandon advertising that's working - but keep trying to enhance it. And regularly test new in order to see how they work that you. If scuff make any changes within your advertising, revenue will eventually decline.
Building an effective business is hard work - most of computer devoted to locating customers. Regardless of whether most people can make use of product or service, you still need marketing and advertising strategy achieve them plus a persuasive sales message to shut sales.
The three kitchen design ideas listed above will spend you very little to execute, and a lot of other low-cost ideas out there. You just need to blend your ideas with your budget. Believe it or not, accesorize, accesorize-a new a hundred thousand dollar kitchen makeover can each morning be achieved with ten thousand dollars. Using creative, kitchen design ideas, anything can be. Trust me; your friends won't believe just how much you enjoyed. Forget that - make them suffer and never reveal your secret kitchen design clues.
0 notes
Text
David Bowie (1967)
What even is a David Bowie? This is the question that his 1967 self-titled debut attempts to resolve with an answer that is, at least from my perspective, a multi-faceted hodge podge of contrasting genres. Is he another poet of the booming British psychedelia scene? The next Anthony Newley to rejuvenate the well-worn traditions of British dance hall? Some third well written descriptor that I can pat myself on the back with? The answer is decidedly undecided, as I cannot stress this is enough: Any attempt to define what David Bowie was defeats what David Bowie is.
However, the efforts of one ‘Davie (Davy?) Jones’ in the early 1960’s can be defined as evolution as a means of survival. For our young David, he appeared to be in a new blues outfit almost every week: The King Bees, The Lower Third, The Manish Boys, all of these resulted in the same results of invisible singles and dead ends. This was until 1966, where a change in record label to new sub label Deram resulted in a contractually obligated album. Now separate from the expectations of fellow mods with aspirations of musicianship, this album provided Bowie with a chance to explore his more theatrically inclined influences and shape the scaffolding of his early lyricism.
My first experience with this album was also one of obligation. In my early years as a self-proclaimed “loyal Bowie consumer”, I felt a sense of duty to listen to all his discography, as if my appreciation for only a few select albums invalidated my status as a fan. And after experiencing the dizzying heights of Ziggy Stardust and the Berlin trilogy, this record certainly…surprised me. With a more sincere approach to the kitschy stylings of London’s contemporary cultural scene, it certainly makes it hard for the scene kids to champion this record as a transcendental moment for music’s tapestry. Treated as a niche piece of laughable history by most Bowie fans, I ask what relevance this record has in a context removed from the dance hall that spawned it. Let’s find out, shall we?
So, What’s It Like?
Up until recently, I had perceived this album only from the perspective of its contrasts. This is an understandable perspective to take, as its clashing of genre can make for a dissociative experience for the first-time listener. For example, the baroque stylings of Maid of Bond Street being immediately followed by the gothic and rather unsettling Please Mr. Gravedigger offers a type of mood whiplash that cannot be overstated enough. From a modern perspective, this could almost be perceived as comedic, near satirical (I mean, In an album full of pop sensibility, why NOT end it with the singer you’ve been selling us on for half an hour talking to the dead corpse of a gravedigger he’s in the process of burying?) yet the faux sense of earnest London charm carefully cultivated in tracks like Love You Till Tuesday and When I Live My Dream dissuades this notion fairly quickly, and suggests an underlying issue in the track sequencing. If anything, this is more of a symptom of what an album was at this point. While records such as the Beach Boy’s Pet Sounds and the Beatles’ Sgt Pepper offered sketches of the LP as a conceptual piece of artwork, albums were still largely viewed as a type of ‘future single depository’ where the importance of the induvial song outweighed its contribution to the composition of an album. When compared to the future-facing LPs later down the line, this debut seems considerably antiquated in its design, especially highlighted in several audible qualities: Bowie’s wavering voice is seemingly trapped between a poor man’s Newley impression and an amalgam of ‘soulful’ pop cliché, and the combination of canned orchestra and stock radio sound effects on some tracks can leave a lot to be desired (Join the Gang, I’m looking at YOU).
Yet there is a lot about the album that presents traces of a unified vision. Lyrically, the earnest cheek of dance hall is surprisingly complimentary to the childish naivete present in much of Britain’s early psychedelia. The happy medium of this patchwork aesthetic is met through a lyrical focus that will be key to Bowie’s process well into the 70’s: Stories about weird little characters. Nicholas Pegg perhaps described it best when he wrote of the album’s “…rouges gallery of lonely misfits and social inadequacies.” For example, the childish yet formulaic occurrences of Uncle Arthur are not that far removed from those of the Beatles’ own Nowhere Man. Strung out Mods, Lesbian Soldiers, Right Wing Cannibals, and even children: Each get a chance to sing their piece and ultimately show premotions of Bowie’s detachment from the self when crafting his art, forming the primordial DNA of admittedly more successful projects. And when the instrumentation fits, it well and truly fits: The triumphant and freeing lyricism of Silly Boy Blue is beautifully accentuated by the almost folksy flavour of orchestration, and There Is a Happy Land’s more stripped back approach invokes a moment of earned sentimentality. There is success here, and that cannot be ignored: yet time has passed around us, and perhaps it is not the type of success some have come to expect from the Bowie ‘Brand.’
*What’s Worth Listening To?*
Rubber Band: Perhaps the most quintessentially ‘theatrical’ track on the album, this track’s protagonist laments a lost love and yearns for a youth that is taunted by the tune the band plays. The narrative focus results in a more trombone and drum centric instrumentation that helps the track to stand out in comparison to the album’s more orchestral leanings. Has a kind of Elanor Rigby aftertaste.
Love You till Tuesday: A wonderfully insipid track that offers a ‘playful’ take on a pining romance. This is perhaps where Bowie channels Newley the strongest on this record, namely through a vocal performance that can only really be heard to believe. CAUTION: Make sure you have a high tolerance for cheese before listening.
There Is a Happy Land: As mentioned, this track scores a surprisingly sentimental victory through its earnest portrait of childhood nostalgia. Perhaps I am a sucker for this specific literary theme, but it is well supported by a gentle and soothing vocal delivery from Bowie and a lovely dichotomy between keys and acoustic guitar. Perhaps one of my favourite tracks from the Deram Period.
We Are Hungry Men: Overpopulation results in the song’s protagonist suggesting mass cannibalism as a viable solution, and he expects to be praised for this. Apocalyptic visions and protagonists with God complexes? This theme is a surprise tool that’ll help us later. Despite the more generic instrumentation (The trumpets seem oddly out of place for me?) This song is arguably the most proto-Bowie, thematically at the very least.
Silly Boy Blue: Baroque Pop styled Psychedelia could’ve been such a great fit for Bowie, and this track offers us a teasing glace at what could have been. The lyrics dabble in ideas of Buddhism, and the rare spotlight of bass and layered harmonies give it a decidedly ethereal, yet contemporary feel. Easily the best of this period, hands down.
Please Mr. Gravedigger: moody and atmospheric, this track is a wonderfully eerie conclusion to this otherwise poppy record. Bowie’s nasally and isolated vocal delivery carries most of the unsettling feeling the track generates, supported by the light rain and rolling thunder heard in the background. With a macabre lyrical focus, this track highlights that experimentation has always been apart of the Bowie experience.
The Laughing Gnome: More of a single, but this may be the only chance I get to bring it to the attention of the public. Just do yourself a favor and listen to this track: The less information you have going into this track, the better.
Final Thoughts?
Well overshadowed by his following albums, David Bowie remains as a somewhat obscure oddity, presenting sketches of Bowies that could have been. And while the swerving tones from track to track can be disorienting to the retrospective consumer, on face value this record presents an ambitious youth looking to make any kind of headway into the music industry (An attitude that admittedly persists well into the next few albums.) When I first wrote on this album, I described it as a “CV in album form” calculated by Bowie’s management at the time. Upon revisit I posit that it's almost a companion piece to Bowie the performer rather than a produced piece of art. However, I see a considerable amount more of Bowie himself in this record than I did initially. There is clear passion here, in that same way how a lot of us hold on to some of our dorkier obsessions: That Newley Impression seems like a teen trying to mimic an admired figure, in retrospect. While ultimately suffering from the mainstream trappings of album production of the period, there are some inventive ideas on display here that I don’t have the heart to outwardly despise. Not a record I go out of my way to listen, but it certainly has its charms. After all, it's almost an ode to the slightly unfocused youthful exuberance we all place into our first creative projects: and while we may cringe at what we once were, it still led us to where we are now. Give it a listen if you are curious to see where it all began!
“Aarrghh, that Tony Newley stuff, how cringey. No, I haven’t much to say about that in its favour. Lyrically I guess it was striving to be something, the short storyteller. Musically it’s quite bizarre. I don’t know where I was at. It seemed to have its roots all over the place, in rock and vaudeville and music hall and I don’t know what. I didn’t know if I was Max Miller of Elvis Presley.” – David Bowie, 1990.
Score: 6/10
#music#rock#classic rock#new wave#new romantics#david bowie#60's#70's#80's#album#the beatles#anthony newley#review#album review#60s psychedelia#neo psychedelia#theatre#musical#musicals#vintage#1967#dance hall#lgbt
0 notes
Photo
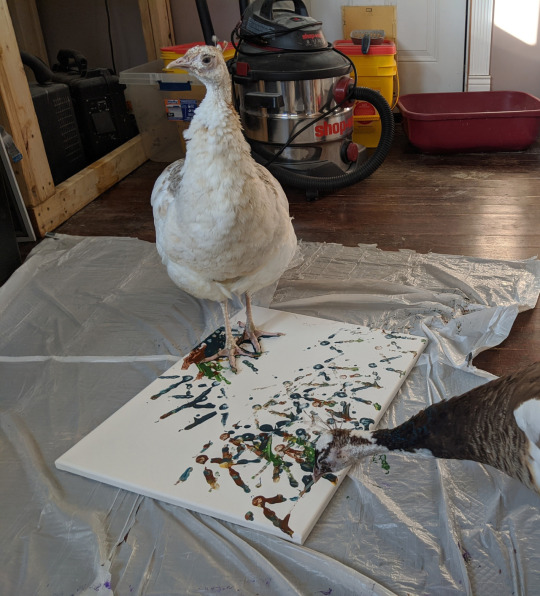


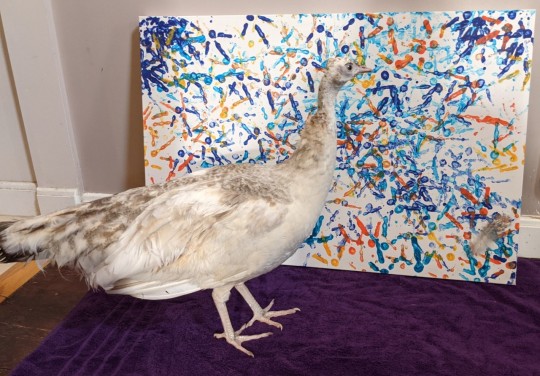
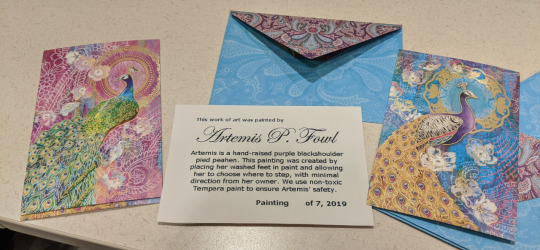
Peahen Painting Commissions by Artemis P. Fowl
Have you ever wanted a peahen to paint you a picture? Have I got some good news for you! Artemis here is opening limited-slot commissions for a painting made by her very own peet (peahen feet)!
Details and pricing for her 2022 run are below the cut.
Please read everything before messaging!
DETAILS
There will be 10 commission slots available. These will be the only commission slots available in 2022. We may do paintings for ourselves or others, but they would be sold as-is.
*NEW* Slots are no longer limited to 1 per person, but will be completed according to which are already paid.
Artemis will be bathed and diapered before beginning (so the painting will be clean), and bathed afterward (so she will be clean).
Base commission canvas size is 16x20, and the cost is included. We are happy to use any size canvas, but you will then be responsible for paying the price difference.
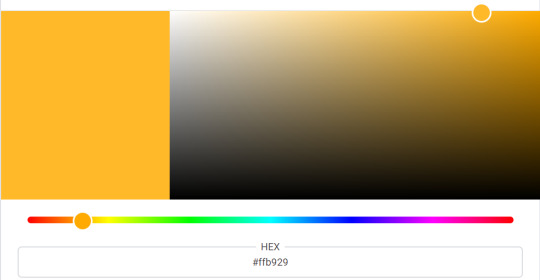
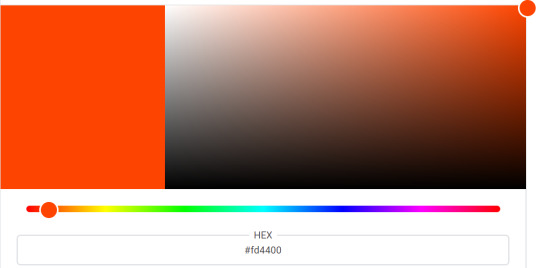
We are using Tempera paint, since it is non-toxic and washes off the bird completely, which means that we are somewhat limited in the colors we can use; you can preview Tempera paint colors online to determine what we may have access to. When you contact me, you will be asked what color(s) you want, so please have some idea before messaging.
You may choose up to 3 colors at no increase in cost, but you are not required to choose 3. You can choose just 1 or 2 if you want, or 3 shades of the same color.
*NEW* We now have access to blue or green glow-in-the-dark paint and for an additional charge we can mix it into another color or have her leave a few “secret” footprints over the top of the painting so that they glow when the lights go out.
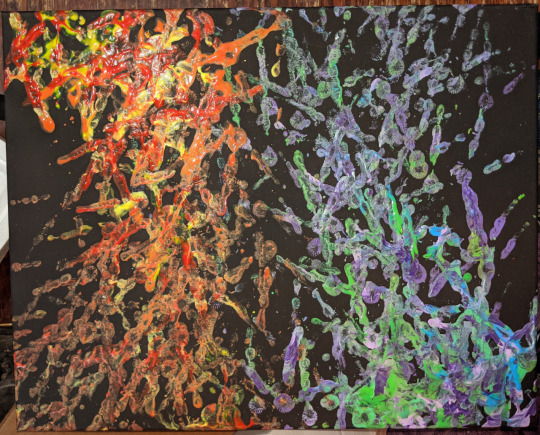
Paint colors will mostly be mixed up as in the above examples, but we’re happy to take directions like “mainly purple with a little pink” or similar. We can include one (1) pure color (the first color down) for no extra charge.
The paintings will be sealed with mod podge spray because that is what the internet said was safe to use with Tempera.
Each painting will come “signed” with one of Artemis’ own feathers in the lower right corner. You will get a preview image of your painting without the feather, so that you can choose the orientation before the feather is attached (you are also welcome to let us choose what we think looks best).
Each painting will come with a printed card of authenticity that is dated and numbered (#X of X, 2022), with information about Artemis and the painting. These will vary in appearance by year!
I will send you a digital photo of Artemis P. Fowl standing beside her creation (like the above examples), and possibly in-progress shots if I have patient help during the process.
I may place a few smaller canvases around the bigger ones while we work, to create miniature side pieces that will be unique and NOT have prints made (and also because she’s always getting paint on the floor anyway when she steps off). Price will vary by piece but be discounted to the commissioner before they go to market. Please ask in advance if you think you might want one to go with your main piece, because I will forget otherwise.
PRICING
Each base commission will be a flat cost of $120 shipped. This covers the time to give Artemis baths before and after, setup/teardown of the workspace, actual painting time, treats for Artemis, curing/sealing work and materials, one 16x20 canvas, paint up to 3 colors mixed, packing material, shipping cost in the continental US, drive time to the PO, and PayPal fees.
Again, a larger canvas will cost more to purchase as well as to ship. A larger canvas may also increase significantly in cost if it will take us more than one session to complete.
Additional colors beyond the first 3 will be $2/each. Glow-in-the dark paint use will be $5/ea.
Special requests which require additional time and stress (for both me and Artemis) may cost extra. For example: if you want multiple pure colors (footprints that are a single color, not mixed), that will require drying the painting at least some, and extra baths, so would be charged per-color. I reserve the right to decline any special request if it is something we cannot do or that I think would stress Artemis too much and as such, any special request must be made before payment is settled.
Payment must be made before the painting begins, and is not refundable once the painting has been painted.
Extra Information/Disclaimers
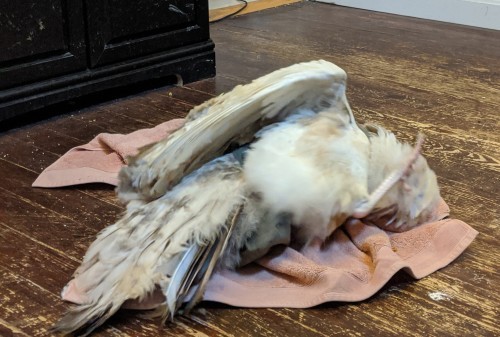
Because I am working with a live animal, I cannot guarantee that paintings are free of pet dander/dust or waste. Artemis does get bathed before and after, but birds are constantly shedding feather sheaths and feather particulate, and while she is diapered and as clean as I can get her, she’s still painting with her feet.
Because I am working with a live animal who has sharp toes, your canvas may have indentations or small punctures. So far we’ve managed to avoid punctures except one small one in a corner, which I patched with paint, but you should be aware of the possibility. If a painting is badly damaged, like with a visible hole, I will start over at no cost to you.
Because I am working with a live animal, I cannot guarantee where the paint goes on the canvas. She walks where she wants to go, and while I can try to tempt her in certain directions with treats, Artemis will do what she wants. The most control I have is if you want a sparsely-printed work, I can end the session after a little while, if you want a densely-printed work, I can let her keep walking around, and I can usually get her to leave some white space to create shapes. I can’t promise what shapes.
Because we are using Tempera paints to keep Artemis safe, the painting may be sensitive to light or water damage if placed in a sunny location or if it gets wet. I WILL seal the paintings before mailing, but you should be aware of the material limitations of your piece due to the nature of its creation, and plan accordingly.
Tempera paint has a long cure time (supposedly??). I will be letting them set and dry for at least 2 weeks, at which point I will seal them and let the seal set for another 2 weeks. After the seal has cured, I will be taking them to be photographed for prints (which means you will also be waiting for all of the paintings to be done, so I don’t have to pay for the photography more than once), and then I will add the signature feather, package them for mailing, and send them all out. I will communicate with you along the way, but be prepared to be patient, you will likely get the painting in May, 2022.
I will be making prints of all of the commissions, and the patterns will be offered on items in Artemis’ Redbubble shop. You will receive the original, but this does not extend licensing for similar use to you.
All of the money received from this endeavor goes straight back into use for the birds. It is used to pay for things like their staple chow, scratch grains, treats, bedding, toys, and associated costs like lumber and fencing for improving or expanding their pens. This particular set of commissions will still be going toward building a protected outdoor flight pen off of our barn, so that Stan and Artemis will have access to outside without having to be supervised or moved into an old pen. Any leftover will spill into their feed fund.
If you are interested in commissioning Artemis, please send me an ask, tumblr message, discord message (Kedreeva#4912), or email me (preferred!) at ItamashiiSparkle at gmail dot com. I will ask you to move to email eventually, in order to keep track, so it’s best if you can start there.
2K notes
·
View notes
Text
AMT U.S.S Enterprise model kit built part 1 :0
Warning, this is probably going to be very boring to the vast majority of you, I just thought it might be fun to track my process on this project.
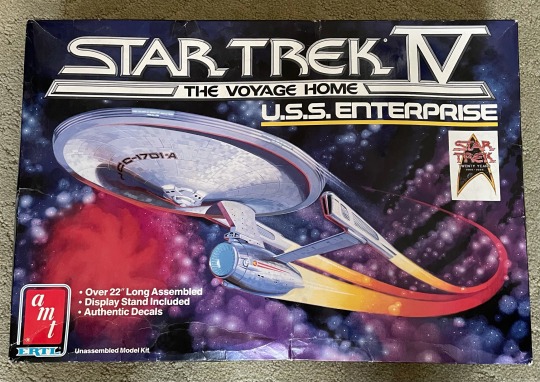
Like I posted about before, I picked up this kit from the antique store. It seemed like at some point someone had built this thing, because all the pieces were put together, but then they ripped it apart again so it would fit back in the box. They also never put the decals on or decorate it, which I’m very happy about, otherwise I’d have a lot more work to do.

This is everything that came in the box (except for the little front piece, which I was already working on when I took this picture, woops) everything is in pretty good condition except for one of the arms that attached the engines, which got snapped off from the hull. I’m assuming (hoping) it’s not going to be a big deal and glue will strong enough to keep the two parts together.
I’ve never built any models other then some Gundam Robots, but those are snap together so the process is very different from this. I just kinda did a lot of thinking about what I wanted to do with this, and how I was going to do it. First of all I wanted it to be sick as hell. I cannot just slap glue on it and call it a day, otherwise it’s really not worth the 30 something dollars I spent on it. Second I wanted lights. This model isn’t really made to light up, but I knew it was possible and something a lot of people do add to their models. Also, my dad had a pack of tiny LED lights laying around the house he said I could use (thanks dad). I also wanted to spend as little money as possible, as I always try to do when making crafts.
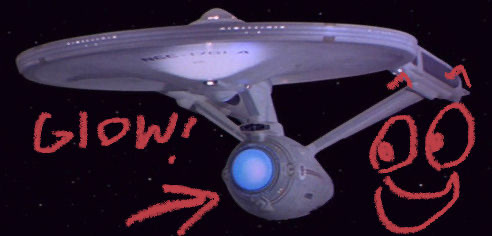
With all that in mind, I’ve formed a very half baked plan. First if all, there are parts of the ship that are supposed to glow, but obviously won’t because the whole thing is made out of opaque plastic. There are tiny holes in the saucer section, which I think will do nicely as windows if I just stick a light in there and let it glow through. All fine there. Looking at imagines of the ship, there is also a big blue light near the back of the saucer. My plan there is to just drill a hole and let one of the LEDs stick out. But, my biggest concern was for the thing in the front to glow, it has to glow.

My original plan was to make a mold of the front piece out of silicone caulk and then use resin to remake the whole piece,,,, but this time see-through!!! Mostly this plan was born out of me already having all the stuff necessary to give it a try, but I didn’t have that much faith in it. And for good reason too cuz it failed!!! Well kind of. Silicone caulk is used to fill up cracks and gaps in walls, not for resin molds. It came out better then expected but it smelled like vinagre and it got all over my hands in the process which made me mad so I just scraped that idea before I wasted my time actually pouring the resin.
Anyway then I thought why am I wasting time trying to MAKE the piece when I can just find a already made replacement, because really it was just a small slightly curved piece of plastic. So thankfully I was able to find this big plastic ball thingie I knew would work fine.


The first picture is half the ball, the small piece I cut out, and the un-altered front piece. I drilled out the front piece with a dremel, then sanded both pieces smooth till they could fit together nicely. Easy easy!!!!! (Well, a little time consuming, but easy). I made some transparent paint out of mod podge, food coloring, and a little bit of water and slapped that on the clear piece and well-

She glows! Of course it’s a bit of a hack job, but not too bad for random crap I found in my house, and I either way it’s a lot more accurate then the original. This front part was very important to me, so I’m glad it turned out okay with no major disaster (tho I could nit pick all day…. That big ol 5 on the front for example 😭) but anyway that’s it for now…. Yep that much writing to tell you about one piece, I warned you this was gonna be boring! I’m going to try and find something for thrusters (engines ? Those things that stick out on either side) next, because those are also supposed to glow. If I can just find a groved clear plastic somewhere in my house, we’re golden. Then it’s on to installing the LEDs, putting it together and painting, yayyy!!!!
#Star Trek#sorry for a long post with images#uss enterprise#model#my model posts#there is the tag block it while you have the chance#although I’m sure you’ll be excited to see it when it’s done#I actually get super self conscious about this kinda stuff because there are professionals#at like model building#and baby I’m probs breaking all the rules#don’t @ me for my hack jobs#it’s all I know
31 notes
·
View notes
Text
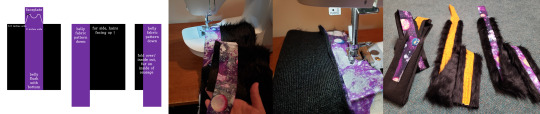
How to Long Furb
For whatever reason, furbies have taken over the internet. It’s beautiful and terrifying and I desperately want one. Original 1998 furbies are hard to acquire but that doesn’t mean you can’t make one of your own. Imagine the potential for neck pillows with long furbies! I’m going to walk you through step-by-step how I acquired the supplies and compiled these monstrosities. Note, this is not by any means a comprehensive guide, just my personal experience. I am an ameteur. There is a huge community of furby fans online with tips and tricks on executing a variety of furby modifications. Read more below!
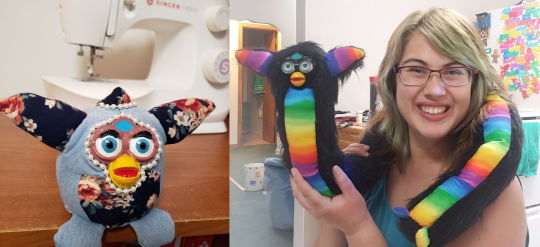
I will start off by saying there were many points throughout this whole process where I got frustrated and set the project aside for weeks at a time. I initially started hand-sewing long furbs but was disappointed with the poor craftsmanship. That’s when I impulse bought a cheap Singer over the 2020 holidays and retaught myself how to use the machine. The point I want to make here is to persevere. Every furby is beautiful! Crooked faceplates and chunky bellies just give a furby more personality. They say practice makes perfect, right? So let’s get started. The main components of a furby are:
1) The faceplate: unless you can get your hands on an original furby, finding a faceplate for your project can be tricky. There are a variety of people online selling furby faceplates. You can also 3D print faceplates using files from thingiverse. I’ve even seen faceplates pressed in resin. My favorite faceplate is from MrDsPrintedCreations on Etsy. The iris of the eyes are recessed so you can easily insert glass eye chips. The first thing I do with my faceplate is glue a piece of fabric behind it so it’s easier to sew into the head. I paint my faceplate with acrylic craft paint and top it off with a clear gloss coat.
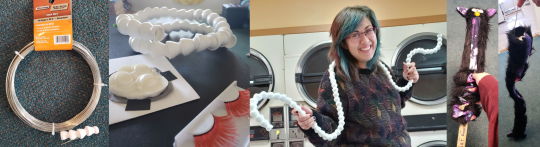
2) The spine: for a poseable long furb, there needs to be a flexible inner piece. I thought thin wire from Menards would do the job, but once it’s in the plush it doesn’t hold it’s shape. I found plastic doll armature works well as a spine. It even creaks when bent for that extra spritz of cursed, spooky energy! You can also use a flexible coolant hose as a spine. I’ve ordered doll armature online from CR’s Crafts: the 1/8th and 1/4th size works well. The 1/2th inch armature is hard to stuff around.
3) Fabric! Fur and belly piece: In order to make furbs, I knew I first needed a sewing pattern. Tumblr user Cavity Sam created a template based on the 1998 furby and I used this to make my first furb with my new machine and scrap fabric lying around. My friend Gunnar 3D printed a rudimentary faceplate to use. After using Cavity Sam’s sewing template, I modified the pattern to use for long furbs specifically. You can download that sewing pattern here.
You’ll need the following supplies per one 3-foot long furby:
quarter of a yard faux fur fabric (9 inches x 44 inches)
patterned fabric for belly, ears, feet (~3 inches x 44 inches)
sewing machine (thread, needle, scissors, pins)
faceplate, 14mm eye chips, eyelashes
E600 glue, scrap fabric
paint (acrylic or nail polish), paintbrushes, clear top coat
spine (plastic doll armature)
cotton stuffing (I cut open cheap pillows from Walmart)

Step one: Use the sewing pattern to cut fabric pieces for the head and body. When cutting on fur, make sure to trace the pattern on the flat backside of the fabric with the fur flattened in the right direction. For example, the hair on the Y-mane piece (back of the head) should be pointed downwards. I made notes on the paper pattern pieces where you can eyeball more or less space. The mane piece should have more rounded corners, for example. I made my furbies 3 feet long, so the front belly piece was 2 inches wide by 3 feet long. The back fur was 6.5 inches wide by 3 feet long.

Step two, feet and ears: Depending on how small you cut your fabric, it can be really hard to combine two separate pieces. For the feet I folded a piece of fabric in half and sewed the C-shapes before cutting them out. Using tweezers made it much easier to turn them back right-side-out. After cutting the ear pieces (making sure the hair on the fur was pointed in the right direction, inside out) I pinned them together before sewing. Turn back right-side-out.

Step three, head: Line the pattern pieces up so the Y-mane is in the middle. Sew the sides of the head to the mane first. Once that is one solid piece, fold it in half to sew the top curve of the head. I have pinned these pieces to ensure they don’t slip when going through the machine. Slow and steady wins the race; make sure to turn the fabric as you’re curving the top of the head. Finally you can sew the piece under the ear together, leaving a gap for the ear to go in.
Step four, ears: Everything up to this point has been done on the machine. I haven’t figured out a way to attach the ears with the machine, so this step was done by hand. With the ear facing right side out, pin the ear to the inside-out head. Make sure the patterned part of the ear is facing outwards (where the faceplate goes). By hand, sew the ear to the hole in the head. After the ear is secured, turn the head right side out and voila!
Step five, body: Lining up these pieces is important and a little tricky. You’ll want some excess belly fabric on the top to merge with the bottom of the beak on the faceplate. See the diagram; rotate everything 180 degrees to begin sewing. The fur hair needs to be pointed upwards and the belly fabric pattern is facing down on top of that. After sewing the belly fabric to the fur, fold it over to sew the other side. The fur should be on the inside of the sausage/ body piece. Once you’re finished sewing, the finished piece needs to be turned fur side out.

Step six: Faceplate break time! This step can be done at any point in the process, up until you hand sew the faceplate into the head. To start, glue a piece of fabric behind the faceplate. The faceplate itself should just be the eyes and the beak, making it easier to sew into the head of the furb. You don’t need that extra plastic around the bottom of the beak (or at least I haven’t figured out how to sew that in convincingly). I used grey scrap fabric and E6000 glue to adhere the faceplate. Then you need to paint the faceplates. In earlier furbs I used acrylic paint topped with clear DecoArt gloss varnish on top. You can also use colored nail polish with a clear coat on top. In the pictured furbs I tried sealing the faceplates with mod podge but it dried tacky/ uneven. Optional: you can accessorize your furb with jewelry!

Step seven, inserting the faceplate: You need to sew this part into the head by hand as well. Start from the top center (head inside out, faceplate facing into head) and work your way down the right. Make sure to use a thicker needle and poke the needle through as close as you can get to the faceplate to ensure the fabric fur is flush to the face. The needle may be stubborn (poking through the hardened glue) so use a thimble or bottle cap to help push the needle. When you get to the bottom corner of the eye, the fabric may not line up perfectly. Use excess fabric to sew a seam, effectively acting like a cheek. This part takes a little finessing. Finish attaching the fur fabric one third of the way down the beak. This is where the belly piece will connect to. The final step (later) will be to put the eye + glass chip in.

Step eight, attaching the head to body: I was able to use the machine for this part. Turning the head inside out, pin the head to the outside of the back fur. The head and back should line up so a gap is left for connecting the patterned belly to the bottom of the beak (that step comes later). After the head is connected to the back, I do a second pass to make sure there isn’t any gap in the seam. When turned right side out, you’ll see that excess patterned belly spills out the top. Keep the furb inside out to connect under the beak.

Step nine, connecting the belly to the beak: On the excess patterned fabric sticking out the top of the body, trace the shape of the “M” to cut out. See the highlighted yellow portion in the picture, as well as the printed sewing pattern piece. The piece directly below the beak needs to be done by hand. If you can manage it, you can sew a diagonal line with your machine before trimming the patterned belly. I found it easiest to start from the right and work my way to the left. The acute angle under the cheek will need finessing, but with small and tight enough stitches the end result is good. Turn the furb inside out to see your long sausage of a creation!
Step ten, spine insertion and stuffing: Now THIS is where I may have messed up (i.e. got frustrated multiple times) and need feedback from the furby community. The furby is essentially complete, it just needs the butt and feet attached to seal it off. Because of this long sausage of a furb, it was hard to push stuffing all the way up into the head/ ears, even using a yard stick. Maybe if I printed my original sewing pattern at 115% or 130% size, the completed project wouldn’t have been so narrow. (The ears are a perfect size now that I think about it, so maybe just the head pieces need to be bigger.) This resizing would make for a larger in diameter, plushier furby too. I thought I could insert the spine after stuffing, but the opposite is true. Insert your wire or doll armature after the ears and head are stuffed but before you begin stuffing below the beak. Alternatively, you can fasten the top of the spine behind the faceplate before stuffing. I taped a cup to the end of a yard stick and that helped push handfuls of stuffing into the furb at a time. Leave 2 to 4 inches of the bottom unstuffed so it’s easier to sew on the bottom circle. We will leave a small gap for the rest to be stuffed before totally sealing it off.

Step eleven, connecting the feet and bottom: Stuff the feet and seal them off with a couple stitches. Don’t stuff the feet completely full, the top seam should lay flat. Place the two feet on the bottom of the belly, pointing upwards. Sew the feet onto the belly in a straight line. Now comes the part that takes more finessing, the bottom. When you line up the bottom circle, make sure the hairs of the fabric are pointed backwards. If you can manage it with the machine, sew the bottom circle to the bottom of your furby where the feet connect to the belly, about a third of the way around the full circle. The fur of the circle should be facing down, touching the belly of the furb. Once you’ve attached the circle to the feet, you can fold the circle back to see the butt starting to take shape! You can give it another pass on the machine, sewing the opposite side/ flip the furby so you can see the backside of the belly. Leave enough room to stuff the rest of the cotton and close the gap by hand sewing. Now that your furby is essentially complete, you can add the finishing touches! I always leave the eye chips for last so I don’t scratch them in the process of turning my furb inside out. You can print or paint the eye designs to place behind the glass chip. Use clear glue like superglue or E600 for the best results. Gluing eyelashes on with superglue is an optional last step.

Aaaaaaand the furbies are done! Again, I’m an ameteur sewer who’s learning as I go. I’m always open to suggestions and feedback; if there’s a way to revise this process to make more efficient and better quality furbs, I’d love to know. Thanks yall and enjoy making these cursed friends!
117 notes
·
View notes
Note
Do you ha e any recommendations on tutorials on how to add titles or anything on covers and spines? I just started book binding, and am still puzzling through most things with it.
Helloooooo! (sorry for delay)
Alas! I have only first-hand tales of failure to report back... Second-hand stories of success almost all involve the Cricut. Personally I feel like I’m at a titling precipice and am surrounded by bad ideas with the distant peeks of ‘Cricut’ or ‘Traditional Leather Tooling’ being my only options but also horrifically far away... though @marvinhere just shared on the Renegade Discord a lovely mod podge printed title example that I’ll perhaps try next...
Some examples of attempts made so far:

My metal font for stamping is cute but very tiny, too thin to print well on book cloth and I’ve not the skill to make a good impression in metal. In fact- even when I had access to a kwikprint hot foil machine at the bindery I never once got a book cloth result I liked. There’s a certain type of (borderline tacky) charm to embroidered titles but my weak eye for color/patterns undermines my attempts.
Not pictured was my paper inset attempt (using my typewriter-- @marvinhere‘s white text on black looked waaaaay better than my black text on white) and hand-writing using a hot foil pen I nabbed from Amazon. The pen attempt’s failing is only my own- it showed fine on book cloth but the rounded tip and my subpar handwriting does not produce results that please me. I know a lot of people paint or write the titles on the spine by hand (or cut templates) but I’ve no interest/hope in that...
I’ve been a big fan of the dust jackets I’ve seen shared on the Renegade Discord (particularly by @kate2kat!) but I fetishize my hinges/case too much to want to cover everything just for the take of a title.
So in short- I’m absolutely not the person to ask this question as I’ve yet to find an answer... Both Cricut and Traditional Tooling would be non-trivial investments (though you might be lucky like @ficcinghell and have a local library that will rent/grant you access to a Cricut) For arbitrary, personal reasons I’m staying away from the Cricut and learning leather working is probably a decade or two out for me...
As someone just starting though I’d definitely advocate for either experimenting wildly or avoiding it entirely. An untitled book is just a surprise encouraging you to glance inside because you’ll never figure it out from the case alone....
Good luck!!!!
29 notes
·
View notes
Text
@tinylionsed doing this in a post bc it’s WAY easier
The absolute BAREST essentials to make a book:
Needle & Thread (Embroidery floss works great, you should technically wax it, that makes it last longer/prevents degradation, but you don’t have to.)
Awl for hole punching. (Could probably be improvised, but you may as well spend the like. $5 to buy a real one.)
Davey boards: This is for your cover. You can get a big ass set of them online for pretty cheap. You want at LEAST 9x6 inches. That’s about the size of a standard cover. I got mine bigger than that, but not big enough to cut one board in half for two covers, so I end up wasting a bunch of board. (I save the cuttings for spine pieces and jigs later. Keep your scraps.)
Book Cloth: $5 for a sheet on Hollanders.com, comes in a ton of colors, and if you do half/quarter bindings (yours were quarter bindings), one sheet will last you a long time. Comes in a million colors.
Cover paper: This gets pricey-er. On Hollanders, it costs the same as cover paper. You can also get it on etsy, (which is where I found yours), which is where it starts to cost $$$. “Lokta” is the magic word. It’s a specific kind of paper that holds up really well, and is beautiful. You can also just use card stock/decorative paper from your local craft stores. All up to you. (You can also save the craps from this for various projects. I’m going to make a scrap cover once I have enough pieces, and they make for fun accents in partial bindings.)
Glue: I bought the smallest bottle of Mod Podge at walmart, which is like 4? oz? And I got several books out of it. You can also make your own paste with 1 part flour and about 4 parts water (hmu for details), which is Ye Olden Method, and works pretty good. I like to use the mod podge for the spine, and then then paste for gluing on the cover paper. It goes farther, and it pastes the paper down really well. (Unless you use cardstock, in which case you’ll need to line the edges with glue to really stick them down. Cardstock is stubborn.)
Nice to have but not really necessary
Bone Folder: Most of my life I literally used the clipy part of a mechanical pencil. You could use a ruler or some type of card. You could use your nail. It doesn’t matter. You just need a straight edge of some kind to get crisp folds.
Mull: This is a... good idea... strongly recommended... but you could probably get away with not using it. I didn’t use it on Ten Lashes, but I did on Cursed, because that was a heftier book. It’s there to reinforce the spine, so smaller books don’t need it, but thicker books do. It’s the cheese-cloth looking paper, also pretty cheap.
Book Tapes: Like mull, it depends on the size of the book. Again, Ten Lashes didn’t have it, Cursed did. It reinforces the spine, and thick books absolutely do need it. I would say once your book gets to about 1″ thick, that’s when you should use them.
Headbands: These are the black strips at the top and bottom of Cursed. They also serve to reinforce the spine, when you actually make them yourself, which is a whole complicated process. You can also buy them as little tab to put on the ends of the book, which is what I did, and it makes the spine took nice and tidy/cleans up the edges. Preeetty much superfluous and there to look nice, you absolutely don’t have to buy them.
I’m pretty sure that’s it for supplies! All in all, it’s sort of a large upfront investment, but the supplies carry over. The only thing you’ll be re-purchasing are the book cloths/papers, really, if you order to project like I do.
I don’t want to be crass and literally outline the costs of your gift, but if you’re interested in average costs I could??
But like as an example, the cover paper cost me about $5 + shipping, and I was able to make your 2 books out of it, with enough left for 2 more. The book cloth will vary more because the amount you use depends on how thick your book is: Ten Lashes used about an inch less then Cursed, I think, but all in all I was using about 4″ wide strips, and I have plenty left over. So as long as you start off with supplies you know you’ll reuse (such as neutral black spines, with more decorative covers), you can stretch the costs.
Also a note on the thread, bc it was my first mistake: Buy white/a light off-white cream. Trust me. You want it to blend with the paper in the beginning. and do NOT get pre-waxed, bc they always over-wax the hell out of it. You’d do better to get your own (linen) thread or floss, and wax it yourself. But get a light color. It looks the best, unless you want to do a contrast color. (Ex. I’m probably going to use a wine shade for my next book. I sadly didn’t have a good shade that would’ve matched the covers for yours T_T)
#cookie speaks#book binding#fic binding#one of these days I'll make a video tutorial#or stream my next project or something so you uys can see#written directions are difficult af
58 notes
·
View notes
Note
love your collages! any tips on how to make them? do you print any of the material or you find them all in magazines etc?
Thank you!
A have a massive collection of clippings (4 XL accordion folders plus a few smaller single slot folders) that I've amassed. Most of the images I use are from magazines or art/photography books that I buy from thrift stores or used bookstores. I really only print things when there's something really extra specific that I'm looking for (like when I was working on @lesmiscollageproject and wanted specific things for the scenes I was interpreting). For a long time I only had one much smaller folder that I used, but in the last couple of years I haven't picked up my camera as much, and I started getting more into collage than photography. Last year I went on Craigslist and put out an ISO post for National Geographic magazines. I ended up buying 9 boxes of magazines from the 60s-80s for about $20 from a couple who were moving. It’s bougie as fuck but there’s this magazine called Kinfolk that has really cool artistic photos in it a lot of times, so I sometimes buy that. I also keep my eye out for anything interesting on the ground, which has been surprisingly lucrative. I also work in a used bookstore, so some stuff that I have comes from clippings or postcards or notes that people leave in books they sell to us. In each of my big accordion folders, I also have a smaller folder where I only keep clippings of text, just so I don't have to hunt for all the tiny clippings I have of like a single word or sentence.
(Extra sidenote: now that my collection is so large, my folders are separated by what type of clipping is in each. So I have one for black & white photos of people, one for color photos of people, and then one each for color or B/W photos of scenery/abstract images/any image without people.)
Before I moved to Chicago, the city I was living in had a "maker store" called Tinkertopia that was basically a creative reuse store. The guy who owned it sold all sorts of weird industrial scraps or bits and bobs that people would use in projects, like scraps of felt, or a whole barrel of corks, or keys, or color chips, or pieces of piano keys/hammers, or old photo slides, or bits of broken jewelry, etc. So I also have a lot of stuff from that shop that I use, although most cities don't have a shop like that. (Random story: When I moved across the country I learned that it's impossible to sell a piano, so instead my housemates and I smashed it apart and gave the guts to the Tinkertopia owner because I knew he sold piano parts.)
In terms of actually making the collages, sometimes I sit down with an idea already in mind (the one with all the flowers is based on a Jean Genet novel, for example) but usually I flip through all my clippings until something catches my eye and then build from there. Sometimes I go through my text folders and pick out a line or two and build from that instead of an image. The "patina of roofs" one was a phrase that popped in my head the first week I moved to Chicago, so I made that collage based on it. But usually my collages are just dictated by the whatever first image catches my interest, and then what I build off of it.
Also, in terms of tools, I have a cutting mat that is great because it's plastic, which means I can wash all the glue or paint off of it (but I didn't own one until last year and mostly just used a piece of cardboard when I was gluing things). Matte mod podge is your best friend because it dries clear and not too glossy and you can brush it on and be really accurate. And Exacto knives are also great if you want to get really accurate cut-outs. I do the majority of my collages in my journals, but I've also done collages just on printer paper/construction paper, on a random piece of baseboard I found in one of the houses I moved into, on a brick I found by the train tracks, on canvas, etc. I really like collage because you can pretty much use what ever you want and whatever you have!
But yeah! My collage materials collection started out very small, just photo/text clippings from some Nat Geos and a couple of old photography books and maybe a few random nonfiction books from Goodwill. That's a really good starting place!
5 notes
·
View notes
Photo

How I Dry Herbs and Flowers
I was asked recently how to I like to dry my flowers, and my explanation just got longer and longer, so I decided to make it a post. These are my personal methods, but they’re certainly not unique to me!
Hanging
Hanging is one of my favorite methods, especially for full-bodied flowers that won’t press well, like roses or baby’s breath. Hanging works with nearly everything I’ve done it with! Example: roses, lavender, basil.
It’s super easy! Take your flowers or stems of leafy herbs and cut them so they’re about the same length. I usually do about a foot, but if you have at least 8-ish inches, it should be good! When cutting from a larger plant, cut diagonally to protect the original plant. If drying flowers, strip off any excess leaves.
Then get some twine or rubber bands and bundle them together, like max 7 per bundle, less if you want to play it safe, but it really depends on what you’re drying. Wrap the twine / rubber band once or twice around the end of the bundle that doesn’t have the flowers on it, then once or twice around each individual stem.
Hang upside-down in a cool, dry place with decent air circulation. If you care about keeping the colors, hang them in a place away from sunlight, which will bleach out the colors. Check back once every week or so until dry, usually 2-3 weeks.
Pressing
Pressing is better for flat flowers or individual petals. This is a little too tedious for herbs. If using full flowers, cut as much of the stem off as possible unless it’s really thin. If drying individual petals, just pluck them off the flower.
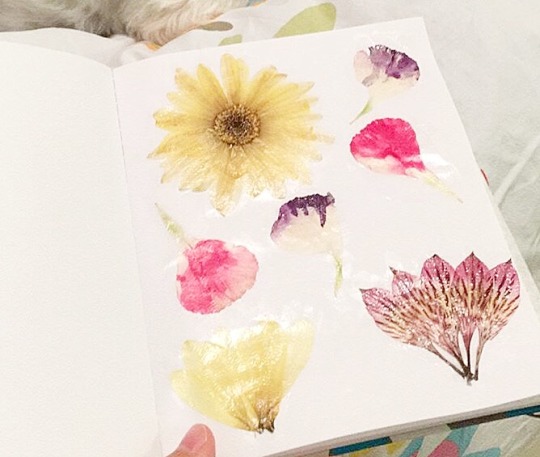
You’ll need a large book or two flat surfaces and something very heavy. Place a few layers of paper towel (preferably without pattern) on one flat surface (or one side of an open book), lay out your flowers / petals in a single later on the paper towel, making sure they don’t overlap, and cover with more paper towel. Then place the other flat surface on top (or close the book). Put some heavy stuff on top. This takes about 2-3 weeks as well. Be careful when opening to check on them as the petals might move around.
Oven
This is best for herbs that you need soon. You can also do with flower petals, though I don’t like doing it with full-body flowers because they can become flat on whatever side is pressed against the oven tray.
Preheat your oven to it’s lowest temperature, usually 250 degrees F. Get an oven tray and cover with a sheet of parchment paper. Strip your herbs (sage, rosemary, thyme, basil) from the stems and lay them out in one layer. Place in the oven for about 30-40 minutes then take them out and give them a stir / flip. Bake for another 30 minutes, or until dry. Leave the oven door cracked open while drying to release moisture.
What to do with your new dry stuff?
I like to use hung flowers for decorations... like wall hangings. You can also make potpourri, or burn them as an offering. There’s tons of other decorative uses! With flattened ones, I love gluing them into my notebook with a very, very thin layer of Mod Podge applied on the paper and on top of the petals / flowers. I’ve always wanted to put some in snail mail, but I never send mail. You could also frame them! Oven dried herbs are great for spells, cooking, etc.
Make sure to store your dry herbs in an airtight container.
#herbs#flowers#drying flowers#drying herbs#dry flowers#dry roses#dry flower petals#flower pressing#oven drying#tutorial#instructions#flower drying tutorial#herb drying tutorial#crafts#dry herbs#hanging#how i dry herbs and flowers#witch#witchy#witches#witchblr#jace the witch#jacethewitch#witchcraft
5K notes
·
View notes
Note
How do you make a custom funko? I saw your Witcher!Jaskier and it looked amazing!!! I’m really impressed and also curious 🧐
Thank you so much! I use target store brand acrylic paint to paint them and a bit of sandpaper and scissors to chop off bits I don’t want. I also separate the head and the body (even if I’m not switching the head to a different body) to paint them separately. I do this using the boiling water method which you can find on YouTube! You should probably seal and prime your funko with mod podge or a sealer and primer from a hardware store but because my W!J is just going to sit on my desk I didn’t bother sealing him.
Here’s an example of the pre painting phase where I’ve separated heads and bodies and taped up parts of the bodies and heads I dont want to accidentally paint while I’m repainting the rest of them.
The second photo is the painting phase where I use several coats of acrylic to get his hair all nice and solid. I did the same for the body. Then I let him dry, popped the pieces back together, and tada!


8 notes
·
View notes
Text
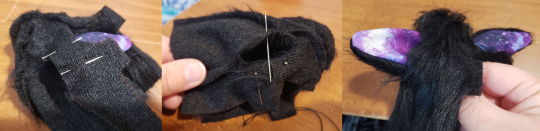
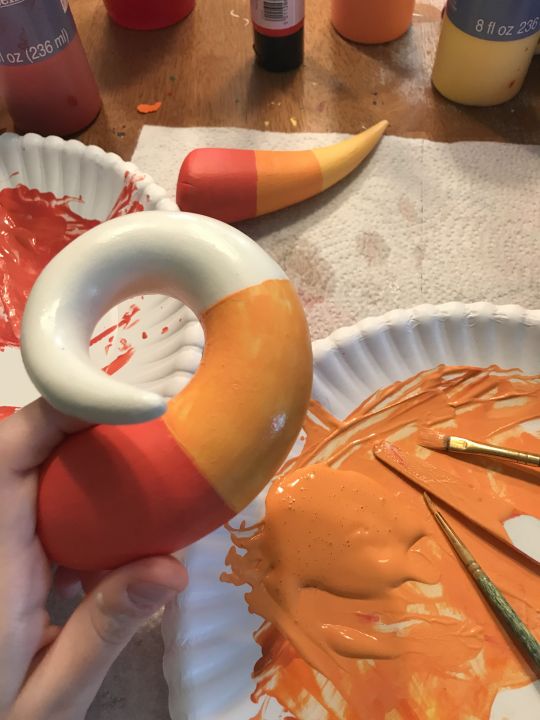
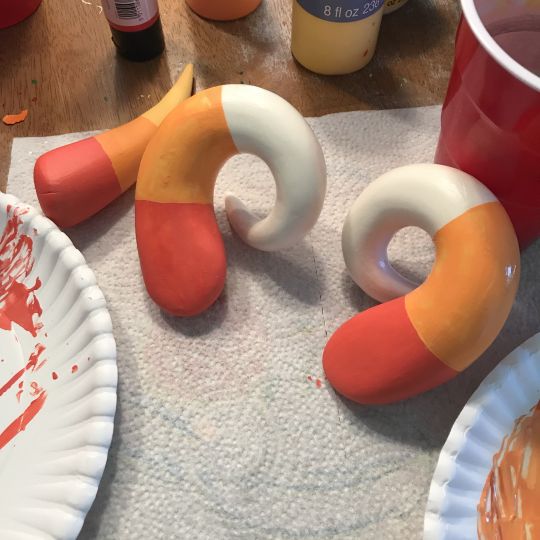
How I make my Homestuck troll horns - Painting
This is the last major step! The big whammy: painting.
It can also be the most daunting though (definitely not what causes me to avoid working on them for weeks). You’ll have to set aside a good chunk of time for this, it usually takes much longer than the molding to get it right. For me, the right coloring can make or break troll horns, and the exact hue is really hard to get right (it just takes a lot of time and anger. lmao).
Basically my advice boils down to about the same as the molding; stare at canon depictions of the horns while mixing paint, getting an understanding of the hue and value before committing it to the horns.
However, before all of that, I’d recommend adding a layer of matte Mod Podge. It seemed to make the paint I used less prone to soaking into the horns (necessitating additional layers), and smoother because it filled in the left over holes from sanding. Disclaimer here: My horns from years past did not have this, and the paint generally stayed fine. While my recent sets of horns that prompted the demand for this tutorial look much smoother, I can’t vouch for the longevity of the paint with such a step. Time will tell, and I’ll update if my horns appear to be suffering from the craft glue/finish under it.

For some reason, my photos of this step are corrupted, which is really unfortunate, but luckily it doesn’t take many visual cues to explain. After the Mod Podge is fully dried, you can sketch out lines where you think the sections of color will go. My general advice for this: most of the horns seem to have a general pattern of the lightest/top color having the most area. It’s not exactly in thirds!
Some examples:


Once you think you have them adequately sectioned off (make sure to compare them with each other; the most important thing is consistency within your own design!), you can move on to mixing.
Let’s start with the troll color palette:

Some things I like to remember while coloring troll horns (for both art or cosplay):
The bottom two colors are fully saturated in a digital depiction, the lightest is offset somewhat with white. However, most “fully saturated” paint mixes for troll horns end up looking brighter than canon, somehow. I offset all three with white (not much).
All three colors are more orange than you would expect. This is the biggest one, for me. I see a lot of interpretations of the horns as “red, orange, yellow” when really they’re just red-orange, orange, and orange-yellow. (Some breakdowns of the colors from a basic color picker off google below)
While I’ve kind of relentlessly insisted on canon adherence, it’s more important to have the colors internally agreeable. In most cases, it’s hard to tell when they’re off if all three work well together and the other tips are kept in mind.

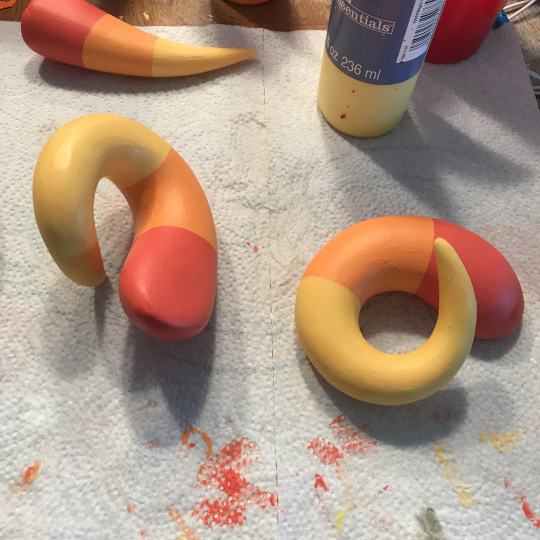
So after you think you have a good understanding of what colors to mix, try out some combos! This is what I started with for the red-orange and orange-yellow:


These mixes are certainly not what ended up being the final mix, but they were pretty close and only needed minor adjustments on my end. As you can probably tell, I have several paints for red, orange, and yellow, and I kind of mix them in here and there to prevent the color scheme from looking too “primary”.
Now, for me, with this latest attempt, I already had recent horns to compare back to, and I know that isn’t the case for most others. A general rule that I follow though is to have the “base” color as red, orange, and yellow, but add more orange to the red and yellow, and some yellow to both the red and orange. Then usually I will offset it with some white (sometimes the amount pictured, though more is typical too).
The general order I work in is bottom to top, or “darkest” to “lightest”. However, this process generally requires that you have all three shades at once and work on them in one sitting to be able to correct errors in your lines. It is also occurring to me now that you could use painting tape for this. Unfortunately, I’m stupid.

A mix for the middle color.

Since I had a former pair to compare back to, I used the base of one of my Kanaya horns to test my new mix. Again, I know this isn’t possible for others, but it may be helpful to see what the troll palette looks like off-screen, and wet vs. dry.

After deciding that the mix was satisfactory, I went through and painted the first couple layers of the bottom shade.

Letting that dry somewhat while still comparing it along the way with my former pair.
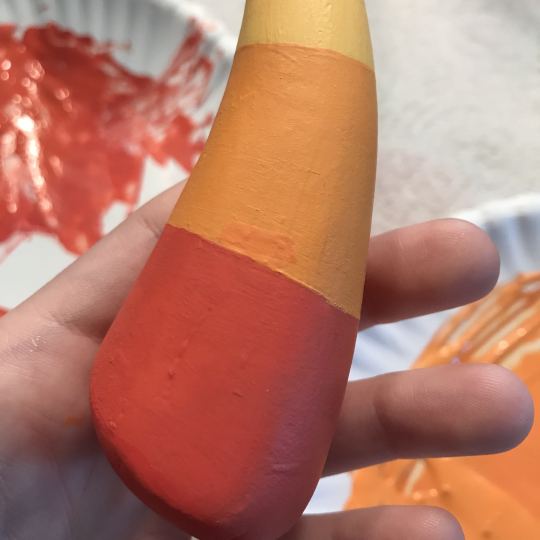
Comparing this mix to the last batch on the Kanaya horn.

It’s probably common knowledge that all of them will need multiple layers, though for me it depended on which types of paint I had mixed for each color. In this case, I think the middle orange needed the most coats.
Drying the final product! It should be noted that canonically, the troll horns do not appear to have any shine. Even matte Mod Podge has a shine to it, and for that reason, I do not add anything further to seal on top of the paint. While this may possibly compromise the horns’ safety with time, I felt that as long as I take good care of them, it’s worth it to have a more accurate look.
And now, comparing the latest pair with my ones from a few years ago before declaring them finished:

These previous horns had a foil core, hence the large crack in the left horn, exposing the foil at the center there.
Mounting is an even more subjective step, but if you wanted to see how I wear them, continue on to the next step.
Up next: Mounting!
If not, then thank you so much for reading! Please let me know if I seemed to make a mistake in my explanations or neglected to mention something, and don’t hesitate to reach out if you have questions about my process. As a reminder, I’m not a final authority on anything, lol, I’m just some 19 year old cosplayer that’s just been doing this for over 6 years and there’s definitely people out there more experienced than me.
As always, I can be found on instagram under @striderification as well. As I only intend to use this tumblr for longer posts such as these, that is the best place to find me.
Again, thank you all! <3
14 notes
·
View notes
Text
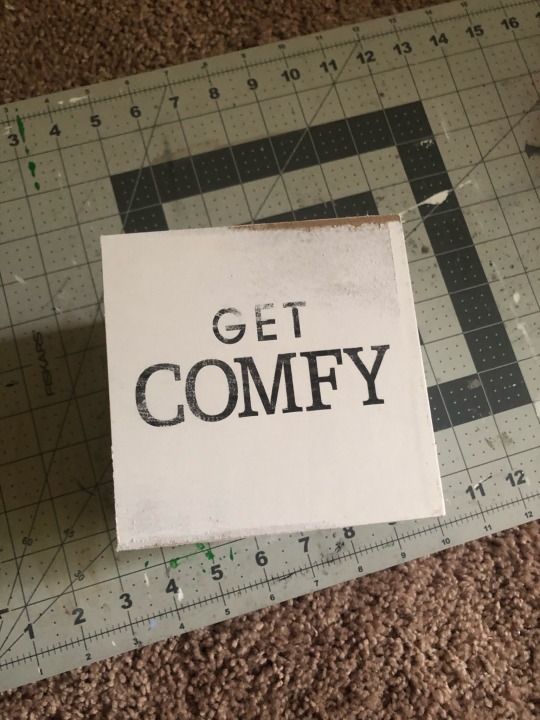
From Cute to Creepy.
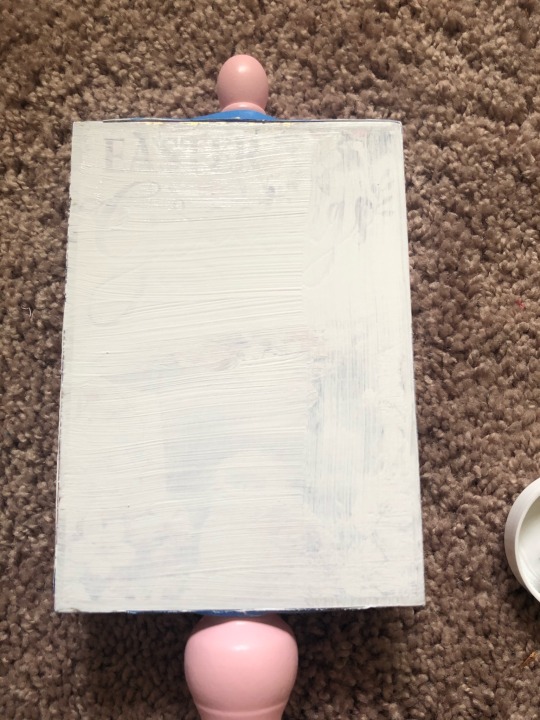
Probably my favorite thing to do is re purpose things I find in the store so I can make them my own style. Take these Easter signs and this guest room decoration.
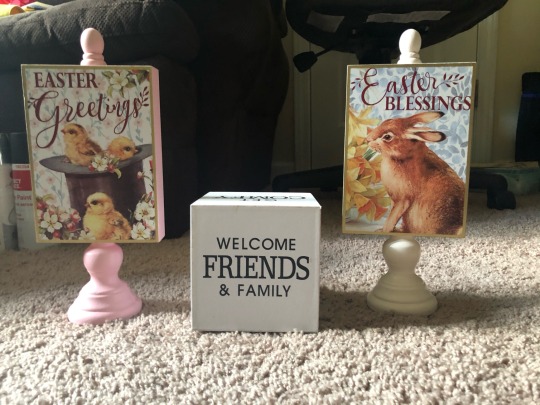
Cute on their own right? However, they’re just not my style. So this is how I took them from cute to my style!
Supply List:
- Some signs. I found all three of these items at Michael’s. The Easter signs were 70% off and the cube was 50% off. You can use literally anything you see in the store, these are just a couple of examples.
- Chalk paint. I used the brand Waverly, specifically the white and the grey color called elephant (I got both from WalMart).
- Painter’s tape (or masking tape).
- Scrapbook paper/ cardstock in a print you like. I’ll have a link to where I got the patterns I picked once we get to that part.
- Mod Podge. Any finish will do, I have matte on hand.
- An electric sander or sand paper.
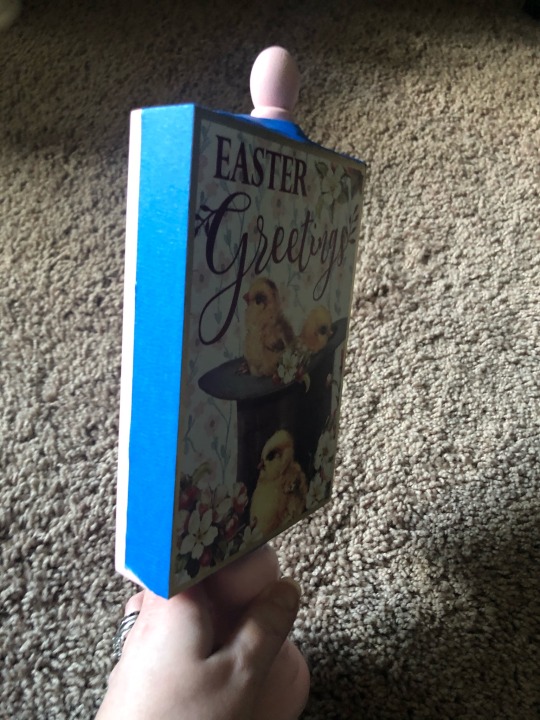
I started by using painter’s tape (you can also use masking tape) around the edges of the pink sign. I wanted to keep that pink color because it goes with what I’m going to use to cover up the image.
Just to make sure that the image of the chicks wouldn’t show through, I gave it 2 coats of white chalk paint. I love chalk paint because you don’t need a lot of it to cover up/ paint something plus it dries pretty quickly and matte.
Once I had my image sufficiently covered, I picked out what paper I wanted to use. I picked this one because it’s just one of the best images I’ve ever seen!
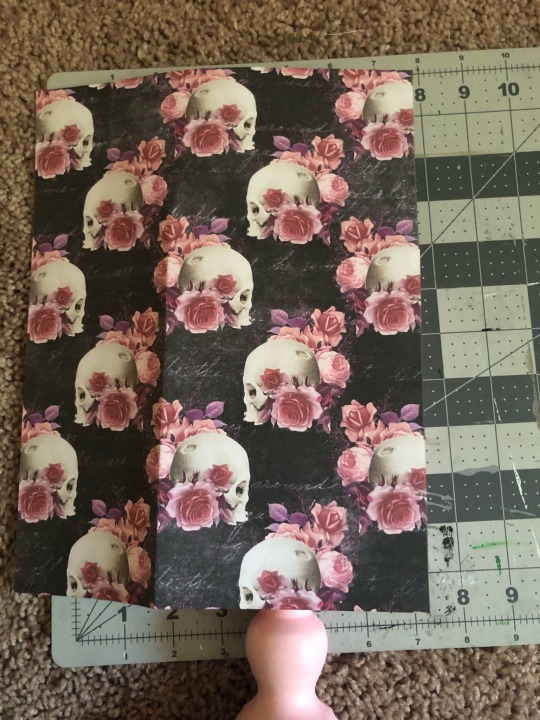
It’s perfectly dark and creepy with a dash of pretty flowers on it. I found it from THIS Etsy shop, which has been a GAME changer for me. I used to have to wait until Halloween when Michael’s gets all of their scrapbook paper in, but not anymore! I just selected the image I liked best (I found this one in the Pink Skulls Collection) and printed it out on some card stock paper I had on hand. I prefer card stock because it’s a little thicker (that’s what she said) than your regular printer paper.
To make sure the image would fit, I folded the paper to make creases where I wanted to cut. Normally, I’d trace out a pattern but this particular piece would not lay flat. Once I’d made the creases as defined as I could, I just cut along the lines and then checked it make sure it would fit, and trimmed off any excess.
Once I was happy with how it looked, I used some mod podge and a sponge brush to apply a thin layer on to the surface of the project and then placed the paper on top of it and smoothed it out to avoid bubbles.
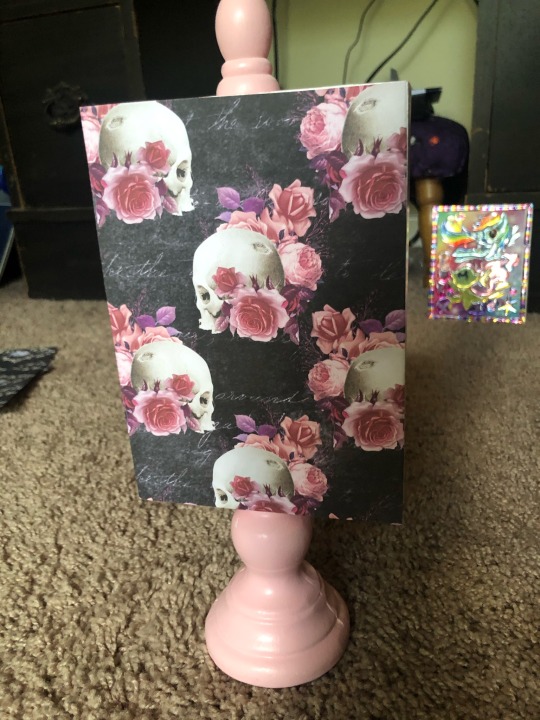
There you have it; this is how the first one turned out! I think I turned out really cute and kinda creepy all at the same time!
For the second sign, I did the same thing I did in the first. I Taped off the edges and painted the image over with the white chalk paint to make sure it was covered up. Once the paint is dry, I peeled off the painter’s tape and then painted the edges of the project with this grey chalk paint. After 2 coats, I was pretty pleased with how it turned out! I wasn’t worried about the paint job being perfect since it would be covered up any way.
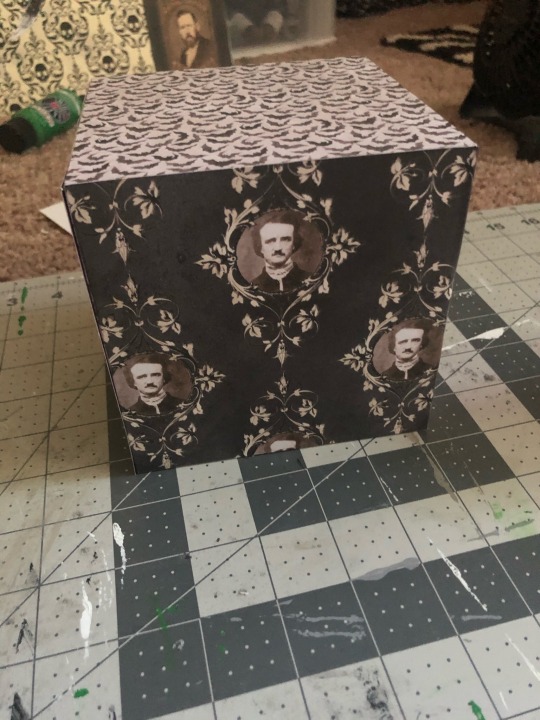
The paper I picked for this sign was from the same Etsy shop I linked above. This came from THIS collection. It’s from the Edgar Allan Poe section (I’m a NUT for all things dealing with him.)
Anyway, so I repeated the same steps as in the first project to get the paper to fit (creased and cut) and then this is how it turned out:
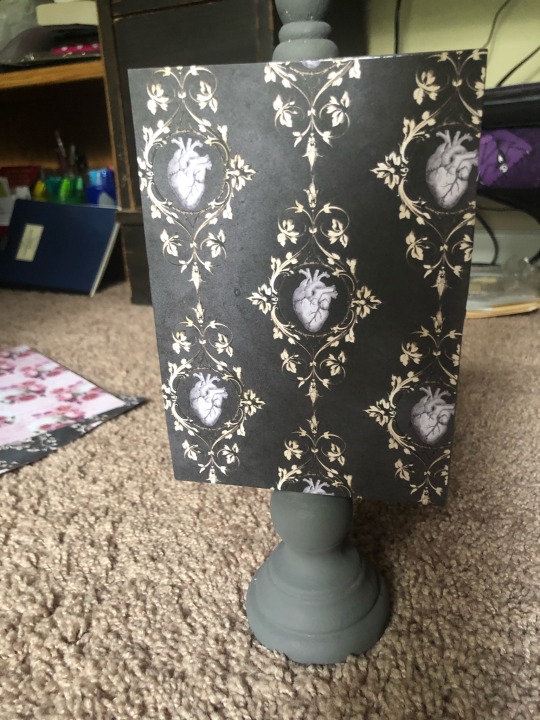
Can you guess which Poe tale this paper is from?
For the 3rd and final project, I wanted to recover this block I found. The first step though was to remove the rough texture from the block so that the paper would stick to the surface.
I have an electric sander that I used, but any sand paper would do the job (I’m really impatient).
So, once I had the rough texture off, this is what I was left with.
I picked out some paper I liked to cover all of the sides of the box and, since this laid flat, I was able to trace out the size that I wanted and cut it out. I, once again, used mod podge and my sponge brush to spread a thin layer on to the side I was covering and smoothed it out as I went to avoid bubbles or wrinkling.
I repeated this step until all of the sides were covered and this is how it turned out.
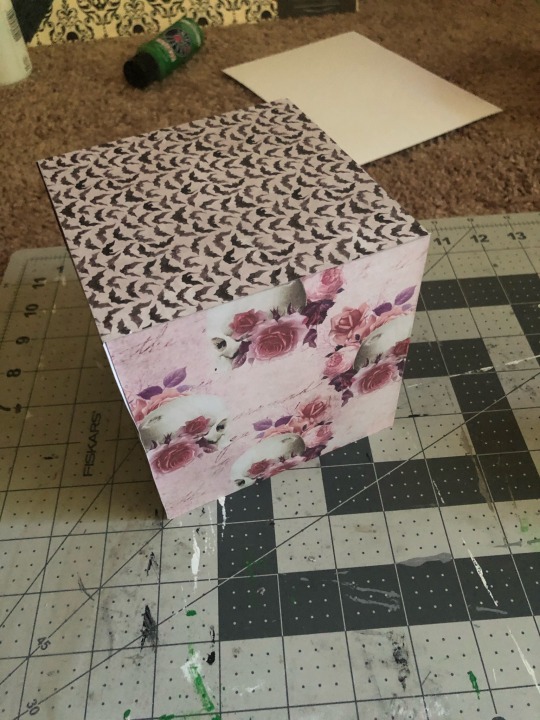
I couldn’t get enough of the Poe paper I found, so of course, I HAD to use this one one side of the project.
Now, where you put these is completely up to you. All three of these pieces are currently on a shelf at work, and I’ve already gotten a few compliments on them!
Hope you guys enjoyed this first round of DIYs, thanks for following! If you want to be tagged in posts like this, just let me know! Thanks again for all of your support, it really means a lot to me!
DIYers:
@flamencodiva @sandlee44 @screechingartisancashbailiff @algud
15 notes
·
View notes
Photo


Peahen Painting Commissions by Artemis P. Fowl
Have you ever wanted a peahen to paint you a picture? Have I got some good news for you, then! Artemis here is opening limited-slot commissions for a painting made by her very own peet (peahen feet)!
Details and pricing for her 2021 run are below the cut.
Please read everything before messaging!
DETAILS
There will be 10 commission slots available. These will be the only commission slots available in 2021. We may do paintings for ourselves or others, but they would be sold as-is.
Slots are limited to 1 per person, and will be first paid first served.
Artemis will be bathed and diapered before beginning (so the painting will be clean), and bathed afterward (so she will be clean).
Since I will have to buy fresh canvas anyway, this time around you will be able to choose your canvas size!
We are using Tempera paint, since it is non-toxic and washes off the bird completely, which means that we are somewhat limited in the colors we can use; you can preview Tempera paint colors online to determine what we may have access to. When you contact me, you will be asked what color(s) you want, so please have some idea before messaging.
Paint colors will mostly be mixed up as in the above examples, but we’re happy to take directions like “mainly purple with a little pink” or similar. We can include one (1) pure color (the first color down) for no extra charge.
The paintings will be sealed with mod podge spray because that is what the internet said was safe to use with Tempera.
Each painting will come “signed” with one of Artemis’ own feathers in the lower right corner. You will get a preview image of your painting without the feather, so that you can choose the orientation before the feather is attached (you are also welcome to let us choose).
Each painting will come with a printed card of authenticity that is dated and numbered (#X of X, 2021), with information about Artemis and the painting.
I will send you a digital photo of Artemis P. Fowl standing beside her creation (like the above examples), and possibly in-progress shots if I have patient help during the process.
*NEW* I intend to buy a few small (anywhere between 2x2 and 8x10) canvases to place around the bigger ones while we work, to create miniature side pieces that will be unique and NOT have prints made. I will offer these first to the original commissioner at a small discount, but any leftovers will be available for purchase by anyone. Price will vary by piece. If you would like to be notified when these become available, please contact me with your e-mail address.
PRICING
Each commission will be a base cost of $100 for labor and some materials. This includes the time to give Artemis baths before and after, setup/teardown of the workspace, actual painting time, treats for Artemis during, curing/sealing, and the paints/other materials I already have on hand.
The canvas cost is not included in the base cost, and is dependent upon what size canvas you would like and whether or not I can get it on sale.
Shipping in the continental US will be a flat $15. This covers the actual price the post-office charges me, plus the packaging materials used to protect your painting and drive between my farm and the nearest PO. I am more than happy to ship anywhere in the world that allows it, but it will cost more than $15.
Special requests which require additional time and stress (for both me and Artemis) may cost extra. For example: if you want multiple pure colors, that will require drying the painting at leastsome, and extra baths, so would be charged per-color. I reserve the right to decline any special request if it is something we cannot do or that I think would stress Artemis and as such, any special request must be made before payment is settled.
Payment must be made before the painting begins, and is not refundable once the painting has been painted.
Extra Information/Disclaimers
Because I am working with a live animal, I cannot guarantee that paintings are free of pet dander/dust or waste. Artemis does get bathed before and after, but birds are constantly shedding feather sheaths and feather particulate, and while she is diapered and as clean as I can get her, she’s still painting with her feet.
Because I am working with a live animal who has sharp toes, your canvas may have indentations or small punctures. So far we’ve managed to avoid punctures except one small one in a corner, which I patched with paint, but you should be aware of the possibility. If a painting is badly damaged, like with a visible hole, I will start over at no cost to you.
Because I am working with a live animal, I cannot guarantee where the paint goes on the canvas. She walks where she wants to go, and while I can try to tempt her in certain directions with treats, Artemis will do what she wants. The most control I have is if you want a sparsely-printed work, I can end the session after a little while, and if you want a densely-printed work, I can let her keep walking around.
Because we are using Tempera paints to keep Artemis safe, the painting may be sensitive to light or water damage if placed in a sunny location or if it gets wet. I WILL seal the paintings before mailing, but you should be aware of the material limitations of your piece due to the nature of its creation, and plan accordingly.
Tempera paint has a long cure time (supposedly??). I will be letting them set and dry for at least 2 weeks, at which point I will seal them and let the seal set for another 2 weeks. After the seal has cured, I will be taking them to be photographed for prints (which means you will also be waiting for all of the paintings to be done, so I don’t have to pay for the photography more than once), and then I will add the signature feather, package them for mailing, and send them all out. I will communicate with you along the way, but be prepared to be patient.
I will be making prints of all of the commissions, and the patterns will be offered on items in Artemis’ Redbubble shop. You will receive the original, but this does not extend licensing for similar use to you.
All of the money received from this endeavor goes straight back into use for the birds. It is used to pay for things like their staple chow, scratch grains, treats, bedding, toys, and associated costs like lumber and fencing for improving or expanding their pens. This particular set of commissions will be going toward building a protected outdoor flight pen off of our barn, so that Stan and Artemis will have access to outside without having to be supervised or moved into an old pen.
If you are interesting in commissioning Artemis, please send me an ask, tumblr message, discord message (Kedreeva#4912), or email me (preferred!) at ItamashiiSparkle at gmail dot com. I will ask you to move to email eventually, in order to keep track, so it’s best if you can start there.
358 notes
·
View notes
Last Seen Blogs

obori-reisuke
OboLog

stigofdump22
Kakarot

vito-psavec
...ať si třeba i píše
devotedlyclassydinosaur-blog
Stuff & Etc.