#gradient text help
Note
hiii i was wondering how you get ur post texts to be pastel pink :) instead of this hot pink
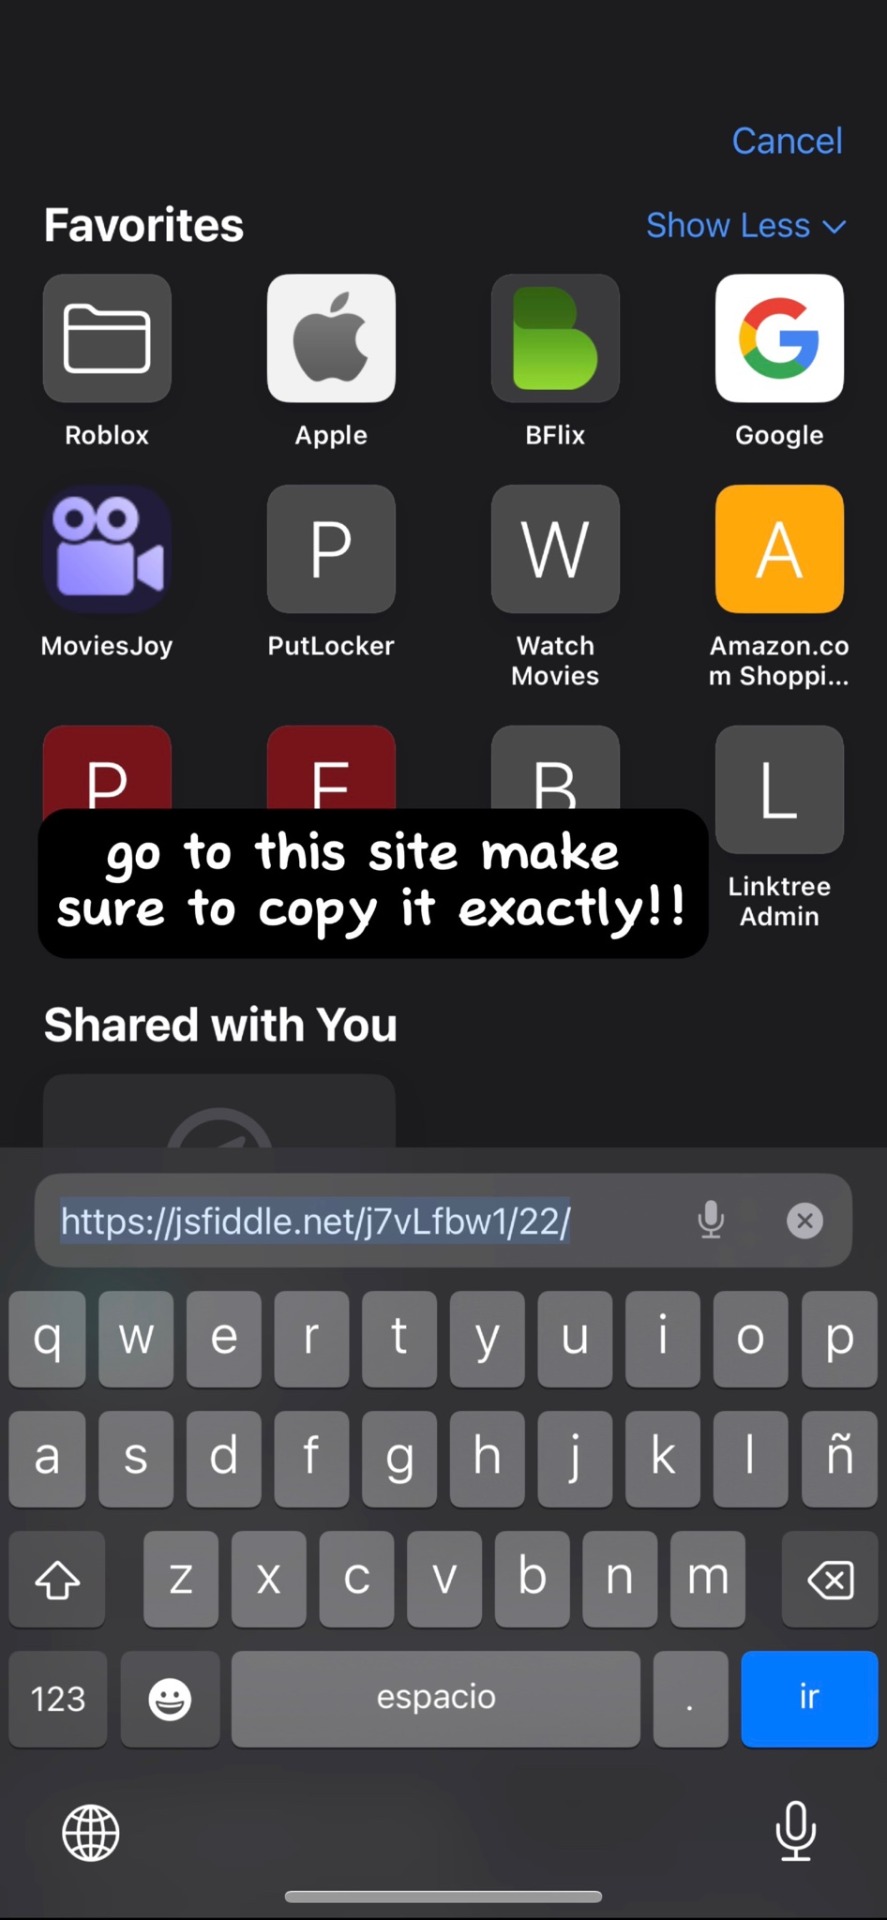
Hiii 💕💕 okay so it actually has to do with coding 😭 I’ll try my best to explain. So basically, I go to this website ( https://jsfiddle.net ), this is where you can make any color text you want.
— STEPS BELOW —
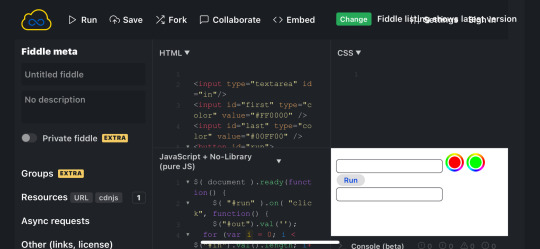
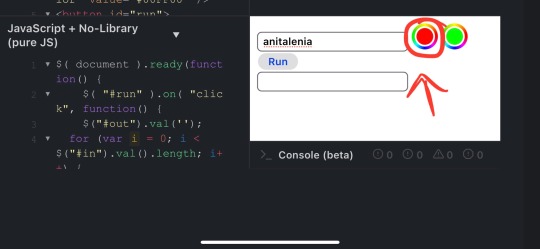
Step One: So, once you’re there you’ll see this screen, I’m on mobile so it might look a lil different.
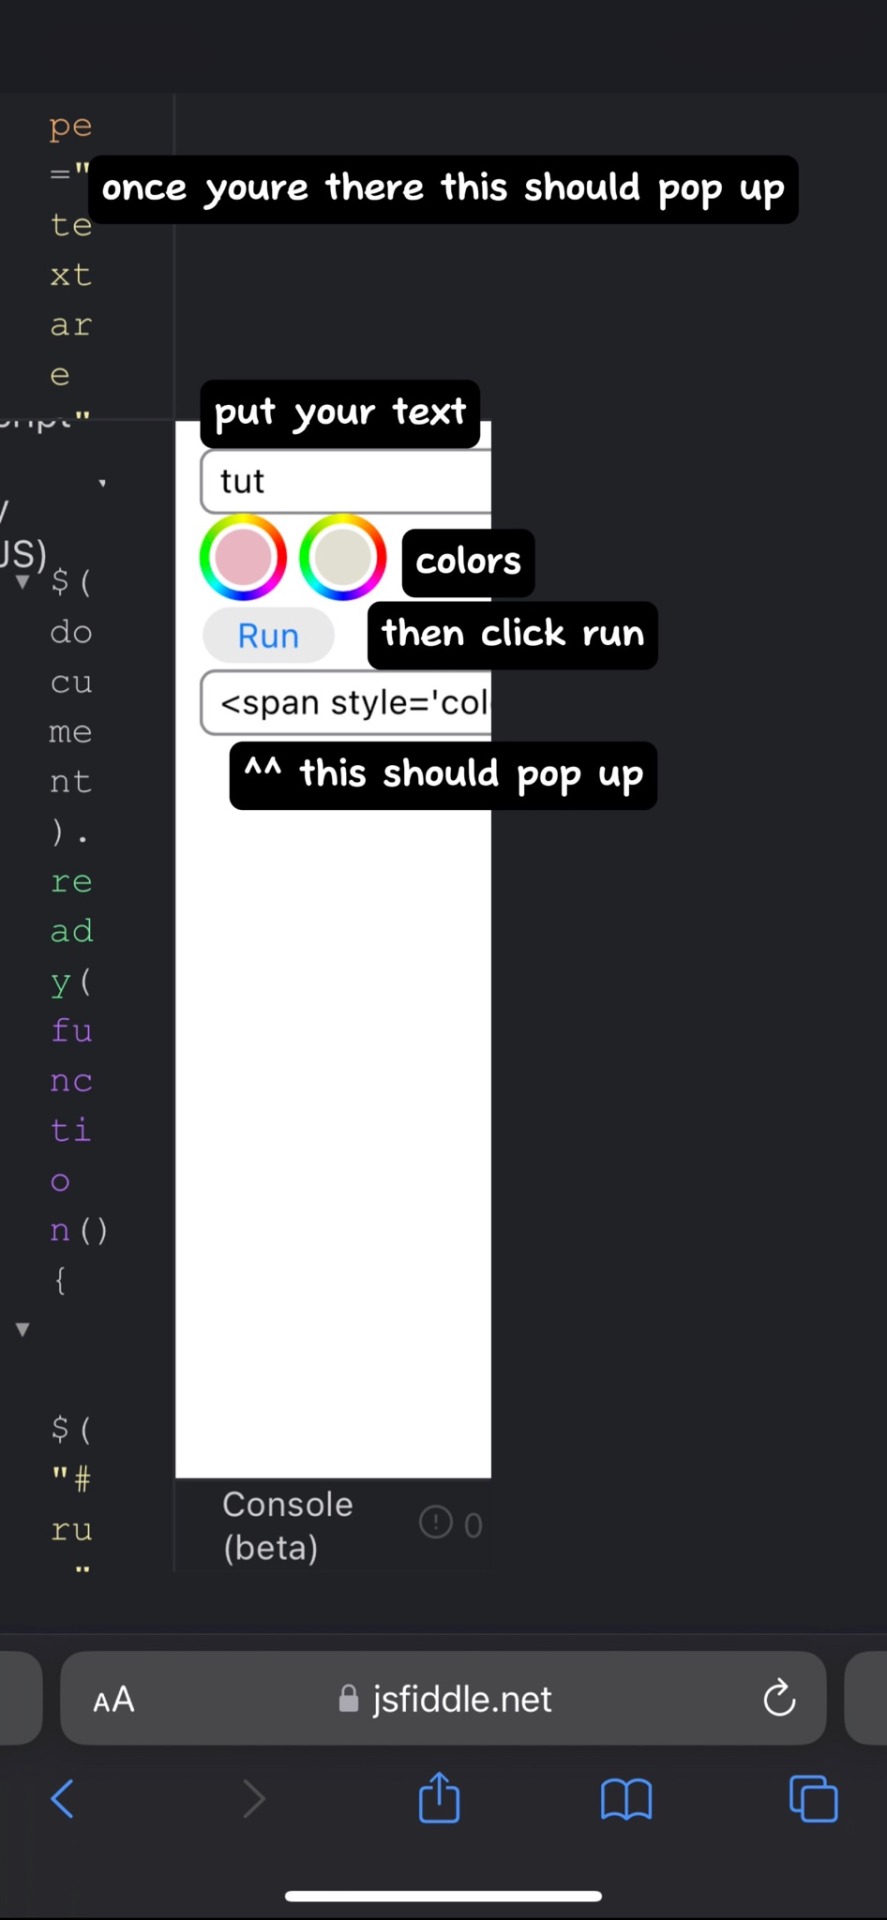
Step Two: Once there, you’ll go to the right side where the text boxes are.
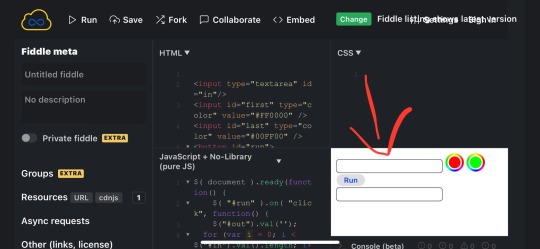
Step Three: In the top box, you’ll want to type in whatever text you want to make a different color.
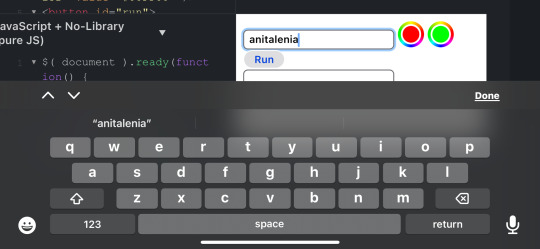
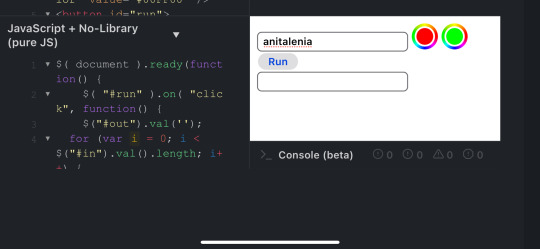
Step Four: Next, where the red and green color dots are, click on the red dot. This is going to be where the color starts. You can make the text whatever color you want.
note: you can make your text gradient, as in two different colors. I make my text just one color ( that pale pink color ), which means both the red and green dot must be the same color. For gradient, the red and green need to be whatever two colors you want to make gradient. For example, if you wanted to do yellow and purple gradient text, change the red to the color yellow and the green to the color purple.


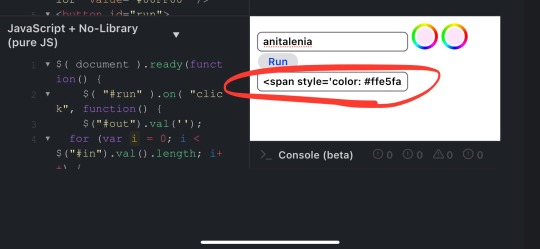
*FFE5FA is the color of my pink text.
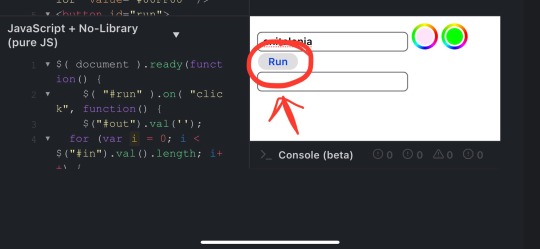
Step Five: After you’ve changed the color, hit the run button in between the text boxes.
Step Six: Once you’ve hit run, the text box below will generate the coding for your colored text.
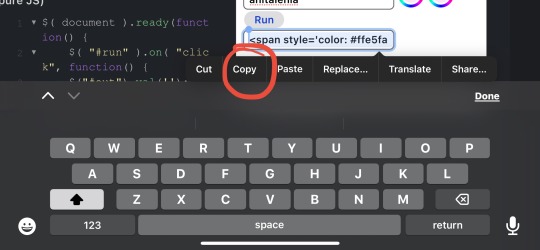
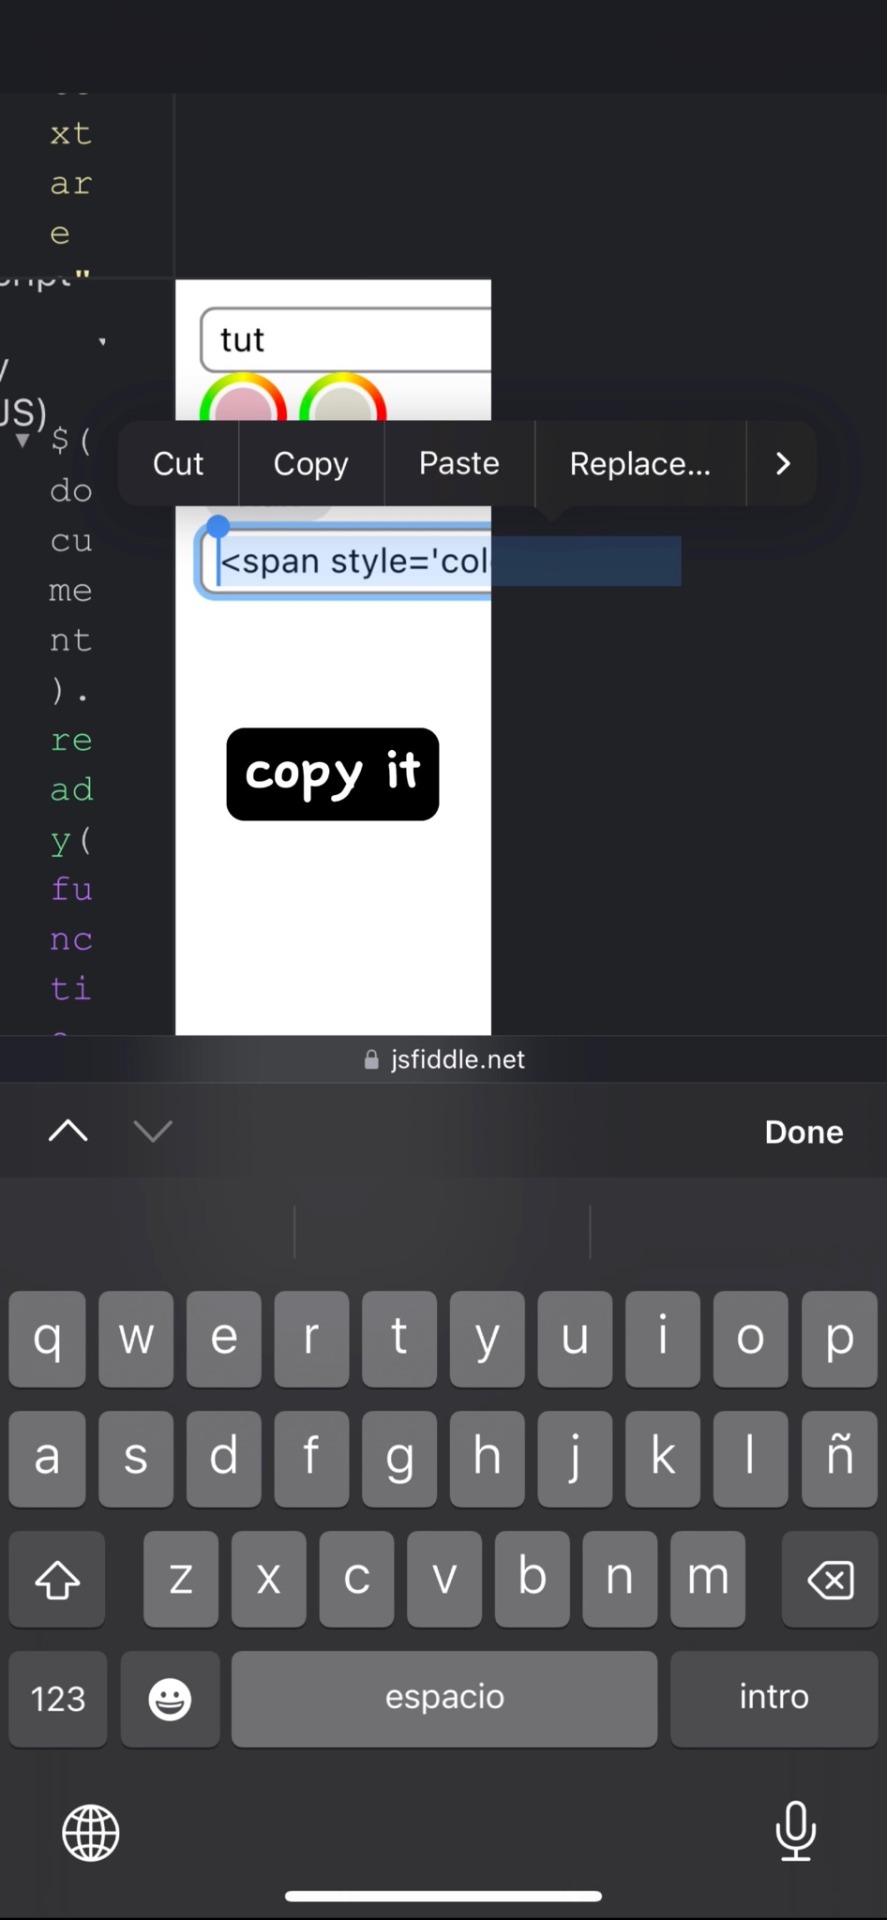
Step Seven: Once it’s there, you’ll want to click on it and hit the ‘select all’ button.
note: I am using this on an iPhone, so it may very on a Samsung or computer. Just make sure you copy the whole thing of code

Step Eight: Once you’ve hit select all, hit the copy button
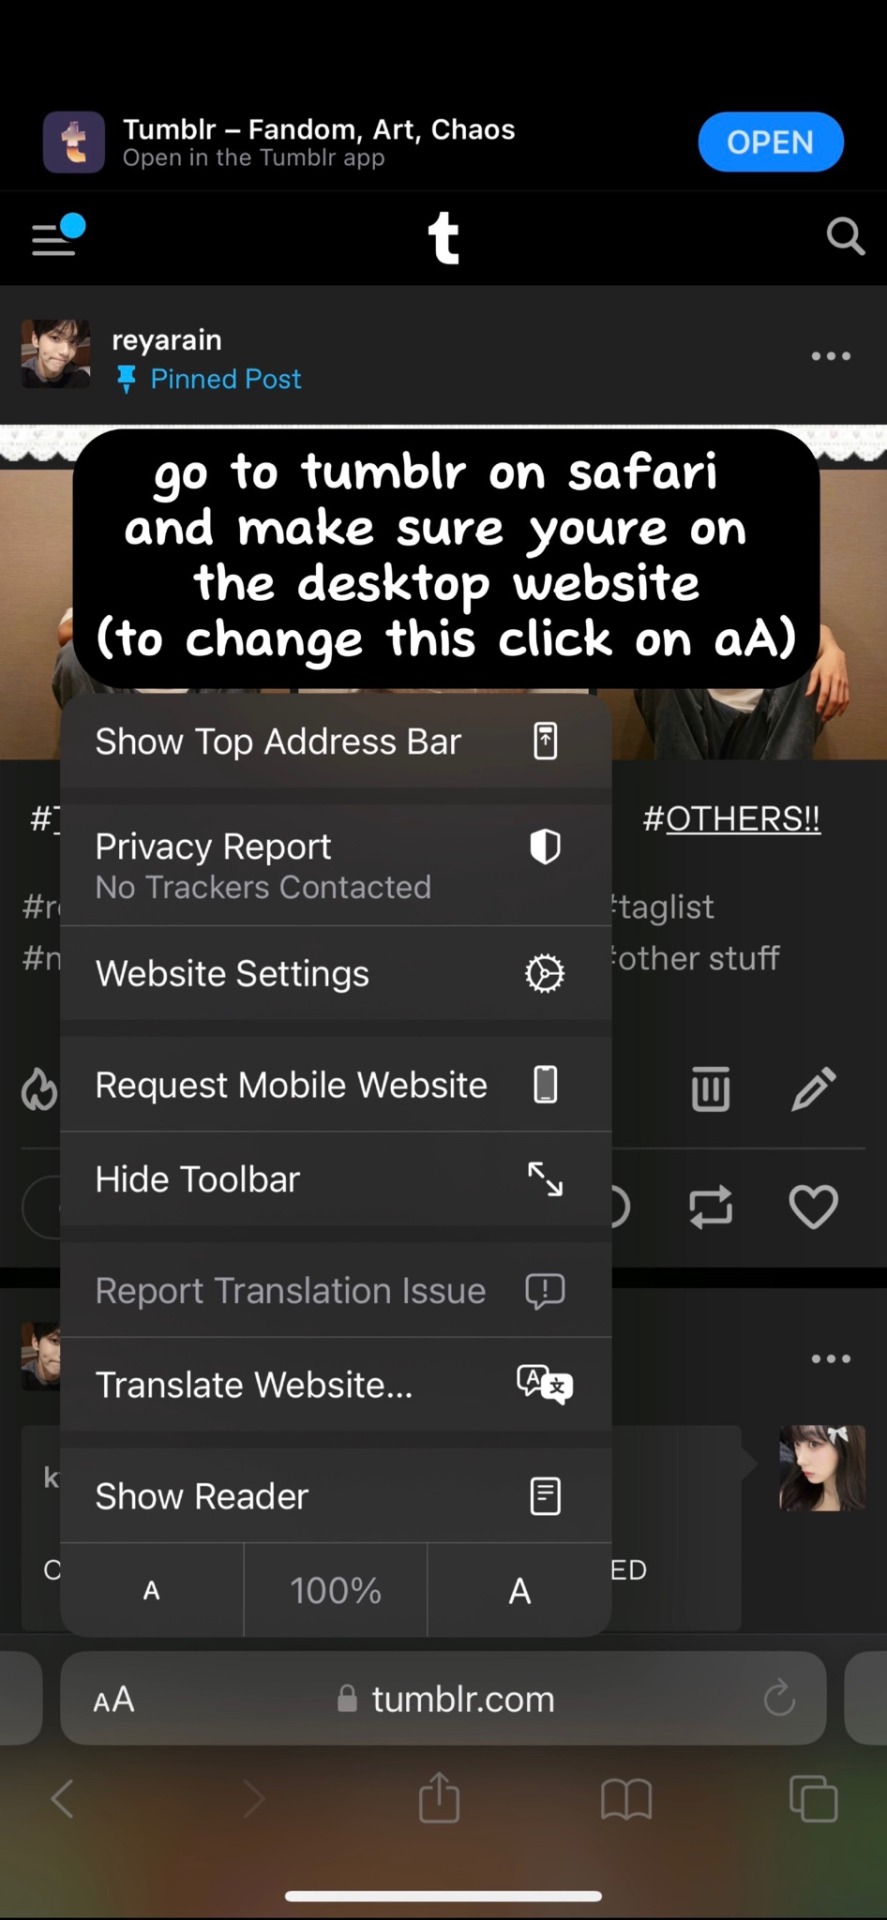
Step Nine: So now the text should be copied to clipboard and available to past where ever you want. After that, and this is an important detail or else it won’t work, you have to go to Tumblr Online, not the app.
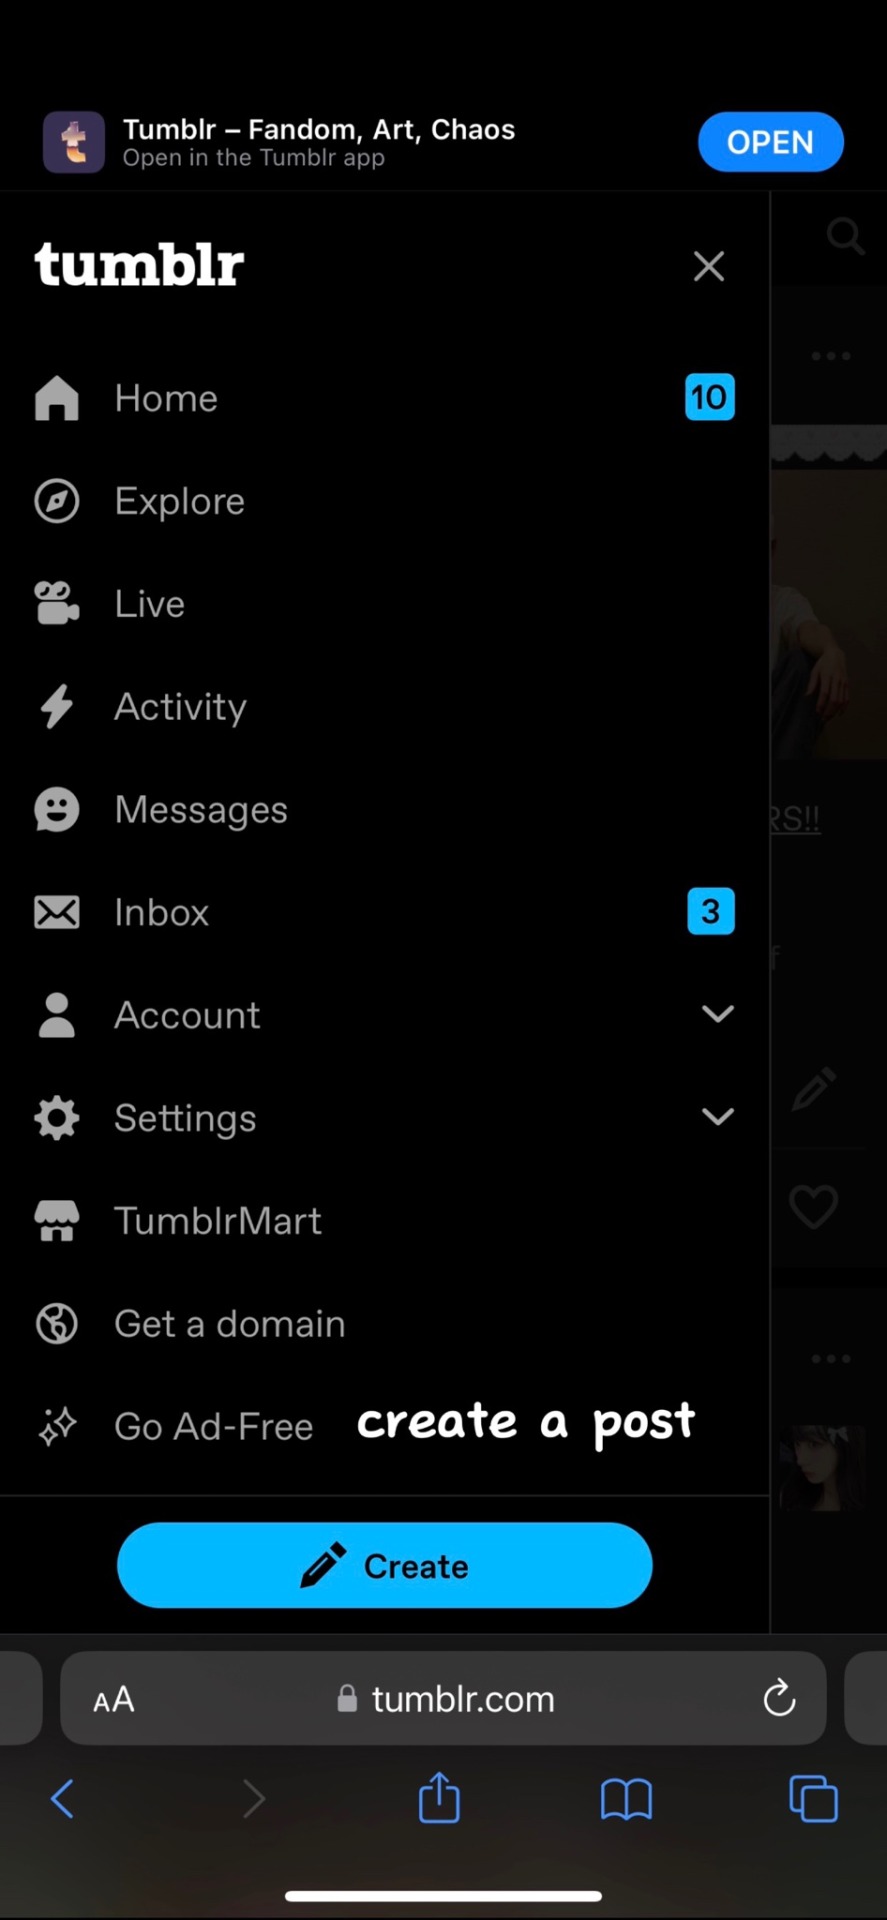
Step Ten: Once you’re on tumblr, go to make a new post.
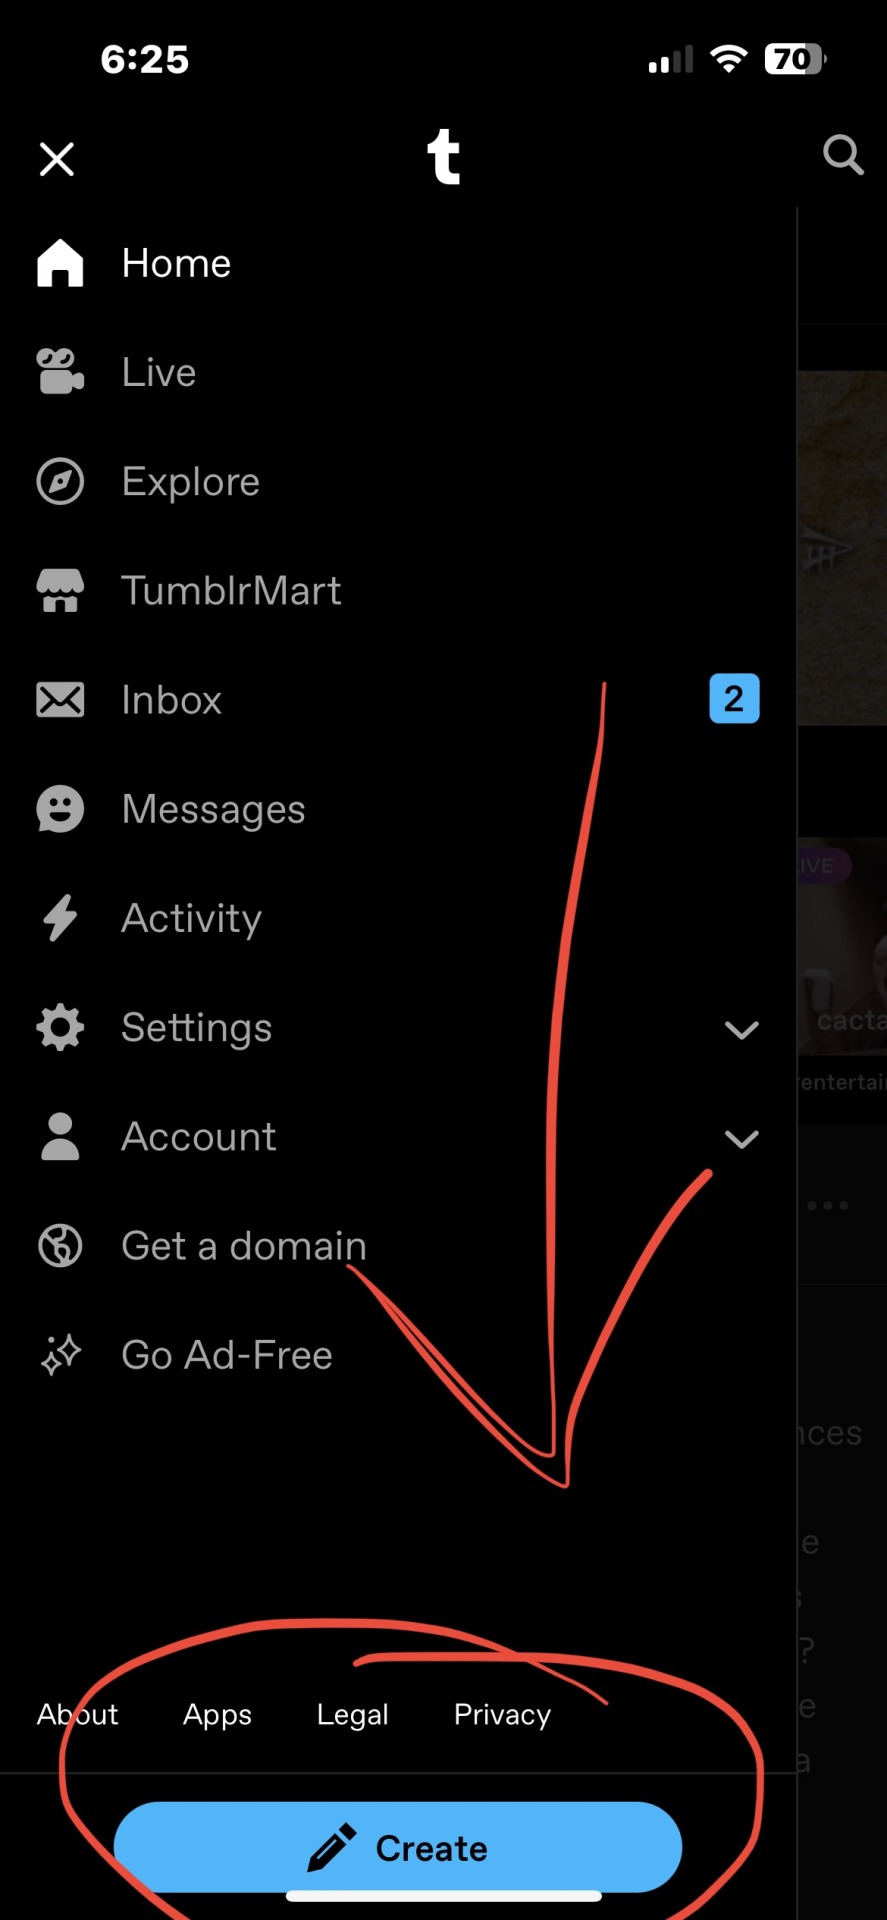
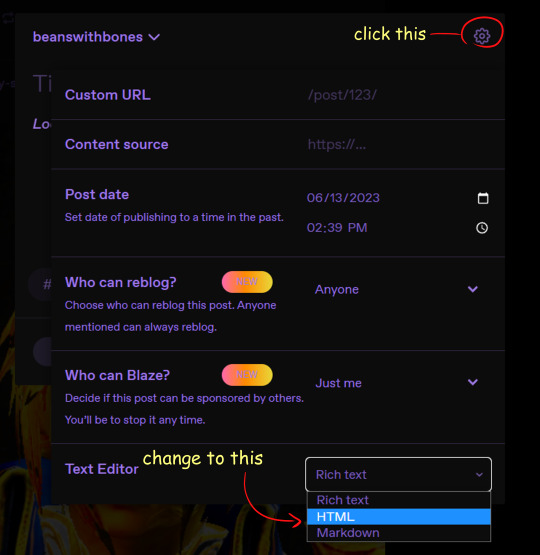
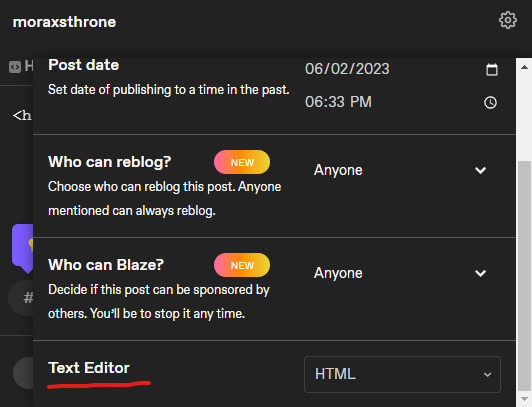
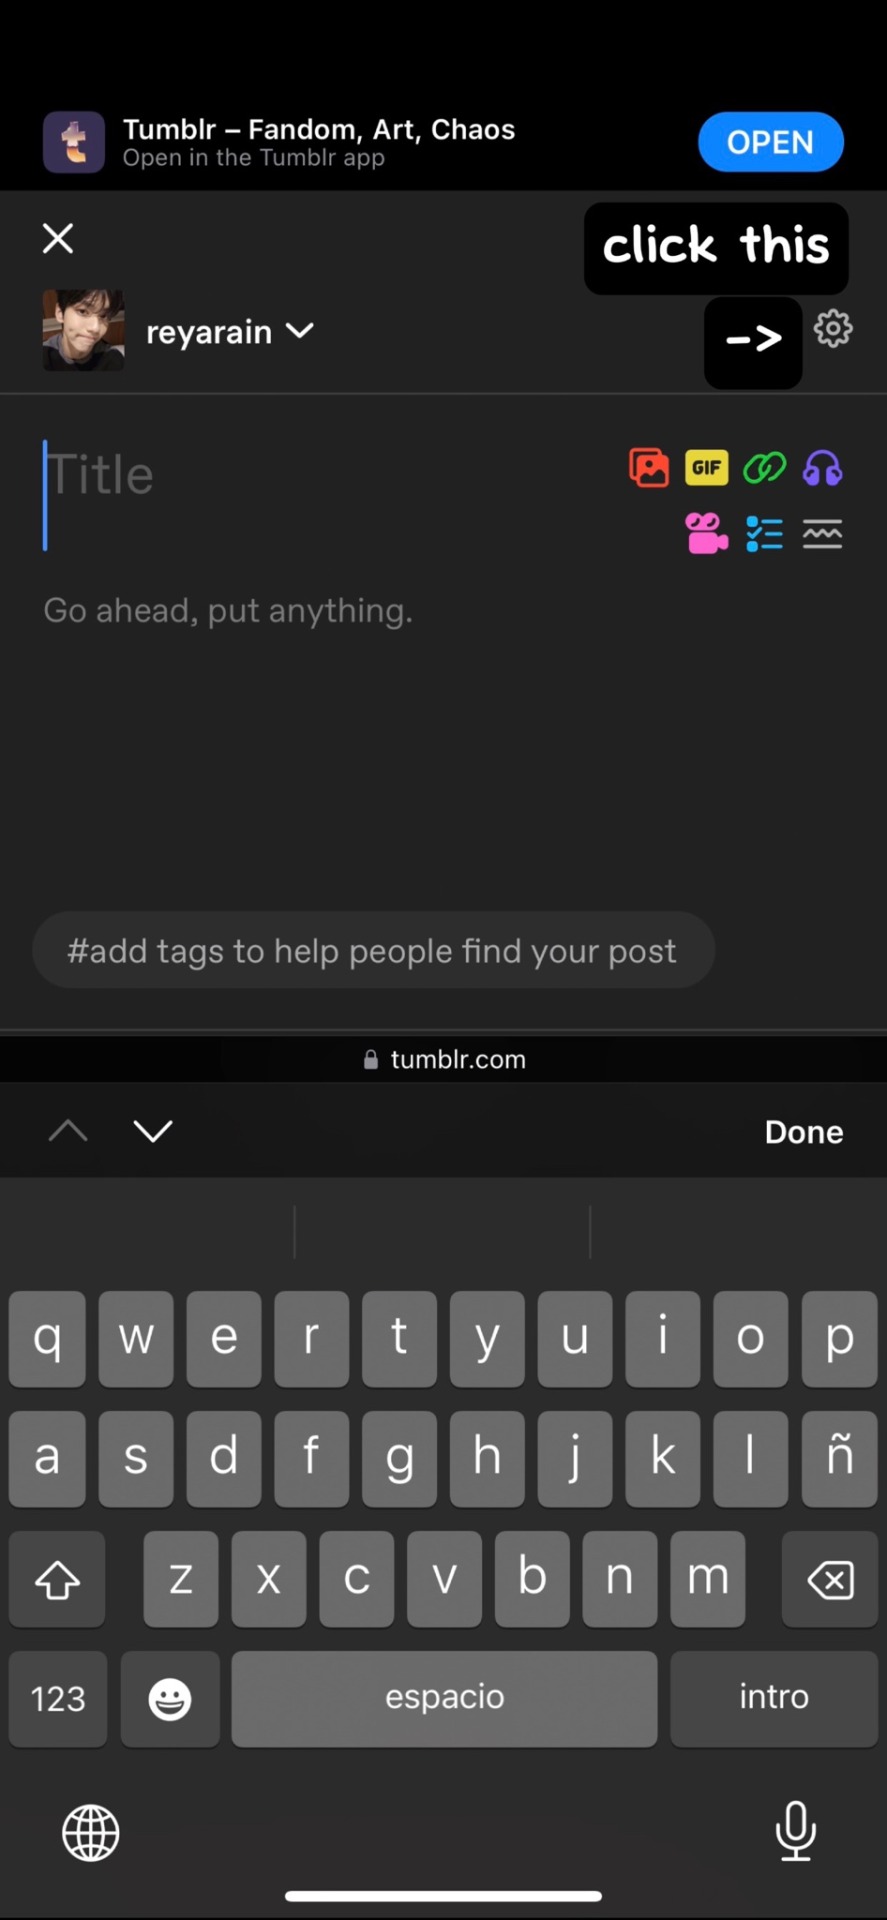
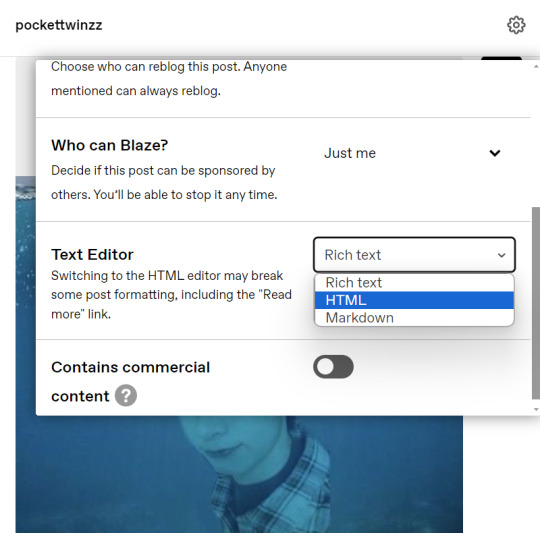
Step Eleven: Once you make the next post, you’ll want to go to the top right corner and click on the settings icon
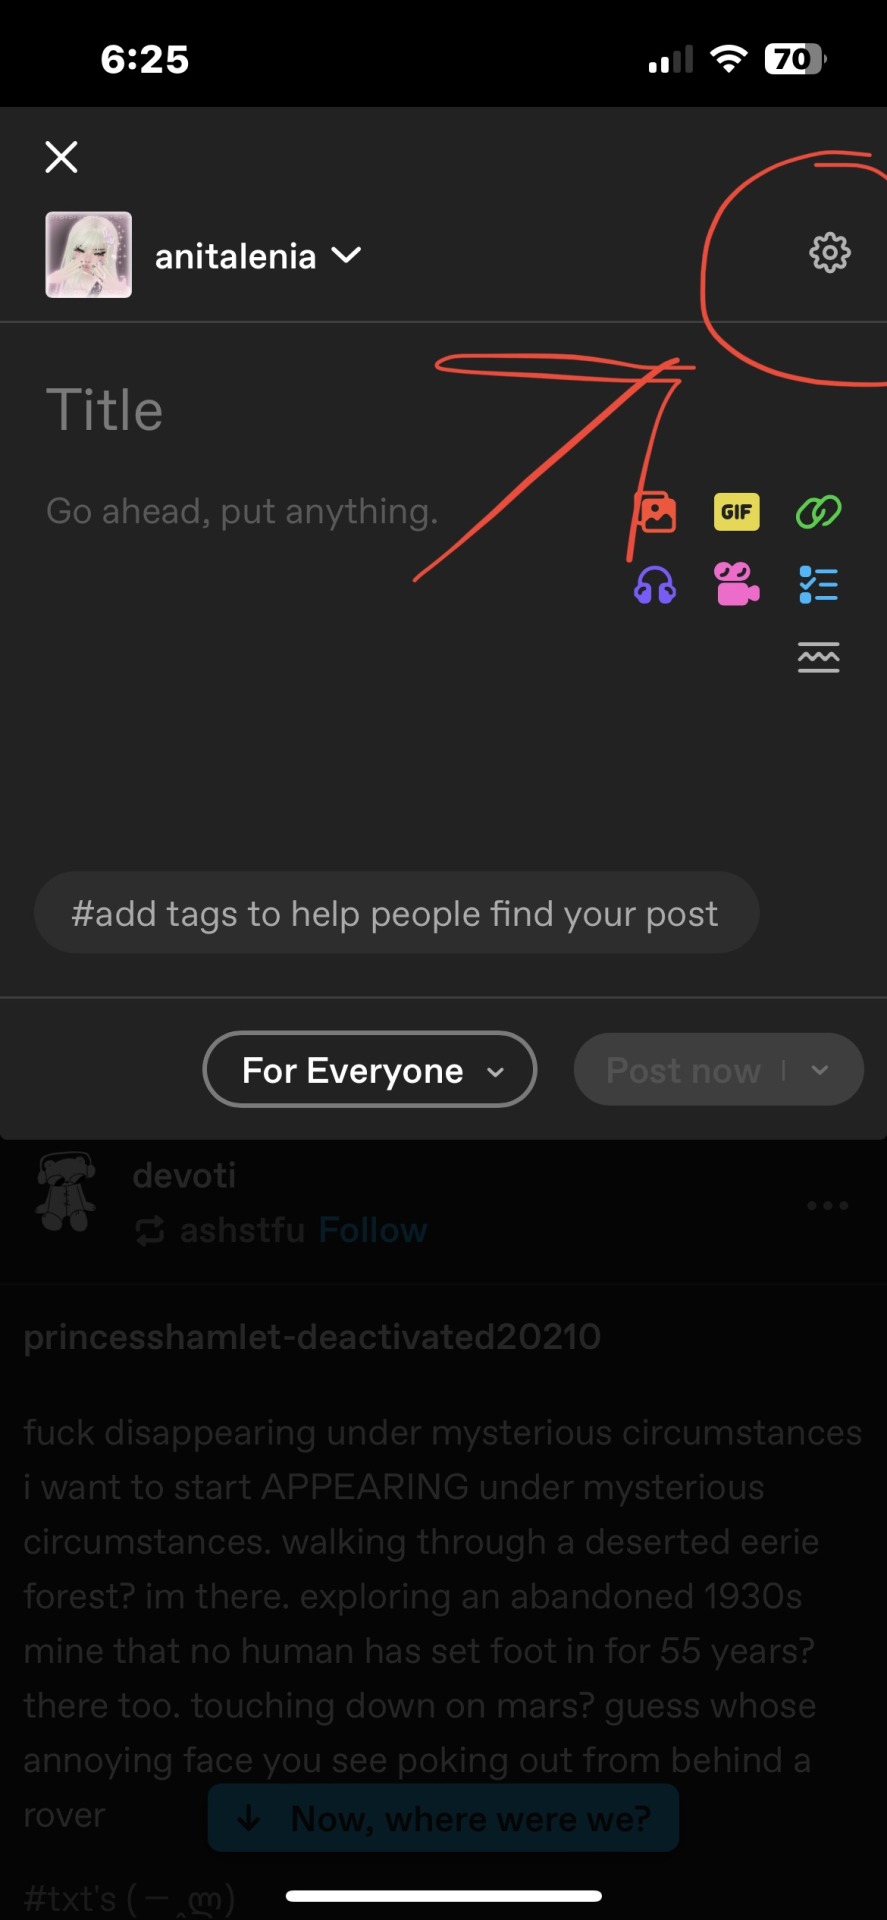
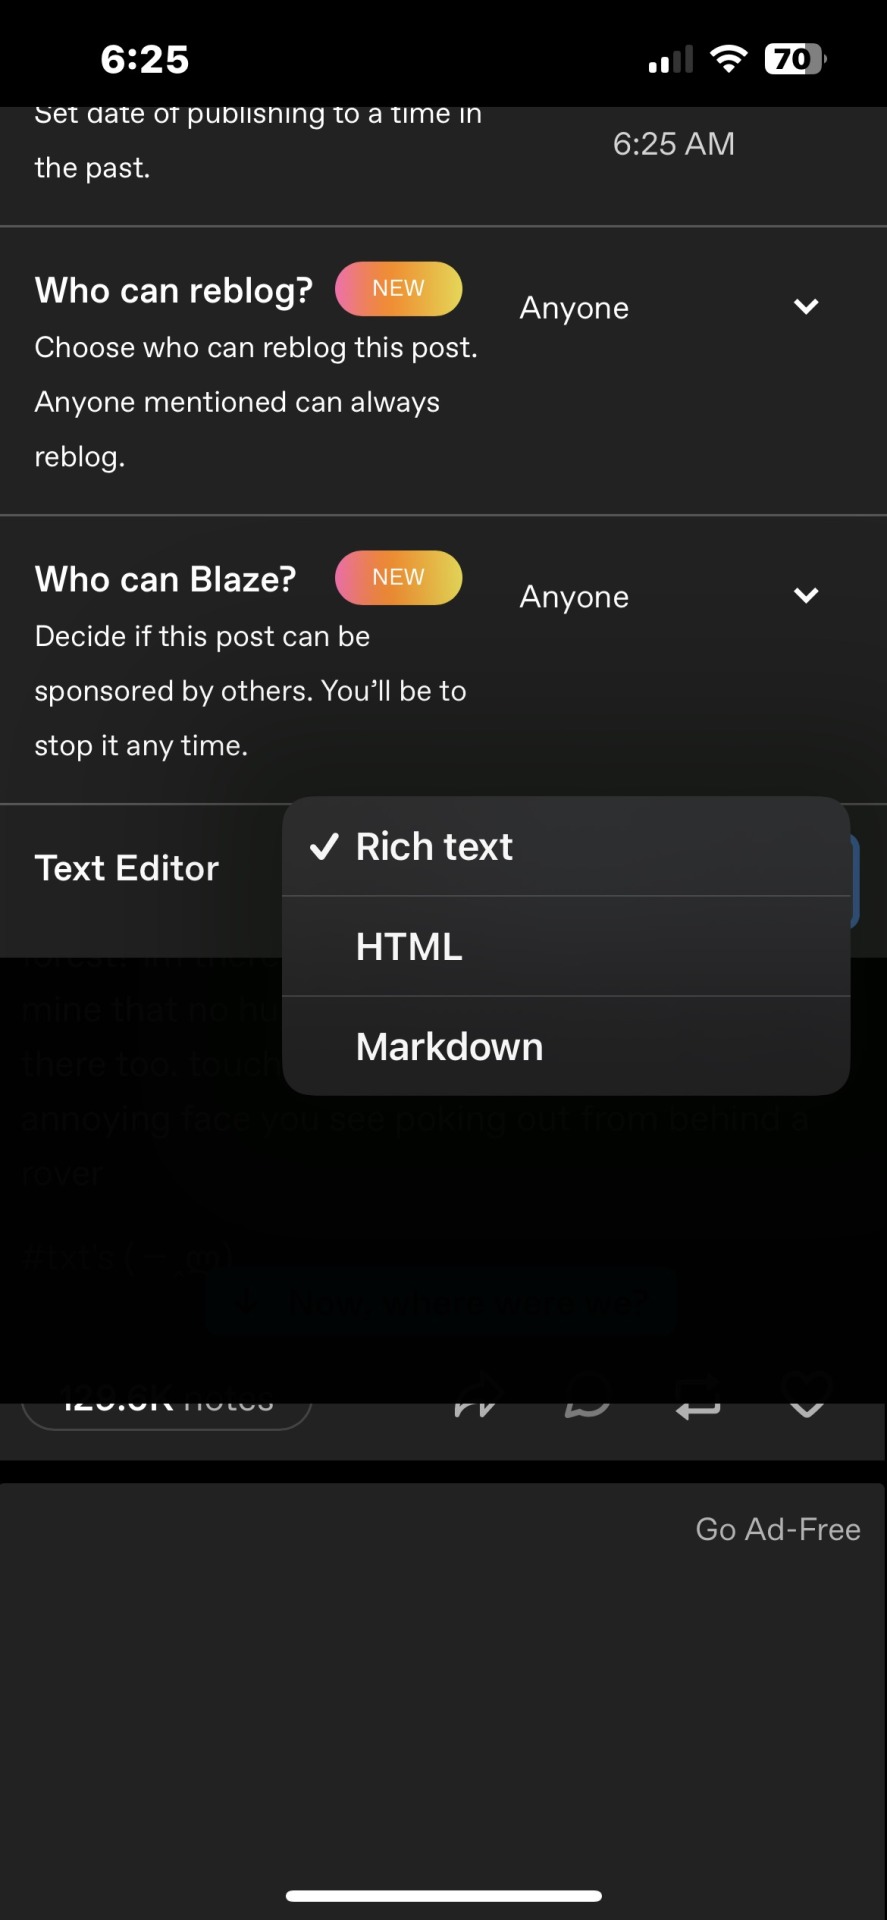
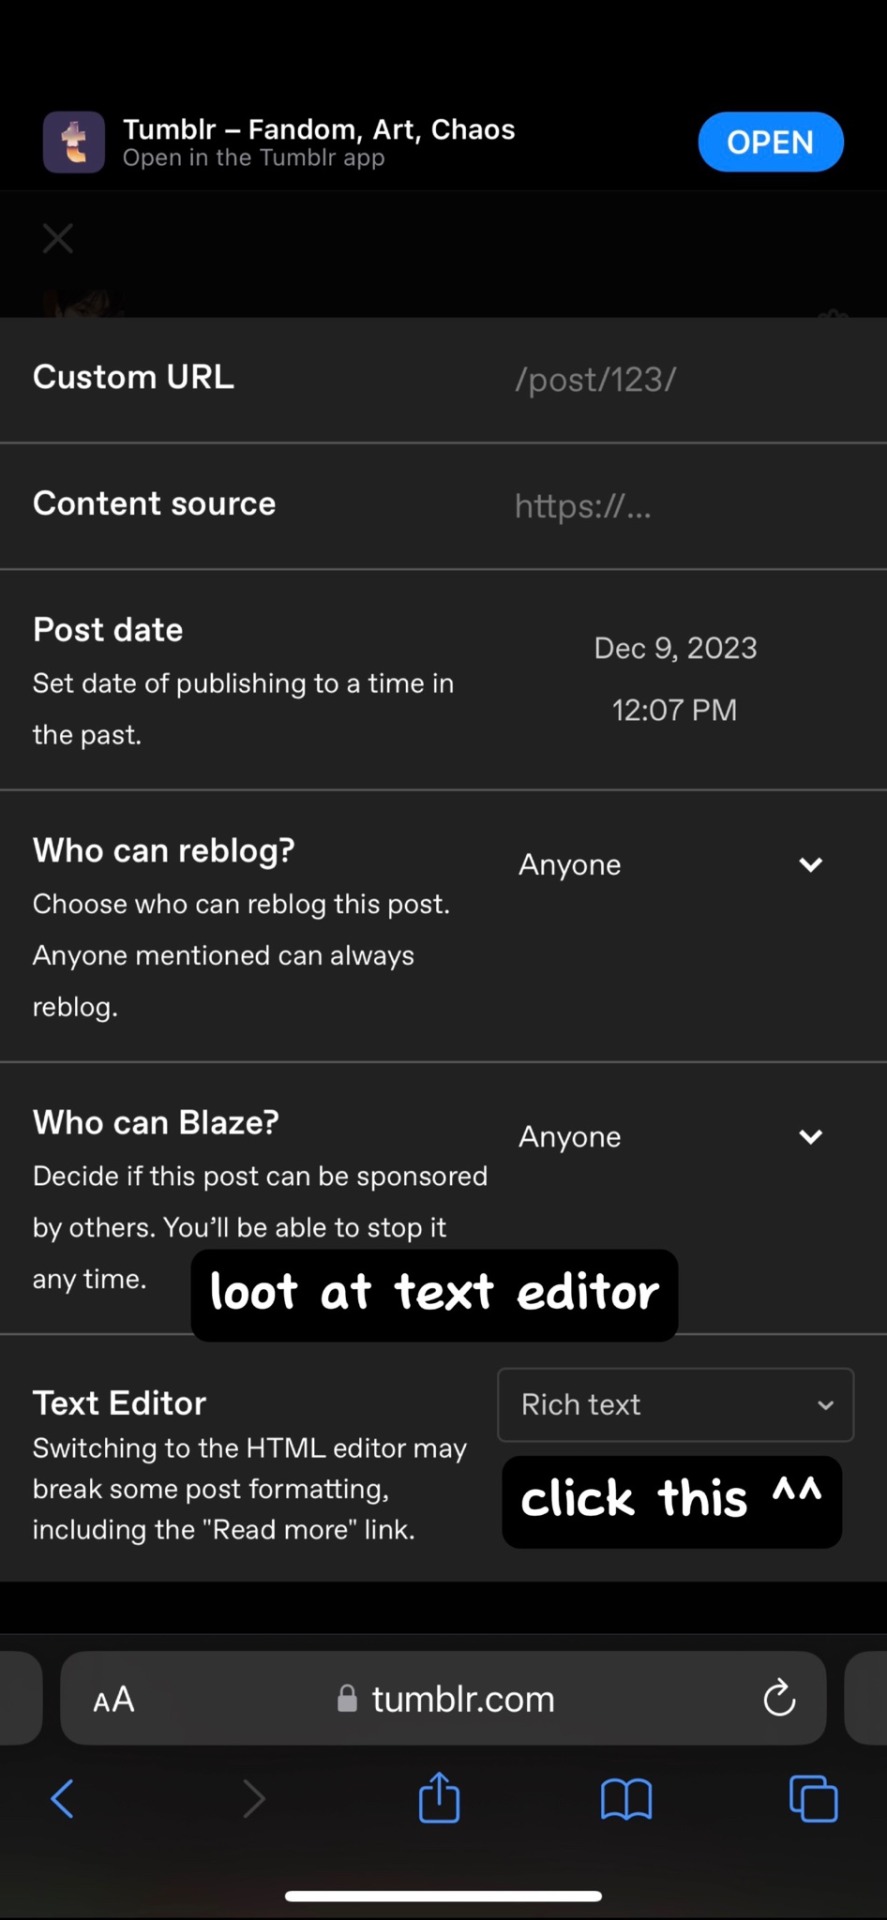
Step Twelve: You should see a screen like the one below. At the bottom of that pop up where it says TEXT EDITOR, the icon next to it should say Rich Text.

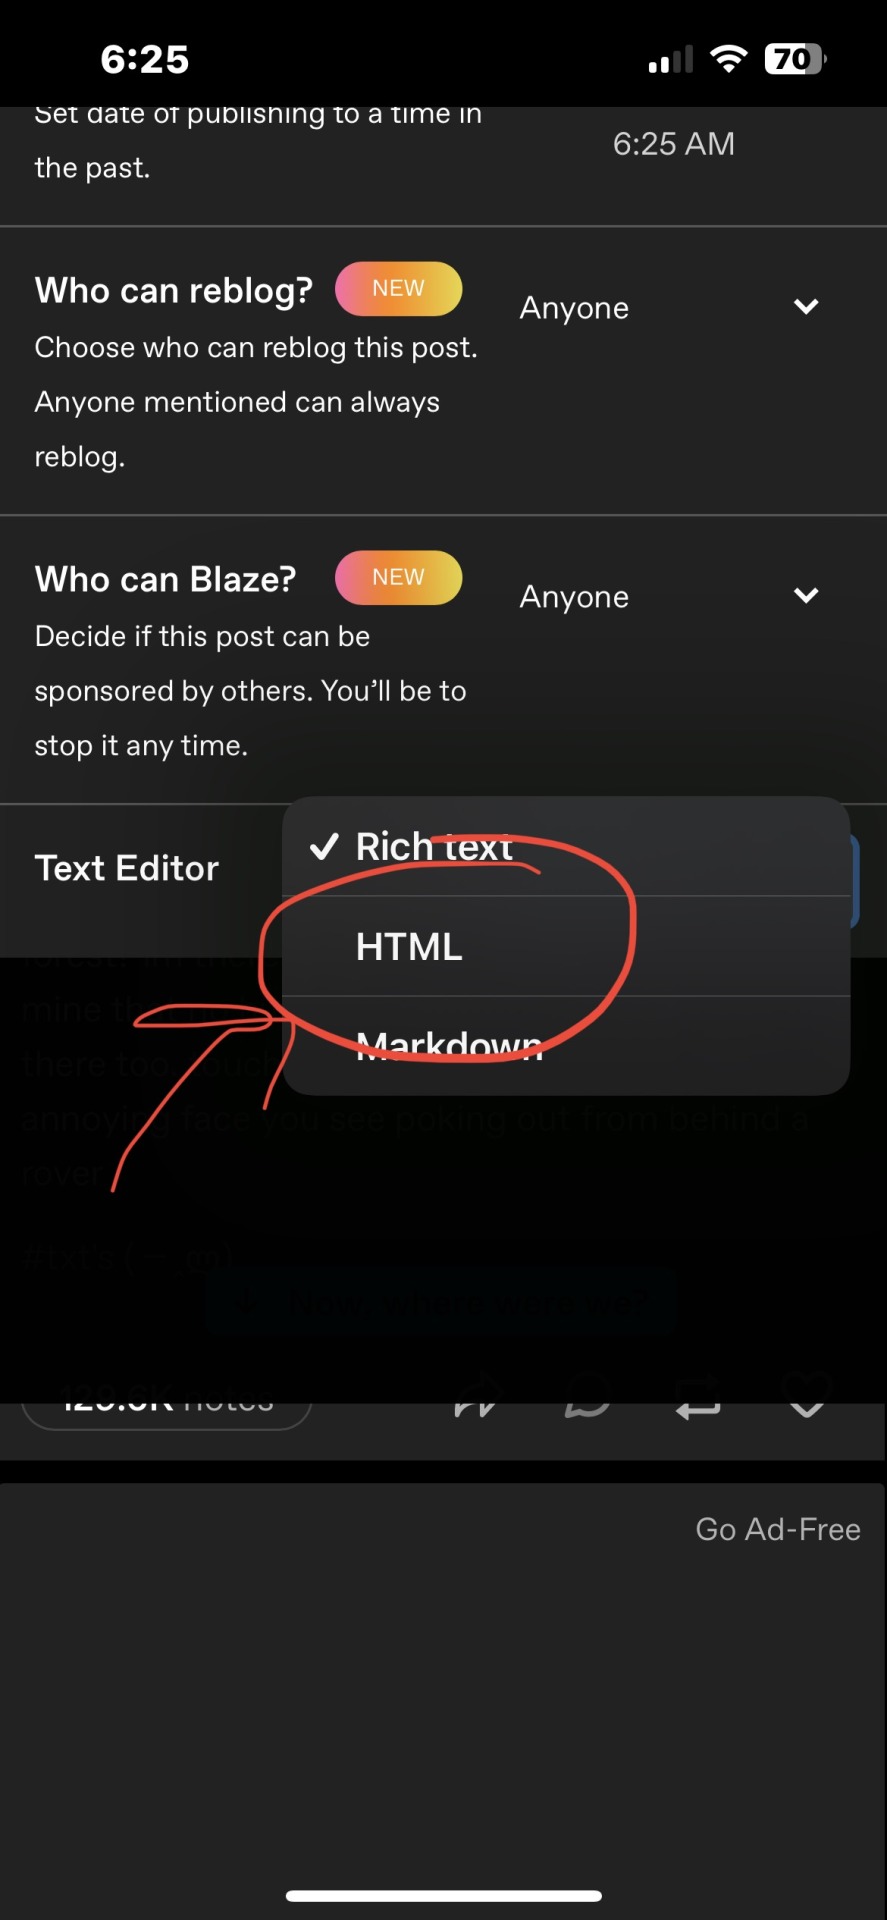
Step Thirteen: Click on the Rich Text box, and options should pop up saying, Rich Text, HTML, Markdown
Step Fourteen: Click the HTML option
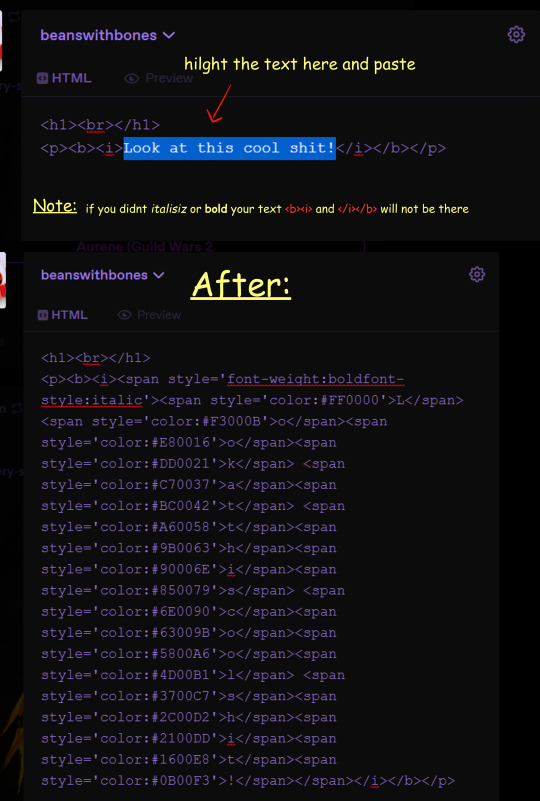
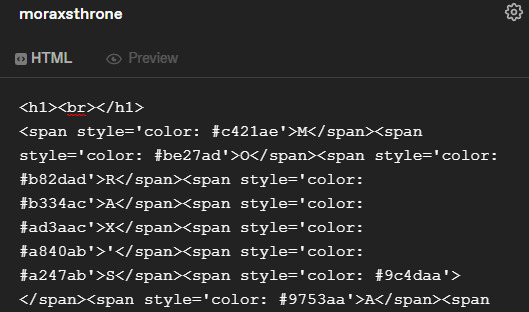
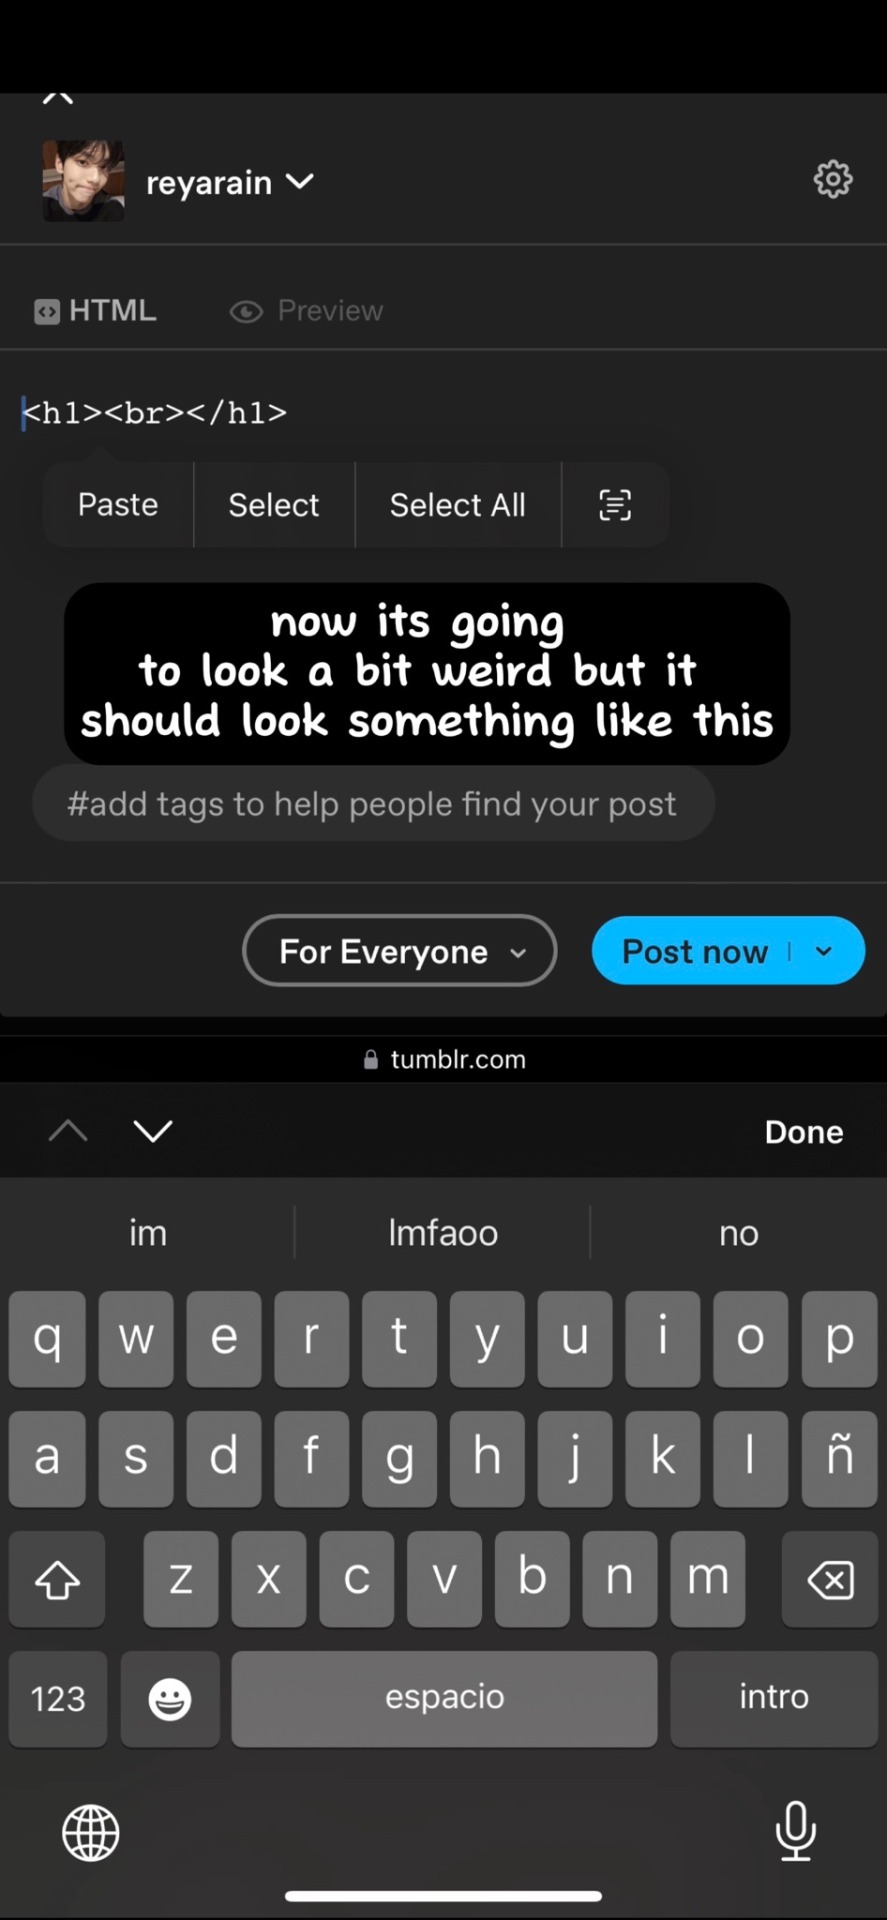
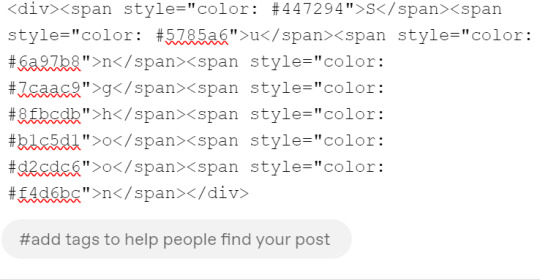
Step Fifteen: You should see this screen next

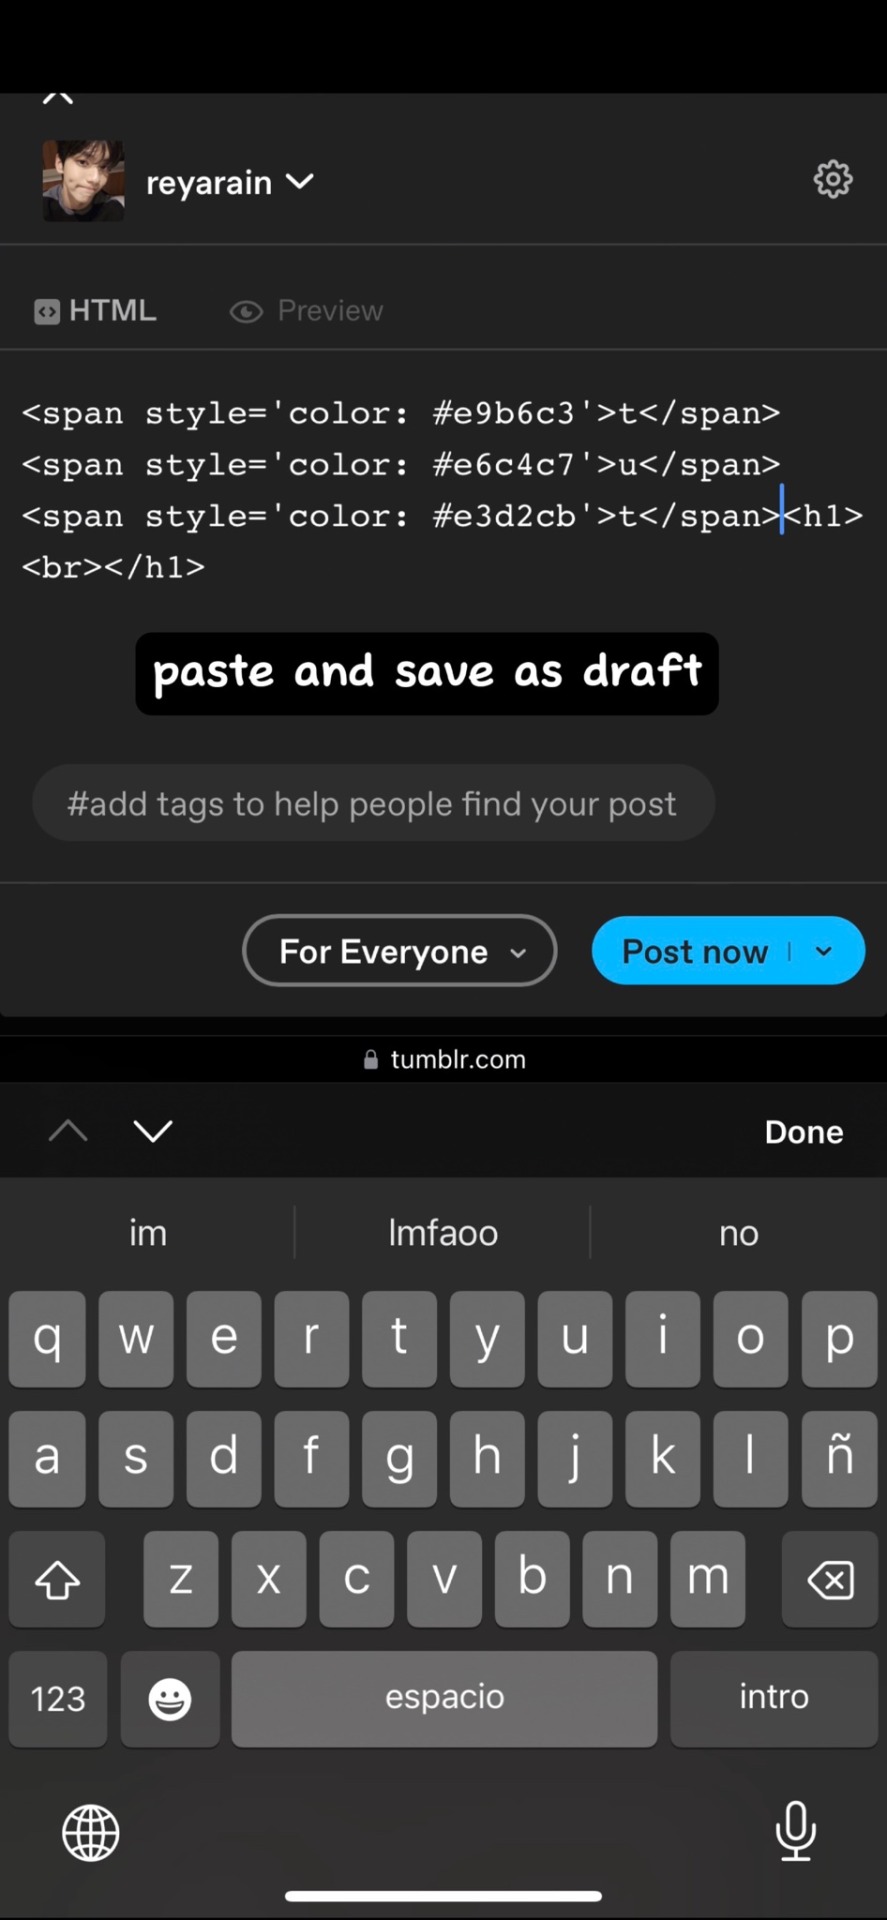
Step Sixteen: You’ll want to paste the HTML code you just copied next to or after the code already there like this

Step Seventeen: Okay then you’ll want to make sure it’s saved as a draft
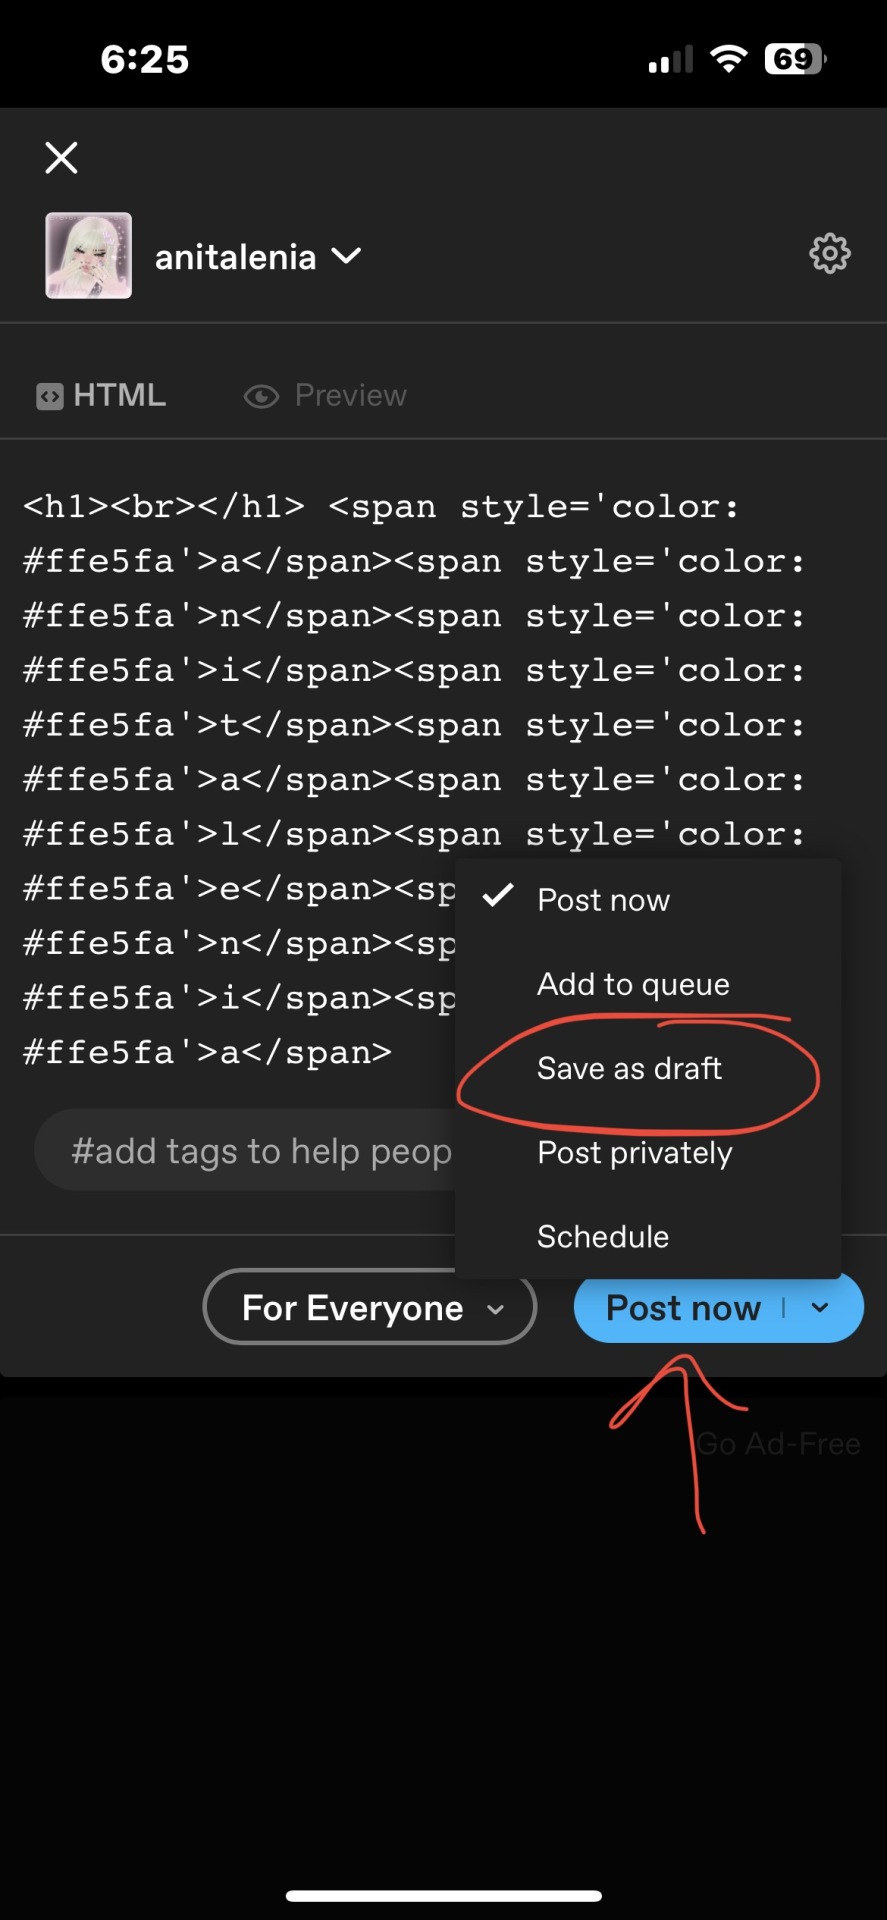
note: if you go to your drafts first and then create a new post, then it should automatically have the save as draft option at the bottom. It’s quicker than doing it like normal and having to select save as draft.
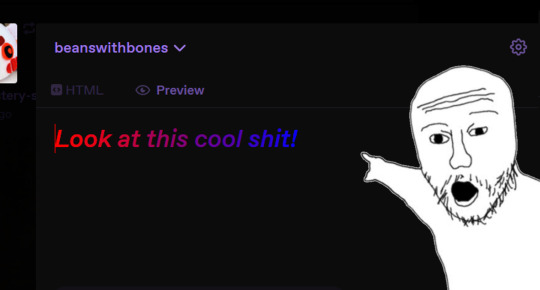
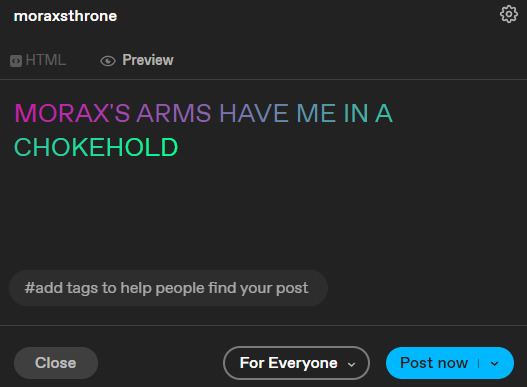
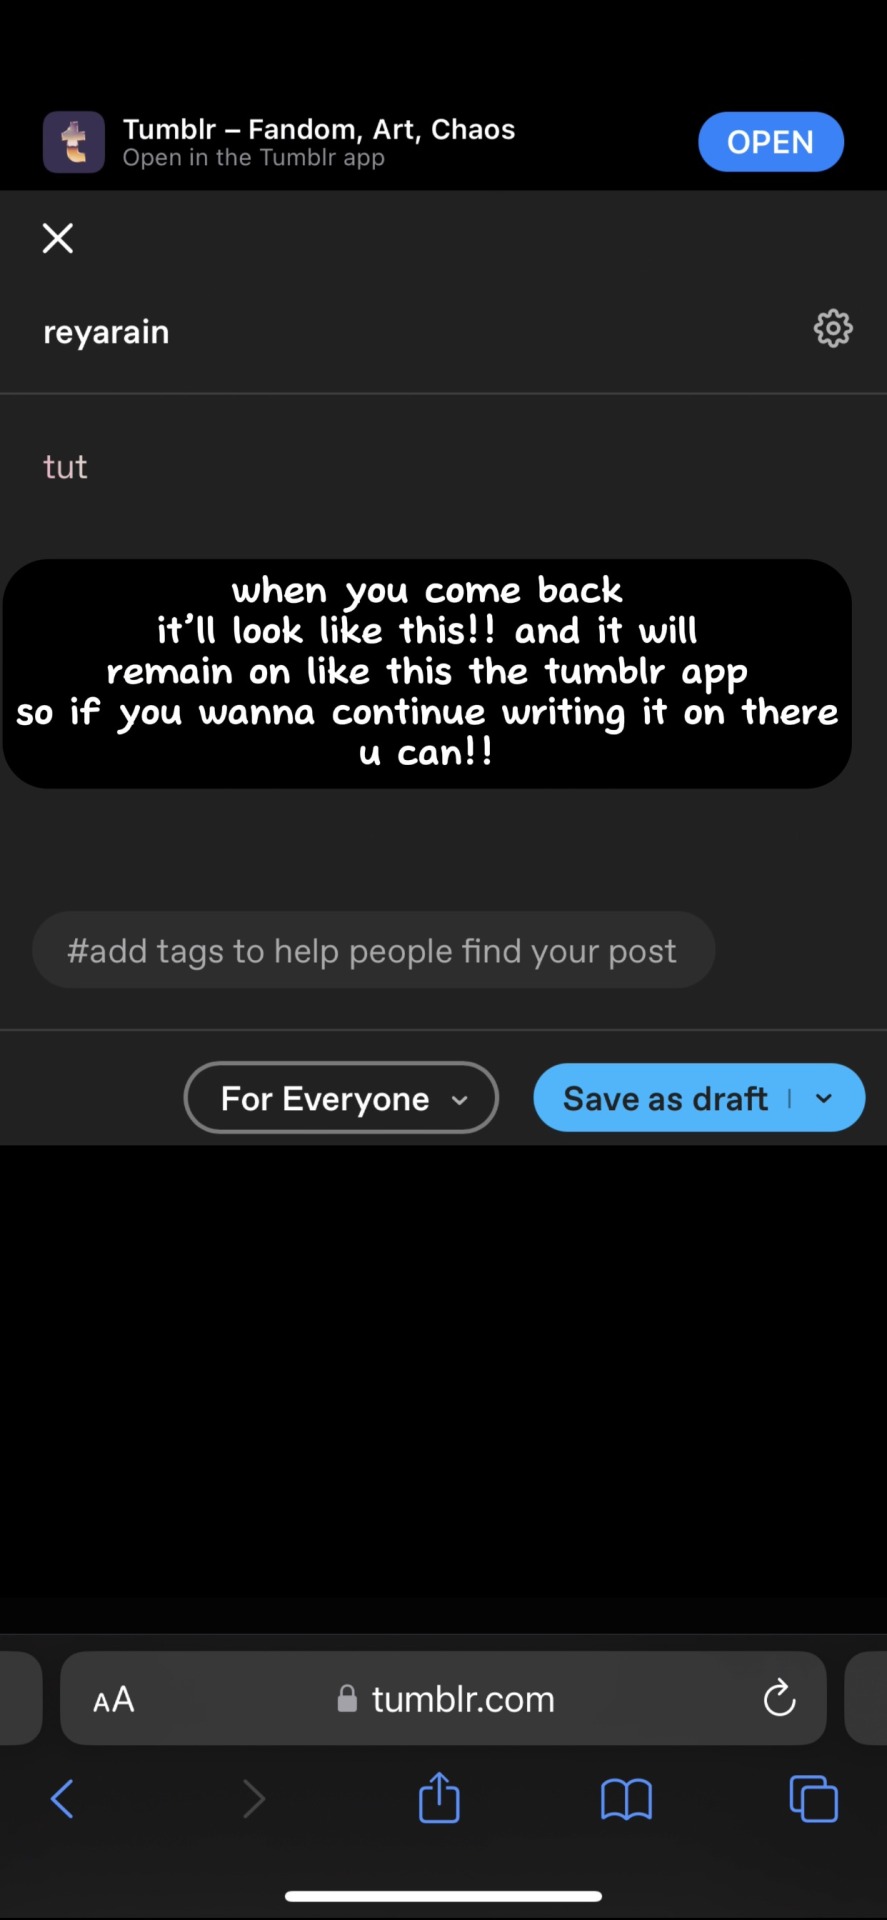
Step Eighteen: It should look like this now

Step Nineteen: Congratulations! You’ve done the hard part. Now go back to mobile or the app because it’s easier for these next steps in my opinion.
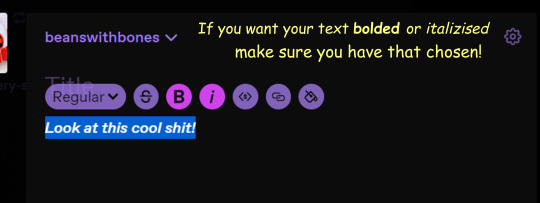
Step Twenty: In the app, go to that saved draft and make the text bold if you so choose, it makes it stand out more that way

Extras: you only need to make one colored text when you make a post, which means you don’t need to go through that whole process for each line/word you want to make colored.
— just type whatever words you want colored next to the already colored text, then move it down a space.
— however, once you delete that line of colored text it cannot be recovered, you’d have to go through this process again.
ANYWAY, I hope this helped. I tried to make it as step-by-step as possible. 😁😁💕💕
#─ ·˚꒰ 𝙍𝙀𝙋𝙇𝙄𝙀𝙎. ꒱ ₊˚ˑ#pink themes#aesthetic#pink#pinkcore#pink dividers#cute#sparkles#stars#writing prompt#writing help#colored text#text help#gradient#gradient text help#gradient text
71 notes
·
View notes
Text
So you wanna make gradient text?
this was originally made just to help a friend but she suggested I post this publicly to help bcs the other tutorials out there aren't very straight forward. with that said pls ignore typos:
↓↓ Site Link ↓↓
↓↓ Site Link ↓↓
Note: you can still continue typing in the preview
Hope some peeps find this helpful
#tutorial#tumblr#tumblr tutorial#text art#text art tutorial#gradient text#art tutorial#I know its not exactly art but I wanan get this out there to help ppl
3K notes
·
View notes
Text


gale & caoimhee + text posts
part 1
#i put way too much effort into this. help#color gradient and text resolution my nemesis#anyway#i love my children so much im gonna cry ugghghg#bg3#baldurs gate 3#gale dekarios#gale of waterdeep#caoimhee thirfaen#bg3 text post meme#oc content#text post meme#mygifs#long post
422 notes
·
View notes
Text
*steps on stage*
*taps mic*
"Happy International Women's Day. I want to peg Captain MacTavish."

I'm going out tonight, but perhaps I'll try to whip something up later on when I get back
#international women's day#soap squad™️#soap prez out#the brainrot of Captain MacTavish#this is how you make this man whimper#is this a deadpool reference?#damn right it is#captain soap mactavish#captain mactavish#og soap#09 soap#call of duty#cod#i wanted to do the gradient text but i am le dumb#someone help a non techy sister out here#please
325 notes
·
View notes
Text
gradient text tutorial
This tutorial is for @ladynephthyss but y’all can have it too xD
We’ll be adding text so the final gif looks like this:
This tutorial assumes basic knowledge of gif-making, Photoshop, and coloring. I’ve only described the text tutorial in this.
Tutorial under the cut:
Couple things to note beforehand:
There is a lot of trial and error involved when doing any sort of text, and this is no exception! You might have to play around with the colors and the settings before you find something that looks good and readable!
This tutorial is inspired by the difference text effect in these tutorials: one and two by @anya-chalotra (highly recommend checking those out!), just done a different way.
This text effect works better on big gifs (540px width) that have quite a bit of movement below the text so you get that effect.
Find fonts that have bold shapes or some width to them, so you can see the movement.
This is my starting gif, after sharpening and coloring.

First, I position my text where I want it. (this can be moved around later, I just like to get an idea). Remember what I said about fonts? Try to use ones that are thick for this effect so you can see the gradient/movement underneath the letters. I’m using Intro.
It doesn’t matter what color the text is at this stage, I just do white text so I can see it:
Then, add a gradient map in the color you want your text to be. For this one, I chose black and purple. The more contrast there is in your colors, the better it looks. You’ll be able to change this later though, if you don’t like the way it looks.
This is how it looks with the gradient map:
Now, we’re going to go over into our layers panel, and where we have the white box (the layer box), we’re going to select and delete that...
...so it looks like this:
Then, while pressing Ctrl, we’re going to hover our mouse over the T in our text layer. Your cursor should show a white box with a dotted border. Press the T in the text with the specialized cursor, and you should get a dotted line all around the letters, like so:
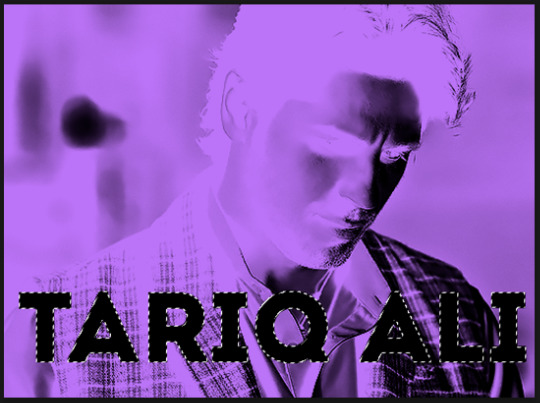
(I’m not able to get a screenshot of the cursor for some reason but I hope the instruction made it clear!)
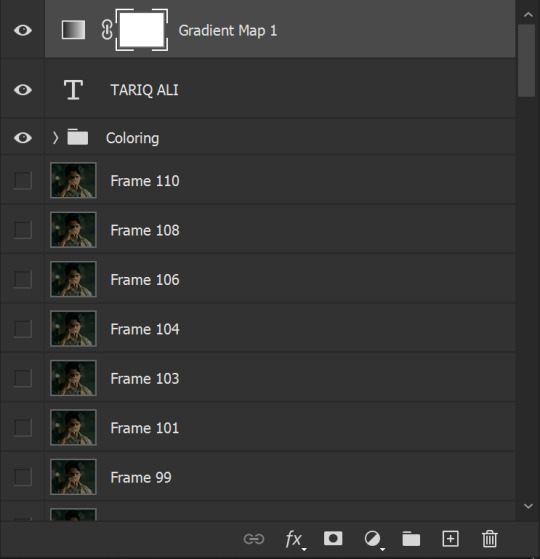
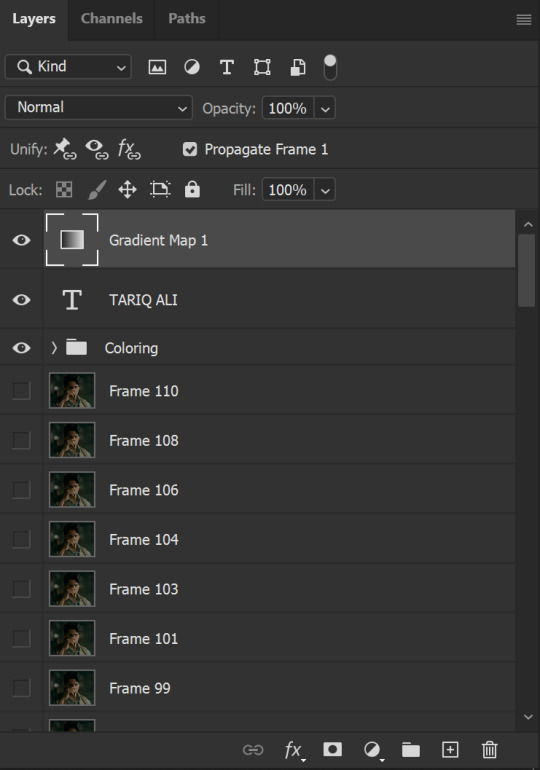
Then, make sure you have your gradient map layer selected, and press the layer mask button (shown by a white arrow in the below image - it looks like a white rectangle with a black circle in the middle.)
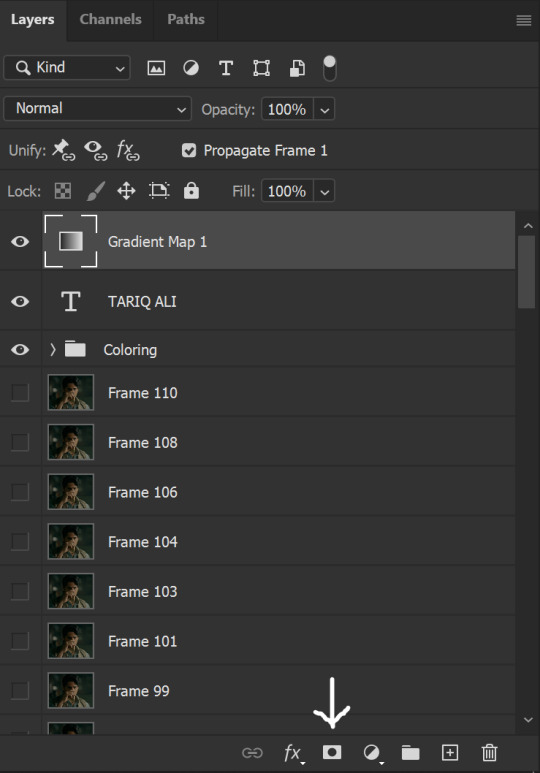
This is what it should look like:
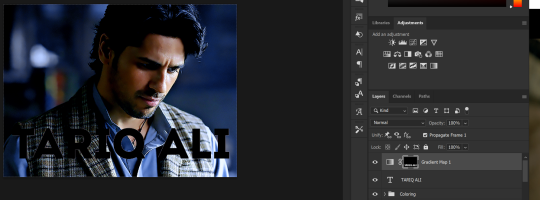
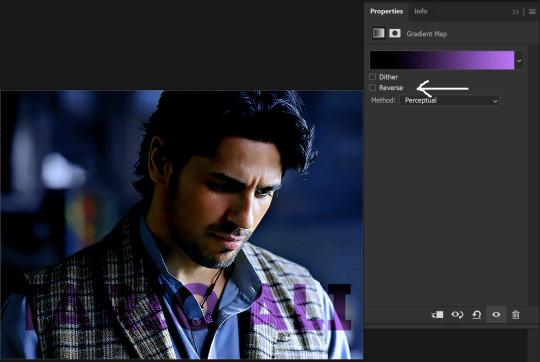
Right now, it’ll look like some solid color (which depends on your gradient). This is because we still have the text layer visible. Once we press the eye icon next to the actual text layer to hide it, you can see that this is what it looks like:

(You can also delete the text layer, but I don’t, just because if I decide to put these two words on two lines, or change their spacing or whatever, I don’t want to have to make a new layer. I can just edit that one before re-masking.)
As you play your gif, you’ll see that this is what the whole movement looks like:

You can see that the movement of him lifting the glass to drink his tea shows through the text, too. Almost like a weird color X-ray type thing, where the lighter color shows on darker shades of the gif, and the darker color shows on the lighter part of the gif.
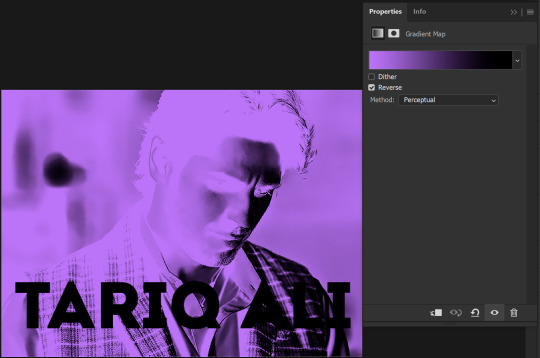
Note: sometimes, depending on the way your gradient is made, you might get text that looks like the picture below. Just hit the reverse button (shown with a white arrow), and you should get the text looking like it does above.
This is the basic way to do it. Now, we can easily edit this, if we feel like there’s too much purple and not enough black. To do that, we go into the gradient, and change the slider positions of the colors. This is purely an aesthetic preference, but I’ll show you how to do it below:
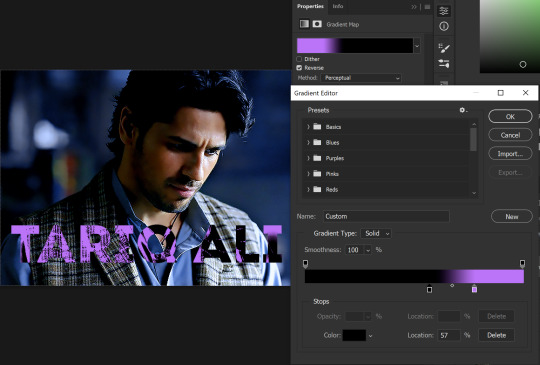
For example, I moved those sliders so there’s more black and less purple, and the gradient feels more like two colors only, instead of all the various hues of dark purple/gray-purple.
This is what the gif looks like:
In the gif before this one, the black was more of a muted gray. In the one directly above, you can see that it looks much more striking. So play around with that until you find something you like.
It still doesn’t look very visible to me, so I’m going to add a drop shadow underneath (again, this is a preference thing). You’d do it just like you would with a regular text layer. Right click the Gradient Map layer and select Blending Options. Add a drop shadow.
This is what mine looks like:
And that’s it! You can keep playing around with the whole thing until you’re happy with it. You can even keep changing the color, and the great thing about that is you’ll be able to preview it as you change it to see what works with your scene. For example, I tried white and black text here:
And that’s it! Feel free to drop me an ask if anything’s confusing! Happy giffing!
#zee's tutorials#tutorials#gif tutorial#typography#gradient text#photoshop tutorial#resources#ps help#dailyresources#completeresources#itsphotoshop#allresources#dailypsd#userisha#userdahlias#alielook
424 notes
·
View notes
Photo


The broken boy who failed to be the blade...the misguided master who sacrificed herself for a friend...and the feckless youth who became my new vessel.
#khgraphics#khgifs#khedits#kingdom hearts#kh birth by sleep#KH3#wayfinder trio#kh aqua#kh terra#kh ventus#my gifs#my coloring#not free to use#don't repost#I can't tell you just how long these took a piece to put together#I do want thank anya-chalotra for the helpful gradient text tutorial#It truly helped remind me of how to go about using this technique in gifs
846 notes
·
View notes
Text
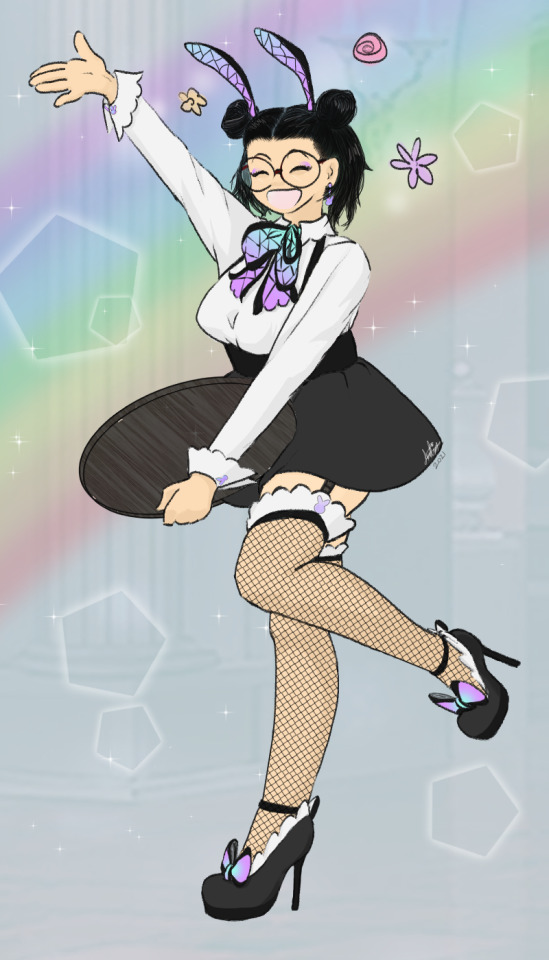
reposting this from twitter since i never put it here apparently. i drew it for the initial bunny outfit events but there's yet another bunny cafe event so here it is again, with original caption:
"POV you heard the Lords of Hell were wearing bunny ears at the club, and find out that tryhard human exchange student in your class is there too
+bonus post-shift snapshot
(THEY/THEM)"
#my art#obey me mc#does it still keep things out of the tag if you have enough tags in front?#i think it was like five tags?#sorry if you see this lmao#it draws#illusion does a thing#i may never draw this well again tbh#i love clip studio assets. is it obvious#let's add a few more tags to be safe#the demon brothers have accessories in their associated colors but i went with a gradient based on the gradients in the original app#i was so disappointed that nightbringer has a '''''more polished''''' look that removes a lot of the character tbh#whatever. anyway#yes it has double ears but that's because the bunny ears are fake. hope this helps#^double ears hater committing double ears crimes#obey me#i would do anything for demon boys.#even work as a waitress in six inch heels.#my hair hasn't been long enough to do the usagi buns in years...#ETA alt text
21 notes
·
View notes
Text


awooo
#jeremy dooley#i cannot help but laugh at him trying to be cool#but hitting his glasses on the mic#im sorry these arent the best quality but premier is a piece of shit#and its been a while since i made gifs#but werewolf jeremy was too good not to gif#one day ill figure out how to make gradient text
299 notes
·
View notes
Note
if you don't mind and bother, make a tutorial please!
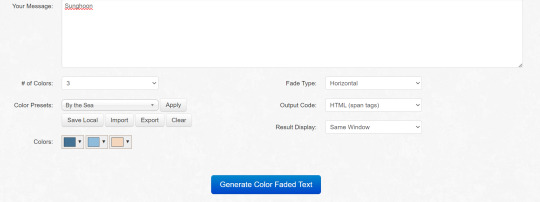
Ohk so first go to the website!
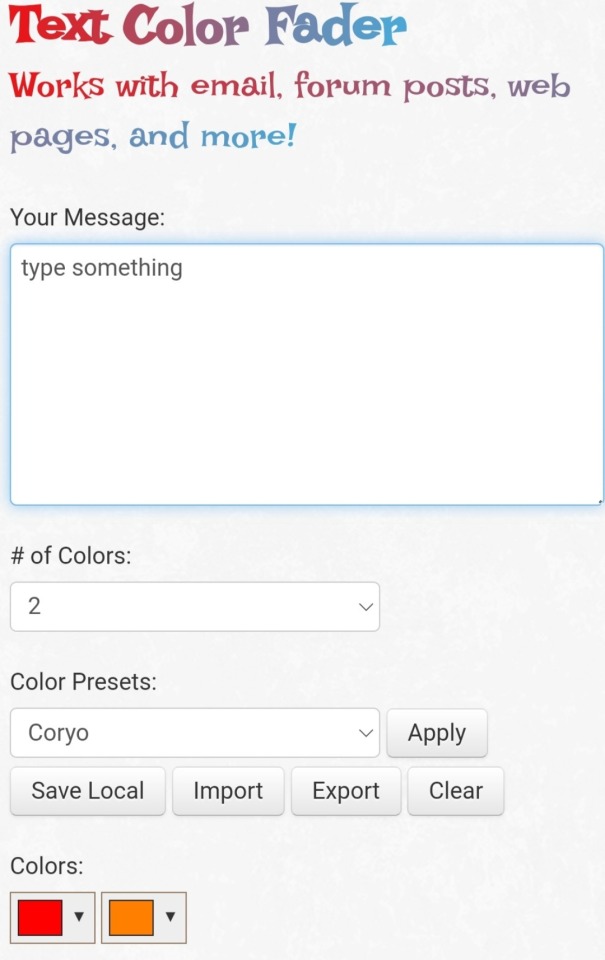
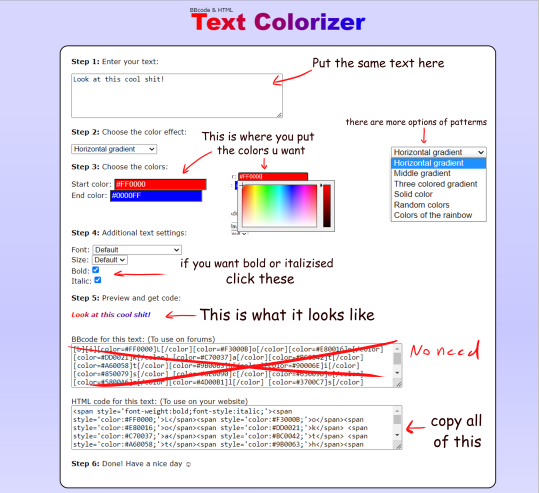
type your desired text, choose the colours you want by typing out there hex code or choosing from the colour picker!
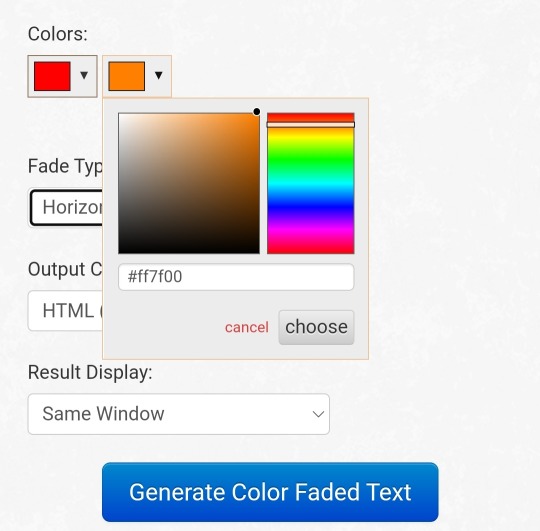
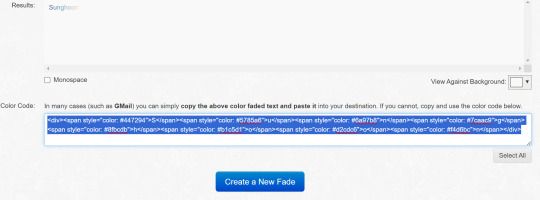
After you're done, select generate color faded text / the blue button
this will appear!
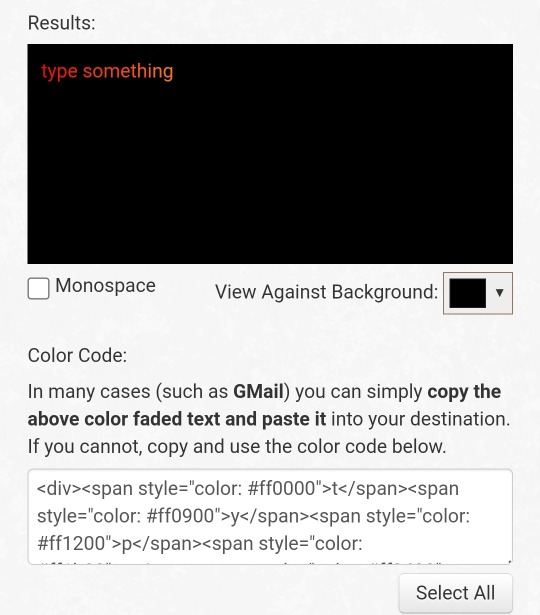
you want to copy the tags and then go to the browser version of Tumblr and create a post, go the settings icon and change the rich text part to HTML
After that, paste what you copied

and then click save!
and this should be the results!
Hope this was helpful <33
39 notes
·
View notes
Text
Yesterday at work, one of my co-workers saw a drawing of Miku in my work notebook. she told me "I thought you drew a spider"
11 notes
·
View notes
Note
Heyy im kinda new to tumblr can u tell me how do you edit your text to be in colours and i dont mean this i mean like two different colours
(Sorry for the bad explanation idk how to explain it 😭😭🫶🏾)
Heyyy Babes🩷!
Ofc I can tell you, gradient text is simple and easy once you learn it! (I hope I explained this good enough for you😭)
Answer below the cut!
I use Text Color Fader
First you pick your hex codes you want (you can find hex codes on this blog)
The hex codes I use are #a0195b → #cc3274 → #ff6999
Then you go to Tumblr website (you can only enter gradient text on tumblr website) and you create a post (you can add it on old post too but creating a new post is easier)
This video below shows you how the process works!
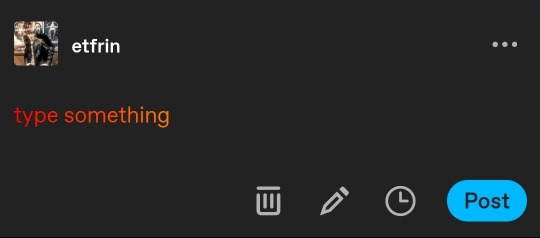
Once you create the post it should look like this!

I hope this video helps! If you have anymore questions (or if you need a better explanation) don’t be afraid to send me another ask or dm me!
#❖ — 📬: 𝑰𝑵𝑳𝑶𝑽𝑬𝑾𝑰𝑻𝑯𝑷𝑨𝑵𝑫𝑶𝑹𝑨 ~ 𝑨𝑺𝑲𝑺.!#❖ — 👻: 𝑰𝑵𝑳𝑶𝑽𝑬𝑾𝑰𝑻𝑯𝑷𝑨𝑵𝑫𝑶𝑹𝑨 ~ 🕸️ 𝑨𝑵𝑶𝑵.!#I really hope this helps!#how to make gradient text#gradient text tutorial#gradient text
35 notes
·
View notes
Note
sorry for asking, but i really liked how you put your text in the pinned post in pastel colors and idk how you did it, do you mind explaining it please? i've been trying myself changing the html thing and i always get so lost
Hello hello 😻✨✨🩷🩷 okay so, I explain in this post how to change your text colors, but I recommend going to this link instead for the html gradient text link I originally put as it’s easier to work with than the one I posted in the og link.
If you do choose to go to the other link for the html, the same steps still apply as in the og link in the sense of applying it to your post, as the source for gradient html doesn’t matter. I hope you understand what I meant and good luck!!! Have fun with it as well, and don’t be sorry for asking that’s why I have an inbox!!! 😙✨✨
#─ ·˚꒰ 𝙍𝙀𝙋𝙇𝙄𝙀𝙎. ꒱ ₊˚ˑ#pink themes#aesthetic#pink#pinkcore#pink dividers#writing help#gradient text help#gradient text#gradient tumblr text help#how to gradient tumblr text
8 notes
·
View notes
Note
Hey! I just have a quick question, how do you do for the font color to be gradient or another color that isn’t blue, pink, purple, orange or green?
i use edit fiddle. (you might only be able to do this on desktop. i've never tried it on mobile before.) also, you can only choose 2 colors doing it this way. i don't know of a way to use 3+ colors, but i'm sure others might!
-> just enter the text you want in the first blank field:

-> click on the colors and change them to whatever you want (it kept closing the color selection boxes when i tried to get screenshots *pouts* but you'll see what i mean when you do it):

-> click 'run' then select and copy all in the field below where you entered your text:

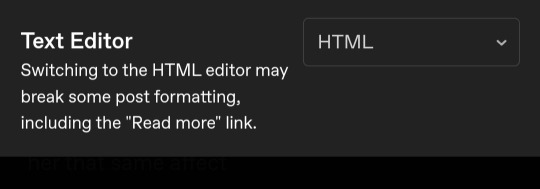
-> open/start a tumblr text draft -> click on the little gear icon in the top right and select HTML in the text editor field:
-> paste the html code. it'll look like this:
-> then click 'preview' and VOILA!
( from there you can make it bold, italic, bigger, etc. if you try it and run into any problems or have any questions, lmk and i'll try to help!! ^.^ )
here's the finished product:

#kel.answers 💌#hope this helps 🥰#if you wanna know more about how to use edit fiddle i know there are some good tutorials on youtube#how to: gradient text color
22 notes
·
View notes
Text
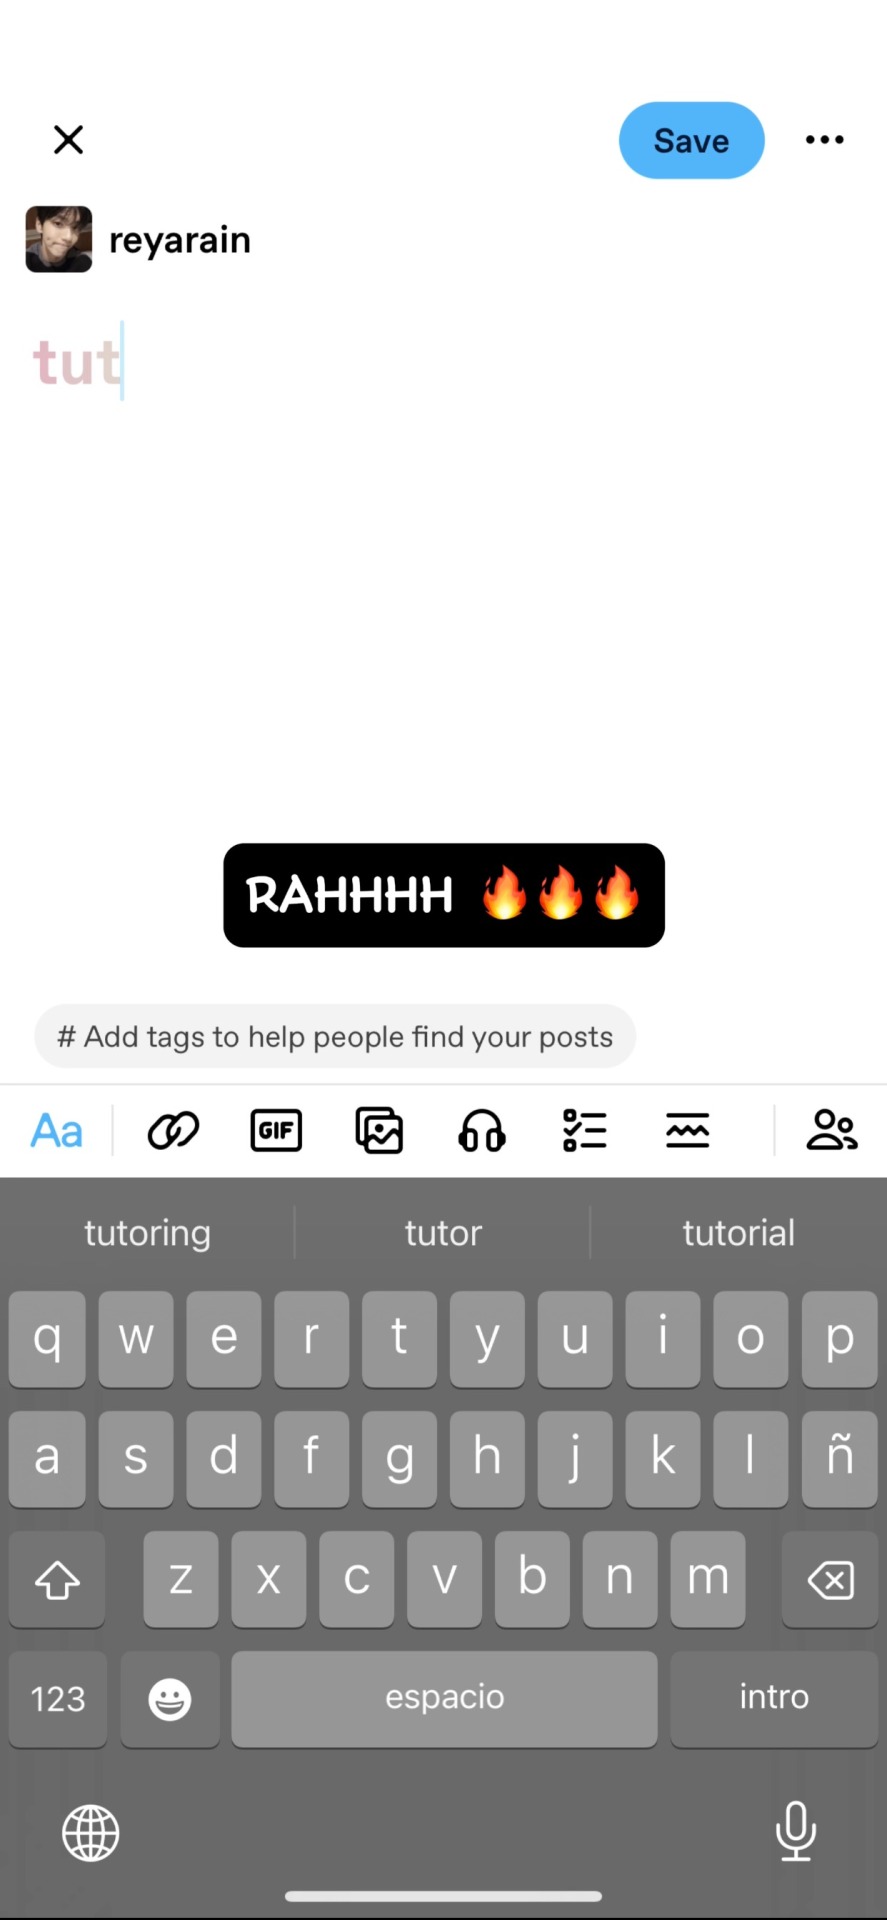
*ping* ┈➤ how to make gradient texts on iphone!

- i got requested to do this and there is no such thing as gate keeping here so here it is!! hope this helps ‼️

19 notes
·
View notes
Note
hihi my smart cookie 🤭🍪 pls educate me on how to do gradient text
OFC ML <33
So you there are 2 methods to do it, I use the Patorjk’s Text Color Fader but there is another method (which idk how to use T^T)
Step-1 : Let's say you wanna type "Sunghoon" in gradient so write it in message. You can change the colours/colour gradient and fade type according to your preferences! Then Click on generate text.
Step-2 : Once the text is generated, click on select all and copy the html code!
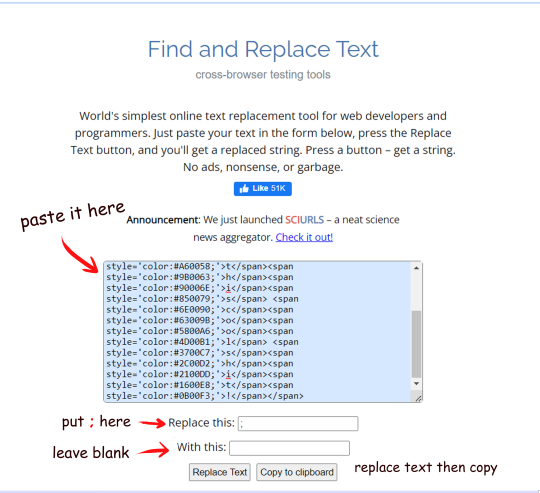
Step - 3 : Now paste it into this site. Click on replace text and then copy to clipboard! [note: just put a random symbol in those boxes like I've done so]

Step - 4 : Go to settings and change the text editor to HTML [note: this cannot be done on tablets/phones]
Step - 5 : paste the code and then shift back to Rich Text
Step - 6 : There you go :D
Sunghoon
6 notes
·
View notes
Text
Me: idk what to do for this graphic design assignment due tomorrow I’m so fucked
Rui kamishiro from the hit mobile game project sekai:

#second time this has happened. thank you law evading rock mv for getting me thru the mental block 🫡#do I like the result? no not really. did it take me 6 hours? yes.#fighting Adobe illustrator & getting my ass beat is a tried and true method for success.#mine#i have so much beef with that fucking program it’s so unintuitive it’s like they did everything they could to piss me off specifically#you can learn photoshop if you know art programs you can learn premier with a bit of hard work#you learn illustrator through tears YouTube shorts and help boards#putting the perspective grids function on my suicide note with a post script abt gradient texts#and envelop distortions
3 notes
·
View notes
Last Seen Blogs

goodnightfabrics-blog
GOOD NIGHT FABRICS


jyotishforyou
Free Astrology Courses

o5-cowboy
Monday Night War Crimes
o5-cowboy
Monday Night War Crimes