#feel free to rb/use!
Text


13K notes
·
View notes
Text
poll for artists!
#been thinking about this cause i used to watch videos or livestreams while drawing but lately its pretty much always music#kinda gets me in the zone.. idk#also feel free to rb for more reach#i probably forgot some things so sorry in advance
2K notes
·
View notes
Text
story idea: the dragonborn dies somehow but the power itself must continue on as destiny bids, so the power attaches itself to some rando who them has a full power of the dragonborn. all while the world has stopped to mourn the greatest hero skyrim has ever seen.
#idk where id go with this#something about grief from a distance definitely#maybe something about expectations#i might tap up a concept for this using eryn('s death) and. idk. ill pick an npc OR make one up myself#full disclaimer im on meds as im writing this so while to me in the moment this sounds brilliant im sure its actually kinda stupid#ill decide in the morning#feel free to rb this with your own takes on the concept tho thats be neat reading material
172 notes
·
View notes
Text
255 notes
·
View notes
Text
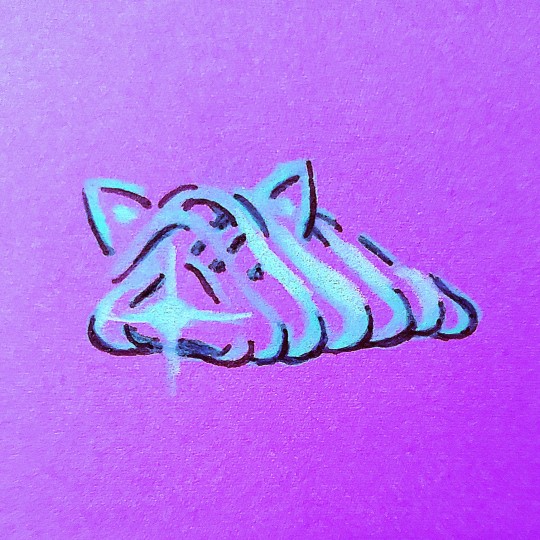
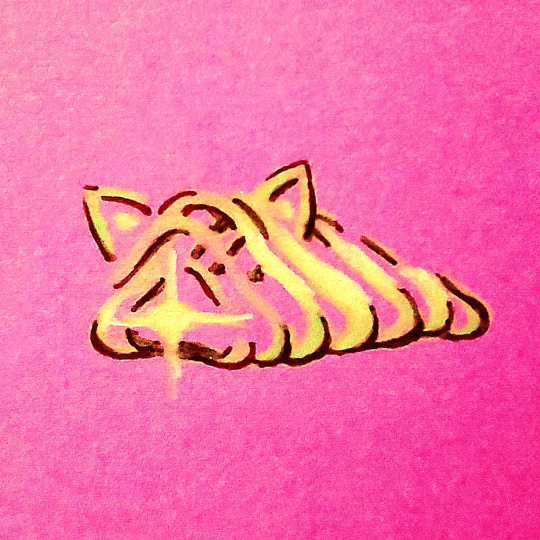

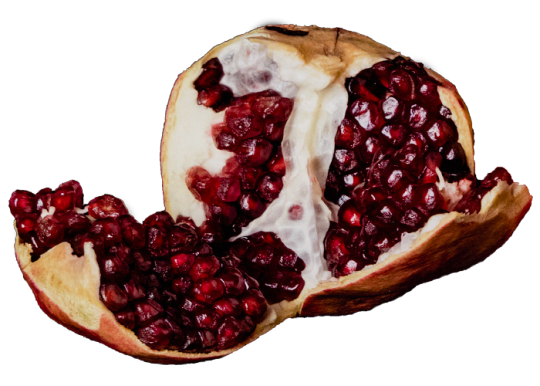
Baby cats, very pog
#I'm sure this has already been done now many times but this is my contribution#feel free to use as icons pls just rb and credit#destiny 2#lightfall#threadlings#strand#art
801 notes
·
View notes
Text


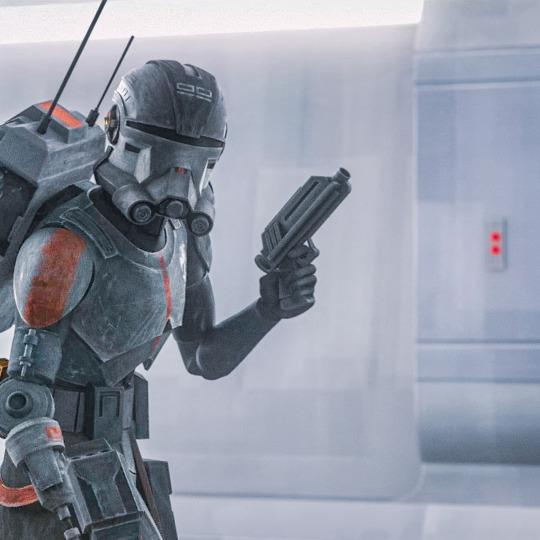


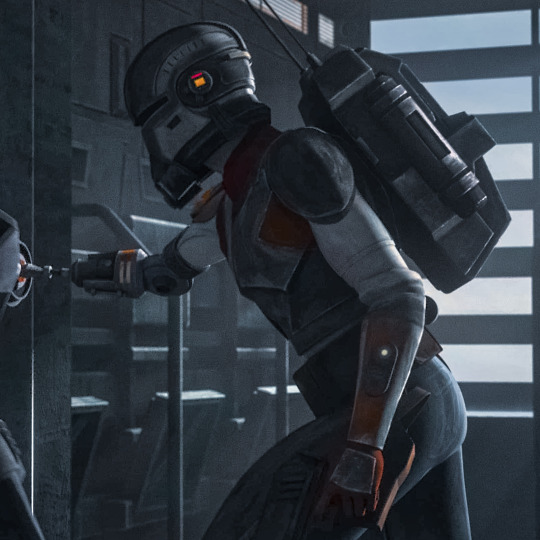
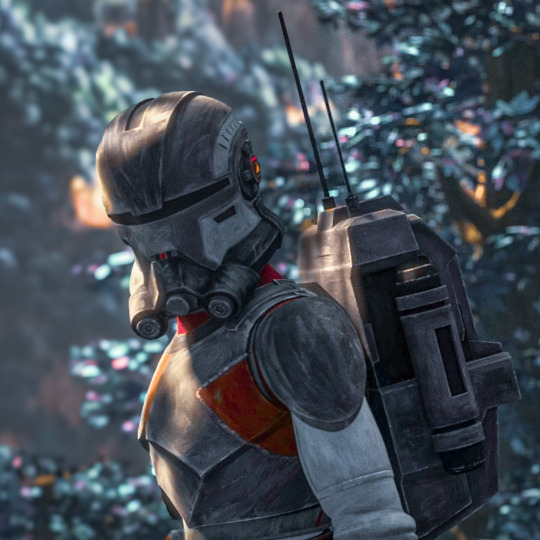

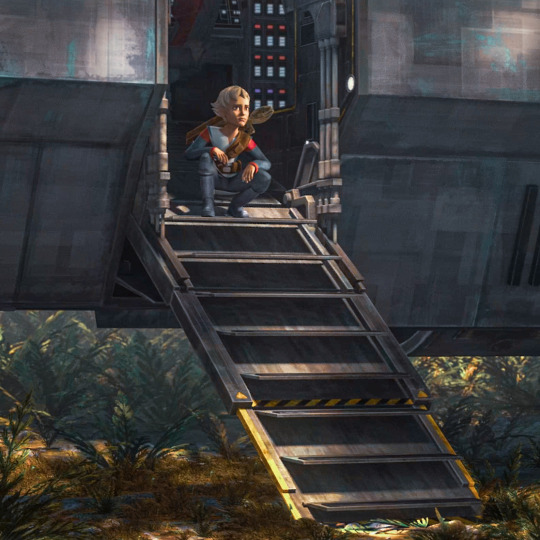
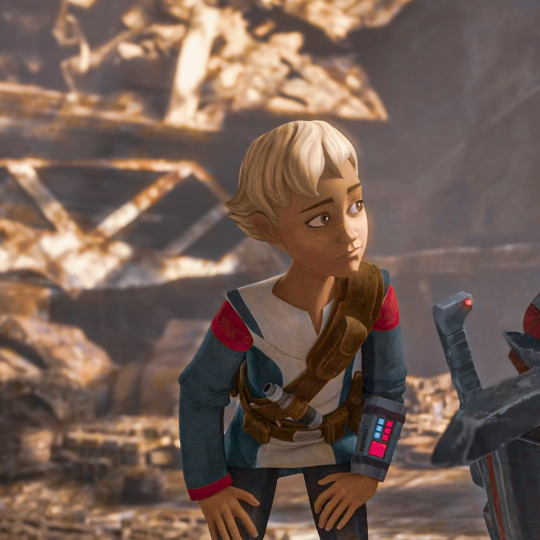
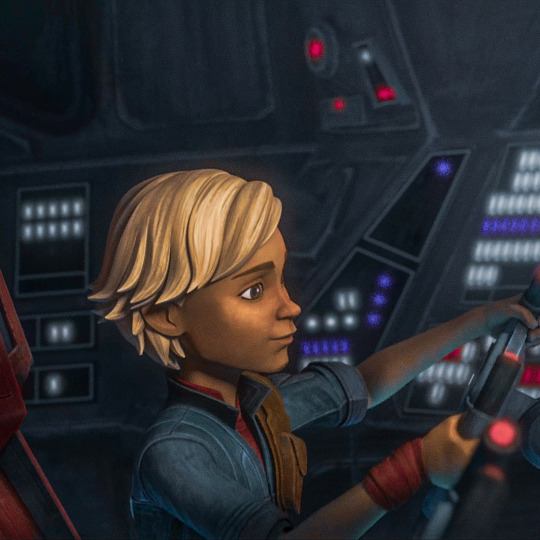
CT-1409 – Echo
[ tcw s3 • tbb s1 • tbb s2 • tbb s3 ]
Hunter Tech Wrecker Crosshair Omega
#was really excited to do this one#my sweet boy echo#feel free to use as icons! just like/rb first pls#the bad batch#tbb#arc trooper echo#tbb echo#ct 1409#star wars#swedit#tbbedit#mine#screencaps are from cap that.com#star wars icons
123 notes
·
View notes
Text

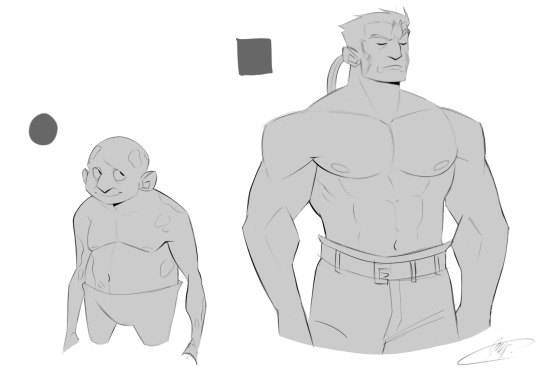
Shape/anatomy practice ft. The Nesties
#ik this is weird i'm so sorry i promise it's for practice BWHDH#this is mostly how I perceive their general body types to be like#uhh might use this as a self ref when i draw them again in the future#if anyone has their own ref tho feel free to rb it here so we have more refs of the nesties <33#fullmetal alchemist#fmab#greed fma#dolcetto fma#martel fma#bido fma#roa fma#O YEA#i made a head turn model sheet for dol and martel b4 but I might redraw that soon#hopefully BWJDW#it would be fun to try this on other fma characters so i might give it a go too
660 notes
·
View notes
Text
10 actual ADHD study tips
from a student with ADHD
(or if you just have trouble concentrating)
1. put your phone in different room.
no, really. there can be any number of excuses not to (i use it as an alarm/timer, what if there's an emergency, but i use it during breaks) but i guarantee that you will focus better without the ability to check your social media. if you're genuinely worried about missing a phone call, don't put it on silent, and leave it across the room so you can hear it, but make sure it's out of reach.
2. invest in some noise-cancelling or muffling headphones.
they're a life-saver. i use them to help with sensory overloads, but now i wear them pretty much every time i study. regular headphones with some kind of neutral backing noise also work pretty well.
3. don't listen to music.
maybe somewhere, somehow, there exists a person who can actually listen to music and focus, but i've never met one. my adhd means i get distracted by anything. i'm a good multitasker, but not when the task requires lots of thought, like my science or math homework, or that english essay i've been putting off. if science is distracting for you as well, put on a neutral background noise (no, not lo-fi hiphop beats - unless that works for you). i usually put rain sounds or white or brown noise (the latter is my favourite).
4. break big tasks into small chunks.
you've probably heard this one before, but adhd makes tackling big tasks seem really daunting. like, where do you even start? before beginning a massive project, make a list of every little thing you need to do. it might seem stupid or excessive, but i can't stress how much it helps. it also gives you a sense of accomplishment whenever you knock a task off the list.
5. if you know you're gonna procrastinate, try and do it productively.
this one is one i'm still getting used to. i realised, after hours of sitting at my desk, not wanting to start on my essay but not wanting to actively NOT write my essay, and just generally feeling like shit, that it would have been better to spend those hours doing that thing i wanted to do (learn that song on my guitar, finally finish the painting sitting on my desk, write the poem that i had scribbled in my notebook a week ago). if you know you're not going to get started on your work, you might as well do something else that isn't as pressing but you still need to get done. it's okay not to be 100% productive al the time.
6. have a clear workspace.
this is a big one. i found that having a lot of stuff on or around my desk just makes me feel fenced in. i like to have 1 lamp, 1 cup of pens/pencils/highlighters, a cup of tea, tissues, and whatever i'm working on. when you're done with a task, PUT IT AWAY ASAP. that way, it doesn't build up, and you can feel ready to start on the next thing.
6.5. eliminate distractions.
i feel like this relates to the point above, but don't have lots of visible posters/lights/tempting tasks. maybe close your blinds or your door, or study in a library instead of your room if it is too bright and colourful.
7. the pomodoro method (organising your breaks).
LOVE LOVE LOVE THIS. the pomodoro method involves working for a consistent slot of time (usually 25 minutes, but whatever works for you) and then having a short break (5-10 minutes), and then a long break every 2-5 "slots" (15-20 minutes). if you don't trust yourself to stick to a timer, get a cute app on your laptop - there are heaps of different themes, and it will help you organise your time and tasks. instead of thinking about a task like "it will take me 2 hours", think about it like "it will take me 4 slots of time", and it will be much less daunting.
(note: for your breaks, try not to reach for your phone/social media. this is a rabbit hole. maybe draw for a minute, or read a few pages of a book. do something you can easily and quickly put away.)
8. organise yourself, but try not to hyperfixate on it.
apps like notion can be really helpful when organising tasks/your workspace, but they can also suck hours of your time away if you're not careful. not everything has to be perfect/meticulously planned, and you're not working on your homework by planning your weekly schedule. speaking from experience, it's really easy to get caught up in something that may feel productive, but really isn't.
9. this is really niche, but... for my reading-glasses wearers:
WEAR THEM WHEN YOU STUDY. i'm very mildly farsighted, which means wearing glasses when i read for long periods of time helps me prevent headaches. technically, i can go without them, and for a few years i usually did, but i've noticed that wearing them when i study has the benefit of getting me in the right headspace, and also stops me from looking up or around my room too often, as the prescription makes me dizzy when looking at things far away.
10. just get started.
i know you hate hearing this, but usually, knocking one or two things off your list can help you get motivated. often, things that seem really difficult or time consuming aren't as bad once you've gotten started.
good luck!
#gonna be so embarrassed if i post this and no one sees it but eh#i'll use it for myself#ironically i wrote this instead of studying#feel free to rb with your own tips#adhd#actually autistic#study tips#actually adhd#adhd in#neurodivergent#executive dysfunction#living with adhd#adhd post
1K notes
·
View notes
Text
FRIENDS TO LOVERS WLW PROMPTS
Prompts between two girl friends that can feel so intimate that you might be only a breath away from becoming girlfriends.
Coming out, discussing questions and concerns about your sexuality, trying not to confess
A long, close hug where you can clearly feel the outline of her body against yours
Having a sleepover, sleeping in the same bed, cuddling
Comforting each other crying, brushing away teardrops with your fingers, trying not to kiss all of them away instead
Giving compliments, making the other blush, teasing with double meanings
Casual touches when one is naturally touchy and the other is touch starved
Taking a bath or a shower together
Getting drenched in the rain, helping each other out of sticky wet clothes, toweling each other dry
Choosing outfits for an occasion together and changing in front of each other, staring but trying not to make it obvious
Buying underwear together, trying to keep the intrusive images at bay
Doing each other’s hair, light tugs and pulls, light touches brushing against the skin of your neck, trying not to let out a noise or a tremble
Making each other’s makeup, trying not to stare too much and willing your hands not to tremble when touching each other
Getting matching items / giving a gift, and trying to keep the possessive thoughts at bay when seeing the other wear it
Feeding each other from hand to mouth, lips and tongue touching fingers
Indirect kiss: sharing food, a cup, a bottle, trying not to overthink too much
Taking pictures of each other, marveling at each other’s beauty and charms
Sitting in each other’s lap
Holding hands, playing with each other’s fingers
Tickle fights that end up with you two on top of each other, looking into each other’s eyes, limbs tangled, faces red, breaths heavy
Dancing or singing along to a love song, the lyrics resonating a bit too much to ignore
Playing the pocky game
Arguing because one of you was so worried and immediately making up because you can’t stand to see the other upset
Sharing a first kiss together because one of you (or both of you) feel inexperienced and want to try with a comfortable friend first
Sharing a first time together because one of you (or both of you) feel inexperienced and want to try with a comfortable friend first
Send your own ideas!!
#writing prompts#writing prompt list#wlw prompts#girl group prompts#friends to lovers prompts#feel free to rb and use
547 notes
·
View notes
Text
get tampermonkey and download the dashboard unfucker right now and send staff feedback on the desktop site
edit: if you're intimidated by tampermonkey and/or userscripts, check the reblogs for a guide on how to install it :3
#not art#feel free to rb this (actually encouraging you to)#tumblr dashboard#dashboard layout#tumblr layout#tampermonkey#idk what tags to use it's just the only thing that's made tumblr usable for us again so i want people to see it
205 notes
·
View notes
Text


5K notes
·
View notes
Text
Anonymously tell me how you'd want me to kill you
#smigglesask#im remaking the anon me how u wanna kill me#the other way around#feel free to use or rb for urself
110 notes
·
View notes
Text

Big Challenges!!! Click for non-blurry actual size lol
#sanrio#big challenges#fanart#pixel art#sprite#animation#casper.png#feel free to use it for whatever - i'd appreciate it if you rb it if you do tho!#i love him :>
49 notes
·
View notes
Text
So you wanna sell your art on Redbubble but you don't know how?
(Or, I meant to write this months ago but better late than never lol)
OKAY okay. I have a bunch of friends as well as mutuals who have lovely lovely art and have considered selling it online (specifically on Redbubble lol that's what's being covered today anyways) but don't really have any clue how RB works, if it's right for them, or what to expect. SO I'M HERE TO GUIDE Y'ALL THROUGH ALL THE BASICS and hopefully, if I've done my job right, this tutorial will help you set up your RB shop and start selling your art online (or help you decide that RB isn't for you lol).
Table of Contents:
What the heck is RedBubble and should I use it?
How to make your account and set up payment
How to add a new work
Pricing? Markup?
Extra: Checking sales and payment history
Extra: Taxes and copyright, in case that scares you.
Extra: The Partner Program (or how to make "officially licensed" fanart)
What the heck is RedBubble and should I use it?
>> RedBubble is a site that allows you to upload your artwork and sell it on quite a variety of different products.
>> The main benefit of using RedBubble, aside from reach and visibility, is that RB handles *everything* when it comes to the manufacturing and shipment of your product. You are literally not responsible for anything other than making the art, uploading it, and deciding how you want it to look on different products. If there is any kind of problem with material quality or delivery (though in my experience they're pretty good with both of those things), it's not your responsibility to correct!
>> RedBubble does not charge you to sell on their site, but they do set a base price for all products to cover manufacturing and to ensure that they make some level of profit for each sale. We'll look into the specifics of this in a later section when discussing pricing and markup, but it would be considered pretty standard, for example, for an item to cost $20 and you to make $4-$5 upon making a sale.
>> At the end of the day, whether or not RB is right for you largely depends on whether or not you feel their pricing and payment is fair, and whether their available products correspond to what you wish to sell.
Okay, so how do I get started?
Well first you're gonna need an account!
>> Head over to the RedBubble main page and click "Sign Up"

>> Select "Artist Signup"
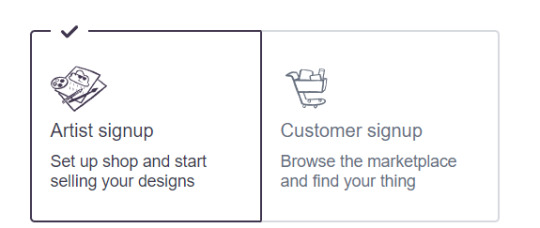
>> Fill in your email, shop name (this is your username also), and password
>> Click "Sign Up"
>> You will be brought to this dashboard page:
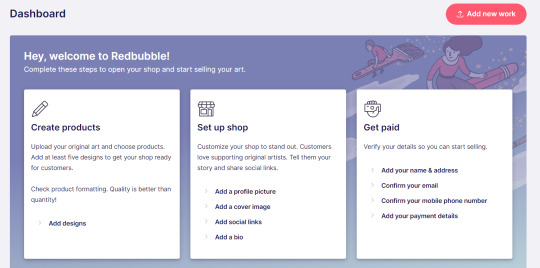
>> We will discuss creating products in the next section. Everything under "Set Up Shop" is optional and I'll let you explore that on your own so we can focus on the essentials. That just leaves... Getting paid!
>> First, check the email you used to confirm your email address. If you didn't receive an email to confirm your email address, don't worry, we can resend the form- keep going with the steps for now.
>> Then, under "Get Paid", click "Add your name & address". Note that all of the options in the "Get Paid" section actually lead to the same form, but selecting this option starts us near the top.
>> Fill out all the fields on this page. If you didn't receive the email to confirm your email address, click on this button:
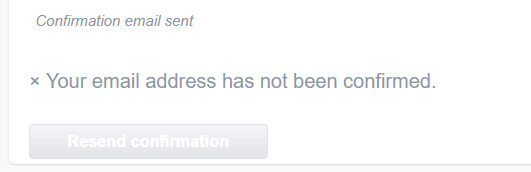
Then check your email again.
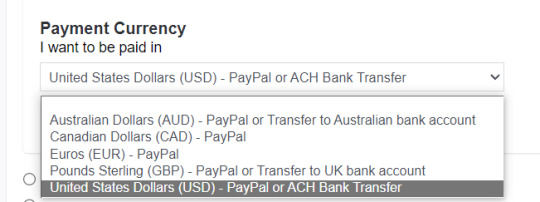
>> Note when choosing your payment method: if you are from Canada, like me, then paypal is your only option. Same for parts of Europe that aren't in the UK. Otherwise, you also have bank transfer options:
>> Once you've finished filling in everything on this page, click "Save Changes" at the bottom and... That's it! Now you can get paid :)
**Note: I believe RB still requires you to make a minimum amount of money before they do a transfer (for me in Canada I believe it's $20 CAD?), so do keep that in mind!
>> Payments are made to your account monthly, generally on the same day every month (assuming you've made profits!).
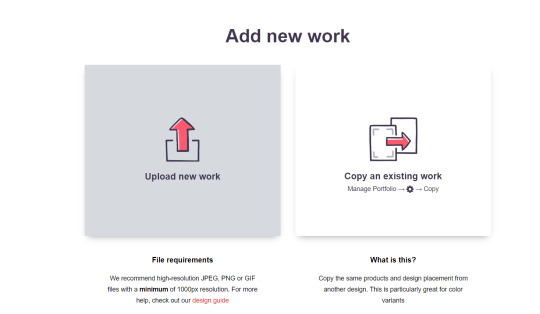
How to add a new work
So you've made your account, fantastic. Now you're ready to actually add your works to RB and make them available for purchase to the wider public! To demonstrate the process, we're gonna use our pal Nicky here (who was a gift from my lovely friend @llumimoon) and pretend that we want to upload him:
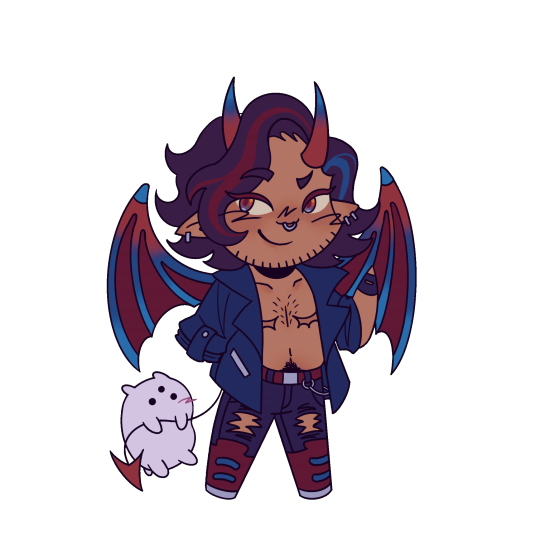
Ain't he a doll? Anyways, let's begin.
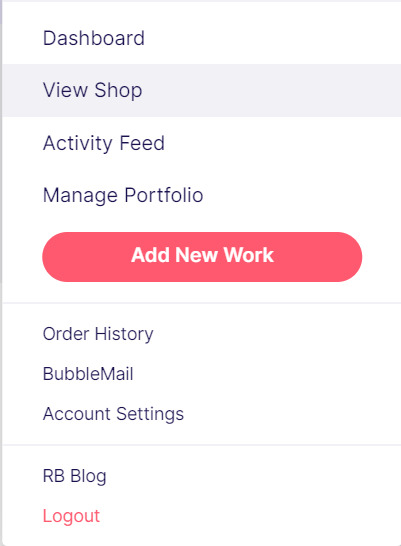
>> Hover your mouse over your pfp in the top right corner to make this drop down menu appear:
>> Click on "Add New Work"
**On a new account with nothing uploaded, this will look a bit different. instead choose "Sell Your Art" from this dropdown menu, then "Add New Work" from the top right corner of the same dashboard page from earlier.
>> Click on "Upload New Work" (and note the file type and resolution requirements at the bottom. I always stick with PNGs, but in theory JPEG or GIF works as well.)
>> Select the file of the image you want to upload. In our case, that's Nicky.
>> Now write a title for your work, tags, and a description if you want. The tagging system is how people will actually find your work, it works a lot like Tumblr's! Try to choose things that are relevant to whatever your piece is. If you're uploading fandom-related art and aren't sure what tags are used for your fandom on RB, try looking some up and seeing what generates the most relevant results!

>> You may have noticed the "background color" section right below Nicky. This sets the default background color for your piece on different products. We're gonna keep this as the default white here, and I'll show you how to adjust this for individual products very soon.
>> Scroll down. This is where we decide what products we want this design to be available on and how we want Nicky to look on each thing we've enabled.
For example, if I were actually selling Nicky here (if that wasn't clear obviously I'm not actually selling my friend's art lol don't do that ofc) I would definitely want people to be able to buy him as a little sticker :]
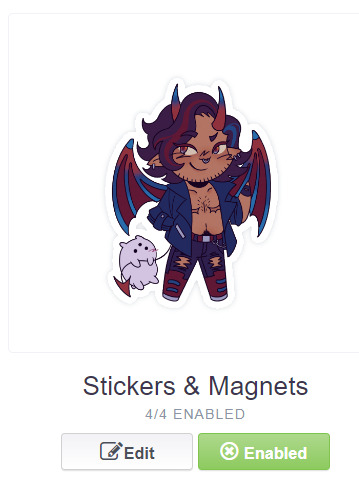
>> In this case, "Stickers & Magnets" have been enabled by default. If you wanted to disable them, you would simply click that little "Enabled" button. Similarly, if we want to enable a product type that is disabled, just click that same button (which will be grey rather than green and say "disabled").
>> If a product is disabled and you are being prevented from enabling it, that's because the dimensions of your image are too small for the product in question! You'll wanna resize your image (preferably in a manner that retains its resolution of course) and come back.
>> Hm. Let's use the hats here as an example of how we might make edits to the layout of a specific product.
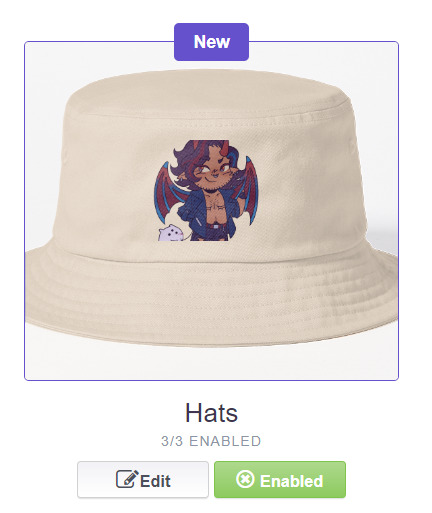
He's kind of cut off, as you can see actually that's pretty in-character, and I think I want this hat to be pink rather than this default beige-looking color.
>> Click on "Edit"
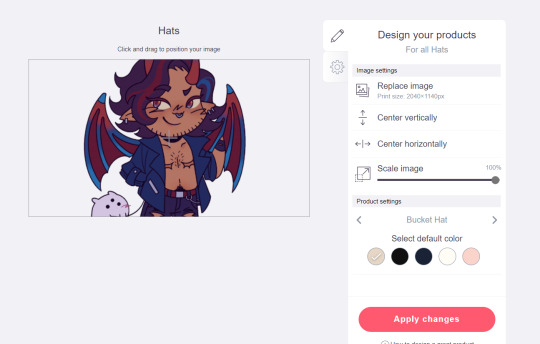
So, the first thing I'm gonna do here is use that "Scale Image" slider to scale him down a bit. I'm also gonna click the image and drag him up a bit to re-center him.
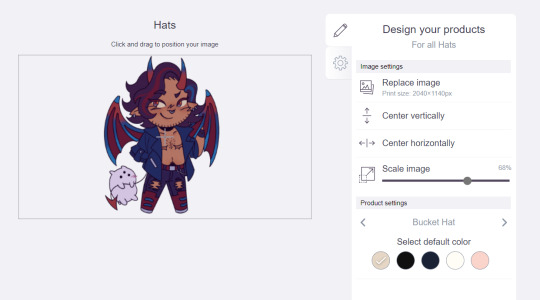
Next, I'm gonna pick from one of the default colors and choose the pink one.
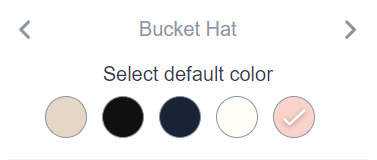
>> Notice the two arrows beside the words "Bucket Hat"? This lets me go through the different types of hats available and change the background/base color for each of those, like the dad hat:

>> Before we apply our changes, click that little gear icon right under the pencil icon
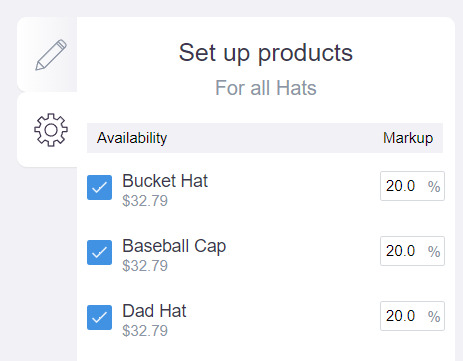
>> This lets us adjust the markup price for each individual hat. It is 20% by default. Changing the markup percentage affects how much you will make off of a sale, as well as how much your product will cost. More on that in the next section!
>> Click "Apply Changes"
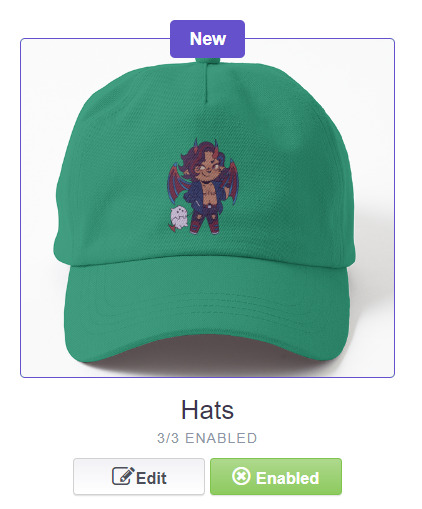
The "dad hat" was the last hat I had selected (when setting its color), so the display has changed to show that one in the preview. Here's our bucket hat from before:
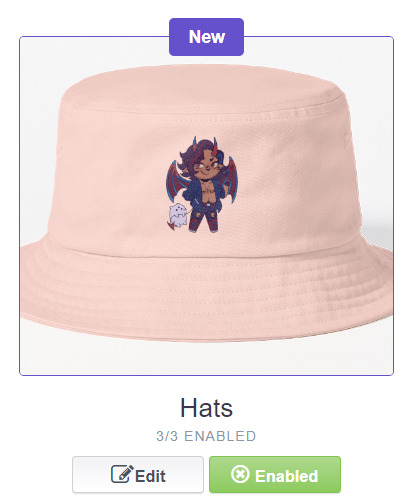
Nice!
>> The specifics of how you can adjust your design will vary depending on the product. With pillows & totes, for example, the editing menu looks like this:
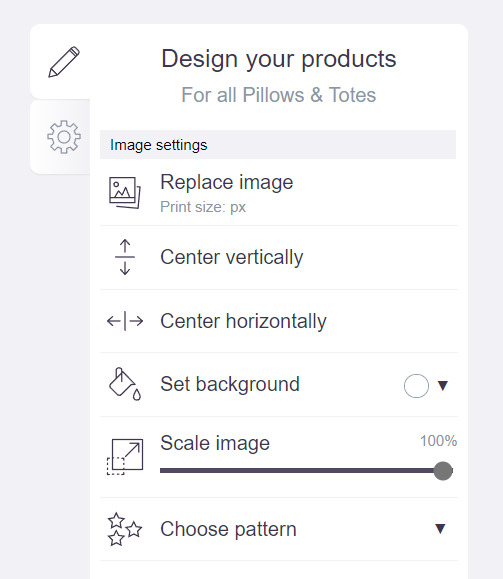
Using the "Choose pattern" option, I can make the Nicky image repeat as a pattern like so:
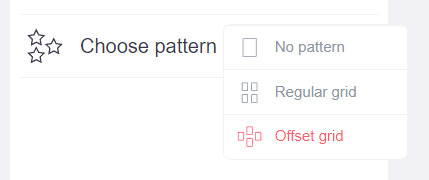

(note that I also scaled the image down a bit here too).
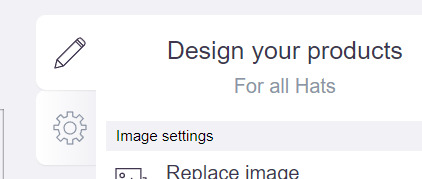
>> One last thing. See that "Replace Image" button near the top?
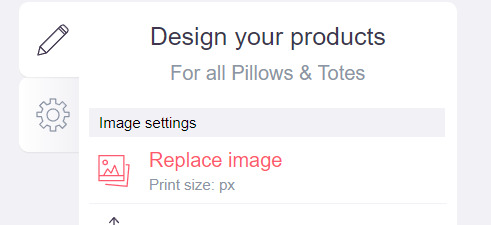
You can use this when you want to use a different version of your image altogether for a specific product.
>> That's the gist! Play around with the settings for each item as you see fit. You can always edit them again later.
>> Scroll down. Select up to 2 relevant media types.
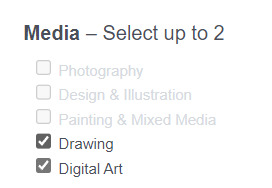
I'm pretty sure this affects search results when users choose specific filters, but tbh otherwise I don't think it's all too important.
>> Let's look at what remains.

>> I have the "Who can view this work?" section set to "Only You"- THIS IS SO I CAN FINISH THE STEPS HERE AND SAVE THE WORK WITHOUT ACTUALLY MAKING IT AVAILABLE TO THE PUBLIC. In practice, you'd only use this option if you wanted to buy your own work on something but didn't want other people to be able to see or buy it. Otherwise, you're always gonna choose "Anybody (public)".
>> Collections can be created to organize the pieces in your shop (for example, by fandom), but we won't cover the specifics of how to do that here.
>> Set whether or not your work contains "mature content".
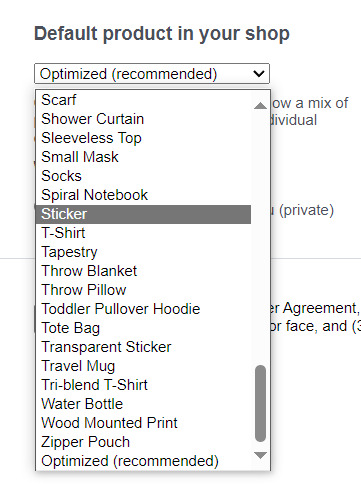
>> If you want, you can set which product shows up in the preview for your work when people view your shop. If you think your piece looks especially nice on a mug, for example, you can make sure that's what people see first.
>> Finally, agree to RedBubble's User Agreement (read that little blurble, since that's basically all you generally need to care about when it comes to what you can and can't sell on RB, but more on that later).

>> Click "Save Work" and voila! Your piece is now available in your shop, and can be found in the search results of whatever tags you left on it (this may take a few minutes to take effect).
>> If you want to check out your design in your shop, navigate to your pfp and click "View shop"
>> Don't fret if the design doesn't appear in your shop right away! Again, this can take several minutes.
>> To edit your design again (and to view/purchase privately uploaded designs like Nicky here), click the "Manage Portfolio" option instead:
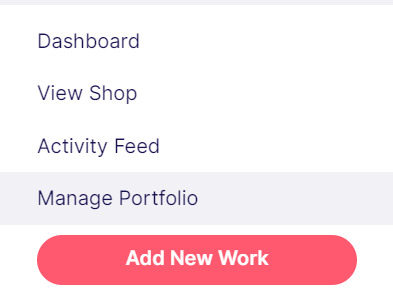
>> Here is Nicky as he appears in my portfolio (again, your portfolio and your shop are different things- Nicky will not appear in my shop at all because he is set to "private")

>> You can click that little gear icon to do a variety of things, like return to the editing menu from earlier. The three icons below Nicky refer to the amount of comments, sales, and likes your design has received in total.
>> Click on your design either from your shop page or your portfolio page. Wow! Your cool art is now available on all the products you enabled. Be sure to look through them and make sure that everything is to your liking!
Pricing? Markup? What's that about?
Well good tumblr user, RB handles everything regarding the production (and shipping) of your product, which means that they set a base (minimum) price for every kind of product to account for materials and production, and of course make some amount of profit themselves. The *markup* is a percentage that you the artist set (see the previous section on how to do so), and will determine how much you actually make off of a sale. Note that increasing the markup price means that your product will increase in price as well!
>> An Example (using hypothetical but more or less realistic numbers):
Let's say that the base price (0% markup, i.e. no profit for you) of a phone case on RB is $15. You set the markup to 30%. 30% of 15 is 4.5, so the public price is increased to $19.5, and if anyone purchases this phone case with your design on it, you will make $4.5.
And that's really the gist! Ultimately the markup price is up to you and what you feel is reasonable, though RB sets it to 20% by default.
Extra: Checking sales and payment history
Eheh, unfortunately I've reached the image limit for this post but:
To check your sales:
>> Click on your pfp
>> Click "Account Settings"
>> Under "Artist Tools" (on the left side), click "Sales History"
To check your payment history:
>> From the same "Artist Tools" menu (see above), click "Payment History"
Extra: Taxes and copyright, in case that scares you.
>> Do I need to report the income I make on RB when I do my taxes?
Yup! But dw, it isn't anything special. I mean, I'm not here to do your taxes for you, but money you make on Redbubble counts as "Self-Employment Income", same as if you sold your art just about anywhere else really!
>> So what am I actually allowed to sell on Redbubble? Is fanart okay?
Generally speaking... Yes! Obviously work should be your own, and it should not contain any company logos or names that you don't have the right to, nor photos of actual people unless you have their explicit permission.
>> Hm, okay, but what if I *do* accidentally sell something that isn't allowed?
In most cases, it'll just get taken down 👍. And no, you won't be asked to pay back any profits you made off the work in the meantime.
**A more extreme case: Story time. So, years ago a friend of mine uploaded some official Rick and Morty art that he forgot to set to "private". Overnight he made... Let's just say he made quite a bit of money. RB responded by taking down the work and banning his IP address, effectively preventing him from ever selling on the site again. But they still let him keep the money he made, and he didn't get into any actual trouble outside of that. What I'm saying is, even if you really fuck up, it'll be alright. And again, this was a pretty extreme scenario.
***Note: if your work falls under one of the brands in Redbubble's "Partner Program" (see the next section), it will be temporarily removed from the search results and your shop while it undergoes review. So don't panic if you see your fanart suddenly disappear from your shop!
Extra: The Partner Program (or how to make "officially licensed" fanart)
Very briefly, Redbubble has their partner program, which I won't explain in full detail here, but basically it means that if you upload a work and tag it as one of these brands, it will be inspected for review and, upon passing that brand's guidelines, will be considered "officially licensed" merch for that brand. Just felt worth mentioning!
So that's really the gist folks! There's certainly much more to play around with when it comes to RB, but that's all you need to know to get started! Hopefully this was useful? Hopefully lol. In any case, good luck out there!
#*breathes* OKAY#gee I sure do hope this is actually useful lol#artists on tumblr#redbubble#selling art#idk what to tag this as lmao#baba's tutorials#<- new tag ig lmao#if y'all have other questions (especially friends and mutuals and followers) feel free to reach out and I'll answer what I can!#so if you're wondering. yes I've sold on the site before. no you don't get to know what haha.#bought a lot from RB too- their shit's good quality!#but to be completely clear ofc I don't speak on their behalf haha this tutorial exists so that I can buy more of my friends' cool art lmao
30 notes
·
View notes
Photo


Chan's "Room” 🐺 Ep. 172 - Home
#if someone wants to use it for musing feel free to rb#bang chan#chan#chris bang#christopher bang#skz gifs#skz#stray kids#stray kids gifs#staysource#staycompany#jypartist#ultkpopnetwork#chan gifs#bang chan gifs#i just wanted to make some gifs of this livestream honestly#gif set
516 notes
·
View notes
Text
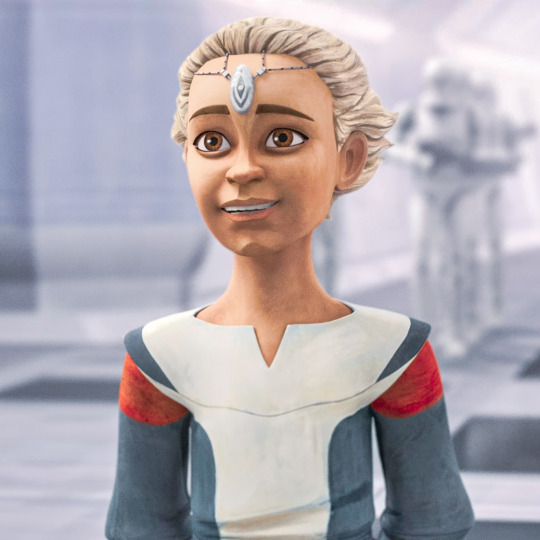


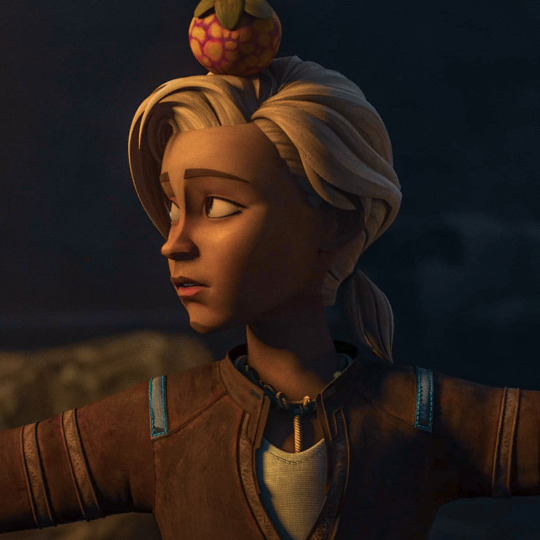

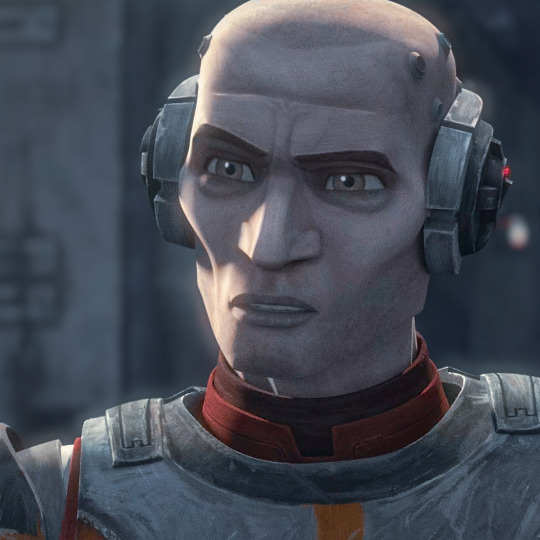
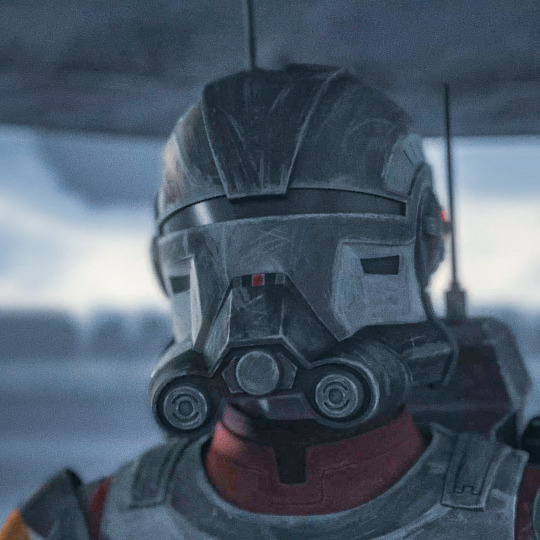
Omega
[ tbb s1 • tbb s2 • tbb s3 ]
Hunter Tech Wrecker Crosshair Echo
#my beautiful baby girl#i love this sweet girl so much it hurts#she was so so little in s1#feel free to use as icons! just like/rb first pls#the bad batch#tbb#tbb omega#omega#star wars#tbbedit#swedit#mine#star wars icons
77 notes
·
View notes
Last Seen Blogs
withay7
Untitled #3

ceasarslegion
You did a bad job with me, god
cybertib
Europe by Art

zombiotical
uninspired heroism

teumeku
kiyo!