#energy patterns
Text
'The ancients' considered the zodiac to be the 'Soul of Nature'. Understanding the zodiacal energy patterns, but also the archetypal energy can help us understand ourselves and our consciousness better. Every modality and sign represents their own energy pattern that we vibe.
●Cardinal signs, are a centrifugal (spinning energy like a blood centrifuge machine)radiating outward energy that moves in a definite direction ↔️(future- present- past);
》Aries & Libra(positive/masculine) are concerned with action in the present and thinking forward & moving towards the future. Aries 'spiritedly' moves directly forward. Libra 'mentally' moves directly forward.
》Capricorn & Cancer (negative/feminine) radiate that same centrifugal energy spinning or radiating the energy inwards and towards the past. Capricorn 'physically' moves with direct attention to the past. Cancer 'emotionally' moves directly with attention to the past.
●Fixed signs, they represent a centripetal energy that radiates inwards towards a center, it's associated with principles of inertia which is also known to give them great powers of concentration & perseverance. The fixed signs are energetically most centered on the here & now. People with the Sun in a fixed sign are literally born with such an intuitive sense of depth and power of the soul or spirit within them, they actually dubbed the fixed signs as "the gates of the avatar" & are the key symbols of the major initiations of the soul. This concentrated energy also brings the fixed signs a potential for concentrated consciousness!》Taurus, Scorpio(negative- feminine) more connected with the past, Taurus 'physically' spirals into itself and down. Scorpio 'emotionally' spirals into itself and down. 》Aquarius, Leo,(positive- masculine) more connected to the future. Aquarius 'mentally' spirals into itself and up. Leo 'spiritedly' spirals into itself and up.
●Mutable Signs, their energy is spiralic patterns. 》Pisces connects to past karmic energy & Virgo spiral towards the ground and are associated with the past crises with development of the personality. Virgo physically spirals outward and down. Pisces 'emotionally' spirals out and down. 》 Gemini & Sagittarius spirals upwards and forward toward the future, with Sagittarius having an increase with prophetic tendencies and Gemini with their endless future speculations. Gemini 'mentally' - Sagittarius 'spiritedly'
So learning how the patterns of the energies of the signs work, it can help you learn more about yourself and how your energy is working for you. Especially your Sun! But the moon, rising, Mercury, Venus and Mars signs(Personal planets and angles too) can help you learn why your always stuck in the past or full of anxiety about the future. Or how you can manipulate energy to better yourself mentally and physically.
Say you have a Cancer Moon in the 9h you're going to have that connection to the past but with prophetic tendencies so pay attention to your dreams! Or maybe you have a Taurus Sun in the 8h you will have access to not only an earthly, physical inner power, but one connected to emotion and the past. Mercury in an air sign but water house, think of the communication you can make with other realms! The combinations are endless. Learn how your main energies work and maybe learn how to control your consciousness, just think of the possibilities!
#AstrologyCommunity #astrologyobservations #zodiacfacts #zodiacalenergy
#energy #vibes

#astrology community#i love astrology#astrology#fixed#Mutable#Cardinal#modalities#zodiac#energy patterns
11 notes
·
View notes
Text
OPINION IS THE LOWEST FORM OF HUMAN KNOWLEDGE ~ Plato
We have spent most of our lives forming sharp opinions and cutting-edge judgments like the sharpening of ice-skating blades for precision skating.
It is the opinions and judgments that tear down, compared to those that build up, which make humanity backtrack in social integrity and maturity. Nothing ever stays the same. Change is always in flux.
What distinguishes advancement in human endeavors…

View On WordPress
#accountability#care#character education#Christman#Christmas#COMPASSION#corcern#dysfunction#education#ego#empathy#energy patterns#Free Will#God#holiday#Holy Spirit#human rights#integroty#Jesus#kingdom#knowledge#larger than life#life purpose#Light#Love#medicine#opinions#patterns#Plato#purpose
0 notes
Text
youtube
I might’ve spoiled the plot of Natlan | Genshin Impact THEORY
In which I read so much lore that I gained the power to see the future (maybe)
This ended up being a real challenge to make - but it was also really fun! Please do lemme know what you reckon of these ideas, and whether y’all wanna see me pattern-recognition my way into several corkboards worth of theories about any other topics sometime down the line! (^^)/
(also: HAPPY NEW YEAR! 🥳🎉 Here's wishing y'all every good thing for 2024)
#artists on tumblr#abd illustrates#genshin impact#natlan#game theory#idek how to tag this one i've never made a vid like this before uhm-- sgdfksdf#anyway oh my GOD i have had so many brain bees about this topic for the longest time#ik making a half hour video about it is unhinged enough but the fact that nobody else seemed to be talking about some of the patterns#was drivin me BONKERS#im so normal about this lore y'all mhm#but also silly tho the energy of this one is#im really proud of it! it was wierdly scary to branch out from my usual content like this#so i do sincerely hope it's a fun watch (^^)/#i'd love to make more off-the-wall and like deep-dive type stuff like this sometime if it goes over well 💖#it also took-- sO LONG TO MAKE#full time video essayists are to be feared i have learned#Youtube
896 notes
·
View notes
Text
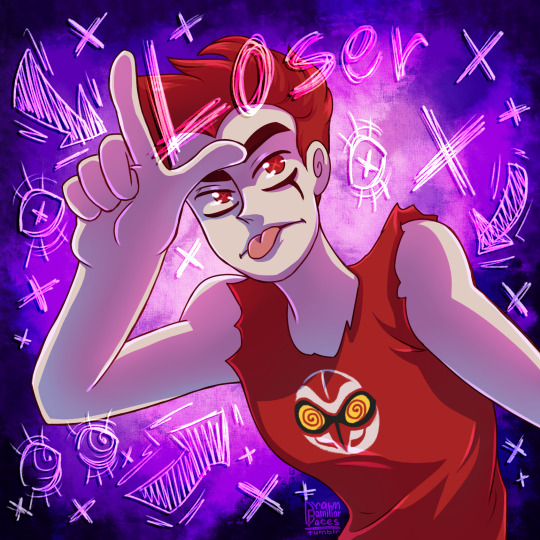
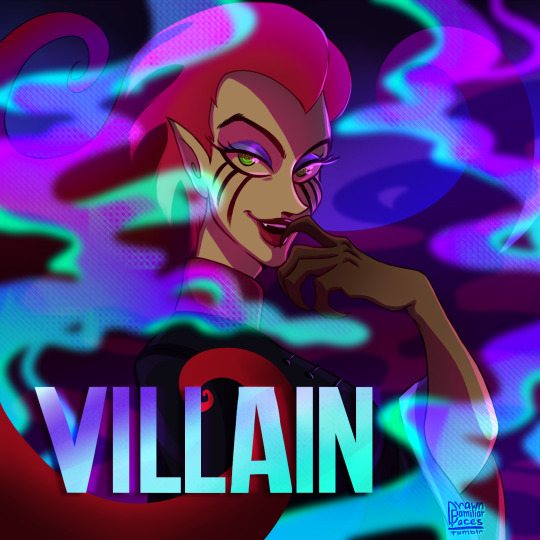
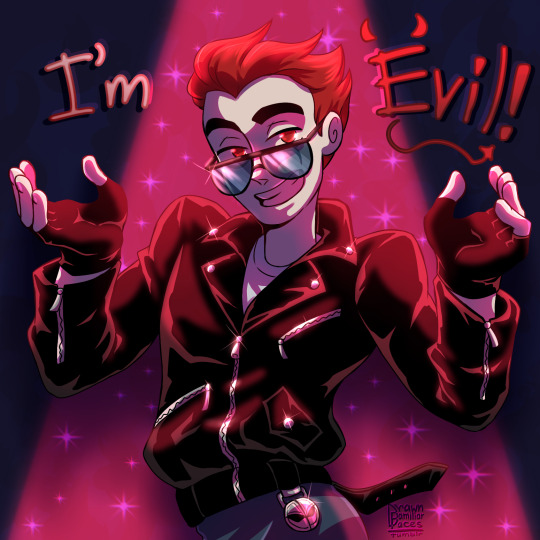


i made a mistake of thinking about animatics and rapidly had like 6 songs/scenarios stuck in my head for these two
naturally instead of actually making any animatic i poured all efforts into making mock covers lol

songs/youtube links (for anyone interested):
Jack
Neoni - Loser
Phineas & Ferb (Carl) - I'm evil for extra credit
Imagine Dragons - Enemy (But also for Jack I kinda prefer Annapantsu cover if only for the 'rap' part xD it fits him better imho)
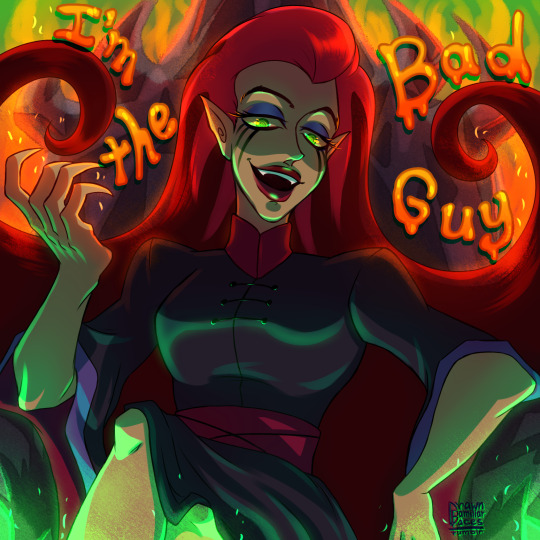
Wuya
K/DA (Evelynn) - Villain
Wander Over Yonder (Dominator) - I'm the bad guy
Devon Cole - W.I.T.C.H.

#xiaolin showdown#jack spicer#wuya#xs wuya#ngl the ones from cartoon are the easiest to do because the og template is already there so i might end up doing them because#i keep giggling when i imagine scenarios and its just very funny#the others are much harder because i have SUCH imagery in my head... and exactly ZERO skills to make it lol#i dont know how to do video effects TT_TT#ive been drawin these for a month!i wish i could pour even half the effort i gave for mock covers into actually making those animatics#noticing the pattern of having angsty songs for jack and underlining lesbian energy songs for wuya
397 notes
·
View notes
Text
went to hotguy lessons and Came Back Wrong
(thank you @oh-snapperss and @panidanya for bestowing cuteguy etho upon the world)
#me??? super late??? pshh never#the energy i was aiming for here was 'newborn giraffe attempting to idol pose' i hope it comes across 🙏#ALSO. I THINK THIS IS THE MOST POLISHED FULLBODY IVE EVER DRAWN LOL#i was experimenting with the rendering and i'm sooooo happy with how it turned out 😭😭😭#i was gonna put him on a cute patterned background or something to make this look like a wall scroll#but then i liked the transparent so much i just decided to leave him like that lol#cuteguy etho#ethoslab#ethoslab fanart#hermitcraft#i-is it ok to maintag this?? i feel like ive done too much to him 😭😭#my art#mouseposting
712 notes
·
View notes
Text
It’s Harkin’ time
((Yes I mean both of them!!))
Now that Dracula Daily and Re:Dracula and over (and I just remembered to post these hhhh) here’s some photos from Halloween!! My friend and I went as Jon and Mina and galavanted around a nearby campus building to take pictures hehe!
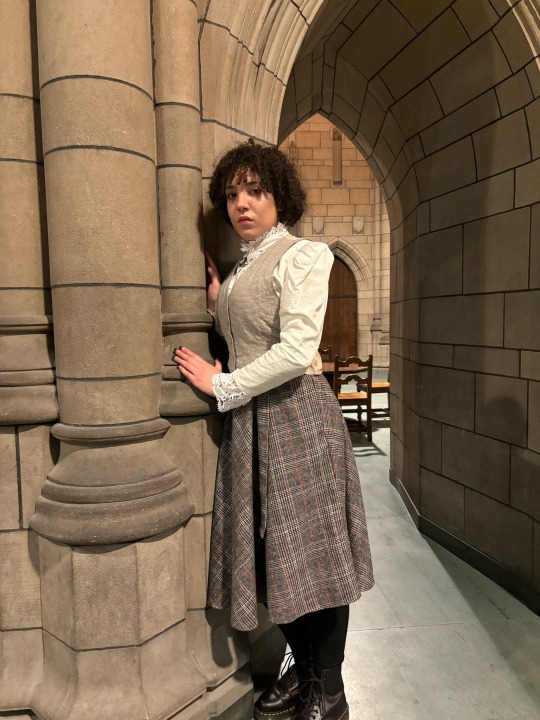
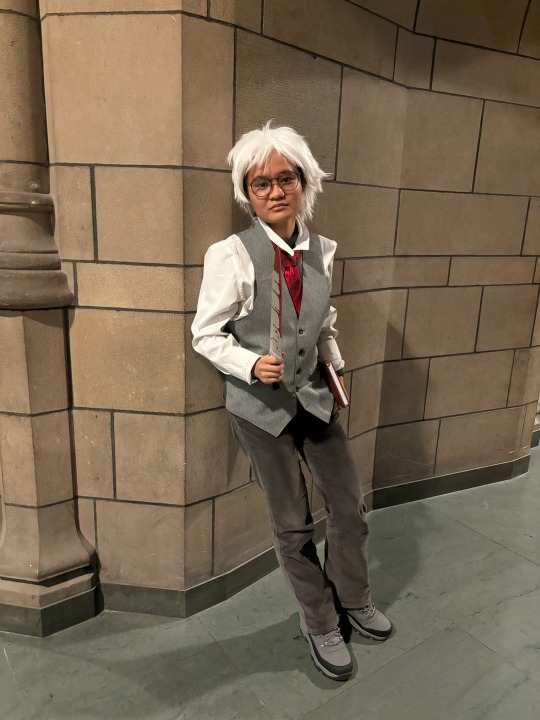
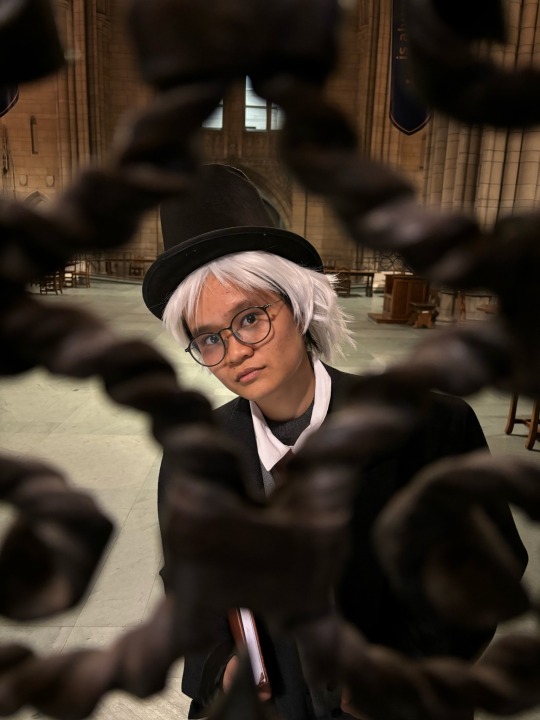
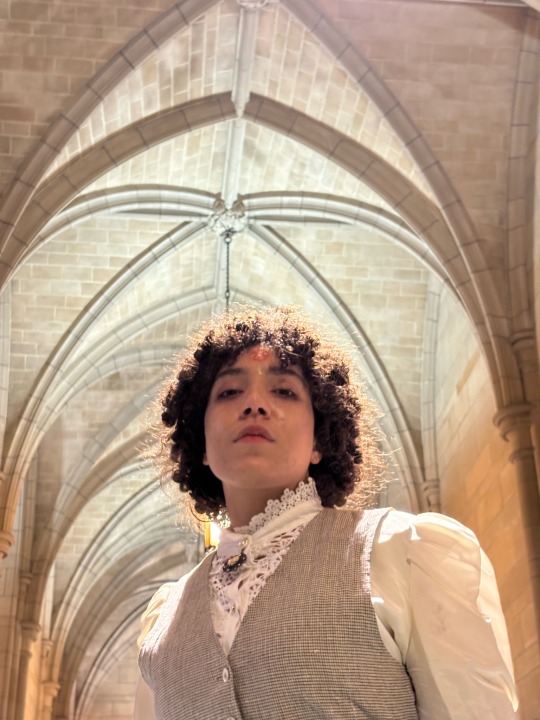
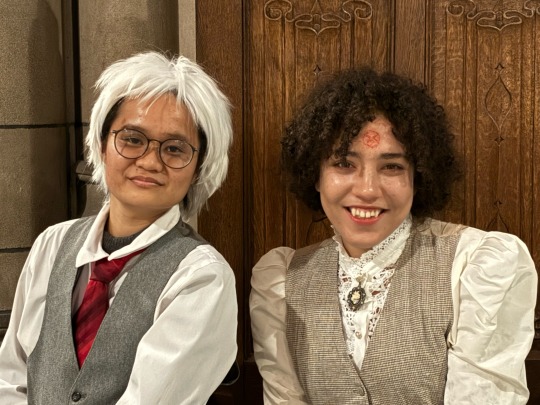

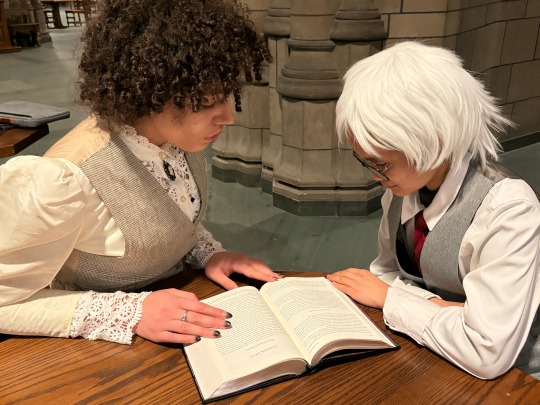

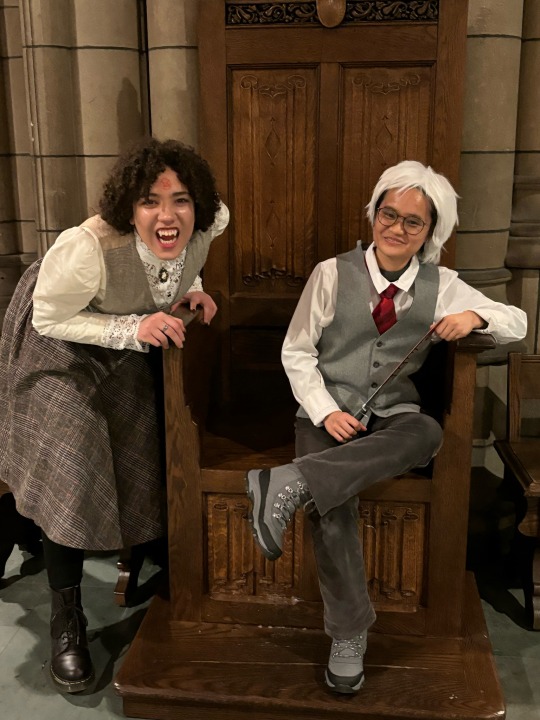
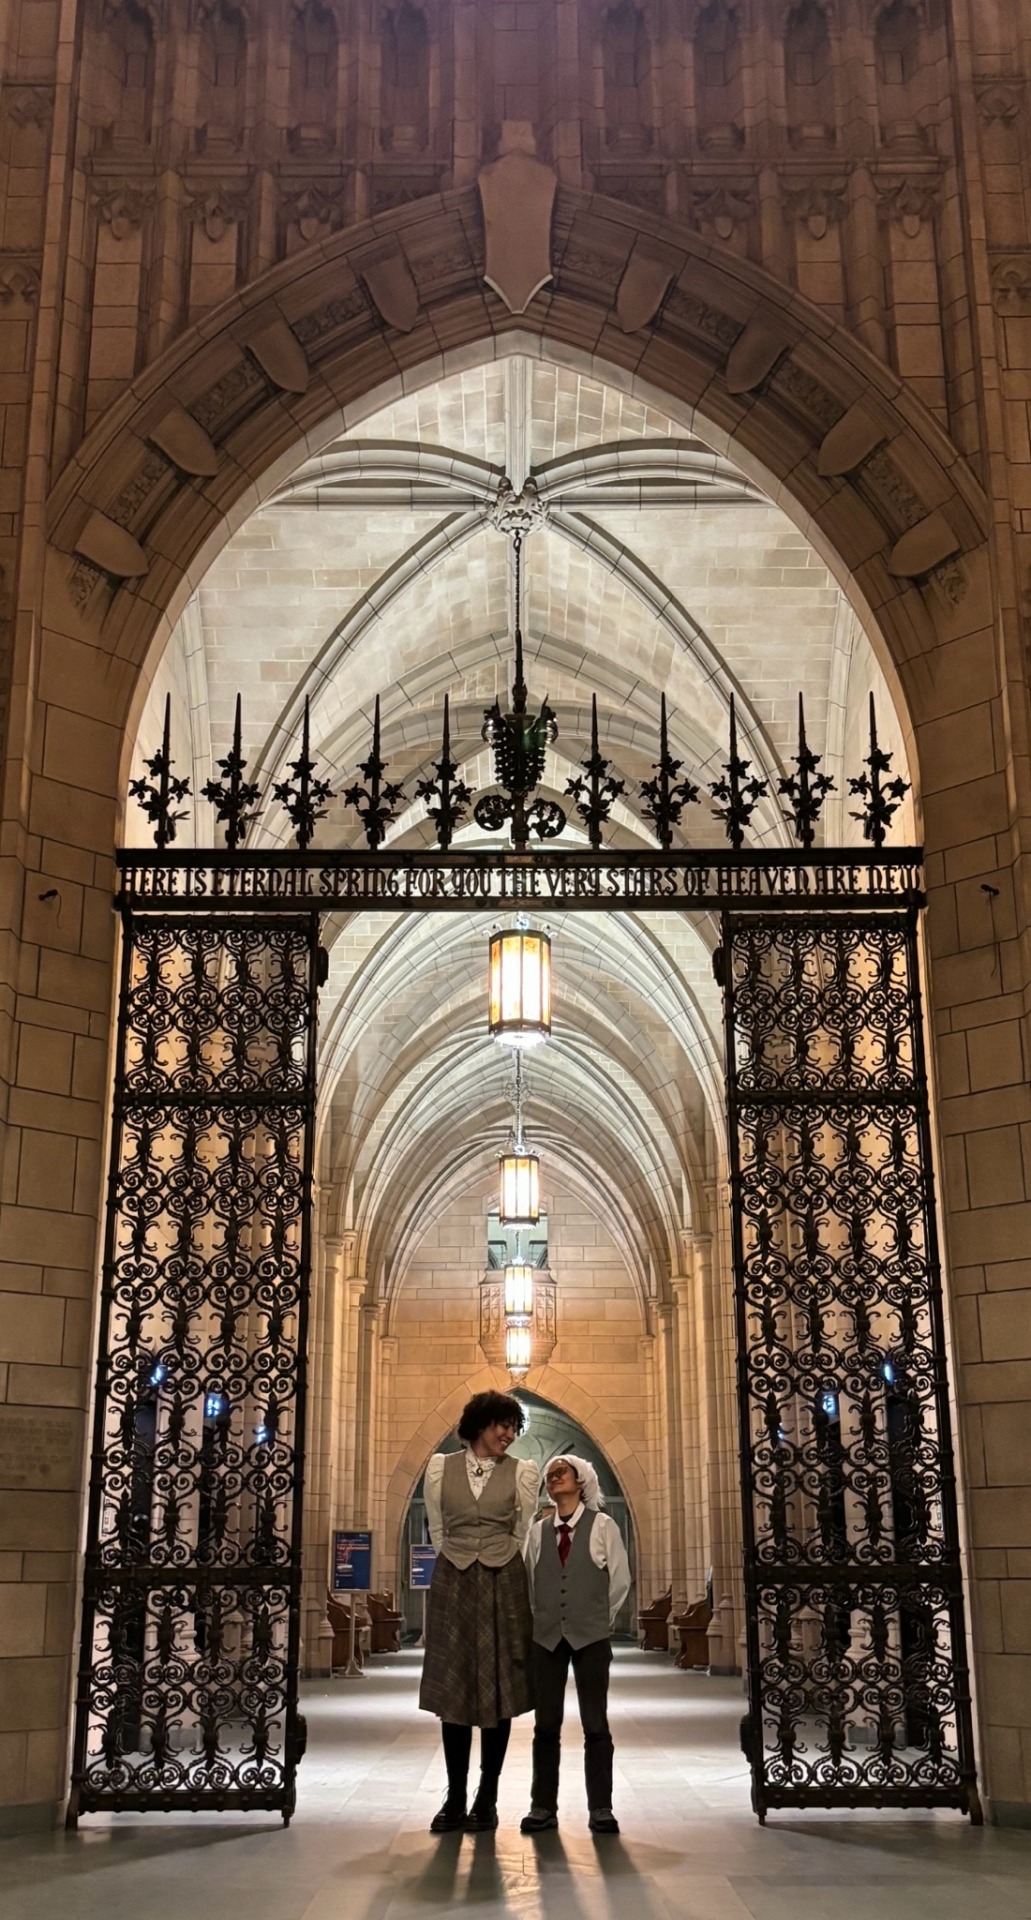
It’s been a real one, Dracula Daily. See ya next year!
#dracula#dracula daily#re dracula#jonmina#I originally wanted to try my hand at sewing my costume but it was too ambitious at the time#so I ended up borrowing some costume pieces from our schools student theatre org.#I DO want to properly finish this cosplay one day#and I can kill two bats with one stone (hah) by reusing the pattern of the dress for my wip Dreamfinder cosplay.#can I do it by February?? yeah that’s up to fate and my energy level to decide#re: dracula#poodleponders
277 notes
·
View notes
Text
Sign Off
Torrent Company: *gathered in front of a window, some of them holding binoculars while others clamor around to listen*
Tup: *curious, steps up beside Jesse and Hardcase* What’s going on?
Hardcase: *grins* The 212th’s venator is orbiting right next to ours. *snatches the binoculars from Jesse, ignoring his annoyed shout, and hands them to Tup* Same level viewing port.
Tup: *peeks in through one scope of the binoculars while Dogma presses in to look as well*
Ghost Company: *a large group of them standing at a window like Torrent, one of them at the center quickly signing with his hands*
Jesse: *bouncing impatiently on his toes* Come on, I wanna see!
Tup: *hands the binoculars back, still confused* What are they doing?
Hardcase: We — *gestures to the center of their group, where Fives is signing back in response* — are having a Sign Off.
Dogma: *frowns* What’s a Sign Off?
Jesse: Shh! I’m trying to translate here.
Hardcase: *rolls his eyes, leans closer to Tup and Dogma, in a low-ish whisper* It’s a little competition where Vode have a battle of wits using ARC sign. We do it when we have some downtime while in orbit.
Tup: Oh! What are they saying now?
Jesse: *grunts in frustration* Damn kid’s signing too fast for me to read.
Fives: *on his turn, quickly fires off gestures using his hands and arms*
Jesse: *groans* Kriff, now I’m lost.
Hardcase: Damn, I thought you were studying ARC sign, Jess.
Jesse: *shoots him a glare* I am.
Dogma: He just signed, “better change that mohawk before a bird mistakes it for a mating display.” *blinks* That doesn’t sound witty.
Hardcase: Osik, we’re getting personal now. Ha!
Jesse: Wait— *looks at Dogma* You know ARC sign?
Dogma: *blushes, suddenly embarrassed and fiddling with his fingers* Y-yes…
Jesse: Kriff, kid, then what am I here for? *hands him the binoculars* Switch places with me.
Dogma: *wide eyed, looks at Tup*
Tup: *smiles reassuringly at him and nods*
Dogma: *still hesitant, looks back at Jesse and Hardcase* Alright.
Hardcase: Yes! Front and center, vod’ika.
Dogma: *takes the binoculars and moves closer to the window. Looks across the open space as the vod from Ghost starts his response. Watches closely and translates* “At least I don’t look like a wanna-be lead singer.”
Jesse: *roars laughing, the others joining him or “ooh”—ing in response.
Fives: *bright red all over his face, has a thousand yard stare for a second before shaking it off and making the sign for yielding*
Hardcase: Oh shit! *laughs, grinning* Ghost takes this round. *claps Dogma on the shoulder, making him jump* We’ll call you for the next one. Sound good?
Dogma: *blinks, still blushing and still a little unsure. Shares another look with Tup before nodding, smiling shyly* Yeah.
Hardcase: Awesome! Keep the scopes.
Jesse: Hey! Those are my—
Hardcase: *ignores him and bumps his arm* Hey, Fives, how’s your pride, vod? You good?
Tup: *stands next to Dogma, chuckling at their siblings*
Dogma: *awkwardly holding the scopes* I don’t think I understand this game, yet.
Tup: *snorts and hides his face with his hands, shaking from holding back laughter*
#chili writes#501st#clone trooper tup#clone trooper hardcase#clone trooper jesse#clone trooper dogma#this is purely a drabble that came to me after I woke up#I’m seeing a pattern where I keep making fun of fives but please knows it’s out of love#he can a little bit of loser energy#for confirmation: it was wooley that fives was competing with
260 notes
·
View notes
Text

Heart Full of Love, Mouth Full of Demonus
Lucifer: I shudder to think what would have happened if it were only the three of us.
Diavolo: wdym we’d just be complimenting each other!
Me, reading this chat and staring into the camera: …the fantastic threes- *is pulled offstage*
#obey me diavolo#obey me lucifer#obey me shall we date#fanart#obey me#obey me fanart#omswd#obey me nightbringer#obey me barbatos#the fantastic three#Luci looks like the first wife#Barbatos has absolute concubine energy#Barbatoes#lord diavolo#I’m sorry about their hair#I don’t have those skills yet#based on the grown-up things memory card#this whole time I’m like FIVE patterns EACH and A FUCKTON OF GOLD ACCESSORIES LIKE bitch PICK ONE#my safe art
219 notes
·
View notes
Text
Skyward Sword replay is going extremely well (THIS GUY ↑ IS ON THE BRAIN AGAIN)
#this was just meant to be a sketch i did to try and figure out how i wanna draw him but HFHGDHFJHK#im currently suffering from: instead of a brain there is. ghirahim#Trying to capture the energy of like. extremely pretty guy with just the most rancid vibes. Completely sinister and offputting#his diamond patterns r so fun to draw hehe#The Legend of Zelda#TLOZ#Skyward Sword#Ghirahim#my art
141 notes
·
View notes
Note
Hiii, i love your stuff and kinda from a distance really look up at you for, in my perception, being able to express yourself without giving a fuck. Thats sick dude, Im so so afraid, of absolutely everything, its nice to think like i might grow into someone less apologetic of my existence. Nice to see people just being yknow
hey, thank you, this is really really nice. the secret that is probably not a secret is that i am also deeply afraid a lot of the time lmao -- but less than i used to be, and in ways that feel less stifling and self-suffocating, if that makes sense.
like, it used to be "i'm scared that if i express myself the way i want to, everyone will find me obnoxious, so let's just sand those edges down to be safe" -- now my fears are more like "now that i'm expressing myself in a way that feels natural and real, i'm afraid that it's all stupid/vapid/not worthwhile or meaningful" (<- specifically abt my art) or "i'm happy that i talk and act the way i want to now, but what if it makes me impossible to befriend," etc etc etc. which still feels bad and puts me in a funk a lot of the time but at least it's a fear that comes After/in reaction to doing stuff, rather than a fear that STOPS me from doing stuff, you know? like, it's evolved into a kind of fear that's less in my way.
anyway. i believe you'll experience something like this, because wanting to grow is the first step of growing. the fact that u hope or wish for something different means you're already on your way. to fewer fucks!! or at least distributing the fucks u give in a way that serves u better
#stuff like accepting that i'm reserved and i'm not very accessible via messages.#or that my online tone isn't very bubbly and it's weird and uncomfortable to force it.#i stop letting fears about that shape my behavior ('i'll look mean or snotty so let's force markers of Friendliness to avoid that!!') -#- and instead act the way i want to and then trade it in for new fears that come After the action.#also a good reminder to give urself is that if ur fear is abt how other ppl perceive u (as 90% of mine is personally)#u really... can't actually control that. and being very very anxious abt it all the time is usually ur brain throwing a tantrum abt not--#--having that control. bc it is understandably very scary that u don't have that control#as much as it sucks + is terrifying the truth is the only thing u can do is ask urself 'am i behaving in a way that i'm proud of'#'am i behaving in a way that's in alignment w my values + what i think is important'#bc if the answer to that is yes and somebody hates u or is deeply offended by ur existence anyway. well. literally not ur problem#but obv being at peace w that is way way easier said than done + requires tons of practice and will take. probably. years. which is fine#i am stuck with myself. i can either contort myself forever trying to be someone everyone will like and find totally nonthreatening and-#inoffensive and in the process exhaust myself totally and never feel safe or natural myself. OR#i can say okay. so i am a kind of prickly guy with stern and drab speech patterns and close to no social energy. and i think i can still be#-sexy and fun this way. and it is up to other ppl to figure out if they can agree w me on that#ANYWAY enough rambling for now. just another one of those things i think abt a lot so i have a lot of ready-made sentences abt it in mind
72 notes
·
View notes
Text

Drawtober 2023 day 31: Fire
He somehow always knows the spot to show her the wonder of nature, broadening her horizon
Previous days: [1][2][3][4][5][6][7][8][9][10][11][12][13][14][15][16][17][18][19][20][21][22][23][24][25][26][27][28][29][30]
#shumako#amamiya ren#niijima makoto#kurusu akira#drawtober2023#drawtober#inktober2023#inktober#he's a country boy afterall#I feel like I could have drawn them in the casual P5S clothes#But my brain think otherwise#which is fine#I like the lotus pattern on her yukata anyway#the bg feels kinda empty even tho it's not#hmmm#I did enjoy adding the glow tho#I almost draw Ren with a freaking wok on fire#unfortunately the image doesn't have enough shumako energy#so we are here together with fireflies instead#and that WE ARE DONE#DONE#FINISH#OVER#HECK YEAH#this challenge lasted way too long for my own good
86 notes
·
View notes
Text
hmmm something about dominik haunting the narrative in king of scars. everything nikolai does is at least a little bit for him. he learns about the life of average ravkan people by meeting dominik's family. he starts gaining influence in politics just so he can improve dominik's life. and then he promises dominik that he won't let ravka break him.
that promise fucking haunts him. it follows him wherever he goes. it's the driving force behind everything he does, every step he takes to heal the centuries-old wounds in ravka. it's what drives him to do better, be better.
dominik is always there, in the back of his mind: this country gets you in the end. always pushing him to do more, because he couldn't save dominik and so he has to save ravka (for dominik) (because he promised) (because he loved him)
#my spicy hot take is that nikolai's relationship with dominik actually affects the narrative of the duology more than -#- his relationship with zoya does#you could argue that *none* of the events of the duology would have happened without dominik's influence#and honestly zoyalai as a relationship doesn't really affect the narrative/plotline all that much#which is One of the problems i have with it being endgame#anyway yes i am writing an angsty nikolai backstory fic why do you ask?#it's mostly about how he reinvents himself at every minor inconvenience (but also how incredibly fucked up his childhood was)#and if i have the energy it might turn into a rewrite of the ending of rule of wolves#bc him giving up the throne just plays into that pattern of running away#so honestly i think it's not a great ending in terms of his arc and character development#this may just be a me thing idk but i just feel like he doesn't actually get that much development in the duology#bc there's this idea of him as being Perfect and Invulnerable and Not Affected By His Trauma#which. is not the case.#it's all very dear reader (taylor swift) imo#ANYWAY#mayhem.txt#mayhem grishaverse originals#nikolai lantsov#shadow and bone#king of scars#grishaverse
64 notes
·
View notes
Text
TOTK Light Dragon Crochet Pattern
It's been a while! Here's a crochet pattern for the Light Dragon from Tears of the Kingdom. I'll post it on deviant art shortly.

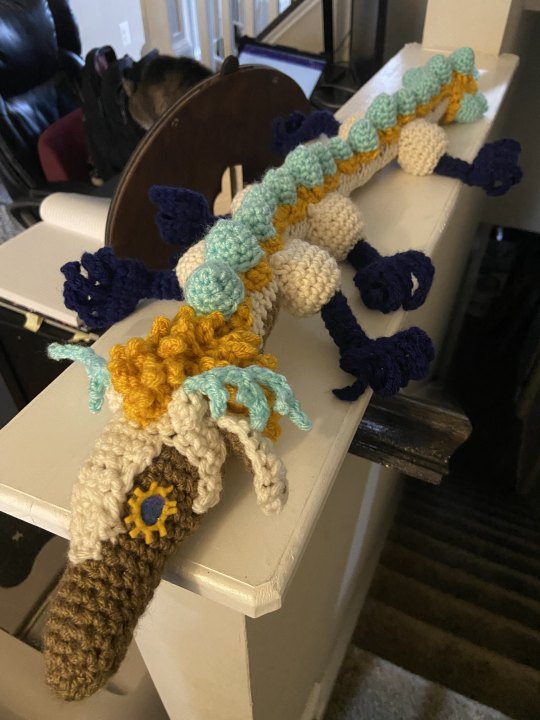

Full pattern below cut. If this ends up on P*nterest, I'm going to be very disappointed with one of you.
Stitches used (abbreviations): chain (ch), slip stitch (sl st), single crochet (sc), double crochet (dc), treble crochet (tr), increase (inc), decrease (dec)
This pattern is complicated – partially because I haven’t written a pattern for anything in a number of years, partially because the Light Dragon has a lot of weird parts. There’s chaining and slip stitching into the chains to make antlers, front loop and back loop work, flattening and working through two halves of a round simultaneously, and a lot of positioning.
I typically work in the round, without joining; if you would like to join, just add a sl st and a ch 1 to the end or start of each row in the round. It may make things twist less.
Head (1 in light brown)
1: ch 3, sc 2 in 2nd ch from hook, sc 3 in last chain, turn work (so that you’re working on the far side of the chain), sc (6)
2: sc, inc twice, sc, inc twice (10)
3-6: sc around
7: in, sc around (11)
8: sc 5, IN BACK LOOP ONLY inc, in BOTH LOOPS, sc 5 (12) (the empty loop will be used with the white head marking)
9: sc around (12)
10: sc 3, inc, sc 5, inc, sc 2 (14)
11: sc 13, inc (15)
12: sc 7, inc, sc 7 (16)
13: sc 4, inc, sc 6, inc, sc 4 (18)
14: sc 8, inc, sc 8, inc (20)
15-18: sc around (20)
19: sc 3, dec around (16)
20: sc 2, dec around (12) DO NOT F/O, continue to body
Begin stuffing here, and continue stuffing as you go
Begin Body
21: sc 6 in brown, join cream, in BACK LOOPS ONLY, sc 6 in cream (12)
22- 25: sc 6 in brown, sc 6 in cream (12)
26: sc 1 cream, sc 4 brown, sc 7 cream (12)
Rep rows 22-26 1 time
32-: rep row 26 (12)
Continue repeating row 26 until you’re happy with the dragon’s body length; mine was a total of 89 rounds. Then, continue with the tail
90: sc 1 cream, sc 4 brown, in cream sc 2, inc, sc 2, inc, sc (14)
91-96: Sc 1 cream, sc 4 brown, sc 9 brown (14)
97: sc 1 cream, sc 4 brown, in cream sc 2, dec, sc 2, dec, sc 1 (12)
98: sc 1 cream, sc 4 brown, in cream sc 1, dec, sc 1, dec, sc 1 (10)
99: sc 1 cream, sc 4 brown, in cream sc 1, dec twice (8)
100: sc 1 cream, in brown dec twice, in cream dec twice (moving the stitch marker to after the decrease) (4)
F/O, make sure everything’s stuffed and weave in ends
White Head Marking (One in cream)
On one end of the unworked loops from Head/Body round 21, attach cream
1: inc, sc 4 inc, ch 1 and turn (8)
2: inc, sc 2, inc, sc 3, inc, ch 1 and turn (11)
3: inc, sc 4, inc, sc 4, inc, DO NOT ch 1 or turn (yet) (14)
4: ch 4, turn, sl st in 2nd ch from hook, sc in next two chs, skip first sc in the row (last worked sc from row 3), sc in 2nd sc, sc one more, skip next sc, sc in the stitch next to it (you want the hole, it’s for antlers), sc 4 more, ch 1, turn
4.1-2: sc 4 across, ch 1 and turn (4)
4.3: sc, dec, sc, ch 1 and turn (3)
4.4-5: sc across, ch 1 and turn (3)
4.6: sc, dec, ch 1 and turn (2)
4.7 dec, sl st into the open loop from Head row 8, sl st into the side of the head marking until you get back to row 4, cont row 4
4 cont: skip the first sc in row 4 (this is the other antler’s space), sc 4, ch 1, turn, sc 4, sl st in 2nd ch from hook, sc 2, join into a sc in row 4
F/O, leaving a long tail
Spike numbers depend on how long your dragon is; her back spikes are arranged in a large-med-small-med-large pattern, starting with two large spikes and ending with an extra seven large spikes on the tail (two on top, four on the sides, and one of the very end). I would recommend making two large, two medium, and one small spike to start, and laying them out to see how many repetitions of that pattern that you can fit on the dragon, and how many spikes you need. I fit three repetitions, and those amounts are reflected below.
Large Spikes (in light blue) (I made 11)
1: sc 4 in mc (4)
2: inc, sc around (6)
3: inc, sc 2 around (8)
4: inc, sc 3 around (10)
5: inc, sc 4 around (12)
F/O, leaving a long tail
Medium Spikes (in light blue) (I made 6)
1: sc 4 in mc (4)
2: inc, sc around (6)
3: inc, sc 2 around (8)
4: inc, sc 3 around (10)
F/O, leaving a long tail
Small Spikes (in light blue) (I made 3)
1: sc 4 in mc (4)
2: inc, sc around (6)
3: inc, sc 2 around (8)
F/O, leaving a long tail
Under-spike gold
I found this easier to follow by working conceptually. You are making circles for each spike to sit on top of. To start, count your spikes, and chain: 6 for each large spike; 5 for each medium spike; and 4 for each small spike. (I had ch 80, but I needed ch 83, see below). Add 2 chains at the end. Those last two chains count as Tr, not as chains to skip/work into. You’ll end up working on either side of the starting chain, mirroring what you do on one side on the other.
For large spikes, skip 2 chs, Tr 5 in 3rd ch, skip 2 chs, sl st in 3rd ch
For medium spikes, skip 2 chs, dc 5 into 3rd ch, skip 1 ch, sl st in 2nd ch
For small spikes, skip 1 ch, dc 5 into 2nd ch, skip 1 ch, sl st in 2nd ch.
Combine the above to match how you want your spikes to sit on your dragon; when you get to the end of the chain, turn your work so that you’re working back up the chain, and mirror your stitches. You should have the correct number of circles, and be able to sl st into the first ch. I had to put Tr 10 into the first ch, since I did not have enough circles, but the ultimate placement worked out.
For the side spikes on the tail, do the following twice: Ch 10, tr 5 in 4th ch from hook, skip 2 chs, tr 10 in last ch, skip 2 sts, tr 5 in the next st (the same st as the initial tr 5), sl st to the first tr, F/O with a long tail. Sew to body, on the sides of the main tail under-gold.
I had to make one circle for the final spike on the tail, by ch 6, tr 5 in 3rd ch from hook, skip 2 chs, sl st into last ch, skip 2 sts on other side of work, tr 5 into next ch (again, where the initial tr 5 is, you’re making a circle), sl st onto first tr and F/O. A magic circle of 6, increasing around to 12, would probably work just as well; so would making the initial golden circles longer to accommodate this spike. I simply lost my spike and didn’t realize it until after I had placed everything.
Hair (make 1 in gold)
1: ch 21, starting in 2nd ch from hook, sc across (20)
2: ch 4, sl st into 2nd ch from hook, sc, in next ch, hdc in last ch, skip a st of row 1, sl st into front loop of next sc. Repeat across the row. Ch 1 and turn at end. (10 spikes)
3: Working in back loops only, sc across, ch 1 and turn (20 sc)
4-7: repeat rows 2-3 twice
F/O, leaving a long tail
Horns (make 2, in cream and turquoise)
In cream:
1: ch 2, sc 4 into 2nd ch from hook (4)
2: sc around (4)
F/O, and turn so that the right side is out. Leave enough tail to sew onto the head.
Using Turquoise, sl st into the cream starting ch. The horns are made from one long chain with different spikes; after slip stitching a new ‘spike’, you’ll continue slip stitching into the original chain.
Ch 12, starting in 2nd ch, sl st 4, ch 4, starting in 2nd ch sl st 6, ch 5, starting in 2nd ch sl st 3, ch 2, starting in 2nd ch sl st 5, ch 3, starting in 2nd ch sl st 4 and F/O (you should have worked all chs)
‘Bangs’(make 1 in gold)
1: ch 7, starting in 2nd ch from hook, sc across (6)
2: ch 4, sl st into 2nd ch from hook, sc, in next ch, hdc in last ch, skip a st of row 1, sl st into front loop of next sc. Repeat across the row. Ch 1 and turn at end. (3 spikes)
3: Working in back loops only, sc, dec, dec, sc, turn (4 sc)
4: rep row 2 (2 spikes)
5: in back loops only, dec twice (2)
6: rep row 2 (1 spike)
F/O, leaving a long tail
Sew this to the forehead of the dragon, directly between the horns – the 6th row points out, the 1st row attaches to the hair
Legs (make 6 in dark blue, 3 left and 3 right):
1: ch 6, join in first ch, sc around (6)
2-7: sc around (6) make sure that you’re working right side out!
8: in front loops only, inc around (12)
9- 10: sc around (12)
Flatten the previous row; you will sc through two stitches at once, closing the opening as you make fingers
RIGHT HAND 11: ch 6, starting in 2nd ch, sl st 5, sc through parallel sts in row 10 twice, *ch 9, starting in 2nd ch, sl st 8, then sc into two parallel stitches in row 10* repeat 3 more times, sl st through the last two parallel scs
LEFT HAND 11: *ch 9, starting in 2nd ch, sl st 8, sc through parallel sts in row 10* repeat 3 more times, sc through parallel sts in row 10 once more, ch 6, starting in 2nd ch sl st 5, sl st through the last two parallel scs.
F/O, leaving the leg unstuffed. You do not need a long tail, just enough to tie off and weave in.
Hips/Shoulders/Haunches (make 6 in cream)
You’ll be working directly into the legs, from their starting chain, and crocheting in the opposite direction. Make sure that the work faces out. Try to plan where you start to be where you want the shoulder to be – in row 6, you’ll begin working only half of the stitches, and they’ll be the stitches in front of your starting position.
1: make a slip st, and join into the starting chain for the legs. Inc around (12)
2: sc, inc around (18)
3-5: sc around (18)
6: sc 9, ch 1 and turn (leaving other sts unworked) (9)
7: sc 6, dec, F/O
F/O, leaving a long tail. Stuff the haunch, leaving the arm/hand unstuffed.
Ears: (make 2)
Inner Ear (brown)
1: ch 3, sc in 2nd ch from hook, sc in last ch, ch 1 and turn (2)
2-4: sc across, ch 1 and turn (2)
5: dec, ch 1 and turn (1)
6: sc, F/O (1) your tail can be short, it won’t be used to fasten anything. I hid mine between ear layers.
Outer Ear (cream)
1: leaving a long tail, ch 4, sc in 2nd ch from hook, sc across, ch 1 and turn (3)
2-4: sc across, ch 1 and turn (3)
5: dec, sc, ch 1 and turn (2)
6: dec, ch 1 and turn (1)
7: sc, ch 1, and turn the work so that you’re working on the edge of the work. Sc into the edge of row 7. Lay an inner ear over the outer ear, and sc into both pieces, along the edge. You’re joining the ear parts together. F/O, leaving a long tail to sew the bottom of the inner ear onto the outer ear. For one of the ears, you’ll have to work backwards or upside down if you don’t want two left ears – or you can just sew both inner ears to the outer ears.
Assembly: Stitch the white head marking to the head. I pinned on the hair, and attached the spikes and under-spike gold. To make this easier, I stuffed and attached each spike onto the under-spike gold first, and then pinned and sewed the gold onto the back (be careful to keep it centered). Then I attached the tail spikes, and stitched down the hair. I added the horns, ears, and bangs, and finally pinned all of the legs. I was careful to keep the legs attached only to the cream, not the brown belly, but that was just a stylistic choice that I made. Finally, you can make and attach the eyes; I used some felt and markers, though I’m not overly pleased with the effect.
#crochet pattern#amigurumi#loz totk#light dragon#light dragon crochet#tears of the kingdom crochet#it's been years since i made a pattern#hopefully this works out alright#i dont quite have energy to help folks troubleshoot#especially after the last person was frankly pretty rude about it#but that was on deviant art so its fine
66 notes
·
View notes
Text
*one of saturday’s mornings*
hawks: *dancing in his pajamas in the kitchen and singing to madonna “like a virgin” and ofc burning breakfast*
dabi: *still sleepy, standing there like for a 5 minutes and just watching* birdie, but you are not a virgin
hawks: SHUT UP
#hawks: dabs you ruining my moment!😩#dabi: im saving you from cringe#hawks: says edgelord himself#i bet hawks has pajamas with little chickens pattern#pure hotwings energy#hotwingscore#hotwings incorrect quotes#hotwings#dabihawks#dabi x hawks#dabi#hawks#my hero academia#incorrect bnha quotes#incorrect hotwings quotes#toya todoroki#touya x keigo#takami keigo#toukei#touya todoroki
113 notes
·
View notes
Text


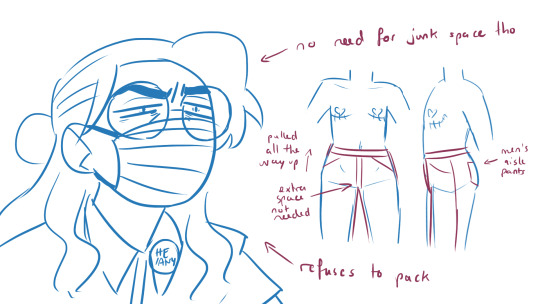
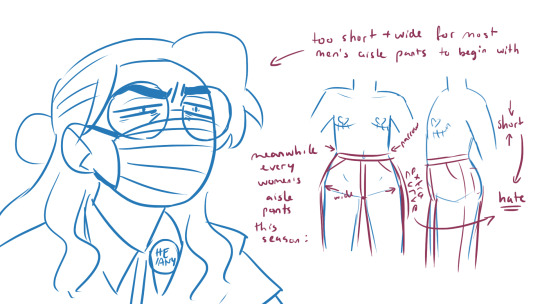
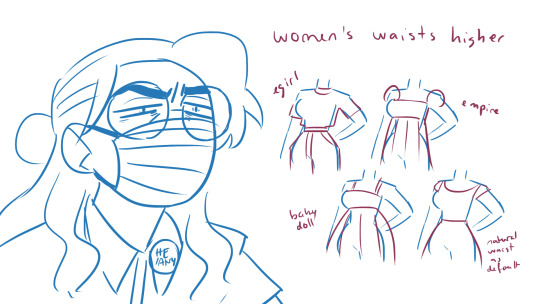

this is what my brain does all day
#welcome to transmasc fashion figuring out hell#it sucks my life energy on a daily basis#trans#fashion#transmasc#men's fashion#one day! one day I will figure out how to pattern pants from scratch and it'll be over for you bitches*#*cis ppl fashion#inspired by def not a real man I listened to for several hours for training today Q.Q#I swear I actually also paid attention
97 notes
·
View notes
Text
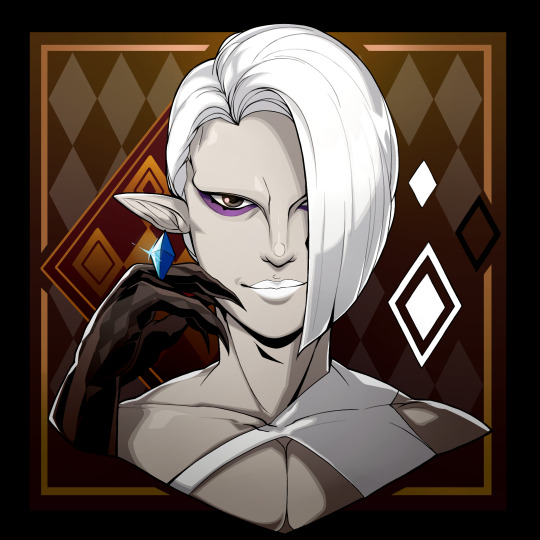
at last we reach the finale of mertoken, with mer-iv

#art#digital art#sleep token#sleep token iv#iv sleep token#sorry his patterns look like ass#i was so tired i almost forgot them and then just. did not have the energy for v much effort#my watsonian explanation is he can change them at will like how seahorses change color#(yes he's based off seahorses)#(also leafy sea dragons)#mertoken#iv
28 notes
·
View notes
Last Seen Blogs
dizzyworm-blog1
t juno

powermindinstitute2-blog
Untitled

ara-lm-blog1
When All You Have Is Your Dreams...

thetourplanss
thetourplanss