#but it was fun and i'm glad i did it!
Text
For something a little different than my usual virtual photography, here's my project for the Horizon Creation Celebration hosted by @horizon-events!
I'm really happy with how it turned out - and I'm excited to see everyone else's creations! More info below the cut ↓
I had this leather bag that I found at a thrift store, but it had somebody else's monogram on the front that I never liked. I always planned to do something about it - and I thought adding the medallion from Rost's armor would be the perfect project. The stitching of the medallion required the most work by far, but I also added a little Nora-inspired feather-and-bluegleam charm to the strap.
I didn't buy any supplies for this - everything was sourced from things I'd already collected (...hoarded?) in hopes of using them in a project someday.* The medallion uses reclaimed leather from an old purse, some blue cord I'd saved from... somewhere, and red cord of similar provenance. A stiff piece of plastic from packaging serves as interior support, and a strong magnet is currently holding it to the bag. I may attach it permanently, but I didn't want to yet in case I decided to use the medallion somewhere else!
All the feathers were found on the ground - there's an obvious jay feather (Steller's jay's in my neck of the woods), a white feather (most likely from a gull) that I colored with alcohol ink, and what I believe is a pelican feather - you can barely see it behind the purple one. The cords holding the feathers were all from my stash as well.
The "bluegleam" is a quartz point colored with glass paint. I'd had an idea for sculpting and casting the bluegleam cluster Aloy wears on her Frozen Wilds armors, but I wasn't able to get a finished product I was happy with. I'm not giving up on it, though - hopefully I can manage it someday!
*Which, honestly, is a miracle. I finally used stuff in a project! See, keeping interesting things is more than just adding to clutter!
#HCC 2023#HCC#horizon creation celebration#surprise! break from virtual photography#horizon art#(not really art more like craft but I already have that tag so...)#it's really too bad the other idea i had for the bluegleam didn't work#i spent so much time sanding lol#if i had a vacuum chamber/pressure pot setup i think i would have succeeded#but i don't#i could also break it into parts and make several molds#but time was running out and the medallion was the real focus of the project so i put it aside#it was my first time doing a fandom event like this!#life has been a bit exhausting lately so there were some challenges#but it was fun and i'm glad i did it!
97 notes
·
View notes
Text
I just wanna say bc I KNOW you're somewhere on tumblr, to the teenage girl who attended Take Your Kid To Work Day at an office building in Ontario, Canada circa 2013 and had a conversation with a middle aged woman in which you showed her your Black Veil Brides fanart and fanfics and ship content and told her about different fanfic tropes including a/b/o verse bc she happened to know who Panic! at The Disco and Fallout Boy were and thus you felt the need to show her your bandblr ship art, that was my fucking mother and I had to clarify all that to her including looking my mother in the eye and trying to explain a/b/o verse without sounding like a lunatic.
It's been 10 years and I still regularly sent evil energies in your direction. Since you'd be probably two years younger than me and thus legally an adult now, please know if this post reaches you it's on sight.
#she cornered me in the car and asked what shipping was and i almost had a fucking heart attack#imagine being like 16 years old and habing to explain knotting to your mother#random emo music girl I'm glad you had fun talking about your Band Guys to my mother#bc i also attended take your kid to work day at that office and i know how boring it was#but christ alive why did you have to fuck me like that?#anyways i hope this post reaches you so at the very least you know i think about you at least once a week#this has been weighing on me for ten years#im almost tempted to blaze this post
60K notes
·
View notes
Text
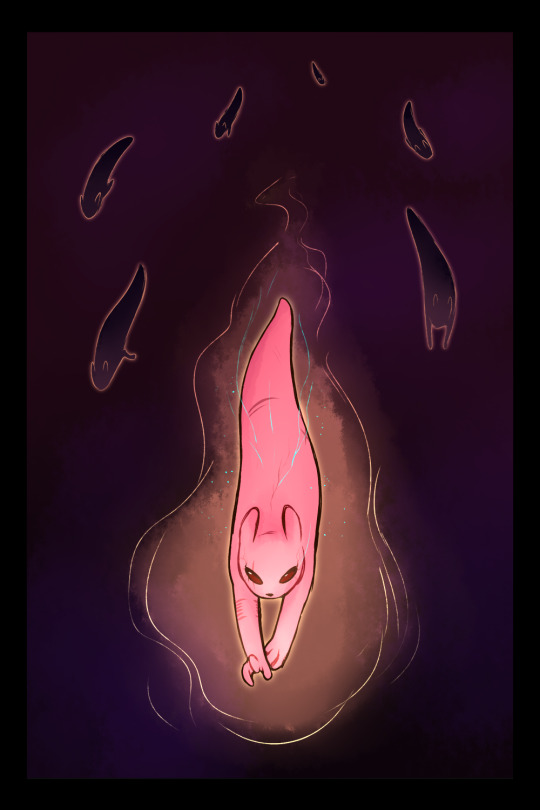

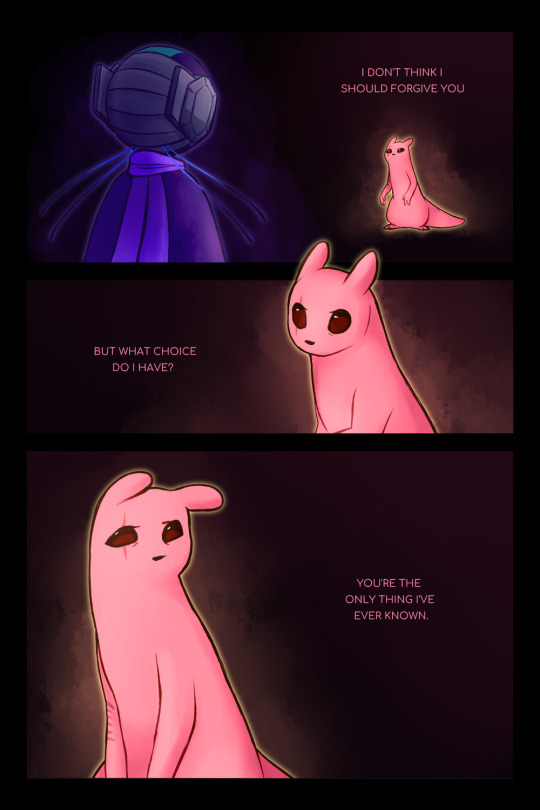
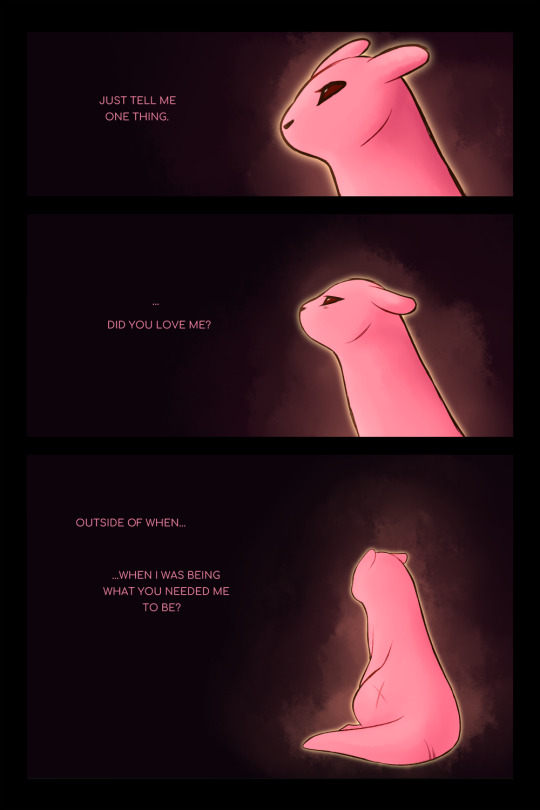
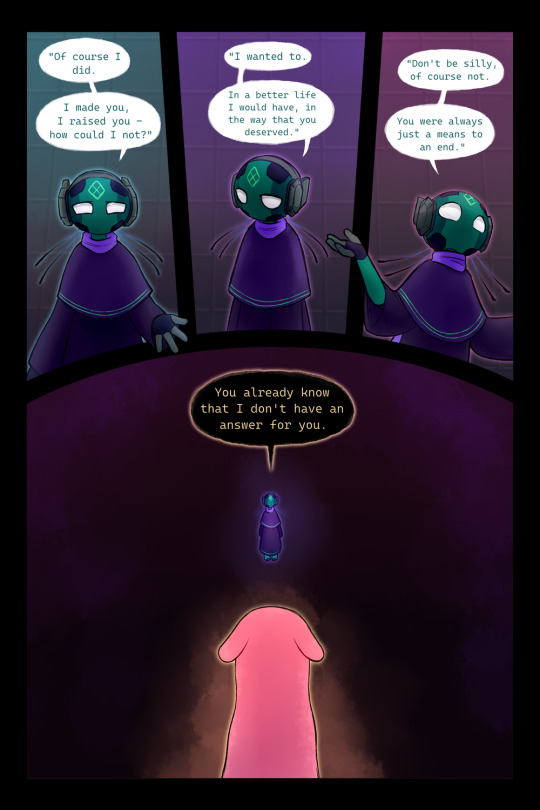


#in the game files the last image of hunter's ascension ending - the one with nsh - is named “embrace”#as a side note#i typically as i like to interpret slugcats as...#intelligent of course as they can draw and sign in downpour lore...#but in a different way from humans. in a different way from iterators.#that's just how i like to interpret them though - if you like to interpret slugcats in a more anthropomorphized/humanized fashion#i'm glad for you and i'm glad you're having fun too :)#anyways i wrote this comic the way i did because i felt like it was the best and most succinct way#to get the message i was trying to express across#so hunter's thoughts are pretty straightforwardly written despite the more complex concepts behind them#i mean they are also made and raised by an iterator so that could come into play#maybe i could have thought of a different way but eh i already drew the comic#rain world#rw hunter#no significant harassment#flickerdoodles#comic#long post#rw spoilers#art
2K notes
·
View notes
Text
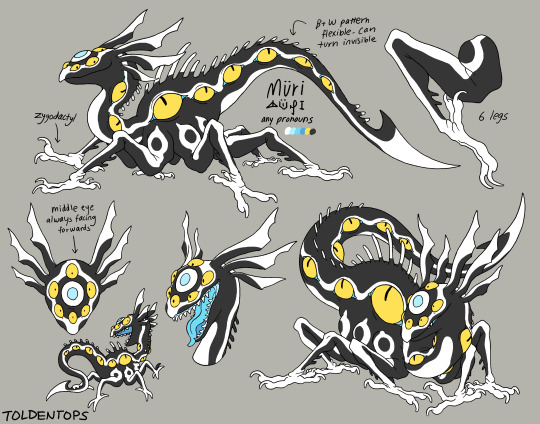

Gearing up for artfight, here's a new ref for a very old character! Müri(any pronouns) is part of a godly pantheon, being the god of mischief, mystery, and mayhem, among other things. The black and white markings aren't fixed, their skin shifts like a chameleon and can even turn invisible.
The very original drawing of him under the cut!

#my art#my ocs#muri#nazri#eyes#character design#creatures#creature design#really really happy with this. I've never been happy with their design and now I'm at a place where I can say this design goes so hard#so glad I went with the insectoid legs#also the top down portrait was so fun! I painted it first and then did the linework. gotta do this method more#scopophobia
2K notes
·
View notes
Text
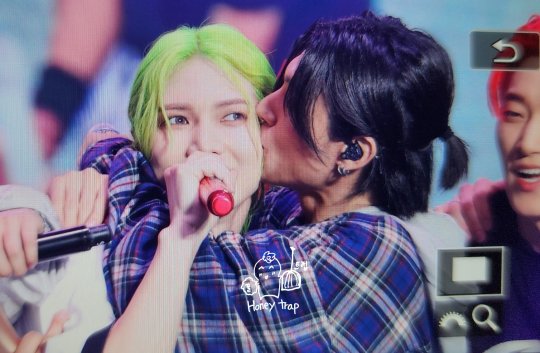
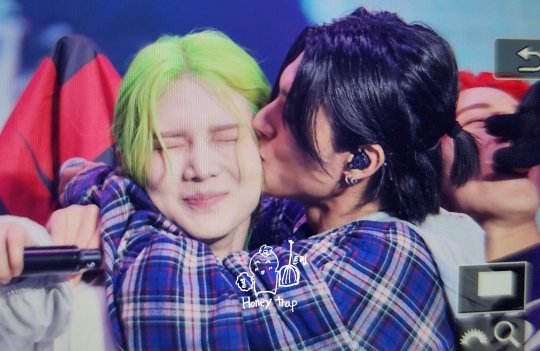
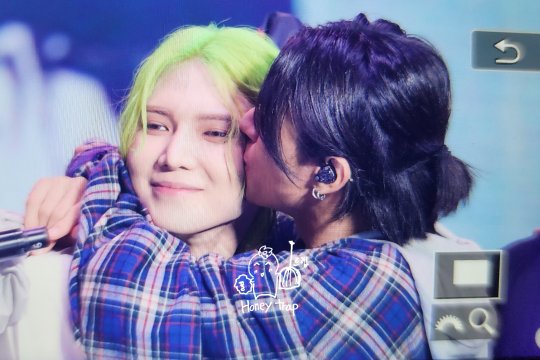
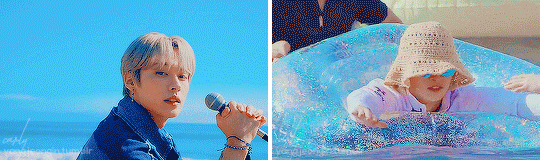
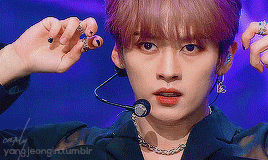
230708 @ HT_0615
#yeosang#wooyoung#woosang#ateez#kpop#WOOSANGTHEWORLD.........#the fansite's tt profile doesn't say anything about reposting so i did the usual w/ a linked credit#BUT if they don't allow reposting please tell me and i'll delete the post!#i just. gkfhgkjsfhgfs#neon yeo looks so cute... green really is his color :')#AND THAT SAN lol it looks like they had lots of fun!! i'm glad!!
2K notes
·
View notes
Text
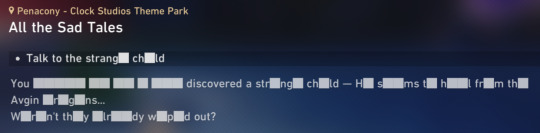
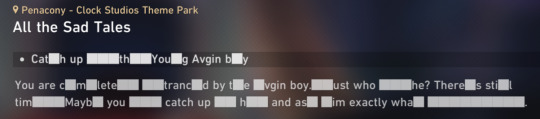
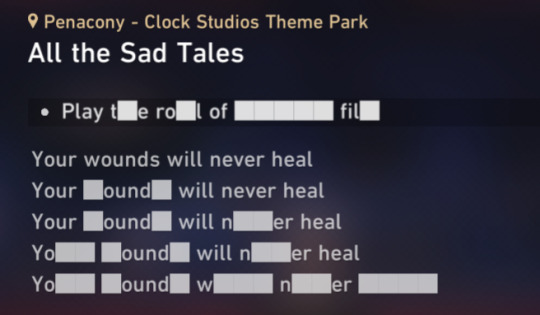


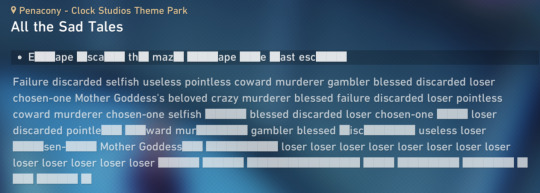

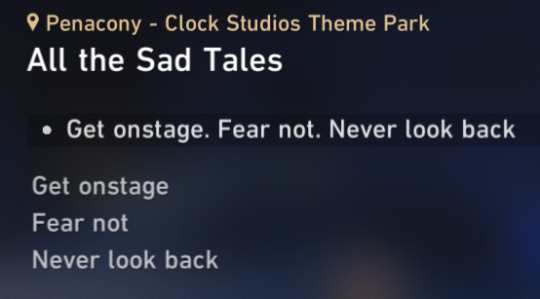
All of the quest menu descriptions for Aventurine's quest "All the Sad Tales".
(... And the one from "A Walk Among the Tombstones.)

#hsr spoilers#honkai star rail spoilers#hsr#honkai star rail#hsr aventurine#penacony spoilers#i really don't look at quest menu text often#but i'm glad i did this time around#i think that's all of them but i could have missed one or two#the text for the next step sometimes changes while keeping the same description so i only captured it once each time#this is was really funky but also goddamn aventurine just had a horrible time the whole patch#delightful for me personally#who loves it when characters suffer#mihoyo pulled 0 punches#i hope i used enough spoiler tags cause that's big fat spoilers right here but it's one of the things i liked the most about the new quest#i love it when games have fun with their medium#ray's records
359 notes
·
View notes
Text

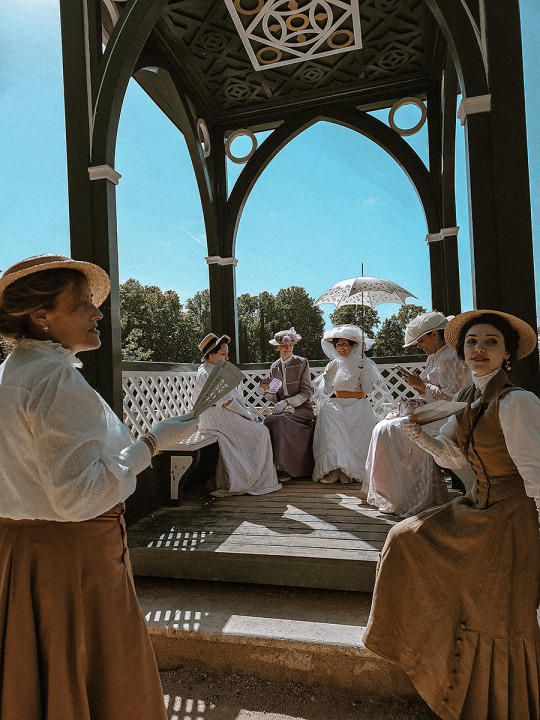


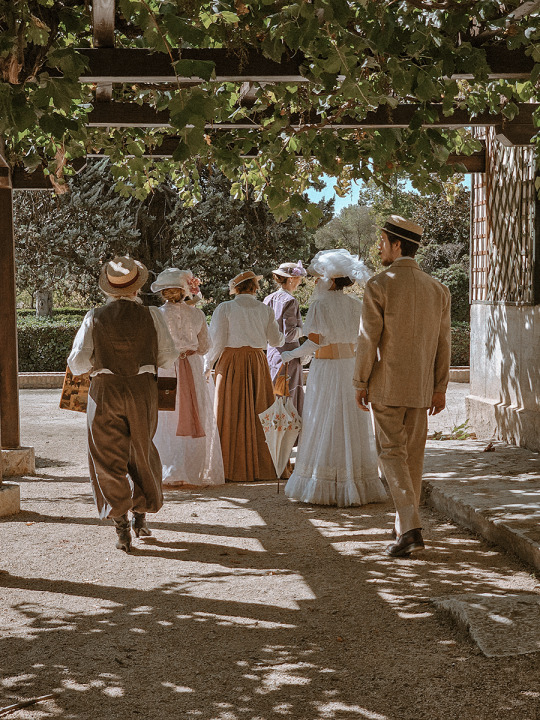


Last weekend we had the most wonderful day doing 1900 historical reenactment with these lovely ladies we had the pleasure to know! 🥰 We walked around royal gardens, watched the air balloons take off, played with the horses and chickens and had an amazing picnic in a beautiful estate! It was such a dream 😭 I look forward to more incredible events with Anacronicos ❤️
#nips photos#historical fashion#edwardian#photography#historical reenactment#I have so many photos!! it was so fun!! everyone was kind and lovely we made so many friends!!#I'm excited to do more 😭#this was so outside of our comfort zone and we went for it and I'm so glad we did#there was a crowd following us around and many photographers and all the tourists asked for photos too and were complimenting us 😭#we met so many kind strangers and everyone would strike conversations even on the train ride back home#it was surreal in the best way I can't believe we did that sajfhkjasf now I want to do this every weekend!!
551 notes
·
View notes
Text


FirstKhaotung having an enemies to friends to soulmates relationship is one of my favorite things about them.
Translation credits: ✦✦
#firstkhaotung#firstkhao#first kanaphan#khaotung thanawat#thai actor#gmmtv boys#:: mygifs!#this is from the our skyy 2 interview and i highly recommend it bc it's actually pretty fun#i'm of the opinion that the best relationships start with one or both parts disliking the other to some degree#and judging by the bond they have now i'm glad first's cold shoulder melted khaotung's heart#tho they did mention something about something else happening before they got in good terms too
388 notes
·
View notes
Photo


your year in every color . . . happy birthday LEE MINHO!
#lee know#stray kids#bystay#createskz#lee minho#flashing tw#*gif#*ccarly#*minho#*carly:minho#*series:bday22#i did it. it's over. a RAINBOW FOR EVERY MEMBER: ACCOMPLISHED#honestly i think this would be my favorite one if not for. yellow. i hate it so much. god#how did past carly make some of the yellow rows for the others so good. sometimes i think i am getting worse#anyway hbd scorpio king love u!!#i also want to take a moment to thank everyone for supporting this gifset series so much :((#i'm so glad people have liked them they did take a lot of work but it was worth!! and overall i had a lot of fun#no idea what i'm doing next year. how about: d*e#*hits
1K notes
·
View notes
Text

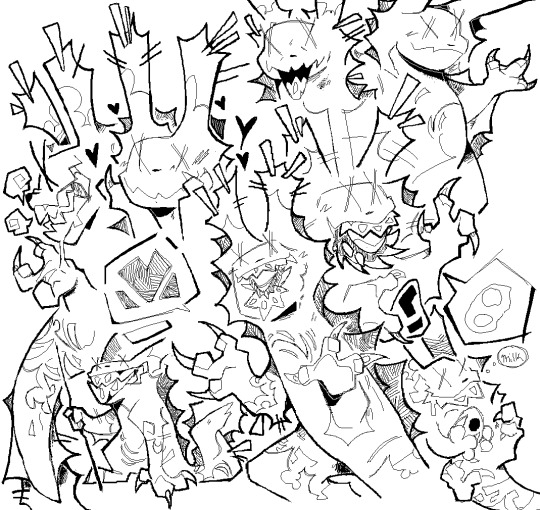


A Collection of a Slugcat With Many Names, The Origins of This Interpretation Being @attex
#rain world#rainworld#rain world inv#rain world enot#inv rain world#enot rain world#my art#fanart#paper post#While I'm still ironing out my own scug designs I just really wanted to doodle this ??? design#And I'm so glad I did it's SO FUN TO DRAW!!#There's just so many wonderful elements in it OMGA#I am but a fool for designs with X eyes and sharp shapes hehe
238 notes
·
View notes
Text

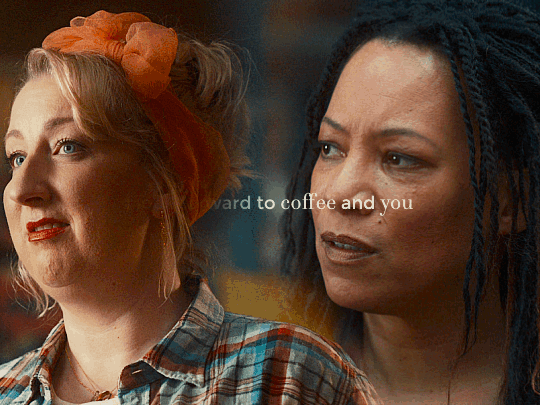

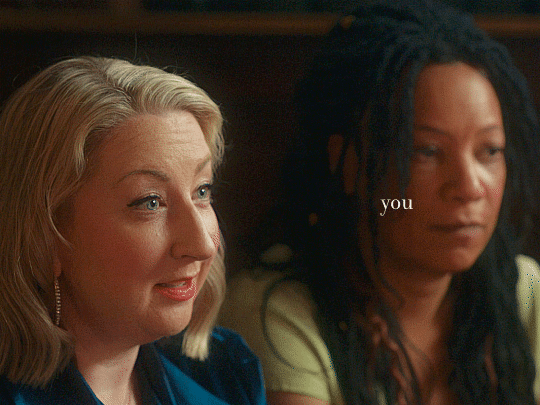
Coffee and you
Maggie and Nina in Good Omens Season 2
#good omens 2#good omens spoilers#maggie/nina#vinylatte#wlwsource#there comes a special time in every young girl's life where she slams her laptop shut and gives up on trying to achieve consistent coloring#such a magical day#this is the hardest thing I've ever tried it took me like. 5 days#my problem is that when I start a new hobby I want to be good right away rather than going through the process of actually learning#but doing this taught me a lot!! it's not perfect but I'm glad I did it anyway#also if anyone can tell me the source of that quote I would be eternally grateful I cannot find it ANYWHERE other than tumblr#it's a very Tumblr quote but maggie and nina's relationship is deliciously tropey in such a fun way I felt like it fit#ghostlygifs
205 notes
·
View notes
Text
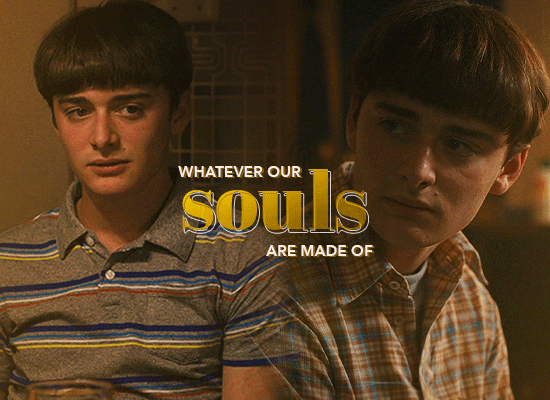

He is more of myself than I am.
Day Seven of @bylerweek2023 - Soulmates
aka: Byler x (Emily) Brontë
+ how he looks at you when you're not looking
#design forward#bylerweek2023#byler#mike wheeler#will byers#I've seen these moments paralleled so many times but not seen them giffed? hence the inpo for these lowkey#BUT !!! you need to understand that me making gifs like these is a revolutionary development courtesy of byler week#the masking and blending and sharpening and style of editing was all learned in THE LAST FOUR DAYS#so I combined all my lessons into these as a simple ‘final hurrah’#Honestly for someone who learned how to gif SOLELY on a whim four months ago I’m pretty satisfied with myself rn lol#anyway. this week was so fun and I'm so glad I did it!#stranger things#my gifs#the me tag
416 notes
·
View notes
Text
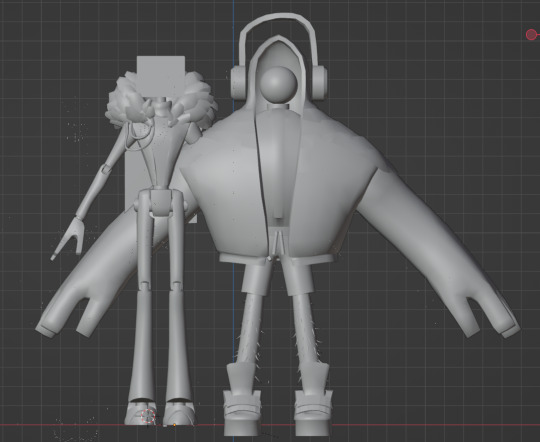
Answering My Own Height Questions
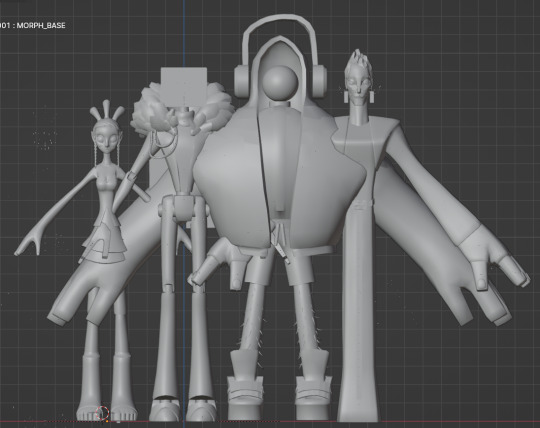
*I want to apologize for everyone being untextured, but I'm too lazy to figure out how to load the textures in Blender. Besides, this should make it easier to see anyway.
While I was poking around, I decided to go ahead and definitively answer my question from a while back about how tall DJSS is.
At a quick glance, the undisputable answer appears to be that he's shorter than Tatiana, but taller than Neon J... barely.
This doesn't consider the thickness of his helmet (unless you think the helmet is his head), but even so, this difference is so small, that it's easier to say that they're about the same height.
BUT
As we know from the Christmas DLC, DJSS's feet do not sink completely into the soles of his shoes.

So adjusting for where his feet would actually touch the ground, DJSS is actually shorter than Neon J. by a good couple of inches, but still taller than Mayday.
(Not that it really matters in fanart, since they're usually wearing their default outfits anyway, so even pointing this out is basically null~)
I also wanted to check Eve against the others, and with heels she's still shorter than NJ and DJSS.
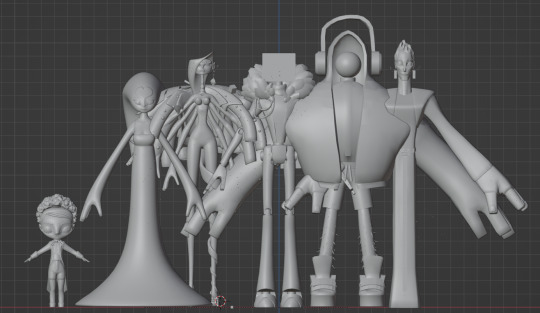
This shot was taken before I adjusted for shoe height for DJSS/Eve, but with adjustments, DJSS is still just a little taller than Eve (it's about the same difference as Neon J. vs. DJSS with shoes).
So, I've a got a win for short!DJSS, but a loss for 2nd tallest!Eve, UmU. (Tatiana is the tallest member of NSR, not counting *Sayu, who I consider a special case.)
*Sayu is in scale to her B2J battle, meaning she's a giant compared to everyone else, so I didn't include her.
And of course I had to do B2J, Kliff, and Tatiana for my own amusement.
I didn't order them by height this time, but the grid guide should suffice. It's a little hard to say if Kliff or Zuke is actually taller since their hair is so dense, but considering that Kliff also wears shoes with a heel, I'm gonna err on Kliff being *just* a hair shorter than Zuke, but they're really about the same. However, Tatiana is actually about a whole head taller than Kliff putting him at perfect motorboating height.
I wanted to check the sewer gang too, but their models are not created equal, and I don't think they're in scale with each other.
Maybe it's just me, or because he's asserting dominance, but Zam seems bigger than he should be, and Gigi/Yiruk look a little smaller than they should be. Robot could be to scale, but I think he looks a little big too.
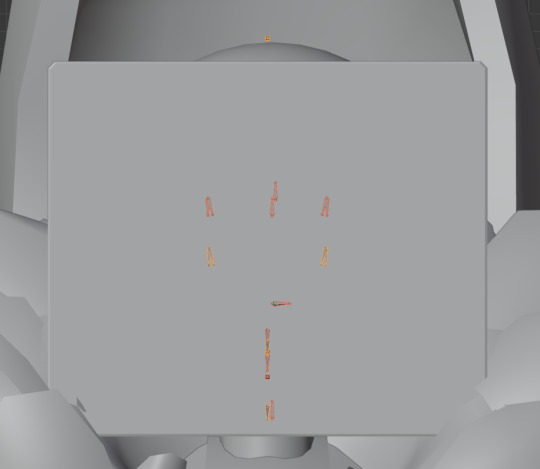
As my final bonus, I wanted to compare Yinu and 1010 to see how accurate my "Heart and Soul" sketch would have been and...

Nope. Handholding is basically impossible for them. At best, Yinu might be able to grab one of his fingers, but it'd be straining to do so unless he hunched over. So, it'd be even more impossible in my fic where she's younger and presumably even shorter, and the MKI is implied to be bigger and bulkier.
#nsr#no straight roads#djss#dj subatomic supernova#neon j#tatiana#mayday#eve#zuke#kliff#1010#yinu#well this was fun and informative#i'm glad i can finally close the book on some of these burning height questions#but chances are i'm probably still gonna draw everyone as i've headcanoned them#i usually make kliff about a head taller than may#but i guess may is actually at about forehead kissing height to both him and zuke#i did have eve at about a head taller than nj and djss as a head shorter than him#but they're all actually pretty close#and even tatiana as the tallest isn't *that* much taller than the majority of her stars#but i'd still like to make her huge~#it's just funnier that way
101 notes
·
View notes
Text

I've beaten Frontiers twice and it's still not enough
#sonic the hedgehog#sonic#koco#sonic frontiers#sth#toma draws#that's saying a lot bc i don't usually replay a whole game so soon. im SO obsessed with this game im rotating it on my mind at all times#i love playing it i love its story+characterization i love its music i love its voice acting i love the foundation it lays for future games#i love the positive reception it's been getting i LOVE what it means for this franchise that means the world to me#thank you sonic team for this fun wonderful delightful experience 😭💖💖 this is THE goty in my heart#here's hoping it wins player's voice!!!!#anyway HI long time no post!! I haven't been drawing a whole lot the past few months between being busy and out of art juice#but it seems to be returning now that frontiers has been marinating in my brain so we'll see 👁#i Did make a couple traditional oc stuff in the meantime tho. ill try to remember to post those sometime#also i'm glad i can still draw sonic it's been So long
962 notes
·
View notes
Text
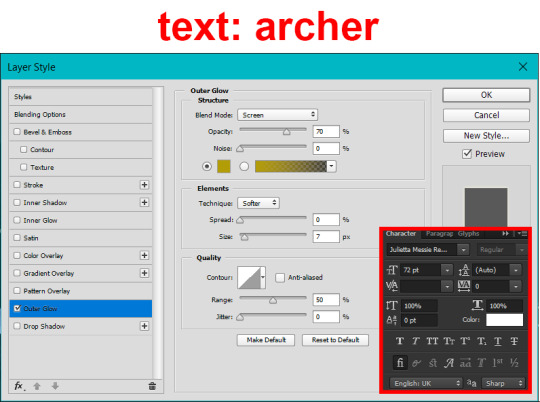
How To Gif: Glass Shatter Effect
By popular demand (ie, 7 people who voted in this poll), here is a tutorial on how to do the glass shatter effect I used to create the first gif in this set.
I use Photoshop CC 2015 (yes I know it's old) for my gifmaking, but you should be able to apply everything to newer versions of Photoshop. For this tutorial I'll be assuming you know the gifmaking basics, but if not, I would recommend this tutorial, which is the process I use to make gifs. Note that this particular process involves saving all of the frames, importing those frames into Photoshop, and then using an action to convert to a smart object.
Keep reading below the cut to learn how to do this effect!
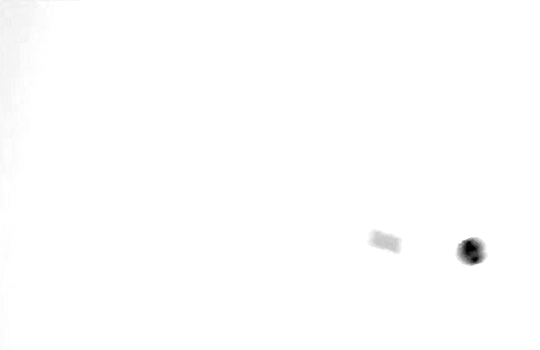
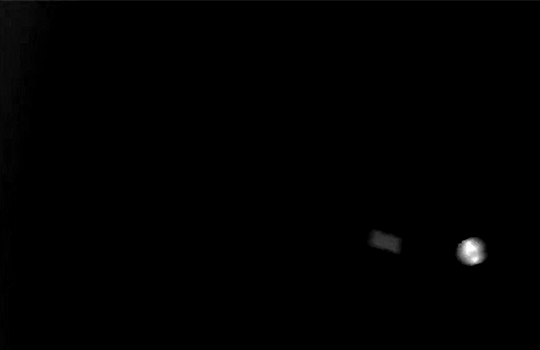
Before I could start making this gif, I needed three things; the two scenes that I wanted to use, and a video of the glass shattering effect. I already knew the scenes I wanted, so then I took to YouTube to find a video which I can't for the life of me find again, but it looked like this:
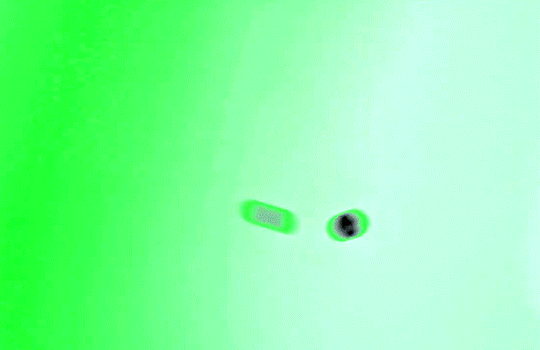
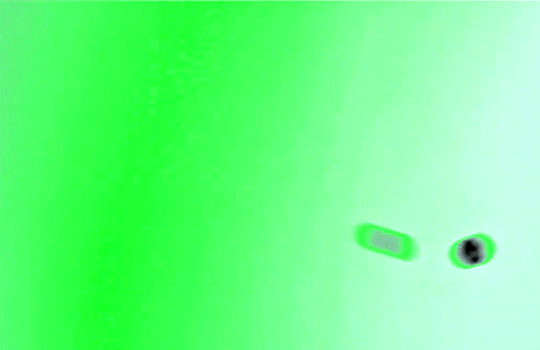
Something like this is what you want. Ideally the green part would be entirely white, but as long as there are two clearly different colours you can usually work with it.
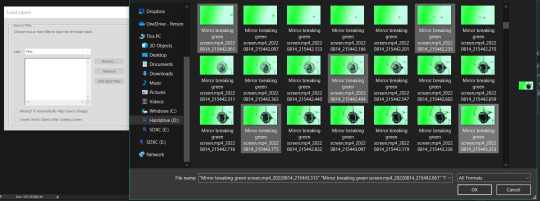
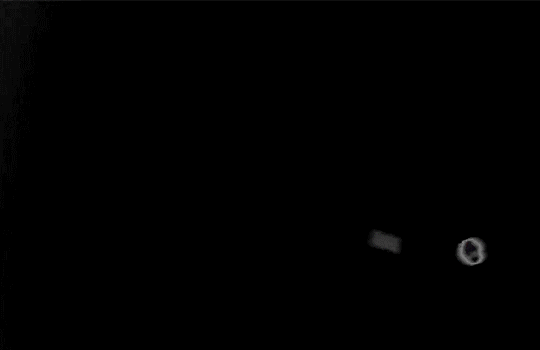
This looks a lot slower than the gif that I made, but that's not because of the frame rate - which is exactly the same above as in the final gif - it's just because there are extra frames in this slower one that I cut out. In the video I used, the glass shattering happened very slowly. I didn't want that, so I ended up skipping several frames when I loaded the frames into Photoshop before using my gifmaking action. I just did this by manually selecting one frame, skipping the next several before selecting another frame, and repeating this until I had selected 60 frames.
After using my gif action, I had a smart object of the glass shatter effect that looked like this:
That's a much better speed! It still wasn't quite where I needed it to be though. I needed this in black and white, so I slapped a hue/saturation adjustment on the smart object and set the saturation all the way down to -100.
Okay great, I could start putting the gif together now.
First, I made a copy of the glass shatter smart object, because I'll need that later. Then, I pulled in frames from the scene that I wanted to appear in the hole after the glass shatters, and I used those to create a new smart object with my gif action (we'll call it Scene-bg). I pulled Scene-bg into the same window as the glass shatter objects. Then I created a new smart object by combining one of the glass shatter objects with Scene-bg, which I did by selecting both layers right clicking, and selecting "Convert to Smart Object".
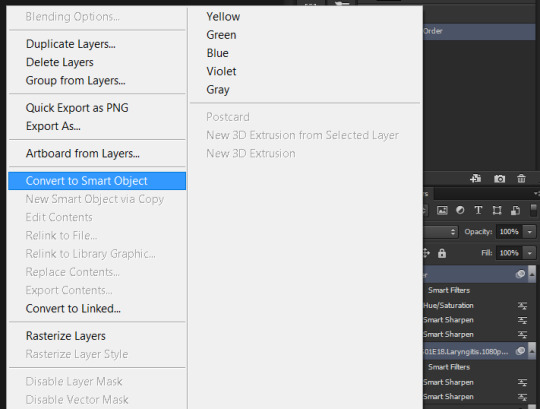
I renamed this smart object to Shatter-fg. I opened it by clicking on the little icon next to the layer name in the layers window here:
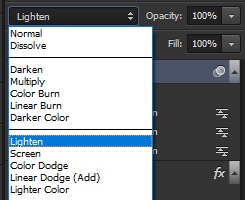
The most important thing here is that the shatter effect object should be the top layer, and I set the mode to "lighten". This will make sure that the lightest colour of either this layer and the layer behind it is displayed; that means that anywhere that's white in our shatter animation will still show up, but anywhere that's black we'll see what's in the layer(s) behind it.
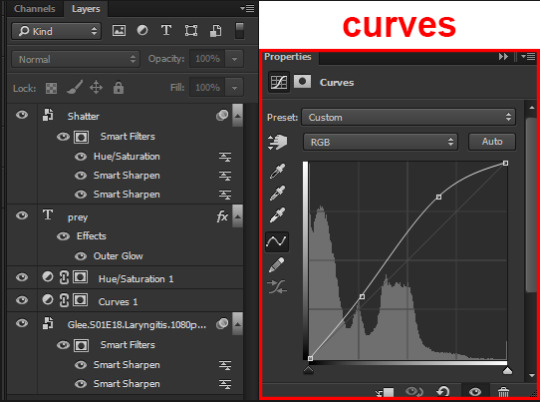
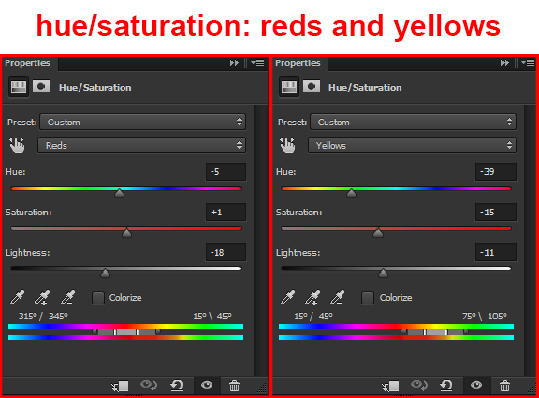
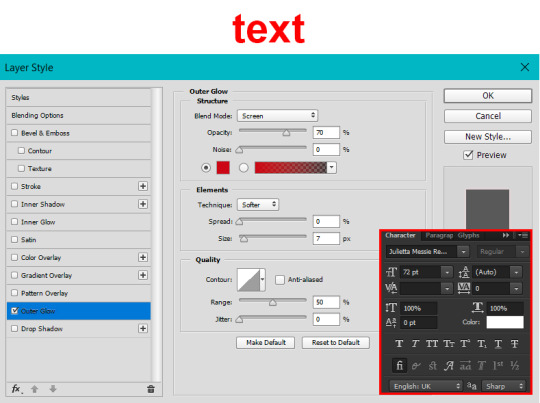
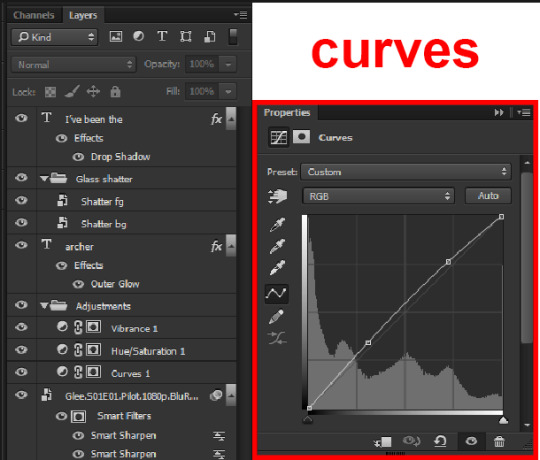
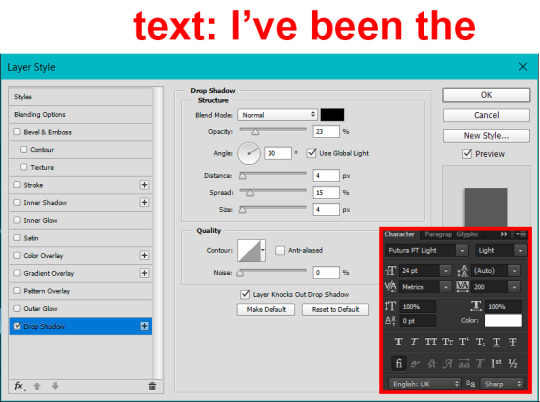
Then I threw some adjustment layers between them to get the colouring I wanted. I used a curves layer, a hue/saturation layer, and I also added text with an outer glow layer effect. Here's what the layer order looked like and the settings I used for each layer:
After this process, Shatter-fg looked like this:

Okay nice, this is starting to look like something! I saved this and went back to the main file with the other glass shatter object.
I needed to invert that other glass shatter object. There's a weird quirk with the version of Photoshop that I use where it doesn't like it when I apply specifically an invert adjustment to a smart object (it appears correctly when editing, but not on export) so I did this by creating a new smart object which included a separate invert layer, but if you have a newer version of Photoshop you can probably just apply the invert adjustment directly. Just note that you'll need to do one of these options; it won't work if you add a separate adjustment layer in the main file, it needs to be applied specifically to the smart object (which we'll now be calling Shatter-bg). It looked like this after I inverted it:
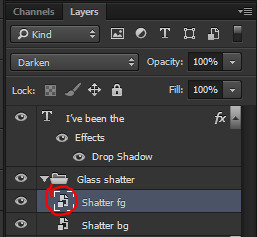
Once that's done, I made sure Shatter-fg was the layer directly above Shatter-bg, and set the mode of Shatter-fg to "darken" and Shatter-bg to "lighten". Since Shatter-fg is set to darken, it will be visible only when it is darker than the layer behind it. By setting Shatter-bg to lighten, I've guaranteed that the layer behind it will always be lighter (ie, white) in the places we want Shatter-fg to be visible, and will be black otherwise. Once I update those settings, this is what the gif looked like:
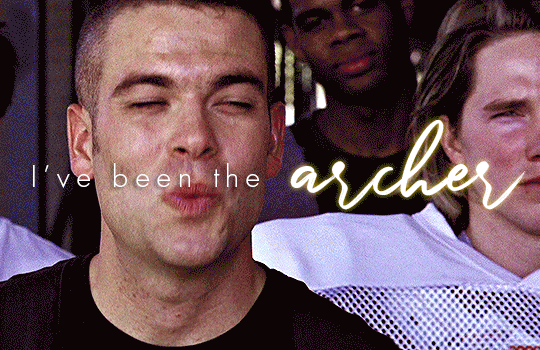
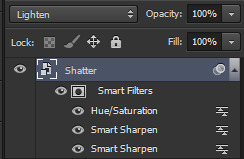
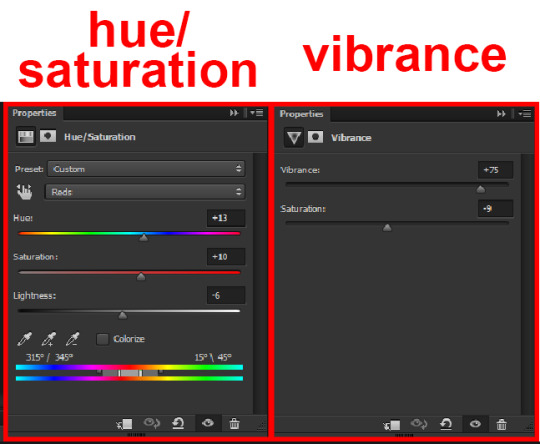
This is all there is to the glass shatter effect itself. Next I pulled in frames from the second scene to fill in the black areas. This layer needed to go below both glass shatter layers, so that it only shows through where the black. Then I added adjustment layers and some text. I used curves, hue/saturation, and vibrance adjustment layers, and I also added the "archer" text below the glass shatter layers so that it would be hidden to reveal the "prey" text. The other text I added above all of the layers, since I wanted this to be visible all the time. Here is the layer order and all of the settings I used for each of the layers:
I also grouped Shatter-bg and Shatter-fg and shifted them on the timeline so there would be some time to see the background gif before the shatter effect starts.
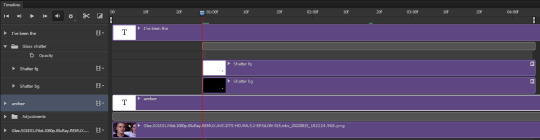
And that's all! Then it''s just a matter of exporting the finished product:
This is the first gifmaking tutorial I've ever made, so I hope I was able to be reasonably coherent and helpful! I'd love to hear if you make anything by following these steps, or even if you just feel like you've learned something reading through this. And if you have any outstanding questions, feel free to reply or send me an ask and I'd be happy to answer!
#gifmaking#tutorials#gifmaking tutorial#gif tutorial#photoshop#photoshop tutorial#usergif#gleesource#my tutorials#mine#how to gif#tw mark salling#mark salling tw#not tagging as glee because it's not actually about that but wanted the tw tags just in case#this was so much more effort to put together than I thought it would be lmao#I was like oh yeah I've already made the whole gif I just need to go back and explain how I did that...#it took A WHILE#anywayyyy it was fun though so I'm glad I did it#would love to know if anyone finds this helpful or interesting or tries out the effect or something similar!#you can also just grab the black/white gif I included above if you want to do the effect since I can't find the video... sorry lol#but yeah you have my permission to steal the black/white gifs for gifmaking purposes if you would like#just don't like. post your own tutorial claiming you made it or something?? but like you don't need to credit me or anything obviously.#ANYWAYYYY#I feel like... a LITTLE pretentious thinking I'm good enough at making gifs to be qualified to make a tutorial#but like it's fineeee everything is fine#gonna finally post this now enjoy byeeee
97 notes
·
View notes
Note
do you think MK is gonna have a circlet arc?? Going along with your eldritch mk theory jt could parallel his past life being contained and also more parallels to SWK and MK how fun
This ask has haunted my ask box for 3 days. Circlet arc??? CIRCLET ARC???? THAT WOULD BE TERRIBLE AND SO SO SO GOOD.
I have no idea if it would actually happen in show, but I have a feeling MK is at the very least going to have an "anti-circlet" arc. Go with me for a moment:
So, we know MK's bandana parallels Wukong's phoenix feathers in design, right?
MK with the two ends of his bandana and Wukong with the two feathers coming out of his cap.
However, MK's bandana is ALSO a parallel to Wukong's circlet:

And MK was given this bandana by Pigsy (presumably):


This is basically a long winded way to say that MK has already been "crowned", in a sense. Unlike Wukong, MK never needed to be controlled in the same way his mentor did at the beginning of his journey. MK, instead, was given morals and love by our wonderful Dadsy from a young age, which effectively functioned as a "circlet", if that makes sense.
So, the bandana, a symbol of both who he is/was raised to be and the crown, is already his circlet. As MK is now, he doesn't need a circlet to exert control over him because of who he is—a good kid who is trying his best to make the right choices.
But, you know, there was that really scary scene that one time where MK didn't exactly feel like MK and he kind of went off the rails...and...WHAT IS THAT

HIS BANDANA WAS DAMAGED BY HIMSELF IN AN EPISODE TITLED "Rip and Tear" !!?!??!?!?
SO.
Say MK were to rip his own bandana off, symbolically showing his complete decent into his "harbinger of chaos" role...that would mean another crown would have to go on to replace it, right?
Whether MK get's crowned symbolically with another bandana or an ACTUAL circlet remains to be seen, but the potential is definitely there! And I'm normal about it
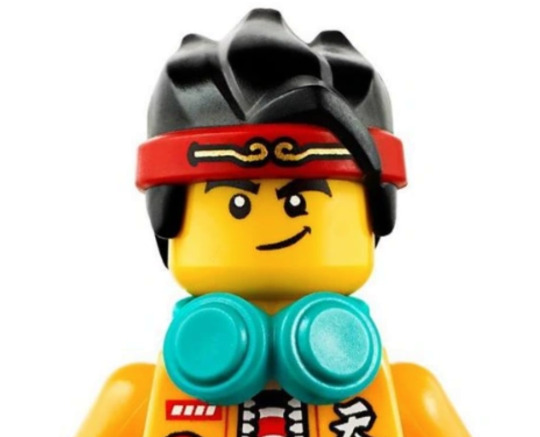
#how fun#anon did you know SWK and MK parallels are my lifeblood#anyways#I'm completely fine!!!! I think about the line ''they will destroy you harbinger of chaos'' a normal amount!!!!!!#I'm sorry guys MK evil arc might be very real. Like not YET. Using his monkey form in the special was kinda a#Samadhi fire Mei situation where you wish it didn't have to happen but are kinda glad it did.#But like. There is going to be a time where Monkey form is not the answer yet it's the one MK gives and the bandana goes and we're FUCKED#Or at least like. That's what I'm speculating#So I don't know if MK will for sure have a circlet arc. But maybe I pray to god everyday he will. Maybe I want it really bad.#Look all I'm saying is that MK destroying his own friendship armor with his own power is NOT a good sign. Okay. thanks ilu#lmk#lmk mk#lmk theory#lego monkie kid#monkie kid#asks#eamk theory
180 notes
·
View notes
Last Seen Blogs

viosintonizw
ΒΙΟσυντονZΩ -VIOsintoniZW
mikijordan1970
Sin título
iamwaytoointostartrek
Star Trek Things

sickwidit
CHILLmatic