#and i found it on a github page
Photo
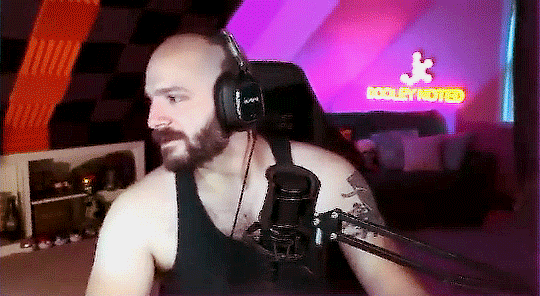


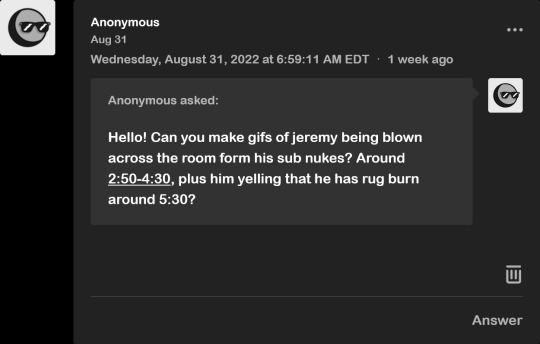
thanks for the request, anon! ♡ 【☢️】
#moments that make me remember that jeremy used to be a gymnast#jeremy dooley#kat dooley#dooleynotedgaming#achievement hunter#man remember when i used to make gifs? i fell off /j#all my messing around with the obsidian AU led me to find the Actual font for the text in the game#it's called ''minecraft seven''#and i found it on a github page#minimal difference between that and ''minecrafter'' but i don't care. i'm keeping mc seven lol#also- yay! i finally settled on what color i can use for kat!#i picked it from her twitch icon :3#e's gifs#fake ah q
189 notes
·
View notes
Text
Nobody fuck with me i just figured out how to do this

^ This
#mypost#godot doesnt have an alt enter toggle by default for some reason#which is weir dbecause in looking up how to do this i found the github page where they went Yeah we can add an alt enter toggle#And the page was from 2 years ago so i guess they just forgot
4 notes
·
View notes
Note
could you type up a quick guide on how to install the plugin for somebody with negative computer literacy? :( I managed to install Calibre well enough, but I'm at a total loss for the plugin...
gonna do this on my win11 laptop because i don't already have calibre set up here, let's see how this goes
STEP ONE: install calibre. you already did that one so that's fine.
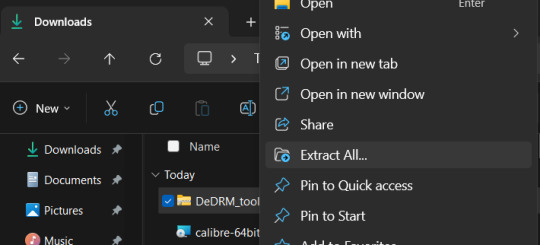
STEP TWO: install noDRM. github is scary looking but look for the thing that says 'releases' off to the right and click the latest one.
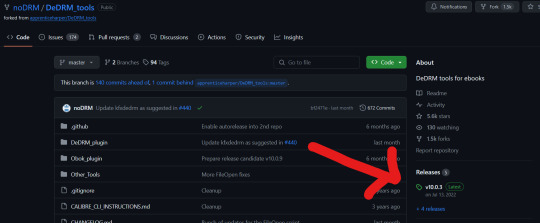
that will take you to the page where you can download the .zip file
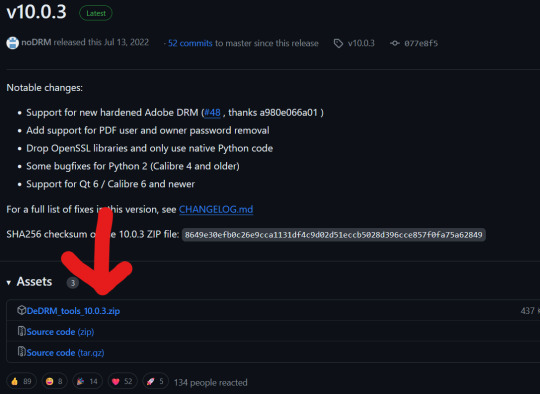
Find the .zip file and right click > extract all
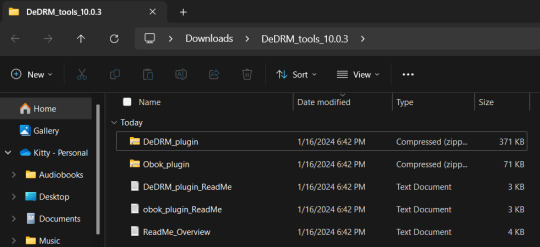
now you have a folder with two .zip files in it, one for each plugin
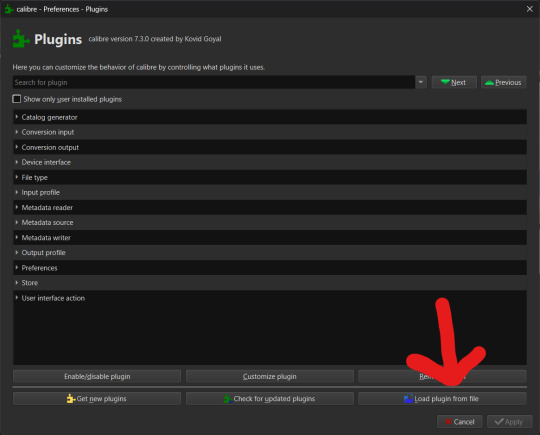
open up calibre and hit the preferences button
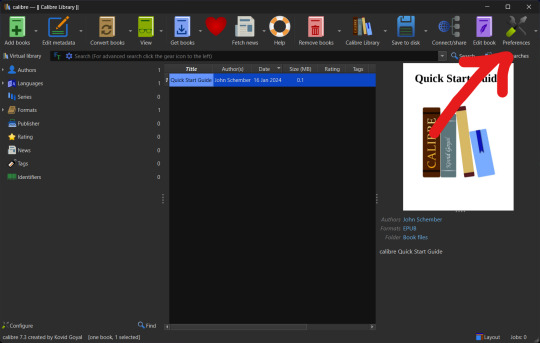
hit the plugins button
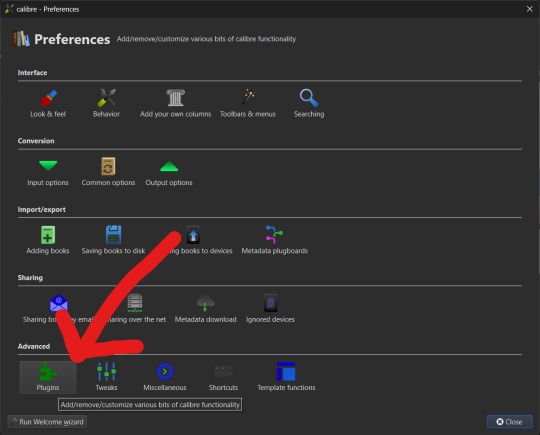
hit 'load plugin from file'
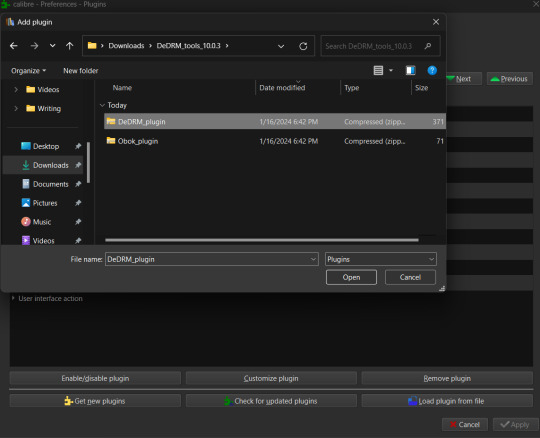
Navigate to the folder where you extracted the plugin file, probably your downloads folder - select dedrm first
it will pop a warning, hit 'yes' to tell it to mind its business

success!

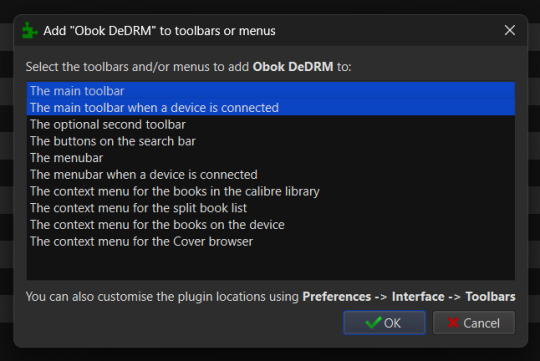
do not restart, instead hit okay and then hit 'load plugin from file' again to select the obok plugin and repeat the install process. this one pops more options but we don't really care about these as much, it's just asking where the buttons go. you can keep the defaults and just hit ok, it's fine.
okay, now you can hit restart

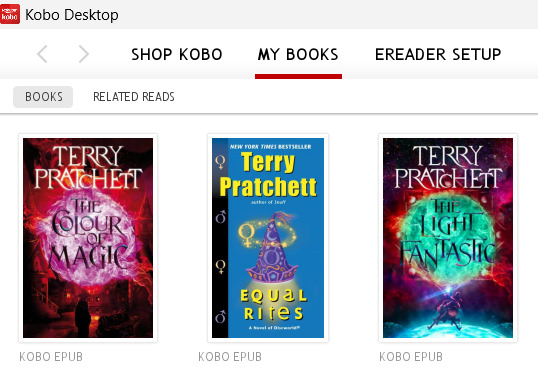
STEP THREE: download your books. now, kobo theoretically lets you download a file from their website but it's a fake file that does nothing but tell adobe software how to download the actual file. this is stupid and confusing so instead download the kobo software for desktop. unlike for kindle you can just download the latest version direct from kobo. once it's installed it will basically just be a shitty browser for their website? i was going to tell you how to download your files but it just did that automatically with all of the books i have on there for some reason, not a fan of that. they'll have a download icon on them if the books aren't downloaded but anyway it'll look something like this:
STEP FOUR: import your books. go into calibre and hit the obok button that exists now:

depending on the size of your calibre window you might not be able to see the button after your restart, in which case you need to hit the button to display the overflow menu. this button is real small, comparatively, so you might miss it.
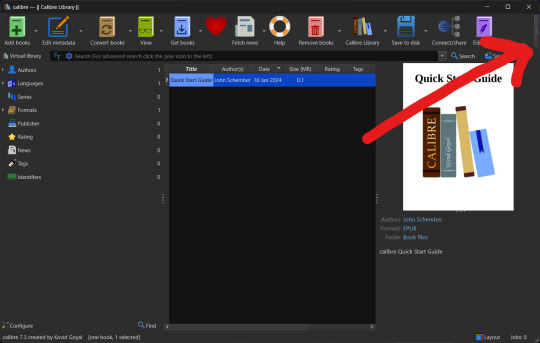
anyway hit the obok button and the books will pop up for import.

that little green icon under drm means there is no drm. for the terry pratchett books, this is a lie. i have no idea why it did this the first time i tried to import them. maybe because i still had kobo open? anyway when i tried to open the files after import they Would Not so i deleted them and closed kobo and this time it admitted that drm existed.
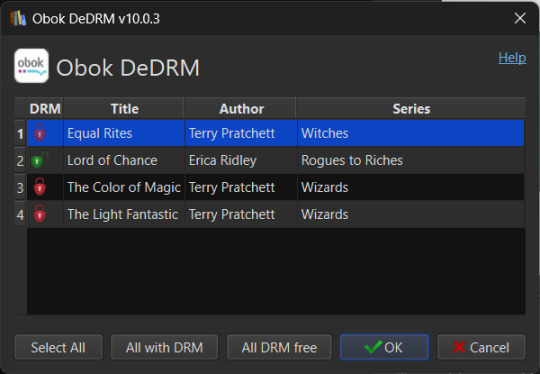
i hit 'all with drm', then hit 'ok', and this time they imported properly. i'm including this because i don't actually know if it was me having kobo open that borked it or if it needs to try and fail once to get its bearings or something. anyway. the covers might be fucked but as long as there's a harpercollins logo it's the real deal, you just need to fix the metadata. you can hit the 'view' button to confirm that the book is readable now.

to fix the metadata/cover you can just hit the 'edit metadata' button and then 'download metadata' at the bottom of the screen that pops up. here's what it'll look like after you hit that button, you can select which version you want to download info from (it includes star ratings for some reason?? i hate that but whatever, you can tweak things.)

once you hit ok it will present you with some cover options, but regardless of what you pick you always have the option of just pasting in a different cover you found doing an image search. i like doing this so i can use fancy alternate covers, or even fan designed ones.
the kindle version of this tutorial is slightly more complicated because step one is finding and installing an old version of the desktop software and preventing it from updating. so i'm not getting into that right now but the broad strokes are the same after that.
#original#how to internet#if you have ever wondered what my 'how to do my job' notes look like#it's a lot like this lmao
462 notes
·
View notes
Text
Fixing Windows 11 - A Masterpost
Windows 11 is absolute crap for a good bunch of stuff so yeah, have a masterpost with most of the things I've found around to fix it haha (they're not all here because I did stuff around and I don't remember what)
Stopping W11 from making you create an account/setting up your computer without internet (with a way to create gpedit.msc if your version doesn't have it)
Fixing the Taskbar (in case you also don't like the grouped Battery/internet/sound or the way the windows look)(there's more to it, check the settings)
How to move the volume and luminosity pop ups (so you can finally see those sweet sweet subtitles)
In case ModernFlyouts doesn't automatically start up, possible solution
Fixing the Start Menu
How to show all options right away
How to remove Copilot if you have it (I don't, but it might be because I'm in Europe??)
Apparently Copilot is being forced on people so hummm
Other stuff not specifically related to the shit W11 did
Changing the size of the scroll bars
How to fully remove Cortana
Website with tools to fix W10 and W11
764 notes
·
View notes
Text
CmarNYC programs are supported again!
You can find them here 👇👇👇👇
*This is just a friendly reminder to those who don't know
I found information about this on the s4studio page here
171 notes
·
View notes
Text
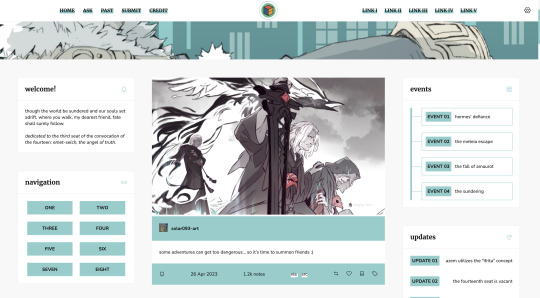

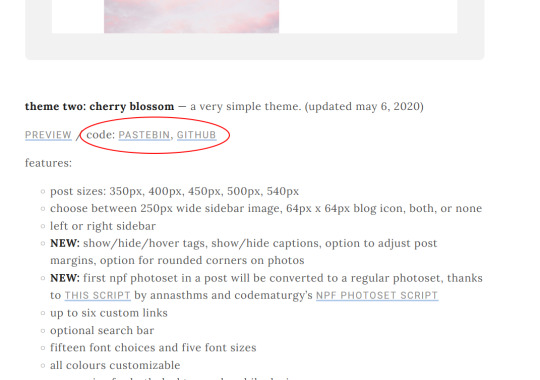
Theme #07: Clio by @pneuma-themes
Where you walk, my dearest friend, fate shall surely follow.
Live Preview (Temporary) / Static Preview: [Index] [Permalink] / Get the code: [pastebin] [github]
This is intended to be a fansite! I am finally happy with how this turned out after a few iterations. This theme features Emet-Selch from Final Fantasy XIV. Be warned going into the live preview as this theme heavily features content that can be found on various points of Shadowbringers and Endwalker, which may or may not be a spoiler!
Features:
Customizable post widths and font sizes. The live preview uses 650px post width and 13px font size. Enter the desired post width on the post width field and the desired font size on the font size field on the Customization page.
One accent color, 7 color options
Option for title alignment (centered/lefthand side/righthand side) to accommodate for the chosen header image.
Option to display or hide the blog title.
Built-in dual sidebar layout. All the boxes on the sidebar (members, events, updates, and site info) and the footer (disclaimer, about, and search box) can be edited from the code directly.
5 custom links at the topbar with additional 8 links on the navigation box.
Customizable photoset gutter. The live preview uses 10px gutter.
A header image. The size of the header (w x h) is the width of your screen x 350px. So if your screen width is 1900px, then the size of your header should be 1900 x 350px.
Notes:
This theme uses @eggdesign's NPF reverse-compatible template. Everything should be working as expected, except for some things noted below.
As we slowly transition into the new editor, posts made by the legacy editor will eventually break. This is particularly evident in a quote post reblogged via the new editor, in which the post will be rendered as a text post with blockquote and cannot be styled similarly to a legacy quote post. This is a Tumblr bug as far as I am concerned and from what other people have told me, so unfortunately there is nothing I can do about it.
I've written a short guide on how to set up this theme here. Everything else is annotated in the code, so do read through them before shooting me an ask!
Credits:
NPF reverse-compatible template: @eggdesign
Header: ユズリコ❂ (yuzuriko_red @ Twitter)
Icon font: Phosphor Icons
Icons (affiliates, members) and toggle tags on click: @alydae
Fonts: Nunito, Merriweather @ Google Fonts
customAudio.js: @annasthms
photoset.css with lightbox: @annasthms and @eggdesign
Search box, minified spotify player: @glenthemes
Toggle-able tumblr controls: @seyche
Shorten note count: @shythemes
Responsive video script: @nouvae
Please like and reblog if you like this theme or are using it!
#themehunter#allresources#chaoticresources#completeresources#*theme: clio#*mine: theme#*mine: all#still ugly crying over emet-selch and hythlodaeus and azem
640 notes
·
View notes
Text
Tumblr Blogpack Manager Userscript
Lets you curate your blogpack lists on tumblr a hidden feature that creates custom feeds based on a comma separated list of usernames.It's functional but it is bare bones.
I made this mainly for myself because I follow a lot of blog types and I feel like a lot of blogs from certain hobbies get drowned out.
If you haven't heard of the blogpack feature I don't blame you I only just recently found out about it [here].
I won't be polishing this much because I am sure it will be officially implemented one day or maybe xkit will do something better but I wanted it now.
[How to/Changelog/ Known Issues] [Github Page]
[How to use userscripts in general]
165 notes
·
View notes
Text
Basics of HTML5: Let's build a webpage!
I'm a huge advocate for learning HTML5 as your first coding language (remember, it's not a programming language)! HTML5 is a great and easy coding language to get you into the feel of coding, especially for complete complete beginners!
I see a lot of people on Tumblr wanting to get into just creating their own websites but don't know how to start - coding is a new thing to them! So, I'm here to help with the language I know like it's the back of my hand!
And I am also an advocate of building projects in order to learn anything in coding/programming! Thus, what better way to learn the basics of HTML5 than to actually build a simple webpage? Let's get started~!

What is HTML5?
HTML, which stands for Hypertext Markup Language, is a special coding language that is used to create webpages. With HTML, you can tell a web browser, like Google Chrome or Safari, what to display on a webpage, such as text, images, and videos. And 'HTML5' is just the latest version of HTML!
HTML tags are special words or symbols that you use to create webpages. You use these tags to tell the web browser what content to display on a webpage, like headings, paragraphs, images, links, and more. Tags come in pairs (most of the time) so you'll have an opening tag and a closing tag. An example of the syntax:

The Simple Webpage
As I mentioned, we will be making a simple webpage for a person called David - see, he needs a portfolio webpage to start off with, and we're going to help me (as well as learning HTML5, of course).
Here is the code we will be using:
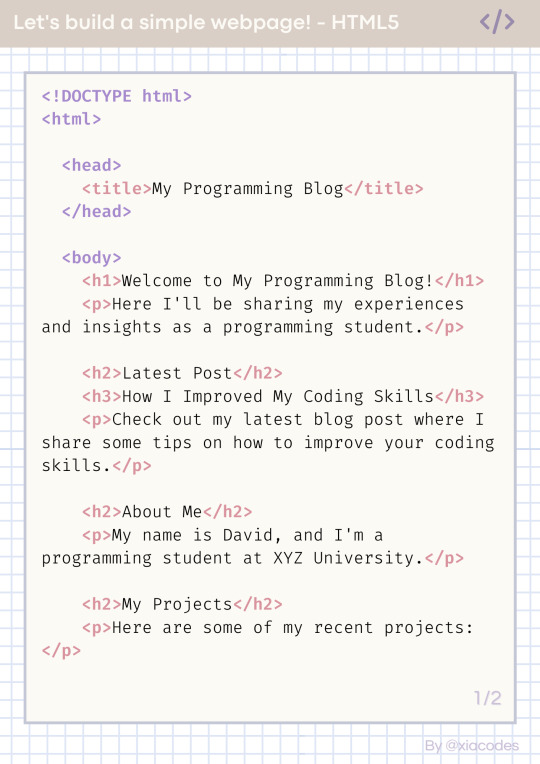
Pretty code, I know but also a bit confusing - let's get into understanding the code by grouping them into chunks! But just a heads up, the code includes these tags:
!DOCTYPE html (mmh it's more of a declaration really)
html, head, body
title
h1, h2, h3
p, a
li, ul, ol
These are some of the common tags used in all webpages on the internet! Okay, let's look at the code finally~!
The basic structure of every HTML page
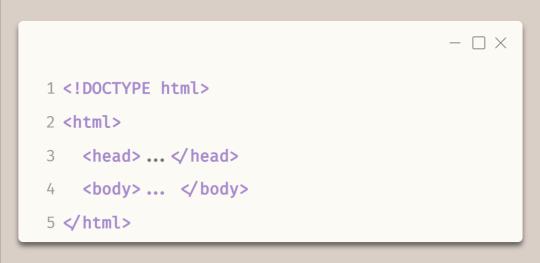
Every HTML file looks like this - it has to have all of these tags!
The first line, !DOCTYPE html tag, tells the web browser which version of HTML is being used.
The code is contained within html tags, which enclose the entire webpage.
The head tags contain information about the webpage, such as the title and links to other resources.
The body tags contain the main and visible content of the webpage, such as text, images, and videos.
Together, this code provides the basic structure for an HTML webpage, with the head tags containing metadata and the body tags containing the actual content.
In the head tags
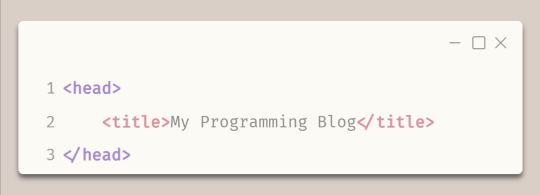
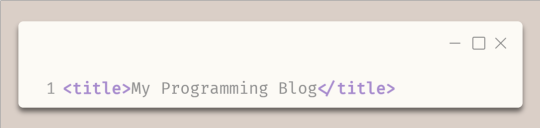
The title tags enclose the title of the webpage. In this example, the title is "My Programming Blog".
The title appears in the title bar of the web browser and is often used by search engines and social media sites to display the name of the webpage.
In the body tags - Headings and paragraphs
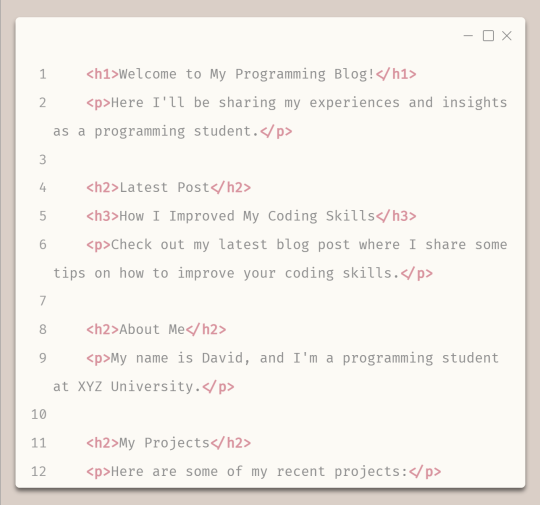
The h1 tags create a main and biggest heading, which in this case is "Welcome to My Programming Blog!" - you can only have one h1 tag on a webpage.
The h2 tags create subheadings, which in this case include "Latest Post", "About Me", and "My Projects" - you can have multiple h2 to h6 tags on a page.
The h3 tags create a sub-subheading under h2 tags, which in this case is "How I Improved My Coding Skills".
The p tags create paragraphs of text that provide more detail about the blog's content and purpose, including a summary of the latest blog post and information about the author and their projects.
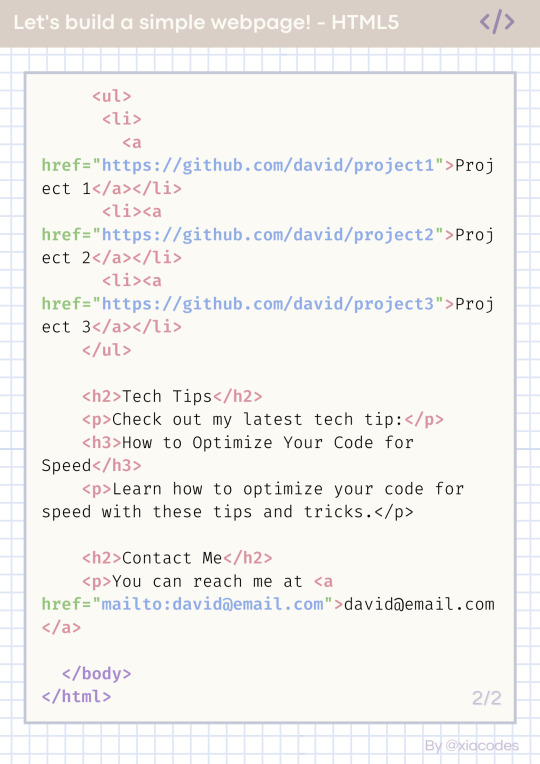
In the body tags - lists and links
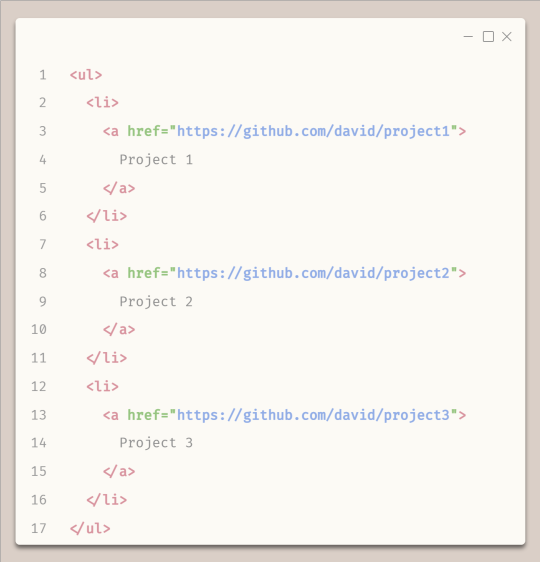
To start any list, you need to either start with ul tags or ol (ordered (numbered)) tags
The ul tags create an unordered list of items.
The li tags create list items within the unordered list.
Each list item includes a hyperlink created using the 'a' tags, with the text of the link being the name of a programming project.
The href attribute within each 'a' tag specifies the URL where the project code can be found on GitHub.
Attributes go inside the opening tags' arrows '<' and '>'.
The End Result
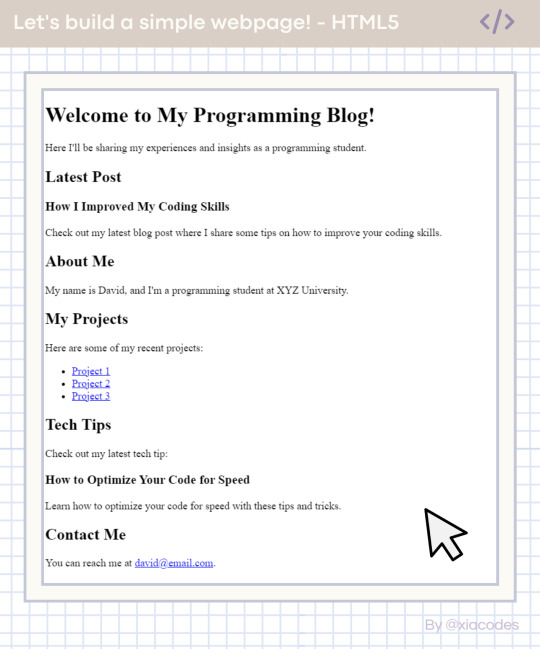
Boom - she's gorgeous, I know! A basic, simple webpage! We did it! You can see the page live + the code used here: [LINK]. Play around with the code, change things, experiment, break things, fix them - do what you need to learn further!
And that includes some online resources to help!
LINK 1 | LINK 2 | LINK 3
And some resources/posts I have shared about HTML
LINK 1 | LINK 2 | LINK 3
What next?
Learn CSS3! The page looks basic and looks like what pages were like when the internet was invented! You need colour, fancy fonts and layouts! CSS helps with that, as it is a styling sheet! Be sure to do some research but I also share resources on my blog under my #resources tag!
Thank you for reading and best of luck learning coding/programming! Remember, this isn't the only way to get into coding! People even recommend languages like Python to be beginners' first language, but I say that HTML5 should be the first coding language and then Python is your first programming language - don't know the difference? I made a post about it here!!
But definitely for people going into Web Development, HTML5 all the way! I don't think you can avoid learning HTML5 with Web Development (not 100% sure though...)!
Anyhoo, have a nice day/night! 👋��💻💕
#xc: programming blog post#my resources#codeblr#progblr#studyblr#resources#coding#programming#computer science#comp sci#technology#tech#software developer#programmer#coding resources#studyblr community#code newbie#learn to code
331 notes
·
View notes
Text
Github Profile pages
so, today I found out you can create special repo's on Github and the readme basically acts as a profile page! I think they look quite neat. Follow below to find out how I did it
First, go to your Github page and create a new Repo:
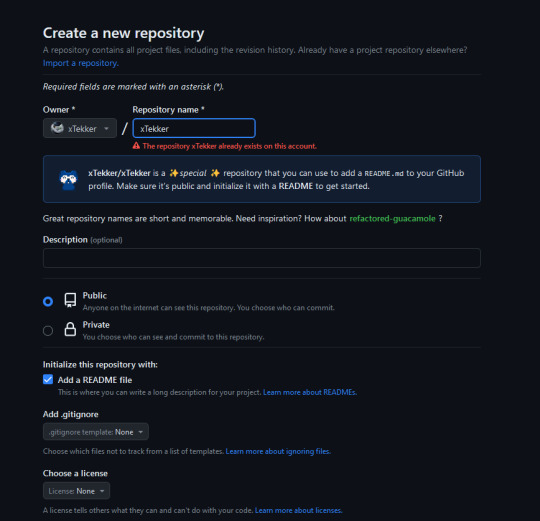
Name the new repo your account name, for example, my Github name is xTekker, so the repo is called xTekker, Choose to add a readme and make it public.
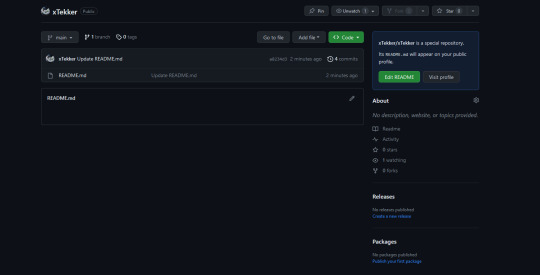
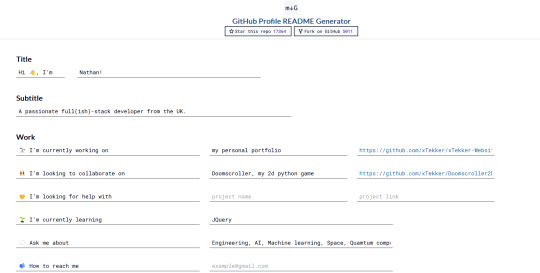
Once here, you can then edit the readme, I used a readme generator I found here https://rahuldkjain.github.io/gh-profile-readme-generator/
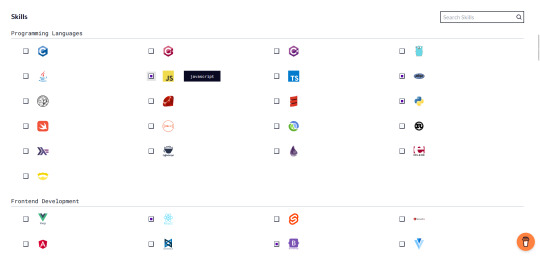
They even have language badges
Once you've input everything to your liking, scroll all the way down and press "Generate Readme", this will bring up the makedown for it like so
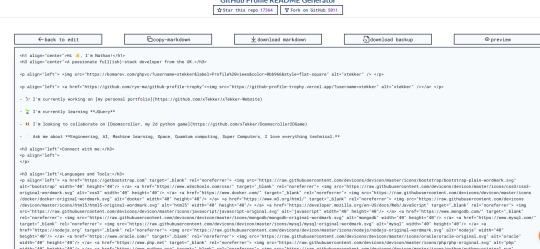
and you can just copy and paste this into the readme file on Github for that username repo we created eariler and Taa-daa!
Enjoy!
72 notes
·
View notes
Text
I noticed i've been getting AI generated art in google image results from these specific websites specifically designed to host AI art, and i found out how to block them with uBlock Origin:
www.google.##.g:has(a[href="domain.tld"])
www.google.##a[href="domain.tld"]:upward(1)
duckduckgo.com##.nrn-react-div:has(a[href*="domain.tld"])
duckduckgo.com##.tile:has-text(domain.tld)
These filters when added to your "My Filters" page block entire websites from page and image searches on google and duckduckgo, pick which one you use. Replace domain.tld with the website you want to block
So I turned this into an AI Image (website) google* Search Blocker
*(other search engines will be added upon request)
At the bottom of your "Filter Lists" page, add the URL https://raw.githubusercontent.com/ranidspace/ranidsublockfilters/main/SearchAi-ImageRemover.txt then hit Apply Changes.


This updates automatically, but if you want you can just copy and paste the insides into your My Filters page.
Here's a before and after with vriska
There's only 6 sites in this list, so please if you have more websites for me to add, reply to this post, or to this github discussion page
82 notes
·
View notes
Text
stim gifs in photopea
[PT: Stim gifs in photopea /End PT]
Hello! This is my (lengthy) tutorial for how I make GIFs for stimblr using Photopea. It's not going to be as extensive as how I make for shows, celebrities, etc, because I have different processes for both, however I'm still aiming to cover everything I think necessary!
It'll be split into multiple sections with headers, so feel free to skip whatever you want if you don't find it necessary :•] Reblogs appreciated if you found it useful, but no pressure obviously!
Sections:
Getting your video
Importing into Photopea
Making the GIF
Sharpening the GIF
Coloring
Exporting & Optimization (in EZGIF)
End results, and misc tips and comments
1. Getting your video
[PT: 1. Getting your video /End PT]
Short section! These are the ways I download and source videos for use
Youtube - yt-dlp (installation instructions)
Instagram
Tiktok (Allows without watermark)
Pexels
For yt-dlp, check out this basic list of commands I made solely for downloading material to GIF! If you have further questions, either send me an ask or refer to the github page.
2. Importing into Photopea
[PT: 2. Importing into Photopea /End PT]
There are two ways to import into Photopea, the first is importing footage directly, and the second is screencapping (which I won't cover in detail, but this tutorial is for installing the program I use on mac & how to use it, and this is for installing on windows)
Option 1: Importing footage directly (see end for comments)
On the home page of Photopea, you'll want to click "Open from computer", and select your clip, upon selecting you'll be presented with a popup like below

All that really matters here is where you see "30 FPS", that's the videos native frame rate. I always put whatever that number is as my frame rate because I find it to be the best, but you can use different presets (Like ezgif, which gives you 12, 20, etc). The less frames you have, the chopper it will be. If you plan to slow it down later, I'd also recommend having more frames so it looks smoother after slowing.
Now you just have to wait for it to load all the frames, then you're set!
Option 2: Importing screencaps
This is my personal way of doing things, so this is assuming you've installed a screencapping program and already have your frames ready.
For this, when you click "open from computer", select the first frame and open it by itself. Once that's loaded, look in the top left at the "File" tab, select "Open & Place", then ctrl + shift to select the rest of your frames. Once they've all loaded in, you can either rasterize them now, or wait until after cropping and resizing (goes faster then).
What's important though, is ctrl + shift to select all your layers, in the top left open the "Layer" tab, hover over "Animation" at the bottom to expand it, and select "Make frames". With your frames still selected, hit the folder button in the bottom left.

Without this, Photopea won't recognize this as an animation, therefore you'll be unable to export it as a GIF.
3. Making the GIF
[PT: 3. Making the GIF /End PT]
3A. Cropping
To begin with cropping, select the crop tool, which is the fifth one down on the left bar (if you hover over, it will say the name), or the "C" key on the keyboard.
Along the top now, you should have some new options. The dropdown menu that says "Free" is going to be how you select an aspect ratio or fixed size, and I always set to 1:1 since most people on stimblr use square GIFs, but you can do whatever works for you! Make sure to leave "Delete uncropped pixels" unchecked, because that lets you move stuff around later without having to recrop.
Crop your animation down as you see fit, then either hit the enter key, or the check button along the top bar. If you're unhappy with the placement, you can undo it OR, select all your layers, then use the move tool (First icon on the left, or the "V" key) and drag it around as you see fit.
3B. Resizing
With all your layers selected still, open the "Image" tab in the top left, towards the bottom select "Image Size", then select what you want to resize to.
Tumblr's exact GIF sizing
1 per row: 540px
2 per row: 268px
3 per row: 177px
HOWEVER. For stim GIFs, I find the quality difference so negligible, you can resize to what you want. It's also better for it to be bigger and scale down, then smaller and scale up. For this reason, I typically do 268px no matter what, or 300px.
As far as resampling goes, leave it turned on, and I personally leave it on bilinear, but the different options vary slightly, so experiment and see what works for you!
If you're happy at this step, go ahead and skip down to exporting! But when doing this way, I do recommend sharpening for better quality at smaller size.
4. Sharpening the GIF
[PT: 4. Sharpening the GIF /End PT]
The fun thing about this section is you get to experiment and find what works for you! I'll give you my personal method, but you can play around, add and remove bits, etc until you get something you're happy with!
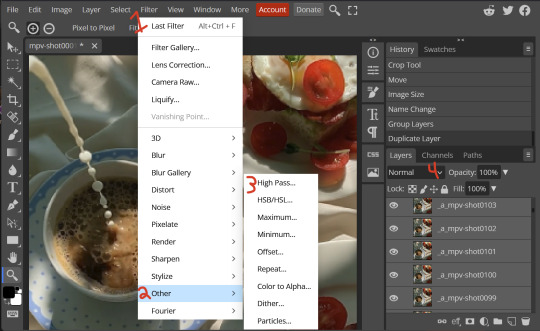
4A. High pass
High pass is my personal favorite way to sharpen GIFs, and for stim GIFs I'll often use only this.
(Steps 1-3 in image) To do, start by right clicking the *Folder* all your frames are in, and select "Duplicate Layer". Select all the frames in Only the folder on top, then go to the "Filter" tab along the top left, hover over "Other", and select "High Pass". The grey look is entirely normal! I normally set my high pass at 2-4, but play around with this step and find something you like!
Select the *Folder* all your high pass frames are in, and change the blending mode (fourth step in image) to "Soft Light", it should be on "Pass Through" initially. With that done, you've used high pass on your GIFs! If you're content here, skip the next section about smart sharpening, and see about merging animation folders under it.
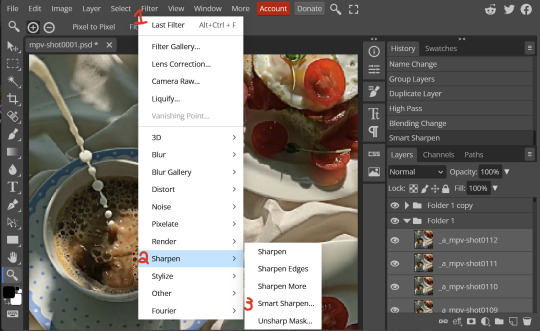
4B. Smart Sharpen
Note: I recommend testing your sharpening settings on one layer BEFORE applying them to all layers, as it will be easier on your computer.
I utilize this in addition to high pass usually, but you can do it all by itself as well! To begin, select all the frames in your folder (if you used high pass, select the frames in the *Bottom* folder). Open the "Filter" tab on the top left, hover over "Sharpen", and select "Smart Sharpen". Now find what you like!
For stim GIFs, if I used high pass, I'll go for 75-110% amount, and a .1 radius. I personally don't like the look of an over sharpened GIF, so I only use smart sharpen if I want to enhance some small details high pass didn't touch enough, which is why I use so little. If you don't like high pass, you might use more here!
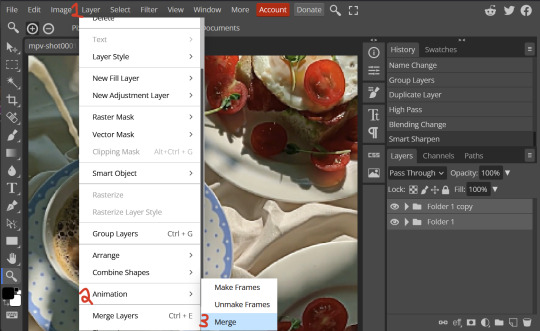
4C. Combining animation folders
If you used high pass, you'll notice you have two animation folders. To fix this, select both folders using ctrl + shift, open the "Layer" tab, hover over "Animation", and select "Merge". It will give you a popup to confirm, and you can go ahead and accept!
If you don't merge these, Photopea will think they're two GIFs in one document, rather than only one, which is why this step is so important.
As a note, once you merge these folders, you can no longer shift the frames around to change where they are in the crop like you could earlier.
5. Coloring (Image Heavy)
[PT: 5. Coloring (Image Heavy) /End PT]
This section is going to be less of a tutorial and more a basic rundown of the adjustment layers and what they do. Coloring will change from GIF to GIF, and you can do light or intense coloring, so this is just a guide to begin with, but really just play around and find what you like!
To access the adjustment layer menu, in the bottom right where "New Folder" was, the one directly next to it that looks like a circle made of two half-circles, will bring up your adjustment layers.
As a note, I always group my adjustment layers in a folder above my animation, for ease of hiding to compare with and without.
5A. Levels
Levels is one I almost *Always* use on a GIF because it makes it look cleaner to me. In the first box, sliding the black square on the left *increases* the blacks, sliding the white square on the right *increases* the whites, and the one in the center changes the general brightness up or down.
Sliding the black box on the bottom bar *decreases* the blacks, sliding the white box *decreases* the whites.
If you change the channel from RGB to another option, you can change the balance of reds/cyans, greens/magentas, or blue/yellows, I personally don't touch this for stim GIFs. In the RGB channel, I set the top black box at ~10, and the top white box at ~245 usually.

5B. Curves
This is another way of adjusting brightness, blacks and whites, or color balance. By adjusting the dot in the bottom corner you adjust blacks, the top corner adjusts whites, and if you make a dot in the center, it adjusts general brightness! You can also make multiple dots to separately adjust some values. By changing the channels, you adjust color channels rather than white/black.

5C. Exposure
This is another way of adjusting the lights and darks of the GIF. Sliding the exposure up and down will add/take away light from the lighter parts of your images. Adjusting the gamma correction up and down will add/take away shadow from the darker parts of your image. Offset increases/decreases the brightness of the whole thing but I almost never use it.

5D. Vibrance
Vibrance is what I like to think of as a "softer" way to increase intensity of colors, instead of using a Hue/Saturation layer. It affects warmer colours more intensely than cooler colours, whether you use the vibrance or saturation slider. The saturation slider here is more intense than the vibrance one, but less intense than saturation in a Hue/Saturation layer.

5E. Hue/Saturation
This one is simple! Sliding the hue slider changes the colour, sliding the saturation slider increases/decreases saturation, and sliding the lightness is basically like directly adding black/white to a color. I use lightness only sparingly.
What's cool here, is you can adjust the range to target a specific batch of colours! If you find your reds are too bright compared to everything else, you can target the saturation of them specifically.

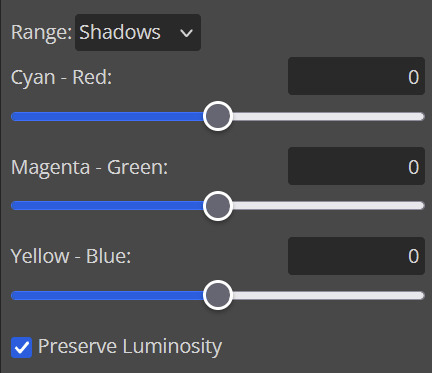
5F. Color balance
This is a simple way to adjust the base colors of an image, by changing it to be more cyan or red, magenta or green, or yellow and blue. This can be useful for making a GIF appear warmer or cooler!
I almost only touch the shadows & midtones, and highlights sparingly. "Preserve Luminosity" preserves the highlights and shadows of the image, so by unchecking it, you can achieve some more intense results.
5G. Black & White
The black and white layer is useful because you can change exactly how light or dark a color appears after making it black and white. For that reason, I prefer it over a gradient map if I need to make something black and white.
5H. Photo filter
Photo filter is a simple way to add a color filter over the entire image, and adjust how strong or weak it is. "Preserve luminosity" once again just keeps the darks and whites of the original GIF.

5I. Channel mixer
I couldn’t even begin to cover channel mixer here, but this is for very intense color edits (I typically use it when I'm trying to make a GIF fit a board). However, here's another tutorial solely about channel mixer if you're interested in taking a crack at it!
5J. Selective color
Finally, selective color allows you to adjust the amounts of color or lightness/darkness of a specific batch of color.
By changing the color channel, you can affect different batches of color. The cyan slider controls cyan/red, the magenta slider controls magenta/green, the yellow slider controls yellow/blue, and the black slider controls black/white.
Checking the "absolute" is essentially like "Preserve Luminosity" in the other layers. With absolute, it's like shifting the color one way or the other, and without absolute, it's like adding to the pre-existing color.

6. Exporting and Optimization
[PT: Exporting and Optimization /End PT]
6A. Exporting
With all that done, we're ready to finish it up! To finish your GIF, open the "File" tab in the top left, go to "Export As", and select GIF!
Here you can rename, adjust the size (WILL ruin the sharpening you did), the quality (I leave at 100%), and the speed.
Another important thing to note is the "Dither". If you leave dither off, you can potentially encounter color banding, which is where (typically gradients) with look like strips of color, rather than smooth. This is because GIFs only have 256 colors they can render, so if something has too many, it bands.
By checking dither, it can get rid of color banding, at the cost of dots on the image (around where the worst color banding is usually). Sometimes the dots aren't noticeable and this is the better option, however it will Also increase your file size. It's up to you if you want to use it!

6B. Optimization
This is technically an optional step, as tumblr's GIF size limit is 10mb, so as long as you're under that, you can post, however, smaller GIFs load faster and I personally find are better for use in stimboards where you're loading a lot of GIFs! So to help this, let's head on over to the optimize section of ezgif. My personal goal is UNDER 4.5MB, ideally under 4MB.
The two main things I recommend are Lossy GIF, or removing frames, and I always start with Lossy GIF. I do anywhere from 5-15, and usually this will bring down GIFs a lot if you made them in Photopea! My example GIF was 6.7 MB to begin with, and afterwards it was 4.2MB.
However if you find that to be not enough, you can remove frames. When you remove frames, it speeds the GIF up, so I also recommend slowing it down (this is why I set my frames high in the beginning as well). I typically do "Remove every 4th frame" and slow it down to 75%-85%.
7. End results, and misc tips and comments
[PT: 7. End results, and misc tips and comments /End PT]


(source) The first GIF is without sharpening/colouring, the second is with sharpening but no colouring, and the third is with sharpening and colouring. I didn't color it much besides making it slightly warmer, but I hardly ever do much anyways!
As for misc comments:
In firefox, when you import footage directly, sometimes it glitches and tries to load 4000 blank frames, which is extremely resource intensive on a computer. The solution is import the footage in chrome, save as PSD, then open the PSD in firefox. (Or work in chrome but why do that /half silly). The other solution is screencap which I do since I do this often, but both work fine.
In firefox, sometimes you're unable to slow the GIF down upon export and it will export faster than it actually is. Slowing the video down to 50% restores it to native speed I've found, and you can do this in ezgif before other optimization.
When colouring, my number one tip is slide something all the way up first, then adjust down! By seeing it at max, you have a better idea of what's getting adjusted.
If you have any questions, drop me an ask :•]
And that concludes our tutorial! My apologies for the length, but I wanted to cover every possible thing here. It definitely seems like a lot, much more than working in ezgif, but when you get used to what you're doing, it goes extremely fast (even if you spend extra time screencapping). I personally find it worth it for the ability to sharpen GIFs alone, but as well as more detailed coloring opportunities.
Thank you for reading, I hope this has been useful!
#i did it :•]#not stim#stimblr#gif tutorial#photopea#big thanks to talos for proofreading this :3 🖤💚🖤💚🖤💚🖤
51 notes
·
View notes
Photo
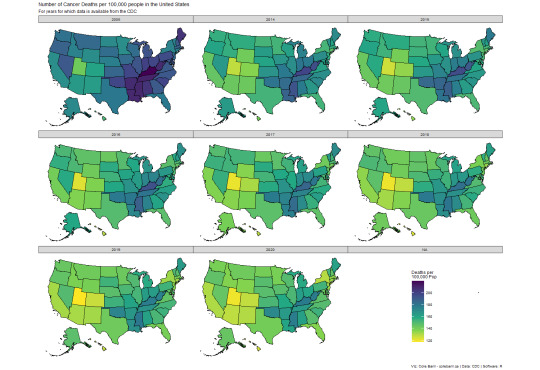
Cancer Mortality in the US from 2005 to 2020 for years data is available. This plot is an improvement on another user's post.
by u/ColeWRS
Edit: based on feedback I created a scale more closely resembling the one from the CDC website here: https://github.com/colebaril/US_Cancer_Rates/blob/main/Rplot01.png?raw=TRUE
This is an improvement on a post by the user u/wildtyping.
I put all years into one plot and standardized the legend. You can clearly see that cancer death rates seem to be declining since 2005. I also used a colour-blind friendly colour palette.
The data and script to produce this plot can be found on my GitHub page here: https://github.com/colebaril/US_Cancer_Rates
The data can be found here: https://www.cdc.gov/nchs/pressroom/sosmap/cancer_mortality/cancer.htm
100 notes
·
View notes
Text

Changing DESKTOP Tumblr Themes For Beginners (With Images)
Okay so, we've got an influx of new people on here. I thought I'd put together a tutorial on how to change your theme to make your blog look prettier and customize it however you want. You don't have to use the default theme, this isn't twitter.
Thankfully, tumblr is still full of very talented theme makers who regularly release new themes for you to use.
And remember - do not remove their credit!
They've spent hours, days and weeks coding those themes.
Also, it's common courtesy to like and reblog their theme posts. Promote their work to encourage them, you can even donate money on their ko-fi, Patreon or buy some of their themes. Support your local theme makers.
Let's start:
You need to find a theme that you like. Don't know where to start looking for themes? Well, you're in luck - there are blogs dedicated to promoting theme makers, the most popular are:
theme-hunter [LINK]
code-hunters [LINK]
codingcabin is also a good source for themes [LINK]
They have navigation pages where you can search your desired themes - one column, 6+ links, 540px posts, different fonts, headers and so much more- It's up to you which ones you like.
Honestly, I'm not going to hold your hand and show you every single theme makers' blog, because it's nigh impossible and you need to find a theme that specifically caters to you, so you need to keep digging on your own.
The rest is under the read more.
Found your theme? Okay. Now what do you do? Easy, find the theme post and look for the code. You can even look at the preview of the theme, so you know what it would look like on your blog.
Here is an example post [made by seyche]:
Note: Most theme makers host their codes on Pastebin and Github, but some may host them on Payhip or Patreon.
Now click either of the links, both will take you to the code, which looks like this:

Don't get scared if you've never worked with HTML, all you have to do is to copy the code. That's it. You don't have to do any coding yourself.
Now we paste the code. There are multiple ways on how to edit your theme on tumblr. I'll show you.
One way is going directly on your blog and clicking this palette icon in the upper right corner:
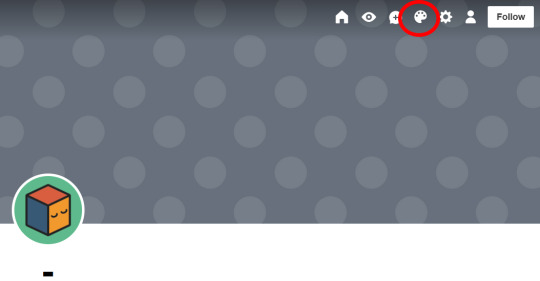
Or go to Settings > Blogs (lower right sidebar)
Make sure to enable custom themes and then click on Edit Theme.

You'll get directed to this page and a preview of your blog:

Now click Edit HTML in the upper left sidebar:
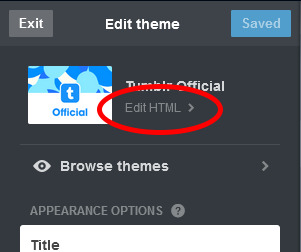
The sidebar changes to this:
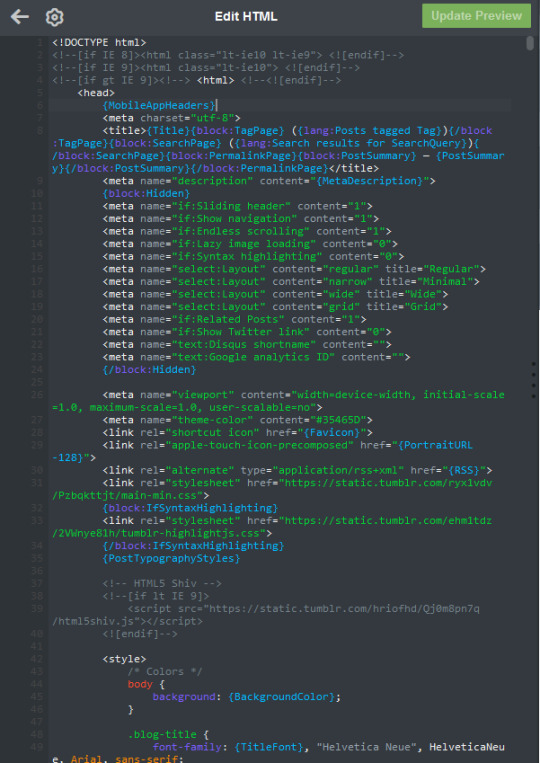
Now replace this code with the code you've copied. If you want to select all, then press Ctrl+A and paste/replace the code with Ctrl+V.
After you've pasted the copied code, click on Update Preview
After that, click on the arrow on the left to go back to the customization menu.
Now you can customize your theme to your heart's content.
(Note that these images are cropped, you can see your blog's preview.)
Every time you change something, the Update Preview button will show up and you have to click on it to see the changes.
When you're happy with your theme, then click Save. And you're done.

#themes#theme#tutorial#ref#this is for all the newbies#this has been sitting in my drafts for a while now
265 notes
·
View notes
Note
How can we get back old dashboard? Is there an option? :(
Yes, there are actually two options that I know of!
Just an fyi, I'll be linking things in Chrome (because that's the browser I use) but these can also be found in Firefox and probably other browsers as well. Just search for them.
Option #1: Tampermonkey + Dashboard Unfucker
Install Tampermonkey (an extension that allows you to make script changes to websites) and then go to the Github page for Dashboard Unfucker. Follow the directions outlined (it literally just seems to be "click this" though lol).
Option #2: Install Stylus
This is the option I went with because I didn't see the (seemingly more popular) Dashboard Unfucker option first, but it works very well! Install Stylus, an extension that lets you use custom themes and scripts for websites. Then install this custom theme of the old Tumblr dashboard. Here's a link to blog of the creator of the theme and their notes on the release btw! They're constantly updating it and making it better. I personally haven't really encountered any notable issues.
31 notes
·
View notes
Note
This has been confusing me for a long while: what exactly is the dev and official version?
For example I started playing clan gen by clicking on well...'clangen' in the extracted file after you download it.
So I guess my question is, if you use it without thonny is that the dev version? or is it installing it via a link that's called 'development version' that makes it dev.
(Sorry this question is so confusing, I really don't know how to phrase it.)
The "official" or "stable" version is the one you can get from our itch.io page. As it's name suggests, it's the most stable version of the game. It's been thoroughly bug-tested and is updated in big chunks whenever we feel that an update meets our standards of stability.
The "dev" version is the one you can get from the developmental branch of our github page. This version is very unstable and will frequently break. Saves made on the dev version are generally not backwards compatible to the stable version and we don't prioritize dev save conversion, so your saves may break or lose information. This is where we work on coding new features to the game, so many people like to play it in order to have access to those features. But, and I cannot stress this enough, we do not recommend anyone plays dev if they aren't one of our official beta testers and we do not offer dev tech support to anyone except our official beta testers. If you play dev, you play at your own risk and you will not receive any help beyond what's found in our discord faq.
Keep in mind that github hosts all our source code versions, which includes source code for the stable versions of the game. The itch.io version is a packaged version, while github has source code versions. Source code just means that you're able to open up the game's code and read or modify it as you wish. Source code is also something you have to run via command line or an IDE if you want to play the game. Thonny is an IDE.
I hope that cleared up some of your confusion? But feel free to send another ask if it didn't.
49 notes
·
View notes
Text
Update/Pinned Post
Welcome to my art archive. I've posted a lot about my OCs, TWEWY, Persona 5, Xenoblade X and in other fandoms.
Unfortunately due to recent-ish changes on Tumblr I no longer feel comfortable posting here much or at all. I'll keep my blog up for the foreseeable future or maybe even forever because of how Tumblr stores data. I'd rather have the link back to the source.
Or if the other sites explode in the meantime.
This has nothing to do with the date sadly. I'm just at my limit.
Here's where you can find me:
Pillowfort: gramophoneturtle. The most artist respected place and a decent long form blogging place.
Neocities: I'm currently developing an art archive on neocities over here. This will be THE archive place, one day! With RSS, one day!
Bluesky: gramophoneturtle. Twitter replacement. I don't trust it but it's meshing with me more than mastodon. Stream announcements are here b/c I ran out of energy for crossposting.
cohost: gramophoneturtle. I don't trust it'll stay but it has both a draft system & can save alt text on draft edits. Wild stuff to praise but when porting art out of Tumblr, it's helpful to have new drafts.
Twitch & YouTube: I stream weekly on Twitch and store VODs on both. Twitch has all my VODs and YouTube has VODs from Fall 2023 and onwards.
More details, pros and cons about each site below for those who are curious. Thanks for sticking around and reading.
Pillowfort
It's user funded and transparent about the breakdown of funds
They're against generative AI. Their reinforcement came out around the time Tumblr's not-really-against-it stance came out. This is huge to me.
They're working on a PWA of the site so it will have a way to function like a smartphone app
Image post options aren't great but you aren't limited to 4 (unlike cohost - kinda, and Bluesky)
Alt text gets eaten if you edit a post currently which is awful. (Tumblr used to do this.) Alt text isn't an option for picture type posts but is for text posts with pictures. But hey at least you can include alt text!
Communities are nice for fandoms and stuff. You can search by tags but you don't follow tags, you join/watch communities.
They have funding for the next 6 months past any month that was fully funded. So as of April 1, 2024, funding should last until (the end?) of October if they were to not get any more donations/subscriptions from now on. Basically, they have a 6 month buffer and so far for 2024 they've been keeping it and maintaining their monthly funding goals
Neocities
Home page URL should not change but artwork URLs might
The artwork section is inspired by Tumblr's archive page/system. I don't think I want it to be exactly like it (might be a limitation of static pages re: tag filtering) but I want to try and partially make it
Artwork on there have been nightshaded and glazed. I would like to reglaze some pieces that are too glazed for my liking, now that I have a better computer for it (so it doesn't take forever). That's why not a lot of art is on there yet
I might go into detail about how I automated some of the web dev stuff to make my life easier on my my main blog. In summary: I'm using 11ty (eleventy), generating pages from data and templates, using github for version control and github actions for updating the site automatically
Bluesky:
Feeds are cool. I've found and made (through SkyFeed) a lot of Feeds. Feeds can look for text in posts and alt text, and/or specific tags. Can filter out reblogs or replies. Can work off of user lists. Can include/exclude specific posts - like Twitter Moments. There's a lot of flexibility and filtering.
Feeds can lookback anywhere from 25 hours to 1 week when not looking at one user. So when pulling from many users, you could just get the latest updates. For one user (say your own gallery of whatever) you're allowed to go back to the beginning, it can be your art gallery. And then people can just follow that feed so you don't have to worry about your art getting buried if people just want to follow your art
There's a setting you can turn on to warn and prevent you from posting until you add alt text. I love this. Especially since, like Twitter, you can't go back and edit a post
Forcing ALT text has the added bonus of leaving it last so I can double check tags and text in case I accidentally hit the post button before I'm ready
Twitch
There is art. And VTuber stuff. And life updates. Art/project updates. Lots of OC talk. Like I wish I could post more about Null considering how much stuff I've spoken about them on stream but freaking time! And energy.
YouTube
Used to do more Timelapses but stopped because laptop was not having fun with it. Now that I have a new computer it might be better!
Also has Twitch VODs because I want another place to back up VODs since local recordings take up a lot of space. And I can mark Chapters(/Moments?) timestamps to find stuff again.
Special thank you to those that made it all the way down here!
So what is the blog for now? Archiving, mainly, as I said at the beginning. I might link to my neocities page in maybe art updates or to pillowfort. And I might need a place to fall back to if the other sites don't last. I know bluesky and cohost are not much better/probably not better in other ways so I know that posting on them probably won't be good long term.
But that's why I'm working on the art archive site on the side. I'll always have a safe and controlled place where I can have all my art and details and stuff. It's gonna take a while and it's challenging but it's what I feel like I gotta do now.
I'm just so tired.
#update#tumblr#pillowfort#neocities#bluesky#cohost#twitch#youtube#text#social media#blog update#the like...guilt...or betrayal of sharing my creations on a site that has caused enough harm that i just Mentally Can't anymore#it's a struggle#again: i don't think bluesky and cohost are better#...i have a feeling april 1st is a poor day to post an update like this but i just need to post this while i'm ready to
8 notes
·
View notes
Last Seen Blogs
filmstillz
Stillz from Films
ask-richard-perkins
Agent Perkins
alex-andretta
dissolve me

mr7browni-blog
M.E.K.

idolverserp
𝕓𝕝𝕦𝕖 𝕤𝕜𝕚𝕖𝕤