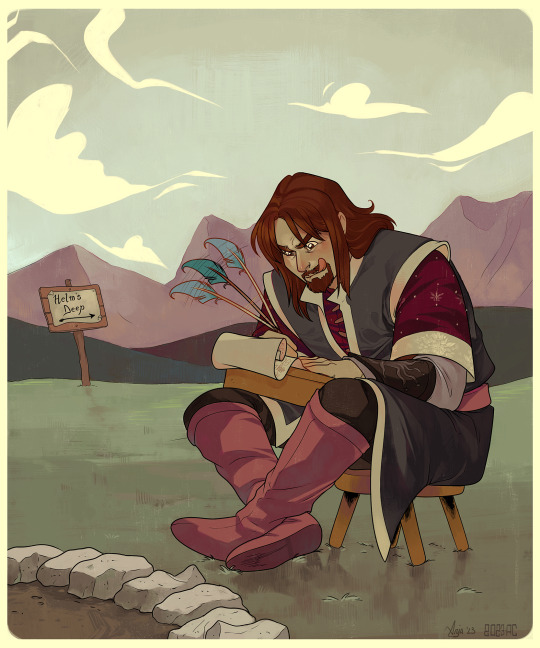
#Advanced Photoshop techniques
Text
Photoshop Unleashed: Tips, Tricks, and Techniques for Creative Professionals
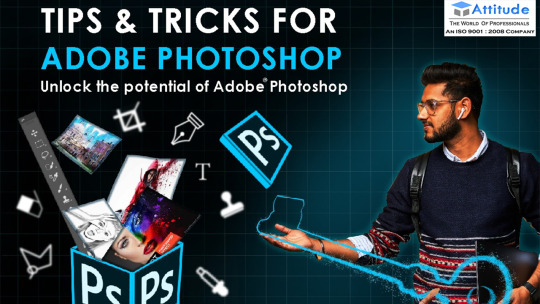
Introduction:
Welcome to the realm of limitless creativity, where the digital canvas comes alive with the power of Photoshop. For creative professionals navigating the intricate landscape of design tools, this blog serves as a comprehensive guide to unleash the full potential of Adobe Photoshop. Dive into a world where innovation meets expertise, and discover advanced Photoshop techniques that will elevate your design game to new heights.
Design Tools for Creative Mastery:
Design tools are the brushes of a digital artist, and Photoshop stands as the ultimate palette for creative professionals. From the fundamental selection tools to the intricate pen tool, mastering these basics forms the cornerstone of any designer's skill set. Begin your journey with a solid foundation, understanding the importance of layers, masks, and blending modes—key elements in the arsenal of design tools.
Unlocking the Power of Layers:
Layers are the building blocks of a Photoshop masterpiece, allowing designers to organize, manipulate, and enhance elements with precision. Whether you're creating a stunning composite image or a sleek graphic design, understanding advanced layer techniques is crucial. Dive into the world of adjustment layers, layer styles, and smart objects, and witness how these features become the backbone of your creative process.
Advanced Photoshop Techniques:
Now, let's delve into the heart of the matter—advanced Photoshop techniques that separate the amateurs from the seasoned professionals. Brush up on your skills with non-destructive editing, a game-changer for maintaining flexibility in your designs. Explore the magic of filters and effects, transforming ordinary images into extraordinary works of art. Learn to harness the power of 3D tools for a touch of depth and realism, pushing the boundaries of your creative vision.
Photoshop Tips and Tricks for Efficiency:
In the fast-paced world of design, efficiency is key. Uncover time-saving Photoshop tips and tricks that streamline your workflow without compromising quality. Keyboard shortcuts, custom presets, and actions can significantly boost your productivity, allowing you to focus on the creative process rather than getting bogged down by technicalities.
Pushing Boundaries with Creative Professionals:
In the realm of creative professionals, collaboration and inspiration go hand in hand. Join the community of design enthusiasts who push the boundaries of Photoshop's capabilities. Attend workshops, webinars, and forums to exchange ideas, learn new techniques, and stay at the forefront of design trends. Engage in the vibrant online community that shares a passion for design tools and advanced Photoshop techniques.
Conclusion:
As we conclude our journey through the expansive world of Photoshop, remember that mastering design tools and advanced Photoshop techniques is an ongoing process. Stay curious, experiment fearlessly, and let your creativity flourish. Photoshop is not just a software; it's a gateway to a universe of possibilities for creative professionals. Unleash your potential, and let your designs captivate the world.
#design tools#advanced Photoshop techniques#graphicdesigntraining#attitude academy#enrollnow#learnwithattitudeacademy#bestcourse#attitude tally academy
0 notes
Text
Mastering advanced masking techniques in Photoshop
View On WordPress
#Advanced Photoshop techniques#ahsan mahmood#aoneahsan#Brush masking#Color range masking#Image isolation#Image manipulation#Masking#Photo editing#Photography#Photoshop#Vector masking#zaions
0 notes
Text
Crime-Scene Photography Techniques & Technology
The main requirement for crime scene documentation is to provide a visible and long-lasting record of an accident or crime scene. With precise measurements of the locations and evidence, forensic photography aids in understanding the various aspects of...
(more…)

View On WordPress
#adobe photoshop uses crime scene investigation#Alternate Light Sources (ALS)#Alternate Light Sources (ALS) uses in forensic photography#Amped software for crime scene investigation#CAD program in crime scene investigation#Crime-Scene Photography Techniques & Technology#diffused light uses in forensic photography#drones in crime scene investigation#forensically for crime scene investigation#Fotoforensic for crime scene investigation#ghiro for crime scene investigation#infrared light uses in forensic photography#izitru for crime scene investigation#JPEG snoop for crime scene investigation#oblique light technique uses in forensic photography#Recent advancement in forensic photography#ultraviolet light uses in forensic photography
7 notes
·
View notes
Text
Most of my photos were from 2012 to 2016. I have learned a lot since then. My photo restoration hobby has improved my image editing skills in general. And I was curious if I tried editing one of my photos from scratch if I could improve upon my original edit from years ago.
This is my friend Nicole.

( @nicolebelongs I hope you don't mind being my guinea pig for this.)
This is just a direct output of the original RAW file. RAW files are typically flat by nature so you have more latitude when processing and editing.
This is my original finished edit from 2016.

I actually made a pretty big lighting mistake when shooting this photo. A beauty dish can cause harsh reflections on makeup and so Nicole's forehead bounced all that light directly into my camera. I was still learning back then and didn't know anything about makeup. All that was required was angling the dish a few degrees up or down, which feels like a pretty silly mistake all these years later.
And here is my 2023 edit. I did not reference the 2016 image until after I finished.

The main priority was the glare on the forehead, but I think this is much more balanced overall as well. I also tried to fix the weird neck shadow and the lack of light in the eyes. I probably should have used a reflector originally, but thankfully Photoshop has a solution to almost any photography blunder. I removed some vellus hairs on the edge of the face, as that is not something you would notice in real life, but the camera and lights can exaggerate them. I'd also like to say I love the new remove tool. Getting rid of flyaway hairs was such a monotonous pain in the ass before and that thing just zaps them with a click.
I am also trying to learn new editing techniques I was never good at. There is a retouching technique called "dodging & burning" that I had trouble with back in the day. Mostly because finding advanced tutorials can be difficult. Much of the content on YouTube focuses on beginner techniques.
Dodging & burning was originally innovated by Ansel Adams back in the days of film. He would block portions of his negatives for a second or two so those areas would develop darker. Or he would let sections expose longer so they would be brighter. It was basically analog Photoshop. You can see a neat video of his darkroom here.
While Ansel mostly did landscapes, portrait photographers of the digital age utilize dodging & burning to help bring out dimension in the face. It's quite similar to makeup contouring, actually. It is very hard to perfectly light every nook and cranny on a face and many portrait lenses are slightly telephoto. Longer lenses compress faces to remove distortion, but you end up losing three-dimensionality as a tradeoff.
My first attempt dodging and burning did not go well but I played with this photo for a few hours trying many different approaches and I think I landed on something I like. But I have been staring at it for way too long, so it is hard for me to look at it objectively.

I do wish we could all look at this on the same display. Green is notoriously difficult to keep consistent from screen to screen.
In any case, there are a dozen subtle things I did with my upgraded knowledge that may not be noticeable individually, but I'm hoping it all adds up to a better finished result.
And I guess we'll see if there is a consensus regarding the dodging & burning. Either good, bad, or just... different.
89 notes
·
View notes
Text
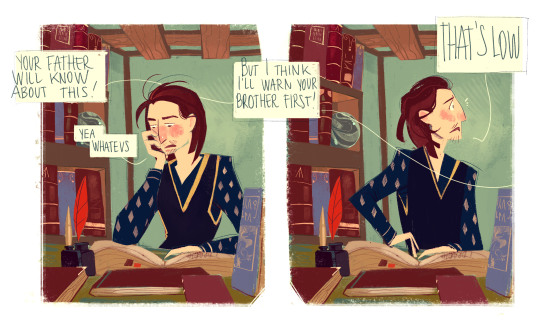
✨ Self Rec Tag Game✨
I was tagged by the creator of the tag game herself, @shivunin and I'm terribly sorry if I came back to it super late ;; it was super fun looking at what others made with it tho <3 people are so talented!!
Rules: Share five of your own fanworks (fic, art, etc.). Then, tag five more people to share the things they've made.
Something you absolutely adore
Something that was challenging to create
Something that makes you laugh (or smile, if that fits more comfortably)
Something that surprised you (in how it turned out, how much other people liked it, etc.)
Something you want other people to see
For those I'll tag: categories aren't necessary, "they're more guidelines than rules" (cit. @shivunin)
I may have broken the rules because I'm chronically undecided << hopefully it's fine sorry in advance
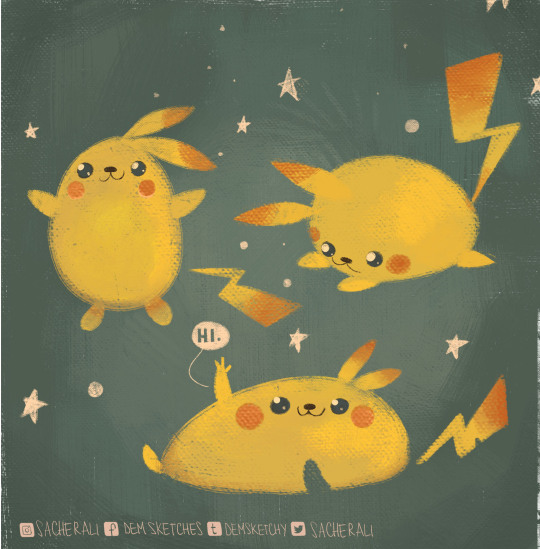
Something you absolutely adore
I just... I'm into chill and comfy vibes <<'
These three together bring me so much joy, like, I remember reading all their interactions on the wikia and smiling like an idiot because I wished that all of it was more blatant rather than "yea there's a 3% chance you'll get this interaction in game"
Something that was challenging to create
Probably the first batch from everything-else-but-Inktober 2020.
I decided to drop the idea of messing with inks and straight up exercised on things I usually fail at / wanted to improve. The whole challenge was, well, a challenge. I remember struggling from day 1 to 30 because I'm terrible at studies, I tend to filter and filter and filter and...
But I like the results!! Far from perfect, but I've learnt big deal through it ;;
If you're interested, here's the links to the instagram posts:
Weeks 1 - 2 - 3 - 4
Something that makes you laugh (or smile, if that fits more comfortably)
I can't decide! Aaaaaargh
Here, have a multitude of things that make me crack a smile :'D

...I wanted to add more but I don't wanna make another monsterpost :'D
Something that surprised you (in how it turned out, how much other people liked it, etc.)
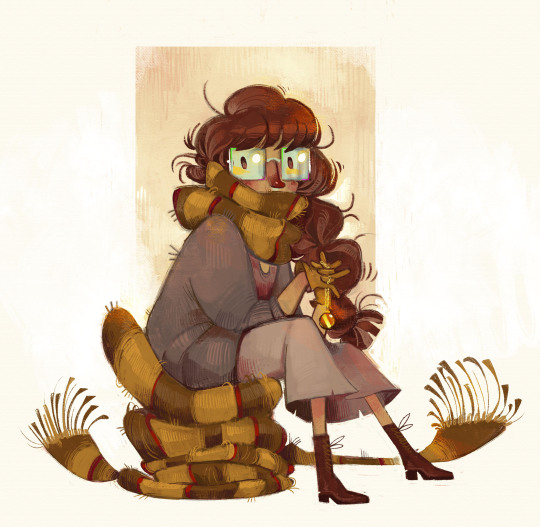
This fanart of Ophélie from Le Passe Miroir, which I'm very proud of ;;
I know it doesn't seem like a huge accomplishment or an art megazord, but I was very in my head before opening Photoshop but during the process, when I realized I was doing exactly what I pictured beforehand, I just couldn't stop being proud of myself lol which is something I don't experience a lot :'''
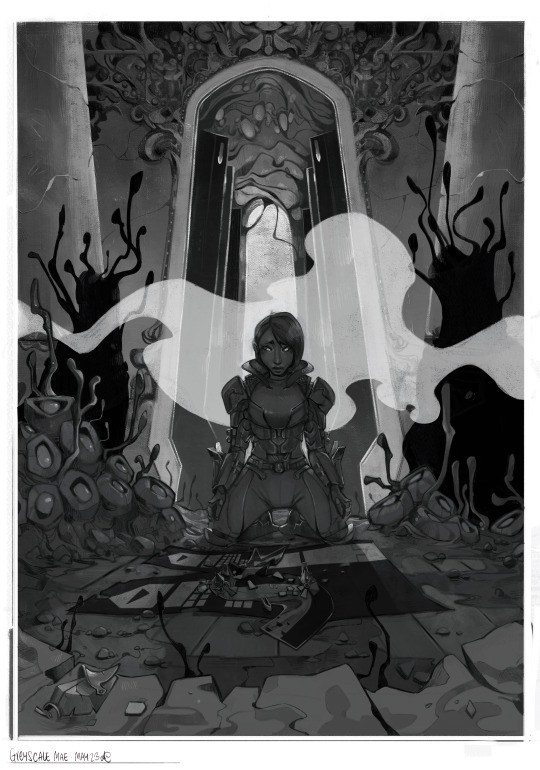
Also this comm I did for @n7viper that made me say "oh, you can handle this"
This was quite the experience ;; thanks again for letting me work on this dude <3
I started with a greyscale then added colors, which is a technique I used some times and like, I was sure it was challenging because it's super hard to balance everything out, but when things came out exactly how I wanted them to be?? Woah, alright Picasso, slay
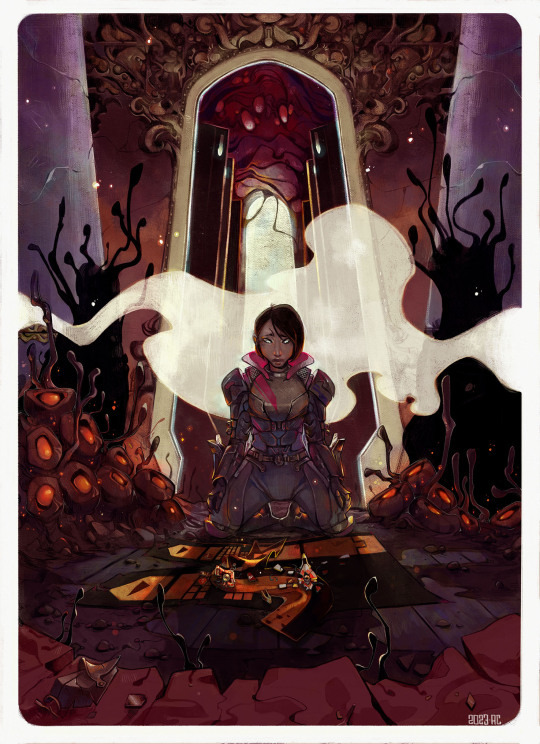
Something you want other people to see
-My dwarven ladies 🧔✨
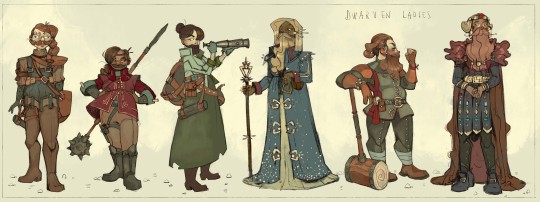
you can check it out here
-The things I'm doing for this artfight lol I think I leveled up in some cases 👌


These are previews, everything will be posted in this blog, my artblog, insta, twitter etc etc
-The collabs and trades I made with some of the most talented people I know and cherish ;;
Like this one amongst the many I did with @greypetrel who dragged me back into Lord of the Rings after years and I'll be forever thankful for that ;; but also for the experience <3

Or these ones I did with @underneathestars
Plus our joint effort for last year's N7 Day: her post - my post
That was a challenge and your girls served 💅
Also This!!! Courtesy of @demandthedoodles
This was like, one of the funniest - yet astounding - outcomes from a sketch I almost forgot I made lol I need to print this out when I can!
I would include all of them, because I traded art and collaborated with people I really appreciate but I can't possibly include other things ;; I'll mass reblog / share them in the next days!
Also, thanks again @shivunin for this tag game ;; I discovered things I've never seen from people I follow and found out awesome new things from people I didn't follow already. So super fun <3
I'm tagging (no pressure, no commitment): @n7viper @underneathestars @qwib @skeltrr @lethalhoopla @kassarts @aukanemin @ii-then @daggerbean @vaesivlasta @sparatus
#long post#tag game#self rec tag game#ndo sta l'art tag#of course I did a monsterpost siigh#listen I'm easily entertained when it comes to shitposting I had to spam :'#no I didn't have to but I did it anyway because I have no self control#I didn't include fics tho <<#I need to stop tweaking this post gdi
36 notes
·
View notes
Text
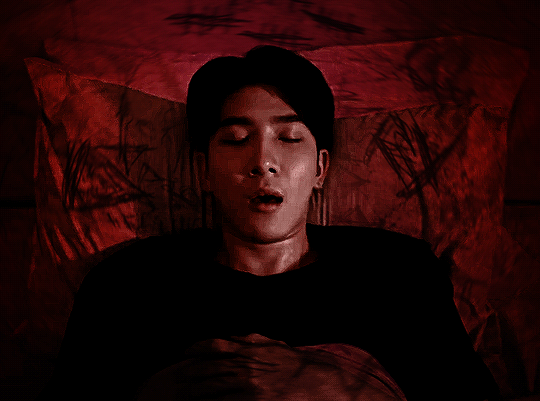
Making Horror! Gifs
so @billlkin asked for me to share my technique for making the gifs for my horror series sets. i will be honest that i just kind of play in photoshop a lot and my technique isn’t always the same because sometimes i find something that works better for some of the gifs but this is the steps i took to make this gif:

in this tutorial, i do assume that you have basic photoshop knowledge and know how to adjust layers and color a gif.
this is also my first tutorial so if i don’t explain something well enough, sorry! but feel free to send me an ask and i’ll try to explain it more thoroughly.
the first step is to pick a scene (i always look for one that you think looks like in a different scenario would fit the horror genre) and color the gif (you may have to adjust some of it later on)
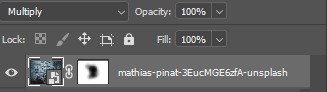
once the base is colored, i look for an image to use as a textured overlay. generally, i use unsplash and i’ll search for smoke, grunge, or horror for this set i used this image and i set the settings to multiply and erased enough so i could see ayan’s face
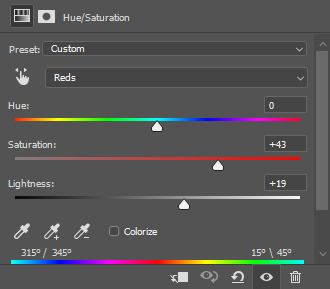
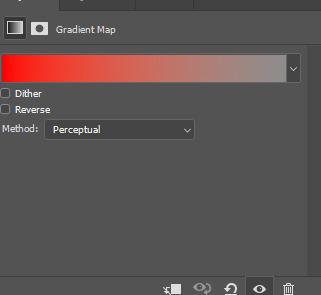
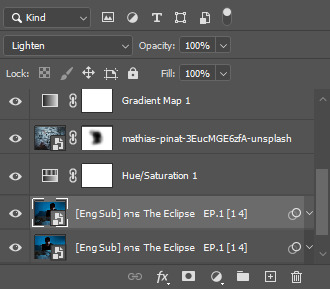
with the overlay in i move on to placing a gradient map layer (making it red and gray) which i set to hue and take the opacity down to either 70% or below, depends on how red i want it
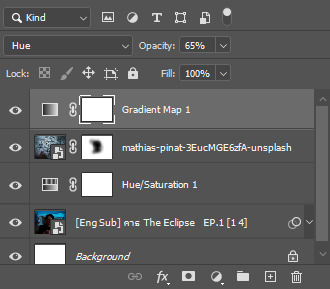
when i did this ayan’s face was pretty much just gray, so in some effort to bring back some color to his face i added in a hue/saturation layer just over gif layer
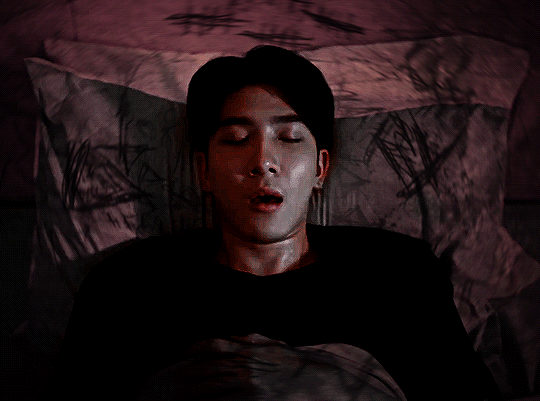
as you can see the gif isn’t all that red and more a purplish color, so i added in another gradient map, made the red lighter and set it to color and again i took the opacity down to my liking
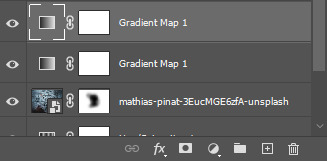
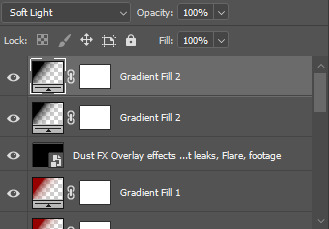
i liked the red over ayan but the sides still needed to be darker in my opinion so i placed in two gradient fill layers set at color. i angled them so they would sort of meet in the middle but not cover up ayan
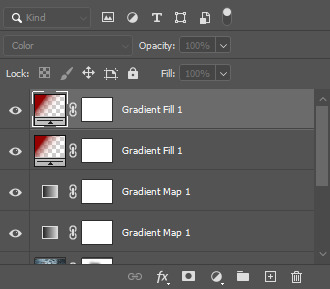

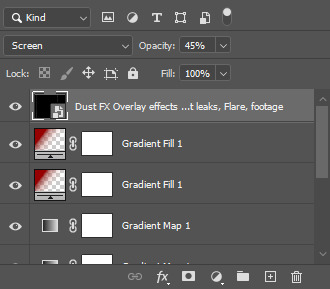
with the gif having the redness i wanted i added in my dust fx overlay. you can find most of those youtube. you just have to use 4k to convert them. the one i used is here. i set it to screen and turn down the opacity to anything below 50.
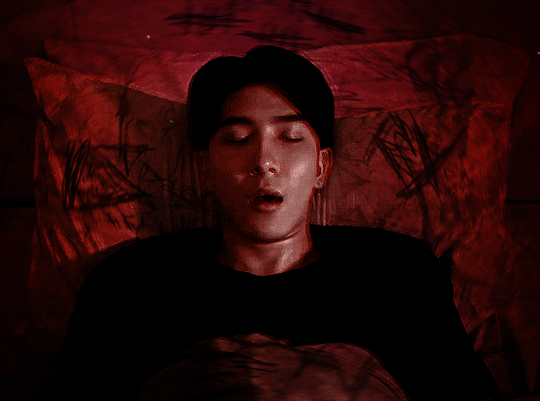
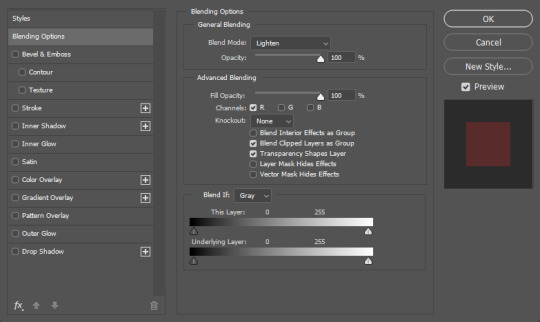
really in the home stretch now. the next step is how i sort of give the red outline. so you duplicate the gif and set it lighten. you’ll see that you have to line it back up with the original but i always do it a little off to the side so the red outline will show.
to achieve the red outline, you right-click on the duplicate gif and choose blending options up at the top. when the screen opens, you look for advanced blending in the middle and uncheck the G & B boxes and it should give you a red square in the preview.
all that is left to do now it to make ayan pop a little more, so i once again do two gradient fill layers but this time with black, i set them to soft light.
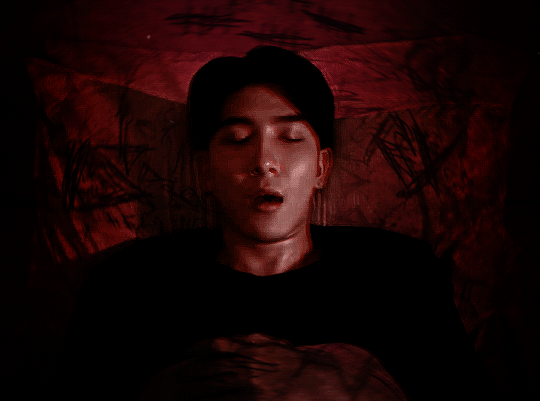
my last step for really any gif i make is to have a levels layer on top to brighten or darken the gif as i please because to me it also always makes the gif more vibrant.
and you’re done! as i said if you don’t understand a step and need me to go into more detail feel free to send an ask <3
73 notes
·
View notes
Text
Upcoming events at Sims 2 Shenanigans!
Friday, March 8th at 09:00 (GMT -6, or 10 AM EST)- The Repository Technique
Host: marcussimmonscc
Topic: Learning to use the repository technique to link multiple objects to a single mesh
Tools needed: SimPE
Approximate time: 1.5 hours
Suggested for: Intermediate. Some knowledge of object creation is helpful.
In this short tutorial, you'll learn link multiple objects to a single mesh with the Repository Technique!
Sharing recolors and other resources across multiple objects can significantly reduce the number of files needed in-game.
Saturday, March 9th at 13:00 (GMT -6)- Camera: Action!- Workshop on shooting machinima
Host: Let It Simmer
Topic: A variety of machinima shooting techniques
Tools needed: OBS Studio or other tool for recording, Premiere Pro or other tool for video editing
Approximate time: 2 hours
Suggested for: Beginners welcome. Most of the techniques discussed will be beginner-level, but there will be a few intermediate-advanced techniques toward the end of the workshop.
A showcase of filming techniques ranging from basic static shots all the way to some greenscreen magic.
Saturday, March 16th at 13:00 (GMT -6)- Forging Your Destiny (Part 1)
Host: Ocelotekatl
Topic: Converting objects from Skyrim to Sims 2
Tools needed: Nifskope/Outfit Studio, Milkshape, Photoshop with DDS plugins, SimPE
Approximate time: 1.5 hours
Suggested for: Intermediate. Some Body Shop/object meshing experience is helpful.
A start-to-finish workshop about converting objects, outfits, and accessories. Part 1 includes building the meshes and finding the textures.
Saturday, March 23rd at 13:00 (GMT -6)- Forging Your Destiny (Part 1)
Host: Ocelotekatl
Topic: Converting objects from Skyrim to Sims 2
Tools needed: Nifskope/Outfit Studio, Milkshape, Photoshop with DDS plugins, SimPE
Approximate time: 1 hour
Suggested for: Intermediate. Some Body Shop/object meshing experience is helpful.
A start-to-finish workshop about converting objects, outfits, and accessories. Part 2 includes building the the recolors, linking the mesh to the recolor, binning, categorizing, and final testing in game.
To RSVP or check your local time, check the event thingy at the top of the Discord.
If you haven’t joined yet, why aren’t you a member of the most amazing creator’s Discord ever? To join, click here: https://discord.gg/tkNzjgsSTS
5 notes
·
View notes
Text
Procedurally Creating Stylized Rocks in Blender
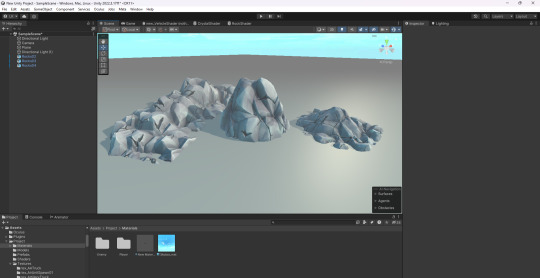
I have this method of quickly generating rocks without spending a lot of time texture painting or modeling them so I documented a bit of the process. (This isn't a step-by-step guide since it is an advanced technique and I don't have time to break it down in full detail atm. It also requires the GrabDoc Blender addon for baking textures and a photo editor that allows you to do smart tiling, which in my case I use Photoshop.)
The gist of it is using blender's shader editor to generate a texture for a rock-like surface. This basically requires using the voronoi texture (distance to edge) and noise for masking and distorting the jagged lines. I work in layers of voronoi at varying scales to get a variety of rock-like shapes in varying sizes and use different blending modes to mix them together. I also use noise to create surface depth and mask some edges for a more organic variety of shapes. I use these methods to create splitting cracks.

I render the resulting texture as a height map and use a photo editor to make the texture tileable. I use the texture tile in Blender as a base for the rock material, apply it to a plane, and use GrabDoc to render different maps (normal, height, albedo, curvature, and ao). I create a lowpoly blob mesh, add a subdivision modifier, and use the height map to displace the mesh in UV space. I apply all modifiers, go to edit mode and decimate the geometry of the mesh until it is at an appropriate resolution for a game engine.
All of this takes about an hour to set up, but once it is done it is so easy to make decent stylized rocks. These aren't the highest quality, but I always hated modeling and texturing rocks (because it is absolutely boring) and this is by far the easiest and fastest way make a whole bunch of them. Procedural generation can be EXTREMELY effective when you're in a pinch.
2 notes
·
View notes
Note
How do you do your photomanips?
Good question with a long answer! The best way to see how I make my edits is to check out my twitch channel. If you go to the videos tab, you can browse through all my past edits:
twitch_live
And if you catch me live, you can always ask me specific questions about how I make my edits!
If you're specifically looking for tutorials, I have some over at my Patreon! If you sign up at the 3rd tier, you'll be able to access 5:30 total hours of tutorials that cover everything from the very basics of photoshop to some advanced techniques! You can sign up once and access them forever, plus you get some nice physical rewards like a monthly postcard and sticker!
24 notes
·
View notes
Note
How do you get your gifs to look like that? The quality is amazing. Do you have any tutorial video suggestions, maybe?
Thanks in advance
OH WOW i genuinely still struggle with making high quality gifs, so i’m so touched that you think they look good!! i learned everything from tumblr tutorials, so sadly, i don’t have any videos to share
but! i’ve always wanted to share my process, so here it is, if you’re interested (or if anyone is, really!)
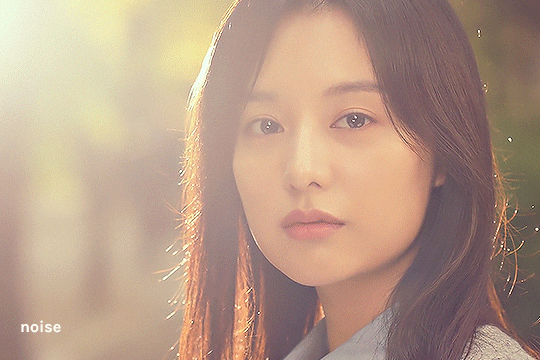
i’m constantly changing up my sharpening settings and coloring process, but here are some processes/tutorials that i (mostly) stick to nowadays, with this gif as my example:

i chose a difficult gif to color because that’s how universal this process is for me (usually)!!
base gif
load video into frames, cropping, resizing
this is all standard, so i'll just share the tutorial i follow: lizzo @ tumblr (steps 1-7)

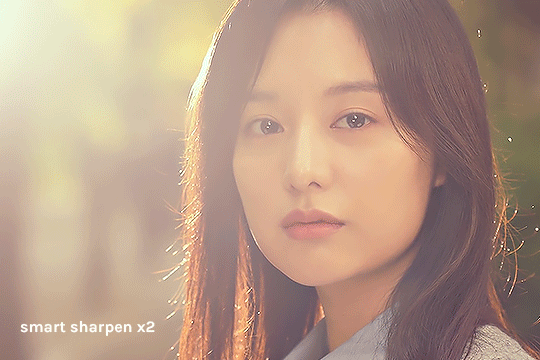
sharpen smart object
i forgot where i got this, but essentially i use the basic Sharpen command then lower the filter’s opacity (25-50%). here’s where you can adjust smart filter opacity btw:

it doesn’t look like it does much, but i usually use this to finely sharpen the gif (by changing opacity) since i try not to mess with the Smart Sharpens

smart sharpen x2
from buckysbarnes @ tumblr, here are my changes:
Smart Sharpen 1: 500%, 0.3 px, reduce noise 20
Smart Sharpen 2: 20%, 10 px, reduce noise 4
these settings look good for this show, but i sometimes change the opacity of these filters for different shows
if the gif is smaller (268px wide), i would reduce the opacity of these filters to 50%
noise
my favorite thing, i can’t live without it now!!! thank you to cuddlybitch @ tumblr for sharing this technique; i use option 2 with these settings:
intensity 10; contrast 50; grain type soft; opacity 25-50%
base coloring
yay it’s the fun part!!
brightness/contrast
honestly, i just press Auto and let photoshop do its thing! i’ll adjust from there, and i rarely ever adjust this
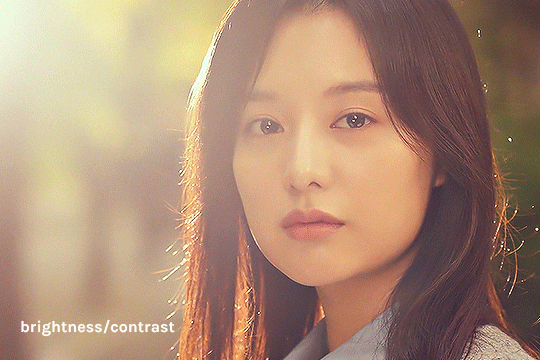
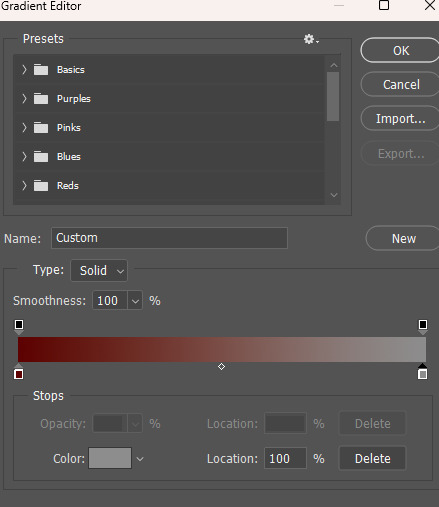
photo filter
deep blue, preserve luminosity on, then i play with the density (maximum 50%)
in this gif, it’s at 32% because it’s very yellow
i sometimes add other filters depending on the mood i’m going for (usually yellow or cyan)

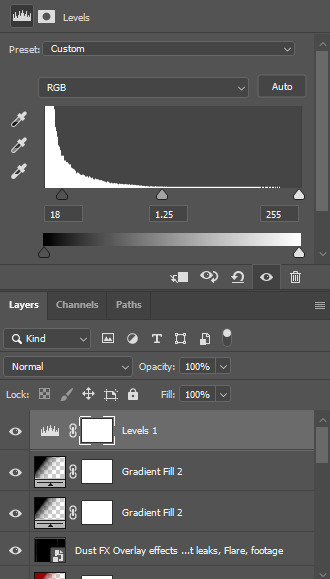
levels
this usually makes or breaks the gif! i start by pressing auto:

then i adjust:
move highlights (rightmost arrow) to start/rise of the histogram to its left
move shadows (leftmost arrow) to the start/rise of the histogram to its right
i adjust midtones (middle arrow) based on the general brightness i want for the gif

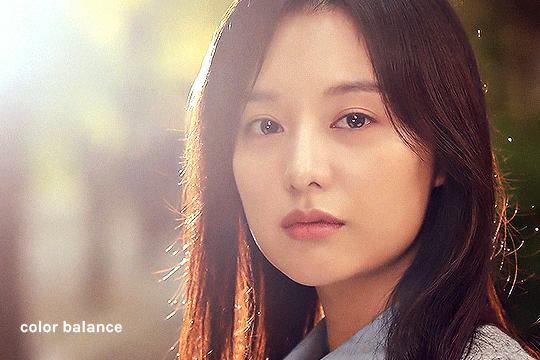
color balance
i generally like my highlights more blue, but this entirely depends on the gif! i just play around until it looks more neutral
in this gif, i added more cyan & blue to the highlights and more cyan & yellow to the midtones/shadows
vibrance x3
i follow this tutorial from s-k-y-w-a-l-k-e-r @ tumblr (just the part about vibrance/saturation)
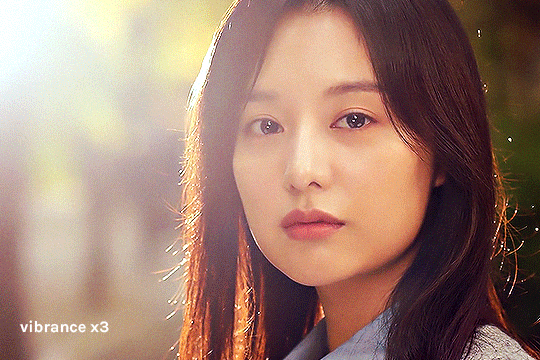
in ths case, i removed the color burn/color dodge layers because it was a little too saturated
i just kept the vibrance +50 layer

hue/saturation
in this layer, i eliminate colors that don’t really add to the gif to reduce colors and increase the quality! i check where the colors are in the gif by increasing saturation to +100, then reducing it to -100 if it seems negligible. here’s what each color looks like

obviously, reds/yellows/magentas are important, but greens/cyans/blues could be removed
i also reduced reds and yellows -10 because it was a little too saturated there

selective color
first, i adjust the black level of each color to adjust the contrast of colors (not the cyan/magenta/yellow yet)

and when i feel like it, that’s when i add subtle changes to the colors
in this case, i only touched red, magenta, and white
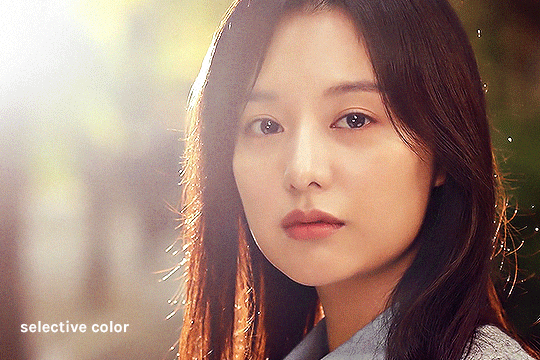
vibrance +25
i usually add a little vibrance +25 at the end for fun haha

additional coloring
this is where i do all the gradients & text layers, but i think the base coloring is always more important!

once again, we started from this
to this
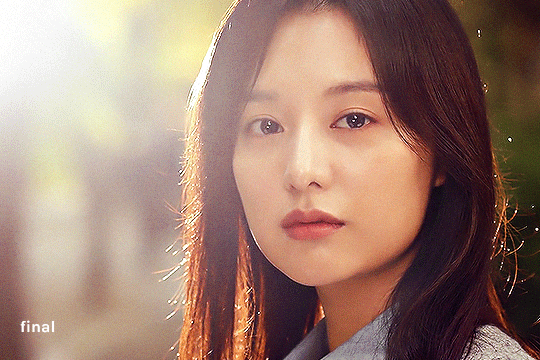
…… and that’s it!
there are probably ways to make it more efficient and use less layers, so i’m still constantly playing with these! this process also tries to preserve the original colors as much as possible, but i’m also able to wildly change colors with photo filters/color balance/selective color, if needed
hope this is helpful to you or to anyone!
#ask#hiswonderfulworks#tutorial#gif making#gif tutorial#forever grateful to everyone who's ever posted a tutorial online#so i swear i'll never gatekeep this stuff#y'all are great <3
40 notes
·
View notes
Text
Advanced Photoshop Tutorial: Mastering Camera RAW Filter for Photograph Enhancement
Introduction: Adobe Photoshop's Camera RAW filter is a powerful tool for enhancing the quality of your photographs. It allows for non-destructive adjustments to exposure, colour temperature, clarity, and more. In this tutorial, we'll explore advanced techniques to make the most out of the Camera RAW filter to transform your images into stunning works of art.
Step 1: Open Your Image in Photoshop Start by opening your image in Photoshop. Go to "File" > "Open" and select the image you want to enhance.
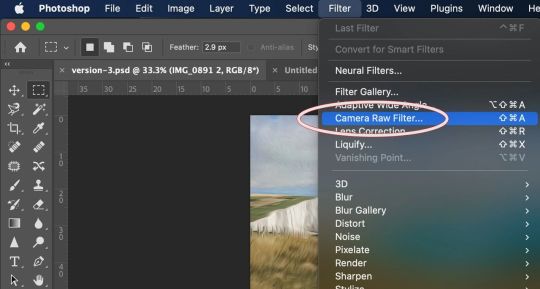
Step 2: Access Camera RAW Filter Once your image is open, go to "Filter" > "Camera Raw Filter" or use the shortcut Ctrl+Shift+A (Cmd+Shift+A on Mac) to access the Camera RAW filter.
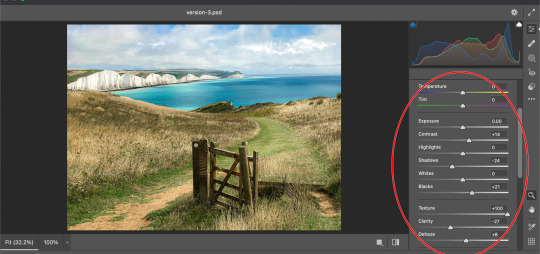
Step 3: Basic Adjustments The Camera RAW filter interface provides various panels for adjusting different aspects of your image. Start with the "Basic" panel, where you can adjust exposure, contrast, highlights, shadows, whites, blacks, and clarity. Use these sliders to balance the overall tonality and contrast of your image. Pay attention to the histogram to ensure you're not clipping any highlights or shadows.
Step 4: White Balance Next, move to the "White Balance" panel to adjust the colour temperature and tint of your image. You can use the Temperature and Tint sliders to correct any colour casts and achieve a more natural look. Experiment with different settings until you find the right balance.
Step 5: HSL Adjustments The "HSL/Grayscale" panel allows you to fine-tune specific colours in your image. HSL stands for Hue, Saturation, and Luminance. Use these sliders to adjust the hue, saturation, and luminance of individual colours. This is particularly useful for making colors pop or toning down distracting elements.
Step 6: Detail Enhancements In the "Detail" panel, you can enhance the sharpness and reduce noise in your image. Use the Sharpening sliders to increase the overall sharpness while paying attention to avoid introducing artifacts. Additionally, adjust the Noise Reduction sliders to reduce any visible noise in the image, especially in areas with low light or high ISO settings.
Step 7: Lens Corrections If your image has any lens distortions or chromatic aberrations, you can correct them in the "Lens Corrections" panel. Enable the "Enable Lens Profile Corrections" option to automatically detect and correct distortions based on the lens used. You can also manually adjust vignetting and chromatic aberration sliders if needed.
Step 8: Effects and Vignette The "Effects" panel allows you to add creative effects such as vignettes and grain to your image. Experiment with the "Post-Crop Vignetting" slider to add a subtle vignette that draws attention to the subject. You can also adjust the "Grain" slider to add texture and character to your image, especially useful for achieving a vintage look.
Step 9: Graduated Filters and Radial Filters For selective adjustments, utilize the Graduated Filter and Radial Filter tools available in the Camera RAW filter. These tools allow you to apply adjustments selectively to specific areas of your image. Use the Graduated Filter for linear adjustments like sky enhancements or the Radial Filter for circular adjustments like spotlight effects.
Step 10: Final Touches and Output Once you're satisfied with the adjustments, click "OK" to apply the changes and return to Photoshop. You can further fine-tune your image using additional Photoshop tools or proceed with any further editing. Finally, save your enhanced image in your desired format.
Conclusion: Mastering the Camera RAW filter in Photoshop opens up a world of possibilities for enhancing your photographs. By following these advanced techniques, you can take your images to the next level, achieving professional-quality results with ease. Experiment with different settings and adjustments to develop your unique style and make your photos stand out.
#my art#artists on tumblr#art#photoshop#disabled artist#photographers on tumblr#adobe photoshop#graphic design#tutorial#art tips#art resources#art help#art tutorial#art reference#landscape#digital art#photographer#original art#how to draw#tips and tricks#useful#tips
4 notes
·
View notes
Photo

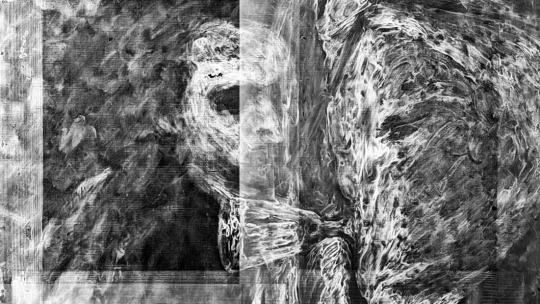
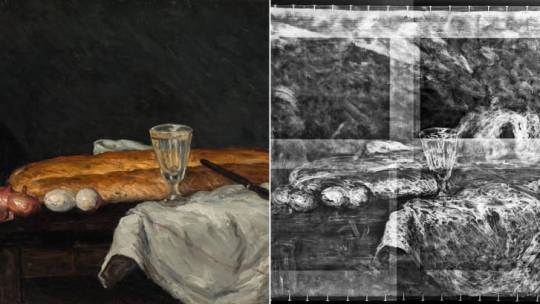

A 160-Year-Old Cézanne Painting Hid a Secret
Cincinnati Art Museum's chief conservator Serena Urry was conducting a routine inspection of the institution's prized Paul Cézanne painting "Still Life with Bread and Eggs" when she noticed something "odd."
For an artwork dating back to 1865, the appearance of small cracks was no surprise. But they were concentrated in two specific areas, rather than distributed evenly across the canvas. What's more, they revealed tiny flashes of white that stood out in contrast to the brooding palette of the French painter's so-called "dark" period.
"I thought there might be something underneath that we should look at," Urry said in a video interview.
The conservator asked a local medical company to bring a portable X-ray machine to the museum, where a technician scanned the 2.5-foot-wide oil painting in several parts. As Urry stitched the series of images together digitally using Photoshop, she saw "blotches of white" that indicated the presence of more white lead pigment.
"I was trying to figure out what the heck they were... then I just turned it (90 degrees)," she recalled. "I was all alone but I think I said 'wow' out loud."
When the scan was rotated vertically, an image of a man emerged, his eyes, hairline and shoulders appearing as dark patches. Given the figure's body position, Urry and her museum colleagues believe it to be Cézanne himself.
"I think everyone's opinion is that it's a self-portrait ... He's posed in the way a self-portrait would be: in other words, he's looking at us, but his body is turned.
"If it were a portrait of someone other than himself, it would probably be full frontal," she added.
Should that be the case, it would be among the earliest recorded depictions of the painter, who was in his mid-20s when the still life was completed. Cézanne is known to have produced more than two dozen self-portraits, though almost all of them were completed after the 1860s and were largely executed in pencil.
"We are at the outset of the process of discovering as much as we can about the portrait," said Peter Jonathan Bell, the museum's curator of European paintings, sculpture and drawings, over email. "This will include collaborating with Cézanne experts around the world to identify the sitter, and undertaking further imaging and technical analysis to help us understand what the portrait would have looked like and how it was made.
"Stitched together, this information may add to our understanding of a formative moment in the early career of this great artist."
Unanswered questions
Part of the Cincinnati Art Museum's collection since 1955, "Still Life with Bread and Eggs" was painted in a realist style — inspired by the Spanish and Flemish Baroque periods — that Cézanne deployed early in his career. He later developed a more colorful aesthetic under the guidance of Impressionist painter Camille Pissarro, before spearheading the more structured style of the post-Impressionist movement.
In the mid-1860s, Cézanne was developing a new coarse painting technique, often using a palette knife to apply color. But whether his hidden portrait was an experiment gone wrong, or whether he simply reused an old canvas to save money, remains a matter of speculation.
Another possibility, Urry ventured, is that the painter suddenly felt inspired and "needed a canvas" — a theory supported by the fact that he appears not to have removed much paint before starting work.
"It's pretty clear that he didn't scrape it down," Urry explained.
Many other questions remain, including the colors Cézanne used and how complete his original portrait was. Museum experts hope to analyze the painting using advanced scanning processes like multispectral imaging, which might reveal the underlying brushwork by assessing textures invisible to the human eye. X-ray fluorescence spectroscopy, meanwhile, could reveal which chemical elements are present and, thus, what colored pigments were used by the artist.
"We're hoping to reach out to colleagues in the conservation and curatorial worlds to see if we can get access to other equipment," said Urry.
For now, however, the museum is looking forward to putting "Still Life with Bread and Eggs" back on display. Since making the discovery in May, Urry has cleaned the painting and thinned the varnish on its surface. It returns to public view, alongside an image of the X-ray, from Dec. 20.
Further scans and analysis could entail transporting the artwork to another institution, presenting logistical challenges and meaning visitors to the museum might miss out on a chance to see one of only two — or arguably, now, three — Cézannes in its collection. "You can't just pop it in your car and drive it to Chicago," Urry said.
"The portrait has been there since he painted it, and it's been there since (we acquired it in) 1955," she added, "so there's no rush."
By Oscar Holland.
#Cézanne#Cézanne 'Still Life with Bread and Eggs' 1865#A 160-Year-Old Cézanne Painting Hid a Secret#french artist#painter#painting#self portrait#hidden painting#art#artist#art work#art world#art news#long reads
28 notes
·
View notes
Text
Exploring the Essence of Graphic Design: A Journey into Visual Communication

Exploring the Dynamic World of Graphic Design: A Comprehensive Overview
Introduction:
Graphic design is a multifaceted discipline that intertwines creativity, technology, and communication to visually convey messages, evoke emotions, and inspire action. In this comprehensive exploration, we delve into the intricacies of graphic design, tracing its historical roots, examining its fundamental principles, and elucidating its evolving role in contemporary society.
Historical Evolution:
The history of graphic design dates back to ancient civilizations, where visual symbols and imagery were used to communicate ideas and concepts. From Egyptian hieroglyphics to illuminated manuscripts of the Middle Ages, graphic design has played a pivotal role in human communication throughout the ages. The advent of the printing press in the 15th century revolutionized the field, allowing for mass production of printed materials and the proliferation of typography and layout techniques.
The Industrial Revolution further propelled the evolution of graphic design, with advancements in printing technology enabling the creation of posters, advertisements, and packaging designs. The early 20th century witnessed the emergence of influential movements such as Art Nouveau, Bauhaus, and Art Deco, which shaped the aesthetic principles and design philosophies of the era.
Fundamental Principles:
At its core, graphic design is governed by a set of fundamental principles that guide the creation of visually harmonious and effective compositions. These principles include:
Composition: The arrangement of visual elements within a design space to achieve balance, unity, and hierarchy.
Typography: The art and technique of selecting and arranging typefaces to enhance readability, convey tone, and evoke emotion.
Color Theory: The study of color interactions and psychological effects, informing the use of color palettes to evoke specific moods and convey meaning.
Contrast: The juxtaposition of elements with differing visual properties to create emphasis, depth, and visual interest.
Balance: The distribution of visual weight within a composition to create stability and harmony.
Hierarchy: The organization of elements to guide the viewer's attention and convey the relative importance of information.
Gestalt Principles: The theory of perceptual organization, which explores how the human mind perceives and interprets visual stimuli, influencing the arrangement of elements in design.
Applications and Disciplines:
Graphic design encompasses a wide array of applications and disciplines, ranging from print media to digital platforms. Some of the key areas of graphic design include:
Branding and Identity: Creating cohesive visual identities that reflect the personality, values, and aspirations of organizations and brands.
Advertising and Marketing: Developing compelling campaigns and collateral materials that effectively communicate messages and engage target audiences.
Editorial Design: Designing layouts for books, magazines, newspapers, and other publications, balancing text and imagery to enhance readability and visual appeal.
Web and User Interface Design: Crafting intuitive and visually engaging interfaces for websites, mobile apps, and digital platforms, prioritizing user experience and accessibility.
Motion Graphics and Animation: Integrating dynamic visuals, typography, and effects to create engaging motion graphics, videos, and interactive experiences.
Environmental and Exhibition Design: Conceptualizing immersive spatial experiences, signage, and installations that enhance brand presence and engage audiences in physical environments.
Technological Advancements:
The advent of digital technology has revolutionized the practice of graphic design, empowering designers with powerful tools and techniques for creating and manipulating visual content. Graphic design software such as Adobe Photoshop, Illustrator, and InDesign have become indispensable tools for designers, offering unparalleled flexibility and precision in design execution.
Furthermore, advancements in digital printing, 3D rendering, and augmented reality have expanded the possibilities of graphic design, enabling designers to explore new mediums and push the boundaries of visual storytelling. The rise of online platforms and social media has also transformed the landscape of graphic design, providing designers with global reach and unprecedented opportunities for collaboration and exposure.
Challenges and Opportunities:
Despite its ubiquity and relevance in modern society, graphic design faces a myriad of challenges in an increasingly digital and interconnected world. The democratization of design tools and the proliferation of online marketplaces have led to commoditization and downward pressure on pricing, challenging the sustainability of professional practice.
Moreover, the rapid pace of technological innovation and evolving consumer preferences necessitate constant adaptation and upskilling for designers to remain competitive in the field. However, these challenges also present opportunities for innovation, collaboration, and diversification, as designers explore new niches, embrace emerging technologies, and champion ethical and sustainable design practices.
Conclusion:
In conclusion, graphic design is a dynamic and ever-evolving discipline that encompasses artistry, technology, and communication. From its humble origins in ancient civilizations to its pivotal role in shaping contemporary culture and commerce, graphic design continues to inspire, inform, and challenge our perceptions of the world around us.
As we embark on this journey through the world of graphic design, we celebrate the creativity, innovation, and passion that define this vibrant field, while acknowledging the profound impact it has on our lives and our collective imagination. As designers, creators, and storytellers, we have the power to shape narratives, ignite emotions, and transform ideas into reality through the art of graphic design.
2 notes
·
View notes
Note
Hi, wcif the cameras in Laura and Franklin’s wedding post? Thanks in advance!
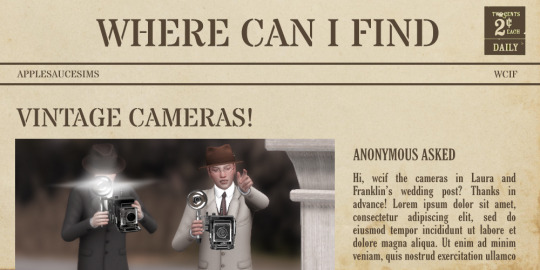
Hey anon! Sorry to say, but these are 100% edited in by me via photoshop. My go-to technique for when I can't find a fitting accessory for my story because idk how to make pose accessories and atp I'm to impatient to learn.
Here's what the unedited image looked like:

6 notes
·
View notes
Text
Mastering the Art of Image Editing: Unveiling the Secrets to Stunning Visuals
In the dynamic and visually-driven digital landscape, image editing has become an indispensable tool for individuals and businesses alike. From social media influencers curating eye-catching feeds to businesses enhancing product images for e-commerce, the demand for high-quality, visually appealing content is at an all-time high. In this comprehensive guide, we delve into the world of image editing, exploring its significance, popular techniques, and the tools that empower creators to transform ordinary visuals into extraordinary masterpieces.
The Significance of Image Editing:
Images are powerful communicators, capable of conveying emotions, telling stories, and leaving a lasting impression. Image editing serves as the catalyst that elevates visuals to new heights, making them more engaging and effective. Whether you're a professional photographer, a social media enthusiast, or a business owner, the ability to enhance and optimize your images is a game-changer in today's competitive digital landscape.
Key Techniques in Image Editing:
Color Correction and Grading:
One of the fundamental aspects of image editing is adjusting and enhancing colors. Color correction ensures accurate reproduction of hues, while color grading allows for creative manipulation, setting the tone and mood of the image. Professionals use tools like Adobe Lightroom or Photoshop to fine-tune colors and achieve a visually cohesive look.
Retouching and Enhancement:
Perfecting portraits or product images involves retouching and enhancing details. Removing blemishes, smoothing skin tones, and refining textures are common techniques employed to achieve a polished and professional look. Advanced tools such as frequency separation help achieve nuanced results without sacrificing realism.
Cropping and Composition:
The right composition can transform an ordinary image into a captivating one. Image editing tools provide the flexibility to crop, resize, and reframe images to improve their overall composition. Attention to composition is crucial for creating visually pleasing and balanced visuals.
HDR Imaging:
High Dynamic Range (HDR) imaging is a technique that combines multiple exposures of a scene to capture a broader range of light and detail. This is particularly useful in landscape photography, architectural shots, and any scenario with varying light conditions. HDR enhances the overall tonal range and details in an image.
Adding Filters and Effects:
Filters and effects are powerful tools for infusing creativity into images. From vintage looks to modern aesthetics, a plethora of filters and effects are available to cater to diverse preferences. These can be applied to evoke specific emotions or align with a brand's visual identity.
Tools of the Trade:
Adobe Creative Cloud:
Adobe's suite of creative tools, including Photoshop and Lightroom, remains the industry standard for professional image editing. With a wide range of features and capabilities, these tools offer unparalleled flexibility and control.
GIMP (GNU Image Manipulation Program):
GIMP is a free, open-source alternative to proprietary image editing software. Despite being free, GIMP provides a comprehensive set of tools for tasks ranging from photo retouching to graphic design.
Canva:
Canva is a user-friendly online platform that caters to both beginners and professionals. It offers a range of templates and tools for easy image editing, making it accessible to those without extensive design experience.
Snapseed:
For mobile users, Snapseed is a powerful and intuitive photo editing app. Developed by Google, Snapseed provides a wide array of editing tools and filters, making it a favorite among smartphone photographers.
Conclusion:
In the digital age, where visuals reign supreme, mastering the art of image editing is a valuable skill. Whether you're a seasoned photographer or a social media enthusiast, understanding the significance of image editing and familiarizing yourself with the essential techniques and tools will undoubtedly elevate the quality of your visuals. So, embark on this creative journey, experiment with different editing styles, and witness the transformative power of image editing in making your visuals truly stand out in the digital realm.
2 notes
·
View notes
Text
Upcoming events at Sims 2 Shenanigans!
Hey, folks! Some new and exciting workshops are on the horizon.
Saturday, March 2nd at 13:00 (GMT -6)- The Tattooer Workshop Revisited
Host: Julie J
Topic: Using Paluding’s The Tattooer
Tools needed: Blender 3.4 or later, The Tattooer
Approximate time: 1 hour
Suggested for: Intermediate. Some experience with Blender is helpful.
A workshop about baking textures from TS4 to TS2 using The Tattooer.
Saturday, March 9th at 13:00 (GMT -6)- Camera: Action!- Workshop on shooting machinima
Host: Let It Simmer
Topic: A variety of machinima shooting techniques
Tools needed: OBS Studio or other tool for recording, Premiere Pro or other tool for video editing
Approximate time: 2 hours
Suggested for: Beginners welcome. Most of the techniques discussed will be beginner-level, but there will be a few intermediate-advanced techniques toward the end of the workshop.
A showcase of filming techniques ranging from basic static shots all the way to some greenscreen magic.
Saturday, March 16th at 13:00 (GMT -6)- Forging Your Destiny (Part 1)
Host: Ocelotekatl
Topic: Converting objects from Skyrim to Sims 2
Tools needed: Nifskope/Outfit Studio, Milkshape, Photoshop with DDS plugins, SimPE
Approximate time: 1.5 hours
Suggested for: Intermediate. Some Body Shop/object meshing experience is helpful.
A start-to-finish workshop about converting objects, outfits, and accessories. Part 1 includes building the meshes and finding the textures.
Saturday, March 23rd at 13:00 (GMT -6)- Forging Your Destiny (Part 1)
Host: Ocelotekatl
Topic: Converting objects from Skyrim to Sims 2
Tools needed: Nifskope/Outfit Studio, Milkshape, Photoshop with DDS plugins, SimPE
Approximate time: 1 hour
Suggested for: Intermediate. Some Body Shop/object meshing experience is helpful.
A start-to-finish workshop about converting objects, outfits, and accessories. Part 2 includes building the the recolors, linking the mesh to the recolor, binning, categorizing, and final testing in game.
To RSVP or check your local time, check the event thingy at the top of the Discord.
If you haven’t joined yet, why aren’t you a member of the most amazing creator’s Discord ever? To join, click here: https://discord.gg/tkNzjgsSTS
5 notes
·
View notes
Last Seen Blogs

allsimsyt
AllSims

saturnodan
Danm._s

butimcamerashy
A Fandom Blog

kman1902
Free space

bachaboska
That Old Ace in the Hole