#you could also use a cup of lemon juice and a teaspoon of salt (again heated until it steamed) to get the same results
Text


After a bit of research and a lot of trial & error, I managed to get all the forge scale (the discoloration in the metal from oxidation) off, straighten out the majority of the wiggles in the band, heat harden it, and give it a good polish. At this point, if I do anything else to it I’m just making more work for myself, and I can’t think of anything that could be improved that wouldn’t also involve me starting a new ring.
#mine#me#hobbies#jewelry making#metal working#puzzle ring#silversmithing#argentiumsilver#for anyone who wanted to know#the pickle recipe that I used to get rid of the forge scale is just 7 or 8 grams of citric acid dissolved in a cup of water and heated until#it steamed#you could also use a cup of lemon juice and a teaspoon of salt (again heated until it steamed) to get the same results#just soak the ring in that solution until it’s slightly cloudy and all the oxidation is gone and then you can start polishing#don’t use iron or aluminum in this process at all cause things can get weird. A stainless steel pot and wooden chopsticks will work well#once you’re done with the pickle keep dumping baking soda into it until it stops reacting (stirring it in as you go) and you can dump it#down the drain
12 notes
·
View notes
Text

My (reposted) inaugural tumblr version of my old blog features Violet Fielding, my custom American Girl character from 1918 Boston. Violet is the youngest of three kids and is trying to find ways to do her part during World War I, and then again during the Spanish Flu epidemic.
World War I food perfectly combines the worst parts of wartime food and early 20th century food: it's often incredibly bland, and you're also working with wartime restrictions or guidance. Because the US was only involved in the war for 18 months, the government never instituted rationing, but the Food Administration still made a huge effort to get the public on board with conserving food with slogans like “FOOD IS FUEL FOR FIGHTERS. Do not waste it. Save WHEAT, MEAT, SUGARS AND FATS. Send more to our Soldiers, Sailors and Allies.”
Tons of booklets and other materials were produced encouraging Americans to conserve different ingredients needed by the military. Non-government publishers hopped on the bandwagon too.These sandwiches were made with a fruit and peanut butter spread included in "Everyday Foods in War Time" by Mary Swartz Rose. Published in 1917, it includes a forward explaining that the book is meant for the housewife seeking guidance on adjusting her mean plans to this unprecedented time. Every chapter includes a forward with advice on how to ensure your family is getting the proper nutrients while adjusting your shopping list to meet wartime conditions.
Here's the recipe:
Fruit and Peanut Butter (for Sandwiches)
Dates, ¼ cup
Figs, ¼ cup
Peanut butter, ½ cup
Salt, ½ teaspoon
Lemon juice, 1½ tablespoons
Raisins, ¼ cup
Corn syrup (light), 2 tablespoons
Wash figs, raisins, and dates, and put through food chopper. Add salt, peanut butter, lemon juice, and corn syrup, and mix well.
I picked this out because I wanted an excuse to break out our new food processor, and also because it seemed like something that would be up Violet's alley as a filling for sandwiches she could take to school, enjoy as a snack, or serve with tea. It made an extremely sticky, thick, almost moldable vs. spreadable filling, and you'll probably not be shocked to hear that it was pretty sweet and basically just a blended PB&J, so therefore very tasty. It didn't make a ton of filling - I'd say you'd probably get eight or so small tea sandwiches, and four bigger lunch sandwiches, if you don't cut the bread in half. But it's also easy enough to double or triple the recipe if you need more. I'd definitely make it again, although I'd maybe like to experiment with reducing the sugar content.
7 notes
·
View notes
Text
Castletown Café Episode 11: Giga Salad
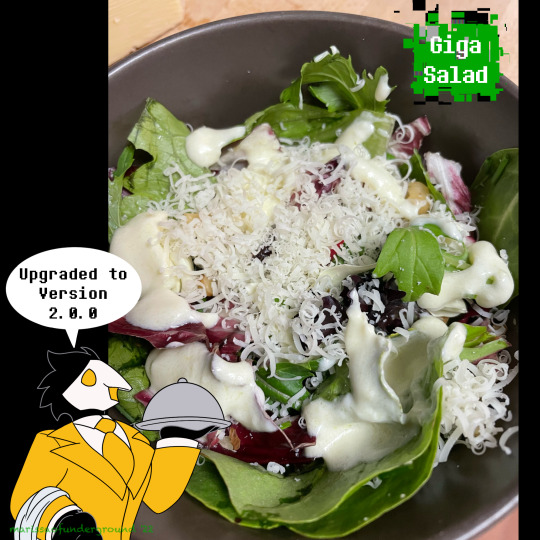
We’re back again with another trip into Gaster’s library of cut content. I bet even the items and concepts that never made it in are just as canonical as everything in the final version of the game. It wouldn’t be too farfetched in the fourth-wall leaning worlds of Undertale and Deltarune, after all - the mere fact that they are games is canon.
This food, however, may have been cut for good reason - for one, the very description of this salad deems it useless, as it’s comprised solely of lettuce. Second, it only heals 4 HP to your team except for Noelle, to whom it heals a whopping 90. Why? Most likely, it has to do with her herbivorous nature as a reindeer, and she even comments as it being “something to graze on.”
But a salad consisting only of lettuce isn’t much of a salad at all....unless you use a ton of different varieties. Even with all these different kinds of lettuce, of course, it still needs more: another veggie or two thrown in for good measure, and what’s a salad without dressing and other toppings to make it extra delicious? With these upgrades, this Giga Salad is not only enormous - but enormous in flavor, too. Now it’s not so useless, but I’m sure it’d still heal Noelle the most, anyway. Hope she’d like lemon yogurt dressing!
This time around, everything was my own creation, down to the lemon Greek yogurt salad dressing. Ideas like this come to me when I can’t sleep, and on one such night, all the ingredients for the salad and the dressing just clicked into place! Of course, whether or not it would work, I didn’t know. But I did know right then and there to write down those ideas - right in the middle of the night - so I could mess with those ingredients the next day and see if I got something that worked, and oh boy, did it!! That’s the great thing about cooking on a regular basis: you gain experience points for each dish you make, and with that experience, your cooking creativity and skills level up!
That said, I still learned something with creating this salad: the walnuts and dried cranberries shouldn’t be mixed in with the rest of the salad as they’ll just sink to the bottom of the salad bowl. Instead, they are meant to be a topping when serving, so I have corrected that for the recipe.
Also, although the salad in my photo contains radicchio, I’ve omitted it from the recipe. Prior to this salad, I had never tried radicchio before, and now I realize why: it’s really bitter! Despite this, the bitterness didn’t ruin the salad for me at all, because there were tons of good stuff in there to counteract it. If you’re a fan of radicchio or other bitter vegetables, you can add it back in if you wish.
As for the dressing? It turned out perfectly! And this is coming from someone who doesn’t know what they’re doing half the time for this series. I was a little apprehensive of adding lemon juice to Greek yogurt, but then I remembered that the dill sauce from the previous episode turned out just fine with that ingredient combination, so, maybe this would turn out fine. The honey adds sweetness, and the olive oil and garlic give it just the right touch of savory to this creamy, slightly sweet, but not too sweet salad dressing that’s perfectly balanced in flavor and exceeded my expectations.
GIGA SALAD DRESSING:
1 teaspoon lemon zest
1 tablespoon fresh lemon juice
1 tablespoon honey
2 tablespoons olive oil
1 clove minced garlic OR 1 tsp garlic powder
1/2 cup plain Greek yogurt
Salt to taste
Wash and zest lemon, putting 1 teaspoon of the zest into a small bowl. Cut lemon in half and juice one half with a hand juicer. Fill up a tablespoon with juice and add to the bowl with the lemon zest.
Add about a tablespoon of honey into the lemon mixture, it’s okay just to eyeball it.
Peel and mince 1 clove of garlic (or just measure one tsp of garlic powder) and add to the bowl.
Add in olive oil, yogurt, and stir to combine, adding just a little salt to taste.
GIGA SALAD:
2 leaves Romaine lettuce
5 radishes
1 cup chopped or shredded green cabbage
A generous handful of the following: spinach, mizuna, chard, frisee, lolla rosa, & arugula leaves.
A generous handful of fresh chives.
Toppings:
1 cup chopped walnuts
1 cup dried cranberries
Freshly grated Parmesan cheese
Wash and dry all vegetables. In a large salad bowl, place your spinach, mizuna lettuce, chard, arugula, frisee, and lolla rosa leaves.
Chop up your Romaine lettuce and add to the bowl.
Chop or shred 1 cup of green cabbage and add to your salad.
Thinly slice your radishes into rounds, and add.
Finely chop up your chives, add to salad, and toss to combine.
Lastly, the toppings. Open up a bag of dried cranberries, chop up your walnuts, and grate Parmesan cheese.
To serve, grab a bowl, fill it with salad, and top with the Giga dressing, chopped walnuts, dried cranberries, and Parmesan cheese. Enjoy!
#castletown cafe#deltarune#giga salad#deltarune food#deltarune chapter 2#deltarune fanart#cw food#deltarune swatchlings#swatchlings#swatchlings fanart#deltarune inspired recipe#deltarune cut content#salad recipe#my art#recipe
15 notes
·
View notes
Note
share the soup recipes PLEASE i adore soup (unless they're like. something you want to be top secret or w/e)
i just finished typing one up let me copypost it here for you anon
Chicken-Vegetable Soup with lemon and dill (makes about 4 bowls)
1 box or 4 cups of chicken broth + 1 or more teaspoons of same flavor better than bouillon paste (if using all btb use the ratio on the side of the container + a little extra)
1 large carrot cut into bite size pieces (i did quartered slices)
1 green zucchini, cut to bite size (quarter slices again)
3 small celery sticks, sliced thin
1/2 large white onion cut small as wanted
1-2 teaspoons garlic, minced/from a jar (i couldnt get mine open so i used garlic powder instead but idr a guesstimate of how much)
1 bay leaf
dill to taste (i used 1 whole little fresh herb blister pack thing from the store; i dont know how much this is in dried dill)
lemon juice to taste (i ended up using like 1/3rd of a medium sized lemon and it had a very lemony tang but i liked it)
salt and pepper to taste
Prepare all ingredients either before or while heating your soup making pan on the stove with some cooking oil or butter. Add carrot, onion, and celery and cook until onions look translucent, then add zucchini pieces and garlic. Cook until garlic smells fragrant and yummy (this happens fast), then add all of the broth and the bay leaf. Add extra water if it doesn't look like enough liquid. Cook on medium-high or medium heat until carrots are cooked through to desired texture and then add dill and lemon juice at the end. Adjust salt and pepper to taste. Ladle into bowl and eat it
ADDITIONAL IDEAS
Cook some egg noodles (or your favorite kind of soup noodle) either in a side pan or add to soup directly for however long their package says to cook for.
Could also add pre-cooked rice at the end instead of noodles - I had some precooked wild rice I had to use so I added that.
You can substitute the chicken broth for veggie broth if you want.
I didn't have any but you could also add pre-cooked diced chicken to this too or any other protein that would taste good in this if you want, like firm tofu or something.
#ENJOY live your soup dreams#just realized this is hilariously on-brand for a senshi dunmeshi icon blogger lmfao
1 note
·
View note
Text
CSA WEEK 14
P i c k l i s t
watermelon - roma tomatoes - garlic - poblano pepper -
Cherry tomatoes - carmen peppers - lunchbox peppers - carrots
THIS WEEK AT EDGEWATER…
We remain swimming in field tomatoes. I believe the crop of plums might be at peak, or nearing peak yields right now. The plants are dripping with fruit, and this abundance is simultaneously soul-nourishing-farmer-pleasing and totally overwhelming. Being rich in tomatoes lends itself to a real feeling of urgency. A crop based time crunch.
For one, as soon as the fruit ripens, we have only so much time until the juice of the tomato bursts through the skin and rots the fruit. The crew has done an incredible job of staying on top of the pick, however it is inevitable that some of the cherries and plums will rot before we move/sell/cook/eat them.
The second feeling of urgency comes when the weather turns and the nights move toward fall and flannel. This is that moment in between seasons that makes me want to harvest everything all the time by day and preserve via canning or freezing all the time by night. This harvest rush makes for a real crazy person (i.e. me).
This week’s CSA share 100% reflects that crazy. Please join me as we get into it and go deep with tomatoes. By Sunday I expect everyone of your countertops to be tomato splattered and every dish piled high in your sink. But come JANUARY, you will be so pleased that you followed suit and took to heart the farmy foodie canny pro-tips.
Let’s CAN people!
(wait wait let me try again)
We CAN do this!
FARMY FOODIE PRO-TIPS the canners edition:
by far my fave way of preserving cherries and plums
It is simple and the only ingredients you need are tomatoes/salt/pepper/GARLIC/olive oil.
READ ON…
Cherry, grape or small Roma tomatoes
Whole cloves of garlic, unpeeled
Olive oil
Herbs such as thyme or rosemary (optional)
Preheat the oven to 225°F. Halve each cherry or grape tomato crosswise, or Roma tomato lengthwise and arrange on a parchment-lined baking sheet along with the cloves of garlic. Drizzle with olive oil, just enough to make the tomatoes glisten. Sprinkle herbs on, if you are using them, and salt and pepper, though go easily on these because the finished product will be so flavorful you’ll need very little to help it along.
Bake the tomatoes in the oven for about 3 hours. You want the tomatoes to be shriveled and dry, but with a little juice left inside–this could take more or less time depending on the size of your tomatoes.
Either use them right away or let them cool, cover them with some extra olive oil and keep them in the fridge for the best summer condiment, ever. And for snacking.
JENNY’S NOTE: Smitten’s slow roasted tomatoes stop there… but I am suggesting you take it one step further. Let’s can :)
STEP 1: Prepare your jars and lids- clean them, dry them/ get em lined up and ready.
STEP 2: Prepare your water bath (big pot with boiling water)
STEP 3-STEP 100: is an excerpt from Tart and Sweet: 101 Canning and Pickling Recipes by Kelly Geary and Jessie Knadler (Rodale, 2011). The excerpt is from Chapter 6: Summer. I am also going to provide their favorite recipe to can tomatoes in case you want to go the “whole” tomato route. However, if you want to take your newly roasted tomatoes and skip ahead to the canning part, go ahead and ladle your warm batch of tomatoes into jars, skip to bullet point 3 and proceed with the lemon juice. But do not add water- any juice leftover from your smashed down cherry tomatoes is enough!
Canned Tomatoes
• 12–15 pounds tomatoes, blanched, peeled, andcored
• About 8 cups water per quart jar
• 2 tablespoons bottled lemon juice (or 1 tablespoon per pint jar)
• 1 teaspoon kosher salt (or 1/2 teaspoon per pint jar)
1. Leave the tomatoes whole or quarter or halve them, as desired.
2. Bring the water to a boil in a large saucepan (you may need more or less, depending on the size and cut of the tomatoes). Reduce the heat, but keep the water hot.
3. Place the appropriate amount of lemon juice and salt in each hot jar. Top with raw tomatoes.
4. Ladle hot water into the jars to cover the tomatoes, leaving 1/2 inch headspace. Check for air bubbles, wipe the rims, and seal. Process quarts for 45 minutes, pints for 40 minutes, adjusting for elevation.
YIELD: 4 quarts or 8 pints
Ok DO YOUR BEST HERE PEOPLE! I Highly recommend you get yourself a copy of this book. It is extremely user friendly and chock full of all my fave ways to preserve. Writing it one more time for the boys in the back:
Tart and Sweet: 101 Canning and Pickling Recipes by Kelly Geary and Jessie Knadler
And if you are not ready to can, but do want roast your maters go ahead and these little gems on toast, with eggs, by the spoonful, or make soup:
Roasted Tomato and Goat Cheese Soup from the cook book: lucid food
serves 4
12 ripe tomatoes
2 cloves garlic, peeled and smashed
1 yellow onion, coarsely chopped
1 tablespoon honey
2 sprigs fresh rosemary
2 tablespoons balsamic vinegar
4 tablespoons olive oil
Salt and freshly ground black pepper
1 dried bay leaf
1/4 cup fresh goat cheese
Preheat the oven to 425°F.
Core and quarter the tomatoes and scoop out the seeds, reserving the seeds and cores for the stock. In a large bowl, toss the tomatoes with the garlic, onion, honey, rosemary, 1 tablespoon of the vinegar, 3 tablespoons of the olive oil, and a dash of salt. Spread the mixture on a baking sheet and roast for 40 minutes, stirring occasionally. Remove the rosemary and set aside.
Combine the tomato scraps, bay leaf, and 1 cup water in a pot and bring to a boil over high heat. Decrease the heat and simmer, uncovered, for 15 minutes. Strain the stock into a bowl and discard the solids. Rinse the pot and return the stock to the pot. Add the roasted tomatoes. Bring to a boil over high heat, then decrease the heat and simmer, uncovered, for 5 minutes.
Let the soup cool for 10 minutes, then pour into a blender. Add the cheese and blend until smooth. With the blender running, add the remaining 1 tablespoon olive oil. Season to taste with salt.
Garnish the soup with the remaining 1 tablespoon balsamic vinegar and a few grinds of pepper and serve.
0 notes
Text
Can You Halve a Cake Recipe? Baking Measurement Tips

Have you ever wanted to bake a cake but had no idea how to scale down the recipe? I know I have! After all, it's not always necessary (or practical) to make an entire cake. That's where half-cake recipes come in handy! In this article, we'll be discussing the ins and outs of halving a cake recipe.
We'll cover everything from ingredient measurements to baking times - so if you're ready for some serious baking advice, let's get started!
Maybe You Also Like:
- Can You Get Recipes On Echo Show
- Can You Patent A Drink Recipe
- Can You Replace Bourbon With Whiskey In A Recipe
Understanding The Basics Of Halving Recipes
When it comes to halving a cake recipe, the key is understanding how exact ratios and changing measurements can affect your baking results. The most important factor to consider when halving a cake recipe is that there are precise amounts of ingredients called for in order for the desired result.
If you try to just cut all of the ingredients in half – such as two eggs instead of four – that won’t necessarily yield the same outcome as if you had followed the original measurements precisely. This means that some adjustments may need to be made along with cutting everything in half, depending on what type of consistency or texture you want from your finished product.
For example, if a particular recipe calls for one cup of sugar, then you would only use ½ cup when halving it. However, if this recipe also includes vinegar or another acidic ingredient like lemon juice, then you should reduce the amount by an additional ¼ teaspoon since these ingredients tend to become more intense after being cooked at high temperatures.
On the other hand, if something needs to be measured out precisely (like salt), then don't make any reductions – just stick with exactly half of whatever measurement was originally called for.
This process takes practice but once you get comfortable with knowing which recipes will require extra attention and why certain adjustments should be made during halving, you'll find yourself easily producing delicious cakes time and time again!
Converting Measurements For Ingredients
I'm having trouble converting measurements for ingredients when I'm baking. For example, I'm not sure how many tablespoons are in a teaspoon, or how many milliliters are in a cup. I know I need to be able to convert measurements in order to successfully bake, so I'm hoping to get some help here!
Does anyone have any tips for converting teaspoons to tablespoons, or cups to milliliters?
Converting Teaspoons To Tablespoons
When it comes to baking, you know that measurements need to be precise. And when it comes to converting teaspoons into tablespoons and vice versa it can get tricky! That's why I'm here with some helpful advice on how to make sure your portion control is top-notch and your cakes come out perfectly every time.
The most important thing to keep in mind when converting teaspoons into tablespoon is the size of your baking pans. If you have smaller pans, a teaspoon may not fit, therefore, it needs to be converted into at least two or three tablespoons instead. On the other hand, if you're using larger pans for your cake recipes, then one teaspoon could easily turn into half a tablespoon.
No matter what type of pan you decide to use for baking, just remember: accuracy is key! Be mindful of each measurement so that all ingredients are well balanced and evenly distributed throughout the dough before popping them in the oven for perfect results every time.
Converting Cups To Milliliters
When it comes to baking, shopping lists and portion control are key. But what about converting measurements for ingredients? Well, that's just as important! Let's take a look at how we can convert cups into milliliters - an especially helpful tip when dealing with small or precise amounts of ingredients.
To start off, you'll need to know the volume of your cup; most often this is 8 ounces, or 240 milliliters. So if your recipe calls for one cup of ingredient A, then you're looking at measuring out 240 milliliters in total.
To make sure you don't overfill or under-measure, I recommend using a kitchen scale to get more accurate readings. That way you won't have any surprises when it comes time to bake!
And there you have it - now you know exactly how much of each ingredient should go into your cake batter without having to guess or eyeball the measurements. With these tips in mind, all that's left is to grab those mixing bowls and let the baking begin!
Adjusting Baking Times
Once you've converted the measurements for your cake recipe, it's time to adjust baking times. Baking can be tricky and there are a few things you should keep in mind when troubleshooting problems.
- First of all, check that your oven is preheated correctly before putting the cake in – this will ensure even heating which is key to getting a perfectly cooked result.
- Secondly, use an oven thermometer if possible; they're very affordable and provide more accurate temperature readings than the traditional dials on most ovens.
- Lastly, don't forget to set a timer while baking!
Checking progress regularly helps prevent over-baked cakes or cupcakes with dry centers. When done right, properly adjusted baking times can make all the difference between a delicious treat and disappointment!
Modifying Baking Utensils And Temperatures
I'm standing in front of the oven, ready to begin baking the cake I've been dreaming about for weeks. I take a moment and look around; my kitchen is filled with ingredients, utensils, and appliances all set up and prepared to help me make this delicious treat. Now it's time to get started!
First, I need to scale down the pans according to the recipe's directions. This means that if the original recipe calls for two 9-inch round pans, then I'll use one 8-inch pan instead – half of what was originally called for. With that done and out of the way, I can move on to adjusting the heat as directed by my recipe.
When halving a cake recipe, you may have to lower or increase your oven temperature accordingly so that your cake bakes evenly throughout its cooking time. In some cases, reducing baking time might also be necessary.
As I slide my halved cake into the preheated oven and watch it start baking away, I'm filled with anticipation of how amazing it will taste when finished – fingers crossed! All there's left to do now is wait patiently until it’s fully cooked before taking out from the oven and letting cool before decorating and eating.
Decorating And Serving A Half Cake
Once you have halved your cake recipe, the next step is to decide how to decorate and serve it. There are plenty of creative ways you can use your half cake for a special occasion or just as an everyday treat! Here are some ideas that might inspire you.
When it comes to decorating, think outside the box. You don't need fancy ingredients - try sprinkling chopped nuts along the top or adding a few edible flowers in pastel colors. For something more indulgent, drizzle melted chocolate over your masterpiece or add swirls of fresh cream. Get creative with whatever toppings you have at home!
Serving tips depend on who'll be eating your cake and what type of atmosphere you want to create. If it's a party, cut up small slices so everyone has enough to enjoy. On a romantic date night?
Serve two generous pieces accompanied by glasses of bubbly for extra romance. Enjoyed alone? Cut yourself one large slice and share the rest with friends or family later on!
Frequently Asked Questions
Can I Freeze A Half Cake?
Sure, you can freeze a half cake! Just make sure that the icing techniques and portion sizes are correct before freezing it. The best way to do this is by cutting the cake into two halves and wrapping each one tightly in plastic wrap or aluminum foil.
Once your cakes have been frozen, they should last for up to three months if kept at a temperature of 0 degrees Fahrenheit or lower. So go ahead and enjoy your delicious treat without worrying about time constraints!
Is It Possible To Double A Cake Recipe?
Yes, it is possible to double a cake recipe. All you have to do is increase the amount of ingredients by two times the original ratio and portion sizes.
For example, if your original recipe calls for one cup of flour, you will need two cups if you decide to double the recipe. You can also use this trick when halving or reducing the ratios and portion sizes in a recipe as well!
How Can I Make A Half Cake Look Presentable?
Decorating a half cake can be tricky. But, with the right portioning tips and decorating techniques you can make it look just as presentable as an entire cake! When cutting your cake in half, use a sharp serrated knife to get nice clean cuts.
Then, frost both sides evenly for a neat presentation. You can also add decorations such as sprinkles or fondant shapes to give it that extra touch of elegance. With these easy steps, your half cake will be looking great in no time!
What Is The Best Way To Store A Half Cake?
When you have a half cake, it can be difficult to know how best to store it. The key is portion size and keeping the cake fresh. Sharing tips like cutting the remaining half into smaller portions will help keep your cake from drying out over time.
For an optimal experience, wrap each slice individually in plastic wrap or place them in airtight containers so they stay moist and flavorful. This way, you don't have to worry about using up a whole cake before it goes bad!
Can I Use An Electric Mixer To Make A Half Cake?
Absolutely! When it comes to baking a half cake with an electric mixer, you'll first want to halve the ingredients and adjust your baking time accordingly.
Depending on the size of your portion, this could mean reducing the cooking time significantly. For example, if you're making just one cupcake instead of a full-sized cake, be sure to check for doneness after only a few minutes in the oven.
Conclusion
Yes, it is absolutely possible to half a cake recipe. The key is to make sure you are measuring your ingredients carefully and making any necessary adjustments along the way. When baking a half cake, I recommend using an electric mixer if you have one available as this will help create a more even texture.
Additionally, when storing the finished product, consider wrapping it in plastic wrap or foil before putting it into the refrigerator so that it stays fresh for longer. With these tips in mind, halving a cake recipe can be done with ease!
If you're looking for more delicious recipes to try, be sure to check out The Disney Chef's recipe categories! Whether you're in the mood for something sweet like a cake recipe, something savory like a chicken or pork recipe, or something fresh like a vegetable or seafood recipe, there's something for everyone. And if you're a meat-lover, don't forget to check out the beef recipes category for hearty and satisfying meals. With so many options to choose from, you're sure to find a new favorite recipe to add to your collection.
Read the full article
0 notes
Text
“My relationship with cooking began a long time ago,” Longoria said in her 2011 cookbook, “Eva’s Kitchen: Cooking with Love for Family and Friends”.
She discovered her passion when, as a starving six-year-old, she pulled a chair up to the stove, picked up a frying pan, and made herself an egg.
“Of course, the pan was full of eggshell. I didn’t use butter or oil so the egg stuck everywhere. I can’t even remember now what it tasted like, but I can remember the sense of accomplishment I had after cooking that egg. It was empowering and energizing.”
Longoria, who was born in Texas, said it was a revelation, and from then on she learned everything she could about cooking.
Longoria has come a long way since then. She wrote his cookbook, inspired by his travels around the world. She also frequently shares her favorite dishes on instagram with his nine million followers.
“There is nothing like a home-cooked meal and sharing memories in the kitchen with your loved ones!” wrote in a post.
Many of their dishes stem from their Mexican heritage, such as their tomatillo salsa, tamales, huevos rotos (fried eggs and potatoes), and pan de polvo (Mexican shortbread cookie).
Here are four iconic dishes from Longoria’s cookbook, along with her personal notes on each recipe.
Martajado guacamole with serrano chiles
I have a few tricks that give my guacamole great flavor and texture. First, I use yellow lemon juice, not green. The yellow lemon has a bit of sweetness that brings out all the other flavors. Also, the key is that I never skimp on the lemon or kosher salt. I basically make a salty lemonade with avocado and other ingredients swimming in it — believe me, it makes all the difference! And finally, never stir as you add each ingredient to the bowl or the guacamole will become too watery.
For 8 cups
Ingredients
6 ripe avocados, cut into ½-inch (1¼-centimeter) cubes
4 medium ripe tomatoes, cut into ½-inch (1¼-centimeter) cubes
1 large white onion, finely chopped
1 serrano chili,
½ bunch of chopped fresh coriander, leaves and young stems
Juice of 4 small lemons (about ½ cup or 118 milliliters)
2 teaspoons | 6 grams of kosher salt or to taste
Instructions
Without stirring, place each of the ingredients in a large bowl.
Then mix gently until well combined. Use a light touch to keep the guacamole consistent.
Transfer it to a bowl and serve.
Sweet potato patties
Empanadas are a quintessential example of what traditional Latin food is made of: solid techniques that can be adapted to make use of whatever is available regionally, or in my Aunt Elsa’s case, in her pantry. She could create the most delicious combinations of ingredients and then stuff and fry a few dozen dumplings in no time. As Thanksgiving approached, these delicate, flaky, slightly sweet empanadas were our take on the classic American pumpkin pie. These little “Mexican Pumpkin Pies” are also delicious as an appetizer.
30 empanadas
Ingredients
Mass
4 cups | 120 grams of all-purpose flour and a little more for the surface
¼ cup | 50 grams of sugar
1 teaspoon | 6 grams of table salt
1¾ cups | 359 grams butter, at room temperature
1 large egg, lightly beaten
Stuffed
2 pounds | ½ pound sweet potato, peeled and coarsely chopped (or 2 15½-ounce or 439-gram cans of sweet potatoes)
2 3-inch (7½-centimeter) cinnamon sticks
¼ to ½ cup sugar, or to taste
Instructions
For the mass: In a large bowl, place 4 cups (120 grams) each of the flour, sugar, and salt and beat until well blended. Use your hands to knead the shortening into the flour mixture. The texture will be crumbly and look like coarse sand, and if you squeeze a handful it will stick together, but crumble again as it falls into the bowl. Add the egg and ½ cup of water, then mix well with a wooden spoon or your hands. Shape the dough into a flattened disk, wrap in plastic, and refrigerate for one hour.
For the filling, option 1: if using fresh sweet potatoes, place them in a large saucepan with the cinnamon sticks and cover with cold water. Simmer, uncovered, until sweet potatoes prick easily with a fork, about 15 minutes. Drains well. Remove and discard the cinnamon sticks. Let stand until cool.
Option 2: if you are using canned sweet potatoes, place them in a large saucepan with the canning liquid. Add the cinnamon sticks and heat over medium heat for about 10 minutes. Drains well. Remove and discard the cinnamon sticks. Let stand until cool.
Place chilled sweet potatoes in the work bowl of a food processor and pulse in one-second bursts only until mashed; don’t mash them. If you’re using canned sweet potatoes, they may already be sweetened, so check the sweetness level and adjust the amount of sugar as needed. Add sugar to taste.
Preheat oven to 350 degrees Fahrenheit (177 °C). Prepare 1 or 2 baking sheets with baking paper.
Shape dough into 30 golf ball-sized balls; keep balls covered with a damp cloth. On a lightly floured surface, use a rolling pin to flatten each ball into a 4-inch (or 10-centimeter) circle. Fill each with a scant tablespoon (or 14 grams) of mashed sweet potato. Fold the dough over the filling to form a half circle and bring the edges together. Transfer to the prepared baking sheet and cover with a damp cloth. Continue until all patties are formed.
Remove the cloth and press with a fork around the edge of each empanada so that they are closed. Bake until golden, 20 to 25 minutes. Let cool slightly on the baking sheet. Transfer to a plate and serve hot.
Tortilla Soup
My friends request this recipe more than any other. I’m often asked if it’s a family recipe. I take it as a compliment when people are always surprised to hear that I found her in a magazine when she was about 12 years old. I have made it so many times since then, and it has evolved into what it is today. I think it’s so delicious — and popular! — for its clear broth, but full of flavor. Tortilla soup is usually heavy, but this one is hearty without getting too thick. Look for dried pasilla and ancho chiles in the spice aisle of supermarkets or Mexican or Latino grocery stores.
4 to 6 servings
Ingredients
4 pounds | 2 kilograms chicken leg
4 pounds | 2 kilograms chicken thighs
12 cups | 3 liters homemade chicken broth, store-bought low-sodium chicken broth, or cold water
4 dried pasilla chiles
4 dried ancho chiles
6 tomatoes, chopped
1 large white onion, diced
6 large garlic cloves, peeled
2 teaspoons | 6 grams kosher salt, or to taste
2 large bunches of fresh cilantro, leaves and young stems chopped
At your service:
1 cup | ¼ liter vegetable oil, more if necessary
36 white or yellow corn tortillas, cut into ¼-inch-thick (6-mm) strips
1 head cored iceberg lettuce, shredded
6 large avocados, pitted, peeled and chopped
3 cups | 366 grams of grated or crumbled fresh cheese (approximately 12 ounces)
Instructions
In a large pot, bring chicken and broth to a boil over medium-high heat. Reduce heat and simmer until chicken is opaque and tender when pierced with a fork, about 30 minutes. Remove the chicken from the pot with a slotted spoon and set aside to cool. Set aside the pot of broth. As soon as the chicken is cool enough to handle, shred the meat; discard skin and bones.
Meanwhile, place the pasilla and ancho chiles in a medium saucepan and add cold water to cover. She brings to a boil over medium heat. Reduce heat and simmer until chiles are soft, about 10 minutes. Drain the chiles and remove their stems and veins. If you want it spicier, save the seeds; if not, remove the seeds as well.
In the work bowl of a food processor, place the chiles, tomatoes, onion, garlic, and 2 teaspoons of salt. Process until smooth, adding ½ cup of the reserved chicken broth to smooth out the mixture if it is too thick.
Mix the chile puree and half the coriander into the broth. Simmer on low heat for 20 to 30 minutes. Taste and add salt if necessary. Add the reserved chicken and the remaining cilantro and remove the pot from the heat.
While the broth is simmering, line a baking sheet or large plate with paper towels. In a large skillet, heat 1 cup of the oil over medium-high heat until hot but not smoking. Add a handful or two of tortilla strips—they can touch, but not overlap—and fry until lightly browned around the edges, about 45 seconds. Use tongs or a strainer to transfer the strips to the baking sheet, tossing and moving them so that they form scribble shapes as they cool and harden. Continue frying in batches until all of the tortilla strips are fried, adding more oil to the pan if necessary.
When ready to serve, place the lettuce, avocado, and queso fresco in separate bowls for easy serving.
For each serving, place a few tortilla strips and a tablespoon of lettuce in a soup bowl. Place the soup in the container. Top with a dollop of avocado, sprinkle some queso fresco on top and serve.
Shrimp cocktail
Longoria uses extra-small shrimp seasoned with plenty of cayenne pepper that she sautés for six minutes in butter ahead of time, according to her cookbook.
4 to 6 servings
Ingredients
1 cup | 240 grams of ketchup
Juice of 2 small lemons (about ¼ cup or 59 milliliters)
1 tablespoon | 14 grams of hot sauce
1 tablespoon | 15 milliliters of distilled white vinegar
freshly ground black pepper to taste
1 pound | 1/2 pound extra-small shrimp (61 to 70 per pound), peeled, deveined, cooked, and chilled
4 avocados, pitted, peeled and diced
Lemon slices to serve
Instructions
In a small bowl, place the ketchup, lemon juice, hot sauce, vinegar, salt, and pepper. Stir until the sauce is well blended.
In a medium bowl, place the cooked shrimp and avocado. Pour in the sauce and mix gently with a wooden spoon or silicone spatula until the shrimp and avocado are completely covered.
Cover and place in the refrigerator for 30 minutes. Divide between 4 to 6 glasses and serve with lemon wedges.
Adapted from the book “Eva’s Kitchen: Cooking With Love for Family and Friends” by Eva Longoria and Marah Stets. Copyright © 2011 Eva Longoria. Food Photography © 2011 by Ben Fink. Portrait Photography © 2011 by Randall Slavin. Published by Clarkson Potter/Publishers, an imprint of Random House, a division of Penguin Random House LLC. All rights reserved.
0 notes
Text
Healthy Breakfast Cookies
Directions:
Pre-heat oven to 350 degrees F and line a large baking sheet with parchment paper. Add all dry ingredients to a large bowl and stir. Next, add all remaining ingredients and mix again until everything is combined.
Use a 1/4 cup scoop to scoop the batter onto the parchment paper. Pat the tops down a little and bake cookies for 15-17 minutes, until firm and cooked through. Let cool on a wire rack before eating.
-+- Ingredients -+-
LEMON BLUEBERRY
2 1/2 cups old fashioned oats, gluten free certified if necessary
3/4 cups flour, gluten free or all purpose
1/4 cup coconut sugar
1 teaspoon baking powder
1/2 teaspoon ground cinnamon
1/8 teaspoon salt
1/2 cup + 1 tablespoon non-dairy milk (I like almond)
1/4 cup maple syrup
1 flax egg (1 Tbsp ground flax mixed with 2 1/2 Tbsp water, let sit for a few minutes)
1 teaspoon vanilla extract
1 1/2 teaspoons lemon zest
2 teaspoons lemon juice
1/2 cup dried blueberries (you could also use fresh)
CARROT CAKE
2 1/2 cups old fashioned oats, gluten free certified if necessary
3/4 cups flour, gluten free or all purpose
1/4 cup coconut sugar
1 teaspoon baking powder
1 1/2 teaspoon ground cinnamon
1/4 teaspoon ground nutmeg
1/4 teaspoon ground cloves
1/4 teaspoon ground ginger
1/8 teaspoon salt
1/2 cup + 1 tablespoon non-dairy milk (I like almond)
1/4 cup maple syrup
1 flax egg (1 Tbsp ground flax mixed with 2 1/2 Tbsp water, let sit for a few minutes)
1 teaspoon vanilla extract
1 cup grated carrot
CHERRY CHOCOLATE
2 1/2 cups old fashioned oats, gluten free certified if necessary
3/4 cups flour, gluten free or all purpose
1/4 cup coconut sugar
1 teaspoon baking powder
1/2 teaspoon ground cinnamon
1/8 teaspoon salt
1/2 cup + 1 tablespoon non-dairy milk (I like almond)
1/4 cup maple syrup
1 flax egg (1 Tbsp ground flax mixed with 2 1/2 Tbsp water, let sit for a few minutes)
1 teaspoon vanilla extract
1/3 cup chocolate chips (I used mini non-dairy ones)
1/2 cup dried cherries (You can also use fresh)
CHOCOLATE PEANUT BUTTER
2 1/2 cups old fashioned oats, gluten free certified if necessary
3/4 cups flour, gluten free or all purpose
1/4 cup + 1 tablespoon coconut sugar
1 teaspoon baking powder
1/2 teaspoon ground cinnamon
1/8 teaspoon salt
1/2 cup + 1 tablespoon non-dairy milk (I like almond)
1/4 cup +1 tablespoon maple syrup
1 flax egg (1 Tbsp ground flax mixed with 2 1/2 Tbsp water, let sit for a few minutes)
2 teaspoons vanilla extract
1/2 cup creamy peanut butter
1/4 cup unsweetened cocoa powder
BANANA BREAD
2 1/2 cups old fashioned oats, gluten free certified if necessary
3/4 cups flour, gluten free or all purpose
1/4 cup coconut sugar
1 teaspoon baking powder
1 teaspoon ground cinnamon
1/8 teaspoon salt
1/2 cup + 1 tablespoon non-dairy milk (I like almond)
1/4 cup maple syrup
1 flax egg (1 Tbsp ground flax mixed with 2 1/2 Tbsp water, let sit for a few minutes)
1 teaspoon vanilla extract
1 large ripe banana, mashed
1/2 cup chopped walnuts
TROPICAL
2 1/2 cups old fashioned oats, gluten free certified if necessary
3/4 cups flour, gluten free or all purpose
1/4 cup coconut sugar
1 teaspoon baking powder
1/2 teaspoon ground cinnamon
1/8 teaspoon salt
1/2 cup + 1 tablespoon non-dairy milk (I like almond)
1/4 cup maple syrup
1 flax egg (1 Tbsp ground flax mixed with 2 1/2 Tbsp water, let sit for a few minutes)
1 teaspoon vanilla extract
1/2 cup diced dried pineapple
1/2 cup diced dried mango
1/2 cup dice dried apricot
1/2 cup chopped cashews
0 notes
Text
Lemon rice

We love eating lemon rice as-is for lunch or one the side with meat/veggie main course. Garnish and Serve Lemon Rice : If using roasted peanuts, mix in now along with chopped cilantro leaves. Ingredients 2 tbsp vegetable oil tsp mustard seeds pinch fenugreek seeds 1 tsp split chana dal 1 tsp urid dal 2-3 dried red chillies, left whole 1. Mix gently If using fresh cooked rice as fresh rice tend to break quickly. These lemon rice pictures I took recently again, while packing lunch for a short trip. You can use any type of fully cooked rice, I prefer Basmati Rice for its low GI. I even make it for picnic or pack it to-go for short trips. Mix rice into oil and spices sitting at the bottom of pan, stir-fry briefly until rice are nicely yellow in color. Zesty lemon, fragrant basil & parsley add a zingy kick to our Pure Basmati grains. Lemon Rice recipe is a day to day South Indian staple and also made during festive season. Fry Rice with Spice and Lemon : Now turmeric powder, chili powder and fry for 10 seconds. Be ready to cover pan with splash sheet after adding these in oil. 1/4 cup fresh lemon juice 3 tablespoons chopped fresh mint, plus. Mustard seeds and curry leaf sputter and splash in hot oil. Lemon Rice 1 small yellow onion, finely diced 2 cups long-grain white rice. (if using roasted peanuts, add in last step.) Add dry red chilies, curry leaves and fry for another 30 seconds. If using raw peanuts, add now and fry for 30 seconds. Prep Spiced Oil : Heat oil in a wok or a sauté pan. Serving: When your rice is done, fluff it with a fork to separate the grains, rather than stirring it with a spoon. Do not uncover (or stir) your rice during cooking. Don’t forget to add about a teaspoon of salt to the water before you add the rice.Ĭooking time: Let your rice simmer on low for about 18 minutes, then remove from heat and allow the rice to steam in the pot for another 5 minutes. But I find my rice is fluffier when I use 1 3/4 cups water per cup of rice.ĭifferent types of rice (brown, Basmati, short/long grain, etc.) may require different ratios of water. How much water? You’ll often hear that you should use 2 cups of water per cup of rice. It’s easy, refreshing, and everyone loves it!īe sure to save this Greek Lemon Rice Pilaf recipe to your favorite Pinterest board for later. If you’re looking to serve something besides plain old rice as a side dish, look no further than this Greek Lemon Rice Pilaf. It adds a touch of color and a wonderful, nutty flavor to this recipe. You don’t want to skip toasting the orzo either. And it just makes the cooked rice taste better! Soaking your rice helps ensure you get a pilaf with all of those perfectly individual little grains. But I really shouldn’t! It’s so easy to do, and it definitely makes a difference in the end. I confess, I’m a lazy cook sometimes, and when a recipe says to soak my rice, I often just skip it. Honestly, you could toss just about any fresh herbs in this pilaf and it would be delicious. I like to use fresh dill and fresh parsley in this dish, but other herbs work well too. My favorite addition is a big handful of frozen peas, tossed it the pot just before the rice is finished cooking. Or for a complete one pot meal, add some protein and veggies right into the pilaf. It’s especially great with grilled fish or chicken.

The fresh lemon juice and zest, along with the mixture of fresh herbs, make this rice pilaf a perfect side for almost any spring or summer meal.īut we love it so much, I make it year round. It’s my youngest son’s favorite pasta ever, so the fact that it’s included in this lemony pilaf makes it even better. The flavor is that of a creamy, lemony goodness enjoyed warm or chilled. It is a thick, custard rice pudding that is made perfect with a dusting of cinnamon. Rice is a side dish staple at my house–mainly because I know everyone will eat it–and this Greek Lemon Rice Pilaf is one of my family’s favorite ways to enjoy rice. Portuguese Sweet rice is a delicious dessert that is typically made with Jasmine rice, eggs, lemon, and milk. GREEK LEMON RICE PILAF–Rice and orzo pasta are toasted, then simmered in broth and lemon juice, before being tossed with fresh herbs in this refreshing and delicious side dish.
0 notes
Note
may we have your cupcake recipe? <3
HELL YEAH, thank u anon. i’ll give you vanilla, citrus, spice, and chocolate cupcakes & if you want anything else let me know! this is going to be stream-of-consciousness rather than linear recipe, because unfortunately that is how i bake. if you want a linear recipe, let me know which particular set of pieces you want and i can write it up for you. i’ll even guesstimate times and such.
BEFORE YOU READ FURTHER: this is very long. if you are not into cupcakes, bookmark this for later when you suddenly decide to make cupcakes and keep scrolling. now with new added read more for additional readability <3
making cupcakes takes me about two hours if i’m doing two batches or an hour and a half if i’m doing one. it might take you a little longer the first time because you don’t quite know what order to do things in or how long everything takes. i like to start my fillings first because they take longer to be ready, then turn on my oven, then mix my batter, then make the frosting while cupcakes are baking.
SUPPLIES
you will need: a cupcake tin, cupcake wrappers, at least one large mixing bowl (2 is recommended to avoid a lot of washing dishes between steps), a hand mixer or a lot of elbow grease, spatula, whisk, small bowl, a small grater or microplaner, a piping tip + bag (or just a plastic bag with a hole cut in one corner) and at least one saucepan or small frying pan. measuring spoons/cups are useful but i’ve tried to include thicknesses and alternatives so you can eyeball it if you have to (i usually do, just because i know what i’m looking for lol)
you will also need some of the following (check your specific cupcake type to find out which): a box of cake mix or ingredients to make your own cake mix, cream cheese, condensed milk, butter, powdered sugar, lemons/limes/oranges, chocolate, vanilla extract (real is recommended; i know it’s more expensive but the increase in quality is worth it if you can), lemon extract, heavy cream, pumpkin pie spice (or at least nutmeg + cinnamon), and fruit of your choice.
CUPCAKE
okay so: box mix is fine. it’s good. great, even. as long as you do this: replace the oil with butter. add an extra egg. i don’t care how many eggs it calls for. i know it feels like a lot of eggs. add an egg anyway. add a sprinkle of extra salt. a tsp or so. you’ve already made a good cupcake!
vanilla:
add a tablespoon (about three capfuls, if you don’t have measuring spoons) of REAL vanilla extract if you can afford it (or i really like the vanilla paste that has specks of bean in it. 10/10)
citrus:
one teaspoon (one capful) vanilla extract. two-ish teaspoons of lemon extract. zest of one lemon. zest of one orange (i like blood orange particularly much) or lime. replace 1/2 cup of the water with lemon and lime or orange juice. add about a tbsp of extra sugar.
spice:
two teaspoons pumpkin pie spice (you can see the spice in the batter without it discoloring the batter) + one tablespoon vanilla extract.
chocolate:
it’s already perfect xoxo. JUST KIDDING. add a tablespoon of vanilla extract.
instructions:
these ratios are for 24 cupcakes. take your cupcake pan and line it with cupcake papers. you can grease the top of the pan if you’re anxious, but it shouldn’t be necessary, especially if you have a nonstick pan. then just mix your batter until it’s not particularly lumpy and fill your cupcake papers about a third of the way full. a quarter cup measure is easiest for me to use bc the amount that easily comes out of it is about the right amount & it drips less than a spoon does. then i like to use a spoon to push the batter up the sides a little so it holds the fillings better.
FILLINGS
you can mix and match the hell out of these, honestly. i typically do cheesecake in everything & then fruit in vanilla or citrus cupcakes, specifically apple or cranberry in spice cupcakes, & chocolate in vanilla or chocolate cupcakes.
cheesecake:
one package softened cream cheese + 10 oz (2/3 a 14 oz can) condensed milk. stir on low heat until smooth, then add 2 teaspoons vanilla extract. DON’T add sugar. it’s not supposed to be very sweet.
fruit compote:
literally just half a cup or so of frozen or fresh fruit. i’ve done this with raspberries, strawberries, blueberries, blackberries, cranberries, apples (fresh and cubed is best), and peaches. anything is fair game, honestly. i want to try stewed kumquats and plums at some point. if frozen, add a tiny bit of water. if fresh, add about as much water as you have fruit. squeeze some lemon and lime in there. add sugar to taste. for the apple spice mix, add another teaspoon of vanilla and a teaspoon of pumpkin pie spice.
IMPORTANT: you do NOT want this to be sweet. this is NOT jam. it should be a little tart when you taste it. if it’s not thick enough, slurry a tbsp of cornstarch in a little bit of cold water and stir it in. it should be thick enough to not drip off of a spoon when you turn it upside down.
ganache:
heat a cup of heavy cream on very low heat. i like to do a double boiler: saucepan half-full of water, bowl full of cream in the saucepan. when the cream is warm, stir in most of a package of dark chocolate chips. stir HARD—whisk the shit out of it. DO NOT let any of the water get into the bowl!! you want the ganache to be gloppy when you lift it with a spoon—it has to not soak into the cupcake mix.
instructions:
so you have your 1/3 full cupcake wrappers with the batter spooned a little bit up the sides. using a small kitchen spoon, drop a spoonful of cheesecake into each cupcake. then top that with a spoonful of ganache or a spoonful of fruit compote (or both! it’s your kitchen!). spoon batter over the top and down the sides. fully covered, it should come to just under the top of the cupcake wrapper—i usually have 1/4 to 1/8 of an inch grace.
pop that in the oven according to the box instructions. i usually find that cupcakes with fillings take the longer time listed, rather than the shortest one. when your time goes off, touch the top of a cupcake. if it feels firm (think: ripe plum; you can push on it and it’s soft but it doesn’t cave in), it’s probably done. you can also put a toothpick down one of the sides, rather than the middle. pull your cupcakes out of the oven, put in your second batch, and set these aside to cool.
FROSTINGS
there are two frostings that go well here. i tend to like buttercream for vanilla and citrus and cream cheese for apple spice and chocolate. your mileage may vary. this is where the sweetness comes from, without overwhelming the cupcake!
buttercream:
let two sticks of butter (one unsalted and one salted) soften on your countertop. DON’T melt them. when they’re room temperature and you could mold them with your fingers, put them in a bowl. a mixer is best for this stage, but you can do it with a whisk and spatula if you’re determined, have patience, or can switch out with someone else. whip the butter a little. add five cups of powdered sugar, a cup at a time.
for a vanilla cupcake, add a tablespoon of vanilla extract (or vanilla paste! the specks are SO cool looking!) and use heavy cream to even out the texture until you think it’s pipeable (you’re looking for “holds its shape without being Chunky”). for a citrus cupcake, add a teaspoon of citrus extract and lime juice until it’s pipeable. two sticks of butter is too much, but one stick usually isn’t quite enough, and i prefer to have extra to practice piping with.
cream cheese frosting:
let one package (8oz) of cream cheese soften on your countertop. mix it in a bowl until smooth. add about four cups (3/4 a regular water cup, i think) of powdered sugar—again, we’re looking for “pipeable without being inflexible”. add a tablespoon of vanilla extract/paste and use heavy cream if you need to soften the texture at all.
both of these frostings take coloring very well. something that i personally love is doing a sort of gradient, where i’ll add red to one side and mix it well, yellow to another side and mix it well, make some orange in the middle, and leave some white here and there. then spoon from each section into a piping bag and voila, free beautiful swirls. you can also use a knife to frost your cupcakes, but i think piping is fairly easy to pick up on if you try it a few times, and it makes your cupcakes look that much more professional.
instructions:
make SURE your cupcakes are COOL TO THE TOUCH before you frost them! pop them in the fridge if you’re in a hurry! a single layer of piping should be enough, but decorate if you want. icing sugar is pretty. don’t go too overboard with sprinkles—they make it hard to eat.
voila! cupcakes.
SUBSTITUTIONS
i have made these gluten-free, dairy-free, corn-free, vegan, etc etc. gluten free box mix is fine. your own powdered sugar (powdered sugar + tapioca starch) is great. you can do a coconut milk pudding instead of cheesecake or ganache. you can do baking soda + vinegar instead of baking powder (1/4 tsp bs + 1/2 tsp vinegar per tsp baking powder). if you’re allergic to fruit, i am SO SORRY for you but please try the chocolate ones. you can substitute any extract, any flavor profile, any combination of ingredients. if you’re using a commercial egg substitute, just add an extra 1/4 cup of it. if you’re using flaxseed, just add an extra tablespoon of flaxseed + 3 tablespoons water.
it may not come out exactly the same as the standard ones, but my friends with dietary restrictions still swear by them. i have never brought cupcakes home from a party. i don’t think anyone who’s ever tried one has not gotten a second helping. people who swear they aren’t cupcake people love these cupcakes. (it’s because they aren’t overly sweet or moist or dry and they aren’t one-note, because the fillings add complexity of texture and flavor. there you go, now you know how to describe your new cupcakes to people).
congrats! you’re about to be everyone’s favorite party guest!
#personal#askposting#i apologize in advance for how much is in here ❤️#i’ll try to put a read more on this when i get on a laptop#most of these recipes are not Mine in that i did not solely invent them. however i have altered them & mixed & matched them & etc etc#so they’re yours now
14 notes
·
View notes
Text
Punjabi Kadhi With Onion Pakora | Cook with Budgett
Cook with Budgett here comes again with simply best yet tasty recipes which are Punjabi Kadhi recipes which is a family legacy recipe.
This fantastic Punjabi Kadhi Pakora Recipe is my mother's treasured or secret recipe of making the Punjabi Kadhi with onion pakora and now I would like to break this secrecy open and love to share with you happiness in order to multiply it. It is one of the recipes she has been making for ages and cherished by all of us till now.

About The Recipe
For this recipe of Punjabi Kadhi Pakora, the Hindi word “Kadhi” denotes a yogurt sauce that has been slow-cooked for quite some time. The word “pakora” means fritters made from gram flour (besan).
In this recipe, the fritters are made with onions and gram flour.We all love kadhi, the craving of it never ends that sour taste with some tinge of spice comes our taste buds get activated by that to have it in our belly be it with or without pakora.

How to make Punjabi Kadhi Pakora
We will first begin with making the curd slurry which we can say gravy part as well, then coming over to the onion pakora and then finally joining up the two and making the kadhi pakora.
Making curd slurry or gravy of Punjabi Kadhi
1. In a bowl take around 2 cups sour curd or about 400 grams of curd max. Whisk it well till it gets smooth enough.
2. Add 9 tbsp gram flour (besan), Half tsp of red chili powder, half tsp of turmeric powder, Half tsp garam masala powder, and 2 tsp salt to the whisked curd.
3. Stir up and mix everything well again.
4. Add 3.5 cups water and stir it again.
5. Stir it very well to make a smooth mixture make sure that lumps are not visible. If there are lumps, then break them with a wired whisk or we say hand blender or a spatula and last we can do with fingers as well. Set the curd slurry aside.

Making now Onion pakora for our Punjabi Kadhi
1. Take 2 cup gram flour (besan) into a bowl and then add half tsp of ajwain/carom seeds, Half tsp of red chili powder, Half tsp of garam masala powder, and 1 tsp salt or as required according to your taste.
2. Add 2 cups of thinly sliced onions. About 3 medium to large onions, sliced, approx 160 grams of onions.
3. Now mix everything well and keep aside make sure it's covered for around approximately 35 minutes.
4. Due to this the onions will get time to release their water into the mixture. It also depends on the water content in the onions, but anyhow we gonna do it as necessity need to be done that's how Cook with Budgett simply best yet tasty recipe will be achieved, due to it the mixture will become very moist or just about moist.
5. Then accordingly add water as per your requirement that you want to make a thick batter out of it or not. Add a quarter cup of water. You can also skip adding water if the mixture is too moist.
6. Heat up the oil for deep frying in a pan or kadhai. with a spoon or by your hands and drop the pakora batter into the fully heated oil.
7. When the pakora is starting to fry partly, turn around and fry it from the other side.
8. Fry till the pakora are crisp and golden in color.
9. Now remove the fried pakora and place them over a kitchen paper towel so that extra oil gets absorbed.
Fry the pakora into the batches this way. When done with keeping all of them aside on a plate.

Making kadhi recipe, We Believe in best spices to make our recipes, So Everest is the one that hits our shore.
1. In another pan or kadhai, heat 3 tbsp mustard oil. Make sure to use a large bottomed pot(which has a flat surface, not like the upward parabola) so that while cooking, the kadhi does not spills out.
2. Add 2 tsp cumin seeds, 9 to 11 fenugreek seeds/methi seeds, and a sweet pinch of asafoetida (hing)/ not too much, just a little. Allow the cumin seeds to dance into the pan and the fenugreek seeds as well till the change in their color visible. Fry on a low-medium flame, so that these spices do not get burnt as well, be very cautious about it.
3. Add a quarter cup of chopped onion. Stir and saute it up for 4 minutes on a low-medium flame.
4. Then add 2 tbsp chopped ginger, 1 tbsp chopped garlic, and 3 green chilies, chopped. Stir and sauté for a minute.
5. Now add 9 to 11 curry leaves, 3 dry red chilies (halved or broken).
6. Stir and sauté for a minute on a low-medium flame.
7. Then add the curd slurry/gravy we made according to the above instructions.
8. Stir very well.
9. Increase the flame to medium-high and bring the kadhi to a boil comes. Keep on stirring often so that our Punjabi Kadhi doesn't get burned at the bottom. Time taken to cook kadhi will be around 15 to 17 minutes.
10. After the kadhi comes to a boil, then lower down the flame and simmer it for again 7 to 8 minutes. Do stir at frequent times. The kadhi will automatically thicken up. If it becomes too thick, then add some hot water into it.
Making kadhi pakora
12. Now add the onion pakora which we have already made to our Punjabi Kadhi. Stir gently.
13. Cover it with a lid and let the onion pakora be soaked in it for around 9 to 11 minutes.
14. Lastly, sprinkle some garam masala powder over the top of Punjabi Kadhi.
15. Garnish it with coriander leaves & serve Punjabi Kadhi Pakora hot with any of maybe it's steamed rice or jeera rice, topped with teaspoonfuls of ghee.We can also serve it with roti or paratha as well.
However, the combination of Kadhi Chawal is amazing and very popular which tastes very good as well.

Tips by Cook with Budgett
Curd (yogurt): Use fully fatty sour curd or sour yogurt made out of whole milk. If the curd is not sour, then our Punjabi Kadhi will not be sour and it will result in losing up of its charm. To make the curd sour, you can add 1 teaspoon amchur powder (dry mango powder) or a bit of lemon juice into it.
Fats: Use mustard oil if it's possible to fry the onion pakora. Mustard oil leaves out a pungent sharp taste and adds irresistible flavor to the kadhi. If you do not have mustard oil, then use a neutral oil like if we say it's sunflower oil.
Baking Pakora instead of frying: You could also bake the onion pakora instead of deep-frying it.
Make sure the oven is preheated at 180 degrees Celsius before baking the onion pakora and bake it until the pakora is crisp and golden in color. For baking, pakora adds 2 to 3 tablespoons of oil into the batter and does not make the batter very moist but keeps it a bit wet and watery.
Curry leaves: Don’t skip the curry leaves part, as you will feel something is the missing vibe from your Punjabi Kadhi Pakora Recipe.
Besan: Use good quality gram flour (besan).Like TATA Sampann which we used in making.

Hope you would have liked the recipe comment down below and let us know and don't forget to subscribe to us. Join our Instagram handle @cookwithbudgett. Learn more as we have our Grocery Store as well where you can purchase.
#indian#indian recipes#north indian cuisine#kadhichawal#tasty#delciious#crave#we crave love#tastygram#it was tasty#delicieux#amazing#tremendous#easy preperation#cooking#loveyourself#love to cook
4 notes
·
View notes
Text
Quaran-Dine & Chill: Here are 12 Homemade Food Recipes From Some Of Your Favorite Bands

Look, we get it: You’re bored. You’re stuck at home with nothing to do and to top it all off you’re absolutely starving with no idea what to make except for a peanut butter & jelly sandwich.
Thankfully, we knew this would happen so we reached out to some amazing artists to see if they had any recipes to help us all get through this never-ending period of social distancing.
Submitting for a feature we like to call “Quaran-Dine & Chill,” bands like Mayday Parade, The Used, August Burns Red, Atreyu, Periphery, New Found Glory and more have all pitched in some of their most favorite recipes to make from home.
To check out how to create Groovy Toast, cook some of Herbie’s Homemade Chicken Taquitos or even put together some Veggie Pasta with Vegan Ass White Sauce, be sure to look below. Afterward, remember, before making anything to eat, WASH YOUR DAMN HANDS!
Oh, and there’s also a special 35-song Quaran-Dine & Chill playlist at the end of all this. Listen to it as loud as you possibly can -- we hear it helps the food taste better.
Enjoy!
JAKE BUNDRICK - MAYDAY PARADE

JAKE’S OVERNIGHT OATS
Ingredients
1/2 cup oatmeal (any type will work but I personally like Old Fashioned or Rolled Oats)
1 cup water
1 scoop protein powder (It's not necessary by any means but I prefer French Vanilla from TrueNutrition)
3/4 cup of either frozen berries or fresh berries (strawberries, blueberries, raspberries, black berries... you can either add this now to soak overnight or wait until you're ready to eat and then add berries. It's up to you)
1 banana sliced
1 tablespoon of natural peanut butter
Instructions
Mix oatmeal, water, protein and frozen berries together in a bowl or jar (frozen berries are optional). You could forego this and choose to add fresh berries later.
Cover and let sit in the fridge overnight or for a few hours -- your choice.
After soaking, add fresh berries if you haven't already. Then add bananas and peanut butter.
Enjoy.
MATT HALPERN - PERIPHERY

REALLY HEALTHY “CEREAL”
I love cereal but I don't want all the bad stuff associated with most cereals. So I came up with a healthy alternative. It's pretty simple.
Grab a bowl
Add Trader Joe's Go Raw Trek Mix
Slice up some strawberries and add them too
Throw on a couple blueberries
Add 1% milk
And there ya have it! Really hearty, really healthy, easy to make “cereal” that actually fills you up!
MATT GREINER - AUGUST BURNS RED

DEER CAMP BREAKFAST CASSEROLE
Ingredients
18 eggs
2 cups of milk
1 cup cheddar cheese
1 lb bacon
1 lb loose sausage
1 ts salt
1 tb pepper
1 pack hash browns
Instructions
Pre-heat oven to 350 degrees
Brown sausage and bacon separately-drain
Pan fry hash browns until golden brown
Grease a 13” x 9” baking pan and line the bottom with hash browns
Add a layer of bacon
Add a layer of sausage
Whip the eggs in a large bowl, then add the mix, salt and pepper, mix well
Add the cheese to the eggs and mix again
Pour the egg mixture over the meat and hash browns
Cover with aluminum foil and bake for 25-30 minutes
Remove foil and bake until the top of the casserole begins to brown. Then remove from the oven.
BRENT WALSH - I THE MIGHTY

B-LEE'S BREAKFAST FEAST
Ingredients
Hash browns
2 eggs
Onions
Garlic
Mushrooms
Peppers
Cheddar cheese
Black pepper
Salt
Ketchup
Valentina (black label, extra hot) hot sauce
Olive oil
Instructions
First, get the hash browns going in a frying pan with lots of oil. They take the longest.
In a second pan, get all the veggies going adding garlic when everything else is almost done so that you don't burn the garlic.
When the hash browns are done, plate them and immediately add the cheese to taste.
The veggies should be about done by this time so add those on top.
Fry the eggs (I like mine over medium) in the original pan you cooked the hash browns in and add salt and pepper while they cook.
I like to top it all off with some black label Valentina hot sauce and a little ketchup.
Add a coffee and mimosa on the side and boom, you got yourself a good ol' quarantine breakfast feast.
MARK HOLCOMB - PERIPHERY

SRIRACHA TUNA SALAD
Take two cans of tuna, break it up in a mixing bowl, toss with two tablespoons of celery, half an onion and some chopped fresh parsley.
Add 1/3 cup of mayonnaise (or veganaise if you’re a tree-hugging hippy like me), 1 tablespoon mustard, and several tablespoons of Sriracha depending on how spicy you want it.
Top off with some ground pepper and lemon juice, to taste.
Also feel free to add half a diced apple if you like some sweetness and crunchy texture in there.
Delicious, healthy and super simple.
JEPHA - THE USED

GROOVY TOAST
Soak a cup of any kind of nut (almond, cashew etc..) overnight in water.
Next day, strain most of the water except for a little bit to help blend it.
Put soaked nuts in blender with a dash of lemon, a pinch of salt, pepper, two tablespoons of olive oil.
Blend until smooth.
Optional fun: slice something spicy like a jalapeño.
Add “Groovy cheese” to either toast or crackers.
Drizzle olive oil and lemon on top of “Groovy Toast” with a spicy, spicy jalapeño and let your mouth party like your stuck at home for the next month or so 🤙
CYRUS BOLOOKI - NEW FOUND GLORY

SHEPHERD’S PIE
Ingredients:
Ground Beef (or turkey, or chicken, or any kind of meat for that matter)
Onion, diced (optional)
Frozen veggies (1 bag of pretty much anything you have, normally a carrot/corn/peas mix, but seriously, anything will do)
Worcestershire Sauce (optional, but check the back of your cupboard because you probably have a bottle that’s been sitting there for years and is still good!)
Potatoes (again, any kind of potatoes will do)
Cheese (cheddar is the standard, but use what you have!)
Instructions:
Cook your meat in a skillet, seasoning with salt and pepper and adding diced onion if you have while cooking.
Cook/microwave your bag of frozen veggies and add directly into the meat and stir.
Now’s the time to find that Worcestershire sauce if you have it -- if not, don’t worry, this is awesome without it too!
Add a cup of cheese in there and also 1/2 cup of liquid (could be water, could be chicken/beef broth if you have). Stir to combine all ingredients and turn to low heat to keep warm.
Meanwhile, make mashed potatoes however you can (whether by hand or with a box) and when done layer these two things in an ovenproof dish — meat/veggie mix on bottom, mashed potatoes on top.
Toss cheese all over the top of that and throw it in the oven on medium heat for 20 minutes to melt the cheese.
Now, sit back, relax and enjoy your dish whether with family or all alone. It’s a full meal all in one, tastes even better the next day and you can even freeze it!
BRANDON SALLER - ATREYU

WINNER WINNER ISOLATION DINNER (Crispy Baked Chicken Thighs)
Ingredients
Bone-in chicken thighs w/ skin
Salt (coarse salt works best but any will work fine)
Pepper
Garlic powder
Mixed herbs or Italian seasoning
Desired veggie - Whatever you have (ie broccoli, green beans, asparagus, zucchini)
Italian dressing (your favorite)
Instructions
Preheat oven to 400º
Pat dry chicken on both sides with a paper towel
Season both sides of chicken liberally. Especially the top. The key to this chicken is the well seasoned crispy skin.
Place on sheet pan and roast in oven for about 40 minutes. You are looking for the chicken to be cooked through and skin to be browned and crispy.
When chicken has about 20 minutes left, put marinated veggies on a sheet pan and roast until chicken is done.
When finished, let chicken rest for about 5 minutes as it just came out of a 40-minute fiery hell and will 100% burn your mouth.
ENJOY!
IRA GEORGE - MOVEMENTS

TACO SALAD
This is a very easy and fluid dish that you can make on your own with ease. Whether you are a vegetarian or vegan, you can make this fit your lifestyle.
Ingredients
1 bag of chopped romaine
1 can of black beans
1 frozen bag of white or brown rice
1 cup of frozen corn (thawed)
Soyrizo (or any type of ground meat)
1/2 bell pepper
2 Roma tomatoes
1/3 yellow onion
1 avocado
Cilantro
1 lime
Taco sauce of your choice
Cilantro dressing (or something comparable)
Diced jalapeños
Shredded Mexican cheese
Handful of tortilla chips
Instructions
Dice the bell pepper, yellow onion and Roma tomatoes
Chop a handful of cilantro
Thaw corn in microwave
In a small pot heat up the can of beans
Cook the soyrizo or other meat in a pan at the same time (if you are using meat you will need to season to your liking)
Heat rice in microwave (if using uncooked rice have it ready before everything)
Grab a big bowl and put rice down. Add the cilantro and lime and toss together
Now add everything else however you want. Remember this is a completely fluid meal, add or takeout any ingredient you feel. Get creative with it! DON’T FORGET TO ADD THE AVOCADO AND SAUCES!!
NICK VENTIMIGLIA - GRAYSCALE

HERBIE’S HOMEMADE CHICKEN TAQUITOS
Servings: 12
Calories: 241
Prep time: 20 min
Cook time: 20 min
Total time: 40 min
Ingredients
3oz cream cheese
1/4 cup salsa of your choice
1 tablespoon lime juice
1 1/2 teaspoon of taco seasoning
2 fresh cloves of garlic, minced
3 tablespoons cilantro or parsley
2 scallions diced
2 cups shredded cooked chicken or whatever protein you desire
1 cup Mexican blend cheese or whatever you want
12 6in flour tortillas
Cooking spray
Kosher salt
Instructions
Preheat your oven to 425 degrees. Line a baking sheet with parchment paper.
In a large bowl, mix together the cream cheese, salsa, lime juice, taco seasoning, garlic, cilantro, and scallions until well combined and creamy. Add in the cooked chicken and cheese; stir to thoroughly combine.
Working with a few tortillas at a time, heat them in the microwave between two paper towels until they are soft enough to roll (about 10 seconds).
Spoon 3 tablespoons of the chicken mixture onto the lower third of a tortilla. Roll the tortilla tightly.
Place the rolled tortilla seam side down on the baking sheet. Repeat with remaining tortillas until the mixture is gone, making sure the taquitos are not touching each other.
Spray the tops lightly with cooking spray and sprinkle with a little kosher salt (don’t skip the salt!)
Bake for 15-20 minutes or until crisp and golden.
Serve with salsa, sour cream, or guacamole.
BALSAC THE JAWS 'O DEATH - GWAR

I offered up my recipes for Feline Fricassee and Poodle Wellington but my publicist informed me that things hadn't yet gotten to the point where most people are ready to eat their pets. Instead, here is a recipe that you should be able to throw together without having to take that dreaded trip to the supermarket.
Now more than ever, everyone should be able to hunt and kill their own food. So the first thing you will need to do is grab your favorite battleaxe, knife or shotgun and go in your backyard. Look for the happy yellow flowers that are probably taking over your poorly manicured lawn. Pick as many of these as you can find, making sure to pull them out from the roots keeping the long dark green leaves intact. You may be asking, “What do I need this shotgun for?” The weapon is in case your neighbor sees you and tries to shake hands!
DOOMSDAY DANDELIONS
Ingredients
Dandelion greens
1/2 cup olive oil
3 tablespoons vinegar (red wine vinegar or balsamic work best but whatever kind you can find in your cupboard. It is the apocalypse after all)
1 tablespoon mustard (Dijon if you've got it but who am I kidding, you only have that horrible yellow crap!)
2 cloves garlic minced
Salt and pepper
2 teaspoons dry herb (use whatever you can find. What are you saving that stuff for?)
Instructions
Pick the flowers off the dandelion greens (these are edible too, I suggest beer battering them and frying them, but that's another recipe and I'm not getting paid for this).
Trim the hairy roots from the greens and discard.
Wash all the dirt from the greens, cut them in half at the base keeping the leaves attached and soak in clean cold water.
Wisk all other ingredients together until they are a cohesive solution.
Drain and pat dry the greens and dress them with the vinaigrette.
Enjoy by yourself!!
SCHUYLAR CROOM - HE IS LEGEND

VEGGIE PASTA WITH VEGAN ASS WHITE SAUCE
Ingredients
1 medium onion chopped
3 cloves of garlic
Red bell pepper julienned
Broccoli florets
Mushrooms sliced thin
Zucchini halved and sliced
Yellow squash quartered and sliced
1 or 4 splashes of white wine
Finisher Sauce
1/4 cup of unsweetened oat milk
1 or 2 tbs coconut oil
1/4 cup vegan mayo
A few handfuls of vegan cheese (I used a vegan pepper jack by Daiya and a bit of Follow Your Heart Parmesan)
1/3 cup of Nutritional yeast
Fresh basil
Herbs and Spices
Kosher Salt
Fresh ground pepper
Herbes de Provence
Some other optional shit
Pasta
Fettuccine noodles ( I like that Ancient Grain in the blue box.)
Instructions
Boil salted water for your noodles and in a separate pot boil a few cups of water to blanche your broccoli. You’ll be mad if your water is not boiling before you start sautéing your veg... that shit goes quick, watched pots never boil.
In a large saucepan over med/high heat: Sauté onion for about 5 minutes until it is soft and almost translucent. Add chopped garlic until that smell wakes up your girlfriend. Boom you’re cooking. Salt and pepper that junk.
Add the peppers, mushrooms, zucchini and squash, hit it with some more salt and pepper. I like to throw in some Herbes de Provence and a TINY SPRINKLE of cayenne (a little goes a long way) plus some truffle salt because I’m fancy.
By now the lil pot should be boiling. Throw those broccoli guys in there and when they turn dark ass green drain them and throw them in the pot with the other veggies.
Shit’s all steamy now. It smells crazy good. Your girlfriend and your dog are in the kitchen salivating.
Hit those veggies with some white wine. I say a few dashes, but you’ll know. You’re gonna want to let that cook off for 3-5 minutes.
Maybe you’ve already put your noodles in. If so, they’re ready to drain. If not, get to it 9 minutes after the water starts boiling again (read the box)
Now your noodles are in the strainer. Make your partner divide that into bowls.
After the wine has cooked off, add the veganaise, coconut oil, vegan cheeses and the nutritional yeast and stir all of that up until melty and gooey and combined with the veggies. I like the throw in about half a cup of chopped sliced basil and leave a little for a garnish after you’ve topped your pasta with this creamy ass veggie goodness.
OH! Pro tip: Garlic bread. (Do this 40 minutes ago before starting anything else.)
Take 2 heads of garlic and peel most of the skin off but leave bulb intact.
Chop the very top of the head off the garlic to expose the clove (like 1/16 of the top).
Place it in tinfoil and close it up around the sides. Douse with a generous amount of olive oil and salt and pepper all over that opening on the bulb and close the foil up tight around the top. Create a little oven inside your oven.
Bake at 375 for 40 minutes. You’ll smell it.
Let it cool well.
Toast a loaf of French bread.
Those little garlic cloves will pop out like little teardrops of pure heaven. Smear that junk on your toasted bread and thank me later. The oil is now roasted garlic oil. You could drizzle that on the bread too or over the damn pasta that’s in the bowl.
(Be careful. You will want to skip the steps of letting the bulbs cool. They are unforgivingly hot and will burn your flesh.)
#He Is Legend#Grayscale#Atreyu#New Found Glory#Periphery#August Burns Red#Mayday Parade#Gwar#I The Mighty#The Used#Movements#interview
12 notes
·
View notes
Text
CSA WEEK 17
p i c k l i s t
PARSLEY - REDBOR KALE - SHISHITOS PEPPERS! - HABANADAS PEPPERS! - CAYENNE PEPPER! - JALAPENO PEPPER! - BEETS - BUTTERCUP WINTER SQUASH - CARROTS- HEIRLOOM FIELD TOMATOES - CORN - ONION - GARLIC
Content Warning: this newsletter talks about food, if you are fasting in recognition of the holiest day of the Jewish Calendar, then please feel free to pause until tomorrow…. Ok?
And now let’s get into it: our Summer CSA ends this week! What in the world are we all supposed to eat after this week’s goodies run out? Cereal?! Hot dogs? Nightly takeout from Brownsville Butcher and Pantry? JK, As you all know our Fall CSA begins in a week, so this is certainly not the end of fresh veg for those that signed up. In fact for many of you, the fun starts next Wednesday (first FALL CSA!) when our efforts go into filling the farmstand with towers of brussel sprouts, bins of onions, trays of greens and if you are smart and gluten friendly- a fresh warm loaf of bread (via add on bread share).
And as for the fields this week, they did get a light frost two nights in a row. Some plants are toast but the majority remain and they will continue to kick around until a deep kill frost hits and the fog breaks. Truthfully, none of us expect the peppers, corn, and cherry tomatoes to stick around much longer, but while they are here, we will love them dearly and pick them with pretend Summer delight. The brassicas and other greens have no problem with these cool temps, and we have enough greenhouses growing food to keep our bellies full and happy through the Winter Solstice (and beyond?).
In other field topics, we are all impatiently waiting for the tops on the potatoes to properly dry so we can begin to dig the spud field using our fave large piece of equipment, the potato harvester- this will save an insane amount of time. We are all a little sick of hand digging and our fingernails could use a break. For real, the pain of hitting your finger nail into a potato while digging into the soil is a shock to the system for daaaaays.
But the most pressing topic to really hit today is all the food we ate together these last 17 weeks. From strawberries in June, to blueberries in July and Melon into the end of September. We ate like kings and queens! And come January, I guarantee you, the onslaught of Equinox peppers will be missed as you sip on your dried tulsi tea. Moreover, a huge shout out to all CSAers near (farmstand pick up!) and far (Eastman! The Studio! Novo Nordisk! Windsor! Brownsville!). I don’t know what the CSA means to you- is it just groceries? Is it more? But for me, the CSA gives my every week real meaning and rhythm. With the help of so many awesome hands and fellow farmers (Ray, Roy, Garnet, Claire, Denroy, Carlington, Tim, Jasper, Strong, Joe and Mike, Mrs. T and Pam), I get to curate your meals from a field! That is a huge honor and I do not take it lightly. And bottomline here, a massive cheers to you all for taking a chance on Edgewater this season, and I do hope to check in with you all again in the not too distant future.
Peace, Love, and Habanadas, Jenny
Pro-tips:
KALE SALAD WITH ROASTED SQUASH AND FENNEL
FROM START SIMPLE
(the above book is absolutely my go to for nearly all meals, treat yourself:
Copyright © 2020 by Lukas Volger. Published by Harper Wave, an imprint of HarperCollins Publishers.
The dressing - a mix of maple syrup, lemon juice, and olive oil, plus an optional jolt of ginger- could make anything taste good, and the salad, with its autumnal profile, works just as well in holiday menus as it does in packed weekday lunches… Add some crumbled feta if you’d like a tangy creamy element.
2 cups winter squash cut into bite size pieces
1 to 1 ½ tablespoons maple syrup or honey
3 tablespoons olive oil, divided
2 teaspoons finely grated ginger (optional)
Salt & pepper
1 small fennel, cored (also optional!)
2 tablespoons fresh lemon juice
1 large bunch of kale (stemmed and torn into bite size pieces
¼ cup crumbled feta cheese (optional)
Parsley, (chopped)
Preheat the oven to 425. Spread the squash on a baking sheet, then toss with 1 ½ tablespoons of the olive oil and sprinkle with a big pinch of salt and pepper. Roast until tender, 15-20 minutes, stirring once or twice. Cool.
Whisk together the remaining1 ½ tablespoons of olive oil, the lemon juice, maple syrup or honey, and ginger, if using, in a serving bowl. Cut the fennel (if using) into thinnest-possible shavings, preferable using a mandoline or, if not, a very sharp knife. Add the fennel and squash to the bowl with the dressing and stir to coat. Let stand for about 5 minutes, which will soften up the fennel, then add the kale and toss with your hands. Top with cheese if using and chopped parsley!
Grounding roasted roots with herbed jalapeño yogurt sauce is a beautiful and simple side dish that features a delicious sauce.
PREP TIME:15 MINS/ COOK TIME:1 HR/ TOTAL TIME:1 HR 15 MINS/ SERVINGS 4 -6
ROOTS:
1 lb carrots (5 medium), peeled and chopped into 2-inch pieces
½ lb beets (3 medium/4 small) peeled and chopped into 1-inch wedges
1 tablespoon olive oil
1 ½ teaspoons za’atar spice
sea salt and ground black pepper, to taste
YOGURT SAUCE:
1 cup mixed herbs, packed (I used parsley, dill & basil), plus extra for garnish
1 small jalapeño pepper, seeded and chopped (I left some of the seeds because I like the heat)
1 garlic clove, peeled
2 tablespoons shelled and salted pistachios, plus extra for garnish
2 tablespoons olive oil
1 tablespoon lemon juice
sea salt and ground black pepper, to taste
1 cup thick non-dairy yogurt (see notes for recommendations)
Notes
I would make this a meal by serving it in a grain bowl-style setup with some cooked farro, white beans, and a big handful of chopped/baby greens per person.
I used carrots and beets, but any mixture of root vegetables you like is good. You’ll need 1 ½ pounds.
If you don’t have za’atar spice blend, that’s fine! Just use salt and pepper. The sauce is super flavourful.
Preheat the oven to 375°F. Line a 9x13x2 baking dish with parchment paper.
Place the chopped carrots and beets in the baking dish and toss them with the olive oil, za’atar, salt and pepper. Once the vegetables are evenly coated, spread them out into a single layer and slide the dish into the oven. Roast the vegetables for 1 hour, taking them out at the halfway point to stir them up and flip them over.
Make the herbed jalapeño yogurt sauce: In a food processor, combine the herbs, jalapeño, garlic, pistachios, olive oil, lemon juice, salt, and pepper. Pulse the machine a few times until everything is finely chopped, scraping down the sides of the bowl with a spatula if necessary. Add the non-dairy yogurt to the food processor and pulse until the sauce is fully combined and uniformly light green. Check the sauce for seasoning and adjust if necessary.
To serve: Spread the herbed jalapeño yogurt sauce out on the base of your serving plate. Pile the roasted root vegetables on top of the yogurt sauce.
Garnish the grounding roasted roots and herbed jalapeño yogurt sauce with extra chopped herbs and pistachios. Serve warm or at room temperature.
Corn!
Heads up yall, this corn was picked on Saturday pre-frost as a just in case frost precaution. It’s great for soups or freezing for winter!
To freeze: blanch in boiling water, let cool, remove kernels, put in zip lock bag, and freeze!
1 note
·
View note
Text
Can You Halve a Cake Recipe? Baking Measurement Tips

Have you ever wanted to bake a cake but had no idea how to scale down the recipe? I know I have! After all, it's not always necessary (or practical) to make an entire cake. That's where half-cake recipes come in handy! In this article, we'll be discussing the ins and outs of halving a cake recipe.
We'll cover everything from ingredient measurements to baking times - so if you're ready for some serious baking advice, let's get started!
Maybe You Also Like:
- Can You Get Recipes On Echo Show
- Can You Patent A Drink Recipe
- Can You Replace Bourbon With Whiskey In A Recipe
Understanding The Basics Of Halving Recipes
When it comes to halving a cake recipe, the key is understanding how exact ratios and changing measurements can affect your baking results. The most important factor to consider when halving a cake recipe is that there are precise amounts of ingredients called for in order for the desired result.
If you try to just cut all of the ingredients in half – such as two eggs instead of four – that won’t necessarily yield the same outcome as if you had followed the original measurements precisely. This means that some adjustments may need to be made along with cutting everything in half, depending on what type of consistency or texture you want from your finished product.
For example, if a particular recipe calls for one cup of sugar, then you would only use ½ cup when halving it. However, if this recipe also includes vinegar or another acidic ingredient like lemon juice, then you should reduce the amount by an additional ¼ teaspoon since these ingredients tend to become more intense after being cooked at high temperatures.
On the other hand, if something needs to be measured out precisely (like salt), then don't make any reductions – just stick with exactly half of whatever measurement was originally called for.
This process takes practice but once you get comfortable with knowing which recipes will require extra attention and why certain adjustments should be made during halving, you'll find yourself easily producing delicious cakes time and time again!
Converting Measurements For Ingredients
I'm having trouble converting measurements for ingredients when I'm baking. For example, I'm not sure how many tablespoons are in a teaspoon, or how many milliliters are in a cup. I know I need to be able to convert measurements in order to successfully bake, so I'm hoping to get some help here!
Does anyone have any tips for converting teaspoons to tablespoons, or cups to milliliters?
Converting Teaspoons To Tablespoons
When it comes to baking, you know that measurements need to be precise. And when it comes to converting teaspoons into tablespoons and vice versa it can get tricky! That's why I'm here with some helpful advice on how to make sure your portion control is top-notch and your cakes come out perfectly every time.
The most important thing to keep in mind when converting teaspoons into tablespoon is the size of your baking pans. If you have smaller pans, a teaspoon may not fit, therefore, it needs to be converted into at least two or three tablespoons instead. On the other hand, if you're using larger pans for your cake recipes, then one teaspoon could easily turn into half a tablespoon.
No matter what type of pan you decide to use for baking, just remember: accuracy is key! Be mindful of each measurement so that all ingredients are well balanced and evenly distributed throughout the dough before popping them in the oven for perfect results every time.
Converting Cups To Milliliters
When it comes to baking, shopping lists and portion control are key. But what about converting measurements for ingredients? Well, that's just as important! Let's take a look at how we can convert cups into milliliters - an especially helpful tip when dealing with small or precise amounts of ingredients.
To start off, you'll need to know the volume of your cup; most often this is 8 ounces, or 240 milliliters. So if your recipe calls for one cup of ingredient A, then you're looking at measuring out 240 milliliters in total.
To make sure you don't overfill or under-measure, I recommend using a kitchen scale to get more accurate readings. That way you won't have any surprises when it comes time to bake!
And there you have it - now you know exactly how much of each ingredient should go into your cake batter without having to guess or eyeball the measurements. With these tips in mind, all that's left is to grab those mixing bowls and let the baking begin!
Adjusting Baking Times
Once you've converted the measurements for your cake recipe, it's time to adjust baking times. Baking can be tricky and there are a few things you should keep in mind when troubleshooting problems.
- First of all, check that your oven is preheated correctly before putting the cake in – this will ensure even heating which is key to getting a perfectly cooked result.
- Secondly, use an oven thermometer if possible; they're very affordable and provide more accurate temperature readings than the traditional dials on most ovens.
- Lastly, don't forget to set a timer while baking!
Checking progress regularly helps prevent over-baked cakes or cupcakes with dry centers. When done right, properly adjusted baking times can make all the difference between a delicious treat and disappointment!
Modifying Baking Utensils And Temperatures
I'm standing in front of the oven, ready to begin baking the cake I've been dreaming about for weeks. I take a moment and look around; my kitchen is filled with ingredients, utensils, and appliances all set up and prepared to help me make this delicious treat. Now it's time to get started!
First, I need to scale down the pans according to the recipe's directions. This means that if the original recipe calls for two 9-inch round pans, then I'll use one 8-inch pan instead – half of what was originally called for. With that done and out of the way, I can move on to adjusting the heat as directed by my recipe.
When halving a cake recipe, you may have to lower or increase your oven temperature accordingly so that your cake bakes evenly throughout its cooking time. In some cases, reducing baking time might also be necessary.
As I slide my halved cake into the preheated oven and watch it start baking away, I'm filled with anticipation of how amazing it will taste when finished – fingers crossed! All there's left to do now is wait patiently until it’s fully cooked before taking out from the oven and letting cool before decorating and eating.
Decorating And Serving A Half Cake
Once you have halved your cake recipe, the next step is to decide how to decorate and serve it. There are plenty of creative ways you can use your half cake for a special occasion or just as an everyday treat! Here are some ideas that might inspire you.
When it comes to decorating, think outside the box. You don't need fancy ingredients - try sprinkling chopped nuts along the top or adding a few edible flowers in pastel colors. For something more indulgent, drizzle melted chocolate over your masterpiece or add swirls of fresh cream. Get creative with whatever toppings you have at home!
Serving tips depend on who'll be eating your cake and what type of atmosphere you want to create. If it's a party, cut up small slices so everyone has enough to enjoy. On a romantic date night?
Serve two generous pieces accompanied by glasses of bubbly for extra romance. Enjoyed alone? Cut yourself one large slice and share the rest with friends or family later on!
Frequently Asked Questions
Can I Freeze A Half Cake?
Sure, you can freeze a half cake! Just make sure that the icing techniques and portion sizes are correct before freezing it. The best way to do this is by cutting the cake into two halves and wrapping each one tightly in plastic wrap or aluminum foil.
Once your cakes have been frozen, they should last for up to three months if kept at a temperature of 0 degrees Fahrenheit or lower. So go ahead and enjoy your delicious treat without worrying about time constraints!
Is It Possible To Double A Cake Recipe?
Yes, it is possible to double a cake recipe. All you have to do is increase the amount of ingredients by two times the original ratio and portion sizes.
For example, if your original recipe calls for one cup of flour, you will need two cups if you decide to double the recipe. You can also use this trick when halving or reducing the ratios and portion sizes in a recipe as well!
How Can I Make A Half Cake Look Presentable?
Decorating a half cake can be tricky. But, with the right portioning tips and decorating techniques you can make it look just as presentable as an entire cake! When cutting your cake in half, use a sharp serrated knife to get nice clean cuts.
Then, frost both sides evenly for a neat presentation. You can also add decorations such as sprinkles or fondant shapes to give it that extra touch of elegance. With these easy steps, your half cake will be looking great in no time!
What Is The Best Way To Store A Half Cake?
When you have a half cake, it can be difficult to know how best to store it. The key is portion size and keeping the cake fresh. Sharing tips like cutting the remaining half into smaller portions will help keep your cake from drying out over time.
For an optimal experience, wrap each slice individually in plastic wrap or place them in airtight containers so they stay moist and flavorful. This way, you don't have to worry about using up a whole cake before it goes bad!
Can I Use An Electric Mixer To Make A Half Cake?
Absolutely! When it comes to baking a half cake with an electric mixer, you'll first want to halve the ingredients and adjust your baking time accordingly.
Depending on the size of your portion, this could mean reducing the cooking time significantly. For example, if you're making just one cupcake instead of a full-sized cake, be sure to check for doneness after only a few minutes in the oven.
Conclusion
Yes, it is absolutely possible to half a cake recipe. The key is to make sure you are measuring your ingredients carefully and making any necessary adjustments along the way. When baking a half cake, I recommend using an electric mixer if you have one available as this will help create a more even texture.
Additionally, when storing the finished product, consider wrapping it in plastic wrap or foil before putting it into the refrigerator so that it stays fresh for longer. With these tips in mind, halving a cake recipe can be done with ease!
If you're looking for more delicious recipes to try, be sure to check out The Disney Chef's recipe categories! Whether you're in the mood for something sweet like a cake recipe, something savory like a chicken or pork recipe, or something fresh like a vegetable or seafood recipe, there's something for everyone. And if you're a meat-lover, don't forget to check out the beef recipes category for hearty and satisfying meals. With so many options to choose from, you're sure to find a new favorite recipe to add to your collection.
Read the full article
0 notes
Text
Gooey Pecan Pie Bars with Toffee

The most gooey and tasty Pecan Pie Bars in all the land! These bars taste like an extra caramel walnut pie, however with an exceptionally rich shortbread outside layer. (Also, no tragic tears, since you don't need to reveal a pie batter.) I adjusted my preferred Pecan Pie Recipe to make these. The toffee bits that soften into the filling are what separate it!
Would someone be able to please remark immediately on the off chance that you read this post and see a few references to "Walnut Pie Bras." I swear I've
scoured it like multiple times as of now and continue discovering to an ever-increasing extent! There are no bras to see here individuals, move along.
In case you're searching for Pecan Pie Bars, then again… I got your back.
Tuesday isn't past the point where it is possible to be sharing these bras, correct? (OK, that one was a joke.) Is everyone prepared for Thanksgiving on Thursday? We simply set up our Christmas tree, so we are thoroughly prepared. Try not to be a hater now, Thanksgiving is very in the not so distant future! In ordinary years everyone would have been setting up their tree a week ago as of now!
Advise that to Home Depot, however. I called ahead to ensure they had live trees, they said yes. So we pull up after supper, and can see the trees over the parking area, however it looks dull. There happened to be a representative strolling by, so we moved down the window and approached if the live trees were available to be purchased.
State what? Individuals today is November 26th. Thanksgiving is so in the not so distant future! A year ago it was on Nov 22! Also, a great many people set up their tree at the end of the week after, correct? Or then again was that simply my family growing up.
I needed to put mine up extra early this year since I'm 36 weeks pregnant. I'm using up all the available time! This infant could astonish us whenever essentially, and I would prefer not to need to stress over enhancing when I'm in recuperation! (I realize I've totally cursed myself now, and will have my child on December 21, precisely when he's expected.)
Anyway, we rolled over to the trees, just to check, and sure enough, there was a worker there prepared to support us. He was so overall quite inviting and even put our tree on the head of our van without any help while we were inside paying, that is completely compensated for the other person, who obviously has no clue about what's happening! Ha!
The most effective method to make the best Pecan Pie Bars
Well on the off chance that you are as yet scrambling about what treat to make on Thursday, I have you secured! These walnut pie
bars
are completely wanton and WAY simpler than pie.
Start by making a shortbread hull. It's exceptionally straightforward, simply margarine and sugar and flour essentially, with somewhat salt and vanilla for flavor. Do whatever it takes not to eat everything without anyone else. (There aren't even any eggs to stop you. As though salmonella hazards at any point halted us at any rate… )
While moving your mixture to the container, I like to split it up into pieces with the goal that it's simpler to squeeze it in equally.
Here's the manner by which I slashed my walnuts. You can hack them as large or as little as you need. On the off chance that you purchase pre hacked walnuts from the store, you can avoid this progression totally! I like to toast my walnuts before adding them to the
bars, yet you can avoid that progression as well. I love the way profound they make the flavor, and you are preheating the stove at any rate, yet on the off chance that it's worrying you, don't stress they are as yet going to taste great!
Try not to skirt blending in the toffee bits, however! They dissolve into the filling to make the gooiest, most caramel filling ever. I LOVE the flavor the toffee bits include, you are going to adore it.
Include your filling head of the hull, prepare, and presto! They are so natural. The hardest part is allowing them to cool.
The most effective method to store Pecan Pie Bars
Perhaps the best part about walnut pie bars
is that they are ideal for making ahead when you have one thousand different things to do on Thanksgiving. Truth be told, it's better on the off chance that you make them early, much the same as walnut pie. The occupying needs an ideal opportunity to set up. Have you at any point attempted to cut into a walnut pie directly from the broiler? It's a wreck! A flavorful jumble it's actual, yet at the same time.
Make these bars
as long as 2 days ahead of time. Store them on the counter, firmly secured so they don't dry out. On the off chance that you might want to serve them warm, put the entire container back in the broiler at 350 for around 10-15 minutes, until warmed through. This will make it overall quite warm for serving, however won't self-destruct the way that they would on the off chance that you served them hot from the broiler.
In the event that the walnut pie barsare not passed by day 5 (how??), at that point I would stick them in the ice chest, secured. You can likewise freeze them in a ziplock and haul them out later. You will truly cherish your previous self. Let them defrost on the counter, fixed. At that point scoop some frozen yogurt on top and shower with salted caramel. Yes.
Upbeat Thanksgiving my companions! I will be back tomorrow with a simple formula for how to make turkey stock from your turkey body! It's so natural and makes the BEST soup. Stay tuned!
More pastry and pie bars plans for these special seasons!
Cheesecake Pecan Pie (Make Ahead!) << The best of the two universes. It's SO acceptable.
Walnut Pie Recipe with Buttery Streusel Topping << I figured I didn't care for walnut pie until I thought of this formula. Try not to detest on my streusel. It doesn't make it excessively sweet, just includes the correct crunch top. I really gave a streusel a shot the present walnut pie bars on one of my tests, yet didn't feel like it required it.
Crusty fruit-filled treat Bars << perhaps the best pie to ever turn into a bar. No doubt.
Cranberry Shortbread Bars << These are so straightforward yet give all of you that cranberry flavor you need!
Earthy colored Sugar Snickerdoodle Blondies << love that cinnamon sugar besting!
Raspberry Cheesecake Bars << such a great amount of snappier than making a springform cheesecake!
Crème Brulée Pumpkin Pie << you will never return to non-bruléed pumpkin pie. I'm letting you know!
Blackberry Slab Pie Bars from The View From Great Island
Custom made Cherry Pie Bars from The Country Cook
Peach Crumb Bars from Live Well Bake Often
Cocoa Cranberry Crumble Bars from Snixy Kitchen
The most gooey and delectable Pecan Pie Bars in all the land! These bars
taste like an extra caramelly walnut pie, yet with an exceptionally rich shortbread outside. (Furthermore, no dismal tears, since you don't need to reveal a pie mixture.) I adjusted my preferred Pecan Pie Recipe to make these. The toffee
bits that soften into the filling are an all-out distinct advantage!
Fixings
For the shortbread outside layer
1 cup (2 sticks) margarine, relaxed
1/2 cup granulated sugar
1/3 cup earthy colored sugar
1 and 1/2 teaspoons vanilla concentrate
3/4 teaspoon fit salt
2 cups universally handy flour, spooned and leveled
For the walnut filling
1/2 cup (1 stick) margarine
3 enormous eggs
1/4 cup granulated sugar
1 cup earthy colored sugar
1/2 light corn syrup
1 tablespoon milk
1 and 1/2 teaspoons vanilla concentrate
1/2 teaspoon fit salt
1 and 1/2 teaspoons new lemon juice
1 tablespoon flour
2 cups walnuts, coarsely slashed
1/2 cup toffee bits
Guidelines
Preheat your broiler to 350 degrees F. Toast your walnuts: If you need, set aside the effort to toast your walnuts a piece before they go in your bars. I like the additional flavor this includes, and your broiler is preheating in any case, however it's a bit much. Spread 2 cups of walnuts out onto a dry preparing sheet and put it into the stove at 350. Mix the walnuts every 2-5 minutes. Leave the walnuts in the broiler for 7-10 minutes all out (How long it takes will rely upon on the off chance that they are as of now hacked.) When the walnuts are fragrant and hot, take them out and put aside to cool.
Make the shortbread: Line a 9x13 inch container with material paper, or foil that you shower with nonstick splash. (You can likewise splash the container itself no issue, yet I like to have the option to lift the bars out for simple cutting.)
In an enormous bowl or stand blender, beat 1 cup of spread nearly to death. You need it to be light and cushioned, should take at any rate 2-3 minutes, in addition to separates for scratching the sides and base of the bowl.
Include 1/2 cup sugar and 1/3 cup earthy colored sugar. Beat until the blend is smooth and rich, again making a point to scratch the sides and base of the bowl.
Include 1 and 1/2 teaspoons vanilla and 3/4 teaspoon genuine salt. Beat well.
Include 2 cups of flour. Beat it all in, it will feel like a lot from the start. Utilize your spatula to get the scraps at the base if essential. Don't overbeat, when the flour is fused, quit blending.
Move the blend to the readied 9x13 inch skillet. I like to area out the mixture into pieces and spread them over the base of the search for gold squeezing, see photographs. Wet your hands only a tad, and press the mixture equally into the container. Try not to shape an edge covering, simply press everything level, wetting your hands again as vital.
Prepare the shortbread at 350 for 18-20 minutes, until softly caramelized on the edges. Expel from the stove and put in a safe spot if your filling isn't all set.
Make the walnut pie filling: Begin by searing your margarine. This gives your bars that profound, nutty flavor that is so ideal for fall. In a little pot, include 1/2 cup margarine. Turn the warmth to medium and let the margarine dissolve. Keep the warmth on medium and don't leave. Mix once in a while. Before long the margarine will air pocket and structure a thick white froth on top. From that point forward, the froth will retreat a tad and you will begin to see minimal earthy colored "bits" framing on the base of the container. Work them up and take a whiff. On the off chance that you see earthy colored spots and your spread has taken on a nutty fragrance, your margarine is seared. Take it off the warmth immediately. It goes from seared to consumed genuine snappy, so focus! Put aside to cool.
In the interim, scratch out any morsels from a similar bowl that you blended your shortbread in. (It's Thanksgiving individuals, we don't possess energy for additional dishes!) Add 3 huge eggs to the bowl and beat on medium speed for 3 minutes, until the eggs have helped up in shading a piece. (You're whipping air into them. Utilize a whisk connection on the off chance that you have one.)
When the 3 eggs are very much beaten, include 1/4 cup sugar, 1 cup earthy colored sugar, 1/2 cup light corn syrup, and 1 tablespoon milk. Beat well.
At the point when your margarine has cooled a sensible sum, add it to the egg blend. On the off chance that it is still quite hot, you can risk everything and include the hot margarine while your blender is running, to ensure you don't sour the eggs. (That is the thing that I generally do. These are the sort of dangers that cause me to feel like I'm carrying on with a hazardous life.) But in case you're apprehensive, hold up until you can put your finger in the spread without it harming. Beat the spread in well.
Include 1 and 1/2 teaspoons vanilla concentrate, 1/2 teaspoon genuine salt, 1 and 1/2 teaspoons new lemon juice (don't skip it! Lemon is the best mystery fixing to an extraordinary caramel sauce!), and 1 tablespoon flour. Beat everything together, racing out any flour irregularities.
On the off chance that you haven't as of now, coarsely hack your walnuts. Include the cleaved walnuts and 1/2 cup toffee bits to the egg blend, and overlap in with a spatula.
Pour the blend on the of the heated outside. It's alright if the outside is still warm, even hot. Spread the blend out equitably.
Heat the bars at 350 degrees F for around 30-35 minutes. At the point when it is done, the edges of the bars will be light earthy colored. The focal point of the bars may squirm a smidgen when you shake the dish, yet it ought not look sloshy. The bars from around 2 inches from the edges and farther ought not wobble. Your bars will prepare a couple of moments quicker in a metal skillet, a few minutes slower in a glass dish.
Let cool totally to room temperature. I mean it now!
See notes for the most ideal approach to serve these walnut pie bars to your visitors warm.
Present with a scoop of vanilla frozen yogurt and a shower of salted caramel! Absolutely unnecessary...but absolutely debauched.
Formula Notes
Make-ahead directions: You can make these
bars
as long as 2 days ahead of time before serving. Store them on the counter, firmly secured so they don't dry out. On the off chance that you might want to serve them warm, but the entire dish back in the stove (revealed) at 350 for around 10-15 minutes, until warmed through. This will make it overall quite warm for serving, however won't self-destruct the way that they would in the event that you serve them hot from the broiler.
1 note
·
View note
Text
Gin and Tonic Chiffon Cake

The Roaring Twenties episode of the Great British Bake Off was one of my favourites, because I love the 1920s fashion, decoration and design, and if I could be an aristocratic sleuth (so I could afford the fashion, but with my own socialist spirit!) a la Phryne Fisher or Peter Wimsey, or even a title-less foreign dandy like Hercule Poirot, I would be quite glad! Also, because David’s tartlets were stunning. But mainly because the showstopper was a Prohibition Era Cake. I knew right then and there, that I would make a G&T cake. I quite like my gin, and always fancy a gin and tonic; so does my Mum, and we’ve converted my Dad! I knew also, exactly for which occasion I would bake it, as my parents were to be home on the 14th November for my Mum’s birthday. They were going to leave and return to Laos on the 19th. Except, on the 14th November, my Dad was in the hospital; so I “only” made Hazelnut Lamingtons for my Mum’s birthday. In the end, it turned out fine; my Dad recovered, and I saw the Classics episode of the Great Australian Bake Off in the meantime, where another David (Davids were my faves on Bake Offs this year!) stunned Maggie Beer with his chiffon cake, and particularly his juniper sponge, which in Maggie’s words “tastes just like gin!” My parents are home until January, and we celebrated both their birthdays (my Dad turned 60!) last weekend, with this glorious Gin and Tonic Chiffon Cake. It could look more spectacular maybe, but it was like eating the cocktail and the sponge was maybe the moistest I’ve ever baked!
Ingredients (serves 8 to 12):
For the Gin and Tonic Jellies
6 1/2 gelatin leaves
3 1/4 cups tonic water, like Schweppes
1 small lemon
1 cup London Dry Gin, like Hendrick’s
For the juniper chiffon cake
30 grams/ 1/2 ounce juniper berries
330 grams/ plain flour
200 grams/ caster sugar
2 teaspoons baking powder
1/2 teaspoon salt
7 egg yolks
a small lemon
125 millilitres/ 1/2 cup sunflower oil
125 millilitres/ 1/2 cup water
9 egg whites
For the filling and icing
1 cup double cream
1 1/2 teaspoon cream of Tartar
450 grams/1 pound cream cheese
1/3 cup Lime and Lemon Syrup
Lime and Lemon Curd
Candied Lime and Lemon Slices
The day before, make the Gin and Tonic jelly. Run a 16cm/6.5″ pan and a 20cm/8″ pan quickly under cold water, and line both pans with cling film (water makes it easier to adhere).
Soak gelatin leaves in a bowl of ice water.
Meanwhile, heat 2 cups tonic water in a large saucepan over medium heat until just simmering. Squeeze in the juice of the lemon. Remove from the heat and immediately stir in Gin and remaining tonic water. Squeeze water out of the gelatin leaves and stir them into the hot Gin and tonic mixture until completely dissolved. Divide Gin and tonic mixture between prepared pan, and place them in the refrigerator to chill overnight.
Preheat oven to 160°C/320°F.
Line two 20cm/8″ round cake pans, and one 16cm/6.5″ cake pan with baking paper. Set aside.
In mortar and pestle grind juniper berries into a fine powder (it takes a bit of time; but it works; if you have a coffee grinder, you can also use it). In a large bowl, combine flour, sugar, baking powder and salt; Sift in juniper powder. and stir to combine. Make a well in the centre and add egg yolks. Grate in the zest of half the lemon. Add sunflower oil and water, and stir with a wooden spoon until just blended.
In a medium bowl, beat egg whites, gradually increasing speed to high until soft peaks form. Continue beating, adding 2 tablespoons of caster sugar, until smooth and glossy.
Stir one third of the egg whites into the juniper batter to loosen it; then, gently fold in remaing egg whites into the batter, one third at a time, until no white streak remains. Divide juniper batter between three prepared pans, and place in the middle of the hot oven. Bake cakes, at 160°C/320°F, for 35 minutes, rotating pans halfway through cooking, until a toothpick inserted in the middle of the cakes comes out clean.
Remove from the oven, and let cakes cool, 5 minutes, before removing from their pans. Let cakes cool completely on a wire rack.
In a medium bowl, beat double cream with an electric mixer, gradually increasing speed to high, until soft peaks form. Add cream of Tartar, and continue beating until stiff peaks just form. Set aside.
Spoon cream cheese into a larger bowl. Whisk in Lime and Lemon Syrup until smooth and well-blended. Then, gently fold in whipped cream.
Spoon half a tablespoon of the icing onto serving plate or cake stand, and sit one of the larger juniper sponge in the centre of it. Spoon about one third of the Lime and Lemon Syrup cream cheese icing onto the sponge, spreading it outwards with a spatula until levelled. Drizzle liberally with a tablespoon and a half Lime and Lemon Curd. Then, carefully lift the Gin and Tonic jelly out of the 20cm/8″ pan, and gently invert it onto the cake. Carefully remove cling film. Place the second 20cm/8″ juniper sponge on top, pressing very slightly. Cover the top and edges with Lime and Lemon Syrup cream cheese icing, to seal the jelly in. Then drizzle about a tablespoon Lime and Lemon Curd onto the centre of the cake. Again , carefully lift the second Gin and Tonic jelly out of the 16cm/6.5″ pan, and gently invert it onto the cake. Carefully remove cling film. Sit the smaller juniper cake on top, and ice the whole cake thoroughly with Lime and Lemon Syrup cream cheese icing, levelling with a spatula.
Arrange Candied Lime and Lemon Slices all aroud the cake, on both levels, alternating l and l on the edges of the top tier, and on top. Keep Gin and Tonic Chiffon Cake in the refrigerator until serving time.

#Recipe#Food#Gin and Tonic Chiffon Cake#Gin and Tonic Chiffon Cake recipe#Gin and Tonic Jelly#Gin#Hendrick's Gin#Tonic Water#Schweepes#Gelatin#Lemon Juice#Juniper Sponge#Juniper Chiffon Cake#Juniper Berries#Lime and Lemon Curd#Lime and Lemon Syrup#Cream Cheese#Double Cream#Cream of Tartar#Candied Lime and Lemon Slices#Great British Bake Off Challenge#Great British Bake Off#Roaring Twenties Week#Great Australian Bake Off Challenge#Great Australian Bake Off#Classics Week#Birthday Cake#Happy Birthday#Mum and Dad#Celebratory Food
3 notes
·
View notes
Last Seen Blogs

shoujo-lightnovel-blog
Shoujo LightNovel

lakkshi
Lakkshi


ftsubva
Untitled

bantinthoitiet
Bản Tin Thời Tiết