#iptable
Text
check iptables ubuntu
$ sudo iptables -L -v
View On WordPress
0 notes
Text
My Linux firewall be like ...

Also check: Linux iptables command examples for new sysadmins
33 notes
·
View notes
Text
Menolak Akses IP Address Tertentu Pada Proctocol SSH Menggunakan Firewall IPTABLES
--------------------- On IPtables Firewall ---------------------
# iptables -I INPUT -s 192.168.1.100 -p tcp --dport ssh -j REJECT
# iptables -I INPUT -s 192.168.1.0/24 -p tcp --dport ssh -j REJECT
Untuk menerapkan aturan baru, Anda perlu menggunakan perintah berikut.
# service iptables save [On IPtables Firewall]
View On WordPress
0 notes
Text
Linux Mint jako router dla sieci LAN: Konfiguracja masquerade

Linux Mint to popularny system operacyjny oparty na Linuxie, który można wykorzystać do stworzenia własnego routera dla sieci LAN. Jedną z ważnych funkcji, które umożliwiają to zadanie, jest masquerade. W tym artykule pokażemy Ci, jak skonfigurować masquerade w Linux Mint, aby użyć go jako routera dla Twojej sieci LAN.
Read the full article
#adresIProutera#adresacjasieciowa#DostępdoInternetu#dostępdoInternetuwsieciLAN#interfejsysieciowe#iptables#konfiguracjaadresówDNS#konfiguracjaadresówIP#konfiguracjaadresówIPstatycznych#konfiguracjabezpieczeństwasieciowego#konfiguracjaDHCP#konfiguracjafiltrowaniaadresówMAC#konfiguracjainterfejsówsieciowych#konfiguracjainterfejsuLAN#konfiguracjainterfejsuWAN#konfiguracjaiptables#konfiguracjamasquerade#konfiguracjamasqueradekrokpokroku#konfiguracjamasqueradewLinuxMint#konfiguracjaNAT#konfiguracjaoprogramowaniaroutera#konfiguracjaprzekazywaniapakietów#konfiguracjaprzepływuruchu#konfiguracjaregułiptables#konfiguracjaroutera#konfiguracjarouteradlamałejfirmy#konfiguracjarouteradlasiecidomowej#konfiguracjaruchusieciowego#konfiguracjaserweraDHCP#konfiguracjasieciLANwLinuxMint
0 notes
Text
Como permitir conexão de uma porta no Ubuntu 22
Algumas distribuições de Linux utilizam o firewal UFW (chamado de firewall descomplicado, Uncomplicated Firewall) que é basicamente uma interface para o iptables.
Quando ele está ativo na sua distribuição, ele bloqueia praticamente tudo.
Para sabermos se está ativo, basta digitar o comando
$ ufw status
Possíveis respostas do UFW
Status: active
Quando o firewall está ativo, em seguida temos…
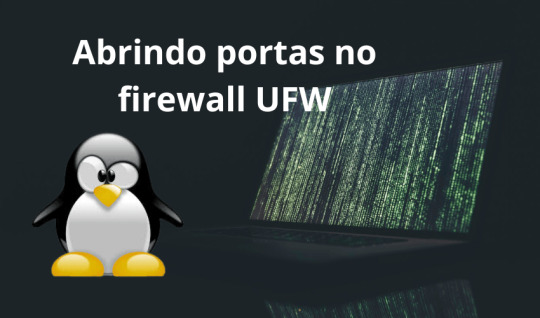
View On WordPress
0 notes
Text
Configurer iptables pour HomeKit avec HomeAssistant
Lorsque j'ai voulu configurer mon pare-feu sur ma machine faisant tourner HomeAssistant, j'ai rencontré quelques difficultés à faire fonctionner le plugin HomeKit : mon iPhone ne parvenait pas à se connecter au bridge HomeKit. Après avoir utilisé tcpdump pour analyser le trafic entre HomeAssistant et mon iPhone, j'ai trouvé la solution pour bien autoriser le trafic.
La voici :
iptables -A INPUT -p tcp --dport 21064 -s 192.168.1.0/24 -j ACCEPT
iptables -A INPUT -p udp -m multiport --dports 5353 -s 192.168.1.0/24 -j ACCEPT
> La première règle autorise les connexions au port HomeKit de HomeAssistant sur mon réseau local 192.168.1.0/24. Votre port pourrait être différent, voir votre config, par défaut 21063 ou 21064 : voir la documentation d'HomeAssistant sur le sujet.
> La seconde règle autorise mdns sur mon réseau local 192.168.1.0/24.
0 notes
Text
iptables Installation Instructions for Linux Mint 21

Iptables, a robust Linux firewall tool, helps you set rules to safeguard your system. It manages all network traffic. Iptables firewall tables offer numerous built-in chains for incoming and outgoing connections. Each chain has a collection of rules that you may customise on your system.
iptables installation for Linux Mint 21
The procedures listed below should be followed to install iptables on Linux Min 21:
https://www.markaicode.com/iptables-installation-instructions-for-linux-mint-21/
0 notes
Link
IPtables là gì? Toàn tập kiến thức cần biết về IPtables
IPtables là một trong những thuật ngữ được nghe nhiều nhưng để có sự am hiểu chi tiết không phải ai cũng làm được. Bởi vì thuật ngữ này chuyên về mảng công nghệ thông tin và chỉ người trong ngành mới có sự am hiểu nhất định. Vậy nếu bạn nào muốn nắm rõ về IPtables thì hãy tham khảo tất tần tật kiến thức được chia sẻ trong bài viết sau đây.
https://fptcloud.com/iptables/
0 notes
Link
Der Sicherheitsforscher Aaron Adams hat einen Use-after-free-Bug im Linux-Kernel gefunden, aufgrund dessen lokale Nutzer sich zum Superuser machen könnten. Der Fehler betrifft die standardmäßig auf den meisten Linux-Systemen aktive Kernel-Komponente NFTables – eine Weiterentwicklung der Linux-eigenen Firewall iptables.
0 notes
Text
(this is a small story of how I came to write my own intrusion detection/prevention framework and why I'm really happy with that decision, don't mind me rambling)
Preface

About two weeks ago I was faced with a pretty annoying problem. Whilst I was going home by train I have noticed that my server at home had been running hot and slowed down a lot. This prompted me to check my nginx logs, the only service that is indirectly available to the public (more on that later), which made me realize that - due to poor access control - someone had been sending me hundreds of thousands of huge DNS requests to my server, most likely testing for vulnerabilities.
I added an iptables rule to drop all traffic from the aforementioned source and redirected remaining traffic to a backup NextDNS instance that I set up previously with the same overrides and custom records that my DNS had to not get any downtime for the service but also allow my server to cool down.
I stopped the DNS service on my server at home and then used the remaining train ride to think. How would I stop this from happening in the future? I pondered multiple possible solutions for this problem, whether to use fail2ban, whether to just add better access control, or to just stick with the NextDNS instance.
I ended up going with a completely different option: making a solution, that's perfectly fit for my server, myself.
My Server Structure
So, I should probably explain how I host and why only nginx is public despite me hosting a bunch of services under the hood.
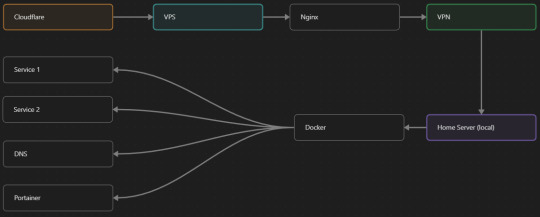
I have a public facing VPS that only allows traffic to nginx. That traffic then gets forwarded through a VPN connection to my home server so that I don't have to have any public facing ports on said home server. The VPS only really acts like the public interface for the home server with access control and logging sprinkled in throughout my configs to get more layers of security. Some Services can only be interacted with through the VPN or a local connection, such that not everything is actually forwarded - only what I need/want to be.
I actually do have fail2ban installed on both my VPS and home server, so why make another piece of software?
Tabarnak - Succeeding at Banning
I had a few requirements for what I wanted to do:
Only allow HTTP(S) traffic through Cloudflare
Only allow DNS traffic from given sources; (location filtering, explicit white-/blacklisting);
Webhook support for logging
Should be interactive (e.g. POST /api/ban/{IP})
Detect automated vulnerability scanning
Integration with the AbuseIPDB (for checking and reporting)
As I started working on this, I realized that this would soon become more complex than I had thought at first.
Webhooks for logging
This was probably the easiest requirement to check off my list, I just wrote my own log() function that would call a webhook. Sadly, the rest wouldn't be as easy.
Allowing only Cloudflare traffic
This was still doable, I only needed to add a filter in my nginx config for my domain to only allow Cloudflare IP ranges and disallow the rest. I ended up doing something slightly different. I added a new default nginx config that would just return a 404 on every route and log access to a different file so that I could detect connection attempts that would be made without Cloudflare and handle them in Tabarnak myself.
Integration with AbuseIPDB
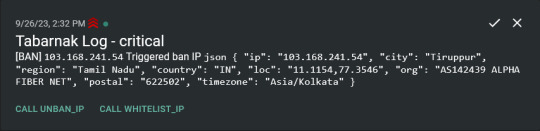
Also not yet the hard part, just call AbuseIPDB with the parsed IP and if the abuse confidence score is within a configured threshold, flag the IP, when that happens I receive a notification that asks me whether to whitelist or to ban the IP - I can also do nothing and let everything proceed as it normally would. If the IP gets flagged a configured amount of times, ban the IP unless it has been whitelisted by then.
Location filtering + Whitelist + Blacklist
This is where it starts to get interesting. I had to know where the request comes from due to similarities of location of all the real people that would actually connect to the DNS. I didn't want to outright ban everyone else, as there could be valid requests from other sources. So for every new IP that triggers a callback (this would only be triggered after a certain amount of either flags or requests), I now need to get the location.
I do this by just calling the ipinfo api and checking the supplied location. To not send too many requests I cache results (even though ipinfo should never be called twice for the same IP - same) and save results to a database.
I made my own class that bases from collections.UserDict which when accessed tries to find the entry in memory, if it can't it searches through the DB and returns results. This works for setting, deleting, adding and checking for records.
Flags, AbuseIPDB results, whitelist entries and blacklist entries also get stored in the DB to achieve persistent state even when I restart.
Detection of automated vulnerability scanning
For this, I went through my old nginx logs, looking to find the least amount of paths I need to block to catch the biggest amount of automated vulnerability scan requests. So I did some data science magic and wrote a route blacklist.
It doesn't just end there. Since I know the routes of valid requests that I would be receiving (which are all mentioned in my nginx configs), I could just parse that and match the requested route against that. To achieve this I wrote some really simple regular expressions to extract all location blocks from an nginx config alongside whether that location is absolute (preceded by an =) or relative. After I get the locations I can test the requested route against the valid routes and get back whether the request was made to a valid URL (I can't just look for 404 return codes here, because there are some pages that actually do return a 404 and can return a 404 on purpose).
I also parse the request method from the logs and match the received method against the HTTP standard request methods (which are all methods that services on my server use). That way I can easily catch requests like:
XX.YYY.ZZZ.AA - - [25/Sep/2023:14:52:43 +0200] "145.ll|'|'|SGFjS2VkX0Q0OTkwNjI3|'|'|WIN-JNAPIER0859|'|'|JNapier|'|'|19-02-01|'|'||'|'|Win 7 Professional SP1 x64|'|'|No|'|'|0.7d|'|'|..|'|'|AA==|'|'|112.inf|'|'|SGFjS2VkDQoxOTIuMTY4LjkyLjIyMjo1NTUyDQpEZXNrdG9wDQpjbGllbnRhLmV4ZQ0KRmFsc2UNCkZhbHNlDQpUcnVlDQpGYWxzZQ==12.act|'|'|AA==" 400 150 "-" "-"
I probably over complicated this - by a lot - but I can't go back in time to change what I did.
Interactivity
As I showed and mentioned earlier, I can manually white-/blacklist an IP. This forced me to add threads to my previously single-threaded program. Since I was too stubborn to use websockets (I have a distaste for websockets), I opted for probably the worst option I could've taken. It works like this:
I have a main thread, which does all the log parsing, processing and handling and a side thread which watches a FIFO-file that is created on startup. I can append commands to the FIFO-file which are mapped to the functions they are supposed to call. When the FIFO reader detects a new line, it looks through the map, gets the function and executes it on the supplied IP.
Doing all of this manually would be way too tedious, so I made an API endpoint on my home server that would append the commands to the file on the VPS. That also means, that I had to secure that API endpoint so that I couldn't just be spammed with random requests.
Now that I could interact with Tabarnak through an API, I needed to make this user friendly - even I don't like to curl and sign my requests manually. So I integrated logging to my self-hosted instance of https://ntfy.sh and added action buttons that would send the request for me.
All of this just because I refused to use sockets.
First successes and why I'm happy about this
After not too long, the bans were starting to happen. The traffic to my server decreased and I can finally breathe again.
I may have over complicated this, but I don't mind. This was a really fun experience to write something new and learn more about log parsing and processing.
Tabarnak probably won't last forever and I could replace it with solutions that are way easier to deploy and way more general. But what matters is, that I liked doing it. It was a really fun project - which is why I'm writing this - and I'm glad that I ended up doing this.
Of course I could have just used fail2ban but I never would've been able to write all of the extras that I ended up making (I don't want to take the explanation ad absurdum so just imagine that I added cool stuff) and I never would've learned what I actually did.
So whenever you are faced with a dumb problem and could write something yourself, I think you should at least try. This was a really fun experience and it might be for you as well.
Post Scriptum
First of all, apologies for the English - I'm not a native speaker so I'm sorry if some parts were incorrect or anything like that.
Secondly, I'm sure that there are simpler ways to accomplish what I did here, however this was more about the experience of creating something myself rather than using some pre-made tool that does everything I want to (maybe even better?).
Third, if you actually read until here, thanks for reading - hope it wasn't too boring - have a nice day :)
8 notes
·
View notes
Text
netstat -na | grep :194
iptables -A INPUT -p tcp --dport 194 -j ACCEPT
sudo service iptables restart
[PORT 194 (Internet Relay Chat protocol) is now OPEN!]
Welcome to ask-the-substitute, an ask blog dedicated to exploring the Hologram Professor (The Substitute) from Puppet History, and what he gets up to after the s5 Puppet History finale.
This blog will likely contain spoilers for Puppet History up to the end of Season 5, and operates on the lore and information up to that point.
man modules
1: "Is It Really A Complex, Or Just Lacking Context?
Under #module Is_It_Really_A_Complex_Or_Just_Lacking_Context?
2: "When You Seek Vengeance, You Must Dig Two Graves"
Under #module When_You_Seek_Vengeance_You_Must_Dig_Two_Graves
3: "Lonely Wolf Keeps Friends As Lambs, Starves When They Are Gone"
Under #module Lonely_Wolf_Keeps_Friends_As_Lambs_Starves_When_They_Are_Gone
4: "Pressure Bomb In A Goddamn Knife Fight"
Under #module Pressure_Bomb_In_A_Goddamn_Knife_Fight
5 (CURRENT): "Try, Fall, Try, Fall, Try, Fall, Try Again"
Under #module Try_Fall_Try_Fall_Try_Fall_Try_Again
cat /etc/passwd
moth:x:0:0:moth:/moth:/bin/bash
Main is @moth-yknowtheartist. OOC posts from me will be tagged under #ls /moth .
substitute:x:1000:1000:substitute:/substitute:/bin/bash
art:x:1:1:art:/art:/bin/bash
Tag for art relating to the blog that isn't part of the modules!! These will be tagged under #ls /art.
Most posts will be in character for The Substitute. These posts will be tagged under #ls /substitute .
plaguerat:x:1001:1001:plaguerat:/plaguerat:/bin/bash
Posts featuring the Plague Rat will be tagged under #ls /plaguerat .
beefboy:x:1002:1002:beefboy:/beefboy:/bin/bash
Posts featuring Ryan Bergara (Beef Boy) will be tagged under #ls /beefboy .
professor:x:1003:1003:professor:/professor:/bin/bash
Posts featuring The Professor will be tagged under #ls /professor .
dinosir:x:1004:1004:dinosir:/dinosir:/bin/bash
Posts featuring the Pterosaur puppet (Dinosir) will be tagged under #ls /dinosir .
dinosara:x:1005:1005:dinosara:/dinosara:/bin/bash
Posts featuring the Tyrannosaur puppet (Dinosara) will be tagged under #ls /dinosara .
cat /home/trmsofsrvice.txt
The story for this blog will be fueled primarily by progression from asks. Because of the audience interaction, this blog will have the following ground rules:
I can and will ignore/delete any asks if I feel they've broken the following rules or if I don't feel they help tell the story I'm hoping to tell. Please don't feel too bad if your ask doesn't get used.
Certain actions will not be possible for asks- such as physical interaction with the environment or characters. Asks trying to perform actions like this will probably be ignored.
Your username may be recognized by characters if it appears often in asks, but generally you won't be considered an additional character.
Don't be weird (in a gross way)- ie sexual content and similar.
If an ask you send in isn't answered the first time for a really long time, feel free to resend it as it may not have come through properly. However, please don't send the same ask over and over and over after this if it still isn't used- if I'm not using it, I'm probably either saving it for later or I'm not planning on using it.
Feel free to message me if you have any questions, but just know I'll be answering DMs out of character.
have fun! :]
31 notes
·
View notes
Note
I could type faster than you.
*could* vs *can*
….. I don’t doubt that,
But I’m sure I could write better iptables than you 😜
5 notes
·
View notes
Text
-> How to save iptables firewall rules permanently on Linux
8 notes
·
View notes
Text
Konfigurasi IPTABLES Untuk Mencegah Serangan LOIC
Low Orbit Ion Canon (LOIC) adalah perangkat lunak yang dikembangkan oleh individu atau kelompok yang tidak dikenal. LOIC adalah alat serangan penolakan layanan (DoS) yang dirancang untuk mengirimkan lalu lintas dalam jumlah besar ke situs web atau layanan online dengan tujuan mengganggu ketersediaan situs web. Meskipun LOIC dapat digunakan untuk pengujian penetrasi atau pengujian ketersediaan…
View On WordPress
#DDoS LOIC#iptables#iptables mencegah serangan loic#Konfigurasi IPTABLES Untuk Mencegah Serangan LOIC#loic#mencegah serangan loic#Script iptables
0 notes
Text
how to make a vpn with a raspberry pi
🔒🌍✨ Obtén 3 Meses GRATIS de VPN - Acceso a Internet Seguro y Privado en Todo el Mundo! Haz Clic Aquí ✨🌍🔒
how to make a vpn with a raspberry pi
Configuración VPN Raspberry Pi
La configuración de una VPN en un Raspberry Pi es una excelente manera de proteger tu privacidad y seguridad en línea. Una VPN, o Red Privada Virtual, en un Raspberry Pi te permite encriptar tus datos y navegar de forma anónima a través de Internet.
Para configurar una VPN en un Raspberry Pi, primero necesitarás instalar un software VPN en tu dispositivo. Hay varias opciones disponibles, como OpenVPN o WireGuard, que son fáciles de instalar en un Raspberry Pi a través de la terminal.
Una vez que hayas instalado el software VPN en tu Raspberry Pi, deberás configurar la VPN con los detalles de tu proveedor de servicios VPN. Estos detalles incluyen la dirección del servidor, el nombre de usuario y la contraseña. Una vez configurada, podrás conectarte a la VPN desde cualquier dispositivo y navegar de forma segura y privada.
Es importante recordar que una VPN en un Raspberry Pi puede ralentizar tu conexión a Internet en cierta medida debido al encriptado de datos. Sin embargo, los beneficios de privacidad y seguridad que ofrece una VPN valen la pena.
En resumen, configurar una VPN en un Raspberry Pi es una manera efectiva de proteger tu privacidad en línea y navegar de forma segura en Internet. Con la guía adecuada y un poco de paciencia, podrás disfrutar de una conexión segura y anónima en tu Raspberry Pi.
Pasos para crear VPN con Raspberry Pi
Crear una VPN casera con Raspberry Pi es una excelente manera de proteger tu privacidad en línea y acceder de forma segura a internet desde cualquier lugar. A continuación, te presentamos los pasos para configurar tu propia VPN utilizando una Raspberry Pi y software de código abierto:
Configurar la Raspberry Pi: Lo primero que debes hacer es instalar el sistema operativo Raspbian en tu Raspberry Pi. Puedes descargarlo de la página oficial de Raspberry Pi e instalarlo siguiendo las instrucciones.
Configurar el servidor VPN: Una vez que la Raspberry Pi esté configurada, necesitarás instalar un software de servidor VPN en ella. OpenVPN es una excelente opción, ya que es de código abierto y fácil de configurar.
Generar certificados de seguridad: Para asegurar la conexión de tu VPN, es importante generar certificados de seguridad tanto para el servidor como para los clientes que se conectarán a él. Puedes utilizar herramientas como Easy-RSA para crear estos certificados de forma sencilla.
Configurar el firewall: Para proteger tu red y la conexión VPN, es recomendable configurar un firewall en la Raspberry Pi. Puedes utilizar herramientas como iptables para establecer reglas de seguridad.
Conectar clientes a la VPN: Una vez que la VPN esté configurada y en funcionamiento, puedes conectar tus dispositivos a ella utilizando un cliente VPN compatible. Configura la conexión con los certificados de seguridad generados previamente.
Siguiendo estos pasos, podrás crear tu propia VPN con Raspberry Pi y disfrutar de una conexión segura y privada en todo momento. ¡Protege tu privacidad en línea con esta solución casera y fácil de implementar!
Tutorial VPN Raspberry Pi
Un tutorial VPN Raspberry Pi es una guía detallada sobre cómo configurar una red privada virtual en una Raspberry Pi. Una VPN es una herramienta útil para proteger la privacidad en línea, cifrando la conexión a Internet y ocultando la dirección IP del usuario. Usar una Raspberry Pi para configurar una VPN proporciona una solución asequible y personalizable para aquellos que desean mantener su conexión segura.
Para empezar, es necesario instalar un sistema operativo en la Raspberry Pi, como Raspbian. Luego, se deben configurar las conexiones de red y asegurarse de tener acceso remoto a la Raspberry Pi. Una vez configurada la Raspberry Pi, el siguiente paso es instalar el software de servidor VPN, como OpenVPN. Este software facilita la configuración de la VPN y la gestión de las conexiones.
Después de instalar el software VPN, es importante generar certificados de seguridad para autenticar las conexiones a la red privada. Estos certificados garantizan que solo usuarios autorizados puedan acceder a la VPN. Una vez completados estos pasos, la VPN Raspberry Pi estará lista para proteger la conexión a Internet y garantizar la privacidad en línea.
En resumen, un tutorial VPN Raspberry Pi es una guía paso a paso para configurar una red privada virtual en una Raspberry Pi, proporcionando seguridad y privacidad en línea de forma asequible y personalizable.
Seguridad en Raspberry Pi VPN
La seguridad en Raspberry Pi VPN es un tema crucial a tener en cuenta al configurar y utilizar un servidor VPN en tu dispositivo Raspberry Pi. Un servidor VPN te brinda la capacidad de navegar de forma segura y anónima por internet, protegiendo tus datos de posibles ciberataques y el acceso no autorizado a tu información personal.
Para garantizar la seguridad de tu Raspberry Pi VPN, es fundamental seguir algunas mejores prácticas. En primer lugar, es recomendable utilizar contraseñas fuertes y únicas para acceder al servidor VPN y asegurarse de que el software y el sistema operativo estén actualizados con las últimas correcciones de seguridad.
Además, se aconseja configurar correctamente el cortafuegos para limitar el acceso no autorizado al servidor VPN y cifrar toda la comunicación que se realiza a través de la red. Esto ayudará a proteger tus datos sensibles de posibles fisgones y ciberdelincuentes.
Asimismo, es importante llevar a cabo una monitorización constante del tráfico de red y de los registros del servidor VPN para detectar cualquier actividad sospechosa y tomar medidas preventivas a tiempo.
En resumen, la seguridad en Raspberry Pi VPN es esencial para proteger tu información y tu privacidad en línea. Siguiendo las medidas de seguridad adecuadas, puedes disfrutar de una experiencia de navegación segura y protegida en tu dispositivo Raspberry Pi.
Ventajas VPN en Raspberry Pi
Una de las ventajas de utilizar una VPN en Raspberry Pi es la protección de la privacidad y la seguridad de tus datos mientras navegas por Internet. Al enmascarar tu dirección IP real y cifrar todas las comunicaciones, una VPN te permite navegar de forma anónima y segura, evitando que terceros rastreen tu actividad en línea.
Otra ventaja de configurar una VPN en Raspberry Pi es la posibilidad de acceder a contenido restringido geográficamente. Al conectarte a servidores VPN en diferentes ubicaciones, puedes desbloquear sitios web y servicios que de otra manera no estarían disponibles en tu región.
Además, al utilizar una VPN en Raspberry Pi, puedes proteger tus dispositivos conectados a la misma red. Esto es especialmente útil si utilizas tu Raspberry Pi para crear un servidor doméstico o para acceder a dispositivos IoT, ya que una VPN añade una capa adicional de seguridad a tu red local.
Por último, instalar una VPN en Raspberry Pi es una forma rentable de garantizar la privacidad y seguridad en tus actividades en línea. A diferencia de los servicios VPN de pago, configurar tu propia VPN en Raspberry Pi te permite tener un mayor control sobre tus datos y no depender de terceros proveedores de servicios VPN.
En resumen, las ventajas de utilizar una VPN en Raspberry Pi son la protección de la privacidad, el acceso a contenido restringido, la seguridad de dispositivos conectados y la rentabilidad en comparación con servicios VPN externos.
0 notes
Text
how to open vpn port on ufw
🔒🌍✨ Erhalten Sie 3 Monate GRATIS VPN - Sicherer und privater Internetzugang weltweit! Hier klicken ✨🌍🔒
how to open vpn port on ufw
VPN-Anschluss öffnen
Ein VPN-Anschluss, auch Virtual Private Network genannt, ermöglicht es Benutzern, eine sichere und verschlüsselte Verbindung zum Internet herzustellen. Durch die Verwendung eines VPN können Sie Ihre Online-Aktivitäten schützen und Ihre Privatsphäre wahren.
Um einen VPN-Anschluss zu öffnen, benötigen Sie zunächst ein VPN-Konto bei einem Anbieter Ihrer Wahl. Sobald Sie über ein Konto verfügen, können Sie die erforderliche Software entweder auf Ihrem Computer, Smartphone oder Tablet installieren. Starten Sie die Anwendung und melden Sie sich mit Ihren Anmeldedaten an.
Sobald Sie angemeldet sind, wählen Sie den gewünschten Serverstandort aus, mit dem Sie eine Verbindung herstellen möchten. Dies kann beispielsweise ein Server in einem anderen Land sein, um auf geo-blockierte Inhalte zuzugreifen oder Ihre IP-Adresse zu verschleiern. Klicken Sie auf "Verbinden" und warten Sie, bis die Verbindung hergestellt ist.
Sobald die Verbindung erfolgreich hergestellt wurde, können Sie sicher im Internet surfen, ohne dass Ihre Aktivitäten von Dritten verfolgt werden können. Ein VPN kann auch nützlich sein, um öffentliche WLAN-Netzwerke abzusichern und Ihre Daten vor Hackern zu schützen.
Insgesamt ist das Öffnen eines VPN-Anschlusses ein einfacher und effektiver Weg, um Ihre Online-Privatsphäre und Sicherheit zu gewährleisten. Es lohnt sich, in ein hochwertiges VPN-Abonnement zu investieren, um von den zahlreichen Vorteilen dieser Technologie zu profitieren.
UFW-Port für VPN freigeben
Um eine UFW-Port für VPN freizugeben, ist es wichtig, die notwendigen Schritte sorgfältig zu befolgen. UFW steht für Uncomplicated Firewall und ist ein benutzerfreundliches Frontend für das iptables-System, das auf vielen Linux-Systemen verwendet wird. VPN, oder Virtual Private Network, ermöglicht es Benutzern, sicher auf das Internet zuzugreifen, insbesondere wenn sie sich in öffentlichen Netzwerken befinden.
Um einen Port für VPN im UFW freizugeben, müssen Sie zunächst sicherstellen, dass UFW auf Ihrem System installiert ist. Dies kann mit dem Befehl "sudo apt-get install ufw" erfolgen. Sobald UFW installiert ist, können Sie die erforderlichen Ports für Ihren VPN-Anbieter freigeben. Dies kann je nach Anbieter variieren, aber häufig werden Ports wie UDP 500 oder UDP 4500 für den Betrieb von VPN benötigt.
Um einen Port freizugeben, können Sie den Befehl "sudo ufw allow /udp" verwenden. Stellen Sie sicher, dass Sie die richtige Portnummer für Ihren VPN-Anbieter angeben. Nachdem der Port freigegeben wurde, können Sie den Status von UFW überprüfen, um sicherzustellen, dass die Regeln korrekt angewendet wurden.
Es ist wichtig zu beachten, dass das Öffnen von Ports im Firewall die Sicherheit Ihres Systems beeinträchtigen kann, daher sollten Sie nur die Ports freigeben, die für den reibungslosen Betrieb Ihres VPN-Dienstes erforderlich sind. Durch das sorgfältige Freigeben von Ports im UFW können Sie eine sichere Verbindung zu Ihrem VPN herstellen und die Vorteile einer verschlüsselten Internetverbindung genießen.
Anleitung VPN-Port UFW öffnen
Eine VPN-Verbindung bietet Sicherheit und Anonymität beim Surfen im Internet. Um eine reibungslose Nutzung von VPN-Diensten zu gewährleisten, müssen manchmal bestimmte Ports in der Firewall geöffnet werden. In diesem Artikel geht es darum, wie man den VPN-Port in der Uncomplicated Firewall (UFW) öffnet.
Zunächst müssen Sie sicherstellen, dass die UFW auf Ihrem System installiert ist. Wenn nicht, können Sie sie einfach über die Befehlszeile installieren. Sobald die UFW eingerichtet ist, können Sie den benötigten Port für Ihren VPN-Dienst öffnen. Dies geschieht durch Eingabe eines einfachen Befehls in der Konsole.
Öffnen Sie dazu die Terminalanwendung und geben Sie den Befehl "sudo ufw allow /tcp" ein, wobei durch die Portnummer Ihres VPN-Dienstes ersetzt werden muss. Zum Beispiel, wenn Ihr VPN-Port 1194 ist, lautet der Befehl "sudo ufw allow 1194/tcp". Nachdem Sie den Befehl eingegeben haben, bestätigen Sie die Aktion und starten Sie die UFW neu, damit die Änderungen wirksam werden.
Es ist wichtig zu beachten, dass das Öffnen von Ports in der Firewall potenzielle Sicherheitsrisiken birgt. Stellen Sie sicher, dass Sie nur die Ports öffnen, die für Ihren VPN-Dienst erforderlich sind, und überprüfen Sie regelmäßig Ihre Firewall-Einstellungen.
Mit diesen einfachen Schritten können Sie den VPN-Port in der UFW öffnen und eine sichere Verbindung zu Ihrem VPN-Dienst herstellen. So können Sie das Internet anonym und geschützt nutzen.
VPN-Verbindung über UFW herstellen
Eine VPN-Verbindung über UFW (Uncomplicated Firewall) herzustellen, ist eine effektive Möglichkeit, Ihre Online-Privatsphäre und -Sicherheit zu gewährleisten. UFW ist ein einfach zu verwendendes Front-End für die iptables-Firewall, das eine sichere Kommunikation zwischen Ihrem Gerät und dem VPN-Server ermöglicht.
Um eine VPN-Verbindung über UFW herzustellen, müssen Sie zunächst sicherstellen, dass UFW auf Ihrem System installiert und konfiguriert ist. Öffnen Sie dazu das Terminal und geben Sie die Befehle ein, um UFW zu installieren und zu aktivieren. Stellen Sie sicher, dass die erforderlichen VPN-Ports (z. B. UDP 1194 für OpenVPN) in der UFW-Konfiguration geöffnet sind.
Sobald UFW konfiguriert ist, können Sie die VPN-Verbindung einrichten, indem Sie die erforderlichen VPN-Einstellungen in Ihrem Netzwerkmanager oder in der VPN-Client-Software eingeben. Stellen Sie sicher, dass Sie die richtigen Anmeldedaten und Serverinformationen bereit haben.
Sobald die VPN-Verbindung eingerichtet ist, können Sie überprüfen, ob die Verbindung ordnungsgemäß funktioniert, indem Sie Ihre IP-Adresse überprüfen oder eine DNS-Leak-Test durchführen. Dadurch können Sie sicherstellen, dass Ihr gesamter Internetverkehr über die VPN-Verbindung geschützt ist und nicht durchsickert.
Insgesamt bietet die Einrichtung einer VPN-Verbindung über UFW eine einfache und effektive Möglichkeit, Ihre Online-Aktivitäten zu schützen und Ihre Privatsphäre zu wahren. Es ist wichtig, sich bewusst zu sein, wie man solche Verbindungen sicher konfiguriert, um maximale Sicherheit und Anonymität zu gewährleisten.
Konfiguration VPN-Port und UFW
Eine wichtige Maßnahme zur Sicherung von Daten und Netzwerken ist die Konfiguration eines VPN-Ports in Verbindung mit einer Firewall wie der Uncomplicated Firewall (UFW). Ein Virtual Private Network (VPN) ermöglicht es, eine verschlüsselte Verbindung zwischen zwei Geräten oder Netzwerken herzustellen, was besonders wichtig ist, wenn sensible Daten über öffentliche Netzwerke übertragen werden.
Die Konfiguration eines VPN-Ports beinhaltet in der Regel die Auswahl eines Protokolls wie OpenVPN oder IPsec, die Festlegung von Zugriffsrechten und die Konfiguration von Verschlüsselungseinstellungen. Durch die Einrichtung eines VPN-Ports können Unternehmen ihren Mitarbeitern sicheren Remote-Zugriff auf das Unternehmensnetzwerk ermöglichen und gleichzeitig die Datenübertragung vor externen Bedrohungen schützen.
Die UFW ist eine Firewall-Software für Linux-Systeme, die es ermöglicht, eingehenden und ausgehenden Netzwerkverkehr zu steuern und zu überwachen. Durch die Konfiguration der UFW können Administratoren den Datenverkehr anhand von Regeln filtern und unerwünschte Verbindungen blockieren. Die Kombination eines VPN-Ports mit der UFW bietet eine umfassende Sicherheitslösung für Unternehmen, die ihre Netzwerke vor Cyberangriffen schützen möchten.
Insgesamt ist die Konfiguration eines VPN-Ports in Verbindung mit der UFW eine effektive Maßnahme, um die Sicherheit von Daten und Netzwerken zu gewährleisten. Durch die Implementierung dieser Sicherheitsmaßnahmen können Unternehmen vertrauliche Informationen schützen und die Integrität ihres Netzwerks sicherstellen.
0 notes
Last Seen Blogs

very-much-not-kur0m1-spam
Hey Whores

charlespodz
Untitled

el-alma-de-un-colibri
El alma de un colibrí