#dnsmanagement
Text
(this is a small story of how I came to write my own intrusion detection/prevention framework and why I'm really happy with that decision, don't mind me rambling)
Preface

About two weeks ago I was faced with a pretty annoying problem. Whilst I was going home by train I have noticed that my server at home had been running hot and slowed down a lot. This prompted me to check my nginx logs, the only service that is indirectly available to the public (more on that later), which made me realize that - due to poor access control - someone had been sending me hundreds of thousands of huge DNS requests to my server, most likely testing for vulnerabilities.
I added an iptables rule to drop all traffic from the aforementioned source and redirected remaining traffic to a backup NextDNS instance that I set up previously with the same overrides and custom records that my DNS had to not get any downtime for the service but also allow my server to cool down.
I stopped the DNS service on my server at home and then used the remaining train ride to think. How would I stop this from happening in the future? I pondered multiple possible solutions for this problem, whether to use fail2ban, whether to just add better access control, or to just stick with the NextDNS instance.
I ended up going with a completely different option: making a solution, that's perfectly fit for my server, myself.
My Server Structure
So, I should probably explain how I host and why only nginx is public despite me hosting a bunch of services under the hood.
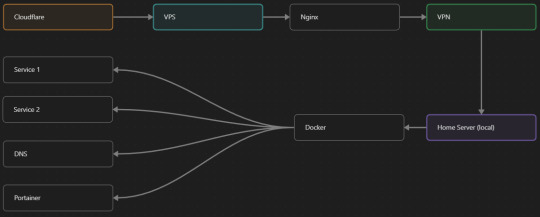
I have a public facing VPS that only allows traffic to nginx. That traffic then gets forwarded through a VPN connection to my home server so that I don't have to have any public facing ports on said home server. The VPS only really acts like the public interface for the home server with access control and logging sprinkled in throughout my configs to get more layers of security. Some Services can only be interacted with through the VPN or a local connection, such that not everything is actually forwarded - only what I need/want to be.
I actually do have fail2ban installed on both my VPS and home server, so why make another piece of software?
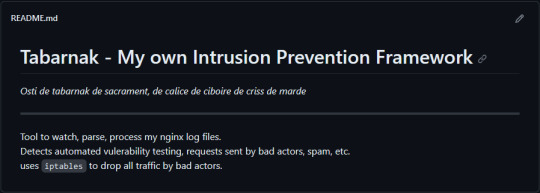
Tabarnak - Succeeding at Banning
I had a few requirements for what I wanted to do:
Only allow HTTP(S) traffic through Cloudflare
Only allow DNS traffic from given sources; (location filtering, explicit white-/blacklisting);
Webhook support for logging
Should be interactive (e.g. POST /api/ban/{IP})
Detect automated vulnerability scanning
Integration with the AbuseIPDB (for checking and reporting)
As I started working on this, I realized that this would soon become more complex than I had thought at first.
Webhooks for logging
This was probably the easiest requirement to check off my list, I just wrote my own log() function that would call a webhook. Sadly, the rest wouldn't be as easy.
Allowing only Cloudflare traffic
This was still doable, I only needed to add a filter in my nginx config for my domain to only allow Cloudflare IP ranges and disallow the rest. I ended up doing something slightly different. I added a new default nginx config that would just return a 404 on every route and log access to a different file so that I could detect connection attempts that would be made without Cloudflare and handle them in Tabarnak myself.
Integration with AbuseIPDB
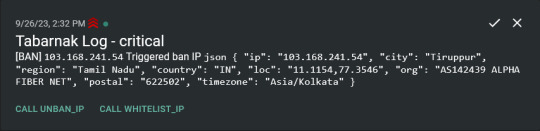
Also not yet the hard part, just call AbuseIPDB with the parsed IP and if the abuse confidence score is within a configured threshold, flag the IP, when that happens I receive a notification that asks me whether to whitelist or to ban the IP - I can also do nothing and let everything proceed as it normally would. If the IP gets flagged a configured amount of times, ban the IP unless it has been whitelisted by then.
Location filtering + Whitelist + Blacklist
This is where it starts to get interesting. I had to know where the request comes from due to similarities of location of all the real people that would actually connect to the DNS. I didn't want to outright ban everyone else, as there could be valid requests from other sources. So for every new IP that triggers a callback (this would only be triggered after a certain amount of either flags or requests), I now need to get the location.
I do this by just calling the ipinfo api and checking the supplied location. To not send too many requests I cache results (even though ipinfo should never be called twice for the same IP - same) and save results to a database.
I made my own class that bases from collections.UserDict which when accessed tries to find the entry in memory, if it can't it searches through the DB and returns results. This works for setting, deleting, adding and checking for records.
Flags, AbuseIPDB results, whitelist entries and blacklist entries also get stored in the DB to achieve persistent state even when I restart.
Detection of automated vulnerability scanning
For this, I went through my old nginx logs, looking to find the least amount of paths I need to block to catch the biggest amount of automated vulnerability scan requests. So I did some data science magic and wrote a route blacklist.
It doesn't just end there. Since I know the routes of valid requests that I would be receiving (which are all mentioned in my nginx configs), I could just parse that and match the requested route against that. To achieve this I wrote some really simple regular expressions to extract all location blocks from an nginx config alongside whether that location is absolute (preceded by an =) or relative. After I get the locations I can test the requested route against the valid routes and get back whether the request was made to a valid URL (I can't just look for 404 return codes here, because there are some pages that actually do return a 404 and can return a 404 on purpose).
I also parse the request method from the logs and match the received method against the HTTP standard request methods (which are all methods that services on my server use). That way I can easily catch requests like:
XX.YYY.ZZZ.AA - - [25/Sep/2023:14:52:43 +0200] "145.ll|'|'|SGFjS2VkX0Q0OTkwNjI3|'|'|WIN-JNAPIER0859|'|'|JNapier|'|'|19-02-01|'|'||'|'|Win 7 Professional SP1 x64|'|'|No|'|'|0.7d|'|'|..|'|'|AA==|'|'|112.inf|'|'|SGFjS2VkDQoxOTIuMTY4LjkyLjIyMjo1NTUyDQpEZXNrdG9wDQpjbGllbnRhLmV4ZQ0KRmFsc2UNCkZhbHNlDQpUcnVlDQpGYWxzZQ==12.act|'|'|AA==" 400 150 "-" "-"
I probably over complicated this - by a lot - but I can't go back in time to change what I did.
Interactivity
As I showed and mentioned earlier, I can manually white-/blacklist an IP. This forced me to add threads to my previously single-threaded program. Since I was too stubborn to use websockets (I have a distaste for websockets), I opted for probably the worst option I could've taken. It works like this:
I have a main thread, which does all the log parsing, processing and handling and a side thread which watches a FIFO-file that is created on startup. I can append commands to the FIFO-file which are mapped to the functions they are supposed to call. When the FIFO reader detects a new line, it looks through the map, gets the function and executes it on the supplied IP.
Doing all of this manually would be way too tedious, so I made an API endpoint on my home server that would append the commands to the file on the VPS. That also means, that I had to secure that API endpoint so that I couldn't just be spammed with random requests.
Now that I could interact with Tabarnak through an API, I needed to make this user friendly - even I don't like to curl and sign my requests manually. So I integrated logging to my self-hosted instance of https://ntfy.sh and added action buttons that would send the request for me.
All of this just because I refused to use sockets.
First successes and why I'm happy about this
After not too long, the bans were starting to happen. The traffic to my server decreased and I can finally breathe again.
I may have over complicated this, but I don't mind. This was a really fun experience to write something new and learn more about log parsing and processing.
Tabarnak probably won't last forever and I could replace it with solutions that are way easier to deploy and way more general. But what matters is, that I liked doing it. It was a really fun project - which is why I'm writing this - and I'm glad that I ended up doing this.
Of course I could have just used fail2ban but I never would've been able to write all of the extras that I ended up making (I don't want to take the explanation ad absurdum so just imagine that I added cool stuff) and I never would've learned what I actually did.
So whenever you are faced with a dumb problem and could write something yourself, I think you should at least try. This was a really fun experience and it might be for you as well.
Post Scriptum
First of all, apologies for the English - I'm not a native speaker so I'm sorry if some parts were incorrect or anything like that.
Secondly, I'm sure that there are simpler ways to accomplish what I did here, however this was more about the experience of creating something myself rather than using some pre-made tool that does everything I want to (maybe even better?).
Third, if you actually read until here, thanks for reading - hope it wasn't too boring - have a nice day :)
8 notes
·
View notes
Text
youtube
In this comprehensive guide, we will walk you through the step-by-step process of setting up Cloudflare on WordPress to achieve lightning-fast website loading speeds and enhance your site's security. Cloudflare is a powerful content delivery network (CDN) that optimizes your website's performance by caching static content and protecting it from online threats.
By following the instructions provided in this tutorial, you will be able to harness the full potential of Cloudflare's features to accelerate your WordPress site and safeguard it against malicious attacks. Boosting your website's speed is crucial in today's digital landscape, as faster loading times result in better user experiences and improved search engine rankings.
Firstly, we will outline the benefits of using Cloudflare as a CDN and how it can dramatically decrease your site's load times. We'll guide you through the process of signing up for a Cloudflare account and connecting it to your WordPress site, ensuring a seamless integration. By utilizing Cloudflare's intelligent caching systems, your website's static content, such as images and CSS files, will be delivered more efficiently to your visitors, resulting in faster page rendering.
Additionally, we will delve into the various performance optimization techniques available within Cloudflare's dashboard. You'll discover how to leverage features like minification, Rocket Loader, and browser caching to further enhance your website's speed and overall performance.
Furthermore, this tutorial will cover the essential security aspects of Cloudflare. From setting up robust SSL encryption to preventing DDoS attacks and protecting against malicious traffic, we'll guide you through the necessary configuration steps to safeguard your WordPress site from potential threats and vulnerabilities.
In conclusion, this ultimate guide to setting up Cloudflare on WordPress provides you with all the knowledge and techniques needed to optimize your website for both speed and security. By implementing Cloudflare's powerful CDN capabilities, your WordPress site will benefit from improved performance, better search engine visibility, and enhanced protection against cyber threats.
So why wait? Follow along with this tutorial and take your WordPress site to new heights in terms of speed and security! Check out our video tutorial for visual assistance and additional tips to maximize your results with Cloudflare.
#WordPress#Cloudflare#WebsiteSecurity#WebsiteSpeed#ContentDeliveryNetwork#WebPerformance#WebsiteOptimization#CDN#WebsiteProtection#WebsiteCache#WebsiteFirewall#SSL#SecureWebsites#WebsiteHosting#WebsiteManagement#WebsiteDevelopment#WebsiteMaintenance#WebsiteSupport#DNSManagement#Youtube
0 notes
Photo

Our domain solutions include everything you need to establish, or reimagine, your internet presence. Contact us today and ask about our services!
https://whitelabelitsolutions.com/services/web-hosting/domains/
#domainservices #domainnameregistration #domaintransfer #domainrenewals #quickandsimple #freesubdomains #domainmanagement #accountmanagement #automaticrenewal #dnsmanagement #share #follow #like
0 notes
Photo

Domain registration, renewal, and transfers. Trust your virtual presence in our professional and specialized care. Contact us today.
https://whitelabelitsolutions.com/services/web-hosting/domains/
#domainmanagement #domainnameregistration #domaintransfer #domainrenewals #quickandsimple #freesubdomains #accountmanagement #automaticrenewal #dnsmanagement
0 notes
Last Seen Blogs

findom-goddess-world
Findom Goddess

originalfailvre
- ̗̀V I N D I C T I V E ̖́-

astoryscribbler
Story Scribbles

nightcourtcaps
Court Is Now In Session

dadtron-3000
Bonks your cockpit