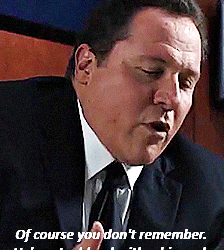
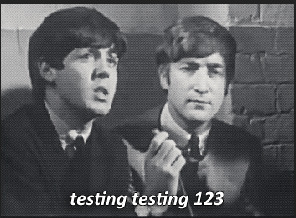
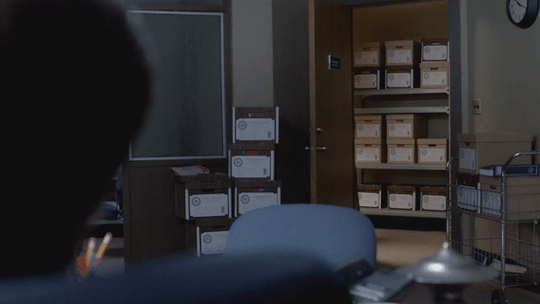
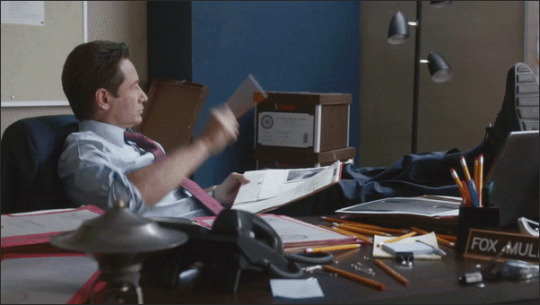
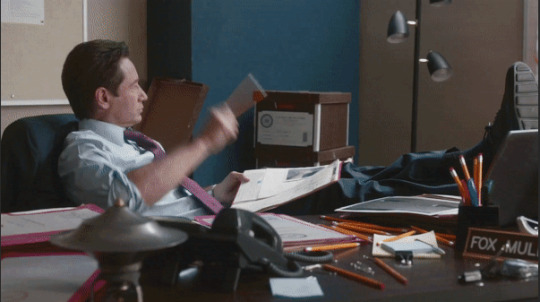
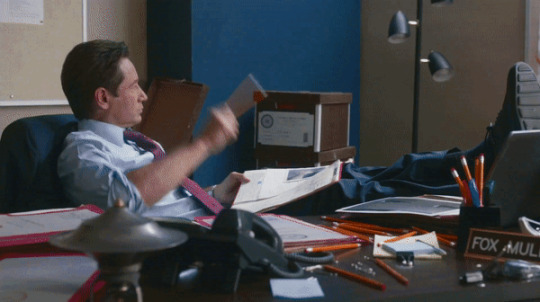
#i was SCREEN RECORDING YOUTUBE VIDEOS BECAUSE I NEEDED TO MAKE IT FAST OR MY BRAIN WOULD EXPLODE
Text
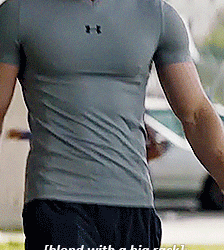
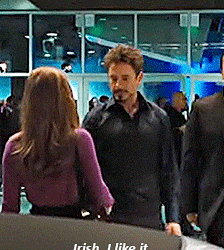
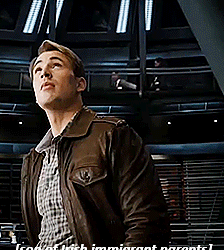

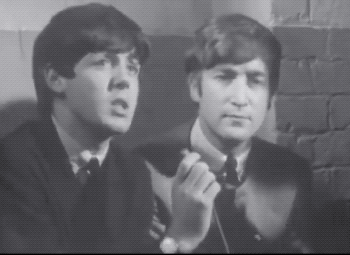
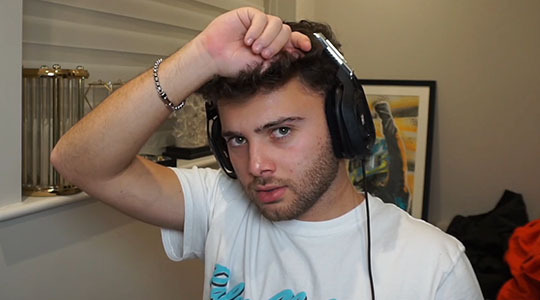
breaking news: steve rogers is tony stark's type
#look i know how lq and shitty these gifs are I KNOW but do YOU know how desperate i was to make these#i was SCREEN RECORDING YOUTUBE VIDEOS BECAUSE I NEEDED TO MAKE IT FAST OR MY BRAIN WOULD EXPLODE#whew. i can breathe now#stevetony#stony#st♡ny#stonyedit#stevetonyedit#*#edit*#gif*#1k#2k
3K notes
·
View notes
Text
a montage of love

summary - a fan has put together a small video of some of your best moments together
word count - ~1.5k
pairing - boyfriend!harry x youtuber!reader
The video screen filled with pictures of you and Harry along with the title ‘A quiet love like Harry and Y/Ns’.
The ten minute video was a fan-made compilation of moments between you and Harry that were quiet love moments. Moments where you didn’t say the words ‘I love you’ out loud, but the actions were louder than words anyways.
The fan put a disclaimer on the screen and claimed that they didn’t own any of the content.
You was a YouTuber so a lot of the content came from her channel, since Harry was always so proud and happy to be on your channel.
The video then started.
>>>>Clip 1:
The background was noise, since you were in a restaurant.
You and Harry were sat on the same side of the green velvet booth, shoulder to shoulder as if it were a pain to be sat apart.
The camera was placed on the table in front of you. You didn’t want to film the whole evening, since it was along time you and Harry couldn’t afford to waste, but you wanted to record a little just for memories.
Harry’s hand comes into view to hold yours that’s resting on the table. When you accept his hand, he brings them both up to his lips to give your skin a soft kiss.
“I love you.” He said quietly, but the camera picks it up.
“I love you too.” You blushed and rested your head against his shoulder affectionately.
“You want the last bite of my chocolate cake?” He asked you.
You nodded against his shoulder and he brought his other hand, fork loaded with a chocolate bite delight up to your mouth for you.
You ate it swiftly, not allowing any crumbs.
That bite was Harry’s way of saying I love you, again, but just in a different way.
>>>>Clip 2:
Standing in front of the floor length mirror in your house, you filmed for a winters walk vlog.
Lulu, your dog, padded around by your feet, awaiting her walk.
You were showing your outfit.
“My leggings are from H&M; cheap and cheerful my lovelies! The hoodie is from Harry’s wardrobe, but I believe it’s not cheap and cheerful. Don’t ask me why it isn’t, when it’s literally just a blue hoodie…”
You often joked about Harry’s incessant need to buy expensive clothes when he could be better spending it elsewhere… like on you!
“The coat is from Zara, I think, but I bought it from Vinted. Grabbed a great price for it and we’re preventing fast fashion in this household. And finally my ugly walking boots are from Go Outdoors. Sexy, I know!” You joked.
Harry walked in behind you then, dressed in a similar attire only with black running shorts over his leggings.
“Ready?” You asked him.
“Not until you bloody zip your coat up.” Harry huffed, picking up the keys from the key bowl by the front door.
“I don’t need to.”
“Yeah, nice try you.” He laughed and then his was before you, taking matters into his own hands and zipping up your coat for you.
Technically one of your hands was filming and the other was controlling Lulu, so there wasn’t much you could do anyways.
“So annoying.”
“Huff and pout all you like, but I’m saving you from a life of misery and cold.” He looked proud of himself after he zipped you up.
“Happy now?” You sarcastically asked.
“Not without a kiss I’m not.”
You pretended like that was a chore, but really you were excited to give him a kiss. The video stopped then, because you weren’t one to expose your PDA to the public.
>>>>Clip 3:
In the same video, you filmed your walk with Harry and Lulu.
You went on a walk alongside a canal, stopping off around at a little book swap along the way. Harry picked up a book and so did you, Harry offering to carry them both as you were walking Lulu.
You were walking canal side when Harry tugged on your hand and pulled you across him.
“What are you doing?” You laughed, Lulu happily walking ahead of you both.
“Making sure you’re less likely to fall in the canal, especially if Lulu tugs you.”
Harry was now walking canal side, holding your hand with his.
You made sure the camera caught the moment where you kissed his cheek in silent thanks, forever indebted to his gentlemanly capabilities.
>>>>Clip 4:
The room is bright as the sunset burns through the room.
You are sat on the floor, in front of the sofa in the living room, filming a segment of a video where you answer fan questions.
“What did Harry get you for Christmas?” You read out the question that you were asked via Instagram.
“He decided to get me a weighted blanket, because every time he goes away I find it quite difficult to fall asleep. The idea of the weighted blanket is to mimic him lying across me, which makes me feel more safe and calms me into sleeping better.”
You blushed as you answered, picking up your cup of tea to take a sip of it to hide your embarrassment.
You paused to think about you opening that gift and how happy you had been in that moment. Harry knew not to buy you anything that was expensive or materialistic. He bought you something practical and perfect, plus the he bought it in your favourite colour; yellow.
It was such a thoughtful gift and even more thoughtful coming from a man who could’ve easily bought you a meaningless yacht if he wanted.
The front door then unlocked and you turned to see who it was.
“Hey, m’love.” Harry said as he walked through, Pleasing tote bag on his shoulder and wrapped for winter.
“Hello, you. How was your day?” You asked him, watching him take off his coat and shoes.
“Busy, but good. Yeah, we wrote an entire verse which I’m proper happy with.”
“I’m just filming a bit for my next vlog, but I’ll make is dinner in a bit.” You promised, knowing he would be hungry after a full day in the studio.
Harry walked over to you, with a bunch of colourful tulips in his hand. He crouched down beside you, waving into the recording camera before handing over the flowers to you.
“For me?” You pouted at how sweet the gesture was, “Why?”
“Does there have to be a reason?”
“Harry…” You whined, feeling like you could cry. “Thank you.”
“It’s okay. You’re worth more than that, which is why takeaway is on me tonight.” He kissed your forehead - aware that the camera was still rolling.
“It’s always on you, honey.” You joked.
“That’s right. Treat you so well, don’t I?”
You couldn’t argue with him there.
“Did you eat today?” You asked him, concerned for his wellbeing as much as he is for yours.
“I did. Mitch brought us a couple boxes of sushi.”
“As long as you’ve had something, that’s all I care about.”
“Oh what would I do without you, my love?” Harry asked you, kissing your cheek.
“Perish.”
“That’s one word for it.”
#harry styles#harry styles x reader#harry styles fanfiction#harry styles x y/n#harry styles fanfic#ask finelinevogue#harry blurb#finelinevogue#harry styles concept#harry oneshot#harry styles blurbs#harry styles fic rec#harry styles boyfriend#boyfriendrry
834 notes
·
View notes
Text
Best Apps For Productivity & Studying
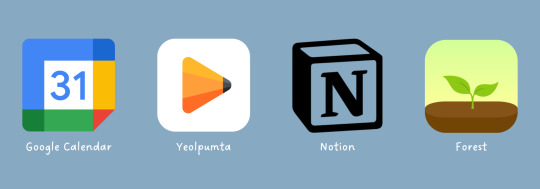
Hello there lovelies! It hasn’t been long since I started my vacay and soon enough, school is about to start. A few days from now I’ll be entering my school as a junior, aka 3rd-year college student. Time flies fast, doesn’t it? I started this blog when I was in my junior year of high school and now I’m a college student!
Speaking of school, I have here 4 apps that I really love to use for studying and any academic-related tasks, or whenever I need to be productive. These are 4 of the best apps out there that can help you be more productive and track your progress. You can also use these apps regardless if you’re in high school or college. Another thing about these apps is they are all easy to use and navigate. Lastly, these are all free to download on IOS and Android devices.

(Photo by Reclaim.ai)
1. Google Calendar
First on the list is Google Calendar. Of all the calendar apps to choose from, this is my favorite. I have tried several calendar apps in the past and this is the only one I continue using and will use forever!
The layout is simple, easy to use, customizable, and it has a lot of features. I like that you can notify yourself multiple times for an event or task. I also like that you share an event (or calendar/tasks) with your organization, friends, and family. Another thing that I like about this app is how convenient it is because you can use it via desktop or your mobile devices.
Note: you can also add more colors for your calendar/event by clicking the three dots when hovering over a calendar, then click add custom color.
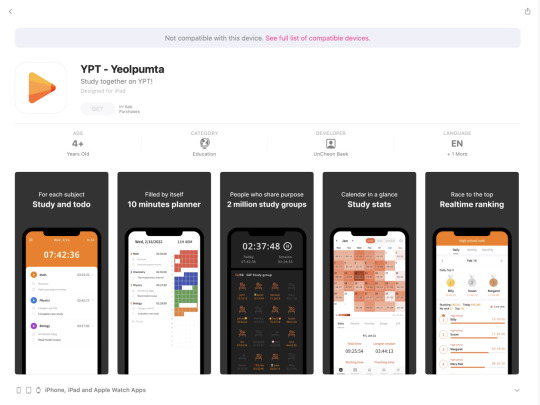
2. Yeolpumta
This is probably one of my best discoveries last semester! It’s easy to use, very customizable, functional, and of course, very aesthetically pleasing.
The app itself looks very minimalist and there arent a lot of distractions. Aside from that, you can use this app for a wide range of options such as a habit tracker, study tracker, pomodoro, etc. I personally use this as a progress and study tracker. This also helps you to stay focused because it wont let you leave the screen unless you’re using one of the allowed apps, which you can also choose which to include. In addition, it also has tons of features like the timer and calculator option, a dictionary, and white noise feature as well as see the users who are also studying at that time.
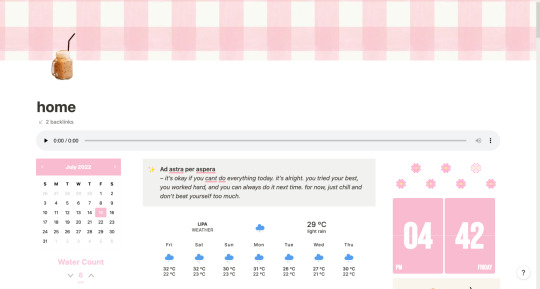
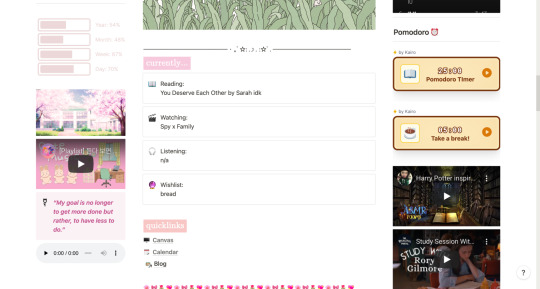
3. Notion
Notion is one of my favorite apps and I’ve been using it since I started college. I use Notion for everything! My habit tracker, expense tracker, reading tracker, journal, class schedule, to-do list, or basically my life is in here. The screenshots above is what half of my Notion dashboard looks like.
You can find lots of cool templates online or you can just create your own. It can be overwhelming at first, but once you get the gist of it, the things that you can create are endless. You may search for Alyanna Ross on Youtube because she has a lot of Notion-related videos and you can learn so much from her.
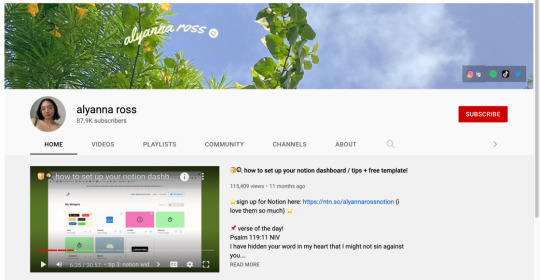
(Alyanna Ross is one of my fave YouTubers so go check her out!)
As mentioned above, you can use Notion for various things, may it be for school, work, life, or productivity. You can add lots of widgets to further customize your setup and make it more tailored to your needs. Take advantage also of the tables and columns to enhance your Notion setup.
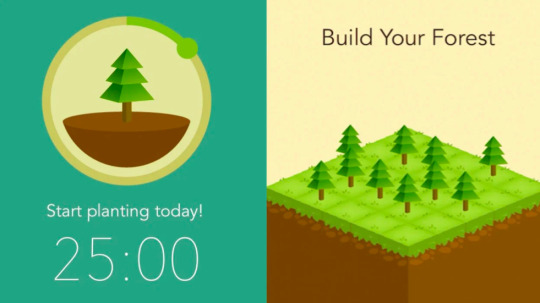
4. Forest
This app is one of my faves to record how long I am studying. It’s also easy to use and can be used on your mobile devices or as a Chrome extension. It’s up to you to select the time or minutes of studying and after that, you get to plant a tree. If you stop, your tree also withers.
I honestly prefer Yeolpumta nowadays because it has more features. However, I am also after the plant a real-life tree feature of Forest and so far, I have already planted 5 trees! Sadly tho, 5 is the maximum.
----------------------
That’s all for today’s blog post, loves! I also just want to say that this is not sponsored. I personally use all the apps that I have mentioned on this post. Anyway, at the end of the day, your progress depends upon your will to take action and nothing will happen if you will not act. Nonetheless, I hope that these apps can also help you to be productive as much as they helped me.
Originally posted on my Wordpress blog Aestrophilia.
Stay self and healthy everyone!
Lets stay connected:
ask.fm: ereecuh
email: aestrophilia@aestrophilia
.
#2022#aestrophilia#apps#studyblr#studygram#studyph#studygramph#study community#studyblurph#studyblur#accountancy#bsa#college#university#productivity#motivation#notion#notion dashboard#notion template#aesthetic#blog#blogger#blogging#lifestyle#septermber 2022#september 2022#september#school#study#studying
426 notes
·
View notes
Text
how to make gifs for free*
*okay, for $5. which is far less than what you would pay for photoshop!
this is my tutorial for people who want to make gifs but do not want to pay the steep monthly fee for photoshop. i feel especially qualified to make this tutorial because i did pay for the monthly photoshop fee a few months ago and honestly, i hated the process of making gifs on photoshop. it was extremely onerous and also cost a lot of money? no thanks! now, are gifs made on photoshop typically better quality than gifs made through free services? yes, but only marginally. and, to me, the slightly-higher quality gifs do not make up for: (a) the cost of photoshop, and (b) the ease of the free-gif making process. it will seem like there are a lot of steps below, but i promise it will all become like second nature soon enough.
BEFORE WE PROCEED: this tutorial is tailored towards the apple ecosystem. however, i’m sure most of the steps in here also apply to windows computers; i’m just not totally sure since i don’t have one.
without further ado, click below to follow the tutorial!
STEP 1: purchase gif brewery 3
this is the only stage where you will need to spend money - this app is integral to the process of creating gifs for free. i have tried out many different giffing apps, and this one is by far the best. it’s called “gif brewery 3 by gyfcat” and you can get it on the app store:

STEP 2: download or screen record your video
now that you’ve got your giffing software downloaded, you’re going to download your video in an .mp4 format.
downloading: i typically download from youtube or vimeo. for youtube downloads, you simply copy the link and paste it into a “youtube to mp4″ converter, which you can find through a simple google search of “youtube to mp4″ (a lot of these sites often get taken down and new ones pop up, so don’t get attached to a specific site because it’ll probably be gone like, 4 days later lmfao). for vimeo, i typically google “vimeo video downloader” and a few websites will pop up.
screen recording: there are a few different screen recording extensions you can add to google chrome, and i’ve tinkered with those in the past. however, recently i’ve been using the built-in macbook screen record function, which can be brought up by pressing command + shift + 5. once that’s brought up, you can change the size of your recording area, click record, and then save the video to your desktop. note that there IS a screen record option built into gif brewery, but i have never used it so i can’t speak to its functionality.
STEP 3: add your video to gif brewery
now that you’ve either: (a) downloaded your video from youtube/vimeo or (b) screen recorded your video and saved it on your computer; you’re now going to add the video to gif brewery and get giffing! this is where the fun part starts.
1. open up gif brewery and select “open video”
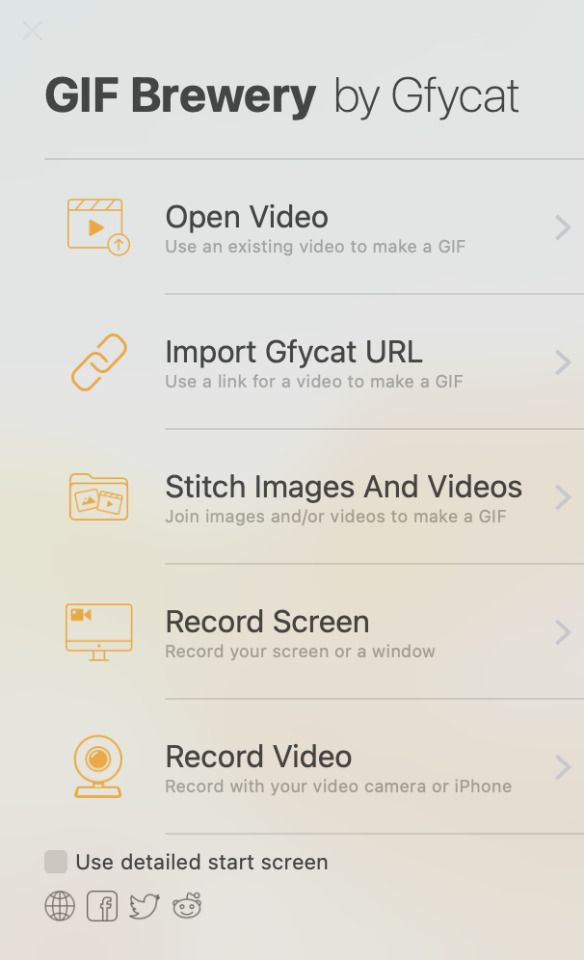
2. head into your computer and find the video you have downloaded/recorded, and select “open”
3. drag the green and red bars to the areas of your video where you want your gif to start and end. i’m using a video i giffed last week as an example:

4. click on “settings” in the top righthand corner to bring up this panel:
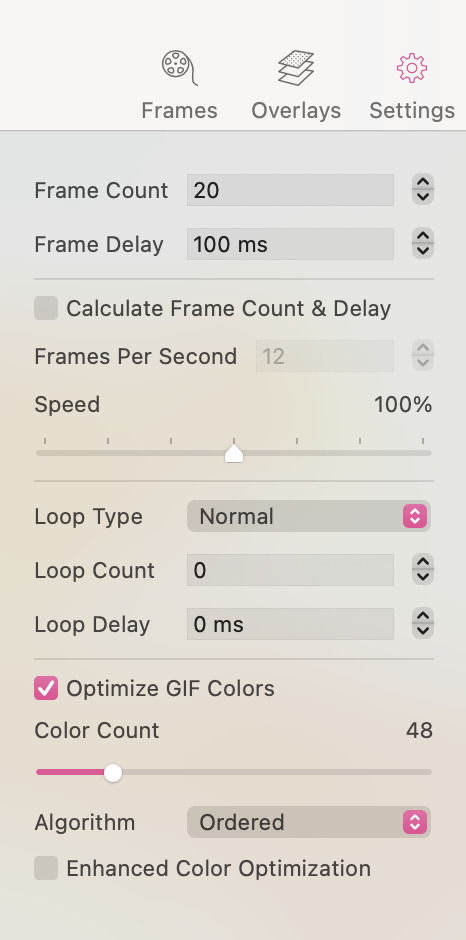
5. this is a VERY important step to ensure that your gifs turn out all right. you’ll want to change the settings in the above panel to something like this:

as you can see, i typically use 25 fps as this helps the gifs flow and not look choppy. some videos, though, work better with 20 fps (this is something you’ll get a sense for when you make a lot of gifs). i typically bring the speed down to between 70-90%, as 100% speed always feels too fast to me. and then i ALWAYS optimize the gif colours to 256. yes, even for black and white gifs.
an interlude about gif sizes: you’ll note that in the above picture, the frame count says “79″. if your gif is larger than say, 600px wide, 79 fps will probably have you producing a decently large gif. keep in mind that tumblr does not allow gifs to be over 10mb, so you’ll need to adjust accordingly. you can apply these settings and then go back and re-adjust those green and red lines from before to shorten your gif to ensure that it adheres to the size requirements of tumblr. also keep in mind that the editing process will add (sometimes significantly) to the size of your gif. so you want to aim for your gif to be well under 10mb at this stage. for small gifs, i don’t limit my fps too much, but for bigger gifs (i.e. ones that are over 600px wide), i will try to limit my fps to under 50. just keep that in mind as a barometer.
6. once you’re happy with your settings, click “create”

7. clicking “create” will bring up a window which will showcase your gif, as well as your gif size (see red circle):

at this stage, i’ll often click the “cancel” button in the lower lefthand corner and fiddle with the gif, as my gif sizes at this stage are typically enormous. this is actually a rare example where the gif is well under 10mb. however, for this gif i would crop the black edges out and probably re-size it down a bit to have it further below 5 mb (this video is far too low quality to produce a gif that’s as high as 5mb. this will vary, though, depending on the quality/size of the video).
8. so, clicking “cancel” above, i am going to crop and resize the gif:
- when you click on “crop”, this window will come up where you can adjust the size of your crop:

when you crop it to where you’re happy with it (if you need to crop your gif, that is), you’ll likely want to resize your gif:
when you click the “resize” button, the dimensions of your gif will pop up:
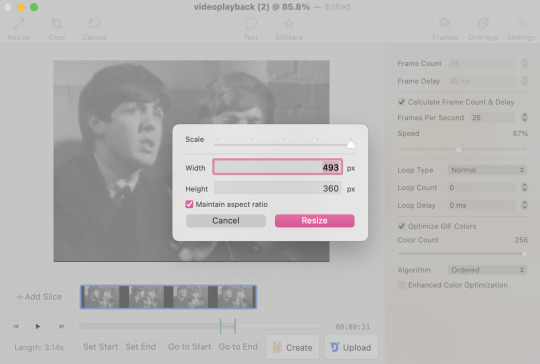
a second interlude about gif sizes: okay. here’s the thing about using a software that isn’t photoshop to make gifs. the quality of your gifs will likely suffer, compared to gifs processed through photoshop. through trial and error, i have learned that i have to make my gifs slightly bigger than the standard tumblr sizes in order for their quality to hold up. it has something to do with pixel compression, which i don’t need to go into right now. i have also learned that low resolution videos (like the one i’m using in this example, which frankly looks like it was filmed using a toaster) should almost never be used for full-sized gifs. instead, the quality of these gifs from a low-resolution video will look much better as half-sized, side-by-side gifs in a two, four, six, or eight-gif pattern (god, does that make sense? message me if it doesn’t). standard tumblr sizes are, i think, 540px wide for a full-sized gif, and 270px wide for a half-sized gif. AS SUCH, i typically make my full-sized gifs around 700px wide, to enhance the quality of them once they’re put into tumblr. yes, this means your gifs will have a higher MB output, which means your gifs will need to be shorter than those that could be made through photoshop. these are the struggles we face as Free Gif Makers, however it is worth it to me.
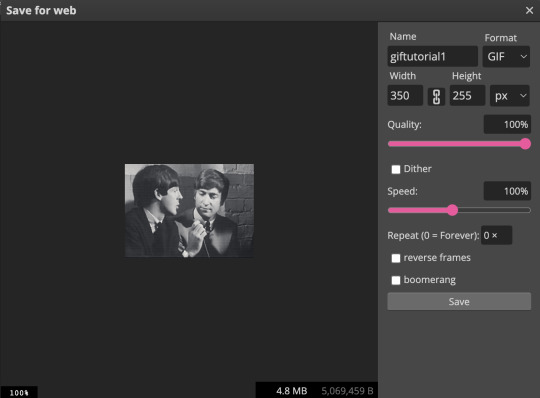
alright, as you can see above, after i’ve cropped the black edges out, this gif is 493x360px. so, it’s under the 540px requirement for a tumblr full-sized gif. the GOLDEN rule of gif-making is to NEVER use a gif that is under 540px wide as a full-sized gif. the gif will be stretched and will lose a lot of quality in the process. however, 493px wide is still well-above the 270px wide standard size for a side-by-side gif. i am going to size this down slightly to 350px wide (remember, we want to be well above the 270px wide standard size, as described above) so my total MBs will be smaller.
9. now that i’ve cropped and resized, my gif is now only 2.7mb:
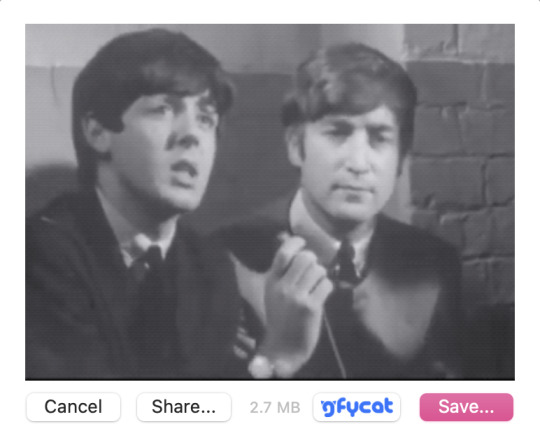
i like this a lot better than the 5mb before, as it gives me more wiggle room in the editing process. i’m happy with it now, so i will click “save...” and save it to my desktop for editing now.
STEP 4: repeat step 3 for all the gifs you want to make for that specific gifset
i am going to make two gifs to demonstrate to you the side-by-side gif thing i was talking about above. these are the gifs at this stage, pre-editing:

STEP 5: add your gifs to photopea to begin the editing process
once you’ve created all your gifs in gif brewery 3, you can close the app. for editing the gifs, i use photopea desktop. photopea is basically a walmart photoshop, and i think it works really well considering it’s free.
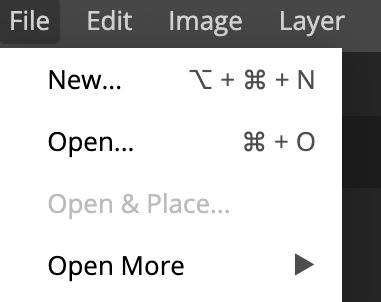
1. click file > open
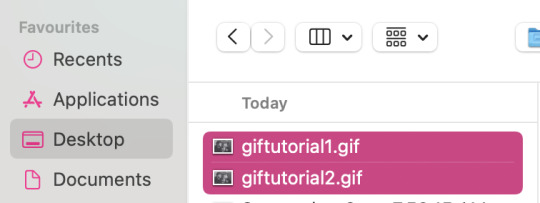
2. locate your gifs that you save from gif brewery
3. now is the actually fun part. this is where you can fiddle with the brightness, exposure, temperature, etc., and/or you can add a psd or two to your gif. i almost exclusively use PSDs and then will fiddle with the brightness/contrast/levels/curves/temperature/sharpening/grain on my own after i’ve applied the PSD. i’ve found all the PSDs i use here. that blog should also have tutorials on how to download a PSD. a PSD is basically a file folder with elements in it which will enhance the colouring/lighting of your gif. PSDs are EXTREMELY trial and error when it comes to working with a certain gif or not, so be patient as you try out PSDs on your gifs. when you download a PSD, you will add the file to photopea (file > open > find the PSD and add it), and then drag it on top of all the layers of your gif, like so:

a note on manually adding brightness/contrast/temperature/sharpening/grain, etc.: you must select all the layers in your gif for these edits to apply these changes, so they all must be highlighted like the below:

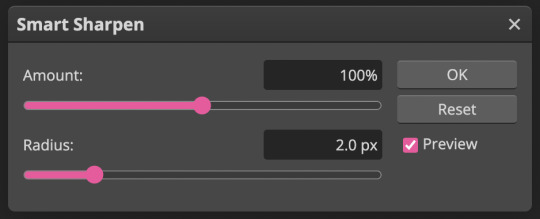
a note on sharpening/grain: adding sharpening/grain to a gif without being careful will HUGELY add to the size of the gif, and will often push it well over tumblr’s 10mb size limit. sharpening can also make your gifs look very bad if you go overboard. i often either don’t sharpen my gifs at all, or am very careful when i do. i always choose smart sharpen (as opposed to “sharpen”, which just adds a shitload of sharpening without you being able to adjust the amount), as i can adjust the sharpening elements with smart sharpen. to find the sharpen tool, go to filter > sharpen > smart sharpen:

these are the properties i sometimes choose for sharpening. however remember that most of the time i don’t even sharpen my gifs, OR i will do 50% instead of 100%. but i am going to use these properties for the gifs i’m making for this tutorial. you can typically be a bit more liberal with sharpening when you’re making smaller side-by-side gifs, as there is more room for the extra MBs added from sharpening:
the properties you choose for sharpening will ultimately totally depend on the gifs you’re making, so don’t be afraid to fiddle around with them! i wouldn’t recommend going over 150%, though.
now, grain is something i hardly use in my gifs, as grain adds even MORE to the file size of a gif than sharpening does. however, sometimes it’s cool to have a bit of grain in your gif, so this is what i would do.
locate grain, which is found in filer > noise > add noise:
use this percentage:
unless your gif is super tiny, anything above 2-3% grain will make your file size extremely massive. use grain with caution!
STEP 5.1: adding text to your gifs
if you want to add text to your gifs, read this step. if you don’t, skip to step 6.
the most common font used with gifs on tumblr is calibri bold italic. photopea does not have calibri built in, so you will need to download it from an external source like here and then add the font into photopea. you will likely have to add it in every single time you make a gif, which is mildly annoying, but yet another tribulation of making Gifs For Free:
1. select the “T” icon on the left sidebar:

2.select the font bar which will appear up top, and then click “load font”
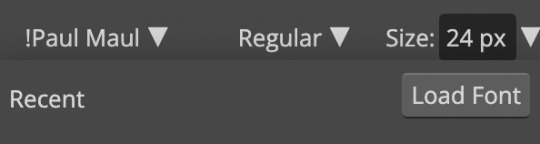
3. locate the calibri font file that you’ve downloaded in your computer and add it in. i suggest adding it in via zip file, because the zip file will include all of the different versions of calibri (i.e. bold/italic/bold italic, etc.). once you’ve loaded it in, search for it in the photopea font list and select it:

4. select bold italic

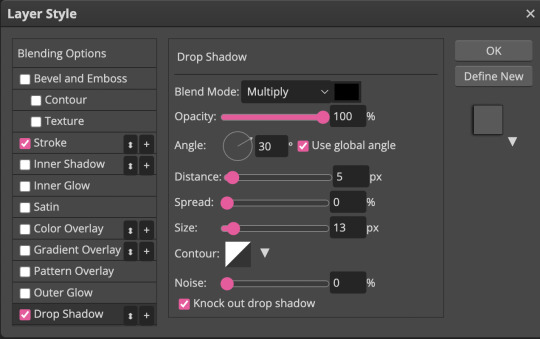
5. use these properties for the stroke (the outline of the font) and drop shadow (these are the only two elements i add to my fonts):

this is what your text should look like (sorry, it’s all pixelated because i had to zoom in):
you can adjust the size of the font as necessary and drag the text around to make sure it aligns with the centre of your gif (i’m not actually going to be using text for these gifs, but i wanted to show you because it does add a handful of extra steps)
STEP 6: save your gifs
once you’re done adding your PSDs/manually editing your gifs, you’re going to save them by going file > export as > gif:
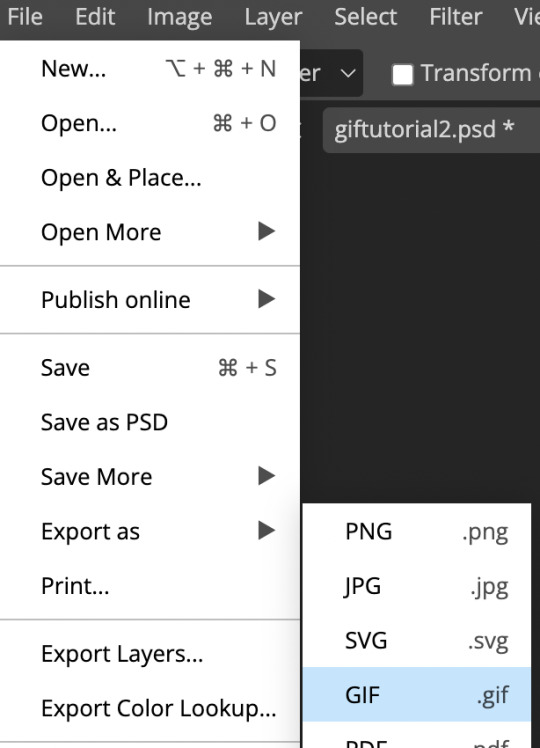
here, you will see a preview of your gif, as well as the MB total in the bottom right hand corner:
note how our gif went up to 4.8mb from 2.7mb after we originally saved it from gif brewery? that is almost entirely from the sharpening we added to the gif, and that is actually a pretty small increase; typically file size increases are much greater than that if you’ve sharpened your gif, especially with coloured gifs (black and white gifs inherently have smaller file sizes due to the lack of colour).
also note the “speed” bar - sometimes if i feel like my gif is still too fast, i’ll reduce that 100% to 80-90%.
if your file size limit is under 10mb and you’re pleased with your gif, click “save”
STEP 7: upload to tumblr
click photo > upload photos > and add your gifs. now, this is what i meant by the “half-size, side-by-side” gifs:

now, to add a caption with smaller font and smaller spaces between lines, you need to go into the HTML of your caption, which can be done by clicking the gear icon in the top right corner of your gifset and selecting HTML:

this is a sample HTML caption code. you can learn the principles of HTML by googling it, or just deducing it from the below:

and this is what that code looks like:

you can also add colour to your captions by adding a code into your HTML from this website
STEP 8: click post!
congrats! if you’ve made it to the end of this tutorial, you’ve successfully created a gif for *almost* free. i really do promise that this all becomes really fast and like second nature once you get the hang of it!
please feel free to shoot me a message if you have any questions at all! 🤍
- xoxo, caro, aka pennie
#holy mother this was a lot more work than anticipated#but it was fun!#please message me if you have any questions#i mean it!#i feel like this got very convoluted at times - especially discussing gif sizes - so plz message me if you need anything cleared up#gif tutorial#mine#giffing#gifs#tutorial
130 notes
·
View notes
Text
Gif tutorial by Alinelovelace
Alright, I'll be doing 3 things here today:
1.) Sharing the programs and websites I use
2.) Showing y'all a tutorial on how I make my gifs (this is my first tutorial, so if anything doesn't make sense, don't hesitate to message me, send me an ask, or comment on this post!!!!!)
3.) Sharing some resources by insanely talented gif makers (because I learned how to make gifs by following tutorials)
It's probably important(?) to mention that I use a Windows laptop
A.) Programs and websites:
ezgif: to make my gifs and do light editing
You can make gifs with video clips or screen caps. I'm not advanced enough to use screen caps, though they're supposed to make gorgeous gifs. I use ezgif to make the actual gif and edit the timing (which I end up having to tweak on Photoshop but...)
I also like ezgif because no watermarks!! I will do anything in my power to get rid of watermarks from websites and editing programs because they bother the hell out of me!
Photoshop: for the rest of my editing
This is where I recolor and add text.
A great alternative to Photoshop is Photopea, which I've used before I "obtained" Photoshop. It's FREE and online, so you don't have to download anything! I highly recommend it if you really want to get into gif coloring !!!!
Currently, I get my videos from torrents (bc I have a wide selection for my family to watch on our tv). But I used to use the Xbox game bar on Windows to record the clips I wanted on online streaming sites (unfortunately there's not a whole lot up and running anymore), then cropped and cut them. If anyone's interested in that, I could probably post a separate tutorial for that another time :)
There's also screen cap websites out there and YouTube. And probably dozens of other ways to get videos that I don't know about!
Video cutter
If you use full length episode videos and don't know how to crop them on your laptop (like me)
★★★★★★★★★★★★★★★★★★★★★
B.) Tutorial:
I'll be remaking the first gifset I ever made since I've learned A LOT since then! It should be pretty simple since there's only one set of subtitles.
Another time, I could do an edit tutorial like my That 70s Show ones. It's just taking the same concepts as this tutorial though, and playing around with colors, fonts, and font placement.
1.) Find your video/screen caps:
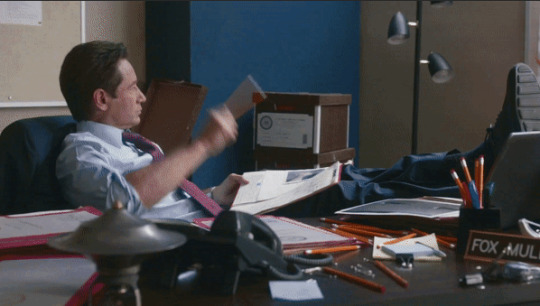
Since I no longer have the video from my first gifset, I just googled "Mulder throwing pencils season 10" on YouTube. After finding the video, I copied the link and pasted it into a YouTube to MP4 site ((this site has never given me popups or tried to get me to download something that isn't my video file)).
2.) If your downloaded video clip is short enough, you can just stick it into ezgif. If not, you may have to cut it using a website or a computer program.
Ezgif.com -> video to gif -> browse -> select your file -> upload video
3.) After clicking upload video, you should find yourself on this page:
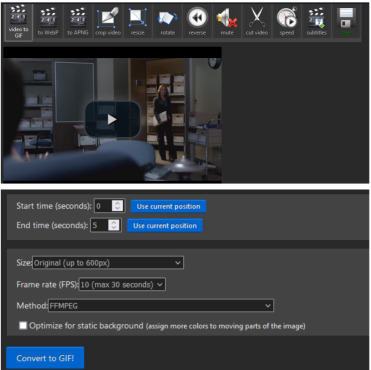
If you need to do any kind of video editing (cropping, rotating, resizing, etc) this is the place to do it! This is also where you make your gifs.
For the first gif, I don't need to change the start time, since I'm starting at the beginning of the video. 0 seconds is fine. But for the stop time, I'm going to play the video, pause where I want my first gif to end, then press "use current position" by end time.
I don't usually touch the settings for size, FPS, or method. If the gif doesn't have a lot of movement, I check "optimize for static background"
Then press convert to gif.
Here's the product I got. Since it's such a short clip, it moves a little fast for me.
I'm going to click "speed" which is below the gif. You're brought to this page:
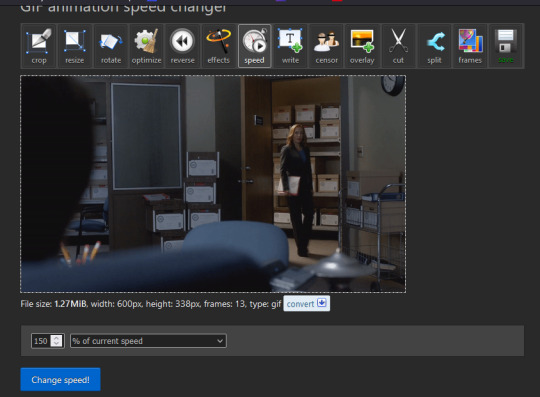
This is completely up to you for speed, but I find that between 60% and 85% end up looking good. If you don't like it, just change the number in the box and press "change speed".
I ended up with mine at 65% of current speed.

A little better, right?
The gifs that turn out best are 3 seconds to 10 seconds in my experience. This one is 1.5 seconds, so it's a little fast.
After that, rinse and repeat for every gif you need to make.
4.) Editing time! This is for Photoshop (if you use Photopea, I very much recommend this tutorial. It's very well explained!)
Go ahead and open all of your gifs once Photoshop is booted up. Then click window -> timeline
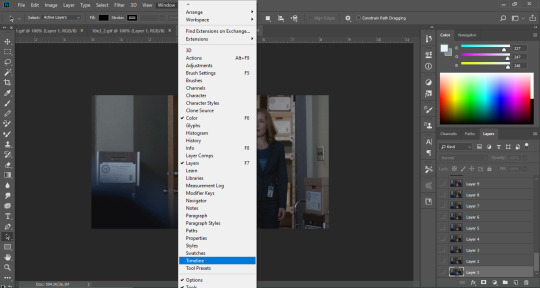
Now you have a handy dandy little timeline on the bottom.
The first thing you're going to do click play and decide whether or not your gifs are running at the speed you want. If yes, move on to next step.
If not: click on the three lines -> select all frames -> little drop down arrow. You should have a variety of times available to choose. Usually, I click other, then put somewhere between 0.04 and 0.08 seconds. Click play again. If you don't like it, try this step again.
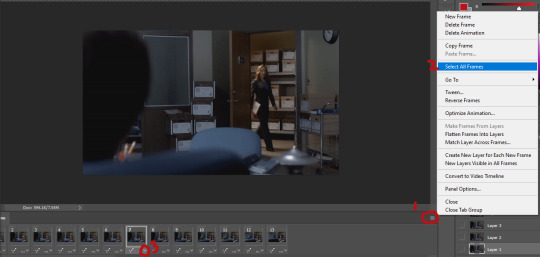
If you need to crop your gif, three lines -> select all frames. Press "c" on your keyboard and crop accordingly.
4a.) Color editing
This is where things get complicated. Just remember coloring is subjective and everyone does it differently. This is just an intro to the different tools most gif makers use to alter color.
You don't have to use all of these! I definitely pick and choose depending on how I want the coloring to look. When I'm making a gif set, my coloring isn't as adventurous as when I'm making an edit. It doesn't feel worth it to give away my settings for this gifset since it changes depending on the coloring and lighting of the scene.
All of these tools can be found under "create new filter adjustment layer"
• Brightness/Contrast
This one is the easiest in my opinion. It's pretty straightforward. The more you drag brightness the right, the brighter your gif gets. The more you drag contrast to the right, the higher the contrast is.

• Curves
This adjusts lighting with color values. It's another tool that's hard to explain. I just drag the little circles on the chart until it looks good

• Color Balance
Like every other setting, exactly what you do with this tool is up to you. Color Balance adjusts the overall tint of your gif. I recommend editing highlights, shadows, and midtones for the best results.
• Channel mixer
This one is one of the most complicated tools when making gifs in my opinion. It's best for getting rid of weird colored tints (think the blue coloring in Twilight). I'll just link a tutorial here for it. I don't make enough gifs to know how to explain it.
• Selective color
Hands down my favorite tool, though not only specifically for gif making. This tool allows you to select a color (reds, yellows, greens, cyans, blues, magentas, whites, neutrals, blacks) and edit each color group. For example: my skin in photos usually has a weird red tint. I can edit the reds in my photo using this tool to make it look less abrasive.
You just play around with the different colors and bars for each color until each color group looks good. I recommend hitting the highest value to see how the color changes/what parts of the gif are affected by the change.
In the instance below, I wanted to see how magenta affected the blue colors, so I dragged magenta to 100. Now, knowing what kind of color changes magenta will make to blue, I can adjust accordingly.
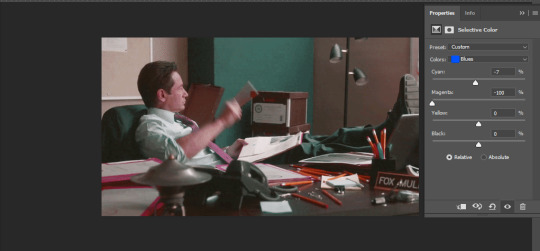
Messing around with the each color put me here:
• Vibrance
Another pretty self explanatory tool! Vibrance and saturation bars make the gif colors more colored and vibrant.
• Applying the filters to all frames
Shift click to select all the filters, and drag them above all the layers. They should now be applied to all the frames.
If not, select all frames with the three lines menu drop down like before -> click the little eye to turn off visibility, then click it again to turn it back on. You should be able to see everything now.
In order to carry the same colors from gif to gif, I take pictures of each setting and edit each filter adjustment layer accordingly. I side by side compare and make adjustments if the coloring doesn't match quite right. I'm sure there's a better way to do this, but I'm not experienced enough yet.


4b.) Subtitles
This part isn't too bad. For subtitle text, I use Calibri. Myriad pro bold italic and Arial are also really good options though!
• Text
Go to the sidebar and select text. Drag yourself out a box approximately where you want your subtitles. Type whatever you want. If you don't like where it is, click the move tool and drag it wherever you'd like.
Here are my text settings:

• Blending options
Right click your text layer and select "blending options" at the top. I edit stroke, which adds an outline. I also edit drop shadow, just because it adds a little depth to the text

• Applying to all frames
Drag the text layer to the top, just like you did with the adjustment filter layers when coloring. The same troubleshooting applies.
5.) Exporting
I know there's other ways to do this, but this is the way that makes the most sense to me.
Select all frames on the timeline -> file -> export -> save for web (legacy) -> save
With everything together, you go from:
To:

I had the subtitles in two parts because my first one had the subtitle in two parts (consistency).
Happy giffing!~~
★★★★★★★★★★★★★★★★★★★★★
C.) Resources:
This is a collection of resources both for Photopea and Photoshop
Photopea Resources:
Photopea giffing tutorial by @heroeddiemunson
Photopea gif coloring tutorial by @heroeddiemunson
Photopea removing yellow tint tutorial by @lacebird
Photopea gif making tutorial by @aragarna
Photopea gif making tutorial by @ashleyolsen
Photopea changing background color of gifs by @benoitblanc
Photoshop tutorials:
Giffing tutorial by @dqmeron
Subtitle tutorial by @itsphotoshop
Blurring gif backgrounds by @clubgif
Inverted colored text tutorial by @spaceslayer
Gradient text tutorial by @tawaifeddiediaz
Gif coloring tutorial by @logangarfield
Color consistency tutorial by @clubgif
Channel mixer tutorial by @zoyanazyalensky
11 notes
·
View notes
Note
i have to shoot my shot and ask - HOW on earth do you make your gifs so crisp. they're so clean its literally out of this world!!!!!! when your gifs are on my dash i almost always know its you just by the QUALITY of the gif. help a girl out!!!
Hii! Thank you!! <3 I'm happy with the way my giffing process now goes but it's taken years and a few different fandoms and stumbling upon good tutorials which is why i decided to make one of my own too.
I still love figuring out new things to try and hopefully you can get some new tips to your process from me too. Under the cut is a long af post about gif making, focusing on some basic stuff and sharpening/coloring tips.
________________________
WAY TOO LONG INTRO
Before i get to the photoshop part, the base stuff is super important: You can't turn a very bad video into great gifs since there's only so much photoshop can do BUT you can turn a good video into great gifs. So, obviously the original video quality matters a lot.
I religiously stand by the correct tumblr size dimensions (see example, the numbers mean the width. Height doesn't really matter). However in 3 column sets i’ll sacrifice that one pixel and would make them all 177px. The empty space between gifs in 2 column sets is 4px, in 3 column sets it's 4px + 4px.
Since tumblr can only properly handle 540 gif pixels in the same row, sets with two wide gifs side by side can be laggy to scroll by. So for example, 268px gif will not be as sharp as 540px gif (if you click on it to see it bigger), since it legit has only half of the pixels, but if you plan to post 2 gifs in the same row, the 268px will look better on the dash in the gif set since it’s correctly sized for the best dash result.
I download videos when i can (dl is always better than screen recording), so that's youtube, instagram/twitter etc. Streaming sites/broadcasts i have to screen record and i use OBS to do it. It's the best i've tried for hq recording. I record with 60fps and use display capture. OBS is a heavy program, as is photoshop, so a good enough computer is also super important imo. I used to make gifs with a laptop of 4gb ram/128gb emmc and lost my mind after all the crashing and spent 1k€ on a new one. Basically, have as much performance as you can afford, and editing experience will be much much more pleasant. Of course gifs can be done with an average computer too, it'll just likely be slower and clumsier and you need more patience ����
Also, i've gotten rid of the urge to be the first to post a gif set when new content drops. I'm not the fastest, i always do every coloring from the scratch. I save to drafts to see how it looks like on mobile, i go back to ps to correct the things that don't look right (too dark/bright, too green/yellow/red, too slow/fast), i make the changes, then save to drafts again and then post. I'd rather post a set i'm happy with than to post quickly knowing i could've made it look better with just a bit more time. (It'd bother me and i'd go back and re-color for my own peace of mind 😅) And i just wanna say it's totally fine when people make gifs of the same stuff!! The more the merrier, no need to think only the first to gif something somehow now has the rights to that moment. I just never get the best result if i try to hurry, so i’ve stopped trying to get my sets out asap. I’ll post when i’ll post.
________________________
SHARPENING
All these words and i haven't even gotten to the point yet 🫣 But fine tuning the details won't work if they don't have a proper base at first. Which!!! Finally brings us to your question:
I'm not sure if the order really matters but the main steps i do in this order: once the layers have been converted to video timeline and video timeline is converted into a smart object -> smart sharpen -> crop -> resize -> coloring
I like to sharpen things first, to me it makes sense to do it before resizing because after resizing you've already lost some pixels, so feels better to sharpen when you still have all the original pixels.
All the above steps (sharpening, cropping, resizing) will affect how the gif looks, so i do the coloring as the very last thing so i can better see how the end result will look.
To me sharpening and coloring go hand in hand, and you use both of them to get the best result. Sharpening obviously does what it says but good coloring will help to make the gif look cleaner and smoother too.
Finally, examples!! The key to a sharp result in my process is 2 sharpening layers. The main layer and the second layer.
Enjoy looking at judgy max f i giffed last year and chose to use as an example here. The source video quality was 1080px and i screen recorded with OBS.
I use photoshop CC2019 so cannot guarantee that these will work the same way in other ps versions. As always, it's about fuckin around and findin out 🙏🏻
__________________
1. Example with resizing done, but no sharpening or coloring (blurry and ungood)
2. Example with resizing and main sharpening layer (already much better)

3. Example with second sharpening layer included (more depth, dark spots are darker, almost too strong of an effect but coloring will fix that)

4. Example with all of the above + coloring (the final result)
5. The final result as a gif

And how did we get that result?
Main sharpening layer settings (yes, it’s in finnish but i think the options are in the same place in every language):

Because the sharpening is quite heavy, I double click on this thingy (red circle) in the layers panel to lower the opacity to 50-70%
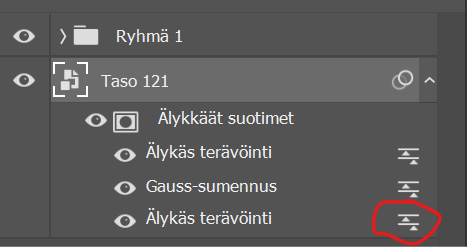
The middle layer is gaussian blur, which i’ve set to 0,2.
So basically i intentionally oversharpen the gif and use the opacity function and blur to soften the effect. Dumb or smart, who knows not me, but it’s working for me so i’m rolling with it.
The top layer is the second sharpening layer. A godsend trick i’ve learned along the way: (the difference between the example photos 2 and 3 above)

(I've created an action, so i just gotta push one button and it'll run thru these sharpening settings, ie. i don't have to manually click thru these every time, saves crazy amount of time)
Wasn't sure at which point i'll mention this so i'm just putting it here: when saving the gif for web, i almost always use adaptive and diffusion.
________________________
COLORING
I’m not gonna go thru every coloring thing in my process since this is already so long hsdkfjdkjgkd but i’ll give some info on what i usually do and some tips i've found helpful.
My style is quite natural and i prefer colder tones. I hateeeee overly green/yellow/red skintones that are caused by bad lighting so I always try to correct that. The below stuff is more or less what i did to color that example gif too. (Everything is down to preference, these are just the way i like to color)
My most commonly used coloring layers:
Curves. Utilize the eye dropper tools, pick white eye dropper and click on a white spot on the gif (not pure white tho since it won’t do anything) and it will turn that spot to 100% white and correct the other colors at the same time. Black eye dropper will turn a dark spot you picked to 100% black. It can be super effective, just try a spot, undo, try another spot, undo, until you find what looks good. If you like the result but it’s too strong, lower the layer opacity. And of course you can just simply drag the curve up and get brightness that way. There are times when the eye droppers won't work nicely but it's always worth a try.
Levels. Works similarly to curves, they are basically the more efficient brightness/contrast combo.
Color balance. No gif of mine has been made in the last 3 years without dragging the blue in the midtones to the right. I also often drag the green to magnetas side.
B&W gradient map. I set the blending mode to soft light and lower the layer opacity. Gives the gif a bit more depth and pop to the dark/light parts.
If the dark parts in your gif are too dark, for example details around eyes look messy but you don't want to lower the contrast, then try adding light colored gradient map (light yellow-white or light blue-white etc) and set it to soft light and play with opacity. It will give light and brightness to the gif without making things blinding and not losing much contrast.
Photo filter. I’m almost always going for cold blue and 10-20 setting. (Orange filters can give a nice effect too, if you want to bring some warmness to the gif.)
Vibrance. Always adding at least a little bit, helps colors to pop and makes skintones look nicer.
Selective coloring. Just drag them sliders to left and right to see what works, that’s really the best advice i can give. If you want reds to pop, go to red and play around. If you think the white spots are a bit blinding, go to white and then slide the bottom one (black) to the right. If you want some more contrast, go to neutral and slide the bottom one (black) to the right. Same with black (black).
Also, i don't like to do too much with one layer. I tend to do different colors with different selective coloring layers, so if needed i can lower the opacity and it will only affect that one color. Also it's handy to duplicate layers if you really want a certain color to pop, one layer often isn't enough in that case so duplicate it and if it's too strong then play around with opacity.
(Left image below). If you want to correct overly yellow/green skintones, go to yellow and you can try these settings. Then lower the layer opacity to see what looks good.
(Right image). If you struggle getting rid of very red tones, you can use hue/saturation layer, go to red and just drag the middle slider to the left. (This is also a good tip with POC, when you think their skintone is overly orange/red but you are afraid of white washing. This setting will usually correct the orange and red tone without taking the dark/black color away.)


______________________
THE END
Wheew this is what happens when you give me an opprtunity to talk about giffing 😅 I hope it was easy to follow, feel free to ask if i was unclear about something!! And hopefully you got to learn something new.
Also these are obviously just my way of doing things, not the Only Correct way, do whatever you like and enjoy and don’t worry too much if other people do things differently. Most important thing is to have fun creating 🫡
#slowestlap's lowkey gif tutorial of sorts#answered#one thing about me is that if i start talking about photoshop#i simply do not know how to stop hdjdjdjdk#ok to reblog btw if you found this helpful#(thank ya again for the nice words anon <3)
26 notes
·
View notes
Text
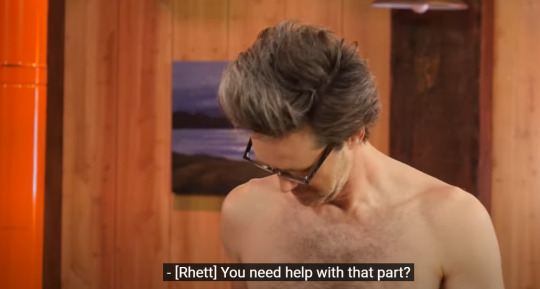
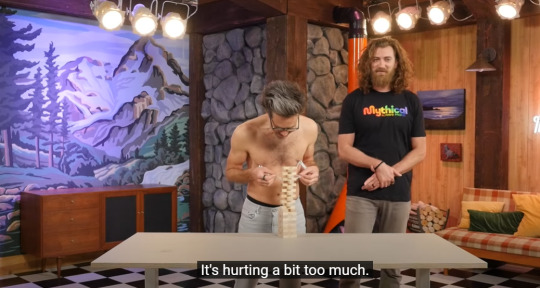
There are people who are Not Okay after today’s episode of GMM, and mother effin’ liars.
I need to get this out of my system before 2 PM PT.
SO.
THIS WHOLE EP I WAS LIKE:

Me on the outside

Me on the inside
Ep thoughts will be under a cut because of length (if ya know what I mean ;) )
No, like actually, I literally look like 800 screenshots or something.

So after seeing that thumbnail I was like...what...exactly are they gonna be doing that is r*sque?!?!
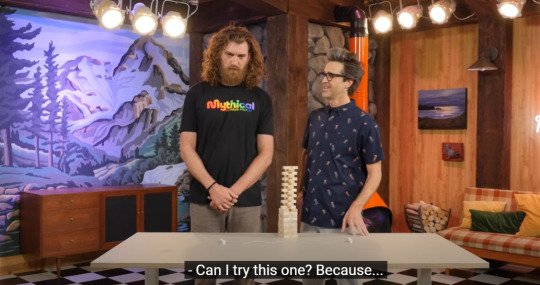

Them watching the video they will be recreating and y’all...I just simply cannot. Barely into this vid and I already cannot.


Link being h*rny af on main, and Rhett just staring at him. KAY. OKAY. THIS IS FINE AND NORMAL.

More like (h*rny nervous laughter).
Is this projection? Am I projecting?
Link just wanting Rhett to look at him while he speaks filth for “content.” ;)


Link, if there was a contest for “least subtlety”...
Only the purest of thoughts today here folks.
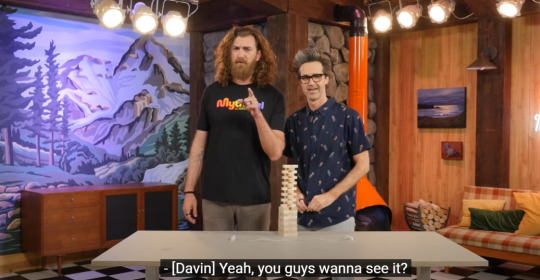
WHY IS DAVIN SO HOT LIKE SHUT UP DAVIN

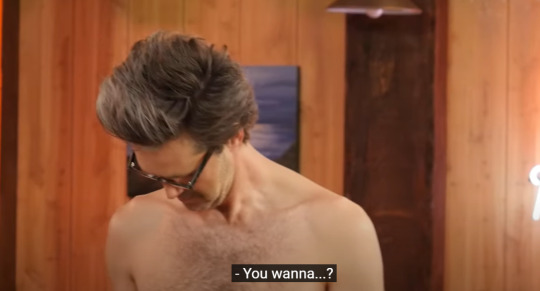
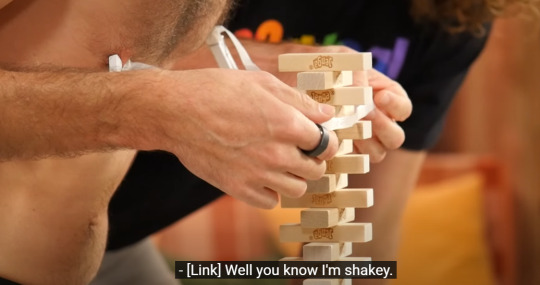
Idk for sure with accounting for how many jump cuts there were this ep but did Link seem to get his shirt unbuttoned like unreasonably fast?
...I feel like I’ve read this fic before.
Rhett was legit offering and then he tried to backpedal so freaking hard. Don’t even pretend you wouldn’t say yes sir.

This is...is my post gonna get flagged by this site? XD This looks more like a thumbnail for a Video Recorded Grown Up Hugging Hub site.

Is this also in the same realm of pretending you don’t like to receive back massages from your best friend?

The SOUND he MADE y’all am I even allowed to be watching this?!?!
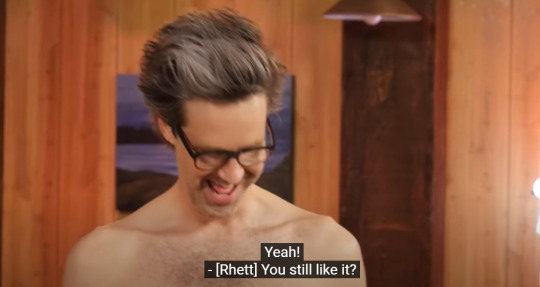
Link didn’t need to say “Yeah!” like that, and Rhett didn’t need to respond like that but HERE WE FREAKING ARE. WHAT THE ACTUAL HECK.
Rhett “I'm trying not to have feelings right now or stare at him directly by looking at him in the monitor and trying to explain my feelings away with science McLaughlin.”

Someone is having a <i>time</i> this ep...

Rhett can only stare at the monitor as he tries to stand with his legs apart and keep his hands inconspicuously in front of him.
The tightness in Rhett’s tone and the way he immediately leans back from Link, like he doesn’t think he will be able to take it if Link looks at him in any number of ways.

These NOISES. Can’t be GME because it’s on YouTube so let’s just call this one Good Mythical Afternoon Tea(T).

This would make such a filthy-looking thumbnail.
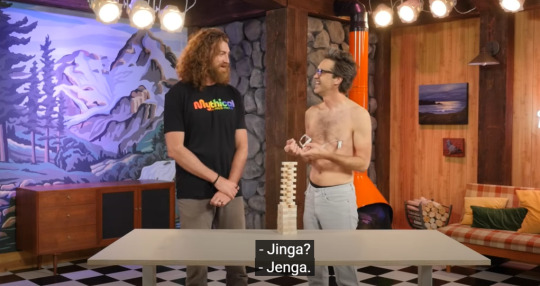
Jenga today served as a literal c*ck b*ock amirght?

RHETT SHUT UP YOU ARE MAKING IT WORSE (BETTER?)

Why do you need to know this so badly Rhett?
I mean, what if he s*anked you at the same time? Also please stop sounding so breathless I can’t.
WHY DID HE SAY IT THIS WAY? ALL TREMBLEY AND HOT AND BOTHERED PLS HALP?

This is weirdly intimate...
OH HEAVENS. I’ve never seen a pic that so fully captures the phrase “c*me ON me bro.”

WHAT?!?!?! ARE WE GONNA SEE HIS FULL MCLAUGHLONG??!? IS THIS ALLOWED?!?!?

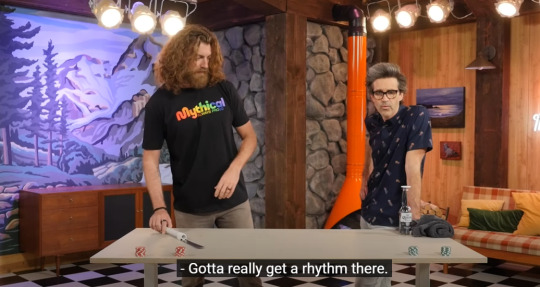
I mean he *did* vow to allow Link to touch a sharp object some time within the rest of his life so...

This is like William Sonoma: After Hours p*rn.

Or maybe it’s Good Mythical Kitchen: What they do when Josh is away.

BRUH. LINK. WHY’D YOU SAY IT LIKE THAT. WHY.
More like DIK TOK.
Rhett saying this...and all I can think of is that “girls putting their hair in ponytails” meme...>.>

Whoa whoa WHOA what?!?! (I wonder just how far Rhett’s competitiveness goes tbh...*looks at fic writers*)
When just thinking about The D is enough to knock you down.

I’m...this screen cap is truly So Much.
Okay apparently Rhett is also an e*hibitionist.

Your CLIENT?!?! What in the RP and/or AU fic is this?
OH. MY. GOD. <3
THIS WHOLE TIME LINK IS JUST SAYING THINGS LIKE...
TF IS THIS PH?!?!?!
Ah yes, always the first totally normal thing to come to mind. SURE RHETT.

Okay but...the SYMBOLISM?!?! THE INTRICATE RITUALS?!?! ?????DSFSDAsdfa

Link being all encouraging at the end ;-;
When you’re too scared to outright flirt with your bro so you just compliment him...

...but your bro has a praise k*nk.

What in the 2008 CGI looking a**...

O.O WHAT. WHAT?!?!?!

Oh good lord...I...


What Rhett and Jessie said to Link before they offered to lend him their “clothes pins” while they watched him sort his mail.
...Of freaking course it is.


The burning UST in the way they look at each other.
The fact that this is the *second* game they’ve come up with where a ball gets bounced off of the other guy’s trouser treasures.

...Y’ALL.
Y’ALL.
Is this real life?
We can’t have a Just for Fans because then what would we do on our main channel?

The physical positioning of it all...

The MOAN here though?!??!!??!?!

...

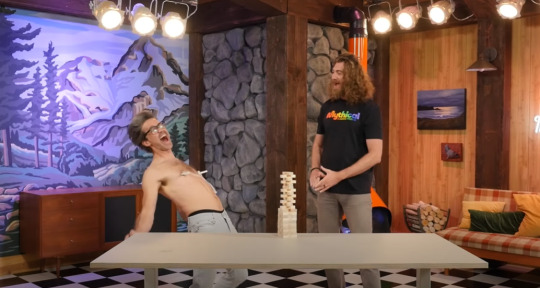
HE HIT THE FLOOR (HE HIT THE FLOOR)
NEXT THING YOU KNOW
LINKY GOT LOW LOW LOW LOW LOW LOW LOW LOW

...I have no words. Omfg. OMFG.

OKAY BUT THIS IS JUST STRAIGHT UP P*RN.
You hungry Rhett? I know you like having something in your mouth.
While I am not yet ready to present my dissertation on Rhett Has An O*al Fixation, I’m sure one of my esteemed colleagues has.

YOU KNOW WHAT YOU SAID. I SEEN IT.

REALLY?!?!? THE SLO-MO?!?!?


...WHAT THE ACTUAL FLIP DO YOU MEAN BY “IN OUR LIVES?!?!” “IN OUR LIVES?!?!” AS IN LIKE “OH YEAH WE ARE GONNA ADD SOME OF THIS STUFF TO OUR HIDE AND SEEK DATE NIGHT.”
Whew. Y’all I think I need to lie down before I even attempt to watch the More.
26 notes
·
View notes
Text
Make Rap Beats Online
Compression is useful which you want to even out variations in volume and control sound attack. Fast attacks accentuate the body of a given sound. Slow attacks increase definition. The areas that benefit the most from compression the actual bass, vocals, and kick drums. However, some other areas might do well with it as well. Be specific to listen to all tracks with and without compression to figure out what's going to work the best.
But, additionally it is easy stop creating original music with online music secretion. It can be easy to use too much technique in the expense to become creative. If so, you may notice that maintain sounding identical shoes you wear. This means it is a person to mix things up, think laterally, to get creative. Then, you could be truly efficient at online music production!
That is why it is usually recommended for anyone trying songs how generate dubstep music to start with simpler, more user-friendly computer system software. ableton live Torrent is important fully grasp the basics of music production, as well as to use the software before moving to expert level programs. Currently one belonging to the hottest programs for beginners is Dubturbo. It is often a professional quality program much more geared toward those not used to the martial art.
There are video tutorials for pretty much all these softwares on YouTube, but, within my opinion, Windows Movie Maker is ridiculously easy to use; but Adobe Premiere has more tools and effects that you are able do video. ableton live License Key presents green screen keying, which Movie Maker does not have. If you feel the need to make music video production or music production a future career, I suggest you look into a college called Full Sail Secondary education. ableton live Registration Key is known the "Harvard of Entertainment and Media Schools" and has one with the three best film programs in the planet and Ableton Live extremely best 5 Recording Arts programs in the actual. It is a high-paced school, and discover receive your Bachelor's in either program in 20 months' time. To look further into this school, visit the full Sail web presence.
Dubturbo is evidently essentially the most user-friendly Dubstep making program available. This means incredibly simple to use, additionally, it has all of the wonderful Dubstep sounds we always require. Compared to other high grade music editing software the Dubturbo absolutely does live of up to its discover.
Don't disassociate with the proven fact that auto-tuning would seem to be hard because lots of famous singers use it, its not quite as hard as you'd believe that. One of the most commonly searched tutorials is how you can sound like T-pain, and guess precisely what? He doesn't use a big fancy studio, he makes use of a MacBook Pro and Logic and sometimes, even Garage Rock band! So it is possible!
All speed you need will be available through the program, furniture from beats to loops to whatever it's fancy. You might like to produced some music, you're able export it directly to MP3 format through the program, also upload it directly onto the internet. This program is perfect for anyone who loves music and creating their own pieces.
2 notes
·
View notes
Text
So About My Sun/Moon Circus AU—
— I figured I’d give a little insight into some of the details about this AU to get the ball rollin’, considering people would probably wanna know what I’ve actually got going on in my head if this AU becomes a thing.
I don’t think I’m going to share anything plot-related yet, as so far it’s a very simple storyline that can’t have much spoiled without giving it all away.
So Firstly! Sun, Moon, and Eclipse are unspecified, semi-omnipotent beings which just... exist. I have no explanation for them or their existence, they just are. Their circus consists of the main tent and some caravans out back where nobody is allowed to go, sort of like a back-stage type of deal. Sun, Moon, Eclipse, and (y/n) all have their own themed caravans and there’s one for the kitchen and one for costumes, storage, etc. The inside of the tent is lined with bleacher to accommodate guests, and the experience is free! Since Sun, Moon, and Eclipse don’t necessarily need food or water to live, they saw no need to have people pay to see their performances. Even concessions are free!
Second! I plan on having three of the songs from ‘The Greatest Showman’ included at three different points in the storyline. The first is probably going to be ‘Tightrope’ in which (y/n) solos in the tent after cleaning up from one of the performances, just sing-songing to themselves. The second is ‘From Now On’, and the third is ‘The Greatest Show’ as sort of a finale piece. I’m not going to explain what I have in mind for the last two songs because that would probably give away a lil too much, and it’s all still a HUGE wip at the moment so I don’t wanna cement anything in place just yet...
Andddd Third! I don’t quite know how exactly I want to present this whole thing visually yet. I thought it would be neat to try out the TikTok way of doing it where you just draw and then record your tablet screen with a music overlay, but I have no clue how to and I’d have to each myself on the fly. Then I thought that YouTube Shorts could be a possibility, where I just compile all the frames into a timed GIF or a short video with a music overlay, which is still a little intimidating but doable at my skill level. Making it into a comic type of deal crossed my mind, but it seems a little bland and basic, though I thought of making the frames for each segment into a comic to post specifically on Tumblr or DA as a side thing for people who prefer still images over a possibly fast-paced video.
Feel free to leave asks or comments if there’s any questions ya want answered! Since I’m new to this site, I don’t know how everything works quite yet, but I’ll figure it out in time!
Thanks for reading! <3
16 notes
·
View notes
Video
youtube
Life in Long Beach: Images from my early childhood
Take a trip back to late 1970s- early 1980s Long Beach, CA. This video is part auto-biography, part therapy, part fairy tale, and all California history. The Chortkoff Archives is a start up non-profit. We worked with the worlds smallest budget to accomplish my epic and ambitious vision! I think you will find this video is fast paced and an enjoyable way to spend 47 quick minutes. Please leave respectful comments. I don't even want to say how long I have been working on this one! I had the idea way back in 2013. That year my childhood home was up for sale and I called the real-estate agent who was only interested in selling the house and I said all the wrong things. So I just thought about it and eventually this was made. The interiors were recreated in The Sims 2, and you get a video walkthrough. So come check out my simulated time machine! Let's go to Long Beach back to the groovy and awesome late 70s early 1980s LA! There is a little something for everyone here! If you like animation, California history, video games, or grew up in the 1970s or 1980s, I think you will like this! If you have lost loved ones and family you will relate to it. If you had a unique childhood I think you will like it too. It is a story about picking up a little girl I left behind in LB in 1985! I had a big story to tell but no budget. I have big visions that I hope to bring to the big screen someday! Hopefully this video will help gain me the popularity I need to buy camera stabilizers, microphones, actors, and sets. Maybe a small camera crew someday! But all I had was a Canon 6D and it's built in microphone. But I got the sound down pretty well anyway! Thanks to Will Wright for inventing the Sims games. They have helped me work through the tough processing of everyday life. I recreated my childhood from memory. I also include a lot of interesting historic facts and elements to make this enlightening for everyone. I exorcized some childhood demons too! I recommend going back and writing out your story from birth! It was hard to keep this under an hour long because I began to remember so much stuff! Plus as I reached out I found my Cuz Peter Shaw, nephew of my beloved grandpa Thomas. I did not see a photo of my grandfather from the age of 10 until about 7 years ago when my dad, Rand Chortkoff passed. He had them! Cuz Peter also hooked me up with lots of photos of grandpa! I have yet to find where my grandparents are buried. This goes by fast and is light and fun I think! It is not made for children, but it is from my inner child's point of view. I would rate it PG. Safe for work, safe for TV, and probably just fine for children but viewer discretion is advised. And PLEASE subscribe to my Youtube! Life in Long Beach Images from my early childhood (and today) All photo restoration, digitalization, animation, and photo and video editing by Jessica Chortkoff Story by Jessica Chortkoff Featuring Jessica Chortkoff and Tasha Ayame Vest as themselves. Kiimm Vi as herself. All Original paintings by Jessica Chortkoff Images of maps and street photos by Google Maps. Other Sources include: Ancestry.com Familysearch.org http://calheights.org/community-event... https://www.longbeach.gov/park/recrea... Vintage Photos: [email protected] "Chewing Gum" Performed by Annie Produced by Richard X Written by Richard X and Hannah Robinson Published by Universal Music Publishing on behalf of Native Songs / Warner Chappell Music Ltd. (P) 2004 679 Recordings Ltd. By arrangement with Warner Strategic Marketing "Sim 2 Theme" "Sim Sation" "Sim Time Sim Place" "Makeover" "Sims Heartbeat" "Busy Sim" "Sim Heaven" "Sim the Builder" "Sim shopping Spree" By Mark Mothersbaugh "Funky Suspense" by Ben Sound "Big Day Out" "Hep Cat Jive" "Rendevous" "Call of the Mountains" "Toys" by Purple Planet Music Bells by Sukhavati (Tasha Ayame vest- Bells and Nick Vest- Guitar) "Popeye the Sailor Man" by Sammy Lerner sung by William Costello "Neighborhood 2" by Marc Russo and Jerry Martin Additional music by Ben Sound and Apple Special thanks Tasha Vest: Driver/lunch Also Nick Vest Rich Riggio (emotional support) Peter Shaw (research and photo-achive) Angel Heart (she knows) Will Wright EA Games (Simulation software) All characters created by Jessica Chortkoff and the Chortkoff Archives 2022
#youtube#Jessica#chortkoff#sims#sims2#marriage#Las Vegas#Last Frontier#sukhavati#mark mothersbaugh#popeye#grandfather#grandmother#nana#family#architecture#long beach#california#family search#schwinn#stingray#art#paintings#original content#animation#therapy#ptsd#ptsdawareness#ancestry#gaming
2 notes
·
View notes
Text
The Only Way To Capture Video Games Console Footage On Your Private Pc
If you're one substantial individuals who've upgraded to Windows 7, kudos! I'm sure by now you've already had fun with this OS. The great much of this operating system is that this just keeps getting more effective. Personally, I love discovering new tips and tricks that make navigation in my little computer even easier. In this article, I'll share 5 great tips to efficiently utilize your Windows 7 OS.
There are distinct types of Freesat available, depending on you want out among the system. With regard to you could choose an average system, HD or the Plus routine. The HD system, which stands for prime definition, provides those by HD ready TV the opportunity watch free HD channels in superb quality. There is undoubtedly apeaksoft screen recorder crack Plus system. A typical all advantages of the HD system, within being excited to pause, rewind and record programs in standard or high quality. The standard system provides neither from the above but allows for you to choose channels through the on screen guide.
Another popular feature of DVRs always be the ability to pause live TV or time shift TV contacts. You can also rewind live TV. This works by recording the current program in the apeaksoft screen recorder hard drive and then giving the option to try to do what you want, from pause, rewind and go forward. This is mainly used for sporting events or other live events but is furthermore useful in films purchase missed some of the plot because cell phone rang.
If you're carrying a digital recorder, record some sites. This works well for business the blogosphere. Interview people at your business organisation. Interview your boss, or a lot of your customers.
As now you are aware that mostly you'll be making an eBook, Audio or Video which any vital information relating inside your business item. Creating apeaksoft screen recorder free download is simplest. Most ebooks tend to be.pdf extensions which can be viewed in Adobe Acrobat. Compose contents, you should use any of this text editor software already installed with your computer. To convert it into.pdf form, you will need to use a very famous application "Open Office". This is usually a free application to see.
Search your spouse's phone for numbers you don't recognize. Track the times calls. Record how long the calls lasted. Where should your family have been during those calls: at home, work, or in another place? Look for patterns.
Finally, realistic chance to succeed successfully uploaded your finished video, remember the fact that YouTube will help you do simple Search Engine Optimization or SEO. Permits a description and tag cloud. As always, make them keyword loaded in. Fred Campos, the founder of FunCitySocialMedia, suggests you include your company's name in video titles. Because of the end game is to find people locate and watch you videos, do not over-look this important saut.
The whole goal here is fast, consistent progress understanding that means a person can sit down, knock out a task, you're implemented. Sit down, knock out apeaksoft screen recorder full version , you're executed. You're not labouring, you are slaving, you just aren't suffering to get a work likewise results, you're sitting down, getting it done, repeatedly. That's may stop from being overwhelmed and reduce multitasking from lots of quick fixes and behaviour shifts like simplifying, cleaning up, having focus, someone and recording your screen if the a really bad multitasking habit.
1 note
·
View note
Text
bandicut software
bandicut Cracked , associated with world of big corporate manufacturing, computers started making their distance to the industries. Computer Numeric Controlled (or CNC) machines, that ran off a collection of punch cards with intricate patterns of holes punched into them, ran huge milling machines and lathes. They were cumbersome, but fast, led to machine will be more expensive than a beautiful house.
I selected a Terk amplified indoor antenna and a Roku 2XS internet streaming box. While at shop I spoke with a knowledgeable young lady who informed me that the off-air signals produce better picture and sound than satellite or cable just because that the broadcast signal is uncompressed. An uncompressed signal suffers none on the degradation of quality that you will get with compressed signals. She was right, the picture and sound are must-see.
For centuries now I've been reading about countless people who were actually "cutting the cable" with success, so I paid close attention. I knew someday I this would definately be among them, but We a involving requirements I want to to satisfy before To become to begin my own slicing.
Try decreasing longer videos into smaller segments. bandicut Registration Key marketers don't think about the audience's attention span, to be able to make videos that are far too long. Believe that exercise will not watch a 10-minute video about a single product. Try breaking a long-term video of that ranking into multiple pieces to be released once each time.
I just popped in my wedding DVD (that's right, I didn't get my wedding video on VHS) in order to anyone with some important tips on to examine in wedding event videographer's accounts. Yes, you need to view the wedding videographer's stock portfolio.
Our property and agent profile videos are 100% web compliant and could be played on any internet browser or mobile phone. Why not embed great deal higher video at your site? Each time a visitor comes for your site they will see exactly what marketing exposure their property could have or when are a market to buy, almost get a sneak peek at which kind of standard could bandicut come anticipate from your agency.
When it comes to videos, this handset is all you actually need. In addition to video streaming from YouTube, the phone's 8 megapixel camera allow you to record videos in 1080p-quality. With the smartphone's look at.3 inch SUPER AMOLED Plus display, you are sure to enjoy your HD video recordings anywhere you might be. bandicut Activation Code Free will also allow in order to definitely share your videos on the larger exhibit screen. Through DNLA, you can wirelessly stream your HD video recordings on compatible Lcd tvs. This does not end with compatible tv set. You can also stream your media to your laptop. It's also possible to stream your tracks to compatible audio systems.
Keeping entertained is made much easier by this phone also. It offers embedded arcade games and down loadable games, but get rid of ready to purchase your downloads as they may be pricey.
0 notes
Link
Saturday earlier than final I used to be taking part in round with a free crypto instrument. Let me preface this by saying that I’m not a crypto knowledgeable by any stretch of the creativeness. However I'm an knowledgeable at making a living on-line, and there was one explicit side of cryptocurrency buying and selling that I seen only a few individuals had been speaking about. Of the a whole bunch of crypto movies I searched on Youtube I noticed none that confirmed how to do that technique. There have been a pair that touched on varied side however none that had been doing precisely what I used to be attempting to do. So I bought this free instrument, and I figured I’d take a look at my technique to see if I may make it work. I began with $3k. (*4*) lower than an hour I burned via $1500 with zero return. I used to be pissed off, and I had another stuff to take action I used my instrument and I rapidly dumped the remaining $1500 into one commerce. I went to the barber with my son, ran a number of errands and got here again residence. I completely forgot concerning the $1500 till I had been residence for about an hour. Let me verify to see what occurred it most likely went down the drain like the opposite $1500. Once I pulled up my steadiness I couldn’t consider what I noticed. I refreshed the display. I logged out and in. I nonetheless noticed the identical quantity. $49,900. My $1500 had became nearly $50k in lower than 4 hours. I used to be blown away. Seems like there was a bit of promise with my technique. My first thought was I’m going to be Mr. $50k a day in crypto! If I can flip $1500 into $50k think about what I can do with this $50k. I ought to not less than have 1 / 4 mil by Monday, proper? So brimming with overconfidence and far ignorance I proceeded to blow via a lot of the 50k on Sunday. By midweek I had just about misplaced all of it. WTF? What occurred to my 50k a day crypto empire? Did I simply get fortunate on Saturday? I did a deep dive and reverse engineered precisely what occurred so I may construct a repeatable course of. Though it actually sucked dropping 50k, I wanted that to refine the method and determine what to not do. There are a number of scams in crypto buying and selling and I fell for all of them. Most entrepreneurs would cease the story at making the 50k. Most entrepreneurs wouldn’t let you know they bought tricked out of hundreds of dollars. However I’m not most entrepreneurs and I’m gonna maintain it actual. You’re gonna get the great, the unhealthy, and the ugly. As a result of for those who select to be taught my technique, me dropping that cash will imply that you just received’t. So in any case that, I got here up with a repeatable course of that may produce massive positive factors on a regular basis. I additionally devealoped quick and simple methods to determine and keep away from the multitude of rip-off tokens on the market. For each 1 legit coin there are 95 rip-off ones. No exaggeration. It’s that unhealthy. And the scammers are superb and at all times adapting. So wading via all these and figuring out the actual alternatives is the largest problem with my technique. By the varsity of arduous knocks I realized how to do that, and rapidly. Now, I've it down right into a system that works on a regular basis, whether or not the market is up or down. Since my 50k loss debacle I’ve been buying and selling smaller quantities so I haven’t hit the 50k mark once more but, however the technique has been working persistently. Anybody can do that. And also you don’t have to begin with $1500 both. You can begin with any quantity. I met a man doing one thing related that turned $9 into 23k in a month’s time. Would you wish to be taught my technique and instruments? I did a personal coaching on June 15 which I recorded going via the complete technique step-by-step. You’ll see all of the instruments (that are free), and most significantly you’ll discover ways to rapidly decide whether or not or not the deal is a rip-off. Tonight I will probably be doing a dwell replace and new coaching. This isn’t long run investing. That is fast money. Each day. I assumed the 22X I bought was luck – however these offers are on the market on a regular basis. Each single day. You simply must know easy methods to discover them and I’ll present you precisely how.
0 notes
Video
youtube
Life in Long Beach: Images from my early childhood
Take a trip back to late 1970s- early 1980s Long Beach, CA. This video is part auto-biography, part therapy, part fairy tale, and all California history. The Chortkoff Archives is a start up non-profit. We worked with the worlds smallest budget to accomplish my epic and ambitious vision! I think you will find this video is fast paced and an enjoyable way to spend 47 quick minutes. Please leave respectful comments. I don't even want to say how long I have been working on this one! I had the idea way back in 2013. That year my childhood home was up for sale and I called the real-estate agent who was only interested in selling the house and I said all the wrong things. So I just thought about it and eventually this was made. The interiors were recreated in The Sims 2, and you get a video walkthrough. So come check out my simulated time machine! Let's go to Long Beach back to the groovy and awesome late 70s early 1980s LA! There is a little something for everyone here! If you like animation, California history, video games, or grew up in the 1970s or 1980s, I think you will like this! If you have lost loved ones and family you will relate to it. If you had a unique childhood I think you will like it too. It is a story about picking up a little girl I left behind in LB in 1985! I had a big story to tell but no budget. I have big visions that I hope to bring to the big screen someday! Hopefully this video will help gain me the popularity I need to buy camera stabilizers, microphones, actors, and sets. Maybe a small camera crew someday! But all I had was a Canon 6D and it's built in microphone. But I got the sound down pretty well anyway! Thanks to Will Wright for inventing the Sims games. They have helped me work through the tough processing of everyday life. I recreated my childhood from memory. I also include a lot of interesting historic facts and elements to make this enlightening for everyone. I exorcized some childhood demons too! I recommend going back and writing out your story from birth! It was hard to keep this under an hour long because I began to remember so much stuff! Plus as I reached out I found my Cuz Peter Shaw, nephew of my beloved grandpa Thomas. I did not see a photo of my grandfather from the age of 10 until about 7 years ago when my dad, Rand Chortkoff passed. He had them! Cuz Peter also hooked me up with lots of photos of grandpa! I have yet to find where my grandparents are buried. This goes by fast and is light and fun I think! It is not made for children, but it is from my inner child's point of view. I would rate it PG. Safe for work, safe for TV, and probably just fine for children but viewer discretion is advised. And PLEASE subscribe to my Youtube! Life in Long Beach Images from my early childhood (and today) All photo restoration, digitalization, animation, and photo and video editing by Jessica Chortkoff Story by Jessica Chortkoff Featuring Jessica Chortkoff and Tasha Ayame Vest as themselves. Kiimm Vi as herself. All Original paintings by Jessica Chortkoff Images of maps and street photos by Google Maps. Other Sources include: Ancestry.com Familysearch.org http://calheights.org/community-event... https://www.longbeach.gov/park/recrea... Vintage Photos: [email protected] "Chewing Gum" Performed by Annie Produced by Richard X Written by Richard X and Hannah Robinson Published by Universal Music Publishing on behalf of Native Songs / Warner Chappell Music Ltd. (P) 2004 679 Recordings Ltd. By arrangement with Warner Strategic Marketing "Sim 2 Theme" "Sim Sation" "Sim Time Sim Place" "Makeover" "Sims Heartbeat" "Busy Sim" "Sim Heaven" "Sim the Builder" "Sim shopping Spree" By Mark Mothersbaugh "Funky Suspense" by Ben Sound "Big Day Out" "Hep Cat Jive" "Rendevous" "Call of the Mountains" "Toys" by Purple Planet Music Bells by Sukhavati (Tasha Ayame vest- Bells and Nick Vest- Guitar) "Popeye the Sailor Man" by Sammy Lerner sung by William Costello "Neighborhood 2" by Marc Russo and Jerry Martin Additional music by Ben Sound and Apple Special thanks Tasha Vest: Driver/lunch Also Nick Vest Rich Riggio (emotional support) Peter Shaw (research and photo-achive) Angel Heart (she knows) Will Wright EA Games (Simulation software) All characters created by Jessica Chortkoff and the Chortkoff Archives 2022
1 note
·
View note
Text
Make the best of a long flight or train journey to work by using openly accessible training videos and seminars
This article will help you make your time more productive. Personally, I love wasting time as much as everyone else. Sometimes, I want to spend all of my time in front of the TV or playing video games even for weeks. Sometimes I need to work. At other times I would like it to last for months or weeks. But I will keep at my work. But, even then, I have time to occupy the time. I love to watch TV while playing with chocolates and gummies. In addition, I enjoy myself, waste time like there's no tomorrow. Since tomorrow is always around the corner, I need to keep working to keep my job. I am the controller of sensitive software used for accounting in 490 out of 500 Fortune Companies, or whatever is the title of the list is.
However, I must admit that the size of the city is bigger than my. I am not able to stay in one spot for longer than two days which is why I move to suburbs... 3 trains away from the city. I commute 1.5 hours to get to the capital of different states, however, I do still commute to my city within the region that is double the distance. That's why I travel to my city by train or car, or having someone drive me. Long distance chauffeurs can truly aid. I fly a lot too to work-related trips, not every top firm has offices in the big city I visit. I also take the train. It's quite a hassle... Sometimes I get taken care of by private jets, wait time is definitely shorter for those planes. The 500 do appreciate my talent and treat me occasionally.
But, I'm not wasting my time doing so, even with the hours and possibly total days of travel every week. Playing games on handheld consoles, or watching television using my laptop (or the 65-inch screen if I'm on an private flight) can consume a significant portion of my time on the plane. I usually download video clips from Youtube to bring along. If I have a training or DIY video I'd like to watch then I save it as an mp4 file to my computer. However, sometimes, videos don’t need pictures so I convert them to MP3 format that I can listen to via my phone. mp3 convert The free online Youtube converter app can always provide me with crisp audio with high-quality for any training or seminar video I'm interested in. I then can listen to the audio as a podcast. It is not uncommon for me to need to return to the first video if I'm having difficulty understanding the message, however this is not often.
These videos made by DIY are fantastic to find their way onto my laptop. However I only view the ones I'm required to watch. ASMR videos are best converted into MP3 and played to with headphones that are great. I've downloaded an mp3 of this cat's purr It really gives me goosebumps, I believe that something about this cat was special. It can really help you relax. Although I don’t like people who whisper, I do like the sound of cats purring and kissing each their fur. To calm myself, I could play the voice recorded by the cat or that person while driving back to home in a car that is private. Make sure you don't listen to or watch ASMR on the train, because they could wake you in a different way.

Youtube hosts many talks and seminars on various subjects. Youtube also contains a lot of recordings of DJ sets live from electronic music festivals. The videos I download as videomp4 files, since I love watching them while on the flight. Internet is not always efficient or fast enough for me to download the video or convert it to MP3 at home. Sometimes I download 2-3 hours of music from the most famous DJs that I can listen to on the plane. I like older UK music, like techno break, house, breaks and jungle. This is the top list of the best dance music of all time that has made everyone be awestruck.
1 note
·
View note
Text
How to stay occupied during long nights as a security guard at an underground facility
It's tough times. It is difficult for me to navigate the new world of gig economy as well as the old one. Prior to the outbreak, I was doing very well. I also had a job as a dental assistant. I now have to take a night-time security role at a nearby machine production plant. It's almost entirely automated. Workers are employed throughout the day, while I and two engineers are the night team. I've got an emergency phone number that I can dial when there's a problem or machinery ceases to function. I call engineers, and/or call the outside line to get more engineers. I don’t do anything. The thing is, they're not producing anything valuable here, so night time guard is really a glorified switch board attendant..
It's something I like. It's peaceful. Although I am a spooky sleeper at times, I do wake up from excessive gas release in the night. Here, however, it is quiet. Nights are quite boring, and I constantly try new ways to make the speed of time pass faster. For instance, in the last two weeks, I've been working on a Tik Tok dance. It's not too difficult however it's difficult for me to recreate the dance. This dance was taught by a younger Tik Tok sister, which is why it's difficult. I'm not sure what to do with that information because I’m old.
I've been experimenting with new videos for fixing my car in the last few months. I'm not able to put them in place immediately to the car, but I love watching other people create their vehicles to be unstoppable. DIY videos are instructive and easy to follow. But I had a second issue. My internet was not working fast enough to allow me to be in a position to access any video or browse the internet in any other manner. Evidently, I discovered how to download videos from Youtube, place them on my phone and now even during the hours of no internet access I could stream DIY videos right off my phone. It doesn't matter if stream it from some site or other online. It's also possible to download it from home and later watch it on your smartphone even if you don't have internet or another online connection. It's as simple as DVR.
My absolute joy in watching new episodes and movies directly onto my laptop is a testament to the power of television. I brought my laptop into work due to its bigger screen as well as more powerful speakers. It's so much easier to watch TV shows there. I signed up with HULU and Netflix. I am now able to download their app and enjoy movies rather than streaming them. The length of the show and quality choices will determine the speed at which the video will download onto my device. Then, it will be available all the time, without internet access. Although the show is only 15 minutes in length, it allows me time to watch the last episode of the night.
yt mp4 downloader There are many other types of interesting or educational items I can get at home and take with me to work to help make time go by faster. Youtube's webinars on different strategies of self-improvement are great. But I find it difficult to follow along with the ideas they present in a one hour video. This is what I mean. In these instances, I time try to get ready at home, and download Youtube video as mp4 file to my laptop and then watch it at any time during work. There are no limitations on wifi, and no wifi needed at all, the file is recorded on my laptop and nothing is ruined, spotty wifi doesn't matter, it is not necessary in my situation.
My son is sometimes working with me. It's those days when my wife is working night shifts, making it difficult for us to stay at home with our children. So, I bring my son along and set him up in front of the screens on my computer that I monitor. He sleeps within minutes. When he awakes up, I offer him my laptop with a few of those freshly downloaded music videos. As he is watching all those amazing young artists doing their crazy things on screens, he is happy, I am content to continue doing my own task on the phone.. It's what makes us feel more comfortable with each other, when we are doing our individual thing. He seems to enjoy coming along with me. Perhaps because he stays up all the night. Isn't that what kids sometimes want?

1 note
·
View note
Last Seen Blogs

electricace
Hyperfixation Station 🚦
betta-fish-momma
Fish Mom


toxic-desiree
www.inspirationalfurniture.co.uk

estrellium
Drawing my silly little guys