#i saved the psd this time tho
Text
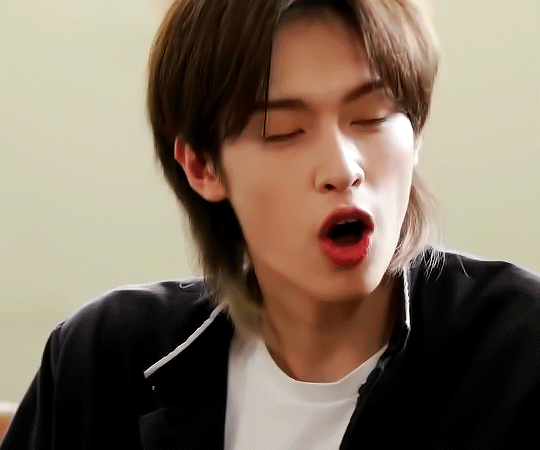
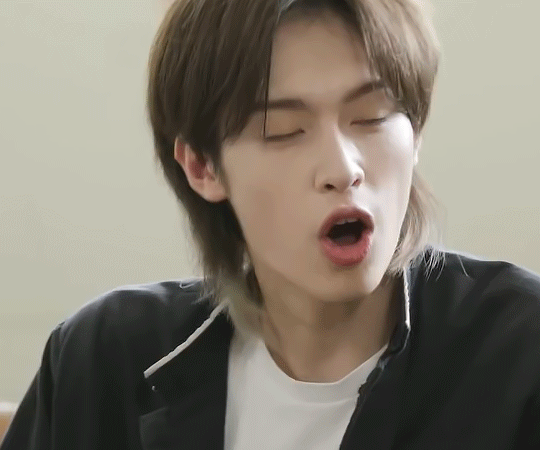
Made a hao gif so amazing it crashed photoshop
6 notes
·
View notes
Text
if anyone wants a sapphic/ace split flag i jus spent like..the better part of an hr making one w/ a high resolution
#sighhh i thought i had the psd of last yrs icon bc i did the same thing#but this time it has a separate file so i don't save over + compress it#also it's specifically for icons so it's a 600px square#if that's too small you can try blowing it up tho bc the reso is p high#anyway!! again if anyone wants. dm me or reply to this
0 notes
Note
image sequence method? 👀 faster than load files into stack method?? 👀👀 please do tell me how it works bc i am tired of it taking soooo long make gifs bc of the time it takes to load files into stack 😭😘
omg it will CHANGE your life! basically what you need to do is put all of the screencaps in folders. one folder per gif. then you open photoshop, click open, navigate to the folder, click on any screencap, and tick that "load as image sequence" box, then open. there will be a little window asking you for the frame rate, and you just need to put in 23.976 fps.

it will open the gif as a smart object on a timeline almost instantly that youn can use as is right away. what i do then is i crop, sharpen, color, etc. and then when my gif is done i use an action to flatten into frames, make sure the speed is set to 0.05, and save! it's very easy peasy. you can save directly from the timeline too, but the gif will probably be way too fast (which you can fix with ezgif.com if you want tho! i do that sometimes when i'm very lazy)
the only downside is if you wanna keep the psd file for whatever reason you need to either A) keep the screencaps where they are and not delete them, or B) flatten the smart object into frames before doing anything else, then turn these frames back into a timeline animation for sharpening and stuff. if you dont do either of these and delete the screencaps, then when you open the psd again you will have your coloring layers, but the gif will be frozen.
this method kinda works as a proxy and points to the screencaps in the folders instead of loading them as a stack. it's much much faster and for scene gifs it's PERFECT, or for anyone who doesn't save psds often like me haha. but yeah i really wished i found out about this before! life changing for real
34 notes
·
View notes
Text
Gifmaking/general photoshopping tips and tricks for beginners (and not)
Hi all! Before we start, I’d like to tell that I’m no expert in any way and everyone should work they way they are comfortable with, these are just some things that I’ve collected over the years to make my life a little easier. And hopefully, yours too. There’s no particular order. I’ll try to keep this nice and short. Let’s get down the rabbit hole, weee! WARNING: IMAGE/GIF /TEXT HEAVY!
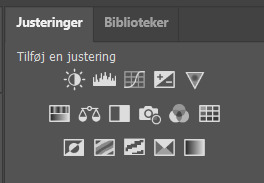
Tip #1: Use cropping presets
Instead of typing dimensions by hand, use cropping presets for quick access. To do that, chose the Crop Tool, type in your dimensions, then go down the dropdown menu on the left and chose New Crop Preset. Tada! You saved your settings for further use. Here are some of mine

Tip #2: If available, work with video timeline instead of frame animation
I personally think that it’s much handy and saves you from a lot of unnecessary clicks, plus you can do a lot of effects (such as text animating etc) without too much trouble. It all comes down to personal preference tho, of course. Here's super useful in-depth tutorial on how to make gifs with video timeline
Tip #3: When working with colors (especially very vibrant ones), convert your document from 8 bit to 16 bit first
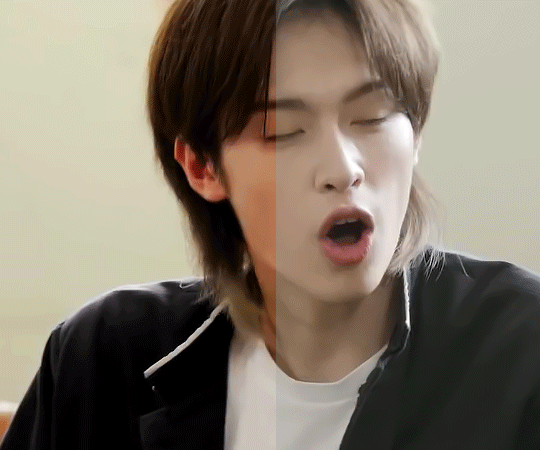
I bet many of you come across this issue: when you work with colors and using brush tool, the visible stripes may appear and ruin your whole image/gif. Like this:
It’s called color banding. Ugly, right? Without too much of technical terms banding happens when an image loses its colors after being digitized (e.g. screencaps, or basically anything that was captured using any capable device). Bad news is that you can’t fully fix it because you can’t restore what’s been lost for good (here’s a great and detailed walk-down on what banding is and how to fix it). But what you can do, is make it less visible. To do that, open your document, and before doing anything with it, go to image > mode > 16 bit. (32 bit is more advanced, i never use it because 16 bit is quite enough for my work) It adds more color depth (or should i say imitates it) to the document, so now when you work on your gifs, the color stripes won’t be as harsh. Another way to fix color banding is to add noise manually. But I prefer to switch image modes because photoshop does a better job at adding more natural kind of noise and it’s barely visible to the eye
Tip #4 (requires video timeline): when slowing down gifs, change the amount of FPS
Sometimes when you slow gifs down they may look kind of choppy. A quick way to fix that is go to your video timeline, click on the three lines button, chose Set Timeline Frame Rate and change the number in the pop-up window. The higher the number, the smoother it will be, but don’t overdo it. I personally go from 60 to 120 FPS and see what looks best for my case. Some times it's barely noticeble, some times it can make a huge difference

Tip #5 There’s no quick solution to anything
Well it’s not exactly a tip, more of an advice actually. I know many of us want our work come to life as fast as possible, preferably, exactly in a way how it was in our mind. But for better or for worse, nothing in this like works like that. So when you make gifs, remember that there’s no «universal» psd coloring, sharpening, blend mode, texture, etc that works exactly the same in every case. Bc every scene is different, the lighting is different, the original color grading is different. As soon as you get used to that, it won’t be a problem anymore. So don’t get scared or discouraged when something doesn’t happen in a matter of «poof» — it’s completely normal. Don’t be too hard on yourself, don’t rush things, take your time and don’t try to be «like that person who’s gifs I like very much». It’s wonderful to get inspired, but try and discover your own tools and ways to work, something that will make your work unique and maybe even becomes sort of your personal signature. Most of the things I did came out of pure experiments i liked the end result of
Tip #6: Discover the power of blend modes and opacity
Don’t be scared to play around with the layers you use, they don’t have to be untouched, on the contrary, they should be modified in ways to achieve interesting results. For example: original gif with only sharpening applied (16 bit mode)
Colored with a whole bunch of Gradient Maps on different blend modes and opacity settings (also 16 bit mode. Not my best work but it pretty much illustrates the point)

Tip #7: Uncheck the «Delete cropped pixels» option in Crop Tool
Sometimes when you do gifs, you often find yourself wanting to reposition them because you feel they’re not quite in the right place, but this happens It’s because this option is checked and Photoshop deletes everything what’s outside of canvas once applied. When it’s unchecked, it just hides those pixels away, so you can freely move your image around whenever you want (not the best example but you get the idea)

Tip #8: Use text boxes instead of individual text layers
That’s pretty self-explanatory. It looks much, much better. Take your Text Tool, drag it across the document to create a box, then paste/type your text and you’re done! Here's a great and detailed guide on subtittles.


And that's about it folks! Have fun being creative :) And if you have any questions, don't hesitate to drop 'em in my askbox.
522 notes
·
View notes
Note
SCREAMING, CRYING, THROWING UP (with excitement) 😭😭😭 my heart feels complete with this chapter filled mostly with Jimin 🫠🩷 i have a lot to say but im very sleepy right now and i want to save my comments for when im in my full senses 😅 but right now im just so happy with the chapter and it was sooo hot too!! (Even tho on the inside I’m like the OC and I’m well aware that my lover boy it’s still a little menace 😂) but just this time I’ll let myself live in delusion bc i just love him so much 😩
psd: i love whenever the OC gives the boys random little kisses 🫠
i'm so happy you enjoyed the chapter!! 🥺💖 jimin is absolutely a menace but i guess he has his moments haha 🙈 (right?? it doesn't bode well for her but i think it's cute that she's started doing it kinda subconsciously lol)
10 notes
·
View notes
Text
An anon asked for a tutorial on how I make gifs, so here we go!
I believe that everyone with a decent computer can learn how to make gifs.
The programs I use are
Vapoursynth
Photoshop
Topaz denoise (a lot of people don’t use this)
This is the gif I will be making in this tutorial!
Step 1. Find what you want to gif!
Download the video you want to gif in the best quality you can find. This is where ts files are really good! Personally I don’t really mind giffing only 1080p videos, but better the quality, better the gif!
Step 2. Crop it using vapoursynth!
Using vapoursynth is a whole tutorial in itself. You can still make gifs without vapoursynth (or avisynth as some people use). You can just crop the gif in photoshop to the size you want. Vapoursynth is just good at doing so without losing a lot of the quality!
The width for tumblr posts are 540px (one gif), 268px (two gifs) and 177px for the outer gifs and 178px for the middle gif, when making three gifs!
This site has everything you need for vapoursynth!
I don’t really have any set settings. I switch it up a lot, but these are my settings for this gif!
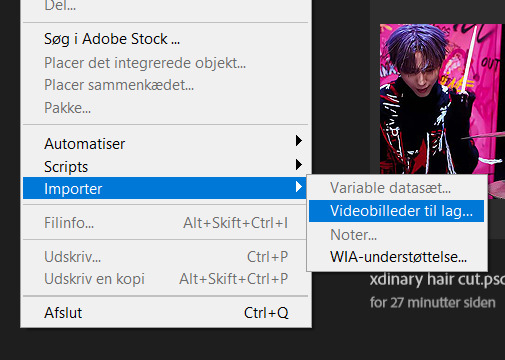
Step 3. Import gif to photoshop!
(My photoshop is in Danish, but it should be the same place in any other language).
You do this by going files > import > video frames to layers
Then you choose the video you got from vapoursynth (if you didn’t use vapoursynth, you just choose the part of your original video you wanted!)
Now we have a basic gif!
Step 4. Colouring!
Now the fun part comes! We colour the gif! This is where your gif truly becomes your gif! Every content creator has their own style of colouring and it really just takes time to find what you really like! Just do whatever you like!
These are the ones you use for colouring! Just play around!
Here we have the gif with colour! I’m not going to do a colouring tutorial, because colouring is really just up to the person making the gif!
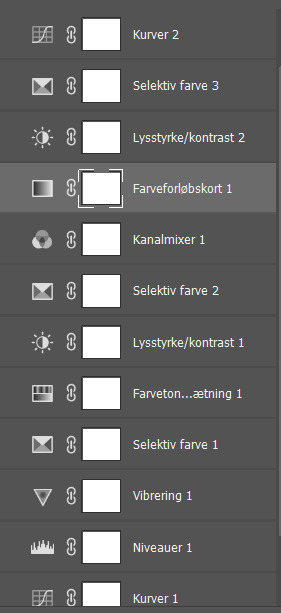
These are the adjustments I’ve used on this!
Again, sorry for the Danish!
Here are some of my psds (tho I always make a new one every time I do a gifset)! I feel like there’s a lot to learn through looking at other people’s psds! Just have fun with it!
Step 5. Sharpen (and topaz)
I more or less always sharpen the same way on every gif (depending on how sharp it already is).
To sharpen you have to make sure you’re working as a smart object! You have to make the frame animation into a timeline and the layerss into a smart object!
Timeline:

Smart object: Select all layers > filter > convert to smart
(or select all layers > right click > convert to smart)
It has to look like this

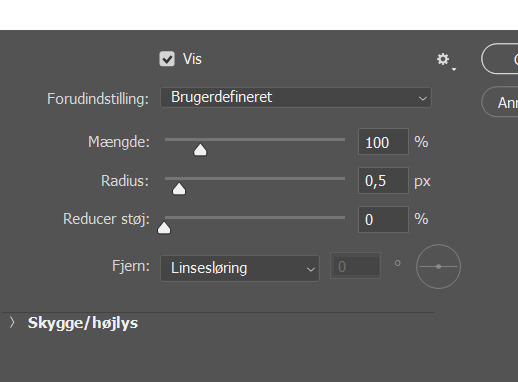
To sharpen you go to filter > sharpen > smart sharpen
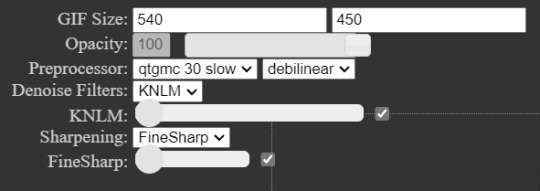
These are my settings:
Then I go to topaz denoise! I don’t really have any set settings for this, I just do whatever feels right in the moment. Topaz denoise is also a whole other thing, but it’s easy once you figure it out! I made a video on how to use Topaz here (to help someone who asked)
youtube
Because I don’t like my gifs way too sharp, I always add a blur at 20-30% opasity!
Step 6. Save the gif!
Before saving the gif, make sure everything is as you want it to be! You also have to remember to set the frame delay! I usually go for 0.05 or 0.06!
To save go to files > export > save for web
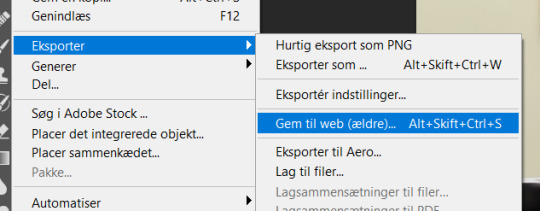
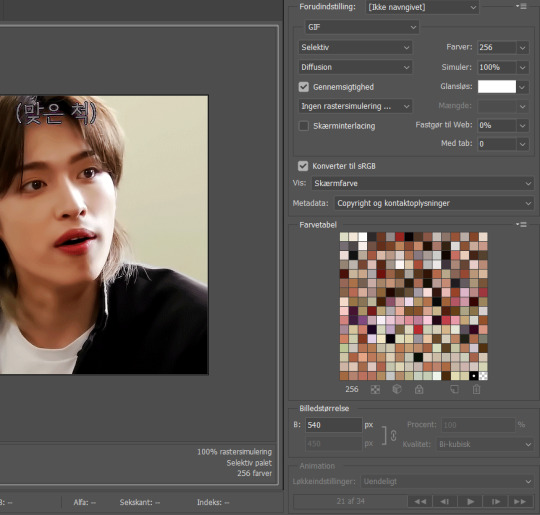
These are my settings!
And there you have it! A finished gif!
If you are more of a visual video learner, here is a video I made of my giffing like over a year ago for a challenge!
youtube
My colouring has changed a lot since then tho! I also didn’t sharpen and use topaz in photoshop (I used a lot in vapoursynth)
I hope this was at least a little helpful! ^8^
#*m.gif#maja talks#ps tutorial#resources#ps resources#photoshop#I am not good with words but here we are
54 notes
·
View notes
Note
What actions and settings do you use for your gifs? They look so nice and clear, without any grain or static!
oh thank you! honestly I don't use any actions at this point, I just make sure I make gifs from the highest quality files I can find so they look good for those 540 px gifs. then I try to adjust my psd to fit the scene I'm giffing and in a way that the colors aren't too different from each other to help keep it cohesive with the limit of 256 colors on ps, the more colors you have on your gif the harder it will be for it to be clean because of the 256 limit. also tumblr has a 10mb limit but gifs with a lot of frames and closer to 10mb tend to be more grainy (can't really tell you why tho it's just something I've noticed) so if you do want to make more colorful gifs it's a good idea to keep them as light as possible on the number of frames. oh and before saving the gif I usually sharpen it a bit with smart sharpen to help it be a bit more clear (but this REALLY depends on the file you're using, but def something I've used while giffing xena and buffy).
other than that I use vapoursynth to help me cut the scenes I want etc prior to importing it to ps, you can find a tutorial for it here. it's the fastest method I've found for scene selection and what I've been using for the past 4(?) years or so, it's pretty intuitive once you get used to it and you can resize your scene on it before importing it to ps which saves a lot of time. but keep in mind that this isn't a magical tool and without the stuff above it will be hard to make clearer gifs.
so to recap:
make sure the file you're giffing is the highest quality you can find (specially if you plan to do 540px gifs)
make sure the colors are cohesive in your gifs since 256 colors is the max for gifs (2 major colors that contrast each other is fine btw, more than that can become too noisy though.) I can't stress this one enough! to me it's even more important than highest quality files because most of the time if the colors are nice people won't notice if it's grainy or not, but nice colors also make the gifs look higher quality than they really are (this can be tricky depending on the scenes you're giffing tho and I hate to say it but it's something that comes with practice, color theory helps a lot tho)
if possible, try to avoid making heavy gifs (close to 10mb) as it can compromise the quality of your gif (sometimes you just gotta say fuck it tho bc the gif won't work with less frames)
try using smart sharpen and see if it improves your gif! (my usual settings are | Amount: (varies depending of the scene) | Radius: 0,3 (I never change this one) | Reduce Noise: 0 (really don't recommend using this because it will blur out your details but it's up to you)
#I wish I could give more tips when it comes to coloring but it's something that it's very intuitive for me at this point and it's hard to#explain for me because I don't think about my thought process when I'm doing it I just do it yk askdjh#but it's definitely something that came with practice! also painting etc is something that improved that for me because I know which colors#go well together and which ones should be toned down for the most part - I still make mistakes sometimes but yeah#sorry that's very long but I hope it's helpful! if you want me to explain anything in more detail lmk#ask
8 notes
·
View notes
Note
never used photoshop so im curious to see your opinions about photopea vs photoshop
ok things to be known: 1) adobe can suck my cock and balls theyre evil and i wish that the corporate entity that is adobe would go up in flames, a corporation shoud NOT have that much insight in your privacy, files, sensitive info, etc 2) photopea is great and built off a small dev team as a basically a passion project, which is awesomesauce! i'm not knocking them at all, and i think ppl should support them in anyway they can
i've been a graphic designer and photographer for years now, and in hs i became adobe certified. i literally spent four years of my life learning on an industry standard. it becomes muscle memory after a while. beside that i was a roleplayer so i became VERY familiar with edits and gifs and all that. again everything became muscle memory. adobe suites are the industry standard for a reason, and for GOOD reason. i think they have an amazing interface and work hard to update the experience and make shit easier for artists; like i will give them that even if i sound like a bootlicker. i never paid for it tho lol as a student i got it for free and i would use cracks/torrents.
when i got my new computer it wouldn't let me run bootcamp so i couldn't crack the adobe suites like i used to :/ new mac processors or whatever don't rely on intel anymore, so not intel = no bootcamp. most cracks are pc based so i just couldn't find one that worked for me. apple went ham on protecting IP and combating torrents so it's like impossible to crack without an extensive VPN or else adobe will literally send a cease and desist to your internet provider. its sincerely fucked up.
i switched to photopea bc of this. i really liked it, but im autistic so having to relearn my own workflow that ive had for years made me want to hashtag die. the interface is VERY close to photoshop, so it wasn't hard, but it doesn't have the same capabilities i was used to w ps. i do NOT like edited photos in photopea; i think its way too laggy and glitchy to work with giant raw files, which really sucks!!! for making small edits and doing my graphic design tho??? i do really like it. it doesn't have the same capabilities as ps sure, but once i just fucked with the filter galleries and different plug ins and worked my process around what photopea could accomplish, i was good as gold. i've been producing quality work on commission through photopea. it's a learning curve for sure, especially if you have zero experience with an editing interface like that, but the more i use it the more i learn.
all of that being said, i think photopea is fucking awesome for being completely free and open source. it has its issues —— sometimes its way too glitchy for me and pisses me the fuck off, i have to frequently save my psd files and hope that they don't fuck up, and then reopen so it's less laggy and rinse and repeat bc some of my stuff takes hours lmfao —— but i think its pretty darn close to the photoshop i was using like less than a year ago. its glitchy, its laggy, the ads are annoying and clog up the screen, but i simply cannot complain to much when its a smallish dev team working on a shoestring budget (last time i checked) and for FREE. like its open and usable on any browser and computer and i think thats rad.
if i could go back to ps without giving them money i would in a heartbeat. ps is awesome for the work i do, and i like that there's constant improvements and updates. it just boils down to look, feel, and workflow to me; ps is rarely laggy and glitchy, its meant to handle giant projects, there's so many plug ins you can find online, etc. i just wish it wasn't a subscription based software; honestly if i new adobe was less like the elf on the shelf and i could make a one time purchase, i would. but alas.
anyways i'm pro photopea all the way. idk if any of this was helpful its mostly rambly lmfao. but yeah. i don't do much photography anymore, so i don't have to work around the glitches and lags and all of that with photopea; i focus on graphic design for event fliers and social media content + rp resources. it has room for improvement for sure for sure, but it's lovely and helpful in its own way.
3 notes
·
View notes
Note
for the ask game: 9 and 30 :)
9. What are your file name conventions
DEPENDS... i used to do the classic keysmash file names but that got annoying so now i just do titles based on what's in the file and if it's a bunch of randm stuff (cause i tend to use .psds like sketchbooks and do a bunch of random shit on different layers) i just title it whatever word i feel like. note that some of the relevant titles i use like 'gus' or 'peebs' are readable to me and no one else
a uh. notable bad habit i have tho is not saving things at all (i mean i do save them, but like, not saving individual drawings as files, i just save the whole psd) and just taking screenshots. makes it a devil of a time to find anything
4 notes
·
View notes
Text
sims tag
tagged by: stole from the dash lol
1. What’s your favourite sims death? cowplant for sure! i also love the vending machine one lol
2. Alpha CC or Maxis Match? maxis mix! i use only maxis match hairs but i sort of mix alpha clothes,,, but not like suuuuper alpha clothes??? yknow,,, lol
3. Do you cheat when your sims gain weight? no. why would i
4. Do you use move objects? all the fucking time. i cant not use it
5. Favorite mod? i love custom recipes! and also mccc, ui cheats, and more cas columns. cant play without em. i also used to play with some slice of life and wonderful whims features, but stopped after the infant update... idk if ill get back to them anytime soon tho
6. First expansion/game/stuff pack you got? i got city living, vampires, and cool kitchen at the same time! i actually wanted outdoor retreat but i was 12 and mt dad bought them for me and somehow i mixed the links lmao (we used the sims website to buy them)... i still to this day dont own outdoor retreat and idk if ill get it anytime soon
7. Do you pronounce “live mode” like aLIVE or LIVing? like living!
8. Who’s your favorite sim that you’ve made? probably bree wisteria. i think a lot about how i didn't end up using them as the heir...
9. Have you made a simself? yes! i have a whole post of dressing my and my friends simselves in different universes!
10. What sim traits do you give yourself? bookworm, clumsy, and socially awkward. i dont own highschool years so i actually used loner instead tho
11. Which is your favorite EA hair color? the new browns!
12. Favorite EA hair? i love the cottage living ones! except agnes' one. it has a weird texture
13. Favorite life stage? children! idk why, i just like playing with them and decorating their rooms
14. Are you a builder or are you in it for the gameplay? definitely a player. i actually am renovating the entire game rn for when im done with my current legacy so ill have a cool looking save to play not so berry in, and im enjoying building a lot more than i anticipated!
15. Are you a CC creator? not at all. i cant even make recolors
16. Do you have any simblr friends/a sim squad? nope. but id love to get to know ppl on here more!!
17. What’s your favorite game? (1, 2, 3, or 4) only ever played the sims 4 (and a little of my cousin's sims 3 when i was 7 but i dont remember much) so i cant really say lol
18. Do you have any sims merch? nope. i do want a cowplant sculpture tho. something resembling a funko pop. if they'd ever make a collab with funko id get them!!
19. Do you have a YouTube for sims? nope. i do watch a lot of sims youtubers tho
20. How has your “sim style” changed throughout your years of playing? i used to make sims from shows and play as them with aging off (i actually have an entire arrowverse save that im considering making into a full on dc save). now im more of a legacy player, especially with challenges and stuff
21. What’s your Origin ID? romychet. follow me! i upload all the renovations im making lol
22. Who’s your favorite CC creator? i dont have a fav atm but it used to be @miikocc and @casteru for a loooong time!
23. How long have you had a simblr? like a year and a half maybe? idk
24. How do you edit your pictures? literally just add a psd as a filter and thats it lol
25. What expansion/game/stuff pack do you want next? honestly all we got lately (book nook kit, green house kit, growing together) are all what i really wanted... i dont own any of them yet (i do however have the greenhouse kit as cc) so i don't have anything im that interested in! maybe a more in depth elder pack? tho i barley play with them atm
25. What expansion/game/stuff pack is your favorite so far? cottage living! it's soooo cozy and cute and i love it for my family gameplay! and speaking of family gameplay, i think that once ill buy growing together itll become my fav! i also looooove parenthood!
6 notes
·
View notes
Photo
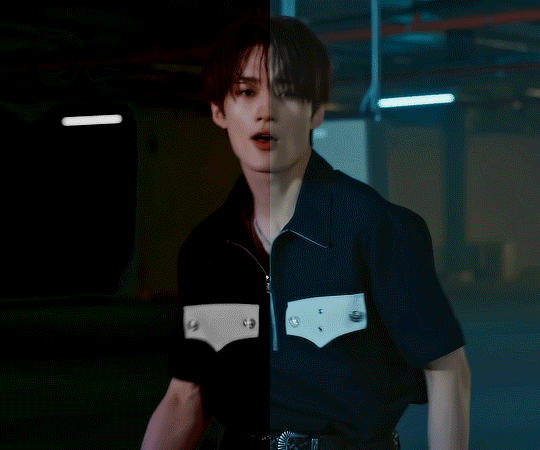
content creator tag game! before vs after coloring ! (or in my case after vs before)
tagged by @innielove @gyeheoni @a-drawingpanda @junjunies thanks for the tags guys^^ enjoyed looking at all of urs!!
tagging: @parabataisarah @kimyongs and anyone else who wants to do it!
turns out i did have some psds saved! idk if i have a consistent coloring style tbqh i just do whatever i feel is best for that specific video/gifset. sometimes its bare minimum coloring changes like the first few but sometimes i do manipulate quite a bit. i dont think any of the psds i found were of huge coloring changes for me but i think there r def some in here that i spent a good amt of time trying to get right. and sometimes the slightest coloring changes often take the longest to get to for me? idk why feel like i struggled w/glasses yongseung coloring a little even tho it doesnt look like muchhh i think its usually because i have specific shades of reds and blues i like and sometimes getting to that shade takes layers upon layers. anyways idk idt im too great at coloring but its always one of my favorite parts about giffing i love the way colors can change its really cool and the manipualtion part itself is fun. sometimes i have an image in my head but i end up coloring it completely differently which is also super fun like i never know how a gif will turn out until the end which prob leads to my inconsistency in coloring but idk i dont necessarily mind that its always fun to explore
+bonus sewoon bc this is literally all yongseung im sorry(?) (had fun with the gifset this gif was from bc its a coloring style i dont really do myself but i wanted to try smth diff. was p okay w how it turned out in the end too :’] )
14 notes
·
View notes
Note
Hello, dude, u disappeared r u ok? It's been some months
It's so nice of you to check up on me, I really appreciate that. Worry not, my friend, I'm doing pretty gucci. 😎
The reason why i stopped posting was, earlier this year my computer just went KAPOOF and it didn't work for a bit. I ended up losing my most uptaded TheBros save (I had just finished giving them all makeovers and was so happy with how they looked too ;-;). Also, I was almost done with a story post and that also got lost.
I still have the pictures saved on my drafts but without the PSD file there's not much I can do to salvage them. (I was also really happy with how they were going too, to add salt to wound)
That kind of put me in a art block that lasted honestly months. The only thing that made me actually start picking up creative hobbies again was drawing (I've also been drawing the bros a lot, I'll share those another time ^3^)
Now I'm better creatively, however, I got a new job and it doesn't leave me a lot of free time and it takes AGES for me to create something. With the news of the new high school pack I'm definetely more hyped to get back into making TBtm content tho.
Again, I really appreciate you stopping to check up on me 💕
#I'll like to stress that i'm doing pretty freaking gucci so no need to worry :^ )#It was just a really bad art block that caused my absense#but also i've always been here despite not posting#i'm still liking other peoples content and such so i'm still seeing all of the goodness you all post#pedroanswer#ask#anon
16 notes
·
View notes
Note
26, 28 & 30 for the gif maker meme
26. frames to layers or screencaps? or do you use a different method?
i used to use screencaps but then realised it crashed my computer and ruined my gif making experience (plus took so long?) so i switched to frames to layers & never looked back!
28. watermarks or no watermarks? any reason why?
i'm lazy <3 i can usually tell what gifs are mine by the sharpening anyway if they're edited in any way, shape or form!! plus i feel like they interrupt the gif as a whole!
30. do you save your psds? if so, do you save one per scene and edit it or do you save one for each gif?
yes & no! so if i know i'm going to use the psd for another gif/scene/episode of the same show, i'll save it (HEAVY on this w/ outer banks bc its piss yellow 99% of the time) but otherwise if i have no intentions of giffing the particular show/movie/etc. i delete them! scene by scene tho :p
gif pack maker question game! 💕
1 note
·
View note
Note
hi !! can i please request a kaeya layout like the one you did for yelan? it looks so pretty <33
Hihi!! Here they are! Uhh i did those layouts a long time ago so i was kinda struggling if i used the psds i saved on my phone or ipad... </3 hope they look ok tho!

1 note
·
View note
Note
idk if it was sent yet but 9 for the ask game?
9. What are your file name conventions?
oh this is a good one. there are few different conventions i use. split up between "personal" and "contract" work.
personal work is broken down to dates, and subject. i look at most files like a sketch page, i'll draw 100 things and maybe pluck 1 or 2 sketches to further render, most of the time tho, files just stay named after the date i started them:
(day)(month)(year).sai2
or
121222.sai2
(and .psd for transferring between Paint Tool SAI2 and Clip Studio)
and if i wanna render more i will save a sketch on its own, separate from the sketch page, and name it smth related to the subject. its usually just the character name like:
121222 morrigan aensland.sai2
if i'm doing contract work however, i get much more thorough, thanks to my time in animation. for example, here's how i would name a file for a commission, let's say for you for example:
(me, artist)_comm_(client)_(subject possibly)_(date).sai2
or
jazzvalkyrie_comm_voidpunker_oc_121222.sai2
the date usually being the point i started the file, or when i saved it for the final time, that part always depends on the context.
and that's how i name files. my art is organized in a folder in my pictures titled "farts" split between personal and contract 😊
0 notes
Note
Do you have any advice on figuring out photoshop and templates? I’m new to all of this and I’m really struggling :(((((
Oh gosh I’m so sorry anon, life’s been so chaotic that I completely forgot about your ask! But I am here now to help :)
I will say off the bat that I’m v much a trial and error kinda gal/look things up on YouTube lmao so I’m self taught in pretty much everything I know with photoshop (aside from a few helpful tips while at uni) so I’ll try and list some things that I find quick and easy to use when editing:
Templates in general tend to come pretty organised with layers names etc so it’s easier to navigate, but I also always recommend NAMING YOUR LAYERS!!! It saves SO much time and even grouping them into relevant sections (groups) can really help navigate the layers panel (especially when you get to 200+ layers like me lmao)
I always edit the resolution of my documents when creating them to be at least 100px (pixels) because then the final design is higher quality! That being said; that’ll depend on your computers RAM capacity and how much of it is used by photoshop - my desktop has A LOT of RAM cus it was custom built, but laptops etc have a lot less (otherwise it’ll make the app glitch and crash essentially)
I use the magic wand tool religiously lmao - it may not be the most perfect outline but if I’m gonna edit the image more afterwards, just getting the background out the way first helps a lot! (Using the layer effect drop down will also give you options of ‘multiply’, ‘screen’ and ‘overlay’ plus a bunch more to add effects to your layers, but a quick way of removing a white bg from a layer is to use ‘screen’ and it’ll auto remove it! Careful tho cus sometimes it removes TOO MUCH of the image aha)
If that tool doesn’t work for you then the ‘colour select’ option in one of the drop downs will do the same thing but will select every bit of colour on the document that you select - ie if you click on the white background, it’ll also pick up every other bit of white on the document so keep that in mind (I apologise that I’m not more specific, I’m writing this on my phone and haven’t got photoshop open)
For text layers, I ALWAYS turn off the ‘hyphenate’ tick box in the text box settings! Hyphenate is more for professional documentation/printed work, so for template edits and personal use I always turn it off cus it makes it look weird imo (the text box settings will open up on the right when you click on your text, so just scroll down a little until you get to the paragraph settings and there’ll be a little ‘…’ to show more options and it’ll be in there!)
CLIPPING MASKS ARE A LIFE SAVER!! On your layers panel, if you have a shape drawn out (ie a square for example) and you add an image/colour layer/literally any kind of layer on top and move the mouse to the line between the 2 layers and click ALT, it’ll add the clipping mask so the layer on top is only visible within the shape underneath! Works for filter layers as well as images in general etc PLUS they stack!
For templates specifically it’s a lot of fiddling until things sit nicely with one another for me, but one thing I use often is PSD filter packs that you can download! Lots are on tumblr and deviantart etc but you should always credit who you use, unless you make them yourself! They help tie a design together so all the colours match!
I also like using the ‘blending mode’ options on the layers panel. So when you right click a layer - it’ll give you the ‘blending mode’ option at the top and that allows you to add shadows/gradients/texture and a bunch of other stuff to that specific layer!! Including ‘stroke’ outlines around the edge of your layer!
I ALWAYS save my PSD files separate to the final product in case I wanna edit them, and I will export any final designs as an image!! For highest quality in your exports use PNGs!! JPEGs reduce the quality SO much so always go with PNGs but if you don’t want a transparent background, make sure you untick ‘transparent’ in the export window!
There’s plenty more tools to use on photoshop, but I recommend just creating a blank document, adding a bit of text and an image and just playing around with it!! You’ll discover so many new ways of doing things and ways that suit you!
If you ever want more specific advice for something then pls ask! I have 8+ years of experience and a graphic design degree so I like to think I know some things haha!
I hope that helps🤍
#misc: asks#misc: anonymous#I’m sorry I couldn’t be more specific!#I’ll probably think of a bunch more tips down the line so I’ll reblog this if I do#for now that’s a good start
1 note
·
View note
Last Seen Blogs
words0ffire
There’s red ships and green ships but no ships like partnershi

local-anxious-ace
What's Next?

betinh3
Robin.draw

tightsunderpants
tightsunderpants

angelsami-fr
*muffled Inspector Gadget theme plays on an intercom*