#i love my posca pens so much
Text

rejoice! it's
COELACANTH SATURDAY
#coelacanth#idk man im not great at drawing fish but i love them so so much#my art#also experimenting with how the posca markers interact with other mediums (gel pen and colored pencil to be exact) has been interesting!#artists on tumblr#fish
756 notes
·
View notes
Text
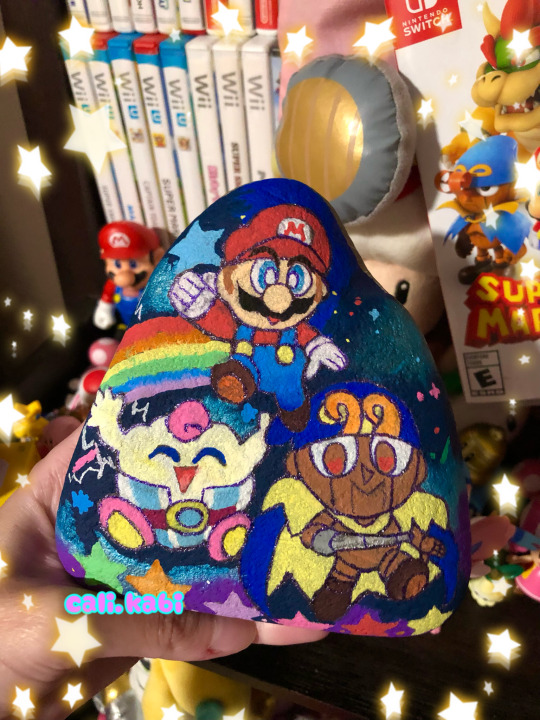
~ Super Mario RPG Trio🌟💫🍄
wanted to paint a rock related to some Mario <3 and a piece of decoration for my desk🎉 :) I love how everything came out so much I was going for the chibi with my posca style hehe ;w;🍬🎨
#my art#sydney’s art#geno super mario rpg#geno smrpg#mallow smrpg#poscapaintmarkers#poscamarkers#posca illustration#rock painting#traditional drawing#chibi Mario#chibi style#super mario rpg#mario rpg#i love the trio so much I hope Nintendo makes more merch of Geno and mallow in the future I would so buy them ;w;#used a glitter pen instead of a black marker for the lineart I usually do cuz I felt like this needed stars and sparkles:)
78 notes
·
View notes
Text

Neil banging out the tunes!!!!
#traditional art#posca pens#painting#paint pens#my art#i know im a day late...i hope i can be forgiven 😔#can you tell im actually having so much fun with these?#i am in love!!!
17 notes
·
View notes
Text
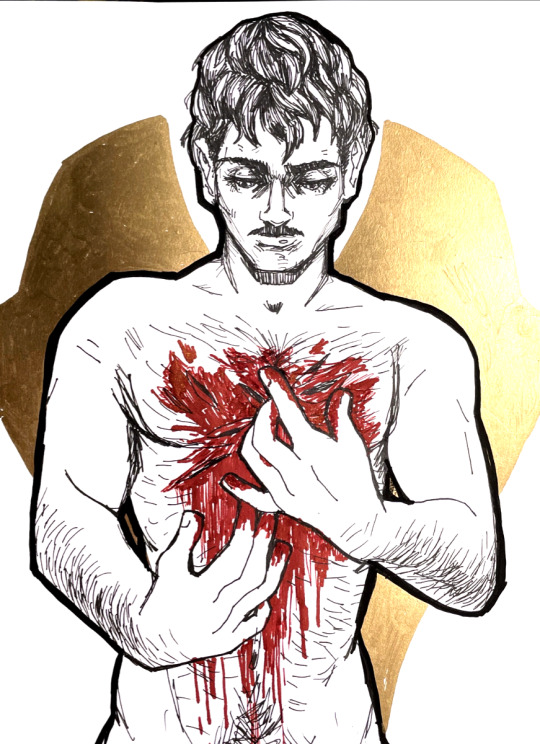
Oct 3 - Creamtober 2023 - sparkling wounds
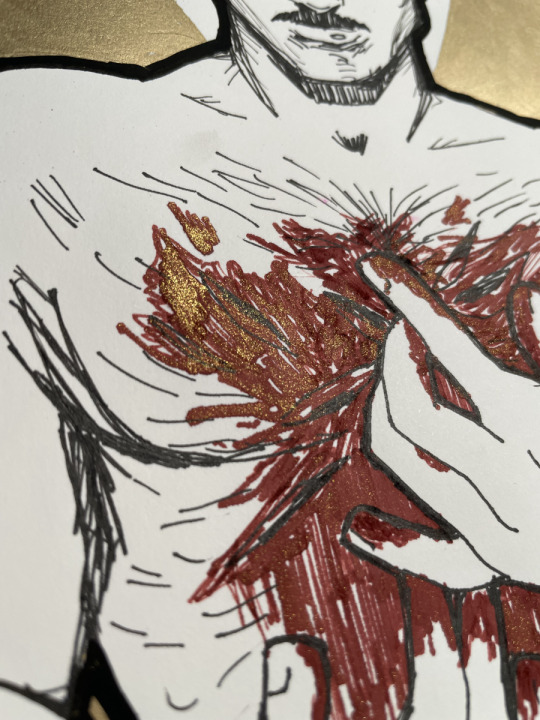
#my fanart#creamtober#october art challenge#tony stark#blood#if only tinman had a heart#it’s me being super literal again#i love this prompt so much#there is an extremely high chance i just recycle it for use with leon later#because of the brainrot you see#but i can’t not with tony either#so you see my dilemma#platinum preppy ef nib#black posca#prismacolor metallic gold pen that i’ve literally owned for years and had zero use for#platinum carbon black ink#and the true mvp#diamine dragons blood
12 notes
·
View notes
Text
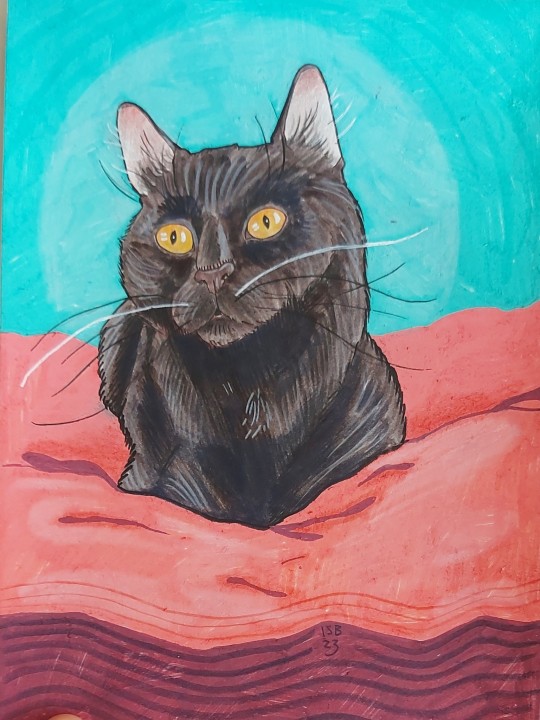
Portrait of a Very Good Girl
#cat#per portrait#my beloved child who i love so much#posca pens#watercolour#ink#colour pencil#illustration#artists on tumblr#my art
50 notes
·
View notes
Text
working at an art store is like. the best and worst thing i’ve ever done. every weekend i am tested. people come in buying so much paint and canvases and i ask what are you going to paint and they almost always show me pictures of their stuff OR if i’m really lucky, they want their stuff framed and i can see the real deal! i’m so locked in to oil, it’s really fun to talk to other painters about their mediums of choice. like, i havent tried acrylics in probably two years? and i’ve certainly only gotten better at painting since then, i should revisit it! or folks buying beads and jewellery making stuff. i’d like to try that :)
#i used to make bracelets and earrings and shit with my mama when i was a kid#we have soooo many beads etc at work it’s insane. hundreds#i’m also thinking about things like: Posca pens and gold foil appliqué#i’d like to get back into collaging and multi-media paintings#which are a bit harder w oil because it’s so finicky and takes so long to fully 100% dry#even if you can touch it and no paint comes off that doesn’t mean the oils are bound and set#so if you add other stuff the pigments can bleed or run#i just love oil so much……expensive and messy though#nice acrylics would be fun to mess around w again. something thick
16 notes
·
View notes
Note
Just saw your sketchbook post and I am amazed at how clean it all looks O_O /pos
So I was wondering, what materials do you use for your traditional drawings (all the stuff from sketch to final piece)?
BOY AM I GLAD YOU ASKED THIS *ahem*
Behold 😌
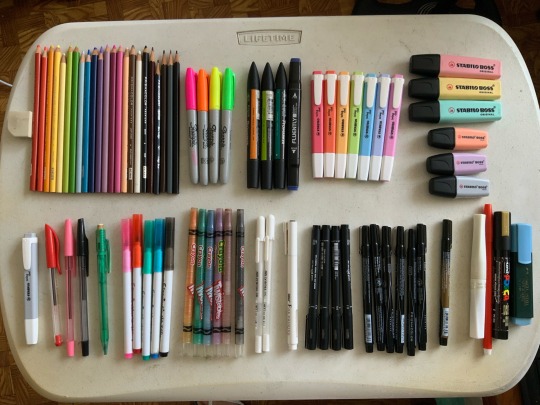
For the sketchbook pages, I mainly stuck to these materials though ^^ these guys are my…
PRIMARY MATERIALS

The green mechanical pencil on the picture on the left has 0.7mm colored lead in it! I alternate between blue and pink colored leads depending on what fits the overall color of the piece better.
Once I finish up the sketch, I line it with the black pilot ballpoint pen! I really like the control and feel of ballpoint pens for traditional lineart, because it gives a sort of variety in pressure I can’t seem to achieve with normal fineliners. I like to switch up the colors of the lineart too sometimes, hence the pink and red ballpens.
Then once the linearts done, I color them in with the stabilo highlighters, as pictured on the right! These guys are my FAVORITES. Sometimes when I’m just freely sketching I use the grey or peach mini stabilos. Although, they do tend to be a bit runny, ‘cause they’re meant for quick highlights and not multiple strokes over an area ^^; so you do have to be careful and quick when coloring with them to get an even coat of color!
Sometimes, though, when there are other colors or textures I want in a drawing, I use my…
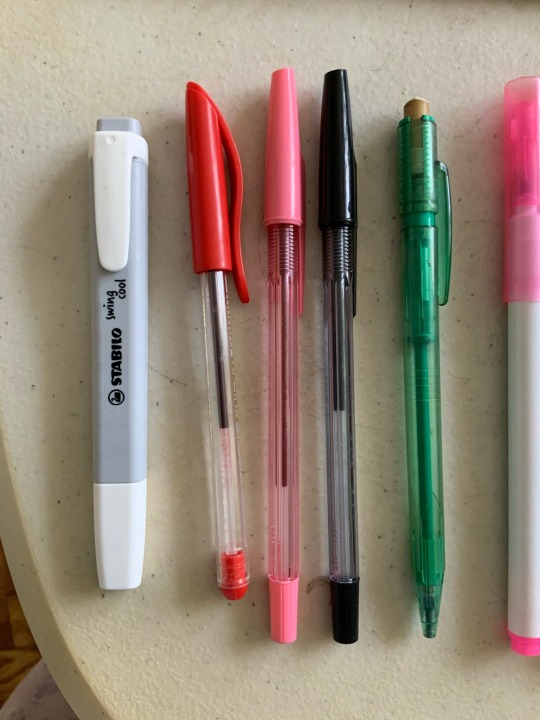
SECONDARY MATERIALS
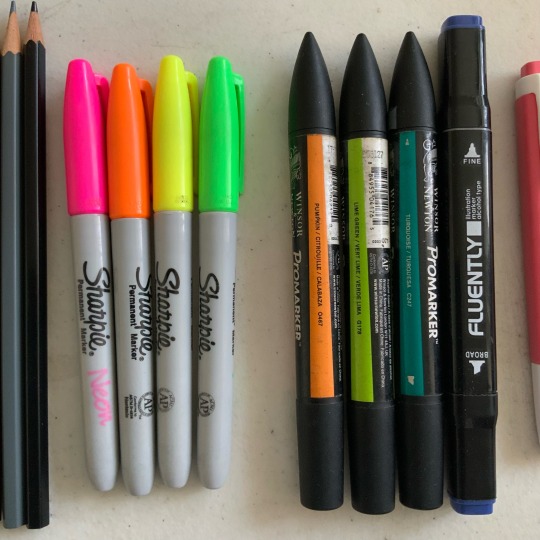
Pictured above are all my alcohol based markers! The four on the left are neon sharpies for when I need that extra eyestrainy kick. The three promarkers with the pointy cap were from when I was a freshman in uni and wanted to collect a full set of alcohol markers, but these were the only colors they had in stock and the college supply store ✌️ I’ve since given up on that dream because they were really expensive ;; they’re really good for sunny grassy scenes though! The last dark blue marker was from a set of other blue markers, but the others have since dried out… I use it when I really wanna darken up a page, like for night scenes!
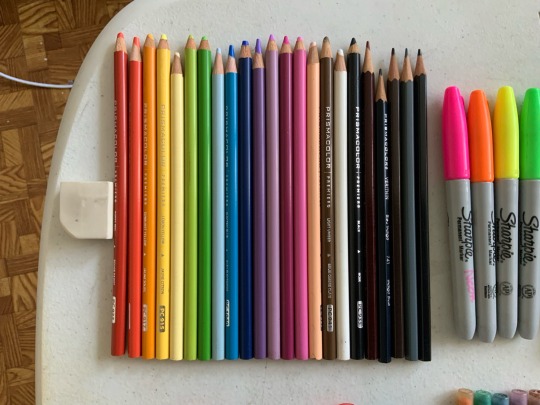
This is my prismacolor set! I like to pair these with the markers, going in after the initial layer of color to give a bit of variety or shine. Some examples of when I use them would be for adding blush or giving hair a glossy sheen 👍
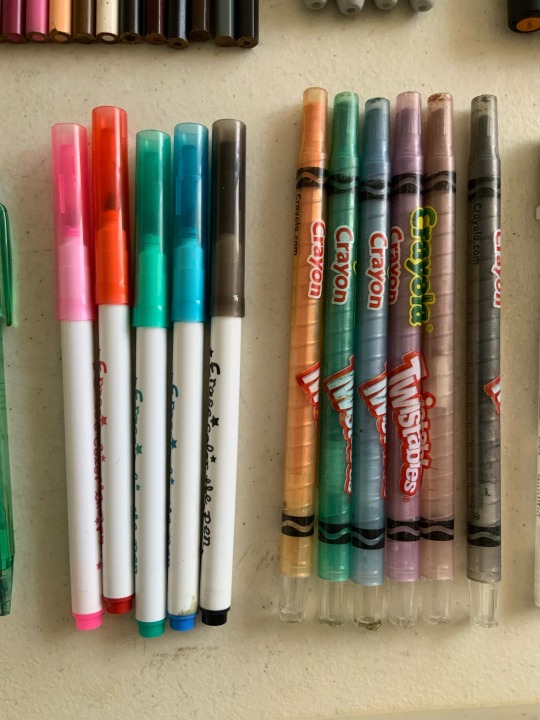
These ones are my “fuck it” materials lmao
I use these when I really just wanna scribble something down wildly. I had these since I was in gradeschool and its quite frankly a miracle they still work? Oh, and the red and yellow twistable crayolas are missing because I vaguely remember giving them to some childhood friends for some reason 🤔
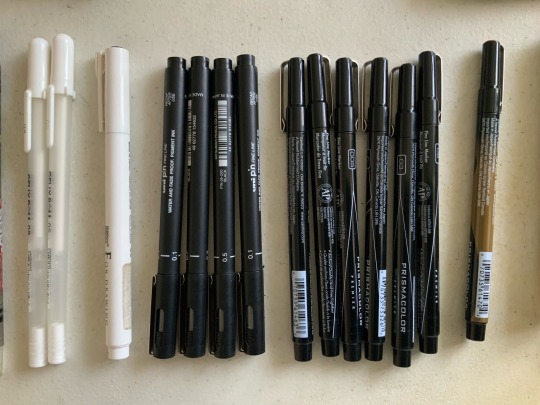
My fineliners and gellyrolls! Haven’t used these much recently tbh. I’d used them for class before, but I never really likes how flat the thickness tends to be :/ the brush tips and chisel tips are cool though. I used them for that one yellow bdubs doodle to try and see if my opinion of them has changed ^^ it hasn’t. Moving on…
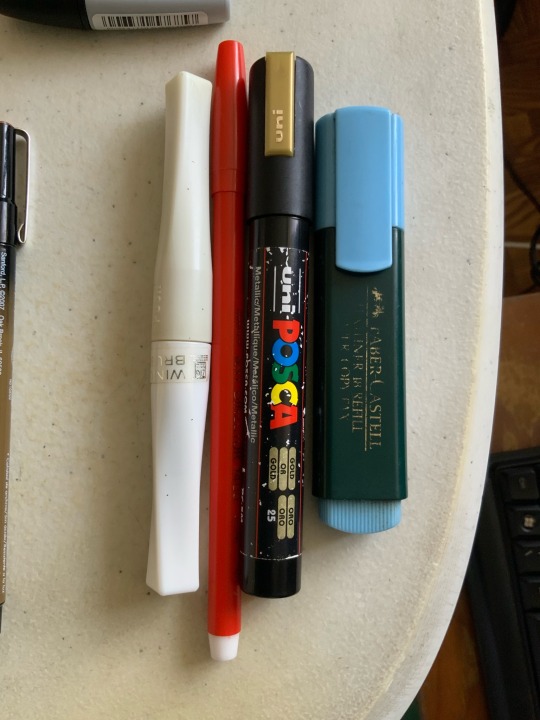
Lastly, we have the special materials! The ones that don’t really go into any sets, or have nice applications. In order from left to right:
Wink of Stella - A brush pen that applies glitter through some sort of black magic. No idea how she works but I love her
Red Marvy Art Director 1400 - A red fine tip marker. Can’t go wrong with a bright red marker 👍
Golden Posca - My only posca marker. Figured if I should get one it might as well be something special.
Faber Castell Blue Highlighter - I use this alongside the stabilos. It has a really nice deep blue color ^^
And well! That should be everything! ^^ Thanks for giving me an avenue to gush about my materials lmao 🥰
85 notes
·
View notes
Text
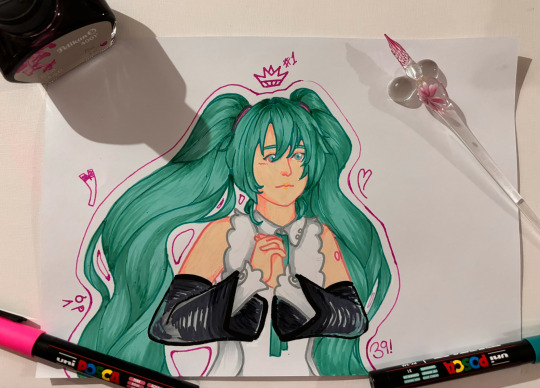
POSCA Miku
You've seen:
Sakura Miku.
Snow Miku.
Bottle Miku.
Shiteyanyo.
Now meet: POSCA Miku (NT)!
I was sooo inspired by Miku Day (3/9) here at Tumblr with so much beautiful art and even though I missed the date, I figured I'd miku miku anyway. Most depictions of her that I saw were in her default, VOCALOID2, iconic outfit. Decided to give Piapro's NT some love!
Also, scratch whatever I said about POSCA being better than alcohol-based markers in my last post. It's just all so experimental to me right now, I should have foreseen what great use alcohol markers shall have to me in my future POSCA drawings! They make for the perfect shading tool, being kinda transparent and all. Blending with POSCAs is a no-no, and shading with them is blocky, black-and-white-- which is actually good for cel shaded illustration, just not what I was looking for.
Now I can't imagine my traditional art without either of them. :)
I had no idea what was going to come out of this. It's not perfect, but since I had no expectations, it ended up pretty satisfying!
Thanks Pelikan and Sinoart for... existing, really, and commercializing the glass pen and pink ink. I love them. I used them to give the drawing a final touch, and Miku seems to have enjoyed it! I'm brand, fresh new in the world of fountain pens.
#hatsune miku#glass pen#pelikan#posca#miku nt#sekai de ichiban ohime sama#world is mine#piapro#crypton future media#cis graf duo#alcohol markers#cryptonloids#vocaloid#miku hatsune#art#traditional drawing#traditional illustration
15 notes
·
View notes
Text
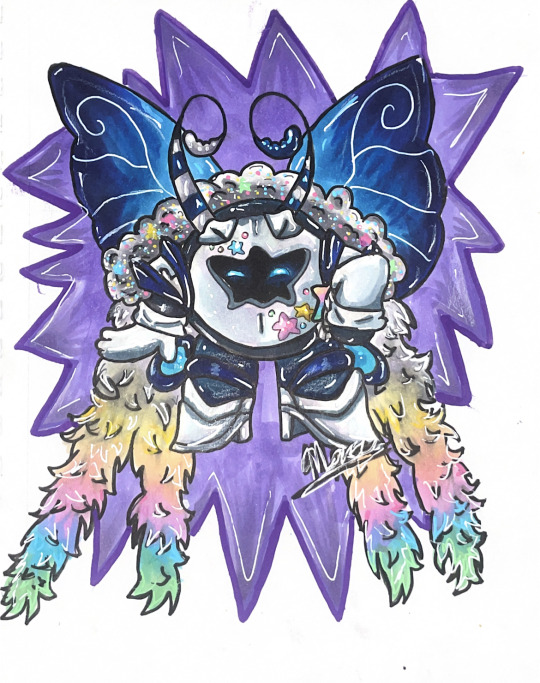
Gift for @kittenvirus
I had so much fun drawing your OC cause he’s so precious and very cute love his wings and pastels on him X33
( Art supplies that I use: Copic, Master Touch brush markers, gel pen, Posca, fine liners, mechanical pencils, xl media, Ohuhu markers ^w^ not my oc )
#fanart#kirby oc#not my oc#gift art#butterfly#comet knight#knight oc#oc#pastels#cuteness#mercy illustrator#mercy art gallery#mask#adorable#oc fanart#love your oc#stars#glitter#artists on tumblr#traditional drawing#sketchbook#ohuhuart#copicart#fun to draw#colors
42 notes
·
View notes
Text

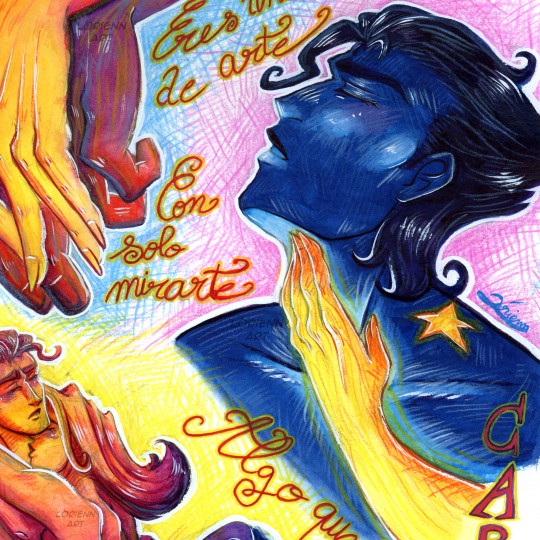
FR [Cariño]
Heyyy !!
Je reviens avec un nouveau travail ! Bon je ne sais toujours pas animer donc je fais des dessins séquentiels de chansons en attendant.. 😂
Du coup j’ai choisi d’illustrer « Cariño » de The Marías (je suis vraiment amoureuse de cette chanson c’est terrible) ; mon objectif premier était de donner une grande impression de fluidité
Côté techniques, c’est assez mixte : j’ai utilisé de l’aquarelle, des crayons de couleurs, des Posca et de la gouache blanche ; je me suis vraiment amusée !
_ _ _ _ _ _ _ _ _ _ _ _ _ _ _ _ _ _ _ _ _ _ _ _ _ _ _ _ _ _ _ _ _ _
EN [Cariño]
Heyyy!!
I’m back with a new piece! I still don’t know how to animate so in the meantime I just make sequential drawings for songs.. 😂
I therefore chose to illustrate “Cariño” by The Marías (I’m really in love with this song it’s crazy); my primary goal was to emphasise a lot on the flow
Regarding the media, they’re pretty mixed: I used watercolour paint, coloured pencils, Posca pens and white gouache; I had so much fun!
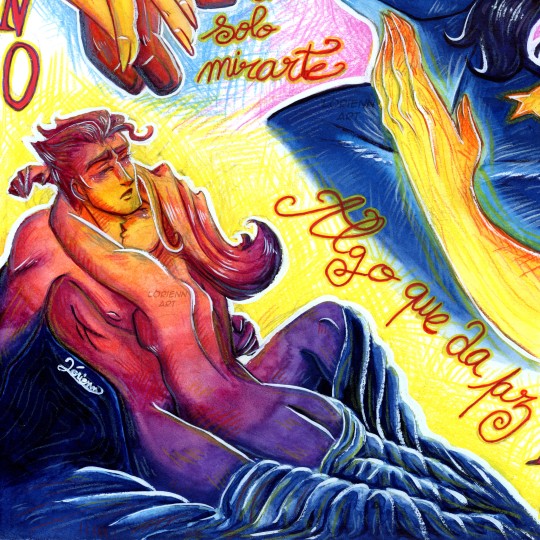
Close ups:

#artists on tumblr#traditional art#mixmedia#watercolour#posca pens#coloured pencils#gouache#cariño the marías#jjba#jojos bizarre adventure#jojo no kimyou na bouken#jotaro kujo#jotawife#jolyne's mom#jolynes mom#mrs kujo
60 notes
·
View notes
Text
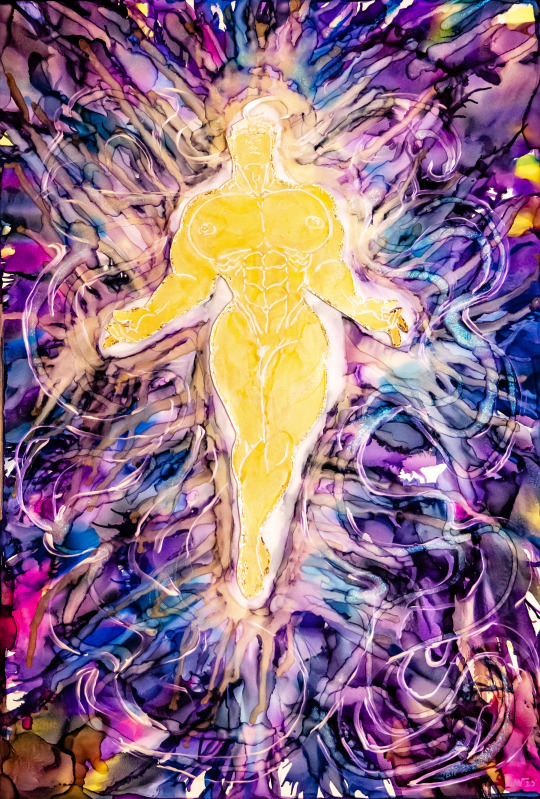


Begin
Or "Eru creates Melkor"
This is 1 of 3 of the Melkor series that I entered into a art show/competition (I'm not expecting this to win but I'll be glad if it gets a place in the show)
A little info bout the piece:
I hc Melkors "blood" to be gold because 1. He was created first (Manwës color is silver cuz he was second) and was Erus Golden boy 2. He's basically marring Arda by kintsugi/Kintsukuroi which is why gold is so abundant and there are literal Veins of it running all through Arda. Hence why Melkor is golden in the picture
I also hc that unlike the other Ainur Melkor shines in ultraviolet, but I could not ask the people of the show to set up a black light just for my piece so I went about it differently and used shifting purple acrylic paint and alcoholic ink with brilliant diamond sparkle to fabricate the ultraviolet
Those who are familiar with my Melkor design might ask "why isn't his hair black in this picture" and the answer to that is very Simple: this was his original hair color: Shimmering in all the colors of the rainbow, but as Melkor loved light So Much that he wanted it all to himself he transformed his hair to become So black that it ABSORBS light (which is why I never draw any shine to it and only use Matt black acrylic when painting it)
Oh and Melkor was drawn on a separate piece of paper and I used double-sided tape to attach him to the picture to further the narrative that he's not, and never will be, part of Erus "perfect" world
Materials that I used:
alcohol inks
yupo paper
acrylic paint
posca pens
double-sided tape
gold foil
#melkor#morgoth#eru iluvatar#my art#tolkien fanart#tolkien#silmarillion fanart#silmarillion art#silmarillion#traditional art#traditionalart#alcohol ink#mixed media art#acrylic
49 notes
·
View notes
Note
Hay :D
Can you tell us what do you use to color your drawings on traditional? I need some tips •́ ‿ ,•̀
why hello!! Sorry for such a late answer!!
so, I’m a fun little something we call ✨inconsistent✨(sigh) so while I may not be the best person to ask…but here’s things I commonly use color wise (favored art supply dump)
Alchohol ink markers
I use these most, they are a beautiful thing, my favorite are Ohuhu as they are high quality and a much lower price then brands such as Copic. (Can you taste the salt.)
They have less blend ability in comparison to Copic but are overall a much better investment if you ask me! They are great for a more smooth look! Another one I have around that I use for less saturated colors is touch youch youch
I very much prefer brush pens over the chiseled ones, for a paint like experience, and more dynamic application! Again these are just personal preference!
(I have a bad habit of opening ink capsules and painting with ink. I would not necessarily recommend this.)
Watercolor
There’s lots of pretty nice watercolor you can get for a pretty cheap price! The ones I prefer currently are MeiLiang, I got them online for a good price and they are very nice!
That said I do mix around different brands and such, whatever is on hand.
Gel pens
I love gel pens, even if you just have like one or two it’s such a difference!! I love just having white ones for adding little details and such to drawings! You can also get colors if you like! I use the Jellyrollers!
Colored pencils
a lot of people hate colored pencils which I get, but I find them very helpful for detailing (when I have motivation to do so lol) I often use them on top of drawings I’ve layed down a base of alcohol ink with! That way it has a clean base and can add the fun texture and stuff afterwards!! Those smooth looks can be achieved with pencils alone, I often just don’t have time for that :) it’s very fun though, layering is key with pencils
I do very much enjoy prismicolor colored pencils!!! It’s an investment I don’t regret lol, although I’m sure any soft core colored pencils would have the same effect!!
Posca
occasionally I use posca markers for large poster sized drawings, esp for the ink capsules. I like the paint coverage!! That said they can be a pain to work with.
it’s probably not good to be like me and use all of this on sketch paper. (I know. I’m aware that that is psychotic.) but I do normally use sketch paper, getting some multi medium paper might be good if you are interested in paints inks and pencils though, that way you can use it for all of the above :))
Color wise that’s what I commonly mix and match with, when it comes to pens my FAVORITE pens to sketch or do lineart with are Tombow calligraphy pens. Simple brush pens, it makes detailing harder but I enjoy the dynamics. There’s lots of micro pens you can find for small details as well!! I also prefer to use mechanical pencils for sketching, simply because the mechanical lead stays thin and sharp instead of getting dull. That said, I use very cheap mechanical pencils, and sometimes you need a full pencil depending on the project.
There’s a little mini rant on the art supplies I use color wise, again these are just my preferences from what I’ve tried!! I’m by no means a professional haha, i very much experiment and make a mess of things!
Traditional art can become…quite the investment. Especially when it comes to buying all of the art supplies as your resources dwindle. I have to buy new art supplies much more often than I’d like to admit.
All that said, I am a firm believer of art being able to be formed from any medium!! >:D
be it a simple 2b pencil, a ballpoint pen, or crayons products, I think anything can be used to make something really pretty :))
Only real advice I have is don’t be scared to mix and match, get messy, and experiment!! Do whatever’s most fun, and don’t think you can’t make something great from something simple!! There’s no real rules. Only techniques and suggestions. It can be daunting because there’s no undo button in traditional art, but I think that’s a really good way to expand your abilities :0 it teaches you to roll with mess ups and learn how to work with them!!
Most importantly, let yourself learn from others, but NEVER let people force how you use your supplies, don’t be scared to beat them up if that’s what you need (the art supplies not the people.), and don’t think you need the fanciest things to make nice things >:D
if you want more specific tips and such feel free to ask, I’ll do my best to answer :,)
#karineverse#art#traditional art#art rant oops#I’m probably bad to ask as I use a mix of whatever I can find#But these are some things I like to use!#hope this helps :.)
13 notes
·
View notes
Note
hello!!! if you dont mind me asking what kind of white pen do you use for adding little highlights in your art? your art inspired me to start inking and coloring my traditional art and ive been having a lot of fun with it for a year or so now but i can never seem to find a good white gel pen to use 😭
you and me both friend 😭 I have a lot of issues with the ones i've tried and im thinking i might switch to just using white dip-pen inks (shirahama has given the brand she uses it's something like icy-white but i'll have to dig that out again).
the best luck i've had has been the following:
General notes of paint/acrylic markers - be extremely careful of smudging and drying times, both of the pen and whatever you have underneath. For any solvent-based mediums (paints, alcohol markers and ESPECIALLY linework inking) acrylic markers can pick up some of the colour or damage the paper and create smudges and tears. This is relatively easy to avoid so long as you wait for stuff to dry and work in small areas. The paint itself will take a while to dry so I usually let it sit for 30mins-1hr before putting it anywhere near my scanner bed. If you need to work on a larger area and the paper you're working on isn't pretty robust you should probably switch to a paintbrush and just use regular acrylic paint (which has a longer drying time).
I've also found that with smaller pen nibs getting a reliable opacity is an absolute crapshoot lol.
Artistro paint market pen - really good when fresh, but god help you if you go without using it for too long after you start using it. it'll gunk up and I don't know how to fix them. They are relatively cheap and come in packs at least. Doesn't seem to have larger sizes though.
Posca paint pens (various sizes) - far more robust than artistro if you store them right but regrettably more pricey. I've also found the finest nibbed white pen to be... deeply underwhelming. It never seems to have adequate pigment no matter how long I shake and prime it. By contrast the artistro gave the same sized line much more consistently, but at the cost of the pen nib itself being pretty unreliable.
Decobrush pigment - I've not got these in white so can't speak for them directly, but the colours I do have are pretty spiffy and it's a BRUSH pen, which gives you so much more control and a range of sizes per pen. There is some difficulty with low opacity on these though (since they're meant to be used with other decobrush markers), so I don't know how a white "corrector" would fair. The colour range is generally pretty gorgeous though, in the long term i'd like to have more of them.
General note on gel pens - I've got a love-hate relationship with gel pens honestly. I find I can get more consistent results out of them because the ink doesn't settle and you don't have to prime the nibs, but that's only if you can find a good brand... and then a good specific pen lol. I've also found an issue when you don't let the medium below dry properly re: smudging, but it also seems like if your work isn't boneeee dry (like overnight or multiple days of alcohol markers drying) the gel can very easily take on the colour of the pigment underneath, especially darker ones. Oddly this doesn't always show up when scanning, but it will look odd in person. Not always a draw back though - it looks great for white detailing in shadow.
Sakura Gelly Roll 08 - Not sure if there's other sizes (or their efficacy) so I thought I'd be specific because if there's one thing about gel pens the specificity MATTERS. I've got a couple of these and they don't disappoint (insofar as my expectations for gel pens go)
Uniball signo broad - this was my favourite until it ran out of ink. I cannot say for the uniball signo (without the broad part) which seemingly just gave up delivering ink and enjoys carving lines on the page and maybe delivering just enough ink that you can see where the ball is on the track it leaves behind. But the broad? I really liked. It honestly probably performs the same as the gelly roll but the pen just feels nicer to use lol, and the fact that it ran out of ink rather than dried out speaks for how much I liked it lol
as a general warning though - basically any gel pen or acrylic pen should be the last thing you do on your piece, because the second it goes down you will not be doing any more colouring in that area (unless you paint with acrylics). You can maybe use lineart pens on top of them once fully dried for at least an hour (ideally more) but it's very likely to smudge.
honestly... if you scan your work, there's no shame in cloning a white area of your work to use as a highlight post-scan. i always feel like im cheating until i remind myself that every digital-artist peer i have gets do to this at their leisure lol. i'd recommend getting a good scan/photo of the work before adding any highlights anyway because it's sooo easy to bugger them up and be unable to fix it (i say this as someone who never remembers and always regrets it lol)
examples:
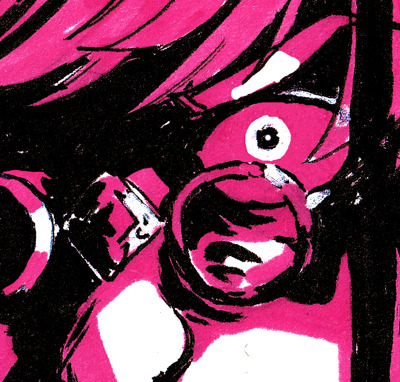
you can see where the opacity doesn't quite hide what it's covering - an extra layer or digital correction would have been great. pretty sure this was artistro acrylic pen. but the unseen thing is i had to correct around the iris to the point where i said "well fuck i can't do what i want now" and just fixed it digitally.
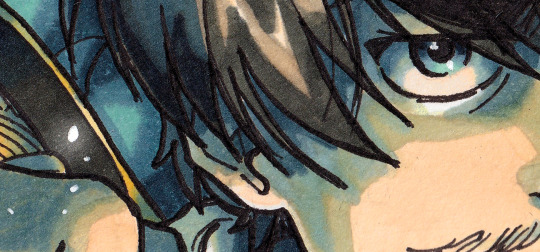
dot highlights on the left and in/around the eye - definitely gelly roll. gel pens are really good for little pin pricks because you avoid the ball-point smearing things too thin and you can get pretty high opacity from that. also some more digital "help" with a bit of airbrush glow.
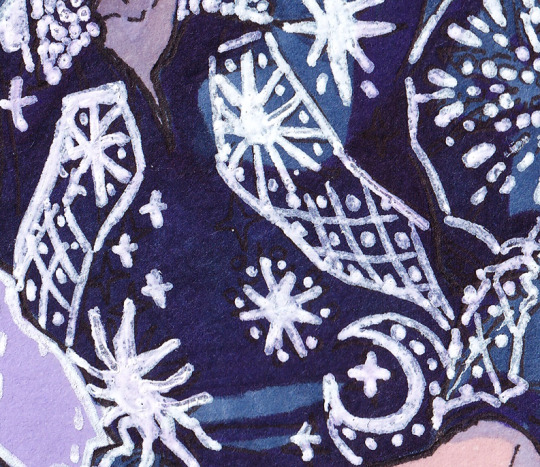
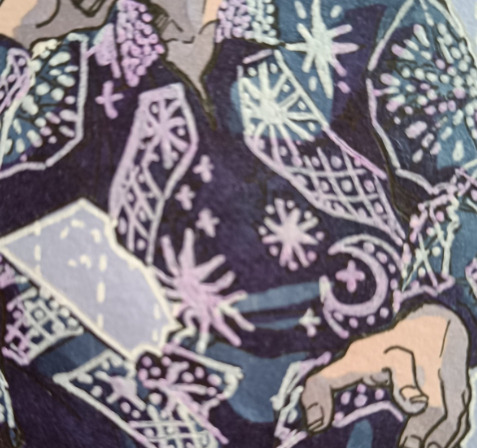
Definitely gel pen but i forget which kind, but I wanted to show what I meant by "picking up some pigments" and how can can be a boon, but also how sometimes the scanner just picks it up as white anyway (left is scanned, right is a photo - you can see it's purplish in the shadows)
#asks#Anonymous#sorry this turned into an info dump basically i also Struggle with this step#and i feel like i should just go full digital with it until i find a better solution#other things i'd like to try are gouache and just using acrylic with a fine brush#mostly cos high opacity white ink is just... hard to find and dip pens are Difficult
10 notes
·
View notes
Text

Octokuber Day 5
Sixth Sentai - Momotani Jiro!!
Literally all of my favorite characters are sixths (Zox, Jeramie, Jiro.,,,) and I was gonna draw a bunch of em together but my bestie sent me a brush pack based on posca pens so I decided to do Torabolt bc I love him so so very much :)
#super sentai#don torabolt#momotani jiro#avataro sentai donbrothers#my art#octokuber 2023#yes I’m many many days behind. don’t worry abt it
8 notes
·
View notes
Note
I saw your traditional pieces and they look really good and clean, do you have any tips for making things look that neat? I sometimes sketch stuff and try to ink the lines but it never looks right
thank you! my secret is that I am not neat at all! My style is a very quick messy style, but my tips for bringing it all together are
- try not to over sketch! this one DEFINITELY comes with time and practice though, so if that's not yet possible I recommend a cylindrical eraser to roll over your sketch and lighten it up. Put down as roughly as possible the shapes you want
- light colors go down first, as messy as you want. My lizards and sky islands pieces are all messy if you look a bit closely x) That blue shading was a disaster when I first started
- dark colors bring it together! i use a black posca to box everything in and bring contrast to my pieces. I use this one second to last, to cover my mistakes with a very dark, hard to see through color. My white posca is always last just for final detailing
- line weight is everything ! often when people line it's at the same thickness. Try making some parts thick and others thinner! In the same way, know when not to add lines. The viewer's brain can fill gaps plenty fine, and excessive linework can sometimes make things look a bit too cluttered
experiment with your materials as well! I fought to try and use microns for the longest time because i loved the appeal of thin sleek line work you'd get from them, but I just hated using them... Poscas were much more fitting to my art style, and i prefer using them much more than any kind of pen or marker!
and as always, don't be afraid to mess up ! a lot of art is try, try, try again.
#yip answers#art talk#of course this is all subjective#and it'll depend on everyone as an artist#but this is what works for me
9 notes
·
View notes
Text
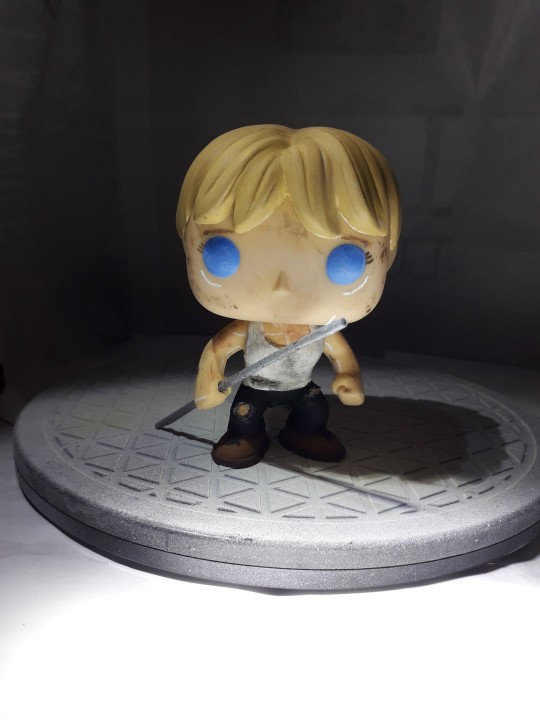
How to Build Your Own 'Augmented Super Wife Supersoldier From The Future' Funko Pop.
A Semi-Coherent Guide By RC.
This is a long one. A loooooooong one.
I meant to do this like two and a half years ago, but in the spirit of keeping this fandom's head above water, and the fact I'm at the hospital (nothing serious!) with nothing to do for the next couple of hours, I'm doing it now.
So if, like me, you are still bitter that Grace and Dani didn't get official Funkos, or official *anything* due to manufacturer short-sightedness, why not say 'fuck it' and build yer own?
This rambling tutorial will attempt to demonstrate how to build Grace from the 'when they start to kill me, run' scene.
Like, literally that bit 😋.
Anywho. Let's do this!
You will need:
- Funko Pop DIY (female)
- Polymer clay (eg. Sculpy, Fimo, CosClay). I'd advise against cheapo no-name alternatives purely because in my experience the baking times/temperatures stated are absolute garbo. Also, polymer clay will give off quite gnarly fumes while curing, so better to use a trusted source. But if cheapo's all ya got, it's all ya got.
Other modeling materials you might consider instead of polymer clay include...
Epoxy clay (eg. Milliput, Apoxie Sculpt, The Army Painter 'Green Stuff', even something like J-B Weld or similar 2 part plumber's/repair putty).
Plain ol' air drying clay (eg. DAS, FimoAir, Gedeo).
You could even whip up a batch of 'cold porcelain', or an oven cure salt dough from ingredients you probably already have at home. Make sure you clear coat any salt dough creations properly after curing as over time ambient moisture may mess with it.
Each option above has its own pros and cons. Do your research if you aren't sure. Me? I used Fimo.
*ahem* Carrying on...
- Masking tape
- Hobby knife
- Pin vice
- Kebab skewer (wooden), or styrene rod
- Paint brushes
- Primer (plus dust mask if you're using a rattle can indoors)
- Sandpaper (around 400 grit oughta do it but you could probably go 200 either side of that and get a good result)
- Acrylic paints (optional: Posca PC-1MR pens in black and white for fine detail).
- Crafter's heat gun, or a hairdryer
- Varnish/clear coat.
Optional extras: Airbrush, spray booth/cardboard box, rotary tool, oven thermometer, artist's/cake decorating turntable, UV resin, silver leafing pen, jeweller's files, jeweller's wire, acetone, superglue or 5 minute epoxy, a lil piece of sponge, pearl mica powder, scavenged Funko Pop head 😈.
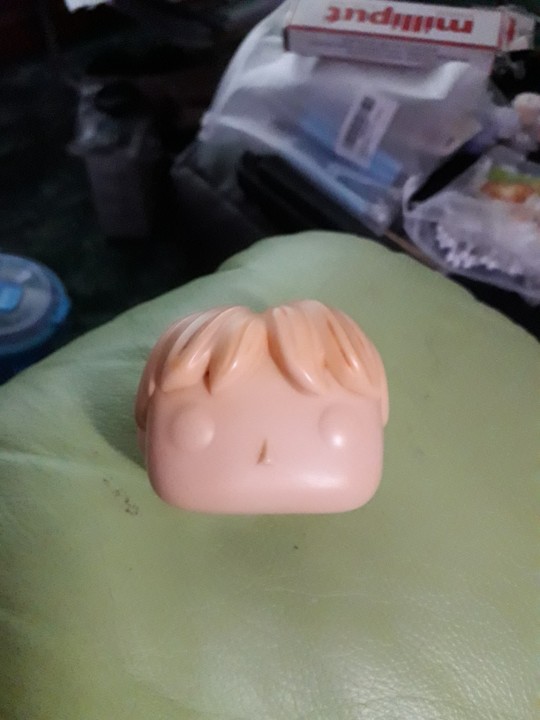
Step One: Grab your Funko DIY and separate the head from body using heat to soften the vinyl enough to wangle it off the neck post. Shoving it in a mug of hot water for a few minutes should do the trick. Make sure to dry out the head as much as possible. Last thing you want is mould growing inside it. This is Terminator, not The Last Of Us 😉. Alternatively you could use your heat gun/hairdryer, but I explain in Step Six why the water bath approach is a better option (imho) at this early stage.
(You are giving this entire thing a quick read through before you start, right? I dunno about the rest of you but I like to have at least a basic idea of the work ahead before I get stuck in. Saves finding out you're missing a necessary tool/material at an inopportune moment and all).
Stop rambling, RC. Sorry. It's easier to be succinct when you haven't lost half your photos 🤦♀️. Moving on...
If you don't wanna attempt to sculpt the hair yourself you can, as I did, take a kitbashing approach instead of using the supplied DIY head. Grab one of the many commercially available Funkos with a decent approximation of the hairstyle you want and then go Step One on em. Buy 'pre-loved', buy BNIB, dig one out of a dumpster, steal one from your lil cousin, it doesn't matter. Procure as your time/budget/situation dictates. Improvise where necessary.
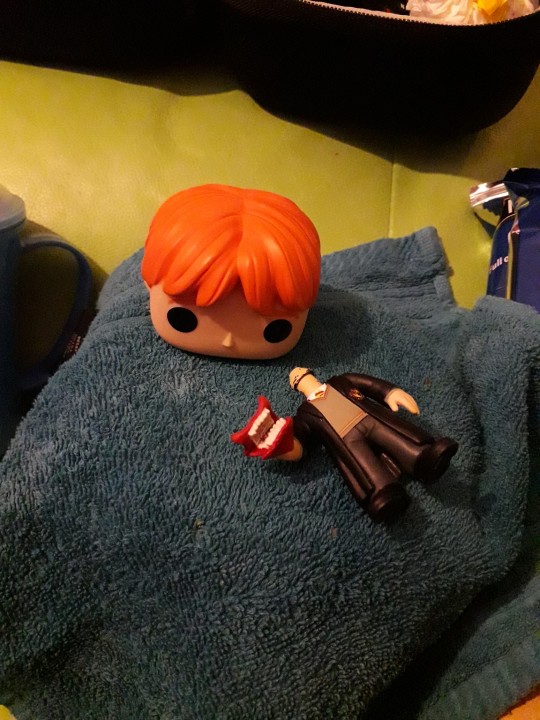
Sorry, Ron. I need your floppy hair. I do not need your clothes.
Or your boots. Or your motorcycle.
...😋
Step Two: Take the body of the Funko DIY and mark out the position of the tank top and the cuffs of the jeans. These will be used as guides for when you add the clay.
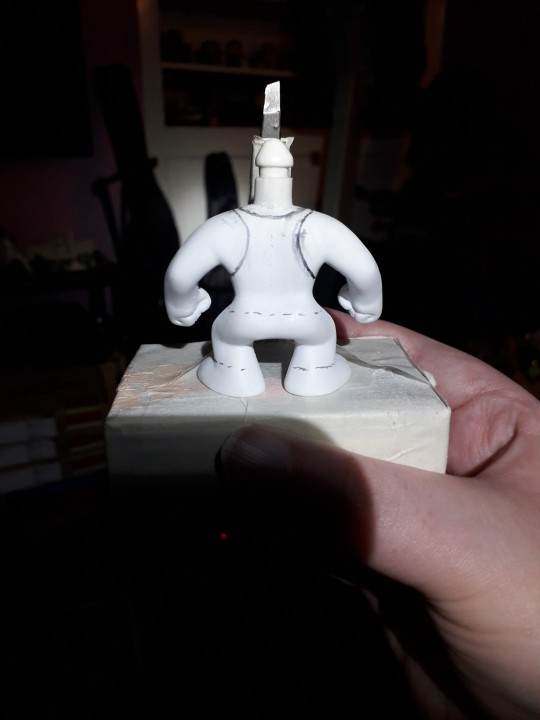
At this point I used a pin vice to drill the hole thru the fist for the rebar. If you're a crazy person you could use a rotary tool with an appropriately sized bit attached.
To make the rebar I fashioned a mould from a drinking straw and filled it with UV resin. Because I'm awkward. A wooden kebab skewer, or some hobbyist's styrene rod (eg. Evergreen Scale Models) would work just as well. Just cut it to size, paint it silver and you're golden. I used a metallic leafing pen. You use whatever you've got handy. Doesn't have to be shiny. A flat grey acrylic would work just fine.
Use jeweller's files and sandpaper to make small adjustments to the hand hole and rebar respectively in order to get a good press fit. There's always glue if you overdo it 😉. But don't add the rebar to the model just yet, as you're gonna need room to manoeuvre for the next bit.
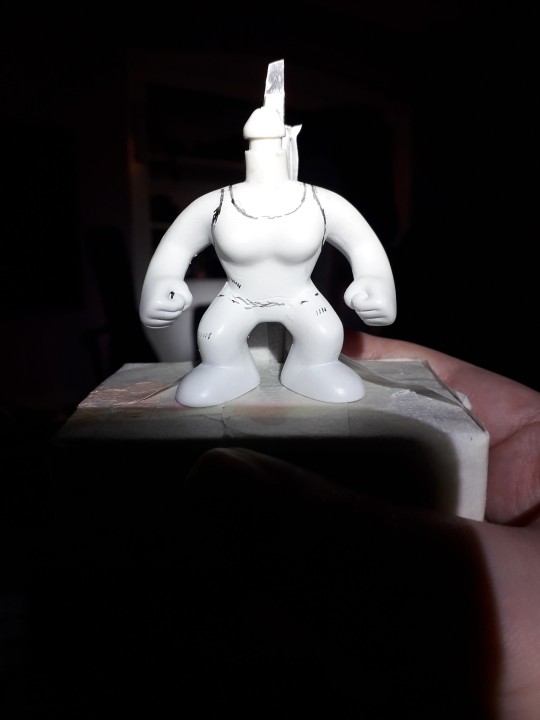
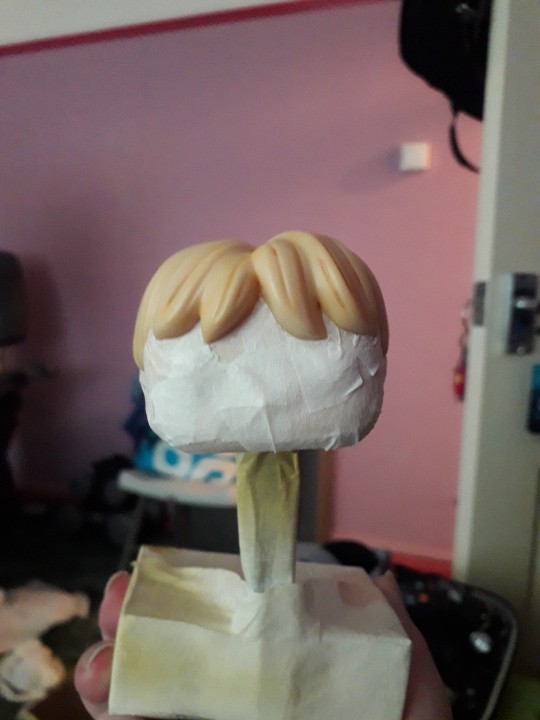
Step Three: How do you make it look like your figure is wearing clothes when you don't have much real estate to work with?
You fake it, that's how.
You do not need to model an entire set of clothes! It's an arse ache, and we're all about working smarter not harder on the RC channel.
So, take your modeling compound of choice, roll a chunk of it out to the desired thickness, and then cut into strips, say 2-3mm wide. Use your best judgement here.
Now, using the jeans as our example, wrap a strip around the bottom of the leg where the cuff would sit. Cut off any excess and blend out the join. Just give it a lil rub and it's like it was never there. Like magic! You should have a nice defined edge at the bottom, just above the foot. Now see the top edge of your lil clay strip? Well, you wanna start pushing and flattening the clay to blend the edge right out so it fades back into the body.
Repeat for the other leg, and the bottom of the tank top. The straps are relatively simple, tho the bits that pass under the arms can be fiddly due to lack of space. Use a hobby knife to shape and crisp up those edges and then blend out the extraneous edge. Same thing with the neckline.
Run a strip around each foot to form the soles of the boots, and a lil 'x' on the top of the feet to give the impression of laces.
For the rips in the clothing you can simply gouge out a little of the clay. If there isn't any on that part of the model (the knee for example) roll out a little wormy dealie (for you North of the Border fans 😉), position it as needed, blend out the edges, then gouge as required.
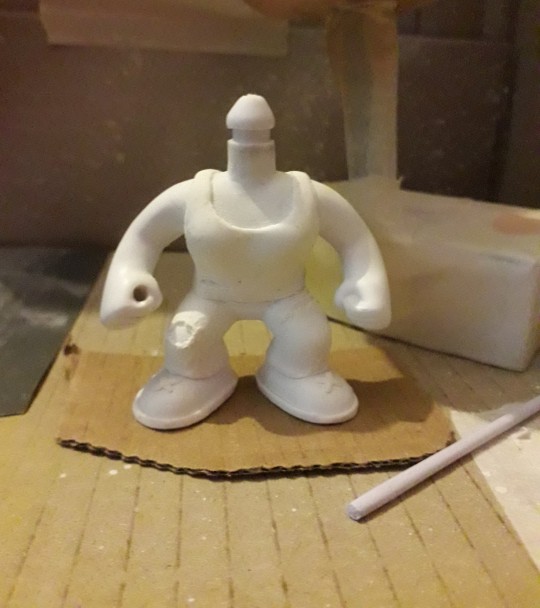
If you're playing on hardcore mode, this might be the time to start piling clay on the Funko DIY head and sculpting the hair. You may prefer to leave it til the head's re-attached tho. It depends on the material you're using. If you don't think it'll stand up to a bit of manhandling while pushing the head back onto the body, save this step til that bit's done.
Cure according to the clay manufacturer's instructions. The vinyl will not melt at the temperatures required to cure polymer clay, but if you don't wanna risk it or you don't wanna use your food oven to cook plastic, with all the gnarly fumes and stuff, I've given you plenty of air dry and/or non toxic alternatives. Consistent temperature is key with polymer clay. Undercooked, it's quite brittle. An oven thermometer comes in handy here if you've got one.
Step Four: Primetime!!! Some like to brush on primer, which is fine if you're painting a fence or throwing gesso on a canvas. Not so fine if you're painting a figurine imho. I mean, unless it's Cassandra from Doctor Who. A good rattle can of spray paint is what you want ideally, but again, it's about what you can afford/wangle/manage with your crafting space, so feel free to ignore me and brush away!
First rule of Primer Club: several light coats are better than one heavy coat. Second rule of Primer Club: knock each coat back a lil with sandpaper before applying the next one. Third rule of Primer Club: sit your rattle can in a warm water bath for five minutes before shaking it up to improve flow.
You can get primer specifically for plastics but while I would recommend it, it's not absolutely necessary.
A scavenged head may need masking off if the base colour already matches the skin colour of your character. Save yourself a bit of painting innit. You can get really tight, clean edges against the hairline with a hobby knife. If the hairstyle, hair colour, and skin colour match straight outta the box? Congrats! Why are you even reading this? 😜.
That thing in the background is a portable spray booth (that other thing is a turntable). A cardboard box is also a portable spray booth if you want it to be. Only thing it doesn't have is an extractor fan. So put on a dust mask, and open a window or work outside.
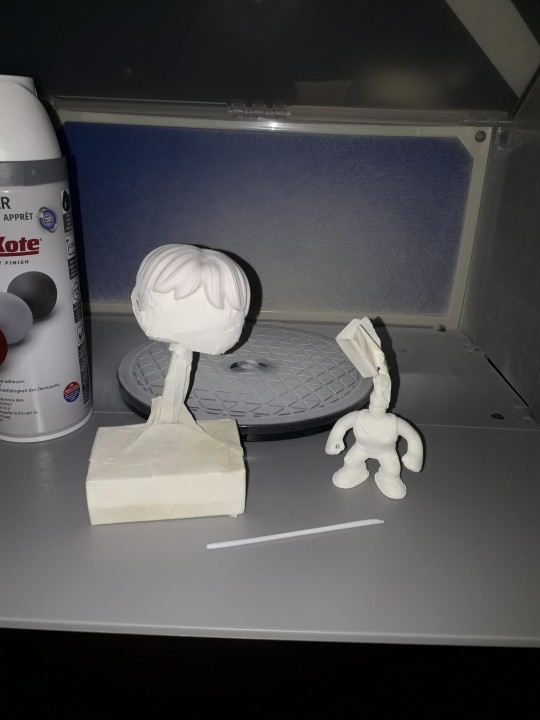
The DIY figure comes primed outta the box, so if you're using the DIY head and are planning on sculpting the hair after re-attachment you don't need to prime it. Unless you want to.
Step Five: Time to paint that shizz. You don't need me to walk you thru this bit, right?
Right?...
Masking is your friend if you don't trust your ability to freehand with a brush. If you're masking over a part you've already painted and are afraid of pulling the paint off, you can knock the level of tack on the tape down by sticking it to yourself (or your clothes) a couple of times before applying it. Some prefer to add a light layer of clear coat to 'lock in' the underlying paint. It's like a real life 'save point'. Some people do both. Some use masking fluid. Some use silly putty/blu-tac/plasticine. Play around, see what works. You do you.
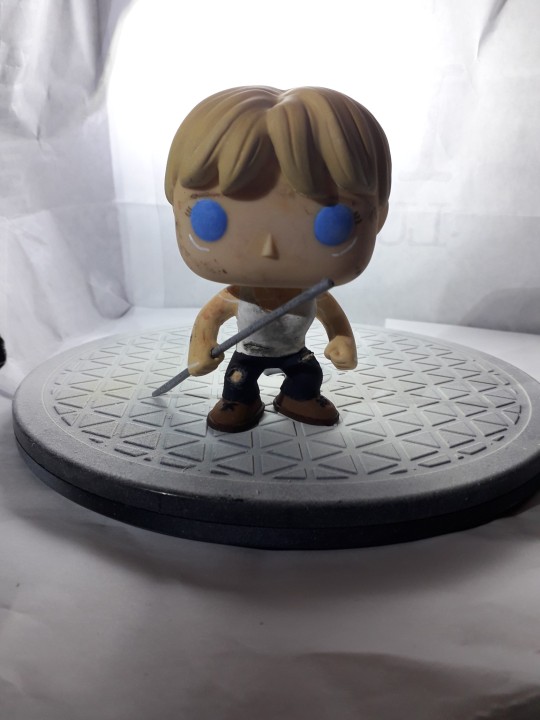
I painted Grace's eyes blue coz Grace is extra and so am I. I threw a lil bit of pearl powder in there to add a subtle shimmer, as I thought going full metallic blue might be a bit too extra.
Lady Funkos have eyelashes. Don't forget the eyelashes.
(I nearly forgot the eyelashes).
A fine tipped Posca pen comes in handy here if you've got one.
Ditto the eyebrows, tho those aren't just for the ladies obvs.
For Grace's augmentation scars, again I recommend a Posca pen but a brush will do.
DO NOT PAINT THE NECK POST. Don't even varnish the neck post. Keep that bitch masked up until you're ready to reattach the head. Like, you can get away with painting the very bottom if you're worried the bare plastic will show even with the head attached, but that's it. Any more will be making a rod for your own back.
You have a choice now. Whether to weather your figure. I chose to add that extra level of detail as it made sense to me. Use a combination of dark washes, dry brushing, and/or sponge stipling to add dirt, blood etc. If ya want.
When you're happy with your paint job, give everything (except the neck post!!!!) a couple of layers of clear coat.
Step Six: When it comes to reattaching the head you probably don't wanna be dunking anything in water by this point, just in case. So we're gonna soften the neck post (and around the base of the head if necessary) with hot air instead. Use a hairdryer if you don't have a heat gun. DO NOT use an industrial or decorator's heat gun for the love o' god. That shit's meant for stripping paint, not gently warming vinyl figurines. It'd be like using a nuke to shake a cherry tree, and you'd likely burn yourself. A hairdryer is more than capable of doing the job.
Why did we not use the hairdryer for Step One? To be honest there's nothing stopping you if that's what you wanna do, but as you don't have direct access to the bits that need softening at that point you will have to wait for the heat to penetrate. You could be doing other things in that time by letting a water bath do the work for you.
Now, however, you do have direct access, so you'll probably find you only need to blast the hot air for 10 seconds or so.
Step Seven: So, you've got the head re-attached, and your paint job is finished and clear coated. That means it's time to add the rebar. If you went a bit too far with the drilling or sanding now's the time to get your glue on. As an final extra touch you can spiral some thin jeweller's wire around the length of the rebar to make it look more rebar-y. I didn't do this bit as the wire I had in my possession at the time was too thick for my tastes.
But whether you opt for that or not, congratulations on making your very own Grace Funko Pop!
I'm still planning on making security guard and future war versions of Grace, and at least one version of Dani. Yeah, I've been saying that for the last two years, but it's still absolutely happening, trust me.
Anyway. That'll do it. If you have any questions, or you need further explanations or recommendations etc. y'all know where to find me.
8 notes
·
View notes
Last Seen Blogs
gorillaz-official-art
Art of all years
misssunflowersandsangria
You’re a Sunflower


nenuobodiistorike
Mokslintoja Ugnė

jhamilizaga
Lanabanana ♡