#i have to export as something else and convert it
Text
bmcblr sings: (apparently both versions of) more that survive
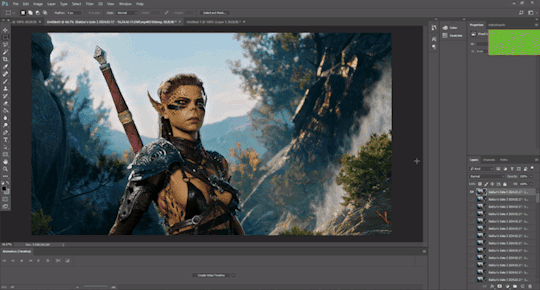
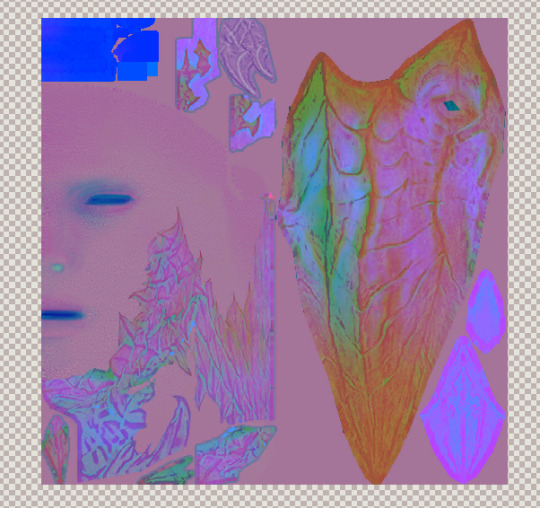
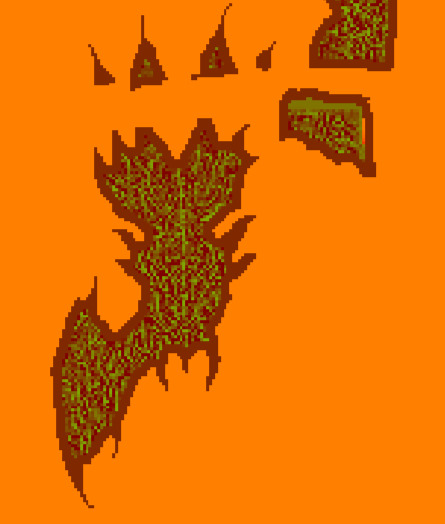
#y’all want crusty you GET crusty#WHO decided it was a good idea for me to try this i spent so long on it and it’s still shit quality#there’s nothing i can do about that but i spent 7 HOURS ON THIS#THIS IS NOT WORTH 7 HOURS#IM NOT EXPERIENCED ENOUGH FOR THINGS LIKE THESE#tbf most of that time i was just nitpicking#it looks a little better than the one before at least#and i’m lowkey pirating the editing software i’m using#idk if that’s the right word but#it’s supposed to cost money but i got a code like 2 years ago and i’ve been using it ever since#it’s so busted it doesn’t even let me export as mp4#i have to export as something else and convert it#bmcblr sings#i know for a FACT there’s gonna be more so i’m just gonna make the tag now#bmcblr remake#i GUESS
53 notes
·
View notes
Text
NEW SSO CONVERTED MANES CC FIND!!
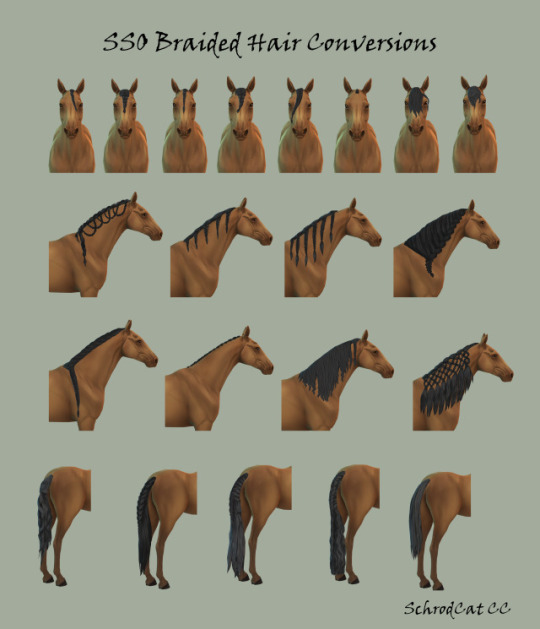
✨✨✨✨✨Created by SchrodCat CC on Patreon! ✨✨✨✨
Creators discription :
Some of these aren't braided but they came attached to braided things so I converted them, too.
PLEASE RECOLOR THESE. Seriously. I only did the base EA colors and even those I'm not happy with. The good thing is that all of these have a fairly logical map so making painted or ombre versions shouldn't be too difficult as far as placing it. I had to do 37 texture files 21 times and I cannot do any more of that or I will quit.
Yes, I will do more SSO hair conversions. However, because of the 700 texture files I did for these, I will be doing something else before getting to another set.
In this post:
Scalloped braid set (3): mane, forelock, tail
Chunky braid set (2): mane, forelock
Thin braid set (3): mane, forelock, tail
Running braid set v1 [Andalusian] (3): mane, forelock, tail
Running braid set v2 [Friesian] (3): mane, forelock, tail
Button braid (2): mane [standard builds], mane [heavy builds], forelock
Relaxed braid set (2): mane, forelock
Lattice braid set (2): mane, forelock
Shorter tail [non-braided]
Download files at bottom of this post!
Note 1: I'm using PureWinter's Better Horse Body which gives taller withers. Manes may not fit the exact same as seen in my images if using a different or no body mod. They should still follow general body morphs regardless of mod use (unless the body mod itself breaks morphs).
Note 2: The button braids have two versions because I prefer them to fit tight against the neck and Sims 4 hates that I like that, apparently. The standard version will completely disappear into the neck of a heavy built body so I made another version that will fit these heavy builds.
Because these use assets converted from other games it is very much not okay to lock any edits to them behind paywall or early access. This is not only against my TOU, but the TOUs that these came from. Conversions from other games have always been a gray area in modding and should myself or MM receive any request to remove them, we will comply. MM posted about this topic on her Tumblr/Tumblr and I align with her views. Additionally, a special thanks to MinervaMagicka for exporting the files.
link to page! ~ 🐎
#ts4cc#sims 4#sims 4 cc#ts4#simblr#ts4 horse ranch#sims 4 horse cc#horse cc#sims 4 horses#cas cc#ts4 horse cc
101 notes
·
View notes
Note
hi sorry if this has been asked before, but i've been looking on your faq page for aska regarding your gifs? especially how yo make them - I'd like to create some too but it's so complicated😅
i use photoshop (not paid for lmao i downloaded a version off here years ago from like. 2016) + kmplayer + if it's game gifs, i use nvidia shadowplay to record
i'll put this under a cut because of images/length
i open my footage in kmplayer, and use the frame extraction function over the timespan of the clip i want to gif. these are the settings for that:
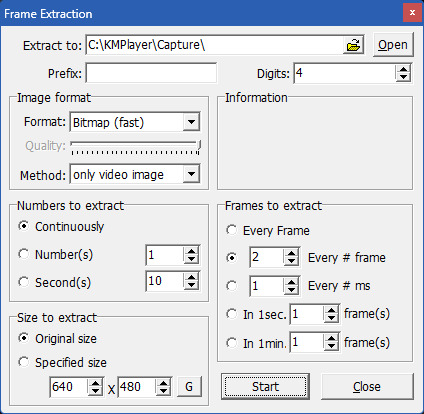
normally for games, i record in 60fps and extract every 2nd frame, but sometimes i extract every frame and scroll through to delete duplicates made from stuttering etc. for everything else like movies/tv, i extract every frame. normally, i try to go for around 100 frames, but you can have more or less depending on your final gif size, and also you can always trim your gif down when you're in photoshop, but more frames = longer import time
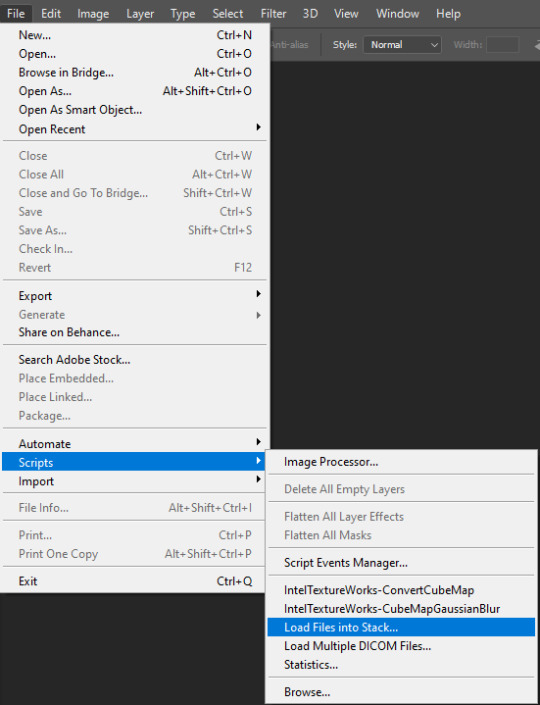
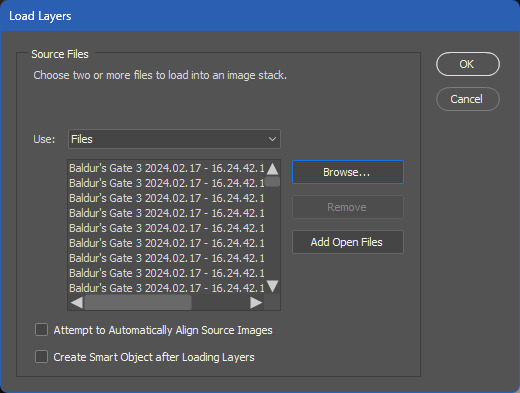
then in photoshop i go to file > scripts > load files into stack and select all the frames i want to go into the gif i'm making
for the method i use, you need a version of photoshop with timeline animation, and make sure the timeline i displayed (window > animation)
now the next part has a lot of little steps, but they're fairly easy to get the hang of once you've done it enough. it's basically muscle memory for me now but i still do sometimes do things in the wrong order lmfao
anyway. the steps are as follows:
click 'create video timeline'
click the 3 little boxes in the bottom left
in the right menu, choose 'make frames from layers'
when thats loaded, open the menu again and choose 'reverse frames'
click the last frame and change from 5 seconds to no delay
make sure you choose 'forever' instead of 'once' in the bottom left
select all frames (you can select the last one, then scroll back to the first and shift click to select them all, or just click 'select all' in the menu, i'm just used to doing it the first way for some reason lmao)
in the right menu, choose 'convert to timeline'
then select all the layers (can use shift click again)
and finally go to filter > convert for smart filters
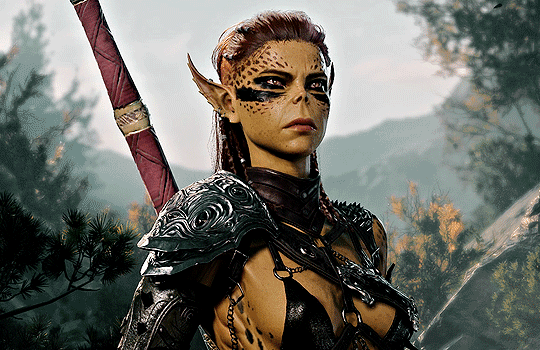
here's a very small shitty gif of the process for a visual aid (a gif of a gifmaking guide... wow)
now you have a gif, basically! but you still need to resize and sharpen and edit, etc. i've posted about some of the things i do before but not really in detail because i mess around every time and don't always do the same things. and you don't have to do much! just do whatever looks good to you :')
tumblr's gif dimensions are 540px width for wide gifs, 268px width for two small gifs, and three small gifs are 177px for the two outer gifs, 176px for the middle one (don't ask me why they did that)
once you're done with that, you can export the gif by going to file > export > save for web (legacy). these are usually my settings:
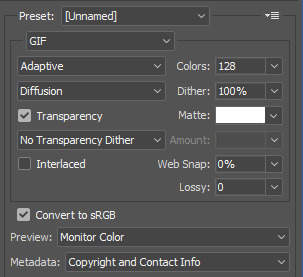
but i might change the colors to 264 if it's a smaller gif, or even to 64 if there are less colours and i can get away with it. for example in these gifs, i only used 64 colours since they were pretty brown/monochrome anyway, but something a lot more colourful would look terrible with 64 colours
the gif needs to be max 9.99MB, but if it goes over, you can always adjust it in the next step. once it's exported, i open it again
select all the frames and click the little arrow on one of the frames, then change the timing. i almost always use 0.05, but you can experiment with what you like the look of
then if the gif's over 9.99mb i just delete frames from the beginning and/or end until it's under the limit. then export it the same way as before (overwrite the old one or save it as a new file if you like) and you're done!
#ask#gif tutorial#kinda. i suck at explanations so maybe this isnt the best LOL#if you need me to clarify anything pls lmk! i always wanna help people learn new stuff if i can
15 notes
·
View notes
Text
GUESS WHAT!!! a tutorial for rayman origins texture mods like how i made uglette

this is for origins only for now, ill make a separate post for legends later (but itd follow most of the same steps)
first of all. use rayman control panel, if you dont have it somehow then what are you waiting for?? make sure its updated to the latest update too (14.0.0.9 as of writing this) for improved modding support
updated on january 10 2024 for the dds portion
-
step 1: getting the textures
in control panel, click origins and then open the archive explorer

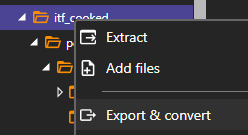
youll get a whole directory of a bunch of folders, what you need for the textures is just the itf_cooked folder. if you want all the textures just right click the folder, click export & convert, and convert them to png or something for convenience
if you converted all the images and dont need any things that arent images, just use windows search on the extracted folder to prune all the remaining .ckd files to save on space, but this isnt as necessary
you can also extract just the sprites you want to work with, or heck get them from spriters resource if you want, but still keep control panel in mind as you need the original directory of the files
if you want to replace the playable characters, their textures are are in the following folders
rayman sprites:
itf_cooked/pc/actor/playablecharacter/rayman/animation
globox sprites (you will also need mosquito sprites for him):
itf_cooked/pc/actor/playablecharacter/globox/animation
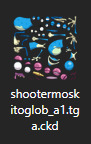
itf_cooked/pc/world/common/shooter/playablecharacter/shootermoskitoglob/animation
teensy sprites:
itf_cooked/pc/world/1_jungleworld/friendly/teensy/animation
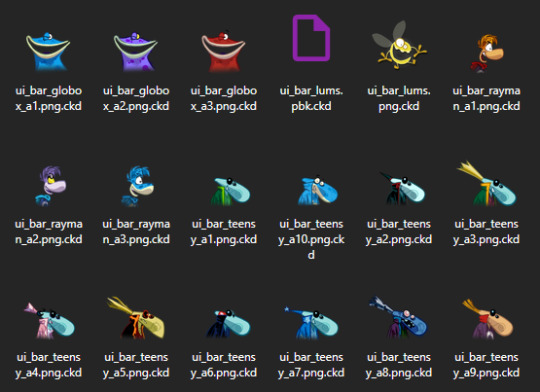
ui icons for everyone:
itf_cooked/pc/world/common/ui/ui_bar
-
step 2: the art itself
once you have the original textures all you need to do is to edit them, or redraw them. this may be a tedious process though! what i did is painstakingly edit each original spritesheet to be 2x size, then aliased to put it into a format that i can easily work with and edit, i mostly did so with a whole bunch of magic wand usage and tweaks
i did finish all the templates for all playable characters, i will see if i can release them somehow eventually? but yeah for now figure out your own way to edit them for now
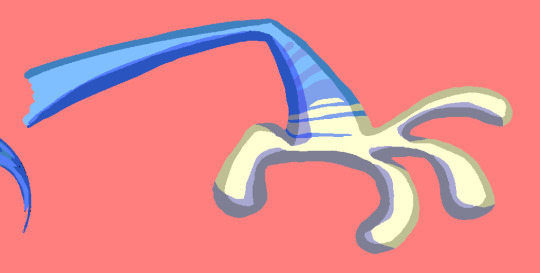
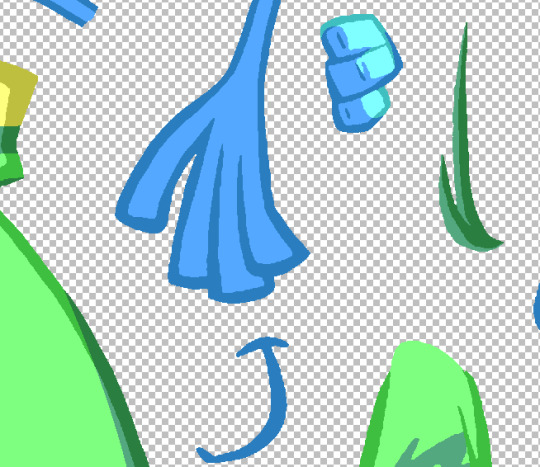
either way you can figure out some way to draw new art for them. save it in a folder separate from all the other assets obviously. here for example i made a more rayman 3-like grand mimimus. i also frankensteined an icon together

-
step 3: dds things
now that youve done the textures for the mod, duplicate them and save them as .dds files
this isnt necessary, as larger resolutions will also work (probably as long as the dimensions are still a power of 2), but you can resize the textures to the original resolution as well. i will be doing that personally
if you dont have a program that supports dds files, i just use paint.net. i provide a save configuration for it specifically, you can get it here if you need
this is updated!!! after much experimenting this one looks the best to me. the most important settings are outlined in orange, but try to match the rest too
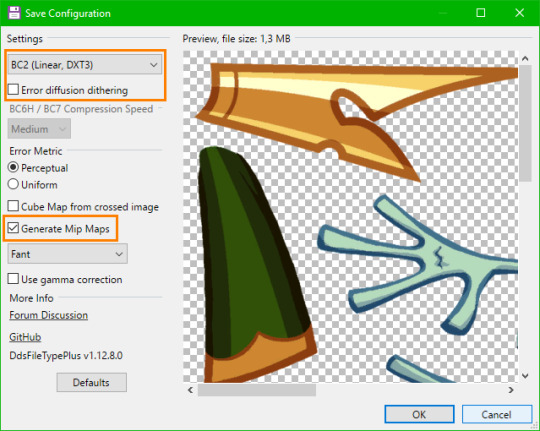
make sure you have generate mipmaps on specifically or else the sprite will end up pixelly

however some additional, more jpeg-y crust will be applied onto the sprite from the mipmaps themselves. so heres the technical part thats probably complicated... if you dont wanna bother with this try to copy the rest of my save configuration, i think it works the best here
i experimented a bit with what looked best and picked fant with no gamma correction, but you can try saving multiple dds files with different settings, viewing them with whatever lets you view the mipmaps themselves (windows image viewer does) and just picking which looks better at a smaller scale
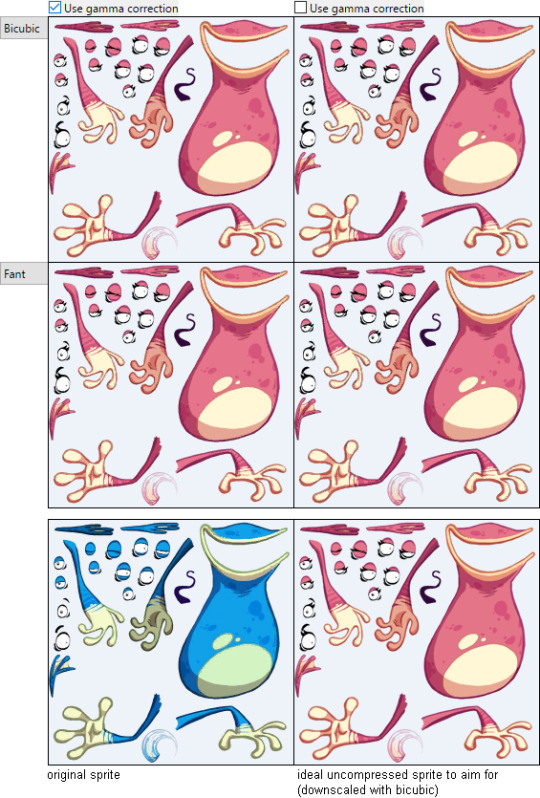
(to see the differences look closely at the eyes specifically, its probably hard without overlaying these one over another and directly comparing though)
one thing i can say is bicubic and fant are definitely the best for matching the original sprites' mipmaps, as theyre not too blurry (like bicubic smooth or bilinear) while remaining fairly good looking
these are the original dds files' settings as viewed in dxt viewer. most of this doesnt seem to be applicable for the save settings but the compressed format is specifically dxt3 (which is also present in its header if you view it in hxd), so for the first save setting you probably have to pick BC2 (Linear, DXT3) as i have
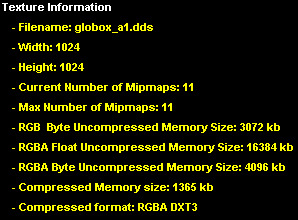
TLDR: i know this is complicated, try to just copy the dds save configuration from the start of this step i guess???
-
step 4: renaming things
once you have done that, the weird thing you need to do is to rename the .dds into files that the game can actually read (even though theyre still dds files, and can be renamed back to .dds for them to function). for convenience you can just duplicate the files again
pay attention to the original file formats which you can see in control panel! as you can see, you should rename the majority of the extensions from .dds to .tga.ckd
windows will stop recognizing them, likely the same for the programs you use, but that shouldnt be a big deal. if you want, you can rename them back to .dds to make them usable
the important part here, dont miss it!!! is that all the ui icons are not tga.ckd, but png.ckd!!! even though theyre actually still dds files under the surface. just rename them correctly and pay attention to the right extension, or else the icon wont work
obviously make sure they have the same filename in general ALONGSIDE the extension
-
step 5: actually making the mod
now that you have the relevant files, click create mod in control panel

select the files module, and then make and select a folder to use as the mod folder, which should give you this result
the files folder should have these two

you should create a GameData folder in added_files, after which the entire regular filepath follows, starting from bundle_PC.ipk, then itf_cooked, then so on. for example, these are (nearly) the full directories of my files
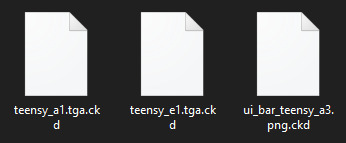
\mod\files\added_files\GameData\bundle_PC.ipk\itf_cooked\pc\world\1_jungleworld\friendly\teensy\animation\teensy_a1.tga.ckd
\mod\files\added_files\GameData\bundle_PC.ipk\itf_cooked\pc\world\1_jungleworld\friendly\teensy\animation\teensy_e1.tga.ckd
\mod\files\added_files\GameData\bundle_PC.ipk\itf_cooked\pc\world\common\ui\ui_bar\ui_bar_teensy_a3.png.ckd
obviously all the textures should have the same filename and the same file path as the textures theyre replacing
then go back to the base mod folder and edit the metadata.jsonc file in something like notepad++. the file itself has commented-in extensive instructions so just follow them
as the mod creator thingy says you can also optionally create a thumbnail
anyway once youve done all of that, select all the files in your mod folder and zip them. you cant just select the folder WITH the mod things and then zip that, as then control panel wont read it because the base of the zip directory doesnt have the metadata file

-
step 6: finally implementing the mod!!!
now that you have the zip ready, click the mod loader and select this in the lower left corner

navigate to your zip and select it. it should appear here under installed mods

make sure you press the checkmark to the left of it and then press the apply button in the lower right

after a short wait for the mods to apply you can go turn on the game and test it

and it should hopefully work !
also yeah ill release the minimus soon enough on gamebanana

if you want to make any further edits to the textures, youd have to resave them as .dds files again, and rename them to tga.ckd/png.ckd and such, then just replace them in the mod's directory (or add new files to it) and just zip it again. its fairly easy to work with i hope
this is overall kind of a complicated tutorial but its not too bad once you get the hang of it
20 notes
·
View notes
Text
SO i've been digging around in the benchmark files with xiv data explorer...
...and with my middling knowledge of how XIV's current texture types work, i've noticed some differences in how texture channels have worked and what data is stored where. i haven't figured out what EVERYTHING'S for yet and if you think you have an idea or any corrections, pls feel free to lmk. could help with figuring out 7.0 modding quicker! this is also decent info for figuring out what old mods can be repurposed for 7.0 graphics.
also content warning for unwrapped face textures under the cut, i know those can look kind of spooky if you arent used to 'em lol
starting off, i didn't source this info but chirp (known plugin dev) on twitter talked about finding about fifty six new bones in the facial armature specifically. this means things like sculpts will probably be unusable unless they are manually re-rigged with each one of those fifty six new bones, or else they wont animate properly.
the default UV maps for the face specifically have changed, too, and many of the uses of the old normal and multi channels have been changed or moved to a different texture. NOTE that these examples were found from au ra textures, male specifically, and the channels may or may not have different uses on non-scaled races!
old vs new multi map. i'm fairly certain every channel here has been repurposed: for example, blue used to be for lipstick, now it seems to be for something else. so where'd the lipstick area data go? well:
it's been moved to the alpha channel on the normal map (these are both the new one). additionally, it seems like the blue channel on the normal map has been changed to signify the difference between skin and non-skin or something of the like.

(old vs new) similarly, even though the body seems to use the same UV layout with a redefined normal map, the blue channel here also seems to indicate skin vs non-skin. but the blue channel used to be for transparency (iirc?), so where is that data stored now?
the transparency data seems to have been moved to the alpha channel of the diffuse now. this image is part of the new face diffuse.
like the face multi map, the body multi map seems to actually use the blue channel now (and looks SO much cleaner, wow!). old vs new.
so what do these changes mean for our current mods?
-due to changed UVs, existing makeups will not be usable with the new faces UNLESS someone goes through the effort of taking the old sculpt (vanilla or otherwise) and weight paints ALL the new face bones to them, or somehow adjusts the UV mapping on the new sculpt to match the old one. i don't work with sculpts so i'm not sure how feasible either of these are
-existing body tattoo mods that only affect the diffuse should theoretically still work fine, as the UVs have not been changed on the body. body scale mods that are just recolors should work fine as well, but matching face scale mods will have to be redone for the new UVs.
-however, if it's a scale mod like dragonborn that changes the placement of the scales and therefore the normal and multi maps, those will have to be adjusted to match with the 7.0 channel uses.
assuming there are no major changes to how this data is stored between now and the releases of dawntrail, you could theoretically begin working now on your own texture mods ready for whenever we get access to 7.0 modding tools. i was able to access these files (and many others) by using XIV data explorer, a program that lets you view and export (but not import!) data directly from specific XIV data indexes.
if you also want to rip textures, the index storing them, alongside skeletons and animations, is 04000.win32.index2. hit ctrl+shift+e to export individual files to a .tex format and then run them through penumbra to convert them into .dds for normals + multis or .png for diffuses for editing. i'm fairly certain that 95% of the pathings will be exactly the same as what penumbra and textools gives us now, so there shouldn't be much need to find entirely new paths.
again, if anyone sees any differences in other races for texture uses or figures out the uses for new channels, PLEASE let me know bc the sooner we get all this figured out the better! i have only been modding for a few years and don't know everything about how every texture works so i'm open to corrections.
#ffxiv modding#ffxiv mods#i just wanted other mod makers to know beforehand so id like to spread this info if possible#finding public modding resources can be a bitch! if i can make things easier i will try
9 notes
·
View notes
Text
How to make regular TS4 clothing compatible with digitigrade legs: PART 1
This tutorial assumes you're converting for my digitigrade leg mesh used in my satyr legs and werewolf override, but it should also apply to any other funky-shaped legs you might want to do this with. Useful either if you want your digitigrade sim to be able to wear a piece of vanilla maxis clothing, or for converting cc (please get permission from the creator where applicable before doing so, especially if they make their own meshes).
I'll do my best to make this tutorial accessible to relative beginners, but I'm assuming that you already have some basic blender knowledge. If you don't, there are a lot of good tutorials that explain its clusterfuck of an interface better than I could, so I recommend finding a few of those and familiarizing yourself with the software before you continue.
You'll need Sims 4 Studio, blender, and potentially an image editor like gimp or CSP (anything that can handle transparency) depending on the clothing.
This first part will cover shorts and anything else that ends above the knee (along with some extra s4s stuff like category settings and CAS thumbnails that I do to make them look better and behave properly in-game); next section will cover long loose pants which is a somewhat different process, as well as cuffed pants, skintight leggings, and other things that might require some heavier editing and altering of the shadow map, UV, and textures.
Getting Started
Digitigrade base meshes are available for download here. Please don't reupload them unaltered, and I highly recommend not changing the edited part of the leg mesh (knees down, basically), or it may mess up their ability to match up seamlessly with other digitigrade leg parts. The most effective way to use them is to append them to the project you're working on and frankenstein them onto your mesh as needed rather than modifying the blend files themselves, especially if you're making WW parts since these don't include Turbodriver's rig.
Mesh Editing For Shorts
Shorts, miniskirts, and anything else that ends above the knee are great because you don't need to do much, if any, actual sculpting, and once you know how it's relatively quick to do.
To start, export the mesh for the shorts you want to convert the same way you did the legs, all LODs. If you're converting cc, it's possible the original creator won't have made proper LODs (some don't because it's incredibly tedious, but it's good practice and improves visuals and performance in-game), and if that's the case you might want to make some LODs, but I won't tell you how to live your life.
For this, I'll be using these base game vanilla shorts, since I need to convert them anyway. Because when I think of satyrs, obviously I think of khaki shorts.

Yeah.
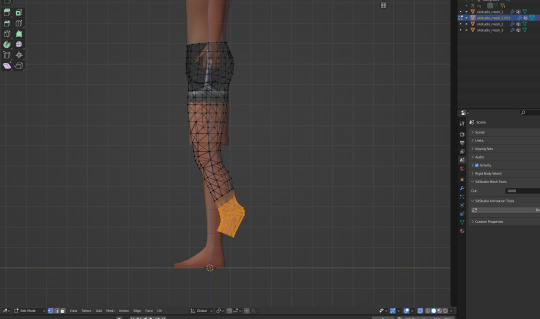
Append the digitigrade leg mesh via File>Append. navigate to where you put the legs, pick the mesh you want (make sure the one you're importing is the same LOD and frame as the mesh you're altering), select the object folder, and import s4studio_mesh_1.
You'll end up with a situation that looks something like this. Do not be alarmed.

I don't know why it imports these things along with the mesh (there's a non-zero chance someone will yell at me for doing it wrong and it's not supposed to be like that) but in my experience you don't need any of it, so deselect the mesh and delete everything else that imported.
At this point, to make things easier on yourself, you'll want to hit numpad 3 for orthographic side view, set viewport shading to solid, and hit alt+Z to toggle x-ray view.
Take note of how many objects make up your mesh. For most maxis shorts (and probably a lot of cc ones) there are three that divide up the legs, and it's important that you maintain that number and don't remove/replace any of them, otherwise the mesh will be broken once you import it to S4S. It's finicky like that.
Select the digitigrade legs and go into edit mode, then select everything up to here:
Separate this bit into a new object (P>Selection), then go back to object mode. Select the separated lower leg bit you just made, then select the lowest piece of the vanilla leg (select them IN THAT ORDER, very important), and hit ctrl+J to join them into one object. Go to edit mode for the newly joined leg bits, and delete the vanilla part, leaving only the lower piece of the digitigrade leg. If you've done everything right up to now, your mesh list will still look like this.
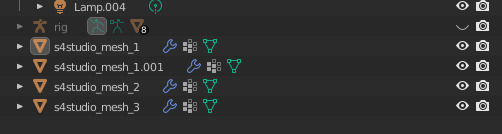
or whatever it looked like when you started, plus the one appended mesh.
Now go back to the main digitigrade mesh and select up to here:

separate it and repeat the process you just did, replacing the next leg segment up.
Now go into the topmost part of the vanilla shorts, and select only the leg part and delete it (it's almost always detached from the shorts in vanilla clothes and very easy to select, but with cc this might be a mixed bag and could take more time/effort to do). At this point you should have only the digitigrade leg and the shorts themselves.
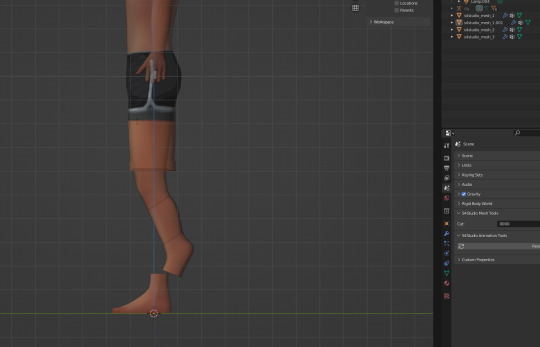
You now want to go back to the uppermost section of the digitigrade mesh and delete most of the top part of it, trimming it down so that the leg ends just inside the shorts.
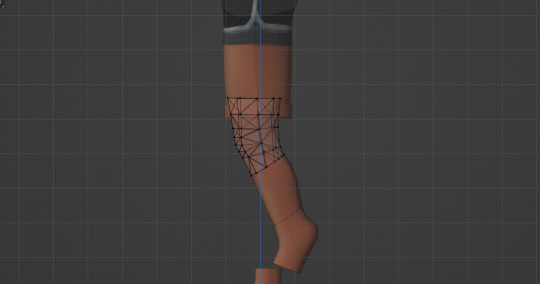
For a lot of shorts and skirts, especially shorter ones, this is all you'll have to do, but in this case I'm going to move those very top/front vertices back a tiny bit, just to make sure there won't be any clipping during animations. I also like to switch viewport shading back to material preview mode at this point to make it easier to see if there are any bits poking through that shouldn't be.

At this point you join the upper legs and shorts like you did with the other two segments (again selecting the digitigrade mesh first and the vanilla shorts second) and by the end your objects list should be back to this:

Now you're done, you can save and import to S4S. the digitigrade legs are already weight painted and have their UVs set up and everything so you don't need to do anything more to them, they'll just work, and as long as you don't edit the mesh or uvs they should blend seamlessly with the goat hooves and/or werewolf paws just like the naked leg.
Now do the same thing for the other three LODs. Maybe while singing a sea shanty to stave off the tedium (personally I like listening to podcasts while I do batches of these, it's kind of like knitting for people who love eye strain take breaks from your computer, kids).
S4S Categories/Thumbnails
The three main things you want to do with any digitigrade conversion are disable it for random, restrict opposite frame, and uncheck all occults. That should prevent any broken leg situations. Don't forget to apply to all swatches (I say this because I forget about 30% of the time and end up having to go back and fix it).
At this point, you don't have to do anything more. The clothes will function as they should in-game. If you want nicer looking thumbnails though, and you have the digitigrade werewolves override, there's one more thing I like to do.
Make sure all the thumbnails are blank and check only the werewolf occult in the categories tab, then save and load up the game. Find the clothing you just made in CAS (it will probably show up by default on werewolves of whichever gender you made it for) and cycle through all the swatches to generate new thumbnails that look like this:
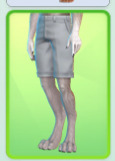
instead of this:
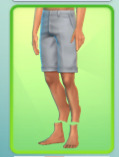
Once all the thumbnails are generated, exit the game and export them all (if some of them appear blank, restart S4S and they'll usually show up), uncheck the werewolf occult, clear the thumbnails again, and re-import the werewolf ones. This ensures they won't randomly switch back to the human ones. And it's way faster and easier than making your own custom thumbnails with screenshots and cropping/editing, which is important if you're doing a large amount of these things.
And voilà, you've got your own digitigrade-compatible clothes. I'll be updating the tutorials as needed for clarity/any information I forgot to include, so please message me if something doesn't make sense or I need to go into more detail on something, and I'll edit it with more/better info. I also entirely learned this through trial and error, so if there's a better way to do any of it that you happen to know, tell me that too, this is just the best way I've worked out to do it.
40 notes
·
View notes
Text
Pachislot slight update
Just a SMALL update, I wouldn't even call it one.
I re-uploaded the extracted sounds to mega, since others had issues with the other host.
https://mega.nz/file/lndgAZhb#fHPLSrXkGLlRzl8nqfdNaoOJ6pZxkGi6HyAL09bOohQ
Also, we've got videos, but without sound. Studying the Criware sofdec2 documentation is helping though, as extracting the videos themselves does not work on any of the currently available open-source Criware ".usm" file exporters/converters because regardless of any settings they simply spit out a corrupt video file, so there's another thing that needs to be worked on, but it IS being worked on. The included video is just a random, short one that I picked.
/* Rant start, you can ignore this it's not important
Finding documentation on this COMPLETELY FUCKED middleware is a god damn pain, you have HUNDREDS of versions spread throughout DOZENS of games MAYBE MORE, all with their own special edits to the file formats either by criware themselves or bythe developers that either are or aren't documented, so sometimes you have a file with a major and minor version as your file, but OH WAIT they're not compatible because someone decided to edit something without even documenting it.
The list of game extraction tools I've had to look at and analyze so far is
-A BUNCH of PS Vita games
-A BUNCH of PSP games
-Several Danganronpa games
-Several PERSONA games
-SONIC FORCES?
-A fucking Pro Evolution Soccer game
-A FUCKING JOJO'S BIZZARE ADVENTURE GAME?
I hate this, good fucking god just DOCUMENT your things properly PLEASE.
I now know what it feels like when someone else peruses through my code which I barely leave comments on because I think "oh people will just get it".
Is this Karma in some way, shape or form? Probably.
Rant end
*/
16 notes
·
View notes
Note
Thank you for sharing how you did the head sculpt! If youd be able to go into more detail I'd truly appreciate it!
Started typing and then before I knew it tips turned into a tutorial so I reformatted the whole thing into a loose step-by-step of how to make them.
This is a tutorial on how to add details to heads like Isahla's neck detail, so not quite how to make everything from scratch but 90% of it at least.
This tutorial will teach you how to bake details on to a head's normal map. I'm using a scar in this tutorial as an example but you can paint any details you like this way. The things to be aware of are:
this tutorial assumes you've got some basic knowledge of Blender and sculpting in Blender. It also assumes you know how to navigate tools like Photoshop or GIMP.
this tutorial won't explain how to make diffuse/other maps match the normal map. That's kind of a whole separate thing with a lot of different methods that can go with or against this one.
this tutorial can be applied to the body as well as the head.
this tutorial won't explain how to blend details across seams (wrist, neck, ankles).
this tutorial can't be applied to… mostly everything else. Skyrim normal maps are special like that, and that's why I love 'em.
And so I don't overwhelm you before going in, here's a quick rundown of the entire process:
We're taking the player's head and preparing it for sculpting. We'll sculpt in the details we want. Then we bake out that sculpted detail into a normal map. Then we edit the player's existing normal map to include the new detail. And that's all.
Also, everything can be done with freeware so you have no excuses. Let's go.
1 Preparing the head.
Exporting your character's head from the game isn't always necessary, but it is encouraged. The closer the head in Blender is to the shape of the head in the game, the more accurate your details will be to their head shape. If you don't wish to use a specific head, feel free to use any other head you like, whether thats the vanilla head, High Poly Head, ECE's head, etc. There is a difference between these heads that should be noted, typically in the UV space, but for individual cases it's not too important.
Exporting is done with RaceMenu, and the resulting nif file can be imported into Blender using the PyNifly plugin available here. If you struggle with this plugin, converting the nif file to another format through Outfit Studio is also possible.
When the head is in Blender, remove any clutter. We don't need anything except the head model for this so we can remove scar and eyebrow masks, eyes, hair, and so on. Now, duplicate the head model so you have two copies of the same head, and for clarity, label your heads low and high poly. I'll be distinguishing between my heads with a _low/_high suffix. We don't need the low poly for now so you can hide it. Your scene should look something like this:

I'm going to sidebar a little bit here to mention that there are two ways to prepare the head for sculpting. One is by "cleaning" the model which I've detailed below. Another (and the method I prefer) is to use Blender's Human Base Meshes bundle (available here) and just scaling and contorting the sculpt-ready model they have to the shape of your character's head. If you feel confident doing that unguided, skip the rest of this step.
Right-click the model and choose Shade Smooth. Enter into edit mode, tap 1 to enter vertex selection, A to highlight everything, and M to merge vertices (choose By Distance). The distance will need to be tweaked depending on the scale the model was imported at but you'll want to merge enough that model isn't splitting when you sculpt later. It should look indistinguishable from before, but there should be no aggressive seam lines like on the back of the head.
In Edit mode, go into Edge selection and Alt-Left Click the border of the neck. Alt-F to Fill. Get inside the head and repeat the process for the back of the lips like you see below.
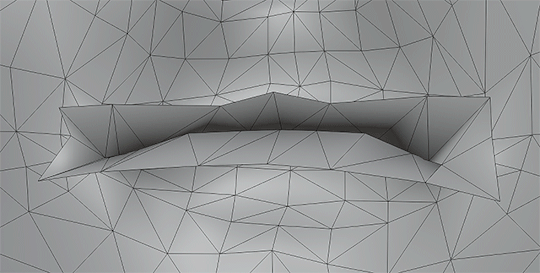
The head should now be prepared for sculpting. You can verify this by attempting to Remesh it, and if it bugs out, there's probably a hole somewhere.
2 Sculpting the head.
This guide isn't going to have a tutorial for sculpting in it as there's plenty online. The techniques you use are up to you. Personally, I'm a large-detail-to-fine-detail kind of person. That said, Dyntopo is far more intuitive and was how I made Isahla's neck details way back when. You do not need to sculpt every detail on the head although there's nothing stopping you; just do your best to keep the head as close to its original shape as possible. Also, if you have a computer that's struggling with higher poly counts—you can absolutely remove entire parts of the model that you aren't going to use later.
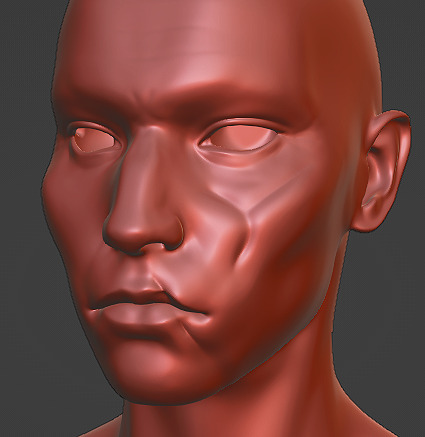
For this example, I've haphazardly cut two scars into a head I had previously sculpted for a different mod. Again, you do not have to sculpt the entire head.
3 Baking.
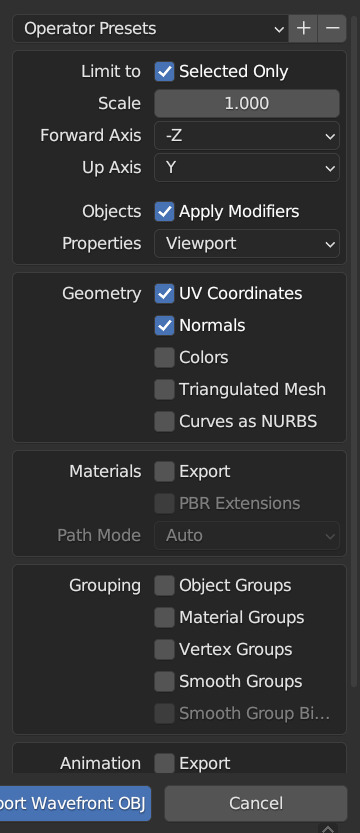
Once you're done, you'll need to export the two heads as .obj files. Remember to name them in a way that you can recognise them as either high or low poly. You can see my export settings below. You may need to tweak these depending on how the bake goes.
For baking, I'll be using xNormal (available here). It's the shadiest looking site on the modern web but it is what it is. Feel free to use another if you find yourself with a better alternative. If you aren't familiar with baking or what it is, it's a process where we take all the detail from the sculpt, compare it with the low poly in a software like xNormal, and it outputs a texture that can be used to mimic the sculpt's detail.
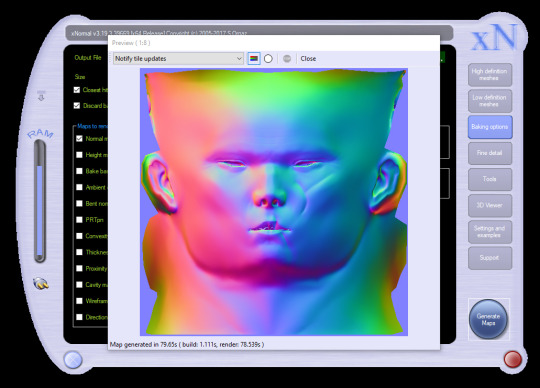
In xNormal, click 'High definition meshes' in the top-right. Right-click, 'Add meshes'. Locate your high poly obj file and select it. Repeat the same steps for the 'Low definition meshes' tab, then move on to the 'Baking options' tab.
In 'Baking options', start by defining a location for the output texture in the 'Output File' field. Name it whatever you like--it'll automatically slap a "_normals" suffix on the end. Bitmap is fine but it's up to you.
Set the size to the same size as the normal map you're currently using. For most skin textures these days, your normal map will be 4096x4096.
Under 'Maps to render' is a large list of maps you can output but for this we want to only have Normal map checked. Click the three dots beside it. Change the settings to match what I have below.

These changes are important because Skyrim bodies use model space normal maps instead of tangent space, and their world Z direction is inverted. Just don't ask me why. You can now 'Generate Maps' in the lower-right. This process can take a little while and if done correctly, the resulting window should look something like this:
If it's looking like a complete mess and nothing like this, I'm sorry to say you may have a bit of troubleshooting to do. Make sure both meshes are set to use exported normals, and make sure your normals are oriented properly in Blender (see guides on face orientation). It may also help to choose the triangulate option on the high poly model on export.
If yours looks mostly the same but maybe the colours are in different orientations, you can try inverting the "swizzle coordinates" and regenerate the map or invert the colour channels in Photoshop/GIMP. You want Red on the left, Green on the top, Blue at the front.
If yours has all sorts of odd marks around the lips, eyes and ears like mine, that's to be expected. Fixing those spots is outside of the scope of this tutorial.
4 Finishing the texture.
For this next step, I'll be using Photoshop. Feel free to use GIMP or Paint.NET, even. You should be able to follow along mostly fine. If you have never edited Skyrim textures before, this may be difficult to follow, and it's not really the space for a tutorial on it. So, I'll quickly address the following:
GIMP 2.10.10+ should have DDS support already.
Paint.NET has DDS support already.
Photoshop requires a plugin. There are two. Hell, I think there's three. I don't know why. I'm using Intel's plugin available here.
If for whatever reason things aren't working out in one program, you can always switch to one of the others.
LE users should export their normal maps uncompressed.
SE users should export theirs at BC7 (Fast, Linear with Intel but don't quote me on that).
I don't know if any of the non-Photoshop ones support BC7 compression or not. If it doesn't, go uncompressed.
First, load your character's current normal map into the program. Then load your new normal map you got from xNormal into the program on top of the first. Name the two layers however you like, or don't, but for clarity's sake, I'll be referring to the original map as Base and the new map as Scar.
Attach a layer mask to Scar (if you aren't familiar with layer masks and how they work, pause now, look it up. Super simple; very useful.) and start to subtract all the stuff that you don't need. You should see the Base layer showing up behind it, filling in all the areas you're erasing.

You'll notice very quickly that the Scar layer will be much smoother than the Base layer, and probably has some differences in hue. Use a really soft brush if you need to blend out the skin. Minor differences in colour value go a LONG way here, so if you see noticeable lines or contours where your new map meets the old one, those will also show up in the game. Do your best to eliminate them if you can. Also, don't be afraid to erase some of the details you're trying to add. Making sure it blends in is the key.

Here's a gif showing the texture I started with, and how it looks with the scar. Note that other than the scar itself, there's nothing new that's been added to the image. This is to keep things as consistent with the original work as possible.
When that's done, you can export it as a .dds file. Make sure not to export with the Alpha channel, as it's unused and will add significantly to the size of the file.
Aaaaand, finally, that's it. Sort of. There's still a lot more you can do but it's all easy tweaking from here on.
Here's how mine turned out:

Even without changes to the diffuse or specular maps, the depth still stands out a lot and if you're willing to keep going and adding details to all three maps, you can really make it stand out.
#asks#skyrim#sorry for the delay in the response btw i came down with something over the weekend and im just coming back now#looking over this whole thing now is honestly really embarrassing#ill be looking over it again and again before bed#but im sure the right people will want it#if thats you then you're welcome <3#skyrim mods#skyrim modding#tutorial#i have a tutorial tag now ig#artsick
6 notes
·
View notes
Text
HELLO FRIENDS today i am going to teach you how to make your own custom enstars text tone!!!
you can use this to make a full song into a ringtone too if you like, or you can also use this to make something non enstars related too obviously
THINGS YOU WILL NEED
- an iphone (this is all i know how to do im sorry android users)
- garageband (its free)
- a sound you want to turn into your text tone
OK PART 1:
assuming you are like me and you want to make an enstars sound, you can get them right off the game itself. turn the background music down to zero and then screen record whoever you want saying a voice line. cut the video down to just the part you want and convert it to an mp3 (you can use any free online converter it doesnt matter). you can also just get them off of youtube or somewhere else if u have a video in mind
you can probably do this entire last part on your phone but i found it easier to send the video to my computer to cut to the correct length and convert it there
next you're going to need to put it into your files on your phone. the way i did this is by emailing the mp3 file to myself and then using the "save to files" option to put it in my downloads folder.

PART 2:
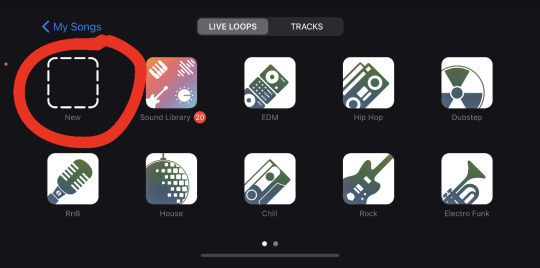
once you've got whatever sound you want in your files, open garageband and hit the plus to make a new song. then click "live loops" at the top, and then "new"
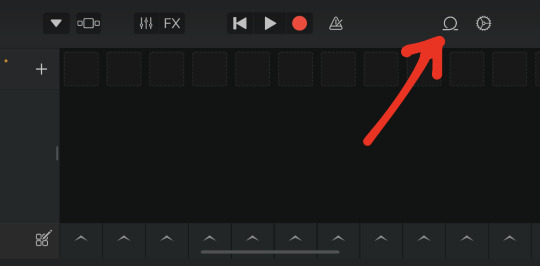
next, hit the weird loop icon to find the sound.
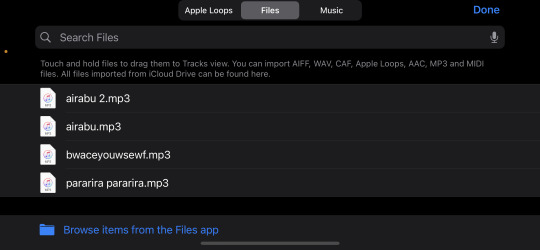
hit "files" at the top of the screen, select "browse items from the files app" to find your sound, tap it, and itll add it to the list. then hold down on it and drag it into that first square slot next to the plus sign.
this will add a little microphone icon to the side. hold down on that, and then select "show in tracks view"
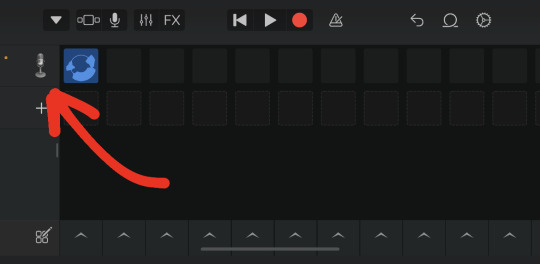

then, repeat the step of hitting the loop icon and dragging the sound into place, just this time you're putting it into the actual track.
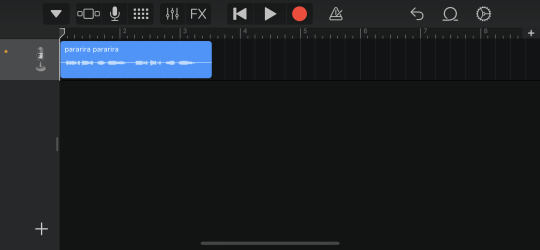
you should have this now. at this point you can hit the top left triangle icon to exit out of this editor (it autosaves on its own)
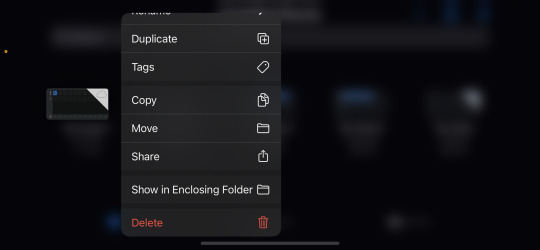
now, you're just going to want to hold down on your "song," select "share" and then click "ringtone!"
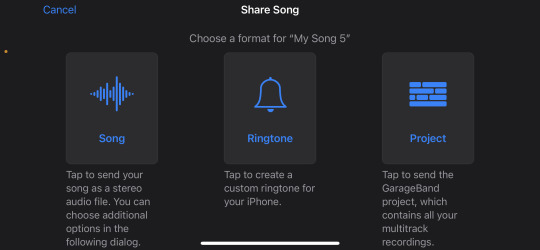
then you can just give it a name and hit export :) from there you can go into your settings or your contacts and use your new sound as a text tone or ringtone!!
i hope this was helpful!!! <3
#cryn rambles#do i even tag this as enstars#enstars#i gUESS#also if any of this is confusing just tell me umu
14 notes
·
View notes
Text
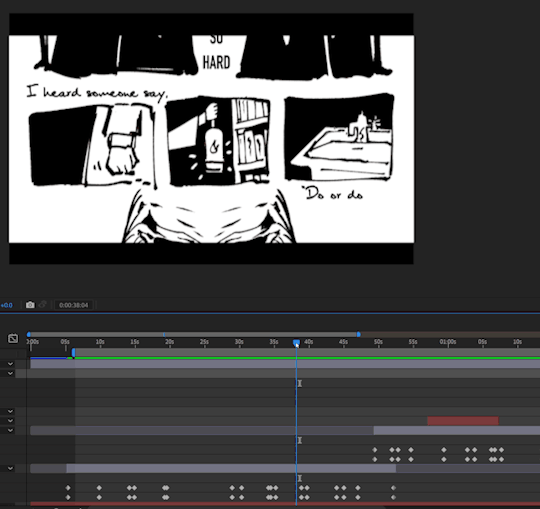
back to AE out of laziness; at about 2 out of 3 min through most of the basic keyframing to the song's lyrics (utter tedium)
more text keyframing and adjustments tmr. then adding some images to fill the instrumental bits and probably gonna mask some parts better...the price paid for being lazy about exporting. I like the din fonts but they're really very blocky...
thinking about adding more effects and prob will but also have realised the reality of a 3+min vid means horrible render times. I don't know if my pc can handle all the previews that well as is—not without spending half my time lagging anyhow lol. Rendering promo vids for fan projects was irksome enough and those were mostly under 15 seconds long. To be fair, this is not exactly a program designed for long content...but, well, it's nothing too complicated either, so here's hoping.
+ gave Salazar a makeover up there so now he kinda matches the basilisk:
I wanted to animate the Tom-church-window still but I'm going to save my sanity and go back to writing after this. This time for real...at least another complete chapter of hfic. Really like that still, however. It's nice. I still want to draw for Glimpse of Us but keyframing is a miserable affair.
Notes to self in am:
-Consider animating diary flip intro sequence?maybe etxra
-flip shots in alive 1 instrumental: Norris. Diary. My name is hp. Hello Harry. My name is Tr. Etc. Maybe a chromab or static fuzz on Harry, snapshots, back to Harry > the rest? Maybe more transition rewind effects.
^if I test VHS-type rewinds now I can recycle it with mild changes for hfic. Although this lyricstuck is very diary. Page flip effects look a little tacky often, however. Photo card flips?or perhaps page flips instead of the sliding masks.
^increase in cool text effects? But what fits? Convert to outlines and animate the trace? But that's very modern-feeling. Ink splashes, maybe?
^instead of VHS, ink spill across Harry? Should be easy to reverse the cc burn. > flip through scattered tomarry pages during the instrumental. >
Really want to animate something for this... L2d it? Or save it for hfic. Do simple blink w masking on Harry alive. But what else? Probably not feasible^. My layer splitting isn't suitable.
^if ink is too garish: out of camera focus into new screen transition. Other moving parts wizard themed book 2? Hmm.. Thematically, probably more dark blob people blinking. It's a long instrumental section so there's probably room. Ink splashes also prob will work, but the text effect I used on my last lyricstuck applied here will probably look good. The only problem is that I wonder if it'll work with my strip-style images. Perhaps see about chopping it up.
^instead, just do this in a more generic MEP syle and then do a separate rigged/video-focused animated MV thing later in the summer? haven't ever made a MEP but anyway closer in feel for a lyricstuck, perhaps...
^do a blur out of Tom in that above with that text effect. Cut Harry out to do the same.
^zoom in on Tom head after > Zoom blur shit > diary
#.txt#Wip#Setting a song's lyrics to text is probably the second best way to get utterly tired of it.#Not quite there yet... But we'll see tomorrow.#The first place goes to frame-by-frame animation.#Now that ruined a fav for me for ages...#I like looping songs a lot but it's different when it's the same 3 seconds x times in a row.#Amateur frame-by-frame takes the cake like no other on song ruination...#The same 3 second bits for a 30 sec animation for 7 days in a row and I could hardly listen to it after lmfao
4 notes
·
View notes
Text
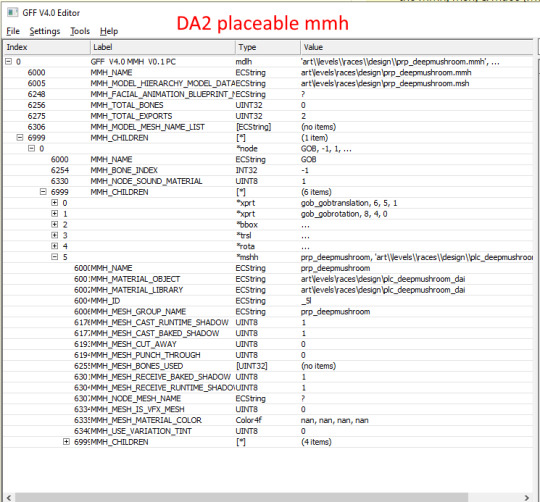
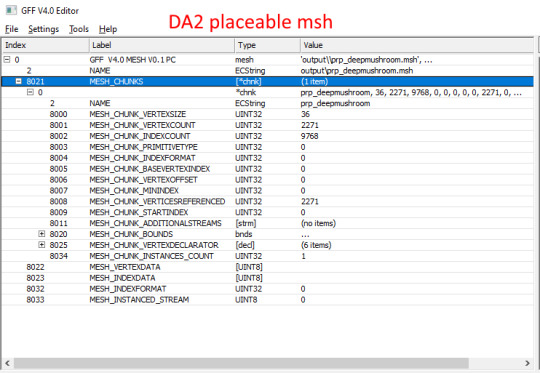
Porting Models from Dragon Age: Inquisition to Dragon Age: Origins or Dragon Age 2
Part 2c - Static Meshes
Blender 2.49b
Blender ImportExport Script, v011 version (under 'older files')
DA2 Blender Import script (only if porting for DA2, do a 'find in page' for "import_dragon_age_2.zip")
ERFv3 Packer (only if porting for DA2)
GDApp
The DAO Toolset OR pyGFF and TlkEdit
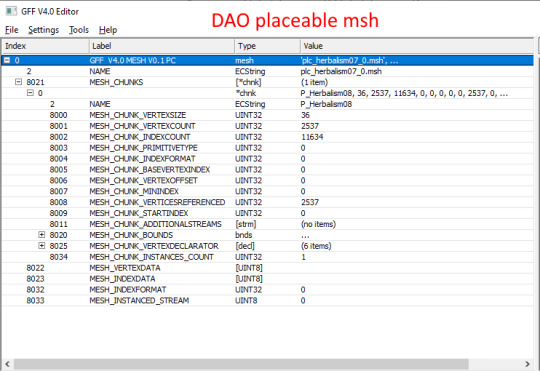
DA2 static meshes use the same file structure as DAO static meshes, which is pretty convenient. You'll need to take a couple extra steps for DA2 meshes, but otherwise the process for porting is basically the same.
If you don't already have it, go back to the first part of this tutorial series get the DAI model you want as an OBJ.
If you're porting for DA2, and don't already have the DA2 import script saved as a .py, do it now: Open up import-dragon-age-2.blend in Blender, and then in the text window that has the import script showing, click Text, Save. Now you can open the import script from any .blend file.
Open up IOTools_v011.blend (if you just had the DA2 import script open, you may need to close Blender entirely first, depending on your install).
If porting for DA2, in one of the text windows on the right, click Text, Open, and open your new import-dragon-age-2 python script.
Execute the import script by right-clicking on the text window, and hitting 'Execute script' (for DAO: if it's not already open, the script you want to run is called "MSHTool_v011")
Import a static mesh similar to the one you're porting (greatsword, staff, chest, table, etc). DA2 meshes don't quite import in correctly; you'll need to rotate it 90 deg on the Z-axis (R, Z, 90, Enter).
Orient your DAI model to match up with the vanilla one. You may also need to scale it.
If doing your scaling/rotating in Object Mode, make sure to apply the changes once you're done, with Ctrl+A, 'Scale and Rotation to ObData'.
Once you're pleased with your efforts, it's time to export.
Copy a vanilla DAO msh, mmh, & phy into a new folder. (you'll be overwriting them with object data from the ported DAI mesh. Don't want to overwrite the originals)
You do need files from DAO, even if you're porting to DA2, since the DAO import script won't open DA2 msh files.
If you have the DA2 import script open, switch the window back to the DAO script (MSHTool_v011).
Browse to your copied DAO msh, and load it.
Make sure your ported model is selected in the 3D window, and click "Replace" in the export script.
Minimize Blender, and go to the copied msh, mmh, & phy. If not making replacers, rename the files to something unique.
It's a good idea to follow Bioware's naming conventions, especially for DAO.
weapons: w_(type abbreviation)_(unique identifier)_0.
placeables: plc_(unique identifier) or prp_(unique identifier).
DAO usually uses "plc_", while DA2 usually uses "prp_".
examples:
w_stf_st01a_0 (DAO staff), w_gsw_003a (DA2 greatsword), plc_chestiron_01_0 (DAO chest), prp_chesta (DA2 chest)
Using pyGFF or the Toolset, open up all three files. Replace all instances of the vanilla file name with your new file name.
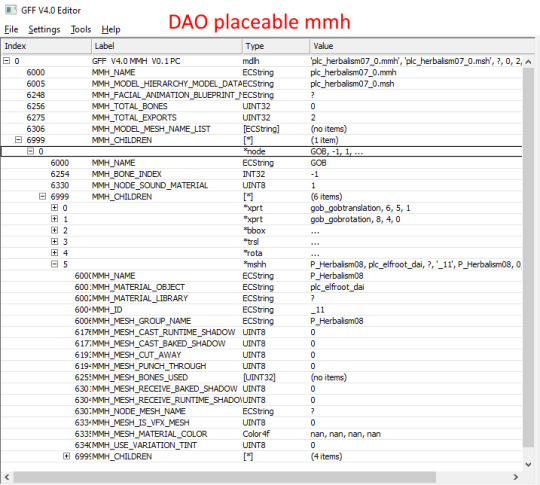
If porting for DA2, you'll need to put in the filepath before the mmh & msh names inside the mmh and phy, using the vanilla DA2 files as a guide. In the msh, put 'output/' before the mesh name inside the msh.
For weapons, it'll be 'art/characters/weapons/[weapontype]'.
For placeables, it'll be 'art/levels/races/[category]'.
If editing with pyGFF, make sure to hit 'save' in the bottom left after each edit, else they'll revert.
Save your files.
You'll also need textures and a mao.
You can find my tutorial for converting DAI textures with Paint.NET here.
If you use GIMP or Photoshop, I recommend these tutorials:
magpie's for GIMP
sapphim's for Photoshop
If all you want is quick and dirty placeholder textures, simply extract the DAI textures as .dds files.
Use a text editor (DAO) or pyGFF (DA2) to open up a vanilla .mao of the same type and replace the vanilla texture names with those from DAI. Make sure not to delete the filepath(s) in the DA2 mao.
Save the new mao with a name matching your model.
If porting to DAO, put all the files into your DAO override folder.
If porting to DA2, you'll first need to pack them into an ERF.
Make a series of nested folders using the filepath as a guide, and put the msh, mmh, phy, and mao in the bottom folder. (e.g. "MyAwesomePort/art/characters/weapons/greatswords").
The top folder will be what your ERF is named.
Make a textures folder next to the files, and put the textures in it.
Navigate back up to the top, and in another window, navigate to wherever your ERFv3 Packer is.
Drag & drop your nested folders onto the ERF packer.
You should get a pop-up; click 'Create PAK', which will generate an ERF next to your nested folders.
Put the ERF into your DA2 override folder.
If you're making a replacer, you can test your port by just booting up your game; it should take effect immediately.
If you're adding a new model, you'll have to tell the game how to find it.
You'll do this by making a GDA extension. Extract the type of GDA matching your model.
For DAO weapons, you need [weapontype]_variation.gda.
For DAO placeables, placeable_types.gda.
For DA2 weapons, item_variations.gda.
For DA2 placeables, plc_base.gda.
Open up the GDA, and delete all but one line that's similar to your ported model (don't choose line 0 or another blank line).
Replace the vanilla mmh name with your new mmh name.
For DA2 models (column "model"), and DAO placeables (column "ModelName"), that'll be pretty simple.
For DAO weapons, you'll need to split the mmh name into 3 columns:
[modeltype]_[modelsubtype][modelvariation] (ignore the final 0)
If you've followed the Bioware's naming convention, this shouldn't be too tricky.
If not, it should still work fine as long as you can split the mmh name into those three columns (keeping in mind the "_" between the first two)
Also enter a new unique ID number (first column).
For DAO weapons, that number must be less than 256. For DAO placeables and for DA2, it can be any number (larger is better to avoid random conflicts).
Since DAO has a limited number of available IDs for weapons, you may want to check the Item Variation ID spreadsheet (NexusMods, Google Sheets) to prevent conflicts, especially if you already have some mods that add new weapon models.
Save your new GDA, adding a unique suffix to the original file name (so, something like "placeable_base_newsword.gda").
For DAO (and possibly DA2, I'm not sure), the maximum name length for the GDA is 32 characters, including the ".gda".
Put the GDA in your game's override folder.
We now have the new model, set up so the game can see it.
Next step is to actually put it on an item, and see how it looks in-game.
An item's appearance isn't actually baked into a save the way a character's inventory is, so we can easily change a vanilla object for testing and then delete the edited uti or utp later without issues.
For DAO, if using the toolset, open a local copy of an item you already have, or a placeable that you know a vanilla location of.
For placeables, you should be able to find your new model in the 'Appearance' drop-down menu. For weapons, your new model should be under 'Item Variation'.
If your model doesn't show on the list, your GDA probably missing, or the name is too long.
If not using the toolset, open the UTI or UTP you're using for testing with TlkEdit.
Change the Appearance (placeables) or ModelVariation (weapons) to the ID for your new model.
Save to your override folder, boot up your game, and check it out. :D
If the model doesn't quite look right, go back to Blender and make adjustments. If you do, you should only have to re-export the msh (and then repack it into an ERF for DA2).
Next time, I'll be (finally) going over how to convert DAI textures to DAO and DA2 using Paint.NET.
4 notes
·
View notes
Text
Method to edit object .package files without changing IDs using TSRW
Here’s a quick-ish tutorial.
Description**:
TSRW won’t let you just open a .package/.sims3pack to edit it. Your only option is to either open a saved project (.WRK file), or make an entirely new project which changes IDs. When IDs are changed, it won’t replace the file and instead ends up creating an entirely new object.
Edit to add (3/3/24): This is for objects only. TSRW doesn’t like it when you try to import a cas item (probably build items, too) into an object project. You might try a different dummy project for this (cas item for a cas item, etc). However, I’ve never tried, so you’ll have to experiment.
For this tutorial you will need to use a .package file.
What else will you need?
TSRW (I use version 2.0.88)
Sims3Pack Multi Installer (only if your cc is a .sims3pack)
----
If your cc is a .sims3pack, you will need to use Sims3Pack Multi Installer to extract it to a .package file.
Once you’ve done that, open TSRW.
Create a dummy project. I just used Sculpture Plant Ivy Ball Topiary (found under Object>Decor>Plants), but it shouldn’t really matter. Edit: TSRW doesn’t like it when you try to import CAS items (probably build items, too) into an object dummy project. I have never tried this, but you might try using a cas/build dummy project for those types, and see if it will work. You’ll have to experiment.
Go up to “Edit” in the menu, and select “Project Contents”.
Highlight all of the files, and Right Click > Remove. While you can remove all the files one by one, it’ll take forever so I highly suggest if you don’t know how to highlight all files at once to check out this youtube video showing you how on PC! It saves a LOT of time!
A window will pop up asking you if you really want to remove the items from the project. Click Yes.
All of the files should now be removed.
Now go to Import>From .package and navigate to the cc you want to edit, and open it. It should say something like “Import done, added X and replaced 0 entries in the project package”. Click “OK”.
Now Click “OK” again.
You should now see your cc that you want to edit.
edit: You might need to select the object’s mesh in the mesh tab drop down to avoid crashing before you start to edit it. (Idk why this is necessary, but I’ll just say it’s ✨TSRW things✨).
After you’re done editing, go back to Edit>Project Contents. Then Export>To .package and save your file. I haven’t tried saving as a sims3pack, but I don’t see why it wouldn’t work?
* This is also how you extract directly to a package file in TSRW (Edit>Project Contents then Export>To .package). I highly recommend compressing your file after this as I’ve noticed TSRW loves to balloon up the size.
** Maybe this allows you to convert a .package file to .sims3pack (to extract with lots etc)? Feel free to try/leave your results in the comments as I haven’t tried it!
70 notes
·
View notes
Text
the violent threat of erasing someone's existence because they said something you don't agree with is a big reason i care so much about educating and expanding the DIY web. i think it is a vital tool against censorship and wreckerism to own as much as possible of, understand as much as possible of, your own infrastructure to connect with the internet.
over the last few years i've watched as tumblr started to move from (this is a niche use case but bear with) something i could in good faith recommend as a free and easy-to-set-up basis for an art portfolio site to something which is (ugh god i'm going to say it) actively going through Enshittification™️ and employs more and more coercive tactics to remove and paywall any meaningful sense of ownership or expansive/extensible-ness over users' individual blogs
it used to be by default when you shared a link to a post it would go to username.tumblr.com/postid and now it goes to tumblr.com/username/postid which means if you don't manually edit the link to the original formation, it forces whoever clicks on the link to make an account to view what you've shared (user capture)
it used to be free to connect a custom domain to a tumblr blog (which is a vital defense against censorship which means you can migrate to a new service/host without losing "brand recognition" with no economic penalty) and now you have to pay monthly and they want you to buy domains directly from them (i'm not sure if it's actually possible to connect a domain tumblr doesn't own to a blog now – this is the Only reason that when i converted this from a project portfolio to a personal blog that i did not set up that project on a different tumblr account and instead now have a tumblr version and a portfolio site which i self-host – i can't use tumblr as the portfolio because i can't connect the URL for free/at all)
the popups and aggressive prompts to make an account when viewing someone's blog at username.tumblr.com have become so severe that where i can i implement custom CSS to suppress them
when you DO make an account the popups prompting you to pay for ad-free browsing are again, increasingly aggressive
this all points to a pattern where tumblr doesn't see itself as a service, it sees itself as a business which needs to make profit from its users (which makes sense, it's a private company and it's following the same pattern as every other site which is free to use – draw people in with a slick user experience and no downsides, run out of VC money or whatever, start to Need To Make A Profit, make the platform ever more extractive to the point where nobody likes using it but nobody sees anywhere else to go – literally the definition of enshittification)
this is a large selling point for federated social media for me. moving your account but retaining your 'social graph' is a Feature of federated social networking. you can migrate to a new server if your admin makes a decision you don't like without losing ~most of your social connections, you can also choose to set up on a server which has moderation policies in line with what you want to post. you can also set up your own dang server and literally be your own mod/admin if you have a bit of spare cash and technical knowledge (warning: this can get expensive). this is also why i advocate for everyone to own a domain and run their own site, as independently as possible from corporate infrastructure, as if someone has your website bookmarked and your host blacklists you, you can just upload your website somewhere else and point your domain there instead
i would suggest everyone who cares about their tumblr account* export a backup of that data as soon as they can – tumblr provides a feature to do this which retains your media and a record of your social connections. i think it also provides some of it in .html form which you could upload to any web server if you wanted to. i would also suggest everyone owns a domain for a personal homepage, and maybe makes a 'home' online somewhere that's not here – my domain registrar of choice is namecheap and i pay about $15/yr for my main domain. you can get free web hosting in a bunch of places – github pages springs to mind, codeberg also offer this if you don't want it to be owned by microsoft. i think netlify still has a free version. there are options! owning a domain means you're free to move between these options without anyone really noticing anything different. i highly, highly recommend it for anyone who likes blogging freely without living in fear of being censored.
*in the current context i am mostly talking to trans women here but i think this advice applies to anyone, nobody is not at risk of being banhammered for basically nothing, these things tend to escalate in severity over time
anyway i love trans women and i am so angry about the decisions unfolding here but it's also totally Precedented and Typical for corporate owned online infrastructure and there are things you can do to insulate your social connections and retain backups of the things you make here. ultimately posting here creates value for the corporate platform owners and there are ways to blog which don't do that!
2 notes
·
View notes
Note
how do u convert toddler hair to infants? is it the same process as other ages? i cant figure it out :(
So here's my attempt at a tutorial (text-heavy, sorry in advance):
You need Sims 4 Studio and Blender version 3.3 or earlier. Put the original file in your Sims 4 Studio Mods folder. Open Sims 4 Studio.
Click "Create 3D mesh" and scroll until you find the file and click on it, and then click next. (You can shift click on the file and it will select all the swatches. You can also filter by custom content to find it easier) It will ask you to save the package so name it whatever you want and save.
Then it'll open the file. Click on the "categories" tag. Find where it says the age & gender tags and toddler should be checked. Un-check that and check infant instead and then you can click "apply to all swatches." I also scroll down to where it says age appropriate and switch that from toddler to infant. Then save. It should then show you an infant with hair floating. This is because the hair is still a toddler mesh.
Go to the mesh tab. Export the mesh. It will ask you to name it so name it something simple and save. It will then open a folder with your mesh in it. Right-click and open it with Blender. Select all the layers that start with "s4studio_mesh_" and depending on the mesh there could be several. (Click on the first one, then shift-click on the last one and it will select them all)
Then click on the "scale" button which is on the top left of the screen. Hit the "g" key, then press "z" twice. This will let you move the hair down but not any other way so it's really easy to get it in the right spot. When you have all the layers selected, you'll see colored shapes under the Sim and if you click on one and drag it, you can make the hair wider, skinnier, etc.
It does require playing around with it to see what each thing does. Once you're done, save it, then go back to Sims 4 Studio and import the mesh. Sometimes it takes a while. Once it's done, save your package again. Put the package in your Sims 4 Mods folder and done.
I hope this helps somewhat. I know it's a lot of text but I don't know how else to explain it. I had to experiment with different tutorials taking what I learned from both in order to make it work. I could try to do a short screen recording showing this if anyone wants that.
8 notes
·
View notes
Text
Check-in for October 25th, 2023
Welp, The Present is a Gift has officially broken 8,000 words and is rapidly approaching the 10k mark! Also, fun fact: according to the outline, I haven't even finished writing the first chapter. This terrifies me when I consider the later chapters which have way more plot packed into them.

Despite me writing out a very detailed plan for the project, it feels like I'm learning new things about the characters with every sentence I write. Twig is apparently a big fan of learning weird, obscure words and is sad that her old hobby of reading dictionaries has been dampened by her struggling to learn how to read footprint runes. You think you know a gal...
I spent most of today working on programming assignments and even got a nice comment on a past submission I sent in. In it, I mentioned single vs. double equals signs always tripping me up and causing bugs in my code--- turns out they used to baffle my instructor too! He's able to use them in their proper places without thinking now, which is encouraging. Regardless, I have never felt this audio more keenly than today:
youtube
I had planned on getting some practice with 3D modeling for low-poly V-tuber of my persona I've been jokingly working on, but that didn't work out as anticipated. I did spend a while admiring how I went from a giant gray cube to this, though:
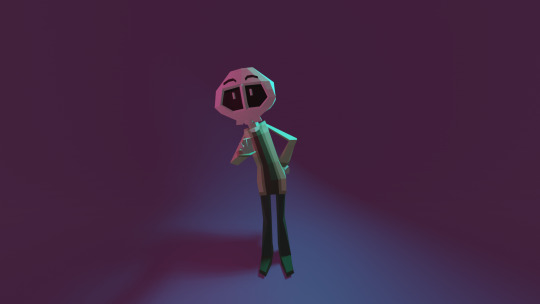
Ahhh. Look at that beautiful skeleton. So few polygons. So few worries. If only I could figure out how make the pupils move or make a bow.
I also spent a while reminiscing about how Blender lit up in flames at one point and I didn't understand why it happened or how I got it to stop. That was a fun seven minutes of unadulterated terror.
I'm tempted to get back into Blockbench for its simple UI, but after learning the basics of Blender, I know it'd be unbearable to return to the rigidity of working in a program that's pretty much built for Minecraft modders. I just need to stick with Blender and find a few more tutorials to keep me going.
I will miss the fact that Blockbench automatically puts your model on a turntable and offers to pixelate it for you, though. It makes low poly modeling so cool so fast.
Just look at these things! They're so cool! I made them yet they look like something out of my fave childhood video games!
I tried to figure out Super Mario Paint this morning and ended up with my first finished song from that program. Tried importing a few soundfonts from other sources but had no luck getting them to work, and the song was definitely rough around the edges--- but I'm still really proud of myself for making a quick tune! It was a battle to figure out how to export the finished product, and I ended up just recording my desktop with OBS to get it to capture the sound and video together, then converted that video into an MP3 file. It was a very roundabout process, but still!!! I made a thing!
The Shy Guy and Boo instruments, as their flawless character designs may have you suspect, are vastly superior to everything else contained in the program. You can't change my mind.
Also, I was tinkering around with Chrome Extensions and found the most heartbreaking note in the description for one of them.
Tiny Sidebar developer, whoever you are, wherever you are--- I want to give you a hug and a slice of cake or two. Reading this activated my inner anime protagonist and I want you to know that there are so many good people out there, but they're quiet about their goodness. Bad people are just loud as heck and make scenes wherever they go.
With that sudden sappiness, I'm signing off on this check-in. Take a parting teaser for a future joke animatic as a palette cleanser. Depressed Friend will be Twig, Emotionally Stable Friend will be Celebi.
Sincerely,
Sofie
#sofie checks in#3D model#3d modeling#blender3d#low poly#low poly art#mario paint#super mario paint#preptober#nanowrimo rebel#nano rebel#The Present is a Gift AU Update
6 notes
·
View notes
Note
Hi there! super sorry if I'm bugging you especially since this was something you asked someone else a while ago, but you sent an ask to ghoulijams that mentioned that you read their fics in an e-reader and I was just wondering what kind of e-reader you use and how you get tumblr fics onto it.
Personally, I'm using a kobo but the pocket integration doesn't always work unfortunately, especially with tumblr fics, so i was wondering if you had something else that turned fics into e-pubs or something else.
again super sorry if this was a weird ask or if others have already asked before me but yeah I was just curious as I would also love to read ghoulijams fics like books lol
hiii! don’t apologize it’s very ok to ask and it’s not weird, i get you a 100% ghoul fic admirers unite 🫡
so i very embarrassingly also do it from ereader but i use kindle. it’s not great but i haven’t found anything that does the job. i tried finding a free epub converter but failed, they’re either all on a subscription service or they just mess up the file completely. the other option is to export it into pdf and just read it like that if you can bear with the horrors.
i get you, i want to read ghoul’s fics from a book also lmao i even considered making my own copy just for me like printing it and binding and making it pretty and stuff (imagine being able to draw some smol illustrations and just cute hearts on the side… you can give up on trying to contact me rn cause this is just the only thing i would do tbh) but that’s venturing a bit too far into the pirating territory and i wouldn’t ever want to do that to our lord and savior ghoul.
all in all companies should make our lives easier and pour money into making a tablet do its thing goddamit
(feel free to pop in my dm if you find a good solution i will smooch you on your brain real hard)
#i’m sorry i really thought a could be consize for once#guess brevity is not my strongest suit I YAP OK??#sorry lovely nonnie 😭#the horrors#sophi answers
1 note
·
View note
Last Seen Blogs
giveitalook
In style

dexalyys
゚✧*:・ kie / ashka !! 🌸
kriprii
Several cans of Monster, Unbounded fatigue
sims-dynasty
Delany Reed
elysion-th
Elysion (sso-TH)