bioniczombie
bz🌵;
🦩 I play & create for The Sims. 🚫 I do not take cc requests. 🚫🏳️🌈 Non-binary AuDHD.
1423 posts
Don't wanna be here? Send us removal request.
Last Seen Blogs

sinnysbun
sinnysbun

buyhomedevice
Untitled

will-sf
Speculative Fiction WCCLS
trashforazriel
#gwynriel
baoyujianshang123
鲍鱼鉴赏
Text


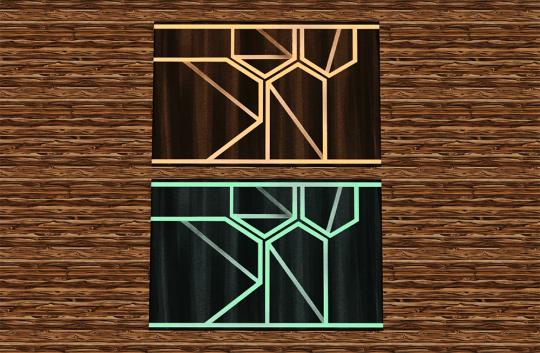
4t3: Perfectly Preserved Rug (Seasons EP)
Compressed.
➨ Download
➨ Alt Download
Info:
13 swatches. 1 is recolorable.
Found Under Decor>Rugs for $195.
My cc is always free, but if you would like to support my work, please consider leaving me a tip on ko-fi.
21 notes
·
View notes
Text
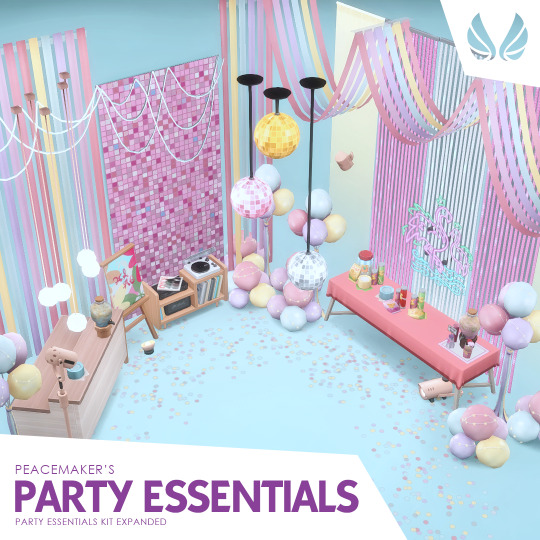


Party Essentials Expanded - Addon for TS4
When I got a code for the Party Essentials kit courtesy of the EA Creator Network, I left left wanting. It was really only catered to the people that play with short wall builds, but I saw this pack as having great potential for community builds that were created using taller wall heights. Although I couldn't do a huge amount in regards to morte decor, I know I could add a bit more variety and useability for community spaces so i decided to make an addon addressing the lack of content for those sorts of builds.
Download at Simsational Designs
1K notes
·
View notes
Text
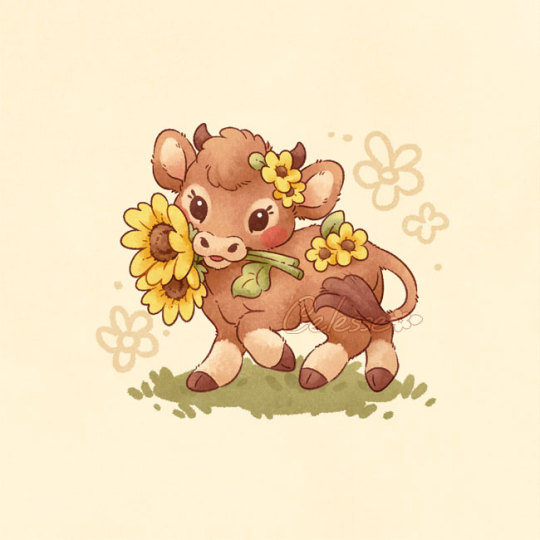
*tiny mooing* 🐮🌻
4K notes
·
View notes
Text
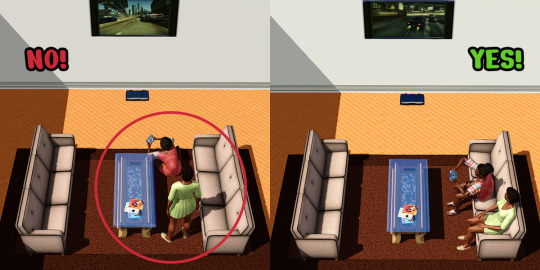

Wider Angle for Watching TV and Playing Games
Didn't know what else to call it, so here you go. Sims not sitting down to watch TV or play games annoyed me a lot when setting up new saves by building houses, because the seating I placed perpendicular to the TV was basically useless.
Now, sims can watch TV and play games on it from a wider angle. Previously, seated sims would be able to do so if the seat was at a ~45° angle from the TV, but that has been expanded to at least 90°. If seating is available, sims will also prefer to sit down to watch TV or play games, rather than stand or sit on the floor.
Modifies the TV_0x2EBD9038FD112AF1 XML resource. Technically speaking, I only changed the value of the kConeAngleInFrontOfSittableObjects parameter to 2.570796 (default: 1.570796), so you can do the same in Retuner if you don't want to use this mod, or if you have another mod that changes the same XML and want to add this functionality to that one.
Made on patch 1.67 but probably works with 1.69 too.
Download: SFS | Mega
186 notes
·
View notes
Text


4t3: Push Your Luck End Table (Paranormal SP)
I really wanted this end table in TS3. Unfortunately it suffers from horrible pixelation with certain colors. I tried to fix it, but even saving uncompressed didn't help much.
Compressed.
➨ Download
➨ Alt Download
Info:
1 swatch. Recolorable.
Found Under Surfaces>End Tables for $325.
❗ Bad pixelation with certain colors!
My cc is always free, but if you would like to support my work, please consider leaving me a tip on ko-fi.
48 notes
·
View notes


Text

A bunch of add-ons and recolors for Pipeline Decoratives from Apartment Life EP, plus one standalone mesh.
Drain Pipe Set
Download (SFS)
Polycounts: 250 - 480. Grungy Old Drain Pipe is 866 poly. Located in Buildmode/Architecture. Merged recolors for 'Pipeline Decoratives' are done with TXMT settings, use original white texture and contain only a single specular map.
Enjoy!


*this is for The Sims 2
289 notes
·
View notes
Text


4t3: Laundry Day Rugs (Laundry Day SP)
Utilitarian Utility Mat (top left rug in each preview) is very pixelated with certain colors. The bottom image shows it with my noise pattern (not included).
Compressed. 1 zip file (all included, unmerged), and individual files available.
➨ Download
➨ Alt Download
My cc is always free, but if you would like to support my work, please consider leaving me a tip on ko-fi.
Info under the cut:
Fringe Benefits Rug:
5 swatches. Last swatch is technically recolorable.
Found Under Decor>Rugs for $220.
Fruit of the Loon Rug:
4 swatches. Not recolorable.
Found Under Decor>Rugs for $150.
Utilitarian Utility Mat:
1 swatch. Recolorable.
Found Under Decor>Rugs for $110.
Very pixelated with certain colors. The bottom image shows it with my noise pattern (not included).
Wicker Whims Rug:
1 swatch. Recolorable.
Found Under Decor>Rugs for $160.
100 notes
·
View notes
Text
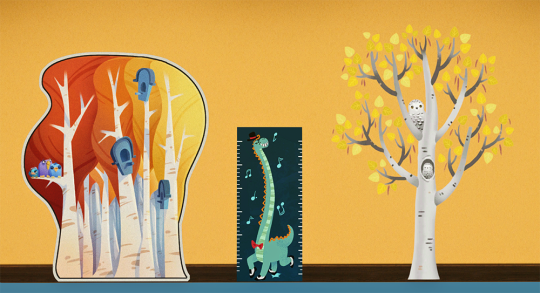

4t3: Kid Decals (Growing Together EP)
Compressed. 1 zip file (all included, unmerged), and individual files available.
➨ Download
➨ Alt Download
My cc is always free, but if you would like to support my work, please consider leaving me a tip on ko-fi.
Info under the cut:
"Hoot's There?" Tree Decal:
12 swatches. Not recolorable.
Found Under Decor>Wall Art for $100.
Hopeful Futures Height Chart:
6 swatches. Not recolorable.
Found Under Decor>Wall Art for $20.
Worlds' Wonders Decal:
3 swatches. Not recolorable.
Found Under Decor>Wall Art for $100.
80 notes
·
View notes
Text
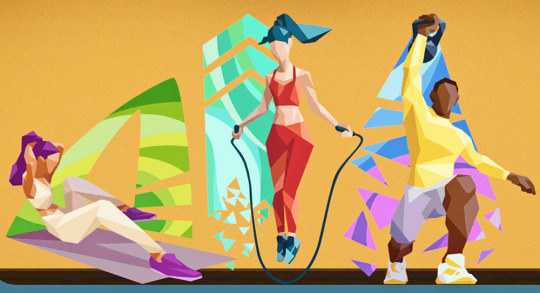

4t3: Recreation Center Fitness Decals (Growing Together EP)
Compressed.
➨ Download
➨ Alt Download
Info:
3 swatches. Not recolorable.
Found Under Decor>Wall Art for $100.
My cc is always free, but if you would like to support my work, please consider leaving me a tip on ko-fi.
91 notes
·
View notes
Text


4t3: Bar Gallery (For Rent EP)
Compressed.
➨ Download
➨ Alt Download
Info:
4 swatches. Recolorable.
Found Under Decor>Wall Art for $200.
My cc is always free, but if you would like to support my work, please consider leaving me a tip on ko-fi.
89 notes
·
View notes
Note
omggg's, you're back! i've missed you :(
Hey! 💜 but I didn't go anywhere, unless you mean my conversions?
13 notes
·
View notes
Text


4t3: Splash Pad Rugs (Growing Together EP)
Compressed. 1 zip file (all included, unmerged), and individual files available.
➨ Download
➨ Alt Download
My cc is always free, but if you would like to support my work, please consider leaving me a tip on ko-fi.
Info under the cut:
Splash Pad - Large:
12 swatches. Not recolorable.
Found Under Decor>Rugs for $500.
Splash Pad - Medium:
15 swatches. Not recolorable.
Found Under Decor>Rugs for $375.
Splash Pad - Small:
12 swatches. Not recolorable.
Found Under Decor>Rugs for $250.
70 notes
·
View notes
Text


4t3: Modern Muse Rug (Moschino SP)
Compressed.
➨ Download
➨ Alt Download
Info:
12 swatches. Not recolorable.
Found Under Decor>Rugs for $350.
My cc is always free, but if you would like to support my work, please consider leaving me a tip on ko-fi.
61 notes
·
View notes
Text

4t3: Abstract Thought Rug (Get Together EP)
Compressed.
➨ Download
➨ Alt Download
Info:
1 swatch. Recolorable.
I recommend sticking to solid colors, but patterns will work.
Found Under Decor>Rugs for $180.
My cc is always free, but if you would like to support my work, please consider leaving me a tip on ko-fi.
48 notes
·
View notes
Note
Hi, I’m loving the advent so far! How do you get your patterns to look so natural? Whenever I make patterns I either get these crusty lines at the edges of some channels where one channel bleeds into the other. Or, I get these super sharp unnatural edges on them that never look any good. Teach me your magic please lol.
Thank you so much for the compliment :)
I made a fancy tutorial, because more people might be interested in this topic!
There are a few things you can do to solve color bleed and crusty lines while making the Sims 3 patterns. These tips are for Photoshop and the TSR Workshop pattern tool, though they also work for Delphy's pattern tool.
The EA CAP tool compresses its image files automatically, so you have no control over it afaik.
Save your textures uncompressed!
Most of your problem should be solved by saving your images in an uncompressed DDS file format (depending on what DDS plugin you use, it "8.8.8.8 argb 32bpp unsigned" or, in newer versions, "8.8.8.8 bgra 32bpp unsigned".
This is an image of the newer dds plugin export dialog with the settings I use:

This reduces blockiness and color bleed significantly!
Note: For maximum visual clarity and the sake of our eyes, starting from now, I will show just the contents of the individual color channels of the image, specifically green and blue.
If you click on a single color channel in Photoshop, it will be represented in greyscale. My screenshots therefore also represent a single color channel and do not show how the colors interact with each other. I thought it would be distracting and hard to see if I presented everything in color and this tutorial is not about how to build a pattern, but how to get crisp outlines and the best possible quality.
What is the issue with compressed textures?
EA's pattern textures are DDS files that use DXT compression (DXT1 for non-alpha/5 for alpha images, BC1/3 in the newer plugin).
If you save your image as a compressed DDS file and reopen it, you will notice that certain areas are blocky/blotchy.
That is because lightness and color information is not retained for every pixel, but areas get grouped together in a more or less chessboard-like fashion.
In this first example, I increased the contrast to make these compression artifacts more visible so you can see what's going on: Notice the grey blocky areas?
These cause color bleed in the final pattern and the textures look blurry or washed out. EA's textures have this issue too, because they use compression.
In some patterns, the effect is less noticeable than in others, but compressed files will always have a reduced image quality compared to the original image.
Deciding to go with uncompressed textures was essential for me to achieve the quality I offer. I reasoned that the patterns are only 256px in size and the performance impact should not be very noticeable.
I once made a survey in which I asked whether my patterns cause performance issues, and most said they did not, so I stuck with it.
You could test it out for yourself and decide!
If you want to continue to use compression, make sure to change the quality of the compression algorithm to get the best possible result. In the screenshot I posted at the beginning of the tutorial, you can see that I set it to "highest" instead of the usual default "fastest", though this is not really needed if you save uncompressed files.
The old DDS plugin used on older Photoshop versions also has that setting, it is just a bit more obscure. I do not have that anymore so I cannot say where exactly.
Is it a bug?
Lines all around the edges of some channels could also be a Photoshop bug*. This was a regular occurring bug in older versions (before CC 2020 or so.) The issue was that when you scaled down or sometimes even just saved an image that was not just the background layer but had stuff on other layers, there would be a faint line around the whole image. Suuuper annoying!
*clarification: It's not an official bug, but a lot of people get annoyed by it. I still had this happen to me with the current 2023 Photoshop version when using bicubic (sharper) on an image with layers, but I do feel there are less problems with saving layered images now. Idk, this might be "feature quirk" after all...
Anyway, to avoid the faint lines around your image, follow these tips:
Using the bilinear mode when reducing an image's size helps, as does flattening the image before image reduction or file export.
I like to create a copy of the entire document using the shortcuts ctrl+shift+alt+e to make sure it appears flattened without actually flattening everything. You could also paste the flattened copy into a new document, merge it down and export the dds file from there. Just try what works best for you.
Retaining maximum quality on resizing
Most images need to be resized to the pattern size, or you might have made a larger pattern and want that in smaller sizes.
You may never have paid much attention to the settings in that image size dialogue, but it holds some key elements to make sure your pattern comes out in the best way possible!
Per default, the resizing mode that is used by Photoshop to make an image smaller is "bicubic (sharper)". This mode has a sharpening algorithm that causes halos if the pixels are not white or black, which can create unwanted effects such as white outlines around grey pixels, or grey ones around black areas. Note: even if you have the "bicubic (automatic)" setting, it will still use the "bicubic (sharper)" if you reduce the image size!
Let me show you an example:
Below, you can see a comparison of bicubic (sharper) reduction vs bilinear reduction.
The channel with the black and white checkers has some greyish edges after using bicubic (sharper), which can cause the texture to become unwantedly transparent in these areas, making the colors become muddled in these areas. Using bilinear or nearest neighbor modes (the latter is great for very geometric, crisp shapes), the result is very clean.
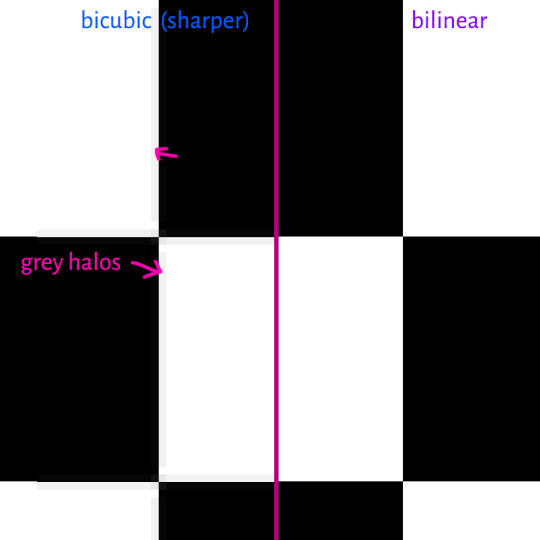
This is why do not recommend to use the bicubic algorithm on your textures. Go for bilinear and nearest neighbor modes, these are perfect for patterns. I do any sharpening of the channels in a more controlled way later.
The best way to sharpen your texture
To make the textures look as crisp as possible, you immediately think about the "unsharp mask" feature, right?
This might not be your best option though!
If you have a white shape on a black background with a rim of dark grey pixels around it and you want to make it crisp and want that dark grey outline to disappear, unsharp mask will actually do a pretty good job, because it mainly targets those grey pixels and there is nothing to lighten or darken on pure white or pure black.
But if you have a lot of grey tones, the algorithm "attacks" a lot in your image, depending on how you set your radius in the options dialogue. Most of the time, the radius is set to a small number, for sharpening details, but it creates a problem for us in the form of halos/bright or dark rims around shapes.
I like to increase the contrast of the individual channels to make the image appear sharper without those halo effects that the "unsharp mask " feature often creates. I love to use the "levels" tool for adjusting the contrast, I use it all the time!
I have grey pixels as a starting point and then applied an aggressive "unsharp mask" (strength 100, radius: 1px) to it so you can see the effect. The results are bright halos around the shapes. This will make the edges of the shapes more opaque on the final pattern and can look strange! On very delicate lines, this might be what you want, but for larger areas, this is less desirable.

Sharpening without actually sharpening
Instead of using "unsharp mask", I like to increase the contrast of the individual channels to make the image appear sharper entirely without those halo effects that the "unsharp mask " feature often creates. I love to use the "levels" tool for adjusting the contrast, I use it all the time!

On this layer, I have some intricate shapes, which should appear fully opaque. The are already bright white, but the edges are a bit too soft right now to get a truly crisp result, so I use the "levels" tool to increase the contrast and make the edges crisper. You can also use the curves tool for this, but I find the levels tool a bit more intuitive for this process! The curves tool gives you even more control over pixel values and lets you adjust them individually, which can be great, but for the purpose of creating controlled contrast, the levels tool will suffice.

By moving the marked sliders towards the middle, the contrast is increased. This also works nicely on grey pixels without creating the halo problem.
Another use for the levels tool in this context is to control the thickness of your shapes by moving the middle slider too, like this:

Final words
"Levels" is your friend when adjusting contrast and making things sharper. In some cases, "unsharp mask" or other sharpened options can create a desired effect, such as on more realistic textures such as carpet/fabric textures, wood and stone, where you might want these halos to increase the depth of details. There is always a right time to use any tool, so if levels alone do not give the effect you desire, by all means, give "unsharp mask" a go! Experiment, and find the best way for you.
The biggest gain in quality will come from saving in an uncompressed format though.
Thanks for reading through the tutorial, I hope it was helpful!
67 notes
·
View notes
Text


4t3: The Brat Mat Rug (Toddler SP)
Compressed.
➨ Download
➨ Alt Download
Info:
8 swatches. Not recolorable.
Found Under Decor>Rugs for $325.
My cc is always free, but if you would like to support my work, please consider leaving me a tip on ko-fi.
67 notes
·
View notes