#how to make paper hexagonal box
Text
youtube
Origami Hexagonal Jewelry Box | How To Make DIY Jewelry Box || Aklima Crafts And Journals
#origamijewelrybox #aklimacraftsandjournals #diyjewelrybox #aklimacrafts #aklima #aklimajournals #origamibox #hexagonbox #painterly #tiktok #tiktokvideo #love #easytutorial #craftingmagic #diyinspiration #handmadecrafts #paperartistry #jewelryboxdiy #origamimagic #creativecrafting #paperfoldingfun #diygiftideas #craftingcommunity #papercrafts #handmadegifts #easycrafts #craftsforteens #giftideas #papergifts #upcycledcrafts #ecofriendlycrafts #diyproject #creativecrafts #handmadelove #jewelryorganizer #handmade #diy #art #satisfyingvideo #satisfyingart #subscribe #subscribetomychannel #thanksforwatching
#diy#arts and crafts#ペーパークラフト#youtube#origami hexagonal jewelry box#how to make DIY jewelry box#aklima crafts and journals#aklima crafts#aklima journals#paper box aklima crafts and journals#origami hexagon box#how to make hexagon box#折り紙#hexagonal jewelry box#origami jewelry box#make diy jewelry box#diy jewelry box#how to make paper hexagonal box#origami hexagon gift box#jewelry box#paper hexagonal box#origami hexagonal box#paper gifts box#diy jewelry box with lid#masu box origami#gift box#origami box#origami box with lid#tutorial#fatema art and crafts
1 note
·
View note
Text
Hexagon-shaped box made with basic materials

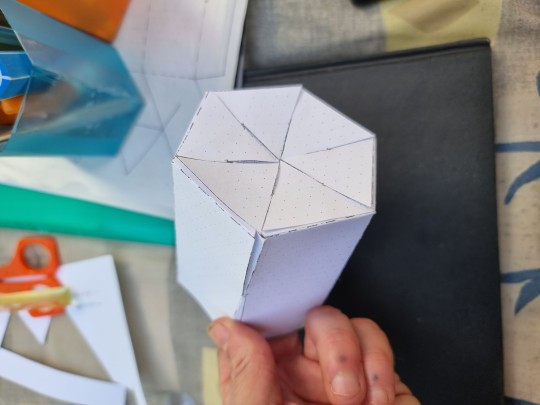
Today I wanted a solution for an easy-to-carry box for my pencils that I can nest into each other (like russian dolls (those wooden box dolls you can insert into each other)).
My solution turned towards this hexagon-shaped box which uses basic Steckverbindungen, cuts and folds.
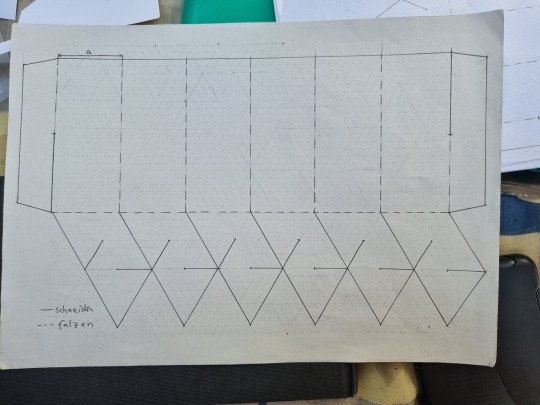
In the sketch you see solid lines - these need to be cut.
The dashed lines need to be folded.
I reduced the size of my blueprint sketch by 5% and by 10% to have smaller grids.
Then I transferred the three differently sized grids on foil and assembled them:
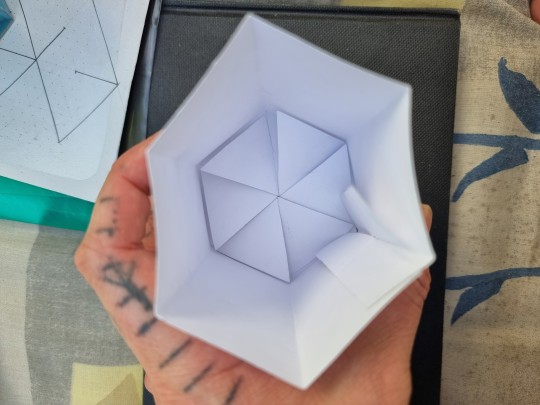
The first attempt:
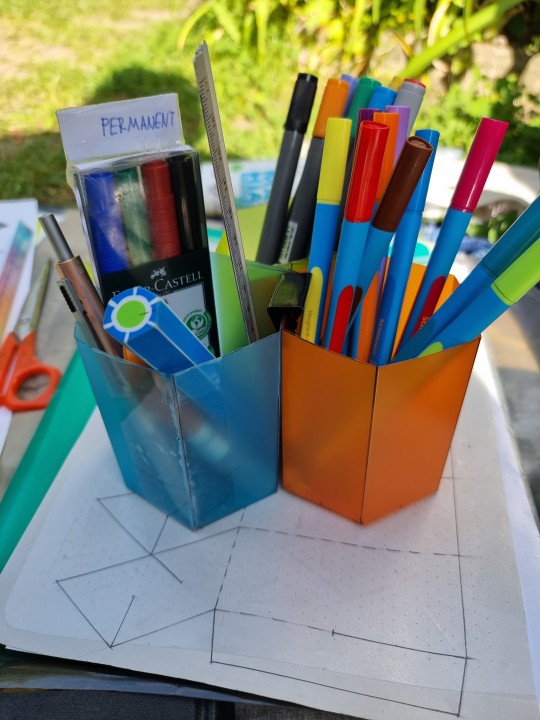
This 3-box-assemble is not stable enough, because the foil I used is very thin and too instable. And I made lots of mistakes and was overally very sloppy with crafting.
Yet, overally this works ok. If I improve the previously mentioned aspects this box assemble will work fine.
I might:
- use thicker material
- be more exact with crafting each box
- consider using 3 clamps for additional stability
- improve the Steckverbingungen between the three boxes
I can insert the three foil boxes into each other.
(I might make photos later. but right now I am very sleepy and want to "laze around". )
Perhaps I might write a better-structured post later as well. (once I crafted the improved model)
after all I enjoy the hexagon design - and how well I could use isometric grid paper to draw the pattern for that box.
#hexagon#hexagons#polygon#polygons#shapes#shape#design#paper crafts#crafts#crafting#my art#art#box#russian dolls#pencil box#pen box#boxes#parametric design#mathy#math#mathy art#math is also usefel for practical stuff while also being beautiful without requiring being useful#mathematics#math appreciation#my crafts#crafty#diy#tinkering#paper art
21 notes
·
View notes
Text
Sam and Max Beyond Time and Space Retrospective: Moai Better Blues (Patreon Review for WeirdKev27)

Hello all you happy freelance police and welcome back to my look at the sam and max telltale games! We're onto season 2 episode 2. After a little christmas in august we're having a science fiction double feature for halloween as this review ended up behind due to a new member of the family.
This is Maddie. She's 5, she's precious, she's very loud , and she's very attached to me.
But even new fluffy good girls with spangly collars can't stop the march of sam and max.
Following up from our heroes adventures in the north pole, this ep finds our heroes dealing with an adventure that's weird even by sam and max standards. And I want to let that sink in because we spent last season stopping a child star hynosis crime ring, starring in a one episode sitcom with a british chicken don knotts, inflitrating a mafia chuck e cheese, running for president against a horny lincoln memorial, murdering the internet and finally facing down with a sentient plankton colony via psychic powers and magic tricks on the moon. And that's not even getting into that guy who would never put his hands down. What was his deal?
So what lies in the greatest mountain of sam and max madness? Stoned Moai, triangular portals, sea monkeys, ghost godlfish, baby jimmy hoffa and horny statue love triangles. So join me under the cut for the madness.
We open with our heroes returning from the North Pole a month after the previous game, with it now snowing, providing a nice atmosphere to things. Before they can get back to the usual banter some fresh nonsense comes in: A triangle chasing their beloved friend Sybil.

It has a neat design too, red, pulsating with lines... it's an excellent triangle all things considered. B+
At any rate we need to stop it, so we go to the wisest sage for weird shit there is: Bosco. It's a nice way to keep him still useful while not having him be one of your item guys. Bosco is getting ready to bunker down from T.H.E.M.
But tells our hero their new foe is a bermuda triangle, an eldtirch shape that sucks people up to another place, and can only be stopped with most of the shapes. Most.. never come into play and are just for a good joke, like blue polyheadrons making them really want to roll them dice and maybe start a live play with a dungeon master with long hair and the voice of god.
The important one is red hexagons stop them.. and the game was REALLY unhelpful with this one. I did have my hints flavor blasted up to the maximum max could do without bursting a kidney.. but he just kept saying the shape and outright told me to go back to the office.. where it entirely wasn't. WE do have a new trophy though, boxing betty. So.. that's nice?
The solution lies in Stinky's diner, where i'd gone earlier since the Cops can't do buisness over the sound of screaming. Amateurs. Stinky can though even with the racket outisde and gives us a granite sandwitch that i'm pretty sure just.. sat in my inventory all chapter. Seriously you don't relaly use it for anything even when you think it'd be obvious like replacing a stone max's ear, and it's more just to set up getting a basalt sandwich from her later. It's on the kid's menu only though.
She is useful in that she has a stop sign for you and with some spray paint from your headquaters, you can make it deep red. Before we go though another beloved supporting character makes a cameo: Flint Paper. I just love how despite being grizzly and willing to beat up random strangers for money, as are we, Flint just.. cheerfully greets our heroes with a hey fellas every time. He's just so happy to see our heroes and they have a deep genuine admiration for him. Like with Sybil in the first episodes, it's nice to see someone our heroes actually like and unlike Sybil, it's nice to see there's at least one person they haven't traumtized. Yet. He's watching Bosco for Bosco's Mom who'se understandably worried about her son because you know, his whole deal.
For now though we go to stop the triangle in the name of love... only for hilariously this all to be mostly pointless as once Sybil stops, Abe shows up , gets sucked in and she goes after him. It's off to Easter Island!
Turns out Sybil and Lincoln are fine and are just enjoying the nice weather. Once again.. this is a dead end puzzle wise as the two are just there to move their subplot along. Unlike the sandwich though, it's at least entertaning.. and mildly creepy as Abe perves on one of the moai present.
Why the bermuda triangle lead to easter island.. is not something we'll be getting into here. What matters is the moai see sam and max as their savior. Well the middle one, a kindly lady moai abe's creeping ion, is. The left one has half his face buried and is contstantly upset, projecting storm clouds when pissed off that are naturally useful, and the right one is

And is largely useless, mostly just sniping at you.
Each has a power of the elements: Rain for the buried one, wind for the nice one and earth for the pedantic douchebag. The fire one was sadly was scattered to the winds long ago, but he did leave behind a son at least to carry on his legacy
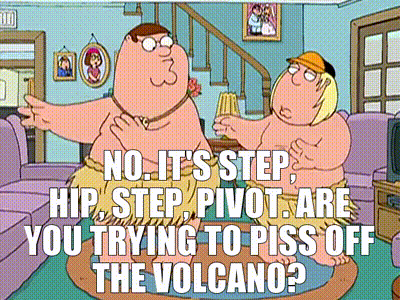
At any rate before we can use the powers of nature itself for fun and profit, we have some problems: As it turns out the nearbye volcano is about to erupt and murder them all due to some understandable but tragic errors
Problem is someone's guarding his lair... and if you haven't played the game yourself, I warn you: You are not remotely ready. I sure wasn't. So whose in our heroes way? Why it's Jimmy HOffa in the body of a baby!
Yeah... look I love Sam and Max for being so gloriously weird. Weird as hell is one of my faviorite kinds of humor as long as their's direction behind the chaos. But It's still easily the biggest what the fuck moment the franchise has thrown me so far and that's with this happening last chapter
youtube
Granted I got spoiled there is some sort of payoff to the Mariachis via a thumbnail, and there is some actual logic behind this.. but even for this franchise "Jimmy Hoffa whose in the body of an infant because he drank too much from the fountain of youth pointing a gun at yoU" is a bit much. And more to the point they NEVER explain why he's working for the episodes big bad.
I.. can't help but love it though BECAUSE it's such a uniquely stupid swing: they had this idea, found a way to have it logically make sense and then put it in the game in full, all while giving us a ton of great jokes as Sam cannot ressit teasing him on the fact he's a baby.
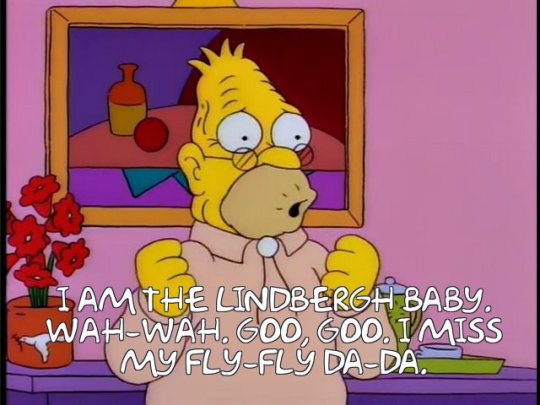
We'll deal with this teamster later, for now we meet the other rugrats on this island: Amelia Earheart, DB Cooper, and The LIndburgh Baby... .
Their mostly here to set up a surfboarding mini game which frustrated me. It's not the game itself, it's a fun enough little distraction if fairly hard to get the analogue controls down on my switch version. It felt like the kind of browser game i'd play as a kid.
My annoyance.. is that the game dosne't tell you that you get nothing for it until you've triggered the right story event. So I went through the whole thing for nothing. Thankfully I also enabled mini game skipping.... I still will TRY not to use it often as these are part of the game and thus need to be evaluated as much as the point and click parts, but in this case i'd already done the actual task so when it asked me to again. As for why again, the trick to getting rid of our little friend involves serving him a drink, using a tiki glass you can pick up at the bar those dumb babies are at. But he'll only take union waitstaff, so you have to play the game to get cerfitied by him. IT makes about as much sense as it sounds. Ah back to normal for this franchise.
To actually do anything though we need some fountain of youth water unfortunately there's something in it

So to take care of them we have to complete a few other tasks
First is the COPS. As i'm guessing is standard for every chapter,we have another driving VR Game from them, this time a fun rythum based one with the beats going as you drive on them. THey thought it'd change the world.. those poor dumb bastards. It's clearly a jab at guitar hero, but it's a decent challenge while still being a lot of fun.
With that we get a car horn and that's the key to our next puzzle: We need to help Glenn Miller, a wwII era band leader whose also now a baby, stage his comback by giving him that new sound he's been looking for. Since the horn plays i've been workin on the railroad, it's just the ticket. He just needs a whistle sound, which you easily get by dumping some gasoline disguised as a drink into a nearbye fire, setting off a tea kettle. He gives you a conch with the single recorded on it. Apparently The Bermuda Triangles also visited skypeia.
Using the dial, we can finally solve our pirahana puzzle.. in theory. In practice it's utterly frustrating if you can't figure out the trick, not helped by Max CONSITENTLY telling me to use the thunder storm moai.
Breaking it down: using the glen miller dial conch, you play it for the nice moai, which gets her whistling. Now when you tick off her half buried friend next to you, which naturally max does with ease and maybe too much glee.. in fact i'm starting a " Going to Hell For This" counter, for each time we ruin someone's life, torture them or what have you to progress, or just for funzies, as we did it a LOT last season and so far have done it a lot. Now I"ll make acceptions for say outright villians or people who deserve it. And even then it'/s about proportions. For example, pelting the soda poppers with urine and bleach? Acceptable, their the soda poppers. Need I say more. But even if Jimmy Two Teeth sucks a LOTTT, nearly driving him to unalive himself is a bit much, not helped by Max's reaction essentially being
He certainly thought it hard enough. So we'll count that one, still keeping leonard hostage after almost a year, sending santa to hell (even if he was possesed), and not bothering to actually help save christmas. So going into this episode we have
Things We're Going To To Hell For: 4
And we can add from this episode taunting that poor moai.
Things We're Going to Hell Fort: 5
So I assumed both from the hint ONLY mentoing the moai , who creates a little storm cloud when uspet and the wind we were supposed to blow it at jimmy hoffa. Instead... it does nothing. It just dissipates if blown too far and never gets near him. Instead we use the portals, which are frustrating as the game makes it clear the two near the entrance are connected.. but dosen't make it clear EVERY portal is connected this way.
The solution is to open one by the fountain of youth, then open another next to the underground moai, have the good moai blow the cloud and boom, a LOT of dead pirhanas and a free fountain of youth. Also
Things We're Going To Hell For: 6
And with that we can use the glass to scoop some up, give it to hoffa... and blink him out of existance.
THings We're Going To Hell For: Still 6 (He Deserved It Yo)
It's REALLY sad when killing someone by making them age themselves out of existance isn't the worst thing we've done today. Or even this month.
This event also moves along Sybil's subplot for the season and who boy. Strap yourselves in because I haven't seen a character nosedive this fast in many moons. So the whole episode, Abe and Sybil have been picnicking, only doing that on Abe's suggestion.. and only so he can oggle the middle good moai. Yeah after several episodes of at worst being out of touch and mildly annoying.. abe's somehow lept straight to the bottom and is perving on someone right in front of his girlfriend and THEN asks her to have plastic surgery to look more like the moai.
Sybil runs off in tears.. and SOMEHOW, SOMEHOW, this gets worse... as Abe THEN tries to hit on the moai. To her credit she shoots him down fast and we get a great response out of him, a casual "that's fair". So he's still funny he's just WAY more of an asshat. I mean granted we just committed two murders in a row, so i'd SAY we can't judge.. but those murders were to save a LOT of lives from death and were of a bunch of fish and a murderous infant man.

Anyways with this we enter our final puzzle set, continuing from the formula laid out last time. Sadly.. they also fall into a fairly trite, terrible stereotype. It's forgivable enough for the time.. but it's still pretty tone deaf. I can't blame them for fixing it as unlike the various lines corrected for save the world, this is a large part of the plot and thus really coudn't be futzed with.. but it's still not great.
Okay so for our final stretch our heroes run into your standard tone deaf "the natives are stupid and belivie anything is their god" plot only this time it's sea monkeys.
Yeah.. they.. really coudl've thought this one out a bit more. We have to convince them max is their god/chosen one/whatever instead, in order to replace an old advesary: Mr. Spatula, sam and max's goldfish whose mad he's died and thus is willing to take an island with him. Now you may recall, even if I didn't name him last time, he died. And he did. THIS IS HIS GHOST.

So to prove ourselves we have to do three tasks. The first is easy and I stumbled into accidently: We have to make the water into BANANG!, an energy drink powder bosco happens to have a lot of.
To get it away from him, we have to torment him.. again. This time we simply radio in, claim to be THEM
And Bosco goes deeper underground, there's too much panic in this town. So we got the powder.. but we also traumtized a friend for life so
Things We're Going To Hell For: 7
Next is adding an ear to a rock formation that looks like max. Once again the sandwitch is useless.. except as a clue. We finally need that basalt sandwitch for kidz, so it's time to use the fountain of youth water on ourselves.. and ONCE AGAIN the game gets frustrating as you transform back very fast from drinking it. The trick is to use a gong I honestly forgot about in Stinky's diner max reminded me of. I can't tell if I just suck at adventure games or this is poor level design.

Anyways we get the Basalt and get a really funnys equence with douchecanoe moai as it turns out dude just needed to blaze it and basalt gets moai REALLY good and fucked up. With that he casually laughs and dislodges a stalctite we use to finish the max.
We then finish this section. The stone feet of the buried moai are needed to anoit us. Also yes they have hands and arms stuck in there. We simply use the shell again, this time on a portal next to the best moai , she whistles, he taps his toes and we win. Kinda.
Problem is the island's still errupting with Mr Spatula planning to take us with it. The only way to stop it? Some clever puzzlery. We get a high preist medallion from the Sea Monkeys, dip it in some red slime, then shoot the triangle, using the portals to send the red triangle through it , eating the lava.. and presumibly murdering someone but we won't worry about that. Our ride home is gone though but Abe offers a lift while the moai celebrate.. before being sad they can't move. Then their abducted by what seems to be aliens!
Moai Better Blues... is a very mixed bag. The writing as usual is hilarious, and while it's a very
Sort of chapter, it's a FUNNY sort of what the fuck is this, from the various babies, to the black comedy shenanigans as usual, to our heroes riding out on Lincoln's head. It continues episode 1's mean streak, but the weirder setting and more over the top weird black comedy bits like unexistinsing hoffa help it feel far less opressive than last time. The deaths and what we do to bosco are way more over the top. Even abe and sybil's breakup, acompained by the mysterious maraichi's, is more funny than genuinely sad. I DO feel bad for Sybil, but abe is such a dick and he gets karmically punished for it as the moai lady SHARPLY rejects him, multiple times if you want, and he looses Sybil.
Gameplay wise.. it's a lot more obtuse. A lot more relying either on memory (Which isn't good for me but is at least fair) or hoping you figure it out and with most of the max clues being way less helpful. It's a pretty meh chapter all things considered and hopefully as we get spooky next time, we also get back to our quality. Speaking of which
Next Time: VAMPIRES! Just in time for the season. And since it's the 2000's their angsty emo eurotrash vampires! Oh BoY! Thanks for reading!
#sam and max#sam and max beyond time and space#sam x ma#sybil pandemik#abraham lincoln#jimmy hoffa#db cooper#amelia earhart#bosco#c.o.p.s.#video games#telltale games#skunkape games
4 notes
·
View notes
Note
------------------
King felt a little weight on his head as Edison chirps "And the crown returns to it's rightful owner!"
He reaches over at the thing on his head, already knowing what it is but indulging in Edison's antics. "I'll put it back on." He says when Edison tries to keep him from taking the thing off his head.
Edison gives up on trying to stop him. "You better!" He huffs affectionately. "Because i spent all week working on that."
It was a paper crown, with one having little pop up paper flowers glued to it's base but otherwise pretty empty. No gems which Edison would normal put on.
"You're such a idiot but you're my idiot." King mused as he inspected the little paper crown. Another one of Edison's little paper creations that he creates whenever he's bored and not going around the site. Though there was something a little different about this one, as it made a little rattle whenever King move it from side to side.
"Oh? I wonder what's in here?" King asks out loud, silently giggling to himself at the way that Edison stares at the crown with all his attention. "Is there a little gift for me?"
They had been discussing about it for a good two months now. Edison was bouncing all over the place whenever the topic was brought up and King had seen his search history even when Edison tried to hide it.
He could practically hear Edison thinking 'open it open it' as King shakes the crown again, hearing as a object thump against the paper.
King smirks a little as he takes Edison's hand. "Come on Sunny, you gotta show me how to open it. I dont want to damage the crown"
"You're just messing with me King." Edison whines but guides King's hand to the little lip at the side of the crown. Lifting it up slightly before letting go so King and open it himself.
The lip at the side was a cap into a compartment inside. A single gold ring with a emerald in the middle sat inside, flipped over on it's side. King checked underneath cap to see a message in Edison's slightly crooked handwriting. "Will you marry me?"
King look up at Edison, who was now adverting his eyes but vibrating in anticipation.
He smiled, picking up the ring, handing it over to Edison. "Yes, Sunny. I will." He answered.
Edison looked like he wanted to just jump on top of King but he held back, choosing to clumsy slide the ring on King's hand. But once the ring was on King, he jumped on the doctor.
King grunted a little from the pressure and his chair rolled back at the force but it didn't matter as Edison was blabbering about how happy he was when he said yes.
"Do you like it King?" Edison asked once he mostly calmed down though he was still giddy with happiness.
King lift his hand with the ring out from his fiance's grasp. The ring had a branch engraving all around it, the emerald in a hexagonal cut. It was quite beautiful to look at. He nodded from the bear hug Edison was giving him. "I love it. It's beautiful."
"I'm glad that you like it." Edison says. "I've been saving up for that one for the entire month then the packaging got delay for three weeks and I spent all of this week making that box." Edison ranted.
Edison was such a loveable dork and he has King wrapped around his pinkie. King listened to Edison's rant about the ring, thinking about the future.
"I almost forgot something." He remembered something on his desk. King released Edison's grasp from himself, getting up as the doctor watched him in confusion. He tries to keep his mind off of the ring around his fingers and fails, a warm bubbly feeling in his chest at the feeling of the ring around his finger.
There was a little secret spot in one of his shelves, a single black box that he was planning to give later that week but might as well do it right now.
King grabs the box, glancing back to check if Edison was still behind and find that he was. Perfect.
King turns around, making sure the box was hidden behind his back, then drops down on a knee. Opening the box to reveal a silver ring with a flower encased in amber, Edison lets out a gasp as he realizes what's happened but stays silent as King clears his throat.
"Michael Edison, my love of my life. My knight in shining armor who as stuck with me during all the ups and downs of this job. Who nearly lose a hand during a breach just to save me." The words spilled out of his mouth, none of it being the words he was going to use when he was rehearsals but still coming from his heart.
Edison had a hand over his mouth to hide his shock with tears spurring in his eyes. King push forward to end his speech. "Micheal Edison, Sunny. Will you marry me?"
Edison doesn't even give him an answer before tackling King. The tears falling down as he repeats. "Oh my god yes King, why did you think you still had to ask?"
"Oh Sunny." King murmured as he push both of them off the floor into a sitting position. "You though i wouldn't get you a ring as well?"
Edison laughed, with a wet grin. "Shhh, you know what i mean my King!"
"Then could i ask you to let me do this?" King asks, holding up Edison's hand in one of his own while his other held the ring.
"You know that i'll say yes." Edison answer, letting King push the ring through Edison's ring finger.
-------------
-soap
Awwwww this is so fucking sweet! Thank you Soap!!
(I can't believe you got tunneled vision to write this with touch tone telephone on the background on repeat and with a wedding happening)
14 notes
·
View notes
Text
So I just went thorough a *eighth* of my bedroom shelf and
HOW DID I KEEP SO MANY THINGS IN HWRE?

(Excuse the doona)
What's on my bed now:
- A Mintie's wrapper
- Papaw Ointment
- The bag of Stuff I Found ™️
-S H E L L bag
- Nail polish
- A travelling toothbrush
- A bath bag of bath bags
- Three masks (that I sewed myself)
- A bunch of badges from Girl Guides (that I got over a year ago)
- A sock puppet I made last year for Drama
- A pencil case (also sewed myself)
- Two lip balms
- Paper hexagons that are meant to be stars but got squashed
- A puzzle that I cheated with because it got loud and annoying when I tried to solve it without the magnet
- A birthday card from half a year ago
- A pencil case (pink) for art supplies
- Something I crocheted about a month ago
- A button
- A needle (sewing)
- Multiple hair ties
- Two recipes
- A notebook
- Three rocks
- A container of sugar (?)
- A scratchie star thing
- A pendant that broke off my necklace
- An old Smartwatch
- Something my second cousin made me
- A box (I'll make another post of what's inside the box)
- A lanyard (?)
- Clay
Holy sh*t
#holy sh*t#why do i have so much stuff#i'll be throwing some of this out#like the wrapper#things i found#i guess
2 notes
·
View notes
Text
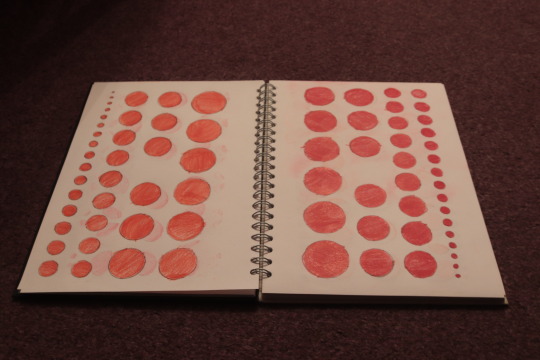
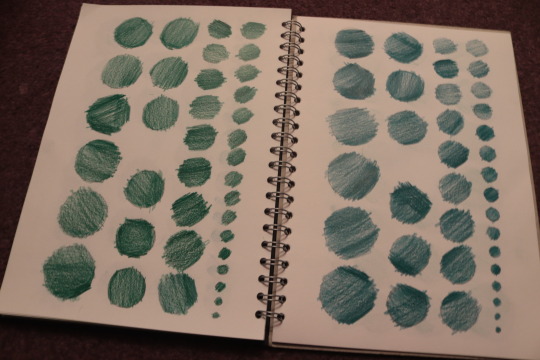
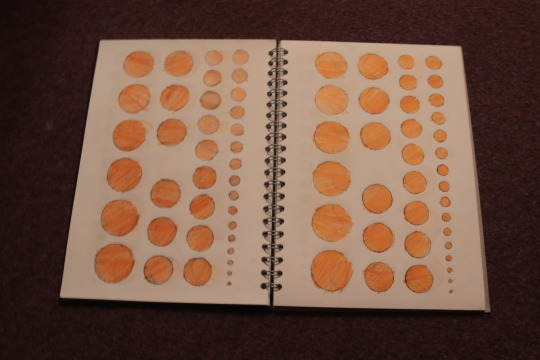
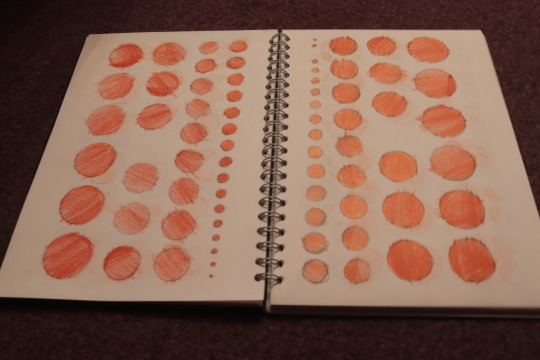
Colour pencils test out part 1

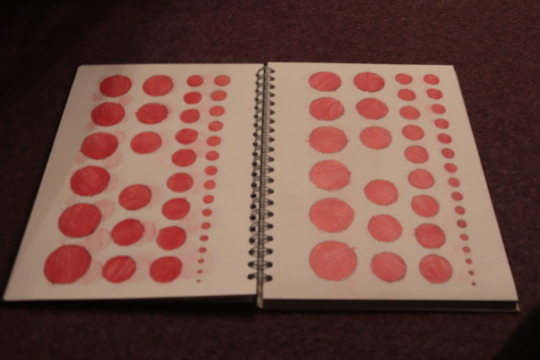

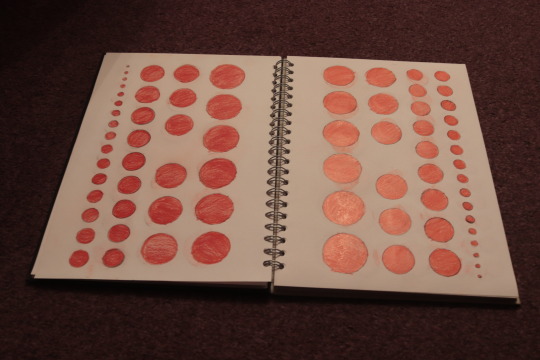
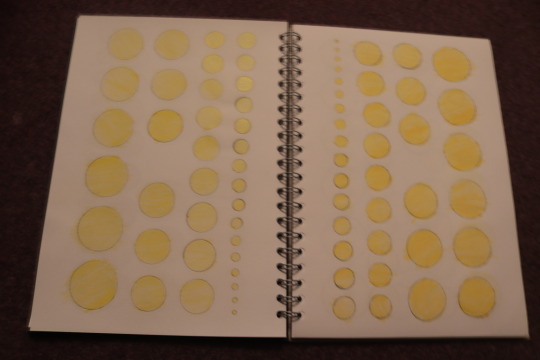

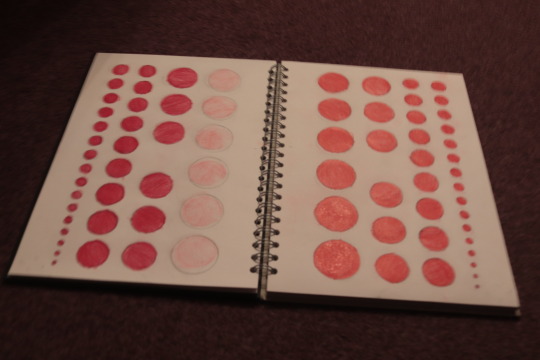


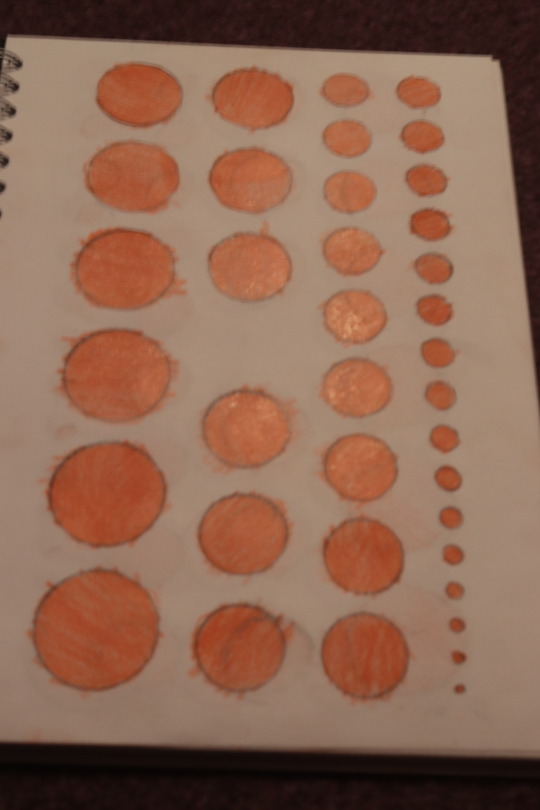
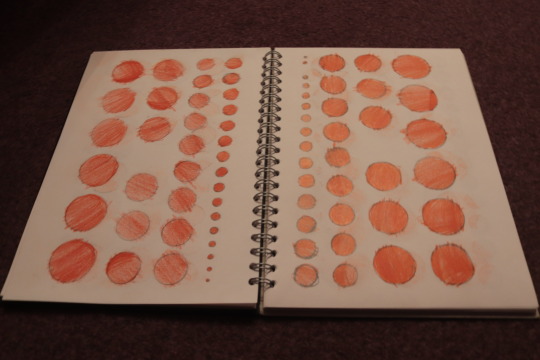


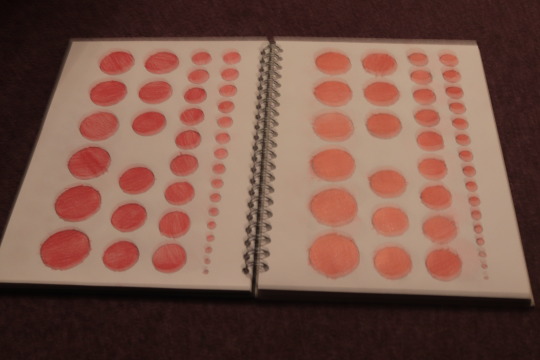
This image is why I decided to post it. I'm going to be talking about the colours. Of the pencils I have been planning to use and experiment with. As an artist, I have to be the least put for myself. The colours are not just the materials around me, but also what I use in it. If I can have an example, I usually use a stencil of circles or shapes like triangles, squares and hexagons. This is the simplest one, and shapes are better to use if you want to test the colours. This is more than what coloured pencils are used for. I used it with watercolour ink and acrylic paint. It is also better to check out not only the pencil colours but also the quality and the brands of the pigment I have been using. I am satisfied with the colour red,d strength and power. I usually. Leaving out some pages when I was sketching, but. When I noticed how they pressed depended so that,t I could see there were some mocks they left the pencils on our mixin; they were noted precisely the same way they came out the colour, like when I was mixing with paint. I wanted. to check out how it would work if I mixing with watercolour because this pencil is a non-watercolour pencil, and I usually see some influencer artists or vlogger artists using watercolour pencils and watercolour pencils and Posca pens and being mixed up as mixing media. Ass for experimentation with pencils whenever I go on trips because the pencils I have is such a thin layer. It's pretty challenging for me, too, as it usually sketches outside. Because it was so thi.So whenever I was on projects, I used a thin layer of a pencil to make a precede stout of drawings and with trips, and when I go outside of life drawing, I use thick coloured pencils or A sick, mixed coloured pencils, usually all chops or online. It could be byte-like as a primary base for pencils. They are mixed up The primary is based on the mixed pencils,s ares created of red, yellow, blue and green. Let's also take modern shops. Could find that for a two or 3-pounded dish. It's also simple because I could like a texture. Pattern also. Whenever I decided to do screen printing or layup printing. It's also great because it's the colours. Thiscolour is responding to me at some point before applying the black and white colour is just part one because we know the old colour I want it to be introducing .g. I want to introduce more coloured circles and not just one of its circles, but also go with triangles, square shapes,s and hexagon shapes. I used crystals because it was like testing the colours while working with my life drawing teacher. He asked us to mixthepaintingsusinggthee gthecolourationn This could be an independent study because it showed I could understand the colours because of the ofstufffI experiment with mixing spare paper or spare sketchbook, not only with coloured pencils or coloured pencils l, so I could bee like addd butt withhdifferentkindss o mat. I could have a little feel for searching for and in my old wort. Also, there are some odd books I had been searching for, and in my old, usually used pieces like a bit of stencil, but I used them. So, I'm calling this a stencil box for myself to test the materials or a plan box to test them before using them independently. Timeor in lessons, how can I support myself and get along with any other materials?. When I was doing my work.
0 notes
Text
Pick, pack, sell - net packaging workshop:

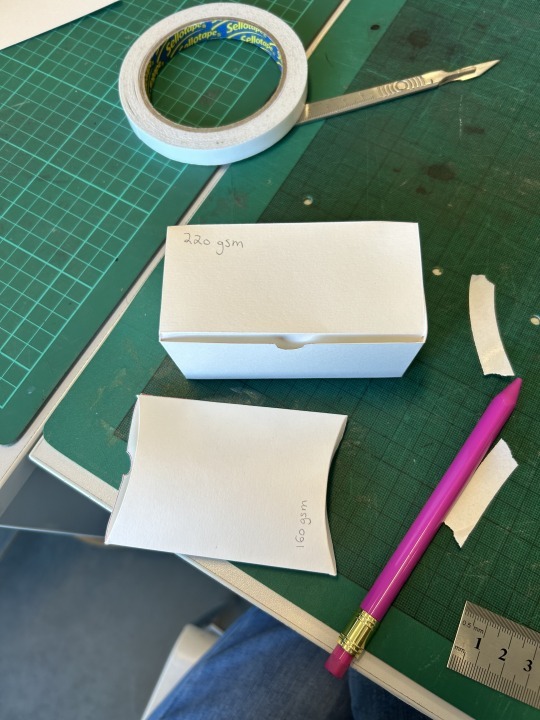

Today, 16/01/24, we had our net packaging workshop with Hannah.
We started by being talked through all the different types of boxes we could make for our projects, how the thickness of our paper will affect the boxes and paper quality/colours too.
We then were given some templates to cut out with our scalpels and start folding and taping together. We started with a gift box kind of box which was easy to put together and moved on to the rectangular box, then the milk carton, then the hexagon box and lastly the matchbox, taking the paper bag home with us to put together.
We used a range of thicknesses for the paper such as 220gsm, 300gsm and 160gsm.
This taught us how to use the website and how to print it off for our projects showing us the range of boxes we could put together using the website.
0 notes
Text
Having the weirdest experience and it wants to write itself out. So here goes.
Hello, my name is Joana Rackoff and I’ve changed my talk to make it more appropriate for this audience. We start with 2 sheets of paper, one covered in squares and the other covered in triangles. You can see the triangles also make hexagons.
Let’s first construct that sheet of triangles and hexagons. We start with a dot and we’ll call that a point. Let’s call that D0. (Getting rid of the ornamentation in the voice is difficult, but this should be as terse as Rachel.) We then attach a flailing arm to that dot, and we imagine that flail spinning around as if there were a circular or even a spherical structure underneath, perhaps even the tip of a large construction but all we can see is the dot and the arm flailing in any direction.
As a note, you can easily derive depth by allowing the flail to shorten. That’s the same as it rotating away, either forward or back, in and out. You can describe all sorts of shapes if you allow rotations. They draw different boundaries, like shadow puppets. IMO, this image embodies the cave used by Plato: the projected existence of the object, like a hand, extends to the dimensions of depth that project. That draws a hole, for example, with a hole being a space with depth, like a cube or box or bubble. This relates to elliptic functions, but I don’t know how to simplify those sufficiently for this talk. Suffice to say they draw these projected holes, so the exact quality of those holes as projected manifests the depth and thus shape of that space. That is why elliptics are so useful in cryptography and in blockchain: they draw shapes over depth and project those, and that enables a vast potential compared to flat projected flat.
(Note: have you ever seen something that deep about elliptic functions? I haven’t. This is getting scary because she knows stuff and I’m realizing my job is to let her out.)
Where were we? Oh right, we had multiple flailing arms connected to dots. Since the arm connects at one dot, why can’t it connect at both? Or to be more rigorous: how would it know if it’s connected at one dot if the ends switch each time it checks? Like I’m here at this spot and that reads 1 because the other spot is now 0. Everywhere I go there’s a connection. Why? Because everywhere I go all the switches flip. How far out do they flip? To the limit of the flailing arm? Those are more difficult question we can talk about later, but for now focus on the fact that if we connect an arm to a dot then we can connect 2 dots by connecting and disconnecting that same arm. Maybe that approaches simultaneity, meaning it looks to us like there’s no alternating because it happens so fast we can’t see it. That is a version of the quantum wave concept of matter. You can see that in action by waving your hand in your face: the fingers sort of disappear as they spread over the waving space. Then look at your hands and think: these are still enough so they are solid enough that they feel like my hands, that they convey information from the outside, and they express how I feel on the inside, but they are clearly not solid like rocks because then they couldn’t act as my hands.
The next step is to see what this constructs. It helps to have labels. We called the dot D0, so let’s call the dot with the flailing arm D1. Then we can construct D2 by adding a D1. That makes a classic segment looking thing with 2 dots connected and an arm. Except note the arm can be at either end because that alternation or flickering back and forth between the two dots would mean the arm is either attached that way or not, meaning it’s free or not at each end.
We can see the triangles come next: we made D3 by connecting a third D1. Now we have a new stable configuration and the label we’re using for that is Triangular: it’s not merely an equilateral triangle but a form of relations which connects inward and thus around the Triangular but which also relates outward because each of these dots has that flailing arm connected and that exists when the arm is not attached to make a triangle.
This is a good spot to go over more labels. Let’s call the dots Ends because now we can see they’re at the End of different connections that read 1 or 0. Let’s call the flailing arms 1Segments: they extend out from the End. And let’s call them 1-0Segments when they run from End to End, meaning each End is 1 when the other is 0 and vice versa.
So we now have Ends, 1Segments, 1-0Segments, and we have constructed a triangle form, which we will label bT for basic triangle. A bT describes the relationship of 1-0Segments and the reach of the 1Segments which exist when that End reads as 0. Note that when you count 1 then 0 or 0 then 1 around a bT, in either direction, each End alternates 1 and 0 or 0 and 1.
We can continue to build shapes. The next is obviously a square. We’ll talk about those in a bit. Look instead at the idea of the flailing arm as describing a dimensional shape projecting on the paper. It can be a smooth circle or it can be some other shape. We draw those shapes by imagining that arm moving a bit, like a clock hand, and that ticking counts all the way around as seconds or minutes or hours, like it factors all the movements the arms can make and this is the shape that makes. So now you’re counting across the length of that movement. That path is the same as the circle when the ticking has tiny length but it diverges as the length grows because now we count across that distance rather than the full distance which could be reached using the same flail length if the gaps or ticks were smaller. It’s like saying the flail shortens, meaning the structure has rotated, so a line draws across that gap. This generates the regular polygons. You can see an obvious example in the sheet with the triangles and hexagons; hexagons are exactly what I mean.
Remember, this creates an object with depth which projects to the sheet of paper. That hexagon draws in that depth and projects to this surface. What does that mean? Let me give you some examples. I can run or walk a mile and it’s still a mile. In music, you count the beat as say 1 2 3 4 but can play a note that takes up part of one of those beats or all of them, but it’s still the same time signature and the same length measures. Then imagine that you are the actor and you need to cover a mile: then the time, effort, clothing choices, etc. all make a specific flailing arm that connects you to all the spots along the way while the entire journey is still a mile which others cross at their own speeds, with their own specific attributes. Like I’m in a car and you’re on foot. Or I’m hopping on one foot and you’re a drunken wanderer. As we endow Ends with more connections, we define them with greater specificity and thus they make different connections out of the potential connections they could make. I’m getting ahead of myself, but I find this exciting.
We have a label for this process by which depth translates to projected polygons: Recombinance. It will be explained in much greater depth later.
The next step is to visualize each of those ticks, each of those gaps, as 1Segments and 1-0Segments in which 1’s and 0’s pass around to maintain the structure in stable form. Or rather, since this is an ideal, this is the structure to which you try to fit, like when you’re balancing and you can’t avoid tipping until you get better at the skill, which you can see in people who do that kind of movement for a living or for religious and spiritual reasons until they look and seem closer to that ideal form. A few people can balance on just the tops of their heads, no hands. That takes great alignment and control.
This introduces something we call D-structure. It is extremely simple: it consists of Ends and 1Segments. The mathematics behind these ideas will be developed as we continue.
We can see that D-structure constructs and comes apart or reduces. The mechanism is the same as above: they’re only attached when they’re attached, so they may attach however they may attach. The math here is particularly lovely but very complicated. That is why we brought up Recombinance: think of it as a catch-all for all the processes and thus the math behind those transformations.
The next step is to consider the actual structures we’re looking at. I want to introduce a few ideas and then we’ll wrap this up for now. Take a look at the Triangular, start at an End and count around the bT. How do you know you’re back? What if you’re actually on the far side, on the other side of the 1-0Segment that embodies the choice from your perspective of go this way or go that way? And that’s true for each End. So really, you only know it’s the same spot if the other spots say the same thing, and that means each of those Ends relates over each of those 1-0Segments it faces to other Ends outside the bT. That’s exactly the flailing arm process but constrained to maintain these specific relationships which maintain the 1’s and 0’s.
So now from a single segment, we have a triangle, then a diamond, then 3 diamonds connected by a central bT. If you look at equilateral triangles, on what we call a Triangular sheet, then you see these constructions. We call this fT for fundamental triangles. They’re fundamental as opposed to basic, though the labels can be switched, I suppose, to indicate a construction level using bT’s once the concept of bT has been estalished.
As you can see, an fT contains one bT that’s upside down versus the other 3. That enables me to introduce the concept of Irreducible. It also has 2 levels, one basic and one constructed using the basic form.
At this point, the mathematics becomes too complicated for this talk. We need to get to a concept we call I//I, as in aye-aye or eye-eye, with the former meaning I communicate yes I heard you and yes I will and the latter doing that face to face. That requires constructing not squares but grid squares, and that is where the richest results await.
Okay. So that was interesting. Hard to control the vestibular function through this but she’s coming through clearer by the day. Everything above is backed by lots of math. I mean a flail can be described as attributes across a set with algebras being the process paths, and so on. But all those depend on the construction of gs and the mechanisms of I//I, SBE, H/D, fCM, etc.
But this? You know how much effort it took to get to this spot where I can stand up with a tablet and maybe even literal sheets of paper with a projector and talk as I actually am. This is the way I remember me from Storyline.
0 notes
Text
Benefits of Using Honeycomb Paper Packaging for Packing Items

Finding eco-friendly substitutes for everyday products has become a primary goal in a world where sustainability is more crucial than ever. While wrapping items, we always rely on the classic bubble wrap, but things are changing right now. People become more cautious about the environment and have switched from plastic to more sustainable elements. Thus, people created honeycomb paper packaging as an alternative to bubble wrap. So before putting the items in the carton box you collected from the carton box manufacturer, wrap the item in honeycomb paper.
Honeycomb paper not only benefits the environment but also other benefits and we will be discussing all these in this article. So, let's start the main topic without any delay.
Also Read: How Paper Pallets are Better Than Wooden Pallets
Advantages of Using Honeycomb Paper Packaging
Sustainable in Nature
A Kraft paper-based, environmentally friendly substitute known as honeycomb paper wrap is created by sewing several bands of the material to form a continuous loop of hexagonal cells. The fact that honeycomb paper wrap is manufactured from renewable resources, including die-cut Kraft paper, makes it 100% curbside recyclable and straightforward to discard.
Lightweight but Strong
Although packaging made of honeycomb paper is lightweight, it isn't any less durable. Compared to other solutions, honeycomb paper packaging offers higher strength and stiffness. It can accomplish a high level of protection and trustworthy, safe transit of goods because of its capacity to buffer and absorb shocks.
Paper honeycomb packaging offers many organizations a cost-effective way to reduce product weight and shipping expenses while still receiving the strength and security it offers.
Also Read: Learn the Major Differences Between Corrugated Pallets & Honeycomb Pallets
Cost-Effective
Compared to alternative packaging options, the honeycomb manufacturing technique uses fewer materials, making it less expensive to create and buy. Not only that, but businesses frequently make multiple savings when choosing honeycomb paper packaging because of the decreased shipping and handling costs and the decreased need for storage space.
youtube
Good Flexibility
Due to its extensible honeycomb structure, honeycomb paper packaging has excellent flexibility and elasticity. This implies that even products with awkward shapes can fit neatly in a well-protected box. Additionally, it results in a smaller package, which lowers shipping costs significantly and preserves handles, uneven edges, and various other odd-shaped components.
Honeycomb paper packaging can be precisely formed around your product to provide the best protection, whether you are packing a single or more oversized item. So, get your eco-friendly packaging materials near your location.
These are some benefits companies can enjoy if they start using Honeycomb Paper Packaging to deliver the package. This will also help them to show that they are very responsible regarding the sustainability of the environment.
#honeycomb manufacturers in india#honeycomb paper packaging#honeycomb box manufacturers#eco friendly packaging manufacturers
0 notes
Text
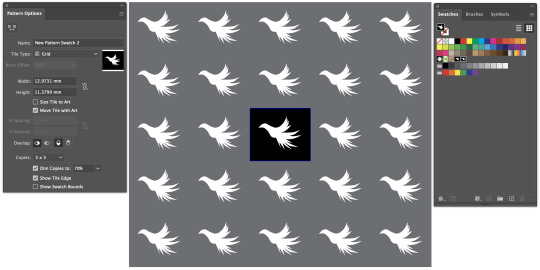
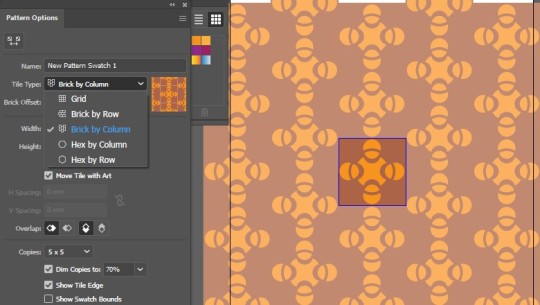
Fundamentals 1: Week 11
17th May
In today's fundamentals class we are learning how to make end papers with tessellation patterns! End papers will be a part of our children's book project as they'll be our first and last spread in the book. First off we briefly discussed some handy shortcuts which are:
Command + 2 = Lock (lock an object in place)
Command + 2 + Option = Unlock
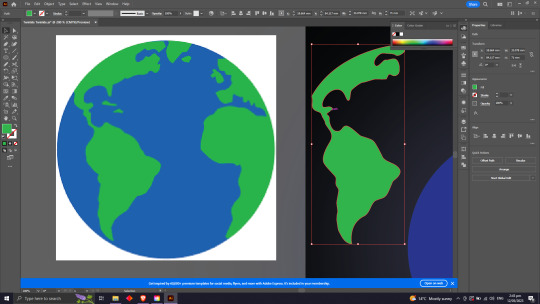
We get straight into work by opening up an A4 landscape file in Illustrator. Toby instructs us to create a black box and draw a design inside of it. He decided to draw a crane and, being quite inspired, I decided to draw the same thing. This box and design had to be quite small on the page so that it would be easier to work with when it comes to making the pattern.

Next we opened up our swatches palette and were told to drag the image (with both the box and drawing selected or even grouped together) and let it go on top of the swatches palette. We could see that an icon of the drawing was added to the collection of swatches (can kinda see it in the image below).

Next we drew a random blob shape on the art board and made sure to have all of the handles on the anchor points either horizontal or vertical. We made sure the object has a fill (could be any colour) and no stroke.


After this was all ready to go we simple had the fill selected and then clicked on our pattern swatch in the swatches palette. As you can see below the blob's fill is now a repeated pattern of our drawing. Cool!
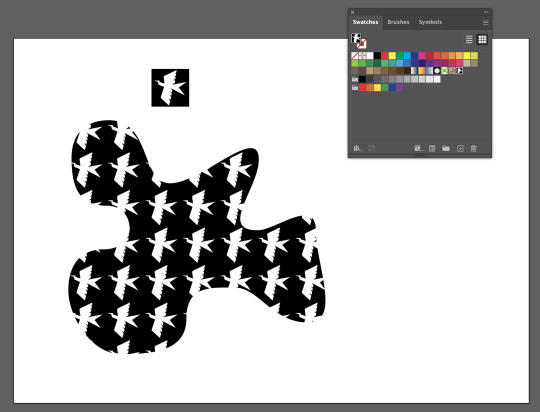
What we could do once filling the blob with our pattern was double click on the pattern in the swatches palette to open the pattern options palette. This is a full menu of all the adjustments we can make to the pattern (excluding colour). Toby showed us that we could also adjust the pattern while in the pattern options mode (we might want to change the angle that it's facing, make it larger or smaller, etc.). You can see this below in the right image.

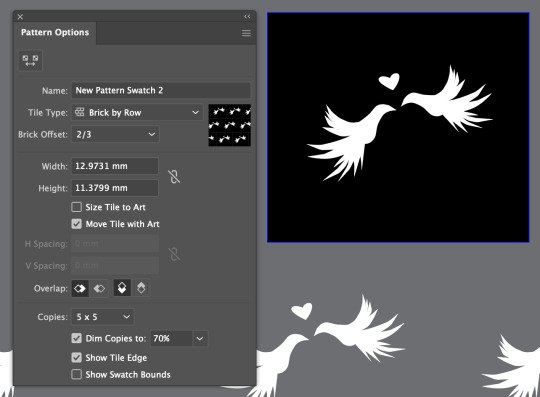
Next we decided that we wanted to try make the pattern with a different shape, which for this task was a hexagon. All we had to do was use the hexagon ellipse tool to draw up a hexagon roughly the same size as the square. We then held down option, clicked and dragged the crane drawing across to create a copy of it which we then placed on the hexagon (seen below). Toby also suggested we make a frame for the hexagon, which we could do by using Command + C to copy the hexagon and then using Shift + Command + V to paste it in place. After this we made it have no fill, a white stroke, and also downsized it to something that looked nice.

Using the same process as before, we dragged the hexagon and drawing over to the swatches palette to create a new pattern swatch. I then created a copy of my original blob outline and filled it with the new hexagon pattern. As you can see below it looks different because the hexagons are only line up in rows like the square patter was. We can go into the patterns options palette and choose to have the pattern "Hex By Row" which makes the hexagons slot in together.

We learnt that we can also adjust the colours of the pattern while in the patterns options mode. Below you can see that I made a nice yellow-orange gradient for the bird and changed the frame of the hexagon to a thin yellow line. It almost reminded me of the mockingjay badge from the Hunger Games.

The last thing Toby wanted us to have a look at was fixed patterns. With the patterns we had in our blobs, we could move the patterns around within the shape without the shape moving - meaning they weren't fixed in place with the shape. If we wanted to have the pattern fixed onto the shape we can select the object, go to the object menu, go to "Expand", make sure "Fill" is ticked and then hit Ok. This will then have the pattern fixed in place on the shape, so if the shape is moved the pattern moves with it.
The image below shows the difference in the preview mode (outline mode? I can't remember what it's called) between the blob that does not have the pattern fixed in place (on the left) vs the one on the right which does. The excessive amount of pattern shows that the pattern is completely covering the shape (or can be seen as underneath the shape) so that there are no gaps, and all of the pattern is attached and moves with the shape.

That was everything we learnt in our class today! I had fun learning about these as I've definitely tried to make a pattern in the past without all of this knowledge and failed miserably because it felt too complicated. This class provided some great tips and shortcuts that I'll certainly use in the future, especially while making this children's book!
0 notes
Text
Week Eleven
For our final session we learnt about End Papers and how to make repeated patterns in Illustrator.
End Papers are patterned page spreads on the first two pages and the back two pages of a book. They should match, ie. be the same design, and should be consistent and cohesive with the overall aesthetic and colour scheme of the book.
To create an End Paper tileable design we're going to go into Illustrator and start by drawing a box (with no outline) and then drawing something inside that we want to have repeated.

To make this easier we can select the box and go Command/Control + 2 to lock it so we can move our anchor points with ease without accidentally grabbing the box. Option/Alt + Command/Control + 2 will unlock anything you have selected.
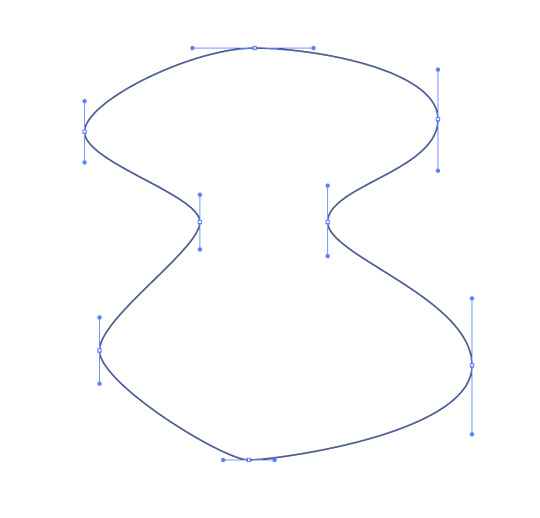
We also went and drew a curvy shape that we will eventually fill to test our pattern. We spent some time in class finessing this shape until our handles were neat, tidy, and how we wanted them:

Once we were happy with our drawing, we unlocked the box and dragged the whole tile into our Swatches palette and then filled our shape with that swatch.
By double clicking our swatch we open up our pattern settings where we can make pick our tile type, change the colours, the offset, and make general changes/updates to our drawing.
We were encouraged to have a play around with the different settings so we could get a feel of what was possible with this tool.


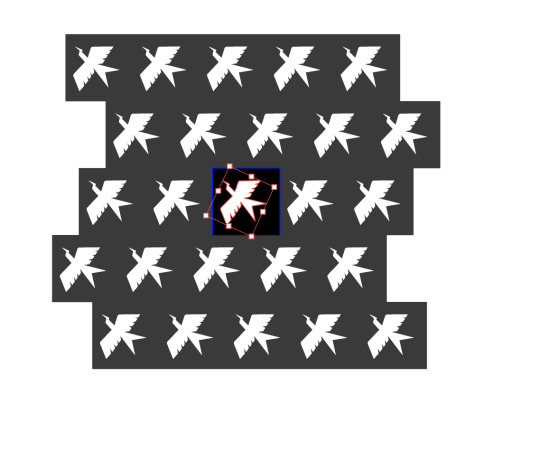
We were then shown how you can follow the same steps but with a hexagonal tile system:

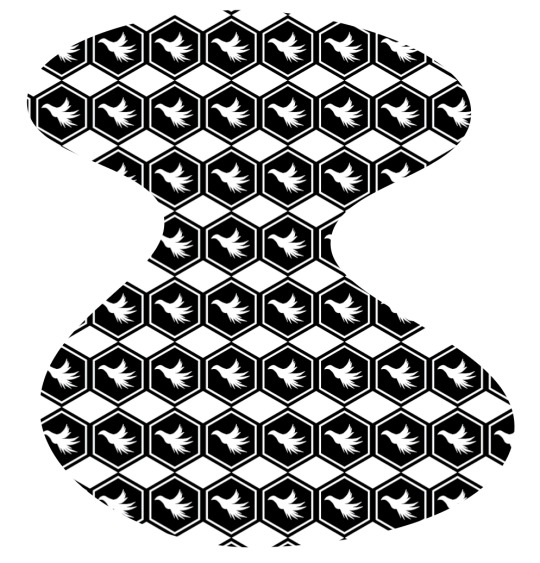

Here are two of my curvy shapes all filled in:
With how it is all set up currently, if you were to move the shape the pattern wouldn't move with it - instead the shape would glide over the pattern. If we wanted to lock the pattern within the shape and essentially "fill" it with the content we want to go Object -> Expand.

If we go into Wire Mode (Command/Control + Y) we can see our shape is now "full" of the pattern, whereas the one on the left is empty since we haven't expanded both. This also makes the individual tiles editable if you wanted to make changes to one without editing the rest.


The last cool thing we learnt today is if we make some text and go Type -> Create Outlines we can then edit individual paths and handles of the font.


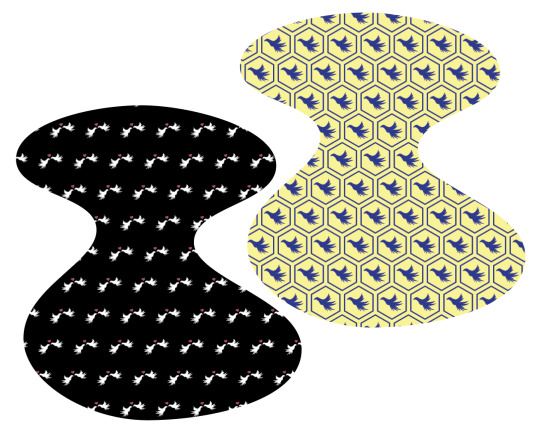
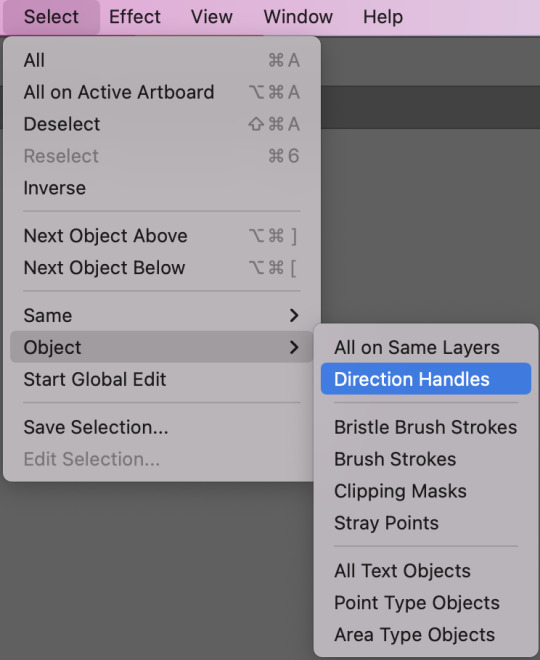
And if we want to bring up all of our handles at once we need to select the shapes we want to see handles for and go Select -> Object -> Direction Handles.
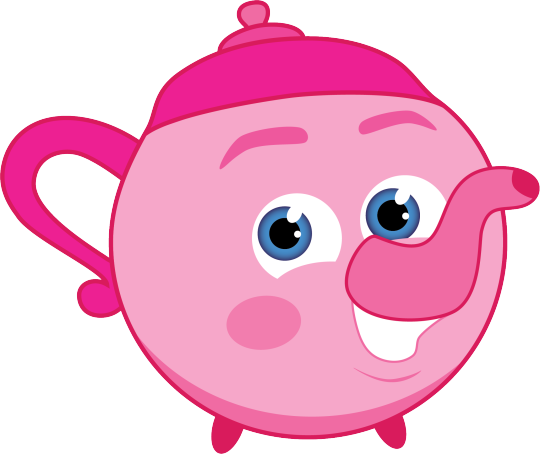
We're in the home stretch of this paper now, with one more week to finish our book designs I am trucking along creating content for my book. In the final part of this session we had self-directed time where I got most of the way through a pink teapot vector that I plan on using as one of my images.
While I completely forgot to document the process, I used the same techniques I have previously written about and here is the completed teapot:
I really enjoyed this weeks session as I found real inspiration in the pattern making process and I am looking forward to using this in future whenever I can.
1 note
·
View note
Text
Children's book + Fundamentals #11
Now for the Final assignment:
We will create a 12 page A5 document. The document will be the beginning of a book of 5 (or more) nursery rhymes / children's songs / stories.
We will choose the selection of rhymes/songs and / or stories to populate the book with.
The book's content should be arranged as follows:
page 1: Cover, with title "Children's songs". - with or without a picture
page 2: and 3 'end papers' (more on this next week but I will explain today)
page 4: contents page
page 5 - 9: the 5 songs
page 1 and 11: end papers
page 12: back cover
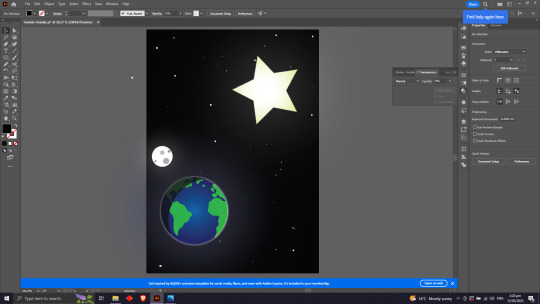
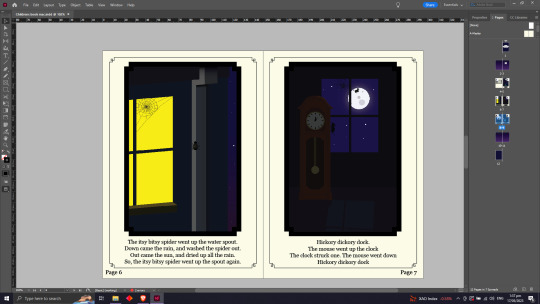
I decided to start this project by doing all the illustrations first. The brief said a minimum of 2 illustrations, but I decided to do one for every nursery rhyme. The nursery rhymes I decided to use were Hickory Dickory Dock, Row row row your boat, Incy wincy spider, Hey Diddle diddle and lastly Twinkle twinkle little star. I went into this project wanting it to be mainly night scenes since I thought a book for bed fit nicely. I cracked on in Adobe illustrator and got to work. I thought it would be a cool idea if all of the images I drew connected each story in a way. So In illustrations with the moon I would have a cow jumping over it to link it back to Hey Diddle Diddle. In some I might have the house from Incy wincy spider and Hickory Dickory dock. and in most I would have a star in the sky for twinkle twinkle little star which will draw the book to an end.
I started of on most of the illustration by giving them a blue and purple gradient background for sky. I then added to landscape (eg. Mountans, Hills, Walls ect) I colored them appropriately and added some finer details like shadows or reflection of moon or lights ect.


In most of my illustrations there is a creature of some sort. For these I usually found clipart online and cut them out using Curves and anchor points. For most of these I just wanted them in silhouette and this would also save some time since I'm on a crunch.


With some other objects I just used pieces out of stuff I found online, creating the rest of it by hand.
Another big thing I learnt is how useful the outer glow tool is. I used this feature for all of my Illustrations and it did an amazing job at adding atmosphere to a scene.
Now to put it all into Adobe InDesign. I created an A5 document and added 12 pages. I started off by setting up the parent pages. I changed the background to an off white color, because I quite like the look of older nursery rhyme books, You will also see examples of this with the simple cover and fancy line work I will show later. I added Page numbers and set them to a special character by making them present the number of each page. I then added frames for the Illustration. I made one frame and simply copy and pasted it onto the other pages. The reason I didn't just put them on the parent page is because I wanted to paste the illustrations into them making it an easier and cleaner process. I then Pasted the images in and added in the nursery rhyme text. I chose to use the font Georgia because I think it fits in well with the overall look and feel of the book.

I also added the contents page in a similar style.

For the cover I decided to go for an old fashioned basic look. I Liked I chose a dark blue because of the old look it has and it also fits in nicely with the color scheme of the rest of the book.

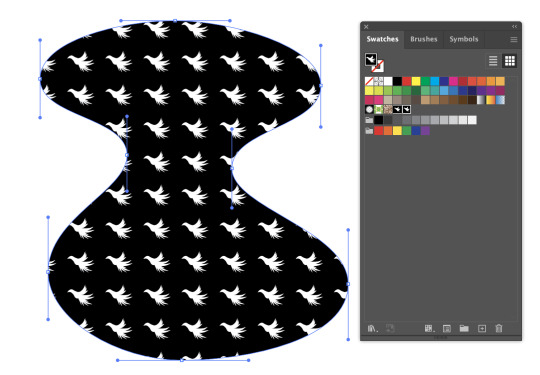
Now finally for the end papers. I started this off by finding some clipart in images that I thought would go with the overall theme of the book. I ended up choosing a flying owl and then tracing using the pen tool to make my own.


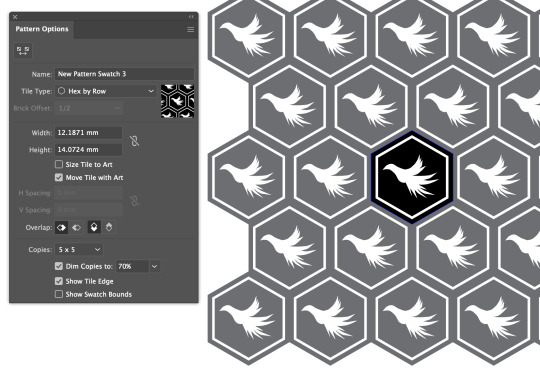
I then put it in a box and added it to the swatches. I tested out this process by making a curvy shape and then adding the swatch to it.
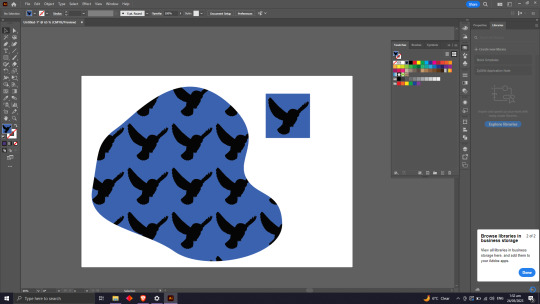
I then decided to play around with it a bit, so I changed the square box the image was in to a hexagon shape. Then after adding that to the swatches I double clicked it and messed around with the placing a bit. I ended up creating one that I thought had a cool 3D look to it. I think the gradient also adds a 3D element also.

Then after this was done I put it into a shape that would fit my InDesign document and exported it on.
0 notes
Note
EXT. NEW HIVE CITY ANGLE ON: Bees sunning themselves. A TIMER DINGS, and they all turn over. CUT TO: EXT. CENTRAL PARK TIME LAPSE of Central Park turning brown. CUT TO: EXT. HiMERU’S FLORIST SHOP CLOSE-UP SHOT: HiMERU writes “Sorry. No more flowers.” on a “Closed” sign, an turns it facing out. CUT TO: SEQ. 3700 - “IDLE HIVE” EXT. NEW HIVE CITY - DAY Niki flies at high speed. TRACKING SHOT into the hive, through the lobby of Honex, and into Kohaku’s office. CUT TO: INT. KOHAKU’S OFFICE - CONTINUOUS Niki meets Kohaku in his office. Kohaku’s office is in disarray. There are papers everywhere. He’s filling up his cardboard hexagon box. NIKI (out of breath) Kohaku, you wouldn’t believe how much honey was out there. KOHAKU Oh yeah? NIKI What’s going on around here? Where is everybody? Are they out celebrating? "Bee Movie" - JS REVISIONS 8/13/07 100. KOHAKU (exiting with a cardboard box of belongings) No, they’re just home. They don’t know what to do. NIKI Hmmm. KOHAKU They’re laying out, they’re sleeping in. I heard your Uncle Madara was on his way to San Antonio with a cricket. NIKI At least we got our honey back. They walk through the empty factory. KOHAKU Yeah, but sometimes I think, so what if the humans liked our honey? Who wouldn’t? It’s the greatest thing in the world. I was excited to be a part of making it. ANGLE ON: Kohaku’s desk on it’s side in the hall. KOHAKU (CONT’D) This was my new desk. This was my new job. I wanted to do it really well. And now...and now I can’t. Kohaku EXITS. CUT TO: SEQ. 3900 - “WORLD WITHOUT BEES” INT. STAIRWELL HiMERU and Niki are walking up the stairs to the roof. NIKI I don’t understand why they’re not happy. We have so much now. I thought their lives would be better. "Bee Movie" - JS REVISIONS 8/13/07 101. HiMERU Hmmm. NIKI They’re doing nothing. It’s amazing, honey really changes people. HiMERU You don’t have any idea what’s going on, do you? NIKI What did you want to show me? HiMERU This. They reach the top of the stairs. HiMERU opens the door. CUT TO: EXT. HiMERU’S ROOFTOP - CONTINUOUS Niki sees HiMERU’s flower pots and small garden have all turned brown. NIKI What happened here? HiMERU That is not the half of it... HiMERU turns Niki around with her two fingers, revealing the view of Central Park, which is also all brown. NIKI Oh no. Oh my. They’re all wilting. HiMERU Doesn’t look very good, does it? NIKI No. HiMERU And who’s fault do you think that is? "Bee Movie" - JS REVISIONS 8/13/07 102.
himeru it is also very much partially your fault . dont help your bee bf sue the human race next time smh
1 note
·
View note
Text
Packaging Design & Feedback
I test printed my packaging design to see how the colours would look in print and also get an idea of how the packaging will interact.
I tried to print the packaging on A3 paper but the printer put it onto A4 instead so these prototypes are not full size.


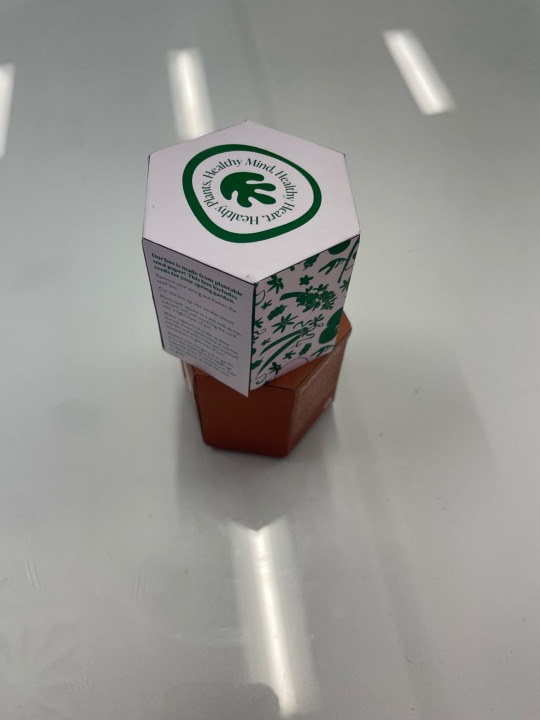


I'm really happy with the direction this packaging is going in. The hexagon works really well and is so much easier for me to make. I also love the way all the colours look printed and aesthetically the sleeve works really well with the dispenser. I need to work on the sizing of the sleeve though, because it didn't fit properly over the dispener.
Feedback
I asked becky for some feedback on my packaging and logo design.
the closed 'P' logo works a lot better than the open 'P', it's easier to read
The illustrations and logo work a lot better together now that they have the same style but the illustrations might still be too detailed, this could be fixed by scaling them up
The sleeve and hexagon idea works a lot better than the box
You won't really be able to print white on card so should look at other colours, potentially brown.
She also suggested I look at this designer, Adrian Frutiger, as he has a similar organic, blobby, flowy style. I really like the forms he's created in the book. They feel really free and natural. The texture in the shapes are really nice as well.


0 notes
Text
Week 10 & 11
- We went though and looked at patterns and how to design them on illustrator, which was for our end papers in the book we designed.
to do this we made a box then we had to draw something inside (I did a star)
we then created a curvy shape to test the pattern out with later, we then opened swatch bar to pick the colour we wanted. when then dragged the pattern into the bar and double clicked to get the pattern
we used the polygon tool under the rectangle tool to create a hexagon design. (hex by row)
Patterns - to make turn switches on and then make a square of any colour and a drawing and colour it white, sit them both on top of each-other, and group them drag into colour switches
Make a circle or shape, click on it and add the pattern you added to switches
Shortcut
Shift x = gets ride of the inside of shape if you have it coloured
Double click ion pattern in switches and you will get pattern options click help by row
0 notes
Text
Indesign Book continuation
End Papers
There to have a serpeartion between cover and content. Huge evolution of design visable through end papers from books.
Learning how to make Patterns In Illutrator
First Make a colour fill square, and a shape to go inside it

colour how you want and move into place ontop of square

Now just group the selection and drag into your Swatched Folder

make a shape and click your pattern to fill it

Now if you double click on you pattern swatch to get to Pattern Options

Here you can adjust the pattern’s properties, like Tile Types and Brick Offset
THe highlighted centre box is editable. Editing this will update your pattern in real time


Now we’ll try a hexagonal pattern by making our swatch image inside a hexigan (polygon tool)
Then copy your previous image into it
Group togther and drag into swatches

change the hexagon pattern options to sit properly togther by double clicking on swatch again

FOr making Endpapers in an A5 spread, make a Landscape A4 to cover whole A5 spread in In Design
0 notes
Last Seen Blogs

bookology
BOOKOLOGY

vladan-fr-blog
Untitled
luv4won
my love for won

craykaymarie
Dancing Through Life
🩷💜💙🩰💍💍🤱

applezboyz17
Untitled