#hopefully not annoying anyone with this tag
Text
learning to spin on a drop spindle: a beginner’s lengthy yet comprehensive guide
I put this monograph together for a friend, but many other people wanted to read it as well, so here it is !
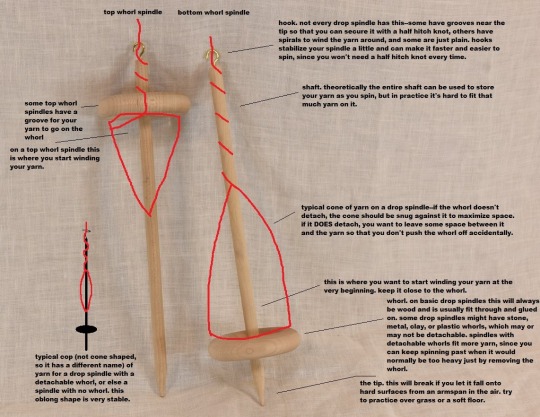
Fig A: Parts of a Drop Spindle. (image source. notes are mine. Click for higher res !). Apologies in advance for the lack of image descriptions--for the most part I use images because I can’t figure out how to describe the thing in words, so describing the images is kinda the whole issue. If anyone wanted to write them for me I’d add them to the original post in a heartbeat !
How to Get Started Drafting and Spinning
So, you have your fiber and your spindle--now what ?


Friendly pre-tutorial reminder that radfems can fuck right off if they think I’m writing any of this for their benefit. I’m not. I hope they all choke on their spindles <3. This is a safe space for trans people first and foremost.
(Check out this post that goes into picking a spindle and your first fiber, if you don’t have one yet)
First, you might wish to practice drafting a little. Drafting is the process of drawing the fibers out from, for example, a strand of roving or a rolag, into a thinner, airy length. To draft, loosely hold your fiber in your dominant hand, and pinch the very tip of the fiber with your thumb and forefinger of your non dominant hand. Then gently pull. If you pull all the way, you should notice that your fiber detaches from the fiber source eventually. For yarn, we want very very long lengths, so we don’t want that to happen. To get a continuous length of drafted fiber, simply change where you’re pulling from as you go. For example, you can draft out 2 centimeters/1 inch of fiber, and then move your fingers 2 cm/1 in back toward your fiber supply, and draft again.
The thinner you draft (or pre-draft*), the thinner that fiber will spin up. Once we start spinning, you’ll see how adding twist immediately compacts the fiber quite a bit, so you need to draft much thicker than you actually want your yarn to be. When pre-drafting specifically, if in doubt--draft thicker. You can always draft it out a little more as you’re spinning.
Figuring out how to draft smoothly can be one of the harder parts of learning to spin, but even before knowing how to do it perfectly you can still create good yarn.
Check out The Joy of Handspinning website to see drafting in action, as well as several different types of drafting.
Also check out this video explaining pre-drafting roving. 1:00-2:30 is especially helpful. If it’s not clicking from this video, search youtube for “pre drafting fiber for spinning” and watch til you have a better understanding.
*pre-drafting just means drafting before spinning--so it’s the same type of thing as drafting while spinning, but without having to wrangle your spindle at the same time. I’d recommend pre-drafting at least a bit of your fiber until you feel comfortable doing it. Then you can spin with your pre-drafted fiber, and it’ll be easier than if you hadn’t pre-drafted.
Tips: If you have a bottom whorl spindle, you may also want to practice spinning the spindle before it has any fiber on it, just to get a feel for how it moves. You could do this with the bottom point in a bowl or on a flat surface like a book or table. Try rolling the top of the shaft between your thumb and index finger. Don’t worry about it toppling over frequently--your spindle will be suspended by the yarn that you’re spinning, so it won’t topple !
If you have a top whorl spindle, you might have a harder time getting it to spin without being suspended, because the center of gravity is so high. Instead, try tying a piece of thread or scrap yarn to the hook (if it has one) or below the whorl (look for figure B below) and secure it with a half hitch knot. Then try spinning it like that, and let it hang freely to unwind itself whenever it has too much twist before you try again.
You can also try spinning a bottom whorl suspended by scrap yarn or thread. The advantage of trying it while it’s suspended is it can allow you to watch twist being added and see what it does without messing with your handspun, as well as letting you get a feel for how it moves while suspended. If you have a bottom whorl, I’d give both a try !
---
Now that you can draft, you’re gonna want to attach your fiber to your spindle. Some people use a leader to do this--it’s a pre-spun loop of yarn that you tie to your spindle. Then you loop some pre-drafted fiber through the loop of the leader, add twist til it holds, and off you go.
Another way to do it is without a leader. I’m much more familiar with this method, and I find it way easier, so I’ll go into more depth on this one:
1. Take the end of your pre-drafted fiber (you will need enough pre-drafted fiber to go from the underside of the whorl to the very top of the spindle, and then back again. If you’ve pre-drafted way more, don’t worry. We’re just working with this short amount for now, but it can stay attached). Make a slip knot at the end. You can roll the fiber between your fingers to add some twist if you’re having trouble making a slip knot with it. (Tip: if you’re having trouble getting the fibers to roll, wet them slightly with water or spit and it will be much easier)
2. Put the slip knot on the bottom point of your spindle, and slide it up so that it’s at the whorl.
3. Gently wind the pre-drafted fiber up the spindle shaft, until you are at the hook or top. Wind it over the hook (or do a half-hitch knot at the top--if there’s a groove near the top your half hitch should sit in there, otherwise it should sit as close to the top as possible while still being secure. You may drop it a few times while learning where the perfect spot is--such is life). Be careful with pre-drafted fiber--depending on staple length and fiber type, it can pull apart quite easily. The trick to keeping that from happening is to keep it a little slack and loose until you have added twist to it.
4. Pinch your pre-drafted fiber between your thumb and forefinger on your dominant hand, about 1 hand’s width from the top of your spindle. Turn the spindle in the direction you intend to spin your yarn (usually this will be clockwise, or to the right). Spin the spindle until you have the desired amount of twist. You should notice that all the fiber above the hook/half-hitch has twist, while the fiber below it has none. You need all of it to have twist, so let’s even it out--pop the half-hitch off with your thumb/unwind the yarn from the hook, unwind the yarn from the shaft so that the entire length you’ve worked with so far is stretched out. This will allow the twist to equalize. Now wind it all back up and put the half-hitch back/wind around the hook again. You may need to repeat this a couple times to get your starting fiber fully twisted (don’t worry though--you only need to do this at the very start. From here on you shouldn’t need to equalize twist like that until the next time you start from an empty spindle).
You’re done attaching the fiber--now you can spin !
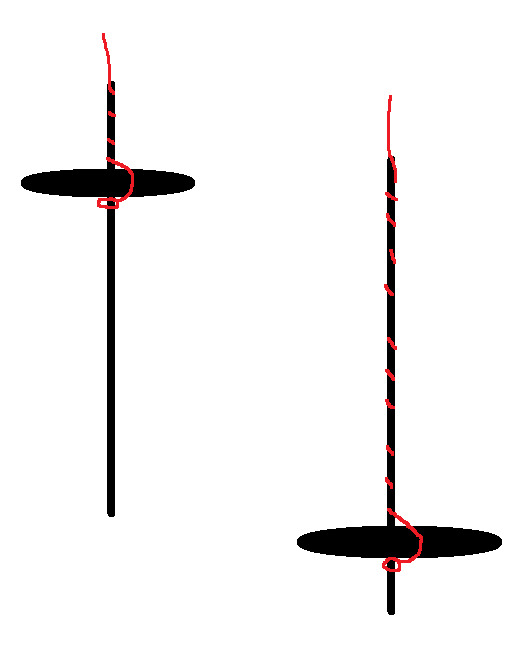
Fig B: How your yarn should sit on a spindle, both top and bottom whorl
If that doesn’t make sense, here’s a video showing how to attach it with and without a leader. If that doesn’t help either, search youtube for “how to attach leader to drop spindle” and keep looking until you have a better understanding.
---
So you know how to draft and your fiber is attached to your spindle--now it’s time to spin ! There are 3 different parts to spinning a singles on a drop spindle.
1. Adding twist. This can be done with just your hands, but the spindle makes it a whole lot faster. This is the purpose of a spindle--to add twist very quickly (and as a bonus, it’s a handy place to store the yarn as you spin it !). All you have to do is spin the spindle, and the only trick is to make sure you always spin in a consistent direction--don’t start a project spinning clockwise and end it spinning counterclockwise ! You’ll have an impossible time plying it then. There are a lot of different ways to spin a spindle--you’ll see a few watching the videos here, and more if you search out videos of drop spindling yourself. Whatever method is comfortable and practical for you is what you should do.
2. Drafting the fiber. You already know how to do this part !
3. Winding the yarn on. When your yarn is long enough that adding more length will make it hard to work with, you’ll want to wind it onto the spindle so that you can get back to spinning. To do this, pop the half hitch knot off the top/unwind from the hook, unwind along the shaft, and wind it near or at the base of the whorl, in the orientation seen in the very first picture. Always wind in the same direction that you’re spinning, to stop your yarn from flying off.
I would highly recommend starting with the method known as “park and draft” while you learn. In this method, you first add a ton of extra twist (usually as much as you can) and then put the spindle down and draft until that extra twist is used up. Then you wind on, and repeat. This isolates the actions of spinning so that you are only doing one at a time, which makes it a lot easier. Most people move on from this technique once they’ve figured it out, but you don’t have to--the drawback is that it’s typically slower, but hey, spinning is a slow craft anyway. There is no wrong way to spin, and everyone’s hands and bodies have different needs and work in different ways.
How to Park And Draft
First, use your dominant hand to pinch your pre-drafted fiber a few inches/6 cm above the top of the spindle.
Now just spin the spindle clockwise, until it won’t really spin any more. (Don’t try to get ~the most twist ever achieved~ or anything like that--your yarn can potentially snap from too much twist. Take your cue from the spindle--when it stops wanting to spin, you’ve got enough twist.) Don’t let the twist advance beyond where you’re pinching it off.
This is important--if the twist gets into your fiber, it becomes much harder to draft it. But don’t worry, you can undo this by pinching just above where the twist has entered your fiber, and with the other hand just below (pinching the actual yarn here). Now (with the hand that’s pinching the yarn) roll in the opposite direction that you’re spinning in. This will move the twist down into the rest of your yarn. Let go of where you’re pinching the fiber, slide your yarn-pinching hand to where it usually is as you’re spinning, and get back to it.
Your leader/yarn should be very kinked up and wiry. Now put the spindle between your thighs (or between your knees, under one knee, or under something heavy that won’t damage your spindle. Thighs are convenient, but if it’s uncomfortable, try putting the spindle somewhere else. It needs to be held firmly in place and not move around). This is the “park” part of “park and draft”.
Now, you want to be pinching the twist off at the same spot, but using your other hand instead. I usually pinch right above where I’m already pinching and let go with the lower hand.
First we’re going to just bring the twist up the pre-drafted fiber by sliding your pinching hand up the fiber, slowly and gently. You should see the twist follow behind your hand as it enters the fiber. If you have lots of pre-drafted fiber, you might wind on, add more twist, wind on again, etc. You could also draft out your pre-drafted fiber (this is what the majority of more experienced spinners who pre-draft do) while you go.
The “draft” part of “park and draft” is just like pre-drafting, but one end is attached to a spindle. This gives you something to lightly pull against, if you want. Draft slowly and with purpose.
At a certain point, you will run out of excess twist. At this point, wind on. If you’ve only done a short length, you can also add more twist, park it again, and go back to drafting.
If you’ve run out of armspan but still have lots of excess twist, unpark your spindle (let it hang free) and allow it to untwist a little, monitoring it closely. If this happens often, try to put less energy into twisting your spindle, or allow it to twist for less time.
The amount of twist that your yarn has matters a lot--it will impact your finished yarn hugely. A yarn without enough twist will be very limp and might even fall apart as you handle it. A yarn with too much twist will be wiry and inelastic. You want to find a middle ground where it’s got just the right amount for what you intend to use it for--a hard, inelastic wool yarn can make a good bag, but not a very good hat.
To see how much twist you’ve added to your singles as you spin, try a plyback test ! This is really quick to do on spindles--just relax the distance between your fiber supply and the top of the spindle. When the yarn is no longer taut, the live twist will cause it to twist back on itself. With too little twist, you may just get a few sad loops (or no loops, if it’s super undertwisted). With too much twist, you may get tons of tight little curls of yarn. With a good amount of twist, you should have a few good curls (just one if it’s a short length of yarn, or several if it’s your armspan) that aren’t too tight. Those curls are what your yarn will look like once 2 plied, so it’s a great litmus test for whether you’re adding the correct amount of twist or not.
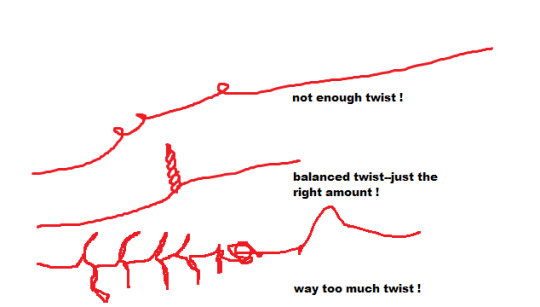
Fig C: What different amounts of twist looks like in your singles.
To fix too little twist, just spin the spindle a little extra until it looks right. To fix too much twist, either draft more fiber or else let the spindle untwist a little.
You can and should do this before winding each new length on, at least while you’re still learning the motions.
Check out this video of how to spin with the park and draft method ! 0:00-4:45 is intro and attaching the leader. 4:46-9:00 is the method itself (note to friend: don’t watch past 9 mins). If this video doesn’t work for you, search “drop spindle park and draft” on youtube.
A few interim tips
1. It’s critical to hold your fiber supply loosely. If you find that you have put a lot of force into drafting, then you are either holding your fiber way too tight or your hands are too close together (or potentially both). Drafting should not require force. If it is requiring force, adjust your grip and your hand placement continually until it gets better, and refine from there.
2. Try to put some tension on the yarn as you wind it on. This will make it sit a little neater and flatter, so that you have a more stable cone of yarn and can fit more on it.
3. If you draft out your fiber so much that it runs thin and just sort of disintegrates, just pull off the most wispy parts from your yarn and the fiber supply, then hold the two together again, making sure to overlap by several inches/6-10cm. Gently draft out a little and add twist before putting that join under the weight of your spindle, or it will fail again. You can join from one fiber source to the next one (necessary with rolags, hand combed top, and strips off of batts) in a similar way; make sure to leave a little unspun fiber for a good join, and overlap the end of the first fiber source with the beginning of the second by about an inch/2.5 cm.
4. If your yarn snaps (rather than your fiber running thin as you draft), it’s because it was A) twisted way too much B) spun too fine for the drop spindle you’re using C) both A and B or D) your spindle has become heavy enough that it can no longer spin as fine as you were spinning.
For A, B, and C: remove as much twist as you can from either end of the snapped yarn, then put both ends in your upturned palm, overlapping them over the whole width of your palm. Add enough either water or spit to get them good and wet (not dripping, but they do need to be wet). Now place your other palm down on top, and rub vigorously for about 30 seconds until the ends have joined together. If necessary, you can also just tie the ends in a knot, although it’s not invisible and you can usually feel it in the finished yarn.
For D: is your whorl removable ? If so, remove the whorl and continue spinning. If not (and for the vast majority of beginner’s drop spindles it won’t be), your spindle is full ! Even if there’s still room, it’s too heavy to continue spinning on for that project. You could keep going spinning a thicker yarn, but that means your yarn will randomly get thicker somewhere near the end, which works for very few projects. If this happens to you when there’s still tons and tons of room on your spindle, that means in general you ought to spin thicker yarn on that particular spindle if you want to fill it up all the way.
Okay, I spun yarn, now what ?
So at the moment, you have what we call a singles (some people just say “single”). That can be used as is, or it can be plied--that is, held together with more strands of singles and twisted in the opposite direction. But either way, you need to get it off your spindle !
If you’re going to leave it as a singles, then you’ll be winding it into a skein (we’ll get into that later). If you want to ply it though, you’ve got a lot of options. (I’ll get to how to actually ply later, this is just discussing those options.)
Many Methods of Plying
Plying Straight Off The Spindles
First, if you’ve got multiple spindles capable of spinning the same weight of yarn, you could just set your full spindle aside and spin another one. You’d need at least 3 spindles (the third, ideally, a bigger plying spindle) to get a 2 ply yarn, and 4 spindles to get a 3 ply with this sort of setup. This is what I do with supported spindles, since I have many, and I can attest that it saves a lot of winding time and is terribly convenient.
But it’s also probably not doable for many people, and it’s ridiculous to buy 3 drop spindles when you’re just getting into it !
Wind And Store
Second, you can wind your singles onto something for storage, and then use your now-empty spindle to spin another singles. Two great things to store yarn on are small rocks and empty toilet paper (loo) rolls.
Winding it around a small rock is better than just winding it into a ball for plying, since the rock will weight it and stop it from flying up in the air once you start plying. A big pebble works great. With this setup, you’d want to put all your balls of singles in a bowl or container of some kind, hold the ends of each, attach it to your spindle, and let them roll around as you ply.
They can tangle (mine usually don’t, but it can happen), so the toilet paper rolls might be an upgrade--these can be put on a stick, and the stick can be put on something (or you can poke two holes in a cardboard box, put the stick through one hole, load the rolls onto it, then put it through the other hole as well) to keep it stationary so that the rolls... well, roll. This requires some storage space (usually if you do this often, you don’t wanna make a new one every time, so keeping it is preferable) and is honestly not a huge upgrade... unless you have a ball winder that can wind the yarn onto the TP rolls for you, in which case this is a big time saver. If you don’t have one and don’t have issues with tangling, the rocks will probably work just as well and take up a lot less space.
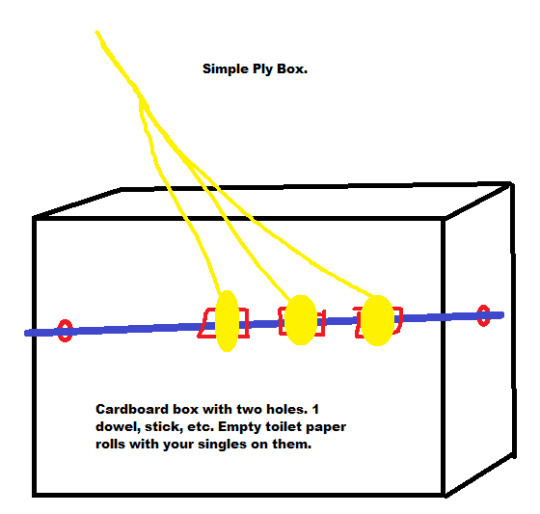
Fig D: Diagram of a Simple Ply Box
Ply Bracelet
Thirdly, if you want a 2 ply yarn specifically, you could wind it onto your hand and make something called an Andean Plying Bracelet. Here’s a link to a page that goes into it in detail. I highly, highly recommend learning how to do these. They look a little complex, and I couldn’t tell you the motions if my life depended on it, but I can do them with my eyes closed while not paying a whit of attention. They rely entirely on muscle memory, so once you learn them, they’re easy as pie.
The whole point of a plying bracelet is to get 2 strands of yarn out of 1 singles. You could of course wind a singles into a ball, then wind half of it onto another ball, and then ply from there. But a plying bracelet is a lot faster, and will always match up exactly.
One downside of a plying bracelet is that, as the name implies, it goes on your wrist. So if you keep needing to put your spindle down to take care of other things, you’ll need to pull off the plying bracelet as well (or carry the whole thing with you). They can be stored on a cylindrical object that’s smaller than your wrist, or sometimes also draped on hooks or put on the spindle shaft itself. I don’t usually encounter problems when pulling on or off my plying bracelets--it doesn’t seem to tangle them--but if you’re plying while cooking or watching a child or something else that might require you to stop immediately and hurry over to whatever needs tending, then you might want to save the ply bracelet for another day.
Chain Plying
Fourth, you could wind your singles into one ball, and then chain ply it. Chain plying is a way to turn one singles into a 3 plied yarn. It also preserves stripes in your singles (we’ll talk about this in more detail later), so it can be perfect for a very colorful singles.
Chain plying is simple. Do you know how to tie a slip knot ? Of course, because you needed one to start spinning ! (Although here’s the link to how to tie a slip knot again, if you need it.) So that means you basically know how to chain ply as well.
Step one: tie a slip knot at the end of your singles (you want a very short tail, since that’s basically waste). Make the resulting loop nice and big, and lay it over your singles. Pull the singles through the loop--now you have a new loop ! Make it nice and big as well. Lay it over your singles. Pull the singles through. Repeat until you’re at the end of your singles (try to have your last loop be a very small one). To finish, place the end through the loop, and then just pull on it until it tightens the loop. Note that you typically are adding ply twist and winding on as you do this, but you can also just chain ply an entire single and wind it into a ball as you go, then add twist once you’re done. That can be a lot easier to wrangle, if you’re having difficulties.
You might notice that this is basically a really open crochet chain. Yep ! It needs to be open so that the twist can enter the yarn, but you can do very big or somewhat smaller loops--although no matter what, you need to keep the loops large enough to at least hook a couple fingers through them so that you can make the next loop. Note that sometimes, the bump at the start of each loop can be felt and/or seen. Also note that chain plying is best done with smooth singles that can slide against each other. It can be done with a bumpy, lumpy yarn that sticks to itself, but bumps and lumps will catch as you try to chain, and if the yarn sticks to itself then it won’t slide nicely, which can really slow you down.
You may find that you prefer holding the ball of singles as you chain, or you may want it in a container on your lap/on the floor. You could also make a little wrist pouch to hold it, although take friction into account--if you make it out of wool yarn, choose a smooth one.
Ply Ball
Fifth is a sort of hybrid of a few of the others I’ve already mentioned, called a ply ball. To make a ply ball, simply wind two or more singles together into a ball (I’d suggest winding them around a small rock for a ply ball, too). The number of singles you wind in your ply ball will be the number of plies your yarn will have. A chain plied single wound into a ball is also functionally a ply ball.
Ply balls are extremely portable--you only ever need to work with one at a time, so you can just keep it in your pocket without worry of tangling, and it’s not attached to you or a box or another spindle. The downside is that it generally requires you to either have multiple spindles (ex: fill up two spindles, wind both off into one ply ball) or do extra winding (ex: fill up your spindle, wind it off to a rock for storage, fill up your spindle again, now wind from the spindle and the rock to get your ply ball. Add more winding for more plies).
However, you can also wind a ply ball from plying bracelet (yes, that’s more winding--but now it’s portable, and you’ve just turned one singles into a 2 strand ply ball) or even chain a singles, but wind it into a ply ball instead of plying it then and there to get a 3 strand ply ball (this also might let you play around with really long or really short chains without having to think about ergonomics as much, since your spindle isn’t involved).
Ply balls can also be helpful if you’re having issues wrangling your singles while you try to ply, since they’re laid together already--so they’re worth an attempt if you are having trouble keeping your yarn in line while plying.
There’s a short (but full of tips) article on ply balls here.
There’s even more ways to ply--look into "plying from a center pull ball” (similar to a plying bracelet, but requires a ball winder or a nostepinne) and “ply on the fly” (chain plying at the same time as spinning the singles--highly portable instant gratification). There may also be others that I’ve forgotten or not heard of, hopefully mentioned by others in the notes !
So Many Ways to Ply--How to Choose ?
So, every plying method and every number of plies has its own effects on the finished yarn, and you can use those effects to get the yarn you’re after.
By the way, if you’re not familiar with yarn weights such as lace weight and worsted weight, you should read this first !
A singles is great for your soft, fluffy, luxury stuff--cowls, hats, mittens that won't get a lot of wear, or shawls. It also preserves the colors that you spun exactly--so if you spun a beautiful perfect rainbow singles and the most important thing to you is that it stays a rainbow, you could leave it as a singles ! You can knit, crochet, weave, and nalbind with them like normal (I actually really prefer them for nalbinding--they felt easier so the joining is quicker), although because they haven’t been plied, they’re a lot weaker to abrasion and snapping. So they’re not ideal for things that need to be durable, and if you’re spinning short and/or fine fibers, you may find that even with some care they still don’t last very long, so keep in mind that stuff made from singles probably won’t be passed down or anything like that. But still, I’ve knit several small pouches from singles that have held up just fine being tossed around my room. One advantage to note is that you have the most yardage and the least spinning time this way, so it’s a very ‘time cheap’ yarn--you spin 100 yards/90 meters of singles, and you get 100 yards/90 meters of yarn. No time spent plying. However, it is as thin or thick as you spun it, and however consistent or inconsistent your spinning is, that’s your end result ! A lot of spinners (me) balk at this.
2 ply is next. I use 2 ply for almost everything besides socks--it’s quick, it’s fairly durable, and it looks very pretty (and an error correction: is ideal for lace). A 2 ply halves the amount of yarn you end up with--if you spin 100 yards/90 meters and 2 ply it, you’ll end up with 50 yards/45 meters. It also has a distinct ‘handspun’ look--2 ply knits up to a messier fabric. I really love that effect, but if you want a neat, uniform fabric, don’t do a 2 ply ! I’m not sure how it affects crochet or weaving, unfortunately, but do I suspect it’s similar with crochet. It also bulks up your yarn--it’ll be a little bit less than double the thickness of your singles, usually. 2 ply holds up alright to gentle/moderate daily wear, and is great for hats, gloves that don’t need to be hard wearing, scarves, and bags that won’t need to bear a huge amount of weight. It’s a workhorse yarn--you can use it for almost anything, and it’ll probably be okay. The only thing I would never use it for is socks--that’s a 3 or 4 ply project.
Let’s talk 3 ply ! 3 ply can be achieved either through chain plying or else as a traditional 3 ply--meaning 3 separate singles all plied together. You’ll get very different effects from these two methods in terms of both color and even-ness. If your singles had any stripes of color, with chain ply they will remain as stripes (this could be an alternative to your rainbow singles !). With a traditional 3 ply, your stripes will all blur together, and you’ll get a varied and multicolored yarn. You will get 1/3 of the yardage/meterage of your original singles, so a 3 ply yarn takes longer to make than a singles or a 2 ply. But it is also about 3 times thicker than your singles, so if you’re struggling to spin thick singles but want a thick yarn, 3 ply is a great option.
If your singles are very even, you’ll see no real different between chain ply and traditional 3 ply (except for the bumps at the start of each loop--they are usually visible as well). However, if your singles are kind of all over the place, chain plying magnifies this. On the other hand, a traditional 3 ply really evens out any inconsistencies. Even though I’ve got a few years under my belt, I am not a very consistent spinner, simply because I can neither visualize nor remember the weight I ought to be spinning, so it’s always a total guess (damn aphantasia). Beginners are also often inconsistent spinners, just due to lack of muscle memory. Either way, a traditional 3 ply can be really helpful in creating a fairly smooth, even yarn from really wild, inconsistent singles.

Fig E: comparisons of chain ply and traditional 3 ply, in terms of consistency
Lastly, 4 ply. 4 ply will turn your heavy laceweight singles into a light worsted, if it puffs up in blocking enough. I love 4 ply for my supported spindles mostly, since those spin very fine yarn and I don’t have a use for anything finer than sock weight yarn. It’s also very durable, and a laid 4 ply (like a traditional 3 ply--just 4 strands held together) make good socks. A cabled 4 ply (take two 2 ply yarns and ply them again) makes terrible socks, but is still very durable and has an interesting rope like appearance and texture. 4 ply in general is great for socks, bags, blankets, and especially sweaters, as it doesn’t pill much and will stand up to heavy wear. However, you have to spin 4 times the singles to get your finished yarn--a 100 yard/90 meter 4 ply skein requires 400 yards/360 meters of singles, and then more time for plying. So these are rather slow. They’re an awesome option for a fiber that refuses to spin up to anything other than the finest lace, and they will make great objects and garments that will last for a good long while.
Past 4 ply, you kind of just get rope. I haven’t ventured past 4 ply much--give it a shot if you’re curious !
The Why of Ply is a great article on the different aspects of different plies, and touches on some stuff I don’t mention (like stitch definition and cables) if you want to know more ! Highly recommend it.
How to Ply
So... you know at least a few methods of plying now, know how many plies you want your finished yarn to have, and you may have even already wound a ply ball or filled all of your spindles. Which means it’s finally time to ply everything.
To start, you need to attach all your plies to your spindle. For the methods that I’ve discussed (with the exception of chain plying), you’re going to do the following: gather the ends of your plies together, and make one slipknot with all of them. Then put the slipknot on your spindle below the whorl, the same way you would when spinning singles (and when not using a leader).
For chain plying: chain your singles until you’ve got about a foot or a third of a meter. Now you want to attach it to your spindle. Take the very first slip knot loop and slip it onto the spindle, below the whorl.
Now, secure your yarn by wrapping it around the hook or else with a half hitch knot, and spin the spindle counterclockwise (anticlockwise). You should immediately see the plies twisting together to form plied yarn.
From here, you will proceed basically the same way as you did when spinning singles--you’ll add twist to your plies, then wind on. This can be a really great opportunity to practice doing things while the spindle is in motion; you won’t be drafting, but depending on the type of plying you’re doing, you may be chaining, pulling from a ply bracelet, or simply letting the plies slide through your fingers (you do want to tension them and keep the twist from getting past your hand). If that requires too much coordination, feel free to park and ply--that is, spin the spindle to add excess twist, park it and let it into your yarn, then wind on.
If you try to ply your yarn the same direction that you spun it, you’ll notice that it doesn’t really turn into a cohesive yarn, and instead becomes wiry and the plies don’t slot neatly together. If you notice this happening, turn your spindle in the other direction. A yarn that is both spun and plied in the same direction won’t be stable or strong, and will tangle the second you try to work with it.
This is why it’s helpful to be consistent in which direction you choose to spin your singles, by the way--if you always spin wool clockwise, then you can know with certainty that it will be plied counterclockwise.
We refer to yarn as having either Z twist or S twist (this refers to whatever the finished twist is, so a singles that you’re never going to ply, or a 3 ply yarn, for example). This just makes it a little easier to talk about and recognize what we’re doing.
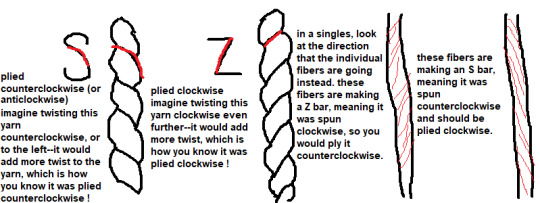
Fig F: S and Z Twist in plied and singles yarn
It’s essentially a mnemonic device that allows you to glance at your yarn and go “Oh! I spun these three singles counterclockwise, so I should ply them all together clockwise.” I often have to draw an S or Z in the air (just like I sometimes have to draw an L in the air to pretend I can reliably tell left from right), but it is pretty foolproof and will prevent you from, for example, trying to ply an S twist singles with a Z twist singles and then wondering what on earth went wrong.
By the way, this page has a really helpful chart on what direction you might want to spin in based on what you intend to do with the finished yarn. For example, crocheting (right handed style) with S twisted yarn will remove the twist as you work, but knitting in continental or English style (or crocheting left handed style) with that same yarn will add twist. Most spinners spin their singles to have Z twist and ply them with S twist--but if you’re a crocheter or knit Eastern style this will unply your yarn as you work, and you are encouraged to try reversing things to have better results with your handspun projects. The more you know !
Now, back to your plying. You may be wondering how you’re supposed to know how much ply twist to add, which is a great question, because plyback tests don’t work when you’re actually plying. Those are for when you’re spinning your singles. Instead, I do what I call a “hanging test”. Just hold out a length of plied yarn between your hands and let it hang (not pulling it taut--the yarn should have a nice downturned curve). A balanced yarn--that is, a yarn that has equal and correct amounts of spin and ply twist--will just hang nicely. An underplied (or underspun) yarn will usually also hang nicely, but you will see gaps inbetween the plies. This is no good at all. Gaps won’t just make your yarn look bad, they'll also make it split when you work with it, and will be less durable and more prone to pilling, felting, and eventual disintegration after much use.
On the other end of the spectrum, an overplied yarn (which may have both too much spin and ply twist, or may be underspun and then overplied in an attempt to fix ones mistake--which won’t work, by the way. You need to go back and add more spin twist to your singles) will twist in the middle instead of hanging. If it only twists a tiny bit, you’re fine. But if it twists a lot, there’s problems. Overtwisted 2 ply yarns tend to be aggressively smooth--this is only relevant for 2 ply, since those have a sort of pearled silhouette. If your 2 ply is smooth, then you’ve most certainly overplied it. 3 and 4 ply are always smooth, however, so a smooth profile for one of those is to be expected.
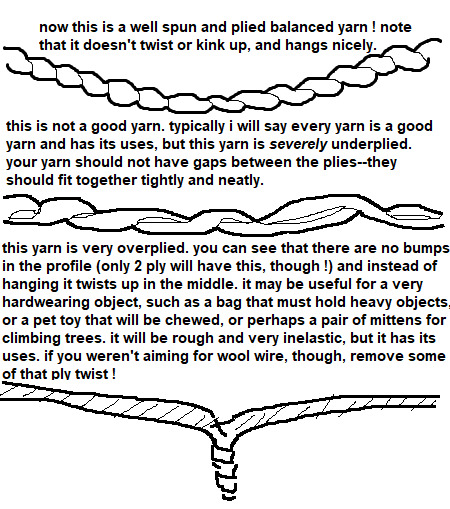
Fig G: Ply twist in 2 ply yarns. Do these yarns have S or Z twist ?
Don’t worry if your first yarns aren’t perfectly spun or plied (really--they won’t be). Every spinner is striving for something different with their yarn. Some are aiming for total technical perfection, some aim for exquisite fineness, some aim for beautiful colorways and for finding the softest and most lovely breed of sheep. Some just want to spin, some just want usable yarn, some just want a pair of socks that last on their feet and find commercial sock yarn to be about as durable as wet paper (that would be me). You certainly don’t have to know what you want to get out of spinning right away, but the point is that every single spinner has their own standards that they hold themself to, and you don’t need to (and shouldn’t !) try to meet others standards. Especially when still learning, but also just all the time and forever.
I’ve Plied My Yarn, Now What ? OR I Just Want Singles, Now What ?
Now your yarn needs to come off the spindle ! But not the way we’ve been taking singles to ply off the spindle--we need to make what’s called a hank. A hank is basically a loop of yarn that’s been tied so that it’s nice and secure. These loops can be pretty big (mine are all 2 yards/1.8 meters) or as small as the distance around your hand--it all comes down to what you wind your yarn onto.
I have already made a tutorial that goes into quite a bit of depth (and has pictures, even), so I’m gonna speed through this part a little bit.
1. Find something to wind your yarn around. A Niddy noddy is the preferred tool for the job here, and will make it much faster to wind and thoughtlessly simple to calculate the yardage/meterage of your yarn (I’ve seen people use yarn swifts as well, and they certainly look very speedy), but they are by no means required. Substitutes include: a large hardcover book, the back of one or two chairs, your hand (ideal for very small amounts of yarn), your forearm (for smallish amounts of yarn--wrap between the thumb and forefinger and go down to the elbow, then back up), or anything else that won’t deform with pressure and is holding relatively still.
2. Wind your yarn around that thing. You may need to start with a slipknot to attach it to whatever it is you’re winding on, or else a piece of tape. If you’re using your forearm or hand, you can simply pinch the end to hold it in place. Unlike when winding your yarn onto your spindle, when winding your yarn into a hank, you want to use as little tension as possible so that you can get a more accurate measurement of length later on. Also try to keep your winding tidy--in an ideal world, the yarn should be traveling almost the same path every time, not a few inches to the left one time, then wildly skewed to the right the next time.
3. Tie off your hank. Once you’ve finished winding, you need to secure your hank so that it doesn’t tangle. You can use either scrap yarn or else the ends of the yarn you just made (I prefer the latter, since the ends tend not to be very good anyway, so at least they don’t go to waste. In this case, snap off or cut both ends--the length you should cut depends on how thick your hank is). Find where both ends are--you will need to tie knots near the ends so that you can attach the ends to them. Tie an overhand knot a few inches/5cm below the first end, and then hold that end alongside one of your strands of knot-tying yarn, and tie another overhand knot. Repeat this with the other end. Make sure you haven’t overlooked any strands of yarn and left them out of the tie--that’s a very easy way to get tangles.
4. Remove your hank. Gently push your hank off of whatever you wound it on. Put it to the side--now we want to measure. Use soft measuring tape (or a piece of inelastic string or yarn, if you don’t have one--you will then need to measure that against a rigid measuring tape) to span the entire path that your yarn traveled. Write down that number, and now count the number of strands in your hank. Multiply the two numbers together. Now convert your inches or centimeters into yards or meters, and you have your yardage or meterage !
Ex: You wrapped your yarn around your palm, which measures 10 inches. There are 41 strands. 10x41=410. 410 inches is roughly 11 yards. Or: You wrapped your yarn around a small book, which measured 21 cm. There are 50 strands. 21x50=1050. 1050 cm is of course 10.5 meters.
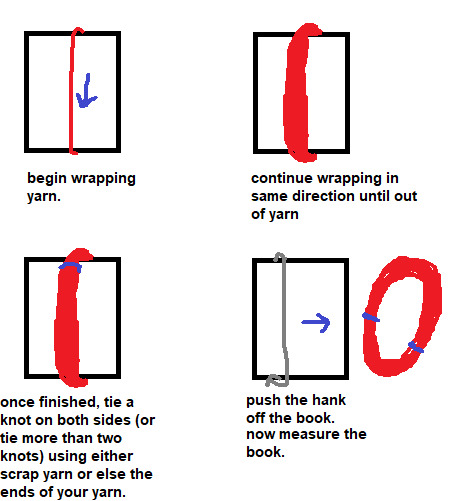
Fig H: Winding a hank on a hardcover book.
It can be very helpful to label your handspun yarn. The yardage/meterage is critical information when it comes to using patterns, less so if you don’t use patterns. But there’s other info that you might still find handy to know later on, such as what the fiber is, where and when you got it, when you spun it, how you plied it, any info on the dye job, what the yarn weight is, what spindle you spun it on, whether it is part of a set, how much it weighs, etc.
Some of my really verbose labels might look like this:
Avocado dye and copper mordant hand dyed in the fleece 2020
Cormo
Bought 2019
Spun for 2020 TDF
2 plied on wheel
210 yards
3.4 oz
light worsted weight
But most of my labels just have the yardage and breed, if I label them at all. I tend to document things online and also remember spinning my yarn better than I remember anything else going on in my life, so I’m a little lazy about labeling. Your labels should include the information that you think you’ll find helpful in the future, or that you know you won’t have another way to recover if you end up forgetting.
Blocking your yarn
Don’t attach that label just yet--we aren’t totally done with our yarn. It has one or two more steps before it’s ready to be used, and that first step is called blocking. There’s a few ways to block yarn--wet blocking, steam blocking, and resting.
Wet blocking: Get your hank of yarn wet, using anything other than very hot water (this could start felting your yarn). You could run it under the tap for a minute or else let it sit in a bowl of water with a little hair conditioner for about half an hour, if you wanted your yarn to be a little softer, then rinse the yarn. Squeeze as much water out as you can, then hang it to dry. You can (and should) also snap or thwack it--but I've gone into detail on that in a link below.
Steam blocking: Get a source of steam going--like a pot of water simmering or a very hot tap running. Using tongs or a long wooden spoon, hold your yarn over the steam and slowly rotate it until the whole skein has been steamed. Don’t let the yarn touch the water.
Resting: If neither option above is possible, you can also just let your yarn sit for at least a week. This lets the twist settle down, so it’ll be a lot easier to work with. However, it doesn’t do anything else that blocking does, so it won’t really show you your “finished” yarn, and may lead to problems down the road.
So--why did we just do that stuff ? Well, we blocked our yarn to reset the fibers, basically. During the spinning, we put the fibers under tension, and they more or less stay in that slightly stretched state. But it’s not really stable--the next time they get wet, they’ll spring back into the natural crimp that the wool wants to have (this changes drastically depending on breed and even individual sheep), and will often puff up. The hank might lose a little length and your yarn’s weight (not as in ounces or grams, but as in lace, dk, or bulky weight) often increases some. So if you’ve made your yarn into something before blocking it, with the perfect gauge and nice drape, the first time you wash it you’ll find that it’s thicker and a little smaller and has less drape. It might not fit anymore, or the seams might be messed up.
This is all entirely avoidable if you just block it before you do anything with it, so I highly recommend that you do.
The other thing that blocking does is set the twist, so your yarn won’t kink up as you work with it--even a perfect, balanced yarn can kink up as you work if the twist is live--which makes it a lot more pleasant. Resting sets the twist as well, as mentioned above.
I’ve gone into blocking in more detail in this post here, if you’d like to know more--I’d especially recommend reading the last section about snapping and thwacking your yarn.
Once it’s fully dry (and remember--wool can hold a lot of water and still feel dry, so give it a little extra drying time just to be sure) it only needs to be wound into a ball before you can use it ! Congratulations on your handspun yarn--that’s a real achievement.
Storing your yarn
If you don’t plan on using it right away, you may want to skein your hanks up to keep them compact and tidy. To do this, put your thumbs on the inside of your hank, and pull it taut. Then, one thumb at a time, twist in the opposite direction that you plied in. Your hank should start to kind of look like rope. Once it has a lot of twist (enough that you’re struggling to add more), find the center point of the hank, and fold it. With 2 yard hanks I tend to fold it over my knee, but a doorknob or something else would work just as well. It should immediately look like an oversized piece of yarn--that’s because we just twisted it one direction, and then folded it in two and let the excess twist twist it in the other direction, which is the same way you ply yarn ! There should be a loop at each end where your thumb was--take your thumbs out and put one loop through the other. Now you can attach your label and you’re good to go !
If it’s a very small hank (one that’s been wound around the palm, especially) you’ll probably just want to wind it into a ball instead. You could do this with any length of yarn--it’s not an ideal way to store wool yarn ultra long term, since staying wound into a ball can stretch out the fibers again, which means you’d need to wind it into a hank and re-block it if you wanted to make an accurate gauge swatch or something. Short term (a year or less) it’s just fine.
If you’re wondering how to wind up a big hank into a ball without tangling, just sit down with your knees up, and put your knees inside the hank, then move your knees apart until the hank is taut. Now you can wind in relative peace, free from tangles. You can also use a yarn swift, if you’ve got one.
I would recommend, by the way, using up some of your first skeins as soon as possible (you might want to keep your very first skein so that later you can see how far you’ve come--I really wish I kept mine). You won’t know how your spinning is until you’ve used it, so to prevent you from getting to skein #40 thinking you’ve been doing great, only to discover that your yarn is actually unusable... use your early yarn ! Evaluate it, make judgements, and learn from it. Does it need more twist ? Is it very lumpy ? Are there lots of spots where it went thin ? Do you like how the colors turned out with the plying method you chose ? These are all good questions to ask yourself as you use your yarn.
Moving On From Park and Draft
Once you’re comfortable with the park and draft method, you might want to try moving on to true suspended spinning. As I said earlier--it may not be for you, and that’s fine, but you won’t know if you don’t try. True suspended is quite a bit faster than park and draft, so if you want to speed up a little, you should give it a shot.
In park and draft, you first add twist, then park the spindle to draft your fibers into yarn. In true suspended spinning, you set the spindle going and draft while the twist is being added. This eliminates the whole ‘standing/sitting there with your arm outstretched, waiting for your yarn to accumulate twist’ section.
The easiest way to get into true suspended spinning is to work your way up to it--try drafting just a little bit while your spindle is building up twist during park and draft. To give yourself more time, set the spindle spinning slower. Then try drafting a bit more. The goal is to draft at the same rate that twist is added, meaning that you can wind on pretty much as soon as the yarn is too long to keep spinning.
The trick here is to adjust the speed at which your spindle spins rather than the speed at which you draft. You can only draft so fast before your technique gets sloppy, and past that you’ll be focused far more on keeping pace with the twist being added than on drafting evenly.
So if I find that I spun my spindle too aggressively, I still it immediately and try again, but slower this time.
I answered an ask about this a while ago where I went into a little bit more depth, if you’re interested.
And if you haven’t seen it, the pinned post on my blog is a lot of stuff like that all collected into one post for easier perusal. Some of them I’ve already linked to earlier in this post, but others I haven’t.
Small Projects, Scrap Projects, and Big Projects: Tips for All
You may be wondering, What the hell am I supposed to do with this yarn ? This isn’t even enough for a pair of fingerless gloves !
Which is a fair concern--endlessly accumulating small skeins of yarn can be frustrating if you don’t know how to use them up.
Drop spindles are limited in how much yarn you can make on them, and while you can make huge skeins by joining smaller skeins together, they may not all be the same weight ! Or they may not match. Or it may just be really boring.
You may also be doing a lot of experimenting, and ending up with 30 yard/meter skeins that you can’t even make something tiny with.
Small Skeins: For single skeins that are too small for gloves, hats, etc, you may still be able to make things like pouches (for yarn, crochet hooks, dice, coins, etc), baby socks or hats, coasters, or other small items. My spinning wheel oil holder is a little basket crocheted out of some handspun, and I have a mini tape measurer on my keys with a cover crocheted over it from handspun as well. You might have to invent things to do with your handspun, but using items that you made enriches your life--I promise.
Scrap Projects: What about tiny skeins ? Or maybe you’ve already made all the coasters and baby socks and spinning oil holders that you could possibly need, and now the small skeins are piling up again. I humbly submit the Scrap Yarn Project--my favorite type of project by far. I’ve been slowly working on a handspun scrap blanket for about 2.5 years, using tiny scraps, small skeins, and leftovers from projects alike. I knit 5x5 inch stockinette squares (some have colorwork, some have different stitch patterns, but mostly I let the yarn be the star) and for the most part just try make squares that are thick enough to stay warm but thin enough to have a little drape. It’s an incredibly satisfying project.
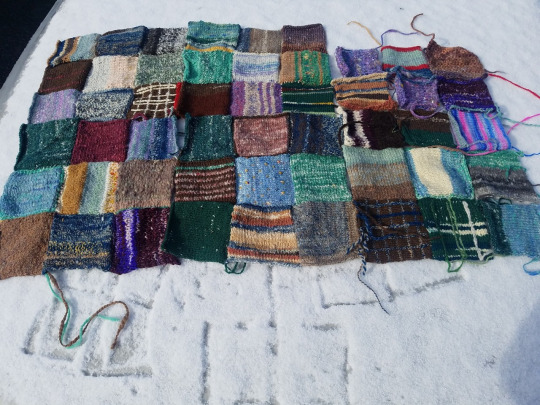
Fig I: An older image of the author’s handspun scrap blanket in progress. The yarns used range from fingering weight to super bulky, and are spun in all sorts of different ways. But it still feels very cohesive.
I like the square approach (and of course if you wanted to crochet granny squares, that would work perfectly too) because it’s modular, so you can decide halfway through that you don’t want a sweater, you want a bag--and then just sew the squares into a bag, instead. But it doesn’t need to be squares by any means--you could also make scrap yarn sweaters, hats, socks, scarves, etc., that are constructed normally.
The only thing to look out for is yarn weight--in some cases, you might want the weights to all be very similar. Socks, for instance, won’t do well if you have parts that are bulky weight and parts that are light fingering weight. You could hold yarns together to get similar weights if necessary, or just only add to the project when you’ve got another scrap skein of worsted weight or whatever. For squares you can use any weight of yarn if you want, but you should change your hook or needle size to get a fabric that’s a similar density, so your stitch count will change from square to square.
Big Projects: These can be difficult even for experienced spinners, because consistency is key to ending up with an even fabric. Not from armspan of yarn to armspan, but from skein to skein--if the weight changes, things can suddenly get much more complicated while you try to correct for the skeins that are too thick or too thin.
One way to try and mitigate that is to not ply anything until you’ve finished spinning all the singles--that is, if you need 10 skeins of 2 ply, spin 20 spindles worth, then go through and pair off your stored singles, thin with thick and average with average. It can definitely be more tedious to do it this way, but if you’re worried about consistency, it might be a good idea.
It also might not be necessary. Try to let your mind stretch back over the whole course of human history--as a species, we’ve been spinning yarns for pretty much all of it, and until very recently, what you spun was what clothed you. If the skeins you spun for your new cloak were all different weights, well... you probably either repurposed those skeins (IF you could, and that’s a pretty sketchy IF) or you shrugged, wore a lumpy cloak, and got on with life. Perfection isn’t everything, my friend. Either way, do what’s going to make you happy. For me, I’d be just fine with a lumpy cloak.
Out Of The Basics: A Few Further Pushes Into The World of Spinning
There’s many, many techniques out there, and an infinite variety of yarns to be spun. Some require tools, some don’t. Some are very advanced, and some quite simple. There are many other tools to spin on besides drop spindles. There’s also processes related to spinning--such as dyeing, fiber prepping, and wool washing--which can greatly enhance your spinning enjoyment and variety. I can’t teach them to you today, but I can certainly tell you about them so that you can look into them yourself !
Changing Up Your Fiber or Techniques to Get Different Effects
We touched on this earlier in the section about the number of plies--a 2 ply yarn will knit up into a bumpy, slightly irregular fabric, and a 3 or 4 ply will be very regular and neat. But that’s not the extent of what you can do to change your yarn up (without buying anything new). I’m going to throw some terms around now--you’ll need to google them, because this is already absurdly long.
For one thing, if you have roving, you can try splitting it lengthwise and fractal plying your yarn for a very beautiful self-striping but marled effect. You can also try spinning it from the fold on multicolored roving, which keeps the colors separate instead of muddied, which can happen otherwise.
With any fiber, you can always mix and match, or add pops of color ! If you’re spinning a bunch of gray rolags, for instance, you can occasionally detach the rolag, spin a tiny bit of blue roving, reattach the rolag, and go back to spinning. Depending on how you ply it, this could produce almost specks of blue or else slips and streaks.
Speaking of plying, the way you make a 2 ply can really change the colorway of the yarn if your fiber is a gradient or multicolored. Say you’ve got roving that’s a gradient from white to purple--if you do a plying bracelet, your yarn will be part barberpole, part gradient: a purple ply with a white ply at one end, and then gradually transition to the midpoint of lavender-pink in the middle, with both plies the same color. But if you plied it the other way, by wrapping your singles onto storage rocks and then plying from those, you’d get a yarn that’s got one pink ply and one white ply at one end, and one pink ply and purple ply at the other.
Chained 3 ply versus traditional 3 ply will make a huge difference as well. If your fiber has stripes, chain plying it will preserve them perfectly (as long as you’re careful to start a loop at the color change--or if you wanted it to fade in a little, you could start partway through a color change), whereas a traditional 3 ply will always marl them, no matter how careful you are about evenly splitting your fiber into 3 sections.
If you like really colorful and bright yarns, you might enjoy cabled 4 ply (where you ply two 2 plied yarns together). If your starting 2 plies are already colorful, you’ll get super colorful yarn with a cabled 4 ply--to me it always looks like dashed lines in different colors.
A laid 4 ply can also make some interesting color combinations, and is perhaps the ideal candidate for mixing random singles together, since it has 3 other plies each singles can hopefully be tempered by. And a yarn that has 3 plies of one color and 1 ply of another color can be interesting indeed !
It’s not just color that you makes an exciting new yarn, though--you can also try making boucle, or thread plying or autowrapping, or spinning beehives, spinning beads into your yarn, spinning thick and thin yarn... the possibilities are almost endless. I’d highly recommend giving “The Spinner’s Book of Yarn Designs” by Sarah Anderson a read if you can--she discusses all of these and many more, and shows how to do them. Other good books that’ll show you how to make lots of different kinds of yarn, or how to tailor your yarn to your needs, are: “Yarnitecture”, by Jillian Moreno, “Spin Art” by Jacey Boggs, and “Yarn Spinning With A Modern Twist”, by Vanessa Kroening. Your library may well have copies, and if not you could likely request they buy it.
You Don’t Have to Drop Your Spindles
...Because there’s other kinds of spindles ! And things that aren’t spindles, but on which you can also spin !
There are Turkish Spindles, which are functionally almost identical to drop spindles (and you can drop them, to be fair), but you wrap your yarn around two detachable interlocked arms that also function as the whorl. When you remove the arms and spindle shaft from the turtle (not cone) of singles, you can then 2 ply with it immediately using both ends. Turkish spindles are great if you love 2 ply and hate winding.
There are Supported Spindles, which come in many forms but are essentially fancy sticks with pointy tips that you spin in bowls. These have more winding than drop spindles because you spin in very short lengths at a time and wind onto a temporary cop that’s just below the tip (it’s much faster than if you wound all the way down to the cop near the bottom). However, you use them while sitting or even (with a bit of wrangling) laying down, and your arms stay in a comfortable, much more relaxed position while spinning. It also spins, as a default, finer yarn than your average drop spindle (I can achieve a very fine and consistent laceweight on any supported spindle, but have only managed that on my tiniest and lightest drop spindle). And they are very fast tools--with proficiency, they can be much faster than drop spindles. Supported spindles are great if you find drop spindles painful, if you have low energy, if you’re mobility impaired, or if you want to spin finer yarn.
There are Spinning Wheels, which come in many shapes and sizes but are the fastest way to make yarn by hand. There are a few objects which could fall under the umbrella of a spinning wheel (namely Walking Wheels, Charkah Wheels, and Electric Wheels) which do not have treadles, but the majority of spinning wheels are powered by foot treadles and can spin faster than you can spin a drop spindle. They also remove winding from your list of duties (for the most part), since the flyer will wrap your newly spun yarn onto the bobbin as you go. New spinning wheels can be prohibitively expensive, but you can also find used ones for ludicrously cheap on craigslist, at estate or garage sales, at antique shops, or other places where old items might be sold. (You can also often find them at affordable but not cheap prices at fiber festivals). Be sure to research the parts of a spinning wheel before you try to buy a used one from a non-spinner--there are many SWSO’s (Spinning Wheel Shaped Objects) out there that will fool you. Spinning wheels are great if you want to make larger amounts of yarn, or want to make yarn faster.
There are Electric Wheels, which are small machines that will add twist and wind the yarn onto the bobbin for you, so all you have to do is draft. New low end models are much cheaper than new spinning wheels, and they take up far less space. They also remove the element of treadling, so if you are intrigued by spinning wheels but have weak legs in any capacity, these can save you a lot of pain. I have a spinning wheel and can’t spin on it much anymore, because my knees and hips dislocate almost immediately. I switched to supported spinning primarily, but an electric wheel would be a good substitute as well. Electric wheels are great if you want to make more yarn faster, but can’t afford a spinning wheel or don’t have the space for them. They are also one of the more accessible tools for those with severe mobility impairments.
And there’s still more, although I can’t do a pitch for all of them xD. There’s Tahkli Spindles for spinning cotton, Navajo Spindles that are long thigh-spinning tools, Medieval Spindles that are easy to whittle replacements for if you break your spindle a lot, and even more beyond that. Many cultures have their own traditional spinning tool, each with their own techniques and strengths, and if drop spindles aren’t doing it for you but you still want to spin, I implore you to check out other kinds of spindles !
From Sheep To Sweater (Washing and Processing A Raw Fleece)
Most people learn to spin from roving (even if it might not be a very good beginner’s preparation), although there’s also rolags, batts, top (both commercial and hand combed), sliver, and cloud. But what if you could start with a raw fleece (unwashed, with vegetable matter and lanolin and who knows what else) and make things out of that ?
There’s some immediate advantages to starting with a raw fleece (even over a washed fleece). For one, raw fleeces tend to sell very cheap. This will depend on where you live, but the vast majority of fiber that I buy these days is raw fleece, and I’ve never spent less on fiber. At a fiber festival, I once paid $10 USD for 2 pounds (slightly under 1 kilo) of raw Shetland fleece. So--they’re cheap. As soon as someone starts putting work into a fleece, like washing it or dyeing it, the price immediately jumps.
Second, if you’re looking for the most bang for your buck, starting from a raw fleece is the way to go. You need to wash it, skirt it (take out the really terrible or gross bits), perhaps sort or grade it if it’s multicolored or there’s clear variation in fiber quality, dye it (if desired--I only dye my white fleeces, as I quite like brown and gray and black), process it into spinnable fiber, spin it, ply it, and then knit/crochet/nalbind/weave/do whatever else your heart desires with it. A single raw fleece can last me a month even if I work on it tirelessly, and I might have paid $20 USD--a little over an hour of wages for me.
It also brings you a lot closer to your work. I can’t say I felt very attached to my fiber when I worked exclusively with roving, but sorting through a pile of hand washed Southdown Babydoll locks while I comb them into top to spin into sock yarn on supported spindles that I whittled myself--I can tell you, I feel pretty damn connected to my work, to the ridiculous little sheep whose wool I have, to my socks, and to the wool itself. It adds a lot of depth, both to the experience, and to my understanding.
It’s also honestly pretty easy. To wash a fleece, you need a dedicated wool pot (as in, don’t cook in it again), a bit of dish soap, and some time. Put the fleece in--don’t crowd it, just work in batches if your pot can’t easily fit all of the fleece--add cold water and a squirt of dish soap, and let it cook on the stove for about 45 minutes, without a lid. Don’t let it boil--ideally it should be steaming but not quite simmering. You can use a dedicated wool spoon/tongs to gently and infrequently stir the wool. The water should get pretty gross. After 45 minutes, start the tap running (you need to rinse the wool in very hot water--if you let temperature shock happen, it could felt), drain the water, and rinse the fleece. Then repeat--filling up the pot with hot water now--until the water stops looking dirty at the end of the 45 minute cooking time. Rinse it one more time, and then let your wool dry, ideally on a clothesline but over a vent/spread out flat on a towel is fine too.
Yes, it really is that easy. If you’re worried about felting or otherwise ruining the entire fleece, you can always start by washing just a handful, so that way if you ruin it there’s not much waste. But I’ve washed at least a couple dozen fleeces that exact way, and I’ve never ruined one.
After washing and drying your fleece, you need to prepare it. I typically prepare enough to spin for a day at a time, but you could also do it all at once if that’s more your style. There’s many ways to prepare wool, and I’ll discuss most of them at least in brief, but we’ll start with teasing. This is where you take a lock in your hands, and tease it open. Let any VM (vegetable matter) fall out or pick it out yourself, and open the lock up to the point that you can no longer see any lock structure. It’s now spinnable, just like that ! This is a pretty slow method, but if you start out your raw fleece journey buying just a few ounces/50ish grams of fleece, it’s perfectly doable to tease it all open by hand.
If you have money to put into the endeavor, a humble pair of hand cards (70 TPI will card most wools), or you can kind of make do with two pet brushes like these (although at that point, spend $10 USD more and you have a pair of hand cards, so idk what the point of that is, unless you already have them) is a very good place to start. Load the fiber onto one card, card it until it’s uniform, roll it into a rolag, and it’s spinnable !
You also have hand combs, which are a lot more expensive than hand cards, but which can process very long fibers and can get out all the vm. Cards don’t remove a lot of vm, so combs is the way to go for super vm-y fleeces. They also produce hand combed top, which spins up into a very compact, strong, and abrasion resistant yarn--great for socks.
Past that are drum carders, which are machines in the way that spinning wheels are machines--manual, but they certainly automate the processing of fiber for you. These can be expensive indeed, but process fiber very quickly and are a great choice if you plan to sell the fiber, if you want to start with raw fleece but haven’t the dexterity to do it by hand (and there are electric drum carders as well--otherwise, you are turning a hand crank), or if you want to process high volumes of fiber because you just go through it that fast.
Honorable mentions include flick carding (both cheaper and slower than hand cards--you work with a couple locks at a time and open them up by flicking them with a tined brush), blending boards (these don’t process raw fiber, but they turn already processed fiber into batts--so you can blend many wools very easily for different textures or colors. These are like painting with wool--so fun !), and willowing (I haven’t tried this one yet, but you lay out your wool and repeatedly hit it with willow branches or other bendy sticks, which opens the fiber and also sends it flying all over the place. It looks very fun, and rather slow, and is also free as long as you can find a willow tree).
This website describes some of those methods (and one I didn’t get to) if you’d like to check it out.
Colors to Dye For
Wool takes dye very readily, and you probably come into contact with several natural dye materials every day--onion skins, avocado pit and peel, daffodils, coffee, black tea, thyme, even grass ! You don’t have to be working with fleece to dye it (although dyeing fleece gives you so much color variation and is very fun)--you can also dye roving very easily. Batts, rolags, and top less easily, although it’s possible with a lot of care.
For most natural dyes, you need to collect quite a lot of it, and then let it cook overnight on low heat. Boiling (sometimes even simmering) can kill the color, so you’ve got to be patient. Crock pots on low or medium are great for this. If you can cook it two days, all the better. Let it sit and cool for at least 12 hours, then strain it. (Tip: you can store natural dyes in jars in cool, dark places for at least a year without any ill effects--so you don’t need to use the dye immediately)
The majority of dyes need something called a mordant (I go into more detail about mordants in this post if you’re interested). There are many mordants, but some easy household ones are alum, baking soda (bicarb), copper (put a few bits of copper pipe in a jug of white wine vinegar, let sit for a few weeks at least before using), or iron (same as copper, but with rusty nails. Use a plastic jug !!! Metal will rust and glass can break). Most people mordant their wool by putting it in their dedicated wool pot with some water, adding the mordant, and letting it cook on low for an hour. Then drain the water and add the dye.
Natural dyes need to cook for a while to set--I usually let them cook overnight at least.
For batts, rolags, and top, you can do something called solar dyeing--carefully mordant your wool as usual, then place it in a jar with the dye, and put the dye outside in the sun. Over time (at least a week--often months, especially if you don’t live somewhere warm and sunny) the heat from the sun will warm the water and dye the wool. You could also try storing the jar somewhere you know will be warm, such as near the stove or fireplace.
You don’t have to use natural dyes either--there are also acid dyes, or food coloring, kool-aid (sugar-free), etc. I’m a lot less familiar with those, so I can’t go on at length. They can be a good choice if you don’t have the time for natural dyes, or if you want to get specific colors and not guess what your wool will turn out as. Look into them if you have any interest !
Dyeing your own wool is immensely satisfying, and can be a very cheap (or free, in the case of many natural dyes if you’ve collected or grown them yourself) way of obtaining more color, if you find that you keep ending up with a lot of white wool.
Endless Breeds of Sheep
There are many breeds of sheep on there (not endless, sorry--although there will always be new breeds being developed, so endless in a way !), and they all have different qualities, both in terms of the sheep themselves, and the wool they produce.
Do you want your wool to be very hard wearing ? Down breeds such as Southdown (one of my absolute favorites), Shropshire, or Dorset can be quite durable, and are resistant to felting. You could also go for stronger, coarser wools such as Jacob or Romney--coarser means stronger with wool, and softer tends to mean weaker.
Do you yearn for a softer wool ? Cormo is fantastically soft, as are Rambouillet, Debouillet, and Merino. Many lambswools (meaning the fleece from a lamb--the older a sheep gets, the coarser its wool tends to be) can be softer than their breed standard, so seeking out lambswools even from breeds like Jacob or Rya (both usually strong wools) can lead to soft fleeces.
Of course, there are more considerations than just soft and hard wearing, but there’s pretty much a breed for everything. If you’re interested, “The Fleece & Fiber Sourcebook” by Carol Ekarius and Deborah Robson is an incredible resource, and covers just about every breed under the sun (with pictures, samples, notes, recommendations, and interesting bits of history), as well as most non-sheep fiber producing animals as well ! Speaking of...
There’s Not Just Wool
There’s also many non-sheep fibers, and plant fibers too !
Animals with easily usable fiber include: alpaca, llama, angora rabbits, goats, camels, musk ox, and more ! Their properties are usually different from wool--all of the fibers from the animals above have little to no crimp in their fiber, meaning that they aren’t elastic like wool is. They’re also varying degrees of warm (cashmere--the undercoat fibers that come from many different breeds of goats--are extremely warm, but still not as warm as musk ox down), and some are unbelievably soft. If you can, I highly recommend getting a little cashmere, a little camel down, or whatever other exotic fiber strikes your fancy. They’re very fun to experiment with, and small amounts can easily be worked into projects to add warmth, drape, or softness.
We can’t forget about silk, either--produced mainly by certain species of silkworms, although most insects undergoing complete metamorphosis produce silk of varying quality as well. Silk is a very interested fiber to spin--but it can also be reeled instead of spun, which is how you can get extremely thin silk pieces without even needing to spin thread-weight yarn.
But in early human history, before we domesticated sheep and bred them to have better wool than they started out with, we spun things like inner tree bark, flax, nettle, and cotton. These all require very different techniques than wool, but most of them can be spun on the same tools (and all but cotton can be hand twisted into cordage instead, if that’s more up your alley). They are also inherently cooling--fabrics made from linen will keep you very cool indeed--so if you live somewhere hot where having wool objects is mostly pointless, don’t despair ! There’s still stuff for you to spin.
Connect With Others !
I’m about done with this monograph, but there’s a few last things I want to share.
First is the existence of Fiber Festivals--you may or may not have some in your area. They’re extremely fun, and you can meet many spinners there. They’re also usually a very cheap source of fiber, as prices are often a lot lower at festivals.
Second is the existence of Spinning Guilds--again, you may or may not have one locally, but if you do, you might want to join ! There are also spinning clubs and groups, which might be a little lower-key and more welcoming to beginners.
Then there’s TDF, or Tour De Fleece. You may have heard of the biking tournament called Tour de France which happens in July--well, every year a lot of us spinners do a tournament ourselves, but it’s generally not competitive (except on Ravelry--there are teams and points and everything). For the most part, participating in TDF just means setting a spinning goal for yourself from July 1st to July 23rd (the end of the race) and then trying to achieve it. For a lot of people, this means spinning every day. Some set goals like “get through this whole fleece I bought 10 years ago” or “spin a sweater’s worth of yarn” or “learn how to spin flax, finally” (that’s what I did last year). Or maybe it is just spinning every day--even if just for 20 minutes. On tumblr you can see other’s work and post your own under the tag #TourDeFleece2023, or #TDF2023 (there’s many variants as well)--we’d love to have you !
Lastly, there’s International Spin In Public Day ! To be honest, nobody can really agree on what day that is--allegedly, it’s the 3rd Saturday of September. (For me, it’s literally every day that I leave my house, but I digress). But I’ve also seen posters for October, for September 10th or earlier, and just generally lots of different dates. I’d say play it safe--if you see someone say it’s International Spin in Public Day, go spin in public just in case :D. The purpose of a day like this is to bring spinning back into public knowledge--let’s face it, most people in the western world have zero clue how yarn is made, and couldn’t differentiate a spindle from a spatula. This sucks ! Spinning is such a great activity--it can be meditative, calming, fun, exciting, or a background motion to other activities that allows you to actually pay attention (if you have ADHD). And I think a lot more people would spin, and would enjoy it, if only they were exposed to the idea. You certainly don’t have to act as Spinning’s public outreach officer, or anything like that... but when people ask what you’re doing, explaining it patiently and encouraging them to look into it does everyone a favor.
In Conclusion
I hope this has been helpful and not too confusing ! It’s really important to note that I’m just one guy--I don’t know everything, and I might not always have the best techniques. Looking for information on spinning from multiple sources is a good way to get a well-rounded understanding, and to correct common misconceptions that you might have already learned. Perhaps more importantly, there’s pretty much an infinite number of ways to do almost every single step I’ve described here, and if the way I showed you--or the video I linked to showed you--isn’t working, don’t despair ! There’s nothing wrong with you, you probably just need to do it a different way. I must have watched 3 dozen videos of people drop spindling before it finally clicked with me.
I hope I’ve opened up the world of spinning to you at least somewhat ! There are many things I didn’t touch on, and lots of stuff I wish I could talk more about, but at the end of the day I mostly wanted to 1) show you how to make yarn and 2) pique your curiosity about the whole rest of it. If you have questions, I’ll try to answer them (Purple, I will of course answer all your questions and also attempt to mind read your questions before you’ve even asked them so that I have a 10 million slide power point done by the time the question is out of your mouth), but check the comments and replies first ! Someone else might have answered it already.
Thanks for reading, and happy spinning !
Fig J: The author holding his old drop spindle, spinning at a doctor’s appointment. The spindle now belongs to the friend for which this monstrosity of a tutorial was written ! :D
#spinning#drop spindle#beginner spinning#tutorial#handspinning#handspun yarn#fiber arts#i truly have no idea how to tag this#its over 13k im so sorry#swords i did end up adding tipping to this blog bc of your recommendation thank you !#i cant seem to add tips to posts that i made after tipping was enabled tho. which is very annoying. so its just on all my posts for now#hopefully will fix that later#this did take about a week of writing ! so if anyone#(BESIDES PURPLE FOR SEVERAL OBVIOUS REASONS THIS WAS A GIFT FOR YOU <3)#wants to show some appreciation if it helped you at all#i would be very thankful as i am so goddamn broke lol
2K notes
·
View notes
Text
A kiss in the snow (illustration from the ficlet posted here).
#steddie#my art#steve harrington/eddie munson#smooches#posting the art again on its own#hopefully that’s not annoying to anyone#very very sorry if it is 😓#mostly it’s to keep my art tag organized
2K notes
·
View notes
Text
[ID: an 11 panel comic featuring characters from the owl house. Panel 1- a cloaked Darius sneaking around a wall. panel 2 he peaks around the corner, saying "well? Did you retrieve...the package?". Panel 3 Hettie Cutburn (who has old Hollywood style text announcing "surprise Hettie Cutburn!" next to her) says "Darius! Of course! Took some digging but I found them eventually. Tell the boy I say 'hi!'". Panel four- she hands documents labeled "classified" to Darius. Later, Hunter (post timeskip) walks through a door in Darius' home, saying "hey Darius, hey Eber, I'm ba-". Next panel- Darius, Willow, and Eberwolf on the couch. Hunter says "...willow?", She replies "hey hunter!", he asks "what are you guys doing?
Darius says "oh nothing...except looking at pictures of you as a baby!" Holding up the documents from earlier. We see two pictures of a younger hunter framed like panels- the first is of hunter as a baby/toddler aged hunter freshly sprouted out of the ground with a blanket around him, covered in dirt, while the second one shows a young scout Hunter covered in bandages receiving his sprig plushie. Darius' narration reads "courtesy of Hettie Cutburn- she found the only surviving copy of your early life medical records and gave them to me". Willow says "aww, you were so cute!". The final panel shows Hunter looking embarrassed/stunned as Willow takes a photo of the documents, and Darius says "I'm considering it an early father's day present- so, thank you, Hunter". End ID]
MERRY DADRIUS WEEK!!! Thank you to @sergeantsporks for hosting! There's other prompts I wanna do but they'll probably be late (maybe I'll do them in bulk and upload them on the final day). Til then here's a silly comic!
#the owl house#toh#dadrius week#hunter toh#hunter deamonne#darius deamonne#won't tag eber and willow cause they're barely there#also i realize that op isn't really a fan of hubtlow i. literally forgot while making this the brainrot was so strong#it's not explicitly romantic though so hopefully it's not obtrusive. i know ships are allowed but i don't wanna annoy anyone yknow?#anyway this was 90% an excuse to draw baby hunter even though it was 90% me practicing drawing Darius#he's fun to draw! i just struggle w drawing him consistently but like. i do that w/ most characters from illustration to illustration#i finished this right under the wire. executive dysfunction and exams really got my ass#but it's finished now! not perfect but i haven't really made a proper comic since my final piece this year#on account of that one took me like 6 months#i needed comic recovery time 😭#also hope the ID isn't an issue for anyone since it's a bit spartan. i was trying to trim down it's length since a) it's long as fuck#and b) this fandom is- respectfully- whimpy as hell abt image IDs#but anyway yeah! happy dadrius week#and also happy fathers day if you celebrate!#i got my dad 'do androids dream of electric sheep' and he was really happy w/ that :]
705 notes
·
View notes
Text
ten lines, ten people
(rules: share the first lines of ten of your most recent fanfics and tag ten people. if you have written less than ten, don’t be shy and share anyway.)
thank u so very much @pretentiouswreckingball for tagging me 🫶
10. salubrious
He’s killing his mother.
9. mike wheeler's guide to falling in love with a superhero
Now, Mike wouldn’t say he was an expert in anything, besides being a massive idiot.
8. resplendent
Will is warm under his hands.
7. adulation
It’s a warm, Wednesday afternoon when Mike practically climbs on top of him.
6. need-to-snow-basis
Mike, Will establishes on a Tuesday afternoon, is acting strange.
5. compunction
Mike Wheeler knows he’s a bad person.
4. your mute inquiry
There’s a life we’re all –
We’re working towards a life we can’t taste, and we’re dying to –
We’re all dying, and we’re all starving, and salvation isn’t coming, and there’s no one to save us, and –
There’s –
There is a –
3. love me on purpose
December is freezing.
2. where we lay our scene
Neil would like to say he’s a pretty decent fellow.
1. cleaving
Will wants to say he hates Hawkins.
tagging @byeler @parkitaco @light-lanterne @miwism @boycattj @itsromeowrites @willelfanpage @elekinetic @andiwriteordie @etchedstars (with no intended obligation) :)
#i tried to tag people i dont usually tag or . interact with#i hope u all feel ok being tagged bc . i havent seen anyone on st tumblr do this yet so hopefully this little trend goes around#since it seems Fun#but . yea hopefully none of u are annoyed !#so . yea#umm#byler#LOL#obligated byler tag#also CAN WE TALK ABT THE DIFFERENCE BETWEEN 10 AND 9 HEEELEPP#THE WHIPLASH BYE#ok . GOODBYE and GOODNIGHT#i am a little . inebriated so um hopefully im not rambling like a lunatic in these tags#ok BYE
124 notes
·
View notes
Text
this might be a reach, but if anyone has in their possession the oxford pennant mcr bumper sticker and hasn’t used it/would be willing to part with it… i badly want to obtain it, hmu 👀
#mcr#my chemical romance#sorry to be annoying im only tagging it to hopefully broaden the reach a little#or if anyone has details abt like. if i order patches will i still get it as a gift?#i wish they sold it separately
113 notes
·
View notes
Text
genuinely tho, i hate the whole moralizing about fandom tastes (including one's taste in ships) period
the whole acting like queer ships are better than het ships is just one example of it (and honestly m/f shippers insisting their ship IS queer too bc they read the characters as/the characters are bi is just as bad/part of the problem tbh). but i can't figure out how to explain why it bothers me bc it's certainly not 'waah you guys are being so mean/unfair to the poor m/f fans!! :(' it's more... making taste a fucking moral standing/one preference inherently morally superior to another is fucking whack. stop it
#idk i'm still not explaining it well but whatever#hopefully u guys get me#sto parlando#this probably needs the:#general fe blogging tag#since this was all spurred my annoyance with the way fe fans try and moralize about their taste vs. anyone they disagree with's#and constantly use that moral superiority to shout down anyone calling out sexism/homophobia/racism/ableism/etc in the fandom#i was being hypocritical for reblogging that post. i think i was just still annoyed from another shitty reddit thread i saw last night#where i saw someone get downvoted and mocked for suggesting dimitri's dedue or felix interactions could be read romantically#(in a thread *about* queer rep in the games! i almost posted about it bc i was so annoyed when i saw that shit YET AGAIN)
22 notes
·
View notes
Text
I live! And I'm writing a fic
Hello, everyone! :) I've re-started the process of moving this blog over to a side blog (@darkeneddawning) when I have time. End goal is to have all my art and stuff from here over there, so my main blog (this one) can be used for everything. The side blog will be where I post new phandom art and stuff.
Hopefully the transfer isn't too confusing for everyone. If you want to follow me to see my phandom art and stuff, you might want to wait until my side blog is all caught up, or you'll be spammed with me reblogging all of my old art over there for the next while. I'll announce on this blog when it's done and wait at least a week so people have time to unfollow this blog if they don't want my reblogs of everything I like to clutter up their dashes.
But I'm too impatient to wait until I'm done with that before I start posting again, so here's a blurb from the DP x DC Circus Gothica crossover fic I'm writing! It's going to be a while before I can post it since I've got a lot going on and I'm a very slow writer so far, but I'm hoping posting about it will keep me motivated to continue working on it :)
It's not a very long blurb, but I'll put it under a read more anyway (along with a synopsis of the fic):
Fic synopsis:
Wait, but if I’m mind controlled, and you’re mind controlled, then who’s catching the evil ringmaster??
Jason wasn’t expecting to join the suspicious circus he was investigating on Dick’s behalf, but a day in found him planning a heist with his new posse of co-slaves. At least getting in on the action gave him the answers he was looking for, as well as some others to questions he’d forgotten he was still asking.
Or: A new circus rolls into Bludhaven, trailing a history of too many pilfered towns to be a coincidence. Dick asks Jason to look into it on account of Dick’s circus related trauma. Jason was expecting to find evidence, not a one-way ticket to minion town, or a mysterious boy who somehow calmed the insatiable waters of the pit. Who is this boy, and what can he teach Jason about himself?
----
Though he felt compelled to come, he didn’t know what was wanted of him now that he was here.
“This area is off limits to guests. Can I help you?”
That reaper kid from the performance, head attached, was looking at Jason with a raised brow. The same Red color that was swirling around Jason’s brain occupied the kid’s irises. Now he was up close, Jason could see how the kid’s stage eyeliner was only a slight enhancement to the genuine dark circles under his eyes. With those in addition to the gaunt hollowness of his cheeks, the kid looked like he hadn’t slept in years.
Jason smiled. It wasn’t a natural smile, but the Red liked it. “I’m here to, uh… cross over to the dark side?” That was all the Red was giving him to work with.
Reaper kid squinted at him, then drew back in surprise. “Woah, I totally thought you were human. Is that a disguise?” he asked, walking up to Jason.
“Disguise?” Jason glanced down at his body like it would clue him in to what reaper kid was talking about. He looked plenty human to himself. “What else would I be?” Was this important to the Red’s mission? Red was starting to feel a little more impatient.
“Uh, you know,” the kid gave a dismissive hand wave, but clarified: “Dead?”
#danny phantom#dp x dc#circus gothica#danny fenton#jason todd#I'm still hammering out the details but I have the main plot figured out#it specifies that danny's head is attached bc it comes off as part of the show#most of my batfam knowledge comes from dp x dc fics so hopefully I don't egregiously mischaracterize them#also are there specific tags the phandom uses for stuff like this that anyone would want me to use in the future?#bc I know I used to stay caught up on my favorite tags in the day and proper tagging/categorization is something I appreciated from others#I still don't want to post on this blog too much before the transfer is complete since I don't want to make the transition too confusing#this blog has gained a few new followers recently (that aren't spam bots) and I worry that the move is going to be annoying for people#honestly I shouldn't post this bc it probably is going to make the move messier if I do#but I really want to get back into participating instead of just lurking#and hinging participation on an intimidating obstacle has prevented me from doing anything for too long#I literally stopped posting on tumblr all that time ago bc I couldn't find a solution to how I couldn't reblog posts to a side blog easily#I tried over and over to figure out a way to reassign which blog was my main#I tried using a side blog as my everything blog and it was not doable for me#I've never seen anyone else make a transition like this so it's kind of embarrassing#but it's still the best solution I've come up with so please bear with me
83 notes
·
View notes
Note
Eddie and Chrissy were cute in concept but then it was brought to my attention that Chrissy is underage, she’s gotta be 16-17 while Eddie is 19-21 😬
first of all, i have a hard time believing this is from an actual reformed shipper and not just someone trying to covertly push their ideals but i'm gonna pretend this is in good faith.
these are the facts. they were in middle school together. american middle school lasts three years. eddie has been held back at least twice. combining these two facts, we know definitively that their age gap is 2-3 years.
we can also reasonably assume that chrissy is a senior, based on her necklace. the necklace says '86', the current year of the show. the most logical assumption is that 86 is her graduation year. there arent a lot of other reasons for a girl that age to own and wear a gold necklace with the current year on it. the time of year is spring, by which time all american high school seniors are minimum 17.
(unless they skipped a grade, which we have no evidence chrissy did, and frankly if you're headcanoning that just to make the ship creepy.... you're the creepy one)
that combined information makes their ages:
chrissy: 17-18
eddie: 19-21
two notable caveats:
these ages are relative to each other, and cannot be further than 3 years apart. it is not possible for chrissy to be 17 and eddie to be 21 at the same time. eddie is ONLY 21 if chrissy is 18.
it is EXTREMELY unlikely eddie is 21 at all. that would mean that hawkins high is sanctioning a 21 year old to stay in their school. that would be an extraordinary circumstance, and one i cant reasonably see being extended to trailer trash eddie, who looks and behaves the way he does.
if you're basing your assertion on chrissy's file, don't. it was most likely just an error, and a screenshot of a prop you have to csi enhance to see doesn't override the things that have been written into the show with the explicit intent to indicate these character's ages. that's insane.
all together, their most likely ages are:
chrissy is 17, and eddie is 19-20.
OR
chrissy is 18, and eddie is 20.
in my country, and most countries, that is perfectly legal. notably, the age of consent in indiana is 16.
what's more, it's normal. i don't wanna be the prick that says touch grass but seriously you guys. get out in the world. a 2-3 year age gap is fine, and extremely common. teenagers date older teenagers all the time.
the problem comes when there is a significant maturity or development gap between partners. if your headcanon or read on these characters is that chrissy is a naive, childlike thing and that eddie is a fully grown and developed man who is preying on her, thats a you problem. you're mad at your own brain. that's not the canon, and it's certainly not my headcanon.
finally, it's not your job or your right to go around pushing your personal morality on other people. even if your assertions were true, which they are not, there's no possible interpretation of the canon in which this relationship would be illegal. so leave people the fuck alone. you don't have to like it! if it squicks you, that's completely valid. my recommendations would be to stay out of the tag, and unfollow me.
#edssy#eddie x chrissy#chrissy x eddie#eddie munson#chrissy cunningham#sorry this is so long im just annoyed by this manufactured discourse#getting granular so i hopefully never have to hear it again#anyway anyone else in this ship tag who dated an older drug dealer in hs lol#anon u came to the wrong guy sry#also i think theres like falseness to saying chrissy is 16-18 and eddie is 19-21#bc the brain goes '16 & 21!' thats sketchy!#but even anon here knows that thats not the case#its like 16&19 OR 17&20 OR 18&20 OR 18&21#i already made that point ig just the wording of this message feels calculated to me#mp
279 notes
·
View notes
Note
I’m fascinated about the oc stuff you mentioned! I only recently (within the last year) started creating oc’s so I’ve not really thought about creating images of them. I pretty much just save stock photos and photos of celebrities that resemble what I’m imagining, but that can be a pain. I’d love to hear more tips (as well as hearing about some of your oc’s if you’d like to share!)
A beloved mutual, hello!!
It's cool to hear that you're getting into oc stuff, making up little guys is so much fun! You'll have to tell me about yours sometime! I gotta admit though, saving stock and celebrity photos sounds like a hassle :/ I can't imagine what you'd do for a non-human oc…
If you're interested, I have a ton of picrew links I can share (and obviously I can give you ones with more specific aesthetics if you have something in mind, versus just dumping a truckload of random links on you).
I also really like using Heroforge (D&D Minifugre website) to make ocs (D&D related or not). They update pretty regularly so there's always better options (especially for non-human ocs) and colors for more specific customizations. It's especially cool because if you decide you really like it, you can buy your oc as a minifigure (but you can still use the site/save your oc even without buying anything)!
I love free websites :3
Lately, I've been focusing on my batch of Minecraft ocs. I was supposed to join a big rp server, but that fell apart so now I'm just 'writing' it all myself. It's been really fun, and I like being able to build an intricate story and characters from a pre-set template that comes with making ocs within a pre-existing world/ruleset (It's just much easier on my busy brain for when I'm not working on my actual original writing or whatever XP). But because of this, I've also been making full Minecraft skins for those ocs. It's pretty much just pixel art, and I am nowhere near the levels of some of the proffesional skin-makers out there, but I've made some pretty cool stuff if I do say so myself!
TL;DR I am not good at art, but my imagination is very hyperactive, so having some of these online resources has helped a ton in just getting something out into the world.
I am more than happy to share site links and answer any questions you have about navigating them if you wanna dm me!
I'd also loove to talk about all my ocs more, but I know that can be a lot for a tumblr ask…especially if tumblr keeps eating them >:(
Thanks for messaging me, hope this helped some!
(Also, sorry for the weird formatting of this post tumblr is being dumb and I can't fix it for some reason...)
#why do the paragraph breaks look like that and why can't I change their spacing tumblr please the readability#i got an ask!#anyone is free to dm me for links btw#I figure it's easier to dm since I'm sure people will want more specific links#I could just make a master-post with all the links but that seems like too much#maybe if enough people ask idk#also been thinkin bout just making oc posts like I do in my writers/rp discord#I have little oc intros with some picrews for visual purposes#but I also don't wanna be annoying and flood people's dashes with stuff they don't care about#hopefully that all makes sense and isn't too many words...#I tried not to go into too many details bc I was excited lol#also trying not to add too much extra info in the tags like I normally do#especially about my frustration with the minecraft skins#I have so much fun making them and they look so good when they're done#But I am colorblind and never tried pixel art before just jumping into skin making soooo yeah lol#but I'm rambling now oops :3#anyways!#no cute emojis like usual bc i'm on desktop sad#heroforge#picrew#oc stuff
3 notes
·
View notes
Text
.
#just a little waffle#xiao: waffle#waffle: miscellaneous#okay turned into a little bit of a long waffle#WHOOPS#shoving it all hopefully under a read more ------------------------------------------------------------------------------------------------#*tag equivalent read more#i have a practical exam coming up in a few days and whenever i think abt it i feel so fucking sick i cant do anything#well i mean#i can do things obviously but i kinda want to hurl while doing them#things like writing and reading become so jarred and misplaced and i cannot enjoy them at all#i cant even write tbh#i hate it sm i just want it to be over but i also never want it to arrive#and i keep thinking abt everything i have to do and how im not prepared at ALL to do them#argh its just so annoying and its not the worst thing anyone could go through i know but it does not mean i do not still wish i wasnt#SIGH#and then i get a headache. and cant sleep either i keep thinking abt it when im just lying there and then im wide awake going through#everything im gonna screw up#god. bleugh. anyway.#waffle over#love and light to yall💫
8 notes
·
View notes
Text
hey @humans saw yall responded to a post making fun of you for updating the pixel alignment of a dash icon rather than fixing anything important saying "changes like this feel small but can make a big difference for some people" which is a bullshit cop out if ive ever heard one so im here to tell you directly in a way you cant wiggle out: you know what would actually make a big difference for a LOT of people? not being transphobic assholes
#that response was so deeply annoying to me like they couldve been like 'yeah its not big but it was technically an update#so we had to include it in the update report' but they tried to frame it as 'well ackshully everyone was BEGGING us to perfecltly#align this pixel so youre WELCOME' and its like. man fuck off you dont get to throw a fit that your userbase is pissed off about#repeated blatent bigotry and then try to act like youre doing us a favor moving an icon a smidge#yall know exactly what the users want you to do to improve this site and are ignoring it because you dont actually give a shit#but you cant say that bit out loud so you have to keep talking circles around it because you know the dirty queers are the main people#keeping your site the tiny bit afloat it still is but are unwilling to actually treat us well so you have to#talk in circles and pretend you give a shit and hype up minor updates like theyre godsend while fucking over trans people anyway#anyways i hope the transphobe on staff is the one who opens this tag notification#just kidding thats all of them because if youre willing to keep a transphobe on your team and allow them to make changes#that directly target lgbt people then you are all transphobes#whats that saying thats like 'if you have 3 nazis and 9 regular men at a table you have 12 nazis'? that#i dont actually expect them to respond to this post bc like. theyre obviously already aware people are mad about this and have just been#avoiding the subject especially if PIXEL ADJUSTMENT is something theyre responding to instead but#w/e#also moving an icon slightly does not make a big difference for anyone sorry not sorry i guarantee if it hadnt been#included in the updates post not a single person would have noticed or cared#they just need something to pad their uodates post out with so people hopefully eont notice the glaring lack#of 'fired the transphobe' 'unblocked queer tags' 'turned off the image filter that targets trans women a lot for some weird reason'
8 notes
·
View notes
Text
Make me draw!
(I've been watching wistfully as all these fun writing games go around, so I decided to try adapting one for artists! ✨🎨✨)
Rules:
Make a 24-hour poll with the title of your current WIPs.
Work on the winning WIP! 10 minutes for every vote received for the top choice. (or change the time per vote: 1 minute, 5 minutes, 15 - it's up to you!)
Tag some people to spread the game! (As many as you want - no pressure)
Tagging: @ahhrenata @resande @bpillustrated @cholvoq @chocoarts (no pressure though - feel free to ignore)
(My mind goes blank when i try to think of people to tag- if anyone else sees this and wants to do it, please join in!)
29 notes
·
View notes
Note
Please, could you do a Rachel Berry is autistic gifset? Or find someone who would? There are a few floating around featuring Blaine (and I love them) but it'd be nice to have some of Rachel too
Yeah it would! I did make one a while ago that was about Rachel, Blaine, and Kurt stimming lol. But ummm I don't. Like my gifsets really aklsjdskfjsl. But maybe if we ask nicely someone else might get inspired and make something for us?? Who knows? @tuiyla @flaine @hummels-turn @backslashdelta @daltonblaine @klaintina @crayonstoperfume @thetroubletones if you have no interest in rachel or this prompt just ignore me alsjfsdklf i cant keep up with who stans and who still hates her lol
#glee#rachel berry#rachel is autistic#asks#holisticfansstuff#i would apologize if i missed anyone in tagging buuut#you probably dodged my annoying little bullet so hopefully no offense aklsjfsklfs#but yeah if anyone sees this and gets inspired lmk uwu
6 notes
·
View notes
Text
I've been a bit too busy to draw today but I need to talk abt Barnaby and Lilith being siblings.
Like
- Lilith doing that little wave dance in the play and Barnaby, watching the play, sees that and is almost immediately like "Well, I know which one is Lilith now." and goes to talk to her and tell her he saw the little wave dance to tease her and Lilith is embarrassed about it. That's sibling energy your honor.
- In their duo heist the valet wants to take her coat so she doesn't have to wear it during the party and Lilith is trying to talk her way out of not giving him her coat as to not reveal she has snake hair and Barnaby realizes this and steps in. He tells the valet "I believe it will be getting quite cold on deck and we anticipate spending a lot of time outside so I think we'll keep our coats with us." and they say how it's part of the ensemble. Then Barnaby doesn't ask her about it and respects the fact she doesn't want to take off her coat.
- She's probably influenced him (in a good way) with all her talk of unions. For example, he calls it what's on trend but he's like "we have this modern progressive thing where we allow the servants to accompany us (to the parlor)" and yes this was so Zillah and Barnaby could stay together but I'm counting it as Lilith has infodumped about unions and workers' rights to Barnaby who remembers it. Hopefully soon he will be influenced enough to be very pro-workers' rights and give workers better pay and benefits.
- Lilith and Barnaby can talk about spirit stuff together and she can help Barnaby figure stuff out about the djinn fox that he accidentally drank and is now in his head. I wanna know more about that fox.
- They're both very good at social stealth could probably do a lot of heists together because of that.
- I do have a headcanon about Lilith's hood flying off and her snakes showing but before anyone can actually get a look at them Barnaby pulls off his coat and puts it over Lilith's head.
#oxventure#oxventure in the dark#Lilith#Lilith Capellenaga#Barnaby#barnaby fortescue iii#barnaby “the butcher” fortescue iii#Barnaby giving his coat to other people is just a form of affection of his in my mind#bc idk it's a big coat he's tall it might only be able to be big and comforting on Edvard and Lilith cuz they tiny#but he can just by wider coats for Kasimir and Zillah but it's about the fact he keeps buying more coats and it's exspensive#and he doesn't give his coat/stuff to just about anyone#idk I can't explain it well but I think the picture comes across but it's rude and annoying I had to type that out in like 4 different tags#there's more Barnaby Lilith sibs vibes examples that I can't think of probably and hopefully more down the line
9 notes
·
View notes
Note
3, 16, 30 and 42 :)
3. What was the last song you listened to?
Oooo this one is interesting because i found this hardcore edm song called 24/7 (Styles & Breeze 2011 Mix) by Eclipse that i actually like lmao. Out of my normal comfort zone but for some reason this song hits.
16. Want any tattoos? What of?
Yes 100% at some point. The first thing i always think of are song lyrics, and if i had to pick lyrics right at this moment i'd say "we have each other and that's all we'll ever need" which is a line from Where Light Divides the Holler by Knocked Loose. The context of the song makes it pretty bleak, but my eyes water up every time the line hits and it just emotionally destroys me every time. I know once i started i'd inevitably have probably dozens lyrics from songs and i wouldn't regret a single line.
30. What are you looking forward to in the near future?
Honestly, well, nothing at the moment. There is/was kind of this trip to a cabin my friends do almost yearly but i havent done it in years and have been pretty undecided if i want to go.
42. Tag 5 of your favorite blogs
Oh lord IM ON THE SPOTTT. @justalonelyworld @sadbitch-mel @empty-eyes-and-thick-thighs @i-am-kay @itsjasper-rojas I HATE PICKING THINGS BUT THERE WE GO
#firstly hopefully im not annoying anyone im tagging#also i didn't realize i wasen't following you back since you remade your blog im so sorry forgib mee 😭
9 notes
·
View notes
Text
why is it so hard to find rosemary fics that don't include my notp lmao

#text#like sure im barely at page 2 of the rosemary tag bUT COME ON PPL!!!!!!!!#i look at the description of a fic i go oh! this looks nice then i look at the pairings and whats the first one that i fucking see? my notp#haha rhyme 😎#BUT HONESTLY NOW DJNDJSNXJSNXJSN this is soooooo annoying bluhhhhhh#if anyone has like. rosemary fic recs that dont include dave////////////kat plz PLZZZZ share lol#meanwhile ill be digging some more and hopefully ill find something good to read todayyyyyy
16 notes
·
View notes
Last Seen Blogs

mcu-hcs
mc-who??

lastdovahkiin
The Grapes Are FUCKED

hyxie1
Hyxie

ohmterratarot
Ohm Terra Tarot

kenconffetti
Comics and Such