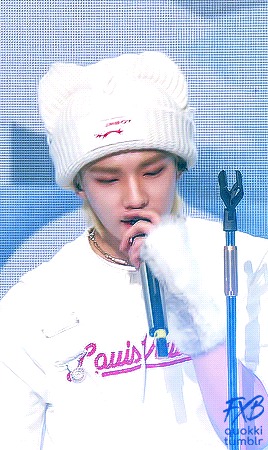
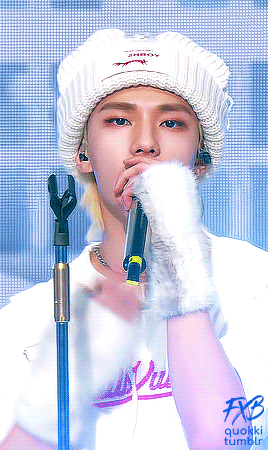
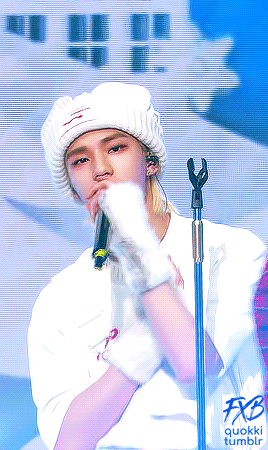
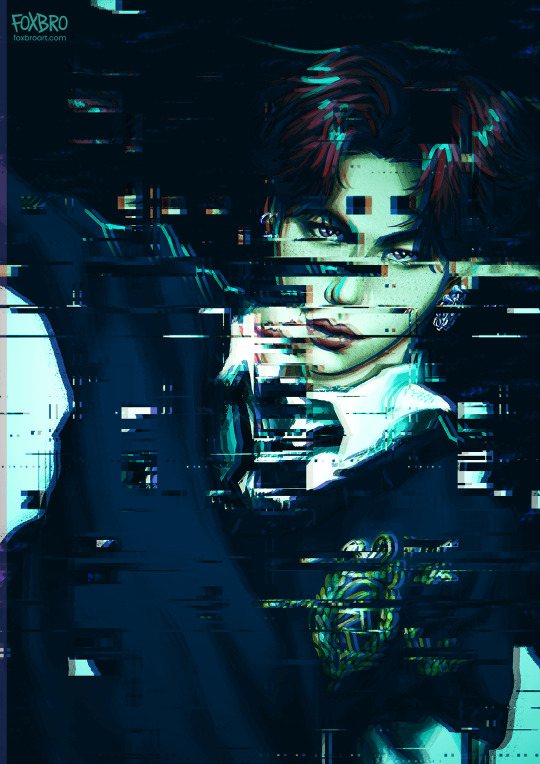
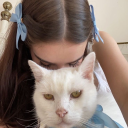
#fxb gifs
Photo
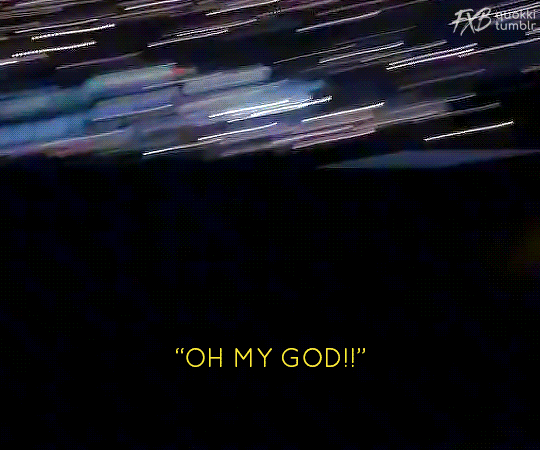
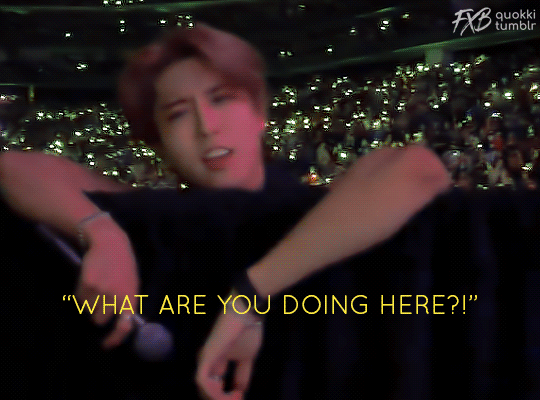

OH MY GOD!!! (x)
#forhanji#hjsnet#han jisung#stray kids#stray kids gifs#dreamytag#vilmatrack#majatual#bangzchan#uservivi#userhyunfelix#jaybrainrot#cheekyuser#live#maniac tour#220628#fxb#fxb gifs#fxb han gifs#1k
3K notes
·
View notes
Text


Binsung cuties being silly for @marshmellowpaint
thank you for commissioning me!
If you like my work, consider supporting me:
Get one of these for $25!!/ ko-fi / Links! / prints
#artists on tumblr#staysart#stray kids#han jisung#changbin#binsung#chibi#commissioned#fxb art#stray kids fanart#cute#dreamytag#kiwitracks#melontrack#adriblr#userhyunchanz#cheekyuser
141 notes
·
View notes
Text


Are you done? [south wind knows my mood episode 29]
#fxb: let me sit on the table block your tv & eat a banana in front of you whilst taunting you after your nth life threatening accident#bananas were your favorite fruit here let me peel one for you and feed it to you oh you don’t want it? okay I’ll eat it while being mean#and not break eye contact with you as i eat said banana because of all the fruits he picked up a kiwi & an apple & he went with banana gtfo#cheng yi#my gifs#south wind knows my mood#cdramaedits#cdrama#fu xinbo#fu yunshen#stand by for the queue#fu xizhou#this is b a n a n a s y’all bananas#you two sure this is about the company? because I’m getting whiplash#I laughed so hard I’m so sorry he’s being such a jerk and I’m here laughing like the immature idiot I am
12 notes
·
View notes
Note
Hi!
I was swimming around the FishBen tag on tumblr and saw you recced at least one FishBen fic.... do you happen to have any more? I love them
Hello, nonny!
I love FishBen tooooo!! Sadly, there is not nearly enough Frankie x Benny content out there in the world, but I'm happy to share the (smallish) list of fics I've found for them so far. (Anyone aware of Frankie x Benny content that I've missed, please jump in with recs!! Anon and I will both love you for it!! 😘)
Anyway, on to the...
FishBen Rec List


List Notes:
Fics are Sorted by pairing then alphabetically by Title
Uses AO3 Ratings: General audiences - Teen & up - Mature - Explicit
Check your Content Settings if you're 18+ and want to be able to see mature content (Settings -> scroll down to Content You See -> Community Labels -> Mature -> show)
Links sometimes misbehave on desktop–If none of the links are working, try opening in dashboard mode (click the eye-shaped button in the far top right)
Partially cribbed from my prev Frankie x Benny (x reader) ask response
Frankie x Benny (aka. Just the FishBen)
(Why is it that FishBen tends to come almost exclusively either fluffy and/or sexy OR whumpy and full or angst? Who knows, but I love it either way!!)
== Sweet and/or Sexy ==
The Beginning (ao3) by @elvenmother
[FxB, get-together fic E, 2.1k, oneshot]
Inside, Upside, & Out by @midnightartemis
[FxB, get-together smut, E, 3.7k, complete?]
Put Your Name On It (ao3) by @alwaysbethewest
[FxB, sweet & sexy, E, 2.3k, oneshot]
Put Yourself in My Place (ao3) by @alwaysbethewest
[FxB, bodyswap smut, E, 3.1k, oneshot]
Right on Cue (ao3) by @alwaysbethewest
[pre-FxB, bartender!Frankie, T, 0.4k, oneshot]
Tennessee Whiskey by @mssr-mcknickers
[WxS with some FxB, cute Halloween fic, T, 1k, oneshot]
Trou de Cu (ao3) by @alwaysbethewest
[FxB, silly & sweet sex shenanigans, E, 0.4k, oneshot]
You Leave a Mark by @alwaysbethewest
[FxB, secret relationship, M, 0.4k words, oneshot]
.
fishben art by @littledozerdraws
(dancing, post-fight, pre-fight?, being cute & sweet)
[ART: FxB, cute & sweet!]
—
== Angst / Whump ==
*be sure to read the warnings with these; things get pretty dark in some of 'em
Cry a Little by @wyn-n-tonic
[FxB, hurt/comfort angst, M, 0.8k, oneshot]
fuckin' tell me by @waywaychuck
[sort of pre-FxB, hurt/comfort, 0.9k, oneshot]
slippin' off the rails by @waywaychuck
[FxB (implied WxS), whump & hurt/comfort, T, 4k, oneshot]
Though I Be The Last by @kesskirata
[some FxB in amongst the team whump, E, 19k, 13ch as of Oct '22]
.
Frankie x Benny x Reader
(I know you didn't ask for this, 'nonny, but since pure FishBen is few and far between, I figured I'd add these as well, for you or anyone else who is interested)
A Helping Hand (ao3) by @dameronscopilot
[Fx RxB, smutty threesome, E, 2.2k, oneshot]
Baby, how do you sleep when you lie to me? by @everyhowlmarksthedead
[FxR x B, revenge? smut, E, 2,8k, oneshot]
Better Together 'verse by @absurdthirst & @wardenparker
[FxRxB, E, 53k, 5 finished oneshots in an ongoing series]
Fics: Better Together, Taking Care Together, Waking Up Together, Celebrating Together, Together for Christmas
Flashback (ao3) by @green-socks
[FxR xB, pining & fluff, E, 0.9k, oneshot]
Heat Wave (ao3) by @thirstworldproblemss & @astroboots
[FxRxB, pining pwp, E, 2.2k oneshot in a larger series]
(hold tight) everything's fine by @raincityruckus
[FxR("she")xB, pining smut, E, 5.3k, part of a poly!TF series]
Just us by @ezrasbirdie
[FxR xB, plus size!reader, E, 4.5k, oneshot, au in series]
Made with Love (ao3) by @thristworldproblemss
[FxB (w/in FxRxB), silly hurt/comfort fluff, M, 1k, oneshot in a series]
Messy Pile of Affection (ao3) by @flightlessangelwings
[Fx RxB, get-together fic, E, 12k, completed fic in an ongoing series]
Series Masterlist
Moonlight 'verse (ao3) by @absurdthirst & @wardenparker
[FxRxB, werewolf!Frankie, E, 32k, 2 completed fics in a series]
Fics: Moonlight Madness & Full Moon Fury
Not A Competiton (But I'm Winning) (ao3) by @alwaysbethewest
[FxRxB, pegging smut, E, 1.2k, oneshot]
No Thinking Over the Weekend by Jazzelsaur (only on ao3)
[FxR xB, get-together smut, E, 8.0k, long oneshot]
.
That's all I could remember and/or find for now. Sorry it's not bigger list, 'nonny! It's really a shame Frankie x Benny stuff isn't more popular since it's such a fun pairing. Anyway, thanks for the ask, and for giving me a chance to spread the FishBen love!! 💕
🧡 twp
—
Want more to read?
Check out my other Author, Fic, & Fanwork Recs
#answered asks#anon ask#frankie morales#benny miller#triple frontier#frankie x benny#frankie morales x benny miller#fishben#fic recs#fic rec list#thirstworldproblemss#twp rec list
88 notes
·
View notes
Text
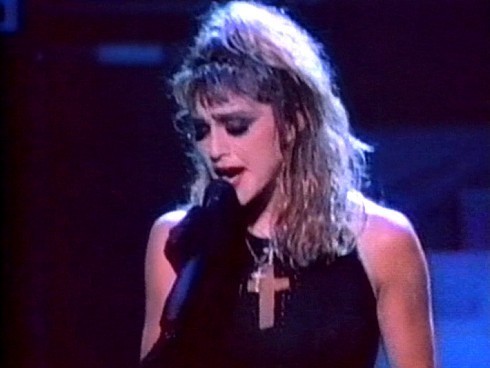
#madonna#80s#tour#fashion#fxb#pop#girl#celebrities#beauty#pretty#blurry#vintage#model#photo#photography
2 notes
·
View notes

Photo

Hyunjin (o´∀`o) Only You
#createskz#staysource#hyunjinnet#hwang hyunjin#stray kids#stray kids gifs#dreamytag#kiwitracks#melontrack#uservivi#userhyunfelix#majatual#vilmatrack#jaybrainrot#fxb#fxb gifs#fxb hyunjin gifs#pf#211231#flashing tw
1K notes
·
View notes
Text
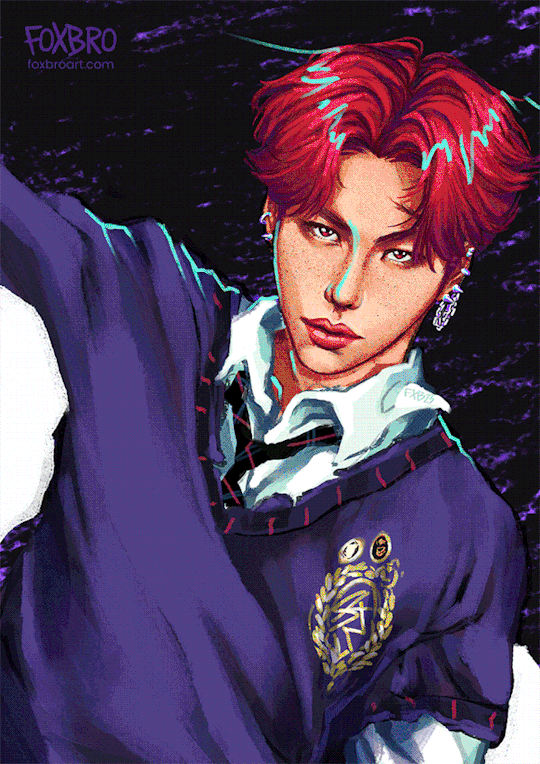


Side Effects for my sunshine @yonglixx
happy birthday 🤍🖤
Commissions are open!! / ko-fi / prints / patreon
#artists on tumblr#staysart#stray kids#felix#lee yongbok#drawing#digital art#photoshop#dreamytag#vilmatrack#majatual#kiwitracks#melontrack#cheekyuser#jaybrainrot#userhyunchanz#flashing tw#fxb art#rough painting#gif#animation
170 notes
·
View notes
Text
VSTHost ~ Windows VST Plugin Host
VSTHost ~ Windows VST Plugin Host
It’s a VST-compatible host that’s capable of:
loading VST effects (aka “plugins”)parameterizing / editing themsound output for VSTisMIDI-input and -outputloading / saving .fxb / .fxp filesI/O through either Windows MME or ASIO driversWave Player / RecorderMIDI Player
While the program started mainly as an aid in understanding and debugging VST plugins, it has evolved into a quite capable…

View On WordPress
0 notes
Photo
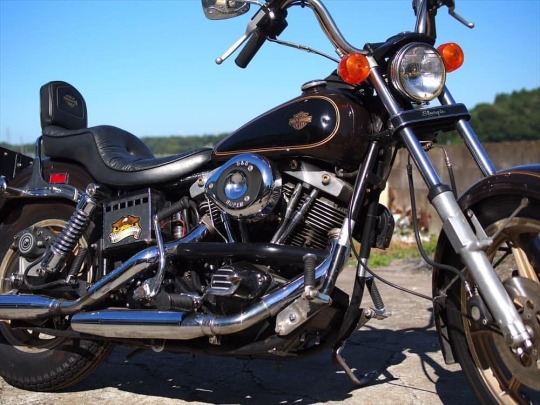
【Thankyou!Sold!!】 1982 FXB STURGIS AMFからBUY BACKした年のスペシャルエディション🔥 ツインベルトのフルオリジナル😎 瞬殺でした!有難うございました🙏 #onanysunday #onanysundayco #harleydavidson #shovelhead #fxb #1982fxb #fxbsturgis #fxs #ハーレーダビッドソン #ショベル #ショベルヘッド #スタージス #佐倉市 #佐倉 #佐倉城下町 (On Any Sunday) https://www.instagram.com/p/CFhBVh3hElF/?igshid=jd6s36hql0yy
#onanysunday#onanysundayco#harleydavidson#shovelhead#fxb#1982fxb#fxbsturgis#fxs#ハーレーダビッドソン#ショベル#ショベルヘッド#スタージス#佐倉市#佐倉#佐倉城下町
0 notes
Photo

Free Trading Signals Channel ! Get daily trading tips at no cost from FXB 🎉💯! Click and join https://t.me/fxbfreesignals #tips #fxb #forex #money #investment (at Sandton, Gauteng) https://www.instagram.com/p/B_5ExRmJgkp/?igshid=1lr7tq18k0pvz
0 notes
Photo
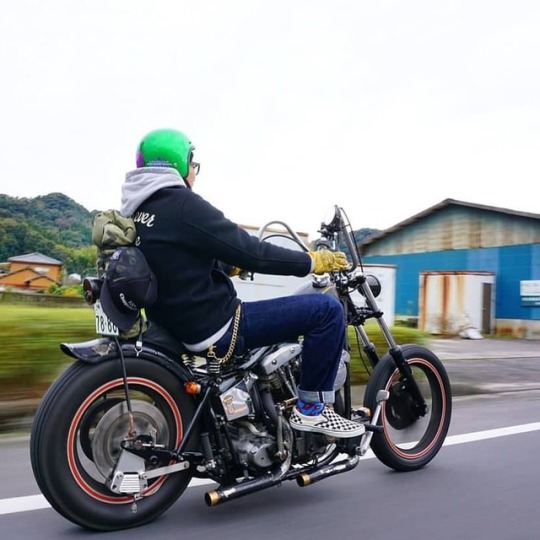
RepostBy @83fxe_masa: ". . @___fuck_________ . . 復活ご機嫌♫♫ . ______________ #harleydavidson #shovelhead #fxb #kagoshima #shovel" https://www.instagram.com/p/BrT-cl8hg1C/?utm_source=ig_tumblr_share&igshid=r0njz297u89p
10 notes
·
View notes
Text
Full giffing process - tutorial (*≧ω≦*)


Due to little demand, i will be going thru my complete process for making gifs. so this will cover all the basics i hope! keep in mind this is just the way I personally do things! please feel free to send me asks or dms if you have any doubts or questions!
☆☆☆☆☆☆☆☆
DISCLAIMER: Everything I know about giffing, I've learned from other tutorials, including the VapourSynth Resources I'll be using in this tutorial so I'll leave links to those tutorials I've used here as well!
In Depth Giffing Tutorial (link here)
How to use VapourSynth (link here)
☆☆☆☆☆☆☆☆
(o´▽`o) I'm a windows user so idk if this works exactly the same on mac!
First things first, you will need:
☆ 4k video downloader (download it here!)
☆ Vapoursynth (download it here!)
☆ Photoshop (download it here! -64bit version only)
Okay! The first thing you need to do is make sure you're working with the highest quality material possible to ensure a decent looking gif!
I'd say the minimum quality needed for decent gifs is 1080px. But if you really want to gif that low quality 2 frame milisecond of your fave, i respect that
☆ lives / streams and tiktoks are typically not very high quality
☆ for stage performances such as music shows, ts/tp files are preferred but those can be really hard to get a hold of (this is a whole deeper level of giffing hell and more of an advanced class topic so nevermind this for now!)
☆ those occasional 4k facecams on youtube work fine tho!
☆ for mvs, variety shows etc, you can download the video with good quality from youtube using 4k video downloader
_(:3 」∠)_
Now let's talk about tumblr and it's pre-requisites for a good looking gif post :D
Tumblr can be sooooo annoying about gifs okay.... I find it's best to plan my whole set before I actually start doing anything but hey that's just me. Some things to keep in mind are: dimensions, file size, number of frames and post layout!
☆ Dimensions
You have 3 main options here and it's all about the width!
☆ 1 collumn: single gifs! these should be 540px wide
☆ 2 collumns: split that in half! 268px wide so there's a lil breathing space between the gifs!
☆ 3 collumns: 3's a party! 177px for each gif please
You can go crazy on the height but the width should mostly stick to one of those 3 unless you want tumblr to pull and squeeze your gif around like a piece of gum.
☆ File Size
This is really important because tumblr has a single image size limit of 10mb. Which means that every single gif you make has to be under that size or you won't be able to post it. The other thing about this is that the dimensions, number of frames and ammount of varying colors throughtout your gif will greatly impact on the final file size. Basically, the larger the dimensions and the more frames it has, the bigger the final file will be. Later on I will show you how to check your gif's final size before exporting it!
☆ Number of frames
This has more to do with the length of your gif, the longer it is, the bigger the final file will be. Typically gifs should be under 3 seconds long. So if you are making a set, try to break the moments you want to include in your set by increments of up to 2 - 3 seconds each, otherwise it might not fit all into one single gif. The number of frames is also extremely important when making combined gifs but that's for another tutorial.
☆ Post layout
If you want to make a cool looking gifset (where some gifs are larger in dimension than others, or when you want to have a single gif followed by a line of 2 gifs next to each other), then it might be worth it to plan out the layout before you start making the gifs. This way you ensure you won't have to remake gifs down the line because they don't fit together the way you wanted to.
☆ミ(o*・ω・)ノ
Timestamping
For this step, you will go through the video you want to gif from and you will just write down all the sections you want to use, down to the exact seconds. Example: 02:30 - 02:32.
(^◕ᴥ◕^)
VapourSynth (VS) - Clipping the video
I know VS can look pretty intimidating with it's bare coding and all but I promise it can be your friend. You just have to set it up correctly and pay close attention whenever you're using it. This software is a must for giffing, it will do all your cropping, resizing, sharpening and denoising for you, making sure your gifs look good. It is also indispensable when giffing ts/tp files because it deinterlaces those files so you can clip them.
First, let's set it up. This is the most annoying and difficult part of this tutorial so make sure you pay full attention to every single step!
☆ step 1) download a version of VS here (link).
☆ step 2) unzip the file on your desktop area.
☆ step 3) open the folder and find the file named "vapourscript (drop video file on me)" - make a shortcut of that file and move it to the desktop.
☆ step 4) find the folder named "gifs" - make a shortcut of that file and move it to the desktop.
☆ step 5) drag your video file you want to gif from and drop it on top of the "vapourscript (drop video file on me)" shortcut on your desktop.
☆ step 6) enter the timestamp input, in the first line it will be the starting of your timestamp, in hours format, then hit enter. in the second line enter how long your timestamps lasts, in seconds, also in hours format. then hit enter and let the code run.
☆ step 7) the resizer tab should now load on a web browser, then you will set the dimensions of your gif on the top left corner. you can also adjust the position of your gif within the video screen and zoom in if wanted.
☆ step 8) choose the preprocessor, denoise and sharpening options on the left and tick the boxes on. I usually just stick to the settings i'm using in my video down below.
☆ step 9) now in the VS box, go to file > load, choose the script saved in the gifs folder.
☆ step 10) copy the code from the resizer into the code in the vs screen, under the designated line.
☆ step 11) alter the code exactly like I did in my video down below. save it. this is now your default vs script for clipping your gifs. what you are doing by adding the hastag and the quotation marks is you're disabling those sections of the code. the reason you do that is in case you want to run the preview before exporting. this is because those lines involve some heavy graphic processing which can make the computer slow. I will talk about the script in more detail later on.
☆ step 12) i don't usually use this option but you can also preview your gif and set specific frames to start and end your gif. This is around the 4:30 mark in the video.
☆ step 13) time to export your clip! now you will temporarily remove the marks you added to disable the code and then go to script > encode video. in the popup box, you will select the option "export to MOV", then start so that you can use that video file in photoshop later.
☆ step 14) after you are done exporting, close the encoding box and then close vapoursynth, never agree to save the script when closing it, or that will override your default script.
☆ step 15) now you need to rename the encoded file for your gif. go to the gifs shortcut folder you created on your desktop, then go to output. this is the folder where VS will save all your encoded files. but everytime it saves the file with the same name so you need to come to this folder and change the name for every gif file you encode before you clip a new one, otherwise VS will just replace the previous clip with the new one you just finished.
Here's a detailed walk through of each step in this video tutorial:
youtube
IMPORTANT
After you are done processing your first clipped file, now you have your default script already built in VS, so whenever you run it to clip more videos, this script will already be in your VS screen. So now all you need to do whenever you want to clip more files (to make more gifs) is to adjust the dimensions, positioning and zoom of the video in the resizer screen and then change a few numbers in your script! then run encode to save the clipped file.
☆ To make new clips: go thru steps 5- 7, also do 8 if you want to mess with the denoise and sharpening filters again, but I don't really know much about how those work so I can't help you with this.
Now what you need to alter in the code, each time you are making a new gif:
after you run VS and change the settings in the resizer to what you want, you need to change the zoom numbers and the video positioning in the code.
you need to replace the numbers in the VS script on the left so they match the numbers in the resizer on the right.
Do step 12 if you want to set specific frames to clip. Then steps 13 - 15 and you are done! You need to do all this every single time you want to make a new gif.
Now let me talk a bit more about some of the lines in this script:
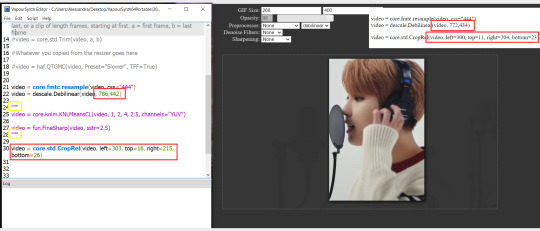
☆ line 14: #video = core.std.Trim(video, a, b)
this line is to set specific frames to trim your video section, your final encoded file will be only the frames inbetween the numbers you input here. a = first frame, b = last frame. you will need to run the preview option in VS in order to see every single frame of your clip and select your first and last frame. I usually do this in photoshop later instead so I don't bother with it on VS unless i'm making combined gifs, in which you need all the clips to have the exact same number of frames. the hashtag at the beginning of this line means that the script won't follow this command when executed. so if you want to include it, you need to remove the hashtag before encoding your file.
☆ line 18: #video = haf.QTGMC(video, Preset="Slower", TFF=True)
this line is for the preprocessor option in VS, that tool is mainly only used when giffing ts/tp files because you need to deinterlace them before you can use them on photoshop. so you will only need to remove the hashtag and enable it when giffing those types of files. when im giffing those files, i usually always keep it with this setting:

I don't really understand much about this so I never mess with it. If you want to know more, I believe there's more info about it in the tutuorials I linked at the beginning of my post.
☆ line 22: video = descale.Debilinear(video, 786,442)
this line is for the zoom of the video screen. you just need to match what you have in your VS script to what you end up with in your resizer.
☆ line 25: video = core.knlm.KNLMeansCL(video, 1, 2, 4, 2.5, channels="YUV")
this line is for the denoising filters, in my case I always use KNLM and this is what it's line looks like. I know you can change those numbers to change the filtering settings but I never messed with it so I'd usually just have it like that.
☆ line 27: video = fun.FineSharp(video, sstr=2.5)
this line is for the sharpening, in my case I always use FineSharp and this is what it's line looks like. I know you can change the number to change it's settings but I never messed with it so I'd usually just have it like that.
note: lines 25 and 27 (which have to do with denoise and sharpening) are the ones within quotation marks in your default script. I believe the quotations work in a similar way as the hashtag, in which the script only executes the lines when the quotations are removed. Which is what you do everytime you are about to encode your clip, otherwise they stay on. I think you should also remove them if you want to test how they affect your gif in the preview screen but i think these filters also require heavier graphic processing which my computer can't handle well so I never do that.
☆ line 30: video = core.std.CropRel(video, left=303, top=16, right=215, bottom=26)
this line is for the positioning of your video screen within the gif dimensions. you just need to match what you have in your VS script to what you end up with in your resizer.
ʕ •̀ o •́ ʔ
Photoshop (PS) - let's make a gif!
Now that we have clipped and preprocessed our video file, it's ready to go to photoshop!
☆ step 1) after you have opened PS, go to File > Import > Video Frames to Layers. Then choose the clipped file you created through VS.
PS should open a box like this:
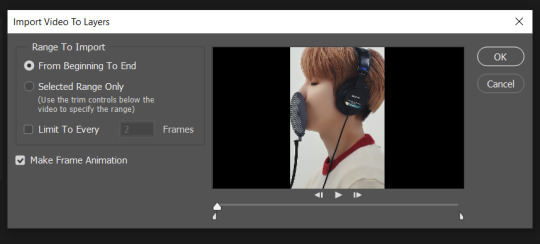
Keep those options ticked and hit OK
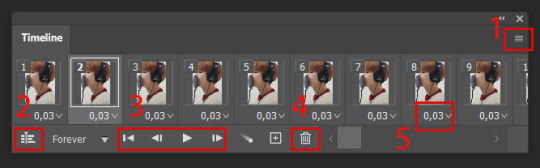
☆ step 2) now you need to go to Window > Timeline to bring up the timeline tool box. This window will always be necessary when making gifs. Let's take a look at it, I've marked down all the important buttons you will need:
timeline menu: there are several commands in here, you will need to use some of them later on.
convert to video / frame timeline
play controls to watch your gif
trash can to delete selected frames. (when deleting frames, first delete them here and then delete it's matching layers which are still there after deleting the frames)
frame delay time: this is where you set the time for how long that frame will be visible in your gif
☆ step 3) remember how I mentioned the preview option in VS and how i don't usually use it to trim the frames of my clip? That's because I usually do that at this step of the process, in PS. Notice how each frame is also a layer, and when a frame is selected, the matching layer has the eye symbol next to it turned on. So now you should play your gif and see if there are any frames you don't want to keep, then delete the frames and it's matching layers.
Since we applied sharpening filters back when we were clipping the video on VS, your clip should probably already look pretty decent even before the next steps, so steps 4 - 9 are optional. The coloring part of my video has been sped up.
☆ step 4) click on the timeline menu and select "Select all frames", then go to the select menu at the top of the PS screen and select "All layers". Now click on button 2 of the timeline at the bottom left, switching from the frame timeline to the video timeline.
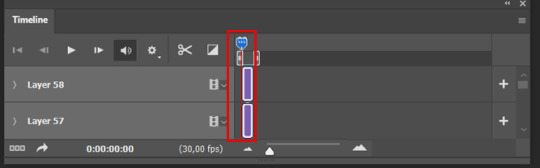
☆ step 5) before you do anything else, make sure the blue holder is at the beginning of the track before you do anything else. Then go to Filter (at the top of PS) and select "Convert for smart filters". This will convert all the layers into one single layer.
☆ step 6) now make sure the layer is selected, then go to Filter > Sharpen > Smart Sharpen. A box will open with several options:
I usually keep the amount to around 30, I don't touch on radius and you can also mess with reduce noise if you think your gif is looking too sharp. Hit OK when you're done.
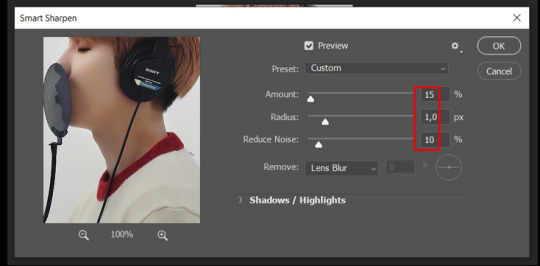
Since this is a filter applied to a smart object (the converted layer that contains all our layer - frames), this means you can turn this filter on or off as long as the layers are in the form of a smart object. You can also go back to it and alter it's settings (like I've done in my video down below)
☆ step 7) now while making sure the blue holder is still at the beginning of the track and the layer is selected, click on the timeline menu that i mentioned above. Then go to Convert Frames, then select Flatten frames into clips.
☆ step 8) again go to the timeline menu, Convert Frames, but now select Make Frames from Clips. Now click on the button at the bottom left of the timeline box, to convert the video timeline back into a frame animation. Then hit continue in the pop up box.
☆ step 9) now you are back to the frame timeline screen from before, but now the first frame is empty. You need to delete that first frame and then check the final frame because sometimes PS also creates another empty frame at the end at this point.
☆ step 10) PS also created a new layer under the layer 0, where the filter is still applied, you can delete this new layer as well. Now for organizational purposes, select all remaining layers (that contain your frames) and group them (you can see how in the video).
☆ step 11) This step is also optional, now I like to add the coloring to the gif. I have a separate tutorial exclusively on this topic. You can check it here:
☆ step 12) This is the time when I also add my signature. This is optional. You need to have the signature layer(s) on top of all the other layers. I usually have it in all black or all white, with lowered opacity of around 40%.
NOTE:
When adding elements (such as a signature) to a gif, it's important to always make sure you have the first frame selected, otherwise PS can move your newly added elements around the canvas on different and random frames. This also applies to anything in the layers pannel that has specific opacities. It's best to already add the elements with the final wanted opacity with the first frame selected.
Exporting + Delay time
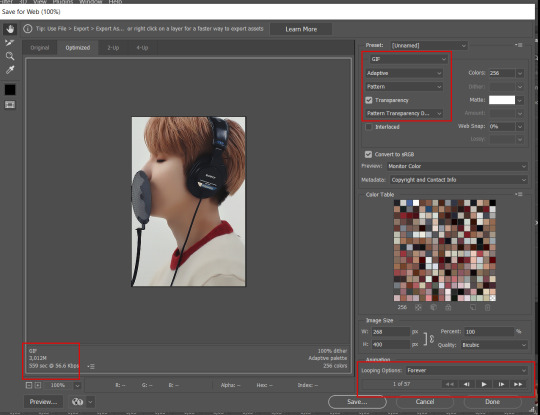
☆ step 13) To export: go to File > Export > Save for web (Legacy). PS will open this box:
First I just use the exporting screen to test the delay time of my gif, and to check the gif's final size.
About the size:
The final size is displayed at the bottom left. Remember it needs to be under 10mb. If it's above that, then you will have to go back and delete frames and test again until the size is within the limit.
About the delay time:
To test the delay time, hit that play button and the gif will play at it's default delay time. If it's too fast or too slow, you will hit cancel and change the delay time (at the next step).
For actual exporting:
The highlighted box at the top right of the screen is very relevant now. Make sure the first box has the GIF option selected. At the next box, you can select either perceptual, selective or adaptive. I usually like to use adaptive. At the next box you need to choose either diffusion or pattern. I like to use pattern. Tick the transparency box and then select either pattern or diffusion transparency dither.
Once you are satisfied with all aspects of your gif, hit save to export your final gif.
To fix the delay time:
After you have exited the export box, go back to your timeline, click on the menu button at the top right and select "Select all frames". Then, on any random frame, click at the small arrow next to the numbers under the frame. Select the option "Other". That will open a pop up box to alter the delay time. To test it again, use the export box explained above. Once you are satisfied, save your gif! I've also altered the delay time in my video to show you the process.
☆ step 14) After your gif is done and saved, I'd suggest to save your psd file if you added any coloring to it. This is so you can reuse the coloring later in other gifs without having to redo it all. This is useful if mking a set of gifs from the same moment / video.
Here's a detailed walk through of each PS step in this video tutorial:
youtube
I hope this tutorial is helpful! Feel free to send me any asks if you have doubts or need extra help! (つ≧▽≦)つ
175 notes
·
View notes
Text


happysiyuanday 💗
for @ambivartence
happy birthday to the loml 💕 i'm so happy to know you and be able to call you my friend 🥰 thank you for being my wife and sharing your amazing talents with us! I adore you so so much and I hope our friendship can bloom even more in the future 🌷🌼🌺🌻🌸
Commissions are open!! / ko-fi / prints / patreon
#artists on tumblr#nct fanart#wayv fanart#nct#wayv#xiaojun#drawing#digital art#photoshop#dreamytag#fxb art#rough painting#gif#animation
132 notes
·
View notes
Last Seen Blogs

kotyachyaberloga
kittens make meth
sadnymi
☆ Mai ༺

queensecretblog
The Queen's Diary

piktemplatess
Pik Templates