#edit obs file
Text
Below here is an (on-going) collection of cutscenes from The Legend of Zelda, Skyward Sword without dialogue boxes or additional UI elements.
Such footage was recorded on OBS and played through on the Dolphin Emulator. I would like to gratefully thank @midzelink for sharing their method of making a custom transparent texture pack to remove UI. Without them, this wouldn't exist.
BEFORE YOU CLICK THE LINK: When you enter the Google Drive, please take a quick peek at the progress report Google Doc for important disclaimers.
TERMS AND CONDITIONS:
These mp4's are free to use for any general purpose like edits, gifs, footage, etc (so as long I as am credited.) This can be through:
Tagging my tiktok account: '@Lorenzo Pacheco' or '@virtcon'
(A thank you is appreciated)
And/or at the very least, linking to this tumblr post so that others may enjoy this footage as well.
I like seeing what people can do with this stuff, so it will be very appreciated.
(Do not claim these files as your own.) Impa is watching you.
Happy Editing!
210 notes
·
View notes
Text
Making Baldur’s Gate 3 GIFS Tutorial
TOOLS USED:
Nvidia or alternate game video recording software
PotPlayer
GIMP (Optional)
Adobe Photoshop
PART 1: Recording
I personally use the Nvidia recording software that came with my computer to capture videos of the game, but there are plenty of video recording options out there. I know OBS Studio is a popular one, for example. Whatever your choice may be, here are three important tips for when capturing video:
Use the least amount of compression settings your recording software can output, and I recommend at least 30FPS, though 60 is better
Press F10 to hide the Baldur’s Gate 3 UI and capture the entire screen
Give about three seconds worth of video before and after the section you want to record, as safety buffers, if you can
PART 2: Frame Extraction
Open the video you’ve recorded in PotPlayer in window mode (not full screen), and pause a little bit before where you want to start your GIF. Press Ctrl + G to open up the Consecutive Image Capturer window, and drag it to the side of the video player. These are the settings I recommend in general:
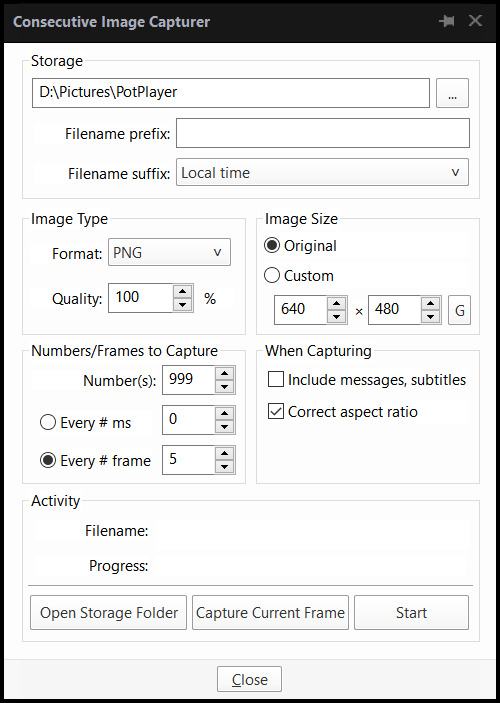
HOWEVER, I suggest playing around with the “Every # frame” option to your own liking. I have a pretty high framerate for this video I’m using, so 5 is fit for me, but if you have a lower framerate, you may want a lower number, like 2.
With your settings in place, click “Start” and unpause the video. Pause the video again after you’ve captured all the frames you want, then click “Stop”. If you’re making a gifset, I recommend then storing each set of frames in a single folder at a time.
PART 3: Resizing
I personally use GIMP to resize/crop the images because I find it easier, then export the image as a PSD for the next steps in Photoshop. But you can use Photoshop for this step too, if you’re more comfortable with that.
The number of frames you can get away with in a single GIF for Tumblr depends on the aspect ratio you plan on saving it as—for example, 270x200 obviously can handle more frames than 540x300 while still fitting within Tumblr’s size limit.
PART 4: Sharpening
In Photoshop, use the Filter > Sharpen > Smart Sharpen tool on each layer. The settings are your choice, but I usually use 200 for the Amount and 0.5 for the Radius.
PART 5: Animation
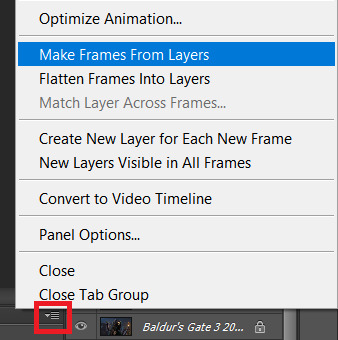
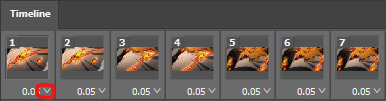
If you don’t yet have the timeline set up in Photoshop, click on Windows > Timeline to bring it up. Then from the arrow, choose “Create Frame Animation” and click on the button to do so. This will insert the first frame into your timeline. Click on “Make Frames from Layers” in the timeline options menu to add them all.
Click on frame 1, then hold down Shift and click on the last frame to select them all. Then click on the drop-down arrow from the last frame and set the delay between each frame changing. I usually use 0.1 seconds.
Change the “Once” option to “Forever” to make the GIF repeat itself ongoing.
PART 6: Editing/Colouring
Click on frame 1. Then click on the top layer, while still keeping frame 1 visible.
You can use a variety of tools in Photoshop to editing the colours, brightness, contrast, etc. of the gif. Make sure the filters are the top layers to apply them to all the frames. If you test out your gif and see that the filters are not applied to all the frames, toggle the visible option on them off and on again.
I’m not going to go into detail of how to edit your GIF here, because each one is different. But I will say the tools I most typically use are Brightness/Contrast and Curves.
PART 7: Export
Click on File > Save for Web. These are the settings I like to use:
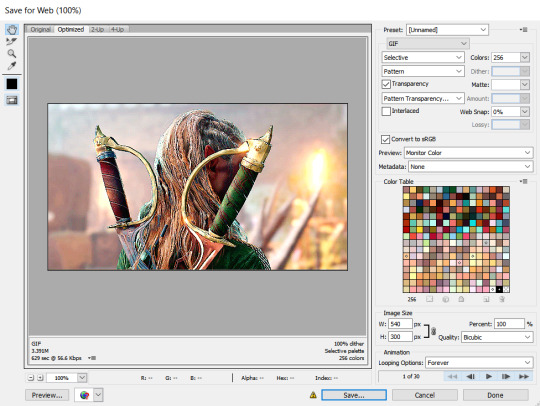
Congratulations, you’ve made a GIF!
144 notes
·
View notes
Text
so you want to use OBS
hello! i’ve decided to compile information on my OBS setup and some resources that have helped me along the way. this is mostly for personal reference, but maybe others can make use of this information!
some notes before i get into it:
i use OBS for both offline recording and (twitch) streaming. any footage i record is edited using DaVinci Resolve 18, which is free.
most of my OBS captures are of video games (through a USB capture card, specifically elgato), and the occasional screen/application capture (like clip studio paint, and sometimes PC games).
as such, the information here is reflective of these experiences. this post is not comprehensive to all of OBS’s features- this is just an overview of the settings and configurations that are most relevant to me.
with that out of the way, all the information will be under the cut!
Basic Setup
file format:
how to change: settings -> output -> recording -> recording format -> press “apply” once finished!
I save most of my recordings as .mkv files- it supports multi-track audio! i prefer .mkv over .mp4 because if your power goes out, you still have a recording to work with.
.mkv files can be read by DaVinci Resolve without an issue- but for Adobe software, they'll need to be remuxed to .mp4 within OBS! (file -> remux recordings -> press the … to select a file -> press the “remux” button)
video resolution and framerate:
how to change: settings -> video -> output (scaled) resolution
my obs canvas is @ 1920 x 1080p (16:9)
i switch between 720p and 1080p as needed! if you're concerned about space, you can probably just go for 720p. i also record at 30 fps, simply because that’s what my capture card supports.
video bitrate:
how to change: settings -> output -> encoder settings (located in both the streaming and recording tab) -> press “apply” once finished!
bitrate is a bit of a doozy to explain, but the most important thing to know is that bitrate affects your video’s quality. lower numbers = lower quality, while higher numbers = higher quality.
generally speaking, you'll want higher bitrate when you're recording things with high depth of information (e.g. you’d want a higher bitrate for something fast-paced like splatoon, compared to a slower-paced game like animal crossing).
my video bitrate is either set to 3000 or 4000 kbps! and here's some of my other (related) settings while i'm at it:
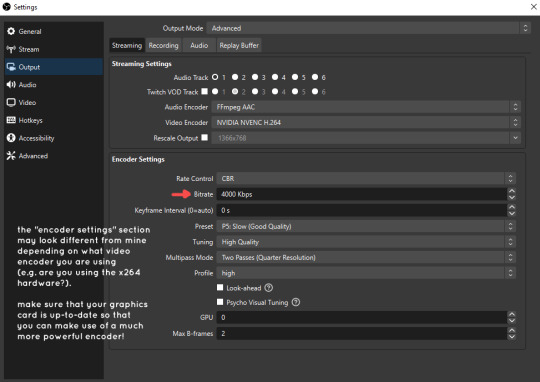
you can put your bitrate at much higher values than me if you're a stickler for quality- but keep in mind that a higher bitrate means:
bigger file size
more information to upload (when streaming)
your computer will need to encode more
i’d recommend reading twitch’s guidelines on encoding, bitrate, resolution, and framerate to get an idea of what values to pick. for people who are doing offline recording or streaming on a different platform, i suggest googling the appropriate resources!
multi-track audio:
this is mostly applicable to anyone looking to do video editing!
multi-track audio basically allows you to separate your audio sources (e.g. discord, game audio, and your own microphone) into different tracks.
this is an immensely helpful tool because it lets you adjust audio levels in post-production (editing). some examples of how this can be used:
increasing someones microphone volume if they speak too softly
increasing/decreasing game audio
muting swear words/sensitive information
completely muting voice call + microphone if you want to upload a no commentary video
and more!
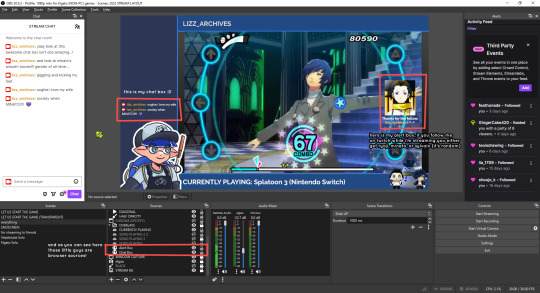
to set this up, take a look at your audio mixer panel, and press the ⚙ icon. this will bring up advanced audio properties.
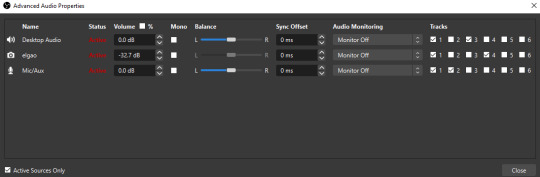
by checkmarking a track box, it puts the audio on that track. to make the above screenshot easier to digest:
track 1 consists of ALL three audio sources- desktop, elgato, and microphone.
track 2 only has the microphone audio.
track 3 only has desktop audio (i use this for voice calls)
track 4 only has the elgato capture card audio (game audio). the volume has also been lowered so that any speaking voices can be heard clearly.
tracks 5 and 6 are unused.
you might be wondering, “why do all three of these have 1 checked off?” this is what i call the universal audio track. i recommend having a universal audio track for a few reasons:
when you stream from OBS onto twitch/youtube- you have to select ONE audio track.
it’s also a nice backup in case you didn’t separate your audio correctly.
if for whatever reason you need to move around your individual audio tracks in editing, the universal track acts as a nice reference point.
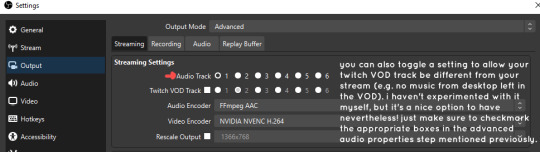
mark off your audio tracks for each audio source as you see fit! once you’re finished with the advanced audio properties, go to settings > output.
for the streaming tab, you’ll want to have the number of your universal audio track selected. in my case, that will be audio track 1.
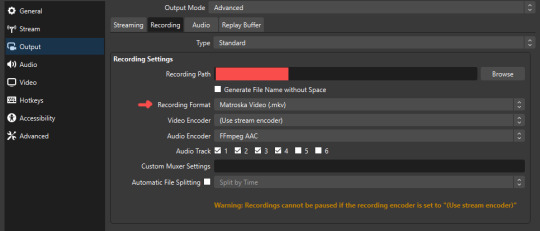
for the recording tab, checkmark all the audio tracks that are applicable to you (in my case, audio tracks 1, 2, 3, and 4). by default, only audio track 1 is selected.
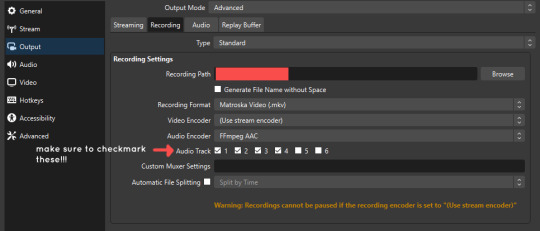
if you don’t check off the additional audio tracks in the output > recordings section, you will not have access to those audio tracks in editing, and you won’t be able to edit your audio tracks independently of each other. so don’t forget to do this! 👍
custom browser docks
custom browser docks are a great tool for when you’re streaming and want to have access to your twitch chat and/or activity feed! (or if you wanted to have some other web browser on OBS).
to create one, go to docks -> custom browser docks.
you’ll be given a table interface that asks you to put the dock name and URL. for streamers who want to have chat and alerts available, do the following:
on twitch’s homepage, go to the upper right and click your icon
then, click creator dashboard
once you’re on your dashboard, go to stream manager
click the vertical “...” on my chat OR activity feed.
press “pop-out chat” OR “pop-out activity feed”
copy and paste the link into the table back into OBS
press apply once you’re done
click and drag the docks around at your leisure to put them where you like!
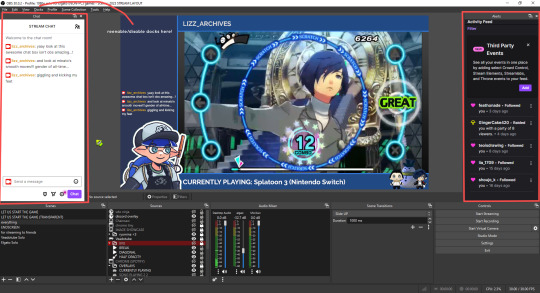
if you ever decide you don’t want to have something on your OBS dock (or want to bring something back), go to the toolbar, click “docks,” and click the appropriate dock!
third party things
a section of optional things that you may enjoy having.
streamlabs alerts
this is basically for anyone who streams and wants to have their chat and/or follower notifications visualized on screen!
streamlab alerts can be added to OBS by adding a browser source into your scene, and the specifics can be customized on streamlabs itself. it’s pretty self-explanatory, so i’ll just leave a link to streamlabs website, where you can log in using the streaming platform of your choice: https://streamlabs.com/
discord overlay
this is a browser source that can be set up to show people who are in a server's voice chat and who speaks. i recommend this to people who make multiplayer content- it can help viewers distinguish who is who but also it can be helpful in editing.
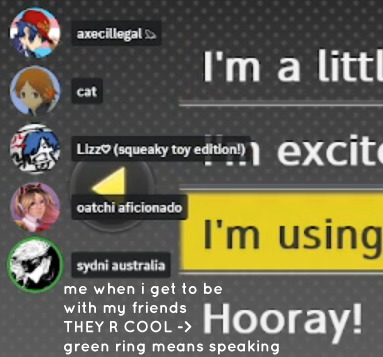
to set this up, go to https://streamkit.discord.com/overlay, click “install for OBS,” and after logging in with discord, go to “voice widget” and click the server and voice channel you want.
you are able to apply CSS if you'd like more control over the visuals, but the standard layout tends to work fine for me! a search of “discord overlay css” on youtube can help you get more information.
veadotube mini
this is a pngtuber software that a friend recommended to me! no webcam is required- mouth opening and closing is based on your microphone input!
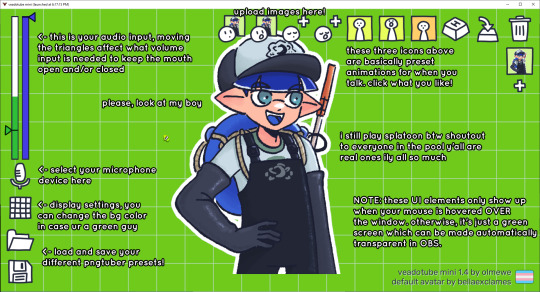
you can download it here (it’s pay what you want!): https://olmewe.itch.io/veadotube-mini
for a proper tutorial on how to use it, i recommend checking out the app's documentation, which you can read here: https://veado.tube/help/
source record
have you ever wanted to stream something with a chat overlay/layout, but wanted your recording to ONLY be the gameplay? or maybe you wanted to record BOTH your gameplay AND your webcam so that you can have a crisp zoom-in on your webcam!
source record is a third party plugin that can help you with that!
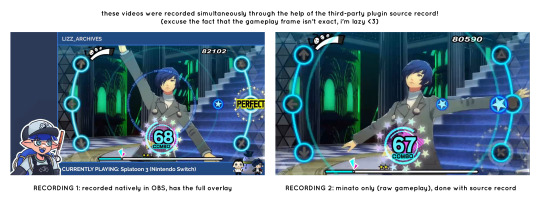
the general gist of source record involves applying the “source record” filter on either a scene or source, and customizing the encoding settings accordingly. the exact details of how to set it up is beyond the scope of this post, so I'll just direct people to this video instead (it was very helpful to me):
youtube
⚠ a quick note about source record: this plugin can be intense for your computer. be sure to do test recordings and the like to see what your computer can handle (and see if the recordings come out the way you like). it took me a few tests before i settled onto something i liked!
you can download and install source record here: https://obsproject.com/forum/resources/source-record.1285/
vdo.ninja
have you ever wanted to do a collaborative video or stream where you feature someone else’s video on your stream? or maybe you’re doing a multi-person streaming event! vdo.ninja is the perfect tool for you!
vdo.ninja turns your OBS virtual camera into a browser source link- which your collaborator can add on their stream! this is a new tool that i’ve added to my arsenal recently- since my friend and i are planning to stream a side order challenge together! i’ve still got to iron it out a bit more, but i like what i’ve used of it so far.
try it out for yourself at their website here (with documentation and demos available on the homepage!): https://vdo.ninja/ (no downloads required!)
ok! i’m set up! what now?
and with that, that’s all of the settings and tools that i thought would be worth mentioning! while most of my setup was written with video games in mind, some of these plugins and setups may be applicable to other types of videos (e.g. tabletop gaming with a physical camera)!
now that i’ve outlined all these settings, i have one more thing i have to say: regardless of what you're using OBS for, do a test recording before doing anything “official” with it. this recording can be as short as 30 seconds. it’s a good habit to develop that can make sure your streams/recordings turn out the way you want them to!
here are the kinds of things i like to check! it’s not an exhaustive list, but this can be a starting point:
video:
does my video look the way i want it to (and can my computer handle that)?
can my computer handle the load of encoding? - OBS will note in the bottom if the encoding is overloaded. if it can’t handle it, turn down your bitrate or adjust other encoding settings (e.g. i had to toggle psycho visual tuning OFF because it was causing lag)
this is especially the case if you're recording PC games- you don’t want to have slowdown on either your game or the recording!
audio:
are my audio sources (e.g. desktop audio and microphone) correct? - if you plug/unplug devices a lot, be sure to check this (settings -> audio).
are any of my audio sources muted? - make sure you don’t have anything on 🔇 if you don’t want it to be muted! otherwise the audio will be lost forever… (i lost my friend’s VC audio once… it was sad)
are my audio tracks separated properly? - requires you to boot up your editing software, but it's worth doing! for the test recording, just have something from all your sources playing at once, and see if your editor has things separated into tracks.
can i hear the voices clearly? or does the music and/or game overpower them?
if for whatever reason your OBS crashes, or you want more information on anything “critical” or “warning” worthy in your set-up, you can go to help > log files > upload current log file > analyze. crash logs currently can’t be analyzed by the log analyzer- but they’re a valuable tool when asking for help on the OBS forums!
and that’s all! for real, this time. i hope that some of these tools and settings can help anyone wanting to get more out of OBS. there’s definitely other things i didn’t touch upon (e.g. audio filters for noise compression, suppression, etc.), so i suggest doing your own research and trying things out!
happy recording/streaming, and thanks for reading! ✨
#lizzy speaks#this was a fun little write up!! i've been slowly getting some of my friends into video making teehee and its SO FUN!!!#(digital) video is like one of my other passions next to art. everyone say thank you splatoon for getting me back into it again <3#i've been using obs since like 2018 so i wanted to share some of the things i learned for funsies... i really love video...#but also i like having reference posts like this in the case people have questions they want to ask me...#because i don't always remember what video tutorials i watched and it's nice to document that somewhere...#warning to anyone who reads it this is like 2.1k words. i do want to stress that this isn't comprehensive but there's still a lot of info#that i wanted to put for this post...! that said topics like designing your own stream layout + assets for it are NOT in the scope of this#post and nor is this a beginner's guide to obs (i wrote this with the assumption that you know how to record and/or stream and that-#people already have an idea of how to use scenes and the different types of sources obs can use).#i hope everyone's had a lovely march 5th! i would love to look at the fanart but im still not done with reload...#but im hoping to finish it by the end of the month!!! yipee!!!#Youtube
44 notes
·
View notes
Note
Hellooo 🥺 I wanted to know if you have followed a tutorial to make the last gifs? Or would you show how to make them? Than you so much 💕
I didn't follow any specific tutorial, I've just made a quick little process after researching how other people on Tumblr make gifs. I can tell you how I do but I would definitely recommend following a tutorial of someone more qualified! lol
Aj's Guide To Sims Gifs
I am going to show you how I made this gif of Wednesday:
You'll need:
A screen recording program; Streamlabs, OBS Studio
Adobe Photoshop (FYI I am using the newest version).
The full tutorial is below the cut.
I promise it is easy, this tutorial is just long because I want to cover all bases, so if you have no idea what any of what I am saying means you can still follow along easily!
Lets get started!
1. Installing Your Recording Programs
You'll need to be able to record your game. Any streaming or screen recording program with work perfectly! I use Streamlabs because that's what I use for Twitch, but OBS Studio will work too! I've used them all, I recommend Streamlabs because it's more user-friendly.
2. Setting Up Your Recording Programs
You'll need to set up a scene in your streaming program that records your display or your game. In Streamlabs you go to the plus bottom beside sources and add either a Display Capture or a Game Capture, select your display or game. Is there a difference? Using game capture will remove any of your miscellaneous desktop UI and you won't have to crop it out later down the line. Despite that being pretty handy, I do display capture because I am difficult. lol If you have questions about this step feel free to send a ask, but I am going to skip over this to be able to go into more detail about the gif-making process.
3. Recording Your Scenes
Now you'll need to record your scenes in-game! I recommend doing this with ReShade or gshade. I use ReShade. Just make sure your lighting is how you like, the time of day is how you like, and have fun!
Tip #1: Save your game before you start recording any scenes. Especially if you are recording gameplay, this will allow you to go back if you miss an animation or interaction. You'll be able to reload your game where you were and you can try to capture the moment again.
Tip #2: Only record for 10-20 seconds at a time. Yes, you'll have a bunch of small recordings and that is what you want. You'll have to import those clips to Photoshop and if they are over 30 seconds they are going to strain your computer and be difficult to work with. Record animations just one time through, and re-record from different angles. This will let you pick from a variety of clips to get the gif you want. For 5-7 gifs I have 15-ish recordings that are about 10 seconds each, for reference.
Tip #3: If you are alpha like me and are plagued by alpha hair vs. MXAO, just be intentional with the hair choices you make because you cannot edit the MXAO out later (I mean you can but it is a lot of fucking work). I have found updos are better at not having crazy MXAO spots. Or opt for using sims with darker hair.
4. Loading and Shortening Your Clip
Now, pick the first clip you'd like to convert to a gif. Go to File > Import > Import Videos To Frames and then select the video file for the clip. A window will appear that looks like this:
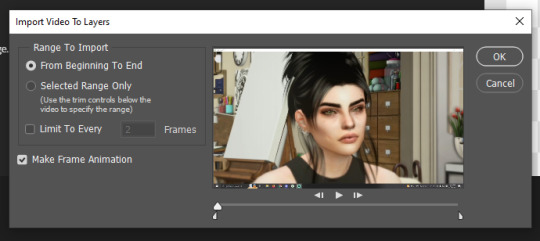
From here you are going to select the exact moment in your clip that you want to use. The two half-sliders underneath the timeline are your start and stop points. You want to move them to just encompass the moment you want to use. Try to cut it down as much as possible to just the moment you need, the longer the clip the more frames, the longer it will take to render and the harder it will be on your computer.
You will know if your clip is too long with this pop-up:
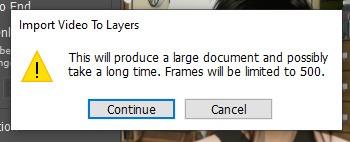
Avoid this!
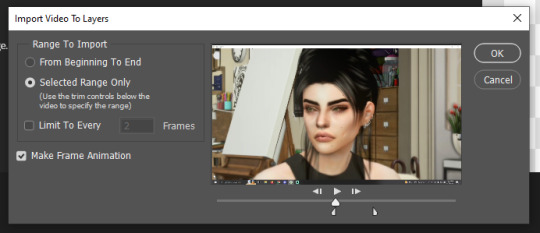
My cut-down clip looks like this:
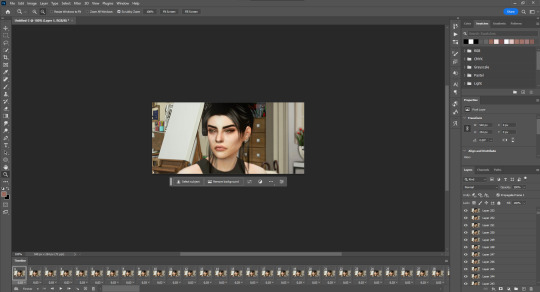
5. Loading In Your Layers & Workspace
Your workspace should look like this!

You should see 100-200ish layers on the right side and a timeline on the bottom. If you do not see the layers on the right side go to Window > Layers, you should be able to see them after doing this. If you do not see a timeline on the bottom, go to Window > Timeline, you should be able to see it after doing this. If your timeline does not look like mine and rather like this:

Don't worry! That's totally fine! If you do want to change it click the three squares on the bottom left and it will show each individual frame.
6. Cropping and Resizing
You want to work with the smallest file possible so you can use the littlest amount of resources and have the smallest file size. This is, one, to reduce strain on your computer but also because Tumblr only allows gifs that are 10MB. We want to keep the gif as small as possible.
First, we are going to crop our gif! In my example, I need to crop out my computer UI. I think long gifs and square gifs look the best, so I am going to crop my long ways.
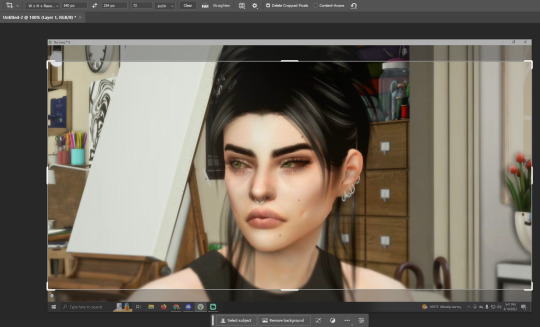
We also want to resize our gif to 540px. I know people get on me for resizing my screenshots to 540px but this is a MUST for gifs. If not they will be blurry. They are not like screenshots and portraits. In my crop settings, you'll see I have my set to 540px.

That makes the cropping resizing process quicker by killing two birds with one stone. Alternatively, you can crop as normal, and then resize to 540px afterward. I've done both and both get the same result! If your post will have two gifs side by side you'll want to crop your gifs to 268px.
If it takes Photoshop a little bit of time to crop the image, that is normal! Just requires some patience. The same goes for resizing. I've found sometimes resizing takes the longest.
My resized gif looks like this!
7. Editing Your Gif
Technically your gif is done! If you don't intend on editing it you can export it and you're done! I like to do a little editing on my gifs.
To edit gifs you'll need to use non-destructive editing methods, ie. adjustment layers or smart objects but most likely adjustment layers. If you, for example, edit by going to Image > and then adjusting your image, you'd have to do that to all your layers. That's not viable. Instead, you'll want to make a group at the top of all your layers and place your adjustment layers in the group. You can make a group by clicking the folder icon at the bottom of your layers panel. You can create adjustment layers by clicking the half-shaded circle on the bottom of your layers panel.
BE CAREFUL! Make sure you are doing edits on layer 1, if you edit other random layers the edit will only apply to those layers. I've made this mistake a few too many times.
As for sharpening, this is when you'd use your sharpening action or sharpen it yourself. I am going to be using this sharpening action by insomniacgifs. I've used a handful but this is the one I like the most because it converts my layers into a smart object that lets me do more edits later (which I will show you).
All sharpening actions are different so make sure to read their instructions before you use them. Some sharpening actions have a layer limit so they will not work on longer gifs.
To start using insomniacgifs action I have to convert my layers to frames. They have an action for this. I select "Layer 1" and run their "Frames to Timeline" action.

Now my layers are in a smart object!

Smart objects are a non-destructive way to edit and something I recommend using with gifs and your edits. Smart objects also preserve the quality of your images despite you resizing and editing your image.
In regards to gifs, this allows me to use Camera Raw Filter and more heavily edit my gif! All I am going to do is open Camera Raw Filter and edit away! It will apply my edits to a layer attached to this smart object.
After I've done my edits, I will pick which level of sharpening I want to use from insomniacgifs action. I usually pick soft. I am going to press play on the "Soft" action. This does sometimes take a while to load. You may get a progress bar. Just be patient. This may take a few minutes.
Now that the Soft actions have finished, my gif is sharpened! I am extra and want to tweak my gif a little more. After finishing the Soft action all my layers will be in a "gif" folder. Remember how I mentioned before that to edit gifs you want to place a group above your layers and place your adjustment layers inside? I am going to do that now! It looks something like this:

8. Saving Your Gif
Now, finally, we can save! This is the easiest part! Go to File > Export > Export for The Web (Legacy). I window will open that looks like this:

In the top right, make sure the file type is set to GIF. Here you can play your gif and see it in action! Now, this is what I normally notice if I do not like the speed of the gif. It defaults to 0.06 seconds per frame. Sometimes I like this slow pace to get a dreamier gif but with this gif, it's too slow. I will show you how to fix it.
Close this window and go to your timeline. Shift + Left-Click the first and last layers on the timeline. Right-click on the frame duration.

Now click other and change it to your desired duration. For me, that will be 0.03 seconds.
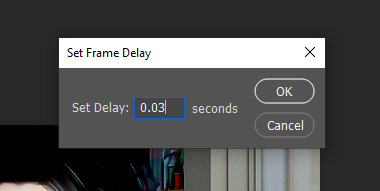
Now let's try to save again! This is the end result!
If you have questions please do not hesitate to ask! I will update this tutorial as people ask questions and clarification is needed! You can always hit me up if you need help!
#Tutorial#Asks#anonymous#Oof this#was a lot of work but I hope it helps you#if you want to learn now to make gifs!
102 notes
·
View notes
Text


It's been requested so here it is: my gif tutorial! I hope to make this very simple as I've made gif making very simple for myself with the help of .atn made by myself and others. More under the cut!
First, what you'll need.
Photoshop (here's a link to a masterlist of free photoshop resources from birdysources)
KMPlayer, to get your screencaps.
These PS actions. (My gifmaking one, and this sharpening action from insomniacgifs.)
Some understanding of how to color gifs (I'll be linking my psd shown here, as well as including the process of making one.)
Next, how to get the videos that you want to gif.
I personally source my videos from Youtube, Twitter, and streaming services. (Firefox browser is your best friend, as it doesn't black out the screen that some services have.) If a Youtube Video Downloader isn't working, or if I'm capturing my own footage, I use the Xbox Game Bar's recording feature (windows + alt + r) to capture footage. There's also applications like OBS Studio. For Twitter, I use twittervideodownloader.com
Now, making the gif.
I use Photoshop CC 2018, but any PS with a timeline will work. But first, we gotta take our screencaps. Open your video in KMPlayer, and press alt+v. This will open up this second screen

These are my settings, with an easily accessible folder that I save my frames to. Find the scene you want to clip, and hit start & play your video, then stop when you have the frames you want.
Next up we're going to open up Photoshop. I changed my keyboard shortcuts so all I've got to do is hit ctrl+alt+o, but for you guys, you gotta go to File -> Scripts -> Load Files Into Stack

Select your screencaps of the scene you want to gif. Now that Tumblr allows gifs up to 10MB, the amount of caps you want is totally up to you. I stick to around 45-50, but sometimes there's a scene I need that's up to 150+ caps, and it still fits under the size limit. It all depends on the dimensions and coloring of your gif. I'm loading up 51 frames as the sharpening .atn deletes the final frame of your gif once it reverts back to frames, so I'll have an even 50 framed gif.
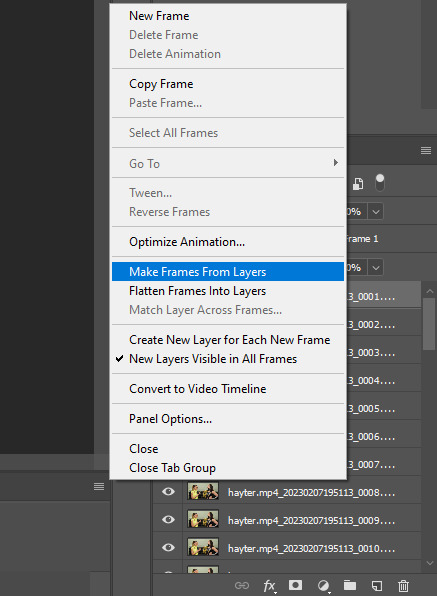
Your PS should look like this. Here comes the gif making itself. You want to hit Create Frame Animation at the bottom, where your timeline is. If your timeline isn't already open, click your Window tab up top, and find timeline in the dropdown.

After you hit Create Frame Animation, you want to Make Frames From Layers, which you'll find when you click the three lines on your timeline.
Then, reverse your frames.
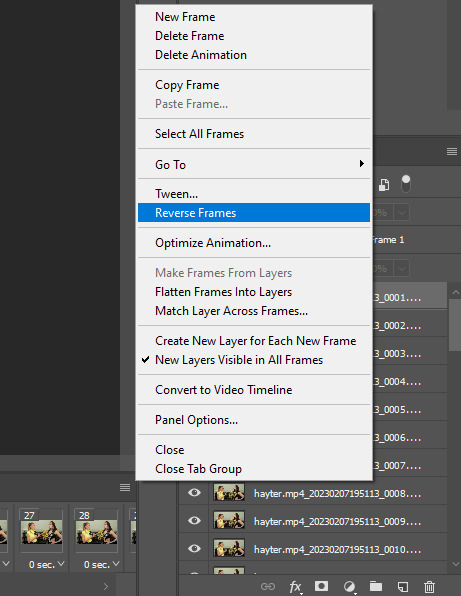
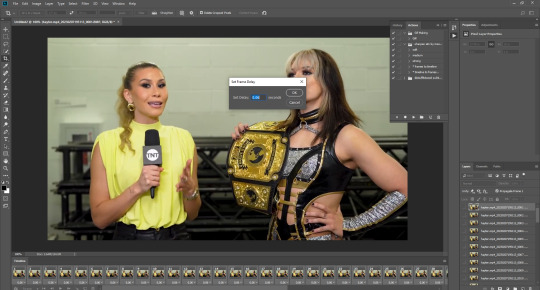
Finally, Select All Frames, click the arrow on the frames, and change the frame delay to .06 seconds.
Way to go! You've made a gif! Now, if you're like me, you'll get tired of having to do that over & over when making a gifset. So, I recorded and uploaded an .atn, which means all you gotta do is load up your frames, hit play on the .atn, and your gif is good to go. I'll link it again so you don't have to lose your place in the tutorial.
So you've made your gif, now what? Now we crop, sharpen, color, and save for the web. Let's get to it.
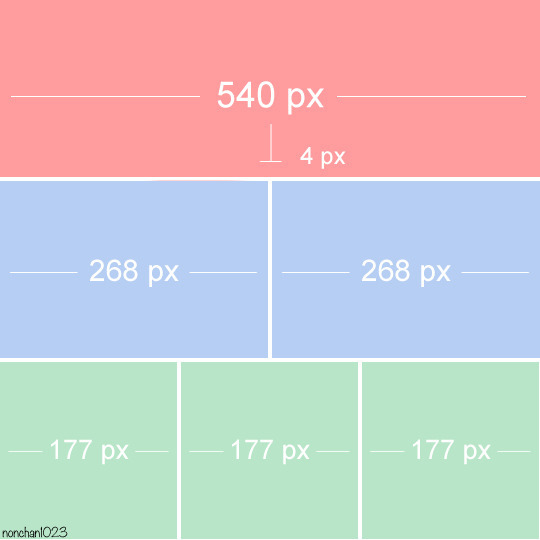
Tumblr dimensions can be tricky, but they're easy to remember. (I even made a little graphic for it!)

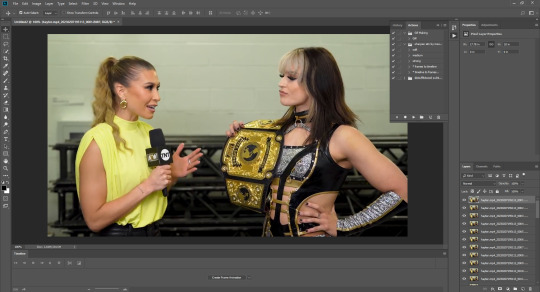
For my tutorial, my Jamie gif will be 268 x 268 :)

Here is my unsharpened, unedited gif of Jamie Hayter. I believe this clip was snagged from YouTube, but it's been awhile since I saved it. I use insomniacgifs' gif sharpening atn, as I hate manually sharpening gifs. So let us run that real quick. (I'll be using the Strong option. Don't forget to delete the final frame.)
Onto coloring! The example I whipped up for this tutorial is super simple, so let's go!
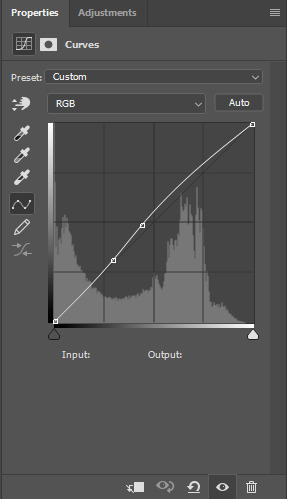
I typically edit the curves first. I'm not sure why, just something I picked up from my photo journalism class back in HS.

Next, I add a little brightness. (+10)

Then, I mess with Selective Color, just a bit. (Neutrals, Black +10. Blacks, Black +5.)
Now, I don't know exactly what Channel Mixer does, but it's fun. Here's my settings.


Some Saturation (+5)

And lastly, I edit the Color Balance!

Aaaaand here's my final product! I also uploaded this as a PSD for you to save and use yourself!

Once your gif is all done, we need to save it properly. File -> Export -> Save for Web (Legacy). Here are my settings.

Note: Make sure your looping options is set to forever so your gif doesn't loop once and freeze!
And that's it! I hope this helped, and if you have any questions, my ask box is open!
#tutorial#gif tutorial#photoshop tutorial#wweedit#wrestlingedit#aewedit#*tutorial#keyara.gif#she's here!!#long post
206 notes
·
View notes
Note
some clanmew-ifications of clangen cats:
Pinnacleheather - Ob-wish (on top of bell heather)
pinnacleheather my blorbo pinnacleheather. he got abandoned in the clan at a young age and then adopted by one of the leader's many children. it turned out that he's paralyzed, and as a result of this, his grandma the leader decided to commit Canon Typical Ableism™ and force him to retire right after becoming a warrior. this was a mistake on her part; pinnacleheather is a) vengeful and b) a good mediator, and now he's dedicated his life to making everyone hate her out of sheer spite. his sprite looks like he has angry eyebrows. i love him
Hemlockwhisper - Mwssaf-hhass (poisonous whisper)
a dishonor title for a cat who turned her leader and her deputy against each other, such that the leader ended up killing the deputy in cold blood.
Gillpaw - Qiliao-pwyr (chaffinch paw)
starclan guide. current name is very much an approximation; i chose chaffinch both for the sound of the actual word and for its scientific name Fringilla coelebs.
Scalerise - ???
ableist grandma's deputy and/or most violent lackey. no relevant translations in the lexicon for either part of his name.
Havenweb - Kenkin-yyb (den large-flat-web)
was pestered by the dark forest for most of his life. telling people about this was a mistake; he was distrusted by most of the clan, and ended up being sent to the dark forest after his death for no real reason.
Primhollow - Prra-mwisk (early missing)
havenweb's mate, and a conscientious objector who willingly followed him to hell. missing a tail, which caused her accessory to show up weird.
Agent Smith - Eishen Smif (transliteration)
a kittypet who generated literally only one experience point away from the maximum. his twolegs abandoned him because they feared his power. whenever i do any file editing i blame it on him
Rimemark - Chiki-karm (frost glyph)
havenweb and primhollow's daughter, and agent smith's former apprentice. she grew up isolated from the rest of the clan for her parentage, and is kind of desperate to prove herself as a result. she died once and was sent to the dark forest for the same stupid reason as havenweb, but agent smith resurrected her from the dead by the power of file editing.
LIST OF REQUESTED WORDS
pinnacle - (mountain) peak
OR: pinnacle - best
hemlock - Conium maculatum
gill - fish body part
scale - fish/lizard/snake body part
rise - hillside
haven - safety; safe place
hollow - tree hollow
hollow - empty
EISHEN SMIF!! Piwarri rrehe pos rarrs!!
Words coming up for you! But-- I'm going to leave hillside out, because I have another request here for a hill-related expansion that I want to include that in.
Pinnacle/Apex/Vantage Point = Ochk
The top of a tree, tall hill, or large rock. The very tip top, highest point one can reach.
Also an adjective for prime or elite-- Ochkwish could mean the top of the heather, or the BEST example of the heather. Similar to the archaic English "Arch-(noun)," seen in Archangel.
Hemlock (Conium maculatum) = Pemwo
(Cluster-of-tiny-Flowers + Killing-by-water)
Named for how it causes you to suffocate to death on dry land through shutdown of the respiratory muscles. You do not survive hemlock poisoning without being immediately brought to a hospital and being put on a breathing device.
FUNfact I'm not going to have BB!Cherryfall eat this. Again, you don't survive hemlock poisoning. She's going to get hurt doing something stupid with her friend Stormcloud, instead.
Gill = Malp
Named for the wet slapping noise of a fish on dry land flapping its operculum. REFERS TO THE ENTIRE CHEEK, including the cheek meat, the operculum, and the gills themselves. Specific things here that RiverClan in particular has words for;
Shegaw Malp = "Gill Mignon." The best bite of meat on the entire fish, just above the operculum.
Pogur Malp = "Gill Overhang." A good place to hook a fish with your claw while fishing; the operculum.
Russ Malp = "Gill Leaves." The actual gills themselves. Some cats like to chew on these for taste and sensory reasons, though they're too stiff to swallow.
Scale = Weesh
The small parts on the skin of a reptile or fish.
Haven = Aferee
(Peace + Place)
VERY important as a word in RiverClan, where cats are taught to recognize "havens" while swimming. They use this word to mean a thing you can cling to, or swim near, that could protect you from getting swept away if you need help. Used standardly in other Clans.
Hollow (Attribute) = Hool
The bones of birds, an empty firkin or turtleshell, certain types of plant stalks, a hungry belly. Compare to Lurre, which is a shallow dip in a forested area.
Hole in a tree/Knot/Hollow = Koen
I'm gonna be honest, my WHOLE life I have called this a knothole or a knot. I can't see it as anything else. Anyway, this is where certain animals nest, such as birds and squirrels.
Snag (Dead tree that still stands up) = Bogko
(From Bone + Limb + Tree)
Also used to refer to "zombies," insects that are possessed by parasites that alter their behavior and force them to move while dead. Anything that should be dead, and yet still stands. Can be an insult to something you're trying to kill that won't die.
(Jayfeather is going to tell the angel he punches, Moleflight, Bosgofba, that he should be called Bogkofba.)
33 notes
·
View notes
Text
well here is sunny's scuffed gif tutorial for anyone who wants to learn how to gif 🎉🎉
so first of all you're obviously going to need a clip of whatever you want to gif. you can either download full videos or use a screen recorder (like obs for example) to record the specific scene you want to gif
once you have your clip you go into photoshop and look for "file -> import -> video frames to layers" then choose your clip and you'll get a screen like this

you can use the two small arrows to trim the clip to just what you need then click ok and it will open the clip up into frames
(btw if you don't already have it on make sure to go to "window" and turn on timeline. that's where you will see the frames)
now personally my first step is cropping and resizing. cropping is kind of self explanatory but to resize the gif make sure you go to "image -> image size" (NOT canvas size. just wanted to say that since the options are kind of similar) (although you can still use canvas size for cropping) and here is a handy little chart that is helpful if you want to know what to resize gifs to (width is what's important here height can be whatever you want it to be)
now personally my next step is sharpening although you can probably also do this at the end. i use maizekeen's gif sharpening actions (if you don't know how to use actions in photoshop there are many tutorials online but very basically you download the actions then go into the actions menu (windows -> action if you don't have it open) and click on load actions) and then from there you just choose your action and click the play button
then after that is usually when i delete any extra unwanted frames in the timeline (it's not necessary to delete the frames from the layers panel)
NOW is the fun part and also where a lot of this becomes up to taste and personal style ✨
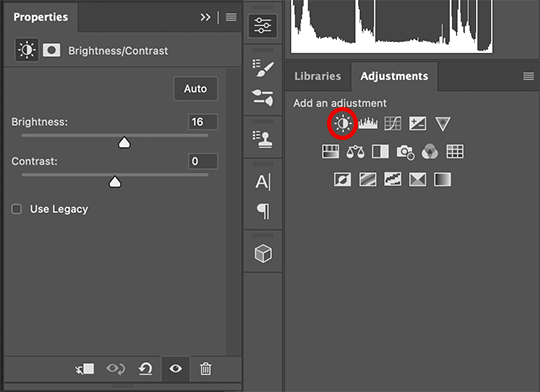
make sure you have your adjustment panel open (window -> adjustments)

the ones underlined are the main ones i use. i recommend playing around and seeing what does what and seeing what ends up looking cool to you
oh and when you use adjustment layers make sure they are above all the layers of the gif like this

i made some different edits of the same gif to show some of the different things you can do. like i said it's up to personal taste and style
here is the original unedited for comparison
and here are some different edits i did real quick to hopefully give you some ideas for what you can do

and if you want to change the speed of a gif make sure to select all frames and then use this little arrow
i tend to use either 0.05 or 0.04 since anything faster or slower tends to start looking wonky but you can try it out yourself and see what looks good to you
btw here is the difference between 0.05 (left) and 0.04 (right)

NOW FOR SAVING
when you feel like you're done you wanna go to "export -> save for web" (it might say legacy next to yours it still works the same) and you will get a window like this

the most important things here are the two options i circled. most of the time i just leave these at adaptive and pattern. perceptual and selective can be used in place of adaptive but i've found that adaptive tends to look best. diffusion instead of pattern can help lower the size of a file in some situations but it doesn't always work but for the love of god please don't set it to "no dither". also make sure the looping option is set to forever (unless you specifically wanna make a non looping gif)
and from this menu you can preview your gif (lower left corner). slightly above the preview button is where you can see your file size (in this case this gif is 7.8mb) tumblr says their gif limit is 10mb but in reality it's slightly less than that so if your gif is 9.7~9.8mb it's probably too big
now if everything looks good then just click on save and name your gif and you're done 👍
now i'm sure there are a lot of things i didn't explain well so if there are any question feel free to send me an ask or a dm and i'll try to explain things more in depth :)
74 notes
·
View notes
Text
How to Make High Quality Gifs
A few people have asked me for a gif tutorial, so here we go! As a disclaimer, there are many parts of gif-making that are subjective, and this is just my personal process/preferences. If anyone is confused about a particular step, or wants more in-depth info about something, just message me!
Tools:
✧Laptop/computer
✧Adobe Photoshop 2024
✧External Hard Drive (mine is 250GB)
✧Video Downloader (I use the Video Downloadhelper extension on Firefox)
PHASE ONE: Make Animated Gif
1. Download high quality video
This is very important! You should download the highest quality of the video you can find. I use the free Video DownloadHelper extension on Firefox, but it doesn't download audio sometimes (it could be me not using it properly, or they want you to pay to get audio). No audio is fine for gifs, but if I'm doing a video edit, I either need to record the audio separately with Quicktime or use a free online downloader for youtube, twitter, or instagram videos.
For this gif, I downloaded an HD interview from the F1 website with the Video DownloadHelper extension on Firefox.
Tip: Make sure your video file is an .mp4 -> photoshop can struggle with .mov files bc they're larger
2. Import: Video Frames to Layers...
File -> Import -> Video Frames to Layers... -> Open your video -> Selected Video Range -> Make Frame Animation
If photoshop has to load a while to make the frames, it means you should select a smaller portion of the video to animate.
Tip: If you discover that there are duplicates of every frame or that there are way too many frames for the portion of video you want to gif, you may need to re-import and check the "Limit to Every _ Frames" box, and write in "2". This will import every other frame of the video and get rid of duplicates or too many frames.
Once your frames are imported, make sure you're working in the "Motion" workspace by going to the top to Window -> Workspace -> Motion.
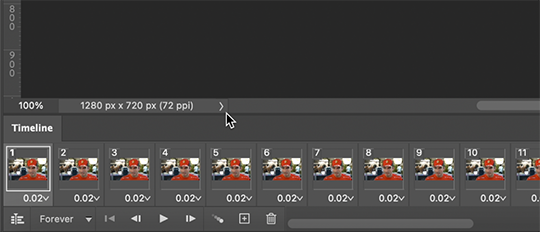
Now, all your frames should appear at the bottom in the Timeline. Make sure that the box in the left corner is set to "Forever", and now it should play the frames and loop back to the beginning each time.
3. Choosing your frames
I usually aim for around 60 frames total for a gif, but sometimes I'll go under or over that number. This particular gif is 55 frames in total. In general, I want my gif to be around 3 seconds in length bc under that feels too short and over that starts to be a large file size. Totally subjective, though! (edit: I have started to experiment with up to 80 frames for some gifs, which comes out to about 4 sec.)
Play through your frames and if you want to delete some, select them and click on the trashcan icon, which you can see in the screenshot above. (If you don't delete them this way, you'll have issues later.)
4. Set Frame Delay

Once you're happy with your frames, select all of them and click on the part that says "0.02", then go to "Other..." I usually choose 0.05 or 0.06, to land my gif around 3 seconds, but it depends on the video and how many frames you have. This particular gif is set to 0.06 because it looked good and brought me to around 3 seconds.
You can always choose a delay and if you don't like it, go back and change it! Just do what looks good to you.
5. Convert to Video Timeline
Click on the symbol that looks like 4 lines stacked, and choose "Convert to Video Timeline". Now is usually when I play through the gif to see what the speed is looking like/if I like the frame delay and it's landing somewhere around 3 seconds. If not, you can just Undo and adjust anything when it's still in the frame animation stage.
Next, scroll through the Layers on the right side and delete any layers that don't have the "eye" symbol next to them -> these are frames you deleted in the frame animation stage, but they need to be deleted in the timeline stage as well. Lastly, select all your remaining layers (which should all have the "eye" symbol) so they're all highlighted.
6. Convert to Smart Object
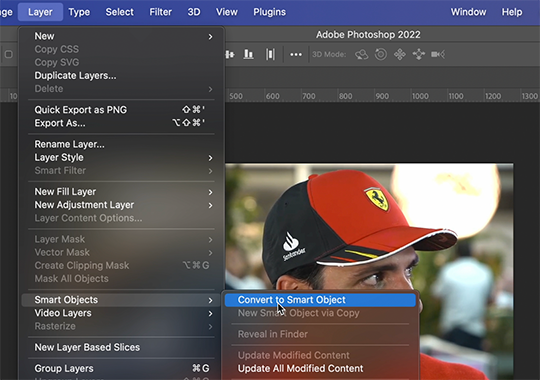
With all layers selected, go to the top to Layer -> Smart Object -> Convert to Smart Object. Ta da! You have a gif.
I always make sure to save my file at this point (you can do it before, but it just depends on how fast you work). Remember to frequently save your progress while gif-making: sometimes, photoshop gets overwhelmed and quits while you're mid-color correction 🥲. You never want to start over from scratch...
Now, some people like to crop & resize their gifs first. Or do sharpening before color. Or color, resize, then sharpen. It's really up to you. The order I like to do is Color, Sharpen, Crop, Resize, Export.
PHASE TWO: Color & Sharpening
(the fun part!)
1. Brightness/Contrast
So here's where we start getting into the really subjective stuff. I always use the Brightness/Contrast and the Selective Color adjustment layers to do my coloring. I rarely touch the contrast bc that can be adjusted in selective color, but almost always, the gif needs overall brightening.
Tip: Even when I think a video looks bright to my eyes, sometimes I post the gif and they look dark once they're in the app. My advice is to always brighten a little bit, even when you don't think it's needed...
Here shows the very subtle shift in brightness I did for this gif. It can be a lot more intense depending on the video quality/lighting. The difference will also look a lot more stark after the color layer is applied.
2. Selective ColorNext is color. This is totally up to you and what looks good to your eyes. Make sure you have any software turned off that might change the color of your screen (like a nighttime filter or something that removes blue light).
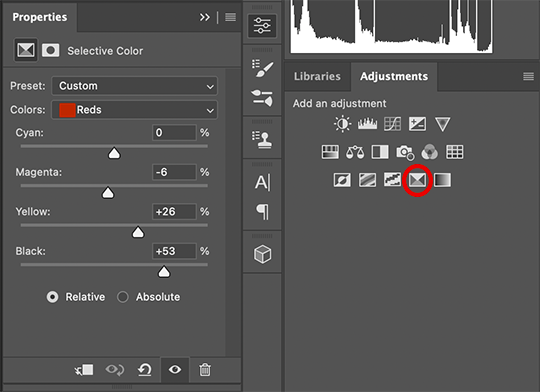
I use selective color bc you can adjust the levels of cyan, magenta, yellow, and black in each color channel independently. This is how I adjust the specific color of red that Charles and Carlos wear, or the amount of cyan in the blacks, etc. The "Neutral" layer effects the whole image, so I'll sometimes add some yellow there if I'm wanting a warmer image, or I'll add or remove black to brighten or darken the mid-tones.
Just play around! Sometimes, I'll take the slider from +100 to -100 back and forth just to see what it's doing to the gif. And I frequently turn on and off the color layer to see what the gif looked like before and after color. (I've found that most F1 content is really magenta-skewed, which you may not even notice until you've corrected it out).
Above is Color vs. No Color.
It might look extreme to you presented this way, but when the whole gif is colored, no one questions it! As long as there's consistency across gifs, that's all that matters. I frequently copy and paste my adjustment layers onto another gif from the same interview/video so the look stays consistent.
Above is Color w/ Brightening vs. Without.
This gives you a better idea of how much of a difference that Brightness/Contrast layer makes.
3. Sharpening
I got my Sharpening routine of choice from this tutorial on gif-making. To be honest, I don't know if it's the best sharpening procedure bc I haven't taken the time to in-depth compare to other ways of doing it, but it looks good to me! So I've stuck with it. (edit: I've also added a Reduce Noise filter to my sharpening routine. But as always, just do what looks nice to you!)
I copy and past the sharpening from my other gifs onto new ones so I don't have to do all the steps again. There are quicker ways of doing this, like using quick actions and stuff, but how I do it is fast enough for me.
If you want to figure out your own Sharpening routine:
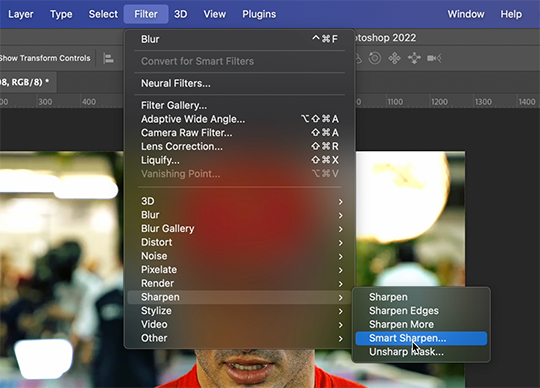
With the gif layer selected, go to the top to Filter -> Sharpen -> Smart Sharpen. It will bring up this window:
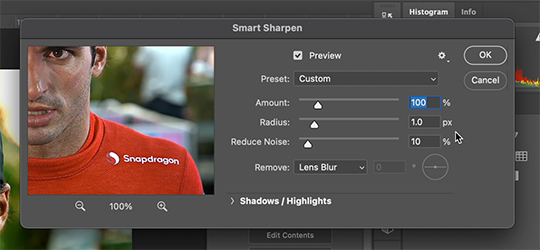
Here you can play around with the amount, radius, noise reduction, etc. and see what you like.
I also add a Gaussian Blur effect, which you'll find under Filter -> Blur -> Gaussian Blur.
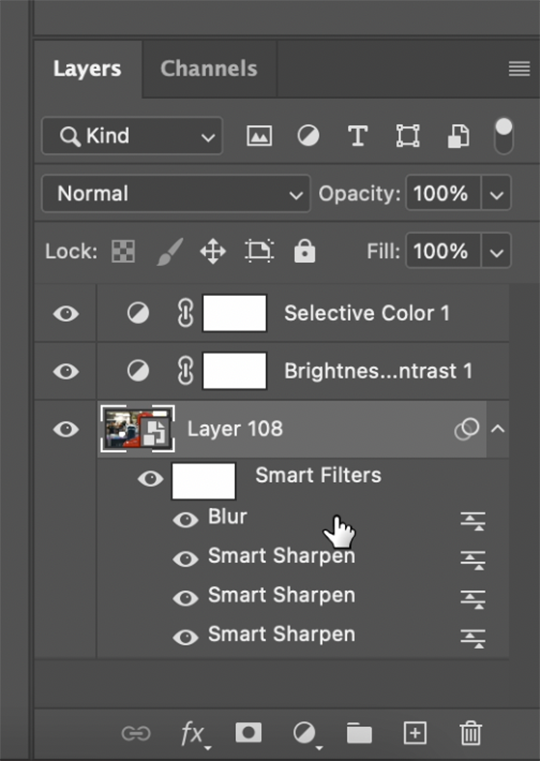
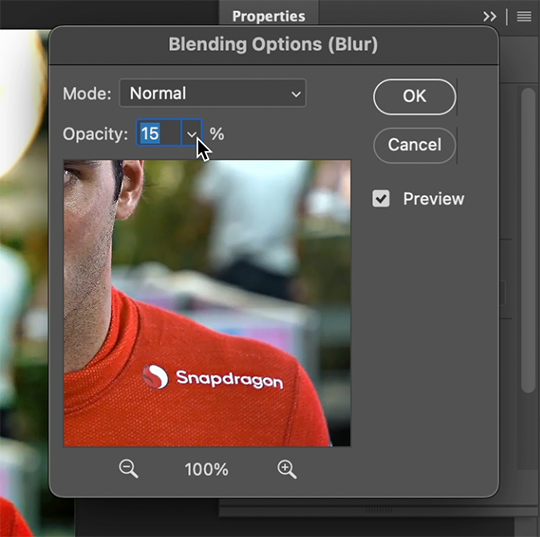
^All of your Sharpen and Blur effects will stack up underneath your gif layer like this. To adjust the opacity of one of these effects, double click on its adjustment/slider symbol to the right, and it'll bring up the Blending Options window.
If there's any sharpening or blurring layer you don't like, you can easily drag it into the trashcan symbol to get rid of it.
Above is a visual of Sharpened vs. None.
You can really tell with the difference in the Snapdragon logo on either shoulder. But I also personally love how much more Carlos' eyes pop to me on the Sharpened side.
As you can see, it's up to your preference. Sometimes, I really love gifs I see that aren't sharp, but rather really smooth and almost painterly. It's up to the gif-maker!
PHASE THREE: Crop & Resize
1. Cropping
Go to the toolbar on the left and choose the Crop Tool. Above where it says "Ratio", you can choose from preset ratios that photoshop has, or you can make your own. I like to use the presets, or at the very least, clear numbers that you can apply to a whole gifset. Free transforming without a ratio makes it nearly impossible to maintain consistency across a gifset.

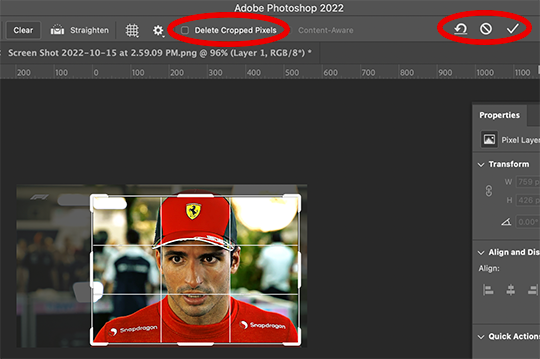
If it isn't already, uncheck "Delete Cropped Pixels". This will allow you to move the gif around inside the cropped area later if you want to adjust what's in frame. It also gives you the option to increase the frame later, if you want. You can also click the gear icon next to "Delete Cropped Pixels" and change how you view the gif during cropping.
When you're done, click the check mark or hit Enter. Now, you've got a cropped gif!
2. Resizing
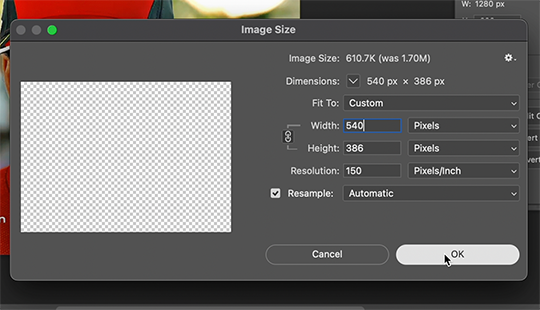
Go to the top to Image -> Image Size...
Make sure you have Pixels selected. For the Resample tab, I have it set to Automatic here, but sometimes I'll use Bicubic smooth or sharpen, depending on what I'm doing. Here's a cool post that compares the different settings. Just experiment with it.
(edit: I no longer change the resolution to 150. I've found that increasing the resolution, and therefore the size, before ultimately resizing down to 540 px means you are compressing even more (the larger something is, the more it has to be compressed within 540 px). I now leave the resolution at 72, which is what it's set at originally, and if the image composition allows it, try to crop in as close to 540 px as I can get so that when I resize, there's the least amount of compression happening.)
If I know a gif is going to be the full width of a tumblr post, I'll resize the width to 540 pixels (the height doesn't matter). But if I make a portrait-style gif which will be sharing a row with another gif, I'll resize anywhere from 270 px -> 350 px. If it's smaller than 270 px, tumblr will enlarge the gif and it'll look bad. If it's wider than 270 px, tumblr might reduce its quality a bit and it won't look as good. But personally, I prefer that if someone clicks on the gif to enlarge it, it looks better enlarged, so I usually will leave it around 345 px as long as the file isn't too big.
PHASE FOUR: Export (last one!)
Once you're happy with everything about your gif, it's time to export. (Remember to save your progress frequently!)
Go to the top to File -> Export -> Save for Web (Legacy)...
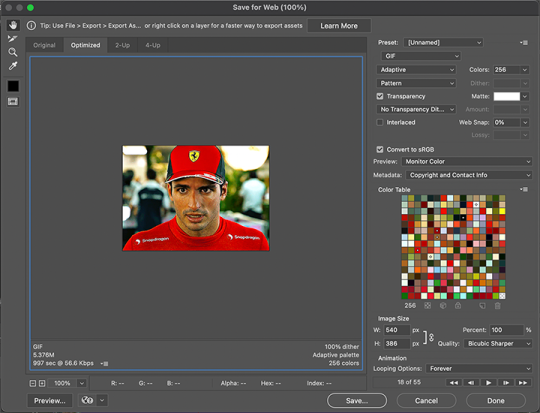
^It'll bring up this Save window.
These are the settings I like to use for gifs. You'll find a lot of differing opinions out there about Adaptive vs. Perceptual/Pattern vs. Diffusion, but you should always have "GIF" selected, "Transparency" checked with "No Transparency Dither" selected, Looping set to "Forever", and Colors set to "256". I like "Bicubic Sharper" for my Quality tab, but there are whole tutorials just about comparing those settings. The best thing to do though is to try them out and compare for yourself.
(edit: I've discovered that if a gif is slightly too large and I don't want to shorten it or resize it down, I can try to reduce the colors from 256 to 128 to get it under the limit. I'll never go below 128, and sometimes I will go to 200 or 170 to try to eliminate as little color variety as possible, but often there is not a noticeable difference in your finished gif. But always compare, of course, to make sure.)
On the bottom left is where the size of the gif is shown -> tumblr requires gifs 10MB and under, but in my experience, gifs load/play best on tumblr when they're around 6MB. I always leave a little growing room as well, bc it might say 5.8MB in this window, but after it saves, the file will have grown a little bit and will likely be over 6MB at that point. (edit: I now regularly post gifs that are around 9.5MB and tumblr seems to be able to handle it better.)
AND THAT'S ALL!
If you've made it this far...congratulations! haha
I know this is a whole lot of information and you might be feeling overwhelmed! But I hope, if anything, this shows you just how complex gif-making can be, and how it is absolutely an art! No one should be stealing anyone's gifs, as a lot of hard work and love goes into the process.
This doesn't include things like adding text to a gif, or more complex adjustments and corrections like masking or key frames. But I'm happy to do more of these if there are specific questions people have.

Let me know what you're curious about or if something is unclear! And happy gif-making! ❤️
#wooow this was a process to make lol#people can let me know if they're curious about adding text or more complex adjustments - i am at your service!#gif tutorial#ask
217 notes
·
View notes
Text
Random Corporate Clash Headcanons, Getting a Virus Edition
For clarification, I'm talking about computer viruses! Also I HC that they themselves will get the virus and basically have symptoms ranging from glitching out to "normal" sickness presentations like coughing.
Duck Shuffler
🎰Dude probably gets something every other week and never learns from it
🎰Falls for free Robux, free Minecraft, free Discord Nitro, you name it
🎰Or maybe he knows it's probably a scam and just likes seeing what happens/taking the chance
🎰Literally does not care when he gets a virus
🎰Symptoms would be his slots spinning on their own and the near inability to speak
Prethinker
🧠I mean, this guy probably made an antivirus program for his own body so I'd be surprised if he did get a virus
🧠He will be so embarrassed if he did though
🧠Will absolutely try to hide it because someone as smart as him couldn't possibly get a virus
🧠Personally gets rid of it himself, or at least will attempt to
🧠If he finds out who made the virus he will send one back
🧠Symptoms would be glitching out and brain fog
Derrick Man
🛢️Doesn't often browse the Internet so this wouldn't be likely to happen
🛢️Probably got the virus from an email from a coworker who got infected
🛢️If not, he was trying to download an open source software like OBS and accidentally downloaded a fake virus.exe without noticing until it was too late
🛢️Will be pretty embarrassed but learn from his mistake and it probably won't happen ever again
🛢️Symptoms would probably be coughing and spewing oil out of his mouth
Deep Diver
🤿Had to have gone on a fake website advertising some kind of aquarium that didn't actually exist
🤿Downloaded a fake tour guide "PDF" {actually an .exe file} that had the virus
🤿Will be angry with whoever made the site and do a deep dive research on them to expose the person{s} behind it and take legal action against them
🤿Symptoms would be poor coordination and fever {or just overheating in general}
Rainmaker
⛈️Either got it from a coworker's infected email or a scam website trying to buy toys to appeal to toons
⛈️Regardless of where she got it, she won't pursue any actions against them
⛈️Will stay home until she's better
⛈️Symptoms would be coughing and not being able to control her weather powers {either as well or not at all depending on the severity}
Land Acquisition Architect
🚦Since he only really uses the Internet for work, it was probably an infected email. Maybe something more sophisticated like a COGS, Inc. embedded link in their website being hacked
🚦Will attempt to ask other coworkers for help and be pretty open about what happened
🚦Will also warn his coworkers about it
🚦Symptoms would be his eyes flickering and weakness
Gatekeeper
⚔️She doesn't
Witchhunter
🔱He also doesn't
Public Relations Representative
🧱He ALSO doesn't {because he's isolated even from the Internet}
Bellringer
🔔Someone didn't like him and personally launched a cyber attack against him, probably because he said a bit too much about them that they didn't like
🔔Got quite a few bits of malware from it and had to get repairs
🔔EVERYONE knows he was cyber attacked because he told everyone. They also know he would love to launch one back at them
🔔Symptoms would be paralysis of his bell, blindness, fatigue, and auditory sensitivity
Multislacker
🥪Got it trying to pirate software because he was too lazy to put in his dad's card information/too lazy to ask his dad to put in his card information
🥪Literally wouldn't care
🥪Just keeps watching TV all day waiting for it to go away until his dad finds out and makes him get repairs
🥪Symptoms would be coughing and glitching out
Mouthpiece
☎️Before she learned about Internet safety protocol, she was dealing with a client via email who "accidentally sent too much money" and asked her to click on a link to Venmo/Paypal/ETC to pay the difference back. She clicked on the link and that's how she got infected
☎️Not hard to track down the client because they used their real name, so let's just say that client had a nice welcome home that evening and then had to go to the hospital
☎️She also took legal action against them and the court ruled in her favor
☎️Symptoms would be her mic cutting out/going to static randomly, phantom phone rings, and a cough
Major Player
🎹Dude was on a suspicious website I cannot make too many references to in an attempt to remain mostly family friendly
🎹He clicked on an ad by accident and immediately panicked, but it was too late. His browser automatically downloaded and opened something because of the website's script to auto download and his settings to automatically open downloaded files...
🎹He uninstalled it and closed everything, but it was too late
🎹Refused to tell anyone about it and just kinda went radio silent for a few days
🎹Symptoms would be his piano teeth randomly playing notes, light sensitivity, and dizziness
Firestarter
🔥Knew he was being scammed with a fake link, but he didn't wanna upset the other person
🔥Pretty much just allowed himself to get infected
🔥Apologized profusely to everyone around him while he was sick
🔥Symptoms would be his body heat and fire powers going way out of control and essentially setting basically anyone and anything around him on fire, regardless of what it was made of
Plutocrat
🌑If you try to give this guy a virus you're either incredibly ignorant or incredibly brave
🌑He will find you. And he will kick your behind.
🌑Symptoms would be coughing and temperature sensitivity... and a runny nose
Treekiller
🪵He'd get it from a work email since he doesn't really go online
🪵Would be very obnoxious about it and try to help his coworker{s} find who was responsible so he could 'teach them a lesson'
🪵He's going to cut up all of their wooden furniture and maybe even parts of their house if he's upset enough
🪵Symptoms would be poor coordination, headache, and nausea
Chainsaw Consultant
🪚For everyone's safety, please do not let him get a virus
🪚The company would invest in very strong antivirus programs for his body for safety concerns
🪚If he does manage to get a virus, it was probably someone directly cyber attacking him
🪚What happens if he's sick? His chainsaw doesn't stop operating and he gets very emotional... let's just say there was a workplace incident that luckily only ended in Acorn Acres having a large amount of trees cut down
Featherbedder
💤She wouldn't really get a virus... I don't even know how she'd get one
💤But if he did, he'd just sleep through the whole thing
💤Literally wouldn't care
💤Symptoms would be runny nose, sore throat, and a headache
Pacesetter
👟Once again, I have no clue how this guy would even manage to get a virus
👟Dude would be pretty upset though. How could someone as awesome as him get infected?
👟Would either tell nobody or make a HUGE public scene about it and I can't tell which
👟Symptoms would be extreme weakness {possibly to the point of being incapable of walking} and glitching out
#toontown#ttcc#corporate clash#headcanon#ttcc headcanons#oh boy time to tag all the managers#duck shuffler#prethinker#derrick man#deep diver#rainmaker#land acquisition architect#gatekeeper#witch hunter#public relations representative#bellringer#multislacker#mouthpiece#major player#firestarter#plutocrat#treekiller#chainsaw consultant#featherbedder#pacesetter#that is a LOT of tags wow
74 notes
·
View notes
Photo

“A pair of Sims find themselves stranded on a deserted island and must endure the will of an angry god to become the ultimate survivors…”
We’re back!
Welcome to my heavily edited version of the Island Challenge by AussieCassPlays. I previously attempted this challenge in August but lost my save file. I’ve decided to try again, this time with modified rules to allow a bit more creative freedom.
The Challenge Goals
Have 16 total sims on the island that have reached the young adult life stage.
With the help of all your tribe members, max out the fishing, logic, parenting, fitness, cooking, handiness, fabrication, gardening and herbalism skills at least twice.
Complete the seashell collection.
Complete the buried treasure collection.
The Setup
Start out with 3 sims. You get to pick their personalities. They shouldn’t have any skills at the beginning of the challenge.
Every sim added into the tribe moving forward needs to have entirely randomized traits. They can be born in-game or added through a specific dice roll.
You must start the challenge on a completely empty lot in Sulani. Provided you have the required packs, the lot must have the following challenges:
Volcanic Activity
Off the Grid
Simple Living
You can start off the challenge with a storage chest (to place your seashells in) and a campfire. Everything else must be earned through hard work and the kindness of the gods.
Seashells are the currency. You can only obtain items by collecting shells to pay for them, from woodworking or from lucky dice rolls. The list of prices for items will be listed below. They are slightly different from AussieCassPlays’.
Your sims cannot have careers or leave the island. Children and teens should not go to school. You must control every single sim added onto the island, whether that means keeping them on a single lot or playing rotationally.
Every day, the gods will intervene and change the fate of your sims. Roll the dice to find out what they have in store for them. The dice rolls will be detailed below. I’ve changed them significantly from AussieCassPlays’.
The Dice Rolls (Kano’s Wrath)
The dice rolls represent the wrath of the volcano god, as well as how effectively the ocean goddess was able to stay his hand or exert her own will to grant a blessing. The lower the roll, the worse the outcome. You have to roll the dice every in-game morning. The dice will tell you what the gods have in store for your sims.
Open up a random number generator and roll between 1 and 35. You’ll do this every sim day.
The challenge begins with a -2 penalty to all rolls. Add +1 modifier for each island cleanliness stage, add +1 modifier every 5th sim in the tribe. Modifiers can also be added or removed through dice rolls.
If you roll a...
1 | A sim dies. Kill them off however you see fit.
2 or 3 | Kano has cursed the islanders. Add a lot challenge.
4 or 5 | Kano resents your success. Add a -1 modifier to your rolls.
6 | The crops are very diseased. Delete 4 crops
7 | A sim falls terribly ill. Remove 4 skill levels.
8, 9 or 10 | Where did all my stuff go? Delete 1 item.
11, 12 or 13 | The crops are a bit sickly. Delete 2 crops
14, 15 or 16 | A sim falls ill. Remove 2 skill points.
17 | A fire starts in the middle of camp.
18, 19, 20 or 21 | 2 shells wash ashore.
22 | 2 seed packets wash ashore.
23 | 5 shells wash ashore.
24 | Vaia has blessed you. Add a +1 modifier to your rolls.
25, 26 or 27 | An object worth less than 100 simoleons washes ashore.
28 | An object worth less than 500 simoleons washes ashore.
29 | An object of your choice washes ashore.
30 | A new sim washes ashore!
30 to 32 | Vaia wants your sim to succeed. Add 2 skill levels.
33 | Vaia is pleased. Add a +1 modifier.
34 | Remove a lot challenge besides volcanic activity.
35 | Kano isn't so angry anymore. Remove the volcanic activity lot challenge.
Crafting & Buying (Vaia’s Gifts)
Your Sims can craft objects that may be very useful in game. Objects crafted with the workbench don’t use up shells and are allowed to be used. Mods such as More Woodworks are allowed — but don’t craft electrical items.
Decorative objects that don’t affect the sims in any way can be placed at any time. (This means no skill objects, objects that give a décor bonus, or objects with an interaction other than “view”.)
All other objects must be “bought” with shell offerings.
Free | Campfire
50 shells | Add a +1 modifier
44 shells + 4 fruits | 4x4 Hut without furniture
20 shells + 2 upgrade parts | Hut expansion (8 tiles total)
2 shells | Window
5 shells | Door or archway
1 shell | 1 medicine or 1 wellness treat
1 shell | 2 Outdoor Retreat bugs
2 shells | 2 Outdoor Retreat harvestable
2 shells | 1 starter or seasonal seed packet
2 shells | Flour or sugar (x5)
3 shells | 1 uncommon seed packet
3 shells | Beach towel
3 shells | Fish trap
4 shells | 1 light (electricity required)
4 shells | 1 oversized crop seed packet
4 shells | Chair / ottoman
4 shells | Kava bowl
4 shells | Party Bush
4 shells | Pet bowl
4 shells | Shelf
4 shells | Trash bin
4 shells | Yoga mat / meditation pillow
6 shells | Bed (single/toddler/infant crib)
6 shells | Counter
6 shells | Dining table (small)
6 shells | End table or coffee table
6 shells | Level 1 skill book
6 shells | Planter box
6 shells | Wood-fired BBQ
8 shells | Jungle Adventure antidote
8 shells | Potty
8 shells | Infant playmat
8 shells | Storage chest
8 shells | Sulani volcano BBQ
10 shells | 2-seat sofa
10 shells | Level 2 skill book
10 shells | Toy (less than 100 simoleons)
10 shells | Wedding Arch
12 shells | 1 chicken (requires coop)
12 shells | 3-seat sofa
12 shells | Bed (double)
12 shells | Bookshelf
12 shells | Dining table (medium)
12 shells | Tent
12 shells | Workbench
14 shells | Level 3 skill book
14 shells | Toy (less than 400 simoleons)
16 shells | Insect Farm
18 shells | Bee Box
18 shells | Dining table (large)
18 shells | Toy (over 400 simoleons)
20 shells | Sink (water required)
22 shells | Toilet (water required)
24 shells | Fireplace
26 shells | Cow / llama (requires shed)
28 shells | Shower (water required)
32 shells | Bathtub (water required)
33 shells + 3 fruits | Wild bird tree stump
33 shells + 3 fruits | Wild rabbit tree stump
40 shells + 4 beeswax | Candle-making station
45 shells | Bar
50 shells | Chicken coop
50 shells + 5 fruits | Juice fizzing station
60 shells + 6 fruits | Animal shed
80 shells + 8 fruits | Dew collector
80 shells + 8 fruits Fridge | (electricity required)
80 shells + 8 upgrade parts | Recycler
80 shells + 8 fruits | Stove (electricity required)
85 shells + 8 upgrade parts | Atmospheric water generator
90 shells + 9 upgrade parts | Wind turbine
100 shells + 5 upgrade parts | Fabricator
100 shells + 10 upgrade parts | Fuel powered generator
100 shells + 10 upgrade parts | Solar panel
If I’ve missed important rules, they’re probably available on AussieCassPlays’ website. You can find her ruleset here. Anything else will likely be explained further as the challenge unfolds.
Let’s get started!
53 notes
·
View notes
Note
ugh your gifs give me life!! i cant seem to make them look THAT good, do you have any advice on how to make gifs? 💖
thank you so so much!! it's honestly a lot of fun for me to make the gifs! for making gifs, i use OBS to record and i open them up in photoshop to edit and export them. i try to keep the gifs at around 2 seconds long since tumblr doesn't like gifs larger than 10mb (i also shrink down the size in save for web to a width of 540 so that the file size is smaller). here are my output settings for OBS and photoshop!


#i hope this helps!! please let me know if you have any other questions :)#this isn't really much of a tutorial but i might tag it as a tutorial so it's easier for people to find this in the future#gif tutorial#gif settings
41 notes
·
View notes
Text
Loki Episode 4 Coherent Thoughts
Spoilers for Episode 4 and before, obviously.
Christ, I have come up with ANOTHER fic idea that has to be posted before Thursday if I want it to be relevant for a little bit, and boy howdy, it is not short.
I think Sylvie got to Mobius. I'm gonna time it next time I watch it (and report back here when I do), but I'm pretty sure even if Loki and Sylvie's conversation happens at the same time as the scene in OB's workroom that immediately follows, there was still enough time for Mobius to look into his memories and get hot cocoa before. Even if he just finds files somewhere and tucks them away to look at later. [EDIT: YES. Sylvie and Loki's conversation in "pie land" takes about 4 minutes and 31 seconds. If we assume the hot cocoa machine takes 1 minute roughly, the total time he's with OB, Casey, and Timely plus that minute is 2 minutes and 42 seconds, leaving 1 minute and 49 seconds to do something that helps him figure out his memories. What that something is in that time, I don't know, but that's still almost 2 minutes of time unaccounted for.]
Listen, I know it's episode 4 so it's too early to be in pain. I know it. But goddamn I still feel bereft. That look on Loki's face that they left us with HURT MY SOUL. (And also I was there (kind of) for Supernatural at the very end and shit went down two episodes before the finale and DID NOT GET ADEQUATELY RESOLVED and I'm not gonna say I was traumatized because that's dramatic, these are tv shows, but I'm a milder version of traumatized. I've been burned by bad endings that started two episodes before the end before.) And I'm just really upset about seeing Loki in pain in general (don't get me wrong, DO IT, it gives me writing ideas and hurts really good, but ouch), and the comics seem to be implying some worrying shit coming down the pipe for my boi, so I don't like shit happening from both ends. I DON'T HAVE THE CAPACITY TO HANDLE IT, Y'ALL!!
I feel like we're going to restart the clock next ep, but I DON'T KNOW HOW WE'RE GONNA DO THAT. The Loom (or timeline, I'm gonna get to this thought in a post tomorrow) exploded without any time for the main six to turn back the clock.
I haven't talked about it much on here, because I don't want to address a rumor and I don't want to believe it, but I have been dreading episode 5 since ep 1 because of Mobius and the Terrible, No Good, Very Bad Spoiler. If you don't know what I'm talking about, I'm very suspicious of this rumor and also a little superstitious of looking at it head-on because I don't want it to be real, so unfortunately you're gonna have to go into the lokius tag yourself to see if you can find it. It might also be in the Mobius tag. There is ONE good-ish possibility for this possible spoiler if it's legit, and it would be that it might prove one of my theories (plus maybe something else if they do it justice, but I don't have too much confidence they will), but either way it kind of upsets lokius and I'm not thrilled by that. I have a theory that's coming tomorrow that could have this happen while still giving us lokius endgame, but given how much time is left in the season I'm not very confident so I'm just gonna sit here for the next few days and pray it was a troll.
Also: "oh no" is a code phrase I've started with my friends that has made its way into my personal reaction notes, and now congrats, you've been (unwillingly) witnesses to it now, too. It means "I am starting to ship this and I don't want to-slash-I know I shouldn't, but I am." And (yike) if you recall this showed up on the reaction about Sylvie jumping into the lokius bickering. I'M NOT SAYING that I ship sylkius. I'M NOT SAYING that I'm GOING TO ship sylkius. I'm just saying I had THOUGHTS when she did that and I didn't love the thoughts I had. I think episode 4 of season one was when I started shipping lokius, though, so...fuck. (It should be noted that 90% of the time I go "oh no" just in general, though, I forget about it pretty quickly afterwards, so statistically it's unlikely.)
#loki#loki tv show#loki theories#loki season 2#sylvie laufeydottir#mobius m mobius#loki season 2 spoilers#lokius#loki 2x04#loki 2x04 spoilers
13 notes
·
View notes
Text
Upcoming events at Sims 2 Shenanigans!
Friday, March 8th at 09:00 (GMT -6, or 10 AM EST)- The Repository Technique
Host: marcussimmonscc
Topic: Learning to use the repository technique to link multiple objects to a single mesh
Tools needed: SimPE
Approximate time: 1.5 hours
Suggested for: Intermediate. Some knowledge of object creation is helpful.
In this short tutorial, you'll learn link multiple objects to a single mesh with the Repository Technique!
Sharing recolors and other resources across multiple objects can significantly reduce the number of files needed in-game.
Saturday, March 9th at 13:00 (GMT -6)- Camera: Action!- Workshop on shooting machinima
Host: Let It Simmer
Topic: A variety of machinima shooting techniques
Tools needed: OBS Studio or other tool for recording, Premiere Pro or other tool for video editing
Approximate time: 2 hours
Suggested for: Beginners welcome. Most of the techniques discussed will be beginner-level, but there will be a few intermediate-advanced techniques toward the end of the workshop.
A showcase of filming techniques ranging from basic static shots all the way to some greenscreen magic.
Saturday, March 16th at 13:00 (GMT -6)- Forging Your Destiny (Part 1)
Host: Ocelotekatl
Topic: Converting objects from Skyrim to Sims 2
Tools needed: Nifskope/Outfit Studio, Milkshape, Photoshop with DDS plugins, SimPE
Approximate time: 1.5 hours
Suggested for: Intermediate. Some Body Shop/object meshing experience is helpful.
A start-to-finish workshop about converting objects, outfits, and accessories. Part 1 includes building the meshes and finding the textures.
Saturday, March 23rd at 13:00 (GMT -6)- Forging Your Destiny (Part 1)
Host: Ocelotekatl
Topic: Converting objects from Skyrim to Sims 2
Tools needed: Nifskope/Outfit Studio, Milkshape, Photoshop with DDS plugins, SimPE
Approximate time: 1 hour
Suggested for: Intermediate. Some Body Shop/object meshing experience is helpful.
A start-to-finish workshop about converting objects, outfits, and accessories. Part 2 includes building the the recolors, linking the mesh to the recolor, binning, categorizing, and final testing in game.
To RSVP or check your local time, check the event thingy at the top of the Discord.
If you haven’t joined yet, why aren’t you a member of the most amazing creator’s Discord ever? To join, click here: https://discord.gg/tkNzjgsSTS
5 notes
·
View notes
Text
so i was a dumbass and recorded all of my clips in the wrong file type and have been spending all day painstakingly trying to convert them
funny thing is this exact thing has happened before when i used to try making sims videos or any kind of video when using obs because i forget every single time
i was hoping for a casual, calming video editing day today, however no, just more repenting for my mistakes
#funny thing is all of the clips that did work are for the second half#all of the songs im not a fan of are being little shits to convert#please send help in these trying times
4 notes
·
View notes
Text
Basic Gen 1 pet hexing Tutorial - Dogz
Hello! I thought it might be fun to do a basic hexing tutorial for tumblr. I'm sure there are others out there but, there's always the need for a refresher corse and a new post won't hurt.
This tutuorial is far from the most advanced and I do my best to assume no hexing experiance. There are many more tutorials on Whisker Wick and RKC. At the time of this tutorial they are the central hubs for the online petz community and are always filled with people who can help answer questions too.
First is the tools needed to hex for the Petz games(note I will be hexing in Petz 4 but the ideas are transferable to at least Petz 5 and I believe Petz 3).
NOTE all the tools I list are FREE to get from the sites I link to.
=-=-=-=-=-=-=-=-=
You can in theory use any hex editor, but if you're like me and they intimidate you a bit I highly recomend getting LNZ pro from Sherlock Software. It is the program most of the community uses too so if there are problems it is easy to find help. If you happen to be in the babyz community as well this program works for them as well. You will also need the petz editing manual. Through the tutorial I will refer to this as LNZ.
Also from Sherlock Software I highly recomend Petz Workshop, I will be useing it in the tutorial and it's great if you're more of a visual person. It has some limits but overall works nicely. Through the tutorial I will refer to this program as PW.
While on Sherlock Software, if you don't have it already I suggest getting Petz A for enhanced game play, and petz pic factory is a life savor to help organizations. Tinker is if you want to get into toy/clothing hexing.
The other program I cannot recomend enough is Brynn's anchor utility. It can be found on Flea Bagz along with the auto spotter.
=-=-=-=-=-=-=-=-=
NOTE! This method of hexing, hexing on the breedfile itself, causes hexed liniage if you breed them. This can be useful and even fun, but is something to keep in mind.
It changes the base coding of the dog/cat and alters there genetics a bit so they can have offspring with colors that would not normally occure.
For exampe great dane masks should only come in brown and black -

(Special appearacne by Coke and Townie, two of our Danes)
However, with hexed linage they can come in other colors such as orange, red, blue, tan, cream, white,


(Denzel, Pitch, Twice,
Tallis, Siddie, Sim)
This is only for ball areas not paintballz. Paintballz do not mutate colors unless there's extra hexing in so those are not affected.
=-=-=-=-=-=-=-=-=
ALSO NOTE! BACK UP YOUR FILES! ANY FILE YOU OPEN WITH THE INTENT OF HEXING! BACK IT UP! I keep a zip file of all my OBs stashed away in a dark corner as well as one with the fixed files I use. Things can go wrong. You don't want to loose a file and not be able to get it back.
Also do frequent saves while working. These are older programs. Things crash with no reason.
=-=-=-=-=-=-=-=-=
We've got the programs now to select what to hex.
A golden retreiver.
There are minor differences between different breed files but for the most part they are the same. The bigg thing to think about is the pug nose - and it's none existance, the chihuahua(and I belive papillon too) have different nose numbers than the other dog breeds because they have a single ball instead of the 2.
DOG NOSES(not cat noses, catz can be done like any other ball)
The first thing I'm going to do is change the golden's nose color. There are two ways to do this:
The first is done completely in PW(you can use LNZ too but as I said, I prefer visuals when I can so I only do it in PW on the rare times I use this method). I rarely use this method, I've spent years hexing for the petz kennel club and this particular method violtates the rules about changing a file.

In PW, once the file you need is open(in this case the Golden Retriver.dog) you'll see some buttons across the top with circles on them. the second from the end has a circle with half the line thicker than the other.
Click it.

Down in the bottom above the text box that tells you you've opened the file and all that are two other boxes. The top one says "outline style:" and is a drop down,
Yep click it.

You'll get a selection of No outlines, both sides(this is the one it auto selects), left side only, right side only, and draw as a nose(this is what the dog nose is already!). When I do this method I do "no outline" but feel free to play with the others and the thickness of the lines. I know some people have done some awesome things with them.
Once your line is selcted thengo up to the modle of the dog and click on their nose!

And the nose is gone! Now back to your top menu!

The second button, the one that has a gradiant from red to blue/purple?
Click it.

Your bottum menue has changed again, click on the "color to paint" square
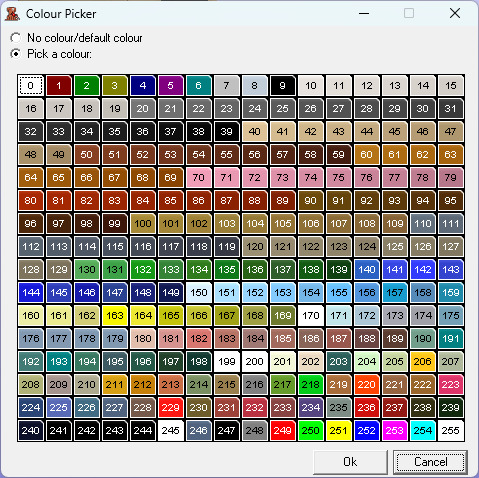
A color picker popup will appear! please note that the last few rows(especially the last two) are very unreliable for being the color that shows up in the game(And that from one persons computer to anothers they're known to just not match.).

Once you've picked your color click on the two nostril ballz that we clicked for the outlines thing as well as the third little black ball beneath them. Note that some colors do not let textures work despite what PW may show.
And that's it, that's method 1 for dogz nose color changing.
You can add the nose shine with paintballz(we will cover paintballz in general later).
Method 2 is in LNZ pro. This is the method I prefer useing.

Once you have the file open down the side of the inner window is a list of smaller menus. You want the one that sayz "LNZ"

Depending on your breed, the letterz on the inner menu from LNZ may be different. You want to open which ever one does not say "PUP"
There are sections labled with brackets you will want to scroll or use the "tools" menu and the "find feature" until you get to [Paint Ballz]
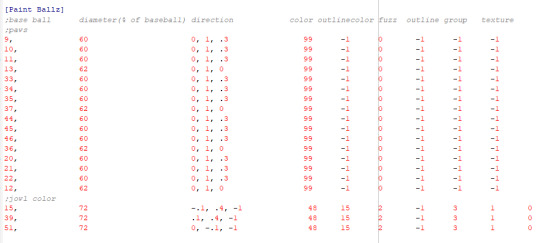
Depending on your file there may or may not be more than the paw pads. Note the lines following the semi collons. These lines are ignored by the program! It's a great way to make notes.
Also note that the three lines after ";jowl color" all have an extra number at the end, that "0" anchors the paint ballz. A general rule(rules are made to be broken so you do you!) paw pads are the only ballz that are not anchored.
Another note, the texture(last number in a row before the anchoring "0") in the paw pads is "-1" this means that there is no texture there, this will apply to any ball or paint ball you want to have no texture!
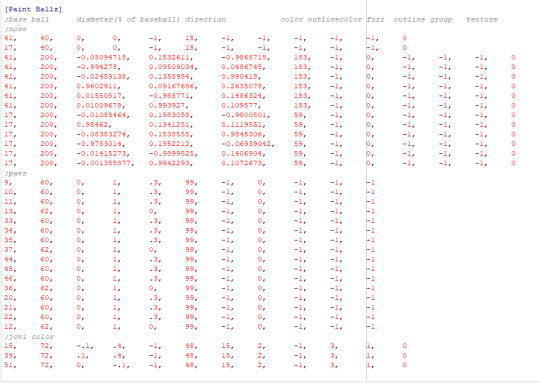
Now adding paintballz to the nostril ballz to cover up the "draw as a nose" line. You'll other than the first two paint ballz(which are the nose shine, which you can 100% use on the previous method) they're massive(200% the diameter of the ball) this is simply to cover as much area as possible. They're also anchored but have a -1 texture.
The 5th number in each row is the color, you can change it to whatever number you want(remember the pop up window from PW? SAME numbers!)
If you would like the code to save for quick coppy paste -
;nose 41, 40, 0, 0, -1, 15, -1, -1, -1, -1, -1 0 17, 40, 0, 0, -1, 15, -1, -1, -1, -1, -1 0 41, 200, -0.05094715, 0.1532611, -0.9868715,183, -1, 0, -1, -1, -1, 0 41, 200, -0.994278, 0.09509034, 0.0486745,183, -1, 0, -1, -1, -1, 0 41, 200, -0.02459138, 0.1358954, 0.990418,183, -1, 0, -1, -1, -1, 0 41, 200, 0.9602911, 0.09167686, 0.2635078,183, -1, 0, -1, -1, -1, 0 41, 200, 0.01550517, -0.988771, 0.1486324,183, -1, 0, -1, -1, -1, 0 41, 200, 0.01009679, 0.993927, 0.109577,183, -1, 0, -1, -1, -1, 0 17, 200, -0.01085464, 0.1983058, -0.9800801,59, -1, 0, -1, -1, -1, 0 17, 200, 0.98462, 0.1341251, 0.1119551,59, -1, 0, -1, -1, -1, 0 17, 200, -0.08383274, 0.1538555, 0.9845306,59, -1, 0, -1, -1, -1, 0 17, 200, -0.9783014, 0.1952212, -0.06939042,59, -1, 0, -1, -1, -1, 0 17, 200, -0.01415273, -0.9899525, 0.1406904,59, -1, 0, -1, -1, -1, 0 17, 200, -0.001355877, 0.9942293, 0.1072673,59, -1, 0, -1, -1, -1, 0
I use the same one every time, just changing the color number.
At this point I like to erase the other painballz if I'm not going to use them. However, I know the jowl color is the paint ballz are the cute mustashes that Labs and goldens sometimes get that I absolutly love and I want to keept them. However, i don't like any paint ballz bellow my paw pads so I moved them above the nose and renamed it.
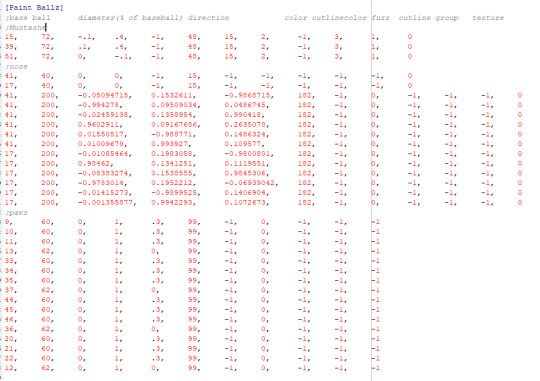
Something to note - your notes in breed files will not transfer to the pet file. Also, PW will unanchor paint ballz so always save that for last.
=-=-=-=-=-=-=-=-=-=
COLORING! WEEE! I do this in PW.

OH NO THE NOSE! It's totally fine, we'll take care of it in a bit.
At this point it is best if you have an idea for what you want to hex, but if not you can wing it, that's always a fun time.

Hit your gradiant ball color circle in your top menu bar on PW
Select your color in the bottom just like the nose in method one.
And start coloring ballz!

Each ball can be selected indivicually(also look at the mustash!).
OR On the left side of PW,
There are tab menus, select the one that says "Balls".

Select multiple with ctrl+right mouse or shift+right mouse(remember that to pay attention to things like R Eye and L iris. If you don't want to cololor the whites of the eye(R or L eye) or the pupil (R or L iris) you don't want to select these.

At the bottom of the selecting box is a button that says "apply to all ballz"(when it's not squished like my window does). hit that and...
it's like a bucket fill! Now you can do multi colors of course, just select a different color like you selected the first and start coloring ballz.
And stick around for part 2 since I hit the limit of photos I can post in one post.
HERE IS THE LINK FOR PART 2
#petz#petz5#petz 4#petz 5#petz4#petzblr#dogz#catz#catz 4#dogz 4#tutorial#hexing#petz hexing#petz 3#petz catz 2#petz game#nostalgic games#game modding#part one
10 notes
·
View notes
Text


I never really keep track of the random ass projects i have and make, so maybe my tumble blog is a decent place to start
StreamPi Streamdeck
In August 2023 I used a Rasberry Pi and some open source software to make a macropad/Streamdeck for personal use. It has support and integration with OBS webhooks and various other things, primarily marketed towards people who make content and stream
as a tiny ass content creator who doesn't make much content, with a multitude of random tech hanging around, including a Rasberry Pi, i didn't want to shell out $150-$200 on an elgato streamdeck only to watch it be phased out and no longer supported
$72 for the screen, and $12 for the original case, and an afternoon of work installing setting up and customizing the interface and setting up the server side on my main PC , and we were up and running, a few discrepancies here and there but for the price and work I had no objections
I'm not much of a content creator, I do a little but of Vtubing on and off, and screw around with things, but even for that it was useful to have an at-hand control panel for essentials, even from day to day for work, being able to quick swap between things, setup hotkeys and macros etc, we were cooking.
I Re-shelled the setup into a more fancy case a few days ago, this case was more expensive, but in the long run its easier to use , I also pimped it out with a power switch and re-wired the insides just for fun (swapped the GPIO setup out for just power leads)
I did however have to re-install StreamPi and re-setup everything, Thats where the issues hit
StreamPi seems to be semi abandoned, its not been updated since 2022 and it's discord server and Github is silent.
StreamPi 1.0 which i used originally wasn't working due to it needing an ancient version of Java and the Rasbery Pi was acting up and didn't want to install or run it (and oracle are super anal about accessing old java for some reason) so fuck it, i installed the Beta 2.0 Snapshot, So after editing the install script to point to the 2.0 files, re-setting up java forgetting to backup all my configs from 1.0 we were back to starting again
after setting up a custom theme again with some basic CSS, the project was ready to re-do,
even though Streampi is a little big clunky and semi abandoned, its still a great bit of software, and if you want a streamdeck without the price tag and an afternoon of tinkering, something like this is perfect to replace it
StreamPi: https://stream-pi.com
Pi 4 4GB: https://www.raspberrypi.com/products/raspberry-pi-4-model-b/
7" Touchscreen: https://www.raspberrypi.com/products/raspberry-pi-touch-display/
Case: https://smarticase.com/products/smartipi-touch-pro
2 notes
·
View notes
Last Seen Blogs

dokidobe
yellow.dr.monv

slovandretro
Slo V and Retro

hwaboomba
Hwa Boomba 💜

jurizdiction
JURIZdiction
jurizdiction
JURIZdiction