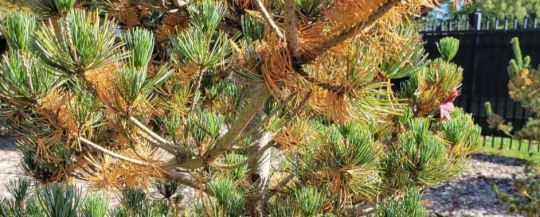
#drought damaged evergreen
Text
A writer’s guide to forests: from the poles to the tropics, part 7
Is it no.7 already? Wow. A big shout out to everyone who has had the patients to stick with this. Now onto this week’s forest…
Dry forest
Water is life. That’s a fact. And especially where it doesn’t rain for more than half the year.
Location: Dry forests are scattered throughout the Yucatán peninsula ,South America, various Pacific islands,Australia, Madagascar, and India. Areas have been cleared by human activity, and the SA dry forests are classified as the most threatened tropical forests.
Climate: Temperate to tropical, with just enough rain to sustain trees. Many are monsoonal, with rain coming in one or two brief periods separated by a long dry season.
Plant life- Hardy trees, such as Baobab and Eucalyptus are able to last with little rain by tapping into groundwater with extensive root systems. Many trees are evergreen, but in India, many species are deciduous. Trees are often more spaced out, and shrubs and grasses grow extensively. Cacti are common plants in the Americas, with some growing tall enough to be considered trees. In order to survive the heat and lack of water, many small plants are annuals, or store water in tubers. Palms can make up a large percentage of the trees, as was the case in the now vanished forests of Easter Island.
Animal life- As they can come and go when they please, birds are common species. Larger animals are active year round, with smaller species of mammals, amphibians, and certain insects only coming out during the rainy season. Isolation means that islands become home to many endemic species; think about Madagascar and the lemurs, or Darwin’s finches, iguanas, and tortoises in the Galapagos. Isolation has also led to the marsupials of Australia developing to fill the niches that would normally be occupied by placental mammals .The introduction of invasive species has brought about the extinction of island fauna.
How the forest affects the story- Water, or the lack of will be the biggest challenge your characters will face. Rivers and lakes may be seasonal, so other sources will have to be utilized. Drinkable fluids can be obtained from various plants and animals, or maybe the bedrock is porous and water accumulates in cenotes. Your characters could come from a culture that builds artificial reservoirs to collect the rain and store it for the dry season. With careful water management, cities can thrive in dry areas. But your characters will have to be careful. Prolonged drought will see societies go the way of the Maya. Deforestation leaves the topsoil vulnerable to the wind, and forests, farms, and grassland will inevitably turn to desert. Whether nomadic or sedentary, your characters and their society will have to find a way to interact with the forest without destroying it or themselves. Can they do it? Can a damaged biosphere be restored before it’s too late? The success or failure of your characters and/or their predecessors can be a driving focus of the plot. Of course ,when the rains do come, it could be in the form of a cyclone. Dry ground does not readily absorb water, and flash floods are a danger. Water can grant life, but it can take it as well.
#writing#creative writing#writing guide#writing inspiration#writing prompts#writer#writers#writing community#writer on tumblr#writeblr
47 notes
·
View notes
Text
Green Gem Boxwood: A Petite and Prized Evergreen

Title: Green Gem Boxwood: A Petite and Prized Evergreen
Green Gem Boxwood, scientifically known as Buxus 'Green Gem', stands as a testament to the charm and versatility of compact evergreens in landscaping. With its petite size and dense foliage, this cultivar of the boxwood family has earned a place of distinction in gardens around the world. In this article, we'll delve into the characteristics, cultivation tips, and design possibilities of the Green Gem Boxwood.
Characteristics:
Green Gem Boxwood is celebrated for its diminutive stature, typically reaching a height of around two feet and a width of two to three feet at maturity. Its compact growth habit makes it an excellent choice for small gardens, borders, or container planting. The glossy, dark green foliage retains its color throughout the year, providing year-round interest and serving as a vibrant backdrop for seasonal flowers or other garden features.
One of the key attractions of Green Gem Boxwood is its slow growth rate, which means minimal maintenance in terms of pruning and shaping. Its naturally rounded form requires little intervention to maintain its neat appearance, making it an ideal option for low-maintenance landscapes.
Cultivation Tips:
When it comes to cultivating Green Gem Boxwood, providing the right growing conditions is crucial for optimal health and growth. Here are some essential tips:
Sunlight: While Green Gem Boxwood thrives in partial shade to full sun, it tends to perform best in locations with morning sun and afternoon shade, especially in hot climates. Adequate sunlight ensures vigorous growth and helps maintain the rich green color of its foliage.
Soil: Well-drained, slightly acidic soil is ideal for Green Gem Boxwood. Ensure proper drainage to prevent waterlogging, which can lead to root rot. Amending the soil with organic matter such as compost can improve soil structure and fertility, promoting healthy root development.
Watering: While Green Gem Boxwood is drought-tolerant once established, regular watering is essential, especially during periods of prolonged dryness. Water deeply, allowing the soil to dry out slightly between watering sessions to prevent waterlogged conditions.
Pruning: Minimal pruning is required to maintain the compact shape of Green Gem Boxwood. Prune lightly in late winter or early spring to remove any dead or damaged branches and to shape the plant as desired. Avoid heavy pruning, as this can lead to sparse growth and diminish the plant's natural beauty.
Fertilization: Apply a balanced, slow-release fertilizer in spring to provide essential nutrients for healthy growth. Follow the manufacturer's recommendations regarding application rates and frequency to avoid over-fertilization, which can damage the plant.
Design Possibilities:
Green Gem Boxwood offers endless design possibilities in both formal and informal landscapes. Here are some creative ways to incorporate this petite evergreen into your garden:
Hedging: Create a low hedge or border using Green Gem Boxwood to define garden beds or pathways. Its dense foliage and compact growth habit make it well-suited for formal hedge designs, adding structure and elegance to the landscape.
Container Planting: Plant Green Gem Boxwood in containers to add greenery to patios, balconies, or entryways. Its small size makes it perfect for confined spaces, and it can be pruned to maintain the desired shape and size.
Mixed Borders: Pair Green Gem Boxwood with colorful perennials, annuals, or flowering shrubs to create dynamic mixed borders. The contrasting textures and hues will enhance visual interest throughout the year, while the boxwood provides a reliable backdrop.
Topiary: Use Green Gem Boxwood for topiary or formal geometric designs to add a touch of sophistication to your garden. With its dense foliage and slow growth rate, it lends itself well to intricate pruning and shaping.
Rock Gardens: Incorporate Green Gem Boxwood into rock gardens or alpine plantings to add evergreen interest and structure. Its compact size and low maintenance requirements make it an excellent choice for rocky, well-drained soils.
In conclusion, Green Gem Boxwood stands out as a petite yet prized evergreen that brings year-round beauty to gardens of all sizes. With its compact growth habit, glossy foliage, and versatility in design, it's no wonder that this cultivar remains a favorite among gardeners and landscapers alike. Whether used as a low hedge, container plant, or focal point in mixed borders, Green Gem Boxwood adds enduring charm and elegance to any landscape.
0 notes
Text
How to grow and cast iron plant
Introduction: Looking to add a touch of greenery to your indoor or outdoor space? how to grow and Cast Iron Plant, with their robust nature and elegant foliage, might just be the perfect choice. Renowned for their resilience and low-maintenance requirements, these plants are ideal for beginners and seasoned gardeners alike. In this guide, we'll walk you through everything you need to know about growing and caring for Cast Iron Plants, ensuring they thrive in your home environment.
Getting to Know the Cast Iron Plant: Cast Iron Plants, scientifically known as Aspidistra elatior, are native to the shaded forests of Japan and Taiwan. With their dark green, lance-shaped leaves and sturdy demeanor, they earned the moniker "cast iron" for their ability to endure neglect and unfavorable conditions. These evergreen perennials are valued for their adaptability to low light and their capacity to thrive indoors with minimal attention.
How to Grow Cast Iron Plants:
Selecting the Perfect Spot: Cast Iron Plants prefer low to moderate light conditions, making them ideal for spaces with limited sunlight. Indoors, place them in rooms with north-facing windows or areas away from direct sunlight. Outdoors, they flourish in shaded spots or under the canopy of trees.
Choosing the Right Soil: Opt for well-draining, nutrient-rich soil when planting Cast Iron Plants. A blend of peat moss, compost, and perlite or sand works well. Ensure the soil remains consistently moist but not waterlogged to prevent root rot.
Planting with Care: When transplanting or potting Cast Iron Plants, use containers with drainage holes to prevent water from pooling. Gently loosen the roots before planting and position the plant at the same depth as it was in its original container. Fill the remaining space with soil and water thoroughly.
Watering Wisely: While how to grow and Cast Iron Plant are tolerant of drought conditions, they still require regular watering. Allow the top inch of soil to dry out between waterings, then water deeply until moisture seeps through the drainage holes. Avoid overwatering, as it can lead to root rot.
Temperature and Humidity: Maintain temperatures between 60-75°F (15-24°C) and moderate humidity levels for optimal growth. Avoid exposing the plants to extreme temperature fluctuations or drafts, as they prefer stable conditions.
Caring for Cast Iron Plants:
Pruning and Maintenance: Remove any yellow or damaged leaves to promote new growth and maintain the plant's appearance. Pruning can also help control the plant's size and shape, ensuring it remains tidy and compact.
Fertilizing: While Cast Iron Plants are not heavy feeders, you can apply a balanced, diluted fertilizer during the growing season (spring and summer) to encourage healthy growth. Avoid over-fertilizing, as it can lead to salt buildup in the soil.
Pest and Disease Management: Cast Iron Plants are relatively resistant to pests and diseases, but occasional issues like mealybugs or scale may arise. Inspect the plants regularly and treat any infestations promptly with insecticidal soap or neem oil.
Repotting: Repot Cast Iron Plants every 2-3 years or when they outgrow their containers. Choose a slightly larger pot and refresh the soil to provide the plants with fresh nutrients and room for growth.
Conclusion: With their timeless elegance and effortless maintenance, how to grow and Cast Iron Plant are a delightful addition to any home or garden. By following these simple guidelines for growth and care, you can enjoy lush, verdant foliage year-round, transforming your space into a green oasis of tranquility. Embrace the resilience and beauty of Cast Iron Plants, and revel in the joy of nurturing these enduring botanical gems.
0 notes
Text
7 ideas for decorating the yard or garden without grass or maintenance - Interior decoration
Post has been published on becoration
7 ideas for decorating the yard or garden without grass or maintenance - Interior decoration
There are several options for decorating the yard without having to incorporate grass and with minimal maintenance. Options can range from growing resilient plants, adding fountains, placing planters and pots, stone pathways, among other ideas that we will explore. You can also opt for outdoor plants that require less water and can withstand the heat to avoid the hassle of worrying about the garden.
Keep in mind that many people are looking for unique alternatives that require little maintenance due to lack of time, but still want to have their yard or garden to enjoy the space. There are a variety of amazing and comfortable options to replace grass in your garden with minimal maintenance.
Ideas for decorating the yard without grass
Wood and Stone Pathways
A great option is to create pathways throughout the yard with wood or stone. These natural materials add a beautiful aesthetic to the outdoors and require very little maintenance. You can create winding paths that look natural and allow you and your guests to enjoy the outdoors without the need for mowing, weeding, or watering. Additionally, with the right materials and designs, you can use the pathways to add visual interest to your garden or yard.
Drought-Tolerant Plants
Drought-tolerant plants are a great choice for homeowners who want to maintain a grassless yard. These plants are usually hardy and do not require frequent watering. Succulents, for example, are a fantastic option and are available in many different colors. Other great options are lavender, ornamental grasses, and yucca. Drought-resistant plants are also a great way to attract wildlife to your outdoor space.
A Water Feature
Water features can give the yard or garden a beautiful and relaxing feel. You can choose from a wide variety of styles and sizes, from small simple fountains to large elaborate ponds. To minimize maintenance, consider incorporating low-maintenance plants and rocks around your fountain. With the right design, a fountain can become the focal point of your outdoor space.
Decorative Edging
If you want to add an elegant touch to the yard or garden, decorative edging can be a great choice. You can create an edge using materials like stone, brick, or wood. You can also use plants, such as ornamental grasses, to create a unique aesthetic. Edging can help define and organize your outdoor space, and requires very little maintenance. It can also be a great place to display your favorite plants or flowers.
All-Weather Outdoor Furniture
To truly make the yard or garden a space to enjoy, consider investing in all-weather outdoor furniture. This type of furniture is designed to withstand the elements and requires minimal maintenance. You can find all sorts of styles and designs that fit your outdoor decor, from classic to modern. When combined with beautiful plants, decorative edging, and a water feature, your yard or garden will become an outdoor paradise.
Incorporate Evergreen Trees
These types of trees are ideal for decorating the yard and providing shade. Place several trees strategically to avoid mowing. They may take some time to grow, but once mature, they fill the space. Once established, they provide a sense of privacy. Choose trees that thrive in that area and make sure not to plant them near other houses or structures to prevent root damage in the future.
Apply a Floral Ground Cover
Using a climbing plant or floral ground cover is a great idea for decorating the yard or garden and an excellent alternative to grass if you want quick results.
Plants that have exquisite pink flowers like trailing phlox are very beautiful to fill your garden with color. Ideal for placing in large areas and is a low-maintenance solution. It is a very resilient and easy-to-care-for ground cover plant. It has an intense pink color, grows from spring to fall. They can be in full sun with abundant watering, but the ideal place to plant them is in partial shade.
Final thoughts…
Do you want to decorate your garden without the need for grass or much maintenance? This moment is ideal as spring is approaching, and it is a great option to renew and decorate your yard or garden. The ideal is to be able to enjoy it all year round without worrying about mowing the grass or doing extensive maintenance.
Consider adding wood and stone pathways, drought-tolerant plants, a water feature, decorative edging, and all-weather outdoor furniture. These beautiful alternatives can help you create the perfect outdoor space without the need for regular mowing, weeding, and watering.
Photos: Freepik, Unsplash, and Pixabay.
via: Opendeco, decoration news in Spanish
0 notes
Text
Symptoms and Causes of Evergreen Tree Diseases
Evergreen trees are at the forefront of this holiday season, and we do get a lot of questions about browning in conifers at this time of the year, especially pines, cypresses, junipers, and cedars. Most of the time, this is caused by seasonal needle drop, which is not damaging at all, but can be alarming. If you have concerns about the late-season condition of your evergreens, give us a call! Regularly inspecting the tree for any signs of discoloration, wilting, or unusual growth patterns can help you detect problems early. , Below we explore the symptoms and causes of 4 evergreen tree diseases.
Rhizosphaera Needle Cast
Evergreen trees are susceptible to a fungal disease called Rhizosphaera Needle Cast. This disease can cause coniferous trees to lose their needles prematurely, turning them brown before they fall off. If left untreated, the symptoms can worsen, leading to severe defoliation and even tree death.
Symptoms of Rhizosphaera Needle Cast
Discoloration: Infected needles may turn yellow or brown, starting from the lower branches and gradually moving up the tree.
Tri-colored girdled needles: Needles may have green, brown, and yellow sections, with the brown area strangling the needle.
Pycnidia: Tiny black fruiting structures that reproduce spores.
Thinning foliage: The tree starts to lose needles, leading to a visually sparse appearance. In severe cases, branch dieback can occur, where entire branches wither and die.
Causes of Rhizosphaera Needle Cast
Rhizosphaera Needle Cast is caused by the Rhizosphaera fungus and can spread rapidly if left untreated. The fungus spreads through the release of spores from fruiting bodies. These spores can be transferred to other trees and plants, leading to further infection. To prevent the spread of Rhizosphaera Needle Cast, thorough inspection of foliage and careful removal of infected branches is required.
Cytospora Canker
Cytospora canker is a highly destructive fungal disease that affects evergreen trees and is known to infect weakened trees. The fungus enters the tree through wounds, causing the bark to crack and ooze a resin-like substance. The infection can spread rapidly, causing the branches to die off and eventually killing the entire tree if left untreated.
Symptoms of Cytospora Canker
Lower branch dieback: Infected trees often exhibit a gradual decline in the health and vitality of their lower branches. These branches may show signs of wilting, turn brown or gray, and eventually die.
Poor growth: Trees affected by Cytospora Canker may appear stunted or have reduced vigor compared to healthy trees. The result is thin, sparse foliage and a general lack of vitality.
Needle discoloration: Faded or brown needles are common signs of this fungal disease. The needles may lose their vibrant green color and become discolored or brown. This symptom is often more noticeable in older needles than new growth.
Resin: Sticky, amber-colored resin may appear to ooze from cankers or cracks in the branches, serving as a defense mechanism for the tree.
Causes of Cytospora Canker
Cytospora Canker is caused by the fungus Leucostoma kunzei. This fungal infection primarily targets spruce trees. The fungus can spread through different means, such as rain, wind, and insects. When raindrops hit an infected tree, the fungal spores can be carried by the raindrops to nearby healthy trees, which can cause the disease to spread. Additionally, wind can transport these spores over long distances, affecting a much larger population of spruce trees. Furthermore, insects, including beetles, can carry the spores on their bodies.
Mature spruce trees are prone to contracting Cytospora Canker disease, especially when stressed due to drought or poor care. When a tree lacks sufficient water or proper tree care, that tree becomes more vulnerable to fungal infection. The fungus exploits the tree’s weakened state, resulting in development of Cytospora Cankers.
Cedar Rust Disease
Cedar Rust Disease is an evergreen tree disease and fungal infection that affects various plants, including cedar trees, junipers, and apple trees.
Symptoms of Cedar Rust Disease
Spores: Powdery red or orange spores on the leaves give the infected tree a distinct “rusty” appearance. The spores may appear as small, raised bumps on the leaf surface, often forming in circular patterns.
Wilting: Infected leaves may turn yellow or brown and become dry and lifeless before dropping from the tree, which can lead to a noticeable thinning of foliage.
Cankers/Witch’s Brooms: Cankers are sunken or swollen areas on the bark, often accompanied by cracked or discolored wood. “Witch’s brooms” are dense clusters of twigs and branches that form in abnormal shapes resembling a broom.
Causes of Cedar Rust Disease
Cedar rust disease is caused by a rust fungus that thrives in humid and rainy climates. The disease mainly affects evergreen trees and spreads due to environmental factors such as leaf moisture. The moisture provides the ideal environment for the rust fungus to grow and spread.
Fungi belonging to the Gymnosporangium family play a crucial role in developing and transmitting cedar rust disease. The fungus generates spores that can travel long distances through the air, are carried by wind currents, and can easily infect nearby evergreen trees. After landing on susceptible trees, spores penetrate leaves and form orange or rust-colored lesions as visible indicators of infection.
Diplodia Blight
Diplodia Blight is a common fungal disease that affects various types of trees, including pines, spruces, and firs. Caused by the fungus Diplodia pinea, this blight can devastate these trees’ overall health and appearance.
Symptoms of Diplodia Blight
Stunted needles: Infected trees often exhibit wilted and discolored foliage, which can be easily noticeable. Young needles may turn a tan color but remain attached to the tree.
Pycnidia: Small, black fruiting structures often found on infected needles, stems, or branches are responsible for spreading the disease by releasing spores.
Infected branches: Widespread infection can lead to significant tree decline if not treated promptly.
Cankers: Resinous cankers may form on the tree, creating recessed areas that exude resin. These cankers are visible evidence of the disease’s progression and can cause further damage to the affected tree.
Causes of Diplodia Blight
As noted above, Diplodia Blight is a fungal disease caused by Diplodia pinea, an opportunistic pathogen. This pathogen can infect trees through various means and cause significant damage if not appropriately managed. Species such as pines, spruces, and Douglas firs are highly susceptible to this disease, providing an ideal environment for the fungus to establish and spread rapidly.
Environmental conditions are a crucial factor in the rise of infection rates. Diplodia Blight thrives in warm and humid climates, especially during extended periods of rainfall. Moisture accumulating on tree bark creates an ideal environment for the fungus to grow and invade the tissues, ultimately resulting in an infection.
Additionally, wounds or injuries to tree branches and trunks serve as entry points for Diplodia pinea. Mechanical damage caused by improper pruning or accidental injuries can allow the fungal pathogen to invade the tree’s defenses and initiate infection.
Diplodia Blight is more likely to occur in already stressed or weakened trees. Other factors, such as drought, nutrient deficiencies, or insect damage, can make the trees more susceptible to this fungal disease. When the tree’s ability to resist the pathogen is compromised, the likelihood of infection increases.
Call Burkholder PHC to Protect Your Evergreen Trees
Are your evergreen trees looking less than healthy? Burkholder PHC is here to help. Our team of certified arborists and plant specialists is well-versed in identifying and treating evergreen tree diseases, staying up-to-date with the latest research, and utilizing the most effective treatment methods. Get a free tree care consultation from Burkholder PHC today.
Blog is originally published at: https://www.burkholderphc.com/symptoms-causes-of-evergreen-tree-diseases/
It is republished with the permission from the author.
0 notes
Text
North Pole Arbovitae
North Pole arborvitae, a hardy and low-maintenance evergreen tree, is a versatile addition to any landscape. To ensure its flourishing, follow these key care recommendations:
1. Selecting the Perfect Spot
Choose a location with abundant sunlight or partial shade and well-draining soil. A hole should be dug twice as wide as the root ball and equally deep. Place the tree in the hole, backfill with soil, gently tamp it down to eliminate air pockets, and thoroughly water. Mulch around the base with a 2-inch layer of bark chips or wood chips for moisture retention.
2. Watering Requirements
While established North Pole arborvitae is remarkably drought-tolerant, consistent watering is vital, especially during the first year after planting. Water deeply once a week, or more frequently in hot, dry weather to maintain optimal moisture levels.
3. Fertilization Practices
Fertilizing North Pole arborvitae need not be frequent. However, applying a balanced fertilizer in the spring is beneficial. Ensure you adhere to the directions on the fertilizer label for best results.
4. Vigilant Pest and Disease Monitoring
While North Pole arborvitae is generally resistant to pests and diseases, regular inspections are crucial. Keep an eye out for any signs of trouble, and if you detect pests or diseases, reach out to a local arborist for professional assistance.
5. Pruning Maintenance
Pruning can be performed during the spring or summer to keep your North Pole arborvitae in great shape. Remove any dead, diseased, or damaged branches, and consider trimming the tree to maintain its desired shape and size. These practices will help your tree remain healthy and aesthetically pleasing.
1 note
·
View note
Text
Discover the Fascinating World of Eucalyptus
Discover the Fascinating World of Eucalyptus-Origins, Characteristics, and Medicinal Benefits
Explore the diverse genus of Eucalyptus plants, which includes over 700 species native to Australia and other regions. Learn about their evergreen nature, leaf shedding, and unique crown shape, as well as their medicinal and economic significance. Find out more here!
Eucalyptus is the collective name for plants of the genus Eucalyptus in the Myrtle family, which probably originated in the late Cretaceous period. Of the more than 700 known species of eucalyptus, most are native to the Australian mainland, with a smaller number growing in the neighboring islands of New Guinea, Indonesia, and the Philippines. It was introduced to the world in the 19th century, and by 2012, it was cultivated in 96 countries or regions. Evergreen plants, a year with periodic old leaf shedding phenomenon, most varieties are tall trees, a few are small trees, shrubby few. The crown shape has spire shape, multi branches and hanging branches and so on. Leaves simple, entire, leathery, sometimes covered with a thin waxy coating. Leaves can be divided into juvenile, intermediate, and mature leaves, with most species having opposite, smaller, heart-shaped, or broadly lanceolate leaves.
They are of medicinal and economic value.
Main value
Economy
China has successfully developed the manufacturing technology of high performance eucalyptus recombination wood, eucalyptus veneer laminated wood, bamboo eucalyptus composite material, thick core eucalyptus solid wood composite board and aldehyde-free eucalyptus plywood, etc. The comprehensive utilization rate of eucalyptus can be increased to more than 90%. Eucalyptus not only brings value to industry, but also brings economic benefits to other industries.
Paper and pulp
Eucalyptus papermaking has been going on since the early 20th century. The average length of eucalyptus fibers is 0.75 to 1.30 mm. Its color, density and extract ratio are suitable for pulping. There are also many large paper mills that use eucalyptus to make kraft paper and printer paper. The cellulose in eucalyptus wood can be made into dissolved wood pulp and then processed into rayon with considerable success.
Oil refining
Eucalyptus varieties are blue, straight rod, Smith, large leaf, small leaf, red leaf, etc. Among them, blue eucalyptus and straight eucalyptus are the main varieties used to extract eucalyptus oil. Eucalyptus oil contains ebulliol, which is colorless or light yellow liquid. It has pungent and cool fragrance. It is mainly used in toothpaste,mouthwash, food and medicine, etc. Eucalyptus globulus and Eucalyptus verticale have excellent species, and the best quality is to extract eucalyptus oil from its branches and leaves.
Gold content
Australian scientists have used X-rays to find trace amounts of gold in the leaves of eucalyptus trees, in what is believed to be the first time humans have found naturally occurring gold in a living organism.The scientists found that eucalyptus and acacia trees in western and southern Australia have deep and extensive root systems. During periods of drought, their roots dig deep into the ground in search of water, some reaching gold veins and sucking up tiny bits of gold. The roots then dilute the gold and transmit it to the tree's venation system, where large amounts of gold accumulate at the tips of the leaves and can form larger crystals.
The scientists further point out that gold is toxic to plants, so it is transported to the ends of plants, such as leaves, where damaging biochemical reactions are reduced.
What's more, the amount of gold in the leaves is so small that the leaves of 500 eucalyptus trees growing in the gold mining region might contain enough gold to make a wedding ring, so the discovery won't be a fortune for gold seekers, the researchers said. However, the scientists noted that the discovery could help explore for gold in a more environmentally friendly and inexpensive way.
Eat
The roots of eucalyptus trees can be eaten or taken for water. There are also places that use eucalyptus for fuel. There are many eucalyptus leaves that can be used as fodder.
Medicine
Eucalyptus oil can be produced by water distillation with fresh leaves of eucalyptus (oil yield 0.5-1.8%). Eucalyptus mainly contains eucalyptus oil (65-75%). Terpene, isoamyl oil, carvidone, humenthone, piperone and other components. It can also be used as medicinal raw materials for oral cavity, rhinitis, expectorant, cooling oil, wind drive ointment and so on.
Click here for more details about eucalyptus 👇
123Pcs Mixed Real Dried Eucalyptus Stems Lavender & Rose Flowers 100% Natural
Hi!~ This is Molly Flora!
Welcome to Molly Garden
An Expert of Preserved Flowers, Dried Flowers, Artificial Flowers
www.mollygarden.com
0 notes
Text
Mastering Azalea Root Systems: Planting & Care Tips

Did you know that azalea, those stunning flowering shrubs, have a root system that plays a crucial role in their overall health and growth? Azaleas belong to the Rhododendron genus, and understanding the characteristics of their roots can help ensure proper care and maintenance. The root system of azaleas is known for being shallow, with short roots spreading out across the ground.
This unique feature allows them to thrive in various soil conditions and establish a strong foundation. However, it's important to note that azalea roots can also be invasive if not managed properly. By familiarizing ourselves with the intricacies of azalea root growth and the root zone, we can provide these beautiful plants with the support they need for optimal development and blooms. So let's delve into the fascinating world beneath an azalea bush and explore its remarkable root system, from planting hole to seed.
Deciduous azaleas have roots that serve the dual purpose of anchoring the plant and absorbing nutrients and water. To effectively nurture these enchanting flora, it is important to understand the function of these roots. Let's take a closer look at this often-overlooked aspect of planting deciduous azaleas.
Are Azalea Roots Invasive?
Deciduous azalea shrubs have roots that are generally not considered invasive, but they can spread if not properly contained. Proper pruning and regular maintenance can prevent the vegetative propagation of deciduous azaleas. It is important to choose suitable planting locations for landscaping to avoid potential issues with spreading roots.
-
Evergreen azaleas, a type of shrub, have short roots that spread horizontally. This shallow root system allows the azalea to bloom beautiful flowers.
-
The spreading nature of their roots allows evergreen azaleas to absorb nutrients efficiently from the ground. With the help of mulch, these flowers bloom beautifully.
-
While deciduous azalea roots may extend beyond the immediate planting area, they typically do not cause significant damage or invade nearby structures. These beautiful flowers are best planted in well-drained ground and benefit from a layer of mulch to retain moisture.
-
Regularly pruning the outermost branches of evergreen azaleas helps control the growth of their root system, ensuring that the shallow roots do not become too extensive and maintaining a healthy balance between short and deep roots. This promotes a strong and well-developed rootball for the azaleas.
-
By removing dead or damaged branches, you can promote healthy root development in both shallow roots and deep roots of the deciduous azalea, and prevent excessive spreading of the rootball.
-
Trimming back the rootball of an azalea plant can help contain its growth and ensure healthy bloom.
-
When selecting a location for planting evergreen azaleas, consider areas with sufficient space for their deep root system to expand without causing issues. Make sure to choose a spot where the azaleas can bloom and thrive, away from any bushes or stumps that may hinder their growth.
-
Avoid planting deep azalea bushes too close to buildings, sidewalks, or other structures where their stump roots may potentially cause damage over time. Ensure there is enough space for the azalea bush to bloom without causing any harm.
-
Providing adequate spacing between individual plants, such as a deep azalea bush, helps minimize competition among their root systems. This spacing should be several inches apart to ensure each plant has enough room to grow. Additionally, when planting, it is important to remove any existing stumps to prevent interference with the new plants.
Do Azaleas Have Deep Roots?
Azaleas, including deciduous azaleas, are known for their shallow root systems. These plant roots typically extend just below the soil surface rather than delving deep into the ground. As a result, azaleas are more susceptible to drought stress and require adequate watering during dry periods to prevent damage to the plant.
To promote healthy root development in azaleas, it is crucial to plant them deep in the bush. This ensures that excess water does not accumulate around the shallow roots or stump, which could lead to root rot or other issues. By providing proper drainage, you can help maintain the overall health of your azalea plants.
Best Time to Dig Up Azalea Bushes:
-
The best time to dig up azalea bushes is during their dormant season, which is usually late fall or early spring. This is because azaleas have a shallow root system, and it's important to carefully dig around the root zone to preserve the plant's health. When transplanting, be sure to keep the root ball intact to minimize stress on the plant.
During the dormant season, azalea bushes with their shallow root system and invasive root system are not actively growing. This makes it an ideal time to transplant them without causing excessive stress to the root zone and root ball.
-
Transplanting during these periods minimizes stress on the plant and increases the chances of successful establishment, especially when dealing with plants that have invasive root systems. It is important to carefully handle the root ball to ensure a smooth transition for the plant. Additionally, removing any remaining stumps or bushes from the area can help prevent competition for resources.
By transplanting azaleas when they are dormant, you reduce the risk of shock and damage to their root system. This allows them to recover more easily and establish themselves in their new location. When transplanting, make sure to dig a hole wide enough to accommodate the stump and deep enough to cover the entire root system. The hole should be at least 12 inches wider than the stump and 6 inches deeper than the length of the roots.
-
Avoid transplanting azaleas during the hot summer months when they are actively growing to prevent damage to their invasive root system. It is important to carefully dig up the root ball and remove any stumps before replanting them. Make sure to leave a few inches of space around the root ball when replanting azaleas.
Transplanting azalea bushes with their root ball intact during the hot summer months can be detrimental. The stress caused by digging up and moving the stump can result in wilting, leaf burn, and even death.
So remember, if you want to dig up your azalea bushes and remove the stump, do it during their dormant season – late fall or early spring – for a higher chance of success. Avoid the hot summer months when they are actively growing to prevent unnecessary stress on the plants' delicate root system. By following these guidelines, you'll give your azaleas the best opportunity to thrive in their new home without any stump remaining.
Transplanting Azaleas without Damage: Tips and Techniques
-
Before transplanting, water the azalea thoroughly to ensure the root ball has enough moisture for the process.
To successfully transplant azaleas without causing damage, it is crucial to prepare the plant beforehand. Begin by thoroughly watering the azalea, ensuring that it has sufficient moisture for the transplantation process. This step will help keep the roots hydrated and minimize stress during the transition.
-
Use a sharp spade or shovel to carefully dig around the azalea plant root ball, maintaining as much of its integrity as possible.
Employing the right tools and techniques is essential. Utilize a sharp spade or shovel to gently excavate around the root ball of the azalea. Take care not to disturb or damage too many roots in this process. The goal is to maintain as much of its root system's integrity as possible, ensuring a successful transplant.
-
After transplanting, provide ample water and shade for a few weeks until the plant adjusts to its new location. This will help the root ball of the azalea root settle in properly.
Once you have successfully transplanted your azalea, it is crucial to provide proper care during its adjustment period. Make sure to water the newly transplanted azalea generously to establish healthy growth in its new location. Providing some shade can help protect it from excessive sunlight while it acclimates. Remember that these initial weeks are critical for allowing your azalea to settle into its new environment comfortably.
By following these simple tips when transplanting your azaleas, you can ensure minimal damage and promote their successful growth in their new surroundings.
Troubleshooting Azalea Leaf Issues: Browning, Yellowing, and More
Browning leaves on azaleas may indicate fungal diseases such as leaf spots or root rot. These conditions can be caused by excessive moisture in the soil or poor drainage. To address this issue, consider planting the azaleas in well-drained soil and ensuring proper water management.
-
Inspect the leaves: Look for brown spots or lesions on the leaves. If you notice any, it could be a sign of a fungal infection.
-
Improve soil drainage: Ensure that the soil is well-draining to prevent waterlogged conditions that promote fungal growth.
-
Apply fungicide: Treat affected azaleas with a suitable fungicide to control and prevent further spread of the disease.
Yellowing leaves on an azalea plant can indicate nutrient deficiencies, overwatering, or improper pH levels in the soil. Here are some steps to take.
-
Check soil pH: Test the pH level of your azalea's soil. Ideally, it should be slightly acidic (around 5.0 to 6.0) for optimal growth.
-
Adjust pH if necessary: If the pH is too high (alkaline), amend the soil with sulfur or other acidifying agents to lower it.
-
Provide proper nutrition: Ensure your azaleas receive adequate nutrients by fertilizing them regularly with a balanced fertilizer formulated for acid-loving plants.
Regular inspection and prompt action can help prevent and treat common leaf issues in azaleas. Consider these tips to ensure the health and vitality of your azalea plant.
-
Monitor for pests: Keep an eye out for lace bugs, which commonly infest azaleas and cause damage to foliage. Use appropriate insecticides if needed.
-
Prune dead branches: Remove any dead or diseased branches promptly to prevent the further spread of diseases and encourage new growth.
-
Maintain proper moisture levels: Avoid overwatering or allowing the soil to become too dry. Monitor soil moisture regularly and adjust watering accordingly.
-
Provide adequate shade: Azaleas prefer partial shade, so ensure they are not exposed to excessive sunlight, which can stress the plants.
By following these troubleshooting steps and staying vigilant, you can address leaf issues in your azaleas and promote healthy growth and vibrant blooms. Remember to regularly inspect your plants, provide proper care, and take action at the first sign of problems.
Potting and Repotting Azaleas: Can They Be Potted in Terracotta?
Azaleas can indeed be potted in terracotta containers, as they are a great plant option. However, it's important to keep a close eye on moisture levels. Terracotta pots offer the advantage of better airflow to the roots of the plant, but they can also dry out more quickly compared to other materials.
When potting azaleas in terracotta, consider these factors:
-
Moisture Monitoring: Due to the porous nature of terracotta, it is crucial to monitor the moisture levels regularly. This will help ensure that the roots do not become excessively dry or waterlogged.
-
Texture Matters: To enhance drainage and prevent waterlogging, incorporate well-draining materials into the potting mix. Adding sand or wood chips can improve texture and promote healthy root growth.
-
Choosing the Right Container: When repotting azaleas, opt for a slightly larger container than their current one. This allows room for future growth while preventing overcrowding of the root system.
While there are considerations when using terracotta pots for azaleas, the plant benefits from their increased airflow. This helps prevent root rot and encourages robust plant growth. Just remember to provide adequate watering and maintain a watchful eye on moisture levels for the plant.
By following these guidelines, you can successfully pot or repot your azaleas in attractive terracotta containers while ensuring their well-being and vibrant appearance. The process of planting or repotting your azaleas is crucial for their overall health and visual appeal. Choosing the right terracotta containers to house your azaleas is essential, as it provides a suitable environment for their growth. Additionally, proper potting techniques will help maintain the plant's vitality and vibrant appearance. So, be sure to follow these guidelines to ensure the successful planting or repotting of your azaleas in beautiful terracotta containers
Conclusion
In conclusion, azaleas are known for their shallow and fibrous root systems. This makes them susceptible to becoming potbound, which can hinder their growth and development. To ensure successful transplantation, it is important to loosen the roots before moving the azalea bushes.
By addressing common concerns such as invasive roots and the depth of the root system, we have provided valuable insights into the nature of azalea roots. We have discussed the best time to dig up azalea bushes and shared tips and techniques for transplanting them without causing damage.
Furthermore, we have explored troubleshooting techniques for various plant leaf issues that azaleas may face, including browning and yellowing. We have also addressed the question of whether azaleas can be potted in terracotta plant pots.
To summarize, if you are planning to transplant your azaleas or address any leaf issues they may be experiencing, it is crucial to understand how to properly handle their root systems. By following our recommendations on loosening potbound roots and implementing appropriate care techniques, you can ensure the health and vitality of your azaleas.
Remember to consult local plant gardening experts or professionals for specific guidance tailored to your region's climate and soil conditions. With proper care and attention, your azaleas plant will thrive in its new environment.
FAQs
Are azalea roots invasive?
Azalea roots are not considered invasive as they tend to grow close to the surface rather than spreading deep underground.
How deep do azalea roots go?
Azalea roots typically stay within the top 12 inches (30 cm) of soil but can spread wider than their height.
When is the best time to dig up Azalea bushes?
The best time to dig up azalea bushes is during late fall or early spring when they are dormant.
How can I transplant my azaleas without causing damage?
To transplant your azaleas without causing damage, it is essential to dig a wide hole around the root ball and handle the plant gently during the process.
Can azaleas be potted in terracotta?
Yes, azaleas can be potted in terracotta pots. However, it is important to ensure proper drainage by using a pot with drainage holes and employing well-draining soil.
Read the full article
0 notes
Text
Forests Forever?
Over the past several years we have joined the many voices sounding the alarm about the health of California forests. We have included a number of articles on this website regarding California's ailing forests. About ten years ago while walking the PCT between Cottonwood Pass south to Walker Pass, the number of unhealthy trees was difficult to ignore. And since then, persistent drought and incursion of pests have made things worse. Erik Vance's piece also includes another factor in the deterioration of forest health . . . over-crowding and the resulting competition for water/nutrients/sunlight.
Vance also notes that the casualties are not equally distributed between tree species with the red fir being particularly at risk.
By Erik Vance
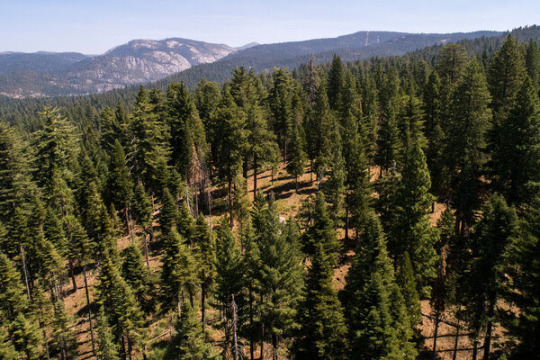
California’s iconic mountain forests are in serious trouble, according to a series of recent studies. The latest — an aerial survey of the state’s most forested regions — shows that a combination of drought and insect damage wiped out a startling 36 million trees between 2021 and 2022.
“These last three years have been the hardest, driest three years on record in California,” said Jeffrey Moore, a forester with the U.S. Forest Service and the lead researcher on the survey, which was conducted from July to October. “When you get talking about multiyear exceptional drought, I mean, it’s rough on everything.”
The death toll wasn’t the highest we’ve seen in recent years, but it was troubling because of the type of trees that died and where they were. There are perhaps 40 species of native evergreen species in California, but more than three-quarters of the dead trees detected last year came from one family: firs.
These Christmas-tree-looking conifers are found mostly at higher elevations where there’s more snow. Half of the dead trees in the study were red firs, a crucial alpine tree in places like the Lake Tahoe area, which had avoided the worst effects of the drought until now.
Likewise, the Douglas fir had resisted the drought by using its deep roots to pull up water. But last year saw a shocking 16 times more dead Douglas firs than the previous one. In other words, the trees that should be the most able to survive the drought are now dying in large numbers.
“Doug fir is probably one of the most resilient species in the Sierra Nevada,” said Scott Stephens, a forestry professor at the University of California, Berkeley. “It is the last species that actually has not been really significantly impacted.”
Losing so many mature, drought-resistant trees can be devastating to delicate mountain ecosystems, and it indicates that the forests of the Sierra cannot withstand many more dry winters. And, of course, all of those dead trees may become a fire hazard. A study from last July showed California had lost an area of forest land nearly the size of Delaware since 1985, largely from wildfires.
What’s causing this die off? In effect, it’s a one-two-three punch, Stephens said. First, over the last 100 years, California forests have gotten more crowded, thanks to policies like fire suppression. He and several colleagues recently showed that 60 percent of lower pine forests in the Sierras are so crowded, the trees are essentially choking one another for water and nutrients.
Then came drought. The already thirsty trees reached a breaking point and many started to die. Lastly, pests like the fir engraver beetle arrived and made a meal out of the already desperate trees.
Stephens said California needed to begin managing its forests preemptively to withstand drought. The best way to do this, he said, is selectively thinning out smaller trees and clearing dead ones before they become a fire risk.
It’s not all bad news though. For one thing, about a third of the dead trees from the U.S. Forest Service survey were white firs, which are the forest version of garden weeds. They grow fast and push out trees like red firs that create a healthier ecosystem. With them gone, it’s possible other species might have a better chance.
Also, there has been a lot of snow this winter in the Sierras, which means the remaining trees will soon be healthier and better able to fight off pests. But Moore said he’s ready for at least one more bad year, since many of the trees that died last summer, including oaks in the lower elevations, weren’t spotted by the last aerial survey, because they hadn’t turned brown yet.
Stephens said: “We’re quite fortunate this year that we were able to recharge the soils. We’ll have to watch, but it’s certainly better than being another drought year.”
1 note
·
View note
Text
Add a Green Bush With Pink Tips to Your Garden
Whether you want to create a new bed or replant one that you already have, a green bush with pink tips can add a touch of class to any garden. There are many different varieties, so you should be able to find one that will thrive in your garden.
Snapdragons
Whether you're planting snapdragons in your garden or trying to grow them from seed, the plant needs proper care. They're known for their unique blooms and colorful patterns. They are also drought-tolerant, making them ideal for many situations.
In order to get the most out of your snapdragons, make sure you're combining proper pruning techniques with proper spacing. More Info can do this by pinching back the plants before they reach four inches tall. This will help them grow bushier and produce more stems for a second flush of blooms in the fall.
You can also use mulch to keep the soil moist and promote growth. In addition, use a rain gauge to keep track of watering.
Petunias
Having a green bush with pink tips in your garden can bring a little color to your yard. This shrub can thrive in many different conditions, from the sun to the cold. They add structure to your garden and cover ground, too. Some varieties are evergreen, while others are perennial. They come in a variety of colors and sizes, too.
The Butterfly bush is a common herbaceous shrub found in many temperate gardens. The plant has long, inflorescent, bright pink blooms, which last for up to 11 months. The shrub grows between 2 and 3 feet tall and can be 60 to 90 cm wide.
Bougainvillea
Depending on the type of Bougainvillea, you can grow it as a ground cover, as a trellis, or even as a bonsai. This plant is hardy and drought-tolerant, and it grows well in a wide range of soil types.
These plants are mainly native to South and Central America. They are part of the Nyctaginaceae family, also known as the four o'clock family. There are three primary species of bougainvillea.
The spectabilis variety is known as "great bougainvillea." It can withstand temperatures as low as 20 degrees F. Its flowering cycle lasts for months, and the foliage continues to remain on the plant during the winter.
Daphne
Whether it's a garden, patio, or walkway, Daphne is a great plant to use for accent. It produces bright, fragrant blooms. It is also an excellent addition to a mixed shrub border.
There are many different types of Daphne plants. The most popular are the white varieties. They grow up to five feet tall and are perfect for adding a little extra color to your landscape.
Daphne is a very sensitive plant and should be planted in an area that is well drained and protected from freezing winds. Some of the smaller shrub species are used as rock garden plants.
A common variety is Variegata. This plant produces white flowers that are very fragrant. It can take up to ten years to reach full maturity.
Stargazer lilies
Whether you're planting a lily flower bed or an indoor container, the Stargazer lily is a beautiful addition to your garden. This popular lily is a member of the Oriental Hybrid lily family and comes in three different colors. The White Stargazer is a pure white lily, the Golden Stargazer is medium to deep golden yellow, and the Crimson cultivar is a popular hybrid.
The Stargazer lily has a robust stem system that is resistant to most pests. However, there are four big pests that can damage your stargazer flowers: aphids, deer, small mammals, and botrytis. These pests eat the buds and leaves on the plant. To prevent them, use a preventative spray.
Weigela 'Spilled Wine'
'Spilled Wine' is a PROVEN WINNERS ColorChoice Flowering Shrubs variety. This is a very long-blooming and low maintenance plant that has an elegant and stylish appearance. It can be used to form a group of shrubs or as a standalone specimen. This shrub is very cold hardy, drought tolerant, and adaptable to almost any soil type.
The Spilled Wine has a spreading habit. In the spring it displays hot pink and magenta trumpet-shaped blooms that will entice hummingbirds and butterflies. Its foliage resembles a deep red wine. It is a low-maintenance shrub that grows well in containers.
It has a relatively small root system, so it can be planted in a shallow hole. The proper spacing will ensure the health of the roots. In the early spring it should be fertilized with a slow release fertilizer. It will also require moderate watering and a bit of mulch on the underside of the plant.
0 notes
Text
Planting a Eucalyptus Tree Close to its Type
Eucalyptus Tree Care
If you're planning to plant a Eucalyptus, there are a few things you should know. Eucalyptus trees don't like to be disturbed, so they'll grow better if they are planted in a spot that's not too crowded. It also helps if the area is well-drained.
Starting with a Hole
To make sure your eucalyptus is properly planted, start with a hole that's at least as big as the pot you're planning to use. Then, fill it with a soil mixture. Be sure to add about three to four inches of pine straw to the bottom of the hole. You can also add a layer of mulch.
pH Level of the Soil
Once the tree has been planted, it's a good idea to check the pH of the soil. You can use a soil pH tester probe to find out how acidic the soil is. If it's too acidic, consider adding organic compost to the soil.
What you Should Avoid
Eucalyptus trees prefer moist, well-drained soil. In addition, you should avoid overwatering. If you do, the roots can be damaged.
Companion Plants
Eucalyptus trees are extremely decorative. They come in a wide range of species. Some grow to over 200 feet tall and produce stately evergreen foliage. Many people choose to plant them as companion plants.
Vulnerable to Drought and Heat
However, when planting a eucalyptus, be sure to choose a spot that gets plenty of sun heat. This is especially important if you're growing it in a container. Houseplants are vulnerable to drought and heat, so make sure you water regularly during hot periods.
https://www.trucoservices.com/post/lawn-care
Best Tree Professionals
TruCo is a team of professional irrigation technicians, landscapers, licensed fertilizer applicators, certified arborists, and top-notch management staff who deliver quality services that you'll be proud to showcase at your home or business.
Truco Services, Inc.
4640 Commerce Drive
Murray, UT 84107
(801) 466-8044
https://posts.gle/KGXFPv
Disclaimer: This is not professional advice and is simply an answer to a question and that if professional advice is sought, contact a licensed practitioner, or professional in the appropriate administration.
0 notes
Text
Planting Yaupons for a Thriving Garden:

Title: Cultivating Yaupon Holly: A Guide to Thriving Gardens
Introduction:
In the world of gardening, few plants offer the versatility, resilience, and beauty of the Yaupon Holly (Ilex vomitoria). Native to North America, this evergreen shrub has long been cherished for its ornamental value, wildlife benefits, and cultural significance. Whether you’re a seasoned gardener or a novice enthusiast, incorporating Yaupon Holly into your garden can elevate its appeal while supporting local ecosystems. In this article, we’ll explore the benefits of cultivating Yaupon Holly and provide practical tips for ensuring its thriving growth.
Understanding Yaupon Holly:
Yaupon Holly is a hardy evergreen shrub belonging to the holly family, featuring glossy, leathery leaves and small, bright red berries. It typically grows in a dense, upright form, making it ideal for hedges, screens, or as a standalone specimen. One of its most notable traits is its adaptability to various soil types and environmental conditions, thriving in both full sun and partial shade.
Environmental Benefits:
Beyond its aesthetic appeal, Yaupon Holly offers numerous environmental advantages. Its dense foliage provides excellent cover and nesting sites for birds, while the berries serve as a vital food source, especially during the winter months when other resources are scarce. Additionally, Yaupon Holly is highly drought-tolerant once established, making it an eco-friendly choice for water-conscious gardeners.
Cultural Significance:
Yaupon Holly holds significant cultural importance, particularly among indigenous communities in the southeastern United States. Traditionally, Native American tribes used its leaves to brew a caffeinated beverage known as "black drink" for ceremonial purposes. Today, Yaupon tea has experienced a revival as a flavorful and caffeine-rich alternative to traditional teas, adding another dimension to its cultural relevance.
Planting and Care Tips:
Location: Choose a site with well-drained soil and adequate sunlight. While Yaupon Holly can tolerate a range of soil types, it prefers slightly acidic to neutral pH levels.
Planting: Dig a hole slightly larger than the root ball and position the plant at the same depth as it was in the nursery container. Backfill the hole with soil and water thoroughly to settle the roots.
Watering: Water newly planted Yaupon Hollies regularly during the first growing season to establish a strong root system. Once established, they require minimal watering, relying on natural rainfall.
Pruning: Prune Yaupon Holly in late winter or early spring to maintain its desired shape and size. Remove any dead, damaged, or crossing branches to promote healthy growth.
Fertilization: Apply a balanced fertilizer in early spring to encourage vigorous growth and lush foliage. Avoid excessive fertilization, as Yaupon Holly is relatively low-maintenance.
Design Ideas:
Hedge: Create a classic, formal hedge by planting Yaupon Hollies in a row, spaced according to their mature width. Regular pruning will help maintain a neat appearance.
Wildlife Garden: Incorporate Yaupon Hollies into a wildlife-friendly garden to attract birds and other wildlife species. Combine them with native grasses, wildflowers, and bird feeders to enhance biodiversity.
Container Planting: Showcase Yaupon Hollies in decorative containers on patios, balconies, or entryways for year-round greenery and seasonal interest.
Conclusion:
From its aesthetic appeal to its environmental benefits and cultural significance, Yaupon Holly stands out as a valuable addition to any garden landscape. By understanding its needs and following proper planting and care practices, you can enjoy the beauty and resilience of this versatile shrub for years to come. Whether you’re seeking to attract wildlife, create privacy, or simply enhance your outdoor space, consider planting Yaupon Holly for a thriving and sustainable garden.
0 notes
Photo

Delicious Blueberry Huge mix blend of Seeds, Organic Fruit, Ornamental, Superfood, Antioxidant B25 Nothing Tastes Better Than Fresh Blueberries Picked From Your Own Garden! Blueberry mixed seeds. Evergreen shrub, fruit is a berry blue/black waxy appearance. A high tolerance to high summer temps. Drought tolerance delivers superior fruit quality. Also grown as ornamental
Early yields
Large berries of excellent quality May bloom in fall in warm climates Great fall ornamental Easy to grow Requires little care Pests and disease resistant High in Anthocyanins and antioxidants
Tips & Fun Facts for Caring for Blueberry Plants 1. Blueberries love Acidic Soil! 2. They Need to Be Pruned. 3. Select an elevated site, such as a hill. If one does not exist, plant blueberries in a raised bed. 4. Make sure your planting location has good drainage. 5. Test the soil before planting. Blueberries like acidic soil with a pH range between 4.8 to 5.2. 6. Space plants six feet apart. 7. Plant at least two varieties for cross-pollination. 8. Water the plant after planting and top the soil surrounding the plant with sawdust mulch. 9. Remove all flower buds at the time of planting to encourage strong root development. 10. Weed early in the spring, before harvest season begins. 11. Keep a 2 to 3-foot weed-free circle surrounding each blueberry bush. This has been proven to increase the yield of berries produced. 12. Young blueberry plants can easily be damaged by weed-eaters. To protect tender plants, place a thick tree protector around the base of each plant. With a little care, an established blueberry plant will produce berries for 20 to 30 years before needing to be replaced.
Did You Know? They require full sun, well-drained soil, and a low pH between 4.5 and 5.5 Grow varieties that are suited to your climate. Plant several varieties to ensure proper pollination and a plentiful bounty of fruit. To extend the harvest season, plant different types that produce fruit in early, mid and late summer. The fruit is very high in antioxidants. They are also high in vitamin C and a good source of vitamin E. They are one of the only natural foods that are actually blue in color. Store fresh crops in an open container to reduce condensation, and keep in the refrigerator. Do not wash freshly picked crop until just before serving. Freeze fresh blueberries! Place unwashed ones in a single layer on a sheet tray, and place in the freezer. Store frozen berries in a plastic storage bag. Native Americans called them "star berries" because the shape of the flower resembles a star shape.
This Blueberry blend has delicious fruits, outstanding flavors, beautiful spring flowers, and brilliant fall colors in a range of sizes and ripening dates. They are wonderful eaten fresh and are perfect for freezing.
Start the blueberry season off with large, high-quality, flavorful berries. Blueberry Plant is one of the earliest ripening southern highbush varieties. The large berries are of excellent quality and are tops for fresh eating as well as baked into pies or other desserts. This plant will often start blooming in the fall in the southern half of zone 8 and into zone 9, and continues blooming during warm periods until normal bloom time. The main crop ripens in late April to May. The plants grow 6 ft. tall and, while self-pollinating, produce larger yields when other blueberry plants are planted for cross-pollination. Zones 7-9.
The blend may contain some of these varieties depending on the season, and availability. We can not guarantee all varieties since they are mixed and randomly packed. Varieties: [northern highbush (Vaccinium corymbosum), lowbush species (V. angustifolium), V. virgatum] Northern And Southern Highbush, midnight cascade, chippewa, mini blues, native blue, northcountry, top hat, burgundy, notyhsky, velvetleaf, aurora, bluecrop, baby blues, blueray, bluejay, brigita, chandler, cabernet splash, darrow, draper, Brigitta, Duke, Gulf Coast, Jersey, Sunshine Blue, earliblue, elliott, hannah's choice, liberty, patriot, pink icing, pink popcorn, razz, rubel, spartan, superior, sweetheart, toro, emerald, jewel, jubilee, legacy, misty, nocturne, norman, ochlockonee rabbit-eye, o'neal, pink lemonade, sunshine blue, and much more.
Growing Blueberries from seeds ------------------------------- Beginning with the most challenging option, you can grow blueberries from seed, but it will obviously take longer to produce your first harvest than it would if you started with established plants.
Seeds can be purchased or you can extract them from the berries. Keep in mind that seeds from hybrid plants won’t grow true to the parent.
To extract seeds, place a cup of blueberries in a blender with four cups of water. Run it on high for 15 seconds and then let the mixture sit for 10 minutes.
Eventually, the pulp will rise to the top and the seeds will sink to the bottom.
Pour out the pulp, add more water to replace what you poured out, and set it aside for another five minutes. Repeat until you get clear water with blueberry seeds at the bottom.
A few months before the last frost date in your area, sprinkle your seeds over a container filled with moistened peat moss.
Place a thin layer of peat on top to cover. Cover the tray with a piece of plastic or a humidity dome to keep the moisture in. Keep the seeds around 60-70°F.
Now comes the waiting game. Every time I’ve done this I’m pretty sure my seeds are duds and I get ready to toss the whole thing out, only to see the little green seedlings stick their heads out of the peat.
That’s because it can take a month or two – or sometimes three! – for seeds to germinate. And I’m impatient.
Once seedlings are about three inches tall, remove them from the peat and put each one in a six-inch pot filled with equal parts peat, sand, and potting soil.
Keep the medium moist but not wet, and put the seedlings in a spot where they receive about six hours of sun a day.
A close up horizontal image of Vaccinium shrubs growing in nursery pots ready to transplant into the garden. Once the danger of frost has passed, you can put the plants in the ground outside, but be sure to harden them off for a week before transplanting them to their permanent home.
Harden off seedlings by placing them outside in a sheltered spot with indirect light for one hour, and then bring it back indoors. Repeat this, adding an hour each day for a week, until they can spend the full day outside.
Because the seeds need such carefully controlled conditions, direct sowing in the garden isn’t recommended.
Planting the Bushes ------------------------------- The ideal time to plant blueberries is when the plant is dormant, before fruit appears. They may be planted in either the fall or spring. It generally takes three to five years for a blueberry plant to produce a good yield, but even the smallest plants will have some berries in the first or second summer. Left unpruned, blueberry plants will reach a height of 10 to 12 feet! Spring is the best time to plant a new blueberry bush. Dig a hole twice as deep and twice as wide as the nursery pot, and amend the soil with compost. Test your soil to determine the pH level and if needed, add peat moss or a fertilizer formulated for azaleas.
Mulch the planting bed with 3 to 4 inches of wood chips, and keep the new plant well watered until it becomes firmly established. They have a shallow root system and the mulch helps to retain moisture while inhibiting weeds.
The plants are fast growers, and begin to produce fruit in their third or fourth year of growth.
Harvesting a Fresh Batch ------------------------------- It's hard to beat the taste of a freshly picked blueberry!
Depending on the variety, the crop begins to ripen in early summer. The clumps of greenish berries begin to turn reddish-purple, and the color deepens as the berry ripens. Ripe fruit is a lustrous, deep purple, and a gentle tug is all that's needed to encourage the berry to release its grip from the plant. Shaking a branch lightly over a basket or sheet of newspaper will result in a pile of ripened produce.
The fruit will continue to ripen for several weeks and in our area, we pick berries every few days from late June through early August. Planting several different varieties that ripen in early, mid and late summer extends the harvest season. http://springsofeden.myshopify.com/products/delicious-blueberry-huge-mix-blend-of-seeds-organic-fruit-ornamental-superfood-antioxidant-b25
#Blueberry#Blueberry seeds#dwarf blueberry#fruit seeds#fruit tree#non gmo seeds#Northern Highbush#organic seeds#Southern Blueberry#Southern Highbush#superfood#V angustifolium#Vaccinium corymbosum
0 notes
Text
This isn't Animorphs related but I wanted to tell you all that the two rabbits that live in my front yard are named Hazel and Hickory. Hickory is the only one of Hazel's kids who made it through to adulthood.

Hazel is on the left and Hickory is on the right. The rabbits really, really like our front yard and their den is under an evergreen bush right up against the house.
We are trying to repair the damage to our yard that has been caused by the recent droughts and accidentally mowing the grass too short last year, but I am worried the grass people or the HOA will blame the rabbits, so we are trying to figure out a way to relocate the rabbits without hurting them if the HOA tries to force us to move them.
Does anyone have any ideas?
#rabbits#not animorphs#HOAs are evil#I want to keep the rabbits but the HOA considers them to be pests
14 notes
·
View notes
Last Seen Blogs

uuu-11
000

ratsickle
R A T S I C K L E . c o m

coolnerdyrn
Fandoms Galore!

vafelka-8-chaem
purple pineapple

ancientartsmoon
Ancient Arts