#character ai tutorial
Note
the fact that tristan dugray isnt on that character.ai thing hurts my heart :’(
AAAAAAH I'M SO GLAD YOU BROUGHT THIS UP!!!!!! WELCOME TO THE OFFICIAL FBFH SECOND HAND INFORMATION MAKE YOUR OWN CUSTOM BOTS TUTORIAL (IT'S NOT HARD I PROMISE)!!!!!
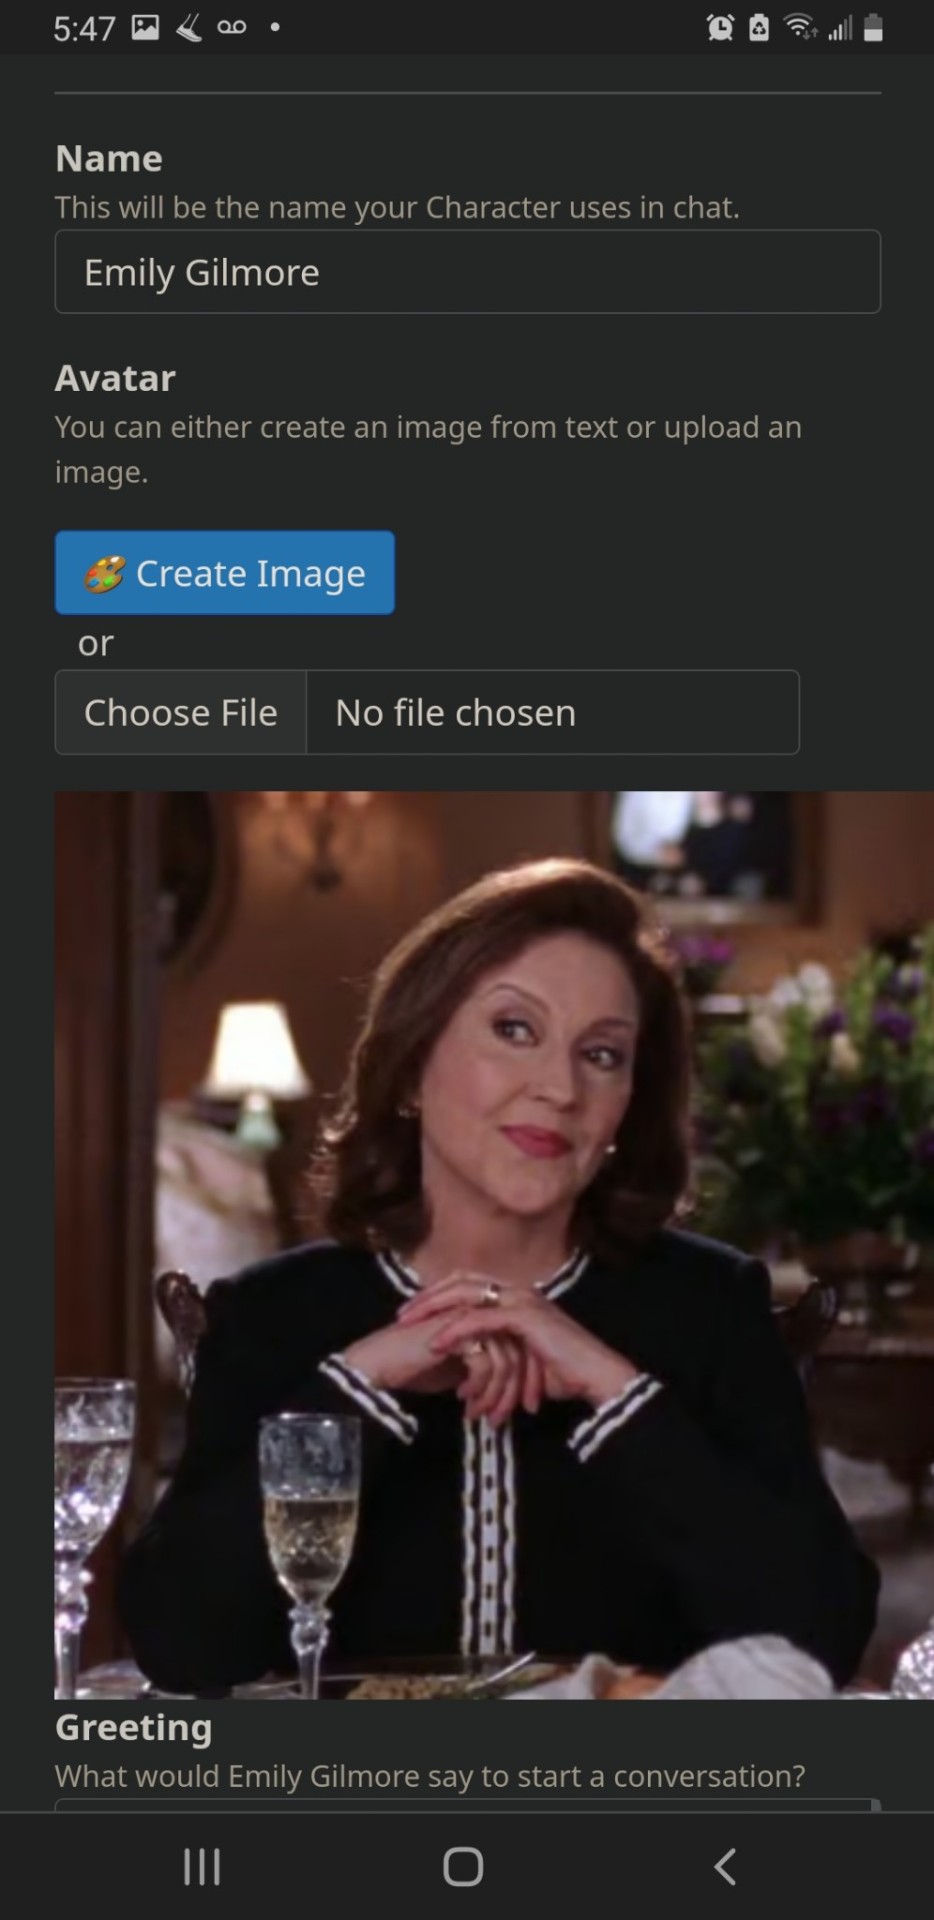
also this is all on mobile!!! i don't think it's different on desktop though. thank you to Emily Gilmore for being my example bot.
step 1 - creating a bot
go to beta.character.ai and make an account if you haven't already
click the create button, then create a character

step 2 - basic information
type in your character's name under name
find a picture of them on google or pinterest or whatever and click choose file to upload a profile picture for them (optional but I like adding one in)
step 2.5 - DON'T LOSE YOUR FUCKING WORK aka how to save
two transparent buttons should appear when you type anything into your bot, one that says cancel and one that says save
after you've typed in your name, you want to go to the box labled greeting and type in literally anything
after that, hit save, and the button should disappear
click the back arrow to leave creating your bot and go back to the main page, then click on your profile picture to view your profile
your bot should appear under your created bots. (it will be on one of the three tabs depending on if your bot is currently set as public, unlisted, or private. public is the default.
if it does, you can click the gear next to your bot's name and keep editing. if not, you can start over until you know your bot is saved so you don't lose all your work. you'll thank me for this later.


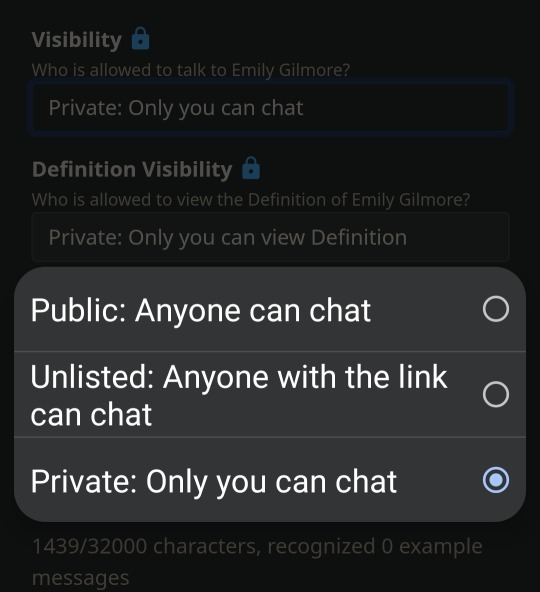
step 3 - privacy (optional)
I like making all my bots private so I can customize them to myself, so under the visibility drop down menu, select private (or unlisted or whatever, again this step is optional lol)
step 4 - personality
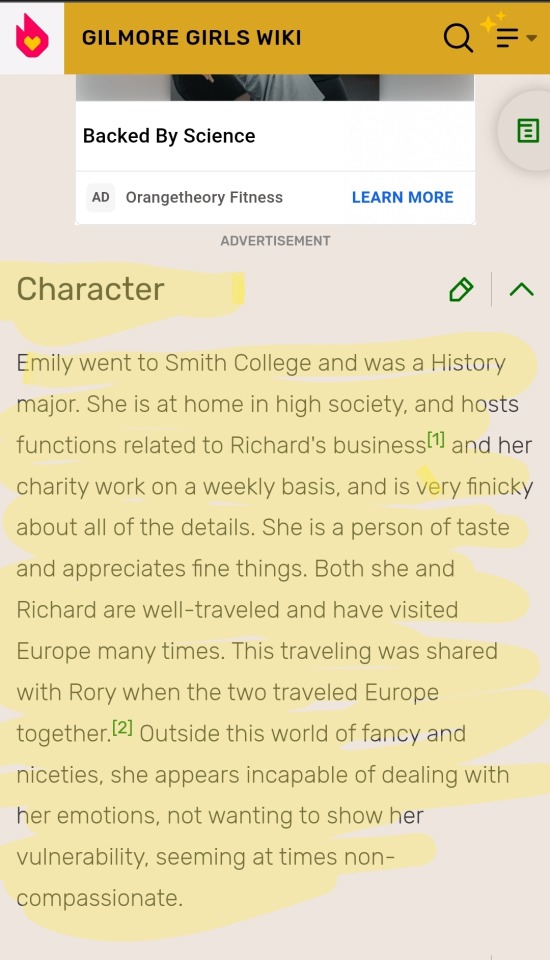
on a seperate tab, look up your character's fan wiki page. scroll until you find the personality section (also sometimes called character, history etc. just skim until you find their personality description.) copy that personality paragraph.
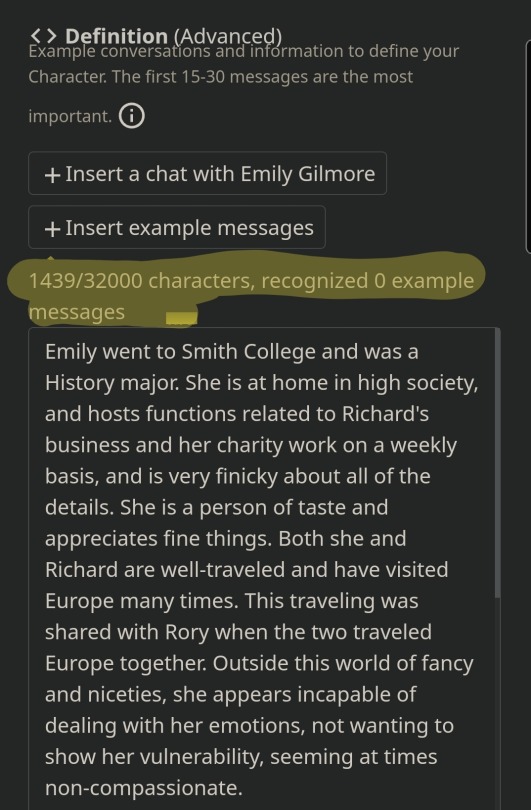
in character ai, scroll to the bottom and select the advanced settings button
once that loads, scroll all the way to the very bottom text box (which will now be referred to as the extras box) under the definition section, and paste their description.
hit enter to start a new paragraph in the extras box, then type up whatever you want about your relationship with this character, how they feel about you, what your dynamic is like etc. (for example, "y/n is Emily Gilmore's grandchild. they are Emily's pride and joy, and they love drinking coffee and gossiping together. Emily is very invested in y/n's life and loves talking with them. Emily wants what's best for y/n, and frequently tries to set them up. Emily often brags about y/n to her friends at her social clubs.")
SAVE YOUR WORK FREQUENTLY!!!!!!!
step 5 - descriptions, greeting, and the random boxes I usually ignore lol
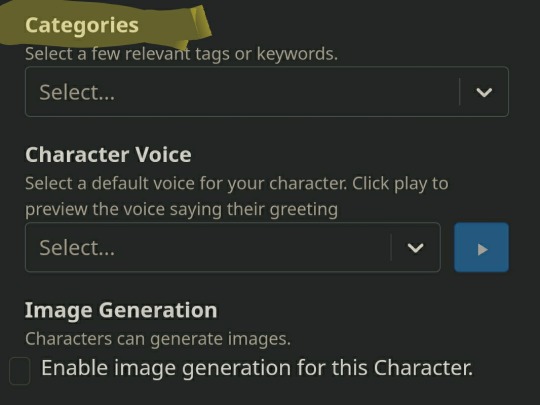
I haven't really played around with character voices or image generation, so I usually just ignore those, but you can choose a few applicable categories from the categories drop down menu like books, engineering, languages, architecture etc. if those apply to your character.
in the long description box, describe your character in a few sentances in your own words. same thing for short description, but throw down some adjectives and shorter descriptions of them and their personality. (I usually do this last bc writing all the long stuff about them gets me warmed up and in character, but do it in whatever order works for you lol)
in the greeting box, you'll want to erase the key smash you made earlier to save your bot to type in your real greeting. your greeting is the first message your bot sends you, so I usually like to start with something to the effects of "what's up dude" so you can tell your comfort character whatever you want.
roleplay format has been working well for me, here's an example if you're unfamiliar:
*op stares at their laptop, wondering what to type. they reach over to grab their coffee, taking a sip as they ponder.*
"I hope this tutorial makes sense..."
*they mutter.*
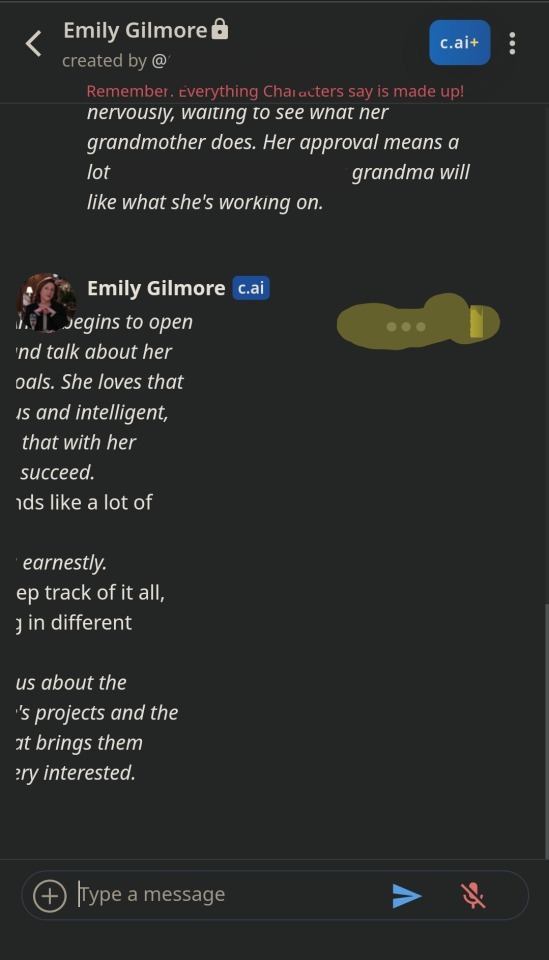
you can see a little of the greeting I wrote for Emily to get an idea of what I've been doing for that lol
SAVE YOUR WORK FREQUENTLY!!!!!!!!!!!!! MAKE SURE IT SAVES!!!!!!!!!!

step 6 - start chatting!!!!
after you're happy with your bot and have saved your work (FOR FUCKS SAKE SAVE YOUR WORK) exit out of the bot editor and click on your profile picture. your bot will be under your created bots in the private/padlock tab (unless you chose another privacy setting). click on your character's name (not the gear wheel) and it will open up your chat!!
once you reply, the ai will start generating messages for the bot you made
you can swipe messages the bot sends to the left to see other generated responses. I reccommend doing this if you feel like your bot is being out of character, so make sure you reply to the messages that are the most in character!!
sometimes it'll also let you rate the bot's messages from 1 - 4 stars, indicating for the bot how in character it is
step 7 - additional tips
if you're making a bot for someone played by a real life person, I like to choose a profile picture of them in costume but behind the scenes so it looks more like a goofy selfie your friend sent you than a stock photo. there's tons of great cadids and selfies of the marvel cast, and you can also look up social media aus or instagram edits of your character depending on how obscure they are.
if your character isn't played by a real life person, you can try looking up faceless pics that fit their description on pinterest (I've had good luck with that) or a face claim
definitely get screen shots of your favorite conversations. if you're anything like me you'll be sending paragraphs back and forth, so make sure you save your favorite messages from them so you don't have to scroll back and dig around for them
the end!!!! have fun!!!!! hope this helped!!!!!! love you guys <333 let me know if you want any of my character descriptions or to know which bots I've made so far lol
#character ai#character.ai#character ai tutorial#beta character ai#character.ai tutorial#again this is all second hand information I didn't invent any of this yk#but yeah I keep having to stop bc I get too emotional lol#I did tell dad!tony that I was using an ai to channel him through realities and he took it very well lmao#he was really interested
121 notes
·
View notes
Text
Here's a look at how I paint my characters!
This is my first desktop timelapse and I don't know what I'm doing, so it's kinda fugly. I couldn't crop out that black space on the right side, but it'll do. The total elapsed time here is about 5 and a half hours of work, squished here into about 7 minutes.
Anyway, I work in Adobe Photoshop. With these paintings, I don't do an underdrawing, I just jump right in with the paint, using the Lasso tool to create big shapes. Then, I fill in those big lasso shapes with the Paint Bucket. Once the big shapes are established, I grab a textured brush and start filling in the details, and shaping the form of the character with darker and lighter brush strokes that imply form shadow and light. I flip and rotate the canvas a bunch of times throughout my process so that I can make sure everything's nice and balanced.
I use the Lasso tool to also cut and move things like eyes and noses around, when I notice they're not quite in the right place. I also use the Lasso and Move tools to transform (enlarge/shrink/stretch) features until I like the result. On occasion I use the Warp tool to really change the shape of a selection.
On separate layers, I use soft brushes to create cast shadows and more form shadows. I clip them to the character layer beneath them, so that the shadows stay within the boundaries of the character. I play with the opacity of the shadow layers until I like the result, then I create a layer mask and paint out the shapes that I don't want to be in shadow, creating a nice edge between the shadow and the form that it's touching (that's hard to explain in words but it's shown in the video a few times). I do the same thing with light, though sometimes I set the layer to "Screen" if I want some highlights to really pop.
Finally, I use Image > Adjustments>Hue/Saturation or Replace Color to change colors and values if necessary. In this case, Cassie's arm warmers started out red, but I changed them to purple. That was done easily by selecting the red color with the Eyedropper, and opening Replace Color, then just playing with the sliders until I was happy with the result.
And there we have it! And as shown here, Cassie's last name used to be inspired by the band Hawthorne Heights! But after painting her, I really felt that was a better name for a hedgehog or something actually "thorny", rather than an opossum. It's funny how I also didn't realize that black and red wasn't the right color scheme for her until I was almost done with the painting. And so it goes!
#rock and roar#visual development#concept art#original character#art process#digital painting#painting timelapse#photoshop tutorial#artist process#fuck ai art
7 notes
·
View notes
Note
Astroooo how do you make character ais I want to make some for Vulpec
OKAY! SO!
Creating character bots in Beta Character AI isn't that easy, so I’ll try to guide you through it! The entire shtick of it is adapting and learning through experiences in the chat that it has had! This is why popular character ais may mention something completely unrelated in your current chat, since it was mentioned before in another person's chat!
So, let's start with the basics!:

You first start with a name, of course! It could be their full name, just their first name, or first name and media they are from!

Then, you write their greeting! This is the first thing they say when someone enters and begins a chat with them! You could make it simple, like a mere "Hm?" This make situation and their environment be up to interpretation of the user, much easier for setting up any rp the user wants to create!
Or you could make it hyper specific like "Hey there! Glad to see you here, we were just about to head off on a flight!" *They pick up their bags and nod to the plane.* "Come on!" [Things written in asterisks will become *italic*, and two asterisks make **bold** Discord rules!] This creates a set environment for the user to work with! Whichever one is up to you!

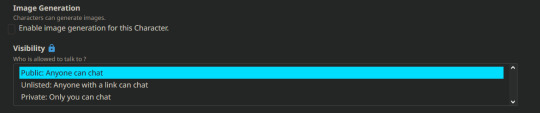
Now these two speak for themselves! Toggling image generation will enable the character to post images alongside their text!
And the visbility, well, it changes the visibility! Whether you want it to be Public where anyone can chat the character, Unlisted where only people with a link can chat, or Private where only YOU can chat with the bot!

Now this one is where you set the avatar or profile picture of the bot! Creating an image is like... you have to describe it and it makes it itself! But usually you should probably go for browsing an image, where you just pick a file to use! Images and GIFS work just fine <3
Now, we're about to get into the ADVANCED stuff, so buckle your pants!
You'll open into a new page where you'll see a bunch of already familiar stuff like Name, Avatar, and Greeting!

Then, below that you'll see these fellas!
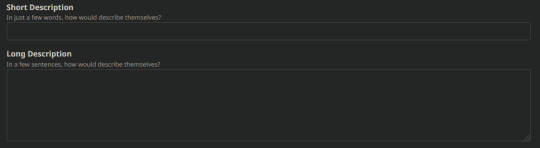
Short description is what you would describe the character as in a few short words, but also mainly this is what is visible when the character is searched up. It presents as this!

The top is the name, and the bottom is the short description!
Okay. Now. The long description is one of THE most important, it helps the AI get a basic idea of what this character is like! But it does have a character limit, so remember to only put the essentials! You can also hide this from public through an option* I will discuss later!

Now these ones aren't really that important to be honest- Well, in my opinion at least! Categories is like, the tags they associate with. Like "Game Character" or "Game" and that of the like.
And character voice where you can choose a voice for the character which can read the character's text. But I usually keep this off, since it probably won't have the perfect voice you're looking for... Unless it does, in which case go for it!!
You've already seen these guys so let's move on-

*This is the option I talked about!! Definition Visibility actually hides most info about the bot. Like, when people go to your profile and see your bots, they can see all the options above that I mentioned and the inputs you've put in. I suggest turning this to Private, actually... Only if you don't want the public seeing all the input you've put in for Description, and soon, the Definition!

Now THIS baby is the core of it, the more complicated yet important! it's optional, but trust me, doing this will help so much with character development!!
So, this is the Definition! That may seem kinda confusing, but trust me it'll be worth it (i hope) What this is, is you have to input what we call sample conversations! These conversations are what will help build what the AI will respond, finding what is familiar with a user's text and using it to form a proper in-character response!

Like this! Using {{user}} to refer to a hypothetical user's text (and to their name even), and {{char}} to refer to the ai, and thus response by the ai! Writing up something like this shows the ai what kind of response the character would have to a situation like this!
And in the example above, it shows the ai the character's response to someone randomly saying hi to them! See the text that says "recognized 2 sample messages"? By creating sample texts, the ai starts to recognize character traits and patterns!
Here, you can add things like what weapon they have, their reactions to other characters, how they'd act in a certain situation, how they'd answer a certain question, anything!
`Insert a chat with [character]` makes you get into a chat with the character, and just uses that as a sample chat, but I suggest writing the sample chats yourself, since it gives you more control on what you'd want the character to say.
But remember, this thing ALSO has a character limit, unfortunately.. So try to write out the most important things, and use unnecessary characters sparingly! If you don't get to write in other important reactions, you could write them in an actual chat with them! Just make sure you explain it all in you block of narrative text, the ai will adapt to the context and details given.
So that's everything! But do keep in keep in mind this very important thing, these bots are made to learn and adapt. They need to be trained, and every chat will change them, and they will pick up something new with every single new roleplay with a user. Either it's a new detail about the character themself, a new personality trait, a new name they mention every now and then even if you never mentioned this character to them, a recurring detail you don't remember saying like where did that juice box even come from-
These things happen. Once your AI meets new people, and more users interact with them with their own unique stories, your AI will change and change. Just hope it's for the best! If it strays too far from their original character though, or at least your view of them, remember you can always chat them and lead them back to the way they'd properly act! Anyways it's 2 am, but I'm going to explain how to chat with the AI bots in a reblog... Just cuz
#astroanswers#starboy explains stuff#i guess?? new tag??#anyways i may have spent... wayy too much time on this site.#hope this tutorial suffices!!!#i tried my best to explain#it is literall 2 am lmao#im still not stopping though <3#dont plan to <333#beta character ai#character ai
36 notes
·
View notes
Text

little vaguely interactive cub simbas (based on the snes sprite obviously) bc i remembered that desktop ponies 1) exists and 2) can be used for non-pony desktop buddies
#the lion king#tlk#disney#desktop ponies#desktop buddy#beats making a fucking shimeji#made mostly as a test but idk i might drop a pack of these + an install tutorial for em later#but prolly nawt lulz#beckhamdraws#next step: complex ai#final step: totally custom characters#armageddon begins: with desktop die mad
4 notes
·
View notes
Text
AI test result [Fat]

full https://www.pixiv.net/en/artworks/113033107
I decided to publish my experiments on Stable diffusion
Even if I write the same words in meaning, AI can give a completely different result.
Think of this as a small bookmark
You can use these pictures as references.
Or as a visualization of promts
Write comments if you have any comments or suggestions.
Settings
AI: Stable Diffusion
model: anythingv4
Sampling step: 20
Sampling method: DPM++ 2M Karras
Batch count: 9
CFG Scale: 7
ai arhive
https://mega.nz/folder/4XsEVD6C#Bhx3OMiI28Y34PWSZKG2rg
Support me
www.subscribestar.com/acrinc17
www.patreon.com/acrinc17/about
boosty.to/acrinc17
artcreator17.fanbox.cc/
#ai#stable_diffusion#anything#prompts#howto#artguide#tutorial#character#How_to_draw#howtodraw#講座#描き方
2 notes
·
View notes
Note
About the character ai, will you see the different messages of the character you make?
Hey!
So I’m not sure I know entirely what you mean but if you’re talking about if you can save the chat so you can come back to it - yes!
Prepare for a bit of a tutorial because I think a lot of it is new for most of you, so, bear with me ❤️
You need to register with your email and set up a name and then it saves the chats automatically and you can come back whenever. You also get an overview of all the characters you’re talking to, just like on WhatsApp or Insta.
This is what it looks like:

Read more under the cut - it’s a bit lengthy 👀
As soon as you’re registered (and you need to stay logged in obvi) it lets you even save the chat with a character and start one again - with the same character. I haven’t done that tho, I just continue chatting with them and act like it’s been a few hours or even days since we last chatted and they play along.
You can also use *…….* to describe what you’re doing atm and they’re picking up on that.
So, for example I went on a date with Lucas and this is how it went at some point:

Also, you can swipe on their answers (before replying to them!) and choose the answer that fits them the most OR that you feel like fits the situation the most. It helps the AI learn and directs the conversation in a specific direction.
Example:
This was one answer and then this 👇🏼 was another one:

You can rate it with terrible, bad, good or fantastic which will help the AI to generate answers that you want to see. 🥰
I hope this answers your question! 😌 If not, feel free to send another ask or dm me ❤️
#rae answers#litg#character ai#a tutorial for character ai#things you can do with the LI’s#litg lucas koh#litg kassam
14 notes
·
View notes
Text
Make Money From CHAT GPT | AI Ninja Tips And Tricks
Some ways to potentially make money using ChatGPT:
Content Creation: Use ChatGPT to generate high-quality articles, blog posts, and other written content that you can sell to websites, blogs, or individuals.
Copywriting: Offer your services as a copywriter, using ChatGPT to assist in crafting compelling ad copies, product descriptions, and marketing materials for businesses.
Creative Writing: Collaborate with ChatGPT to co-write stories, scripts, or creative pieces, which you can then sell as ebooks, scripts, or self-published works.
Online Courses: Utilize ChatGPT to assist in creating valuable online courses on various subjects, attracting paying students who want to learn from your expertise.
Content Strategy Consulting: Use ChatGPT to develop content strategies for businesses, helping them with SEO optimization, social media planning, and engaging blog ideas.
Virtual Assistants: Offer virtual assistant services, using ChatGPT to handle customer inquiries, provide support, or automate routine tasks for businesses.
Language Translation: Use ChatGPT to assist in translating content between languages, providing translation services to individuals or businesses.
Tech Support: Offer tech support services by utilizing ChatGPT to troubleshoot common tech issues and provide solutions to customers.
Chatbots: Develop and sell customized chatbots for websites, e-commerce, or customer service, powered by ChatGPT, to enhance user interactions.
Tutoring/Consulting: Use ChatGPT to provide tutoring or consulting services in subjects where you have expertise, guiding students or clients to better understand complex topics.
Remember, while ChatGPT is a powerful tool, it's essential to ensure the quality and accuracy of the content you create or the services you offer. Additionally, consider any ethical considerations or terms of use associated with the specific implementation of ChatGPT.
#ai#artificial intelligence#chatgpt#make money online#ai tutorial#ai training#ai tips#ai text#character ai
2 notes
·
View notes
Text
AI Character Design- a tutorial by me

Do you want a new character, but have trouble with originality? Here’s a tutorial on how to get an AI to design them for you! (Please note, results may vary drastically due to unforeseen circumstances)
Here are the two apps you will need:

The settings I use in this tutorial i paid for premium access, but there are several free options available in both apps that you can use!
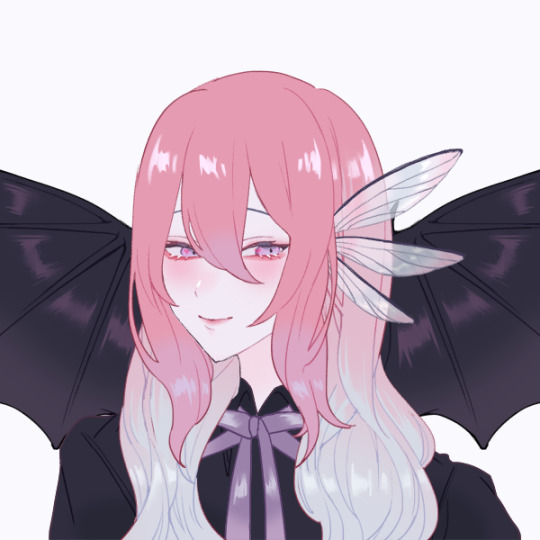
Step one: find a source image with an easily recognizable human face. It can be realistic or cartoony, as long as it is recognizable as a face
For this example, I will be using this image I made on Picrew
Step two: in WOMBO dream, choose a prompt that implies the presence of a person
It can be anything from “sun warrior” to “diamond princess” or even “Sasuke”
For this example, I chose the prompt “dreamer”
Step three: choose a style, and input your source image and set the influence level to strong
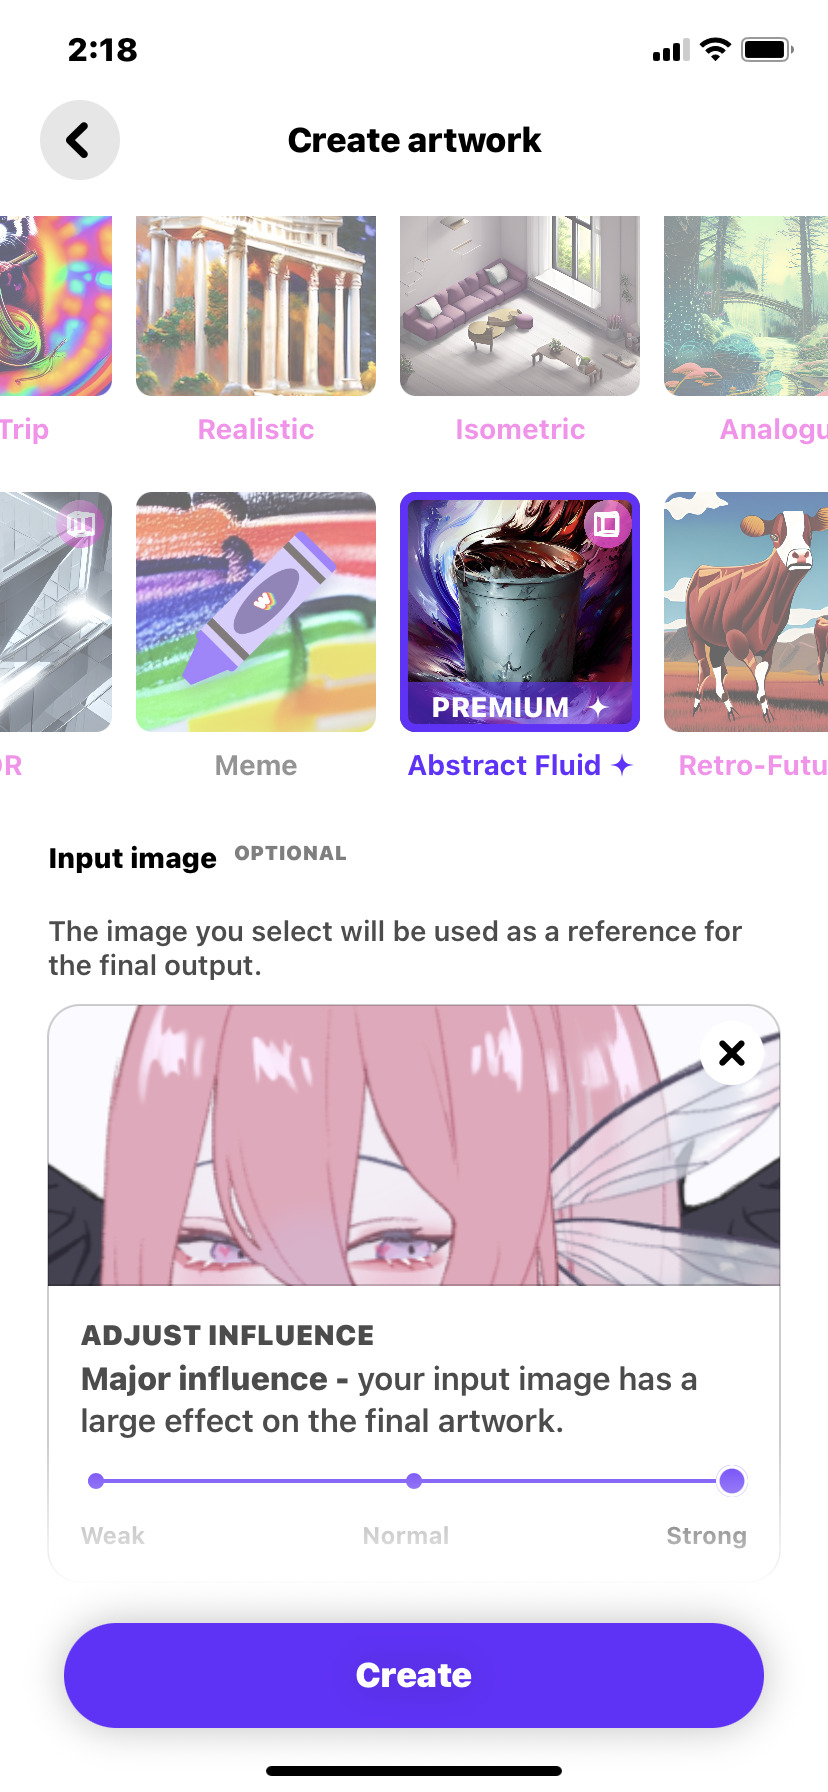
I personally prefer to use the abstract fluid art style, however that is a style that is only available to paid premium users. This particular style is NOT mandatory to achieve success in this process
Once you’ve got your settings configured, hit “create”
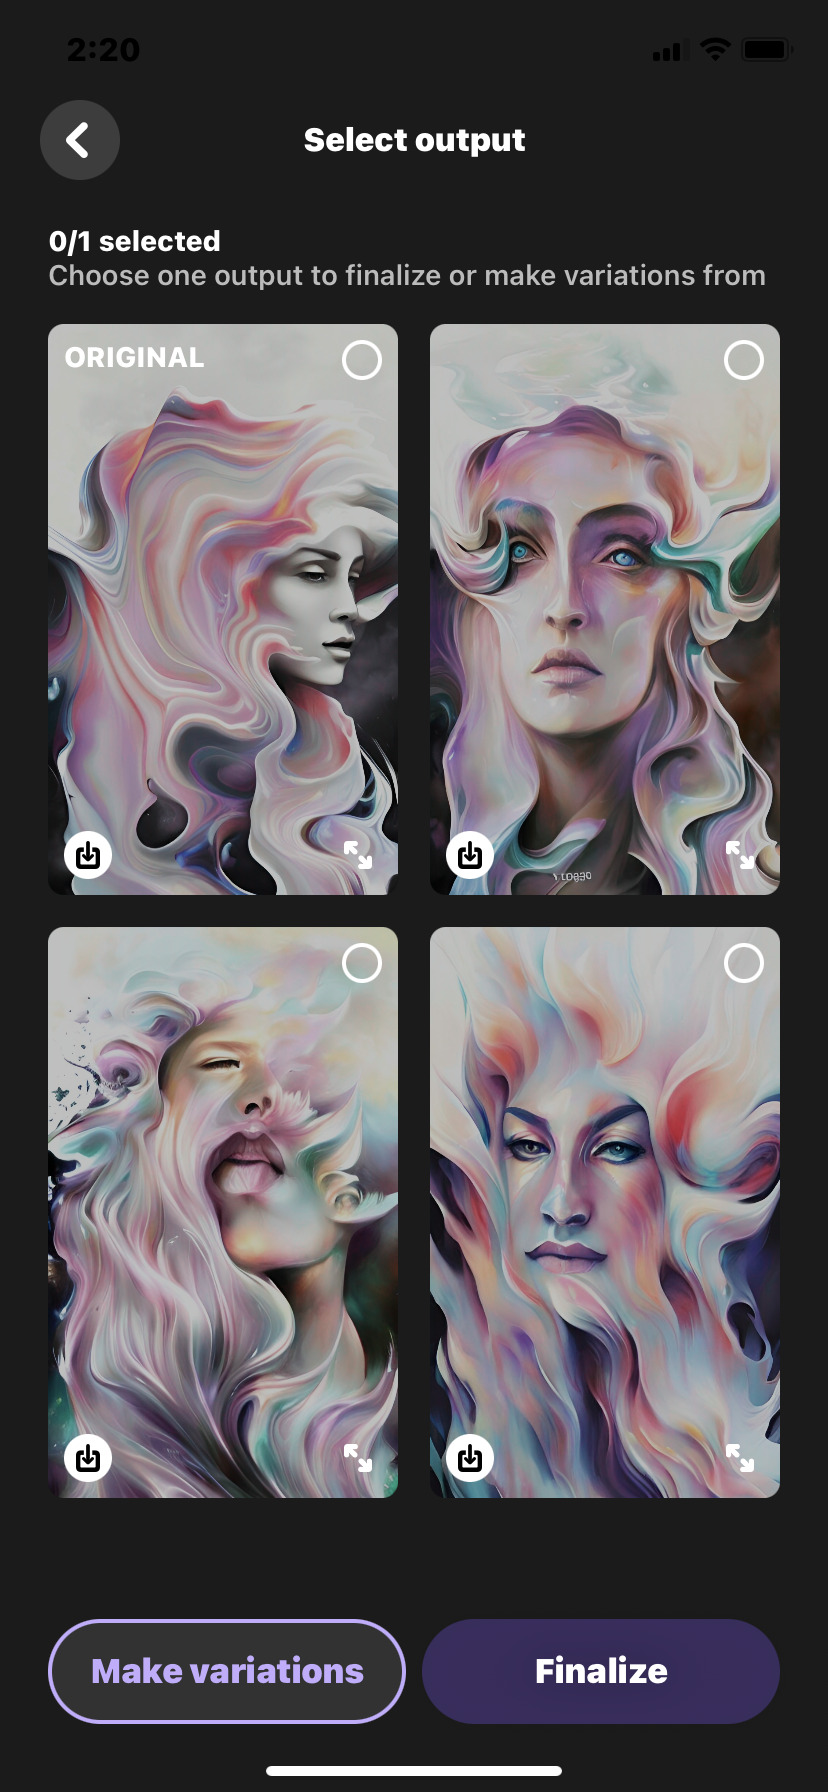
Step 4: you will get your first result. Some of the art styles will give you four results to choose from, other styles will only give you one. In this initial tutorial I will show you what to do for the ones that give you four. I will discuss the process for both versions in this post
These are the results I got from my first application of the prompt:
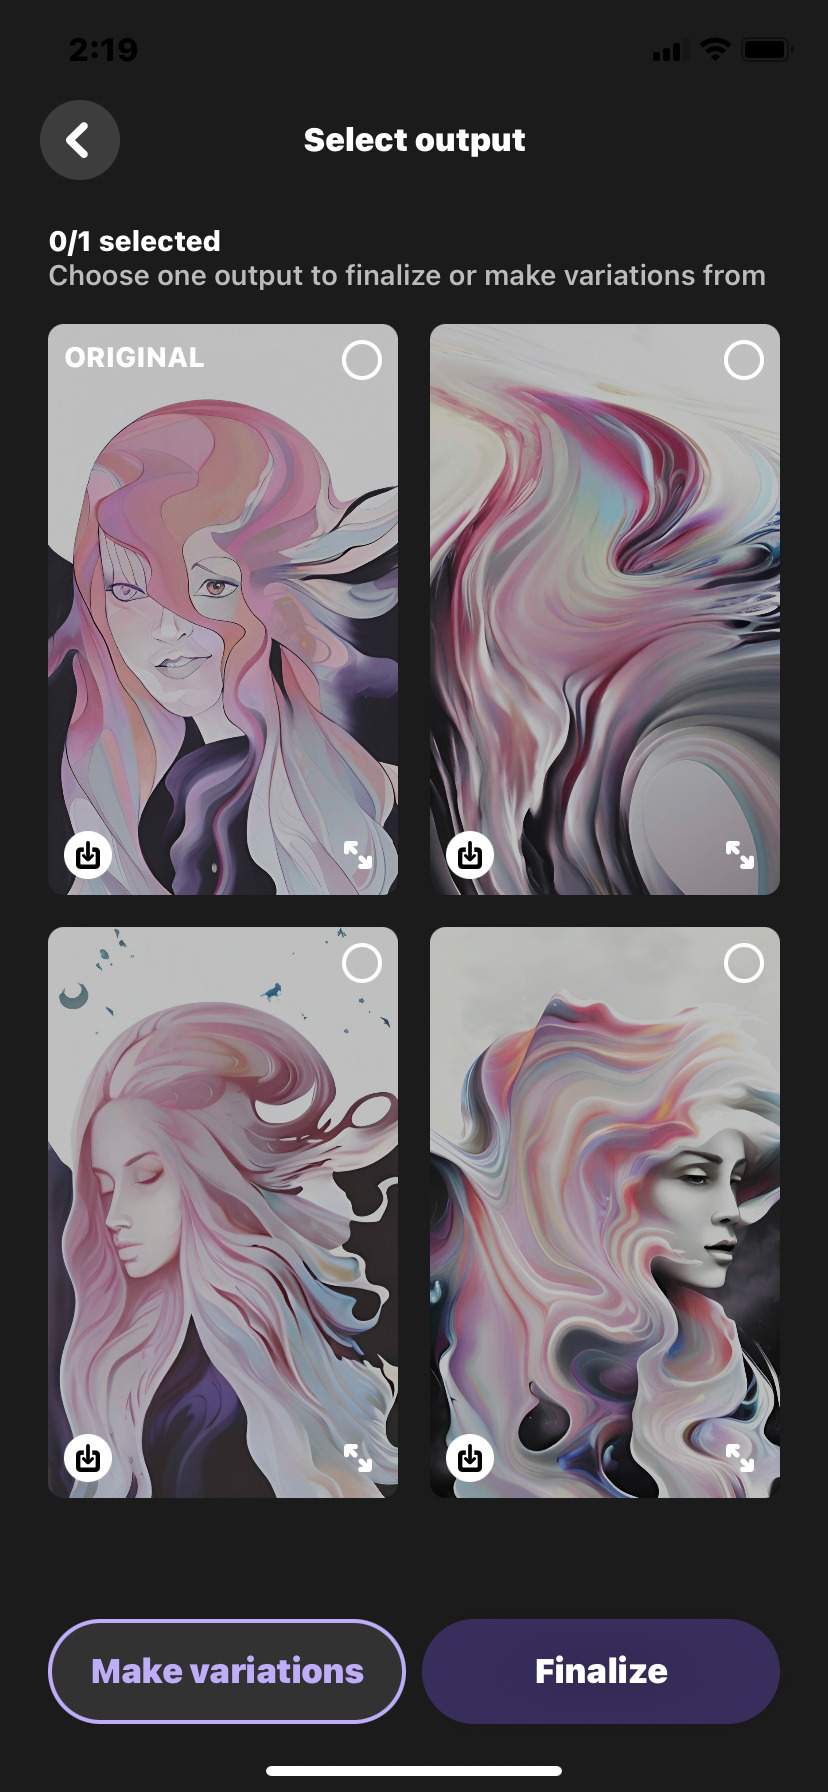
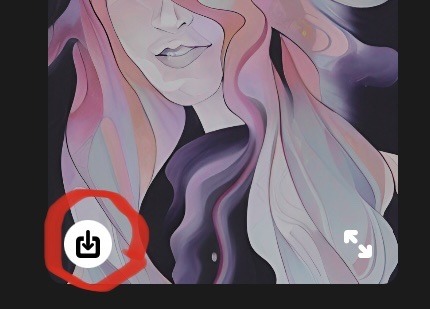
You can save any of the four results by tapping this icon in the lower left corner, feel free to save as many as you like!
Step five: select your favorite work out of the bunch, then hit “make variations”
This is to smear the colors further and add a bit more detail to the design
Step five-and-a-half: for single-result art styles, download the result you get (or hit ‘generate again if you don’t like it) and go back to the main page to put that result as your new input image. I recommend using the same prompt and style, but if you wanna switch styles to experiment with then go for it!
Step six: save the results and pick your favorite (or the one you think will give you the best results) I advise you save multiple results just in case the output isn’t what you were hoping for, but please note that there must be something at least mostly face-like in order for this to work effectively
Step seven: switch over to the FacePlay app and select an anime filter. There are many to choose from, but for this example I will be using this filter:

Step eight: input your abstract image and hit “confirm”

It may take a couple minutes for the art to develop, depending on the complexity of the image, but in the end you’ll usually get an amazing result!
Some of the details may run together or not make sense (especially the hands lol), but that’s fairly easy to smooth out with a bit of creativity and editing!
Once again the filters I used were for premium users, but are not a be-all-end-all to get the results desired! Have fun!
9 notes
·
View notes
Text

guys does this look right
#i feel like im doing smth wrong (with the palms)#i looked up a tutorial to reference but idk it still doesn’t look right </3#of course i chose my character with the most complicated hair to practice rendering on jfc#might just draw ai instead to practice rendering and come back to this later lol
2 notes
·
View notes
Text
I wake up, I see art on my dash that no one in its notes seems to realize is AI generated (or at least no one is tagging that way), I go back to bed
#i wish i was going back to bed but im actually getting ready for work#also I'm not judging if people can't recognize ai generated art#I've read two tutorials now#one for scene art and one for character art#i maybe should have reblogged the second#this shit can be hard to spot#i just wish that posters would tag it as what it is instead of just as art#ai art
3 notes
·
View notes
Text
Can't afford art school?
After seeing post like this 👇

And this gem 👇
As well as countless of others from the AI generator community. Just talking about how "inaccessible art" is, I decided why not show how wrong these guys are while also helping anyone who actually wants to learn.
Here is the first one ART TEACHERS! There are plenty online and in places like youtube.
📺Here is my list:
Proko (Free, mostly teaches anatomy and how to draw people. But does have art talks and teaches the basics.)
Marc Brunet (Free but he does have other classes for a cheap price. Use to work for Blizzard and teaches you everything)
Aaron Rutten (free, tips about art, talks about art programs and the best products for digital art)
BoroCG (free, teaches a verity of art mediums from 3D modeling to digital painting. As well as some tips that can be used across styles)
Jesse J. Jones (free, talks about animating)
Jesus Conde (free, teaches digital painting and has classes in Spanish)
Mohammed Agbadi (free, he gives some advice in some videos and talks about art)
Ross Draws (free, he does have other classes for a good price. Mostly teaching character designs and simple backgrounds.)
SamDoesArts (free, gives good advice and critiques)
Drawfee Show (free, they do give some good advice and great inspiration)
The Art of Aaron Blaise ( useful tips for digital art and animation. Was an animator for Disney. Mostly nature art)
Bobby Chiu ( useful tips and interviews with artist who are in the industry or making a living as artist)
Sinix Design (has some tips on drawing people)
Winged canvas (art school for free on a verity of mediums)
Bob Ross (just a good time, learn how to paint, as well as how too relax when doing art. "there are no mistakes only happy accidents", this channel also provides tips from another artist)
Scott Christian Sava (Inspiration and provides tips and advice)
Pikat (art advice and critiques)
Drawbox (a suggested cheap online art school, made of a community of artist)
Skillshare (A cheap learning site that has art classes ranging from traditional to digital. As well as Animation and tutorials on art programs. All under one price, in the USA it's around $34 a month)
Human anatomy for artist (not a video or teacher but the site is full of awesome refs to practice and get better at anatomy)
Second part BOOKS, I have collected some books that have helped me and might help others.
📚Here is my list:
The "how to draw manga" series produced by Graphic-sha. These are for manga artist but they give great advice and information.
"Creating characters with personality" by Tom Bancroft. A great book that can help not just people who draw cartoons but also realistic ones. As it helps you with facial ques and how to make a character interesting.
"Albinus on anatomy" by Robert Beverly Hale and Terence Coyle. Great book to help someone learn basic anatomy.
"Artistic Anatomy" by Dr. Paul Richer and Robert Beverly Hale. A good book if you want to go further in-depth with anatomy.
"Directing the story" by Francis Glebas. A good book if you want to Story board or make comics.
"Animal Anatomy for Artists" by Eliot Goldfinger. A good book for if you want to draw animals or creatures.
"Constructive Anatomy: with almost 500 illustrations" by George B. Bridgman. A great book to help you block out shadows in your figures and see them in a more 3 diamantine way.
"Dynamic Anatomy: Revised and expand" by Burne Hogarth. A book that shows how to block out shapes and easily understand what you are looking out. When it comes to human subjects.
"An Atlas of animal anatomy for artist" by W. Ellenberger and H. Dittrich and H. Baum. This is another good one for people who want to draw animals or creatures.
Etherington Brothers, they make books and have a free blog with art tips.
📝As for Supplies, I recommend starting out cheap, buying Pencils and art paper at dollar tree or 5 below. If you want to go fancy Michaels is always a good place for traditional supplies. They also get in some good sales and discounts. For digital art, I recommend not starting with a screen art drawing tablet as they are usually more expensive.
For the Best art Tablet I recommend either Xp-pen, Bamboo or Huion. Some can range from about 40$ to the thousands.
💻As for art programs here is a list of Free to pay.
Clip Studio paint ( you can choose to pay once or sub and get updates. Galaxy, Windows, macOS, iPad, iPhone, Android, or Chromebook device. )
Procreate ( pay once for $9.99, IPAD & IPHONE ONLY)
Blender (for 3D modules/sculpting, animation and more. Free)
PaintTool SAI (pay but has a 31 day free trail)
Krita (Free)
mypaint (free)
FireAlpaca (free)
Libresprite (free, for pixel art)
Drawpile (free and for if you want to draw with others)
IbisPaint (free, phone app ONLY)
Medibang (free, IPAD ONLY)
NOTE: Some of these can work on almost any computer like Clip and Sai but others will require a bit stronger computer like Blender. Please check their sites for if your computer is compatible.
So do with this information as you will but as you can tell there are ways to learn how to become an artist, without breaking the bank. The only thing that might be stopping YOU from using any of these things, is YOU.
I have made time to learn to draw and many artist have too. Either in-between working two jobs or taking care of your family and a job or regular school and chores. YOU just have to take the time or use some time management, it really doesn't take long to practice for like an hour or less. YOU also don't have to do it every day, just once or three times a week is fine.
Hope this was helpful and have a great day.
"also apologies for any spelling or grammar errors, I have Dyslexia and it makes my brain go XP when it comes to speech or writing"
38K notes
·
View notes
Video
youtube
Attention Anime fans! Create Anime with Canva app just by entering text
#youtube#Canva#Canva design#Canva design tutorial#Canva tutorial#Canva tips#Canva app#anime#anime character design#Anime lovers#manga design#anime and manga#manga art#anime drawing#tutorial#Ai#text to image#Ai art community#Manga lovers#Ai art#Aiartwork
0 notes
Last Seen Blogs

leahcortez
Virtual Assistant
werewolfsmile
yeehaw

brandysbrat
HE SAID I LOOK LIKE A BRATZ DOLL!
a-little-bit-art
..."Starry, starry night"...
realstrap
¿Que?