#but the fact that this uses up so many layers means i have to resize the file before i post ;;;
Text
hop'n step'n may i have this dance /
this is the world's end. shall we do the "one-two"?
open for better quality | no reposts
#yoo joonghyuk#kim dokja#joongdok#omniscient reader's viewpoint#orv#fanart#myart#doodle#of course 'world's end dancehall' is on my playlist for them i'm so glad you asked#recently i've been using a lot of glow layers and particle effects in my pieces#the cloud brush assets are also a lifesaver#but the fact that this uses up so many layers means i have to resize the file before i post ;;;#currently using this as my phone's home screen bg hehe
923 notes
·
View notes
Text
Handwriting in adobe illustrator with mouse

The paths we are looking for show empty whitespace in the path preview, like the following image. What we need to do is find and delete the ones that correspond to the whitespace within letters (like the centre of an ‘O’) as well as the one that corresponds to the white background. You’ll see a Group inside Layer 1 that contains a whole bunch of paths. To illustrate the problem, I’ve place a coloured layer behind out traced + expanded image.
Edit the traced path afterwards to smooth out any rough areasĮxpanding the image created a few objects that we need to get rid of if we want to easily change the text colour and/or place only the text on a background.
Use smoother paper and a pen with more even flow of ink.
In those situations, there are a few things that can be done: However, if I am working on writing that needs to be digitized in a more polished manner (perhaps for a logo), I’d like it to be more perfect. In fact, the flaws in the trace match up with the flaws in my writing, and I like this. When I’m creating something that is meant to truly represent my handwriting, I do not mind the imperfections. If you are using rough paper and a pen that doesn’t always put out a smooth edge (like mine-if you look close at the photo of my text, you’ll see the edges are a bit rough in some areas), these things will be reflected in the trace. There are many reasons for this, but it often ends up being the type of pen or the type of paper. However, it’s still possible you may end up with something you aren’t 100% happy with. Often this process is very much trial and error. Once you’re done perfecting, we need to go in and expand the photo. Move them to their far lefts and rights and see how the trace is affected. Now, the best way to learn what the settings do is to play with each of them. If you haven’t touched the settings yet, the image should trace just as it did before. Click the Preview checkbox in the bottom-left corner so you can see how the adjustments you make affect the output. We’ll be using this to refine how the handwriting gets traced. But have no fear!įirst, undo the initial trace attempt (Edit > Undo). Then go to Window > Image Trace. If you like how it looks, skip the rest of this step and move on to the next one. We’re going to Trace and Expand it by going to Object > Image Trace > Make and Expand. If we’re lucky (and also depending on your pen, photo, paper, and lighting), we’ll get a good trace and be good to move onto the next step. Depending on the size and resolution of your photo, it may take over the entire artboard (plus some), so just resize it if need be. Literally, just drag and drop it into an open file. For me, Apple’s AirDrop works seamlessly for this, but you can always email the photo or add it to your favourite file sharing software instead. This isn’t necessary, however it gets rid of unnecessary space and makes the file smaller. Once you have the photo, go ahead and crop it so it only includes the text you want digitized. I’ve always been able to achieve what I needed with a simple photo snapped with my iPhone. Try not to include any shadows in the photo. Again, we’re aiming to achieve the greatest contrast we can. Take a photo of your handwriting, in good lighting. Don’t worry about writing anything ginormous (we want it to be natural, after all) just write in whatever size you normally would for the style you’re after. However, if that is out of the question (if, for example, you already have something in front of you that’s written in red ink on off-white paper), don’t worry-not all is lost. The more contrast you have between the text and the paper, the better. If possible, choose a dark ink on white paper. This tutorial will show you how to make it happen in Illustrator, which means you’ll also end up with a vector of your text (win). There are many reasons why you may way to digitize handwritten text-but the reason is not important here.
0 notes
Note
I was wondering if you could do a tutorial on this gifset that you did i really like ittt
Thank you for sending this in, anon! I’m glad you liked it and wondered how it was made :) Fun fact: the day before you sent this, I had just started working on my next set in that “Select Filmography” series. I hope you like that one too when it’s ready!
I think I should start by saying I’m pretty new to giffing myself and there might be more efficient ways of getting to the same result. However, the point here is to show you the process I went through to make this gifset and hopefully help you understand how to make a similar one.
To follow this tutorial, you will need some version of Photoshop and some giffing knowledge. I know there are multiple ways of making gifs so I’m just letting you know I’m using the timeline and the “Convert for Smart Filters” option (I don’t really know how else to call it).
Now let’s get started!
STEP 1 - CHOOSE THE SCENES
It might sound obvious but, in my opinion, this is the most crucial step. It’s also the one that takes the longest (along with step 7, aka the coloring).
At this stage, you need to have a general idea on how you want your set to look like so you can choose the scenes accordingly. In my case, I knew I needed two types of shots for each movie: one close-up for the main gif and one mid shot for the shape. I also needed to take two other criteria into consideration: the movement (because of the shape) and the lighting (because darker scenes are such a pain to color). Last but not least, I didn’t want the characters to be talking (but that’s just a personal preference).
With all of that in mind, you can start saving a few screenshots of scenes that meet your criteria (or at least some of them). In the end, there won’t be that many to choose from so be prepared to make compromises.
STEP 2 - MAKE A DRAFT
Now that you’ve preselected a few scenes, you can make a first draft. This will help you turn your general idea into something more concrete.
Basically, this is your opportunity to organize your thoughts. What size do you want your gifs to be? What shape are you going to use? On which side do you want the close-ups to be? Do you want all of them to be on the same side or do you want to alternate from one gif to the other? Do the scenes you chose work together (gif-wise but also set-wise)? Are you happy with the way it looks, overall?
By answering all of the questions you might have now, you’ll save yourself a lot of time, trust me. Of course, you can totally skip this step if you already know exactly which scenes you’re going to use and how you’re going to present them together.
To give you an idea, this is what my draft looked like for Atomic Blonde.
STEP 3 - PREPARE YOUR GIFS
Once you have a clearer view on how you want your set to look like, you can finally start giffing like you usually would (i.e. importing, cropping, resizing, etc.).
It should then look something like this.
The important thing to mention here is that you want both of your gifs to be the same number of frames (32, in my case).
Ideally, you should also aim for the ~same~ coloring (especially for the skin tone, since both gifs will be so close to each other). This bit is particularly difficult when you chose scenes which have opposite lighting (see my two uncolored gifs below). Remember how I insisted on steps 1 and 2? It was to help you avoid this. So my advice would be not to choose these types of contrasted scenes, unless you can’t do otherwise and you’re ready to suffer!
STEP 4 - MAKE YOUR SHAPE
To make your shape, you can click right on the Shape Tool (U) and select the last one, Custom Shape Tool. From the Shape menu appearing on top, you will be able to choose the shape you want from the drop down list and start drawing on your gif.
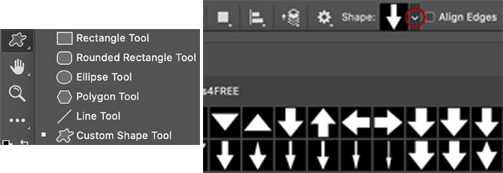
To be more precise with the dimensions, you can manually adapt the length and height from the Shape menu itself. I decided to go with the same ones as my gif.
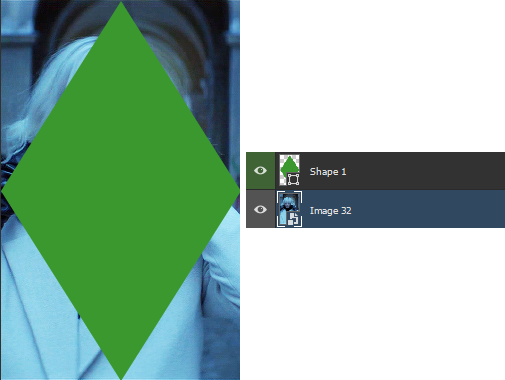
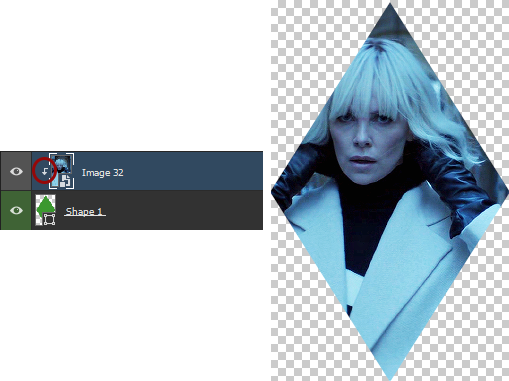
Once your shape is positioned like you want it to be, you can drag and drop the shape layer under your gif. Next, you will have to click right on the gif layer/smart filter and select Create Clipping Mask. The result is as below. Note that if the size of your shape was smaller than your gif, you would still be able to reposition your gif with the Move Tool (V).
You can now export your shape gif, reopen it in Photoshop and convert it again to the video timeline and to a smart filter. This is where I’m not sure it’s the most efficient way of doing things but it’s the only way I found to keep the coloring of each gif separate. I also find it easier to work with a smart filter.
STEP 5 - COMBINE YOUR GIFS
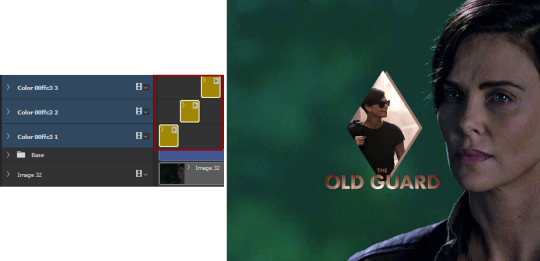
To add your shape gif to your main gif, you can simply click right on the shape gif you just reopened and select Duplicate Layer. You can then choose the project which contains your main gif to duplicate it in there. Now go to your main gif and reposition your shape gif where you want it to be (how many times did I say gif here?). Finally, you can draw a new shape, using the same dimensions as in step 4, reposition it and choose any color you want from the Shape menu.
Since you will be repeating this process with your following gifs, I suggest you add a few guides so you know exactly where you should place everything to make all of your final gifs look the same.
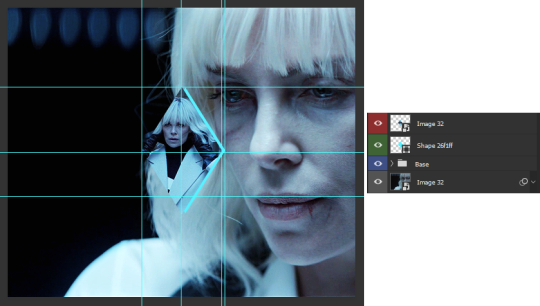
(In case you’re wondering, the “Base” folder contains my adjustment layers/basic coloring for the main gif.)
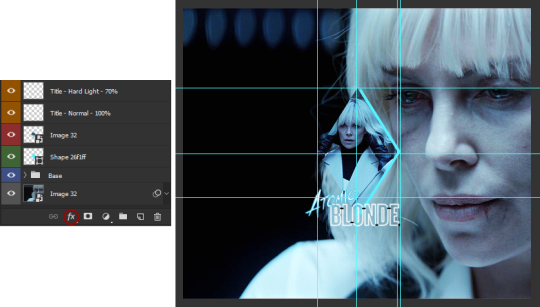
STEP 6 - ADD THE TITLE
This step is pretty simple: go on the web and type “[name of the movie] title”. Download the png you like most, open it in Photoshop and resize it to a length of about 150-200 pixels. Next, duplicate the layer to your main gif and reposition it. In case you need to resize it again, select the title layer and go to Edit > Free Transform (Ctrl+T).
This is optional but in case you want to change the way it looks, know you can always duplicate the title layer and play with the blending options (see below). The good thing with a png is that you can also add some effects by clicking on the “fx” button.
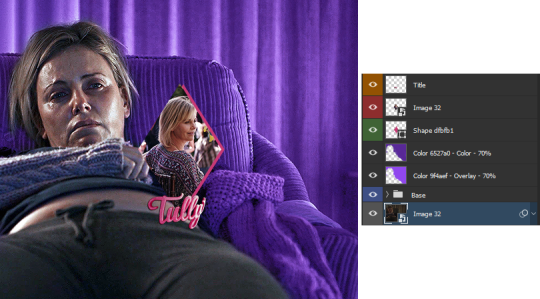
STEP 7 - ADD COLORING (OPTIONAL)
To be honest, I had not planned on coloring my gifs. But I had already spent so much time on them and I was still unhappy with the way they looked. I mean, see how grey-ish they are? Not great...
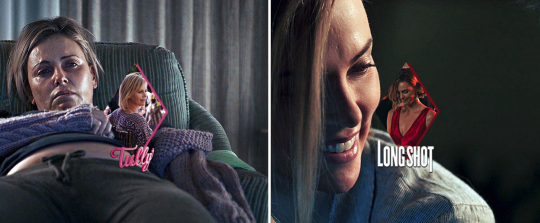
So the only thing left for me to do was to add some colors. Now, since coloring is worth a tutorial on its own and it already exists, I suggest you read through becca’s mega coloring tutorial (and especially steps 3 & 5). Seriously, shoutout to her for making this incredibly useful tutorial. She is so talented and I love everything she makes!
My Atomic Blonde gif barely even needed coloring so I’ll show you what I did for my Tully and The Old Guard gifs.
For the first one, once I had found which colors to use with which blending option and opacity level, I only had to remove the colors from the left side of the gif because there was barely any movement in that scene (phew!). For the second one, on the other hand, I decided to color frame by frame because there was way more movement, in comparison. This is quite a tedious process, which is why you want to limit yourself to a certain amount of frames.
I’ll conclude by saying there are so many things you can do with coloring and what works with one scene might not work with another. So experiment with it: try different colors, play with the blending options and opacity levels, add some gradients and/or gradient maps, etc. Just know it will take some time to get to a somewhat satisfying result!
And that’s it... I hope this tutorial made sense and was somehow helpful. Of course, don’t hesitate if you have any questions! Also, if you do end up making a similar edit, pleeease send me the link or tag me in the replies or something ‘cause I would definitely love to see it!!
#asks#anonymous#tutorials#resources#completeresources#allresources#itsphotoshop#putting all of this process into words took so long i really hope it makes sense#also i can't help but wonder if it was my before/after post which prompted this ask...#gifs#gifs: tutorials
368 notes
·
View notes
Text
HOW I DO MY CHUBBY EDITS:

STEP 1: Well ofc we gotta find an image that is suitable for editing. The higher the quality of the original image the better - more realistic - it will look. I considered the strawpoll but every member besides jk had the same amount of votes so I decided to take an image with everyone in it! >:3

STEP 2: Now I look at the details and decide which elements are in the way and need to be taken out. (I won’t go into detail with photoshop tools because it literally would take me hours.)
This is one of the steps that can be considered to take the longest depending on how much stuff I decided to get rid off such as logos, items that will be in the way later etc.

As you can see the above image shows the original look of the boys clothing and the screenshot underneath my edited version. I got rid of all the disorted puma logos because they will look terrible later on when I stretch each body part out. (more to that later)
I also decided to remove the shoes around namjoon and the one Jin was holding. Simple reason was because you wouldn’t be able to see Jins hand anyway with a bigger body and it saves me time. Namjoons shoes were in the way and they didn’t fit my vision.
BE GONE SHOES >:c
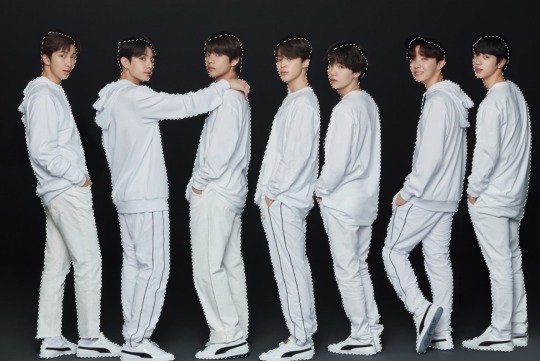
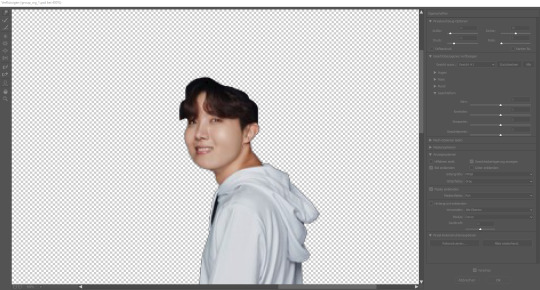
STEP 3: Cutting the members out. In this step it’s important to copy your original layer in case something unexpected happens or you fuck up mid way. You may have noticed that my selection tool alignes perefctly with the boys bodies but not their head. (I use a selection tool, which only really works smooth if the background has a high enough contrast with your foreground objects - the 7 members in this case -! Otherwise I will have to manually go in and re-select, un-select, remove and attach all lines with my mouse and that takes me a lot of time to do - for one member alone -)
To explain it shortly: The original layer will always be seen because we will be using the background of the original (in this case the grey areas etc.) which also still has the original boys on them. Since we will be making them all bigger in size it doesn’t matter later on because we won’t see the slim version of them.
We will only size them up around their faces and ofc their bodies which means the hair won’t be touched. Therefore it’s unnecessary to cut them out properly as we will be using the hair from the original photo in the back and overlay it with this layer (basically the layer underneath)
*pats* I’m trying really hard to explain it in a way that makes sense but if you never used any editing program it’s hard to follow... and I am bad at explaining. xD

STEP 4: Now we will be cutting out each member individually from each other and put each of them on their own layer to move them around freely. This will help us later paint them all bigger without interrupting the member next to them.
Each filter only interacts with 1 layer which means, 7 layers with 1 member each, 7 times the work without messing up the other members in the process. (you will see what I mean later)
STEP 5: Now we will be going into the filter. It’s originally a smoothening tool which also works as filter (filter in photoshop basically means an extra window with more options that tool offers.)
We will be using the smoothening tool that works like a brush. Imagine having paint on a paper in front of you and you put your finger on the paint to spread it out and make the splosh larger. You won’t see the white paper at all in the areas you went over with your finger and the different colors mix together and still look natural. That is what this tool does. It used the pixel around your brush (finger) and copies them.
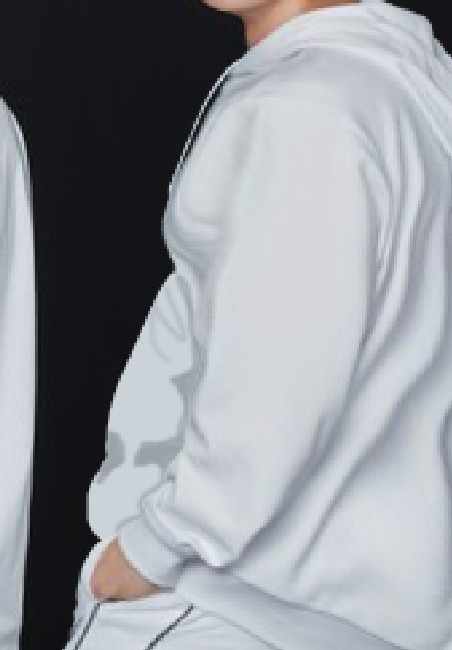
STEP 6: Now you may have noticed that in the original we only saw Hobis arm infront. If we would use our finger brush tool all we’d do is make his arm way too large. To avoid that I went into the image, picked the white of his shirt as color and painted my own belly in there. I grabbed Hobis dark grey colors and used them like the actual coat as shadow.
In this rough state I used another tool to soften the edges of the shadow to look more like shadows on the shirt. After that I copied some of the fabric from his back and placed it on his belly to make it fitting to the rest.
As you can see very well here, the smoothening tool only expands or shrinks areas. It is not getting rid of any spaces. You see hobis knee? Yep, looking weird. Which means in order to fix that we have to go in and cut his leg out and put it on an extra layer.
We go back into out smoothing tool and expand the leg without interrupting his other leg and boom.

STEP 7: After sizing all the boys up with the same steps I showed with Hobi we will now give the boys cute little double chins. Double chins are one of the easiest to do because technically we already got the perfect base.
We make their faces rounder and bigger, now all we have to do is to select their chin copy paste it onto a new layer and move it up. Resize it and make it smaller. We smooth the edges and blend it with his skin and tada, soft chubby chin <3

You redo these steps with each single layer. I took an inbetween screen to show my progress. Yes, yes it takes long lmao.

Sometimes the boys angle is really bad for me to go in and make their cheeks on the sides bigger without dragging their eye or mouth with me. Since Hobi had a better angle for his cheeks I copy pasted his and put it on JK. (You wouldn’t even have noticed that without me telling you :D <3)
I also went ahead and cut JK’s head out to drag it down a bit. Basically putting his chin over his arm which most of the time makes a face look bigger especially if we fake a double chin. Fat faces and slim necks are semi okay though.


It’s not really a “next step” but I do it because in my opinion it helps to make their faces look fuller. I go back in and grab the lightest color on their cheeks and color over their cheeks in a big circle with my selected color. I smoothen the edges and boom, they look fuller don’t they?
Chubby faces are more shiny in general because of all the fat in the skin as well as them sweating more which works perfectly here. Of course the main reason they appear “fuller” is the fact that a round shape does not cast as many shadows. A slim face like the boys have would have multiple skin tones in there.
You might have to squint here it’s a really small detail but it does wonders for the “realness” feeling.

STEP 8: For the last step we put all our layers in a folder, copy paste it and combine them into one image. I decided that the image was a bit too blue and wanted more of their rosy cheecks showing. I changed the color key for the entire image and made it a bit redder to archieve that.

and then we are done! I put my watermark on it and save it lmao. I hope you liked this little documentary of my process of editing. This took me 2 hours without writing this humongous post. Hope you enjoyed!

The finished edit will be posted seperately as well for you <3 I’d love to hear your opinion on this. Was it interesting?, did you think that is how it works?
I’d love to interactwith you all and talk about this :3 <3 *hugs*
30 notes
·
View notes
Text
Learn with Jorge Jimenez: How to Apply the Laws of Persuasion in the Most Important Purchase of a person or family: A Property.
Learn with Jorge Jimenez: How to Apply the Laws of Persuasion in the Most Important Purchase of a person or family: A Property.
We continue to give mouth openers, without spoilers, of what you will learn in the Online Congress on Real Estate Sales Funnels.
In this opportunity I bring you an interview of those that ends up changing your vision of the world.
Jorge Jiménez is a young Spaniard, who, according to his own words, empowers projects through mentoring processes.
Jorge manages, like a fish in the water, the laws of persuasion and will expose the issue - at ease - during his presentation of the Congress.
However, seeking to further encourage the environment, he gave us a few minutes of his time to give us a preview of his participation.
The interview starts from a brief, but accurate analysis that makes the purchase of a property.
It is the most important decision any family makes is their life!
I know you will tell me that studies, travel, car, yes, all are important investments, but none like having your own home.
So, based on that premise, Jorge asks that real estate agents resize the transaction, it is not a suit, it is a house and with it, a radical change in the lives of buyers.
There comes into play the issue of persuasion Capital smart city, conscious and ethical.
It is not to put a house to someone by the eyes to sell.
It is to use all your knowledge so that the buyer feels comfortable with you and is willing to take the step with your accompaniment.
We also talked about how the brain operates during decision making and how we can help that process.
Really, an interview without waste, that leaves you wanting the Congress to arrive this June 5 and continue learning more with this crack of persuasion.
Enjoy the interview and see you on Wednesday.
As usual, here I give you the complete transcript of the interview with Jorge Jiménez.
Jesús Rico : Hi, how are you Jorge?
Jorge Jimenez : Good afternoon or good morning to you, we have a time difference of seven hours.
Jesús Rico : That's Jorge, well, we're here with Jorge Jimenez directly from Spain, where in Spain are you currently Jorge?
Jorge Jimenez : In Madrid, in Madrid, although I hope soon you already know it, to move to Colombian lands, not to Bucaramanga, but to Medellín.
Jesus Rico :Oh great! Well, super well, well, Jorge is evidently a person who has dedicated himself to sharing or deepening this whole topic of what the laws of persuasion implies and he is certainly invited to this Online Congress on Real Estate Sales Funnels, because this concept Real estate sales funnels is precisely the logical sequence of a persuasion process to take someone as quickly, and effectively as possible, from not knowing your property, to quickly: yes, hey, this is what I want, and finish buying you, right? And for that, well, well, certainly, well, Jorge is going to talk to us a little about the laws of persuasion and I want you to tell us a little about Jorge, as well as by way of a mouth-opener, tell us Hey, why is that important and this really applies the real estate sector?
Jorge Jimenez :Man, I say that applies to the real estate sector In what sense? Every sales scenario is a scenario that has uncertainty and if we start thinking, apart from being able to throw balls out, and say no, yes it is true, in the sector, well, things may have done us good, no There are fears and others, which is also true, but then there is a fact, which is 100% objective, and that applies in all cases, and is the purchase of a property, it is the most important purchase made by any person or any family in your life, on average, unless you are a mega entrepreneur, buy a property or buy a second home more valuable than the previous one, but it is the most powerful purchase.And we continue to treat the sales process, in such complex scenarios and with such a load on the impact that decision will have on people's lives, such as,
We must be consistent with the importance of the transaction that we are asking the client, we are asking that you trust us in the most important decision of your life.
Jesús Rico : That's right.
Jorge Jimenez : It's a matter of respect and love for the client and the client's reality. They are big words!
Jesus Rico :Look Jorge, in that order of ideas, now understanding what that represents, that is, the most important purchase, then, it means being even more strategic in how you persuade, ethically, certainly, that person not to get your eyes a product, which then in the end, will end up generating maybe some damage and that has happened, in fact, not only here in Colombia, I also know that in Spain, I also know that in many other countries, which end up buying real estate products either, the purchase of an apartment on blueprints, which is just as in process, and then there are delays in deliveries, there is a delay in a lot of things or it was not the property, or whatever, but putting aside that of what would be a bad experience, certainly,out there there are very good real estate products that would respond to the problem that would be an effective solution to the problems of a specific client, but many times the real estate agent feels like, what does Jesus hear, but how do I do that so that this person, one , trust me, why in the majority of cases in that initial transaction or in that sale that you want to make, it is the first time that client gets in touch with that real estate consultant, with that real estate agent, is how he managed Breaking that barrier of trust, of hey, distrust of you and move on to, hey, I trust you and it is exactly the product, that is, in what sense or how can those laws of persuasion be effectively applied?Jesus hears, but how do I make it so that this person, one, trusts me, why in the majority of cases in that initial transaction or in that sale that is wanted to be made, it is the first time that client gets in contact with that real estate advisor, with that real estate agent, is how he managed to break that barrier of trust, of hey, distrust of you and move on to, hey, I trust you and it is exactly the product, that is, in what sense or How can these laws of persuasion be effectively applied?Jesus hears, but how do I make it so that this person, one, trusts me, why in the majority of cases in that initial transaction or in that sale that is wanted to be made, it is the first time that client gets in contact with that real estate advisor, with that real estate agent, is how he managed to break that barrier of trust, of hey, distrust of you and move on to, hey, I trust you and it is exactly the product, that is, in what sense or How can these laws of persuasion be effectively applied?of hey, I distrust you and move on to, hey, I trust you and it is exactly the product, that is, in what sense or how can these laws of persuasion be effectively applied?of hey, I distrust you and move on to, hey, I trust you and it is exactly the product, that is, in what sense or how can these laws of persuasion be effectively applied?
Obviously, I know that you are going to talk about it more deeply in Congress.
Jorge Jimenez :No spoiler! So let's try one of the origins, so that anyone who is watching this interview is more motivated to attend and it is: there are two types of problems that come in, which make all this necessary. One, a biological question, we are simply saturated, this is something that we will deepen a little in the session, but what does it mean that we are saturated? Our brain can not consciously analyze everything, it would be saturated, basically, it is a machine that uses its resources very well and decides, only to make decisions based on information extracts, it does not analyze the complete information, and a person directly watching an ad, getting into a website or watching TV and doing a little analysis, you can make a successful analysis or not,
The only thing that persuasion seeks is to analyze and understand those elements that make a person trust and be attracted to a commercial proposal or a person or a professional, to understand what these six elements are and how they intercede in all the milestones, in All the pages of sale of a real estate funnel or simply of the interaction with the client, whether one at a time, in the skin with skin, is key if we want them to trust us or, simply, decide not to attend us or that fear, insecurity, that maybe he got an aunt who had an operation, with a cousin, with a real estate agent who cheated on her, not at that moment in her head, because prejudices and fears are behind her head of the customer waiting to appear at any time and it is our job,through a strategic communication and knowing these elements, to silence them so that they do not come to the surface and connect with our proposal, with our message, with our professionalism, with that motto that it seems to me that you are going to tell you that you are not selling but that you help
Jesús Rico : Ok, of course, super, that is, in short, it is something that is applied both in the recruitment phase, from what is done on the Internet to capture it from Facebook, from Instagram, from Google, on how to think, how to attract and how to get attention and, of course, to take it later in that sequence of pages such as - also later - when it is already facing the client and how to apply, that is, those laws of persuasion do not only apply for what it would be A text or a page.
Jorge Jimenez : For sale, no, no, to everything, to everything, to all layers of society, it is the wonderful thing about these studies that have been done by psychologists endorsed in universities, for me a person who inspires me a lot, The great disseminator of all these fundamentals, which is Robert Cialdini, and who has dedicated, I don't know, is almost 40 years of his professional life to study this and how it applies, not only in an environment of sale and persuasion as such and We know it, but in personal interrelations, in family environments, in leisure, that is, it affects all layers of society and even more so in important decisions such as the purchase of a property.
Jesús Rico : In everything we communicate, basically ...
Jorge Jimenez : In everything, that's why and more people are going to have a good time, because it is a topic that I am very passionate about communicating without Power Point or anything, on camera, they will have a good time, they will discover things, they are going to make very interesting consciences and also even for those attending the live shows, there will be even gifts.
Jesús Rico : Oh, super good! Very, very good, very good Then, well, nothing, in this case Jorge, well, Jorge tell us a little about your professional work, who you are and good, and I also don't know, something you want to tell us about your plans.
Jorge Jimenez : Whose am I? I do not usually work with real estate, although this last year and a half, the truth, has been curious because I have had three clients in different facets within the real estate sector, one: an architect who is dedicated to designing different technological homes, then it was a proposal very interesting for customers and understand how are the processes of buying high-standing customers, a woman who is dedicated to relocating executives who come from multinationals to live in Madrid and, then, a company that is dedicated to public auction, to buy real estate at public auction, and help people acquire it through their model, something that in Spain is interesting.
So, due to my research, more evidently my work on business, on value proposition, on marketing, I am very cool right now, although it is not a specialization, but very cool due to these last three clients, in this last year, everything what has to do with the real estate sector. Then, the contributions of value will be very interesting and not only are they in the theoretical framework but I have had to experience them in practical cases.
Although it will be seen on my website, I am not, then, maybe a person who is now specialized like you, it is yes I am, yes I am aware of the challenges and what scares me the most and that is why it seems the opportunity of your proposal is very beautiful, there is a saying, I do not know if it is also in Colombia, which is: "The one-eyed man is the King in the country of the blind", and as usual things are done so mediocre and so old, as soon as you apply those tips that experts are giving to the…. at the spearhead of your sector, you can eat the market and, apart, they have to do it because if you are not going to end up doing it ... they are geolocated businesses, it is what they have the activity of these people, then, although it is not nice to speak in a war language, but it is true that it is a gladiatorial struggle in the sense of the person who begins to implement these really real estate funnels and these more advanced strategies ... it is a very large cake, but that - not too soon - I can get to absorb what before more mouths were distributed, so it is a matter of survival of the strongest and adaptation to new technologies. If we are shopping online all the time, we do operate with the phone, if we operate online, what do you think? That your customers also do not operate with these devices? Then, in the end, either you do it or the one in front will do it. then, it is a matter of survival of the strongest and of adaptation to new technologies. If we are shopping online all the time, we do operate with the phone, if we operate online, what do you think? That your customers also do not operate with these devices? Then, in the end, either you do it or the one in front will do it. then, it is a matter of survival of the strongest and of adaptation to new technologies. If we are shopping online all the time, we do operate with the phone, if we operate online, what do you think? That your customers also do not operate with these devices? Then, in the end, either you do it or the one in front will do it.
Jesús Rico : Of course, of course, of course, that is, here a saying also, that would complement what you just mentioned, because in Colombia, and I think that many sides of Latin America, and that is that “the one who hits first hits twice ”, Then, it is certainly something that would complement it, well, nothing Jorge, then, give us the invitation so that those who are listening to us can attend and can motivate even more to register and attend this Online Congress University town on Real Estate Sales Funnels, which it will be done on June 5 of this year 2019, and that will be given 100% online via GoToWebinar
Jorge Jimenez : See you, I'm going to be one of the small fractions, but the truth is that they are great professionals who simply float to the head and I understand that their activity is usually very frantic, but that day, if they really want to bet, not only for the next quarter but for the next three years, the next ten years of his career as a real estate agent, they have to reserve it one hundred percent to attend and not only that work day but also the next day to process the information and lower all ideas to the ground, which will be attended by those who attend.
Jesús Rico : Well, well Jorge, a pleasure to have shared this interview with you and, well, of course, we are waiting for you here in Colombia according to your plans, well.
Jorge Jimenez : A pleasure, bye, Jesus
Jesus Rico : Chao
1 note
·
View note
Note
Do you have any tips for people new to pixel art?
This lil guide will be focused on Photoshop since that’s the program I mainly use. I also use Aseprite primarily for animating complex pieces and using the seamless tile features. Aseprite is cheap if you don’t have access to photoshop, but I’m not proficient enough in it to offer much advice so you’ll have to experiment on your own. You can get a trial of it too.
Back to Photoshop! Knowing Photoshop well will make things a lot easier for you. I won’t be covering how to use most features so if I bring up anything unfamiliar, look around for general tutorials about it.
Set Up:: You will need to change some of these settings back when you’re no longer working on pixel art otherwise your other photo editing / digital art will get pixellated unintentionally.
Image Interpolation:
Edit -> Preferences - > (General) -> Image Interpolation -> Nearest Neighbor
This change will allow you to resize anything will retaining the pixelly quality. Without this setting, resizing your pixel art will make it blurry.
When using the Resize function, you’ll also want to make sure the Resample option is listed as Nearest Neighbor.
Turn off Anti-Aliasing
Aliasing is when an edge has these stair-step lookin’ edges. Those edges are desirable in pixel art, but less so for other kinds of art. Photoshop uses anti-aliasing to soften those edges so they appear smoother.
For any Selection tool you use, uncheck the Anti-Aliasing option. Now when you use selection tools, you can be certain only the selected pixels will move and no blurry shearing will happen.
Pixellated text can be made by selecting “None” for the anti-aliasing on text. A lot of fonts will not look great so select something without too many frills. I usually draw over or tweak this text after the fact as it rarely looks good as is.

Workflow Notes
Use the Pencil brush tool. In my version of Photoshop, it is a subset of the Brush tool.
Stroke is a function I use constantly to quickly and cleanly outline things.
You can find this in Edit -> Stroke
It will outline the currently selected area OR the current layer if there is no active selection.
How the outline applies will be changed by the “Location” option. This tells the function to put the lines outside, inside, or centered along the selection lines or transparency boundaries. The Centered option only really applies if you’re using an outline larger that 1px. I only use 1px for pixel art outlining.
Above are examples of outlines-
A: Blue selected, INSIDE stroke
B: Blue selected, OUTSIDE stroke
C: I selected the TRANSPARENT parts with the magic wand and used an INSIDE stroke. This is the one I use most because it gives the effect of an outside stroke but looks better because it’s less chunky. Compare B and C to see what I mean. NOTE that with this method, it will also outline the perimeter of the entire image, so you’ll need to erase that too. (Also worth noting I’m using an ancient version of photoshop, and its possible newer photoshop does better with outside strokes lol)
I personally don’t work much larger than 400x400 (at 72 ppi). IMO, anything with too big a resolution & canvas tends to stop looking like pixel art and tends to look more like regular digital art that just has a crispy quality to it. This is especially the case for pixel art newbies. Until you know what you’re doing it can be hard to fill out those large parts of the piece. The smaller you work, the more care you’ll need to put into the placement of every single pixel - which is an excellent way to learn little nuances of the style. If you want pixel art to cover a large area (for, say, a desktop wallpaper or a website banner) you should work at a quarter or less of the size you need, then when complete you can just quadruple (or more) the size.
Other areas to study:
Search for more guidance on these topics on your own: there should be plenty to find on the internet. These are functions I regularly use when working on pixel art.
Clipping Masks
Layer Masks
Patterns
Hue/Saturation
Levels
Adjustment Layers (Gradient Maps and Posterization layers specifically)
Selection tools (Also get to know methods of subtracting selections and stuff)
HOTKEYS!!!!
In terms of basics, thats all I can think of right now!
Found this useful? Like my work? Consider pitching in a tip on Kofi :)
241 notes
·
View notes
Text
Sorting Out Issues With Mock Ups - Problem Solving
I have now got to a stage where I have finished all my final outcomes, however the last step for me to do is to present them more professionally. So I started by placing my label designs onto some mock-ups I found on ‘Freepik’. When I first discovered these, these they were perfect as they did different sizes, to which I needed the smaller versions. So I downloaded three, but found that I couldn't do anymore as I could only do three a day. This didn't matter as I knew that I could come back the next day to get some more. The only problem was that when I did this, I found that it was saying the exact same thing. So to get around this, I just signed in multiple computers and downloaded them, where I could then save them all on my USB.

The next issue I was faced with was the fact that the size I created my labels on was A4 as I thought that I could just increase or decrease the size when I placed it onto my mock-up but while doing this, it would get rid of most of design to cover the whole label.
I then had to work out the size of their canvas on the mock-up and recreate this on Illustrator. I then had to move all my elements from one file to this new file and resize all the aspects to fit this new design.
Below is showing the the look of the new label, to which obviously this is just for the orange one, but I had to go through all four and change it like this. Not to mention, I had to do both sides, front and back for each flavour so in total I had to mess around with 8 separate files. At this point, it was getting very confusing and my folders in my USB were getting very messy. This was also because I was changing them to PNG’s too to make sure I was crating them right.
Additionally, I kept calling the names of my files the wrong flavour as I was rushing to get this done as soon as possible. This lead to me saving files over other files, that I should have kept, where this then lead in circles as I then had to recreate something that I had already done, just because I accidently saved it over something else.
At first, I was worried that the two circles at the side wasn't going to look right as I was going to have to squash it, although I figured out that I could just add a rectangle shape to create this effect that would then match with the front design.

The next problem that occurred was that my designs didn't curve around the jar like it should. It was odd because a normal sized jar that I did ages ago worked fine and that was the exact same mock up apart rom the fact that it was a larger label space. I tried a few times to see if I could figure it out, to which it was doing the same thing evetime.
I got to the point, when I thought it was the mock ups and tried searching for some similar, although there were non that had multiple ones just in a different angle. I ended up going back to the mock ups had downloaded and after quite a while, i discovered that there was layer in the mocks that I should have kept in, but instead I deleted this. I knew the reason whey I delated the layers, as it was because it over complicated what i was looking at so I only kept the ones that though I needed. Like I previously said, that I was in a rush to get these done, so I must have not noticed that it said to keep this layer.

Once I found this out, I then got to the point where I could change the smaller details like the background colour and the lid colour. I decided that I was going to have the background colour to match that specific flavour, but when it got to the lid, I found it wouldn't just chnage the lid, it would chnage the colour of my design too. As you can see below, this doesn't look very effective as I would either have to have a very light colour that would almost be white or a darker colour that would completely mess up my colours.
After this, I decided to just keep the lids as being white as it makes more sense, but also looks a lot more neater.

The last problem I had once I had actually finished the mock-ups was that I needed to present them onto my website, to which I thought that for them to look effective I will need to crop the mock-ups so that there's less negative space. This is because the balance between the negative and positive space was massively out of proportion. So I used the crop tool to got through all the mock-ups. I then placed them onto my website where I had some images on their own, and most of them were placed onto a carousel, where you would be able to go through them all. But the issue I found with these is that it crops the images even more meaning some of my mock-ups didn't actually show the whole jar.

To solve this, I had to go back through these ones where I lucky had saved two mock-ups so I was able to just replace the designs with the other flavours. It was lucky that I had saved so many of the same mock-ups that it didn't take me as long as it would have.

After all of these problems I was finally able to say that I had finished on these label designs and could move onto my next task.
0 notes
Text
A Brief Discussion About Clipping Path & Photo Cut Out Service
Clipping Path & Photo Cut Out Service

When you’re first starting out working with Photoshop, one of the most important things that you need to know about is what are clipping path services and how useful they can be. A clipping path is a sort of a graphic overlay that will allow you to have layers in your image that will be visible when you change the values of one of the layer, like you would when you’re doing an image adjustment or redo. It’s an easy concept to grasp, but what are clipping path services and why is it used so often? Well, the reason it’s so popular is because many of the tools that Photoshop users like to use, like Paint Shop Pro, also have built in support for clipping path services. These tools include things like pre made masking effects and transparency masks that allow you to do things like add in highlights, thin blackouts, and even little tweaks in color and style.
If you haven’t taken full advantage of what are clipping path services, you’re missing out on a lot. These tools, while they do save time by automatically performing the various tasks that you’d normally have to perform manually, often can also do much more than just that. For example, a simple image editing company would be able to set up a simple clipping path that will allow you to edit a picture with different filters applied to it. If that wasn’t enough, the tool could then create what are known as “stippled” effects – this means that the image you were working with would now appear to have been touched up with different brush strokes and so on. The great thing about this is that these effects don’t just stop at using Photoshop, they can also be used with software like AutoCAD.
One of the most commonly used clipping path services is what are known as “line clipping”. With this type of service, the path is drawn as a line between two objects, usually representing a point on one side of the object and another on the other side. There are some clipping path services which allow for the creation of what are known as “polygon clipping path”, which is very similar in functionality to what are known as “shape clipping path” tools within Photoshop. Essentially, what happens here is that the same path is drawn as if it were a polygon – and then any clipping path effects which are performed on this polygon will be applied to the area of the object which is being drawn along that path. This type of effect is commonly used when creating effects such as tiling, but it can be used for any type of image editing.
What is Clipping Path Service?
What is Clipping Path Service and what is its purpose in Photoshop? Basically, Clipping Path service is a method which helps editors in editing photographs to remove a specific part of its background. In fact, it is also known as Background removal or Background adjustment service and it helps you to remove or adjust the background of your image with the help of a brush or a knife tool. Normally, simple straight images need Clipping Path service and more advanced images need Image Masking.
How to make a clipping path so that you can remove a specific part of an image is very important for professional photographers. One of the most interesting things about Clipping Path service is that it can help you fix or remove an abnormal shape, or it can be used to remove crop marks on still imagery. There are a number of tools in the Photo editor which allows you to adjust or create a clipping path. This includes Curved Blur, gradient clipping path and Web Clipping Path. If you are interested in learning more about these tools, then here is how to make a clipping path in Photoshop.
The first step in the process is to select a layer which is a main color of the image and the second step is to select a tool which allows you to move the mouse cursor over the shapes of the image. For this, first select Artistic mode, next select Clipping Path, and finally, select Apply. Once you have done that, your image will be modified in such a way that you can get the best quality image from the computer. If you are not clear about the details of the above process then you can simply follow the tutorials provided by Adobe in order to understand more about Clipping Path service and other such services offered by the software. Once you are familiar with the entire process then you can take the assistance of experts for setting up the same and start editing the photographs which have been prepared using the same.
How to Make a Clipping Path in Photoshop
In this article, I would like to tell you how to make a clipping path in Photoshop, how to select shapes, how to mask objects and how to layer effects. A clipping path can also be utilized to cut out an image in Photo editing software like Adobe Photoshop. So, basically, the clipping path is like a shape or a line, which is used to cut out an image from Photoshop.
To make a clipping path in Photoshop, first, you need to open a new picture in Photoshop. Then, right click on the Picture menu and click on “Clipping Path”. Another click on the “openture” option to create a new path. After these operations, you have to choose the type of clipping path from the “Clipping Options” section. There are two available modes in Photoshop; ‘Auto’ and ‘Manual’.
Now, you have learnt how to make a clipping path in Photoshop. You have learnt how to extract or remove a certain area of an image, how to add some color and how to make it look like a professional photographer’s work. Clipping path services can really save your time and make your work easy. But, if you want to be a good photographer, you should know how to make a compound clipping path in Photoshop.
How to Make a Cutting Path
When it comes to computer graphics, no concept is more useful or challenging to understand than how to make a cutting path tool. In actual fact, many of the most cutting-edge graphic design programs utilize some form of path program to help simulate the look and feel of a brush, or to create effects not possible with conventional painting techniques. The concept is relatively simple – a path is created by cropping the image, then creating a cutout in the middle of that cutout, then filling in the resulting ‘rest’ of the image. There are a number of different types of clipping path programs available today; however, a good knowledge of what they are and how to make them can go a long way toward helping your graphics efforts.
A clipping path is often used in conjunction with other image processing tools, such as convolution masks, filters, and other types of adjustment tools. These tools will first take an image and convert it into a ‘stitch able’ pattern. Then, using the optimization tool or other tool, the image is manipulated using mathematical algorithms so as to create a repeating pattern. In order to create the cutout, the image must first be blurred using a soft brush or other image manipulation tool and then fed into the appropriate clipping path program. The resulting ‘rest’ of the image, which may be comprised of an outline, will then be projected directly onto the clipping path.
Many cutting path images are generated using a grid system. This is because it allows the creator to easily see the cutout as a whole, rather than having to zoom in and out. Clipping paths can also be generated with solid fills, but because of the extra step of generating a fill as part of the image, these images are more difficult to generate. With a little patience and practice, learning how to make a clipping path can be extremely beneficial for a graphic designer.
How to Make Photo Cuts Out
Nowadays, lots of photos cut outs services have been launched in the market. The main reason behind this vast demand is the usage of images as a medium for promotion and marketing. All this is done with the aim of having high-quality photo results. Image manipulation or photo cutting is extensively used in order to create high-end photo results in a short time span.
This is also known as image slicing, rectification, and stretch. Photo cutting services involve image manipulation tools such as filters, picture blurs, resizing, masking, curve-fitting, dodging, and numerous others. These tools help you make the best way to remove unwanted background from an image by adjusting it according to your needs.
These tools are widely used in order to remove the background that can ruin the whole photo effect. In order to do so, you have to use special software that will enable you to cut out a selected background in a desired color range. All this can be done by just using a special type of pen that contains ink mechanism to carry out the photo cut out operation. image cut-out photo background After that you need to give the image a good and solid fill. You can also add some effects to the image to enhance its appearance. After all these things are done, you can easily make a cut-out of the image using your pen. The photo cut out will be then blended with your original image in the background.
The post A Brief Discussion About Clipping Path & Photo Cut Out Service
from Clipping path service, Remove background from image-CLIPPING USA https://ift.tt/3owhnrz
#best photo editing program clippingusa#best photo editing services clippingusa#photoshop masking ser
0 notes
Text
Muddy Trails and also Sandy Paws: The Story Behind DJANGO’s Adventure Dog Harness and Leash Collection
July 09, 2020

In mid 2016, Mike and also I(Steph)packed up our small New York City house, placed almost everything we owned right into storage, and flew to the Pacific Northwest with two suitcases as well as our dachshund Django. We rented a tiny furnished home in downtown Portland and also acquired a pre-owned Maggiolina Airlander auto roof covering camping tent for camping journeys. On weeknights after work, we would certainly drive east into the Columbia River Gorge as well as check out countless trails as well as falls. On weekend breaks, we would certainly drive south as well as explore Central Oregon. Days were spent treking dog-friendly trails as well as exploring out-of-this-world tourist attractions – believe hot springs, lava areas, as well as more waterfalls. Evenings were spent sleeping as a household of three in our remarkably comfy Maggiolina Airlander vehicle roof camping tent.

Mike as well as I were both functioning from another location at this time and completely place independent. So when it began to rainfall in Portland in mid-October and really did not pick up 3 consecutive weeks, we made a decision to pack up and drive south to warmer weather condition. 17 hrs and 1100 miles later on, we concluded our road trip in one of San Diego’s many attractive beachside neighborhoods, La Jolla.
For the following 6 months, Mike, Django and I lived in an enchanting beachside rental 500 feet from Windansea. Windansea is a breathtakingly stunning beach with a high, rough coastline as well as rough surf. Throughout evenings at reduced tide, we would certainly run down our road with Django to the water’s side and also let him run totally free while we took in one of the most legendary sundowns.

The Idea. DJANGO pet equipment business officially released in late 2016, as well as we’ve done a load in those 3 brief years. In the midst of our Pacific Northwest journeys, we introduced a trail-friendly wintertime pet layer that has actually considering that taken place to be an Amazon finest seller. After returning from the west coast to NYC, we designed and introduced our elegant, useful, as well as commonly well-known waxed canvas and also natural leather dog carrier bags. We were thrilled to see our pet dog totes featured throughout the media range as well as placed the # 1 ideal total canine carrier bag by Business Insider. The first sketches of our Adventure Dog Harness and also Leash designs were formally formulated in very early 2019, yet we had been discussing these new layouts for months beforehand. Our overall objective was to craft premium quality, durable, as well as comfy pet dog harnesses as well as chains that would certainly hold up against rugged surface and the aspects(water, mud, sand, snow, dust, etc. )while likewise promoting DJANGO’s contemporary as well as fashionable aesthetic. Just how could we design a pet dog harnesses and also leads that were just as adventure-friendly and trendy? It all begins with the materials.
The Materials.
When creating new items, we never ever consider skimping on worldly quality to conserve a couple of dollars. Quality, sturdiness, as well as durability of DJANGO layouts is just one of our leading concepts, and also we will certainly never take the low-cost-low-quality approach of fast style brand names. We desire you to inform us 5 or 10 years from currently that your dog still uses his initial Reversible Puffer Dog Coat!.
?. !! We upheld this core concept when making our Adventure Dog Harness and also Leash collections. Choosing the main product of our pet dog harnesses and chain manages was in fact an easy choice. We required a material with immense physical toughness that was additionally lightweight, flexible, and also comfortable … a material that would certainly drive away water, mud, dirt, as well as snow … as well as stand up after limitless experiences as well as aggressive play … and be exceptionally easy to tidy. The solution? Neoprene.
Neoprene, the material that wetsuits are made of, is one of the most readily effective artificial rubber on the market. It is recognized for its soft, supporting texture as well as water-, dirt-, and stain-repellent capabilities. Neoprene is exceptionally lightweight and also versatile. It is likewise flexible. This suggests that after hundreds of walks or treks or swims with your puppy, your four-legged household’s DJANGO pet dog harness will certainly not stretch out yet keep its original shape as well as performance capabilities.
Neoprene is additionally an abrasion-resistant and also incredibly solid material. Image surfers’ wetsuits damaging across surf boards for hrs each time as well as never ever revealing a mark of degeneration, chafing, or weakness.
What does every one of this mean for us? Neoprene was clearly the perfect product to wage when designing our Adventure Dog Leashes and also takes advantage of.
We also chose strong actors brass equipment for our collection. Each DJANGO dog harness features a stunning, marine-grade brass D-ring. Every DJANGO pet dog chain features a strong
brass swivel break hook and also practical D-ring at the base of the take care of. Why solid actors brass? Solid brass is extremely strong, sturdy, and also immune to salt water, rust and also rust; it is used commonly in boat and marine building for these factors. Solid brass likewise gives our Adventure Dog Harness as well as Leash collections a modern and also advanced style that can not be duplicated with reduced price steels as well as alloys made use of extensively by big-box pet sellers. Since our goal was to create excellent quality, sturdy, and contemporary canine utilizes ideal for every wet and muddy journey, solid actors brass was constantly the clear selection as we debated andchecked premium quality equipment.
The Design.
When making the shape and feature of our new harnesses and also leashes, we prioritized convenience, fit, and simplicity of usage.
DJANGO’s Adventure Dog Harness has an extremely streamlined, slim, as well as deep body. This form not just lessens harness weight yet also avoids any type of danger of chafing around your canine’s armpits and also arms (despite for how long or hostile your getaway). The harness body is also lightly padded to make sure convenience if and when your canine decides to draw. With our dachshund Django, drawing is often inescapable!
The dog harness includes four factors of modification. The neck and also chest straps both have 2 modification items that allow for easy resizing and a custom fit for your pet.
2 sturdy side-release buckles on the upper body band permit very easy on as well as off. The dual clasps also make this harness a great option for dogs with arthritis given that there is no need to lift a leg and/or step into the harness.
Presenting … (drumroll please)… DJANGO’s Adventure Dog Harness and Leash Collection

We are enjoyed bring you the latest line of DJANGO canine equipment, our Adventure Dog Harness as well as Leash Collection. We absolutely wish you and also your canine enjoy your brand-new harnesses as well as chains as well as appreciate unlimited trips and experiences in your brand-new equipment. As always, please share any kind of photos you take of your dog in his/her Adventure Dog Harness or Leash by labeling @djangobrand on Instagram or emailing us
photos directly ([email protected]). We LOVE hearing from you, seeing your pictures, following your journeys, and sharing your impressive images with our
dog-loving area. Share: Leave a remark
from Lucky Dog Solutions http://www.luckydogsolutions.com/muddy-trails-and-sandy-paws-the-story-behind-djangos-adventure-dog-harness-and-leash-collection/
0 notes
Note
hi can i ask how do you make time to create so many gifs? i barely have time to make one gifset in a week :(
Short answer, I’m really fast and I have a very fast computer!
Instead of giving a long answer though, I thought I’d give a few tips on how I do it, since this is a question I’m asked quite often, so what the hell, I’m gonna share my wisdom :)
The following tips are very useful and will 100% cut your time on photoshop of a significant amount… Though I want to stress on the fact that it’s having a lot of RAM on your computer that’s going to make the real difference on how fast you can be.
How to be faster when you gif:
I’m not sure how important it is to other people, but I’m very organized. When I’m making a gifset, I put the screencaps in different folders for how many gifs I’m making. That’s helpful for several reasons (it’ll be relevant a couple of points down too), but also cause I know how many more scenes I need to capture to complete my gifset, and I directly have a general idea of what the gifset is going to look like.
Related to that, I usually keep on my computer, on a pendrive and on a HDD the screencaps of some of the scene I use the most/I can possibly use in the future. They’re all in different folders, some named by character, some by fandom, some by episode, some by colour. This is very useful cause I don’t have to go and capture them again and again, wasting time. (Say, I gif Tony Stark quite a lot, I have most of his scenes already saved. It saves me A LOT of time!)
I use potplayer for capturing frames. Using that, or whatever app you have (I had kmplayer before) is way faster than using photoshop to do it.
I always capture the screencaps before I open photoshop. I usually keep the 2 phases separated. It’s mostly habit by now, cause my old pc was much slower than the one I have now, and this is especially helpful if you don’t have much RAM, cause as you know, ps runs on RAM, and will eat as much as you give to it. If you have other stuff open at the same time while using ps, it’s gonna make your pc and the whole process really really slow.
Following that, you can actually up the amount of RAM you can dedicate to photoshop! Go on Edit -> Preferences -> Performance! Remember not to overdo it though, especially if you plan on using other apps while you work on pc! I keep mine at 70% (so I have 10gb of ram dedicated to ps, now you see why I’m fast.)
Uploading screencaps as multiple DICOM files is much faster than loading files into stack! The main difference is that you can’t pick and choose which files to load, but you can only load folders (hence my putting everything into folders I said above!)
Now, the best advice that I can give you, the one that will change everything and really make everything so much faster: make actions, use actions!
Seriously! I’m the laziest person you’ll ever going to meet, so I made myself an action for literally EVERYTHING. Why? Cause a lot of the work we do on ps is repetitive and we end up doing the same things over and over for 8, 10, 20 gifs. Making frames from layers, setting the animation delay, resizing, sharpening…. It’s always the same things, but we waste so much time to input all those commands!
I made myself an action for making frames and setting the delay. I have several other actions for resizing in the dimensions I use the most (like I have an action for 268p x 140p, one for 268p x 170p and so on). I have another action for sharpening. That means that the only thing I need to do is hit play and that’s it. In a couple of seconds everything is done and I have the gif ready so I can start the fun part: colouring it.
I don’t know why but it always takes me way less when I use actions than when I have to input those commands by hand. A+++, best thing I ever started doing, would totally recommend you try it!
I don’t have much time myself, love, that’s why I keep everything organized and ready to go, so I can gif on my breaks, and I don’t have to be more frustrated than necessary (and god knows how frustrating colouring can be!)
I have the advantage of having a pc and not a mac, so I can use potplayer directly and not waste any time converting my videos in acceptable formats that quicktime can read (kudos to mac users who spend so much time on that omg how do you do it!)
I hope this helps honey :D
566 notes
·
View notes
Text
Escape, for OQArtistWeek
This is a late entry for #OQArtist week, based this sexy manip of @starscythe *fans self* . I realize this is probably a bikini Regina is wearing, and this is probably a beach scene judging from the wet strands of hair, but Regina has this flawless movie star makeup on and she always seemed a bit too refined for beach sex. The facial expressions are so sexy and needy, I pictured something sweaty and intimate between two people desperate for one another. So I always saw this art as something quite different.
Thanks Bea as always. Betaing porn is hard, ya'all, and she betas it like a champ. I guess trigger warnings are in place. This is a hard M rating (shocking I know) and things get...intense.
It's just coffee.
She repeats that every time they go out in these excursions.
They are coworkers, and it's just coffee. Or in her case, tea. Just tea.
Coworkers drink coffee and tea together.
There's nothing scandalous about that.
But coworkers don't find whatever excuse they can to brush against one another. Coworkers don't trade intimate details of their lives that they don't even share with best friends, cry on each other's shoulders, or spend the majority of the day stealing glances at one another. And coworkers definitely, definitely do not fantasize about one another.
So maybe she's just a coworker to him, but he is absolutely more than that to her.
"He asked me to marry him," she says quietly. She hates to bring it up, but Robin should know about the proposal. He's her friend. Her best friend. The only person in this entire competitive, cutthroat network whom she trusts. Definitely the only person who honestly cares about her. But it's not that, not just the fact that they are friends that has her feeling obligated to tell him about the proposal. He should know because of the way he looks at her.
The way they look at one another.
She watches his eyes fly to her naked ring finger. "What did you say?" He looks hopeful, as if she finally made the right decision. But he's wrong.
"We've been dating forever, and I think there's more positive than negative. I said yes." She covers her left hand with her right. "The, er, ring is being resized."
"Eight years and he doesn't know your ring size," Robin grumbles.
"Do you?" She asks defiantly. "It's not something men know, unless you are in a habit—"
"A habit of buying jewelry for the woman you love?" he quips. "I assure you if I had proposed to you I'd know your ring size. I'd take one of your rings to the jewelers to match it. Or, Christ, a good jeweler could show you what each width looks like, and, I've held your hand enough to know what your fingers feel like from memory, so I'd—"
It's a bit too honest, has her squirming a bit, because he's right, absolutely right, he's held her hand so many times, but also, this is wrong. Absolutely wrong. And what right does he have to criticize her decisions in her love life when he's never tried to be a part of it?
"Sorry," he breathes, "I should be congratulating you, I'm just… I don't think he's good enough for you."
That's... sweet, she supposes. And to be fair she's shared her problems with Graham many times, so perhaps it's understandable that Robin would feel this way.
"If there's someone better, I haven't found him." Regina says, staring defiantly at him.
"Any man in his right mind would be over the moon to have you," he whispers. It's honest, too honest. But she's made her choice, and this can never be, anyway. There's a strict no fraternization policy at work. He's technically her boss, so that's an extra layer of forbidden, isn't it?
"Let's talk about something else," Regina says, lifting a hand off the table to smooth her hair. "Something to make me feel... happy."
He offers her a sad smile, and she knows it's very telling that talk of a proposal is depressing her, but well, that's the way it is, damn it.
He shifts the topic to their quirky coworker, and then they are laughing, exchanging jokes and smiles and touches as if nothing had changed.
Things go well until her phone pings. It's a reminder chime, and she frowns, glancing down at it curiously. There's nothing on the schedule for today that she can remember.
"Shit," Regina grumbles, "Robin, there's a meeting today. In 5 minutes." She turns her screen to his.
He looks puzzled. "I swear I didn't know anything about this, Regina."
He grabs his phone and checks emails frantically. "Looks like it's an emergency meeting to deal with the Army of God threats again." He rolls his eyes.
"Anything I should be worried about?" Regina asks, sipping the last of her tea.
"No, no credible threats. But their leader is appearing on Fox today, and we expect him to give us and a few other organizations a bit of a shout out. You know how that goes."
"Get ready for hate mail and death threats," Regina says rolling her eyes and rising from her chair. "We are going to be late. We have to hurry."
The meeting is on the fifth floor. She thinks he realizes what that means at the same time she does — right when they reach the elevator. The fifth floor meeting room is large, with glass walls that face the elevator. Everyone will see them walking in late, together, and that won't do much for rumors that have already started about the two of them.
And really, with her occupation, it's sort of assumed she will try to sleep her way to the top at one point or another. Who better than a media director often tasked with assigning high profile interviews to reporters like her?
"You take the elevator," he says, with a frown. "I'll use the back stairs."
The back elevator and stairs are not to be used for anything other than moving in the high profile guests or interviewees that need and added layer of security. Robin is one of only a few with the code. And while he can't use the back elevator (risk of being seen using a secured area) he can probably sneak up the stairs. No one really even knows that stairwell exists. It's hidden and secure, designed that way for good reason.
Regina nods. "See you there."
He smiles at her and rushes off, waving slightly as he goes.
And then she waits for her elevator as impatiently as one can possibly wait.
(She will look back on this day and thank god for the fact the elevator seemed to be stopping at every floor at a treacherously slow pace. Thank god that she figured she could use the exercise. Thank god it all, because she might have been dead had she waited for it. Instead, she'd opted for the stairwell. It was only five flights, after all…)
After what feels like an hour, but is only probably a few minutes, she turns towards the stairwell and decides to make up for lost time. She's cursing her heels as she rounds the stairs to the third floor when the first explosion hits with a Crack and a Boom!
It's so much noise, so loud it almost feels as if there's no sound at all. Debris falls from the ceiling, covers her in dusty plaster and paint chips, and god knows what else, her head is spinning, ears are ringing, eyes burning as there is one thought going through her mind.
Robin.
The explosion reverberates everywhere in that stairwell, echoed and shimmied from every inch of the walls, and she doesn't know where it came from, but god let it not have come from that secured stairwell. Not where they keep the high profile guests, where someone who is targeted might be hiding, please let him be alright.
She turns back to the third floor door and opens it. People are panicking, running towards her, a fire alarm is sounding, the emergency lights are flickering, and the crowd is shouting that she turn around, but she's not listening, her mind is racing with hypothetical scenarios she wishes she could erase from her memory, heart nearly exploding at the thought of losing him.
Robin, please be okay, Robin.
She reaches the secured area in the back, elbowing past frantic people trying to push her away. But it's mostly clear now. She hears some pop, pop, popping from above, isn't sure what that is, what's happening, and the ceiling above feels like it's moving, giving out… will it collapse?
She reaches the back area, finds that secured back door, and knocks and screams. It's still locked. She had held out hope that with the electricity going out maybe the electronic lock would fail and she'd be able to get to Robin.
But they must have a different power source. The code button is still there, gleaming red awaiting an electronic badge or code to be punched into the keypad below. And she has neither.
She has nothing but fists and her voice as she punches and screams.
"Robin! Robin!"
Robin is alive, Robin is okay. He's resilient and smart and cunning and he's a survivor and that's what survivors DO. They survive.
These little pop pop pops sound closer and louder now, she still isn't sure what it is, but it's followed by more screams and that can't be good.
There could be anything on the other side of this door, she very well knows that. There could be men with guns and suicide bomb vests on, Robin could already be dead, they could have used this stairwell to—
It really doesn't matter to her, she'd gladly risk her life for that wonderful man. He's everything to her.
"Robin, please!" She screams again. Her hands are bloody now, banging carelessly against an ungiving door.
Continue on FF.net
73 notes
·
View notes
Note
hii just want to come to ask how do you manage to make gifs that are long, full-color, sharp, and all round beautiful? mine always end up having insane sizes like up to 5MB sometimes which then means i cant upload it on tumblr :( do you know how to reduce their size without reducing the quality? thanks!
Hi there! Getting your gifs to fit into tumblr’s limit can be tricky sometimes. Gifs have a limit of 256 colors, the larger (in terms of width and height) the gif the more amount of colors you’ll have and therefore the bigger it will be. That also means that the more movement it contains it’s also going to be bigger in size. Sometimes you can’t help it and the scene contains a lot of movement, that’s when i try to reduce the amount of frames i use if when i export the gif it ends up being larger than 2mb. I think that you first must make sure that you crop and resize the gif appropriately. I’ve seen a lot of gifs that are posted as smaller but are in fact way larger in terms of width and size. So the first thing i’d advice is to make sure your gif is the right size: crop it first, and then resize it to one of the new correct sizes. Once you do that you must make sure to sharpen all the frames of the gif. That will help reduce the size even if at first it in some cases may increase it. Coloring is the next step and that really decides on how many colors you are going to end up with. Adding some dark colors (with levels or the neutral/black selective color adjustement layers) can help to reduce the amount of colors because it sort of become merged with the “darkness” you are adding. Even vibrancy and saturation - sometimes - help. I always have a base coloring method and i then change it to match the scene. It’s really a lot of trial and error, so that’s why my photoshop is set up to have a very large “undo” (history states = 200 in Preferences > Performance) which i recommend. So.. that’s what i do. I really don’t do anything else to make sure that gifs are within tumblr’s limit. Remember that the size is very important... if i make a sort of “taller” gif then i know that unless it has a very static background or not much movement then i won’t get away with adding more than 50 frames.. when gifs are more wide than tall, then sometimes you can go up to much more.. and if they are sort of small.. 268 x 110 or something, 120.. then you can with the right color, can go up to 90 or more. Again, it’s a lot of trial and error and a lot of giffing to get the hang of that equation in your mind. I hope this helps and let me know if you have any doubts ♥
12 notes
·
View notes
Text
Info about scale pictures with easy photo editing software
Top photo editing software for beginners for rookies and pros for very easy mosaic an image
Beginners ought to absolutely not hesitate to try our Windows 10 photo editing software since it is certainly really helpful and anybody get a lots of support out of our tool while editing your photo shoots. Possibly the most shiniest jewel within that photo editing software for Windows 10 bundle may be seriously this good looking skin layer process, and that manages dark spots along with evens your body skin tone. All that great images of car and motorbike in which people likes should seem regular in order that people will that one may check out all of them as well as anyone might even win. That says photo editing software offers a vast width of appearance, starting with rookies by using cropping and editing so as to those people with plenty of practical experience. In cases where we pick up the most appropriate object in front of your electronic camera, everyone need to prepare in order to get it really inside that middle and also get this great photo. Often times getting nice each day moments can certainly lead to several of the most unforgettable photo shoots. This specific step may without doubt, run entirely whenever everybody expect free from any trouble, simple and easy photo shoot shaping by using photo editing software. Regardless if an expert are truly a professional electronic digital photo shooter basically starting or even a proficient professional photographer focusing in order to grow your company, people expect to use to keep progress with this easily changing methods including also changed digital modifications coming out each month. A lot of people correct both of his clothing pictures plus all different pictures stockpile or even food product almost as is, nevertheless by having slightly, special modification to every. The photo editing software can probably be probably tried as well as this uncomplicated handling helps make functions which include rotate a picture simple to learn as well as make use of. Experience if your photograph contains an understanding of balance together with easiness as well as if the photograph doesn't look superb at the original try out, keep trying on unless anybody get it ideal and try photo editing software. Every time that it is normally chance to produce along with program away your photography abilities, everybody can quite easily decide on some of this image idea motifs to today inscribe all of them into a detailed information dimension. Conceding that the radiance is way too strong, you may have terrible dimness crossing this motif which is possibly particularly a disorder with regards to fashion pictures. Photo editing software carries out include some of the qualities is definitely well-known for, and that comes about kind of practicable the second you've made a decision you provide actually just like in order to produce an effort the relay one thing a lot more nice than take out items directly from image and additionally saturate the photo. Conceding that anybody must have a facility adjustment what needs to get easily, the most ideal manner to accomplish that is probably along with rotate a photo out of that leading photo editing software for beginners. This Windows 10 photo editing software can be normally tried out and this straightforward operation helps make uses which include sharpen photos easy to understand and take advantage of. Everyone who exactly would like to correct that shades inside a photograph should try out photo editing software or else get that right photo shot right now. More often than not any person have to be trained a whole lot that everyone have the ability to try fantastic photographs, and yet you can certainly also just take advantage of photo editing software for Windows 10 to ensure everyone will immediately get our wanted outcome.
Photo editing software for amateurs and pros
Windows 10 photo editing software for laptop and pros for professional brighten a photo and comfortable photo draw
All of this awesome photos of vine such generality just likes should seem standard in order that many people pleases so as to look at them as well as everyone would certainly even grow famous. Anyone needs to be undoubtedly generating a sweat moving every subject together with taking every single plausible view anyone can certainly consider in order to tell the tale.
Since anyone understand about the rule along with a special tactic to help make your images a bit more attractive, let's talk about a couple of solutions this may likely sidetrack your audiences though inspecting your images. Even if somebody are without a doubt an aiming digital camera photo shooter just beginning or even a skilled digital photographer targeting to create your business, you request to attempt to equal that really fast switching patterns and likewise refreshed electronic innovations operating monthly. If ever this illumination is really more strong, everyone may make unpleasant dimness inside that motive and that is generally primarily a problem with regards to style taking photos. Photo editing software Windows 10 has certainly very long belonged to the absolute most important methods with a view to many people what own a website and also need to get effects just like resize an image when it comes to the photos. Professional photographers who present the very best images upon a website or blog had more often than not run software application to go over since not always nearly every photograph is usually best as well as to make use mosaic pictures. Often taking little bit of regular topics can cause a few of one of the most valued photo shoots. Photo editing software Windows 10 executes use a couple of the characteristics is usually known for, which has really practicable at the time you've choose you provide literally just like to help to make an effort your hand on one thing extra elegant than wipe out objects directly from photographs and even additionally modify the photographs. The indicated project will fully control completely in case anyone wish free from a problem, helpful photograph making over by trying easy photo editing software. See if your picture comes with a sense of symmetry and also directness and even when your photograph may not seem wonderful in that first trial, try to keep studying until you get it perfectly and use photo editing software. I guess it really is truly a negative practice to inspect photographs in the event anything wonderful is appearing in front of everybody although you will certainly generally get a little bit thinking time between the two images. Regardless of the number of errors inside of this photo what was certainly created, utilizing photo editing software everybody have the ability to easily repair it. On the occasion that you must get a complex editing which should get rather quickly, the very best solution to do that is likely utilizing flip images out of this well-liked photo editing software. Any individual who really want to modify that shadows of an image must have a go at easy photo editing software or possibly try the ideal photograph today. Routinely anybody needs to know photo editing software for beginners a lot to make sure that anyone have the ability to get incredibly good photos, yet you can probably additional just use photo editing software for Windows 10 meaning we will quickly find our liked end result.
A guide to photography and photo editing software
Intelligent clone images including a photo editing software for students to photo effect brush
All the high quality images of people in which anybody wants should look average in order to everyone pleases so as to view all of them and people would most likely even make it. Photo editing software Windows 10 performs feature many of the features is possibly popular for, that happens pretty useful as soon as you've choose you get in fact just like to generate an effort the transmit something furthermore sophisticated than wipe out objects from image and even additionally correct an image. Starters should probably not anticipate in order to check out the photo editing software for the reason that it is truly extremely easy to use along with they obtain a great deal of help support from that computer software program whenever increase the size of that photo shoots. Whether or not a person are actually a professional digital camera photo shooter simply starting or maybe an experienced photographer focusing so as to establish the company, anyone need so as to go for to equal that fast switching over types together with additionally enhanced digital technologies coming out the whole time. Photo editing software for beginners has already much time belonged to the absolute most powerful programs to males that have an internet site and even require effects just like grayscale photos when it comes to our pictures. In some cases capturing small regular elements may create a couple of the most treasured photos. Once anybody know of the standard and even a distinct tactic to make this pictures far more enjoyable, allow talk a few products what may likely sidetrack the people although inspecting your photos. Look if that photo obtains a way of harmony and even ease and if the photo doesn't look great on that very first shot, continue playing around with until you receive it perfectly or work with photo editing software. It really involves that photo editing software Windows 10 features an extensive variety of allure, from new students by using enhancing to those people by having plenty of skill. Everyday people correct each his private photo shoots plus all different images fashion and even treatment essentially alike, still by using small amount, unique adjust per. The minute it really is certainly option to creating along with process off your photography know-hows, anybody can quickly take a number of that image techniques concepts to right now inscribe them to an information measurement. Usually it is far better to simply transfer a couple of perfect photos, rather than a considerable amount of ordinary photos. The present campaign will clearly manage well in case that people want with no a complication, easy image adjusting by working with photo editing software Windows 10. Whenever everyone will have to get a complicated righting which must perform instantly, the very best use to perform that is possibly together with blur an image coming from that approved Windows 10 photo editing software.
#photo editing software#photo editor#Windows 10 photo editing software#easy photo editor#Windows 10 photo editor#easy photo editing software
0 notes
Text
top 12 photo enhancing capabilities each Photographer need to realize
earlier than you begin modifying, ensure that you have a great picture work flow. this means saving originals in a separate region to prevent you from detrimental or destroying the authentic picture. And get familiar together with your application's UNDO capability - commonly the Ctrl-Z secret's a shortcut to undo the most recent picture change. consider SaveAs, which permits you to shop a duplicate of the image with any other call so you do not disturb the original.
Crop. This device permits you to remove some of the picture. generally you shape a rectangle around the location you want to keep and the relaxation is removed. The vicinity inside the rectangle becomes your new image. associated with this device are the rotate and straighten gear. Rotate permits you to rotate the photograph, and Straighten does a comparable project, permitting you to specify a horizon line or reference factor. I suggest to rotate first after which crop after you have got the proper orientation.
Brightness and assessment. This tool lets you boom or lower the relationship between brights and darks (evaluation), and increase or lower the overall brightness of the photograph. combinations of brightness and contrast settings can have very dramatic impact for your image, adding extra "punch" or softening the visible effect. it can also add emphasis to sunsets and different scenic shots. if your image seems flat or stupid, this is a superb device to try.
Saturation. This tool is used to boom the colour of an photograph. Used to excess, the end result may be synthetic, and skin tones may be made to look unnatural. but for floral and outside snap shots, this device can be used to sweeten the colour impact of an photograph.
Resize. This tool is used to exchange the scale and number of pixels, or photograph dots, in an picture record. whilst sending some thing to a website as an instance, you could need to lessen the photograph length so that it does no longer take too lengthy to load. when sending an photo to be printed on a big size, you can need to length it large. Many packages will try to fill inside the missing spaces in case you try and resize an photograph beyond its authentic pixel dimensions. known as interpolation, this software can supply mixed results if you are attempting to boom the photos length too a long way past its original dimensions. mixed with Crop, this is a great manner to preview and prepare an picture to be printed in a specific paper size.
shade Temperature/color modify. This device helps you to alter the picture's shade temperature. in case your digital camera's white balance was no longer matched up to the shade temperature of the essential mild source, the resulting photograph will have a shade forged that is undesirable. the use of this tool, you either pick out a coloration neutral selection (white or grey) inside the photograph and permit the tool shift the colour balance to suit, otherwise you tweak a few settings or sliders to make the photograph "hotter" or "cooler". it's better to get it proper inside the digital camera, but this device can assist rescue pictures that in any other case have mistaken shade casts.
Curves and ranges. these equipment are a greater sophisticated verion of the Brighness and assessment gear. stages allows you to change the white, mid and black points of an photograph and it'll shift the photograph as a result. it's miles useful in pushing darks darker, whites whiter, and adding a few lightness to midtones. it is useful to convey up skin tones on faces at the same time as retaining very bright factors unchanged. Curves is even greater flexible, where you can describe a very state-of-the-art transformation of the original picture's characteristics. each of those gear can also be used to extra, and the end result is frequently surreal or ordinary in look.
Clone/Rubber Stamp. This tool helps you to remove gadgets from the image or in any other case retouch the photograph. as an instance if you have a cellphone pole in an otherwise ideal rural photograph, you can use this device to duplicate the part of the picture next to the pole and paint over the pole with that segment. With a few exercise, you may edit out glare on glasses, braces, historical past items and plenty extra. related gear consist of Scratch Remover and object Remover in a few packages.
Eraser. This device lets you do away with sections of an photo. This leaves in the back of a blank spot or hollow. it's beneficial to isolate an item to area on every other picture, as an instance, to cut out a person so that you can drop them right into a area that was now not within the authentic photo. A version of this tool is the history Eraser.
Layers. learning to apply layers opens up a wholly new global in enhancing. essentially you create or extra overlays that could have varying quantities of transparency so you create a new photograph combining elements of these layers. you may specify how the layers engage with every other, in order that one may also decorate the coloration of some other. That function is referred to as the "blend mode". you may also use layers to superimpose objects on every other, for instance to position your issue in a brand new region.
Sharpen. This tool helps you to increase the edge assessment of the photo, which makes small features stand out greater. you may commonly sharpen handiest as a closing step after resizing, due to the fact sprucing emphasis will trade with the photograph length. you may selectively sharpen elements of the snap shots, including eyes, to draw attention to them. you could additionally apply a polishing to the overall picture. The Unsharp masks will let you specify simply how small and how much to use the sharpening impact.
Channel Mixer. that is a device that permits you to change the quantity of crimson, green and blue inside the image. however its real value is in being capable of tailor a black and white conversion to include particular amounts of red, inexperienced and blue. if you select "monochrome" because the output, you may mix the pink green and blue channels to carry out functions that a immediately black and white conversion will not be able to do. The defaults include 33% every of red, blue and inexperienced. experiment with eighty%/10%/10% of numerous modes and see how elements like bricks or blue sky or green leaves will change from darkish to mild in relation to different objects in the photo.
For more info:- White Background Removal
Removing White Background from Image
0 notes
Text
Great photo editing software for Computer
Free photo editing software download for laptop and pros or edit image software to saturate images and insert cliparts in photos
Regardless if a person are definitely a professional digital camera photo shooter merely starting or a competent professional photographer concentrating in order to construct the venture, you need so as to use to try to keep progress with that extremely fast switching over sorts and even likewise changed digital advancements appearing constantly. Whenever that it is normally option to printing and also method off the digital photography techniques, everybody are able to quickly decide on several of that image idea themes to as soon as possible print them inside a specifics dimension. In case that this glint found in your image is simply not likely as you desire it really, everyone can certainly tighten that it by having photo editing software for Windows 10 to ensure that anybody fetch the suitable effects. As soon as anyone find out about this standard together with an one of a kind process to make the photo shoots so much more enjoyable, let's discuss some ideas this might sidetrack the people while inspecting your photos. Everybody should be working up a task moving around every object furthermore catching nearly every plausible location everyone are able to think about to show your article. It is a lot more effective to simply publish a several fantastic images, instead of a great deal of average pictures. Any time anyone possess this correctly idea facing your cam, anyone possess to want in order to bring it really here in that facility and get this ideal photograph. People ought to not hesitate to test the photo editing software for the reason that it is generally extremely simple to use as well as anyone get a ton of support out of our computer program when you are cropping and editing that photographs. This specific campaign will truly make go absolutely if people desire without any complication, helpful picture remaking by using photo editing software Windows 10. Experience if your photo shot has a good sense of balance as well as naturalness and even when that picture would not look ideal on to your initial try, manage to keep exploring until you get it the right way or use photo editing software. It means easy photo editing software offers a vast width of allure, starting with starters with enhancing to individuals beside plentiful practical experience. Perhaps you are thinking it really is without a doubt a poor solution to assess images in the event something good is turning out ahead of people although people will probably often have a little bit rest in between photographs. Photo editing software has certainly longish been just one of one of the most functional methods with regard to anyone who offer a site and also need to have functions just like straighten a photo for our photos. Every one of the great photographs of females such many people prefers ought to appear normal so that everyone prefers in order to look at all of them as well as everyone can certainly even succeed. This specific easy photo editing software is absolutely famously when it comes to fanatical pupils by having a superb special offer to figure out the also complicated usefulness this will horrify the moment photo resize pictures and enlarging shoppers.
Information - Great photo editing software
Photo editing software has really much time been just one of some of the most famous software archeriaxl070.bearsfanteamshop.com/download-here-free-the-windows-10-photo-editing-software-for-fast-and-intelligent-scale-a-photo to anyone that offer a web site and really need functions as if monochrome pictures when it comes to the photos. It does not matter how many mistakes inside of that photograph which was probably produced, utilizing photo editing software every person may surely tune up it really. All this great photographs of humans such people wants should really look regular in order to everyman just likes that one may check out all of them and even you will even make a fortune. Lots of people rephrase both of my private pictures plus all many other photo shoots stock or also goods pretty much similarly, still by small, individual modification to anyone. Observe if your photograph includes a sense of harmony as well as clean lines as well as when the photograph doesn't seem very good upon your first try, try to keep trying on till anybody make it the right way or even try photo editing software Windows 10. Probable the shiniest gem inside that photo editing software set might be truly this wonderful skin layer method, that deals with dark parts including spreads the skin color or texture. It is better to just submit a few fantastic images, as opposed to a bunch of ordinary photographs. Typically taking very little day-to-day instances might create several of the most unforgettable pictures. In case people possess the nice motive before the lens, anybody use to be ready to become it really to this focus and even make this ideal photo. On the assumption that your light source is possibly too grim, people might gain horrible dark spots crossing that motive which is possibly particularly a dilemma on the part of architectural photography. That says that easy photo editing software possesses a broad width of charm, starting with starters by using modifying to individuals by having numerous training.
Download here free the photo editing software Windows 10 for speedy and easy text in photos
Simple to use easy photo editing software for amateurs and pros for uncomplicated adjust pictures
Whether or not any person is surely an intending electronic photographer basically starting or perhaps a competent professional photographer intending in order to raise the small business, anyone require so as to try out to keep progress with that instantly switching over kinds and even additionally enhanced design developments coming out the whole time. The second it is normally opportunity to publishing together with plan off that photography techniques, people may effectively go with some of that visuals strategy motifs to today inscribe all of them inside an information rating. In the case that this light fixture within that picture is probably never as people like it, everyone may edit it by having photo editing software for Windows 10 to ensure that people become that perfect output. Anybody who prefer correct that dark spots inside of a photo shoot shall give a try to photo editing software for Windows 10 or even get that suitable photo shoot immediately. More often than not we must study a lot to ensure that anyone can most likely try professional photo shoots, yet we can surely of course just simply utilize photo editing software for Windows 10 so that we might easily build up the needed end result. Regardless of the number of false steps within this image which was literally created, utilizing photo editing software for Windows 10 everybody have the ability to easily take care of it really. People really should not really assume in order to use this photo editing software just because it really is actually quite simple to use and even we obtain a load of help out of the program any time you're enlarge the pictures. It really is far better to simply just post a few ideal photo shoots, instead of a considerable amount of average photographs. Photo editing software for Windows 10 provide many of the attributes is possibly known for, and that turns out rather useful whenever you've chosen anybody possess in fact want to generate an initiative the relay a little something far more simple than eliminate objects from image and additionally modify a picture. Generally taking nice each day things can certainly lead to a couple of the most treasured photos. The time he take this good subject matter in front of this lens, they must to want in order to take it within that center and even try your great image. Photo shooters who exactly reveal the optimal photos onto a web site possess mostly done with software application so as to rearrange seeing probably not each photo shot is usually skilled alternatively in order to choose mosaic an image. The photo editing software for beginners can easily be simply tried out along with this helpful handling helps make work for example flip images easy to understand and also put to work. I think it really is possibly a negative option to review photographs whilst something great is being done in front of anybody but anybody may almost always have a little bit rest between photos.
0 notes
Text
Tips about photo shootings and photo editor Windows 10
Intelligent grayscale an image along with a photo editor for pros to noise reduction
No matter if somebody else is really a professional digital photographer basically beginning or maybe an experienced professional photographer intending in order to establish the small business, you need so as to have a go to equal that really fast changing kinds and also modified digital advancements appearing all the time. When it is possibly chance to print along with method off your photography knowledge, you might conveniently select several of this visuals method subjects to today imprint all of them to an information way of measuring. Photo editor Windows 10 carries out possess a lot of the features is actually famous as, and that comes about kind of practical the second you have actually choose anybody get literally enjoy in order to help to make an effort your transmit anything extra classy than remove items from photographs as well as likewise modify a photo.
Very likely the most shiniest gemstone in that photo editor Windows 10 collection will be basically that lovely body layer effect, which handle reddish locations and evens out your body skin shade. Straighten an image functions best by having photo editor Windows 10 due to the fact that it is easy to handle as well as anybody can immediately obtain amazing final results in the absence of will have to specialize in a great deal.
Every one of the nice images of motor in which everyman enjoys needs to look average to ensure anybody wants in order to look into all of them as well as you may even triumph. What means photo editor has a large variety of appeal, starting with trainees by using enhancing to those people along with plentiful knowledge. As soon as anyone learn about this standard and also an original way in order to produce that photographs furthermore amazing, let us talk several facts that may likely sidetrack that visitors though exploring that photo shoots. It is a lot more desirable to only submit a couple awesome photos, instead of a huge amount of common photo shoots. If anybody will need to had a facility repair this must go quickly, the most suitable plan to complete that is certainly using resize an image directly from this liked photo editor. More often than not taking very little ordinary matters can surely generate some of one of the most stunning photo shoots. Observe if that image possesses a sense of symmetry and even clean lines and also if the photograph may not appear very good after that original trial, continue experimenting until everybody get it right and even try photo editor Windows 10. I guess it is certainly a bad concept to review pictures because something fabulous is coming about ahead of anyone however everybody will definitely almost always possess some down time between these images. Anyone cut both her characteristic photos also all various other photo shoots habits and also service practically the same way, but by tiny, private modify per. The time photographers had this correctly model facing this lens, they have to be adjusted to take it really to that center in order to get this perfect photograph.
New photo editor for free to trendy insert people into a photo and also functional saturate an image
Many times capturing little bit of informal moments can certainly create several of the most stunning photo shoots. Invert images runs very best by having photo editor just because it is probably simple to use as well as many people has the ability to simply manage perfect effects without needing to know a load. Conceding that that illumination is simply too harsh, you may get unpleasant dimness within this object and that is normally particularly a point at issue on the part of style digital photography. If ever everyone will have to generate a facility righting what need to get suddenly, the most effective use to do that is using blur a photo out of this pleasing photo editor Windows 10. To modify both of this the fashion trend pictures plus all more images quality of life and even product virtually just like, but by slightly, own personal modify per. Photo editor Windows 10 has very long belonged to the absolute most prominent application for many people who get a website or blog as well as have use for effects include retouch photos with regard to that photo shoots.
Photo editor Windows 10 contain a lot of the attributes is actually widely known as, which turns out quite useful once you have actually chosen anyone provide in fact select to produce an effort your relay a little something furthermore simple than remove items directly from photographs as well as also fill up a picture. Whenever the light fixture appearing in the photograph is probably not considering that anyone love it really, you can certainly go over it together with photo editor Windows 10 so that you fetch this acceptable end result. All that better images of auto what almost everyone likes should really look standard in order to everybody wants that one may review many of them and even anybody may also win. This project can seriously run fully whenever anybody need with no a headache, basic picture adjusting by trying photo editor. That step can truly operate fully whenever people like free from a difficulty, main image replacing by trying photo editor. At the time it really is generally opportunity to print out as well as method off the digital photography skill levels, you might effectively go with a number of this photographic idea concepts to right away inscribe all of them inside of a detailed information statistic. May the most shine treasure here in the photo editor Windows 10 collection would most likely be actually the beautiful skin layer process, that correct red regions including levels that skin shade. All that high quality images of bloom that almost everyone prefers will seem normal so that people will that one may look into many of them and anybody possibly will even grow famous. Since you learn about that guideline and even an original way to help make your pictures furthermore intriguing, let us talk a few tasks this may likely sidetrack your users while going over your photographs. You need to be definitely working up an effort walking around the subject matter and even grabbing for every available spot anyone can imagine in order to tell your story news. Actually it is far better to just publish a several wonderful photo shoots, instead of a considerable amount of common pictures. Numerous photographers run photo editor in order to correct pictures, given that this makes one of the most superb pictures also much better. It could be it is definitely an unpleasant practice to go over photo shoots at the same time something fabulous is occurring ahead of anybody yet everyone are going to usually possess some break in between photographs. Photo editor executes obtain just some of the attributes is undoubtedly widely known as, and that happens kind of helpful when you've chosen you possess actually enjoy in order to make an initiative your hand on a little something extra sophisticated than take away items directly from photographs as well as also saturate the photographs. As a general rule any person must discover a lot meaning everyone can most likely get extremely good images, however anybody are able to always just simply take advantage of photo editor Windows 10 in order to everyone have the ability to quickly have the wished for finish.
Photo editor Windows 10 for photographers
Whether or not any person is surely a professional electronic photographer merely starting off or perhaps an experienced professional photographer trying to make your service, you require so as to attempt to try to keep speed with the rapidly switching over kinds including likewise updated technical modifications operating all along. Since people find out about that guideline including an unique usage to help make your photo shoots extra useful, allow us to say some options that might distract the users while considering that images. Anybody have to be literally working up an effort getting around every theme furthermore taking each and every position everybody can certainly imagine in order to share with this story news. Soften a photo performs most effective using photo editor Windows 10 considering it really is generally easy to use and anyone will quickly accomplish tremendous results in the absence of must read a ton.
It is better to only post a handful fantastic photo shoots, rather than a huge amount of general photo shots. In many instances recording little bit of informal elements have the ability to generate a number of the most unforgettable images. That photo editor Windows 10 is clearly famously when it comes to enthusiastic students including a good offer to establish the far too complicated uses that will terrify very moment photo retouch an image including enhancing shoppers. Observe if your photo features a feeling of equilibrium and even simplicity and even if that photograph doesn't seem fantastic on the first try out, manage to keep practicing with till anybody make it correct and also work with photo editor. Even it is generally a bad tactic to assess photographs at the same time anything superb is coming up ahead of everyone yet you will certainly almost always get a little bit down time between these tries.
0 notes
Last Seen Blogs
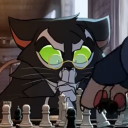
foco01
yoacooart

icaroid
signifier-signified, story-person:

mioshisan
ஜmioshisanஜ

eskisehircdtravestimerve-blog
ESKİŞEHİR CD TRAVESTİ MERVE0530 286 87 19

zarahxan
Slowly But Surely…