#UNSW
Text
australian university students are so cooked. wdym we have to be paying more than 10% internet rate for our HECS 😭 can somebody kill off our fat red politicians already 😭😭
#7.1% was already crazy. then my family friend is telling me her HECS debt prevented her from buying her first house#im crying bro im never gonna be able to escape home#im never gonna be able to afford anything#and im doing a double major like im actually cooked#holy fuck just bomb all the unis atp#slogging#australia#unsw#university#unimelb#deakin#rmit#usyd#monash#hecs#hecs debt#auspol
5 notes
·
View notes
Text
As part of this effort, the Molecular Design and Synthesis Group at the University of New South Wales has been designing tagging agents that will temporarily introduce highly fluorinated alkyl groups to molecules to aid in organic synthesis (for example, see figure 18.17).

"Chemistry" 2e - Blackman, A., Bottle, S., Schmid, S., Mocerino, M., Wille, U.
#book quotes#chemistry#nonfiction#textbook#research#molecular design and synthesis#university of new south wales#unsw#fluorination#alkyl group#organic chemistry#diol#polyfluoroalkyl#chemical reactions#acetic acid#oxidation
4 notes
·
View notes

Text
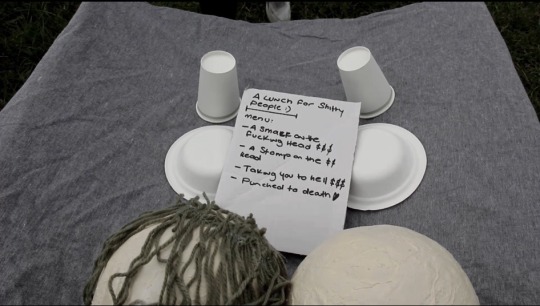

Jessica Ferrara
A Lunch For Shit Heads
Performance video and Installation display, 2023
A Lunch For Shit Heads is a video performance that expresses the concept of feminine rage, cathartic energy, anger and humour. By using these themes, I decided to expand my own personal experiences and created a scenario about two people that I dislike the most and ruining their lunch but hitting the sh*t out of them until they’re nothing, in a space that is significant to them and me.
I wanted to add more depth into my work- like adding quotes from female authors, phrases from films and music that reflects the perspective of what rage in women is. This speech and action displays how can women change the world and speak louder for our rights through variety of forms.
Insta: personal- @jezz_f
Art account- @bluesidepalette
**Please take a listen to the related playlist based on the self-directed piece.**
#femalerage#catharticenergy#feminine rage#angercore#feminism#female rage in media#my art#unsw#self healing#Spotify
2 notes
·
View notes
Text
Week 8 - Digital Iteration
The focus for this week was experimenting and developing our CAD skills specifically with 3ds max. This was achieved through a series of steps that helped me to better understand the program somewhat. However I ended up finding that my own research into tutorials was most beneficial.
Watching Andrew Simpson's video on the development of a razor, its clear the importance of the design process of testing out lots of different elements and ideas to best create a solution. It was informative to hear about the ways different materials effected the weight and ergonomics of the product and is something to always have in mind. Andrew talks about low-fidelity and high-fidelity as different levels of the model making quality. This is in context to an explanation about how the design process isn't always linear with the development of quality and sometimes lower quality models can be made after higher quality models to test out different ideas.
Part 1 "The introduction":
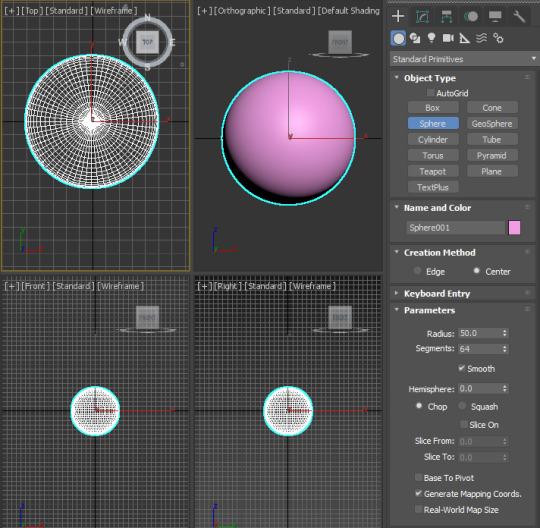
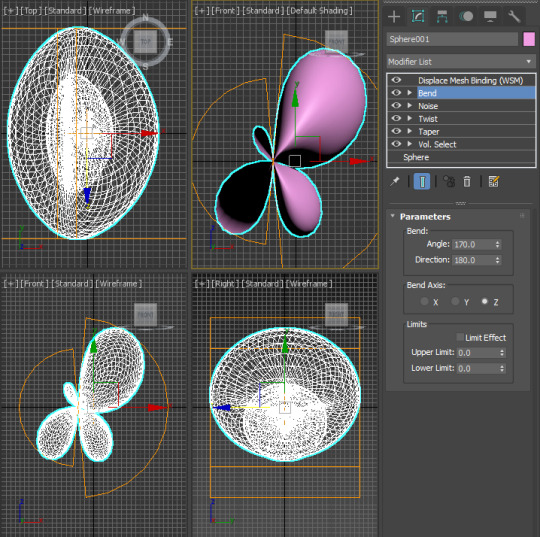
For the first part of this task, we made a simple sphere (done with the sphere tool) which we then played around with in order to explore the effects of the different tools available on 3ds. Personally I find there to be an initially overwhelming amount of different commands that made it difficult to work with. It was interesting seeing what some of them did, but frustrating trying to figure out how to do anything you wanted to achieve. This process was a lot of trial and error, just throwing myself into the depths of this program.
Part 2 "The learning":
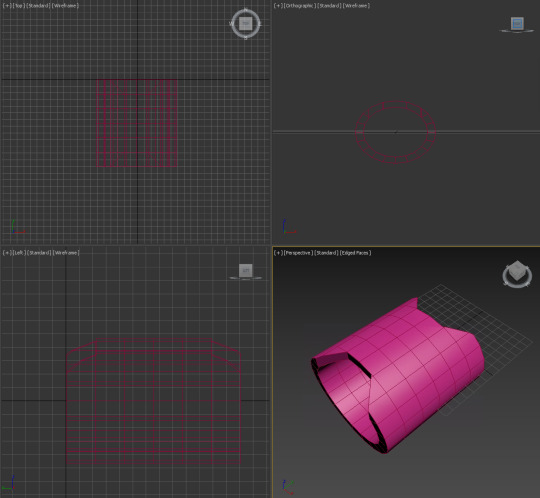
Part 2 is where I really took the initiative on figuring out how to make even the most basic of things I could normally create in a few seconds on other CAD programs. I started out creating a bottle like shape, trying to use everything I had learnt from my experimentation of the different tools with the sphere. The result was something very organic and asymmetrical. Fairly happy with this as a basis, and it definitely looks wieldable so that's nice too.

I wanted to move onto something that looked like it had more intention and structure behind it. I ended up looking through numerous youtube tutorials that better explained the process of making different kinds of objects. I would highly recommend just following a tutorial like this as it helped me a great deal to better understand the specific tools which are actually helpful for average tasks. I ended up following a tutorial to create an omnitrix which I thought of as a complex shape that would require a diverse use of tools to further my learning. I figured out how to properly warp shapes how I wanted to as well as combining/subtracting new parts to add to the form. I also finished the design by adding more fitting colours and am really happy with both how it turned out, and how much I learned from the process. Its very evident the difference in level of intentional design between the bottle and the omnitrix as a result of the research done for it.


7 notes
·
View notes
Text
Week 5: Sketching
Building off from last week and the basics of perspective drawing I felt confident coming into this. The first part of the task to draw thumbnail concepts was quite easy and fun. Creativity can flow and its hard to draw a front on view so badly it can't be recognized. My first sheet wasn't very good at all however which lead to a complete redraw of 12 new thumbnails which I think 2 or 3 could be taken further.

Now onto Part 2. The punishment from not taking the time to learn how to draw curves in perspective catches up with me. I found translating what I thought my bottles should look like into 3D drawings to be quite the challenge. They seemed to always come out looking boxy or just like a regular cylinder. I attempted many times to find a way to make the rounded corners of the bottle look somewhat accurate, getting closer and closer every time. Different methods were implemented, I was determined to take some time to figure it out. Adding some shading here, breaking up the perspective box this way or that way. I found drawing oval shapes in perspective to match up all the lines helped a bit. Still after construction lines where erased the bottle went back to looking like a round cylinder. So then shading was experimented with. I thought if I had the basic shape done then what was missing was some faux shadows. This seemed to help a bit but the complex curves I was trying to draw from an idea built in my brain still proved to fail me. I think I got close to what I was after but to me more still needs to be done.


7 notes
·
View notes
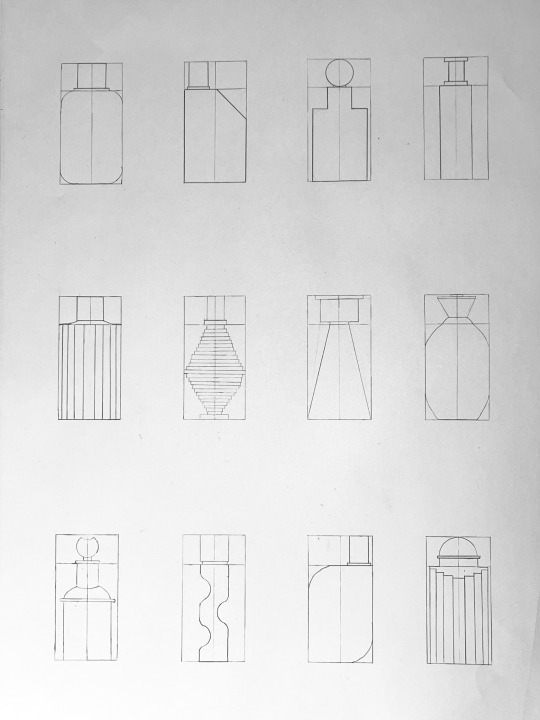
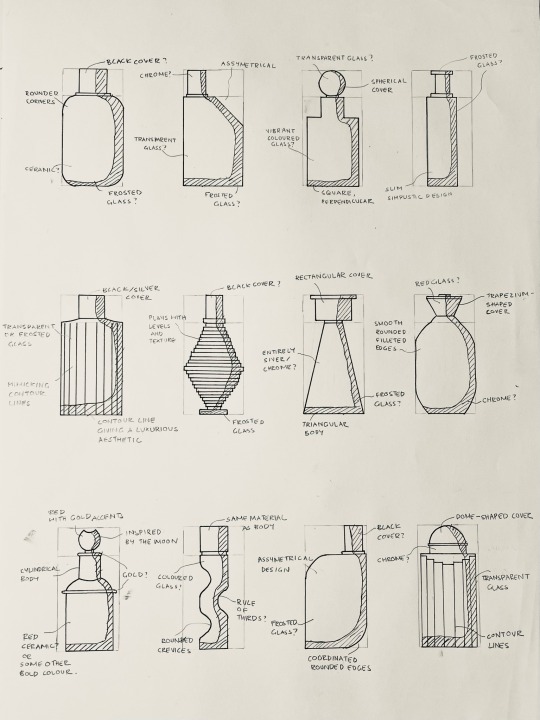
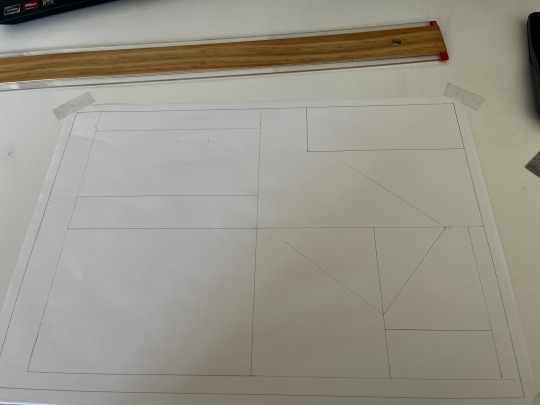
Text
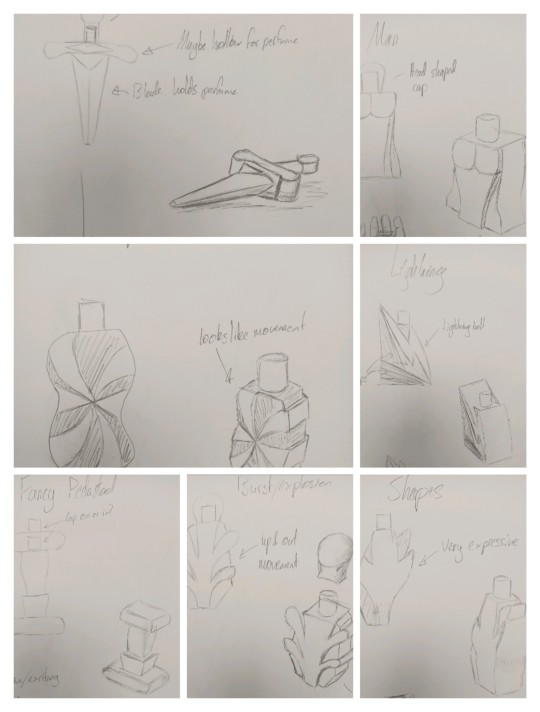
Week 5 - i promise they're not potions
This week's task was a creative change from previous weeks, and I found it useful to highlight the areas where my skills could use a lot of work. To begin with, the amount of time I spent placing the 65*32.5 boxes on an A2 page was absurd, but once I had them I begun sketching the perfume bottles quite quickly as ideas kept coming to mind. I chose pride for the emotion I designed off of, because lord knows I have no idea what 'motivated' means.

I started at the bottom right and worked my way up to the top left, presuming that as I ideated I would have more interesting ideas that I would want to bring attention to first, as opposed to the more basic shapes I had started with.
I ended up creating a good range of shapes which I was halfway pleased with, particularly disliking the top row once I felt I had finished my sketches. I think it's important to also know what you don't like in a design, so I left them as examples of how perhaps too much detail - for example the top right - can detract, and that having more abstract shapes - top left - can make for just ugly shapes. My favourites were the two in the middle row on the right hand side, as well as the more basic tapered prism in the bottom left. I thought these were the most interesting and had the most potential to be expanded upon, so I chose to redraw these in perspective.

I was really quite pleased with how these came out in perspective, especially considering how few straight lines the far left drawing had. I really struggled to get good curves and to accentuate the shape of the bottom of the bottle, but I'm still proud of my progress in perspective drawing. My personal favourite is by far the middle, although I feel like it's not terribly unique in terms of it's design it still conveys pride quite well.

I really struggled adding shading to the drawings, as that's a skill I've always lacked and am still developing, albeit slowly. I don't think it's too bad, and it does help accentuate the shape of the middle one quite well, but I feel it detracts from the far left significantly enough that I think it looked better without.
Overall I'm pleased with the outcome of this week's task, and I feel it has helped me identify some of my weaknesses in sketching so I now have a clear path of something to work on. I'm excited to see how these will come out with a digital makeover next week.
8 notes
·
View notes
Text
Week 5
This week's lecture and tutorial were extremely fun and interactive, I really enjoyed the class activities and the discussions and conversations that took place. However I was quite taken aback by the amount of content that we had gone through.
Sketching Drills


During most of the tutorial I was introduced to 7 different drawing exercises, all aiming to relax my body in order to draw feely without any rulers, pencils or templates.
A super helpful piece of advice given by the tutors was to draw from your shoulders as compared to drawing from your wrist. This technique of drawing is suitable for drawing straight lines, circles, and ellipses and allows the upper body to be free flowing.
As I worked through the drawing drills, I found that the first few fundamental drills had played a big part in preparing for more intricate drills like the cubes and ellipses in perspective.
This sketching drill allowed me to experiment with ballpoint pen and ink pens.
Part 2: 2D Orthographic Thumbnails
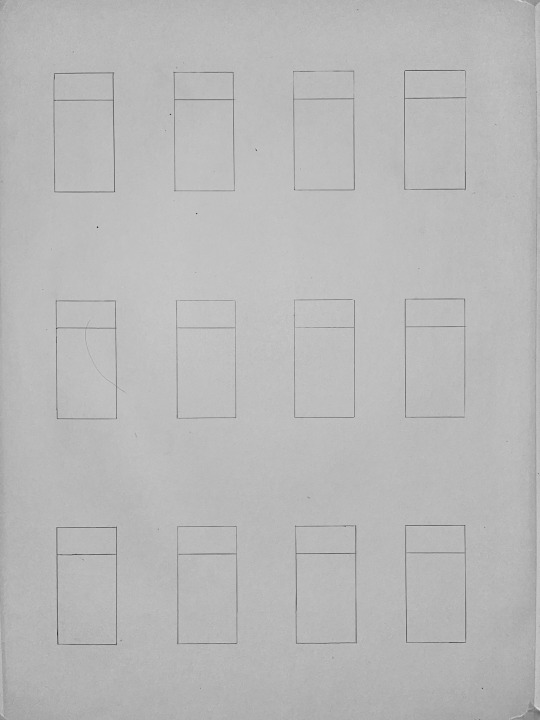
This section was both challenging and interesting, giving us an opportunity to work on our sketching skills while also drawing up perfume bottle concept ideas for the studio 1B class.
I found myself having a relaxed atmosphere when coming up with different silhouettes and shapes that I could incorporate into my own design whilst also taking inspiration from the current market.
This exercise also gave the chance to visualise the possible types of colours, materials, and textures i wanted my perfume bottle to have.
Part 3: Perspective sketch

This exercise was very similar to a sketching drill where I had to draw cubes in perspective. I find being able to draw perspective drawing is a very important skill to have especially when one is pursuing to become an industrial designer.It allows both the designer and client to visualise the product and have a sense of its overall composition, depth, aesthetic.

This was a very packed and full-on week with a lot of useful content and advice.
Excited to bring my sketches to photoshop and experience rendering with it for the first time!
10 notes
·
View notes
Text
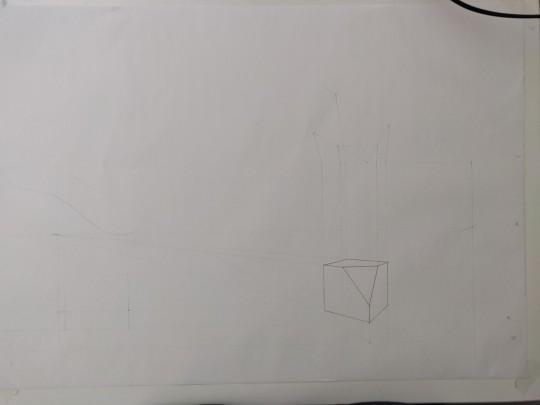
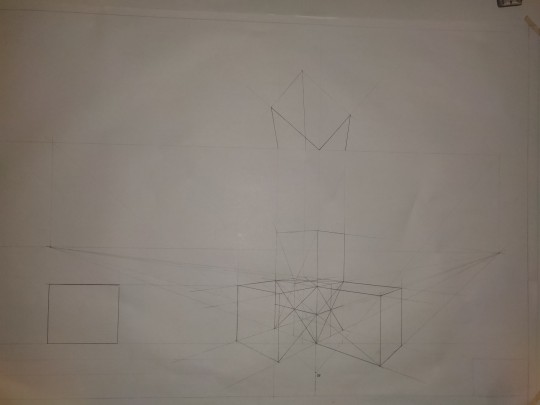
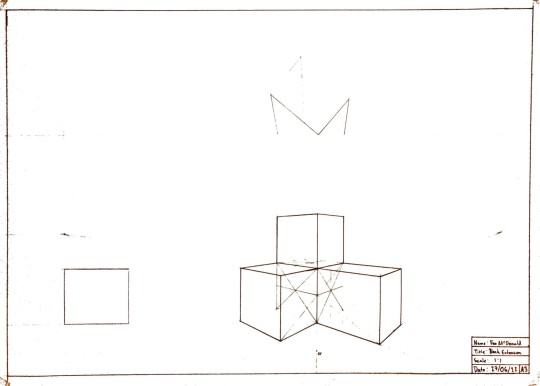
Week 3 Studio Tutorial – Section and Auxiliary Views
This week was an introduction to both Section and Auxiliary Views, as well as further practice for orthogonal technical drawings. While I have some experience in section views from last terms BENV1010 assignment, auxiliary views was a concept I was completely unfamiliar with. Initially it took me some time to wrap my head around how these projections were formed, but eventually I figured out Auxiliary Views conceptually through revising the material on moodle.
Week 3 Task: Orthogonal, Sectional and Auxiliary Views of a Tapered Block.
This week we were tasked with creating a technical drawing of a tapered block using novel views. This block was presented in an isometric view with the dimensions present.
Similarly to last Week 2, I started the technical drawing with a general block out. This was done by observing the overall dimensions of each view of the Tapered Block, and representing each view with a rectangle. Due to the auxiliary projection, the spacing between the different views were relatively tight.
Below is the final illustration of the Tapered Block. I rectified some of the mistakes made in week 2's technical drawing, such as writing everything capitalized and with a more consistent font. Additionally, I had a more comprehensive use of dimensioning in this week's Illustration.

Overall, I am happy with my technical drawings of the week. Some improvements could be made to the drawing however. The inconsistencies of the arrows is still prevalent in this week's work. Additionally, the placement of the title block breaks conventions as they are typically placed in the bottom right hand side of the illustration.
6 notes
·
View notes
Text
Week 3
The task:
We were given an isometric diagram of a component and instructed to draw an orthographic view of it, included in the drawings a sectional view and a partial auxiliary view that should be shown.
The process:
After reading all the instructions, I drew up a quick layout sketch to plan my A3 page. I then drew boarders, a title block and began drawing each view of the component, front, top, sectional and auxiliary, using projection lines to show the relationship between the views.

To draw the partial auxiliary view I rotated my page so that the T-square could be used to precisely draw the view. I drew over the pencil with pen and added dimensions.

Reflection:
Compared to last weeks task these drawings went faster and ended up looking better, I am very happy with my progression and enjoyed this task too. I have used CAD for years but have never gone back to basics and hand drawn detailed diagrams, I have noticed the importance of order and grew my competence at reading an isometric view. When it comes to order, I've started to begin my drawings from the bottom, working upwards to complete the outline of the component, I then fill in details.
Despite being pleased with the result of this task, I made a few mistakes, such as poor planning resulting in a piece of the drawing going over the border, and an unnecessary line diving the surface cut through in the sectional view.
5 notes
·
View notes


Text

I've been quite busy since my double update in February.
I've attended the launch of the CASE Incubator studios, delivered a presentation as part of Louise Bourgeois: Tides and Currents at the AGNSW, participated in the second leg of the KanCan Laboratory in Kandos, and attended Big Trauma/Big Change: Building Tomorrow Today.
For more details (and more photographs) check out this blog post over at my website.
#art#blog#update#AGNSW#louise bourgeois#Kandos#Canberra art biennial#cementa#cad factory#case incubator#barc#big anxiety research centre#unsw#big trauma big change#Tom Isaacs
0 notes
Text
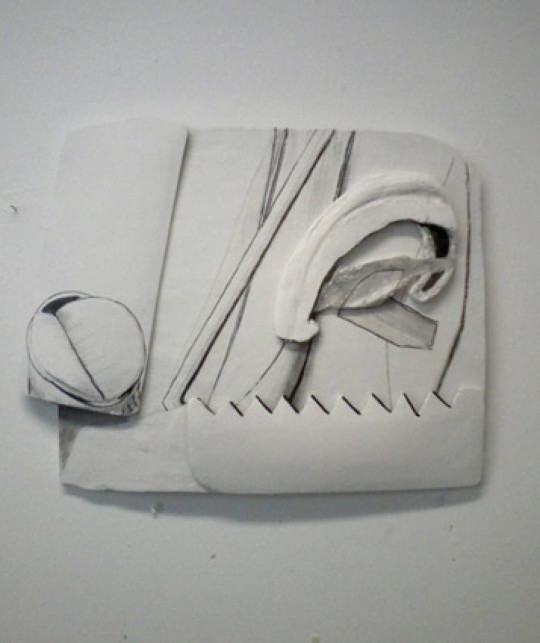
Imma gonna put the others I found here too so I don't lose them again so easy.
It's after a sculpture I saw everyday at art school, "Bed" by Martin Sims. "Bed" was made out of steel, but the lines were all about drawing, so I mixed the drawing and sculpture together to see what would happen in this plaster/papermache/ink piece. I drivelled at the time about how form is line and line is form, not sure if the teachers bought my bullshit or not but it was fun to make.
I loved that Sculpture. I just found out Martin Sims died in 2021. I wish I had gotten to meet him :(
0 notes
Text
Week 7 - Physical model making
I was quite keen to get into model making this week and developing some ideas I've had into physical form. I created a variety of designs to give myself different kinds of challenges through the model making experience.
Model 1:
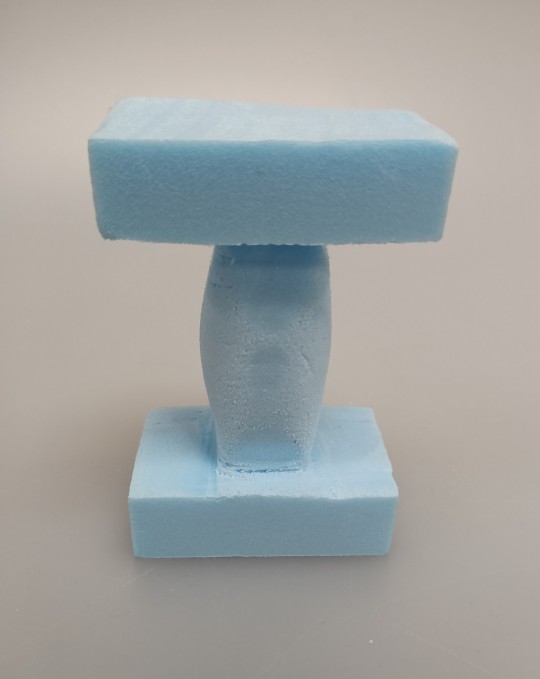
For the first model I started fairly simple and so I made a very square template out of card. This template was based on the orthographic views of the design so I could stick them to the foam in order for me to accurately cut into the foam with hot wire.

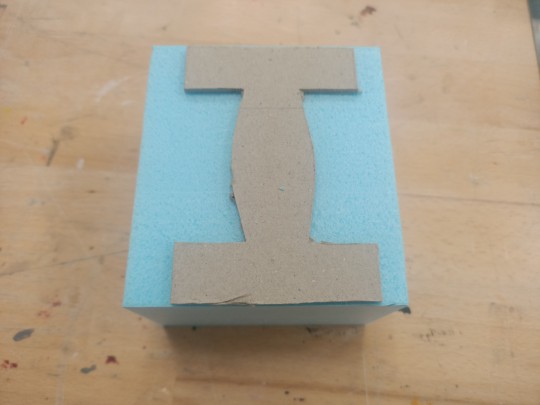
After cutting out the basic shape, I got to work sanding and refining where needed. This is my favourite part of the process as it's where you get to really see the product take its final shape and make any precise changes to improve aesthetics and ergonomics.
Model 2:
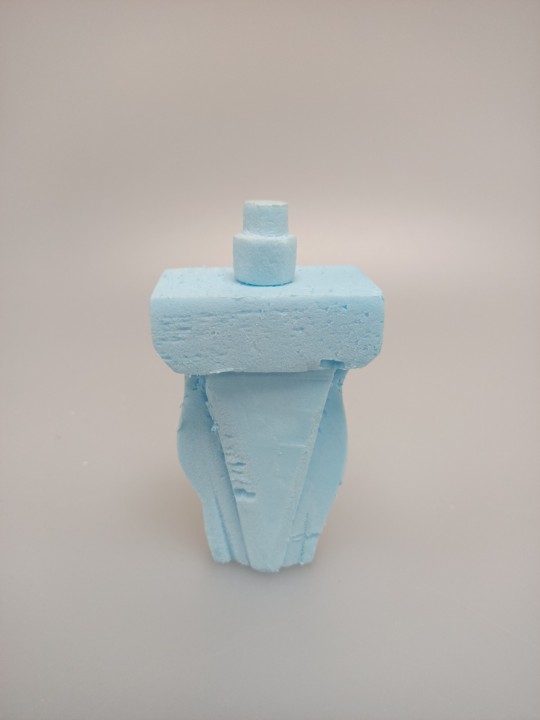
For my second model I went for a more difficult design involving different layers and curves. The aim was to find the best tools/techniques to craft the foam into the design.

Once again I started with some sketches to give me something to follow. Then I created a simple template of just the outline to guide me when using the foam cutter. In order to achieve the effect of different layers I used a knife, following an imprint I made in pencil of the design. This worked fairly well however there were noticeable cut marks in the foam where there didn't need to be and also sometimes the foam would get caught on the knife causing tears. I found that having a fresh blade and using more of a back and forth cutting motion helps to stop the tearing, however this isn't really an option when working in tighter spaces as I found in later models. I finished off with some sanding which I could have spent more time doing to improve the model, however I was more set on trying out different things. I also believe that creating the parts individually and assembling the bottle with glue would give a way cleaner look but would take a bit longer.
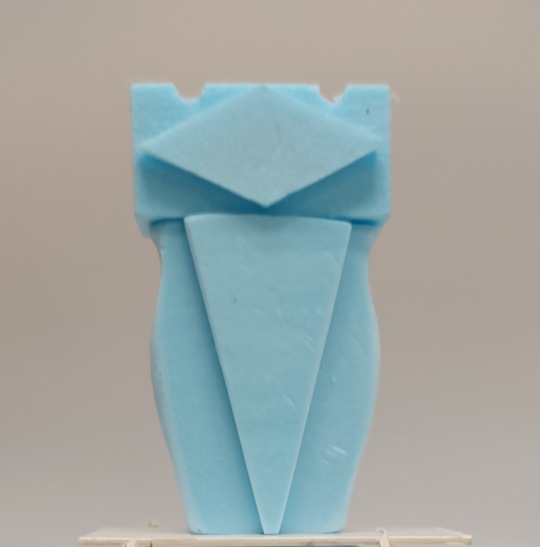
Model 3:
For my third model I tried really hard to build on the second and try new techniques that would improve the quality of the design. The biggest difference was making each part individually, then using double sided tape which worked very effectively at sticking the foam pieces together. I also used different types of files such as a rounded one to make the indents in the lid. The bottle was finished with a 1500 grit sandpaper giving it a very clean and more professional look.
Models 4-10:
I had a lot of fun coming up with a variety of designs and ended up getting a bit carried away. I tried to be really diverse in the designs, requiring different problems to solve which I believe I've achieved. The hardest problem I faced was definitely in the more curved shapes where I had to try and cut foam out from very tight spaces. As mentioned before, a much better method to achieve these kind of designs would be to cut the parts out individually and glue them.
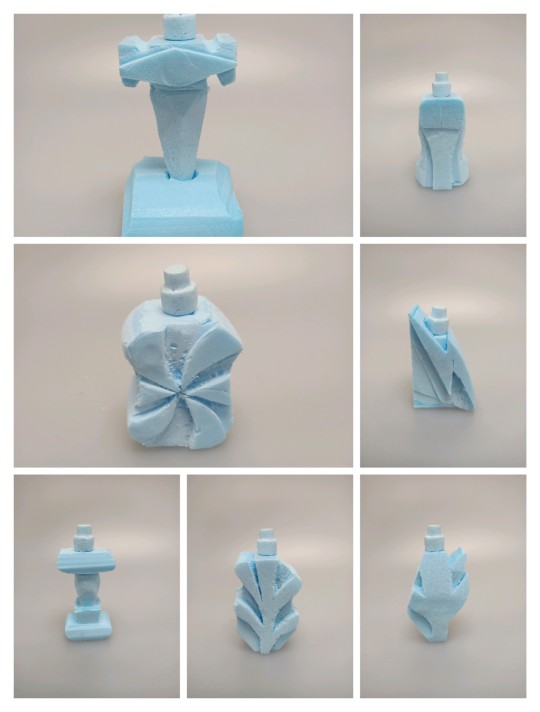
In the end I believe I've learnt a lot from this exercise, the most important of which is the value of sanding properly for creating a much nicer and cleaner finish. A lot of my designs suffered from lack of refinement but I was able to learn a lot through my plethora of testing and really enjoyed the experience.
10 notes
·
View notes
Text
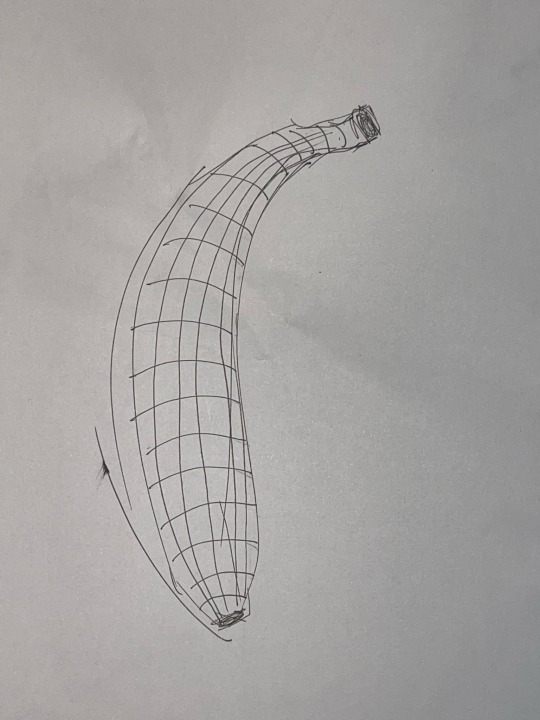
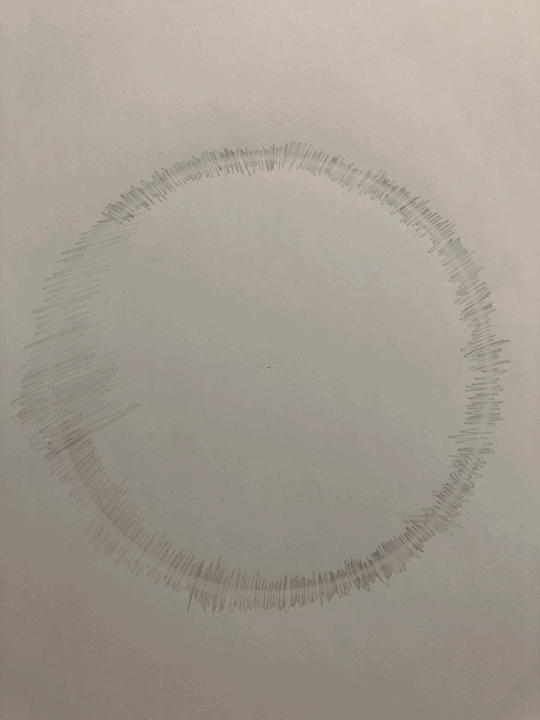
Week 4: Perspective Drawing
This week taught me more than any other week. To learn how to draw in accurate perspectives. The reading for this week proved to be a great help in understanding a previously unfamiliar concept. Translating a 3D object onto the 2D plane while ensuring the distortions that occur stay accurate and legible to the viewers eye was challenging and hard to wrap my head around. After many sheets of paper and mistakes in following the instructions, such as where to put the right and left vanishing points and connecting the wrong lines to said vanishing points, it clicked. The shape came together and looked as it did from my perspective. Once the basis of the concept was grasped things moved along a lot more smoothly. Thanks to help from Rob and my fellow classmates I feel I have a solid foundation to continue doing perspective work.

Part 2 seemed to be a breeze at first. Draw another box and extend the lines out further. But then came the problem. Where do the new boxes end? They do not go on forever and they must have an end point that is still with in relation to the actual dimensions of the box. After some lines drawn here and lines drawn there, I looked on tumblr to see some fellow classmates worked and found out what seemed to be be an accurate place to draw the end lines. However I am not sure if it was in the right place as the boxes do seem a little odd looking. This may have more to do with my vanishing points however.

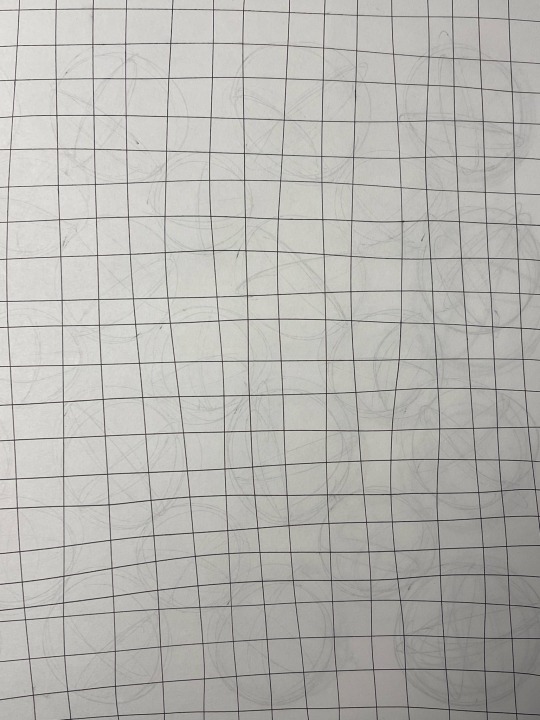
And then comes Part 3. The circle in perspective. I really found this difficult to do well. Even with a the box square on to make things easier for my self, a few coffees providing a shaky hand and a forgotten ruler lead to some less than desirable circles. I couldn't figure out how to draw the circles to make them seen as if they were in the correct perspective. I think more practice is necessary in this exercise. Perfection comes at the steep price of repetition and hard work, which has always been a weak point for me. I think a calm mind to enable me to find the drawings meditative rather than a task will aid in my future leanings.

9 notes
·
View notes
Text
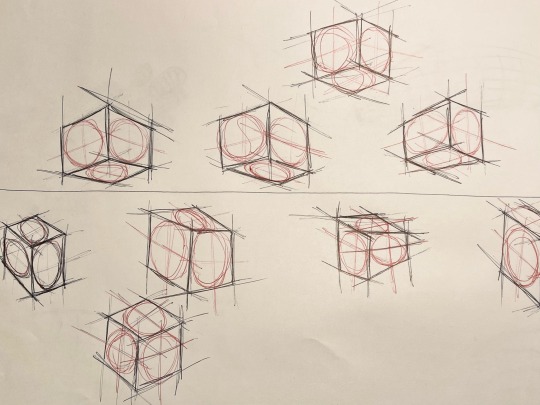
Week 4 - "Draw a few circles, it'll be easy" they said.
I found this week's activities took me significantly longer than the previous weeks' tasks, perhaps because there was a similar initial process between the three tasks. I definitely found that my process sped up and became more accurate as I did them, and I found it became quite intuitive quite quickly.
The first chamfered box was the biggest struggle, as this was the first time trying 2 point perspective from such a rigid method.
It came out quite nicely, I'd say, only a few lines looked a bit wonky in the sketch process which I'd call a win.

Again I feel my photography could use some work, particularly in the photo above - Using certain filters doesn't really seem to help, nor does changing the lighting massively impact the outcome so I keep feeling displeased with how my work is being shown here.
The second task was really interesting to work out how planes extend in perspective, and I found it an intuitive continuation of the last task. This was the more enjoyable part of this week's task, and I can completely understand how I can make use of similar techniques with my own drawing in future.
The third part drove me insane, frankly.
Drawing circles with what is effectively early onset Parkinson's is like trying to cut through a brick wall using a spoon. I 'got there' eventually, but I'm not terribly pleased with the outcome...
I tried using different circle templates of different radii, as seen in the top left of the front face below, but for a few I wanted to try by hand which was a serious struggle.
I also found the use of the major and minor axis weren't terribly helpful in drawing the circles, perhaps I misunderstood their use.
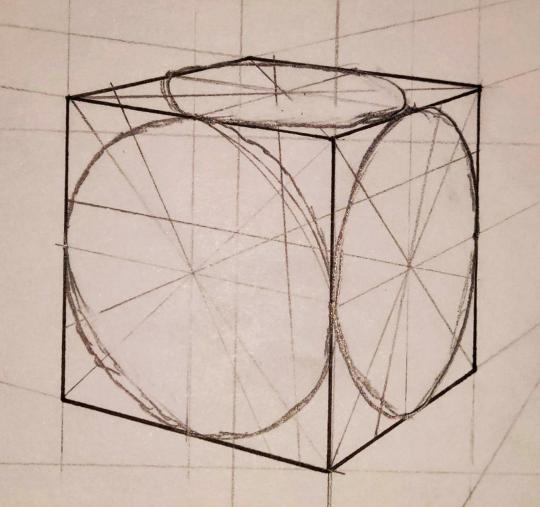

Overall I felt like I learned quite a lot this week - 2 point perspective is quite tough, especially when you're drawing with an object with defined measurements that have to be accounted for. I'm really enjoying the increasing level of difficulty in the tasks.
7 notes
·
View notes
Last Seen Blogs

andy-weishunzhou
Plastic Extruder Manufacturer From Kerke Extrusion

rangewarden
love everything

digitalinfobytes
Digital Info Bytes

amitkumarchauhan-blog
Untitled
xazafranx
AzaFran's Space